Kyocera IUD19AA Desktop User Terminal of Wireless Internet System User Manual CONTENTS
Kyocera Corporation Desktop User Terminal of Wireless Internet System CONTENTS
Kyocera >
Contents
- 1. User Manual 1
- 2. User Manual 2
User Manual 2
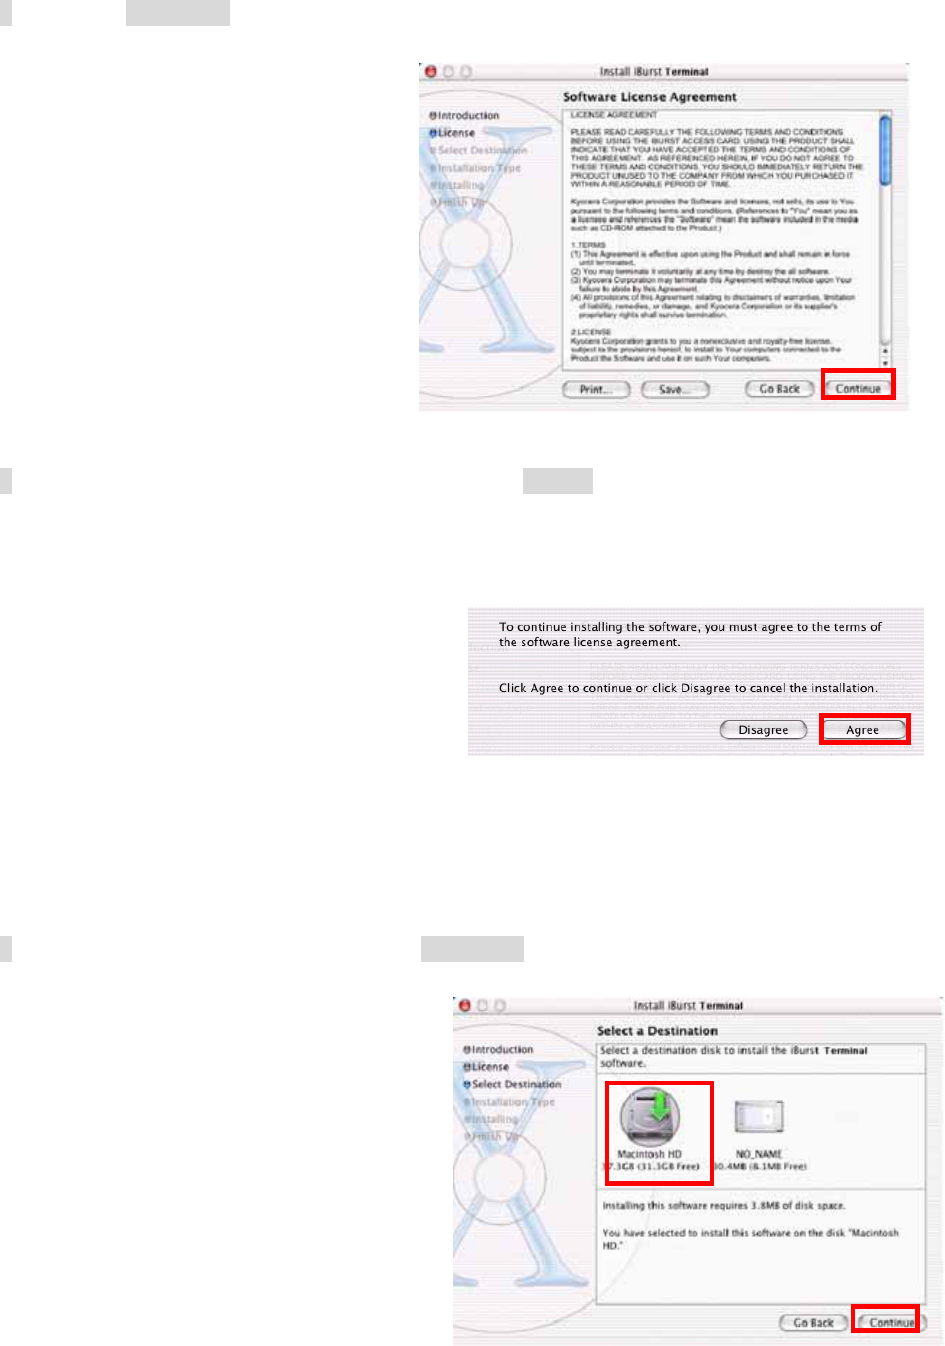
5 Click the [Continue] button.
6 The following dialog window will appear, click the [Agree] button.
7 Select a destination disk, then click the [Continue] button.
- 51 -
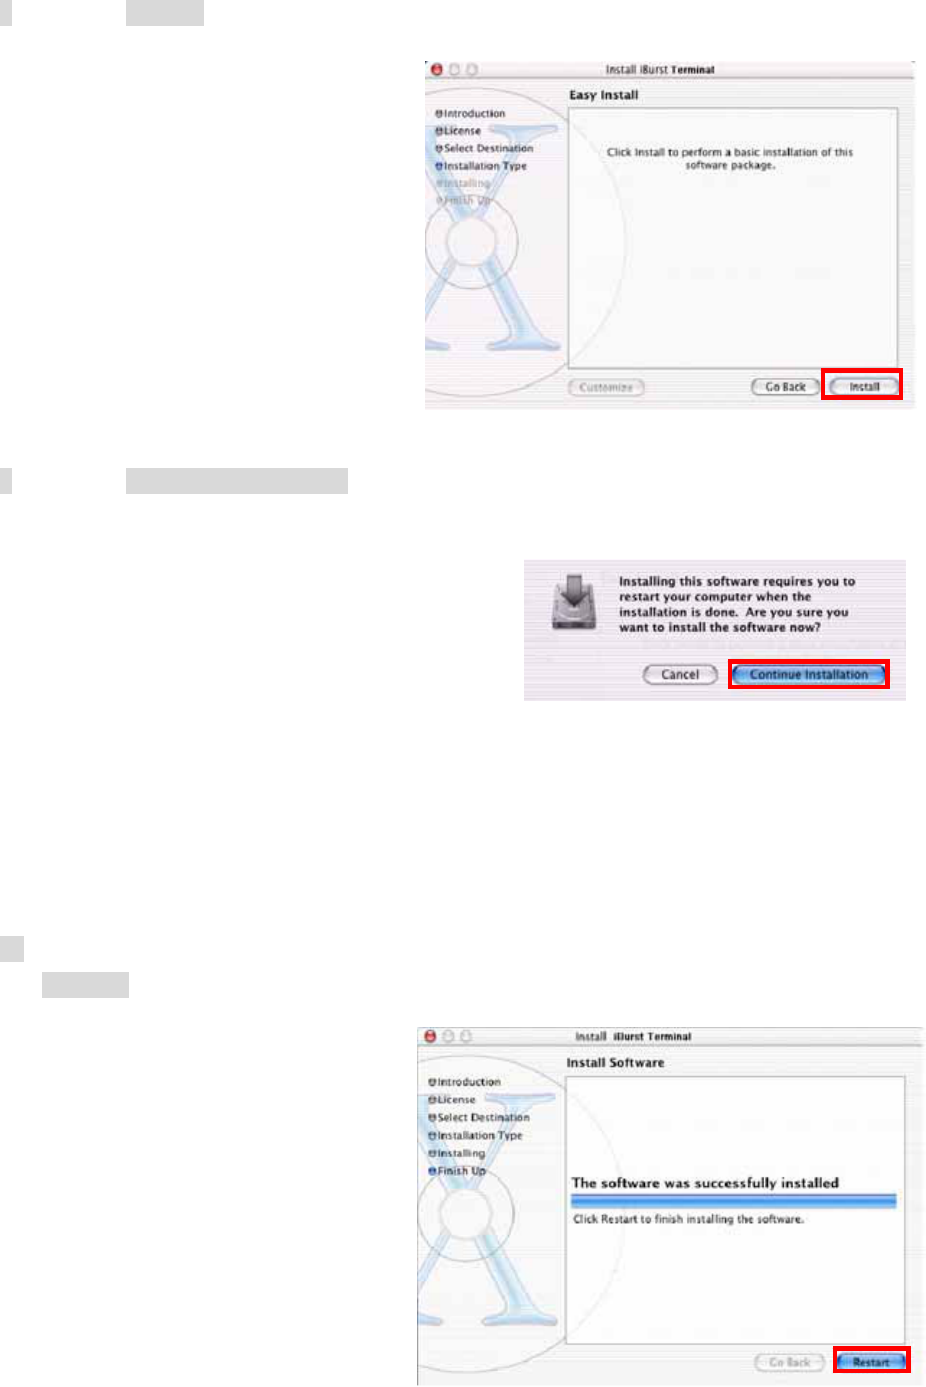
8 Click the [Install] button after appearing dialog window as shown below.
9 Click the [Continue installation] button.
10 When the installing process finishes, the dialog window shown below will appear. Click the
[Restart] button in the dialog window.
- 52 -
Connection Establishment
Connection Establishment for Windows XP
As Windows XP operating system supports PPPoE protocol, we don’t use connection application for
iBurst to configure network connection.
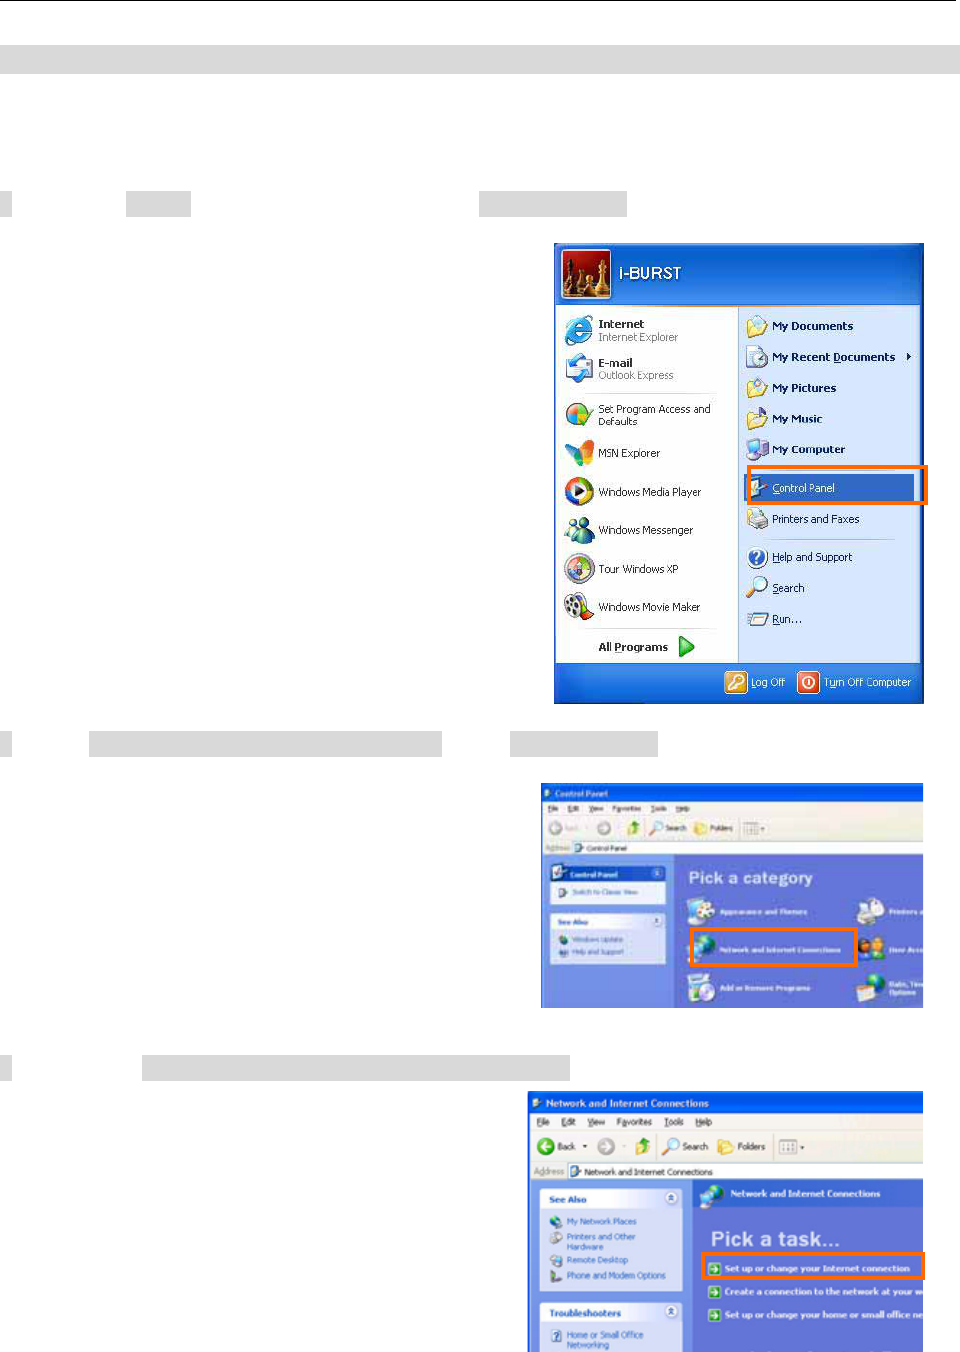
1 Click the [Start] button, followed by selecting [Control Panel] as shown below.
2 Click [Network and Internet Connections] in the [Control Panel] display.
3 Next, click [Set up or Change your Internet connection].
- 53 -
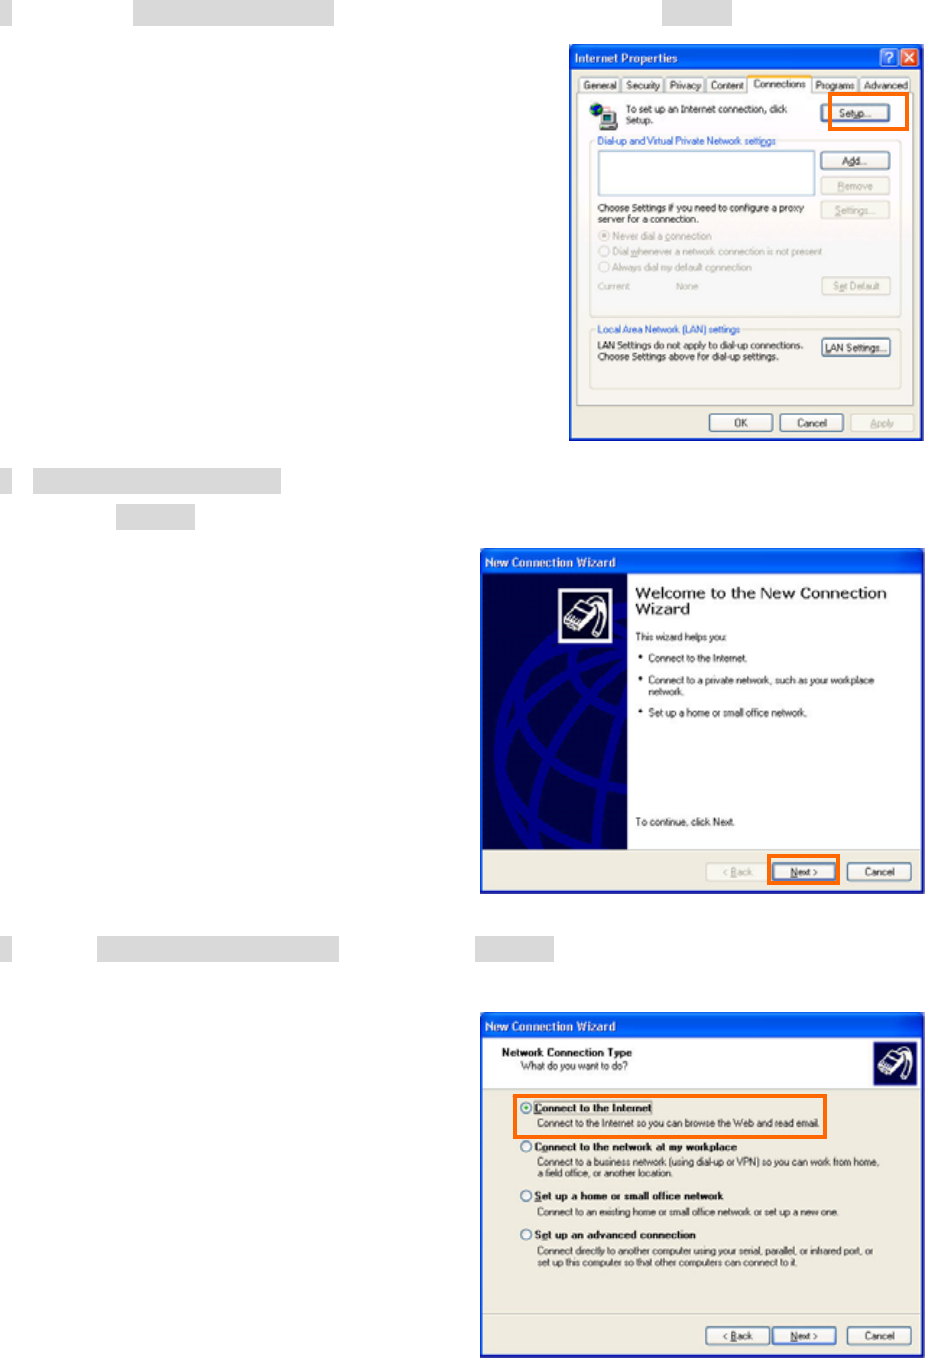
4 When the [Internet Properties] dialog window appears, click the [Setup] button.
5 [New Connection Wizard] will begin and the dialog window as shown below will appear.
Click the [Next >] button in the dialog window.
6 Select [Connect to the Internet] and click the [Next >] button.
- 54 -
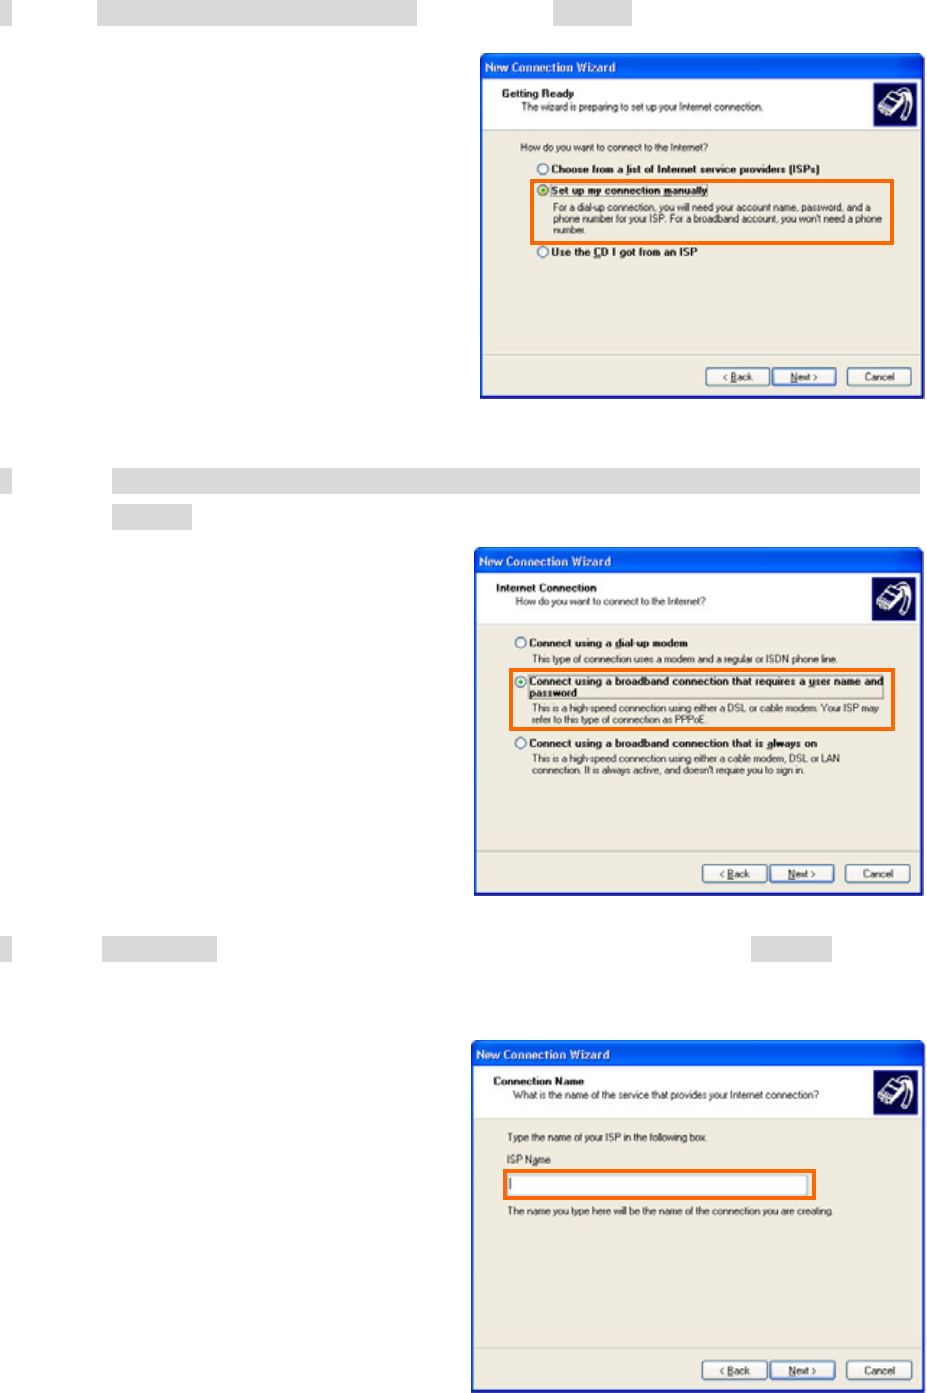
7 Select [Set up my connection manually] and click the [Next >] button.
8 Select [Connect using a broadband connection that requires a user name and password] and
click the [Next >] button.
9 Fill in [ISP Name] edit box with an ISP Name, followed by clicking the [Next >] button. Note
that any ISP name is acceptable.
- 55 -
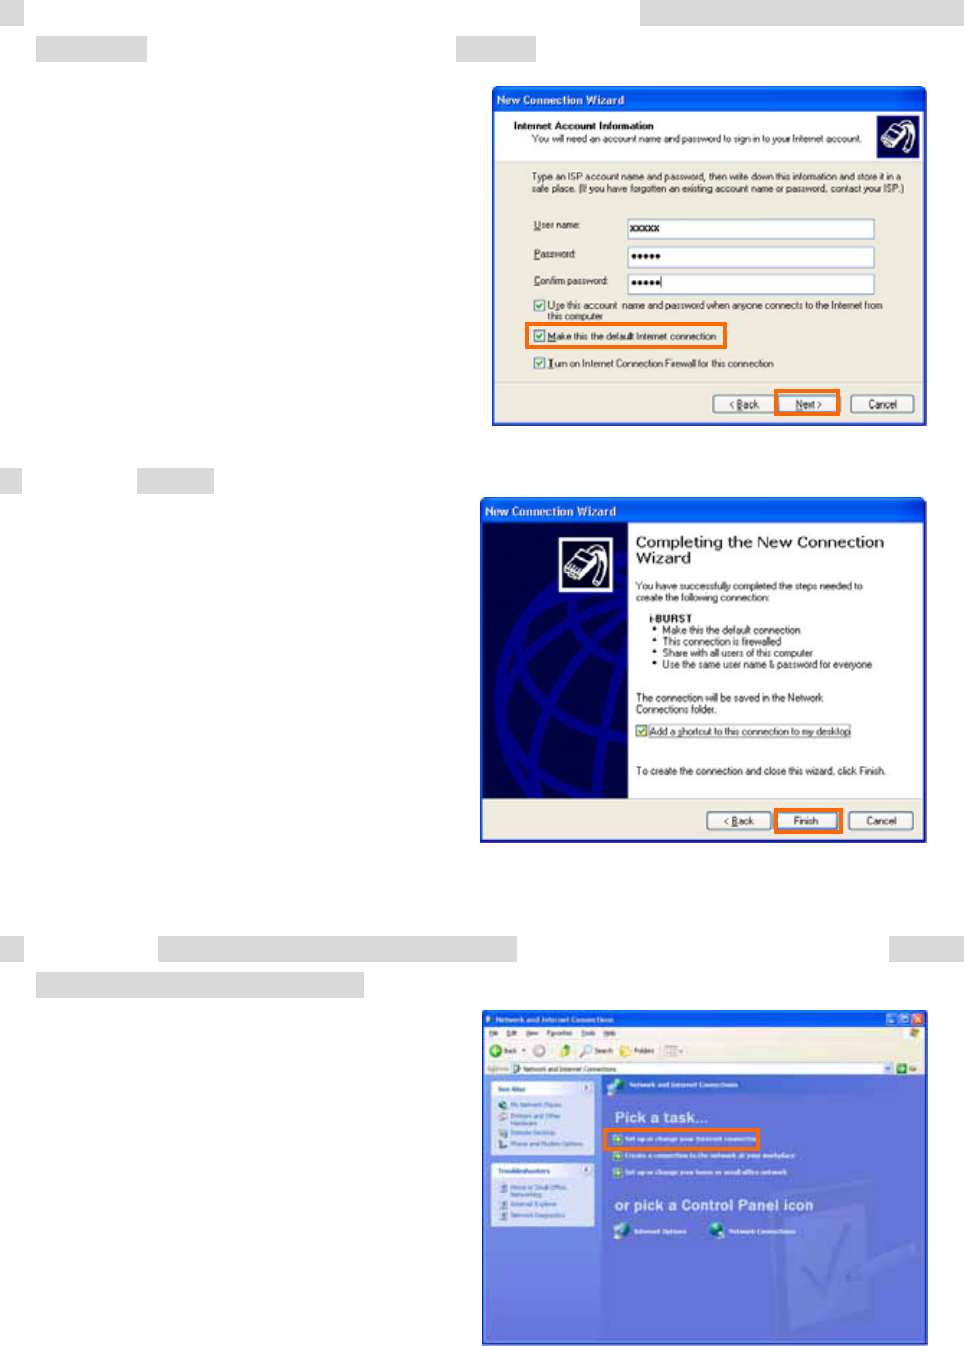
10 Enter user name and password and make sure that the [Make this the default Internet
connection] check box is checked. Click the [Next >] button.
11 Click the [Finish] button.
12 When the [Network and Internet Connection] window pane appears again, click [Set up
change your Internet Connection].
- 56 -
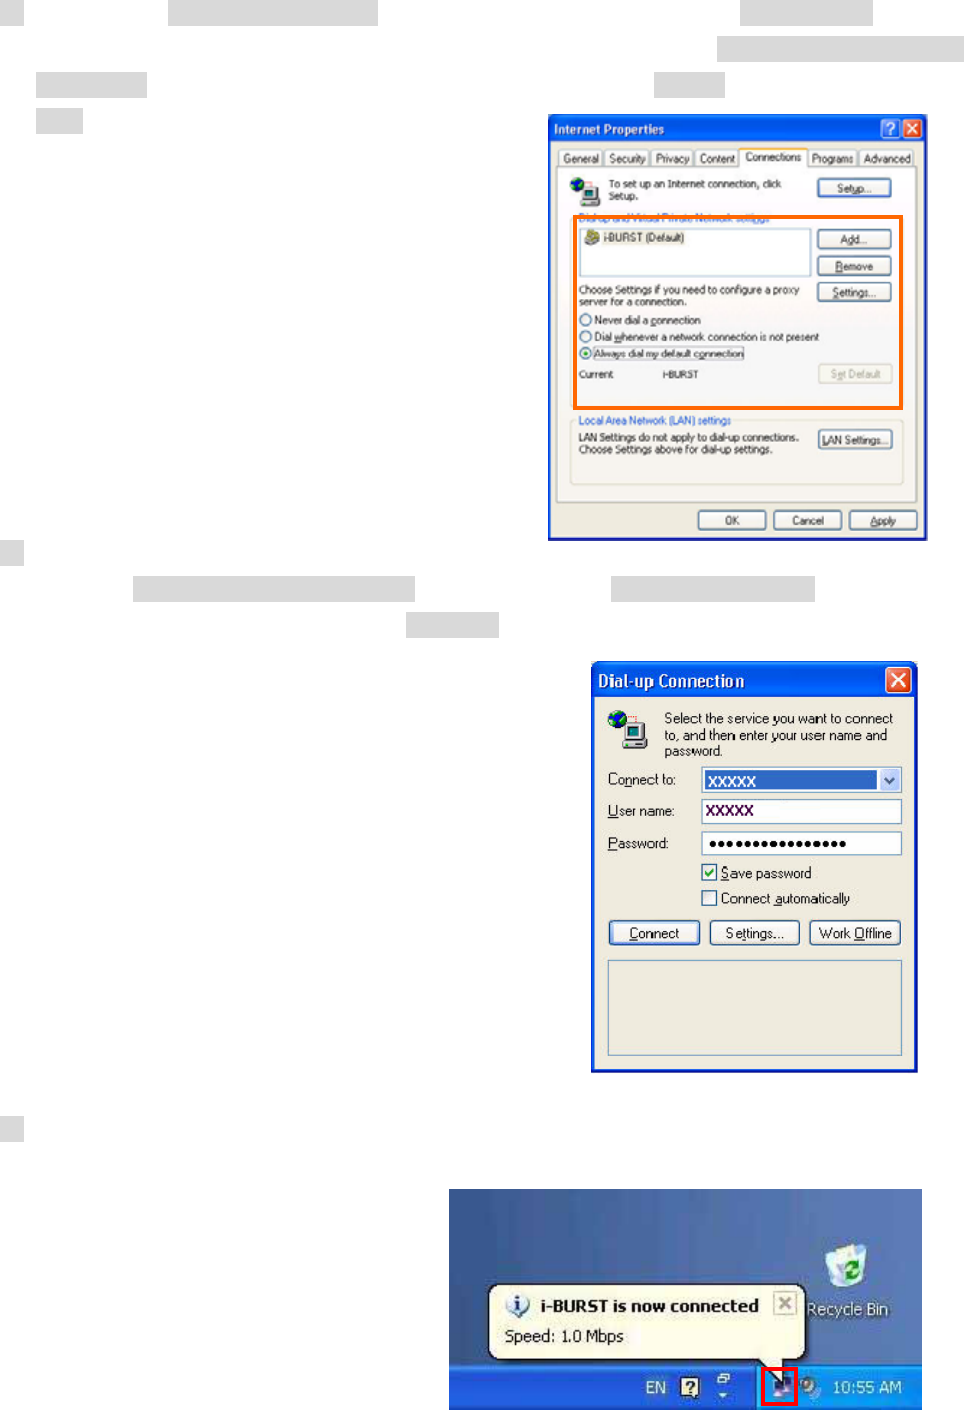
13 When the [Internet Properties] dialog window appears and the [Connections] pane is
displayed, confirm the connection name and make sure that the [Always dial my default
connection] radio button is checked, followed by clicking the [Apply] button. Then, click the
[OK] button to close the dialog window.
14 At this point, the connection configuration is complete. When you call Internet Explorer
program, [Dial-up Connection Wizard] will begin and the [Dial-up Connection] dialog window
as shown below will appear. Click the [Connect] button to connect to the network.
15 When the connection establishment process is complete, a message indicating completion of
the connection will appear at the task tray as shown below.
- 57 -
Connection Establishment for Windows 2000/Me/98SE
For Windows 2000、Windows Me and Windows 98SE,a connection application for iBurst is used.
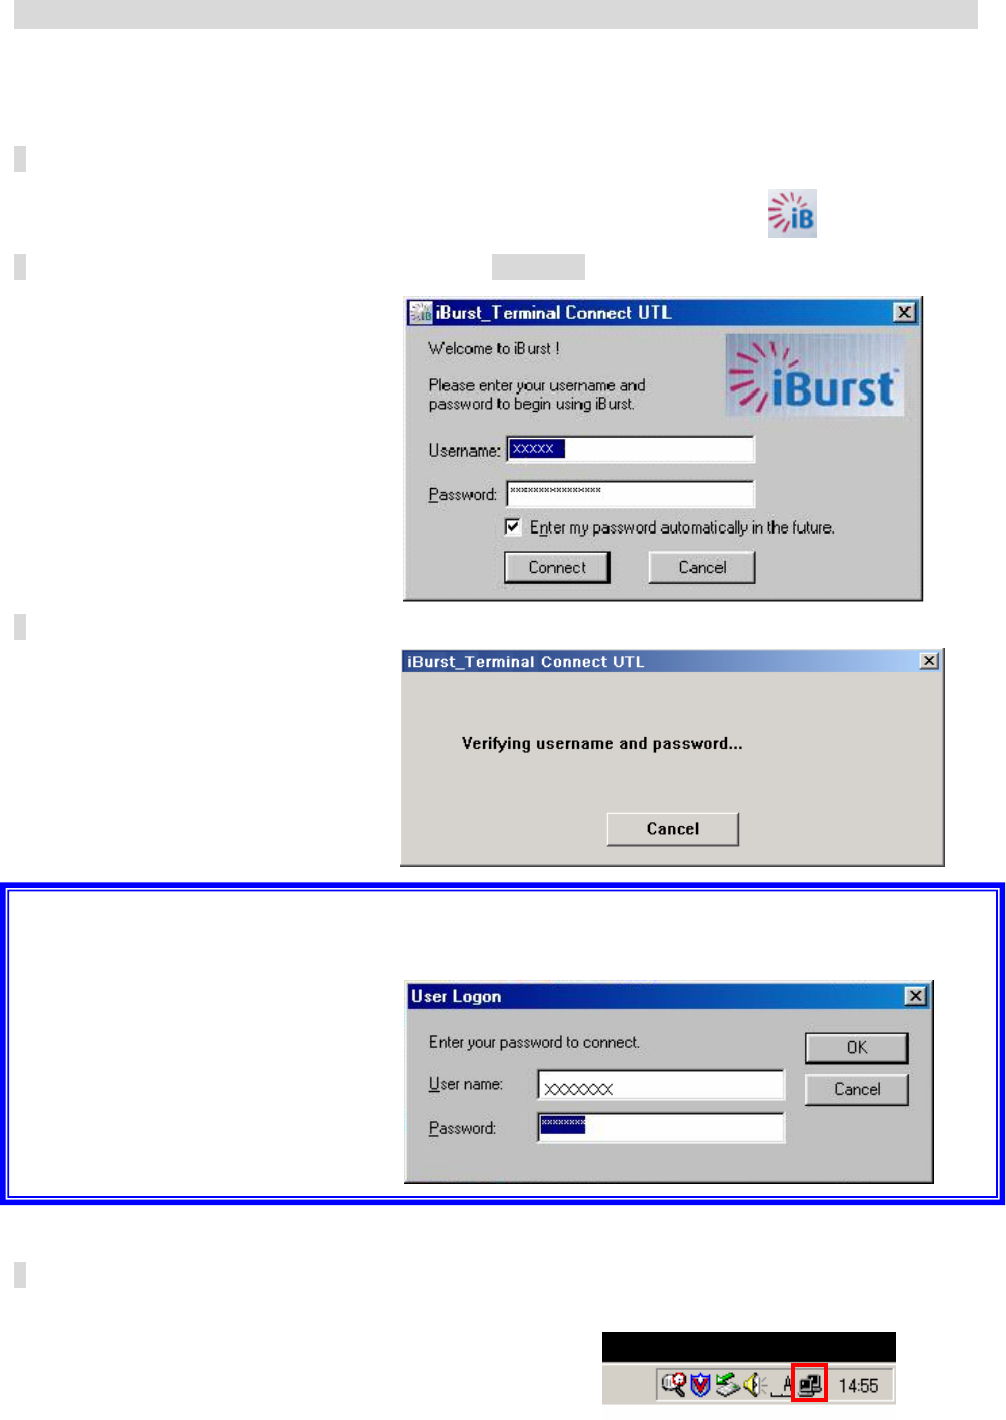
1 Double click the shortcut on the computer's desktop which was created by iBurst connection
application.
2 Enter user name and password and Click the [Connect] button.
3 While connecting to network, the following connection status window is displayed.
Note
: On Windows 98SE, if a wrong user name or password is entered, User Logon window
shown below may appear. In this case, please enter user name and password again, and then click
the OK button.
4 If connection is successful, connection icon will be displayed at the task tray.
- 58 -
Connection Establishment for Mac OS X
As Mac OS X operating system supports PPPoE protocol, we don’t use connection application for
iBurst to configure network connection.
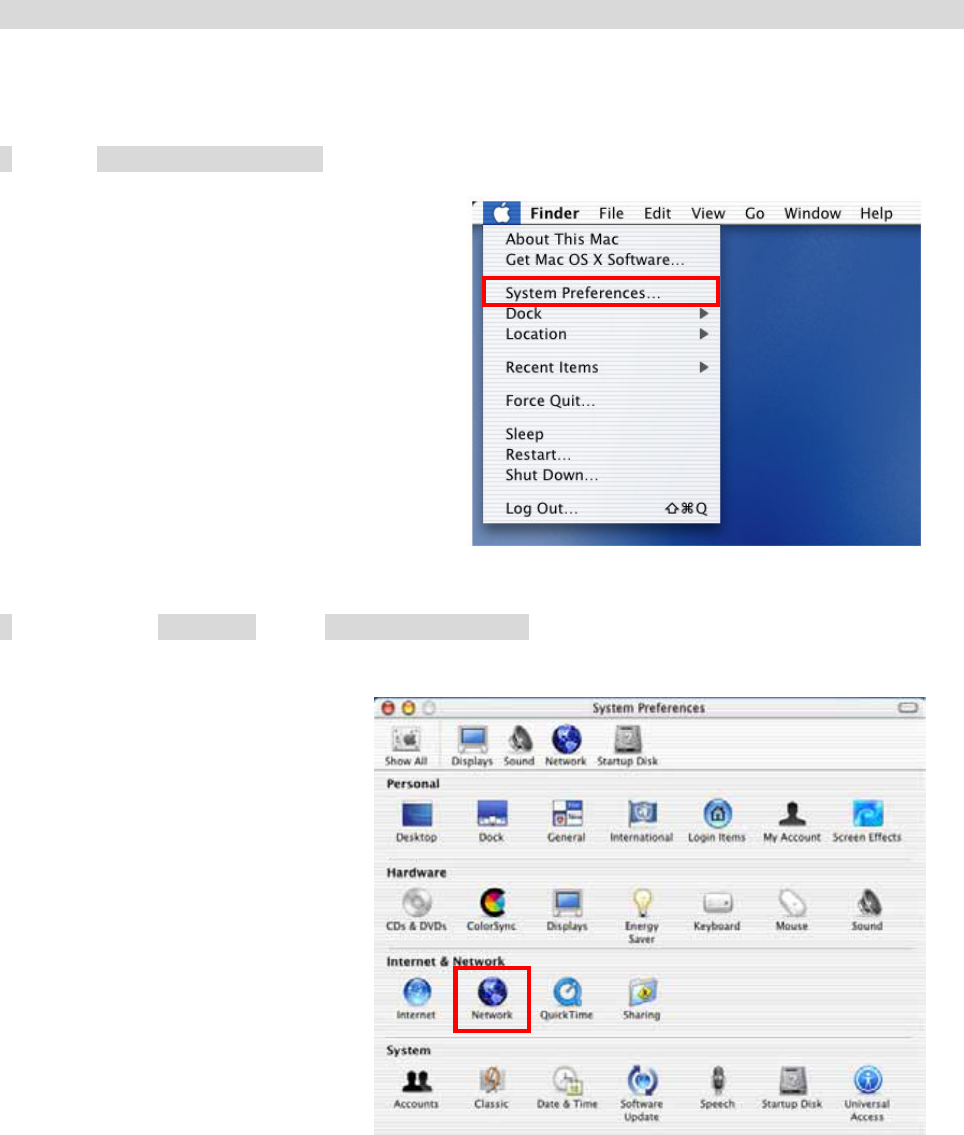
1 Select [System Preferences…] on the Apple menu.
2 Double click [Network] in the [System Preferences] window.
- 59 -
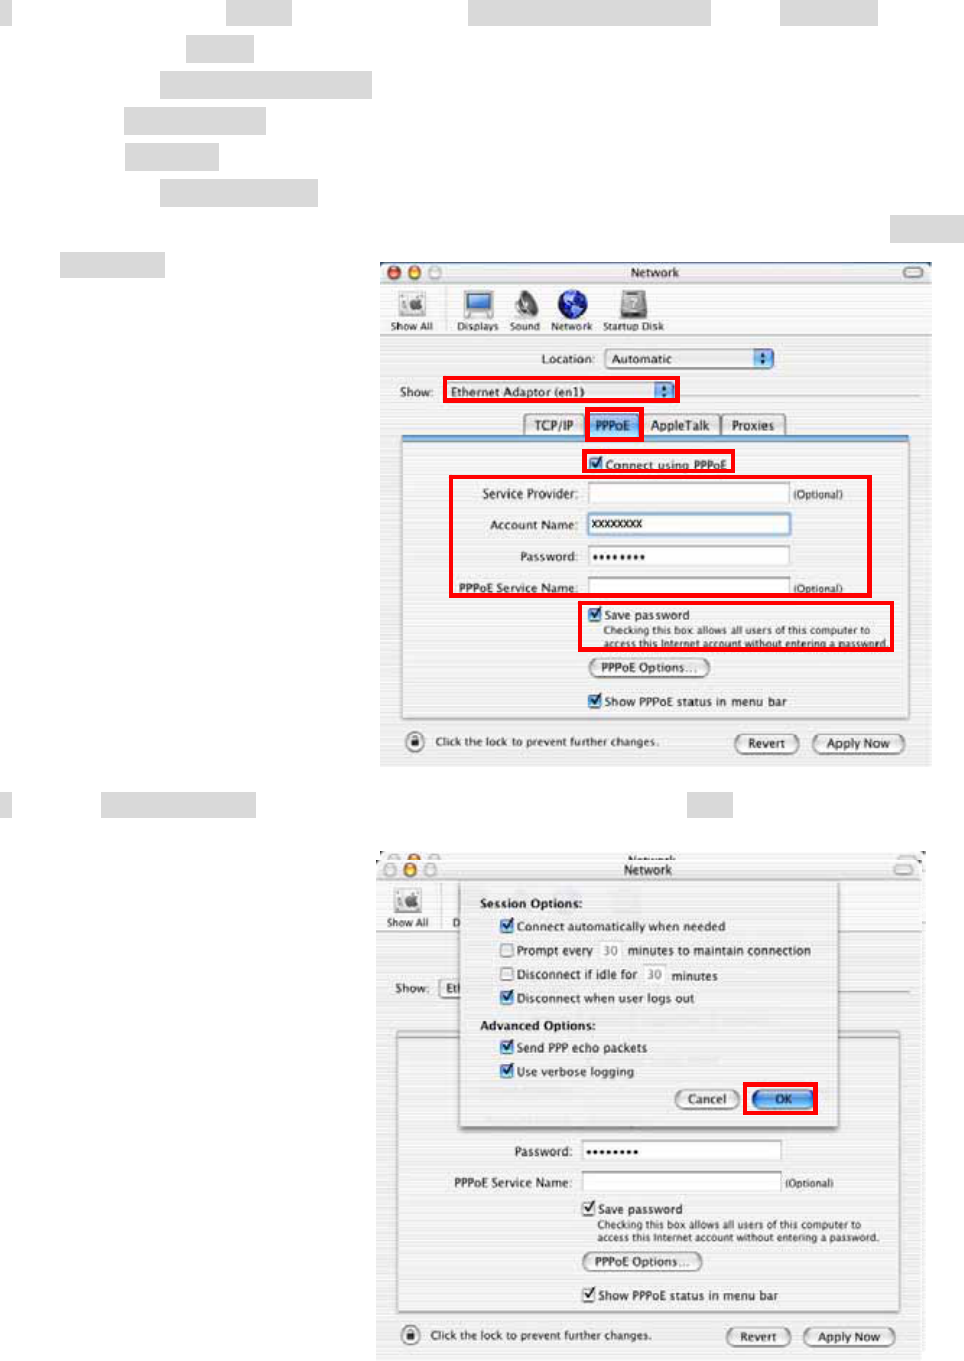
3 Click on drop down [Show] menu, and select [Ethernet Adaptor (enX)] in the [Network] window.
・Click on the PPPoE tab.
・Check off Connect using PPPoE.
・Enter Account Name as provided by your ISP.
・Enter Password as provided by your ISP.
・Check off [Save password] If you require the computer to remember your password.
・When you require the computer to connect or disconnect automatically, Click on [PPPoE
Options…]
4 Under Session Options check the boxes when needed, then click on [OK].
- 60 -
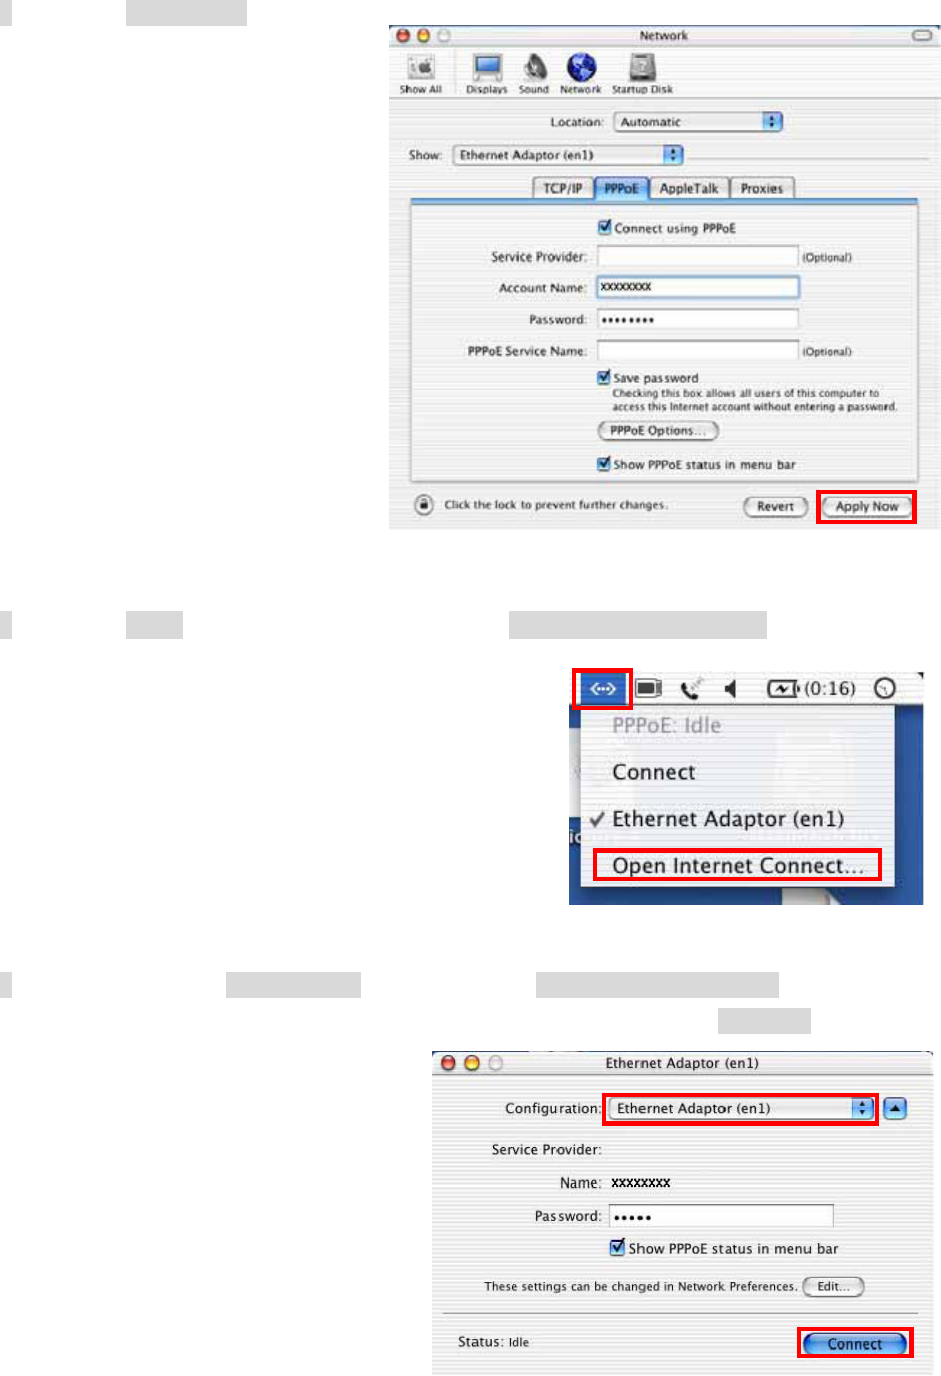
5 Click the [Apply Now] button.
6 Click the <・・・> icon at top right of screen, select [Open Internet Connect…].
7 Click on drop down Configuration menu, and select [Ethernet Adaptor (enX)].
The configuration of Ethernet adaptor (enX) will be displayed, click the [Connect] button.
- 61 -
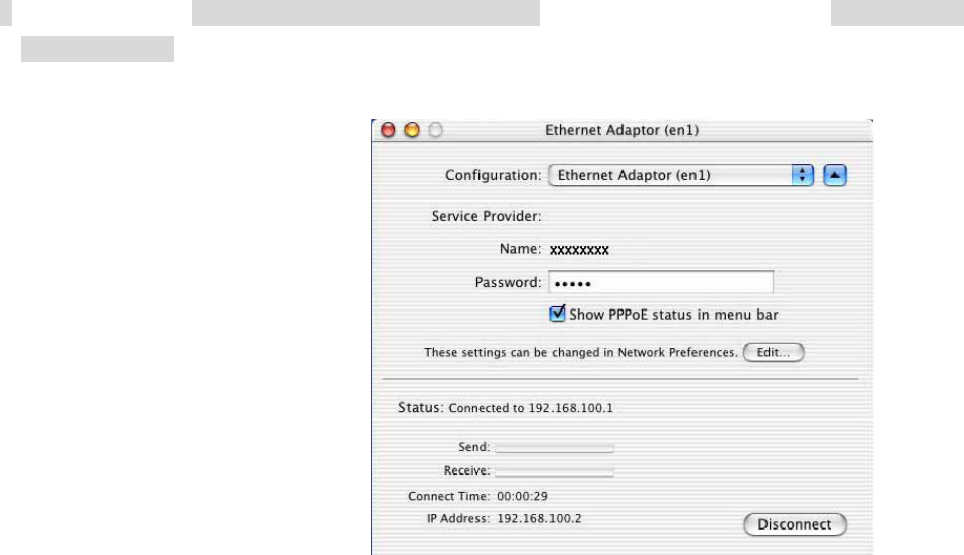
8 When the box Show PPPoE status in menu bar is checked, PPPoE Status Connected to
xxx.xxx.xxx.xxx will be displayed after having finished connection.
- 62 -

Chapter 2 Utility Software
This chapter describes the features and usage of the
Utility Software for iBurst Terminal.
- 63 -
Using Utility Software
Using Utility Software for Windows
How to display utility dialog window
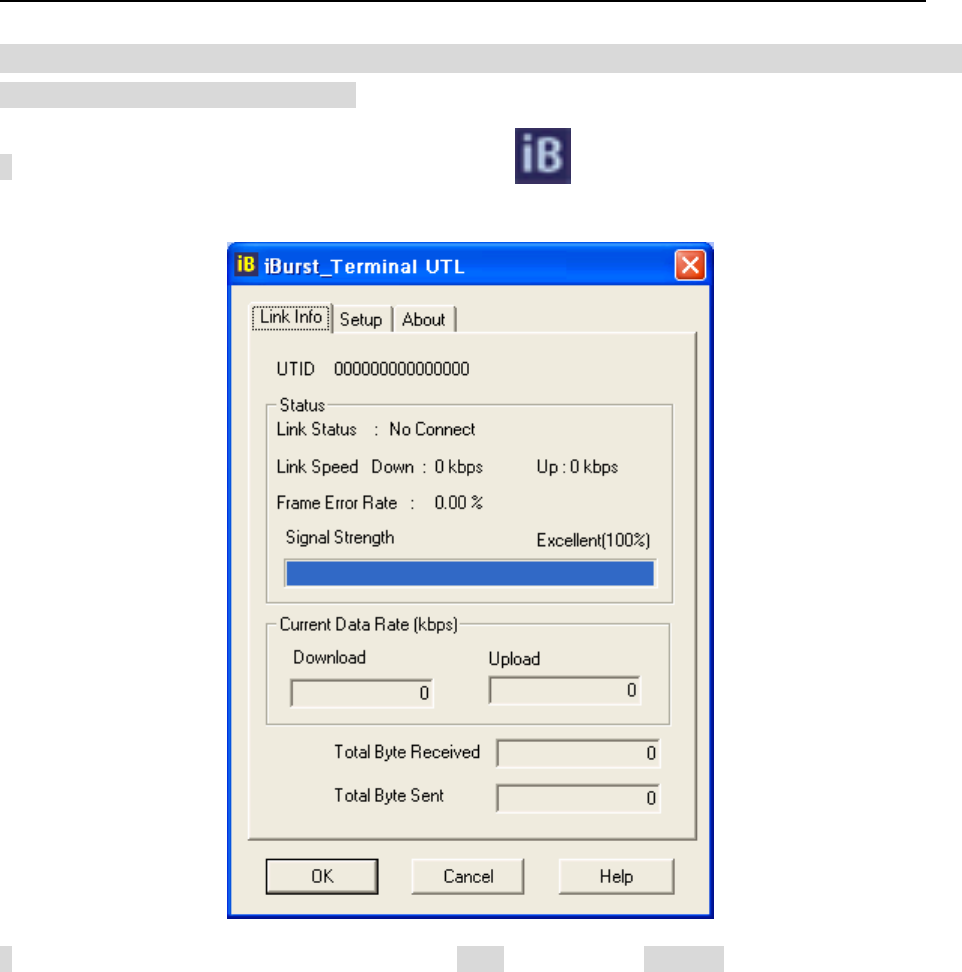
1 To open the utility dialog window, click the icon on the computer’s task tray. When the
window opens, the [Link Info] pane will be displayed as shown below.
2 To close the utility dialog window, click the [OK] button or the [Cancel] button or the X mark at
upper-right corner of the dialog window.
- 64 -
Link Info Pane
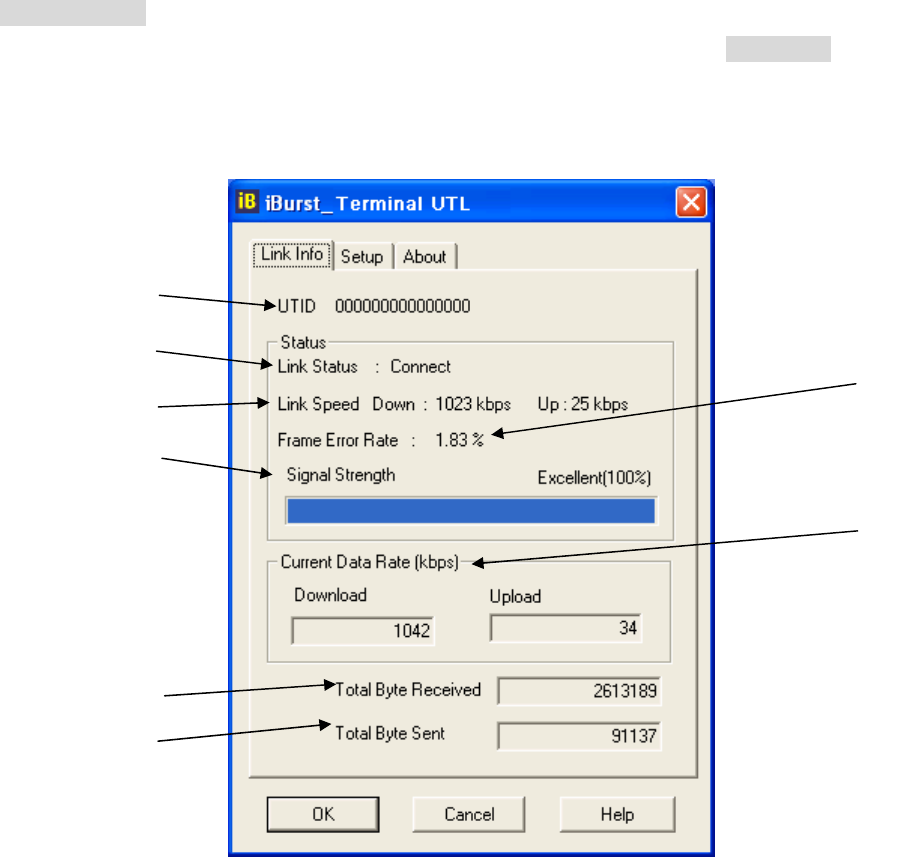
Link Info pane can be displayed in the main dialog window by clicking the [Link Info] tab.
Generally, the elements in the Link Info pane give information about the communication link
between iBurst Terminal and the access point to the network.
(1)
(2)
(3)
(4)
(5)
(6)
(8)
(7)
The following describes each item of the Link Info pane.
(1) UTID
UTID is used as the identifier of iBurst User Terminal.
(2) Link Status
Link Status indicates connection state of the communication link between iBurst Terminal and
the access point.
Connected : The link is connected.
No Connected : iBurst Terminal is inserted in the USB port but the link is not
connected.
No iBurst Terminal : There is no iBurst Terminal inserted in the PC’s USB port.
(3) Link Speed
Link Speed indicates speed of the link in both down and up direction.
- 65 -
(4) Frame Error Rate
Frame Error Rate indicates the FER of the received data.
(5) Signal Strength
Signal Strength indicates the signal strength of the received signal. Here, two kinds of indicators,
percentage indicator and 5-step indicator, are used to indicate the received signal strength.
The percentage indicator is the RSSI value in percent. On the other hand, the 5-step indicator
shows performance of the received signal in words as follows.
No Signal : RSSI = 0%
Poor : RSSI is in the range of 1∼24%
Fair : RSSI is in the range of 25∼49%
Good : RSSI is in the range of 50∼74%
Excellent : RSSI is in the range of 75∼100%
(6) Current Data Rate
Current Data Rate indicates the current transmission throughput and the reception throughput.
(7) Total Byte Received
Total Byte Received indicates the total number of bytes of the data which iBurst Terminal has
received from the access point since the communication link is established.
(8) Total Byte Sent
Total Byte Sent indicates the total number of bytes of the data which iBurst Terminal has
transmitted to the access point since the communication link is established.
- 66 -
Setup Pane
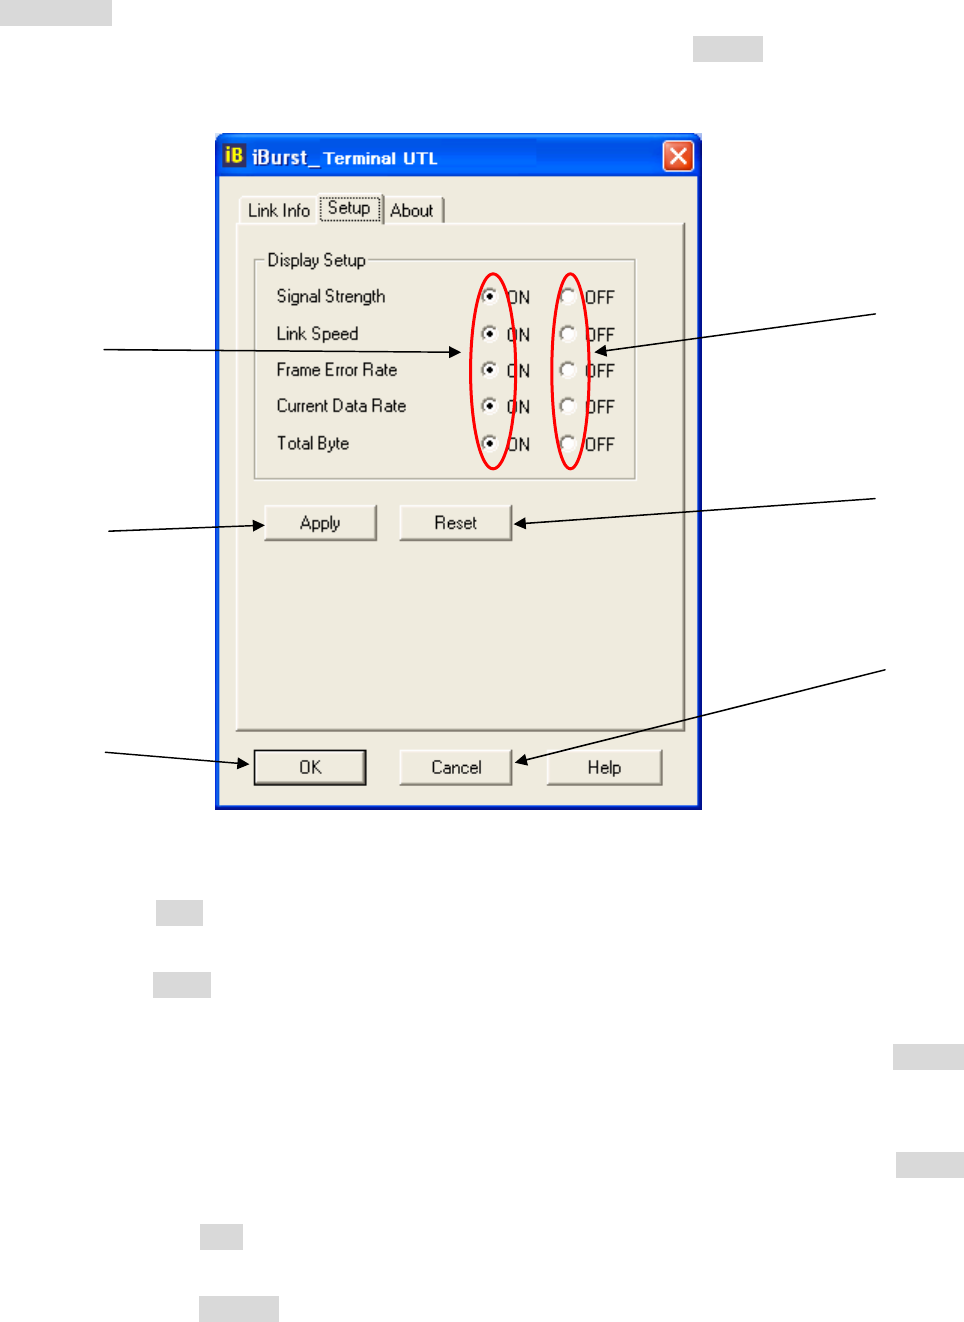
Setup pane can be displayed in the main dialog window by clicking the [Setup] tab. Setup pane is
used to configure the display items in the Link Info pane.
(6)
(5)
(4)
(3)
(2)
(1)
The following describes usage of each item of the above figure.
(1) Check the [ON] radio buttons at the right hand side of the items you want to display in the
Link Info pane.
(2) Check the [OFF] radio buttons at the right hand side of the items you don’t want to display in
the Link Info pane.
(3) The configuration shown in the Display Setup subpane is activated by checking the [Apply]
button.
(4) The configuration in the Setup pane can be set to default (Default is the state in which all
radio buttons on the right hand side of display items are set to “ON”.) by clicking the [Reset]
button.
(5) By clicking the [Ok] button, the current configuration will be activated and the dialog window
will be closed.
(6) By clicking the [Cancel] button, the dialog window will be closed but the current configuration
won’t be activated.
- 67 -
About Pane
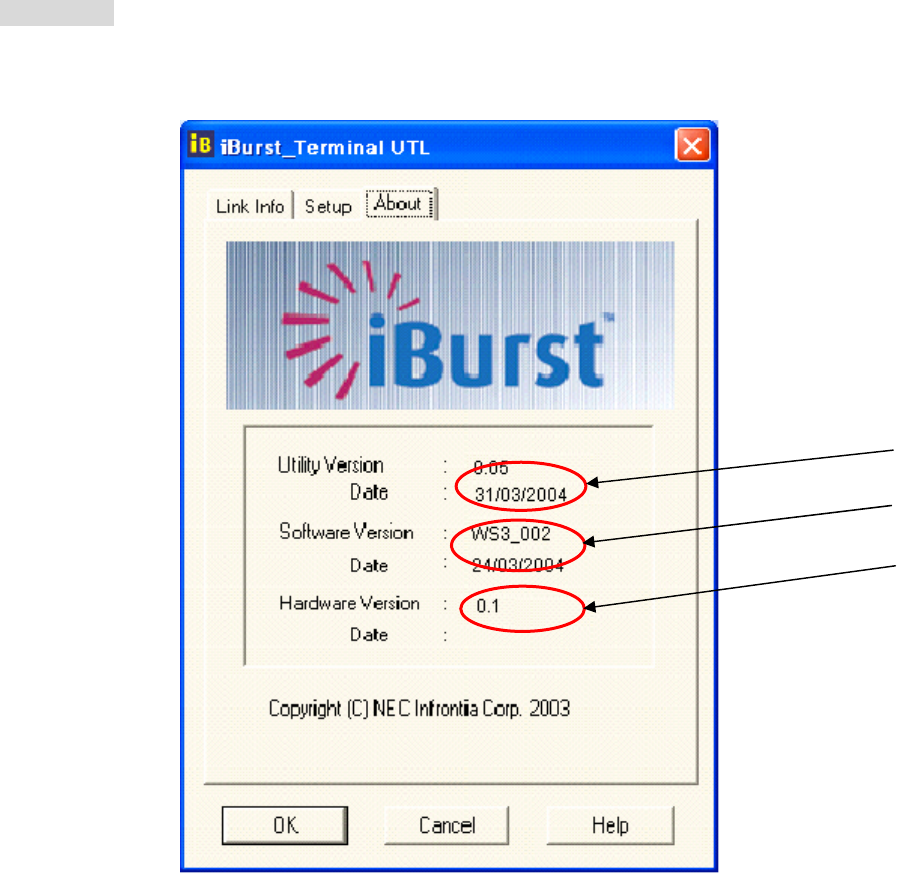
About pane is used to display the version numbers of Utility Software and hardware and show
copyright notice.
(1)
(2)
(3)
The following describes the function of each item of the About pane.
(1) This shows the version number and the release date of the Utility Software.
(2) This shows the firmware version and the build date of iBurst Terminal in use.
(3) This shows the hardware version and the build date of iBurst Terminal in use.
- 68 -
Icon Display in task tray
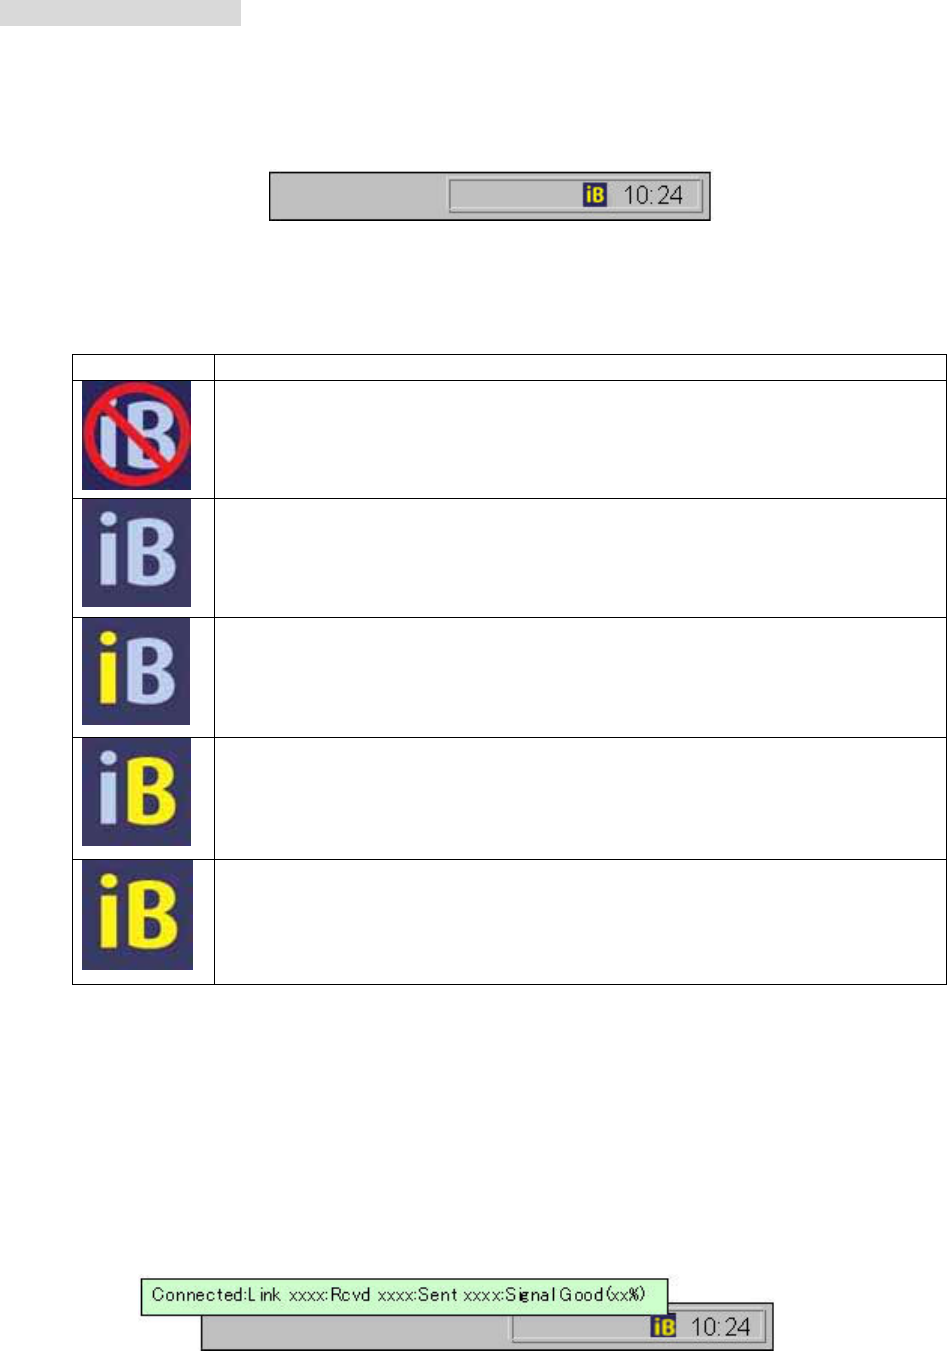
When the Utility Software for iBurst Terminal is active, an icon of the Utility Software will be
displayed in the task tray of the computer monitor according to communication activities on iBurst
Terminal.
The following shows the relation between the icons to be displayed in computer’s task tray and
activities on iBurst Terminal.
Icon Activities on iBurst Terminal
iBurst Terminal is not inserted in the PC’s USB port.
There is no action of transmission or reception on iBurst Terminal.
iBurst Terminal is transmitting data.
iBurst Terminal is receiving data.
iBurst Terminal is both transmitting and receiving data.
From the task tray icon, user may also get information of Link Status, Total Byte Received, Total
Byte Sent, Signal Strength, which is displayed in the Link Status pane of the utility dialog window,
without opening the dialog window. This can be done by placing the mouse’s pointer over the
currently displayed icon of the Utility Software. The below figure shows an image of what happens
when the mouse pointer is placed on the task tray icon.
- 69 -
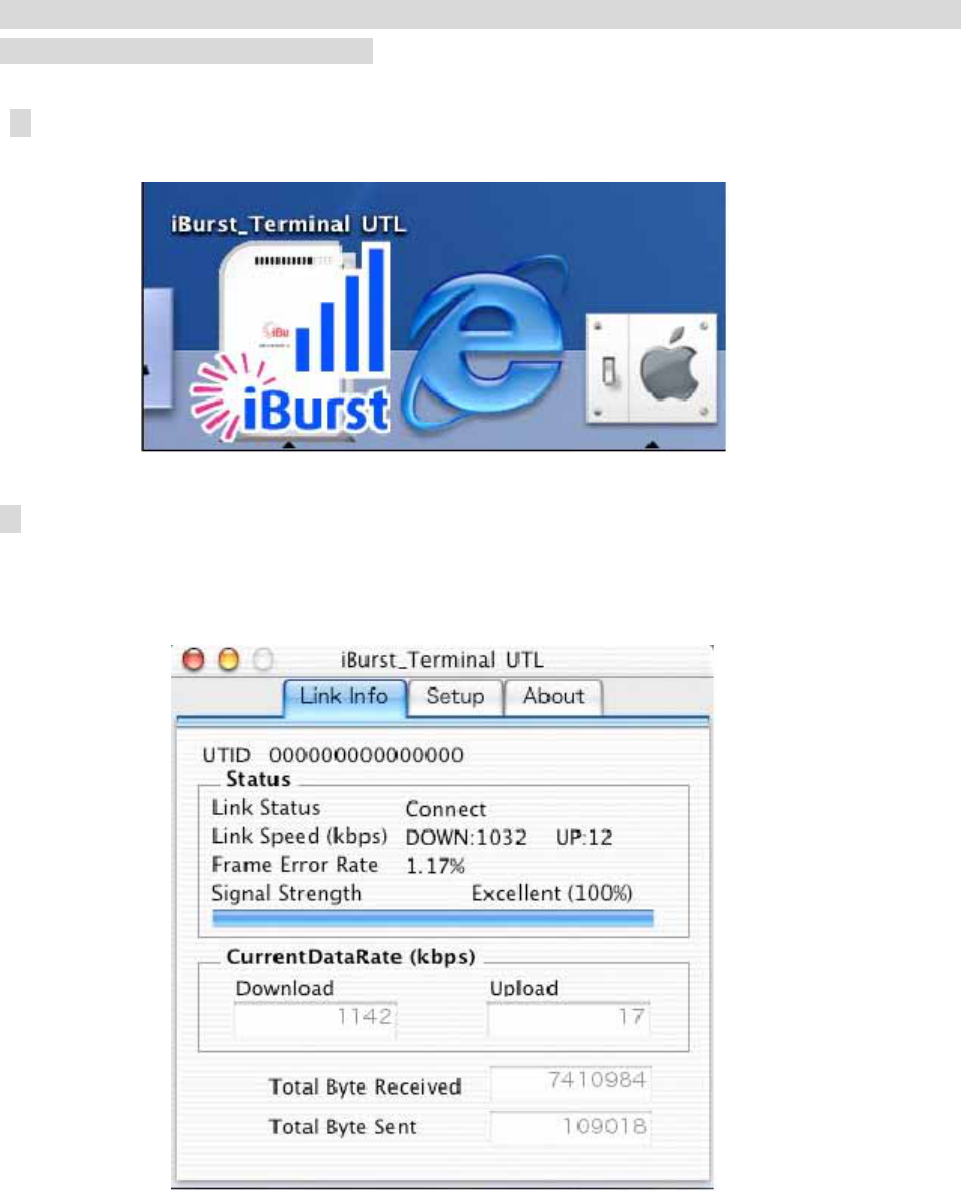
Using Utility Software for Mac OS X
How to display utility dialog window.
1 Double click the iBurst Terminal icon from the Dock.
2 The Link display window appears, and the status of iBurst terminal will be displayed.
- 70 -
Link Info
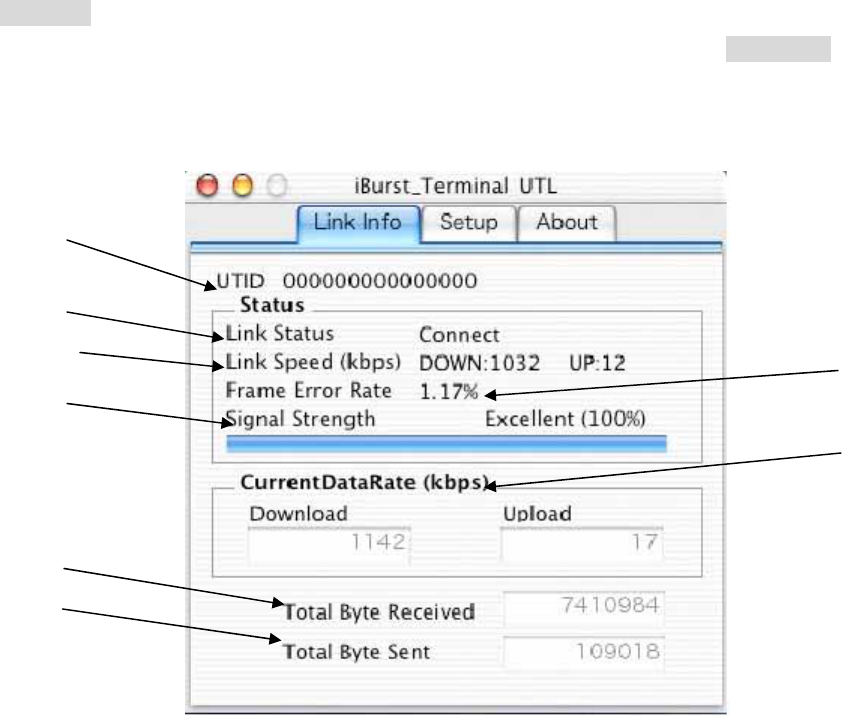
Link Info pane can be displayed in the main dialog window by clicking the [Link Info] tab.
Generally, the elements in the Link Info pane give information about the communication link between iBurst
Terminal and the access point to the network.
(8)
(7)
(6)
(2)
(3)
(5)
(4)
(1)
The following describes each item of the Link Info pane.
(1) UTID
UTID is used as the identifier of iBurst Terminal.
(2) Link Status
Link Status indicates connection state of the communication link between iBurst Terminal and
the access point.
Connected : The link is connected.
No Connected : iBurst Terminal is inserted in the PC’s USB port but the link is not
connected.
No iBurst_Terminal : There is no iBurst Terminal inserted in the PC’s USB port.
(3) Link Speed
Link Speed indicates speed of the link in both down and up direction.
(4) Frame Error Rate
Frame Error Rate indicates the FER of the received data.
- 71 -
(5) Signal Strength
Signal Strength indicates the signal strength of the received signal. Here, two kinds of indicators,
percentage indicator and 5-step indicator, are used to indicate the received signal strength.
The percentage indicator is the RSSI value in percent. On the other hand, the 5-step indicator
shows performance of the received signal in words as follows.
No Signal : RSSI = 0%
Poor : RSSI is in the range of 1∼24%
Fair : RSSI is in the range of 25∼49%
Good : RSSI is in the range of 50∼74%
Excellent : RSSI is in the range of 75∼100%
(6) Current Data Rate
Current Data Rate indicates the current transmission throughput and the reception throughput.
(7) Total Byte Received
Total Byte Received indicates the total number of bytes of the data which iBurst Terminal has
received from the access point since the communication link is established.
(8) Total Byte Sent
Total Byte Sent indicates the total number of bytes of the data which iBurst Terminal has
transmitted to the access point since the communication link is established.
- 72 -
Setup Pane
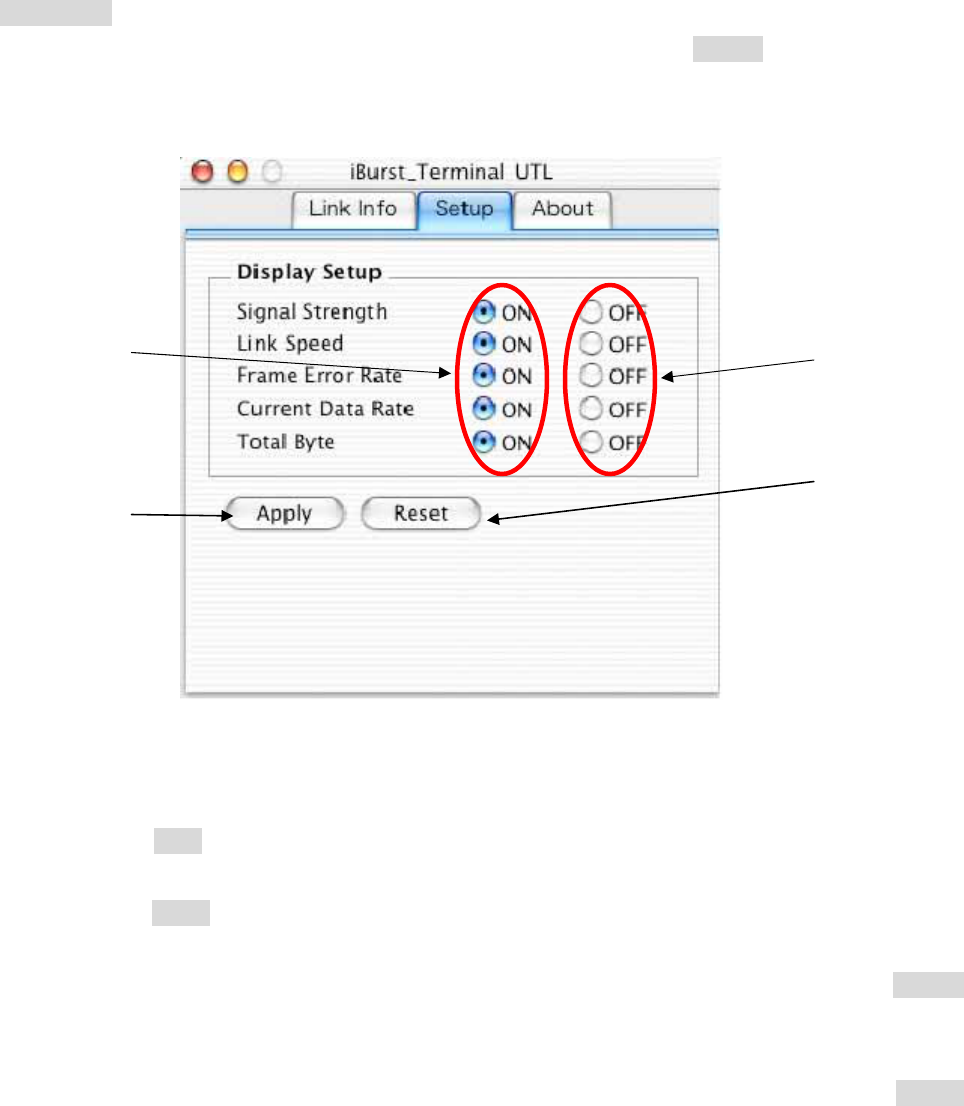
Setup pane can be displayed in the main dialog window by clicking the [Setup] tab. Setup pane is
used to configure the display items in the Link Info pane.
(3)
(1)
(2)
(4)
(1) Check the [ON] radio buttons at the right hand side of the items you want to display in the
Link Info pane.
(2) Check the [OFF] radio buttons at the right hand side of the items you don’t want to display in
the Link Info pane.
(3) The configuration shown in the Display Setup subpane is activated by checking the [Apply]
button.
(4) The configuration in the Setup pane can be set to default (Default is the state in which all
radio buttons on the right hand side of display items are set to “ON”.) by clicking the [Reset]
button.
- 73 -
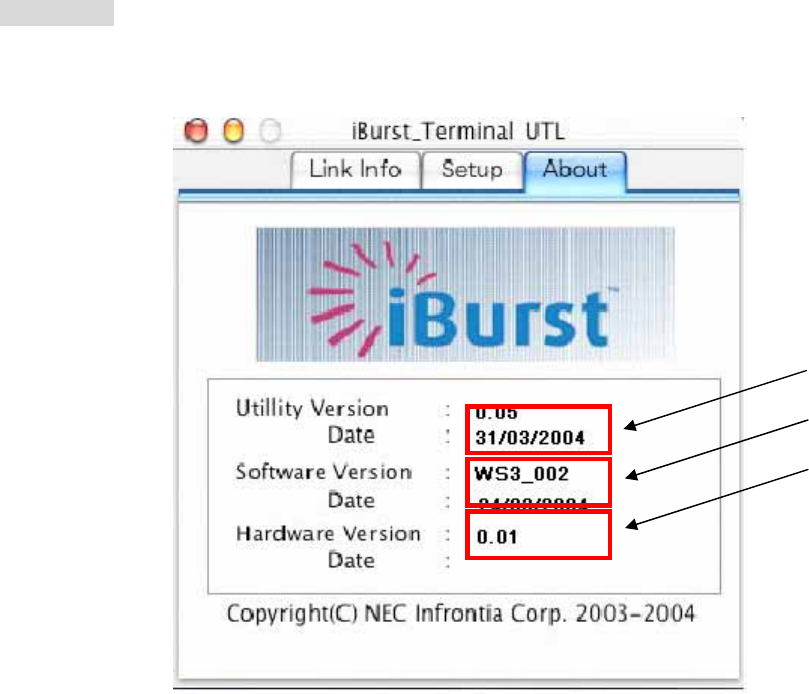
About Pane
About pane is used to display the version numbers of Utility Software and hardware and show
copyright notice.
(1)
(2)
(3)
The following describes the function of each item of the About pane.
(1) This shows the version number and the release date of the Utility Software.
(2) This shows the firmware version and the build date of iBurst Terminal in use.
(3) This shows the hardware version and the build date of iBurst Terminal in use.
- 74 -
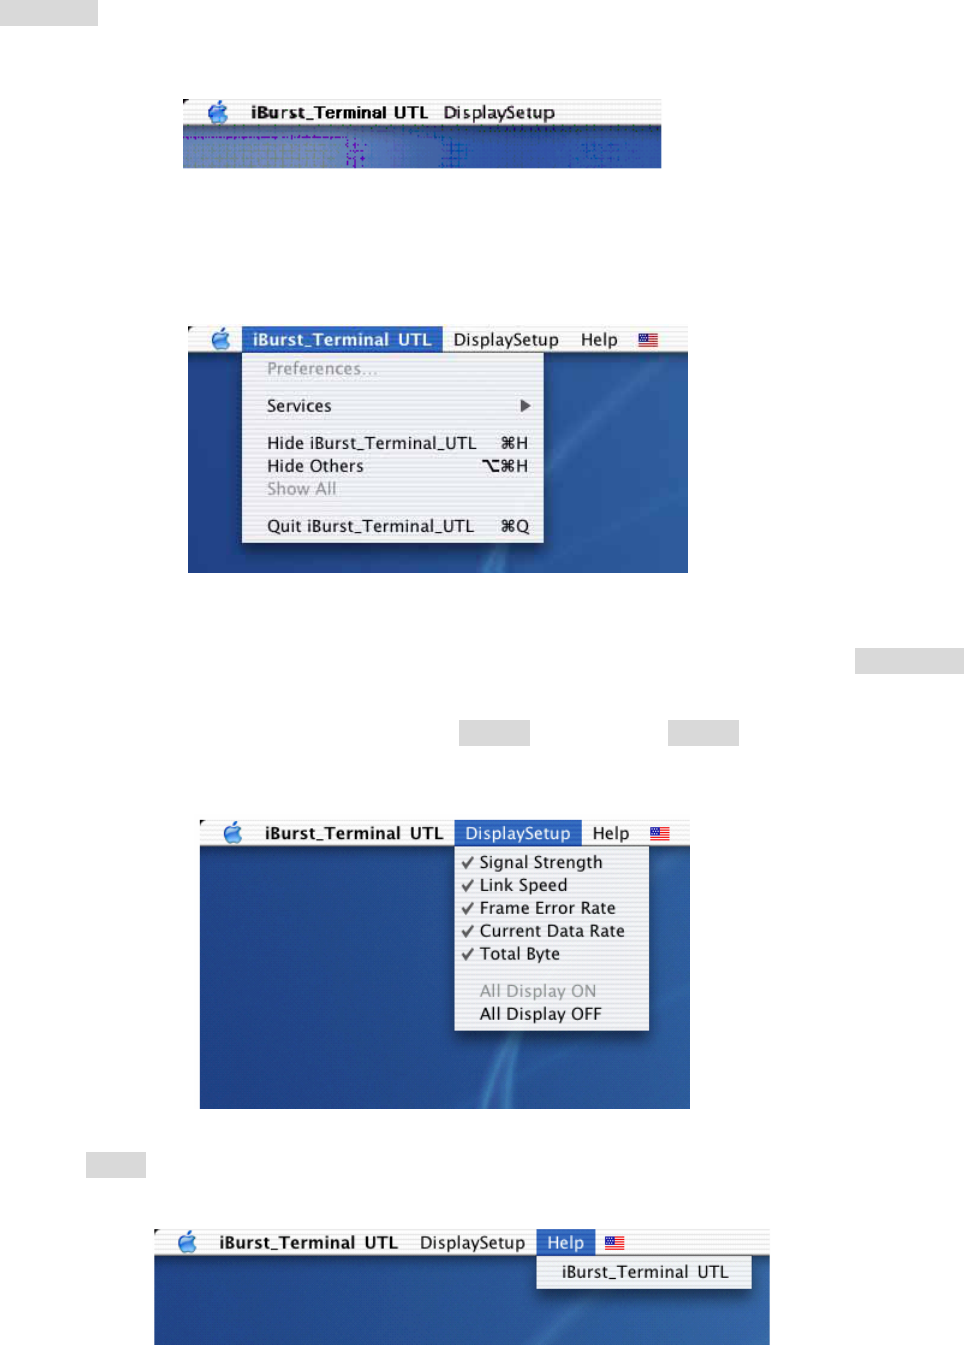
Menu Bar
It will be displayed when the iBurst utility starts.
(1) iBurst_Terminal UTL menu
The menu is used to quit iBurst Terminal utility or to perform other operations.
(2) Display Setup menu
The menu is used to select displaying or undisplaying status information in the [Link Info]
window.
The function is the same as that clicking the [Apply] button in the [Setup] window.
The checked items will be displayed, and the unchecked items will not be displayed in the Link
Info window.
(3) Help menu
The [Help] window will appear when help menu is selected.
- 75 -
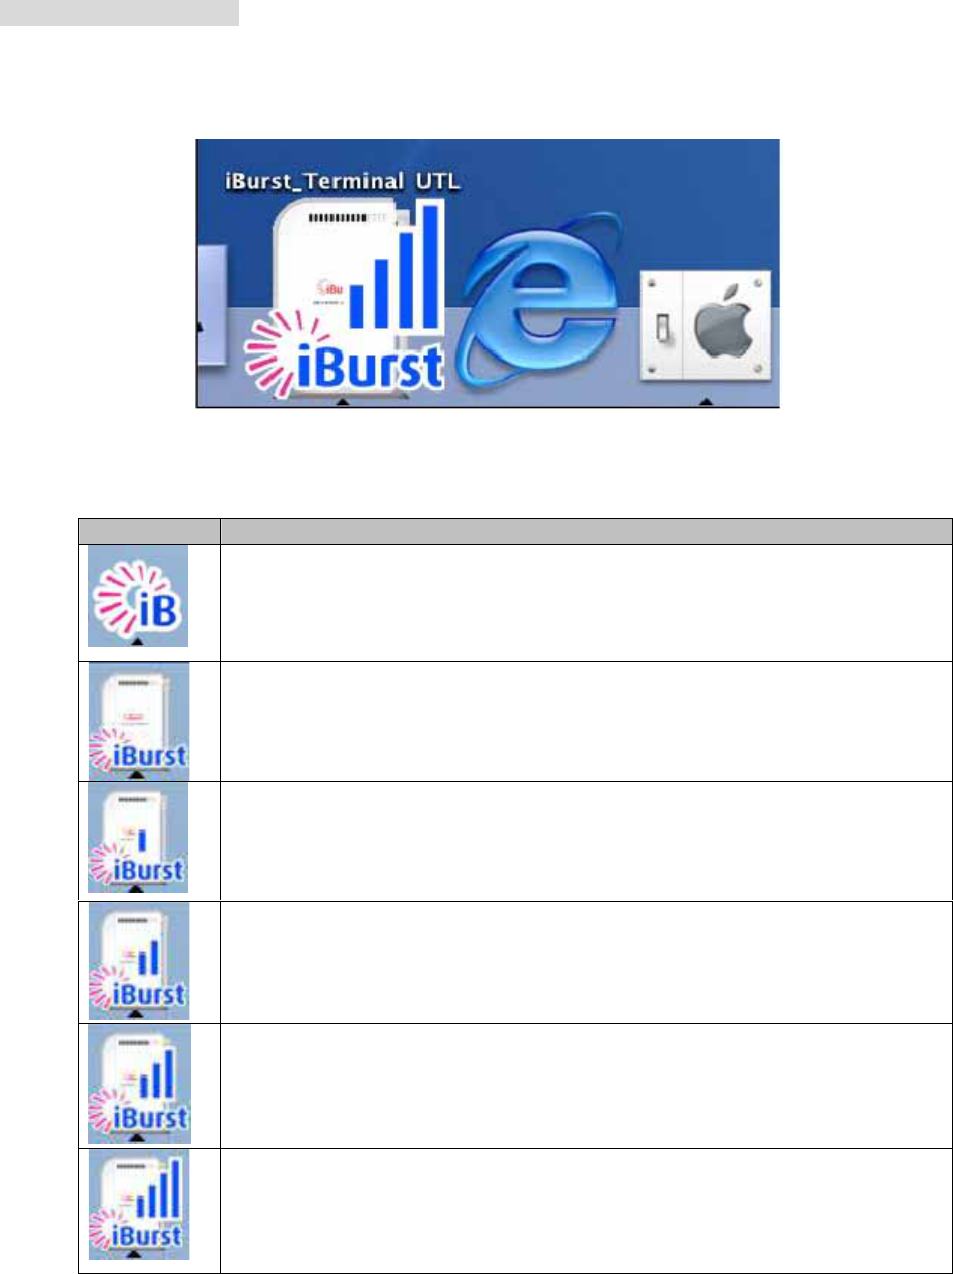
Icon Display in the Dock
When the Utility Software for iBurst Terminal is active, an icon of the Utility Software will be
displayed in the Dock of the computer monitor according to communication activities on iBurst
Terminal.
The following shows the relation between the icons to be displayed in the Dock and activities on
iBurst Terminal.
Icon Activities on iBurst Terminal
iBurst Terminal is not connected to the PC.
iBurst Terminal is connected to the PC,and Signal Strength is No Signal.
iBurst Terminal is connected to the PC,and Signal Strength is Poor.
iBurst Terminal is connected to the PC,and Signal Strength is Fair.
iBurst Terminal is connected to the PC,and Signal Strength is Good.
iBurst Terminal is connected to the PC,and Signal Strength is Excellent.
- 76 -

Chapter 3 Uninstallation
This chapter describes how to uninstall iBurst software.
- 77 -
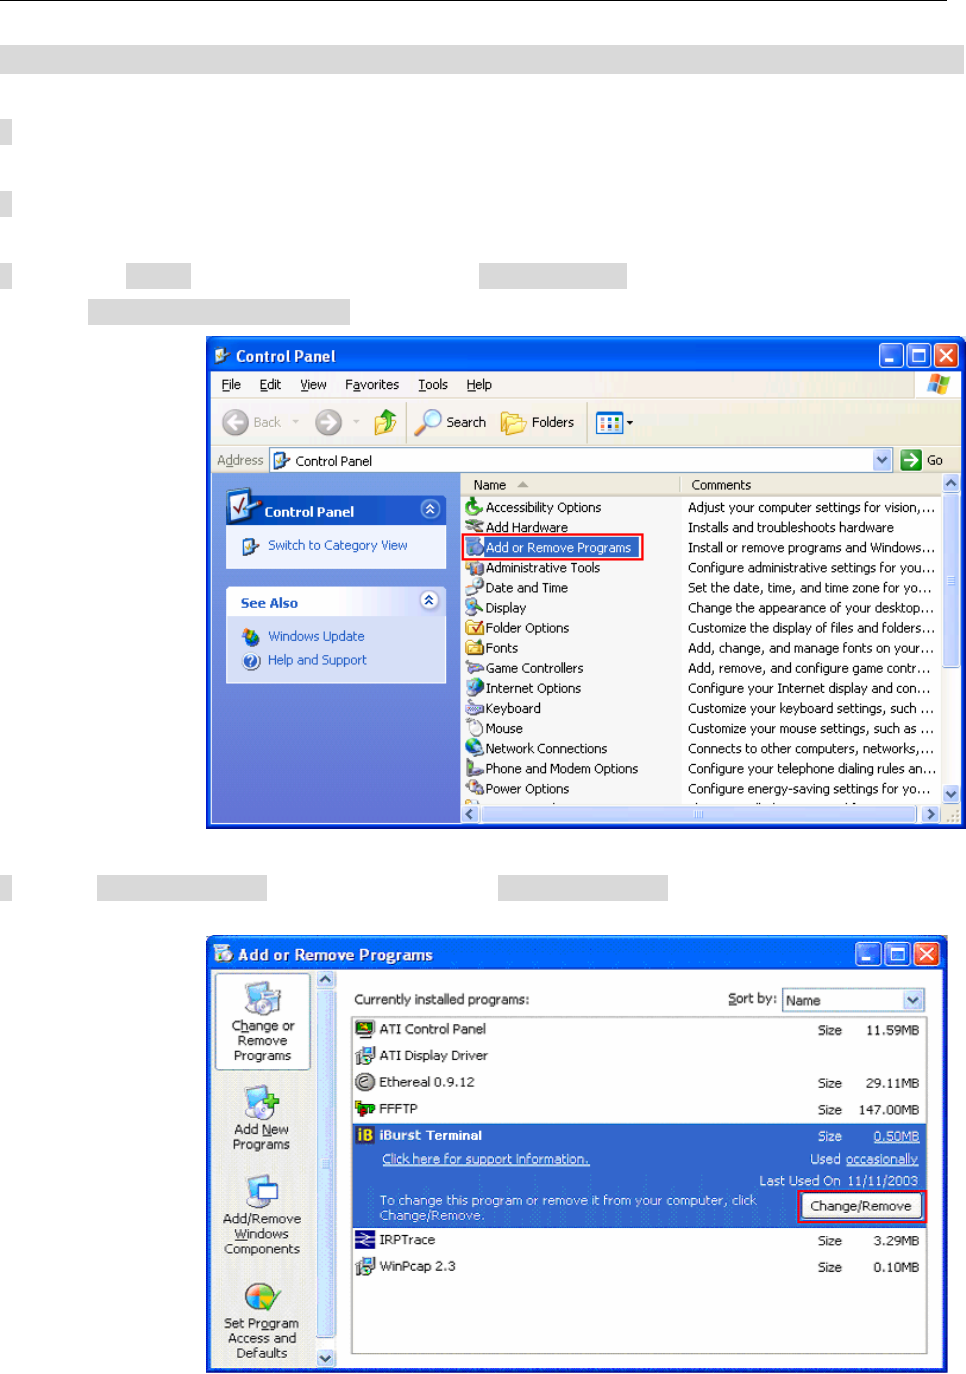
iBusrt Software Uninstallation
Uninstallation for Windows XP/2000
1 Close all programs that are currently running.
2 Remove the iBurst Terminal from the computer.
3 Click the [Start] button, followed by selecting [Control Panel] as shown below.
Click [Add or Remove Programs].
4 Select [iBurst Terminal] software, and click the [Change/Remove] button.
- 78 -
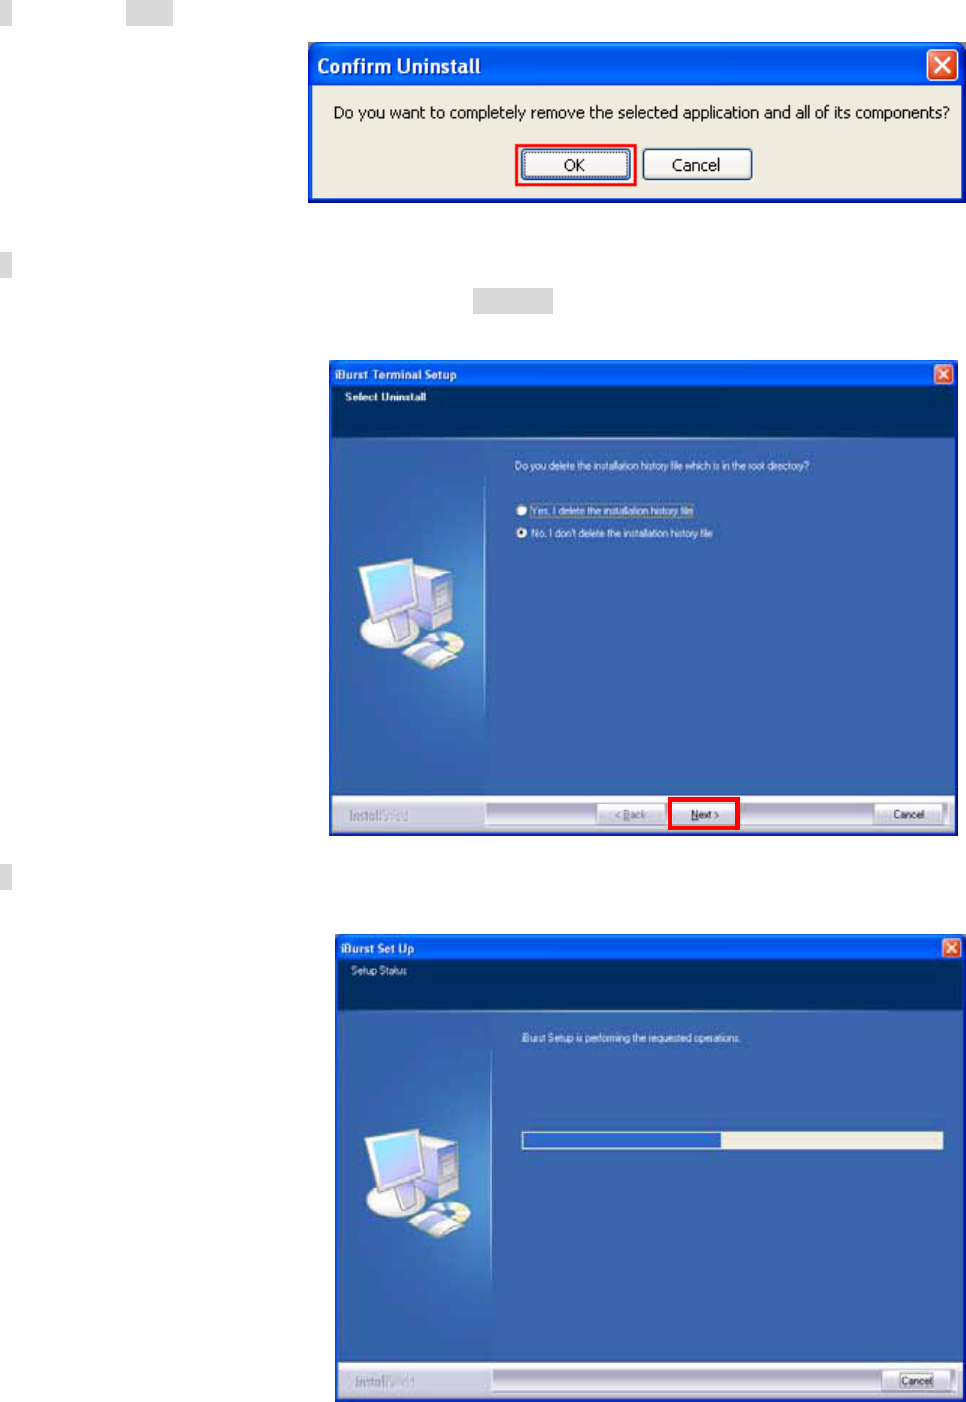
5 Click the [OK] button after appearing dialog window as shown below.
6 The following dialog window will appear, and select to delete or not to delete installation
history files before uninstallation, then click the [Next >] button.
7 The following dialog window will appear, and uninstallation of software begins.
- 79 -
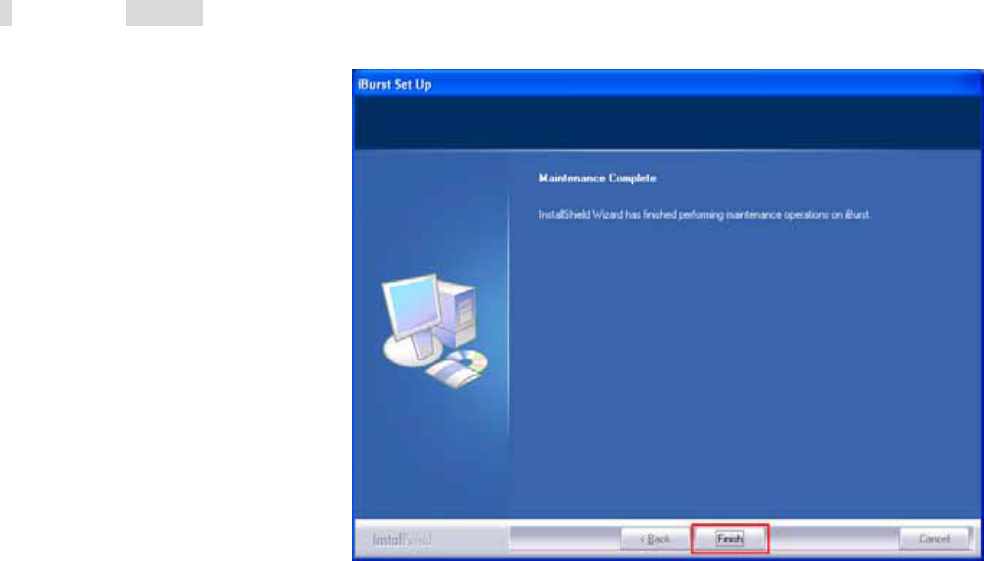
8 Click the [Finish] button after appearing dialog window as shown below.
- 80 -
Uninstallation for Windows Me/98SE
1 Close all programs that are currently running.
2 Remove the iBurst Terminal from the computer.
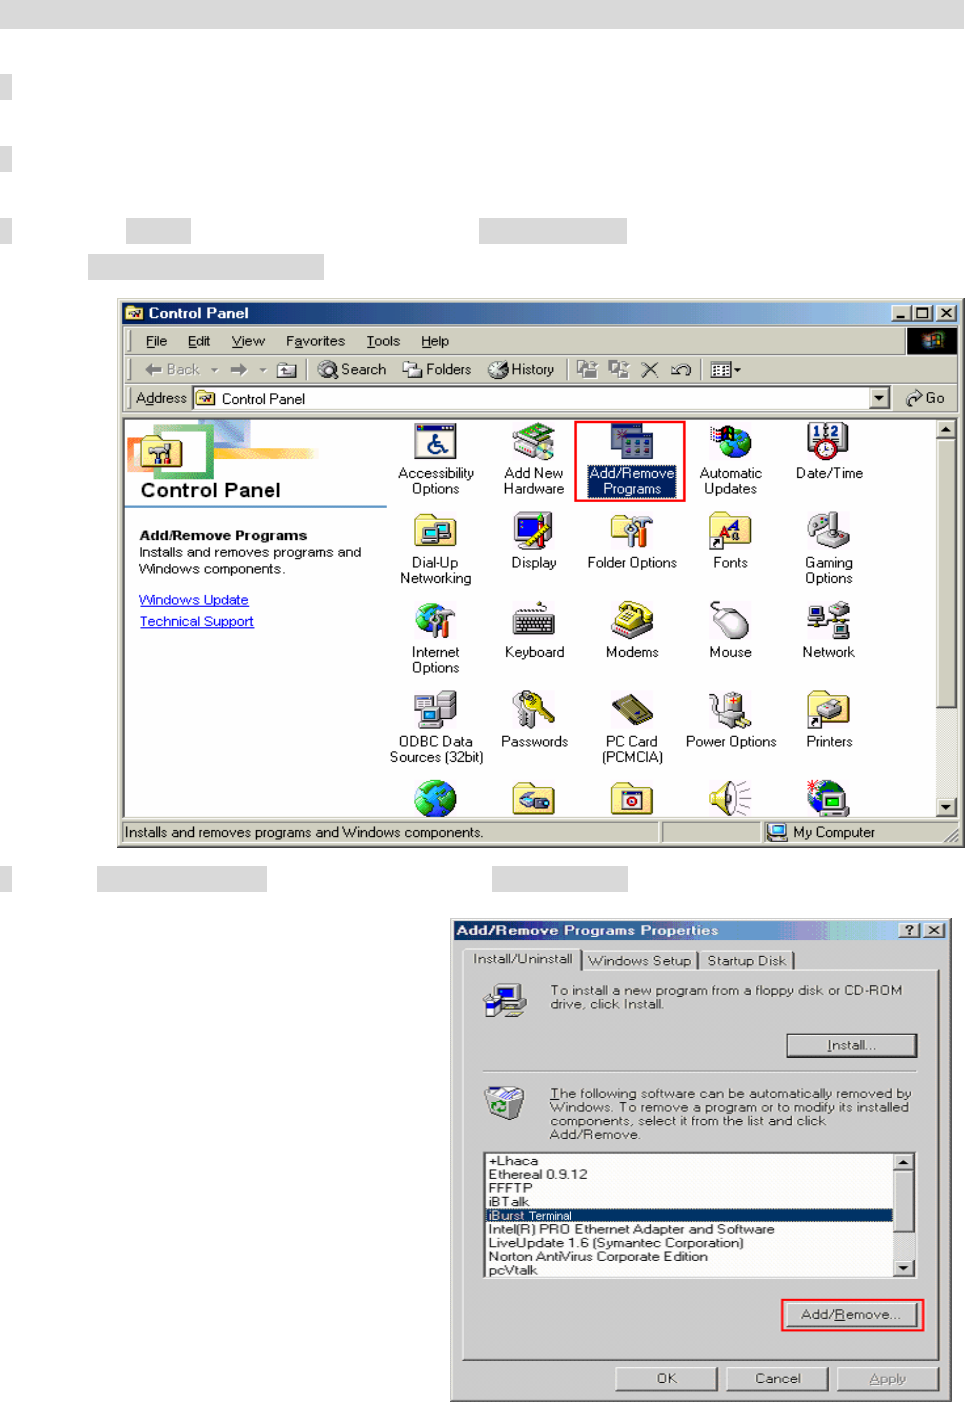
3 Click the [Start] button, followed by selecting [Control Panel] as shown below.
Click [Add/Remove Programs].
4 Select [iBurst Terminal] software,and click the [Add/Remove] button.
- 81 -
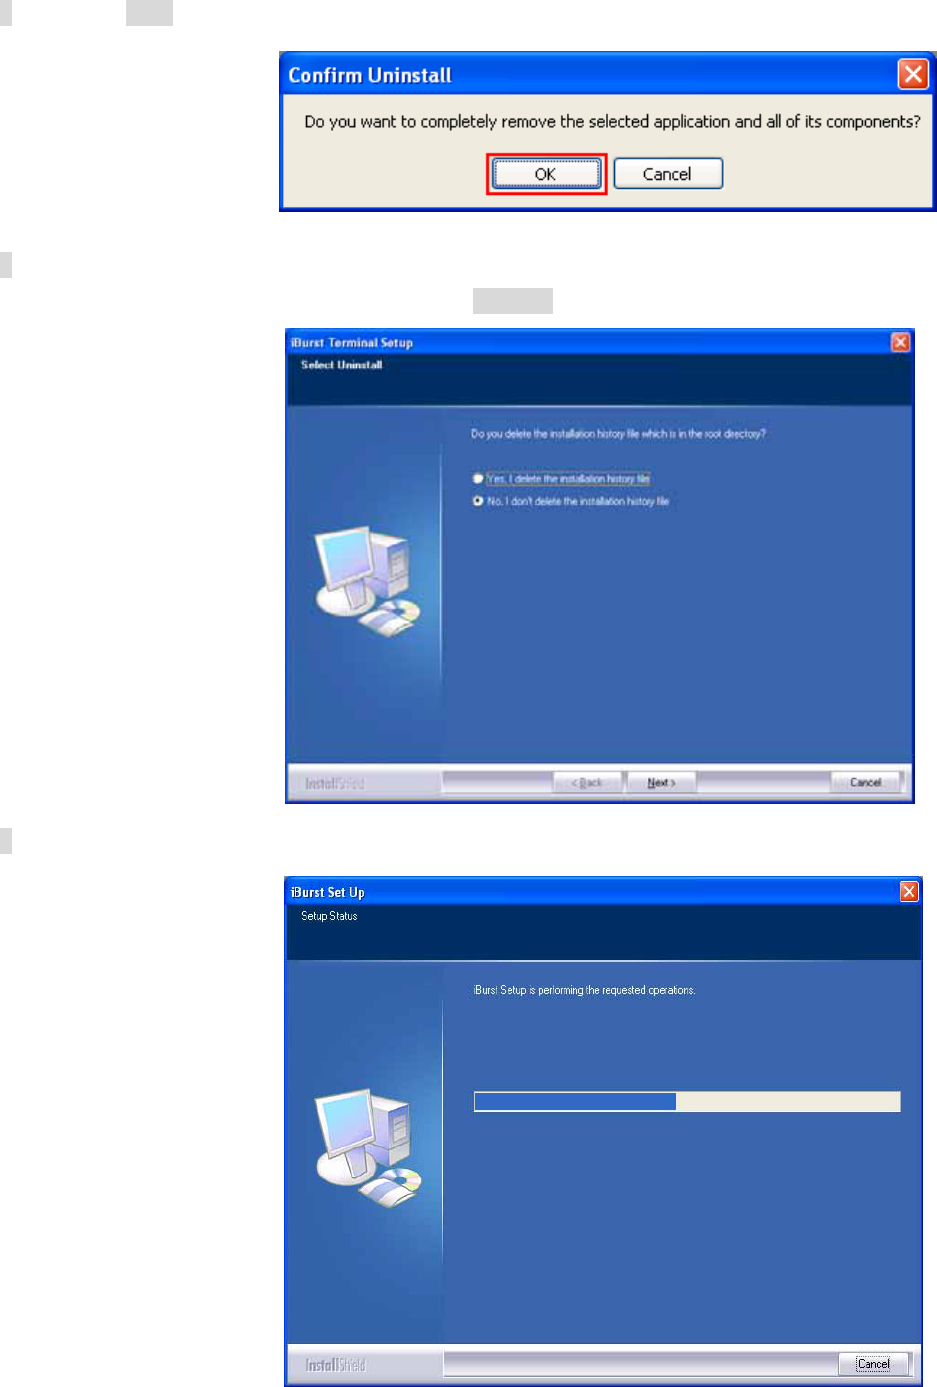
5 Click the [OK] button after appearing dialog window as shown below.
6 The following dialog window will appear, and select to delete or not to delete installation
history files before uninstallation, then click the [Next >] button.
7 The following dialog window will appear, and uninstallation of software begins.
- 82 -
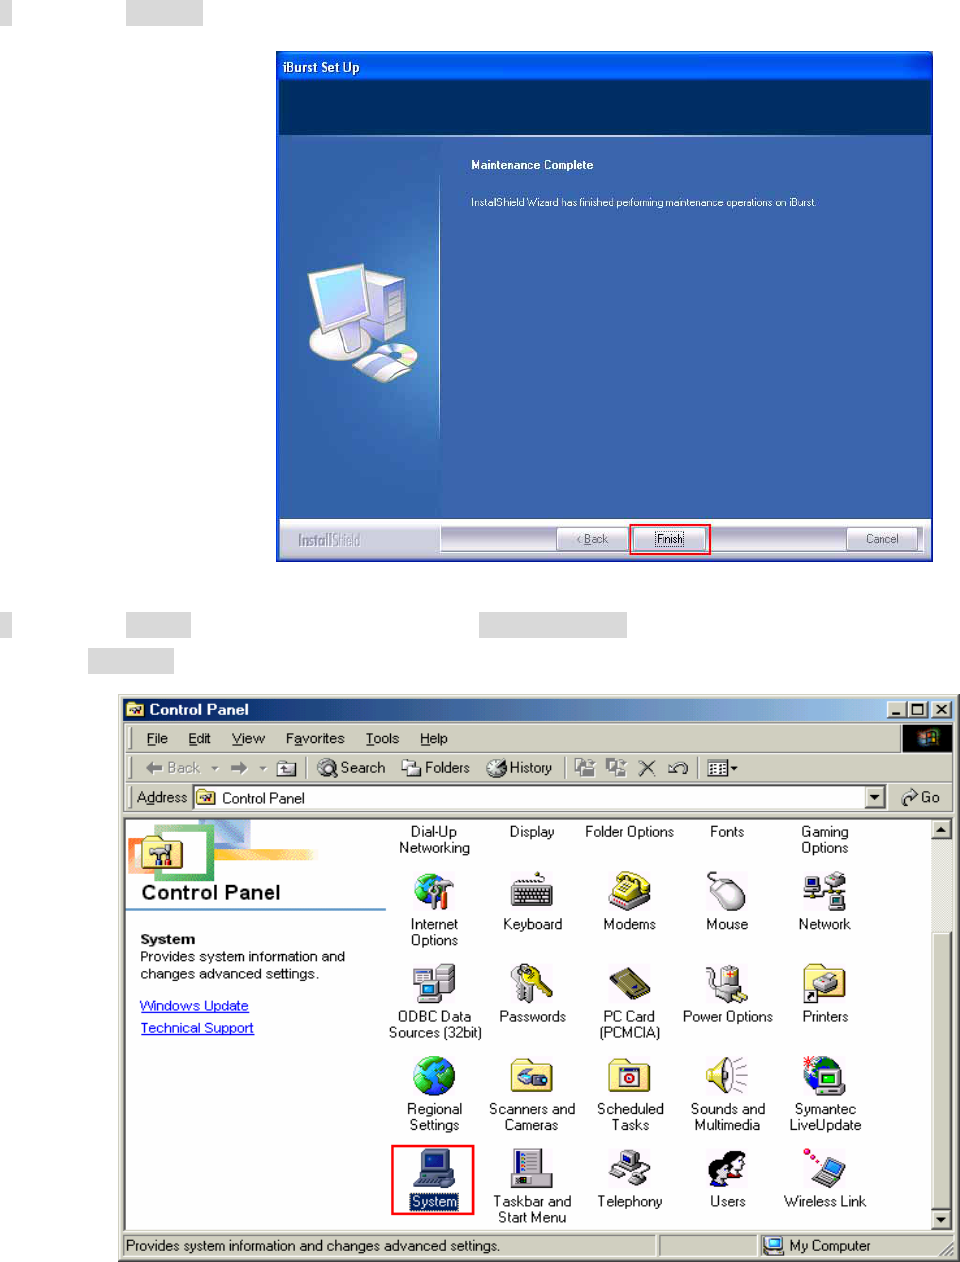
8 Click the [Finish] button after appearing dialog window as shown below.
9 Click the [Start] button, followed by selecting [Control Panel] as shown below.
Click [System].
- 83 -
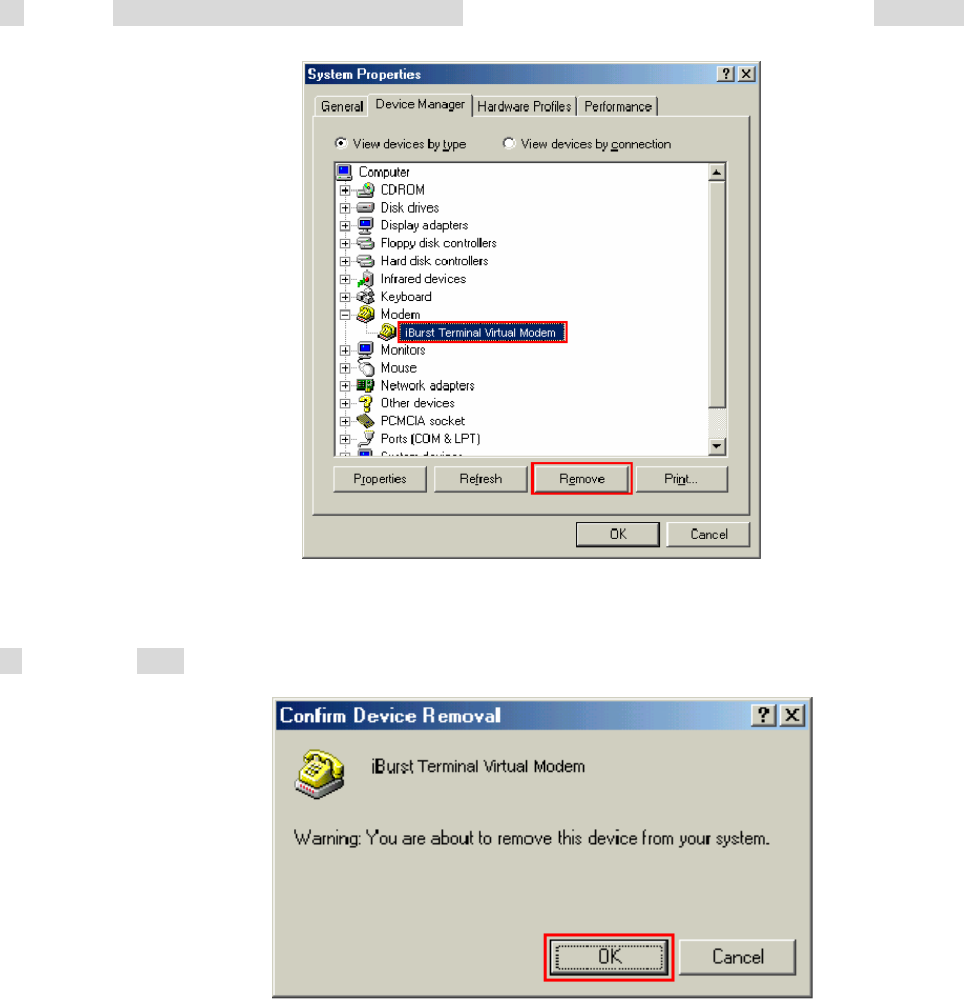
10 Select [iBurst Terminal Virtual MODEM] on Device Manager tab, then click the [Remove]
button.
11 Click the [OK] button.
- 84 -
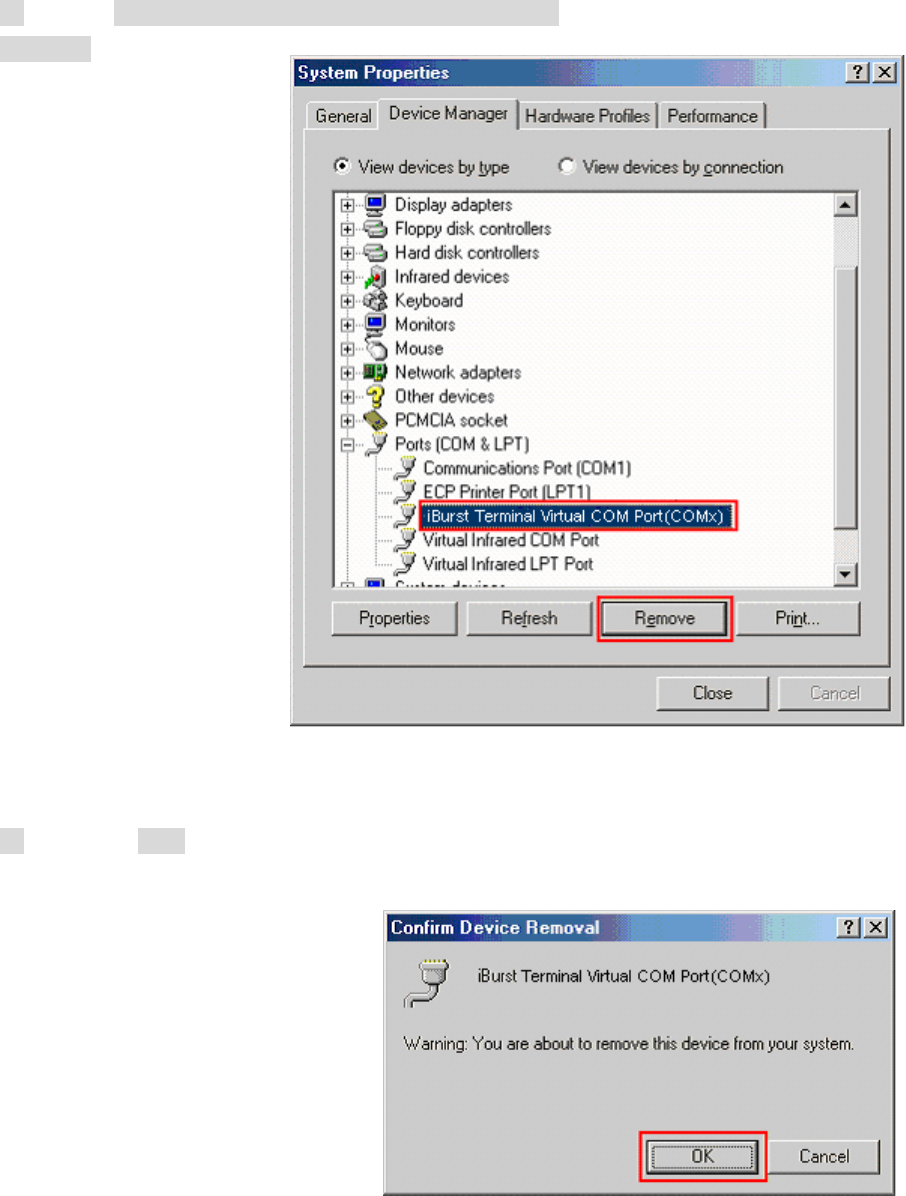
12 Select [iBurst Terminal Virtual COM Port(COMx)] on Device Manager tab, then click the
[Remove] button.
13 Click the [OK] button.
- 85 -
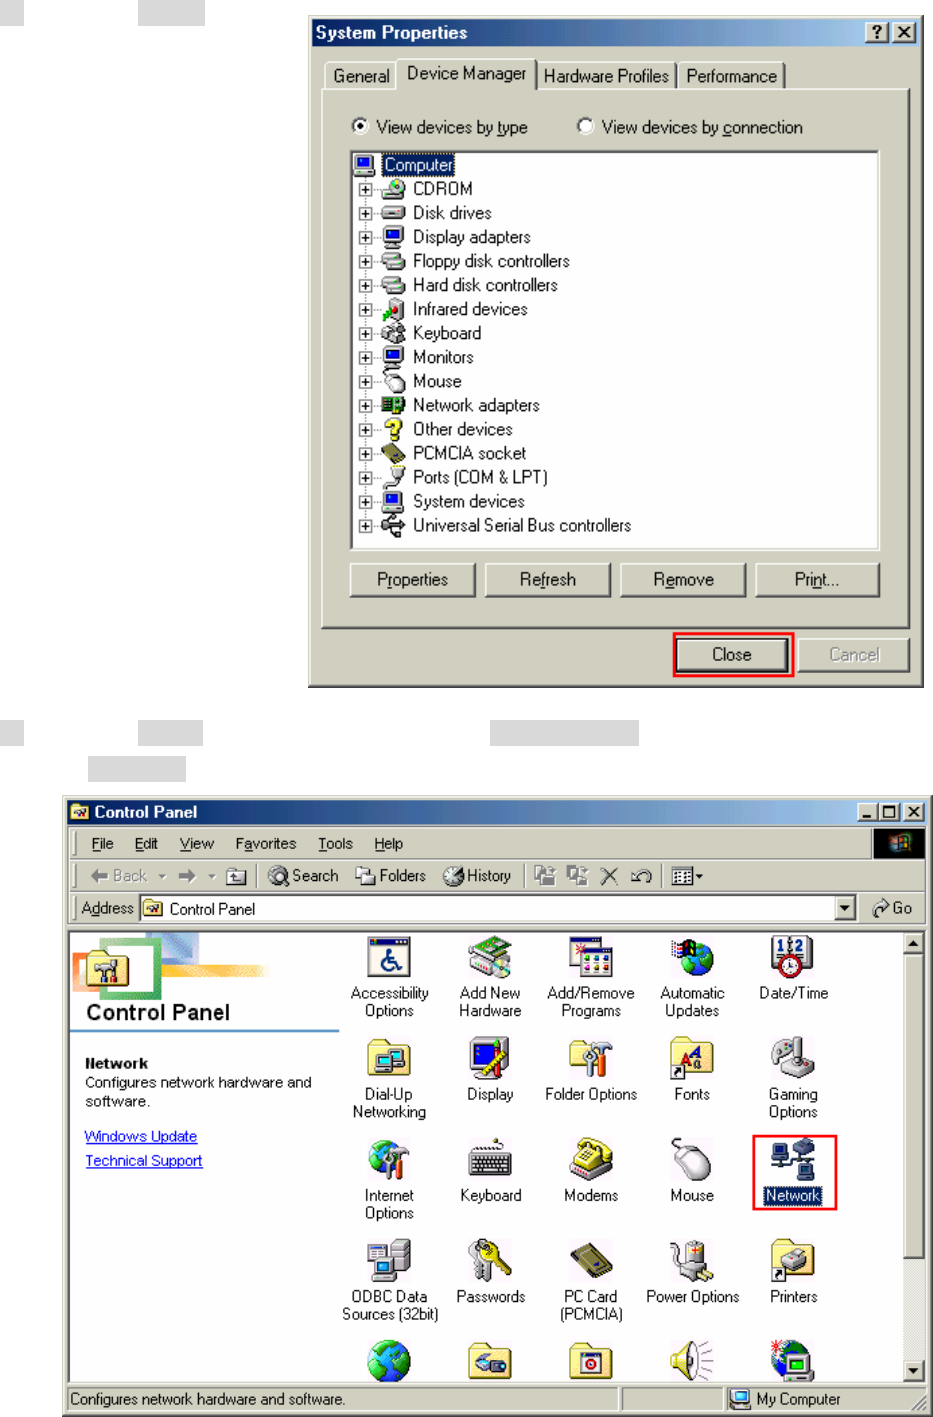
14 Click the [Close] button.
15 Click the [Start] button, followed by selecting [Control Panel] as shown below.
Click [Network].
- 86 -
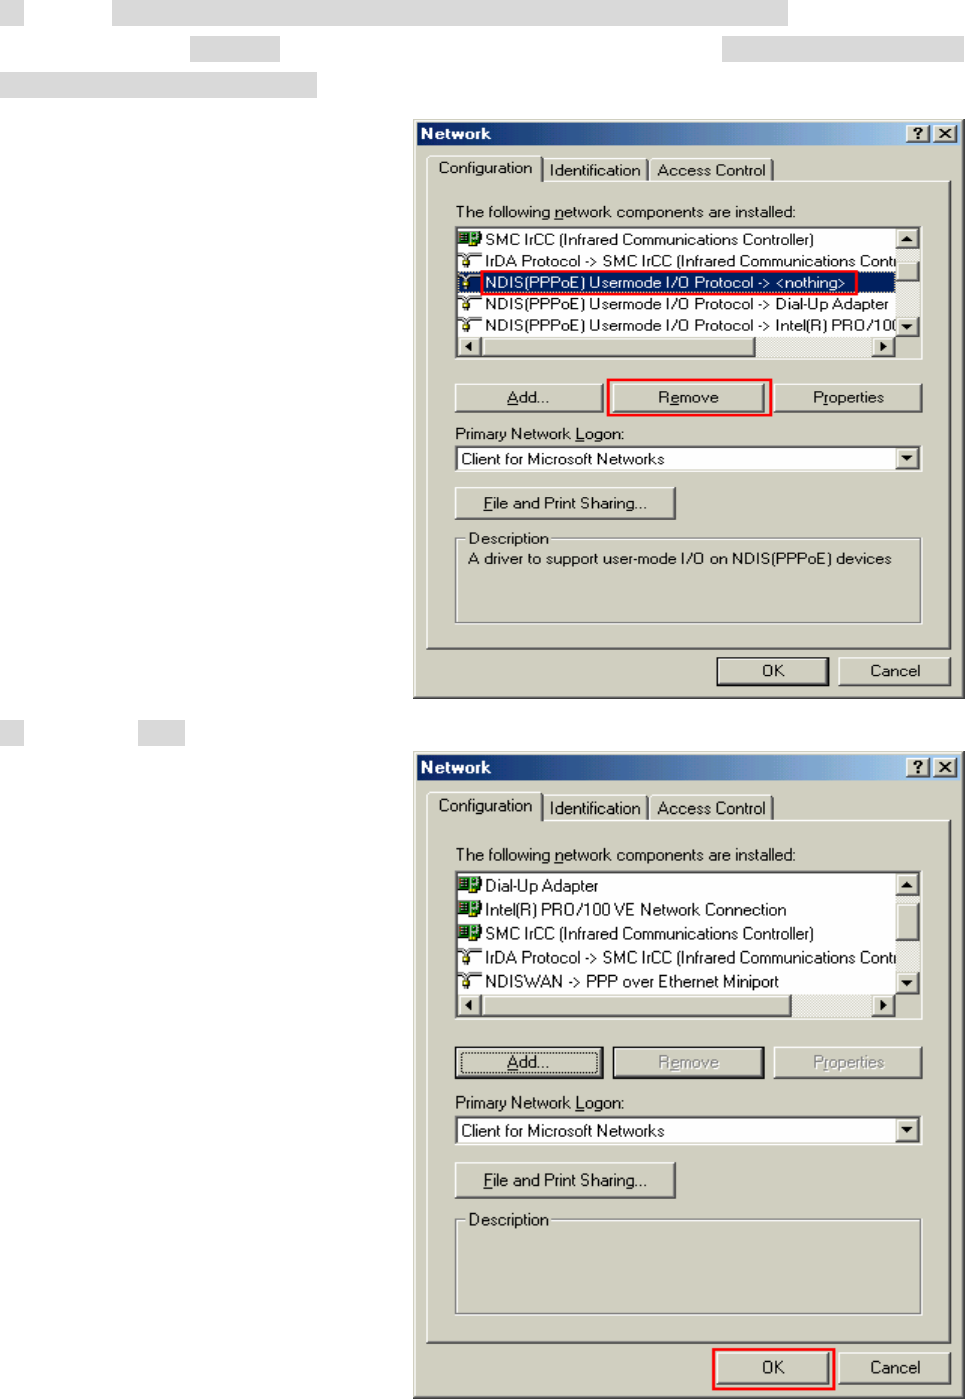
16 Select [NDIS(PPPoE)Usermode I/O Protocol for iBurst Terminal-> xxxxxx] on Configuration
tab, then click the [Remove] button.(Repeat the above steps if the other [NDIS(PPPoE)Usermode
I/O Protocol for iBurst Terminal] components are installed.)
17 Click the [OK] button.
- 87 -

18 The dialog window shown below will appear, click the [Yes] button, and restart your PC.
- 88 -
Uninstallation for Mac OS X
1 Close all programs that are currently running.
2 Remove the iBurst Terminal from the computer.
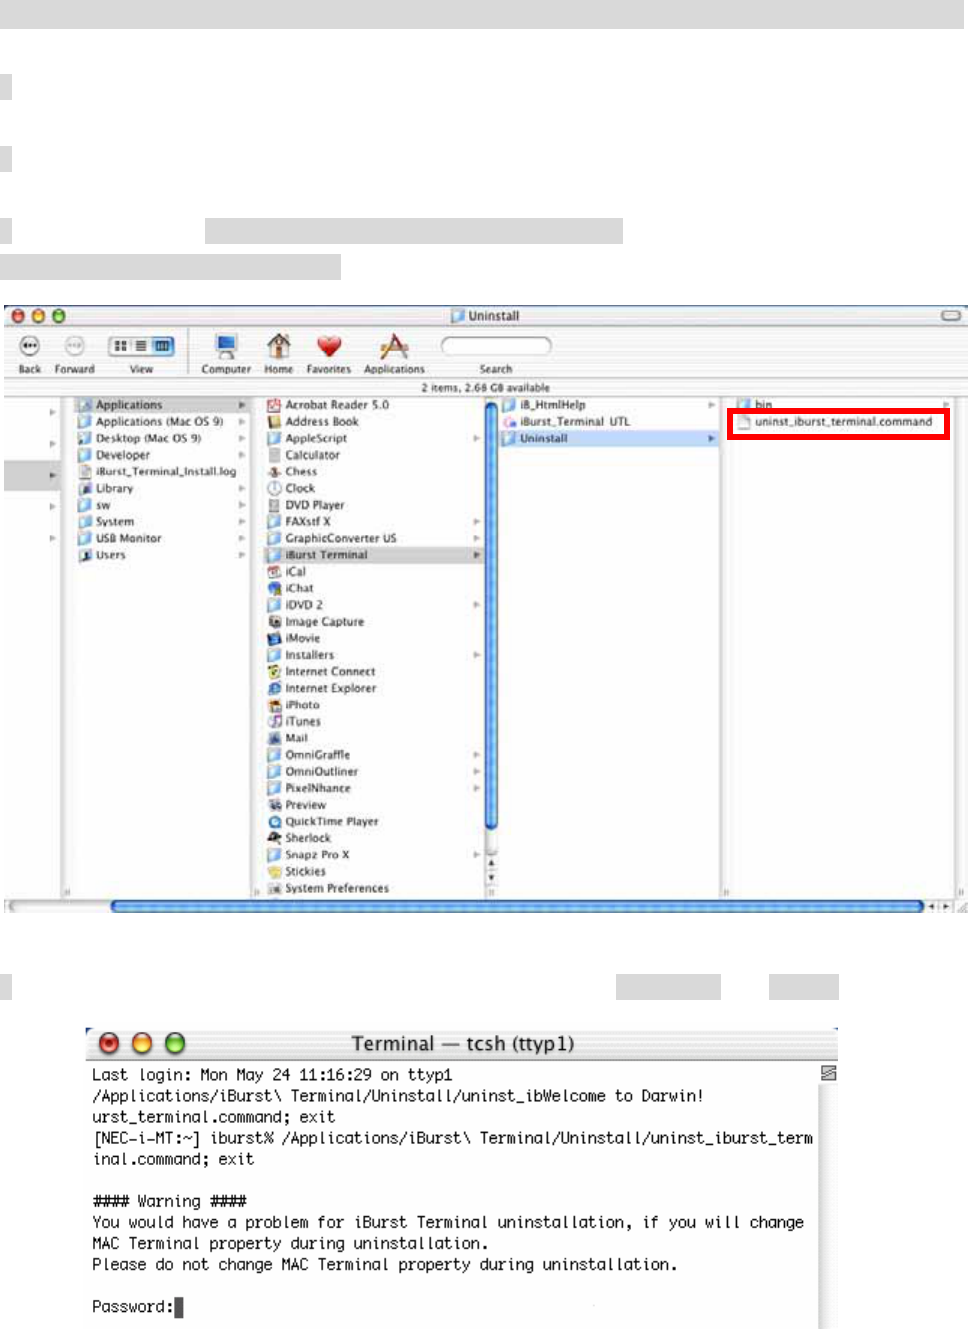
3 Open the folder [Applications¥iBurst Terminal¥Uninstall], then double click the script file
[uninst_iburst_terminal.command].
4 The terminal window shown below will appear, enter user’s [password] and [Enter] key.
- 89 -
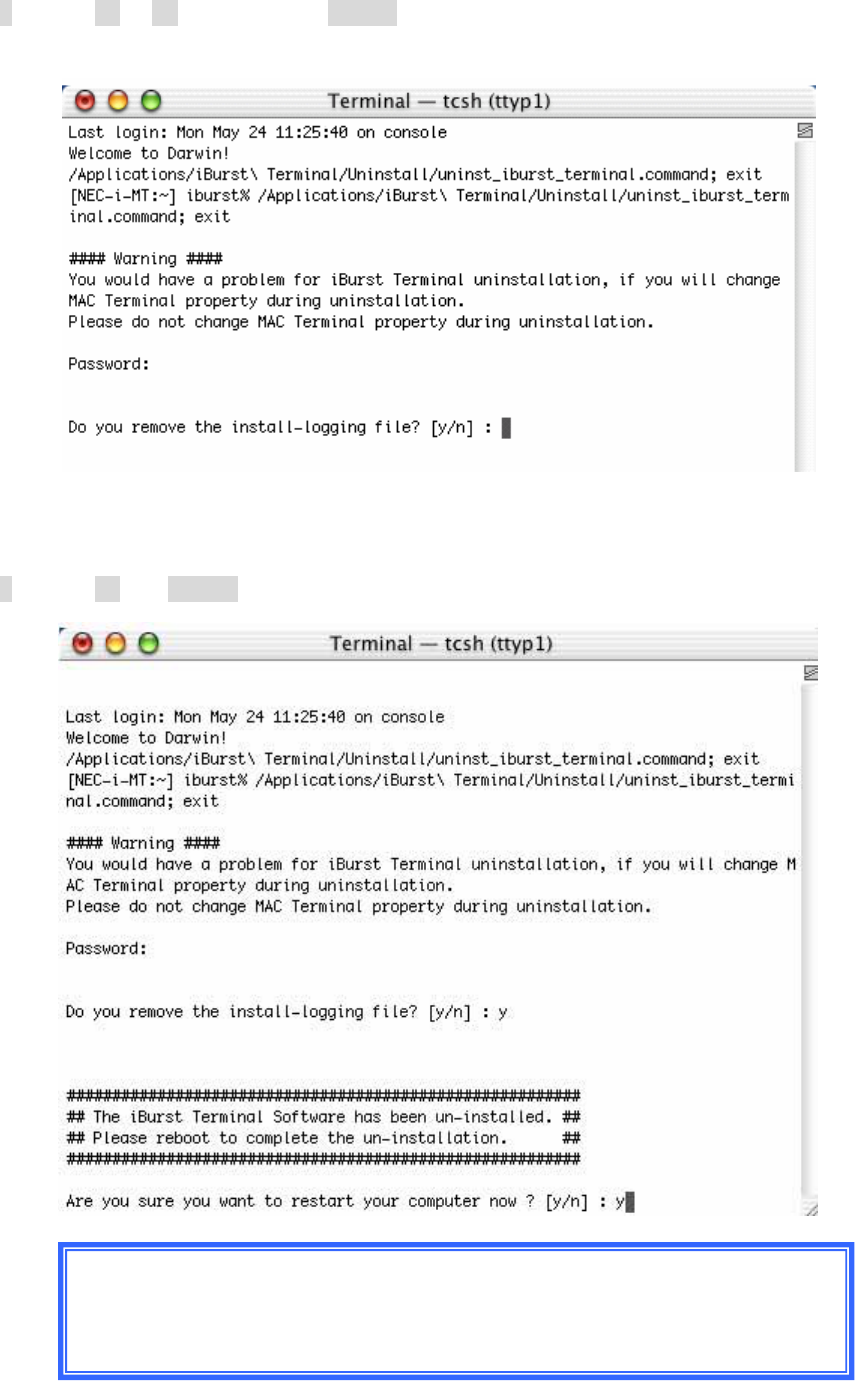
5 Enter [y] or [n] key, and enter [Enter] key.
6 Enter [y] and [Enter] key to restart your computer.
Note
: You would have a problem for iBurst Terminal uninstallation, if you
will change MAC Terminal property during uninstallation.
Please do not change MAC Terminal property during uninstallation.
- 90 -

Chapter 4 Trouble shooting
- 91 -
4-1 Windows
4-1-1 USB connection with Windows Me.
Windows Me may need a couple seconds or maximally 1 minute to detect iBurst Terminal through
USB connection. If you find this phenomenon, you can avoid it by following procedure.
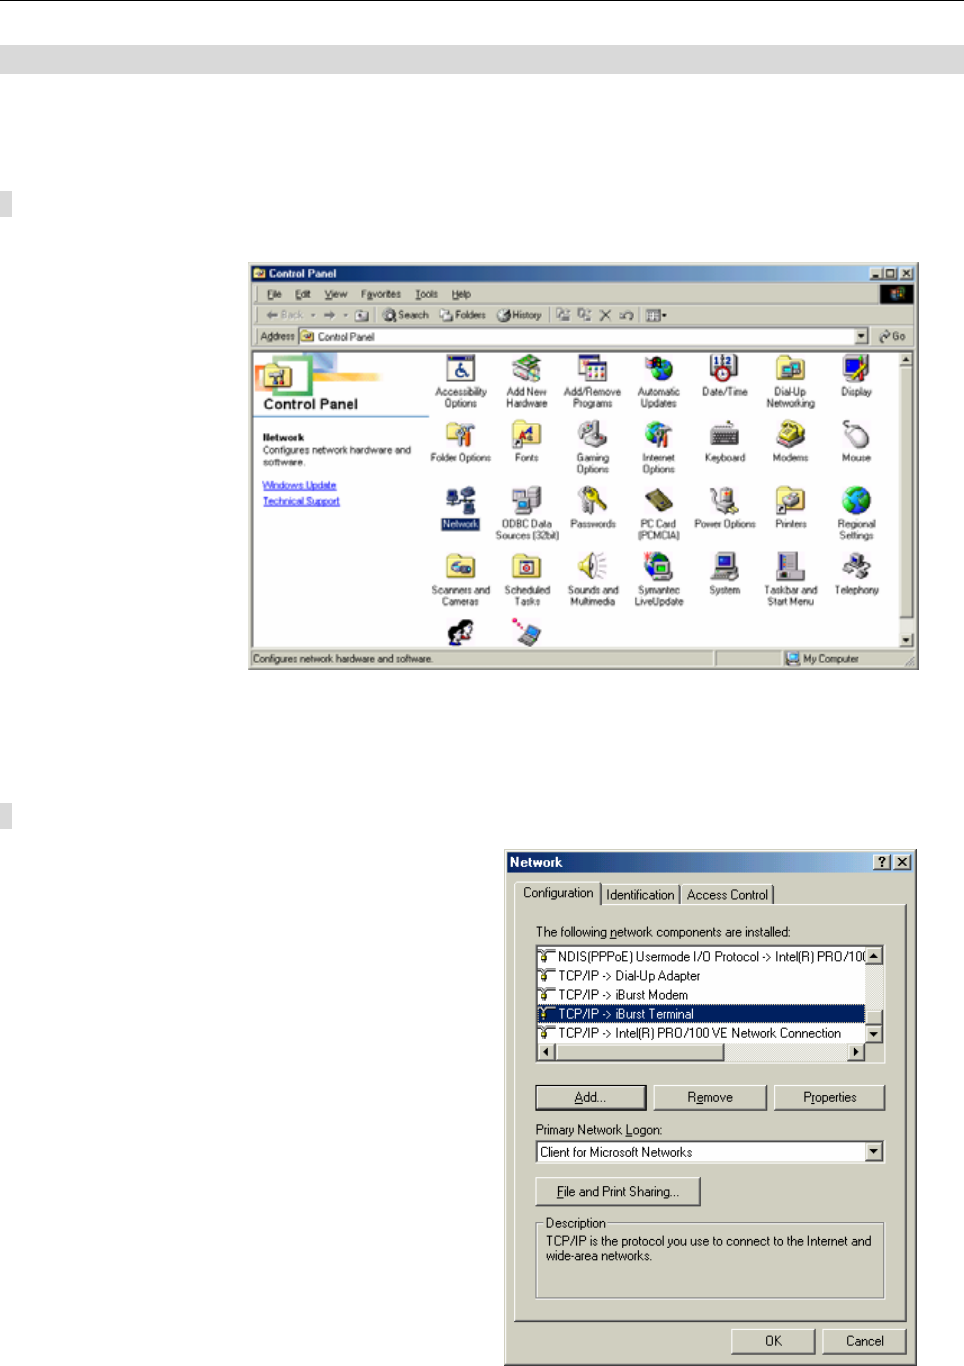
1 Open Network property "Start→Settings→Control Panel→Network".
2 Select TCP/IP->iBurst Terminal component, then click Properties.
- 92 -
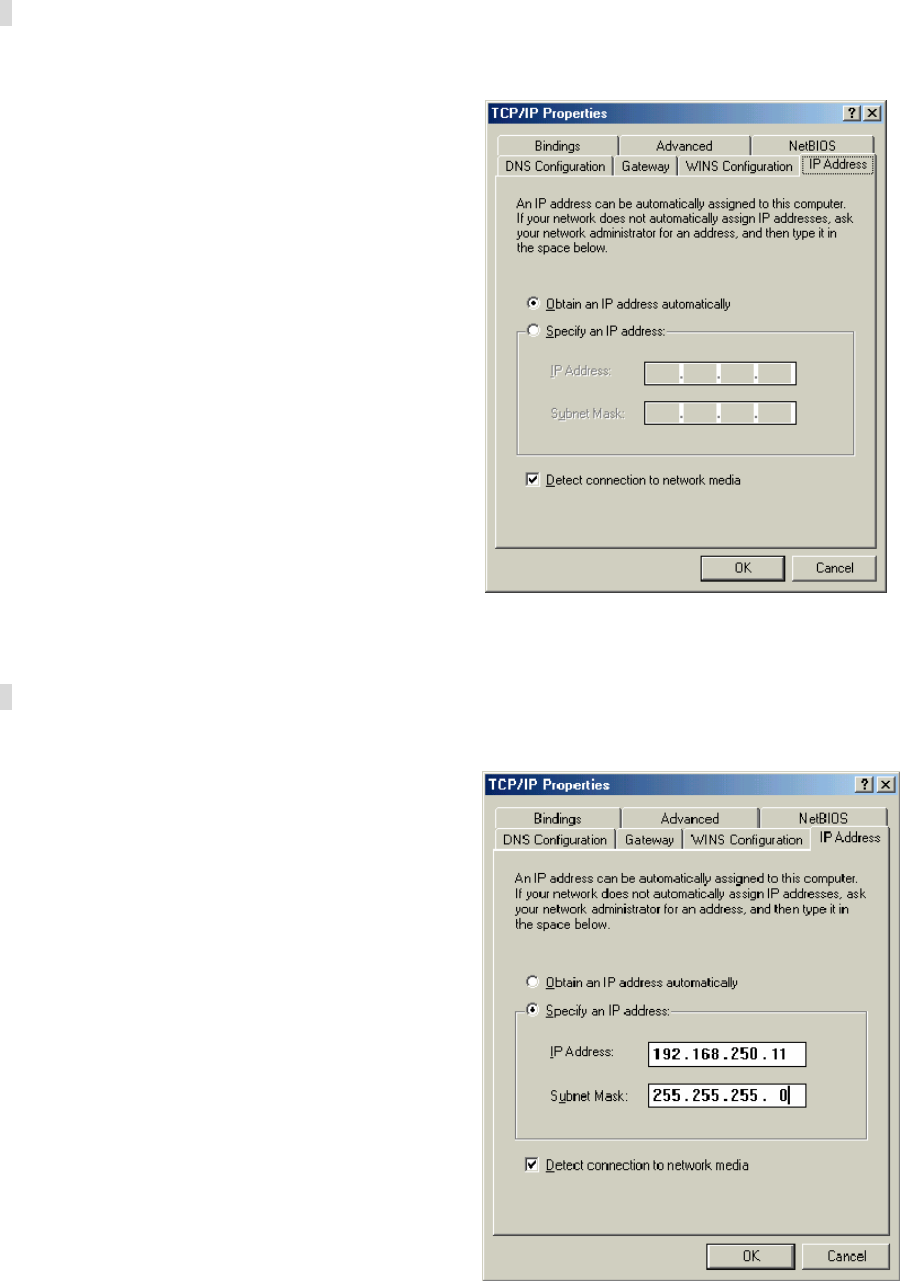
3 Open "IP Address".
4 Select "Specify an IP address" then type a private IP address (for example: 192.168.250.11)
and type 255.255.255.0 on Subnet Mask.
- 93 -
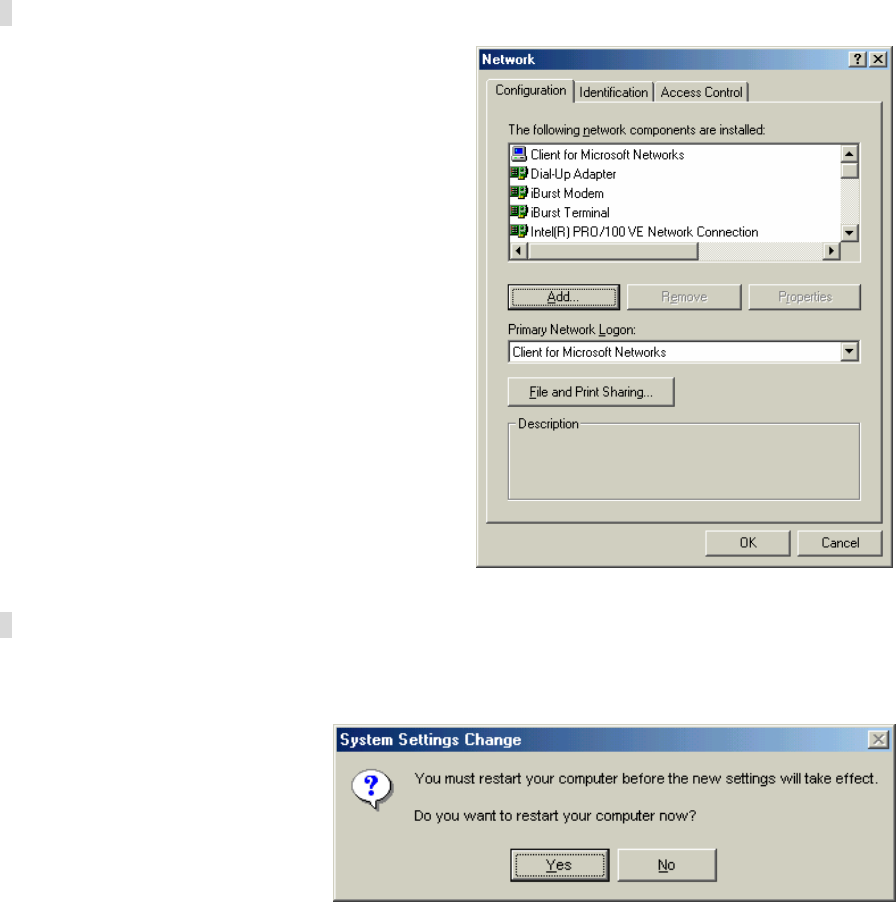
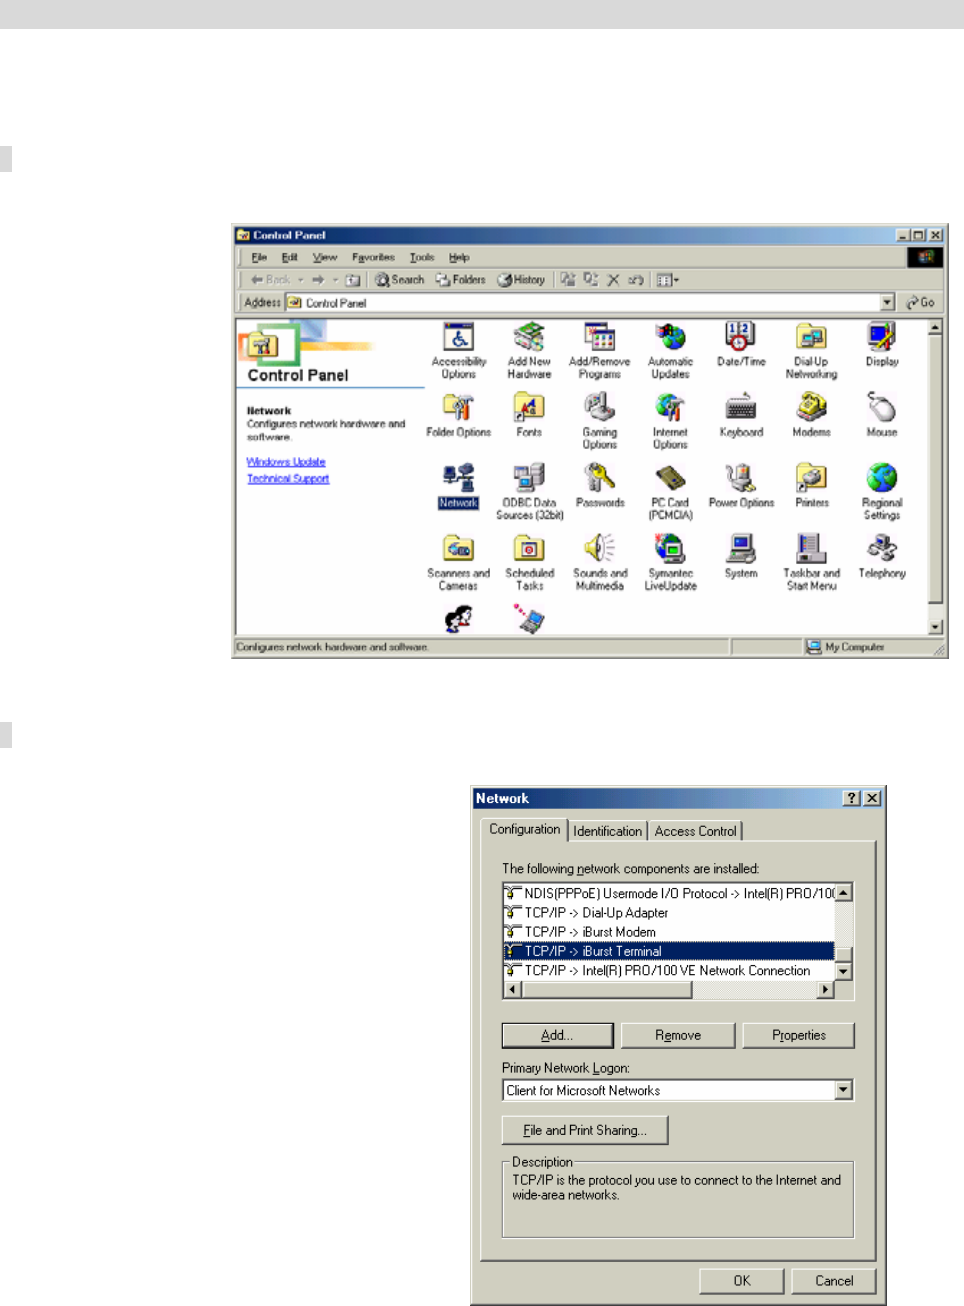
5 Click OK.
6 Click Yes, and restart your PC.
- 94 -
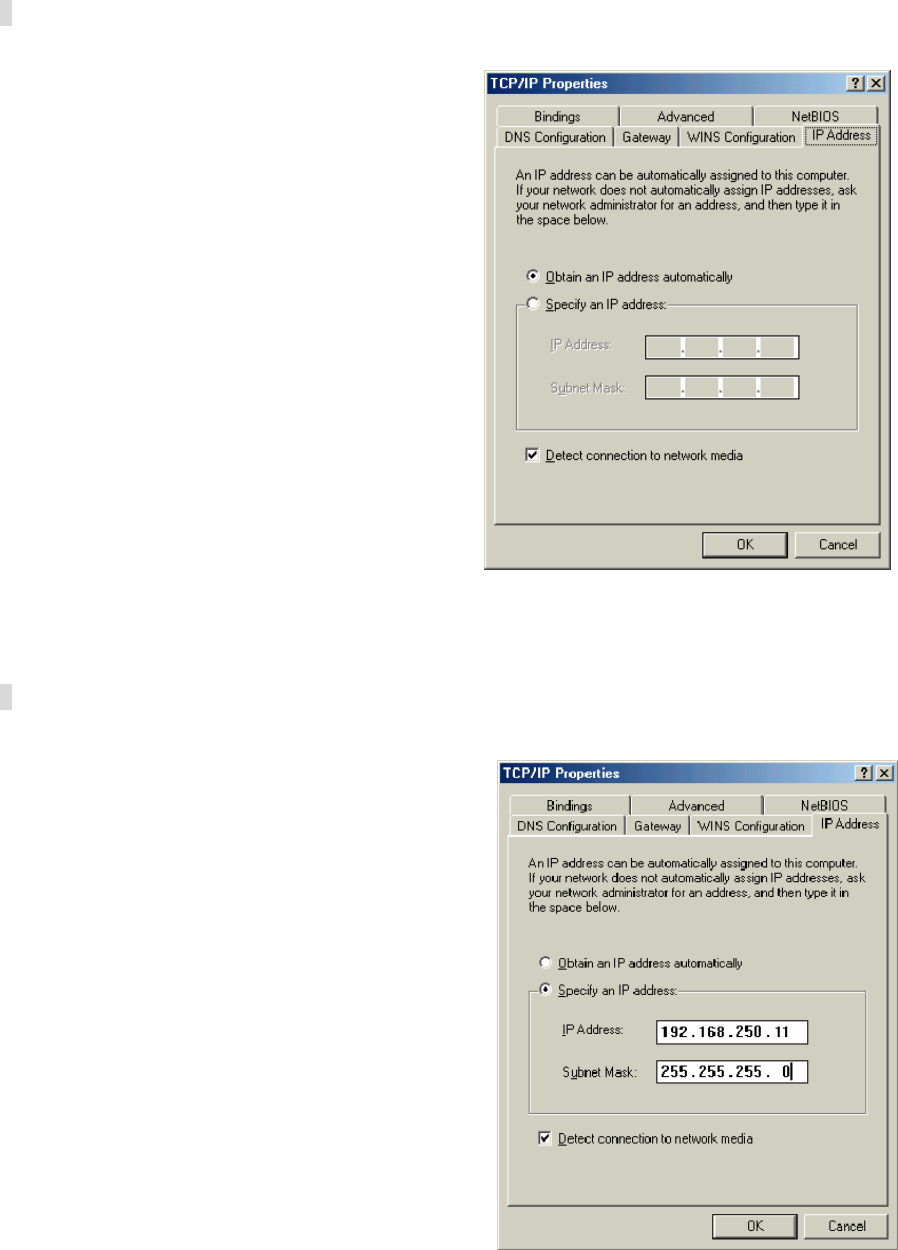
4-1-2 USB connection with Windows 98SE
Windows 98SE may need a couple seconds or maximally 1 minute to detect iBurst Terminal
through USB connection. If you find this phenomenon, you can avoid it by following procedure.
1 Open Network property "Start→Settings→Control Panel→Network".
2 Select TCP/IP->iBurst Terminal component, then click Properties.
- 95 -
3 Open "IP Address".
4 Select "Specify an IP address" then type a private IP address (for example: 192.168.250.11)
and type 255.255.255.0 on Subnet Mask.
- 96 -
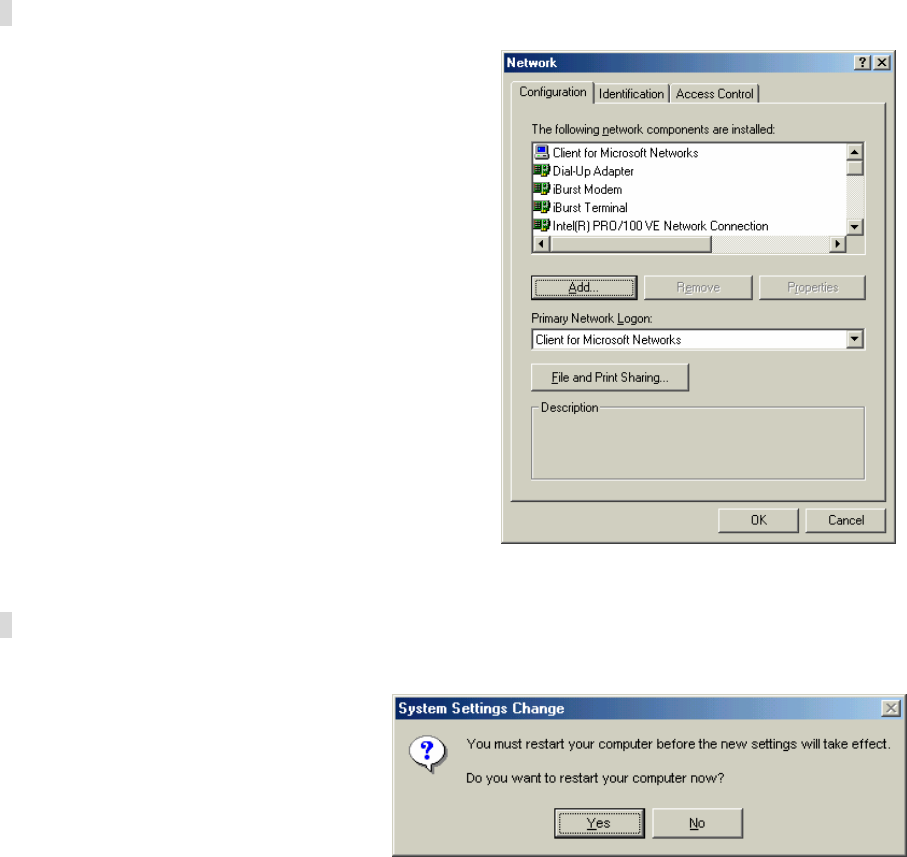
5 Click OK.
6 Click Yes, and restart your PC.
- 97 -
4-1-3 Illegal hang-up when install iBurst Terminal.
Windows 98SE may need a couple minutes to shutdown itself, or may hang-up in worst case after
iBurst Terminal device driver installation.
This case is from Windows OS and competition with other devices.
The following gives you the procedure to fix this problem.
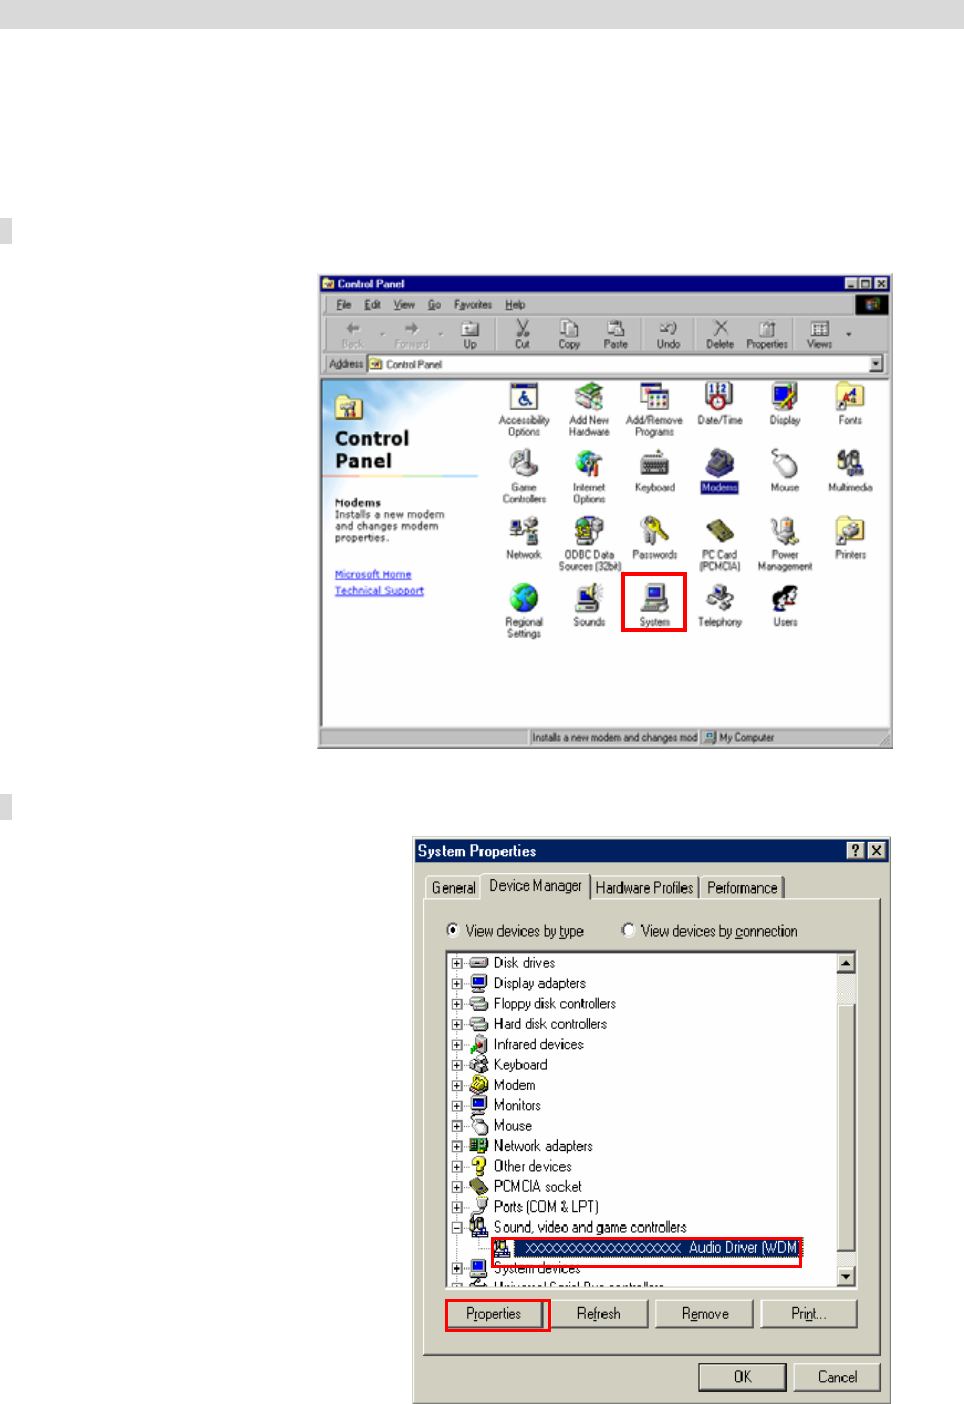
1 Open Device Manager "Start→Settings→Control Panel→System→Device Manager".
2 Disable sound card device and other which will not effect for Windows performance, ie network
card and modem.
- 98 -
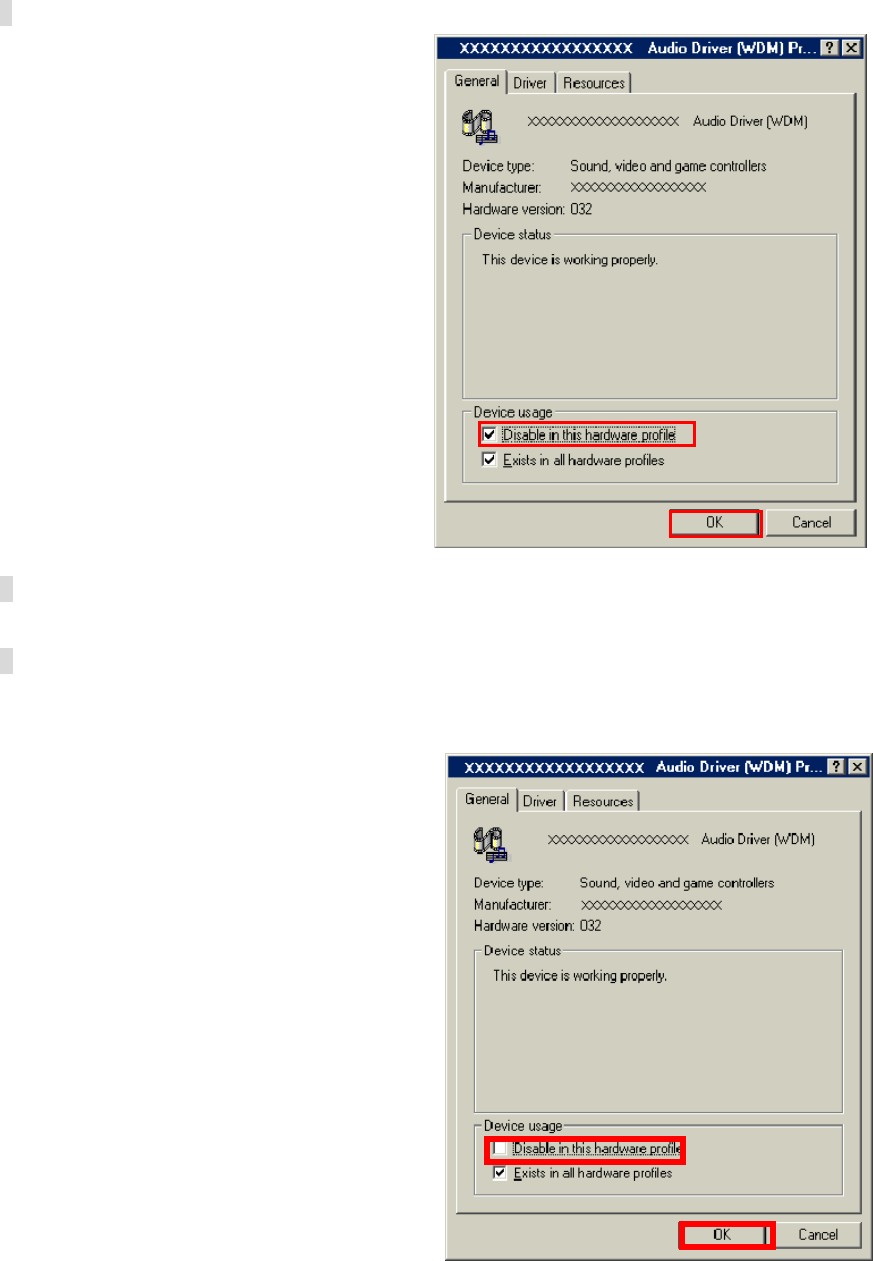
3 On the General tab, check the box labeled Disable in this hardware profile, and then clicks OK.
4 Connect iBurst Terminal to USB port.
5 On the General tab, uncheck the box labeled Disable in this hardware profile, and then
click OK.
- 99 -
4-1-4 Illegal hang-up when set up dialler
Windows 98SE may need a couple minutes to shutdown itself, or may hang-up in worst case after
iBurst Terminal Virtual COM Port driver installation.
This case is from Windows OS and competition with other devices.
The following gives you the procedure to fix this problem.
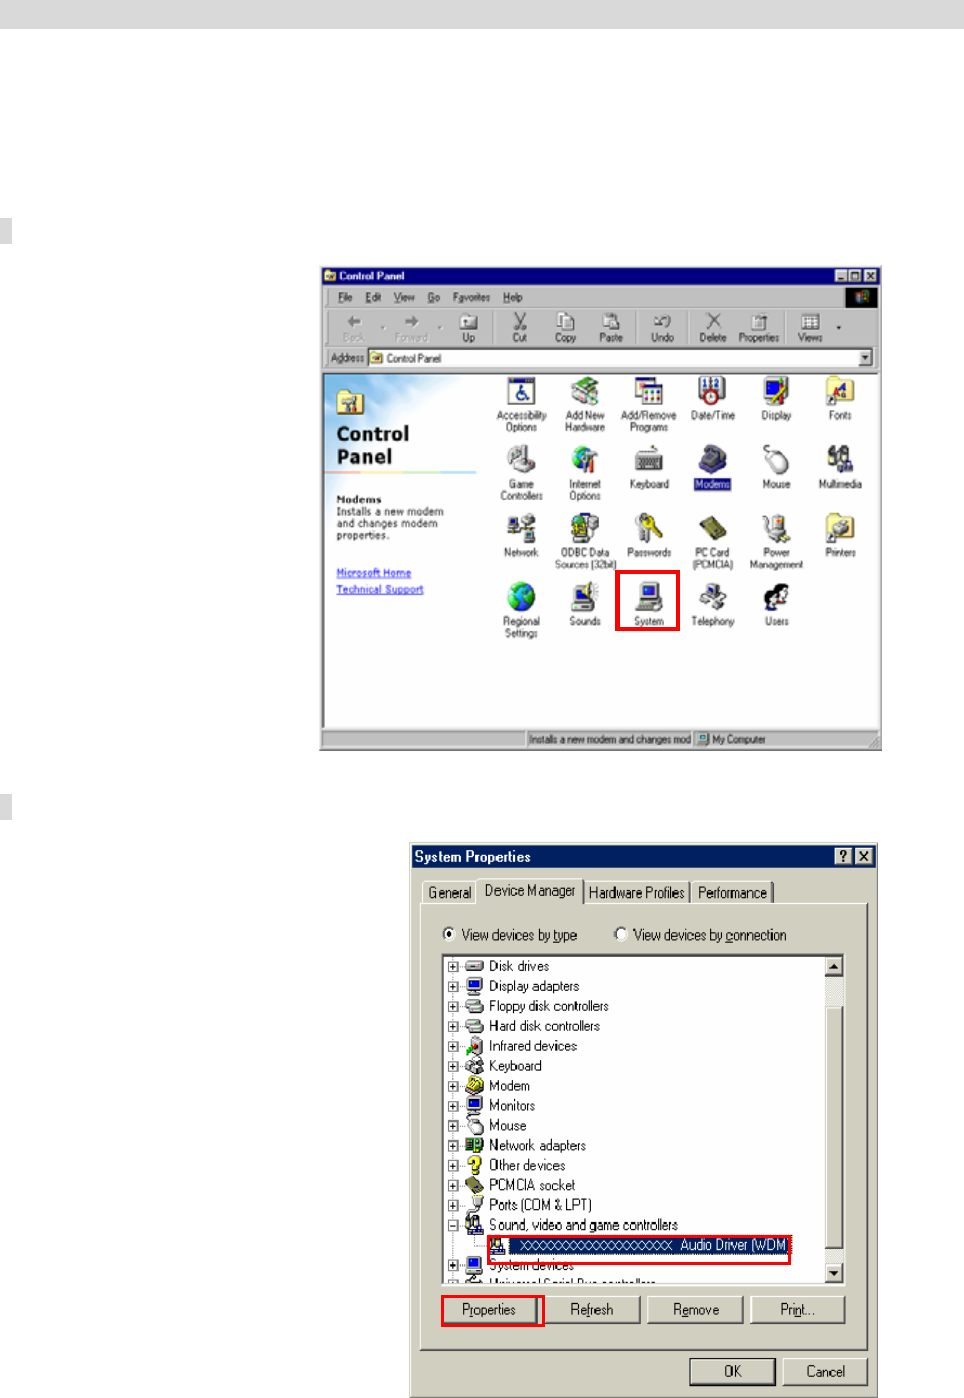
1 Open Device Manager "Start→Settings→Control Panel→System→Device Manager".
2 Disable sound card device and other which will not effect for Windows performance, ie network
card and modem.
- 100 -
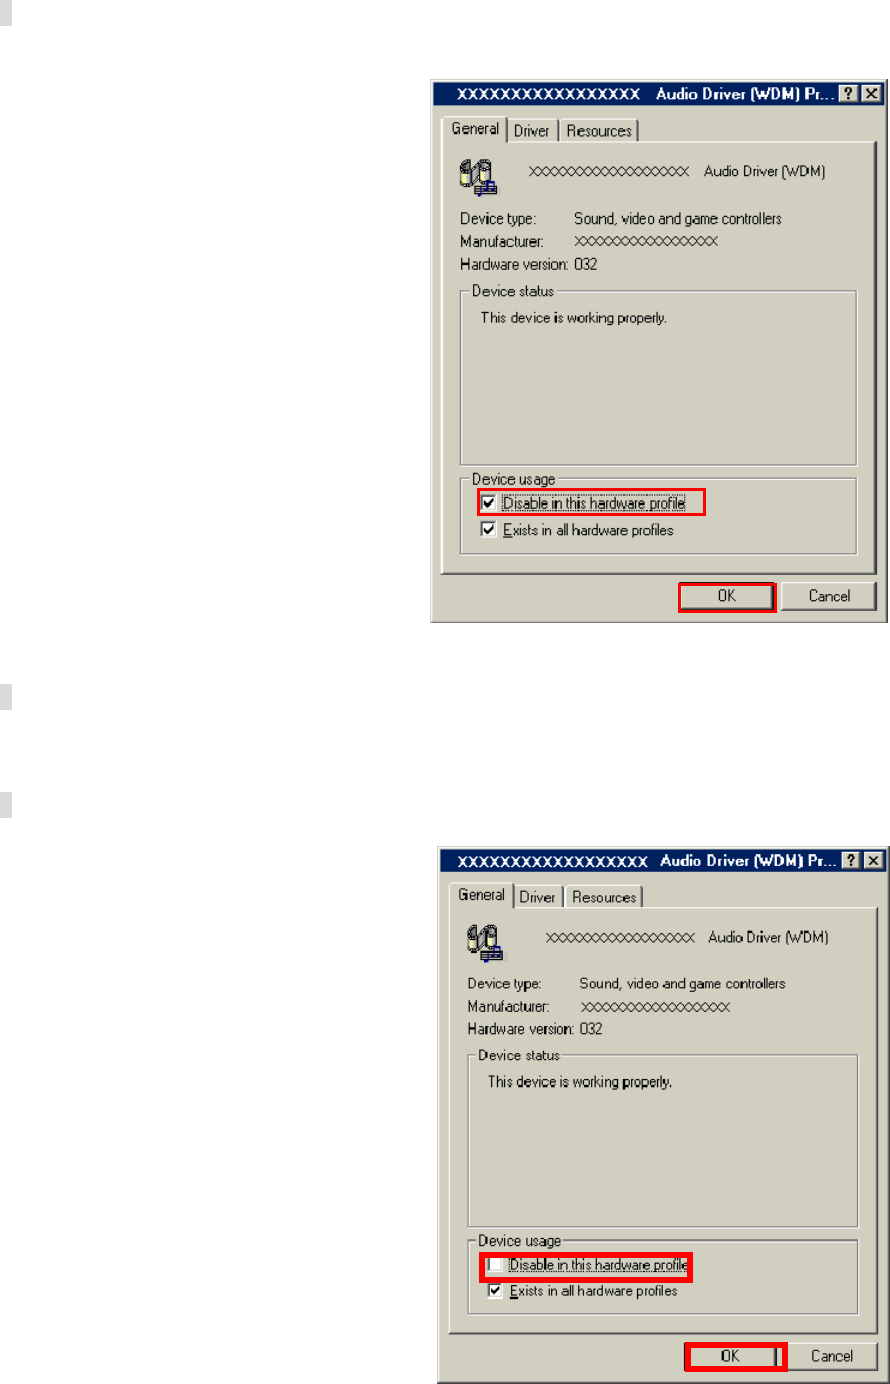
3 On the General tab, check the box labeled Disable in this hardware profile, and then clicks OK.
4 Re-install iBurst Terminal Virtual COM Port driver according to installation procedure,
chapter 1 "installation for Windows 98SE" step 21.
5 On the General tab, uncheck the box labeled Disable in this hardware profile, and then click
OK.
- 101 -

4-1-5 PC hang-up when eject iBurst Terminal from Win98 USB port.
Windows 98SE basically does not support hot plug-out for USB interface.
You might find a problem that your PC hang-up itself when you eject iBurst Terminal from USB
port during PC running.
In this case, please do not eject iBurst Terminal from USB port during PC running.
You should eject iBurst Terminal from USB port after you shutdown your PC.
- 102 -

4-2 Mac
4-2-1 Data rate
iBurst Terminal would not perform maximum data rate when it connects Mac PC via Ethernet.
This is obviously caused by Mac OS.
And typical data rate connecting with Mac is 800Kbps at downlink and 240Kbps at uplink.
- 103 -

Chapter 5 Information
- 104 -

FCC Compliance Statement
This equipment has been tested and found to comply with the limits for a Class B digital device,
pursuant to part 15 of the FCC rules. These limits are designed to provide reasonable protection
against harmful interference in a residential installation. This equipment generates, uses and can
radiate radio frequency energy and, if not installed and used in accordance with the instructions,
may cause harmful interference to radio communications. However, there is no guarantee that
interference will not occur in a particular installation. If this equipment does cause harmful
interference to radio or television reception, which can be determined by turning the equipment
off and on, the user is encouraged to try to correct the interference by one or more of the following
measures:
▬
Reorient or relocate the receiving antenna.
▬
Increase the separation between the equipment and receiver.
▬
Connect the equipment into an outlet on a circuit different from that to which the receiver is
connected.
▬
Consult the dealer or an experienced radio/TV technician for help.
You are cautioned that changes or modifications not expressly approved by the party responsible
for compliance could void your authority to operate the equipment.
FCC RF Radiation Exposure Statement
This equipment complies with FCC RF radiation exposure limits set forth for an uncontrolled
environment. This equipment should be installed and operated with a minimum distance of 20
centimeters between the radiator and your body.
- 105 -