LEGO Systems 95646 Mindstorms EV3 User Manual LME UserGuide ViewAll US 20130507
LEGO Systems Inc Mindstorms EV3 LME UserGuide ViewAll US 20130507
Contents
- 1. User manual part 1
- 2. User manual part 2
- 3. User manual part 3
User manual part 2
LEGOeducation.com 37
LEGOtheLEGOlogoMINDSTORMSandtheMINDSTORMSlogoaretrademarksofthe/
sontdesmarquesdecommercede/sonmarcasregistradasdeLEGOGroup©TheLEGOGroup
EV3 SOFTWARE
Every time you open the EV3 Software, you will automatically start
out in the Lobby area. The Lobby makes it easy to locate and work
with the software and gives you access to everything you need.
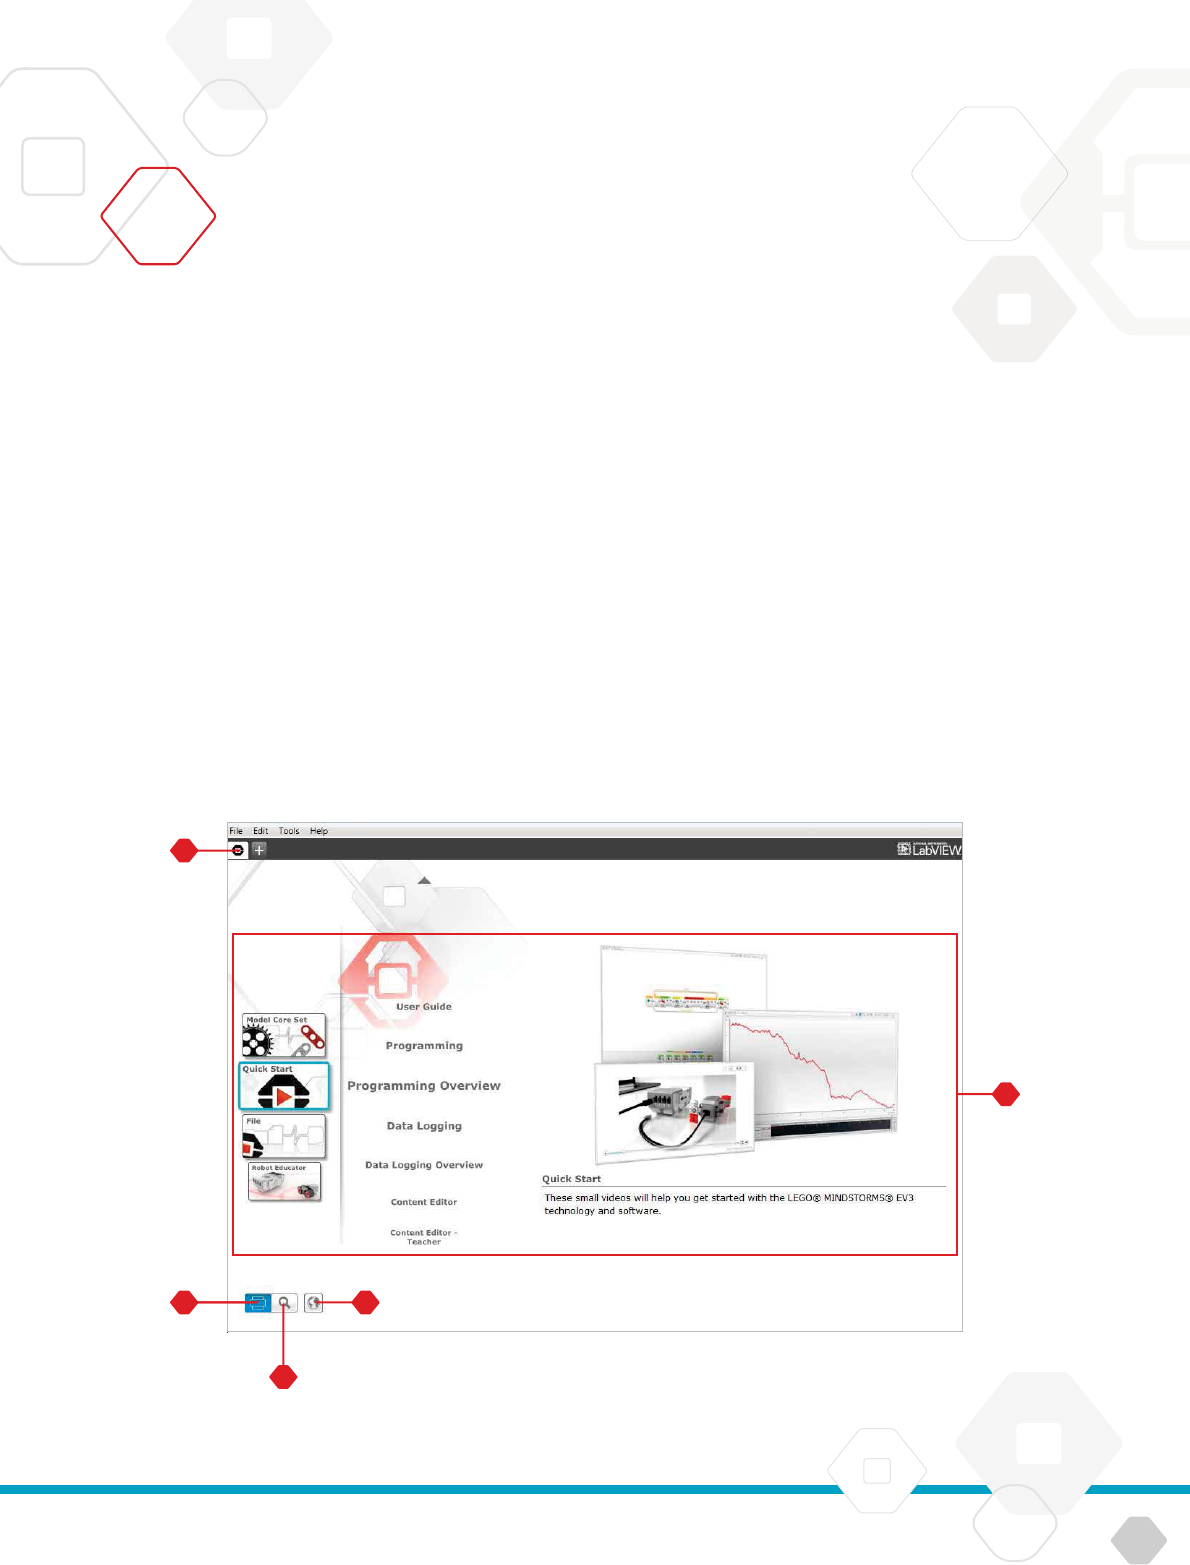
In the Lobby you will find the following options and resources:
Lobby Tab—This button always returns you to the Lobby.
Activity Overview—Here you can access, organize, and
preview content and get started with a project.
+ Building instructions for the Core Models
+ Quick Start resources such as a small introduction video
and the EV3 User Guide
+ File management, where you can start a new project or
open an existing one
+ Robot Educator, with forty-eight step-by-step tutorials that
explain how to use the EV3 Software and Hardware
View—This button takes you back to the Activity Overview.
Search—Find projects with specific content using different
filter options
www.LEGOeducation.com/MINDSTORMS—A link to the official
LEGO® MINDSTORMS® Education website.
Lobby
Lobby overview

LEGOeducation.com 38
LEGOtheLEGOlogoMINDSTORMSandtheMINDSTORMSlogoaretrademarksofthe/
sontdesmarquesdecommercede/sonmarcasregistradasdeLEGOGroup©TheLEGOGroup
EV3 SOFTWARE
When you open a new program or experiment, it will automatically
create a project folder file. All programs, experiments, images,
sounds, videos, instructions, and other assets that are used within
aproject will automatically be stored in this project folder. This
makes it easy to store your project and share it with others.
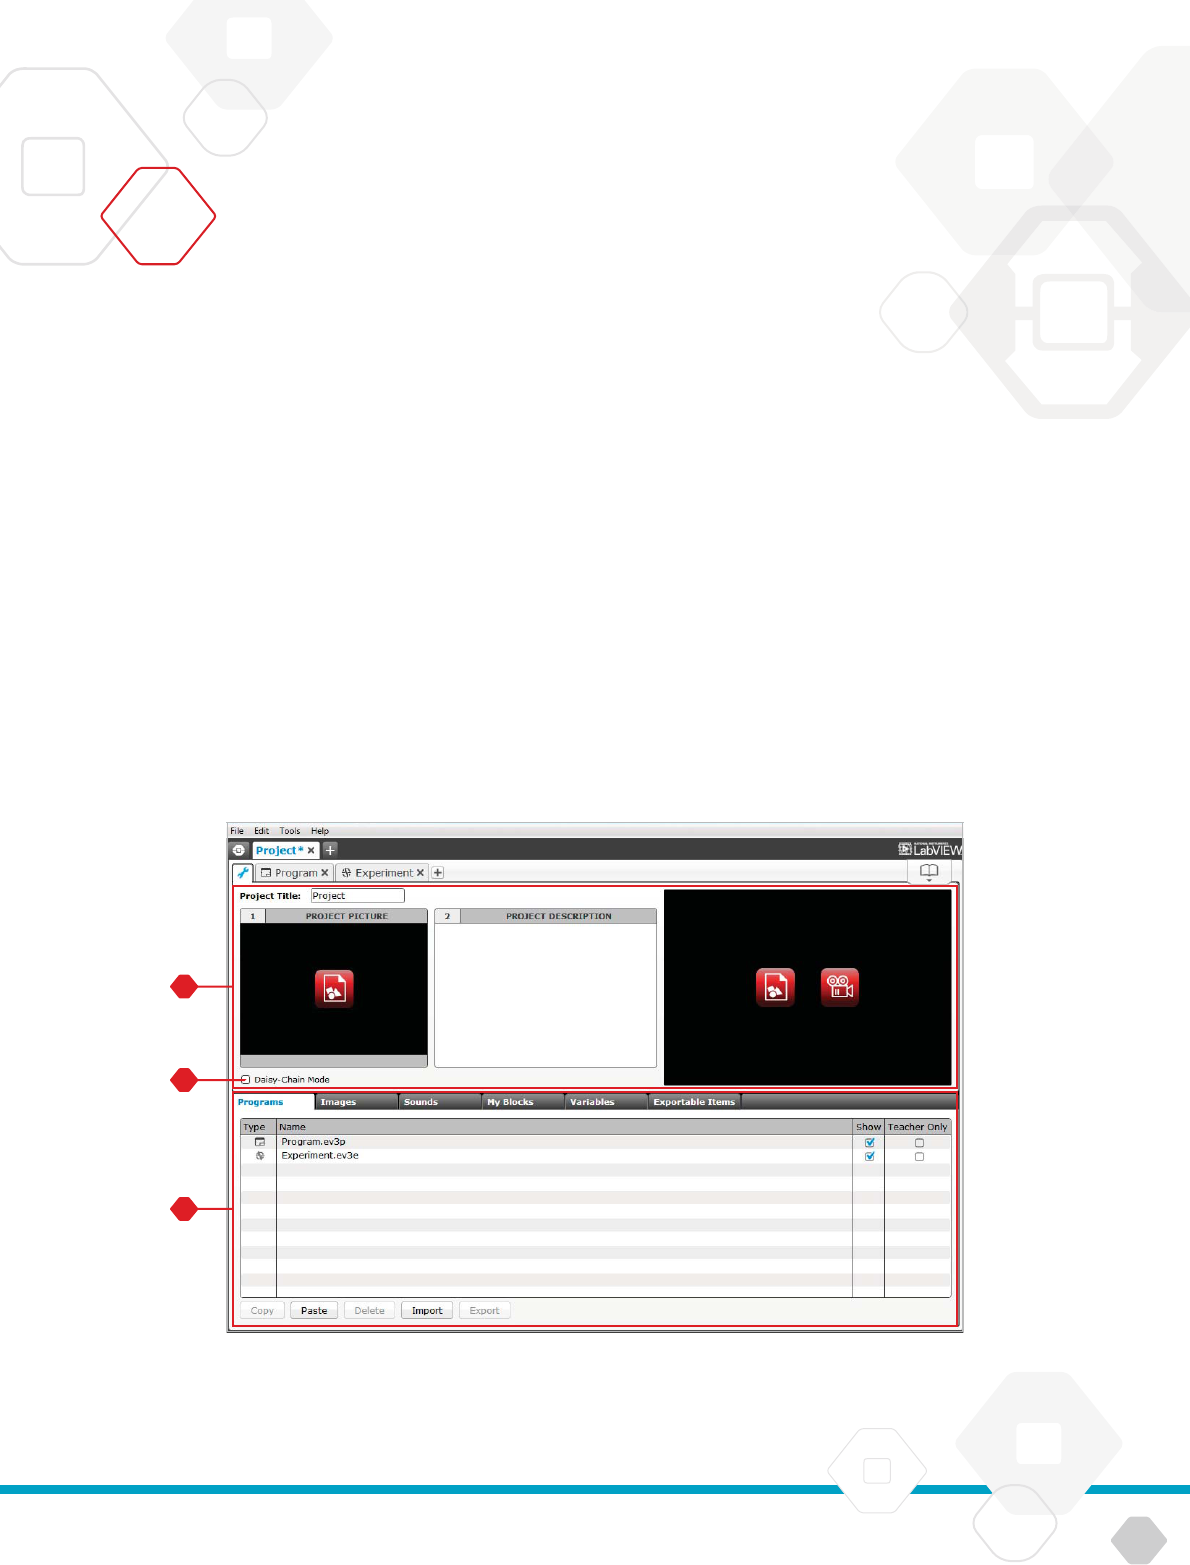
Each project will be displayed in the form of a tab at the top of
the screen. Underneath, you will see tabs for the Programs and
Experiments that belong to the selected Project. You can add a new
Project, Program, or Experiment by clicking on the + button to the
right of the other tabs. Clicking on an X will close thetab.
PROJECT PROPERTIES PAGE
If you click on the tab with the wrench to the far left of the Program
and Experiment tabs, you will be taken to the Project Properties
page. This page gives you an orderly display for the project that is
currently selected, including all programs and experiments, images,
sound, and other assets. Here you can describe your project with
text, images, and video that will determine how the project shows up
in the Lobby. In the Teacher version of the EV3 Software, the Project
Properties page also allows you to restrict access to selected
programs and other assets in your project.
Project Properties and Structure
Project, Program and
Experiment tabs
LEGOeducation.com 39
LEGOtheLEGOlogoMINDSTORMSandtheMINDSTORMSlogoaretrademarksofthe/
sontdesmarquesdecommercede/sonmarcasregistradasdeLEGOGroup©TheLEGOGroup
EV3 SOFTWARE
Project Properties displayed include:
Project Description—Give your project a title, describe it,
and insert any images and video you would like to appear in
the Lobby when the project is previewed.
Project Content Overview—Here you will find all assets
included in the project: for example, programs, experiments,
images, sounds, and My Blocks.
Daisy Chain Mode—This check box enables the Daisy Chain
Mode, so you can program up to four connected EV3 Bricks.
Project Properties and Structure
Project Properties page
LEGOeducation.com 40
LEGOtheLEGOlogoMINDSTORMSandtheMINDSTORMSlogoaretrademarksofthe/
sontdesmarquesdecommercede/sonmarcasregistradasdeLEGOGroup©TheLEGOGroup
EV3 SOFTWARE
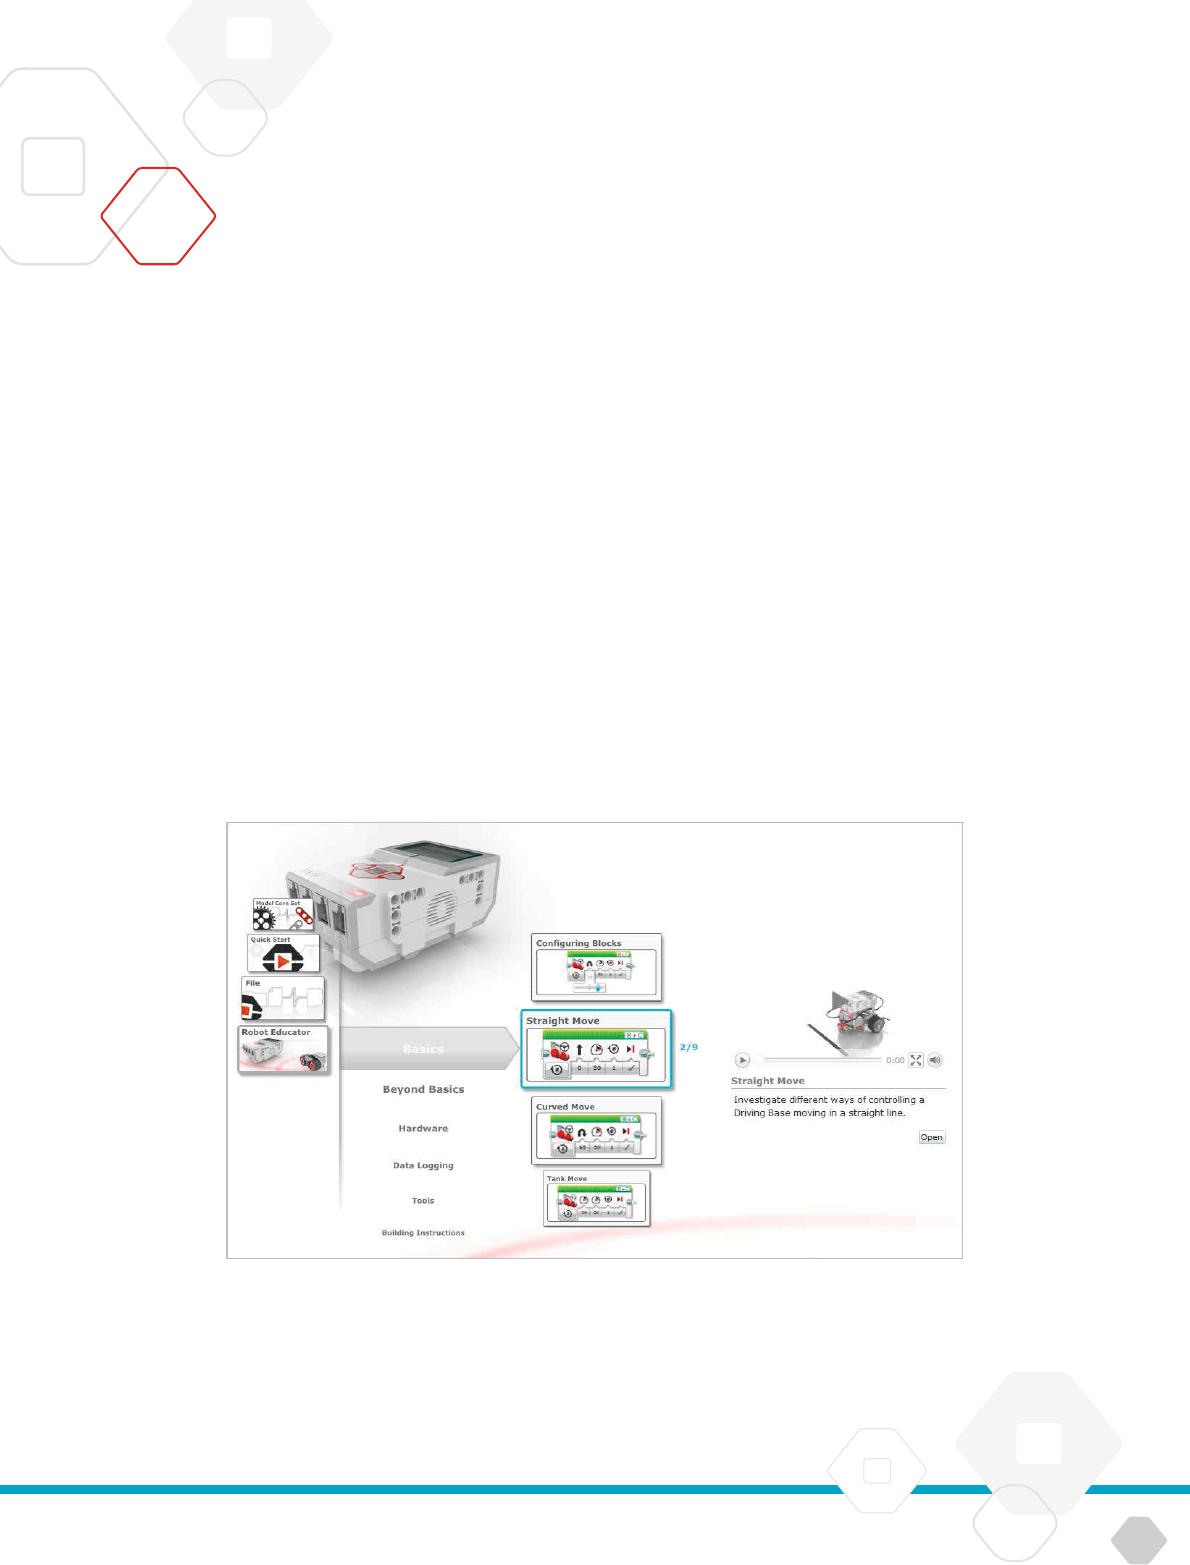
Robot Educator is the name of both the basic robot and the tutorials
you will find in the EV3 Software. The Robot Educator learning tool is
designed to take you through the essentials of programming, data
logging, and hardware.
Robot Educator consists of forty-eight tutorials divided into
thefollowing categories: Basics, Beyond Basics, Hardware, Data
Logging, and Tools. Each tutorial is structured in the following way:
+ Understanding the objective
+ Build and program your robot
+ Test it
+ Modify it
In the Robot Educator section in the Lobby, you can also find all
related building instructions and a Teacher’s Guide (only available
in the Teacher version of the EV3 Software).
Robot Educator
Robot Educator
LEGOeducation.com 41
LEGOtheLEGOlogoMINDSTORMSandtheMINDSTORMSlogoaretrademarksofthe/
sontdesmarquesdecommercede/sonmarcasregistradasdeLEGOGroup©TheLEGOGroup
EV3 SOFTWARE
Without a program, a robot is just a statue. It may be a cool statue,
but it’s still a statue. When you program a robot you give it abilities—
to move, to follow lines, to avoid objects, to make mathematical
calculations, and much more. The EV3 Software has an intuitive,
graphics-based format that users from 10 to 100 years of age can
quickly learn and successfully use.
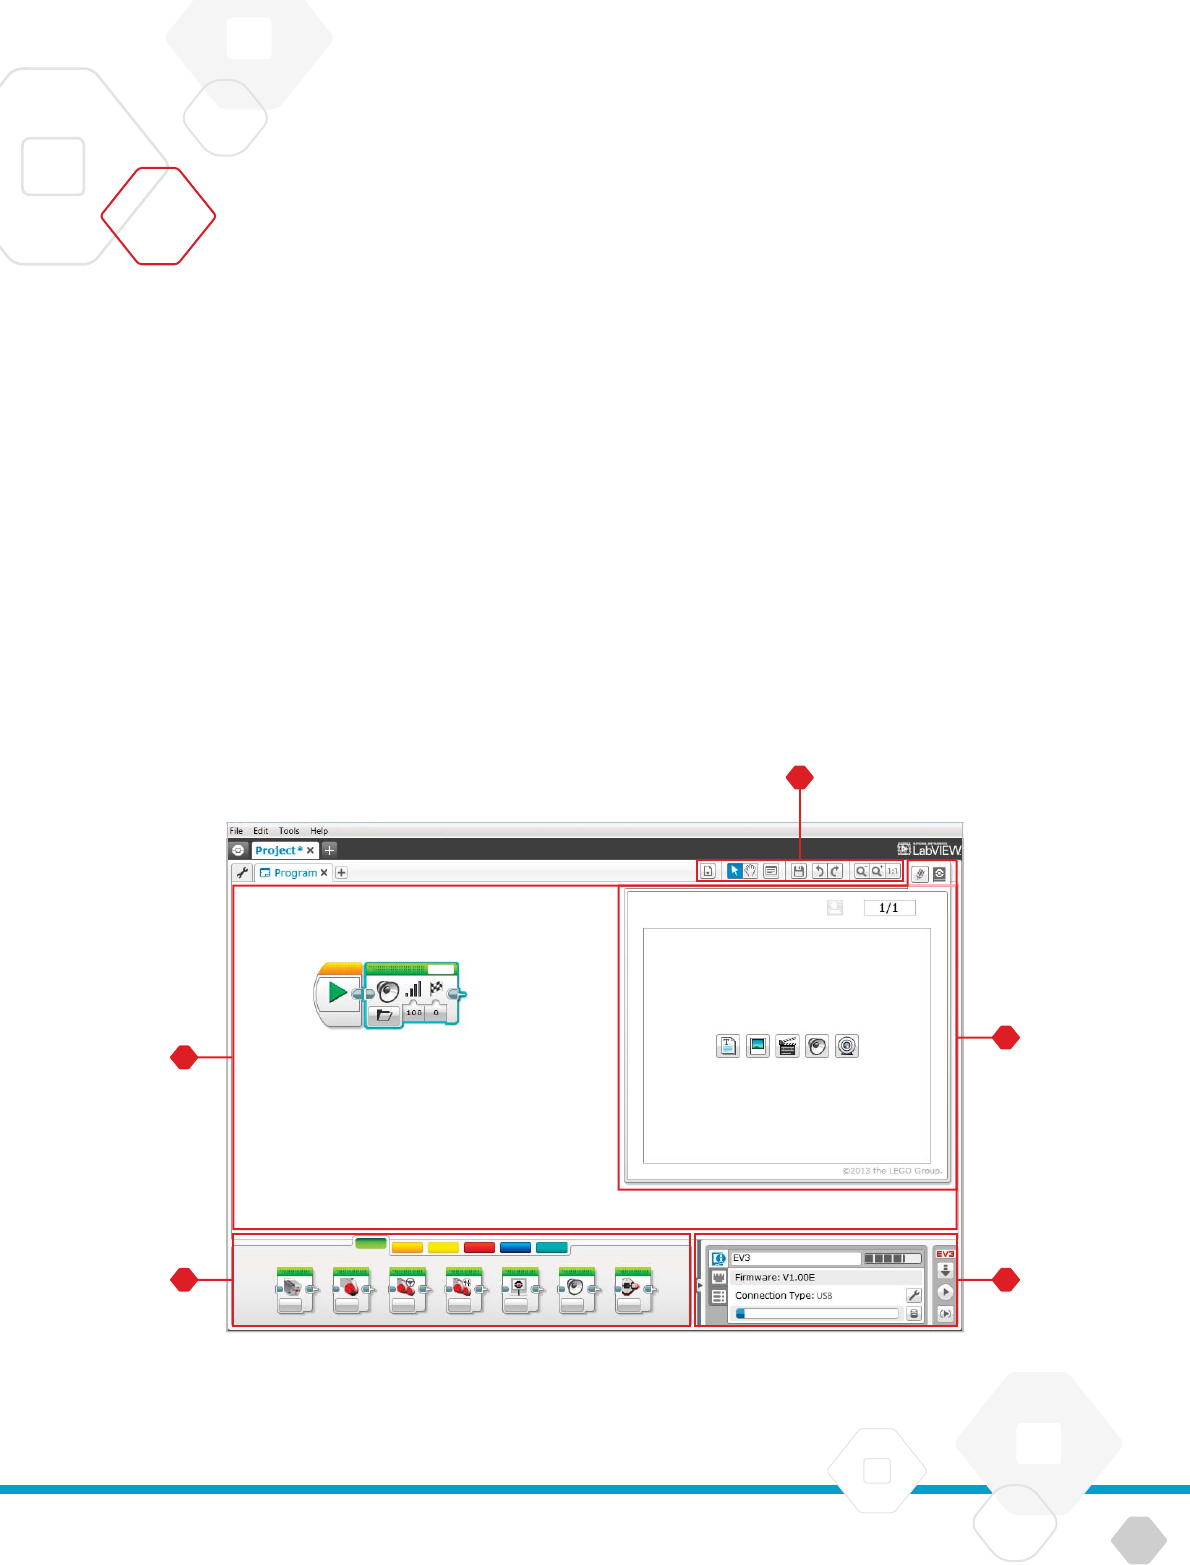
The EV3 Programming environment consists of
the following main areas:
Programming Canvas—Lay out your program here.
Programming Palettes—Find the building blocks for your
program here.
Hardware Page—Establish and manage your communication
with the EV3 Brick here and see what motors and sensors are
connected where. This is also where you download programs
to the EV3 Brick.
Content Editor—A digital workbook integrated into thesoftware.
Get instructions or document your project using text, images,
and videos.
Programming Toolbar—Find basic tools for working with
your program here. Learn more about these tools in the EV3
Software Help.
Programming
Programming environment
LEGOeducation.com 42
LEGOtheLEGOlogoMINDSTORMSandtheMINDSTORMSlogoaretrademarksofthe/
sontdesmarquesdecommercede/sonmarcasregistradasdeLEGOGroup©TheLEGOGroup
EV3 SOFTWARE
Programming Blocks and Palettes
All the programming blocks that are used for controlling your
robot are located in Programming Palettes at the bottom of
theProgramming environment underneath the Programming Canvas.
The Programming blocks are divided into categories according to
type and nature, making it easy to find the block you need.
To learn more about the EV3 Programming environment and see how
you can get started with your first program, see the Programming
and Programming Overview videos in the Quick Start section of
the Lobby.
You can also find more information about how to program in theEV3
Software Help.
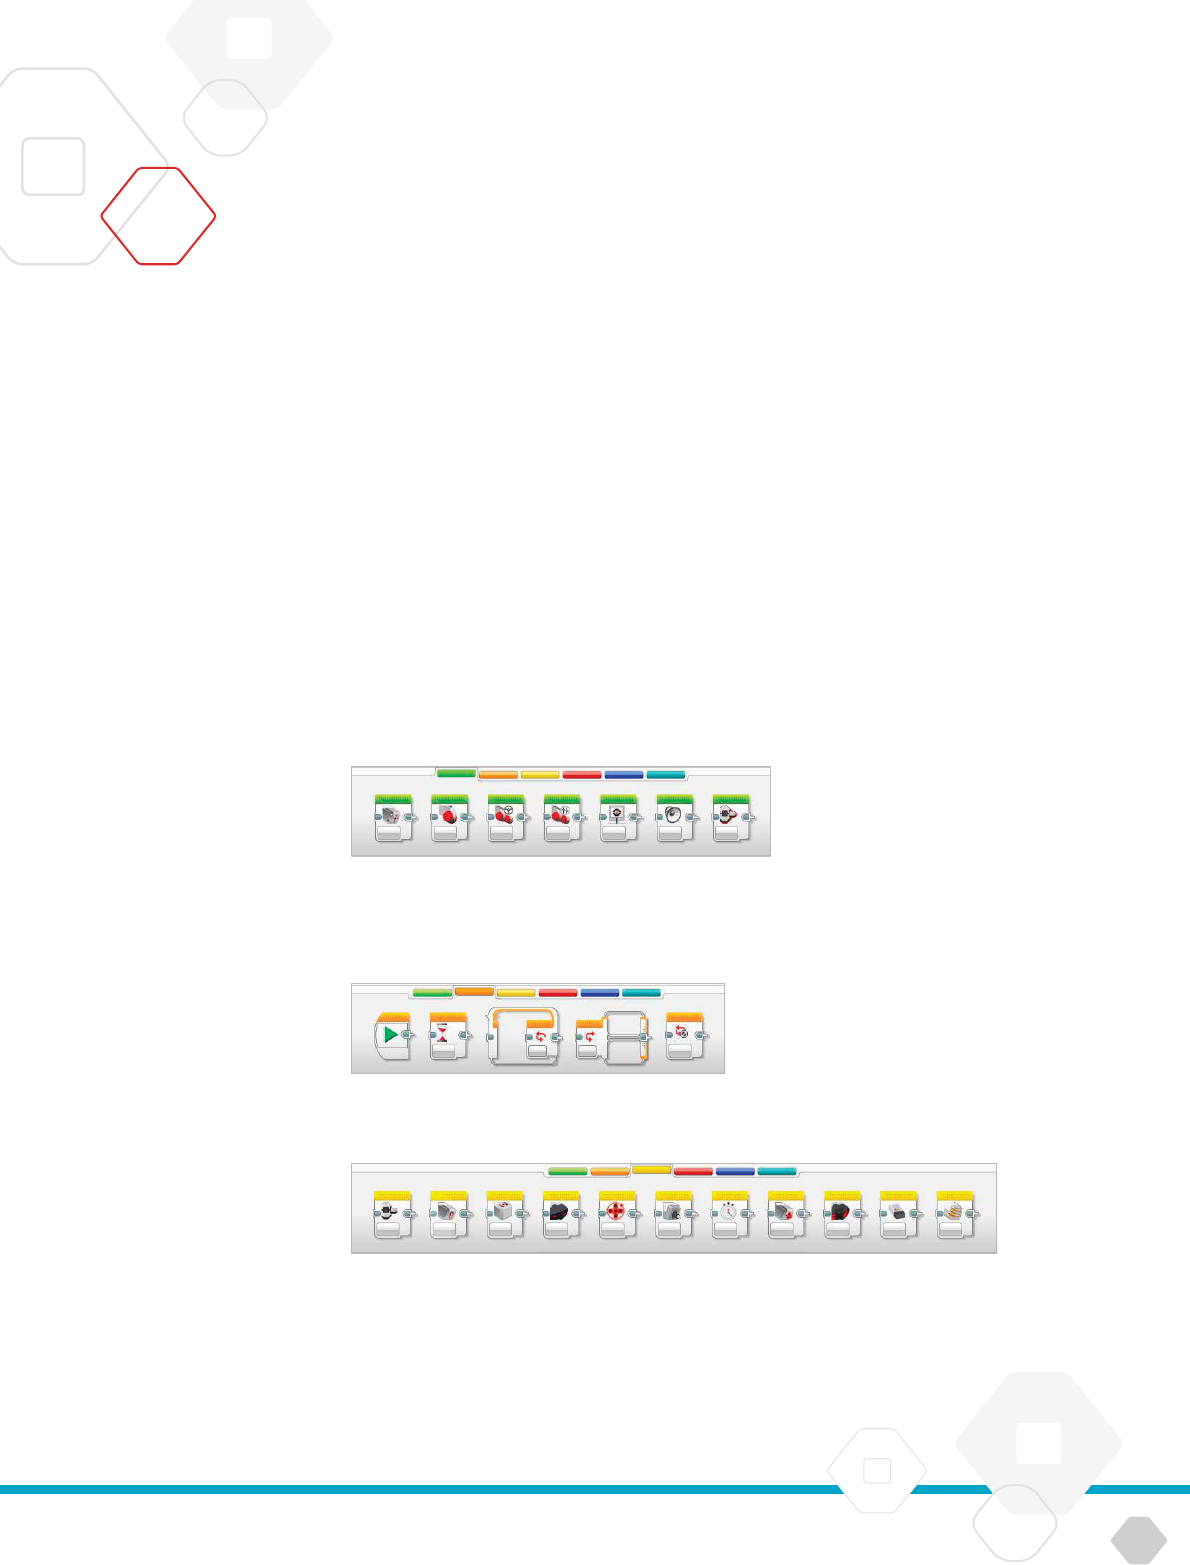
ACTION BLOCKS
(In order from left to right)
+ Medium Motor
+ Large Motor
+ Move Steering
+ Move Tank
+ Display
+ Sound
+ Brick Status Light
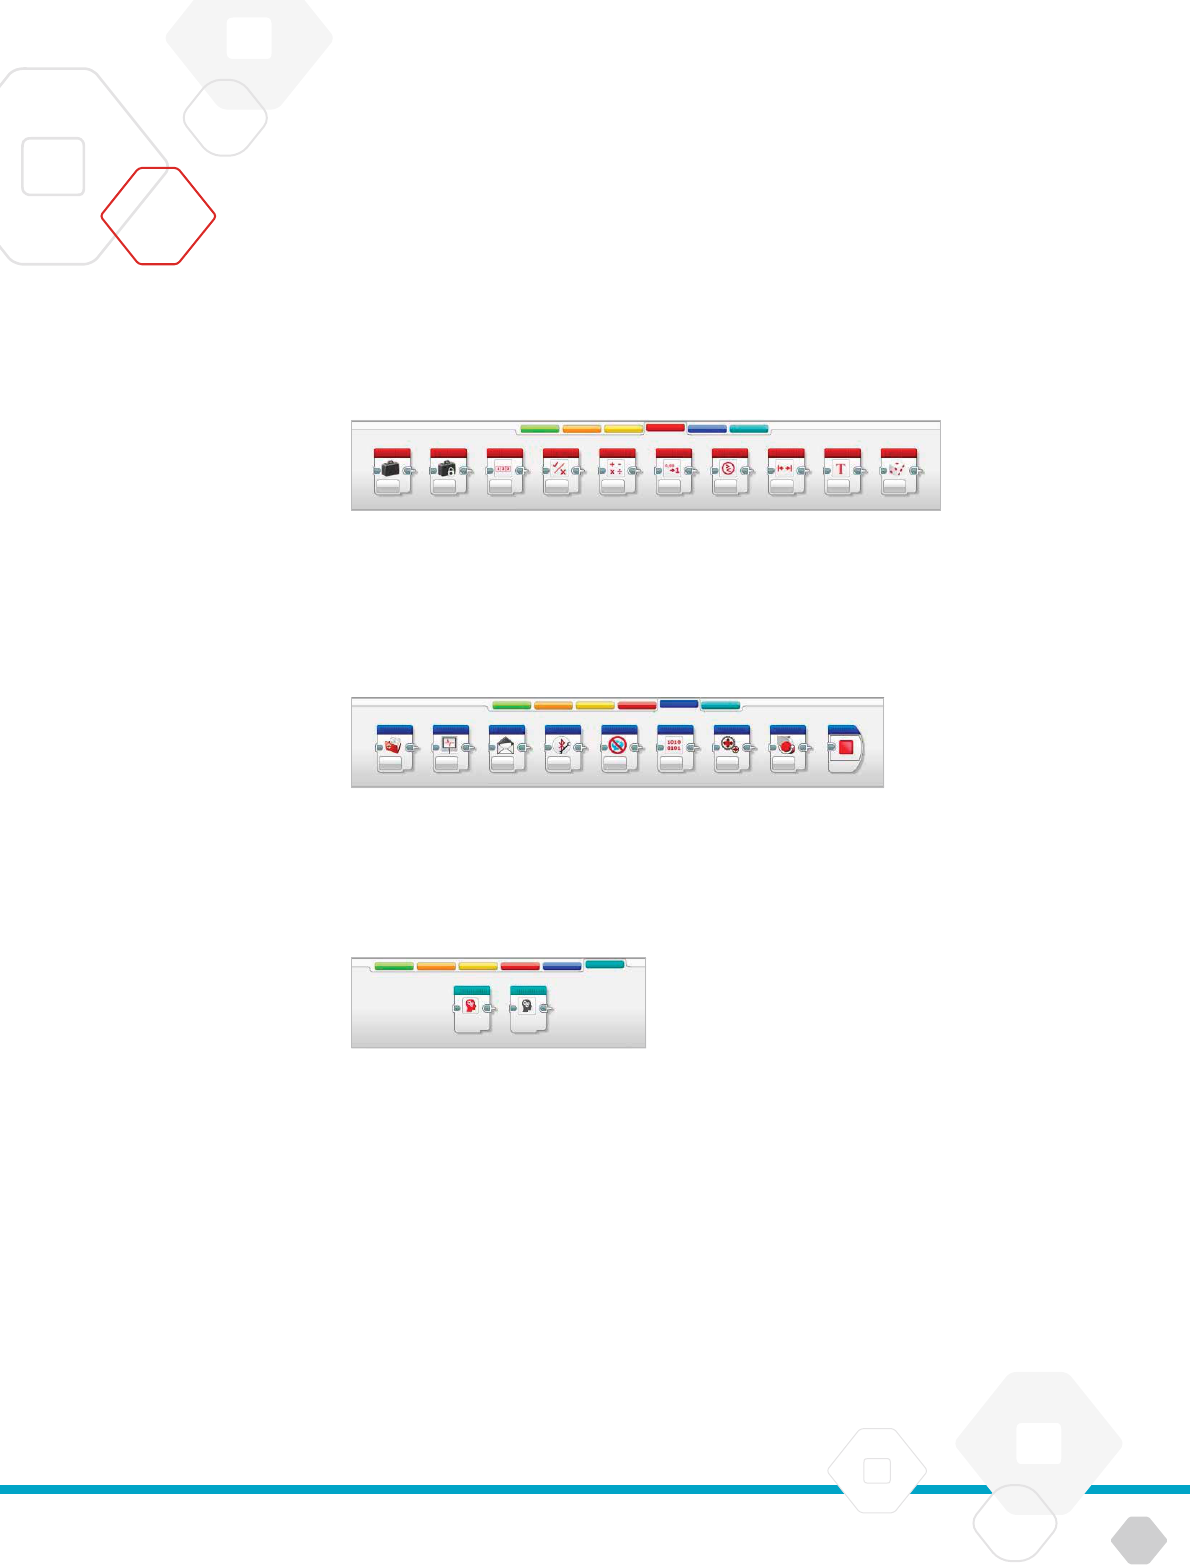
FLOW BLOCKS
(In order from left to right)
+ Start
+ Wait
+ Loop
+ Switch
+ Loop Interrupt
SENSOR BLOCKS
(In order from left to right)
+ Brick Buttons
+ Color Sensor
+ Gyro Sensor
+ Infrared Sensor
+ Motor Rotation
+ Temperature Sensor
+ Timer
+ Touch Sensor
+ Ultrasonic Sensor
+ Energy Meter
+ NXT Sound Sensor
LEGOeducation.com 43
LEGOtheLEGOlogoMINDSTORMSandtheMINDSTORMSlogoaretrademarksofthe/
sontdesmarquesdecommercede/sonmarcasregistradasdeLEGOGroup©TheLEGOGroup
EV3 SOFTWARE
Programming Blocks and Palettes
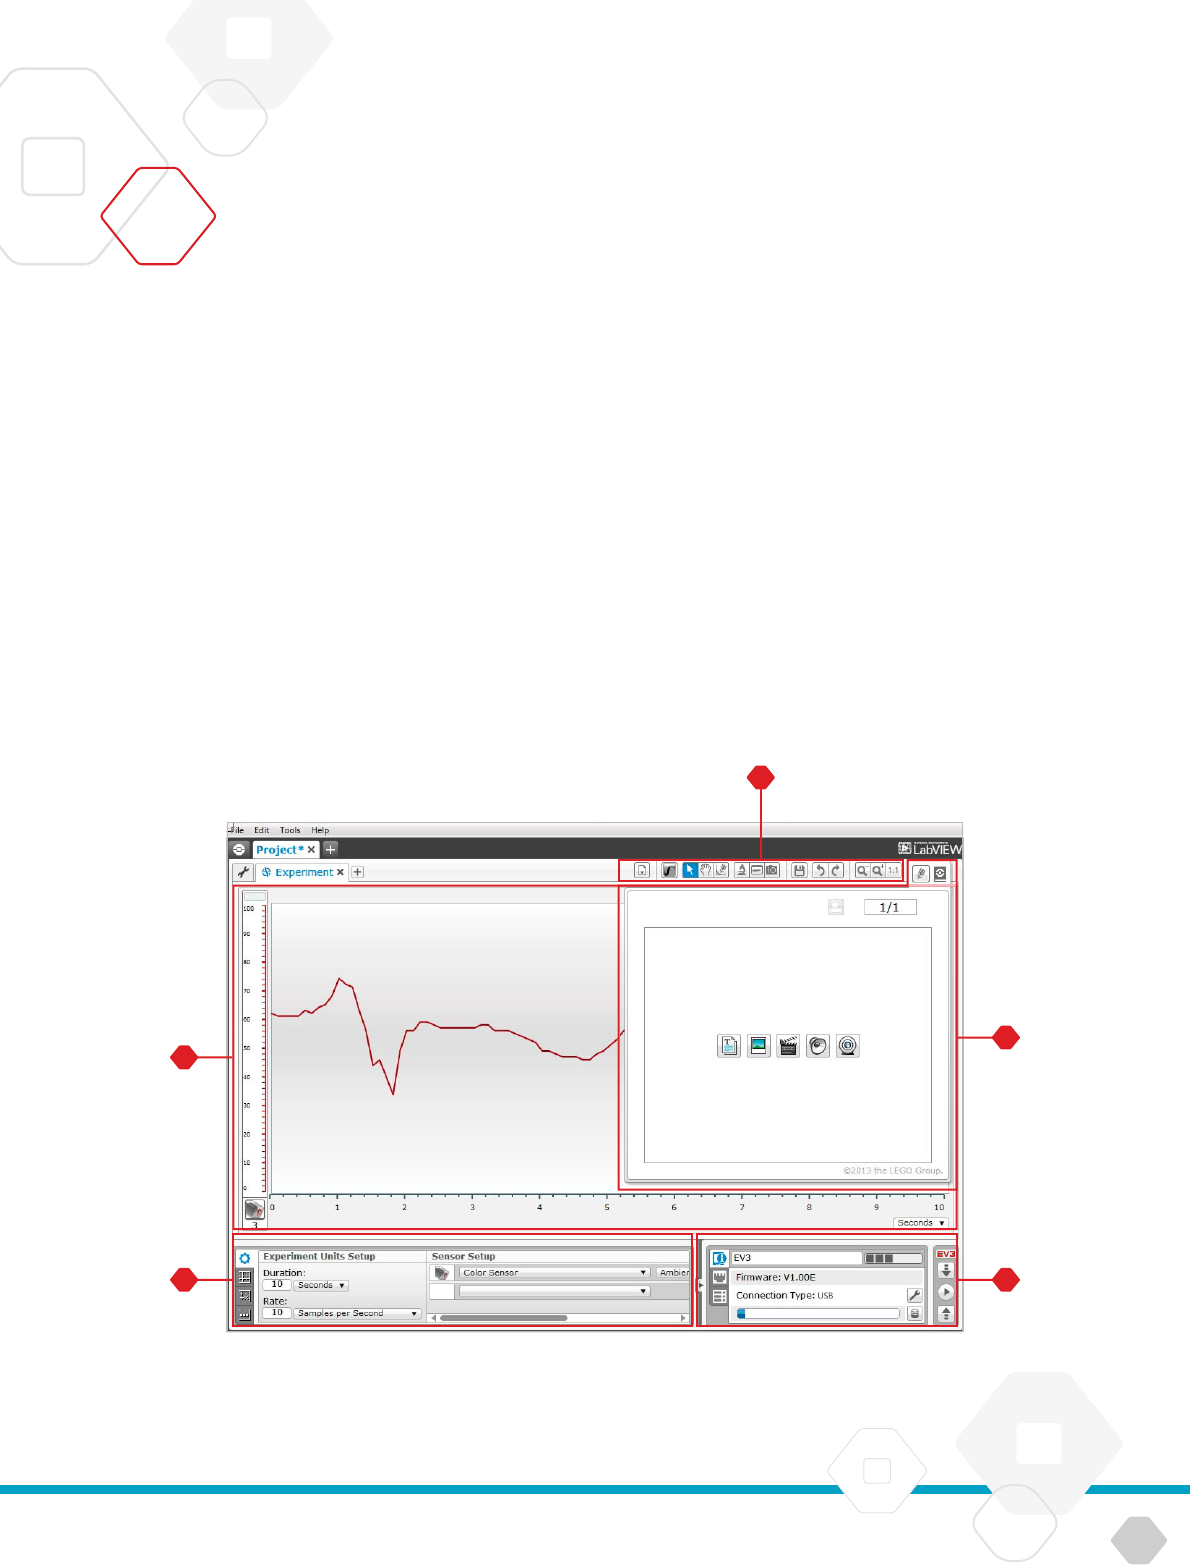
DATA BLOCKS
(In order from left to right)
+ Variable
+ Constant
+ Array Operations
+ Logic Operations
+ Math
+ Round
+ Compare
+ Range
+ Tex t
+ Random
ADVANCED BLOCKS
(In order from left to right)
+ File Access
+ Data Logging
+ Messaging
+ Bluetooth Connection
+ Keep Awake
+ Raw Sensor Value
+ Unregulated Motor
+ Invert Motor
+ Stop Program
MY BLOCKS
When you are repeatedly
using the same segment of
aprogram in many programs,
that is a good time to create
aMy Block. Once your My
Block is created, you can
simply insert that single
block into future programs
within the same project.
LEGOeducation.com 44
LEGOtheLEGOlogoMINDSTORMSandtheMINDSTORMSlogoaretrademarksofthe/
sontdesmarquesdecommercede/sonmarcasregistradasdeLEGOGroup©TheLEGOGroup
EV3 SOFTWARE
Data Logging
To data log is to collect information for analysis. For example,
aweatherperson might collect temperature readings throughout
theday, and then analyze it for a report on the evening news. Or
azookeeper might collect data on where visitors are spending their
time at the zoo. The EV3 Software cannot only record data, it can
help you to organize and analyze it.
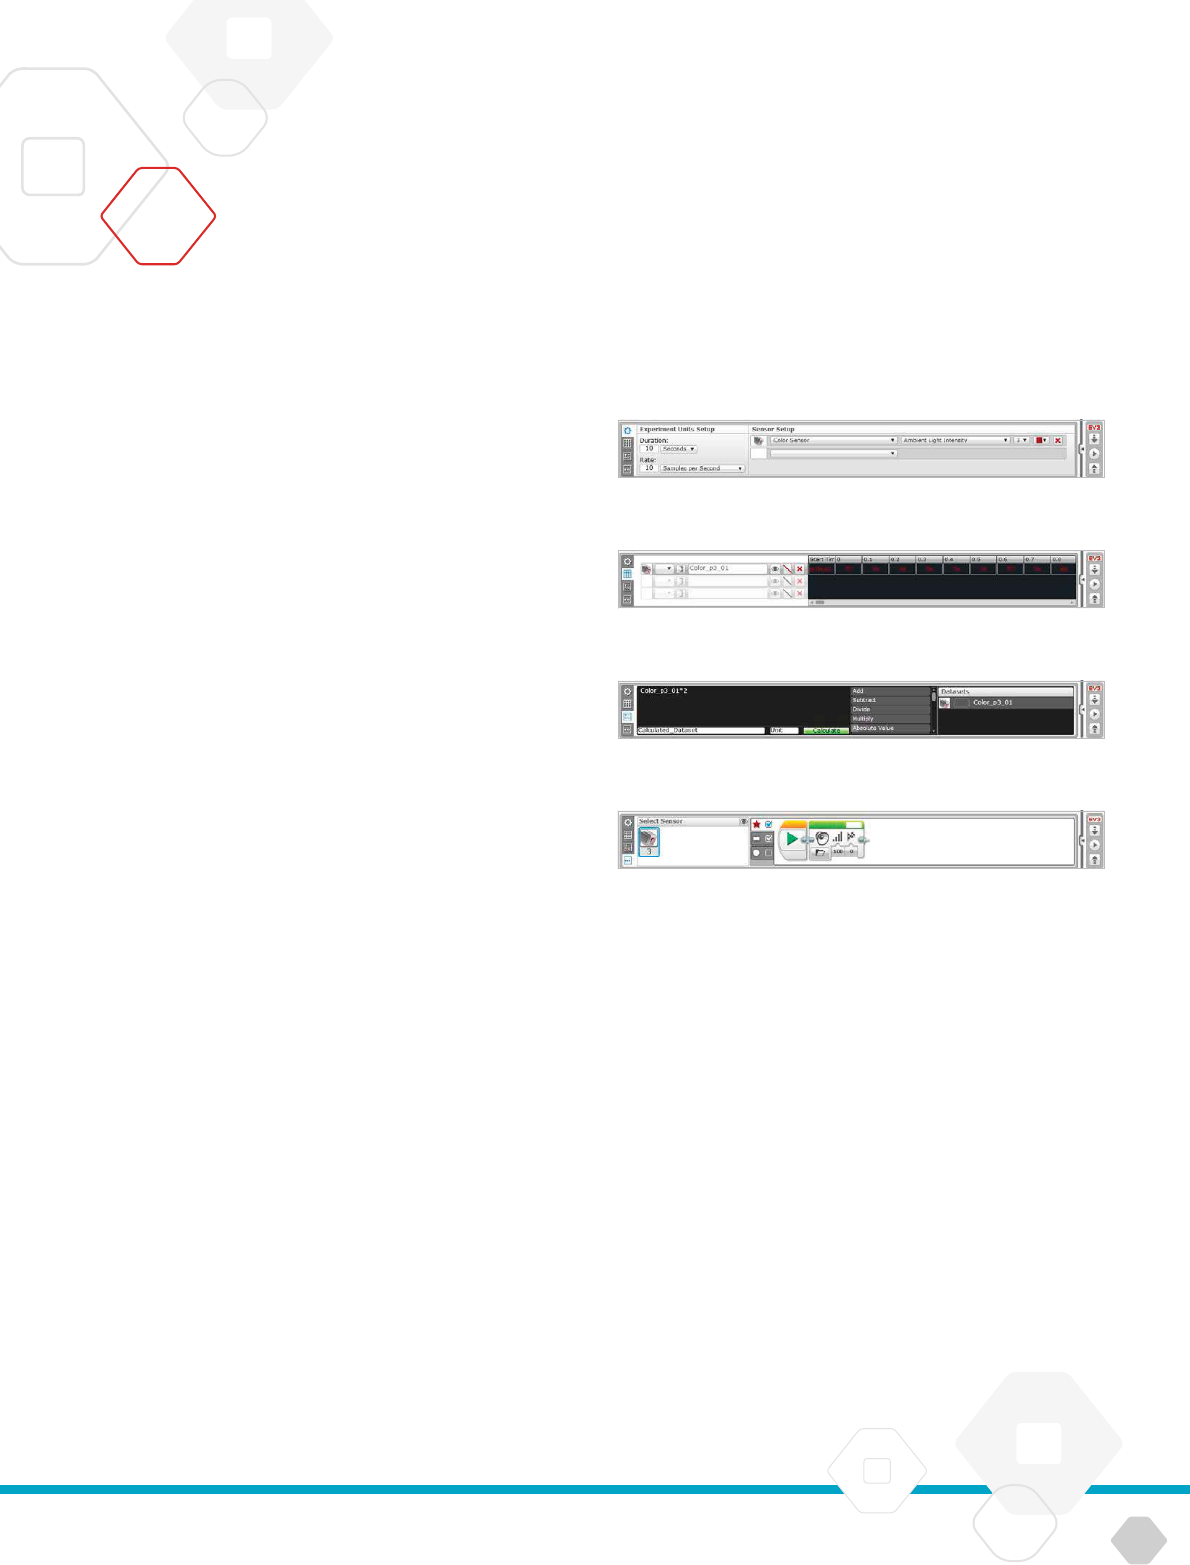
The EV3 Data Logging environment consists of
the following main areas:
Graph Area—This is where you see and analyze your data
plots.
Configuration Panel—Here you set up your experiment,
manage your dataset, and get access to Dataset Calculation
and Graph Programming, special data logging functionalities.
Hardware Page—Establish and manage your communication
with the EV3 Brick here and see what sensors are connected
where. This is also where you download experiments to the EV3
Brick and upload data to the software.
Content Editor—A digital workbook integrated into
thesoftware. Get instructions or document your project using
text, images, and videos.
Data Logging Toolbar—Find basic tools for working with your
graph and experiment here. Learn more about these tools in
the EV3 Software Help.
Data Logging environment
LEGOeducation.com 45
LEGOtheLEGOlogoMINDSTORMSandtheMINDSTORMSlogoaretrademarksofthe/
sontdesmarquesdecommercede/sonmarcasregistradasdeLEGOGroup©TheLEGOGroup
EV3 SOFTWARE
Configuration Panel
In the Configuration Panel, you will find four different tabs that will
help you prepare, manage, and analyze your experiments. Some
of the tabs are dynamic: they will automatically be shown when
relevant. You will always be able to switch between tabs manually.
EXPERIMENT CONFIGURATION
Here you set up your experiment by selecting the sample duration
and rate and choosing what sensors to collect data from. For each
sensor, you also have to select sensor mode, since most sensors
can provide different types of data.
DATASET TABLE
In addition to displaying the collected data in the graph area,
adataset will be shown in the Dataset Table. Here you can also
rename the dataset, delete or hide it, and change plot style and
color of the graphs.
DATASET CALCULATION
Here you can manipulate datasets and graphs by doing various
calculations using numbers, functions, and other datasets.
Theoutput result will be displayed as both graph and dataset values.
GRAPH PROGRAMMING
By dividing your graph area in different zones, you can enable your
sensor input to trigger or activate an output: for example, a motor or
a sound from the EV3 Brick when the sensor values reach a certain
level or threshold.
To learn more about the EV3 data logging environment and see how
you can get started with your first experiment, see the Data Logging
and Data Logging Overview videos in the Quick Start section of
theLobby.
You can also find more information about how to data log in theEV3
Software Help.
Data Logging
Experiment Configuration panel
Dataset Table panel
Dataset Calculation panel
Graph Programming panel
LEGOeducation.com 46
LEGOtheLEGOlogoMINDSTORMSandtheMINDSTORMSlogoaretrademarksofthe/
sontdesmarquesdecommercede/sonmarcasregistradasdeLEGOGroup©TheLEGOGroup
EV3 SOFTWARE
The Hardware Page provides a range of information about your
EV3 Brick. It is always located in the lower right-hand corner
when working with both Programs and Experiments and can be
collapsed when needed using the Expand/Collapse tab. Even when
collapsed, theHardware Page Controller will be visible, allowing you
to download your program or experiment.
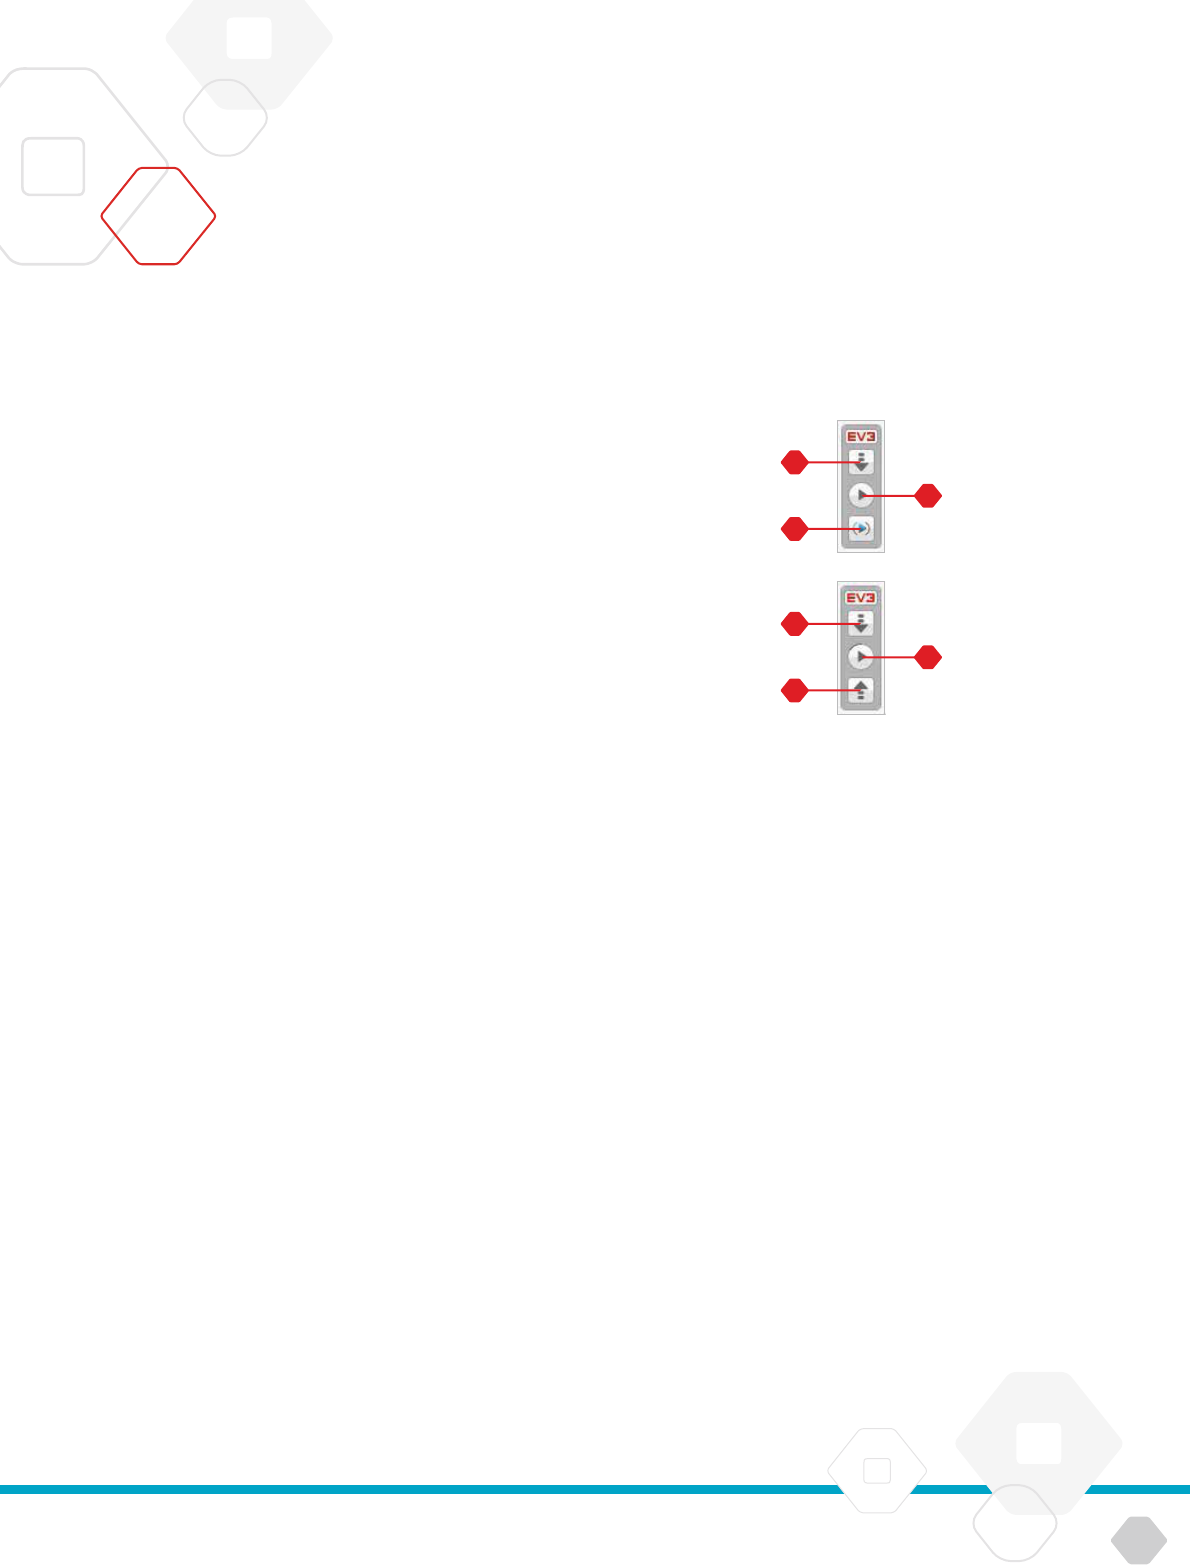
The different Hardware Page Controller buttons have
thefollowing functionality:
Download—Downloads the Program or Experiment to the EV3
Brick
Download and Run—Downloads the Program or Experiment to
the EV3 Brick and runs it immediately
Download and Run Selected—Downloads only the highlighted
blocks to the EV3 Brick and runs them immediately
Upload—Uploads your collected datasets from the EV3 Brick
to your Experiment
The EV3 text in the small window at the top will turn red when anEV3
Brick is connected to your computer.
Hardware Page
Hardware Page Controllers
LEGOeducation.com 47
LEGOtheLEGOlogoMINDSTORMSandtheMINDSTORMSlogoaretrademarksofthe/
sontdesmarquesdecommercede/sonmarcasregistradasdeLEGOGroup©TheLEGOGroup
EV3 SOFTWARE
BRICK INFORMATION
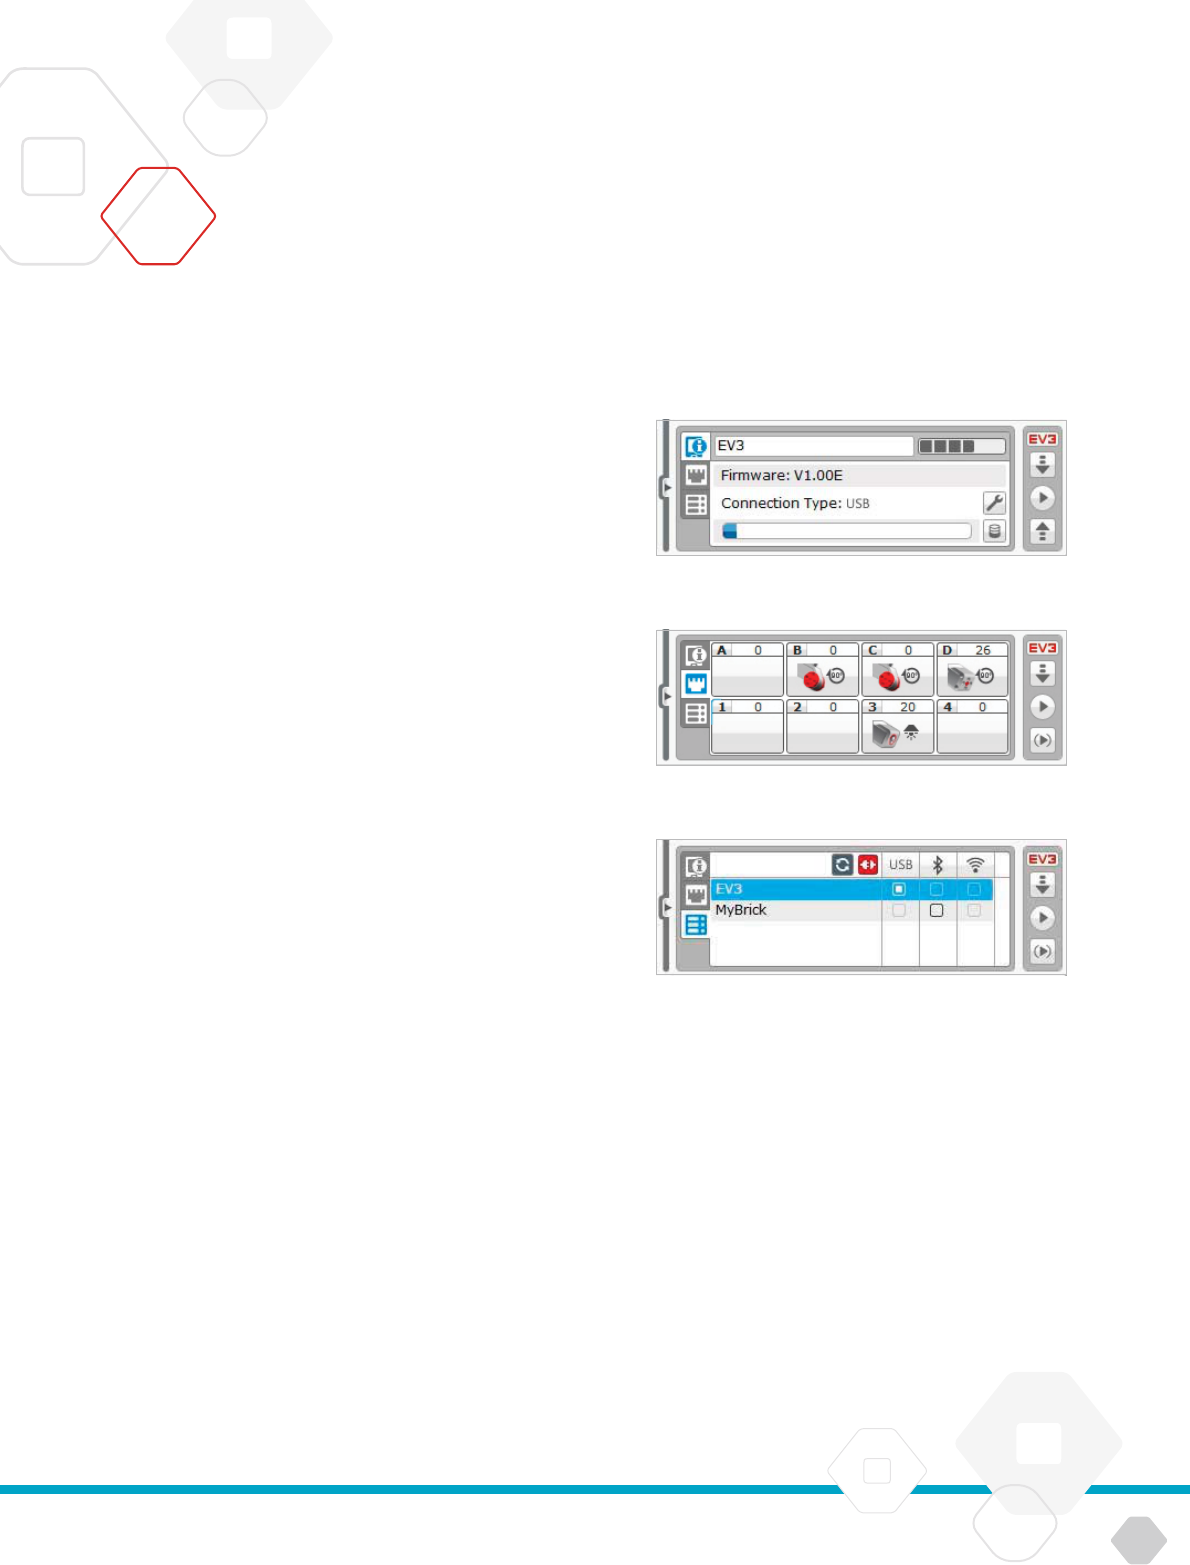
The Brick Information tab displays important information about
theEV3 Brick that is currently connected, such as EV3 Brick name,
battery level, firmware version, connection type, and memory bar. It
also gives you access to the Memory Browser and Wireless Setup
tools.
PORT VIEW
The Port View tab displays information about the sensors and motors
connected to the EV3 Brick. When your EV3 Brick is connected to
the computer, this information is automatically identified and you
will be able to see the live values. If your EV3 Brick is not connected,
you can still set up the Port View tab manually. Select a port, then
select the appropriate sensor or motor from the list.
AVAILABLE BRICKS
The Available Bricks tab shows the EV3 Bricks that are currently
available for connection. You are able to choose which EV3 Brick
you want to connect to and the type of communication. Also, you
can disconnect an existing EV3 Brick connection.
You can find more information about how to use the Hardware Page
in the EV3 Software Help.
Hardware Page
Brick Information tab
Port View tab
Available Bricks tab
LEGOeducation.com 48
LEGOtheLEGOlogoMINDSTORMSandtheMINDSTORMSlogoaretrademarksofthe/
sontdesmarquesdecommercede/sonmarcasregistradasdeLEGOGroup©TheLEGOGroup
EV3 SOFTWARE
The Content Editor offers a convenient way for users to document
the purpose, process, and analysis of their projects. You can include
text, images, videos, sound effects, and even building instructions.
It is also a convenient, paperless way for educators to monitor and
evaluate student projects. Content Editor is also the place where
already-made content—for example, Robot Educator tutorials and
purchased LEGO
®
Education activity packs—is displayed and used.
Each page can be customized with different layouts and can
automatically perform a range of actions, such as opening specific
programs or highlighting a particular programming block.
The Content Editor is located in the top right corner of the EV3
Software and is available whether you are working with a Program
or an Experiment. You open the Content Editor using the large button
with the book icon. Once open, you will be able to see whatever
content has been made for the project: for example, a Robot
Educator tutorial.
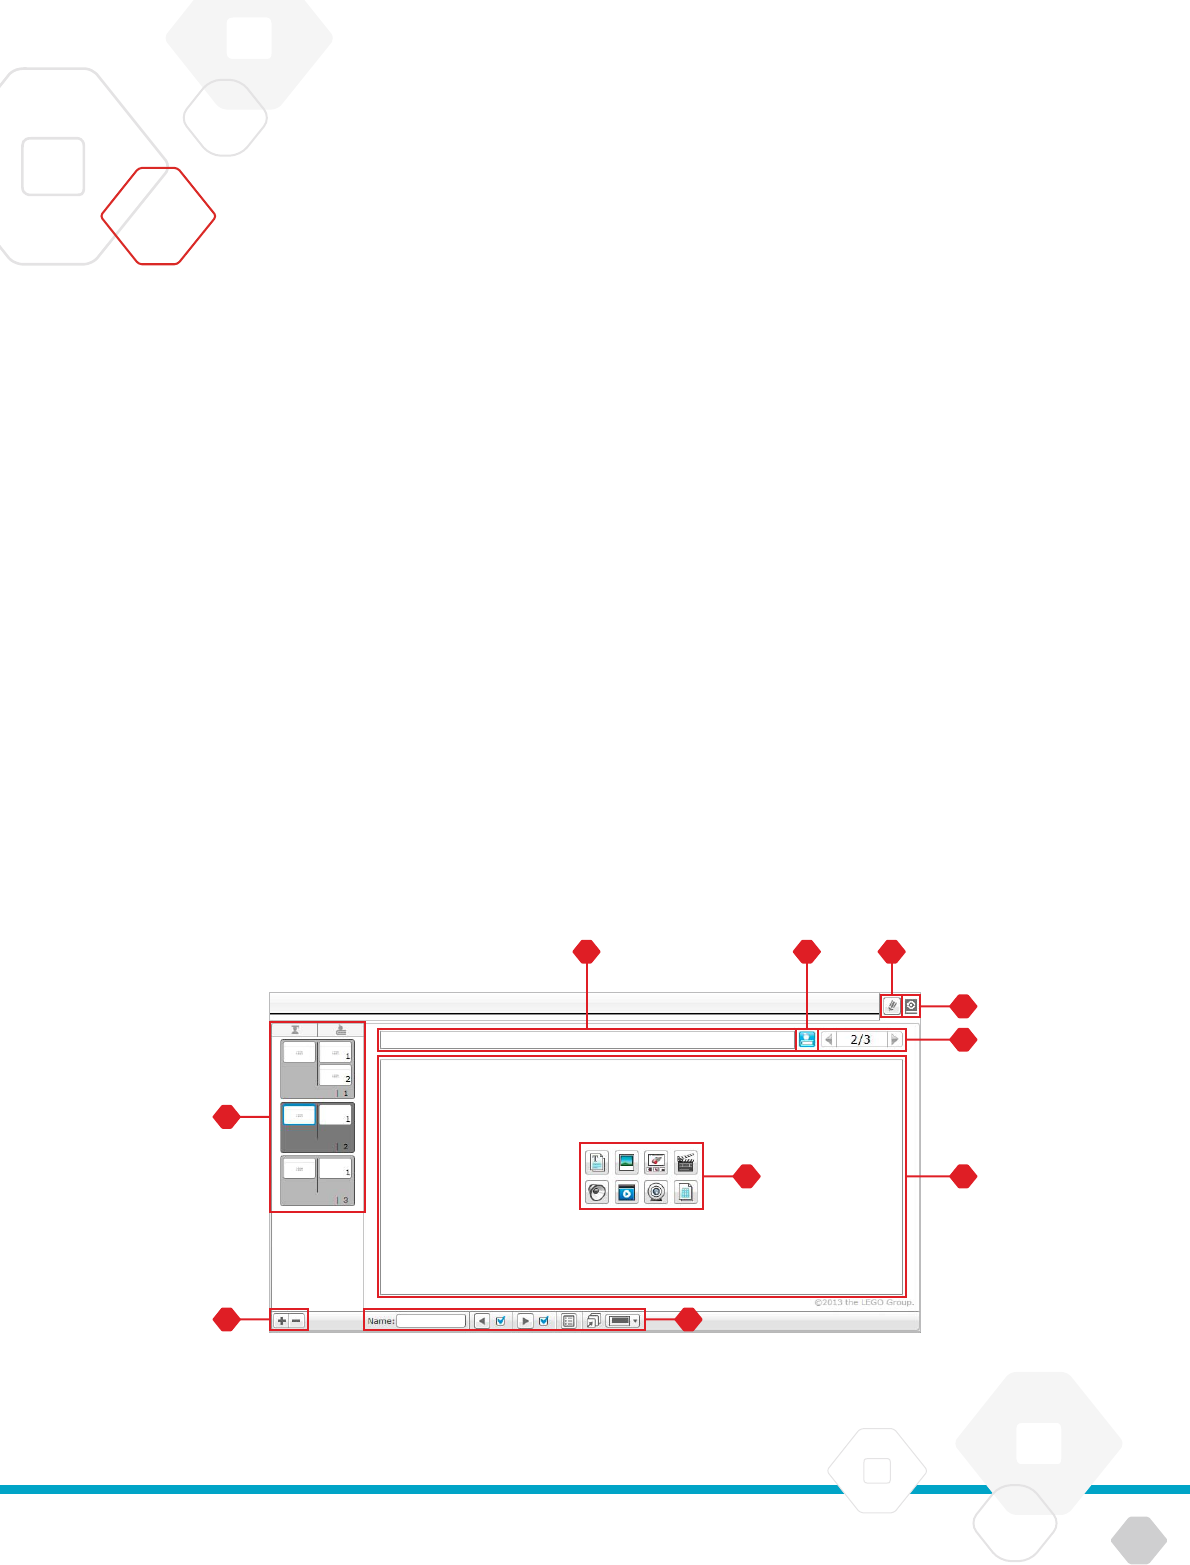
The Content Editor consists of the following main areas
and features:
Open/Close Content Editor—Here you open and close
theContent Editor.
Edit/View Mode—Allows you to view or edit your pages.
Page Navigation—Go to the next or previous page.
Teacher/Student Toggle—Switch between the Student Page
and Teacher Notes while viewing the content. This functionality
is only available in the Teacher version of the EV3 Software.
Page Title—Add a title to your page.
Page Area—This is where the main content is shown and
edited.
Media Icons—Select what content type you wish to add to
thepage area.
Page Thumbnails—Go to a specific page using the thumbnail
images. In the Teacher version of the EV3 Software, Teacher
Notes will also be available.
Add/Delete Page—When adding a page, you get to choose
from fourteen different templates.
Page Setup—Make special settings for each page, such as
format, page action, and navigation to the next page.
You can find more information about how to use the Content Editor
in the EV3 Software Help.
Content Editor
Content Editor

LEGOeducation.com 49
LEGOtheLEGOlogoMINDSTORMSandtheMINDSTORMSlogoaretrademarksofthe/
sontdesmarquesdecommercede/sonmarcasregistradasdeLEGOGroup©TheLEGOGroup
EV3 SOFTWARE
In the top menu bar of the EV3 Software you will find a number of
small Tools that can add extra functionality and support to your EV3
Software experience.
You can learn more about most of the Tools in the EV3 Software Help.
SOUND EDITOR
Create your own sound effects or customize one from our selection
of official EV3 Sound files. The sounds can then be used for
programming your robot by use of the Sound Programming Block.
IMAGE EDITOR
Make creative use of the EV3 Brick Display by designing original
images or customizing existing images. The images can then
be used for programming your robot by the use of the Display
Programming Block.
MY BLOCK BUILDER
Sometimes you make a great miniprogram that you want to use
again in another project or program. My Block Builder helps you take
this miniprogram and create a unique My Block where you define
the name, icon, and parameters that are relevant for you. My Blocks
will automatically be archived in the My Block Programming Palette.
FIRMWARE UPDATE
Periodically, updated firmware will become available for your EV3
Brick. We recommend that you install new versions as they become
available. This tool will tell you if there is a new firmware version
available and help you update it on your EV3 Brick.
WIRELESS SETUP
In case you wish your EV3 Software to communicate with your EV3
Brick using Wi-Fi, this tool will help set up the wireless connection.
To do so, you will need to acquire a Wi-Fi USB dongle for the EV3
Brick and enable Wi-Fi communication on the EV3 Brick.
BLOCK IMPORT
Add new blocks to your Programming Palettes. This can be
new LEGO
®
Programming Blocks or blocks developed by other
manufacturers: for example, in relation to a third-party sensor. These
Blocks first need to be downloaded to your computer—then you can
import them into your EV3 Software using this tool.
MEMORY BROWSER
It is easy to lose track of what you have stored on your EV3 Brick.
The Memory Browser provides an overview of memory use on your
EV3 Brick (including an SD card if you have it inserted). You can use
the Memory Browser to transfer programs, sounds, graphics, and
other files between your EV3 Brick and a computer, and copy and
delete files that are already on your EV3 Brick.
Tools

LEGOeducation.com 50
LEGOtheLEGOlogoMINDSTORMSandtheMINDSTORMSlogoaretrademarksofthe/
sontdesmarquesdecommercede/sonmarcasregistradasdeLEGOGroup©TheLEGOGroup
EV3 SOFTWARE
DOWNLOAD AS APP
Advanced users may enjoy the challenge of creating applications
for generic tasks on the EV3 Brick. An EV3 Brick app is made as
anormal EV3 program, but when downloaded to the EV3 Brick
using this tool, it will show up as a new app in the Brick Apps screen,
together with the default apps such as Brick Programming and Port
View.
IMPORT BRICK PROGRAM
This tool will enable you to import a program made in the Brick
Program App on the EV3 Brick to the EV3 Software programming
environment. Your program can then be further refined using the full
functionality of the EV3 Software.
DATA LOG FILE MANAGER
Use this tool to view, manage, and import datasets created by
anexperiment into your EV3 Software. This is used when collecting
data remotely on the EV3 Brick. The Data Log File Manager can
import datasets from the EV3 Brick, an SD card, or your computer.
REMOVE VALUES FROM DATASET
When collecting data from your sensors, you may later wish to
remove certain values from a dataset. This might be done to narrow
the range of sensor values you wish to further analyze or because
your dataset contains sporadically invalid values generated by
a sensor returning a default value when a real value cannot be
measured.
CREATE DATA LOGGING PROGRAM
If you have an experiment that you would like to integrate into
a program, this tool will help you. Rather than collecting data at
the same place all the time, you may wish to program a robot to
collect data from different areas in a room. This tool will transform
your experiment into a Data Logging Programming Block on
theProgramming Canvas. You can now build your program.
EXPORT DATASETS
If you wish to work further with your dataset in another software
tool (for example, Microsoft Excel), you can export any EV3 dataset
to a comma-separated value (CSV) file format and save it on your
computer. The CSV file can then be opened from within the chosen
software. Make sure the software supports theCSV file format.
Tools

LEGOeducation.com 51
LEGOtheLEGOlogoMINDSTORMSandtheMINDSTORMSlogoaretrademarksofthe/
sontdesmarquesdecommercede/sonmarcasregistradasdeLEGOGroup©TheLEGOGroup
TROUBLESHOOTING
Under Help at the top menu bar of the EV3 Software, you will find
access to the EV3 Help section. The help section is acomprehensive
and structured resource that provides helpful information about and
guidance with all of the EV3 Software, including how to best use and
program with sensors and motors. This is the first place to look if
you need help or more information on how to use the EV3 Software.
Software Updates
Under Help at the top menu bar of the EV3 Software, you can enable
the EV3 Software to automatically check for software updates. By
clicking Check for Software Updates, a check mark will appear and
the software will regularly check for software updates (this requires
an Internet connection). If a relevant update is available, you will be
notified by the software. If you wish to install this software update,
you will be taken to a website where you can download the update
file. Once downloaded, you can install the update. Make sure you
have closed down your EV3 Software during installation.
EV3 Software Help
LEGOeducation.com 52
LEGOtheLEGOlogoMINDSTORMSandtheMINDSTORMSlogoaretrademarksofthe/
sontdesmarquesdecommercede/sonmarcasregistradasdeLEGOGroup©TheLEGOGroup
TROUBLESHOOTING
NOTE:
Updating firmware will
delete all existing files and
projects in theEV3
Brick memory!
Firmware is the software that is inside the EV3 Brick. Without its
firmware, the EV3 Brick will not work. Occasionally, the LEGO Group
may release new versions of the firmware that add enhanced
functions or fix software bugs.
To update the firmware, you need a USB connection from your
computer to your EV3 Brick. Your computer must also be connected
to the Internet.
Turn your EV3 Brick on and connect it to your computer.
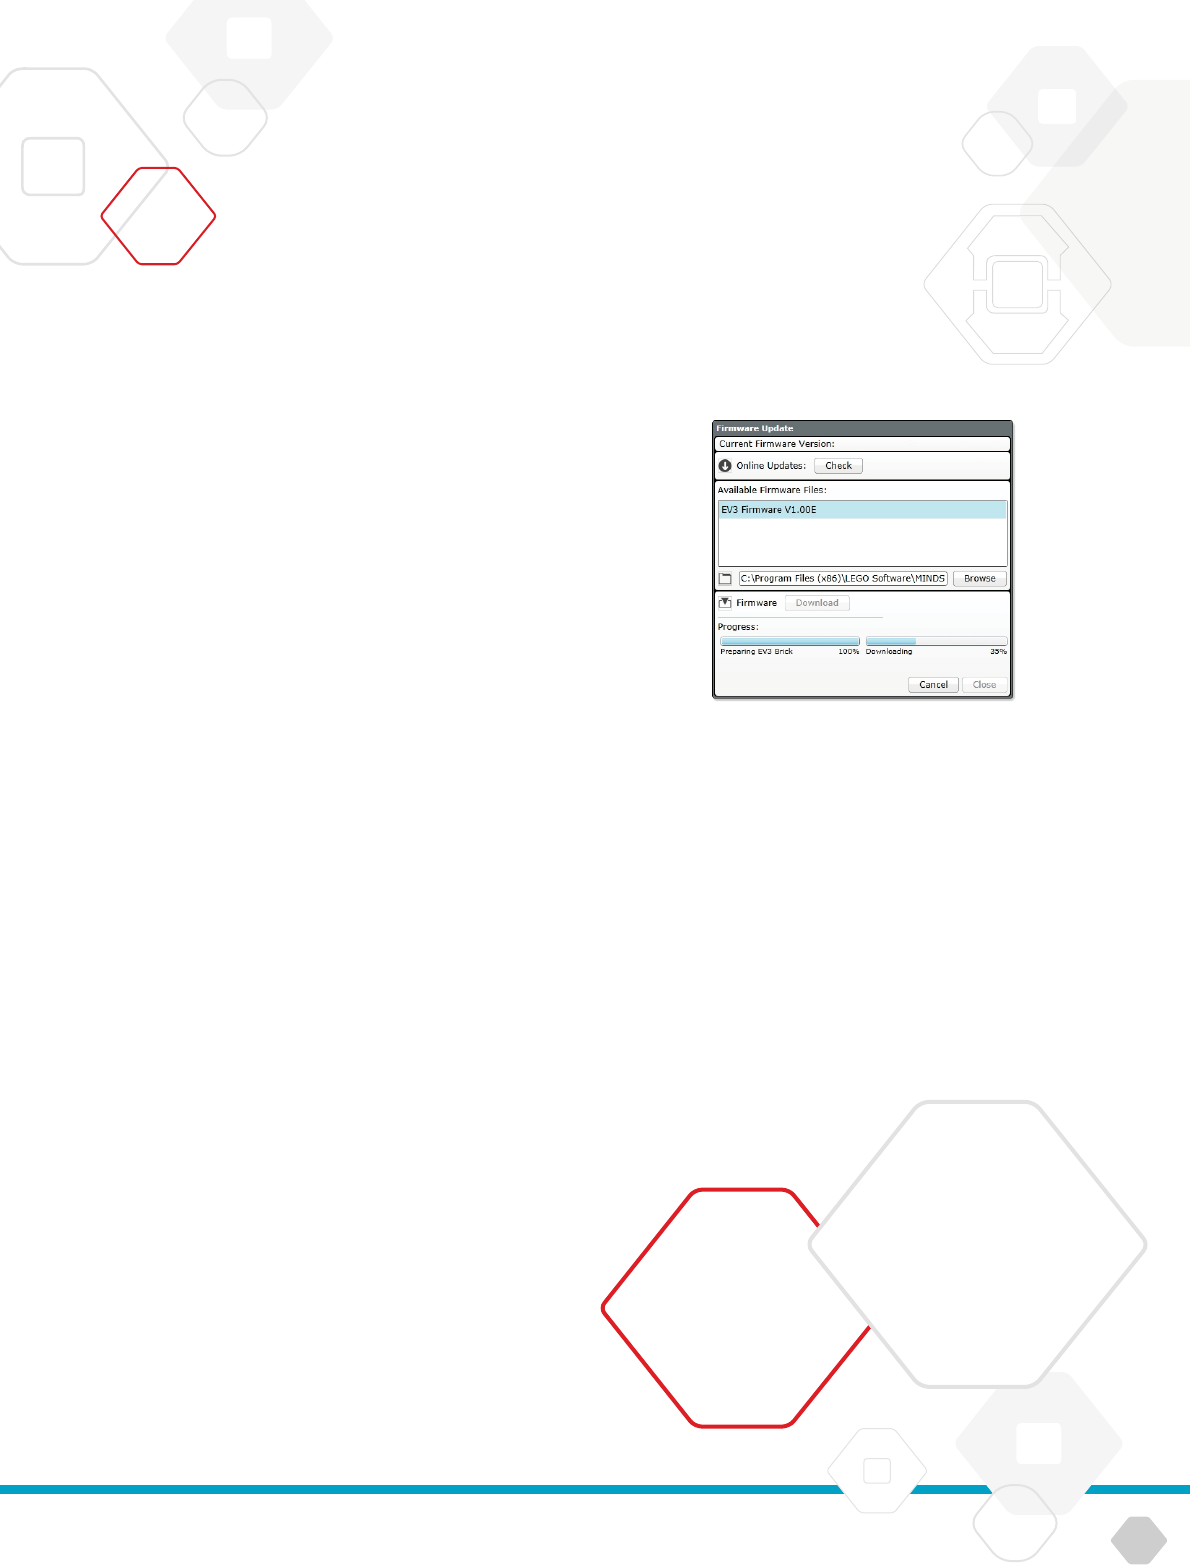
Select Firmware Update in the Tools menu.
Click the Check button to see if new firmware updates are
available.
Select the most recent firmware version from the Available
firmware files.
If you want to use a firmware version located on your computer
instead, use the Browse button to find and select the correct
firmware file.
Click the Download button to download the new firmware to
your EV3 Brick. The progress bars at the bottom of theFirmware
Update dialog box will show you how the firmware update is
proceeding. Once complete, your EV3 Brick will restart itself.
If for some reason your EV3 Brick stops working during the firmware
update process, you will need to manually update the firmware by
doing the following (the EV3 Brick still needs a USB connection to
your computer):
Hold down the Back, Center, and Right buttons on the EV3
Brick.
When the EV3 Brick restarts, release the Back button.
When the screen says “Updating,” release the Center and Right
buttons and click the Download button in the Firmware Update
tool. The firmware will be downloaded to your EV3 Brick, which
will restart itself.
If the manual firmware update does not make your EV3 Brick work
the first time, repeat the manual update process.
Firmware Update
Firmware Update tool
NOTE:
Check your EV3 Brick
batteries before repeating
manual firmware updates.
The problem may simply
be due to worn-down
batteries!

LEGOeducation.com 53
LEGOtheLEGOlogoMINDSTORMSandtheMINDSTORMSlogoaretrademarksofthe/
sontdesmarquesdecommercede/sonmarcasregistradasdeLEGOGroup©TheLEGOGroup
TROUBLESHOOTING
If your EV3 Brick suddenly stops working and cannot be shut down
through the normal process, you will need to reset your EV3 Brick.
Resetting the EV3 Brick does not delete existing files and projects
from previous sessions in the EV3 Brick memory. Files and projects
from the existing session will be lost.
Make sure that the EV3 Brick is turned on.
2. Hold down the Back, Center, and Left buttons on the EV3 Brick.
3. When the screen goes blank, release the Back button.
4. When the screen says “Starting,” release the Center and Left
buttons.
Resetting the EV3 Brick
NOTE:
Check your EV3 Brick
batteries before reinstalling
firmware. Problems may
simply be due to worn-
down batteries!
LEGOeducation.com 54
LEGOtheLEGOlogoMINDSTORMSandtheMINDSTORMSlogoaretrademarksofthe/
sontdesmarquesdecommercede/sonmarcasregistradasdeLEGOGroup©TheLEGOGroup
USEFUL INFORMATION
Sound File List
ANIMALS COLORS
Catpurr Black
Dogbark Blue
Dogbark Brown
Doggrowl Green
Dogsniff Red
Dogwhine White
Elephantcall Yellow
Insectbuzz
Insectbuzz
Insectchirp
Snakehiss
Snakerattle
T-rexroar
LEGOeducation.com 55
LEGOtheLEGOlogoMINDSTORMSandtheMINDSTORMSlogoaretrademarksofthe/
sontdesmarquesdecommercede/sonmarcasregistradasdeLEGOGroup©TheLEGOGroup
USEFUL INFORMATION
Sound File List
COMMUNICATION EXPRESSIONS
Bravo Boing
EV Boo
Fantastic Cheering
Gameover Crunching
Go
Goodjob
Good
Crying
Fanfare
Goodbye Kungfu
Hello Laughing
Hi Laughing
LEGO Thankyou Magicwand
MINDSTORMS Yes
Morning
No
Ouch
Shouting
Okay Smack
Okey-dokey Sneezing
Sorry Snoring
Uh-oh
LEGOeducation.com 56
LEGOtheLEGOlogoMINDSTORMSandtheMINDSTORMSlogoaretrademarksofthe/
sontdesmarquesdecommercede/sonmarcasregistradasdeLEGOGroup©TheLEGOGroup
USEFUL INFORMATION
Sound File List
INFORMATION MECHANICAL
Activate Airrelease
Analyze Airbrake
Backwards Backingalert
Color Blip
Detected
Down
Erroralarm
Blip
Blip
Error Blip
Flashing Horn
Forward Horn
Left Turn Laser
Object Up
Right
Searching
Motoridle
Motorstart
Start Motorstop
Stop Ratchet
Touch Sonar
Ticktack
Walk
LEGOeducation.com 57
LEGOtheLEGOlogoMINDSTORMSandtheMINDSTORMSlogoaretrademarksofthe/
sontdesmarquesdecommercede/sonmarcasregistradasdeLEGOGroup©TheLEGOGroup
USEFUL INFORMATION
Sound File List
MOVEMENTS NUMBERS
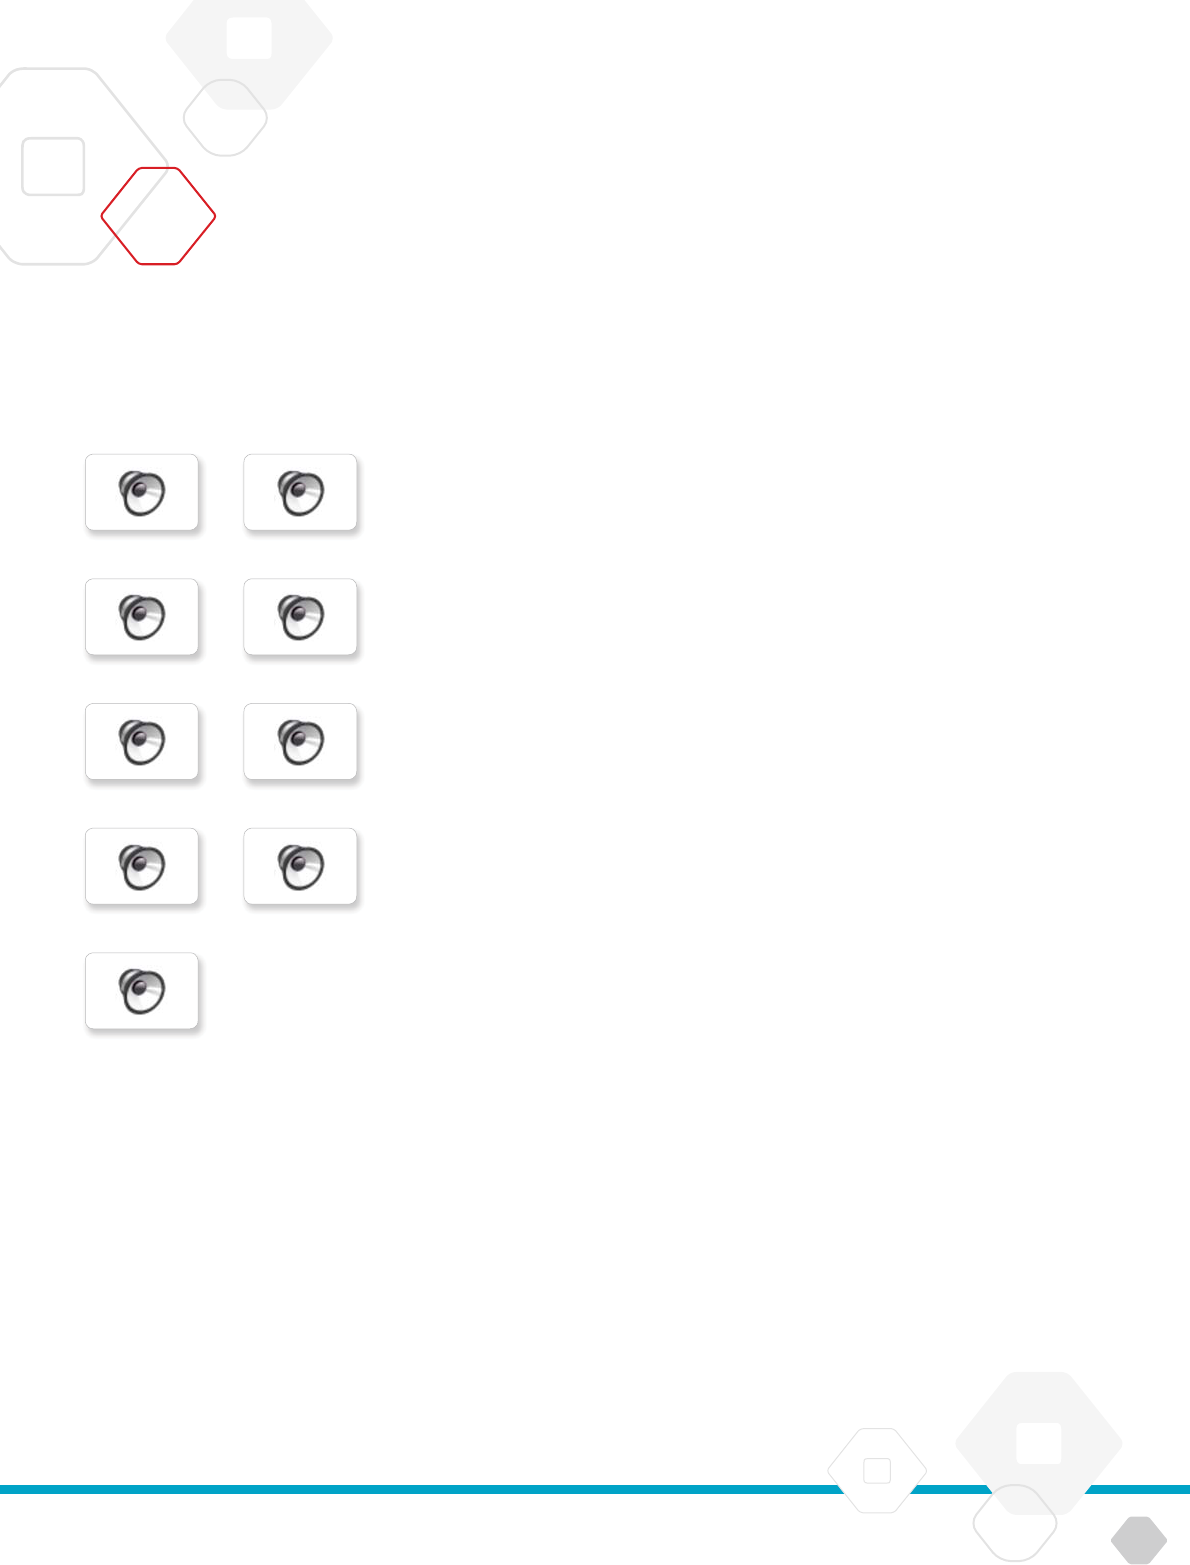
Arm Eight
Arm Five
Arm Four
Arm Nine
Dropload
Liftload
Servo One
Servo Seven
Servo Six
Servo Speeding Ten
Slideload
Snap
Speeddown Three
Speedidle Two
Speedup Zero
LEGOeducation.com 58
LEGOtheLEGOlogoMINDSTORMSandtheMINDSTORMSlogoaretrademarksofthe/
sontdesmarquesdecommercede/sonmarcasregistradasdeLEGOGroup©TheLEGOGroup
USEFUL INFORMATION
Sound File List
SYSTEM
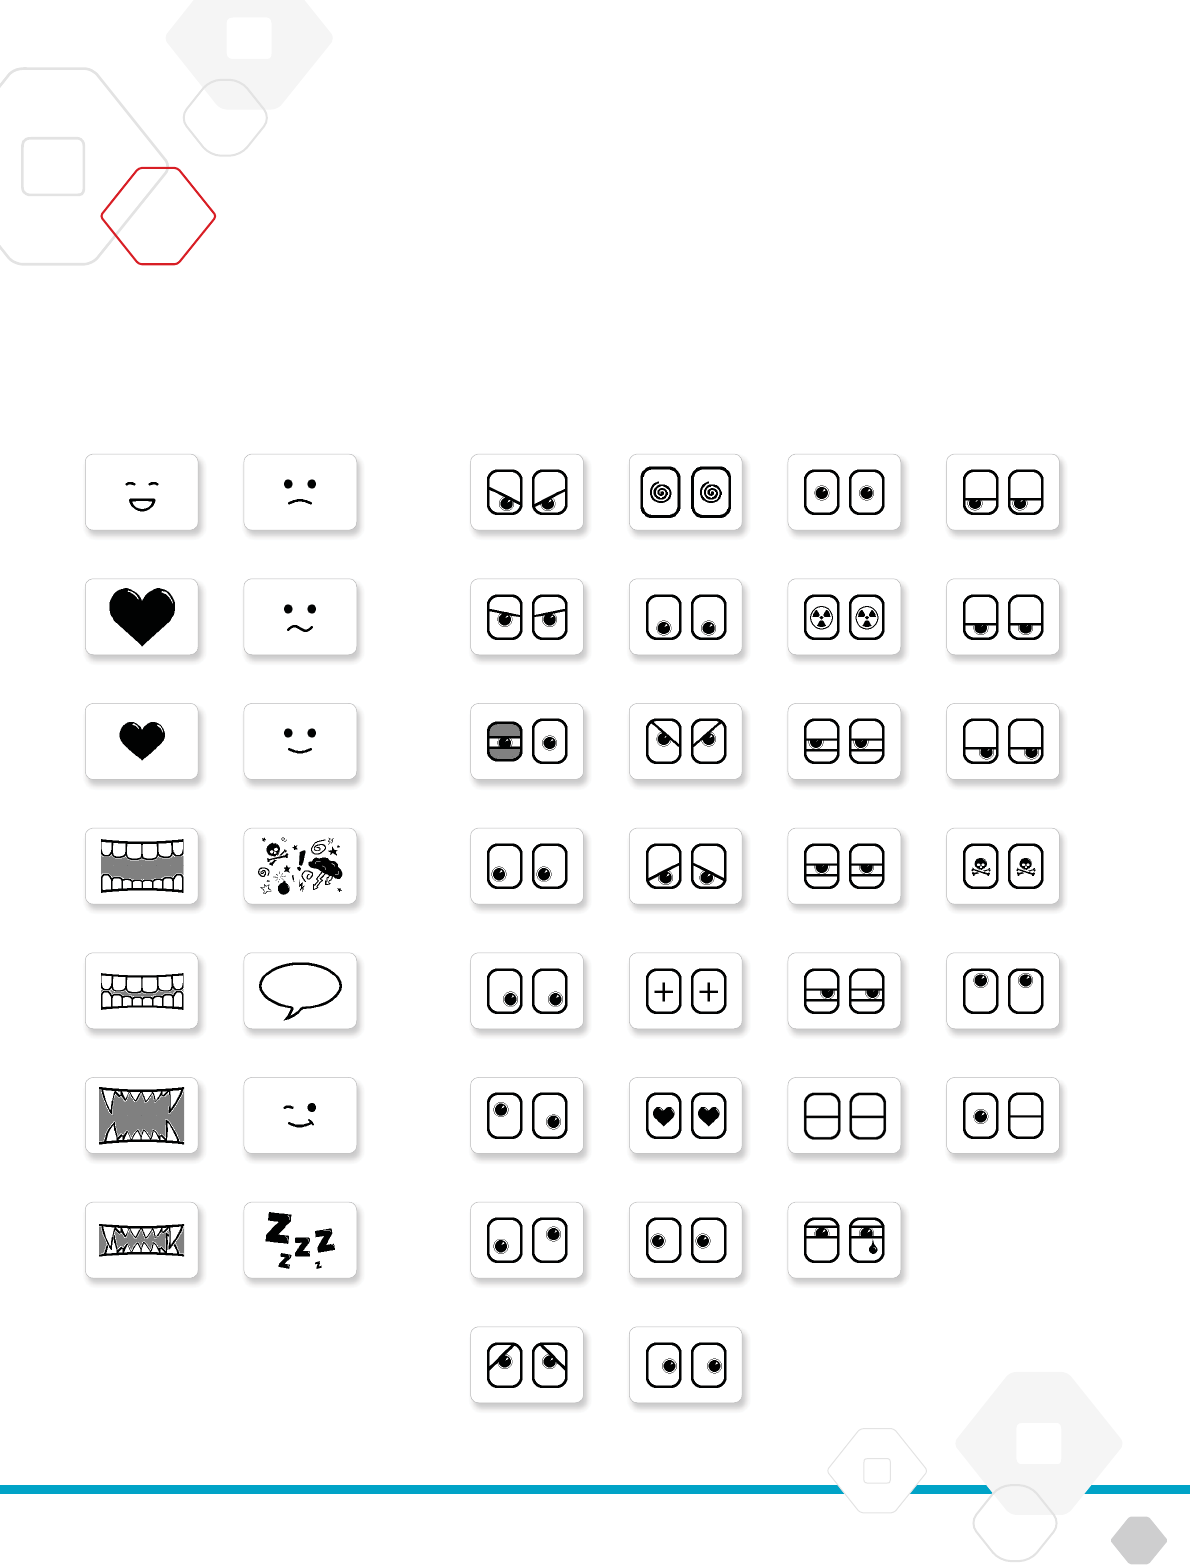
Click
Powerdown
Ready
Startup
Confirm
Connect
Download
Generalalert
Overpower
LEGOeducation.com 59
LEGOtheLEGOlogoMINDSTORMSandtheMINDSTORMSlogoaretrademarksofthe/
sontdesmarquesdecommercede/sonmarcasregistradasdeLEGOGroup©TheLEGOGroup
USEFUL INFORMATION
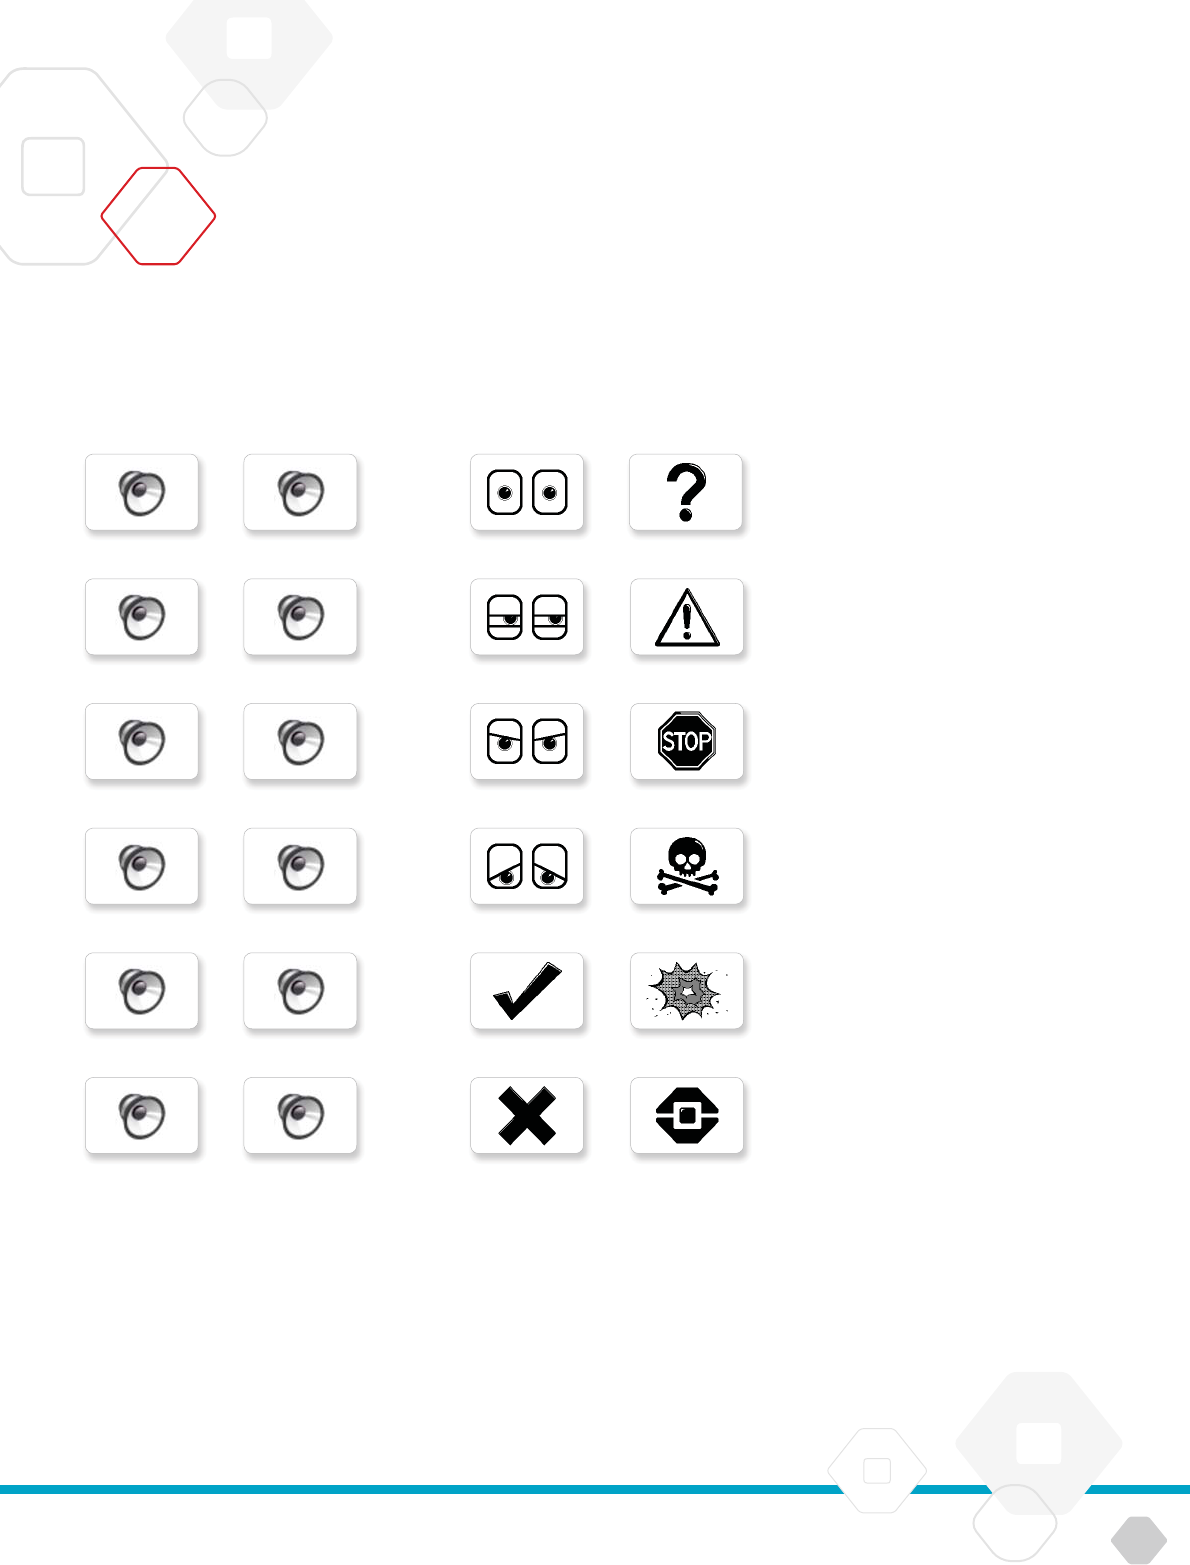
Image File List
EXPRESSIONS
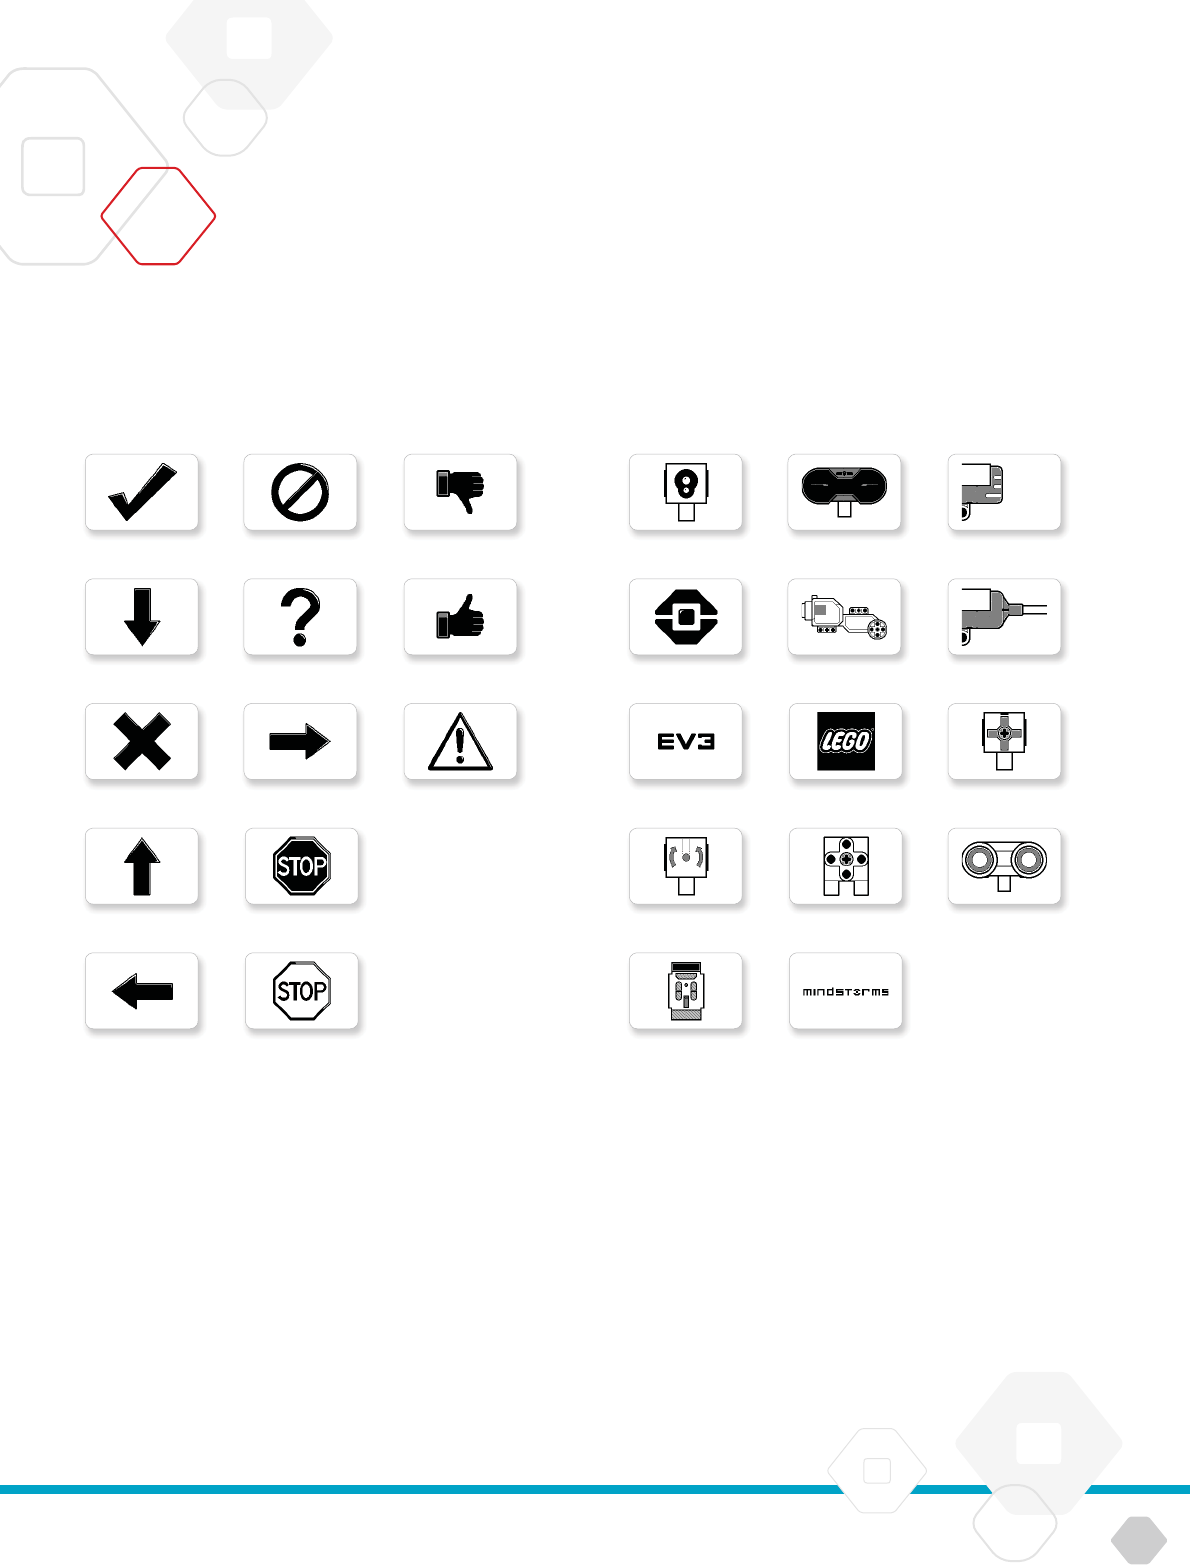
Bigsmile
Heartlarge
Heartsmall
Mouthopen
Mouthshut
Mouthopen
Mouthshut ZZZ
Sad
Sick
Smile
Swearing
Talking
Wink
Disappointed
Angry Dizzy
Awake Down
Blackeye Evil
Bottomleft Hurt
Bottomright Knockedout
Crazy Love
Crazy
Up
Sleeping
Pinchright
TearMiddleleft
Winking
Middleright
TiredleftNeutral
TiredmiddleNuclear
TiredrightPinchleft
ToxicPinchmiddle
EYES
LEGOeducation.com 60
LEGOtheLEGOlogoMINDSTORMSandtheMINDSTORMSlogoaretrademarksofthe/
sontdesmarquesdecommercede/sonmarcasregistradasdeLEGOGroup©TheLEGOGroup
USEFUL INFORMATION
Image File List
INFORMATION
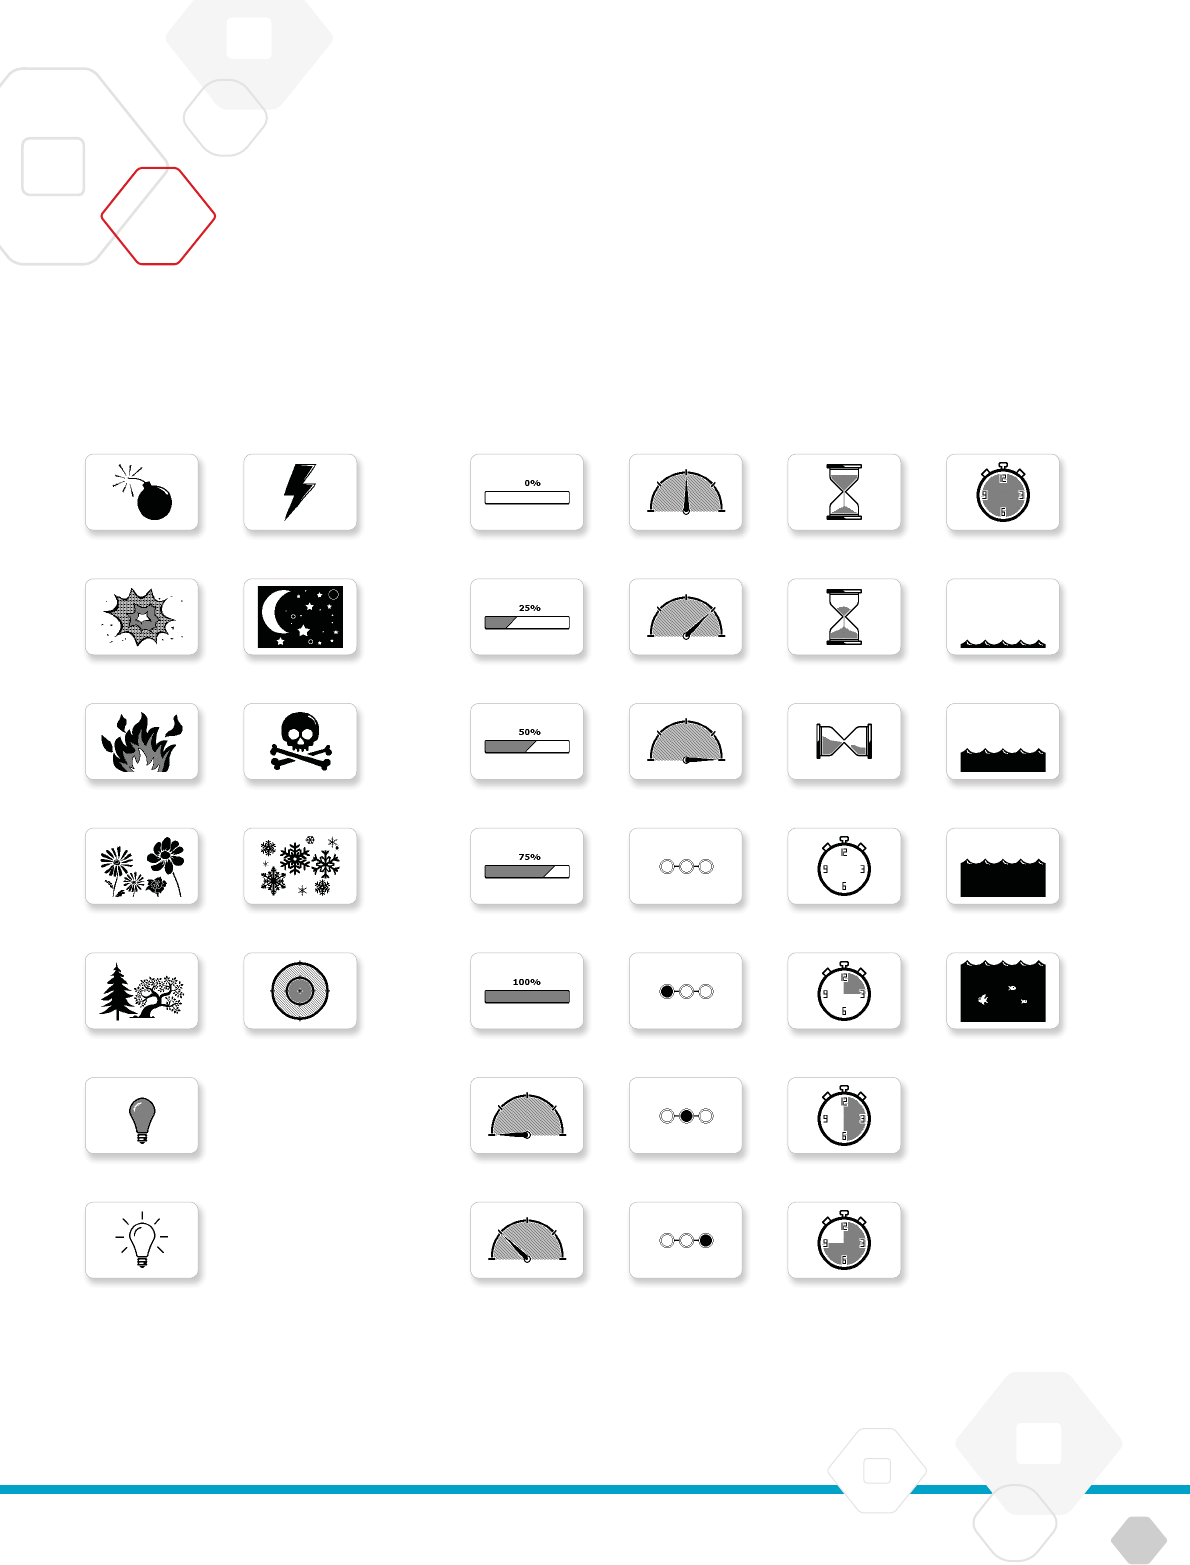
Accept
Backward
Decline
Forward
Left
Nogo
Questionmark
Right
Stop
Stop
Thumbsdown
Thumbsup
Warning
Colorsensor
EVicon
EV
Gyrosensor
IRbeacon
IRsensor
Largemotor
USsensor
LEGO
Mediummotor
MINDSTORMS
Soundsensor
Tempsensor
Touchsensor
LEGO
PROGRESS
LEGOeducation.com 61
LEGOtheLEGOlogoMINDSTORMSandtheMINDSTORMSlogoaretrademarksofthe/
sontdesmarquesdecommercede/sonmarcasregistradasdeLEGOGroup©TheLEGOGroup
USEFUL INFORMATION
Image File List
DialBar
DialBar
DialBar
DotsBar
DotsBar
DotsDial
DotsDial Timer
Hourglass Timer
Hourglass Waterlevel
Hourglass Waterlevel
Timer Waterlevel
Timer Waterlevel
Timer
OBJECTS
Bomb
Boom
Fire
Flowers
Forest
Lightoff
Lighton
Lightning
Night
Pirate
Snow
Target
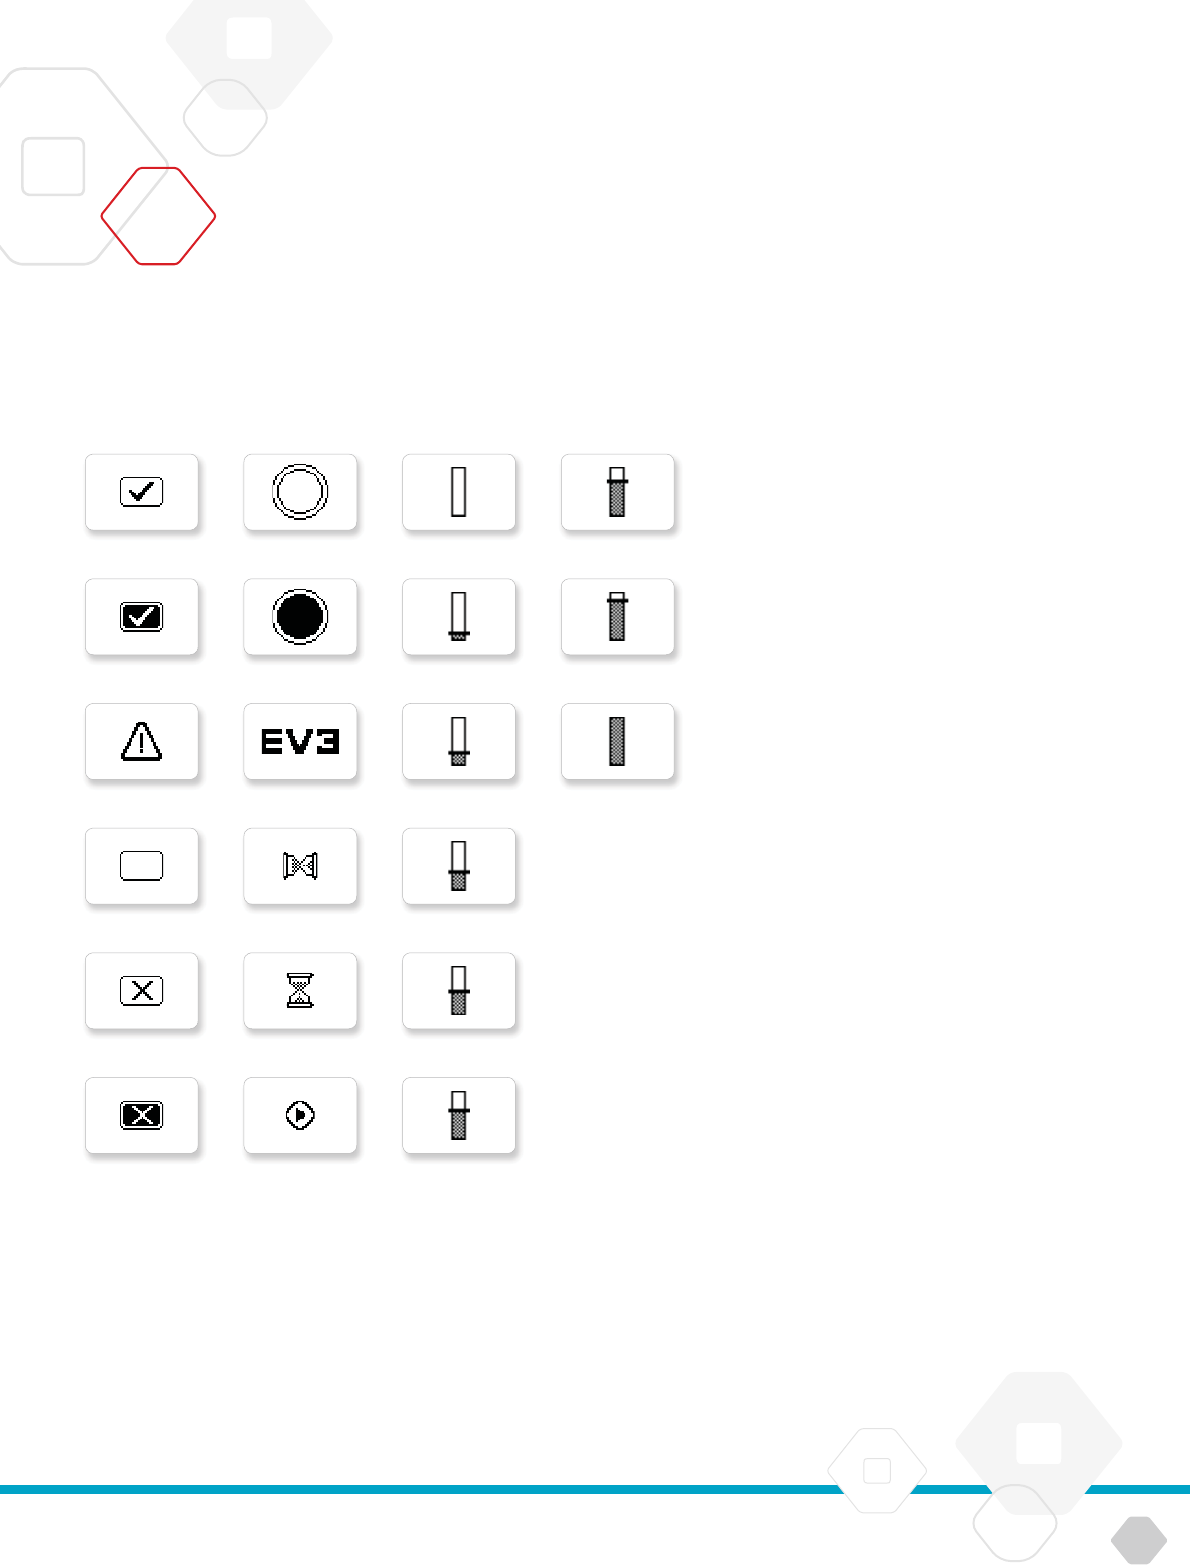
LEGOeducation.com 62
LEGOtheLEGOlogoMINDSTORMSandtheMINDSTORMSlogoaretrademarksofthe/
sontdesmarquesdecommercede/sonmarcasregistradasdeLEGOGroup©TheLEGOGroup
USEFUL INFORMATION
Image File List
SYSTEM
!Accept
!Accept
!Alert
!Box
!Decline
!Decline
!Dotempty
!Slider
!Slider
!Dotfull
!Slider!EV
!Slider!Hourglass
!Slider!Hourglass
!Slider!Play
!Slider!Slider
!Slider
LEGOeducation.com 63
LEGOtheLEGOlogoMINDSTORMSandtheMINDSTORMSlogoaretrademarksofthe/
sontdesmarquesdecommercede/sonmarcasregistradasdeLEGOGroup©TheLEGOGroup
USEFUL INFORMATION
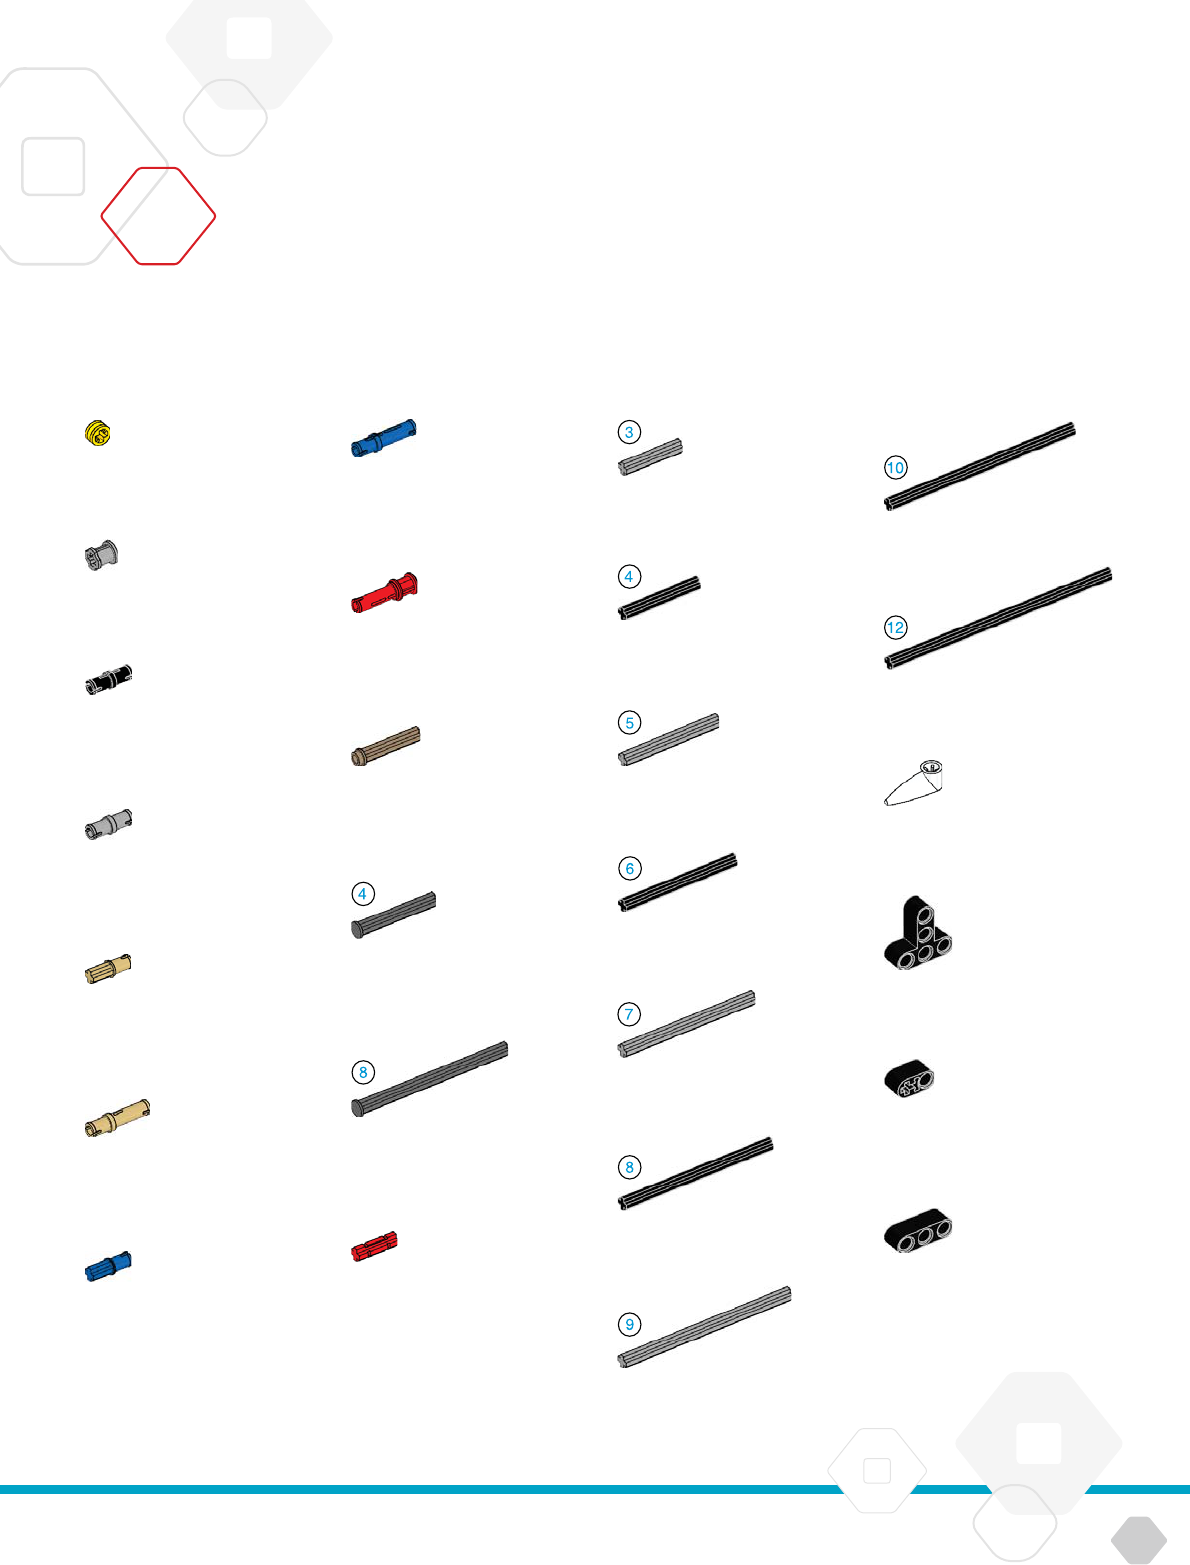
IMAGES
Accept
Pinchright
Pirate
Neutral
Hurt
Decline
Questionmark
Awake
Warning
Stop
Boom
EVicon
Brick Program App—Assets List
SOUNDS
Hello
Fanfare
Start
Goodbye
Erroralarm
Stop
Object
Blip
Snap
Ouch
Arm
Laser
LEGOeducation.com 64
LEGOtheLEGOlogoMINDSTORMSandtheMINDSTORMSlogoaretrademarksofthe/
sontdesmarquesdecommercede/sonmarcasregistradasdeLEGOGroup©TheLEGOGroup
USEFUL INFORMATION
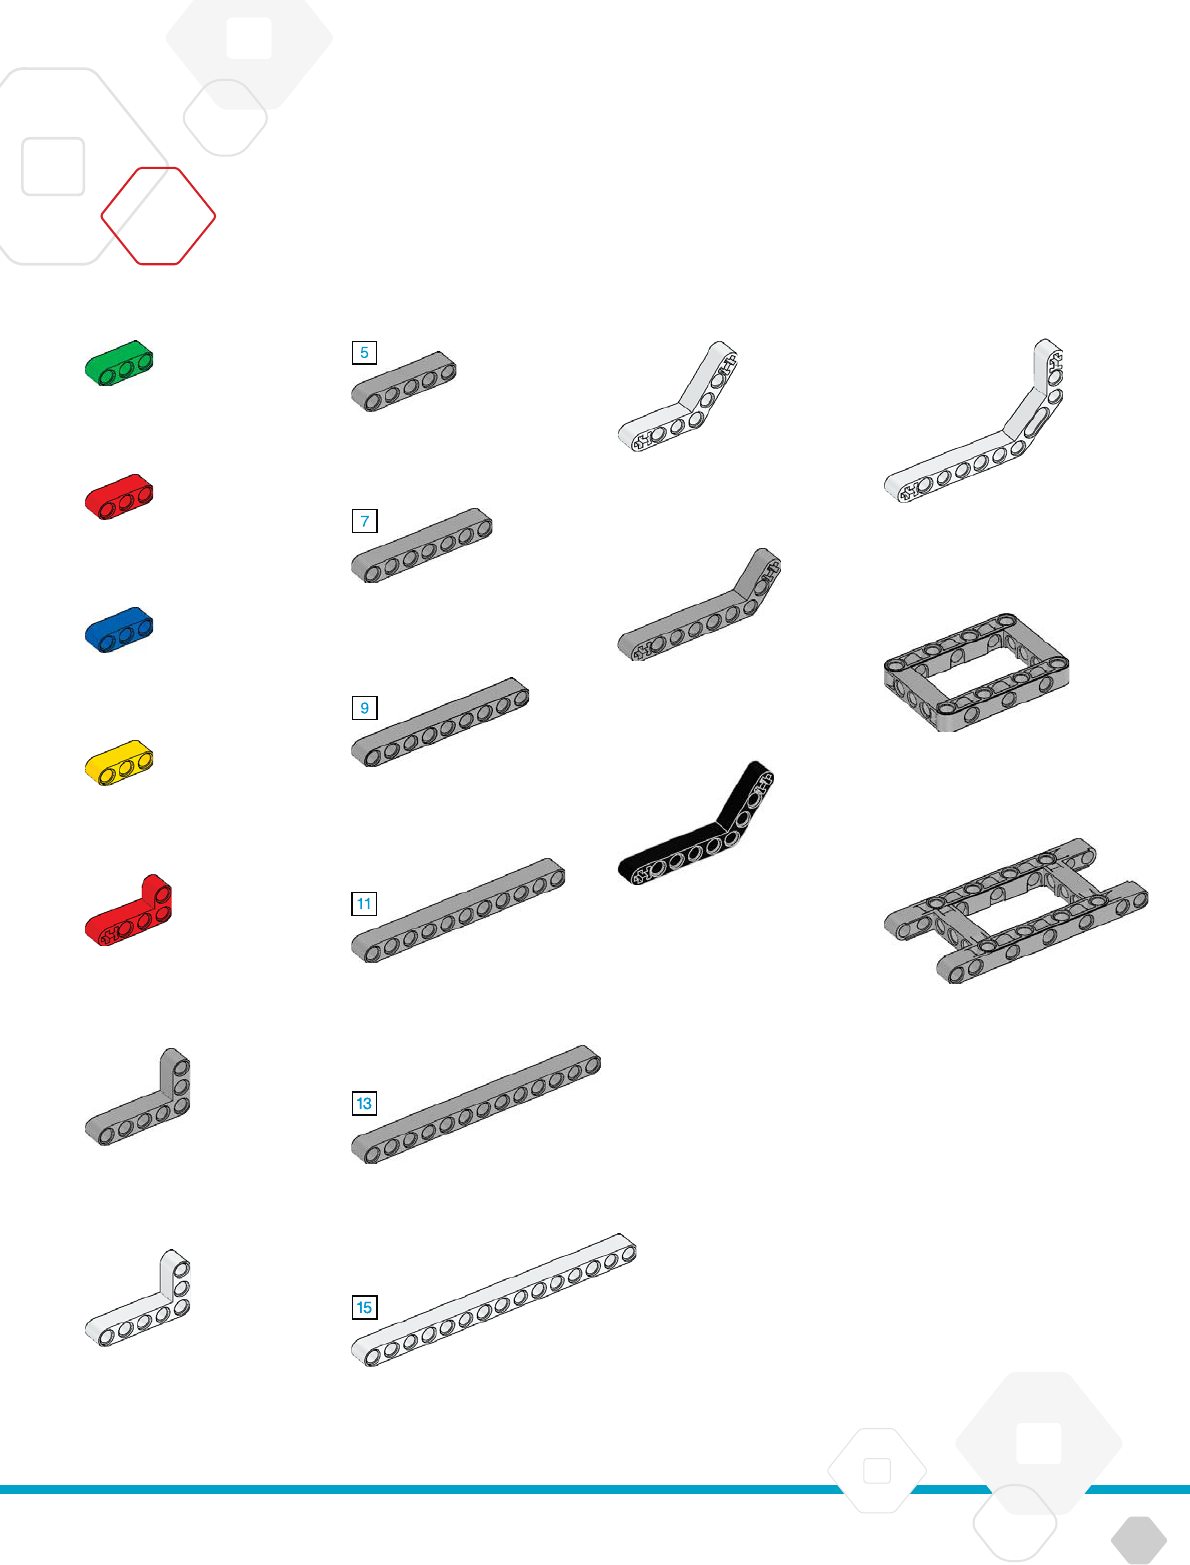
Element List
x
Pointer-modulewhite
x
Connectorpegwithaxle
-modulebeige
x
Connectorpeg
-modulebeige
x
Axle-modulered
x
Connectorpegwithbushing
-modulered
x
Connectorpegwithfriction/axle
-moduleblue
x
Bushing½-moduleyellow
x
Axlewithstud
-moduledarkbeige
x
Bushing-modulegray
x
Connectorpegwithfriction
-moduleblack
x
Connectorpeg
-modulegray
x
Axlewithstop
-moduledarkgray
x
Axlewithstop
-moduledarkgray
x
Axle-modulegray
x
Axle-modulegray
x
Axle-modulegray
x
Axle-modulegray
x
Axle-moduleblack
x
Axle-moduleblack
x
Axle-moduleblack
x
Axle-moduleblack
x
Axle-moduleblack
x
T-Beamx-moduleblack
x
Beam-moduleblack
x
Beamwithcrosshole
-moduleblack
x
Connectorpegwithfriction
-moduleblue
LEGOeducation.com 65
LEGOtheLEGOlogoMINDSTORMSandtheMINDSTORMSlogoaretrademarksofthe/
sontdesmarquesdecommercede/sonmarcasregistradasdeLEGOGroup©TheLEGOGroup
USEFUL INFORMATION
x
Angularbeam
x-moduleblack
x
Angularbeam
x-modulewhite
x
Angularbeam
x-modulewhite
x
Doubleangularbeam
x-modulewhite
x
Beam-modulered
x
Angularbeam
x-modulered
x
Beam-moduleblue
x
Beam-moduleyellow
x
Beam-modulewhite
x
Beam-modulegreen
x
Frame
x-modulegray
x
Frame
x-modulegray
x
Angularbeam
x-modulegray
x
Beam-modulegray
x
Angularbeam
x-modulegray
x
Beam-modulegray
x
Beam-modulegray
x
Beam-modulegray
x
Beam-modulegray
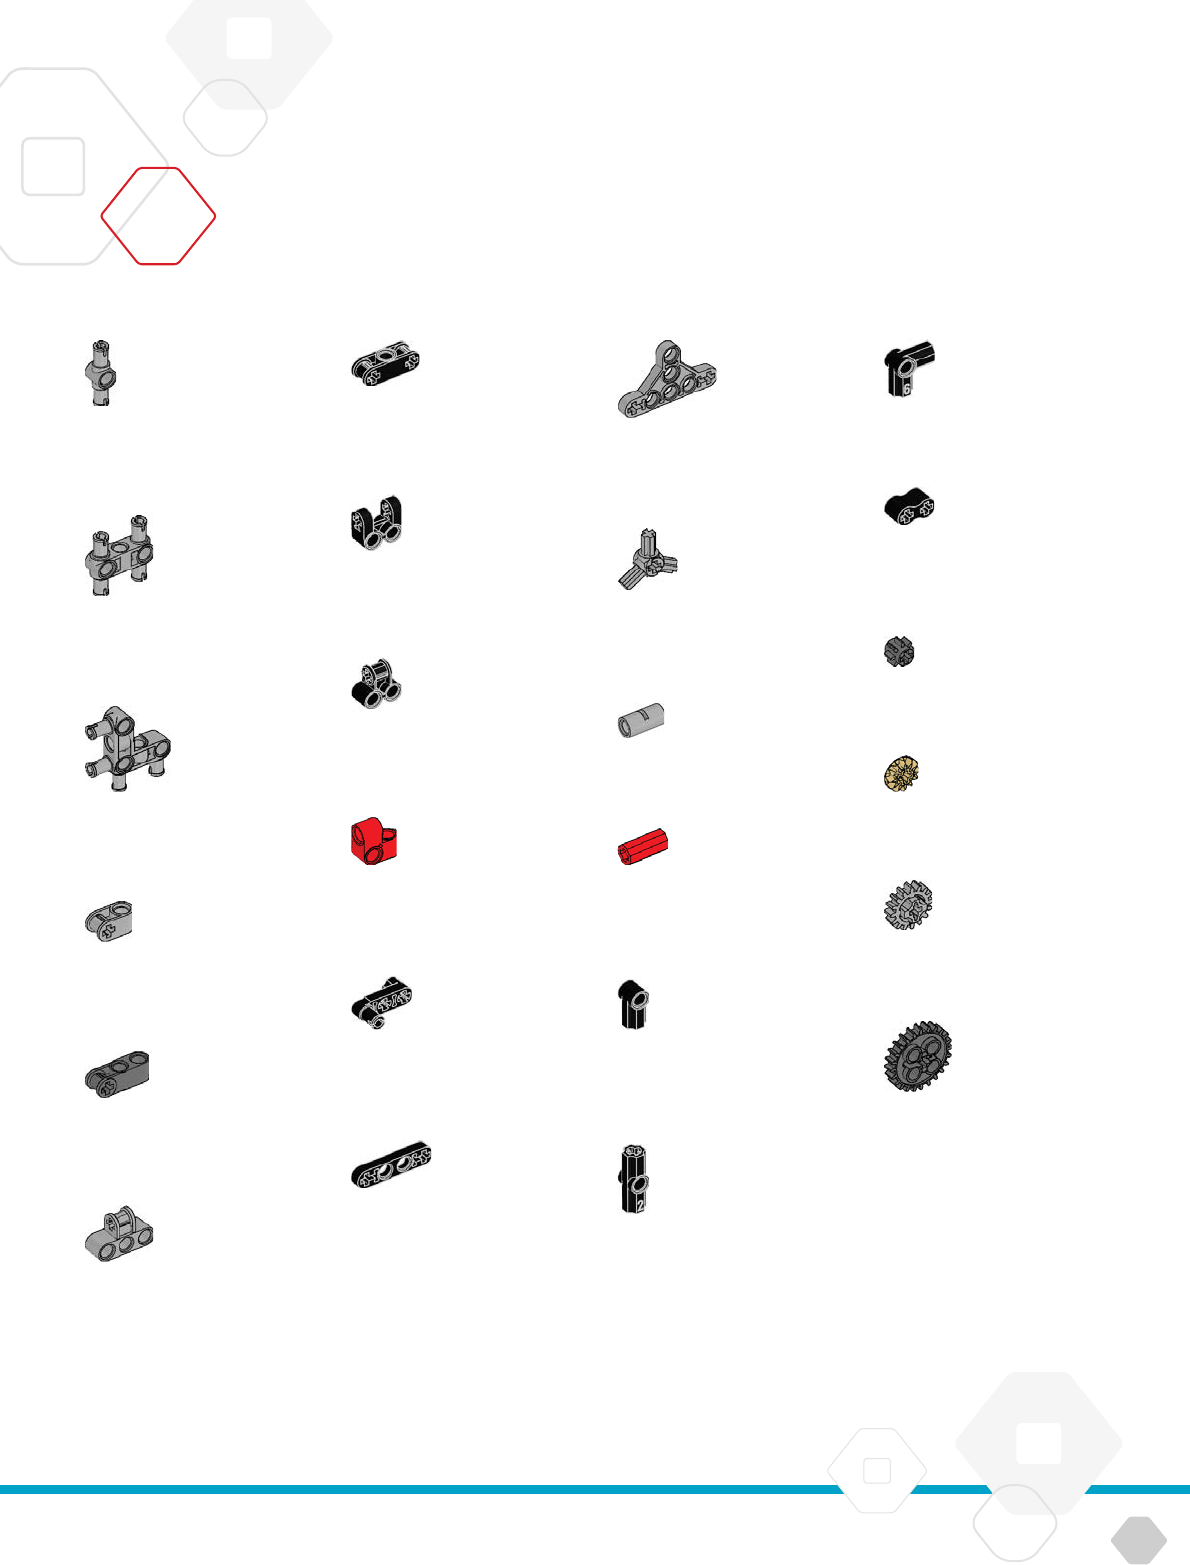
LEGOeducation.com 66
LEGOtheLEGOlogoMINDSTORMSandtheMINDSTORMSlogoaretrademarksofthe/
sontdesmarquesdecommercede/sonmarcasregistradasdeLEGOGroup©TheLEGOGroup
USEFUL INFORMATION
x
Connectorpegwithhandle
-moduleblack
x
Crossbeam
x-modulered
x
½trianglebeam
x-modulegray
x
Doubleconnectorpeg
-modulegray
x
Crossblock
x-modulegray
x
Doubleconnectorpeg
x-modulegray
x
Crossblock
-modulegray
x
Angularconnectorpeg
x-modulegray
x
Crossblock
-moduledarkgray
x
Crossblock
x-moduleblack
x
Doublecrossblock
-moduleblack
x
Crossblockfork
x-moduleblack
x
½beam
-moduleblack
x
Angularblockº
black
x
Angularblockº
black
x
Angularblockºblack
x
Rubberbeamwithcrossholes
-moduleblack
x
-spokeangularblock
xºgray
x
Tube-modulegray
x
Gear-toothdarkgray
x
Gear-toothdarkgray
x
Gear-toothgray
x
Bevelgear-toothbeige
x
Bushing/axleextender
-modulered
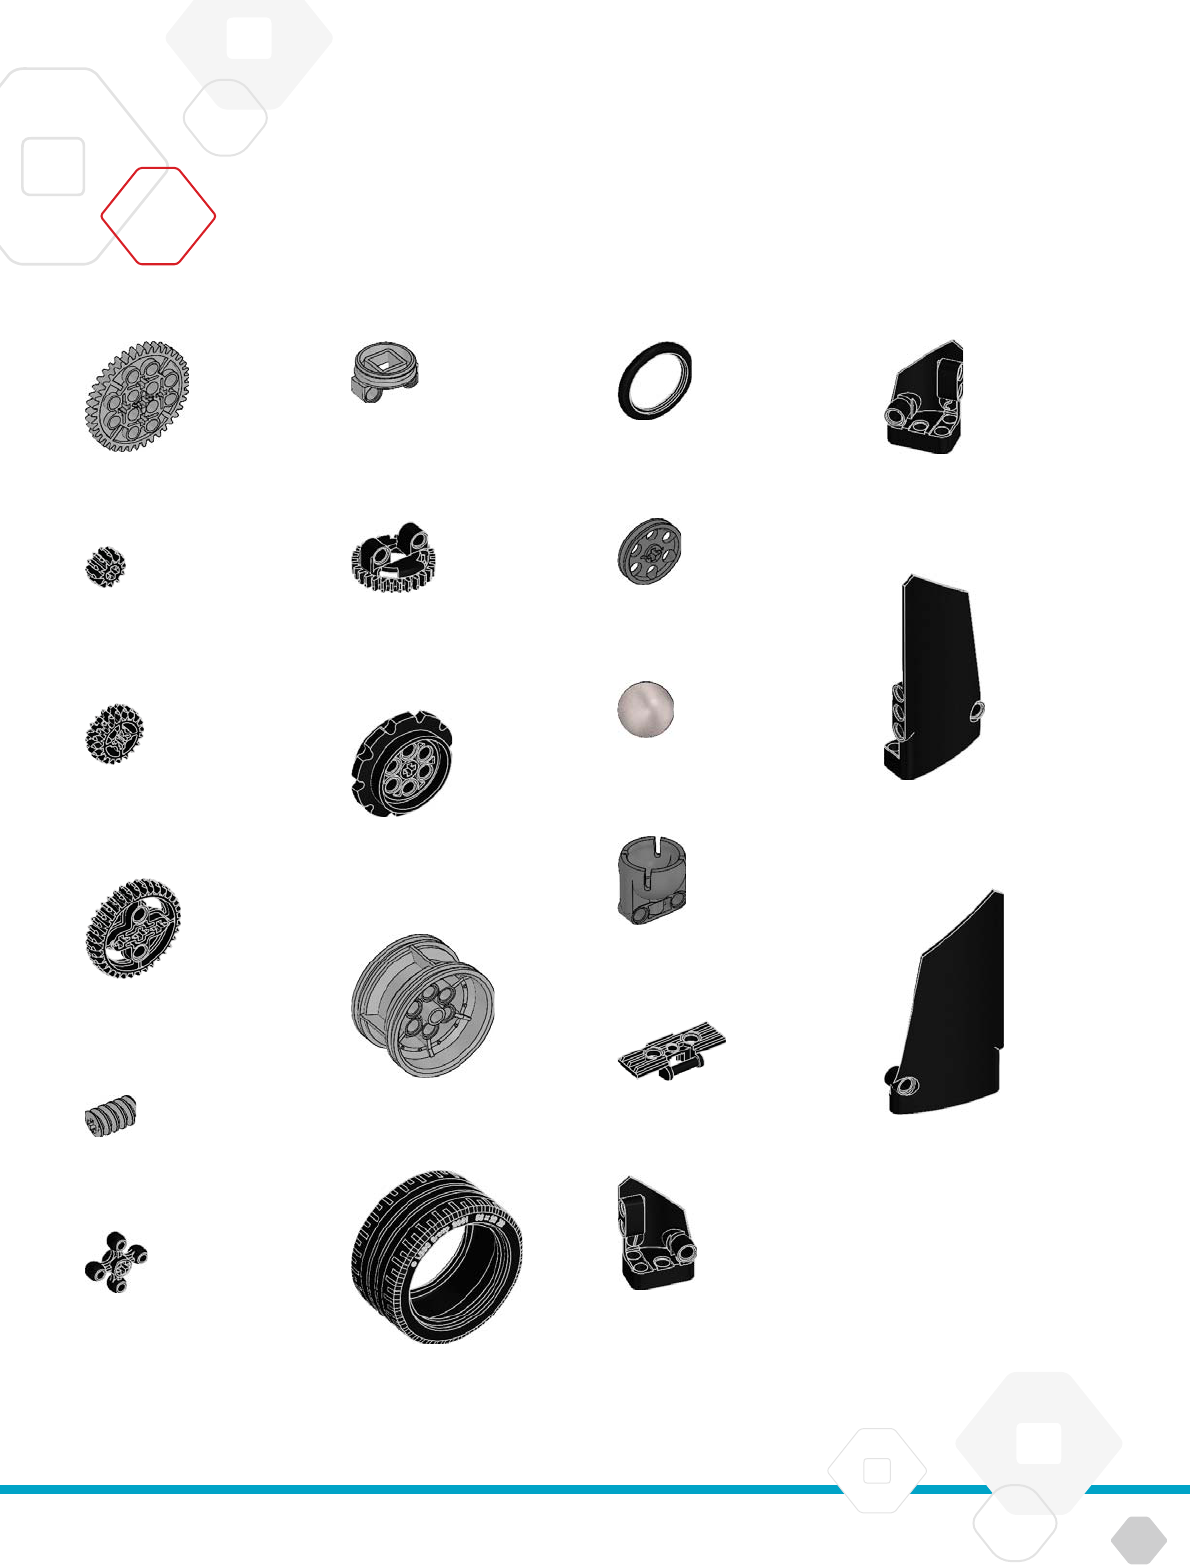
LEGOeducation.com 67
LEGOtheLEGOlogoMINDSTORMSandtheMINDSTORMSlogoaretrademarksofthe/
sontdesmarquesdecommercede/sonmarcasregistradasdeLEGOGroup©TheLEGOGroup
USEFUL INFORMATION
x
Turntablebottom
-toothgray
x
Wormgeargray
x
Turntabletop
-toothblack
x
Gear-toothblack
x
Lowprofiletire
xmmblack
x
Tirexmmblack
x
SteelBallsilvermetalic
x
Hub
xmmgray
x
Ballbearingdarkgray
x
Hubxmmdarkgray
x
Trackx-moduleblack
x
Rightcurvedpanel
x-moduleblack
x
Leftcurvedpanel
x-moduleblack
x
Rightcurvedpanel
x-moduleblack
x
Leftcurvedpanel
x-moduleblack
x
Sprocket
xmmblack
x
Doublebevelgear
-toothblack
x
Doublebevelgear
-toothblack
x
Doublebevelgear
-toothblack
x
Gear-toothgray
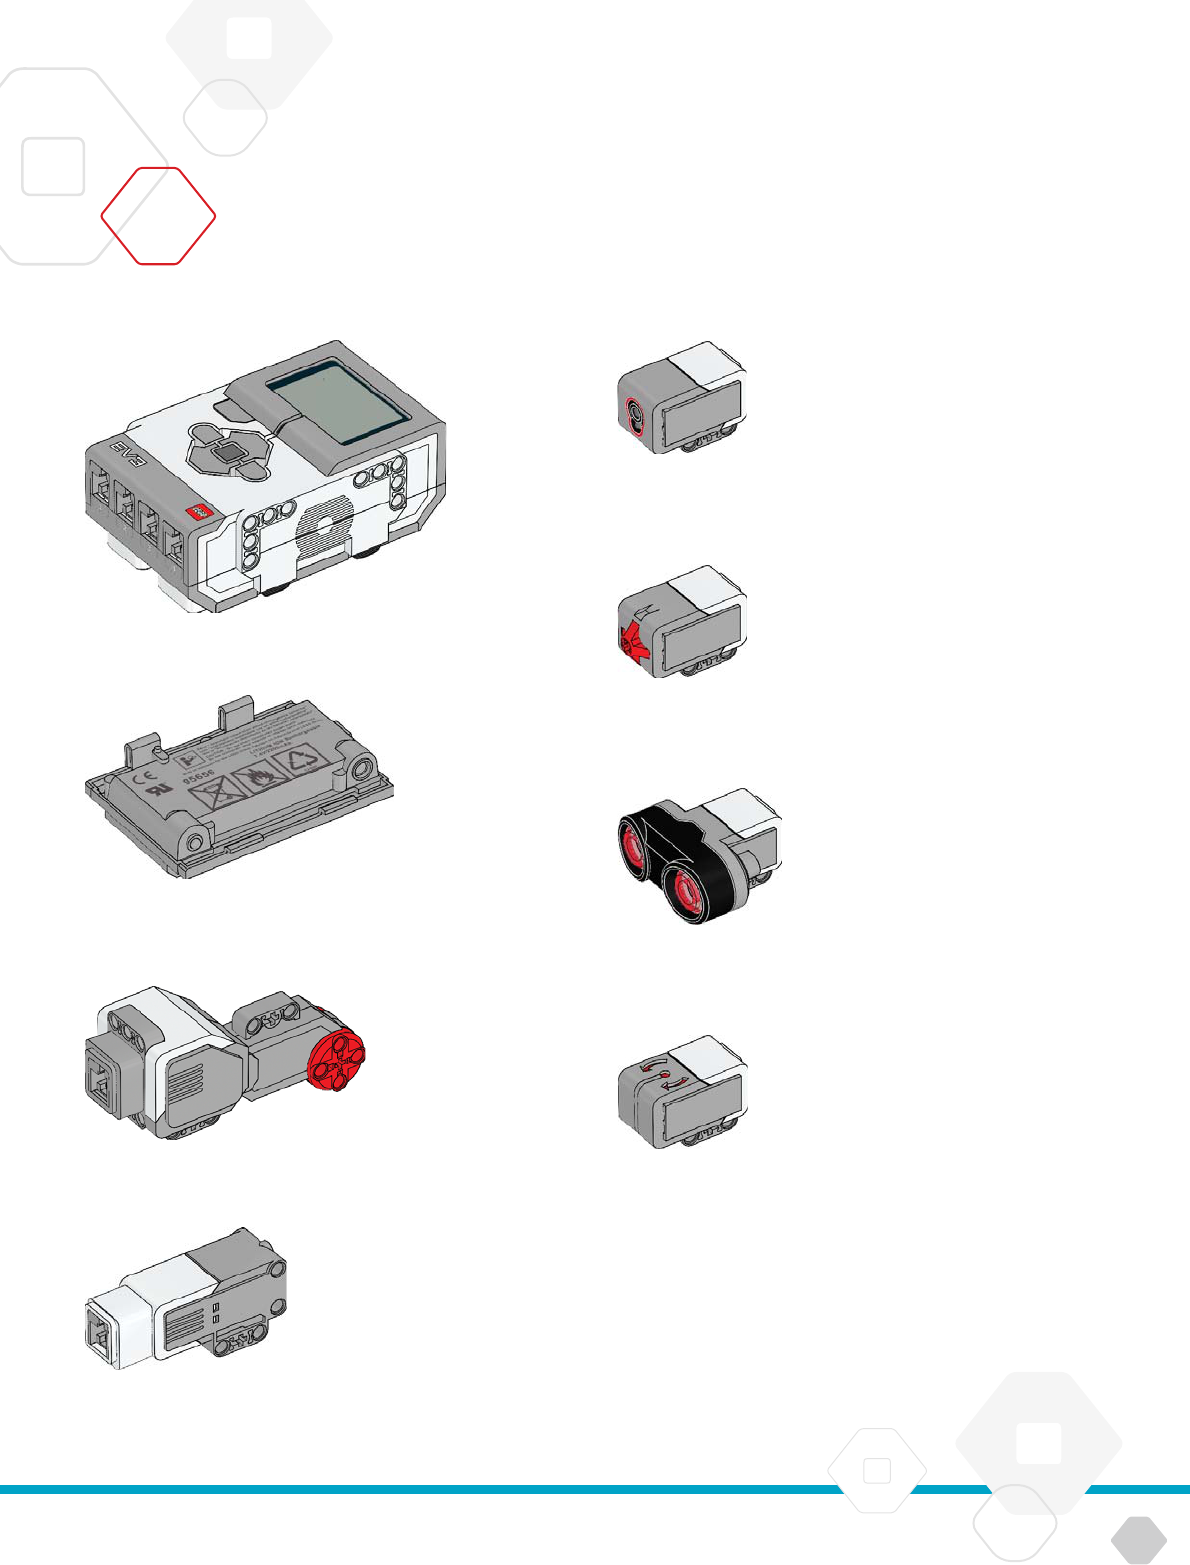
LEGOeducation.com 68
LEGOtheLEGOlogoMINDSTORMSandtheMINDSTORMSlogoaretrademarksofthe/
sontdesmarquesdecommercede/sonmarcasregistradasdeLEGOGroup©TheLEGOGroup
USEFUL INFORMATION
x
GyroSensor
x
UltrasonicSensor
x
ColorSensor
x
TouchSensor
x
MediumMotor
x
RechargeableBattery
x
LargeMotor
x
EVBrick
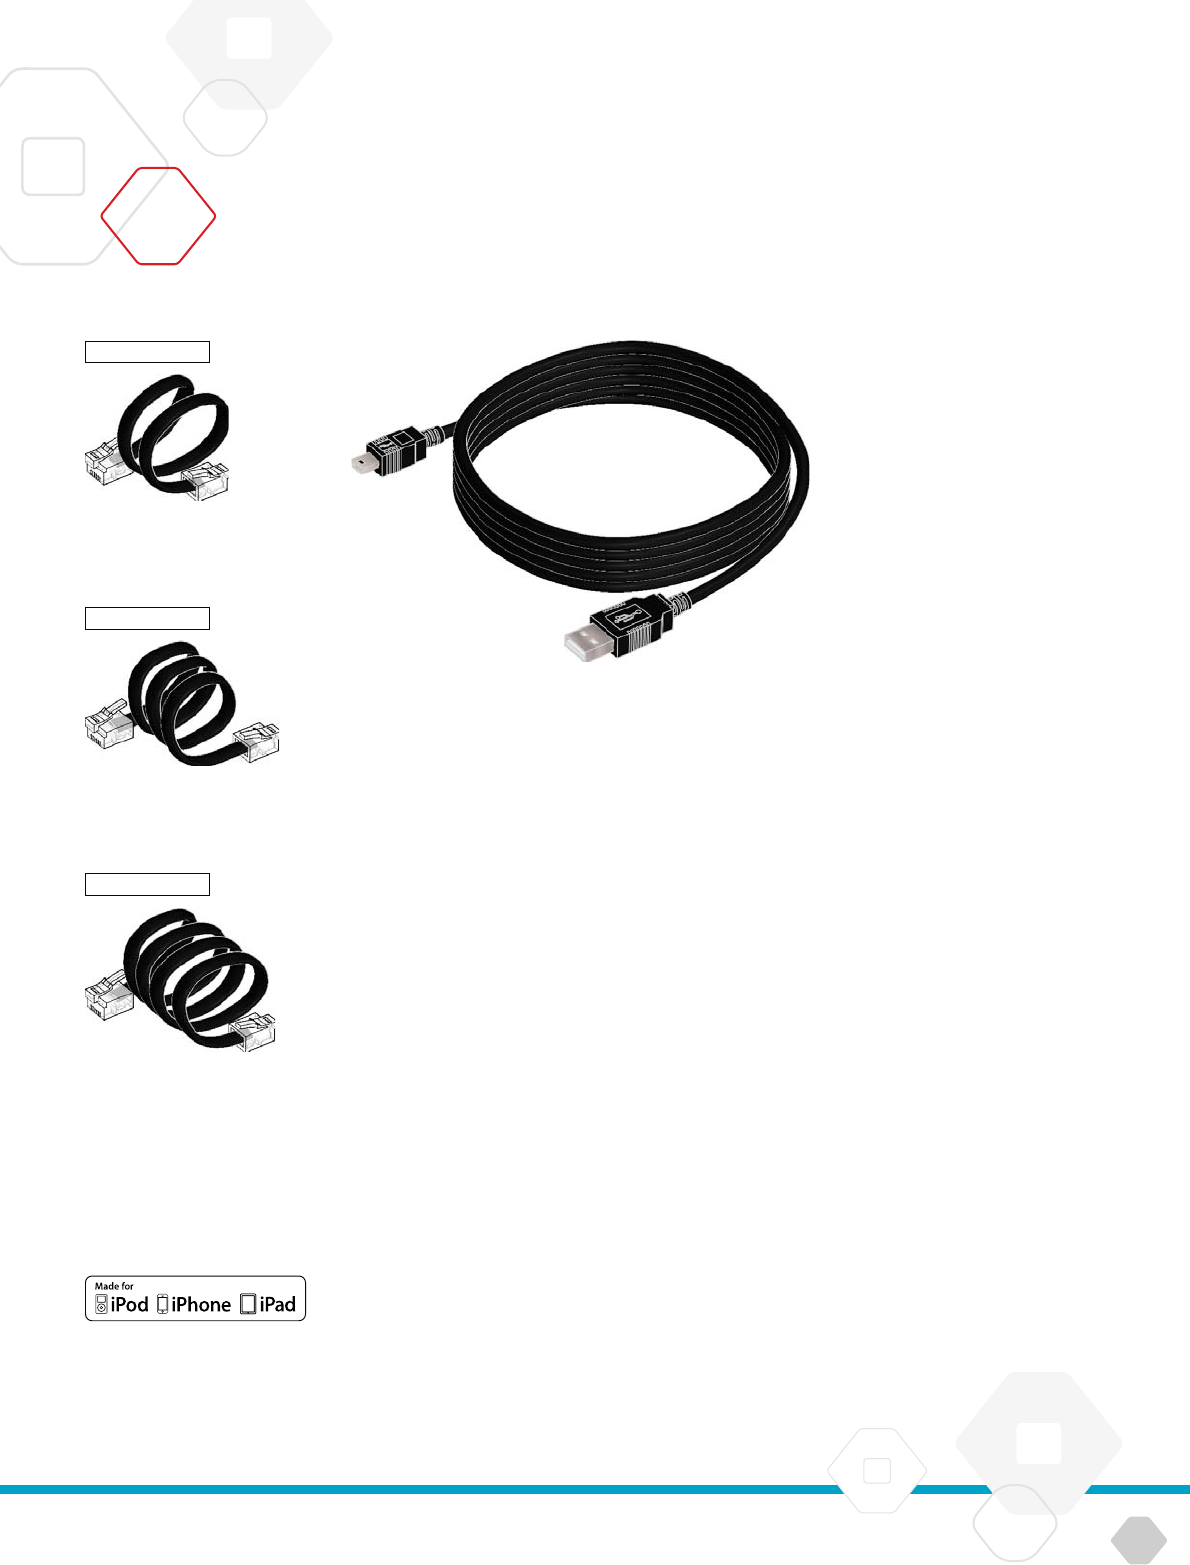
cm/in
cm/in
cm/in
LEGOeducation.com 69
LEGOtheLEGOlogoMINDSTORMSandtheMINDSTORMSlogoaretrademarksofthe/
sontdesmarquesdecommercede/sonmarcasregistradasdeLEGOGroup©TheLEGOGroup
USEFUL INFORMATION
x
Cablecm/in
x
Cablecm/in
x
Cablecm/in
x
USBCable
iPad, iPhone and iPod touch are
trademarks of Apple Inc., registered in
the U.S. and other countries.
iPod Touch (4th gen.)
iPhone 4
iPhone 4S
iPad 1
iPad 2
iPad 3 (3rd gen.)