LG Electronics USA 42LP620HUH LED TV MONITOR User Manual MFL67694902 EN indd
LG Electronics USA LED TV MONITOR MFL67694902 EN indd
Contents
- 1. User Manual 1
- 2. User Manual 2
User Manual 2
ENGLISH
13
ASSEMBLING AND PREPARING
Setting up the TV
You can mount your TV to a wall or attach the stand if you wish to place the TV on an entertainment center
or other furniture.
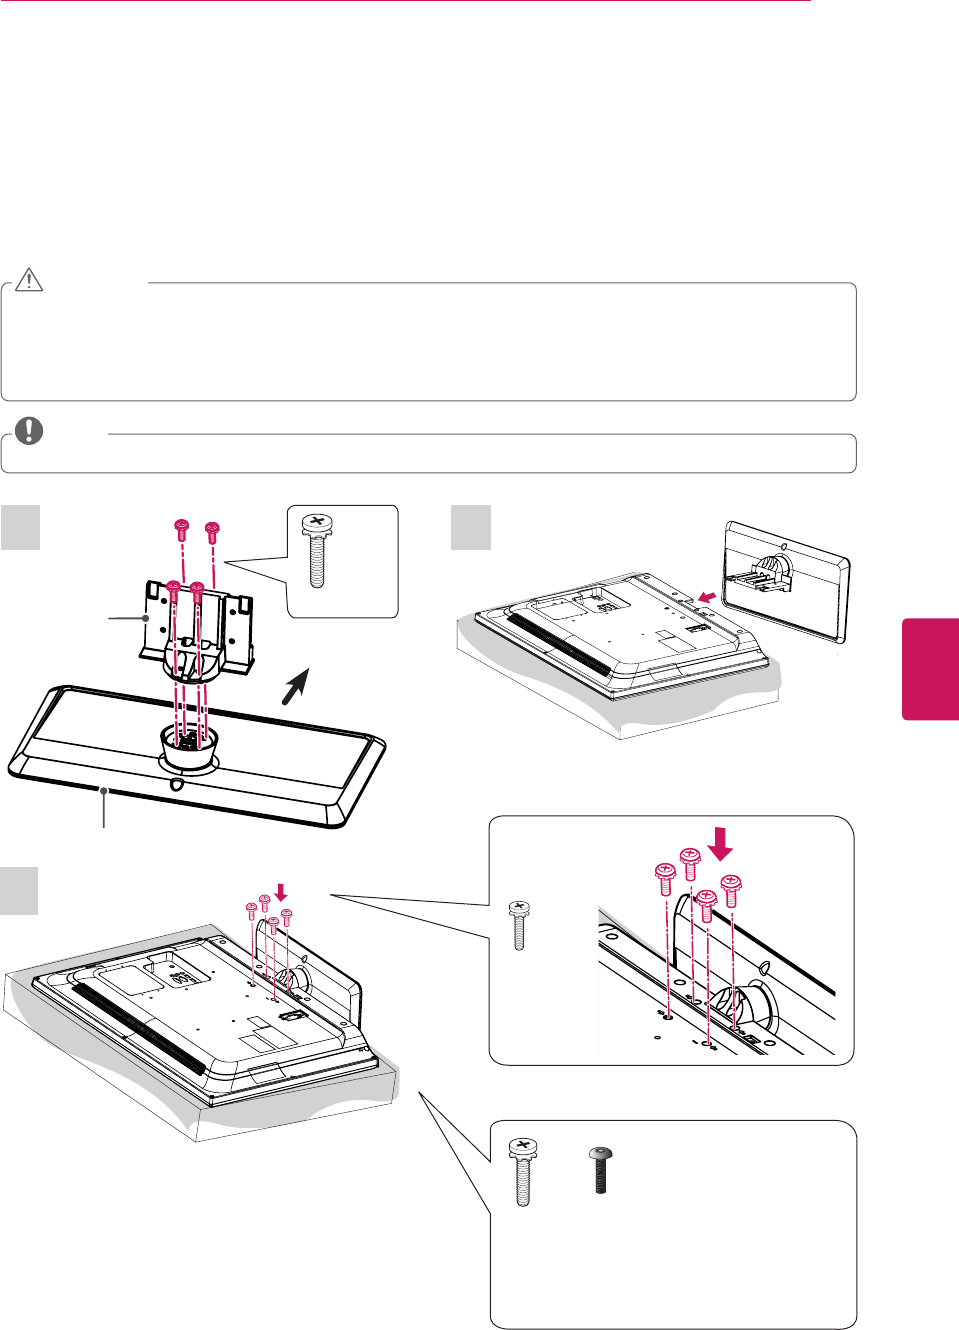
Attaching the stand
If you are not mounting the TV to a wall, use the following instructions to attach the stand.
When attaching the stand to the TV set, place the screen facing down on a cushioned table or flat surface to
protect the screen from scratches.
Make sure that the screws are fastened tightly. (If they are not fastened securely enough, the TV may tilt forward
after being installed.)
Do not tighten the screws with too much force; otherwise they may be damaged and come loose later.
CAUTION
Remove the stand before installing the TV on a wall mount by performing the stand attachment in reverse.
NOTE
1 2
Front
Stand Body
Stand Base
M4 x 20
4 EA
3
or
Tighten the two of these four screws and the two
Torx plus star head screws
(provided as parts of the TV) to secure the TV.
Tighten the two Torx plus star head screws with a
star head driver bit (not provided as parts of the TV).
2 EA
ὤ㨴㥄
wyv{lj{pvuGjv}ly
2 EA
M4 x 16
4 EA

ENGLISH
14 ASSEMBLING AND PREPARING
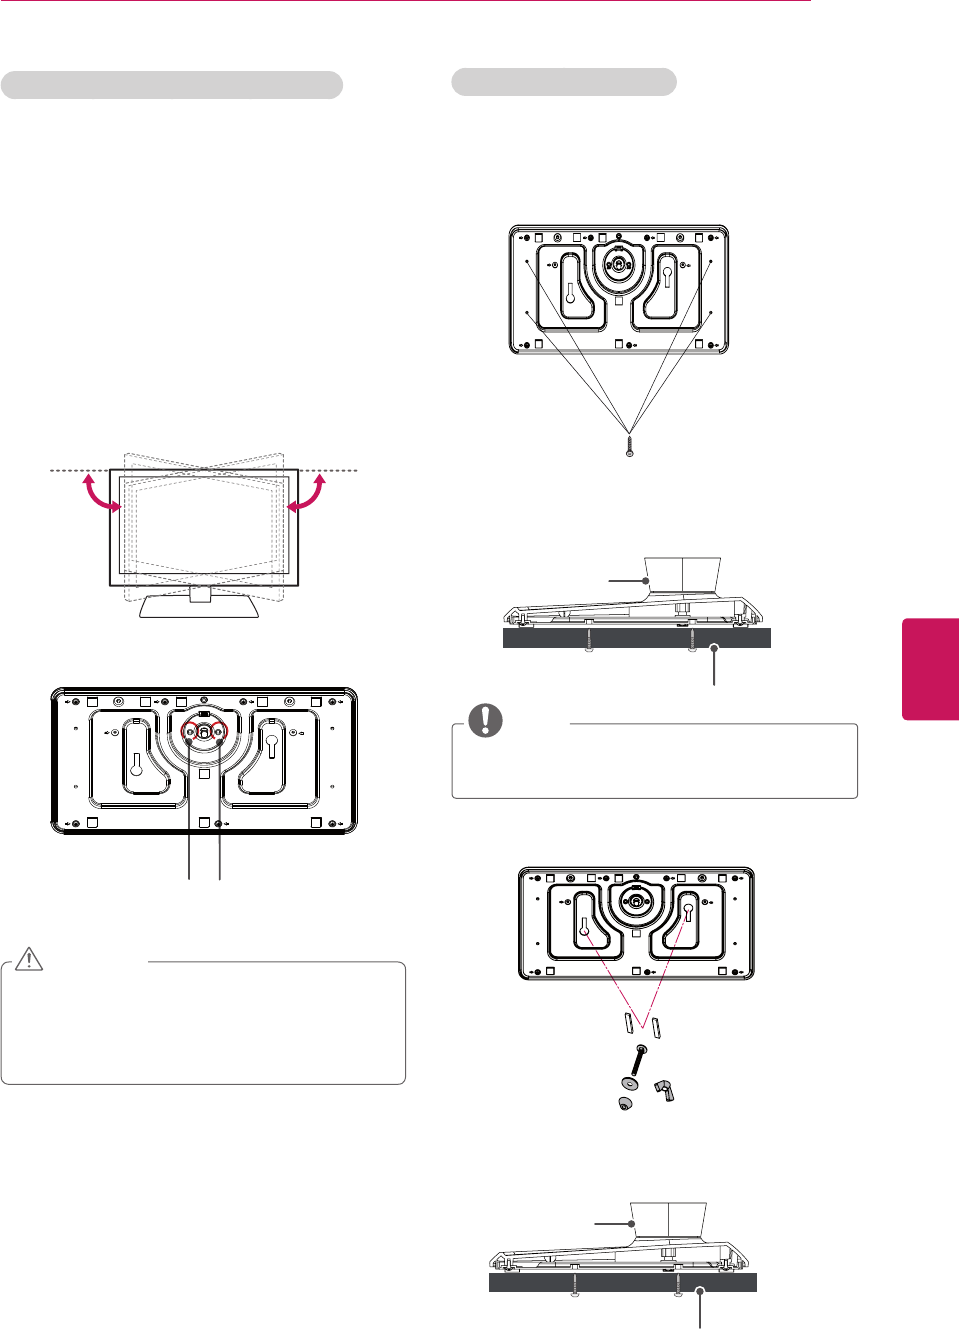
Mounting on a table
1 Lift and tilt the TV into its upright position on a table.
- Leave a 10 cm (4 inch) (minimum) space from the
wall for proper ventilation.
10 cm
10 cm
10 cm
10 cm
(4 inches)
2 Connect the power cord to a wall outlet.
Do not place the TV near or on sources of heat, as
this may result in fire or other damage.
CAUTION
Securing the TV to a table
Fix the TV to a table to prevent from tilting forward,
damage, and potential injury.
Mount the TV on a table, and then insert and tighten the
supplied screw on the rear of the stand.
To prevent TV from falling over, the TV should be
securely attached to the floor/wall per installation
instructions. Tipping, shaking, or rocking the TV
may cause injury.
WARNING
Make sure that children do not climb on or hang on
the TV.
CAUTION
Using the Kensington security system (optional)
The Kensington security system connector is located at
the rear of the TV.
For more information of installation and using, refer
to the manual provided with the Kensington security
system or visit http://www.kensington.com.
Connect the Kensington security system cable between
the TV and a table.
The Kensington security system is optional. You
can obtain additional accessories from your local
dealer.
NOTE
ENGLISH
15
ASSEMBLING AND PREPARING
Attaching the TV to a desk
The TV should be attached to a desk so it cannot be
pulled in a forward/backward direction, potentially
causing injury or damaging the product.
TYPE 1
4-Screws
(Not provided as parts of the product)
Desk
Stand
NOTE
Screw: M5 x L (*L: Table depth + 8~10 mm) ex)
Table depth: 15mm, Screw: M5 x 25
TYPE 2
2-Screws, 2-Washers, 2-Nuts, 4-Rubbers
(provided as parts of the product)
Desk
Stand
Adjusting the angle of the TV to suit view
(Depending on model)
The swivel angle is adjustable. If no adjustment screw
(M6 X 10) is used, the swivel angle is ±90°.
Installing the adjustment screw in the B position will
restrict the swivel angle to ±45°, and installing the
adjustment screw in the A position will restrict the
swivel angle to ±20°.
Installing an adjustment screw in the A and B positions
will restrict the swivel angle to ±20°.
(Basically, only one screw (M6 X 10) is provided for fixing
swivel.)
90˚90˚
B
A
When adjusting the angle of the TV, watch out for
your fingers.
- Personal injury may occur if hands or fingers are
pinched. If the product is tilted too much, it may
fall, causing damage or injury.
CAUTION
ENGLISH
16 ASSEMBLING AND PREPARING
Mounting on a wall
An optional wall mount can be used with your LG
Television. Consult with your local dealer for a wall
mount that supports the VESA standard used by your
TV model. Carefully attach the wall mount bracket at the
rear of the TV. Install the wall mount bracket on a solid
wall perpendicular to the floor. If you are attaching the
TV to other building materials, please contact qualified
personnel to install the wall mount. Detailed instructions
will be included with the wall mount. We recommend
that you use an LG brand wall mount.
10 cm
10 cm
10 cm
10 cm
(4 inches)
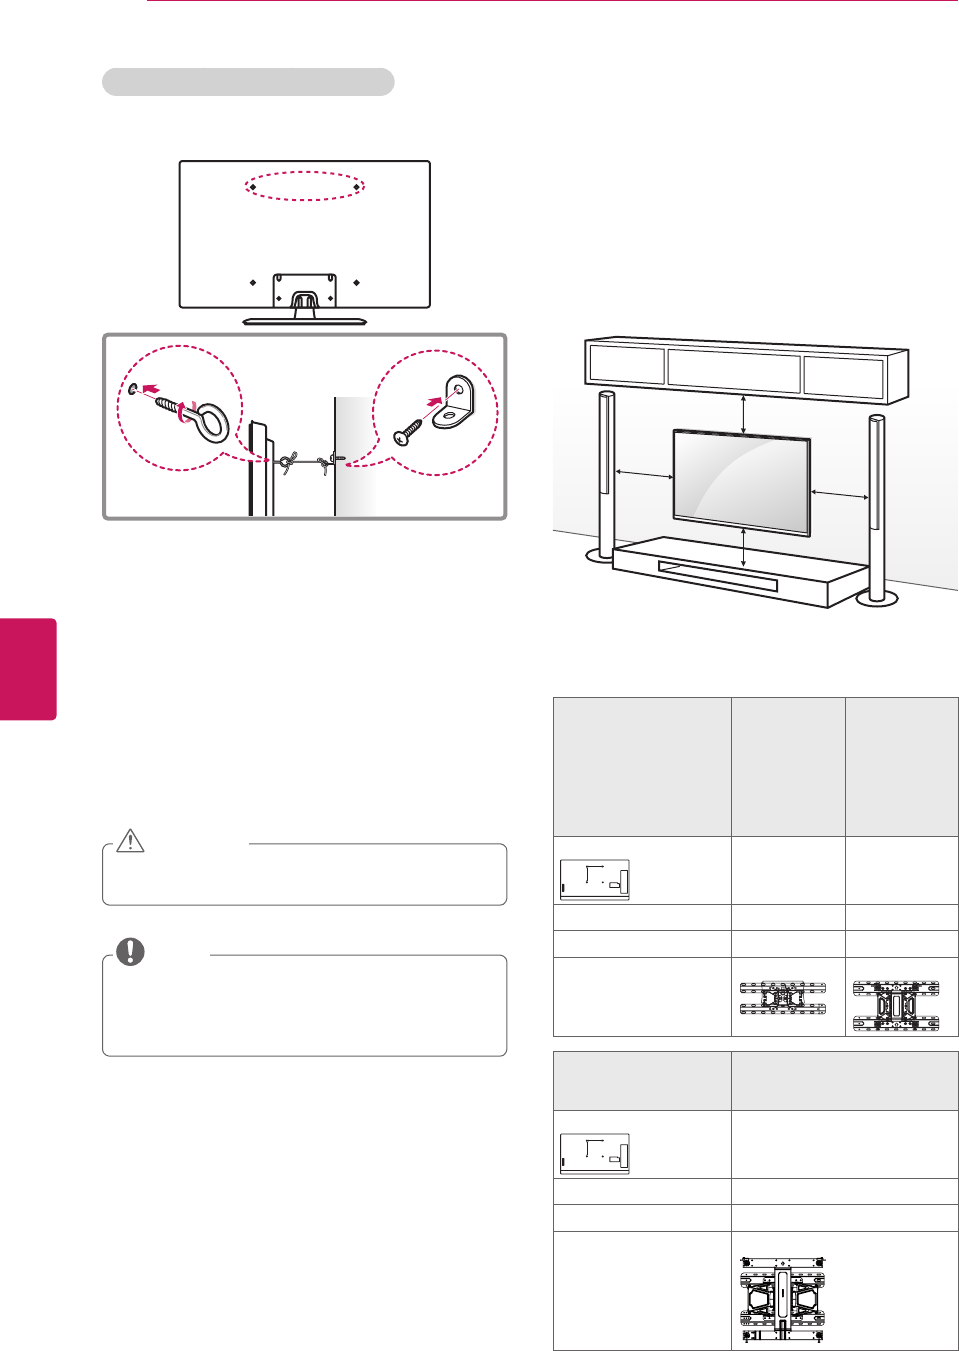
Make sure to use screws and wall mounts that meet the
VESA standard. Standard dimensions for the wall mount
kits are described in the following table.
Model 32LP645H
32LP620H
32LP621H
37LP645H
37LP620H
37LP621H
39LP645H
39LP620H
42LP645H
42LP620H
42LP621H
VESA (A x B)
A
B
200 x 100 200 x 200
Standard screw M4 M6
Number of screws 4 4
Wall mount bracket
(optional)
LSW130B LSW230B
Model 47LP645H
55LP645H
60LP645H
VESA (A x B)
A
B
400 x 400
Standard screw M6
Number of screws 4
Wall mount bracket
(optional)
LSW430B
Securing the TV to a wall (optional)
(Depending on model)
1 Insert and tighten the eye-bolts, or TV brackets and
bolts on the back of the TV.
- If there are bolts inserted at the eye-bolts position,
remove the bolts first.
2 Mount the wall brackets with the bolts to the wall.
Match the location of the wall bracket and the eye-
bolts on the rear of the TV.
3 Connect the eye-bolts and wall brackets tightly with
a sturdy rope.
Make sure to keep the rope horizontal with the flat
surface.
Make sure that children do not climb on or hang on
the TV.
CAUTION
Use a platform or cabinet that is strong and large
enough to support the TV securely.
Brackets, bolts and ropes are optional. You can
obtain additional accessories from your local dealer.
NOTE
ENGLISH
17
ASSEMBLING AND PREPARING
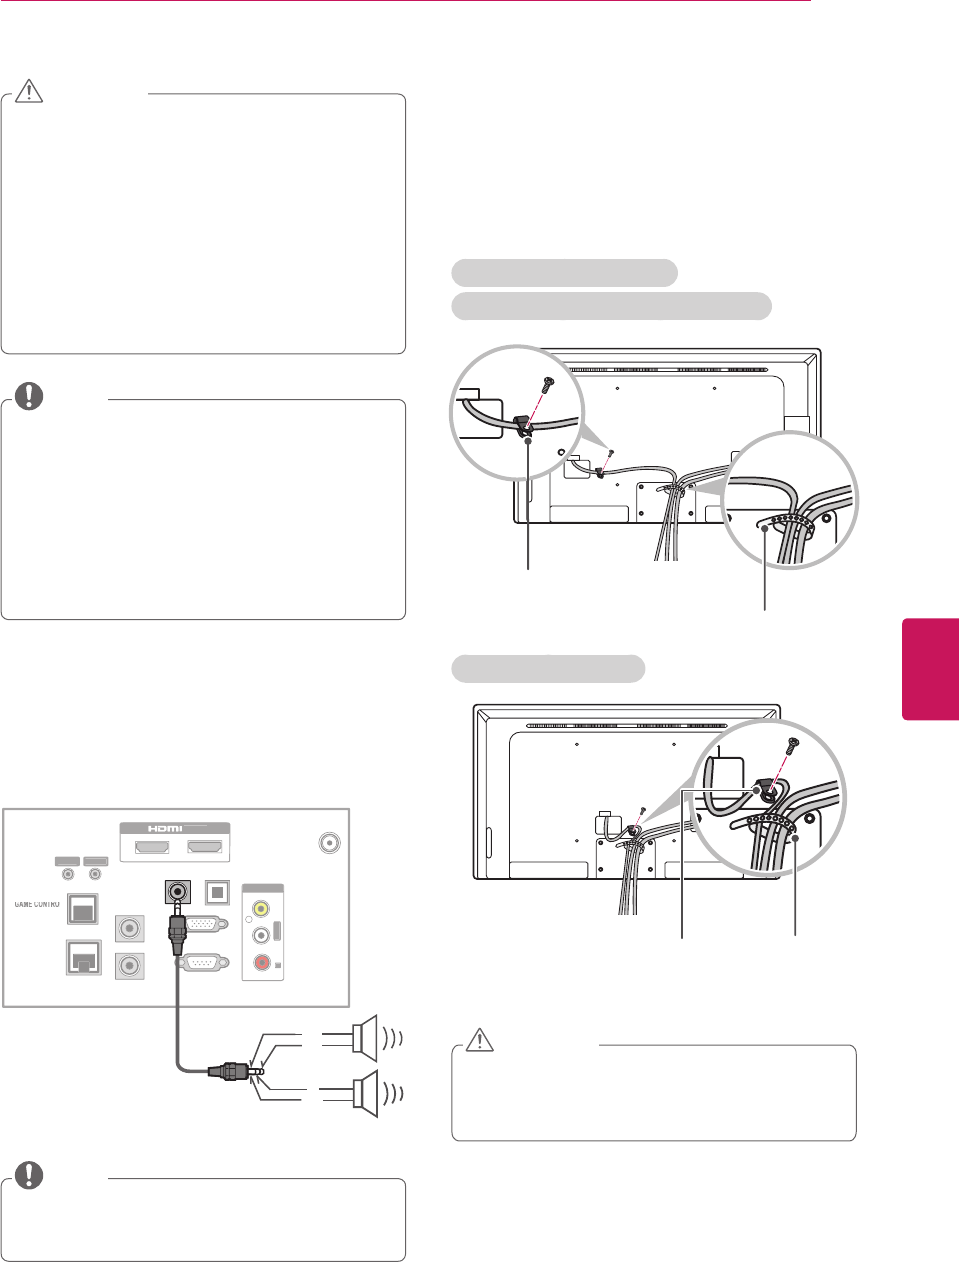
Tidying cables
1 Install the power cord holder and power cord. It will
help prevent the power cable from being removed
by accident.
2 Gather and bind the cables with the cable holder.
For 32/37/39/42LP645H,
32/37/39/42LP620H, 32/42LP621H
Power Cord Holder
and Screw
Cable Holder
For 47/55/60LP645H
Power Cord Holder
and Screw
Cable Holder
Do not move the TV by holding the cable holder
and power cord holder, as the cable holders may
break, and injuries and damage to the TV may
occur.
CAUTION
Disconnect the power before moving or installing
the TV. Otherwise electric shock may occur.
If you install the TV on a ceiling or slanted wall, it
may fall and result in severe injury.
Use an authorized LG wall mount and contact the
local dealer or qualified personnel.
Do not over tighten the screws as this may cause
damage to the TV and void your warranty.
Use the screws and wall mounts that meet the
VESA standard. Any damages or injuries by misuse
or using an improper accessory are not covered by
the warranty.
CAUTION
The wall mount bracket is optional. You can obtain
additional accessories from your local dealer.
Use the screws that are listed in the VESA
standard screw specifications.
The wall mount kit includes an installation manual
and necessary parts.
The length of screws may differ depending on the
wall mount. Make sure to use the proper length.
For more information, refer to the manual supplied
with the wall mount.
NOTE
External speaker out
Connect the external speaker.
GAME CONTROL
2
1
/
DVI IN
R
S
-2
3
2C I
N
(
CONTROL & SERVICE)
RG
B IN (P
C
)
SPEAKER OUT
LINE OUT
ANTENNA
/
C
ABLE IN
O
PTICAL
A
U
DI
O
OU
T
AV IN
VIDE
O
L/M
O
N
O
-AUDI
O-
R
L
R
AUDI
O
IN (R
G
B DVI
)
RE
S
E
T
UPDATE
RJP
P
T
C
S
ERVI
CE
(S
ERVI
C
E
O
NLY
)
T
V-LINK
C
F
G
/
M.P.
I
GAME CONTROL
GAME CONTROL
GAME CONTROL
R
GND
L
GND
Make sure that the external speaker should be
connected with TV under power-off state.
Use external speaker with SE type (3 pin).
NOTE
ENGLISH
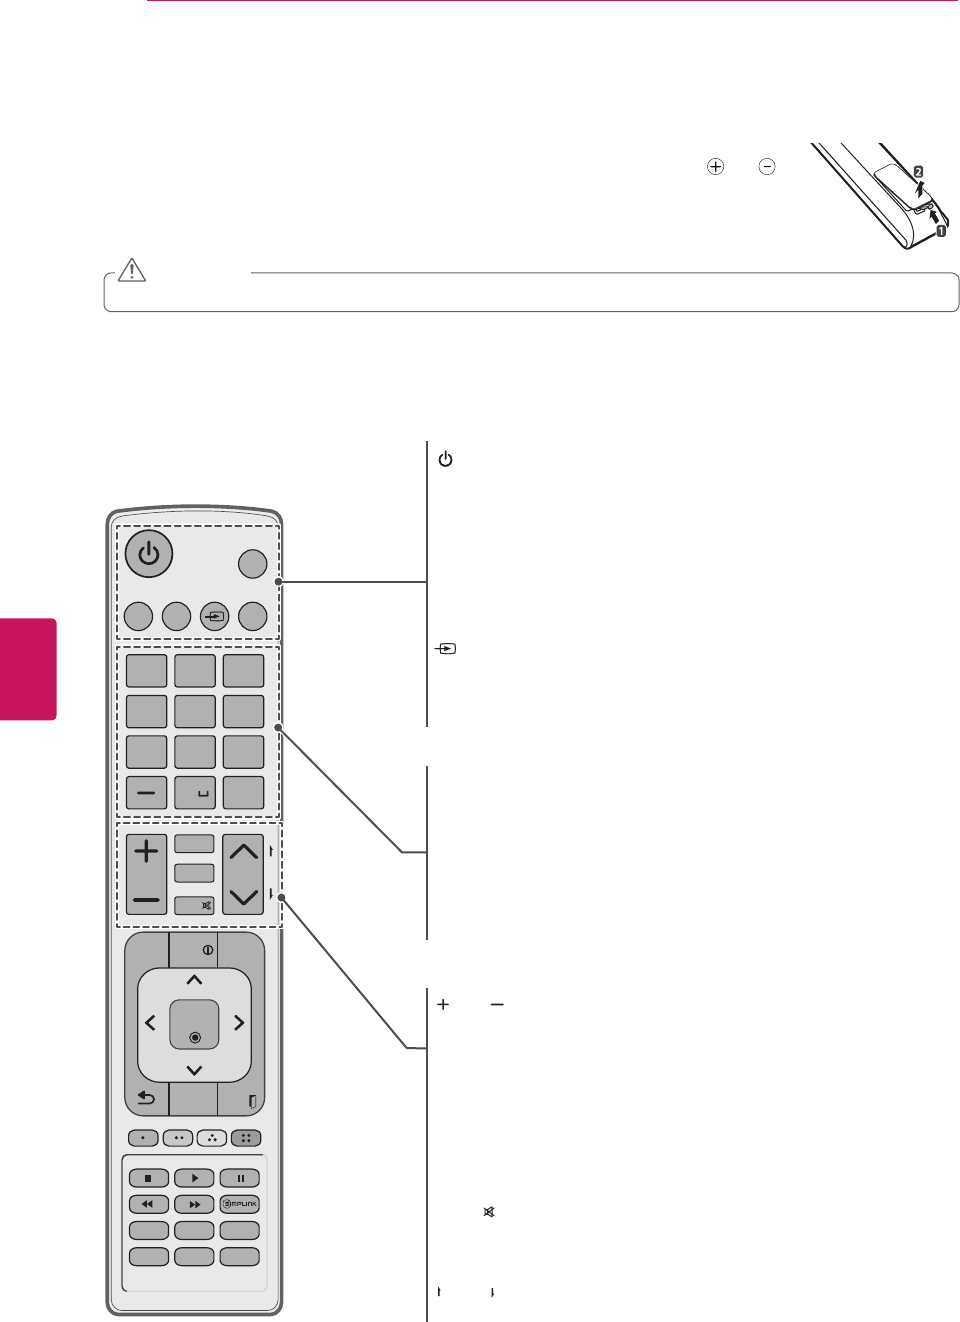
18 REMOTE CONTROL
REMOTE CONTROL
Below is a description of the remote control. Your remote control may look slightly different.
To install batteries, open the battery cover, insert batteries (1.5 V AAA) matching the and
ends to the label inside the compartment, and close the battery cover. To remove the batteries,
perform the installation actions in reverse.
This remote uses infrared light. When in use, it should be pointed in the direction of the TV’s remote sensor.
CH
1 2 3
4 5 6
7 8
09
P
A
G
E
Q.MENU
INPUT
CHAR/NUM
FLASHBK
EXIT
OK
GUIDE
PORTAL
TV DVD
MARK
CC
TIMER
MUTE
INFO
PIP PIPCH+ PIPCH
-
SWAP
PIP
INPUT
SAP
MENU
SETTINGS
abc def
ghi jkl mno
pqrs tuv wxyz
.,;@
DELETE
ENTER
VOL
(POWER)
Turns the TV on or off.
Q. MENU
Not functional
TV
Selects the remote’s operating mode: TV.
DVD
Selects the remote’s operating mode: DVD.
INPUT
Rotates through inputs. Also switches the TV on from standby.
MARK
Not functional
Number button
Enters channel numbers or other numbers required.
Also supports characters.
— (DASH)
Selects a program number for multiple program channels
such as 2-1, 2-2, etc.
FLASHBK
Tunes to the last channel or input viewed.
VOL
Adjusts the volume level.
CHAR/NUM
Switches between Letter and Number input modes.
CC
Selects a closed caption.
TIMER
Turns the TV off in a set amount of time.
DELETE
Deletes letters and numbers.
MUTE
Mutes all sounds.
^
CH
v
Scrolls through the saved channels.
PAGE
Moves to the previous or next screen.
Do not mix old and new batteries, as this may damage the remote control.
CAUTION
ENGLISH
19
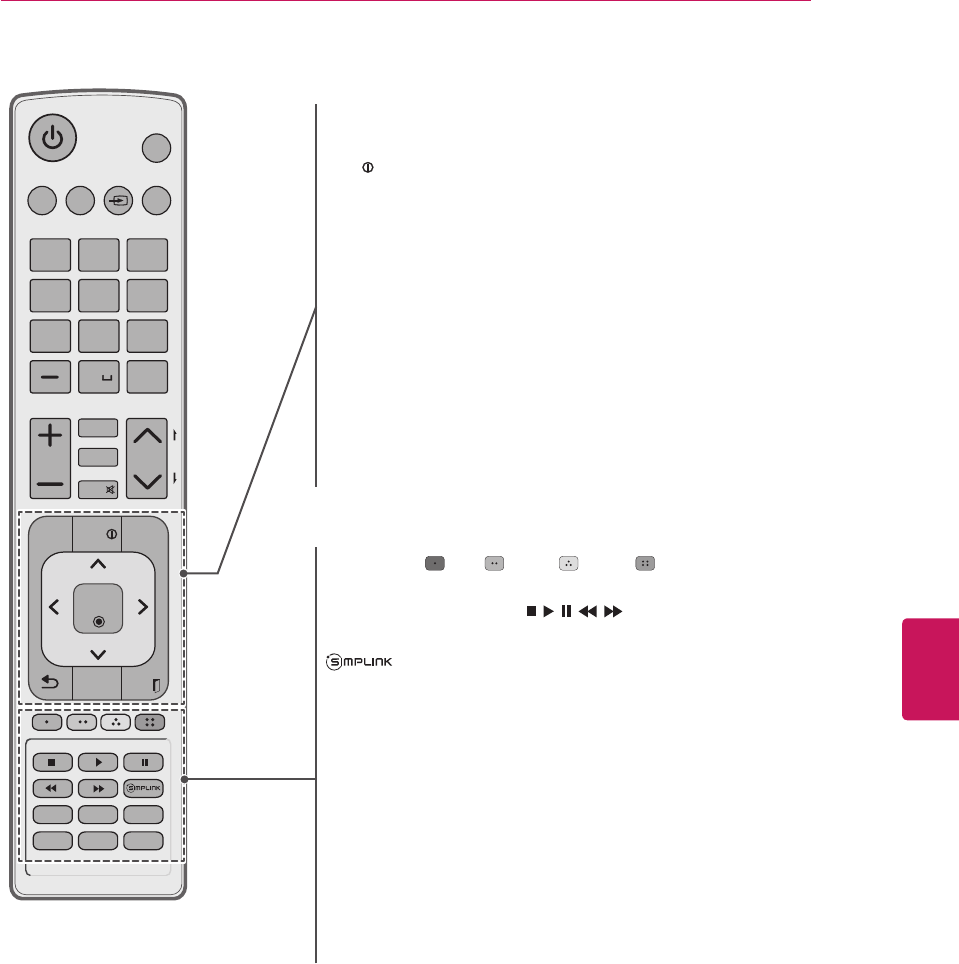
REMOTE CONTROL
CH
1 2 3
4 5 6
7 8
09
P
A
G
E
Q.MENU
INPUT
CHAR/NUM
FLASHBK
EXIT
OK
GUIDE
PORTAL
TV DVD
MARK
CC
TIMER
MUTE
INFO
PIP PIPCH+ PIPCH
-
SWAP
PIP
INPUT
SAP
MENU
SETTINGS
abc def
ghi jkl mno
pqrs tuv wxyz
.,;@
DELETE
ENTER
VOL
Color buttons ( : Red, : Green, : Yellow, : Blue )
These access special functions in some menus.
VCR/DVD/USB control buttons ( , , , , )
Controls video cassette recorders or DVD players or USB.
Accesses the AV devices connected to the TV;
Opens the SIMPLINK menu.
PIP
Not functional
PIP CH +/-
Not functional
SWAP
Not functional
PIP INPUT
Not functional
SAP
Analog mode: Selects MTS sound (Mono, Stereo or SAP)
DTV mode: Changes the audio language.
PORTAL
Displays and removes the interactive menu.
INFO
Views the information of the current program and screen.
GUIDE
Displays and removes the electronic program guide.
Navigation buttons (up/down/left/right)
Scrolls through menus or options.
OK/ENTER ꔉ
Selects menus or options and confirms your input.
ꕣ (BACK)
Returns to the previous level.
MENU/SETTINGS
Accesses the main menu.
EXIT ꕯ
Clears all on-screen displays and returns to TV viewing.

ENGLISH
20 SPECIFICATIONS
SPECIFICATIONS
Product specifications may be changed without prior notice due to upgrade of product functions.
Power requirement AC 100 - 240 V ~ 50 / 60 Hz
Television System NTSC-M, ATSC, 64 & 256 QAM
Program Coverage VHF 2-13, UHF 14-69, CATV 1-135, DTV 2-69, CADTV 1-135
External Antenna Impedance 75 Ω
Environment
condition
Operating Temperature 0 - 40 °C
Operating Humidity Less than 80 %
Storage Temperature -20 - 60 °C
Storage Humidity Less than 85 %
MODELS 32LP645H
(32LP645H-UH)
32LP620H
(32LP620H-UH)
32LP621H
(32LP621H-UA)
Dimensions
(W x H x D)
With stand 738 x 497 x 207 (mm)
29.0 x 19.6 x 8.1 (inch)
Without stand
738 x 449 x 79 (mm)
29.0 x 17.7 x 3.1 (inch)
Weight With stand 7.0 kg (15.4 lbs)
Without stand 6.4 kg (14.1 lbs)
Current Value / Power consumption 1.3 A / 80 W
MODELS 37LP645H
(37LP645H-UH)
37LP620H
(37LP620H-UH)
Dimensions
(W x H x D)
With stand 849 x 558 x 226 (mm)
33.4 x 22.0 x 8.9 (inch)
Without stand 849 x 500 x 79 (mm)
33.4 x 19.7 x 3.1 (inch)
Weight With stand 9.1 kg (20.1 lbs)
Without stand 8 kg (17.6 lbs)
Current Value / Power consumption 1.5 A / 150 W
MODELS 39LP645H
(39LP645H-UH)
39LP620H
(39LP620H-UH)
Dimensions
(W x H x D)
With stand 894 x 583 x 283 (mm)
35.2 x 23.0 x 11.1 (inch)
Without stand 894 x 537 x 79 (mm)
35.2 x 21.1 x 3.1 (inch)
Weight With stand 9.7 kg (21.4 lbs)
Without stand 8.6 kg (19.0 lbs)
Current Value / Power consumption 1.5 A / 150 W
ENGLISH
21
SPECIFICATIONS
MODELS 42LP645H
(42LP645H-UH)
42LP620H
(42LP620H-UH)
42LP621H
(42LP621H-UA)
Dimensions
(W x H x D)
With stand 968 x 625 x 283 (mm)
38.1 x 24.6 x 11.1 (inch)
Without stand
968 x 579 x 79 (mm)
38.1 x 22.8 x 3.1 (inch)
Weight With stand 13.3 kg (29.3 lbs)
Without stand 9.6 kg (21.2 lbs)
Current Value / Power consumption 1.6 A / 160 W
MODELS 47LP645H
(47LP645H-UH)
Dimensions
(W x H x D)
With stand 1,080 x 688 x 282.4 (mm)
42.5 x 27.1 x 11.1 (inch)
Without stand 1,080 x 642 x 80.5 (mm)
42.5 x 25.3 x 3.2 (inch)
Weight With stand 16.7 kg (36.8 lbs)
Without stand 13.4 kg (29.5 lbs)
Current Value / Power consumption 1.3 A / 130 W
MODELS 55LP645H
(55LP645H-UH)
Dimensions
(W x H x D)
With stand
Without stand
Weight With stand
Without stand
Current Value / Power consumption
MODELS 60LP645H
(60LP645H-UA)
Dimensions
(W x H x D)
With stand
Without stand
Weight With stand
Without stand
Current Value / Power consumption
ENGLISH
22 SPECIFICATIONS
HDMI (DTV) supported mode
Resolution Horizontal
Frequency (kHz)
Vertical Frequency
(Hz)
720 x 480p 31.47 59.94
31.50 60.00
1280 x 720p 44.96 59.94
45.00 60.00
1920 x 1080i 33.72 59.94
33.75 60.00
1920 x 1080p
26.97 23.976
27.00 24.00
33.71 29.97
33.75 30.00
67.432 59.94
67.50 60.00
RGB (PC), HDMI (PC) supported mode
Resolution Horizontal
Frequency (KHz)
Vertical
Frequency (Hz)
720x400 31.46 70.08
640x480 31.46 59.94
800x600 37.87 60.31
1024x768 48.36 60.00
1360x768 47.71 60.01
1280x1024 63.98 60.02
1920x1080 67.50 60.00
Except 32/37LP645H, 32/37LP620H, 32LP621H

ENGLISH
23
TROUBLESHOOTING
TROUBLESHOOTING
General
Problem Solution
Cannot control the TV with the remote
control.
Check the remote control sensor on the product and try again.
Check if there is any obstacle between the product and the remote control.
Check if the batteries are still working and properly installed ( to , to ).
No image display and no sound is
produced.
Check if the product is turned on.
Check if the power cord is connected to a wall outlet.
Check if there is a problem in the wall outlet by connecting other products.
Image appears slowly when the TV
turns on.
The image is muted during the product startup process. This is normal. If the image does not
appear in a few minutes, unplug the TV for 30 seconds and try again. If the image still does
not appear, contact the authorized service center in your local area.
Cannot connect external devices. Refer to the “Connection Overview” and connect an external device.
The TV turns off suddenly. Check the power control settings. The power supply may be interrupted.
Check if the Auto sleep feature is activated in the Time settings.
Refer to the “Sleep Timer”.
Audio
Problem Solution
No sound is produced while images are
displaying.
Press VOL + or - button.
Check if the sound is muted by pressing MUTE.
Scroll to other channels. There may a problem with the broadcast.
Check if the TV Speaker feature is activated in the menu option.
No output from one of the speakers Adjust Balance in the menu option.
Unusual sound from inside the TV is
produced.
A change in ambient humidity or temperature may result in an unusual noise when the
product turns on or off. There is no problem with your product.
Video
Problem Solution
An image displays in black and white or
the color quality is poor.
Adjust the color setting in the menu option.
Keep a sufficient distance between this product and other electronic products.
Scroll to other channels. There may a problem with the broadcast.
Horizontal or vertical bars appears or
images blur
Check if there are local interferences such as an electrical appliance or power tool.
Lines or streaks appear on images Check the antenna or aim the antenna to the proper direction.
Afterimages (ghosts) appear when the
product turns off
Pixels may have been damaged from a fixed image displayed for a long time (image burn).
Use a screen saver to prevent the pixel damage on the screen.
The power is on but the screen appears
extremely dark.
Adjust the brightness and contrast in the menu option.
“No Signal” appears on the screen. Check if the signal cable is connected between the TV and products properly.
Check the selected input source by pressing INPUT.
Black spots appear on the screen. Several pixels in red, green, white, or black may appear on the screen that can attribute to
the characteristics of the panel.
This is normal.
The display offset is wrong. Adjust the position setting in the Picture menu.
Check if the video card resolution and frequency are supported by the product. If the
frequency is out of range, set to the recommended resolution using the display settings on
the external device.
Thin lines appear in the background of
the screen.
Check the video cable connections.
The reception on some channels is
poor
Scroll to other channels. There may a problem with the broadcast.
The station signal may be weak. Aim the antenna to the proper direction.
Check if there is local interferences such as an electrical appliance or power tool.

The model and serial number of the TV is located
on the back and one side of the TV.
Record it below should you ever need service.
MODEL
SERIAL
Pro:Centric is a trademark of LG Electronics U.S.A., Inc. Pro:Idiom is
a registered trademark of Zenith Electronics LLC. b-LAN is a trademark
of LodgeNet Interactive Corporation. All other trademarks or registered
trademarks are the property of their respective owners.
LG Customer Information Center
For inquires or comments, visit www.lg.com or call:
1-888-865-3026
1-888-542-2623
USA, Commercial User
CANADA
This product qualifies for ENERGY STAR in the
“factory default (Home Use)” setting.
Changing the factory default settings or enabling
other features may increase power consumption
that could exceed the limits necessary to quality
for ENERGY STAR.