LG Electronics USA 50PM4MAWA PLASMA MONITOR User Manual MFL36274107 en rev04
LG Electronics USA PLASMA MONITOR MFL36274107 en rev04
UserManual.wiki
>
LG Electronics USA
>
50PM4MAWA User Manual
User manual
Navigation menu
Upload a User Manual
Namespaces
Wiki Guide
HTML
PDF
Info
Views
User Manual
Discussion / Help
Navigation
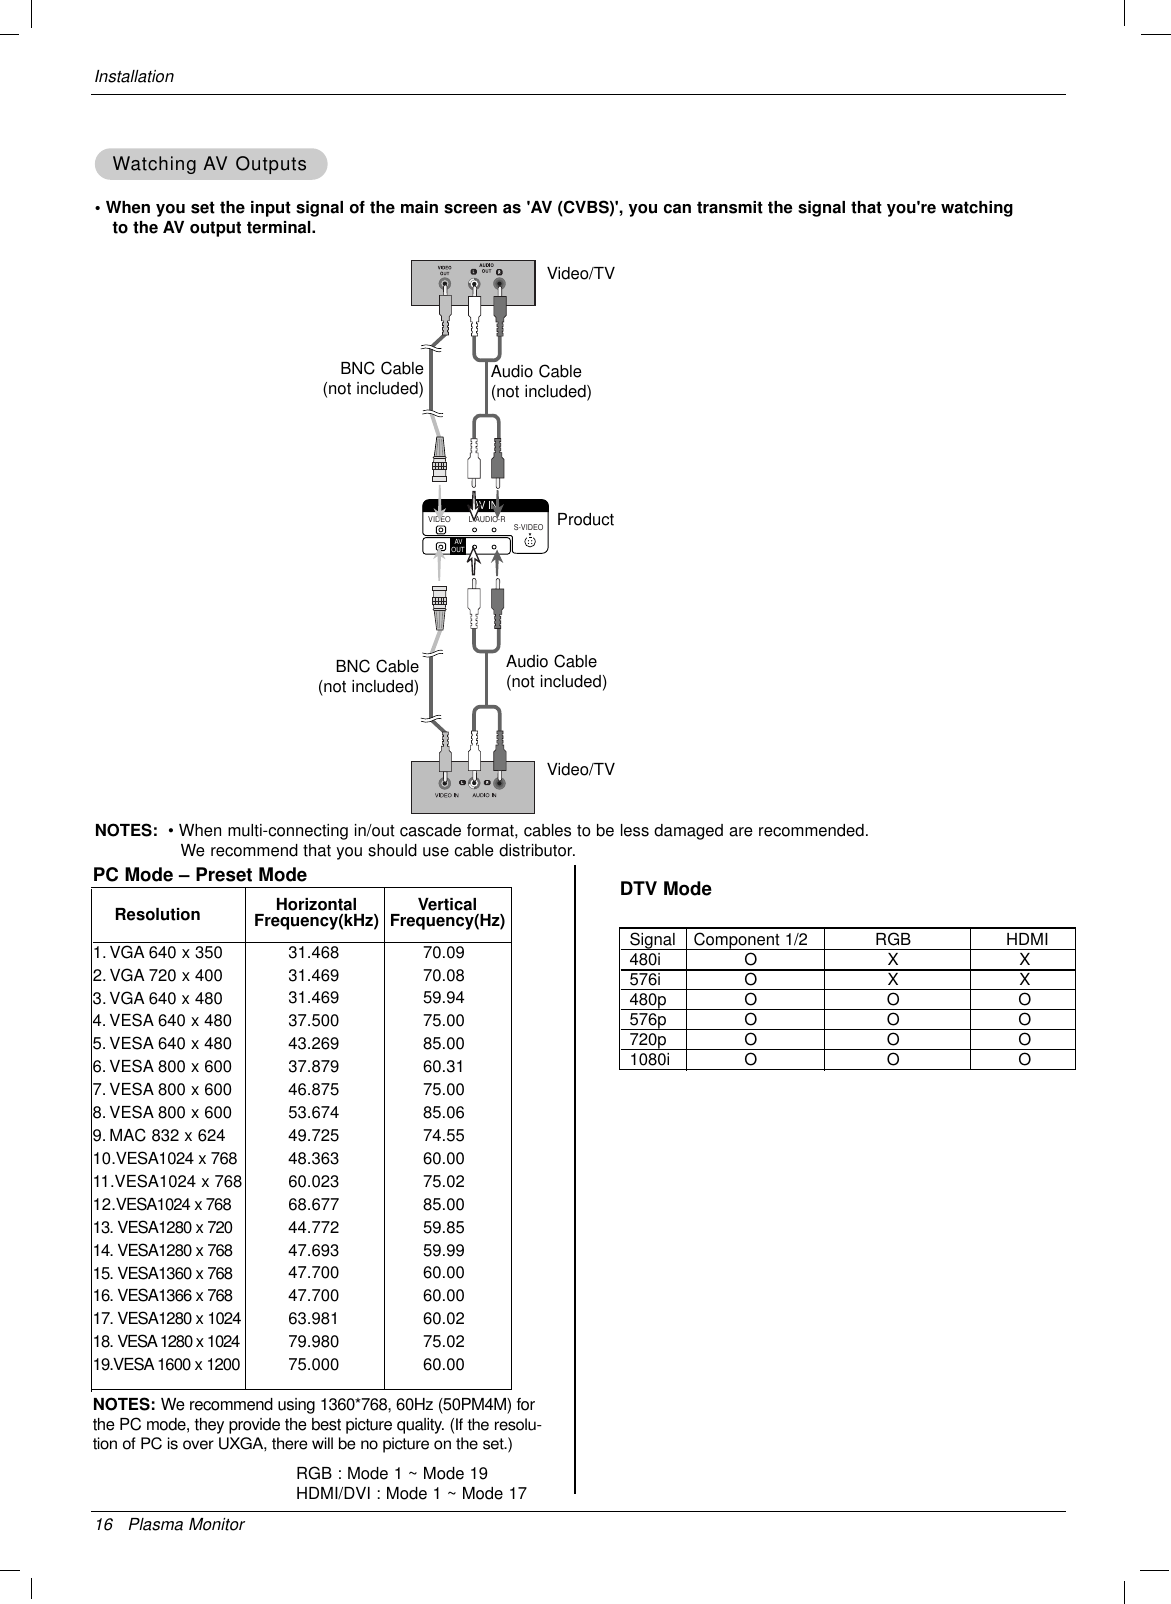
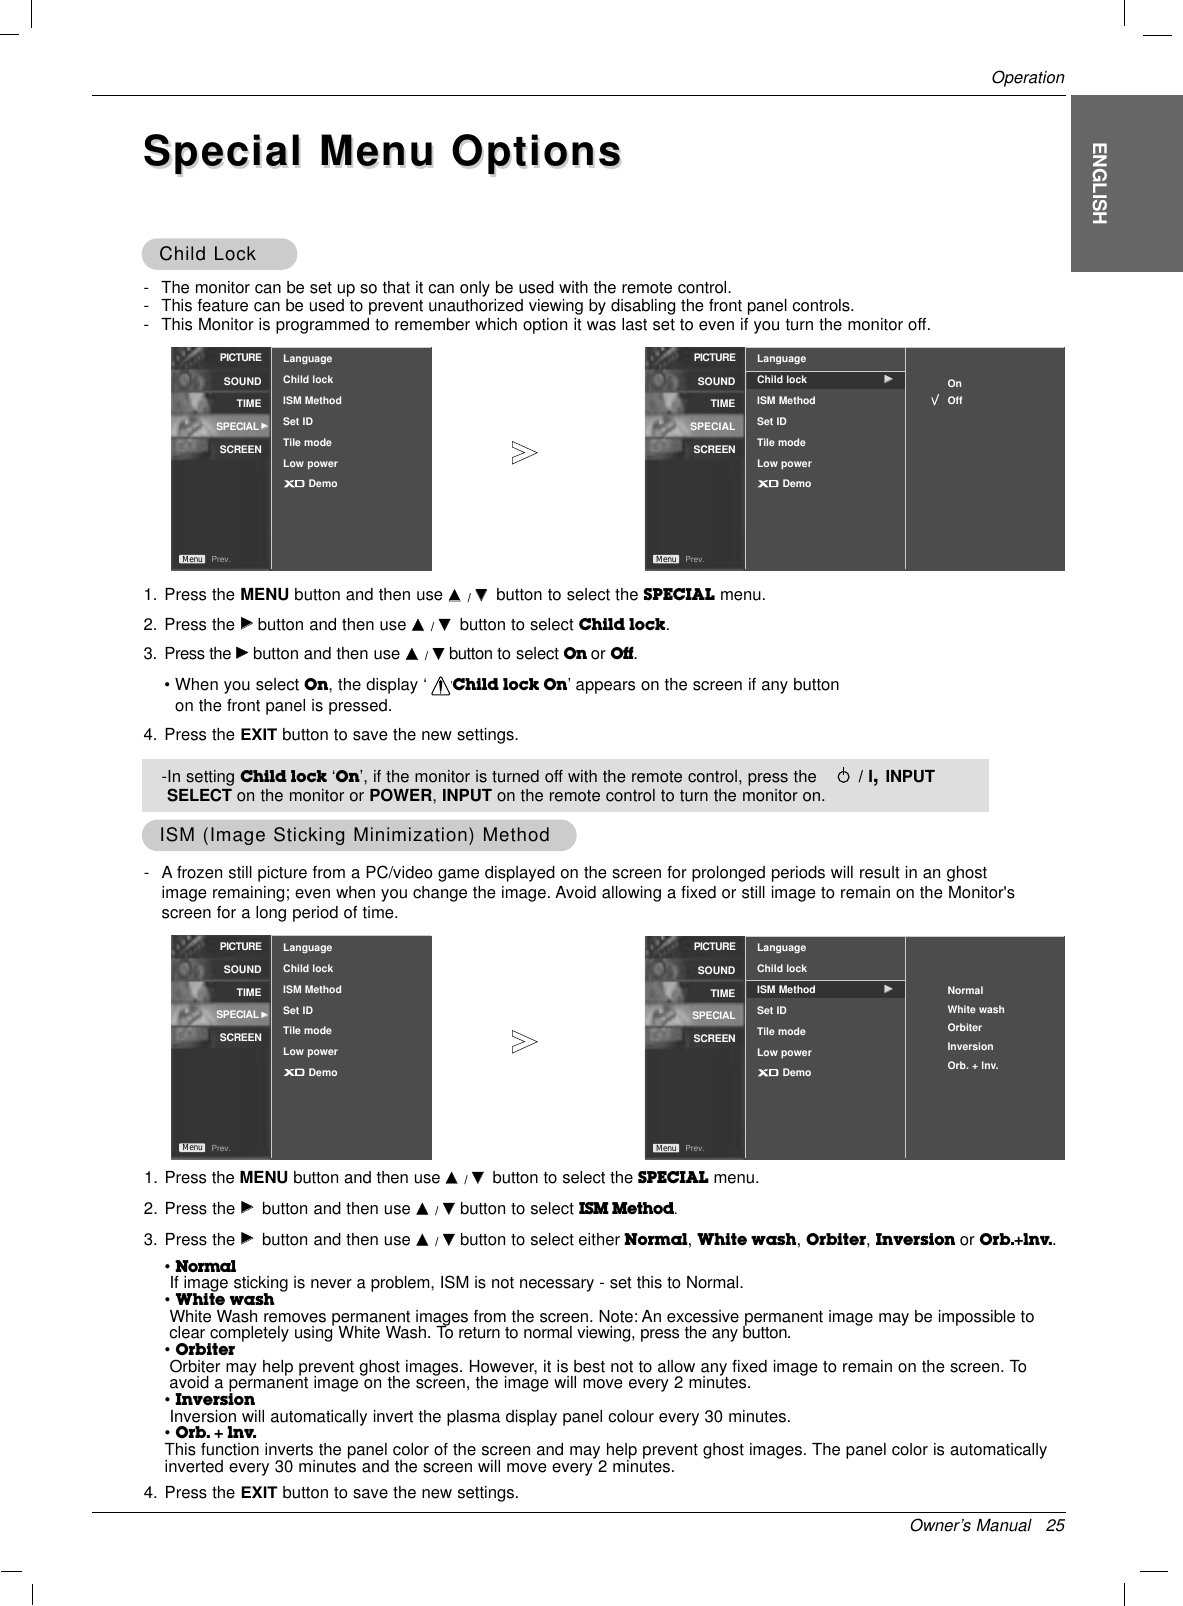
![Owner’s Manual 19OperationENGLISHXDXDManual Colour Manual Colour TTemperature Control (emperature Control (CSMCSM set to user option)set to user option)- You can adjust red, green, or blue to any colour temperature you prefer.1. Press the MENU button and then use DD / EEbutton to select the PICTURE menu.2. Press the GGbutton and then use DD / EEbutton to select CSM . 3. Press the GGbutton and then use DD / EEbutton to select User. 4. Press the GGbutton and then use DD / EEbutton to select Red, Green or Blue.5. Use the FF / GGbutton to make appropriate adjustments.• The adjustment range of Red, Green and Blue is -40 ~ +40.6. Press the EXITbutton to save the new settings.PICTURE0SOUND0TIME0SPECIAL0SCREEN0Prev.MenuPSMCSMAdvancedResetAutoManualXD Contrast XD Colour XD NR MPEG NRGGOnOn0Off1. Press the MENU button and then use DD / EEbutton to select the PICTURE menu.2. Press the GGbutton and then use DD / EEbutton to select XD.3. Press the GGbutton and then use DD / EEbutton to select Auto or Manual.4. Press the EXITbutton to save the new settings.* Selecting the ManualThis menu is activated after selecting the User1 or User2 of Picture Mode.1. Press the GGbutton and then DD / EEbutton to select XD Contrast,XD Colour,XD NR or MPEG NR.2. Press the GGbutton and then DD / EEbutton to select On or Off.3. Press the EXITbutton to save the new settings.•XD Contrast : Optimizing the contrast automatically according to the brightness of the reflection.•XD Colour : Adjusting the colours of the reflection automatically to reproduce as closely as possible to the natural colours.•XD NR : Removing the noise up to the point where it does not damage the original picture.•MPEG NR : To reduce the picture noise which may appear on the screen during watching the Monitor.-XD is LG electronic's unique picture improving technology to display a real HD source through anadvanced digital signal processing algorithm.- It’s not available to use this function in PC[RGB/HDMI] mode.SOUND0TIME0SPECIAL0SCREEN0Prev.MenuPSMCSMAdvancedResetPICTURE GG](https://usermanual.wiki/LG-Electronics-USA/50PM4MAWA/User-Guide-924227-Page-20.png)
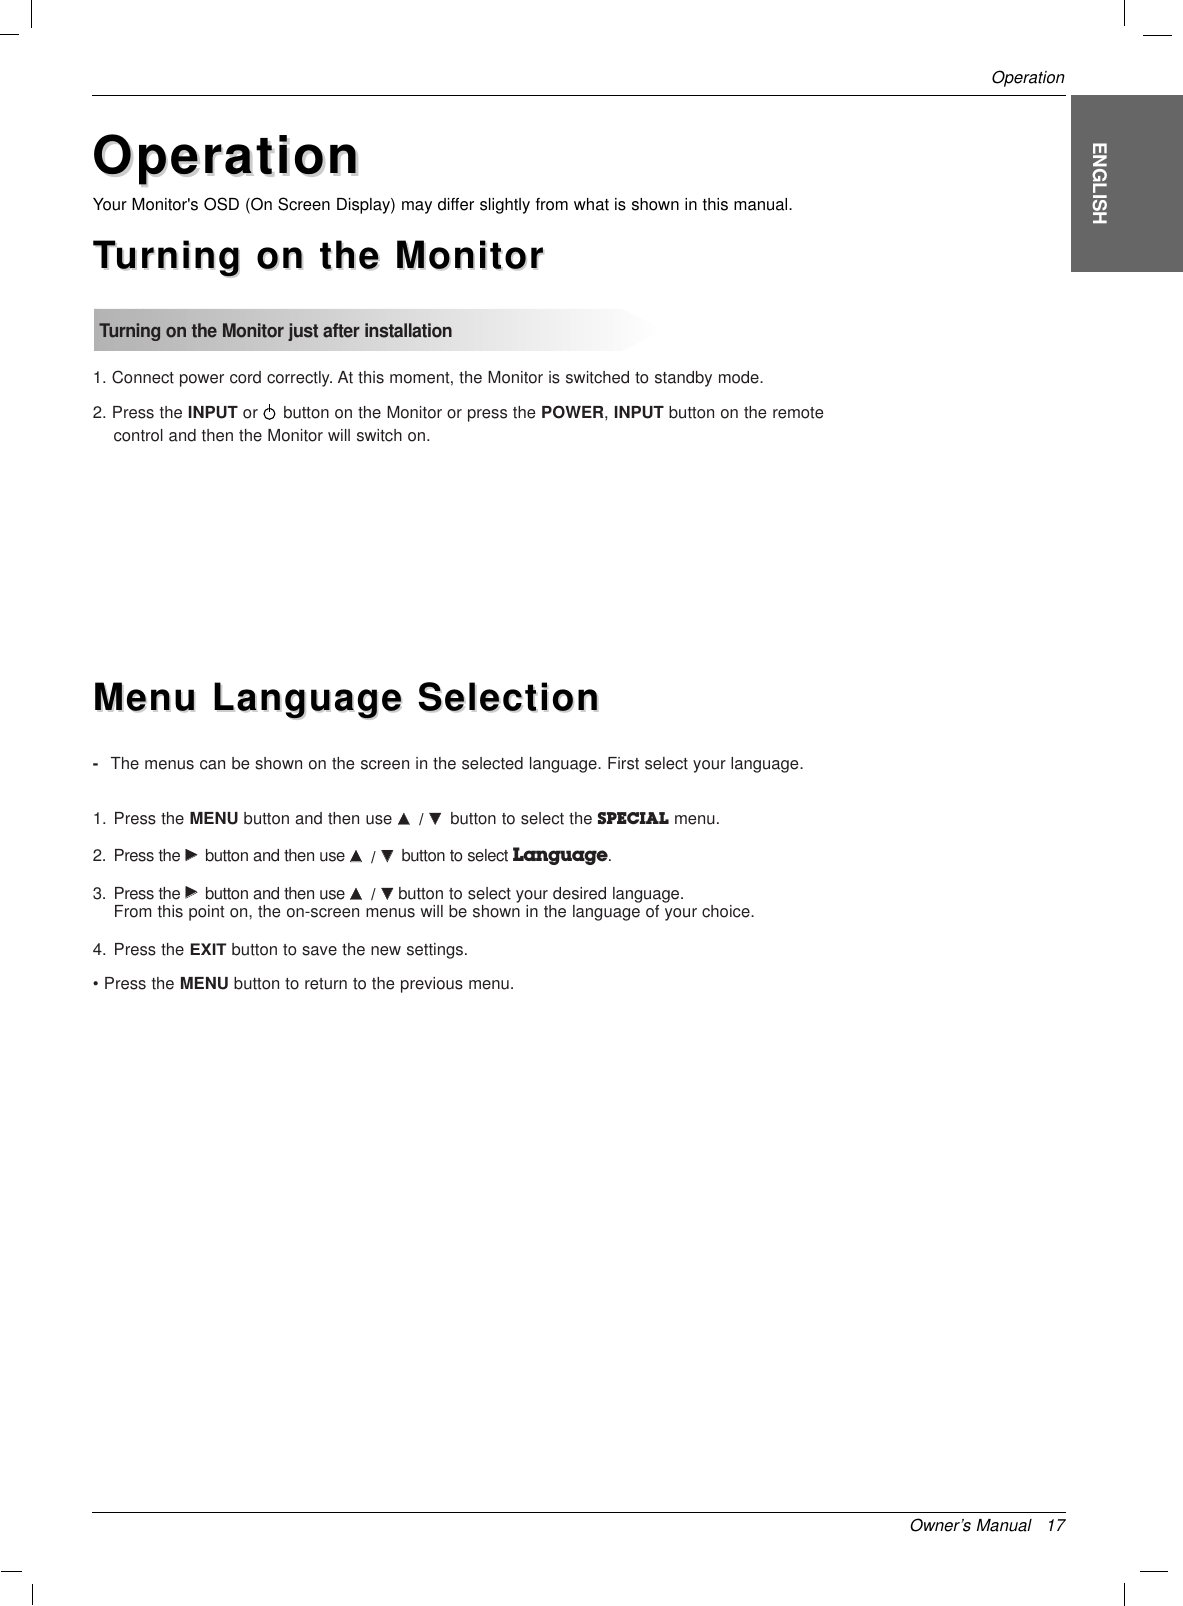
![28 Plasma MonitorOperationXD DEMOXD DEMO-Use it to see the difference between XD Demo on and XD Demo off.- It’s not available to use this function in RGB[PC], HDMI[PC] mode.1. Press the MENU button and then DD / EEbutton to select the SPECIAL menu.2.Press the GGbutton and then use DD/ EEbutton to selectXD Demo.3. Press the GGbutton to begin XD Demo.4. To stop XD Demo, press the MENU or EXIT button. PICTURE0SOUND0TIME0SPECIAL0SCREEN0Prev.MenuLanguageChild lockISM MethodSet IDTile modeLow powerDemo GGTo startSpecial Menu OptionsSpecial Menu OptionsPICTURE0SOUND0TIME0SPECIAL GGSCREEN0Prev.MenuLanguageChild lockISM MethodSet IDTile modeLow powerDemo](https://usermanual.wiki/LG-Electronics-USA/50PM4MAWA/User-Guide-924227-Page-29.png)
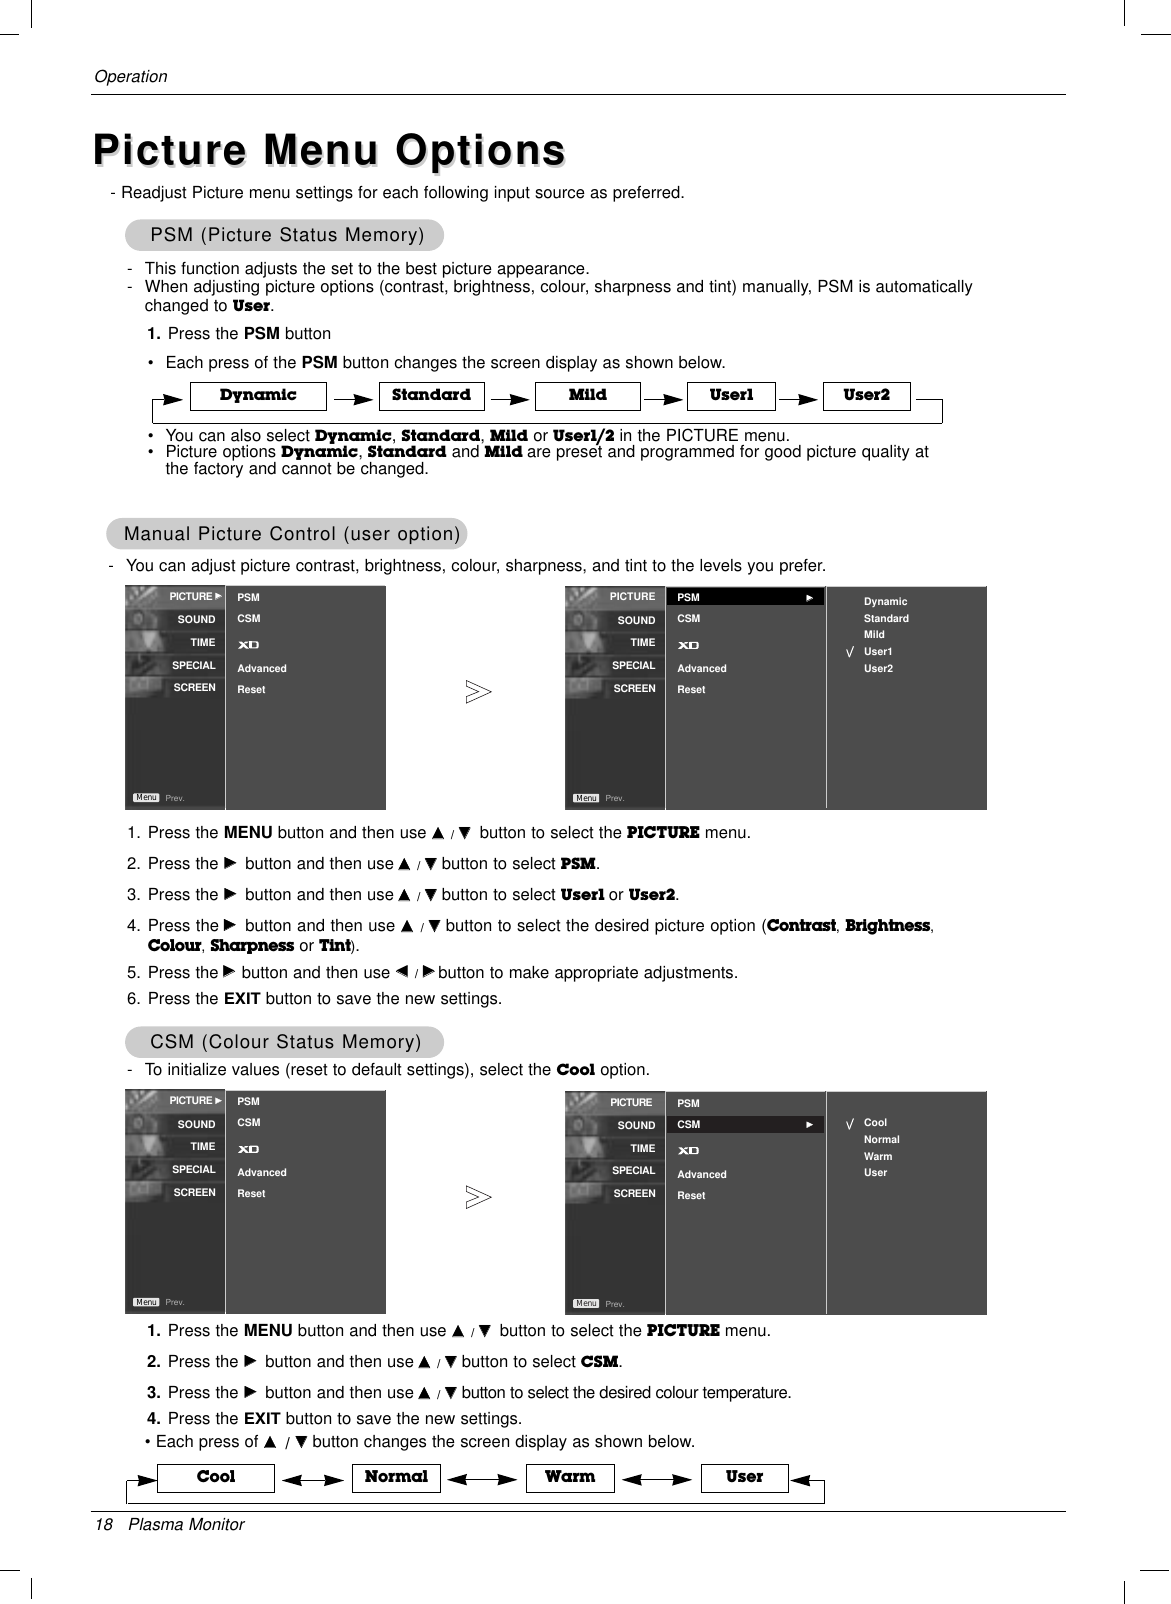
![Owner’s Manual 29ENGLISHOperationScreen Menu OptionsScreen Menu OptionsAuto ConfigureAuto Configure1. Press the MENU button and then use DD/ EEbutton to select the SCREEN menu.2. Press the GGbutton and then use DD/ EEbutton to select Auto config..3. Press the GGbutton to start Auto config..• When Auto config. has finished, OK will be shown on screen.•If the position of the image is still not correct, try Auto adjustment again.4. If picture needs to be adjusted more after Auto adjustment in RGB (PC), you can adjust the Manual config..5.Press the EXITbutton to save the new settings.PICTURE0SOUND0TIME0SPECIAL0SCREEN GGPrev.MenuAuto config.Manual config.XGA ModeARCReset PICTURE0SOUND0TIME0SPECIAL0SCREEN0Prev.MenuTo set Auto config. GGManual config.XGA ModeARCReset -Automatically adjusts picture position and minimizes image shaking.-This function works in the following mode : RGB[PC].Manual ConfigureManual Configure-This function works in the following mode:RGB[PC], RGB[DTV], HDMI[DTV], COMPONENT[DTV] mode only- If the picture isn’t clear after auto adjustment and especially if characters are still trembling, adjust the picturephase manually (RGB-PC mode only).- To correct the screen size, adjust Clock (RGB-PC mode only).1. Press the MENU button and then DD/ EEbutton to select the SCREENmenu.2. Press the GGbutton and then DD/ EEbutton to select Manual config..3. Press the GGbutton and then DD/ EEbutton to select Phase,Clock,H-Position or V-Position.4. Press the FF/ GGbutton to make appropriate adjustments.5. Press the EXITbutton to save the new settings.PICTURE0SOUND0TIME0SPECIAL0SCREEN0Prev.MenuPhaseClockH-PositionV-PositionAuto config.Manual config. GGXGA ModeARCReset 0000PICTURE0SOUND0TIME0SPECIAL0SCREEN GGPrev.MenuAuto config.Manual config.XGA ModeARCReset](https://usermanual.wiki/LG-Electronics-USA/50PM4MAWA/User-Guide-924227-Page-30.png)
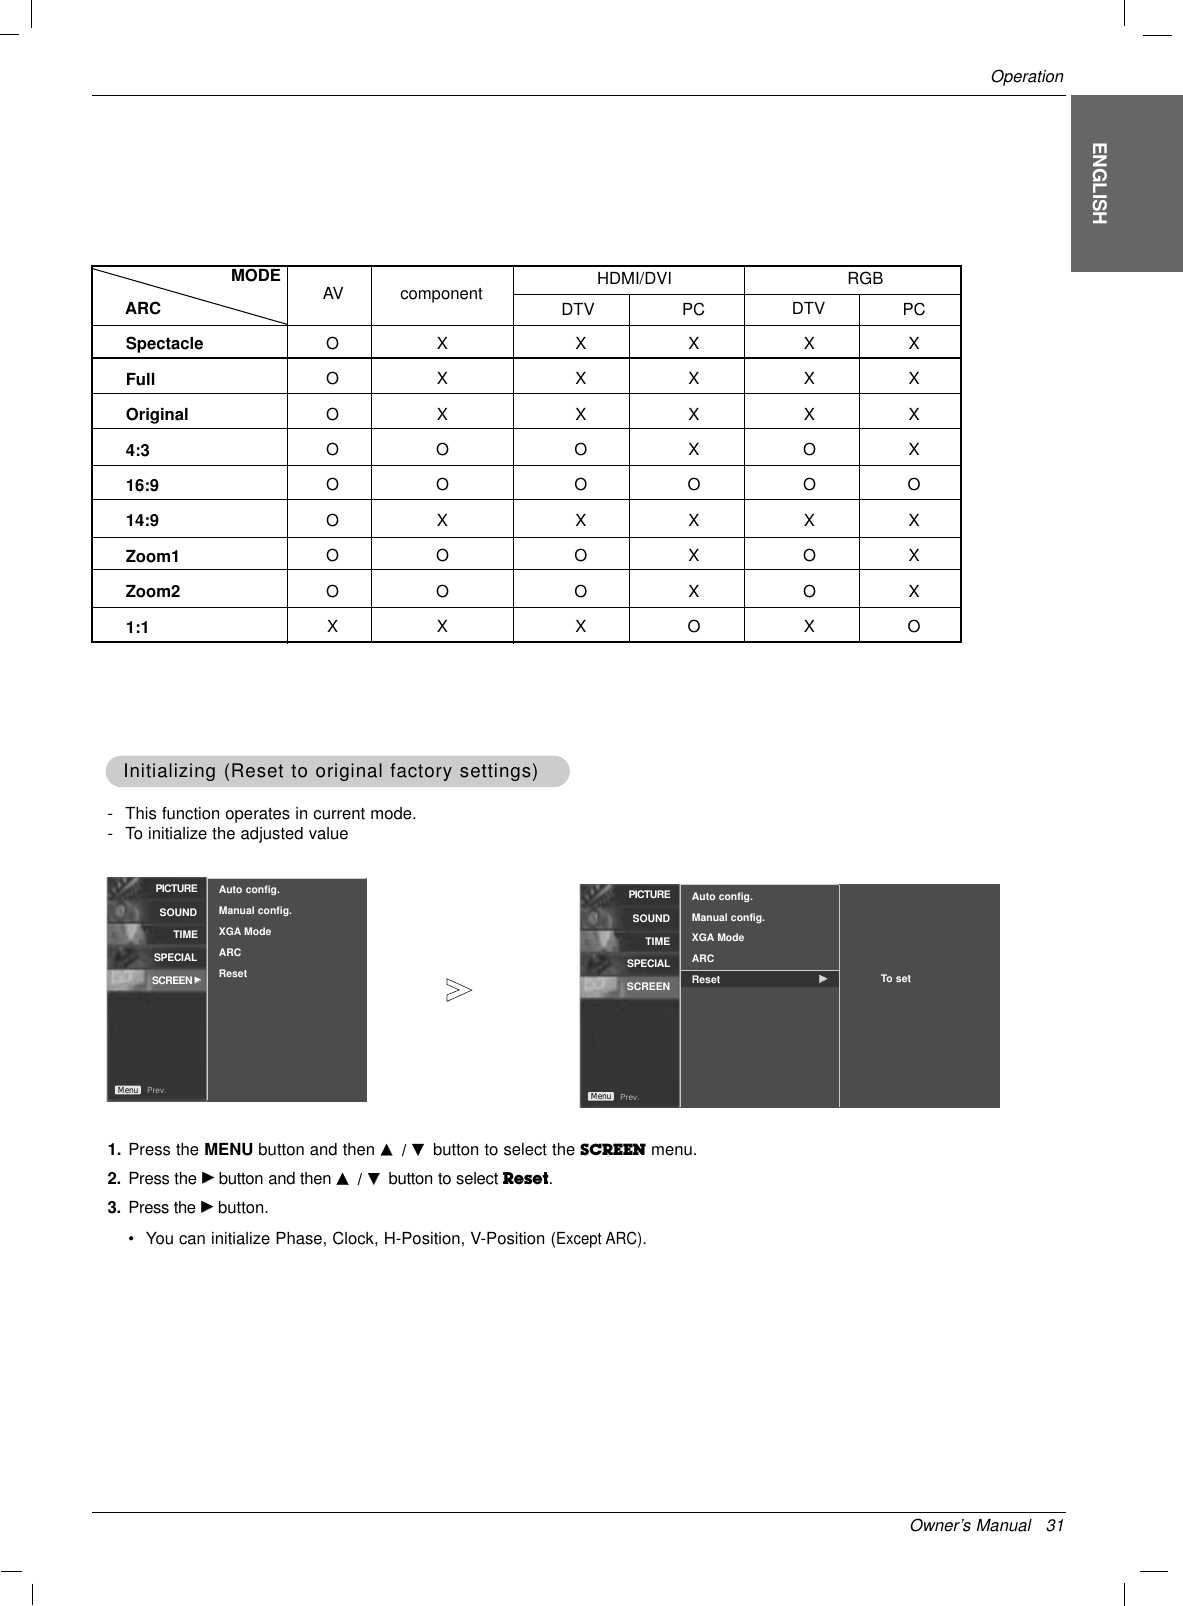
![30 Plasma MonitorOperationSelecting XGASelecting XGA modemode- To see a normal picture, match the resolution of RGB mode and selection of XGA mode.- This function works in the following mode : RGB[PC]1. Press the MENU button and then use DD /EEbutton to select the SCREENmenu.2. Press the GGbutton and then use DD /EEbutton to select XGA Mode.3. Press the GGbutton and then use DD /EEbutton to select the desired XGA resolution.4. Press the SETbutton.5. Press the EXITbutton to save the new settings.PICTURE0SOUND0TIME0SPECIAL0SCREEN0Prev.Menu1024x7681280x7681360x7681366x768Auto config.Manual config.XGA Mode GGARCReset Setting the Picture FormatSetting the Picture Format- You can watch the screen in various picture formats; Spectacle,Full,Original,4:3, 16:9,1:1, 14:9,Zoom1,Zoom2.1. Press the MENU button and then use DD/ EEbutton to select the SCREENmenu.2. Press the GGbutton and then use DD/ EEbutton to select ARC.3. Press the GGbutton and then use DD / EEbutton to select Spectacle,Full,Original,4:3, 16:9,1:1, 14:9 or Zoom 1/2.• SpectacleWhen your AV receives the wide screen signal, it will lead you to adjust the picture horizontally, in a nonlinear propor-tion, to fill the entire screen.• FullWhen your AV receives the wide screen signal, it will lead you to adjust the picture horizontally or vertically, in a linearproportion, to fill the entire screen fully. (Europe an version only)• OriginalWhen your AV receives the wide screen signal, it will be automatically changed to picture format to be sent.• 4:3This pIcture format is 4:3 of general AV.• 16:9You can enjoy movies (the picture format of 16:9) or general TV programmes thorough 16:9 mode. Programmes with16:9 format are viewed naturally but 4:3 programmes are magnified on the left and right so that the screen is16:9 format.• 1:1This pIcture format is 1:1 of general AV. (only RGB PC, HDMI/DVI PC)• 14:9You can enjoy the picture format of 14:9 or general AV programmes through 14:9 mode.Programmes with 14:9 are viewed naturally, but 4:3 programmes are magnified on the top/bottom and left/right sides.• Zoom1, 2You can enjoy movies on a vast screen through Zoom mode. The 4:3 programmes are magnified on the top/bottomand left/right sides so that screen is 16:9 format. The bottom and top of the picture may be lost.4. Press the EXITbutton to save the new settings.PICTURE0SOUND0TIME0SPECIAL0SCREEN0Prev.MenuSpectacleFullOriginal4:316:91:114:9Zoom1Zoom2Auto config.Manual config.XGA ModeARC GGReset Screen Menu OptionsScreen Menu OptionsPICTURE0SOUND0TIME0SPECIAL0SCREEN GGPrev.MenuAuto config.Manual config.XGA ModeARCReset PICTURE0SOUND0TIME0SPECIAL0SCREEN GGPrev.MenuAuto config.Manual config.XGA ModeARCReset](https://usermanual.wiki/LG-Electronics-USA/50PM4MAWA/User-Guide-924227-Page-31.png)
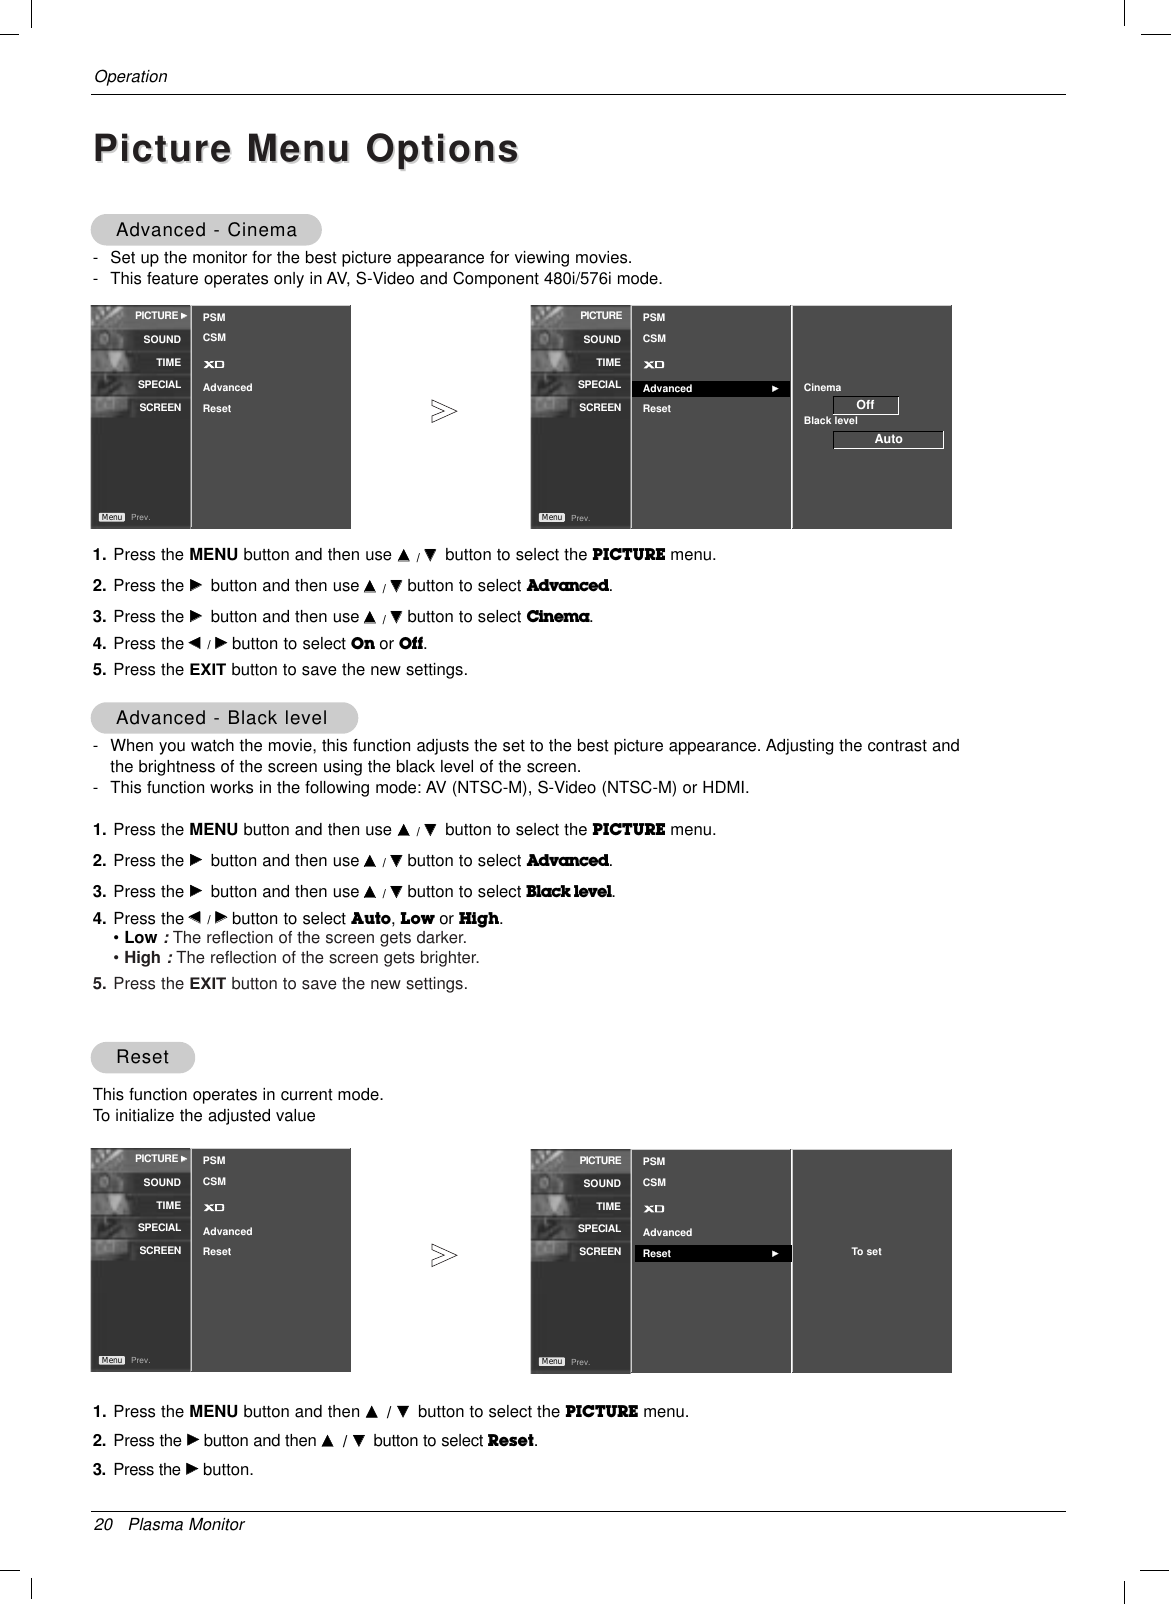
![Owner’s Manual 33ENGLISHExternal Control Device SetupTransmission* [Command 1]: k, j, m,d* [Command 2]: To control Plasma Monitor set.* [Set ID]: You can adjust the set ID to choose desired moni-tor ID number in Special menu. Adjustment rangeis 1 ~ 99. When selecting Set ID ‘0’, every con-nected Plasma Monitor set is controlled. Set ID isindicated as decimal (1~99) on menu and asHexa decimal (0x0~0x63) on transmission/receiv-ing protocol.* [DATA]: To transmit command data.Transmit ‘FF’ data to read status of command.* [Cr]: Carriage ReturnASCII code ‘0x0D’* [ ]: ASCII code ‘space (0x20)’[Command1][Command2][ ][Set ID][ ][Data][Cr]OK Acknowledgement* The Monitor transmits ACK (acknowledgement) based onthis format when receiving normal data. At this time, if thedata is data read mode, it indicates present status data. Ifthe data is data write mode, it returns the data of the PCcomputer.[Command2][ ][Set ID][ ][OK][Data][x]Error Acknowledgement* * If there is error, it returns NG[Command2][ ][Set ID][ ][NG][Data][x]TTransmission / Receiving Protocolransmission / Receiving Protocol• Baud rate : 9600 bps (UART)• Data length : 8 bits• Parity : None• Stop bit : 1 bit• Communication code : ASCII code• Use a straight cable.Communication ParametersCommunication Parameters01. Power k a 0 ~ 102. Input Select k b 2 ~ 903. Aspect Ratio k c 1 ~ 904. Screen Mute k d 0 ~ 105. Volume Mute k e 0 ~ 106. Volume Control k f 0 ~ 6407. Contrast k g 0 ~ 6408. Brightness k h 0 ~ 6409. Colour k i 0 ~ 6410. Tint k j 0 ~ 6411. Sharpness k k 0 ~ 6412. OSD Select k l 0 ~ 113. Remote Lock /Key Lock k m 0 ~ 114. Balance k t 0 ~ 6415. Colour Temperature k u 0 ~ 316. Abnormal state k z FF17. ISM mode j p 0 ~ 818. Auto Configure j u 119. Key m c Key Code20. Tile Mode d d 0 ~ 4421. Tile H Size d g 0 ~ 6422. Tile V Size d h 0 ~ 6423. Tile ID Set d i 0 ~ 1024. Natural Mode (In Tile mode) d j 0 ~ 1COMMAND 1 COMMAND 2 DATA(Hexadecimal)Command Reference ListCommand Reference ListPICTURE0SOUND0TIME0SPECIAL0SCREEN0Prev.MenuSet IDSet ID-Use this function to specify a monitor ID number.- Refer to ‘Real Data Mapping 1’. See page 35.1. Press the MENU button and then use the DD /EEbutton to select the SPECIAL menu.2. Press the GGbutton and then use DD /EEbutton to select Set ID.3. Press the GGbutton and then use F / Gbutton to adjust Set ID to choose the desired monitor ID number.• The adjustment range of Set ID is 1 ~ 99.LanguageChild lockISM MethodSet ID GGTile modeLow powerDemo1PICTURE0SOUND0TIME0SPECIAL GGSCREEN0Prev.MenuLanguageChild lockISM MethodSet IDTile modeLow powerDemo](https://usermanual.wiki/LG-Electronics-USA/50PM4MAWA/User-Guide-924227-Page-34.png)
![34 Plasma MonitorExternal Control Device Setup02. Input Select (Command 2:b) (Main Picture Input)GTo select input source for the Monitor. You can also select an input source using the INPUTbutton on the Monitor's remote control.TransmissionData 2 : AV4 : Component15 : Component26 : RGB (DTV)7 : RGB (PC)8 : HDMI/DVI(DTV)9 : HDMI/DVI(PC)[k][b][ ][Set ID][ ][Data][Cr]Acknowledgement[b][ ][Set ID][ ][OK][Data][x]01. Power (Command 2:a)GTo control Power On/Off of the Monitor.TransmissionData 0 : Power Off 1 : Power On[k][a][ ][Set ID][ ][Data][Cr]Acknowledgement[a][ ][Set ID][ ][OK][Data][x]GTo show Power On/Off.Transmission[k][a][ ][Set ID][ ][FF][Cr]AcknowledgementData 0 : Power Off 1 : Power On* In a like manner, if other functions transmit ‘FF’ databased on this format, Acknowledgement data feedbackpresents status about each function.[a][ ][Set ID][ ][OK][Data][x]03. Aspect Ratio (Command 2:c) (Main picture format)GTo adjust the screen format.You can also adjust the screen format using the ARC(Aspect Ratio Control) button on remote control or in theScreen menu.TransmissionData 1 : Normal screen (4:3)2 : Wide screen (16:9) 3 : Horizon (Spectacle)4 : Zoom15 : Zoom26 : Original7 : 14 : 98 : Full (Europe version only)9 : 1 : 1 (PC)[k][c][ ][Set ID][ ][Data][Cr]Acknowledgement[c][ ][Set ID][ ][OK][Data][x]05. Volume Mute (Command 2:e)GTo control volume mute on/off.You can also adjust mute using the MUTE button onremote control.TransmissionData 0 : Volume mute on (Volume off)1 : Volume mute off (Volume on)[k][e][ ][Set ID][ ][Data][Cr]Acknowledgement[e][ ][Set ID][ ][OK][Data][x]04. Screen Mute (Command 2:d)GTo select screen mute on/off.TransmissionData 0 : Screen mute off (Picture on)1 : Screen mute on (Picture off)Data 0 : Screen mute off (Picture on)1 : Screen mute on (Picture off)[k][d][ ][Set ID][ ][Data][Cr]Acknowledgement[d][ ][Set ID][ ][OK][Data][x]06. Volume Control (Command 2:f)GTo adjust volume.You can also adjust volume with the volume buttonson remote control.TransmissionData Min : 0 ~ Max : 64•Refer to ‘Real data mapping1’. See page 35.[k][f][ ][Set ID][ ][Data][Cr]Acknowledgement[f][ ][Set ID][ ][OK][Data][x]Data 2 : AV4 : Component15 : Component26 : RGB (DTV)7 : RGB (PC)8 : HDMI/DVI(DTV)9 : HDMI/DVI(PC)Data 0 : Volume mute on (Volume off)1 : Volume mute off (Volume on)Data Min : 0 ~ Max : 64](https://usermanual.wiki/LG-Electronics-USA/50PM4MAWA/User-Guide-924227-Page-35.png)
![* Real data mapping 10 : Step 0A : Step 10 (SET ID 10)F : Step 15 (SET ID 15)10 : Step 16 (SET ID 16)63 : Step 99 (SET ID 99)64 : Step 100Owner’s Manual 35ENGLISHExternal Control Device Setup13. Remote Lock /Key Lock (Command2:m)GTo control Remote Lock on/off to the set.This function, when controlling RS-232C, locks the remotecontrol and the local keys.Transmission[k][m][ ][Set ID][ ][Data][Cr]AcknowledgementData 0: off 1: on[m][ ][Set ID][ ][OK][Data][x]GTo adjust the screen sharpness.You can also adjust sharpness in the Picture menu.Transmission11. Sharpness (Command2:k)Data Min: 0 ~ Max: 64•Refer to ‘Real data mapping 1’. [k][k][ ][Set ID][ ][Data][Cr]Acknowledgement[k][ ][Set ID][ ][OK][Data][x]12. OSD Select (Command2:l)GTo select OSD (On Screen Display) on/off.Transmission[k][l][ ][Set ID][ ][Data][Cr]AcknowledgementData 0: OSD off 1: OSD on[l][ ][Set ID][ ][OK][Data][x]09. Colour (Command2:i)GTo adjust the screen colour.You can also adjust colour in the Picture menu.TransmissionData Min : 0 ~ Max : 64•Refer to ‘Real data mapping 1’. [k][i][ ][Set ID][ ][Data][Cr]Acknowledgement[i][ ][Set ID][ ][OK][Data][x]10. Tint (Command2:j) (Video only)GTo adjust the screen tint.You can also adjust tint in the Picture menu.TransmissionData Red : 0 ~ Green : 64•Refer to ‘Real data mapping 1’. [k][j][ ][Set ID][ ][Data][Cr]Acknowledgement[j][ ][Set ID][ ][OK][Data][x]08. Brightness (Command2:h)GTo adjust screen brightness.You can also adjust brightness in the Picture menu.TransmissionData Min : 0 ~ Max : 64•Refer to ‘Real data mapping 1’. [k][h][ ][Set ID][ ][Data][Cr]Acknowledgement[h][ ][Set ID][ ][OK][Data][x]Data Min : 0 ~ Max : 64Data Min : 0 ~ Max : 64Data Red : 0 ~ Green : 64Data Min : 0 ~ Max : 64Data 0: OSD off 1: OSD onData 0: off 1: on07. Contrast (Command 2:g)GTo adjust screen contrast. You can also adjust contrast in the picture menu.TransmissionData Min : 0 ~ Max : 64•Refer to ‘Real data mapping1’ as shown below.[k][g][ ][Set ID][ ][Data][Cr]Acknowledgement[g][ ][Set ID][ ][OK][Data][x]Data Min : 0 ~ Max : 64](https://usermanual.wiki/LG-Electronics-USA/50PM4MAWA/User-Guide-924227-Page-36.png)
![36 Plasma MonitorExternal Control Device Setup16. Abnormal state (Command2 : z)GAbnormal State : Used to Read the power off statuswhen Stand-by mode.TransmissionData FF : Read0 : Normal (Power on and signal exist)1: No signal (Power on)2 : Turn the monitor off by remote control3 : Turn the monitor off by sleep time function4 : Turn the monitor off by RS-232C function6 : AC down8 : Turn the monitor off by off time function9 : Turn the monitor off by auto off function[k][z][ ][Set ID][ ][Data][Cr]Acknowledgement[z][ ][Set ID][ ][OK][Data][x]17. ISM mode(Command: j p)GUsed to select the afterimage preventing function.TransmissionData 1 : Inversion2 : Orbiter3 : Orb.+Inv.4 : White Wash8 : Normal[j][p][ ][Set ID][ ][Data][Cr]Acknowledgement[p][ ][Set ID][ ][OK][Data][x]14. Balance (Command2:t)GTo adjust balance.TransmissionData Min: 0 ~ Max: 64•Refer to ‘Real data mapping 1’. See page 35.[k][t][ ][Set ID][ ][Data][Cr]Acknowledgement[t][ ][Set ID][ ][OK][Data][x]Data Min: 0 ~ Max: 64* Balance : L50 ~ R5015. Colour Temperature (Command2:u)GTo adjust colour temperature.You can also adjust ACC in the Picture menu.TransmissionData 0: Normal 1: Cool 2: Warm 3: User[k][u][ ][Set ID][ ][Data][Cr]Acknowledgement[u][ ][Set ID][ ][OK][Data][x]Data 0: Normal 1: Cool 2: Warm 3: User 20. Tile Mode(Command : d d)GChange a Tile Mode.Transmission[d][d][ ][Set ID][ ][Data][x]* The data can not be set to 0X or X0 except 00.Acknowledgement[d][ ][Set ID][ ][OK][Data][x]18. Auto Configure (Command: j u)GTo adjust picture position and minimize image shakingautomatically. Auto Configure only works in RGB-PCmode.TransmissionData 1: To set[j][u][ ][Set ID][ ][Data][Cr]Acknowledgement[u][ ][Set ID][ ][OK][Data][x]19. Key (Command: m c)GTo adjust Key code for IR remote control.TransmissionData Key code : Refer to See page 39.[m][c][ ][Set ID][ ][Data][Cr]Acknowledgement[c][ ][Set ID][ ][OK][Data][x]Data00121314...44DescriptionTile mode is off.1 x 2 mode(column x row)1 x 3 mode1 x 4 mode...4 x 4 mode](https://usermanual.wiki/LG-Electronics-USA/50PM4MAWA/User-Guide-924227-Page-37.png)
![Owner’s Manual 37ENGLISHExternal Control Device Setup21. Tile H Size(Command : d g)G To set the Horizontal size.Transmission[d][g][ ][Set ID][ ][Data][x]Acknowledgement[g][ ][Set ID][ ][OK][Data][x]22. Tile V Size(Command : d h)GTo set the Vertical size.Transmission[d][h][ ][Set ID][ ][Data][x]Acknowledgement[h][ ][Set ID][ ][OK][Data][x]Data Min: 0 ~ Max: 64•Refer to ‘Real data mapping 1’. See page 35.23. Tile ID Set (Command : d i)GTo assign the Tile ID for Tiling function .Transmission[d][i][ ][Set ID][ ][Data][x]Acknowledgement[i][ ][Set ID][ ][OK][Data][x]Data Min: 0 ~ Max: 10•Refer to ‘Real data mapping 1’. See page 35.Data Min: 0 ~ Max: 64•Refer to ‘Real data mapping 1’. See page 35.24. Natural Mode (In Tile mode) (Command : d j)GThe image is omitted by the distance between thescreens to be naturally shown.Transmission[d][j][ ][Set ID][ ][Data][x]Acknowledgement[j][ ][Set ID][ ][OK][Data][x]Data 0 : Natural Off1 : Natural Onff : Read Status](https://usermanual.wiki/LG-Electronics-USA/50PM4MAWA/User-Guide-924227-Page-38.png)