LG Electronics USA 60LA7400UA LED TV MONITOR User Manual MFL67652612 indd
LG Electronics USA LED TV MONITOR MFL67652612 indd
Contents
- 1. User Manual 1
- 2. User Manual 2
- 3. User Manual 3
User Manual 2
ENGLISH
16 ASSEMBLING AND PREPARING
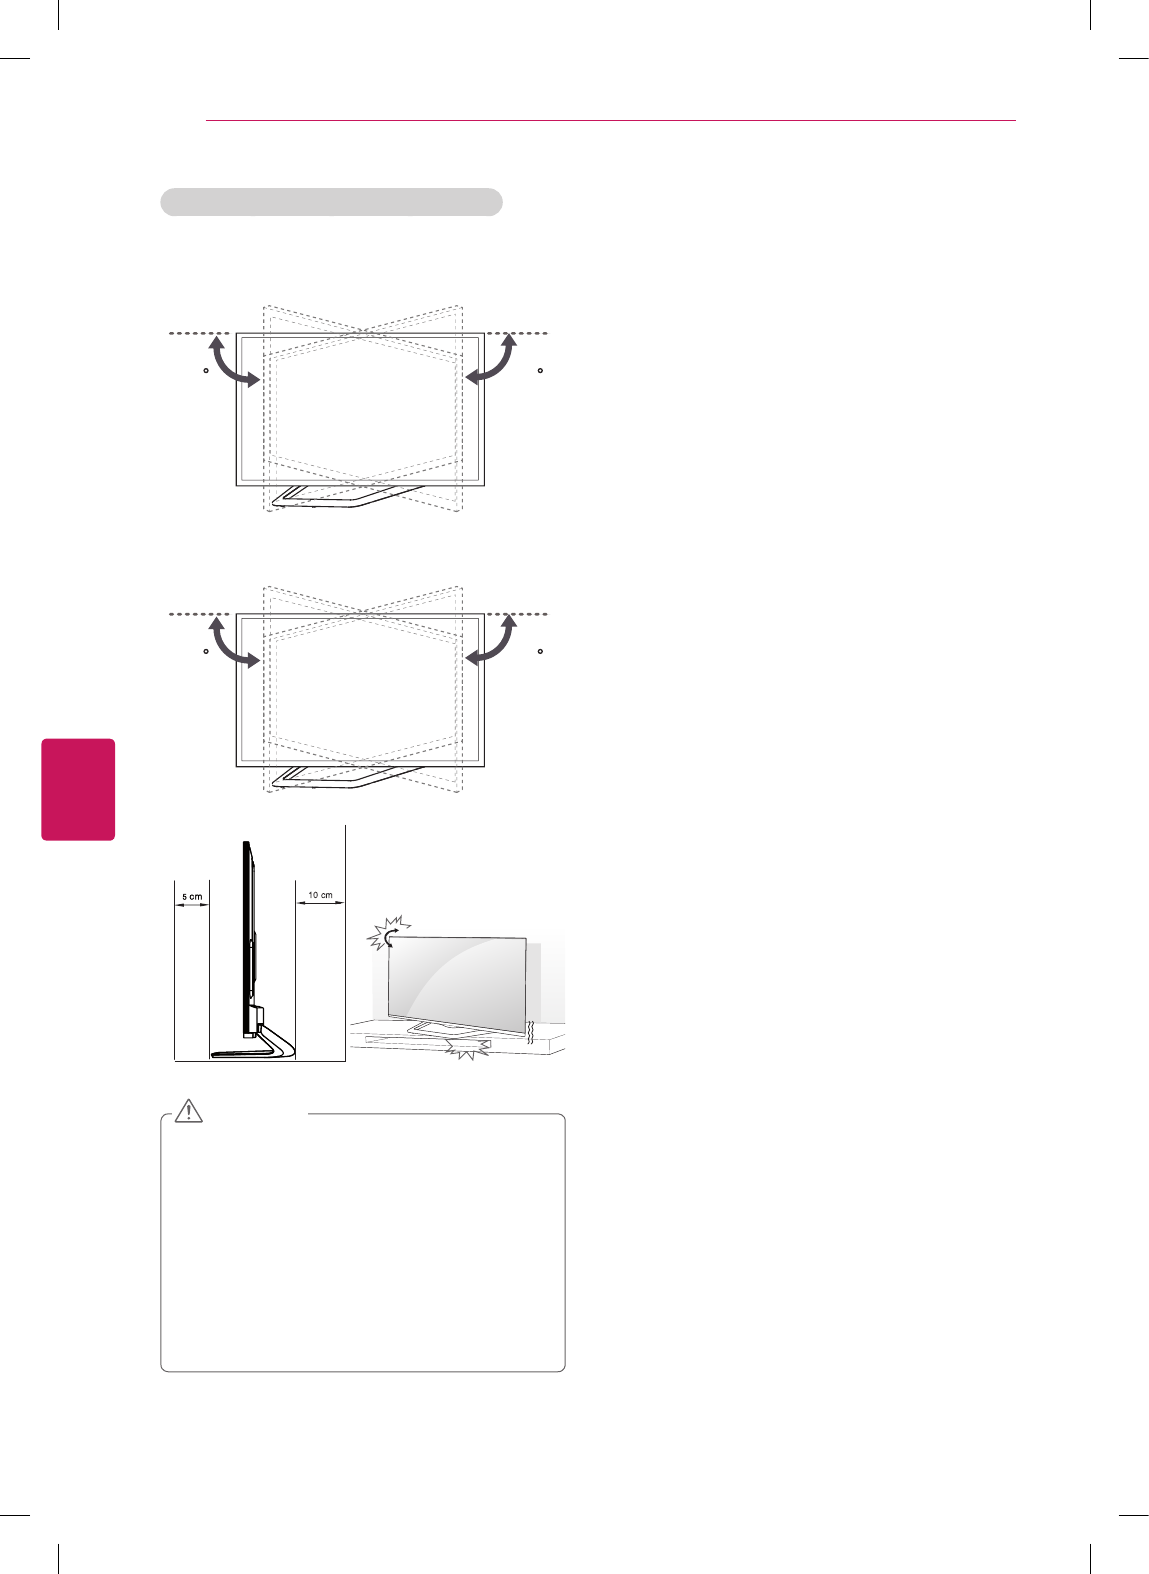
yInstall the product on a flat surface for easy swivel.
Make sure to use the TV cabinet or stand that can
properly support the TV.
yAfter installing the TV, the angle of the screen can
be adjusted to the left or right.
yWhen adjusting the angle, make sure there are
no objects near the TV and the TV has enough
distance from the wall. A space of at least 5 cm
on the front and 10 cm on the back should be
available. Otherwise, the product could fall due to
balance problems, which may cause personal injury
or damage to the product.
CAUTION
Adjusting the angle of the TV to suit view
Swivel 10 degrees to the left or right and adjust the
angle of the TV to suit your view.
(For 47LA6900, 47LA7400)
1010
Swivel 8 degrees to the left or right and adjust the angle
of the TV to suit your view.
(For 55LA6900,55LA6950, 55LA7400,60LA7400)
88
ENGLISH
17
ASSEMBLING AND PREPARING
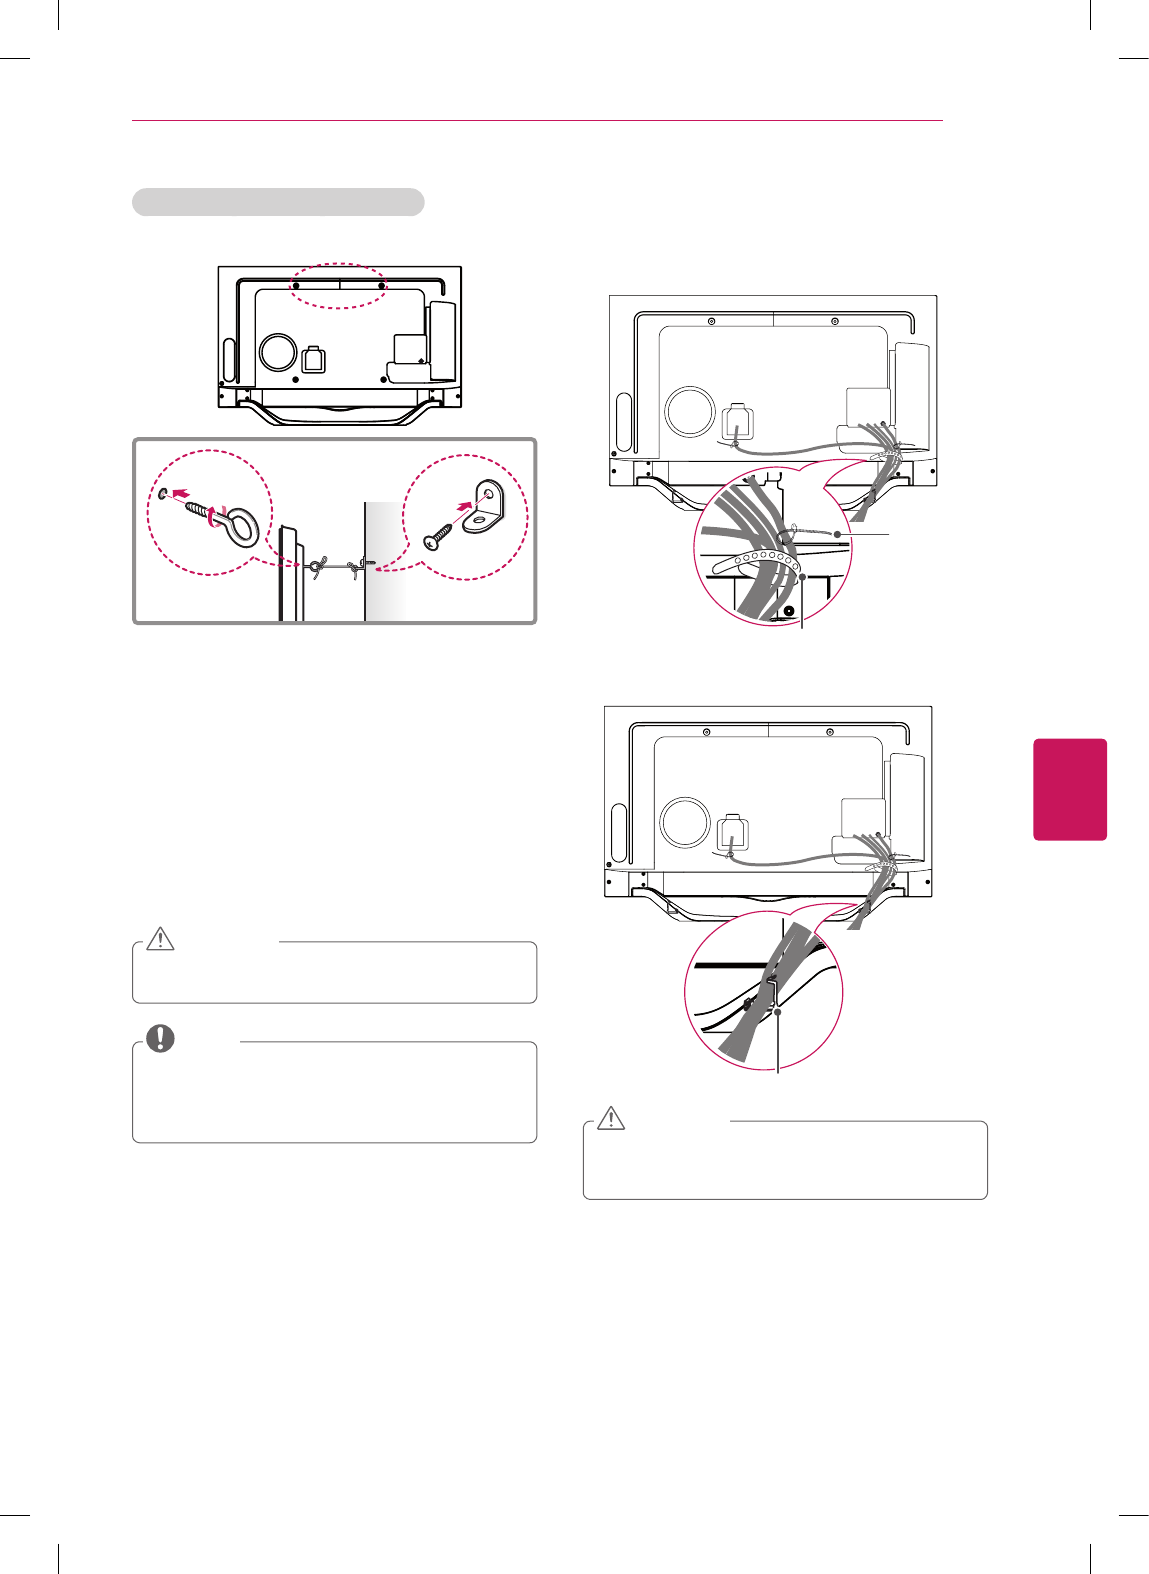
Securing the TV to a wall (optional)
(Depending on model)
1 Insert and tighten the eye-bolts, or TV brackets and
bolts on the back of the TV.
- If there are bolts inserted at the eye-bolts position,
remove the bolts first.
2 Mount the wall brackets with the bolts to the wall.
Match the location of the wall bracket and the eye-
bolts on the rear of the TV.
3 Connect the eye-bolts and wall brackets tightly with
a sturdy rope.
Make sure to keep the rope horizontal with the flat
surface.
yMake sure that children do not climb on or hang on
the TV.
CAUTION
yUse a platform or cabinet that is strong and large
enough to support the TV securely.
yBrackets, bolts and ropes are optional. You can
obtain additional accessories from your local dealer.
NOTE
Tidying cables
1 Gather and bind the cables with the cable holder on
the back of the TV.
2 Gather and bind the cables with the cable
management clip.
⨲㘶ᖂ2
㏪ⱞ⋾#Ɐᴏ
yDo not move the TV by holding the cable holder,
as the cable holders may break, and injuries and
damage to the TV may occur.
CAUTION
Cable Holder
⨲㘶ᖂ2
㏪ⱞ⋾#Ɐᴏ
⨲㘶ᖂ2
㏪ⱞ⋾#Ɐᴏ
⨲㘶ᖂ2
㏪ⱞ⋾#Ɐᴏ
⨲㘶ᖂ2
㏪ⱞ⋾#Ɐᴏ
⨲㘶ᖂ2
㏪ⱞ⋾#Ɐᴏ
⨲㘶ᖂ2
㏪ⱞ⋾#Ɐᴏ
⨲㘶ᖂ2
㏪ⱞ⋾#Ɐᴏ
⨲㘶ᖂ2
㏪ⱞ⋾#Ɐᴏ
G
ather and bind the cables
with the cable holder on
the back of the TV.
Cable Management Clip
Cable Tie
ENGLISH
18 ASSEMBLING AND PREPARING
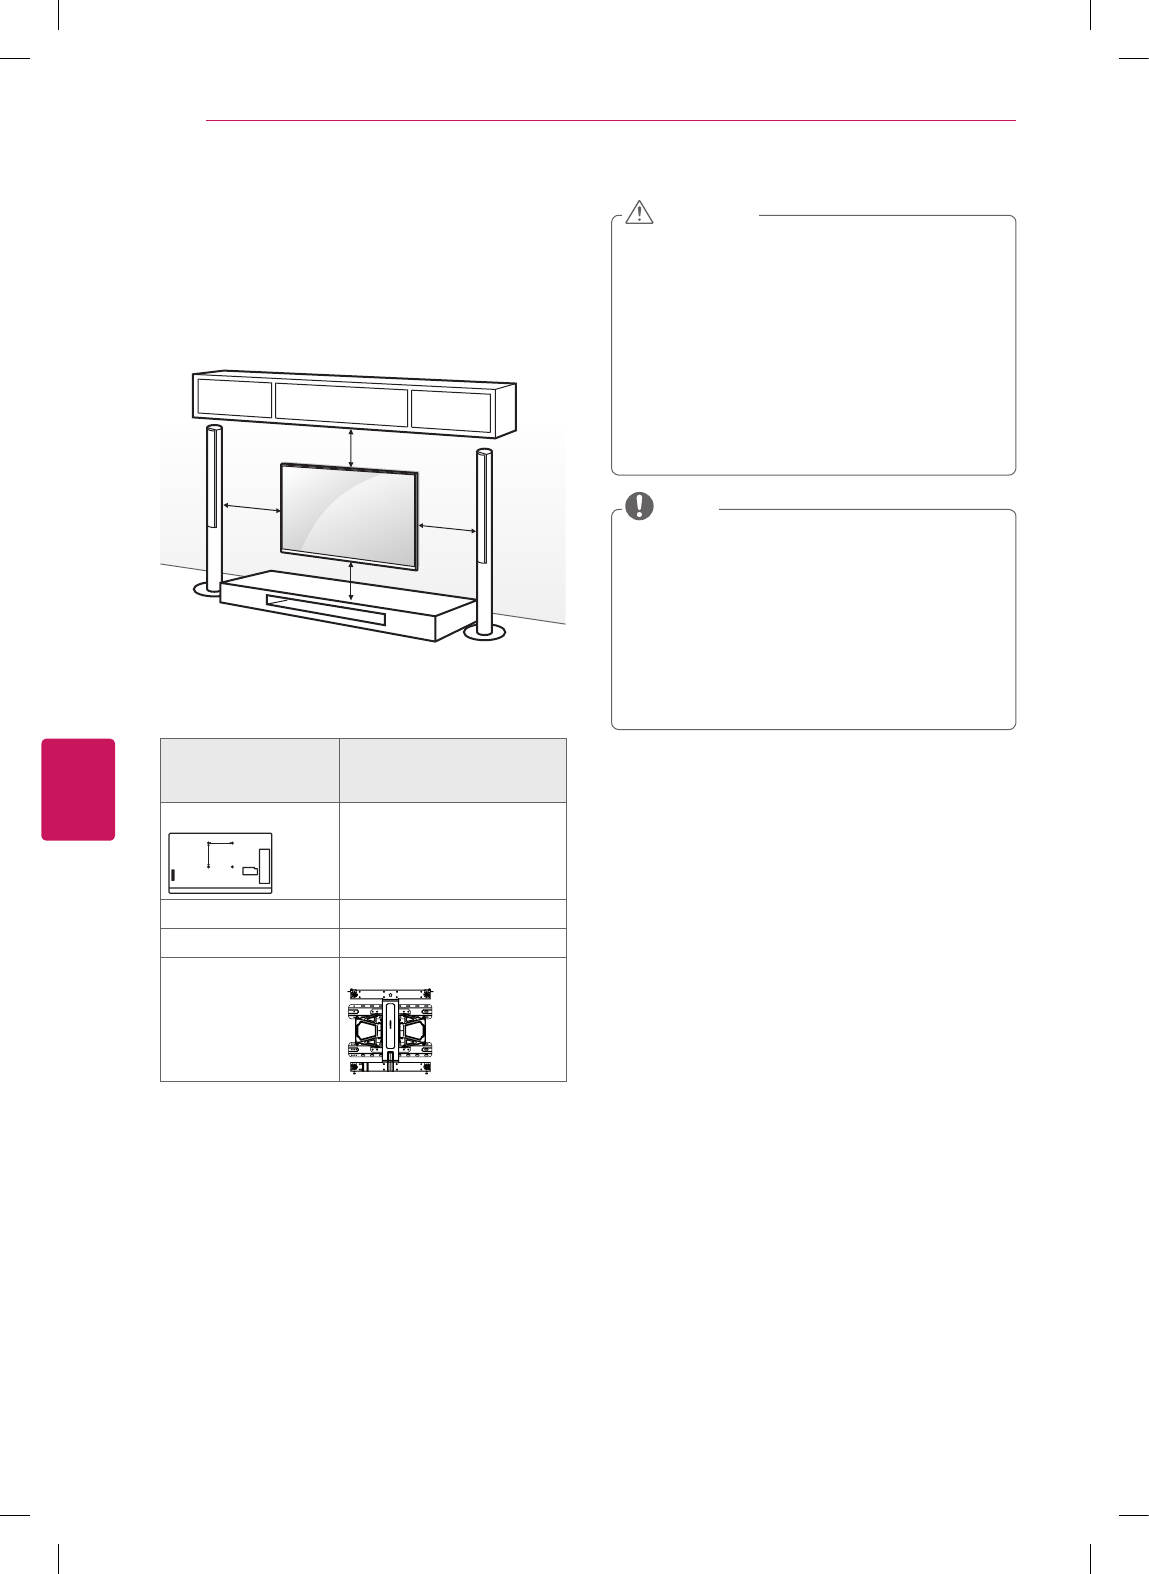
Mounting on a wall
An optional wall mount can be used with your LG TV.
Consult with your local dealer for a wall mount that
supports the VESA standard used by your TV model
(listed below).
We recommend that you use an LG brand wall mount
when mounting the TV to a wall.
10 cm
10 cm
10 cm
10 cm
Make sure to use screws and wall mounts that meet the
VESA standard. Standard dimensions for the wall mount
kits are described in the following table.
Model 47/50/55LA6900
47/50/55LA6950
47/55/60LA7400
VESA (A x B)
A
B
400 x 400
Standard screw M6
Number of screws 4
Wall mount bracket
(optional)
LSW430B
yDisconnect the power before moving or installing
the TV. Otherwise electric shock may occur.
yIf you install the TV on a ceiling or slanted wall, it
may fall and result in severe injury.
Use an authorized LG wall mount and contact the
local dealer or qualified personnel.
yDo not over tighten the screws as this may cause
damage to the TV and void your warranty.
yUse the screws and wall mounts that meet the
VESA standard. Any damages or injuries by misuse
or using an improper accessory are not covered by
the warranty.
CAUTION
yUse the screws that are listed in the VESA
standard screw specifications.
yThe wall mount kit includes an installation manual
and necessary parts.
yThe wall mount bracket is optional. You can obtain
additional accessories from your local dealer.
yThe length of screws may differ depending on the
wall mount. Make sure to use the proper length.
yFor more information, refer to the manual supplied
with the wall mount.
NOTE

ENGLISH
19
MAKING CONNECTIONS
MAKING CONNECTIONS
You can connect various external devices to the TV. Supported external devices are: HD receivers, DVD players, VCRs,
audio systems, USB storage devices, PC, gaming devices, and other external devices. For more information on external
device’s connection, refer to the manual provided with each device.
Connecting to an antenna or cable
Connect an antenna, cable, or cable box to watch TV while referring to the following. The illustrations may differ from
the actual items and a RF cable is optional.
VHF Antenna
UHF Antenna
Antenna
Terminal
Coaxial (75Ω)
Wall Jack
Coaxial (75Ω)
or
ANTENNA
IN
CABLE
IN
yMake sure not to bend the copper wire of the RF
cable.
Copper wire
yComplete all connections between devices, and
then connect the power cord to the power outlet
to prevent damage to your TV.
CAUTION
yTo improve the picture quality in a poor signal area,
please purchase a signal amplifier and install it
properly.
yUse a signal splitter to use more than 2 TVs.
yIf the antenna is not installed properly, contact your
dealer for assistance.
yDTV Audio Supported Codec: MPEG, Dolby Digital,
DTS
NOTE
yIf you record a TV program on a DVD recorder or VCR, make sure to connect the TV signal input cable to the
TV through a DVD recorder or VCR. For more information of recording, refer to the manual provided with the
connected device.
yThe external device connection may differ from the model.
yConnect external devices to the TV regardless of the order of the TV port.
yIf you connect a gaming device to the TV, use the cable supplied with the gaming device.
yRefer to the external equipment’s manual for operating instructions.
NOTE
ENGLISH
20 MAKING CONNECTIONS
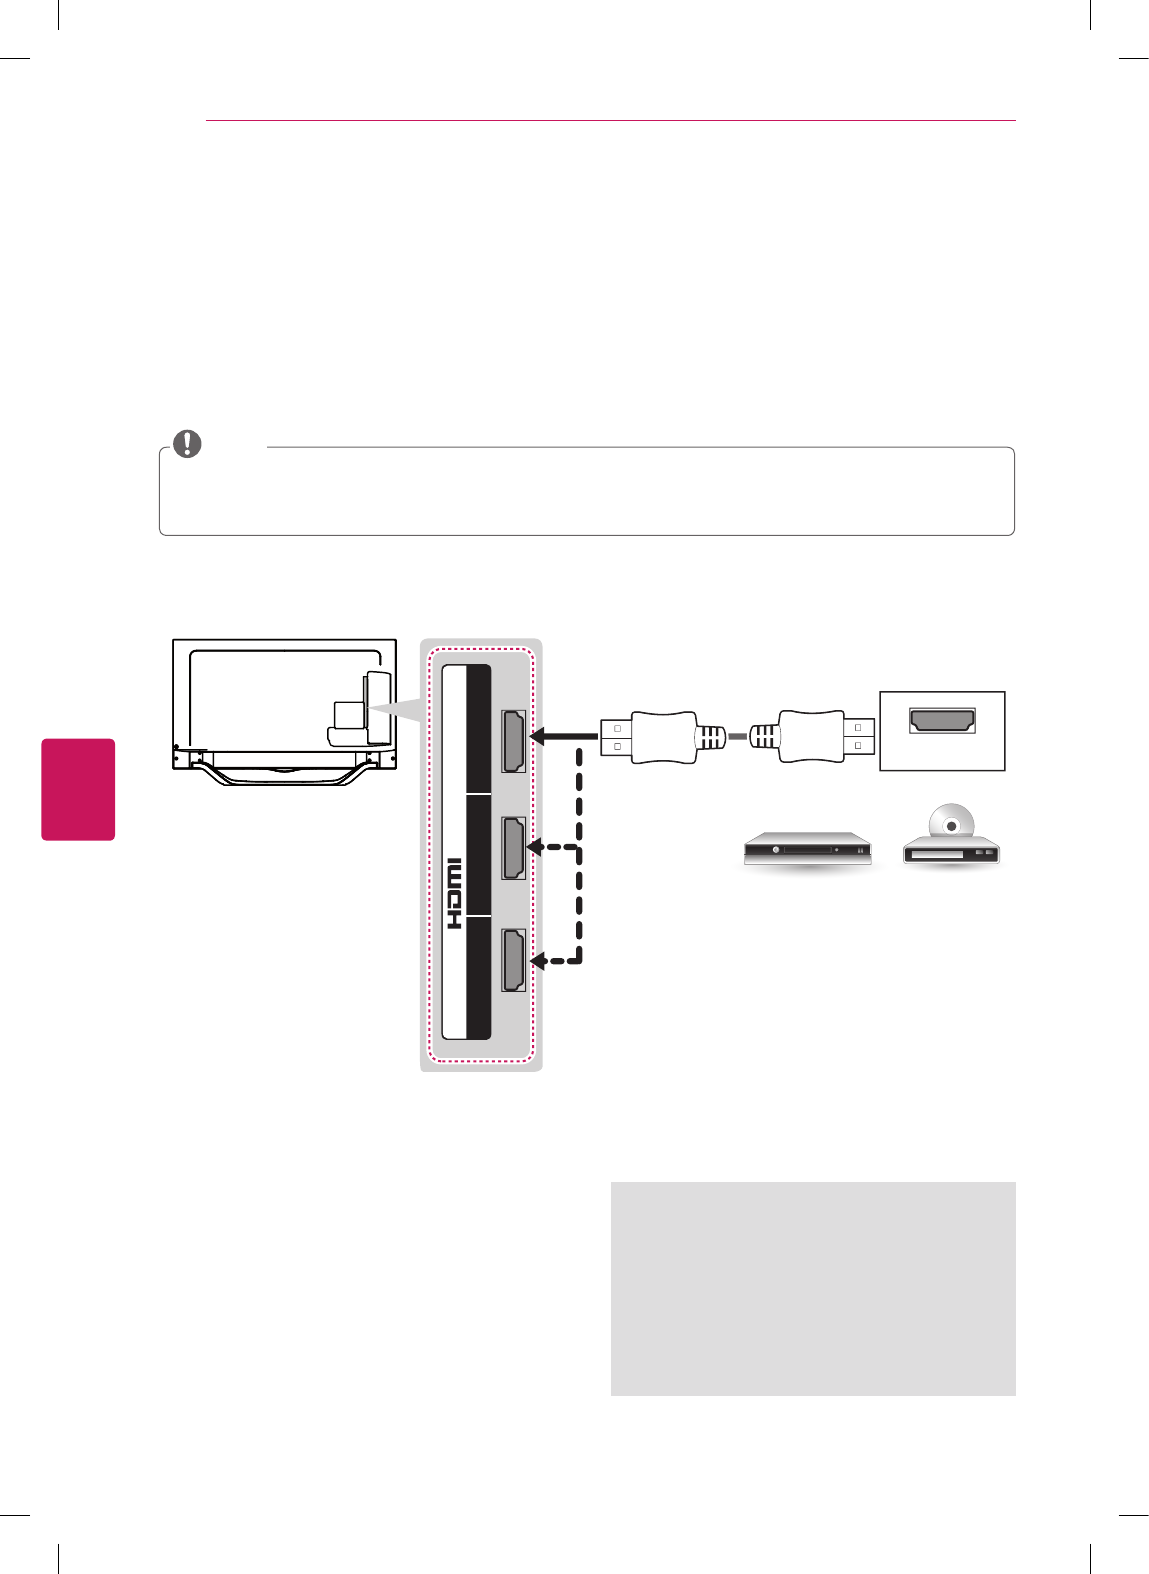
Connecting to a HD receiver, DVD Player or VCR
Connect a HD receiver, DVD Player, or VCR to the TV and select an appropriate input mode.
HDMI Connection
HDMI is the best way to connect a device.
Transmits digital video and audio signals from an external device to the TV. Connect the external device and the TV with
the HDMI cable as shown in the following illustration.
Choose any HDMI input port to connect.
It does not matter which port you use.
ARC (Audio Return Channel)
yWhen connected with a high-speed HDMI
cable, digital audio can be sent to a compactible
device without an additional optical audio cable.
yARC is only supported on the HDMI input
1 (ARC) port. An external audio device that
supports ARC should be connected to HDMI 1
if you wish to use ARC.
yUse the latest High Speed HDMI™ Cable that supports CEC (Customer Electronics Control) function.
yHigh Speed HDMI™ Cables are tested to carry an HD signal up to 1080p and higher.
yHDMI Audio Supported Format: Dolby Digital, PCM (Up to 192 KHz, 32k/44.1k/48k/88k/96k/176k/192k) -> DTS.
NOTE
(*Not Provided)
DVD / Blu-Ray / HD Cable Box / HD STB
HDMI
IN
2 1
(ARC)
3
(MHL)
/DVI
ENGLISH
21
MAKING CONNECTIONS
DVD / Blu-Ray / HD Cable Box / HD STB
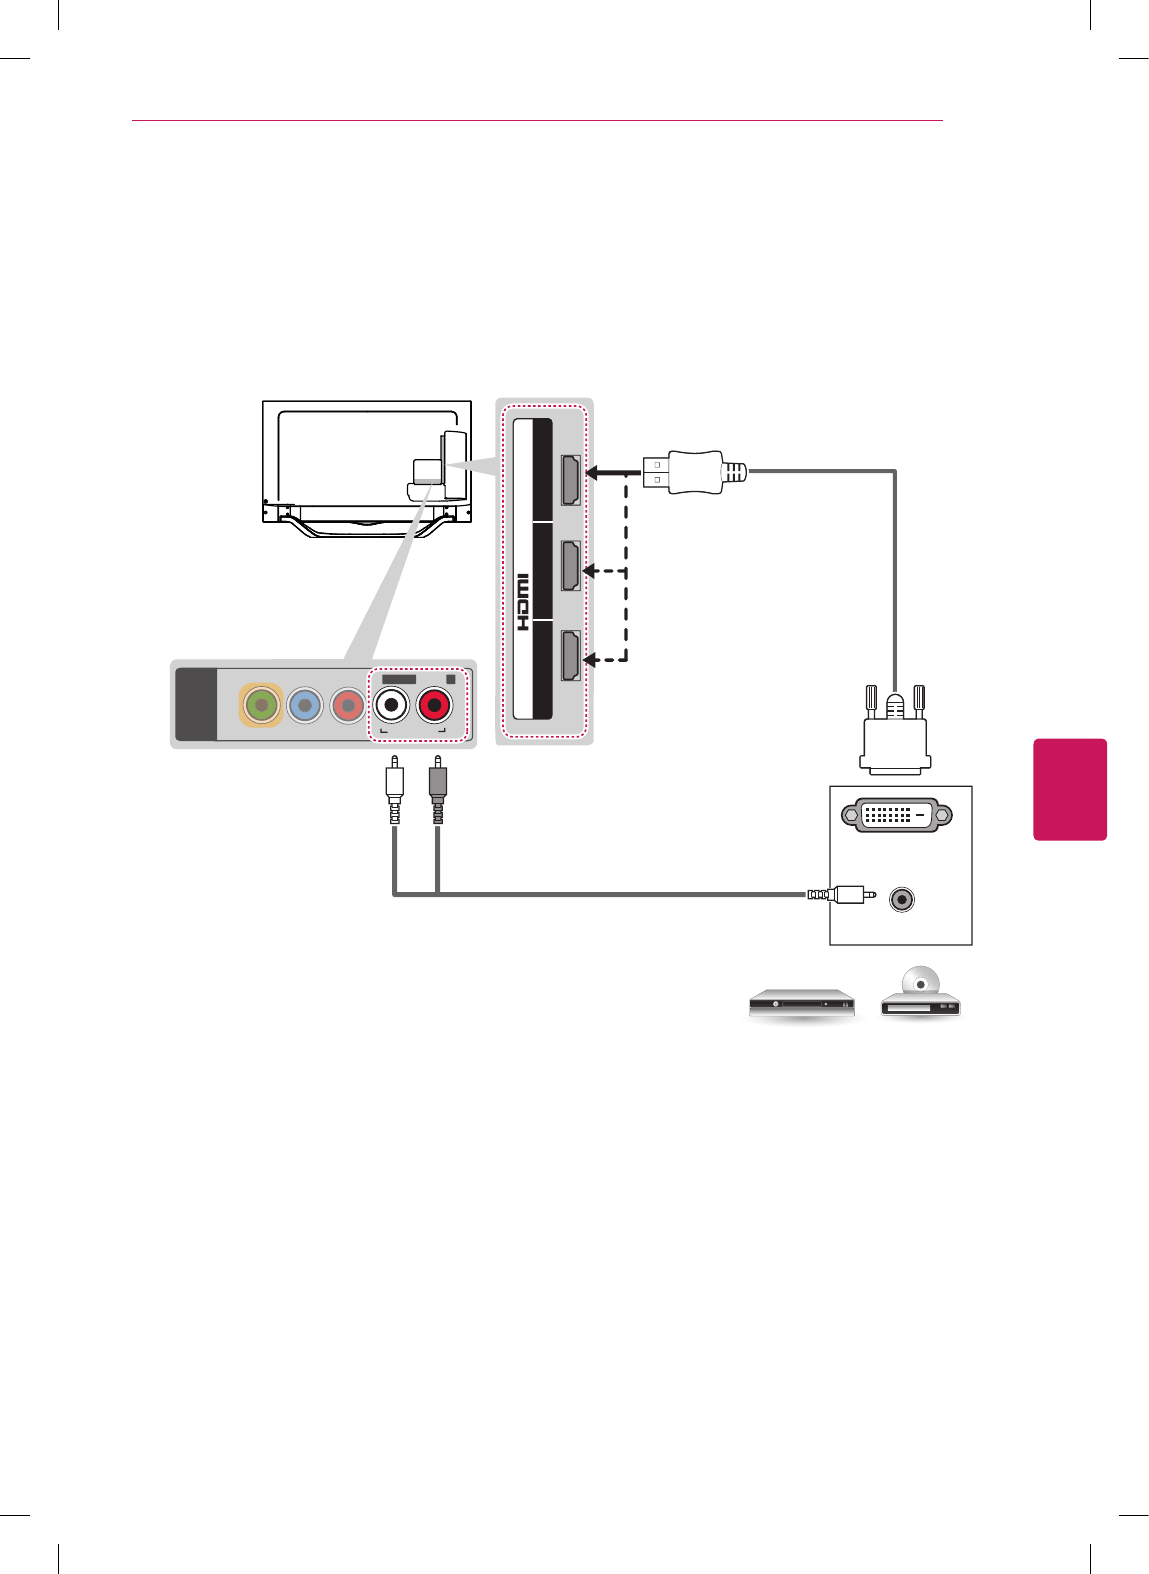
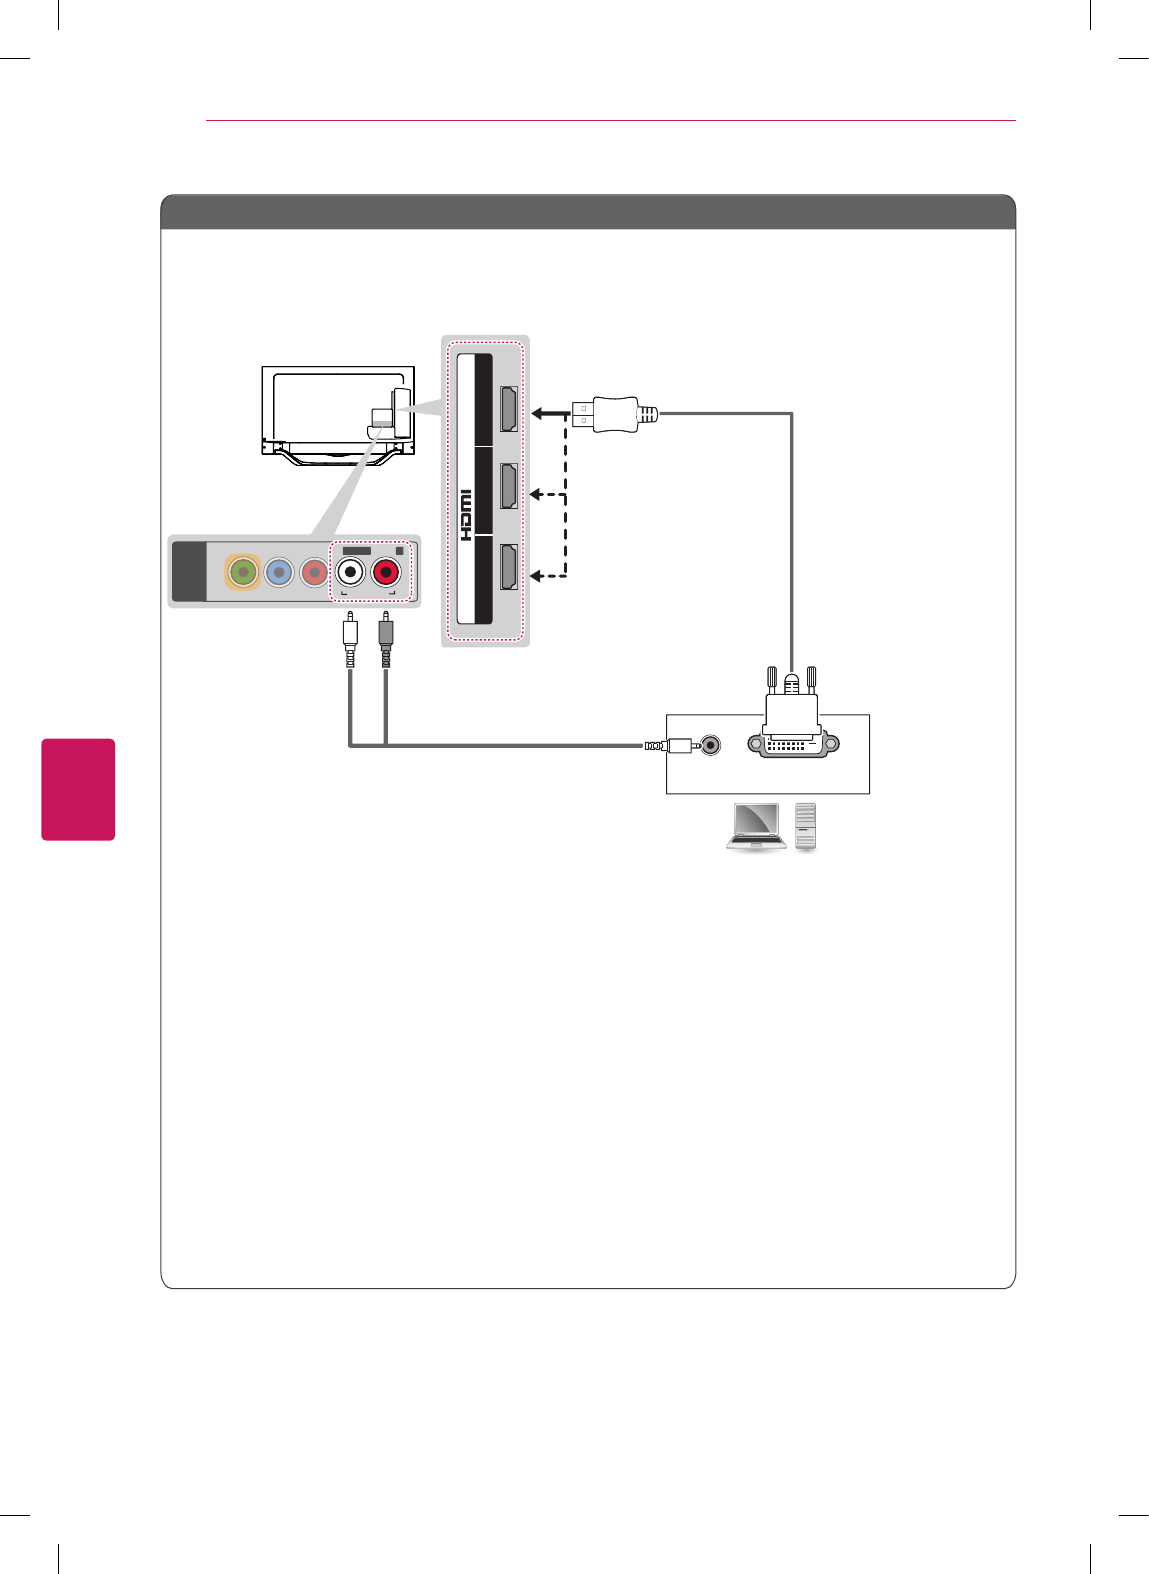
DVI to HDMI Connection
Transmits the digital video signal from an external device to the TV. Connect the external device and the TV with the
DVI-HDMI cable as shown in the following illustration. To transmit an audio signal, connect an audio cable.
IN
2 1
(ARC)
3
(MHL)
AUDIO OUT
DVI OUT
P
B
P
R
VIDE
O
/Y
PC-AUDIO IN
L/MONO AUDIO R
COMPONENT IN
/AV IN
/DVI
(*Not Provided)
(*Not Provided)
DVD / Blu-Ray / HD Cable Box
WHITE
RED
Choose any HDMI/DVI input port to connect.
It does not matter which port you use.

ENGLISH
22 MAKING CONNECTIONS
Connecting to a mobile phone
Mobile High-definition Link (MHL) is an interface for transmitting digital audio/visual signals from mobile phones to
television sets.
yConnect the mobile phone to the HDMI IN 3 (MHL) port to view the phone screen on the TV.
yThis only works with an MHL-enabled phone.
ySome applications can be controlled by the TV’s remote control.
yFor some mobile phones supporting MHL can be controlled with the remote control.
yThe MHL passive cable is needed to connect the TV and a mobile phone.
NOTE
3
(MHL)
(*Not Provided)
MHL Cable
Mobile phone
ENGLISH
23
MAKING CONNECTIONS
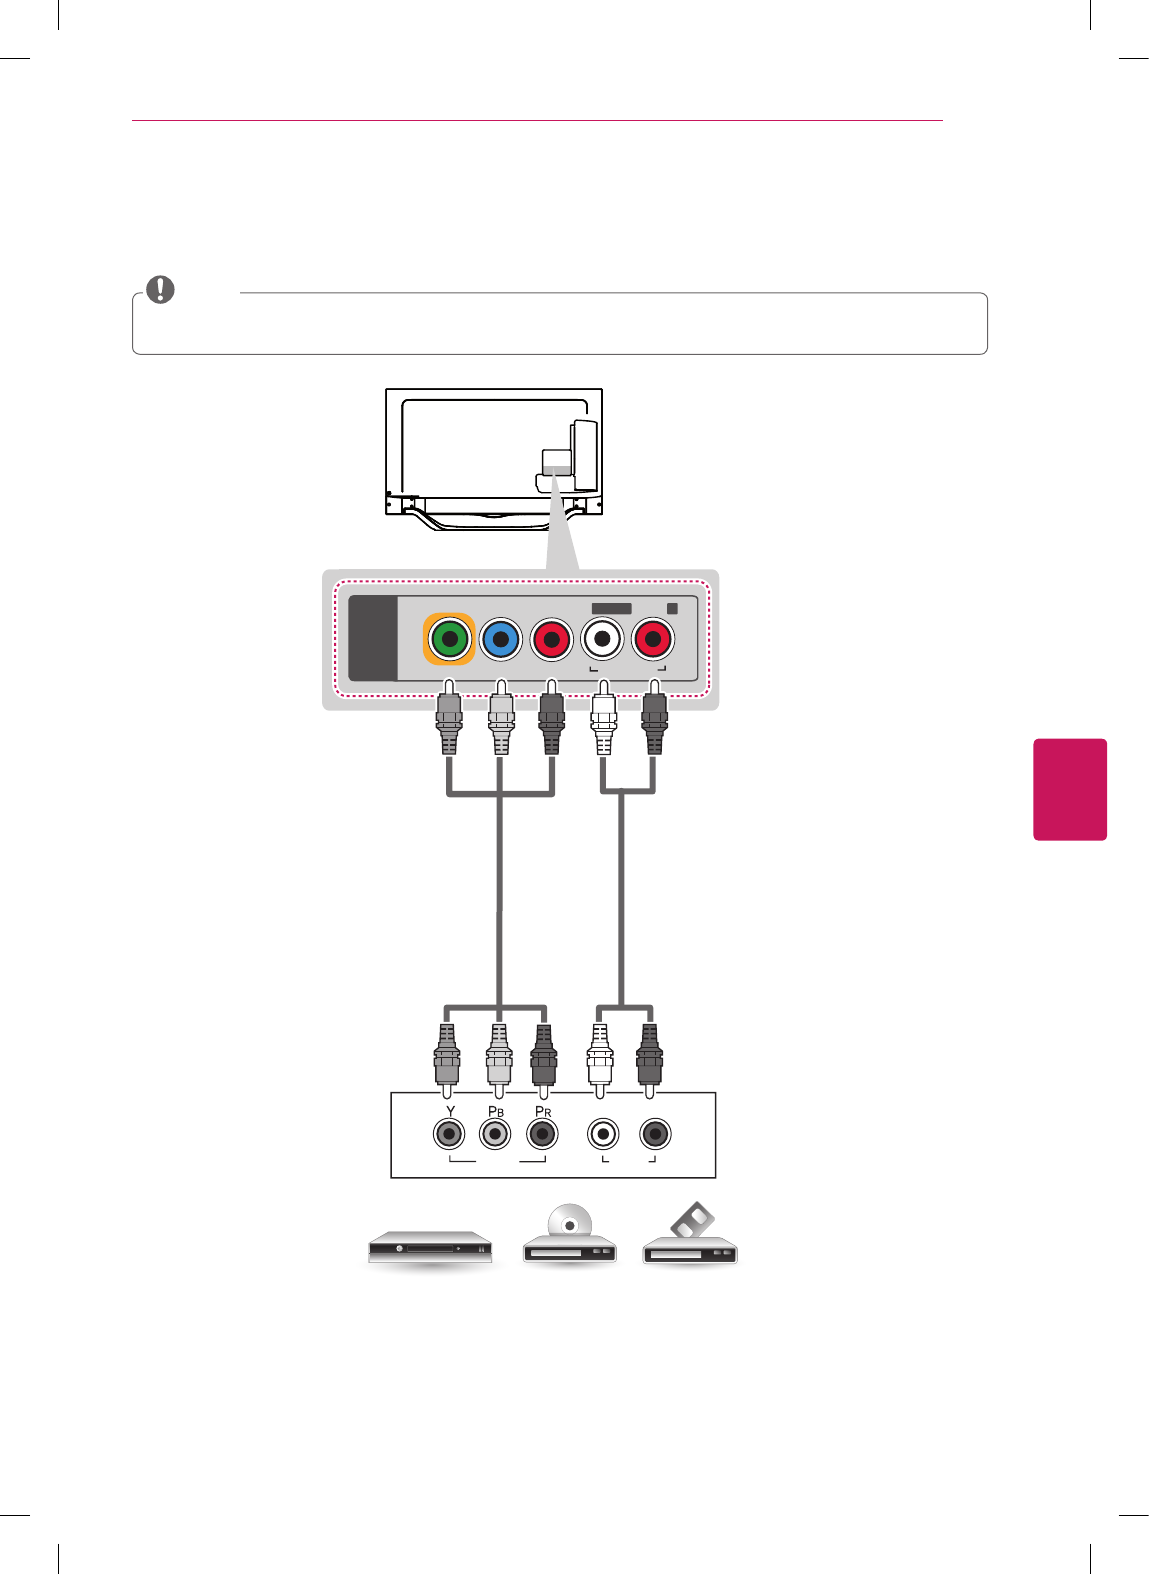
Component Connection
Transmits analog video and audio signals from an external device to the TV. Connect the external device and the TV with
a component cable as shown in the following illustration.
yIf cables are installed incorrectly, it could cause the image to display in black and white or with distorted color.
yCheck to ensure the cables are matched with the corresponding color connection.
NOTE
AUDIO
VIDEO
LR
P
B
P
R
VIDEO
/Y
PC-AUDIO IN
L/MONO AUDIO R
COMPONENT IN
/AV IN
DVD / Blu-Ray / HD Cable Box
(*Not Provided)
(*Not Provided)
GREEN GREEN
BLUE BLUE
RED RED
RED RED
WHITE WHITE
ENGLISH
24 MAKING CONNECTIONS
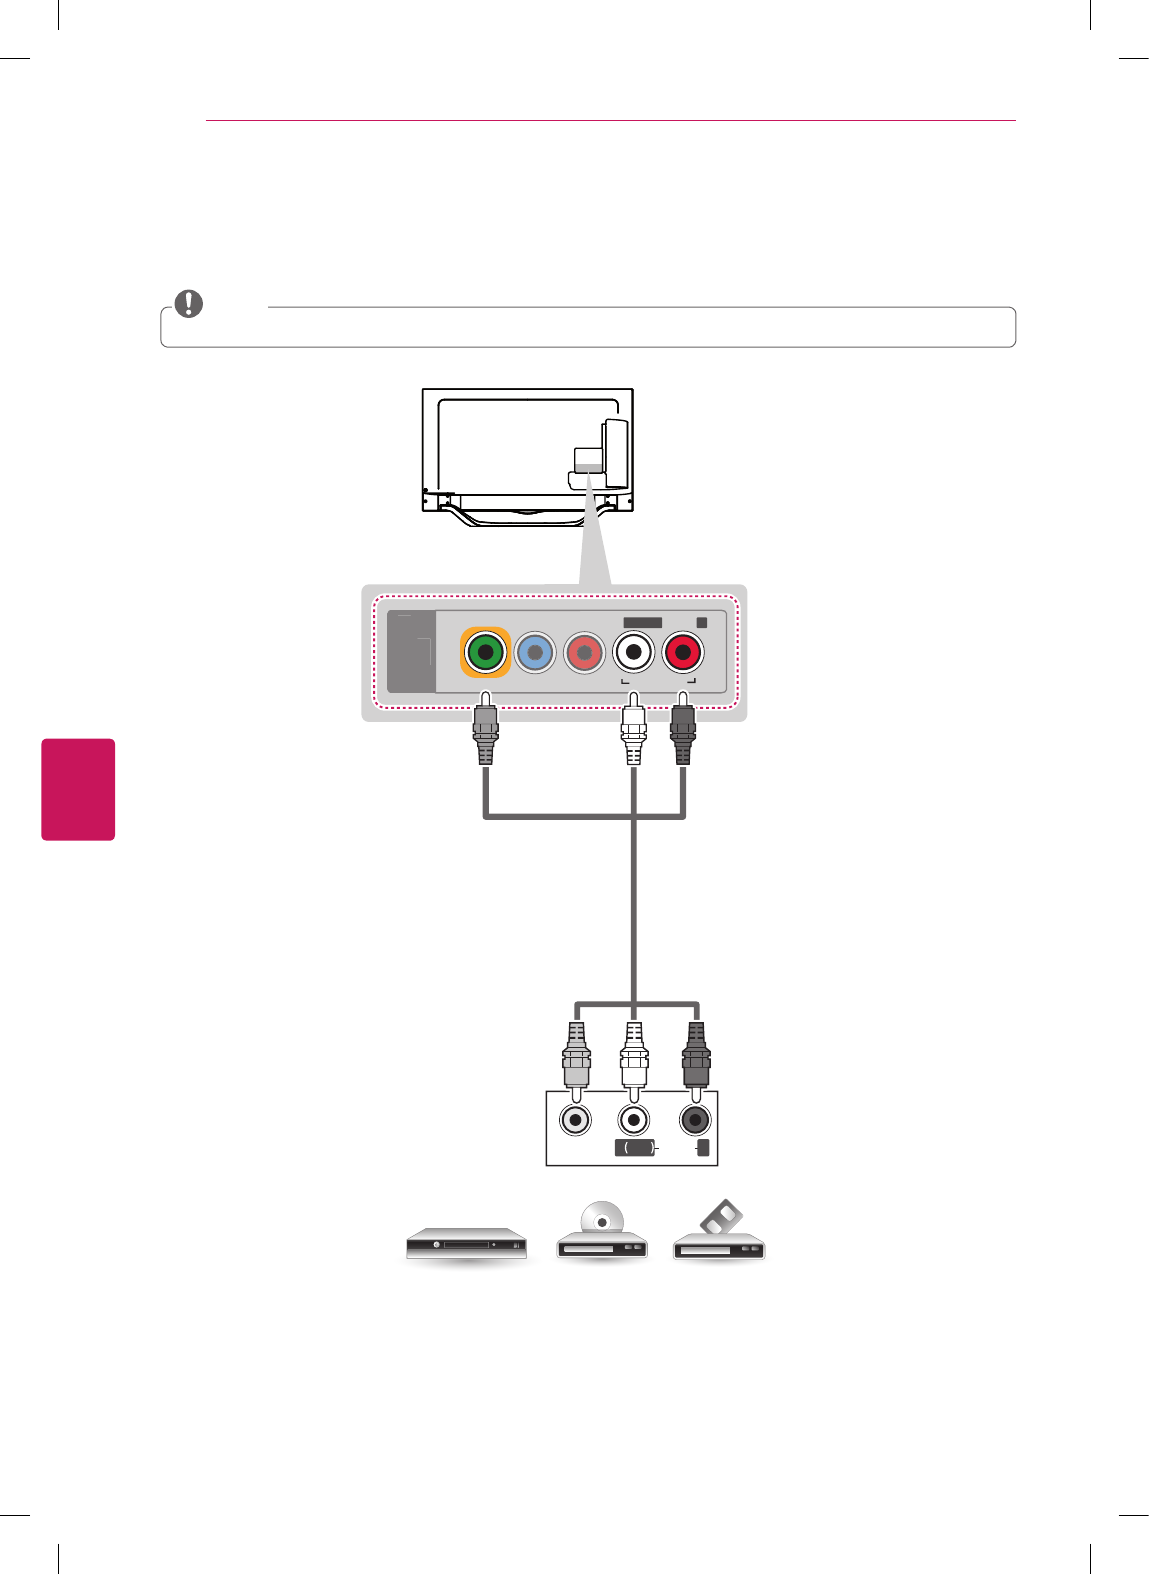
Composite Connection
Transmits analog video and audio signals from an external device to the TV. Connect the external device and the TV with
the composite cable as shown in the following illustration.
yCheck to ensure the cables are matched with the corresponding color connection.
NOTE
P
B
P
R
VIDEO
/Y
PC-AUDIO IN
L/MONO AUDIO R
COMPONENT I
N
/
AV IN
VIDEO
MONO
( )
AUDIOL R
VCR / DVD / Blu-Ray / HD Cable Box
(*Not Provided) YELLOW
WHITE
RED
YELLOW
WHITE
RED
ENGLISH
25
MAKING CONNECTIONS
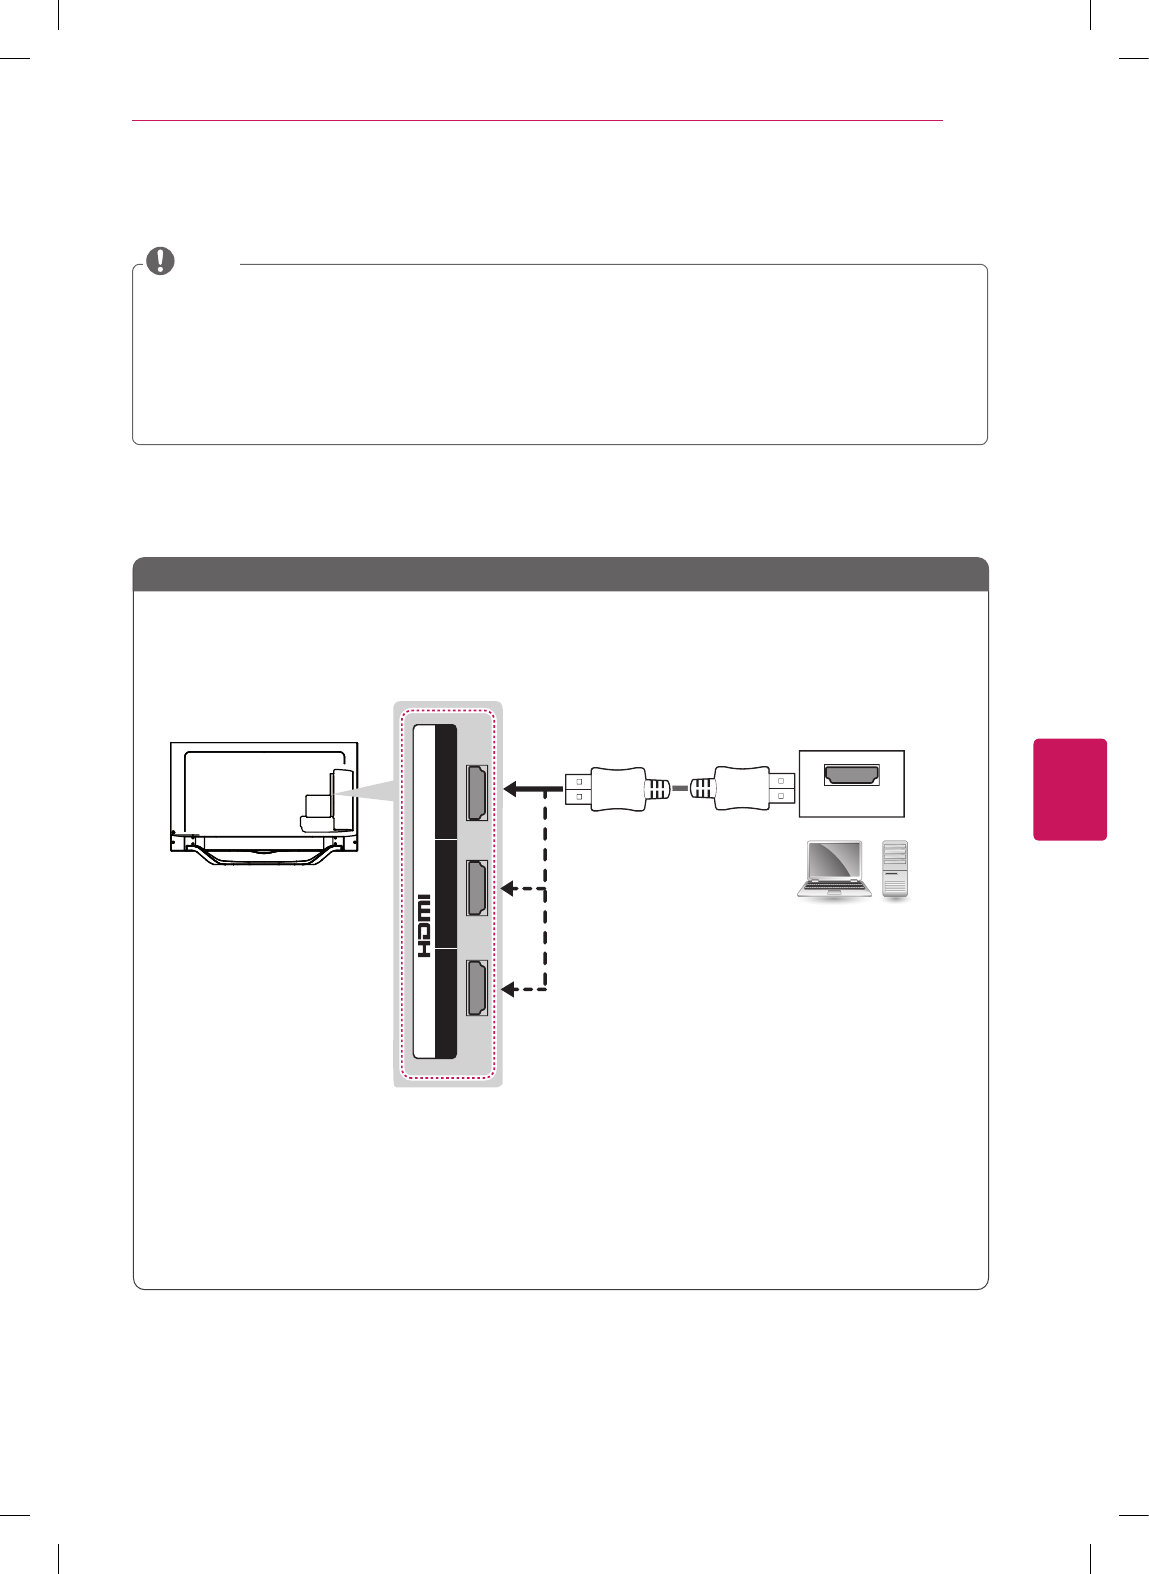
Method A: HDMI Connection
Connecting a PC
yIt is recommended to use an HDMI connection for the best image quality.
yDepending on the graphics card, DOS mode video may not work if a HDMI to DVI Cable is in use.
yIn PC mode, there may be noise associated with the resolution, vertical pattern, contrast or brightness. If noise
is present, change the PC output to another resolution, change the refresh rate to another rate or adjust the
brightness and contrast on the PICTURE menu until the picture is clear.
yThe synchronization input form for Horizontal and Vertical frequencies is separate.
yDepending on the graphics card, some resolution settings may not allow the image to be positioned on the screen
properly.
NOTE
HDMI Connection DVI to HDMI Connection
Choose method A or B to make connection.
IN
2 1
(ARC)
3
(MHL)
RGB OUT (PC) AUDIO OUT
(PC)
RGB
(RGB/HDMI-PC)
AUDIO
(PC)
RGB
(RGB/HDMI-PC)
AUDIO
AUDIO OUT DVI OUT
HDMI
OPTICAL
DIGITAL
AUDIO
OUT
H/P
IN
2 1
(ARC)
3
(MHL)
/DVI
(*Not Provided)
PC
Choose any HDMI input port to connect.
It does not matter which port you use.
Method A: HDMI Connection
ENGLISH
26 MAKING CONNECTIONS
Method B: DVI to HDMI Connection
P
B
P
R
VIDE
O
/Y
PC-AUDIO IN
L/MONO AUDIO R
COMPONENT IN
/AV IN
IN
2 1
(ARC)
3
(MHL)
RGB OUT (PC) AUDIO OUT
(PC)
RGB
(RGB/HDMI-PC)
AUDIO
(PC)
RGB
(RGB/HDMI-PC)
AUDIO
AUDIO OUT DVI OUT
HDMI
IN
2 1
(ARC)
3
(MHL)
/DVI
(*Not Provided)
PC
(*Not Provided)
WHITE
RED
Choose any HDMI/DVI input port to connect.
It does not matter which port you use.
ENGLISH
27
MAKING CONNECTIONS
Connecting to an Audio System
You may use an optional external audio system instead of the built-in speaker.
NOTE
yIf you use an optional external audio device instead of the built-in speaker, set the TV speaker feature to External
Speaker or Optical Sound Sync.
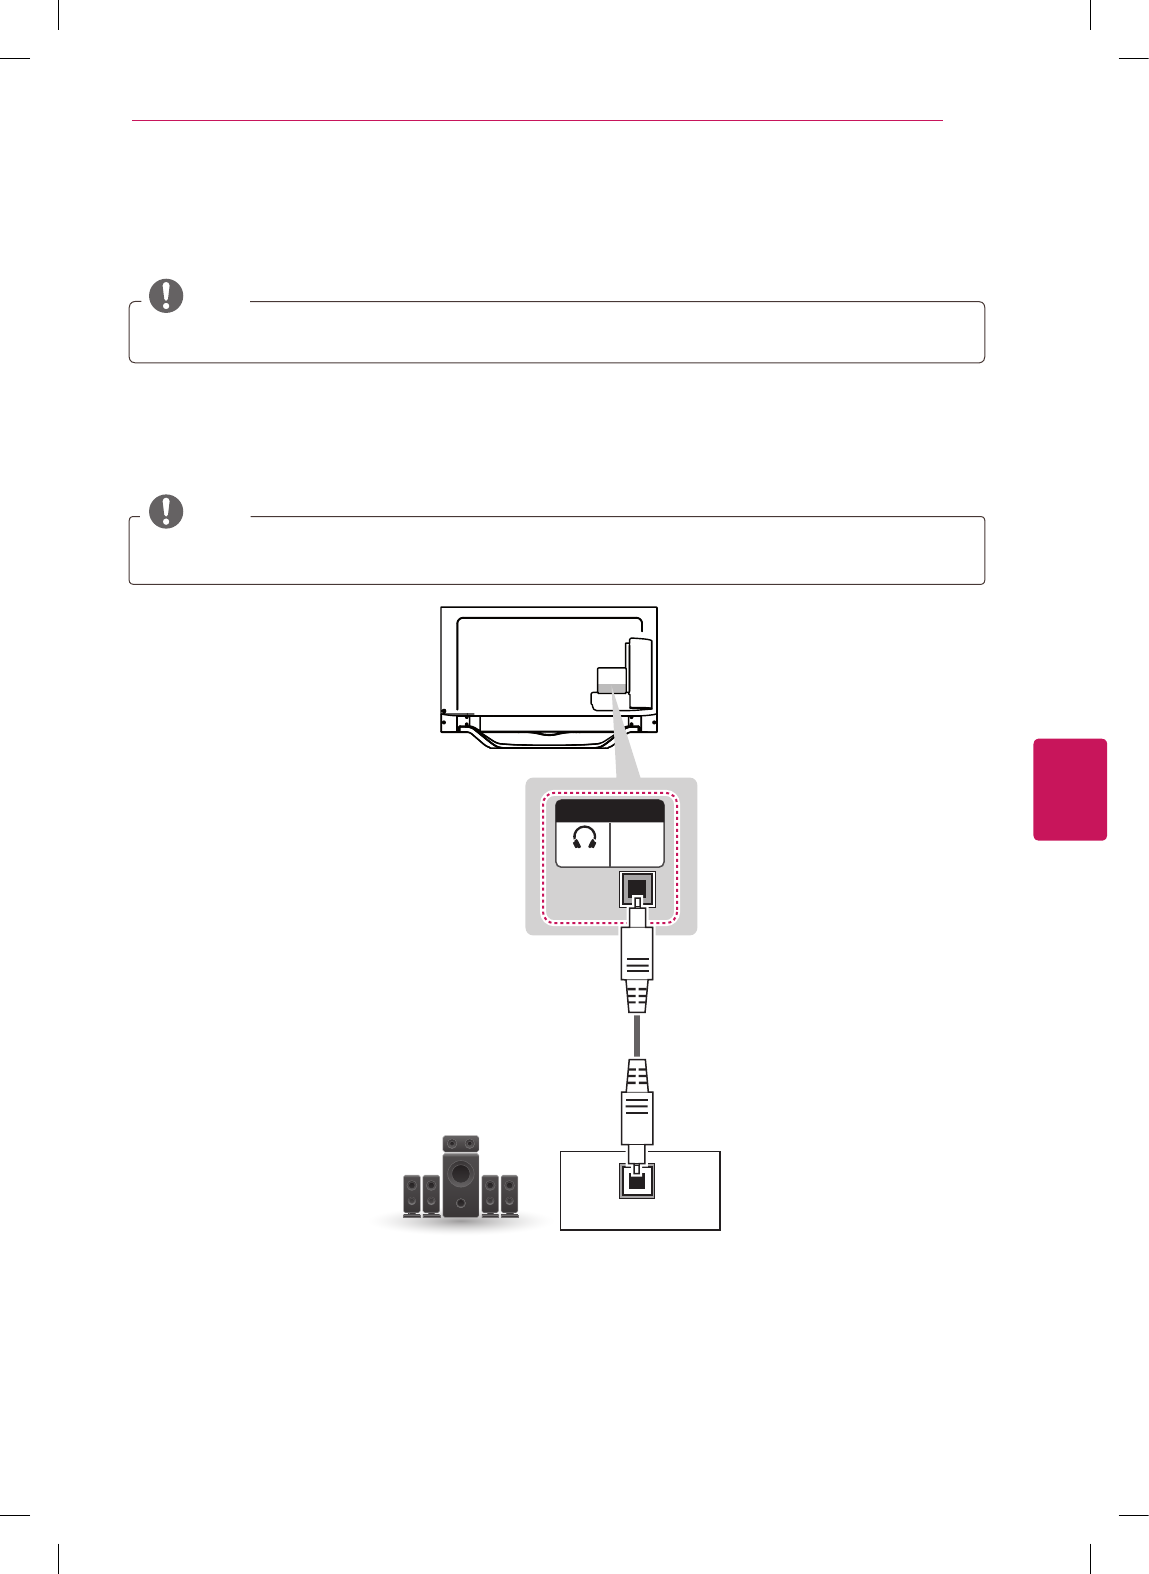
Digital Optical Audio Connection
Transmits a digital audio signal from the TV to an external device. Connect the external device and the TV with the
optical audio cable as shown in the following illustration.
NOTE
y Do not look into the optical output port. Looking at the laser beam may damage your vision.
yAudio with ACP (Audio Copy Protection) function may block digital audio output.
Digital Audio System
(*Not Provided)
OPTICAL AUDIO IN
OPTICAL
DIGITAL
AUDIO
OUT
H/P
ENGLISH
28 MAKING CONNECTIONS
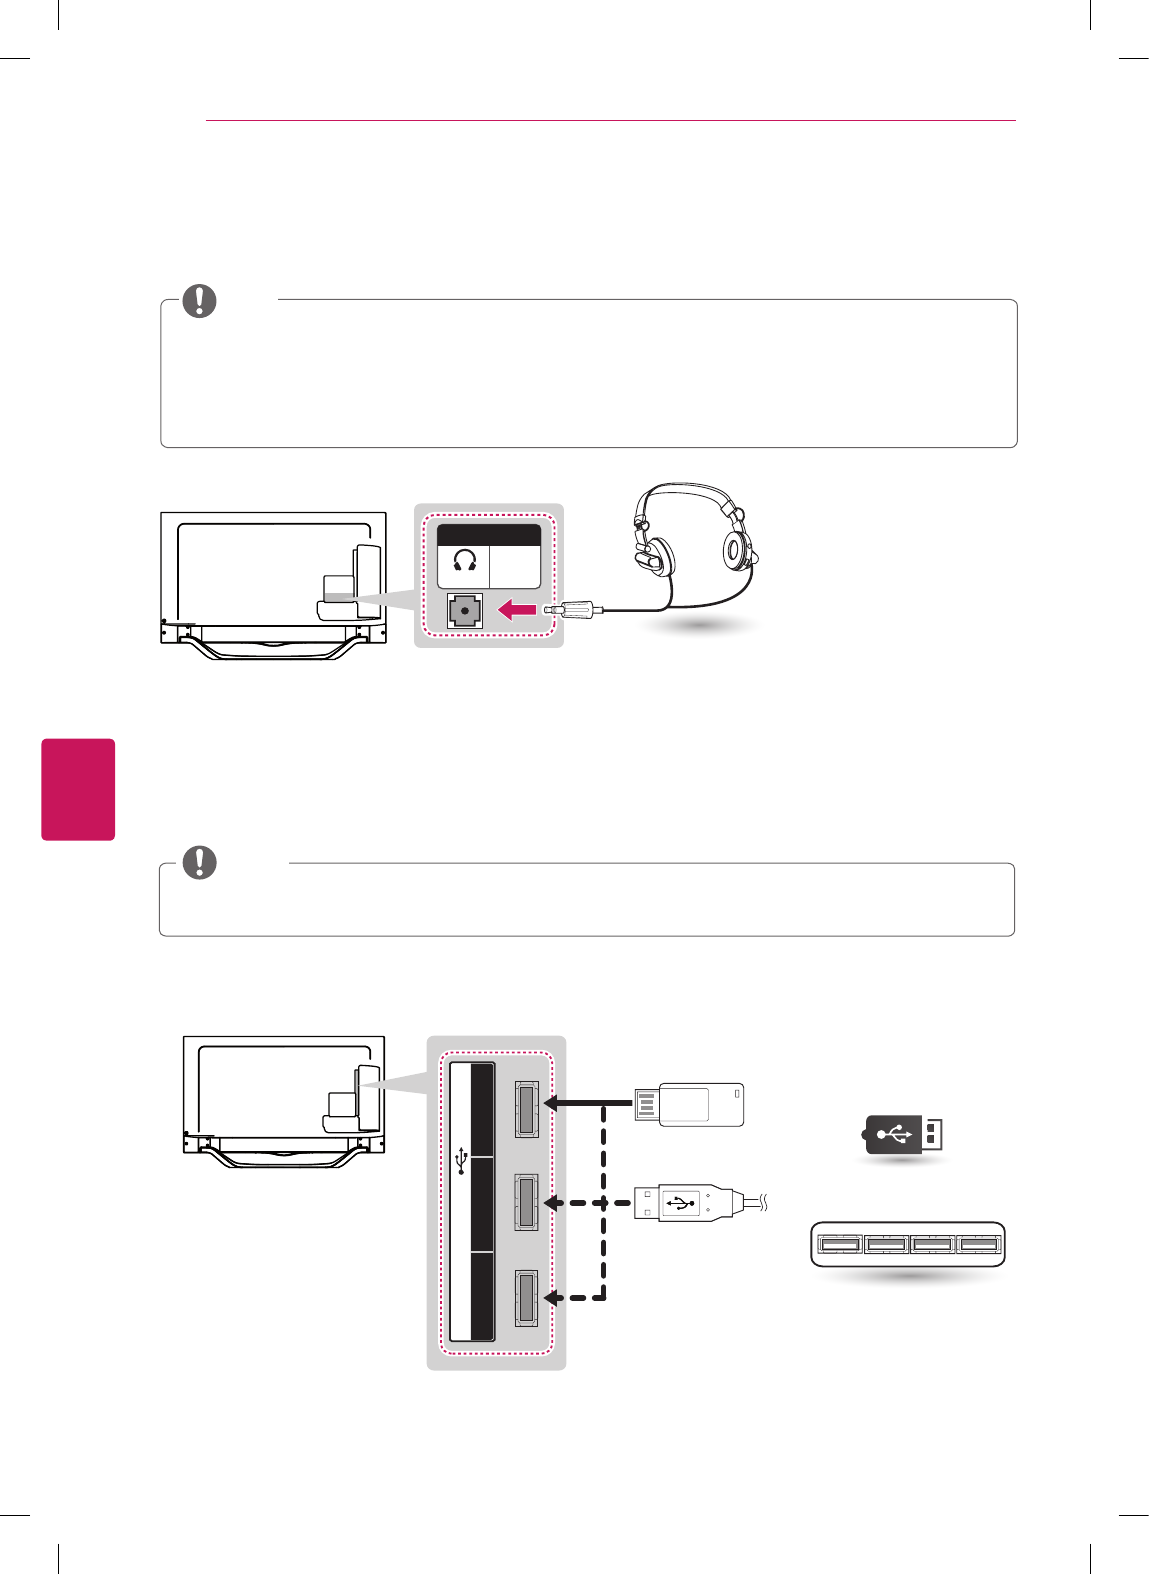
Connecting a USB Device
Connect a USB storage device such as USB flash memory, external hard drive, or a USB memory card reader to the TV
and access the Smart Share menu to use various multimedia files.
1
2 3
USB IN
(*Not Provided)
Choose any USB input port to connect.
It does not matter which port you use.
USB HUB
USB
yAUDIO menu options are disabled when using headphones.
yWhen changing AV MODE with headphones connected, the change is applied to video but not to audio.
yOptical Digital Audio Out is not available when headphones are connected.
yHeadphone impedance: 16 Ω
yMax audio output: 10 mW to 15 mW
yHeadphone jack size: 0.35 cm (0.13 inches)
NOTE
OPTICAL
DIGITAL
AUDIO
OUT
H/P
Connecting Headphones
Listening through sound with headphones
ySome USB Hubs may not work. If a USB device connected using a USB Hub is not detected, connect it to the
USB port on the TV directly.
NOTE
BACK
Returns to the previous level.
ENGLISH
29
REMOTE CONTROL
CH
VOL
/Q.MENU
BACK SMART
BACK
Returns to the previous level.
VOL
Adjusts the volume level.
CH
Scrolls through the saved channels.
(MUTE)
Mutes all sounds.
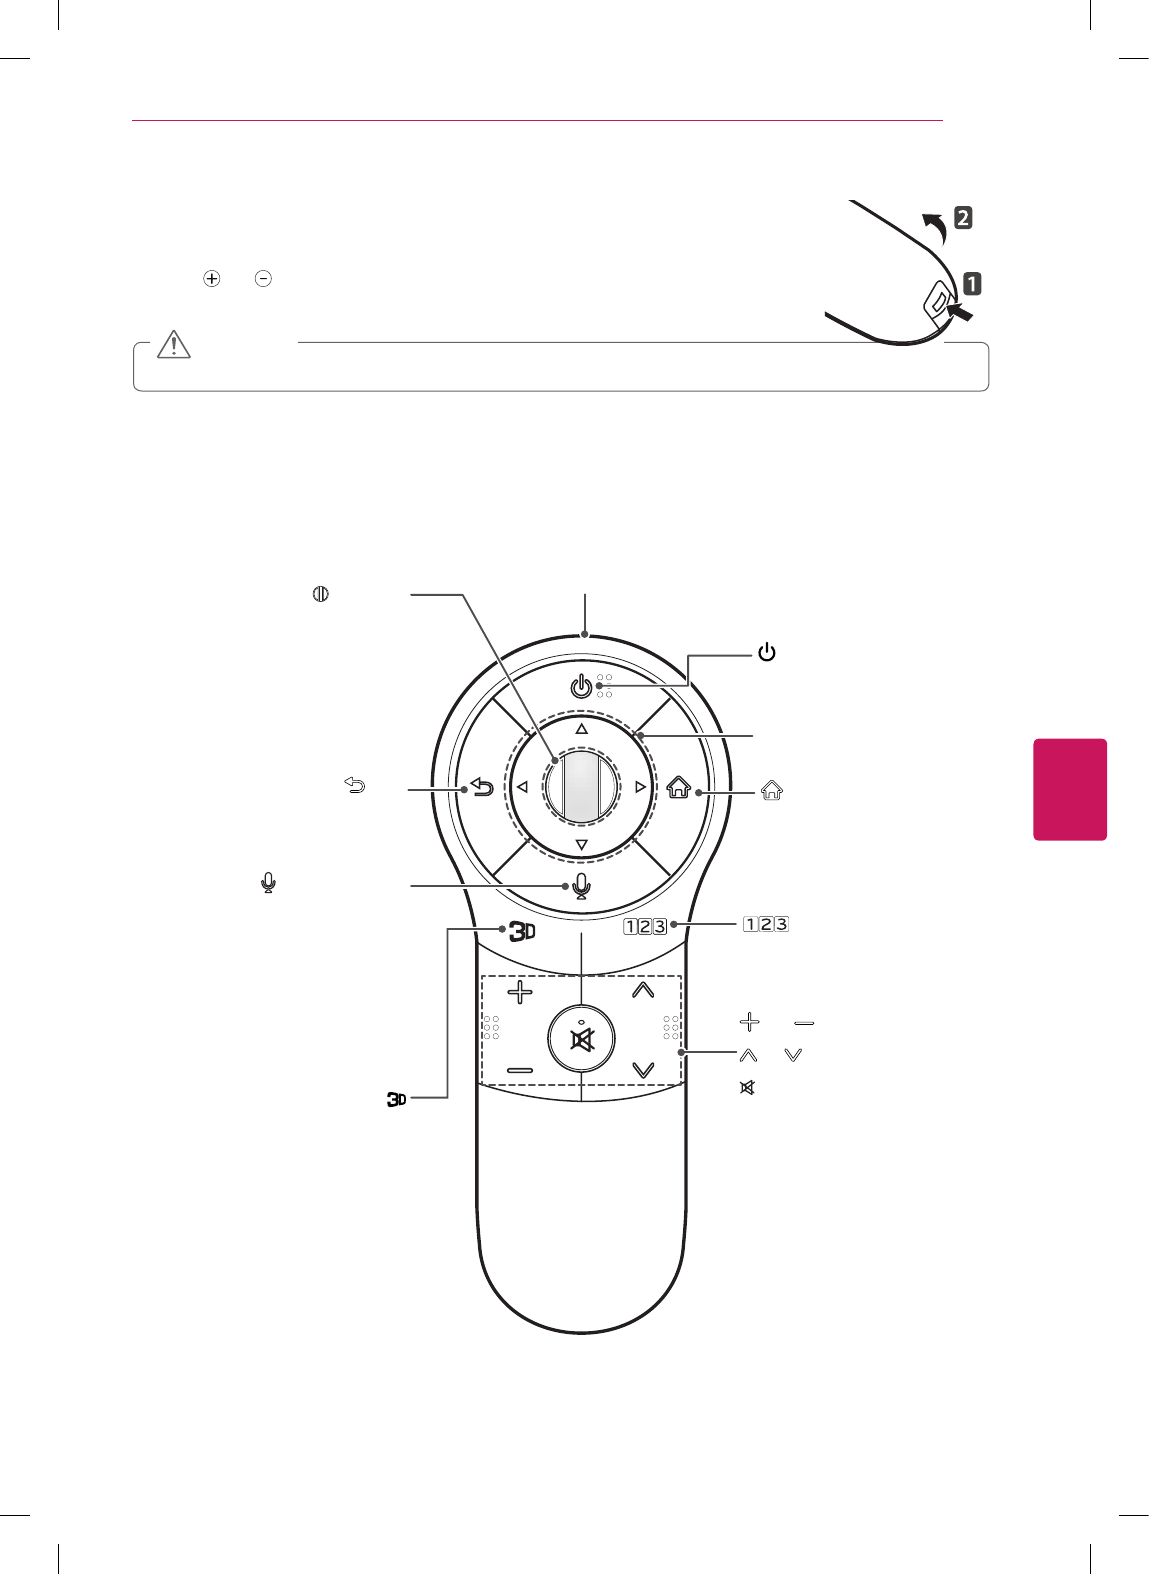
MAGIC REMOTE CONTROL FUNCTIONS
When the message “Magic remote control battery is low. Change the battery.” is displayed,
replace the battery. To install batteries, open the battery cover, replace batteries (1.5 V AA)
matching and ends to the label inside the compartment, and close the battery cover. Be
sure to point the remote control at the remote control sensor on the TV. To remove the batteries,
perform the installation actions in reverse.
yDo not mix old and new batteries, as this may damage the remote control.
CAUTION
This remote uses infrared light. When in use, it should be pointed in the direction of the TV’s remote sensor.
(POWER)
Turns the TV on or off.
SMART
Accesses the Smart Home menu.
Pointer (RF transmitter)
Navigation buttons (up/down/left/right)
Scrolls through menus or options.
Wheel (OK)
Selects menus or options and confirms
your input.
Scrolls through the saved channels.
If you press the navigation button while
moving the pointer on the screen, the
pointer disappears, and the Magic remote
control works as a regular remote control.
To display the pointer again, shake the
Magic remote control from side to side.
Used for viewing 3D video.
/Q.MENU
Accesses the Universal Control.
Accesses the quick menu.
Voice recognition
-This is a beta version and only available in
selected functions for supported models.
-Network connection is required to use the
voice recognition function.
1. Press the Voice recognition button.
2. Speak slowly and precisely.
When a voice is recognized, the processing
message appears on the screen.
• Use the magic remote control no further
than 10 cm from your face.
ENGLISH
30 REMOTE CONTROL
Registering Magic Remote Control
The Magic Remote Control operates by pairing with your
TV.
Please register the remote as follows.
How to register the Magic Remote Control
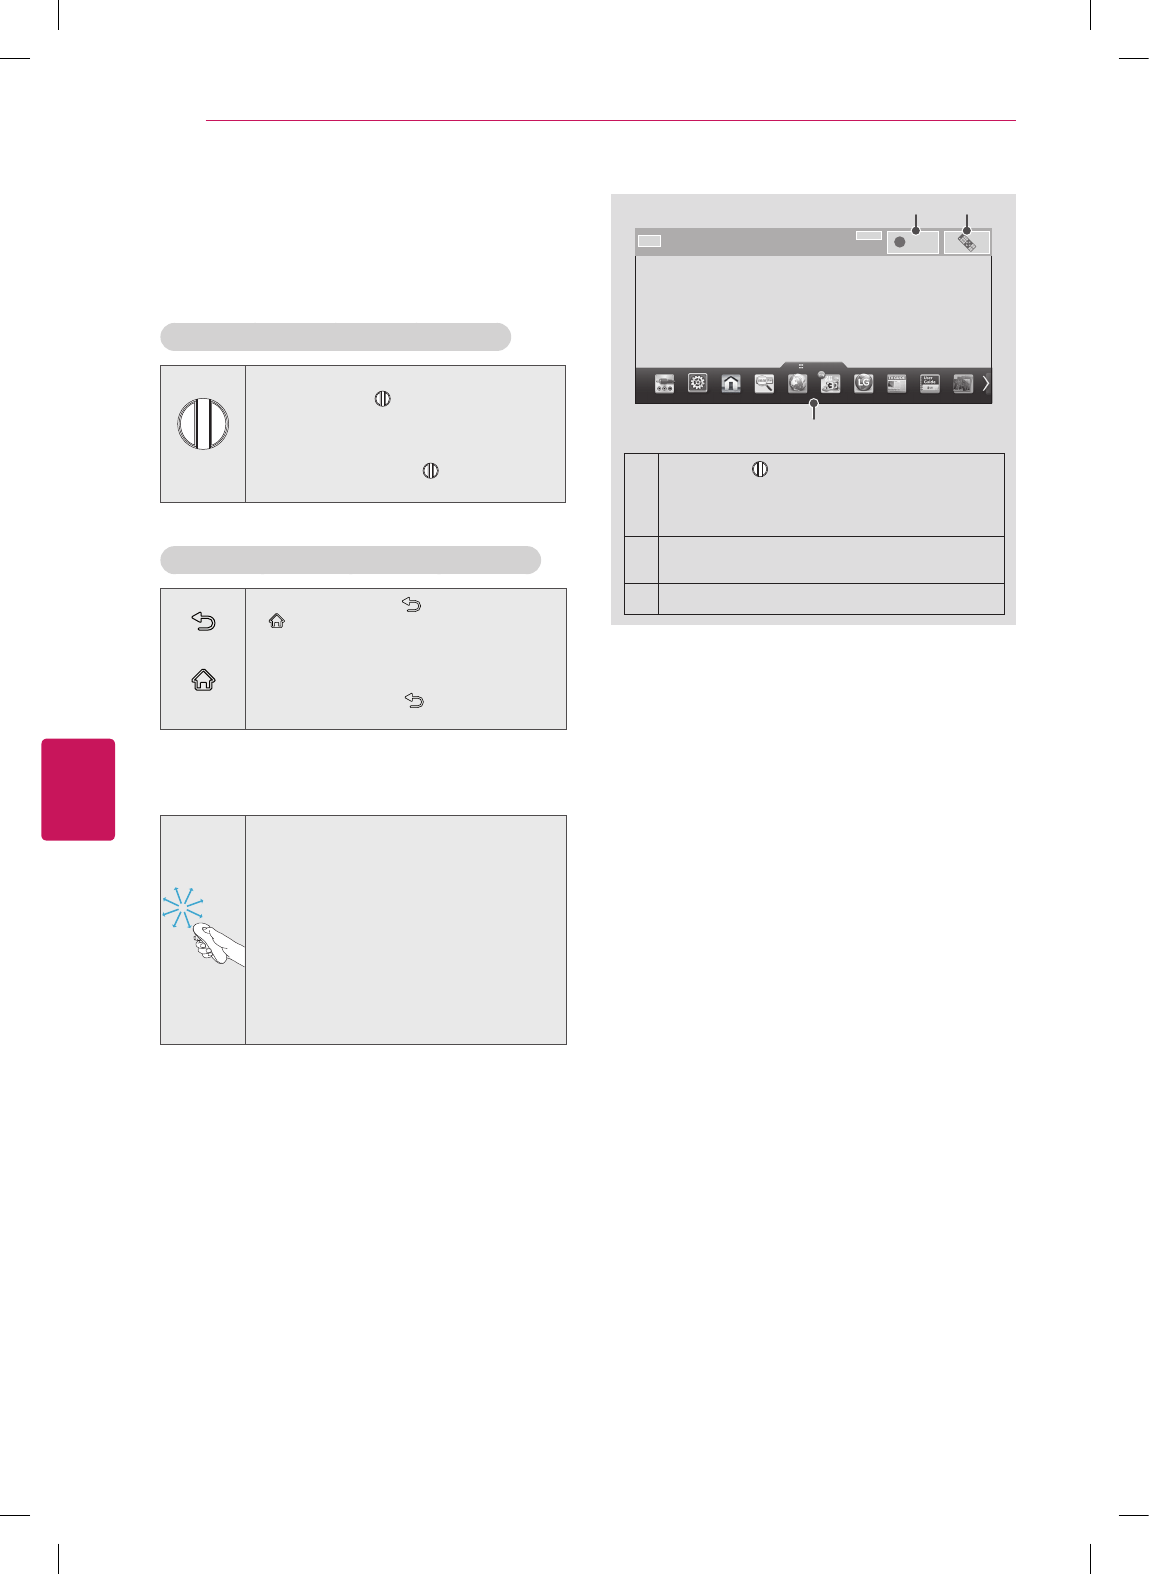
(Wheel)
To register automatically, turn the TV
on and press the Wheel (OK). When
registration is completed, the completion
message appears on the screen.
If registration fails, turn the TV off and
back on, then press the Wheel (OK) to
complete registration.
How to Re-register the Magic Remote Control
BACK
HOME
1 Press and hold the BACK and
SMART buttons together for 5
seconds to reset, then register it by
following “How to register the Magic
remote control” above.
2 To re-register the Magic remote control,
press and hold the BACK button for 5
seconds toward the TV.
How to use Magic Remote Control
1 You can move the pointer by aiming the
Pointer Receiver of the remote control
at your TV then move it left, right, up or
down.
»If the pointer does not work properly
leave the remote control for 10 seconds
then use it again.
2 If the pointer disappears, move the
remote control slightly to left or right.
Then, it will automatically appear on the
screen.
»If the pointer has not been used for a
certain period of time, it will disappear.
i
1
3
2
1
If you press Wheel (OK) on the Magic
remote control, the screen appears.
Shows information about the current program
and screen.
2Pressing this button will display number
keypad which you can select channel number.
3You can select My Apps Menu.
Precautions to Take when Using the
Magic Remote Control
yUse the Magic remote control within the maximum
communication distance (10 m, 32.8ft). Using the
remote control beyond this distance, or with an object
obstructing it, may cause a communication failure.
yA communication failure may occur due to nearby
devices. Electrical devices such as a microwave oven
or wireless LAN product may cause interference, as
these use the same bandwidth (2.4 GHz) as the Magic
remote control.
yThe Magic remote control may be damaged or may
malfunction if it is dropped or receives a heavy impact.
yTake care not to bump into nearby furniture or other
people when using the Magic remote control.
yManufacturer and installer cannot provide service
related to human safety as the applicable wireless
device has possibility of electric wave interference.
yIt is recommended that an Access Point (AP) be
located more than 1 m (3.28 ft) away from the TV. If
the AP is installed closer than 1 m (3.28 ft), the Magic
remote control may not perform as expected due to
frequency interference.