LG Electronics USA 9QK-MAX620 Car CD/MP3/WMA Receiver User Manual
LG Electronics USA Car CD/MP3/WMA Receiver
UserManual.wiki
>
LG Electronics USA
>
9QK MAX620 User Manual
user manual
Navigation menu
Upload a User Manual
Namespaces
Wiki Guide
HTML
PDF
Info
Views
User Manual
Discussion / Help
Navigation
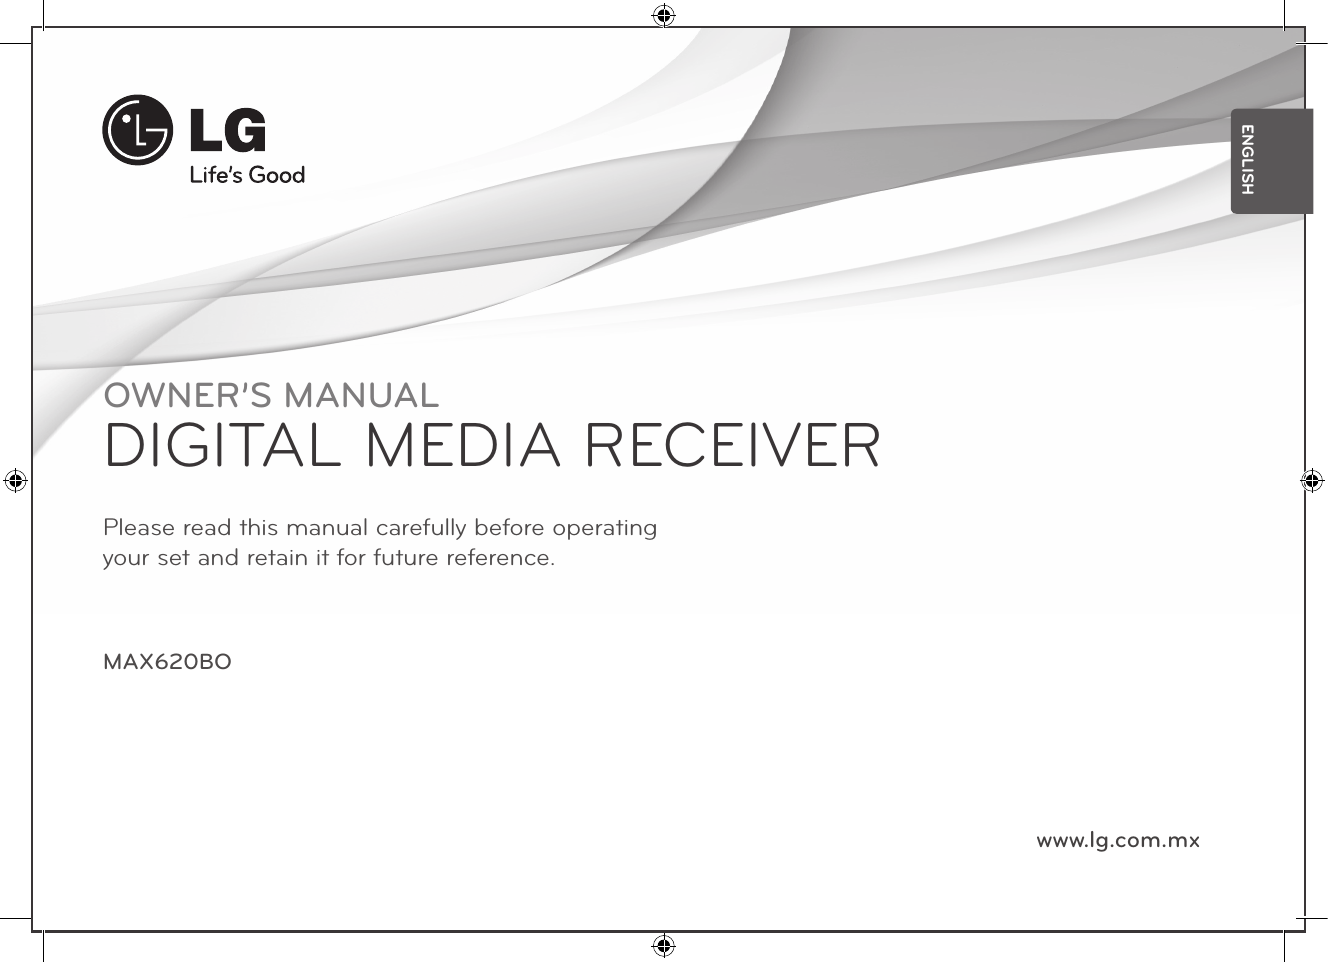
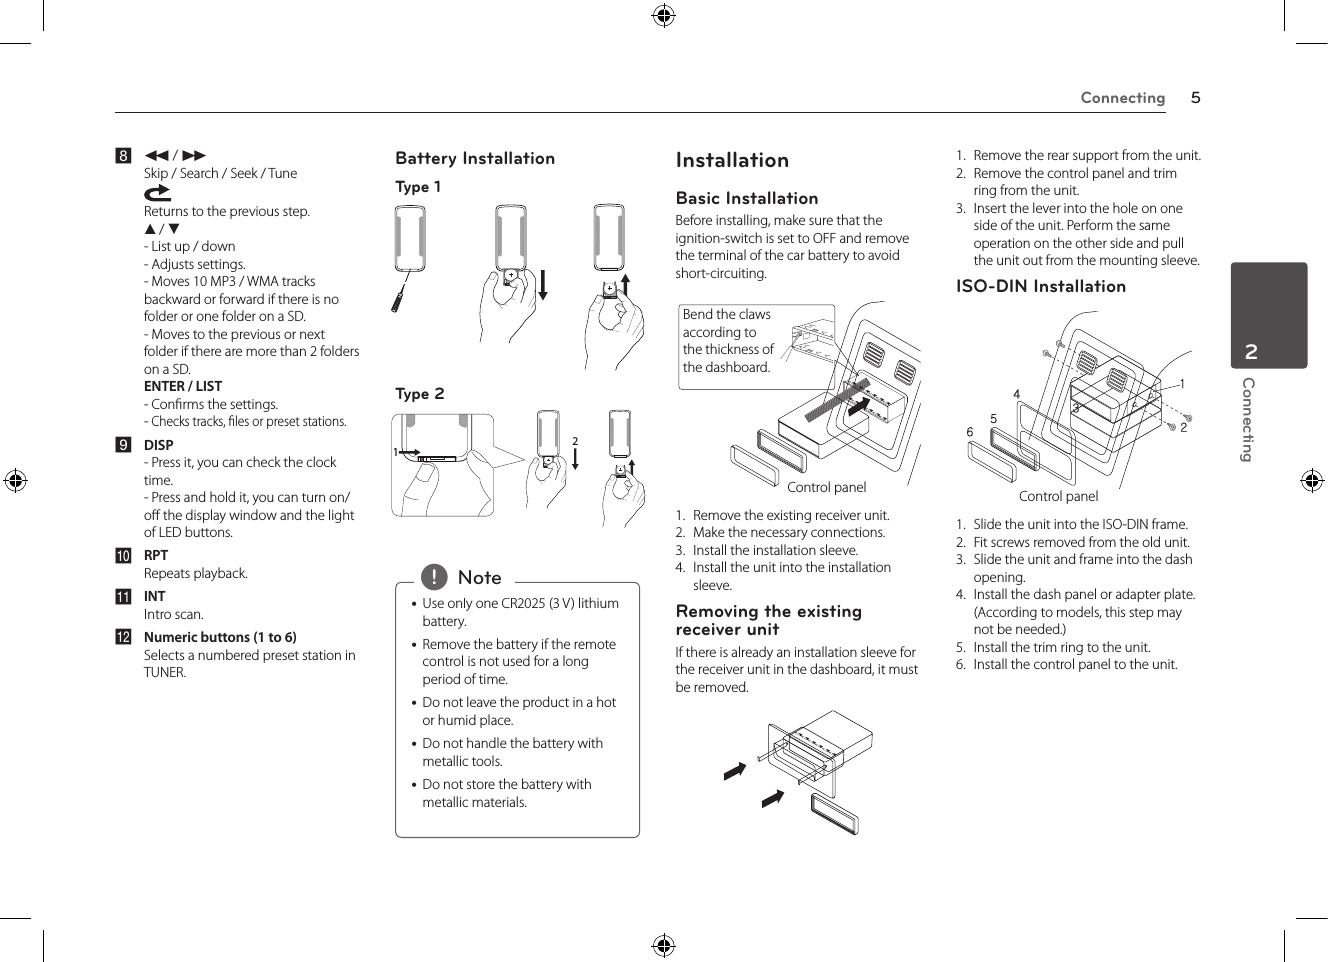
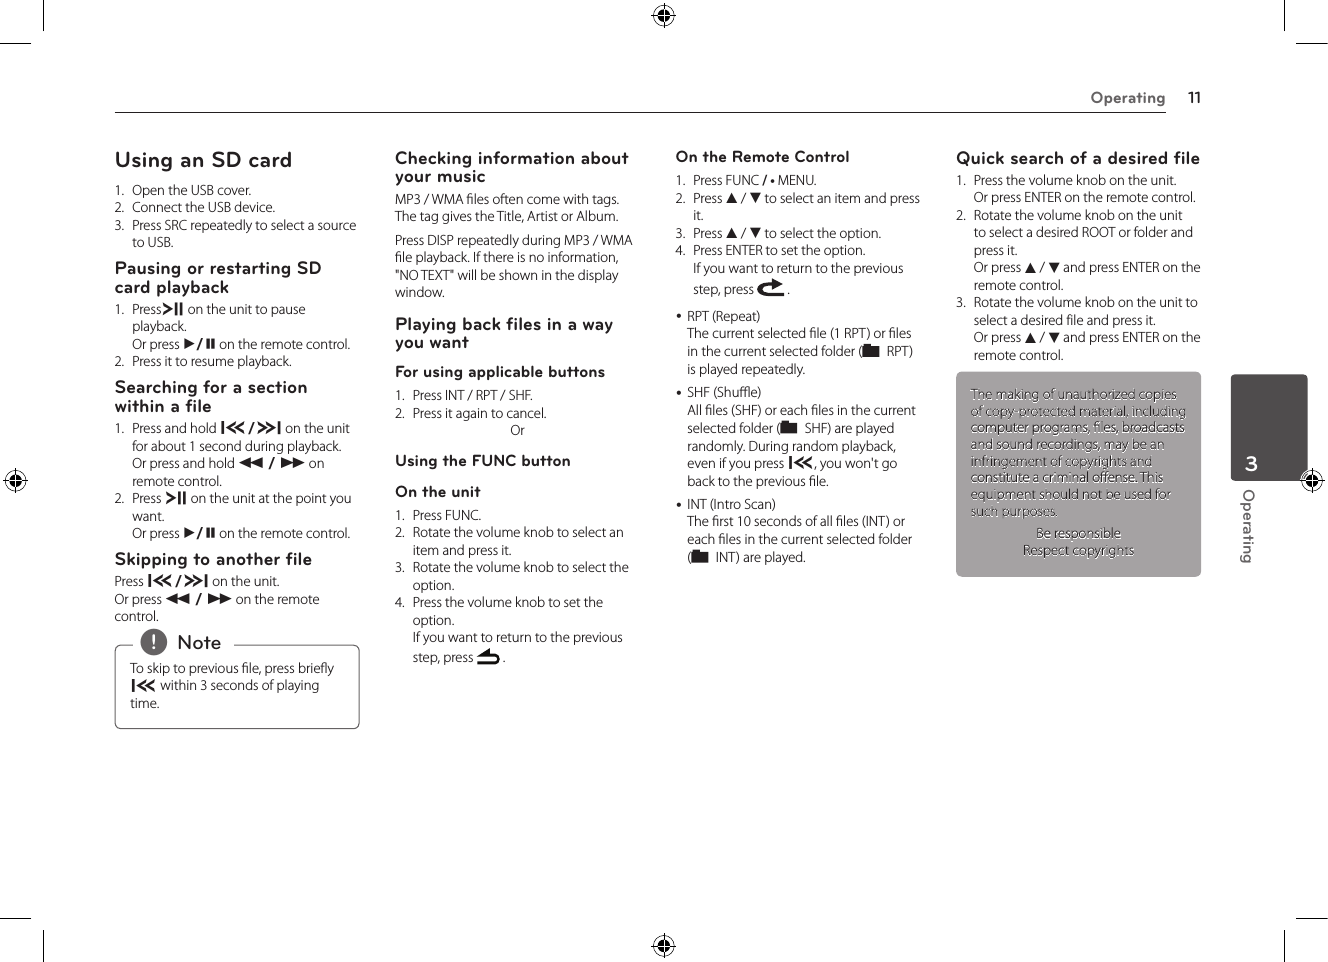
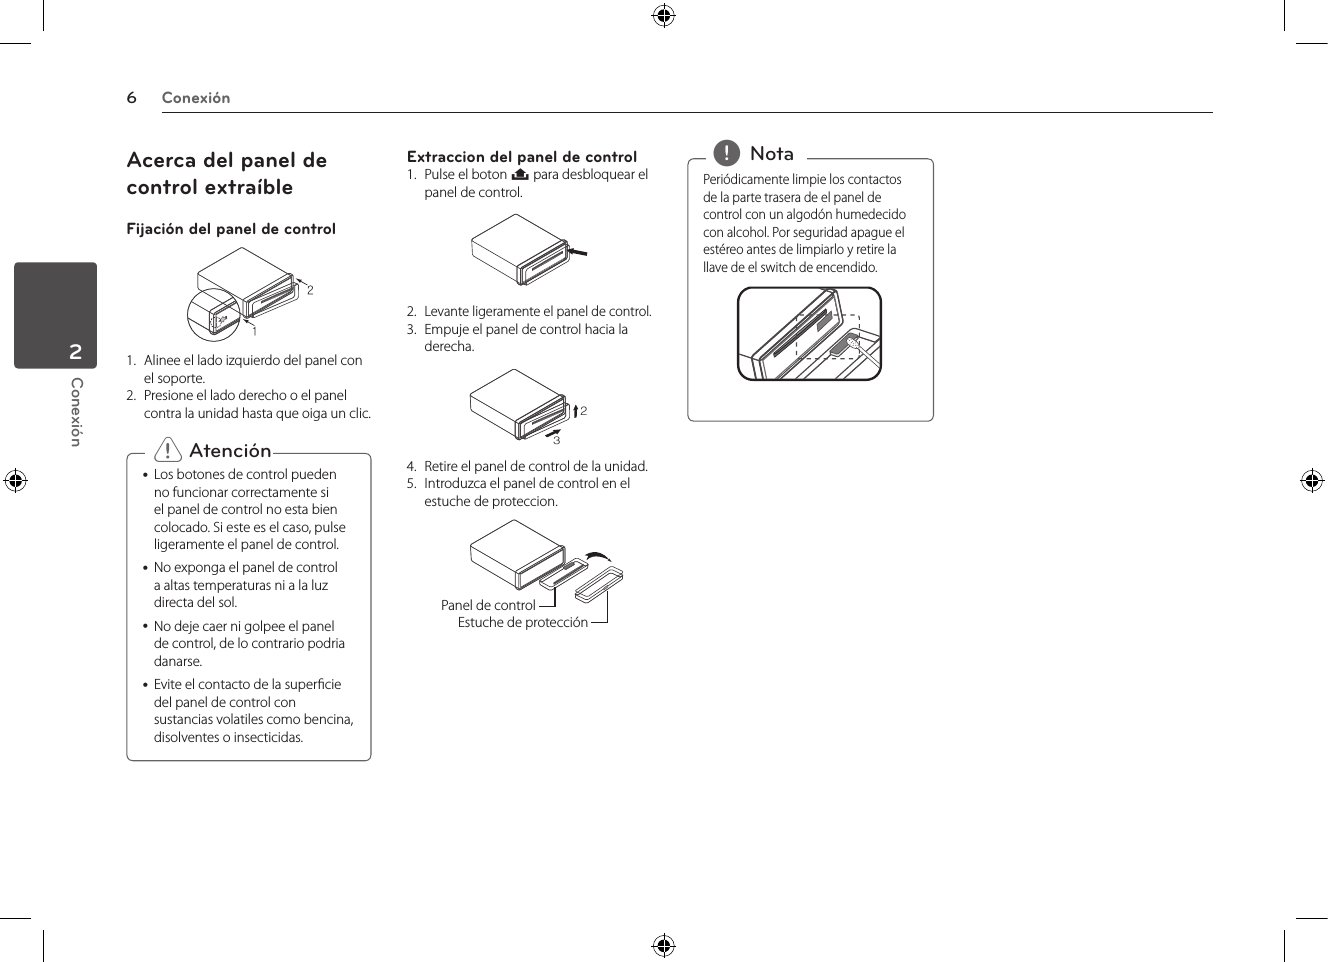
![3 OperatingOperating8Operating3OperationBasic operations1. Turn the unit on by pressing any key on the unit.2. Select a source by pressing SRC.3. Rotate the volume knob to adjust the volume on the unit. Or press VOLUME W / S on the remote control.Turning off the sound temporarily1. Press MUTE to mute your unit. Or press MUTE on the remote control.2. Press it again to cancelUsing EQ (Equalizer)EQ is to increase or decrease the signal strength of audio frequencies. The function helps you to enjoy sound more plentifully. Press EQ on the unit repeatedly. The indicator lights up in the following order.FLAT /XDSS+ / POP / CLASSIC / ROCK / JAZZ / VOCAL / SALSA / SAMBA / REGGAE / RUSSY / USER1 / USER2Using 3D SOUNDThis mode delivers outstanding surround sound.1. Press and hold EQ/ • 3D.2. Press and hold it again to cancel.Checking the clock1. Press DISP.2. Press it again to cancel.Turning off the display light1. Press and hold DISP.2. Press and hold it again to turn it on.Under the light-o condition, press any key, the light is turned on and then o automatically if you don't press it within a few seconds. , NoteResetting the unitYou can reset the unit when it does not operate properly.1. Detach the control panel.Refer to page 6 for detaching the control panel.2. Press the RESET hole with a sharp object.Adjusting the general settingsYou can adjust [SOUND], [LIGHT] and [OTHER] settings.On the unit1. Press and hold • MENU.2. Rotate the volume knob to select [SOUND], [LIGHT], or [OTHER] and press it.3. Rotate the volume knob to select the item and press it.4. Rotate the volume knob clockwise or counterclockwise to adjust the level.5. Press the volume knob to confirm the setting. If you want to return to the previous step, press .On the Remote Control 1. Press and hold FUNC / • MENU.2. Press w / s to select [SOUND], [LIGHT], or [OTHER] and press ENTER.3. Press w / s to select the mode and press ENTER.4. Press w / s to adjust the level.5. Press ENTER to confirm the setting. If you want to return to the previous step, press .For [SOUND] settingYou can adjust sound quality by adjusting the level BAL (left/right speaker), FAD (front/rear speaker), SW (Subwoofer), SW-F (Subwoofer frequency), A-EQ (Auto EQ).- When you set the EQ to USER 1/2 mode. : You can adjust the level of BAS (bass), MID (middle), TRB(treble). ySW (Subwoofer) You can adjust the volume of subwoofer. ySW-F (Subwoofer frequency) OFF/ SW 55 Hz/ SW 85 Hz/ SW 120 Hz You can enable the subwoofer. yA-EQ (Auto EQ) ON / OFF AUTO EQ operates only in the music le supported with genre in the device. When you set AUTO EQ to ON, POP, CLASSIC, ROCK, or JAZZ is automatically selected according to the music genre.](https://usermanual.wiki/LG-Electronics-USA/9QK-MAX620/User-Guide-1657424-Page-8.png)
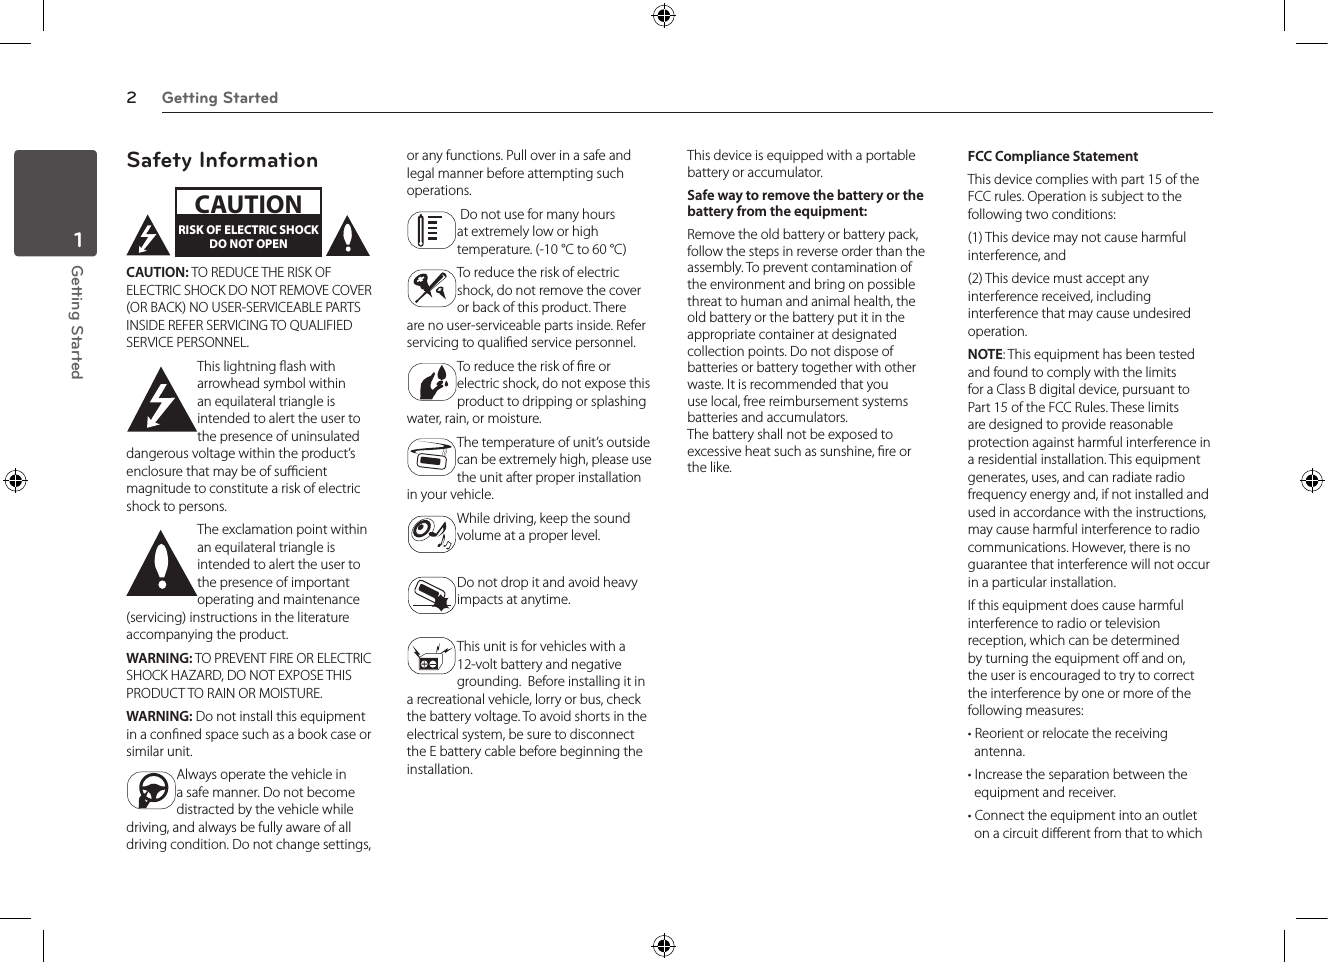
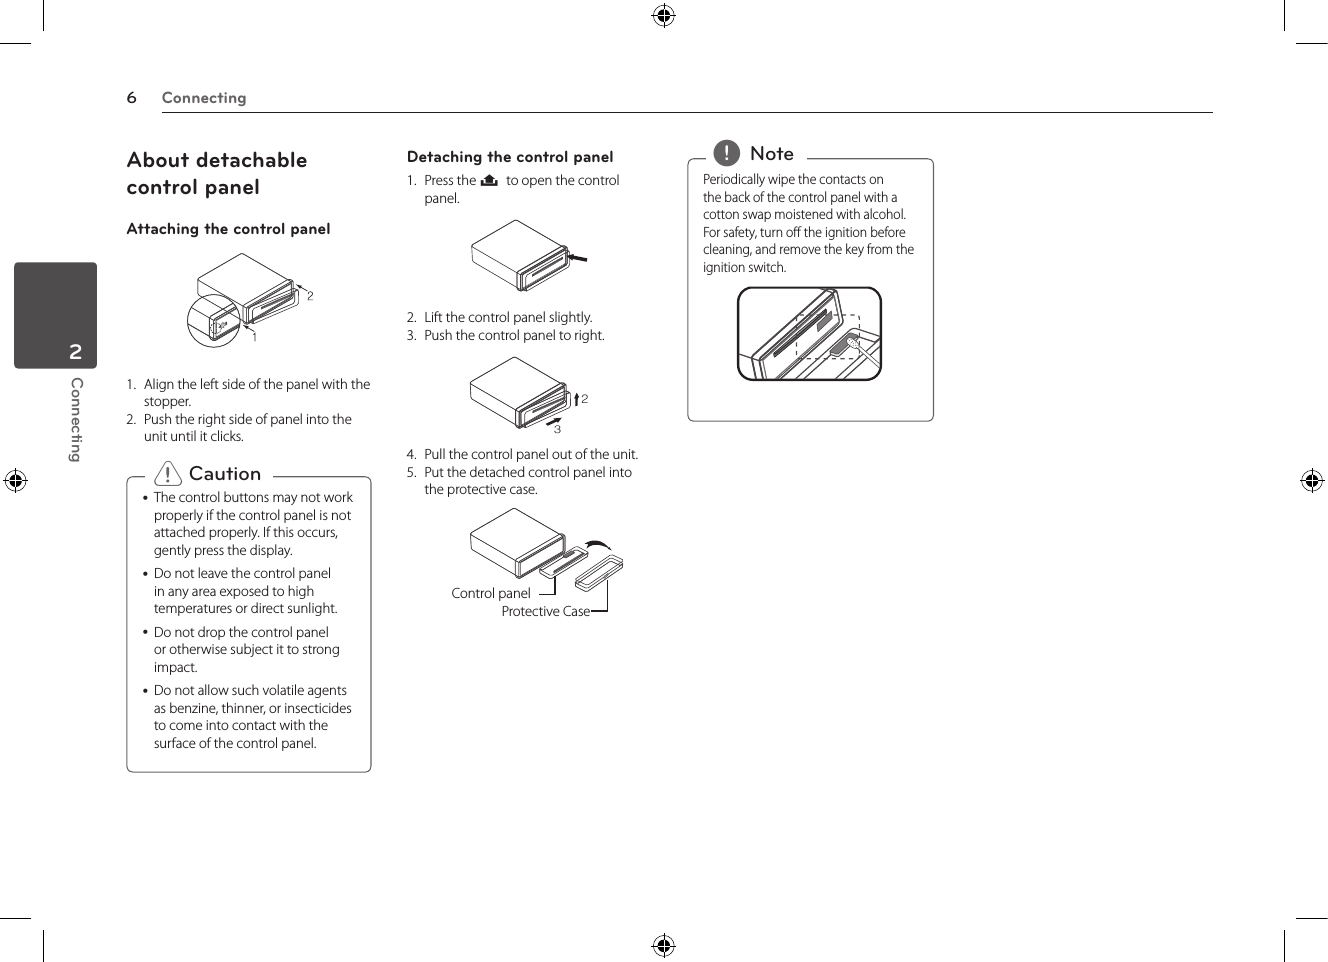
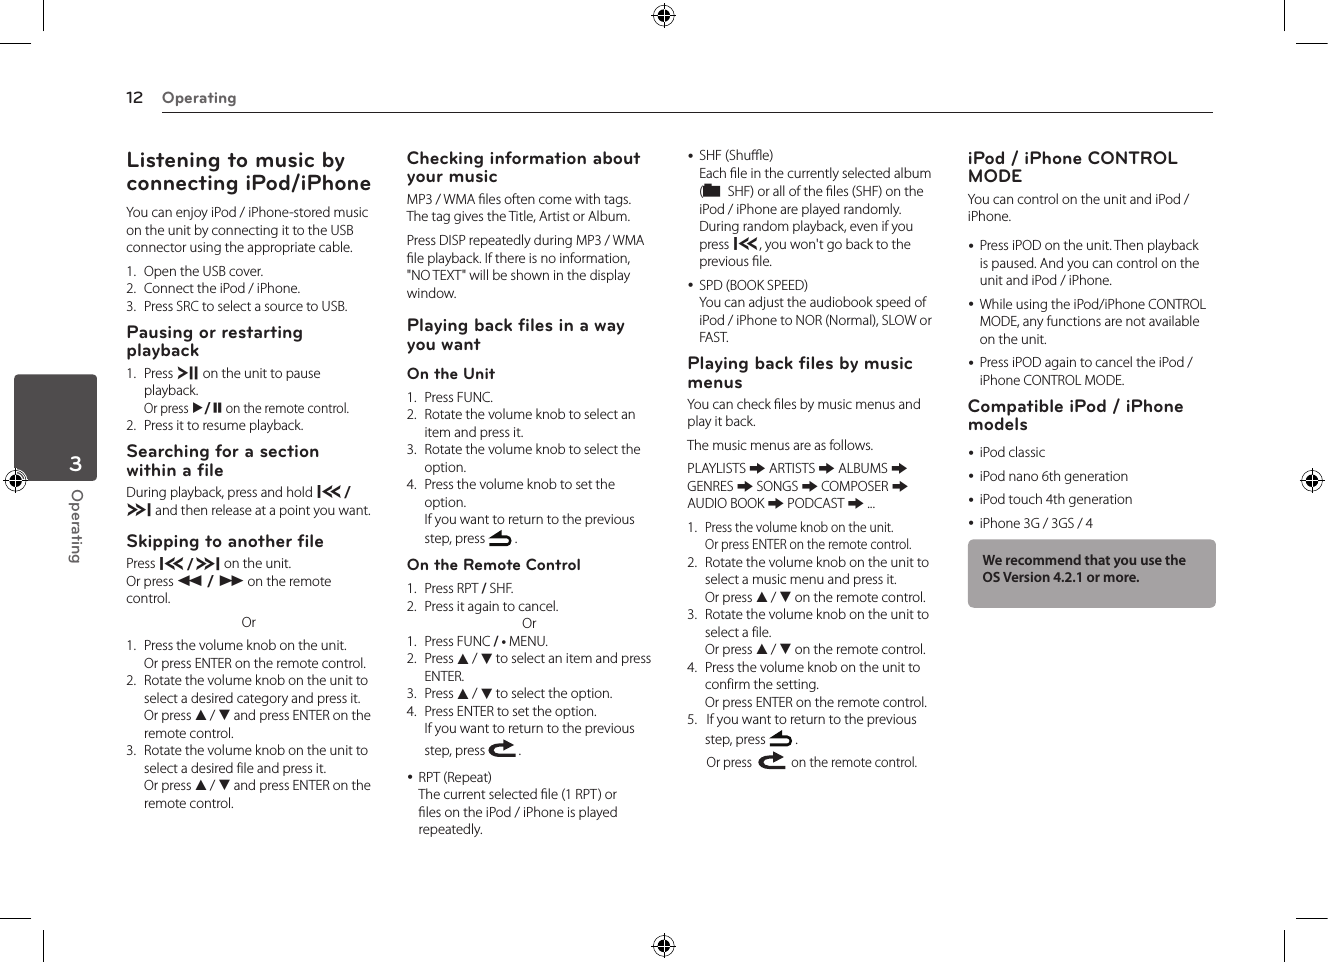
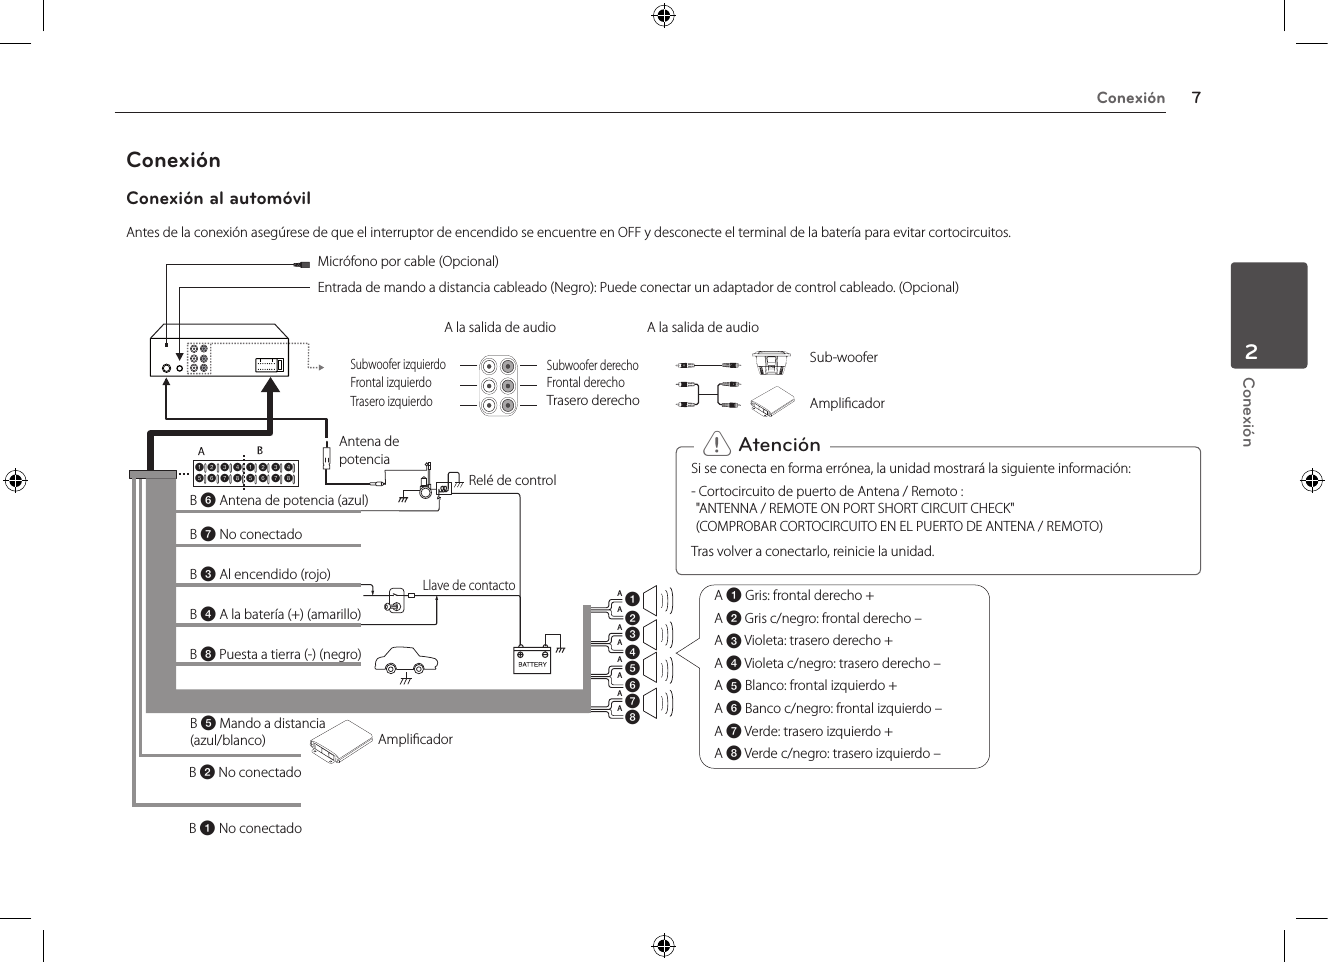
![Operating 9Operating3For [LIGHT] settingYou can adjust the light eects by adjusting LED, DIM, or DIM LV. yLED COL1 / COL2 / AUTO : You can change the LED window color. yDIM (Dimmer) OFF / ON : You can change the brightness of the display window during the power-on status.Settings DescriptionDIM ON The display window becomes dark.DIM OFF The display window becomes bright. yDIM LV (Dimmer Level) : When you set DIM to ON, you can adjust the dimmer level. (-2, -1, 0, +1, +2)For [OTHER] setting yAUX (Auxiliary) ON / OFF It is possible to use auxiliary equipment with this unit. Activate the auxiliary setting when using auxiliary equipment connected to this unit. yDEMO OFF / ON You can change the initial indication on the display to information name (function name, EQ name, etc...) while listening to a source. yBEEP 2ND / ALL BEEP 2ND : The beep is generated when a key is pressed for longer than 2 seconds. BEEP ALL : The beep is generated when any key is pressed. yCLK (Clock) For the model RDS is not supported unit or even for a RDS supported unit.- When RDS CT information is not received and then you set CT to OFF, you can adjust the time by yourelf. Set the clock as follows ;1. Select a source to TUNER.2. Press the FUNC to select the CT and then set CT to OFF. (Refer to the " Adjusting TUNER settings " on the page 11 for setting the CT (Clock Time) ON / OFF.)3. Press and hold • MENU on the unit to select [OTHER] and then select CLK by rotating the volume knob.4. Set the hour by rotating the volume knob.5. Press the volume knob to confirm the hour.6. Set the minute by rotating the volume knob.7. Press the volume knob to confirm the minute.- When RDS CT information is received; The clock is displayed according to the RDS CT information.- When RDS is not supported, set the clock according to 3 to 7 steps.Listening to music from an external device1. Connect an external device to the AUX jack with line input cable.2. Select a source to AUX.3. Play the connected Auxiliary Equipment.Preventing radical changes in volume as switching sourcesOnly when you set AUX to ON as switching sources, you can adjust the volume level of each source to prevent radical changes in volume by selecting GAIN 0 / +6.1. Press FUNC on the unit. Or press FUNC / • MENU on the remote control.2. Rotate the volume knob on the unit. Or press w / s on the remote control to set the option. (GAIN 0 / +6)3. Press the volume knob on the unit. Or press ENTER on the remote control to confirm the setting. 4. If you want to return to the previous step, press . Or press on the remote control. Listening to the radio 1. Press SRC repeatedly to select a source to TUNER.2. Press BAND repeatedly to select a desired band.3. For manual search, press and hold Y/U on the unit until “MANUAL“ is displayed. Then press it repeatedly to select a desired frequency. Or press and hold c / v on the remote control. For auto search, press Y/U on the unit. Then “SEARCH” is displayed. (Except MW) Or press c / v on the remote control.Storing desired frequencies manually1. Press BAND to select a desired band you want to store.2. Select the desired frequency by using Y/U on the unit. Or use c / v on the remote control.3. Press the volume knob and rotate the volume knob to select a preset station among 1 to 6 and then press and hold the volume knob until the beep sound is heard. Or press and hold one of preset buttons among 1 to 6 on the remote control until the beep sound is heard.4. Repeat steps 1 to 3 to preset other stations.](https://usermanual.wiki/LG-Electronics-USA/9QK-MAX620/User-Guide-1657424-Page-9.png)
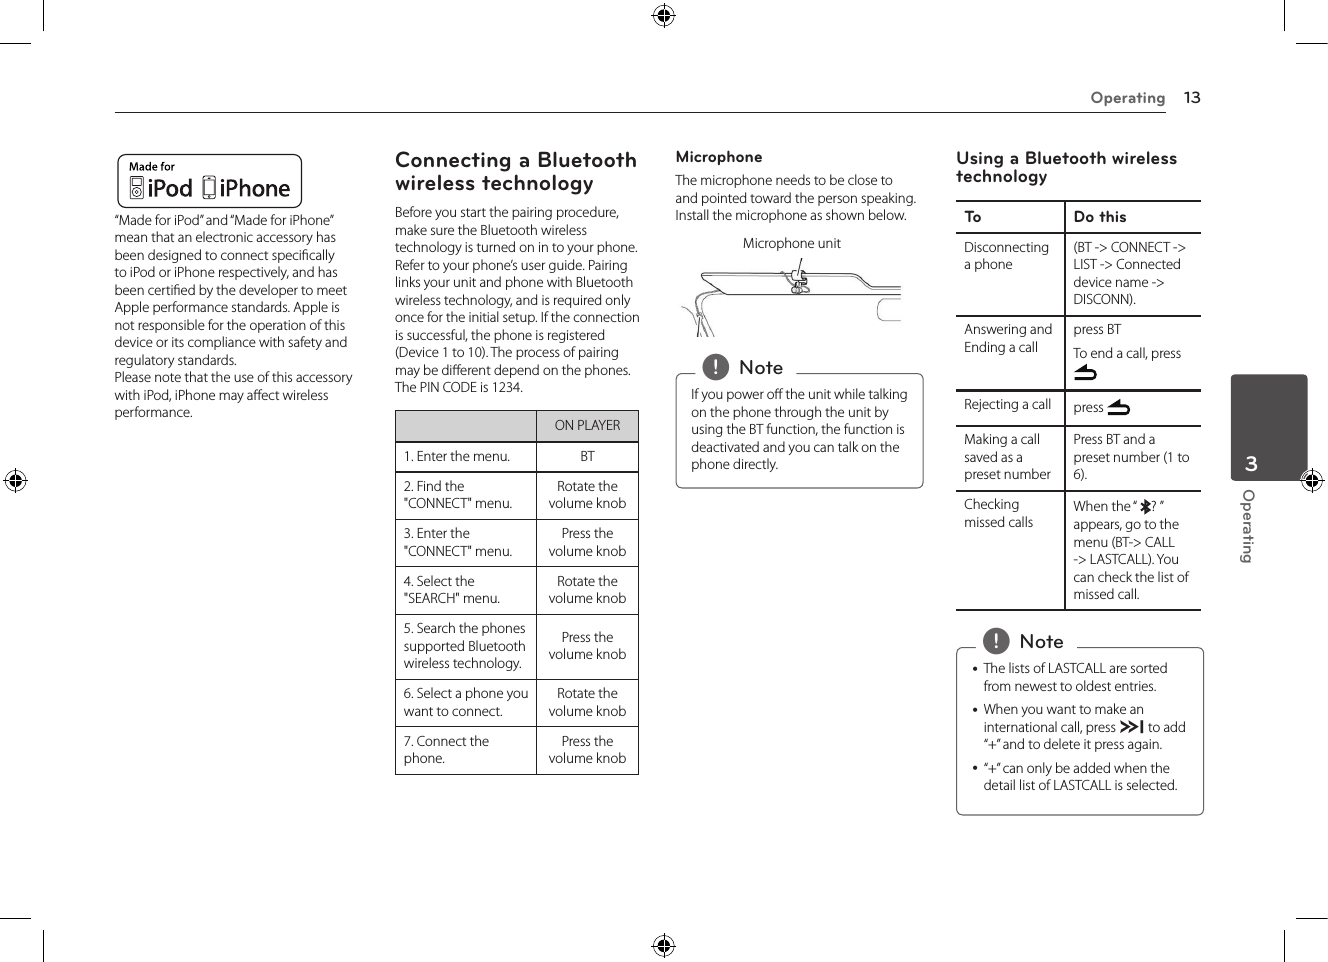
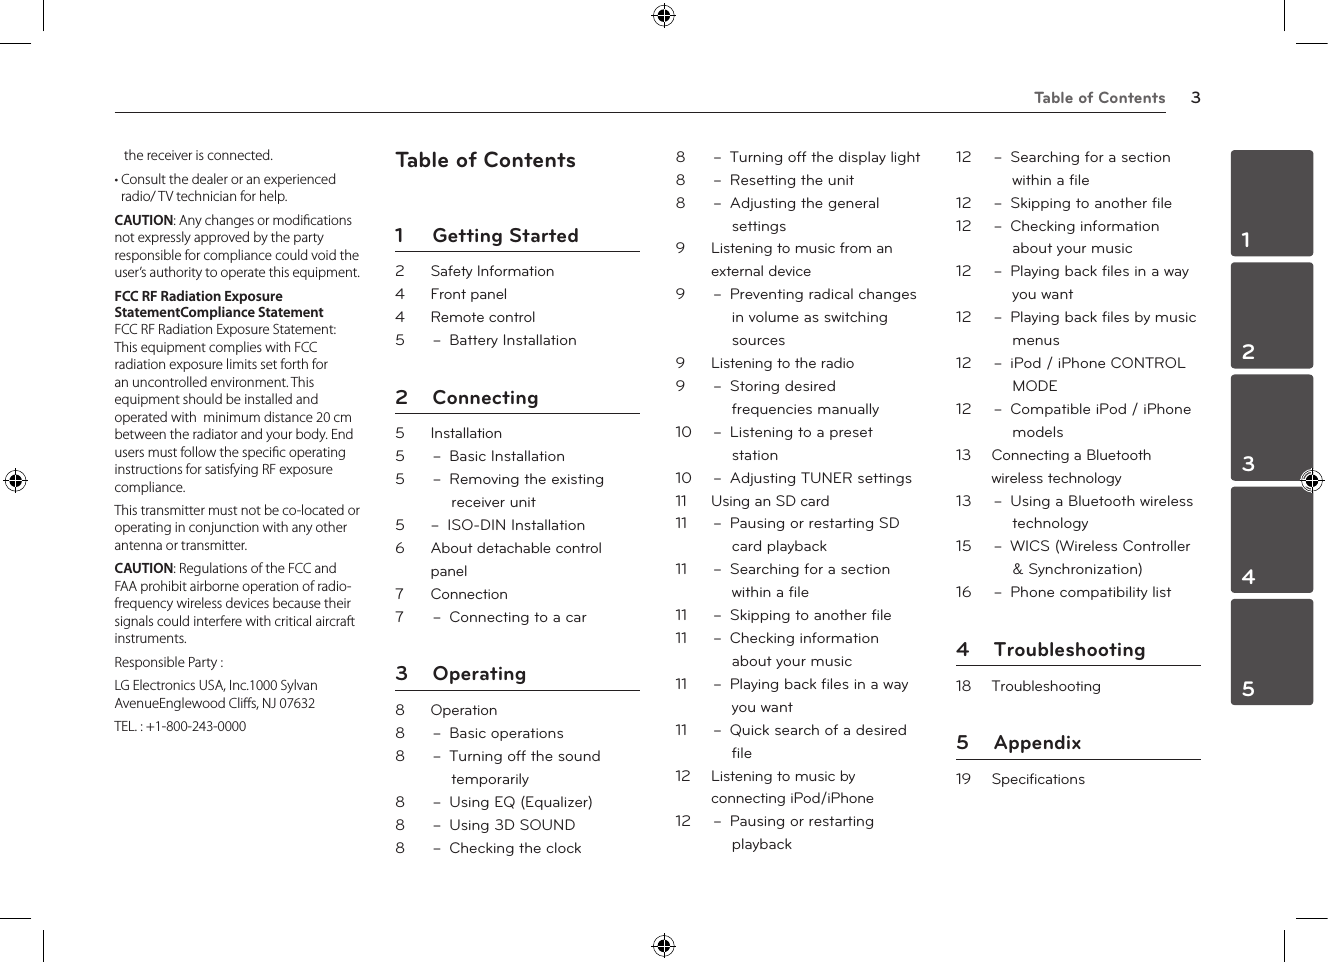
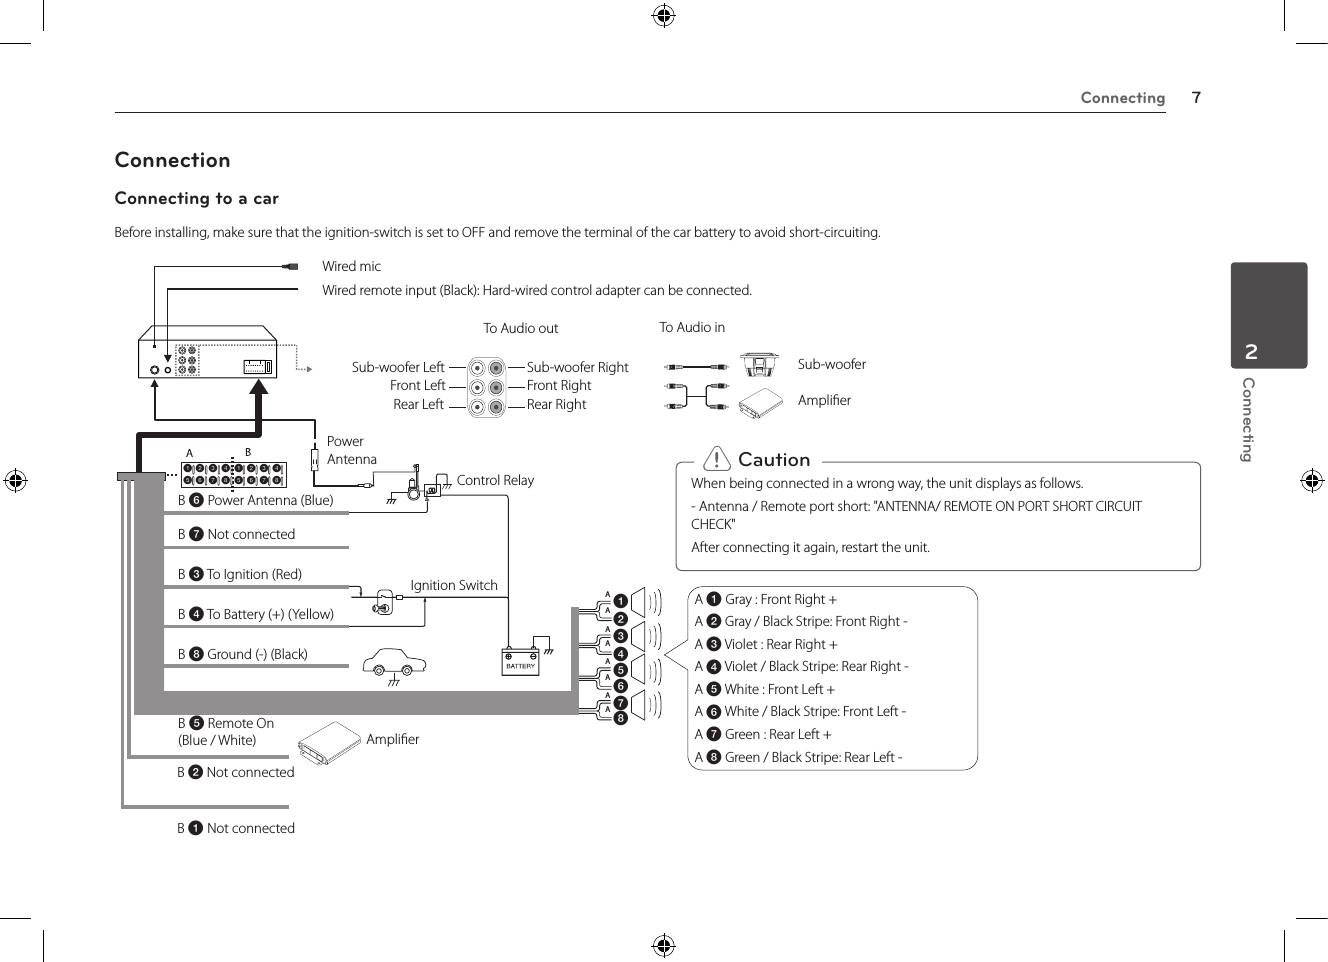
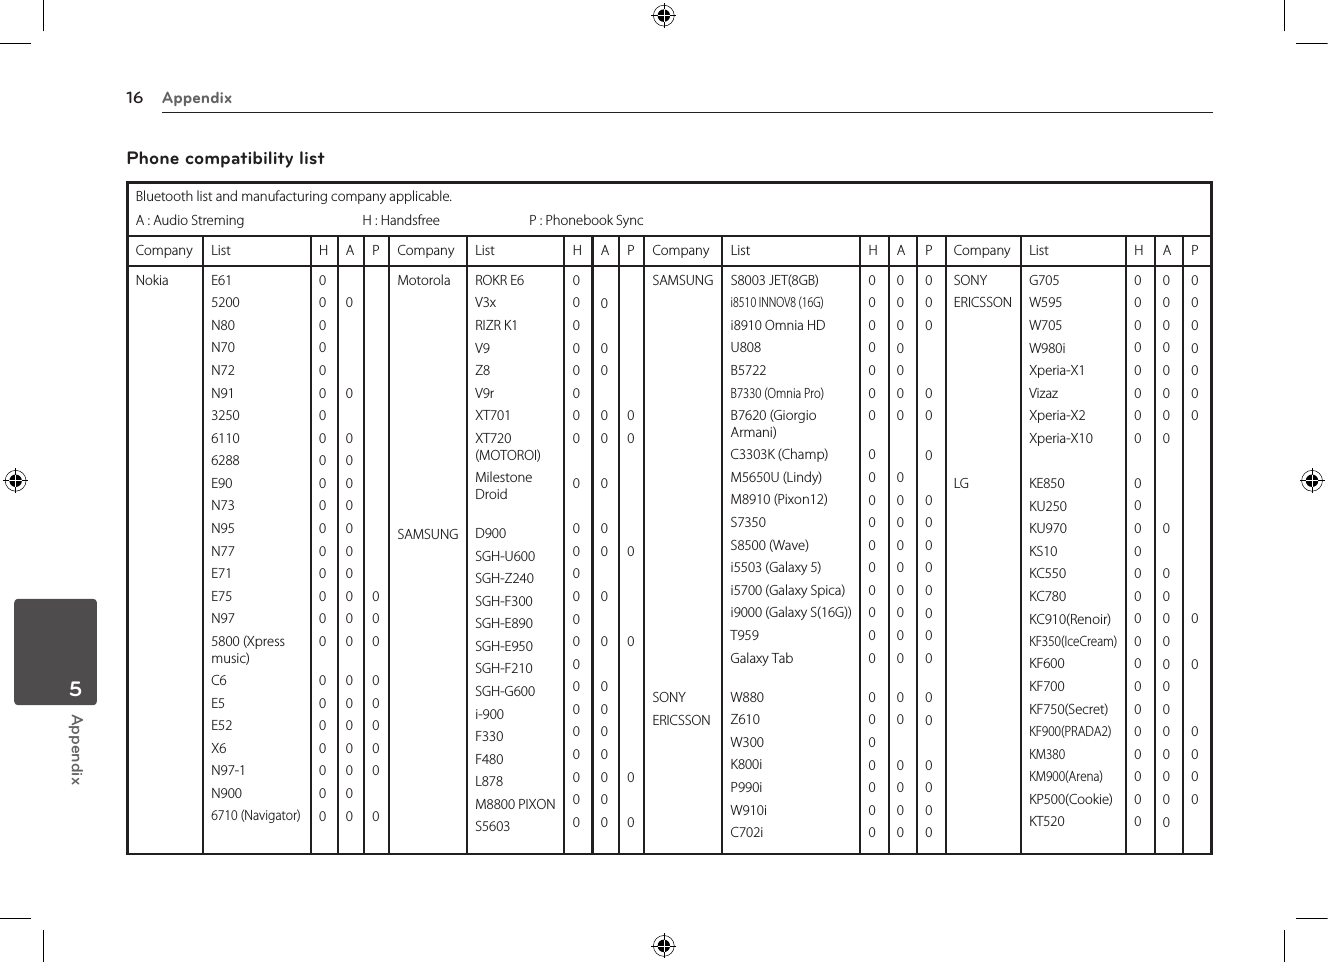
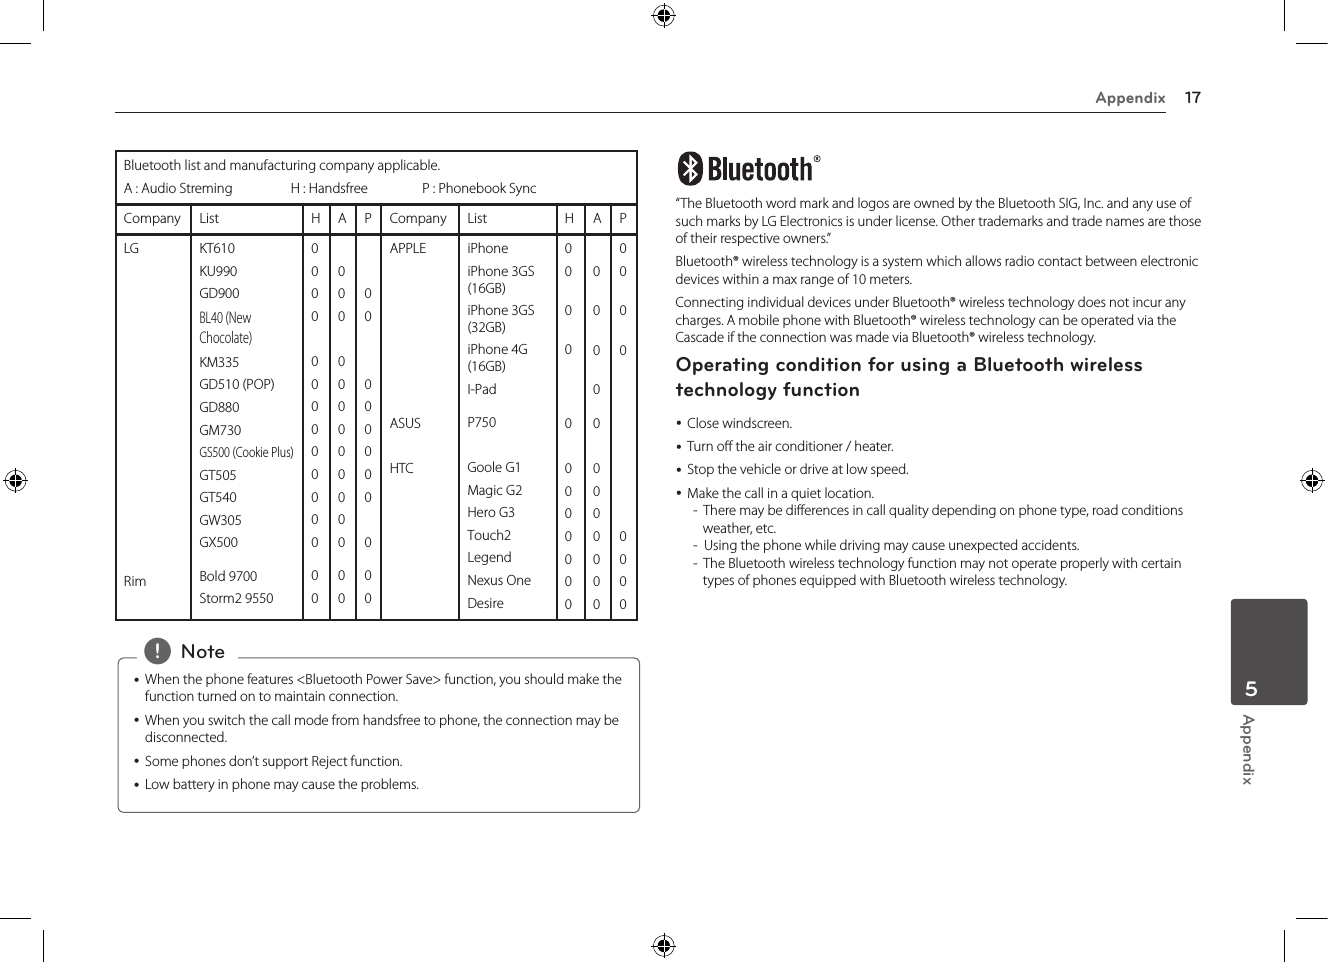
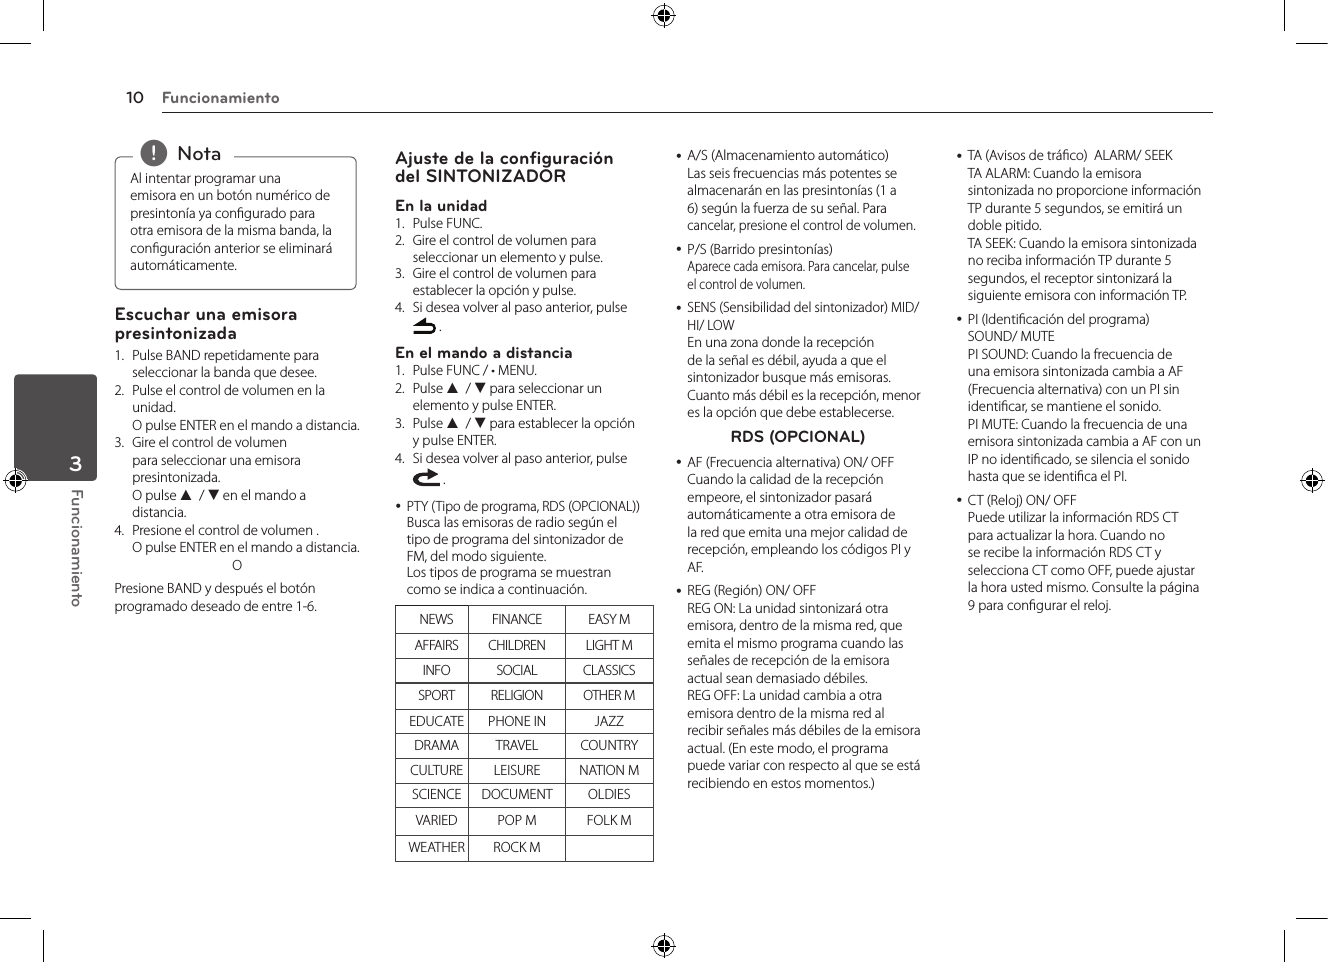
![Operating 15Operating3SETUP yVISIBLE Makes it is impossible to search this unit. (SHOWN <-> HIDDEN) yAUTO CON Adjusts connection with automatically or not. (ON <-> OFF) yAUTO ANS Adjusts answering automatically or not. (MANUAL <-> AUTO) yMIC VOL Adjusts microphone volume on the phone from 1 to 5. While you are on the phone with Bluetooth wireless technology, press Y/U (or c / v on the remote control) to adjust the MIC volume. yREDIAL Adjusts the counts of redial. (1 TIME <-> 2 TIMES)INFO yNAME Changes the name of this unit. yADDRESS Checks the address. yPIN-CODE Changes the PIN code. Default is 1234.WICS (Wireless Controller & Synchronization)You can control the unit by using the "WICS" application.1. Search the “WICS” application and install it. [Displays installed "WICS" application]2. Pairing links your unit and iPhone with Bluetooth wireless technology. (Refer to the page 15.)3. When you run the “WICS” application, activating source is displayed after initial screen. Then you can control the unit on iPhone. [Initial screen] [Tuner screen]You can select a source by pressing "SOURCE". [Source Mode screen]](https://usermanual.wiki/LG-Electronics-USA/9QK-MAX620/User-Guide-1657424-Page-15.png)


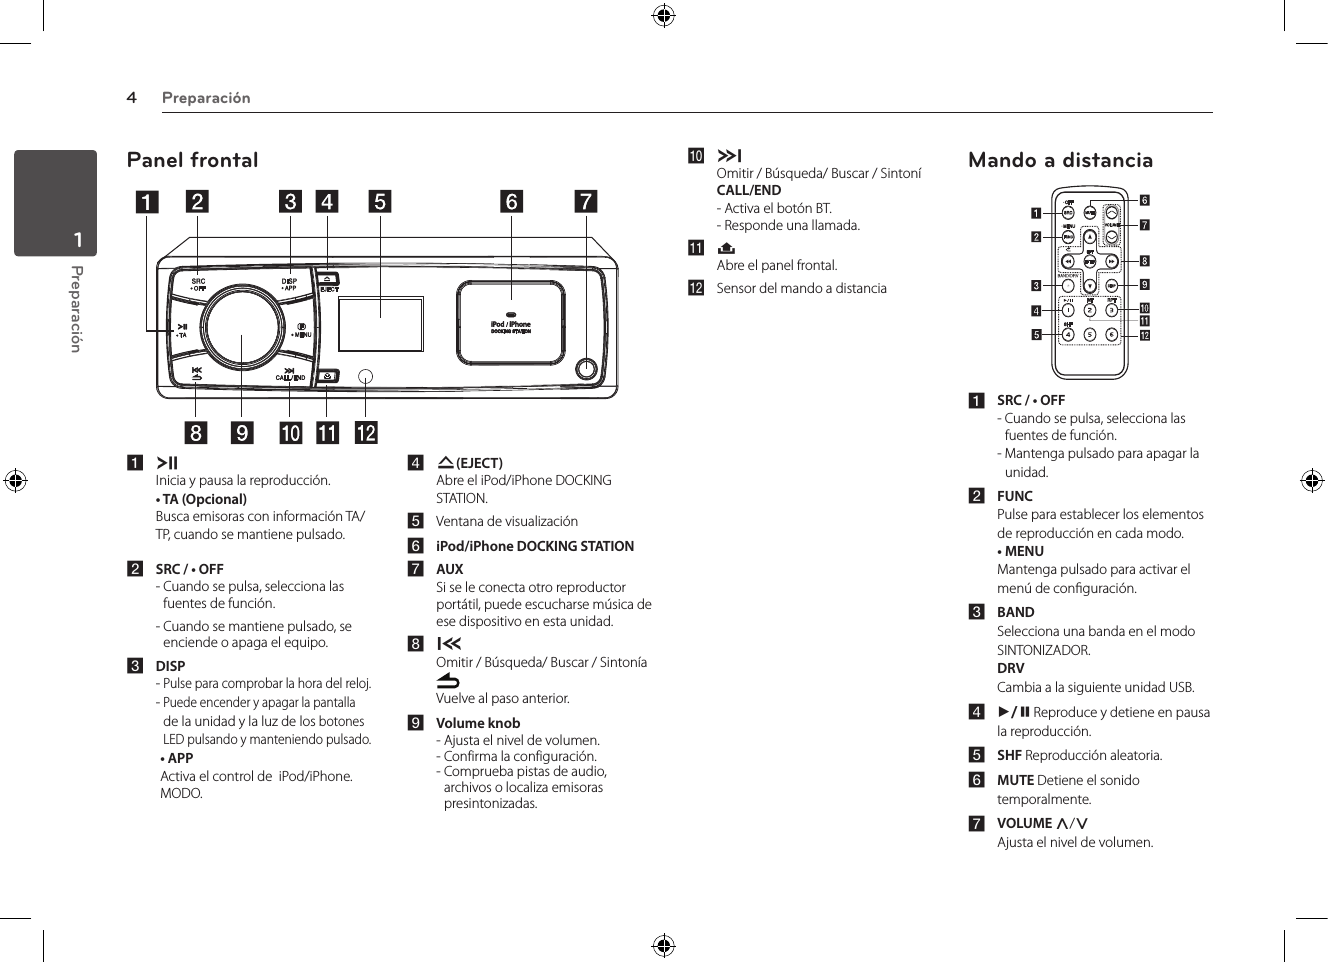
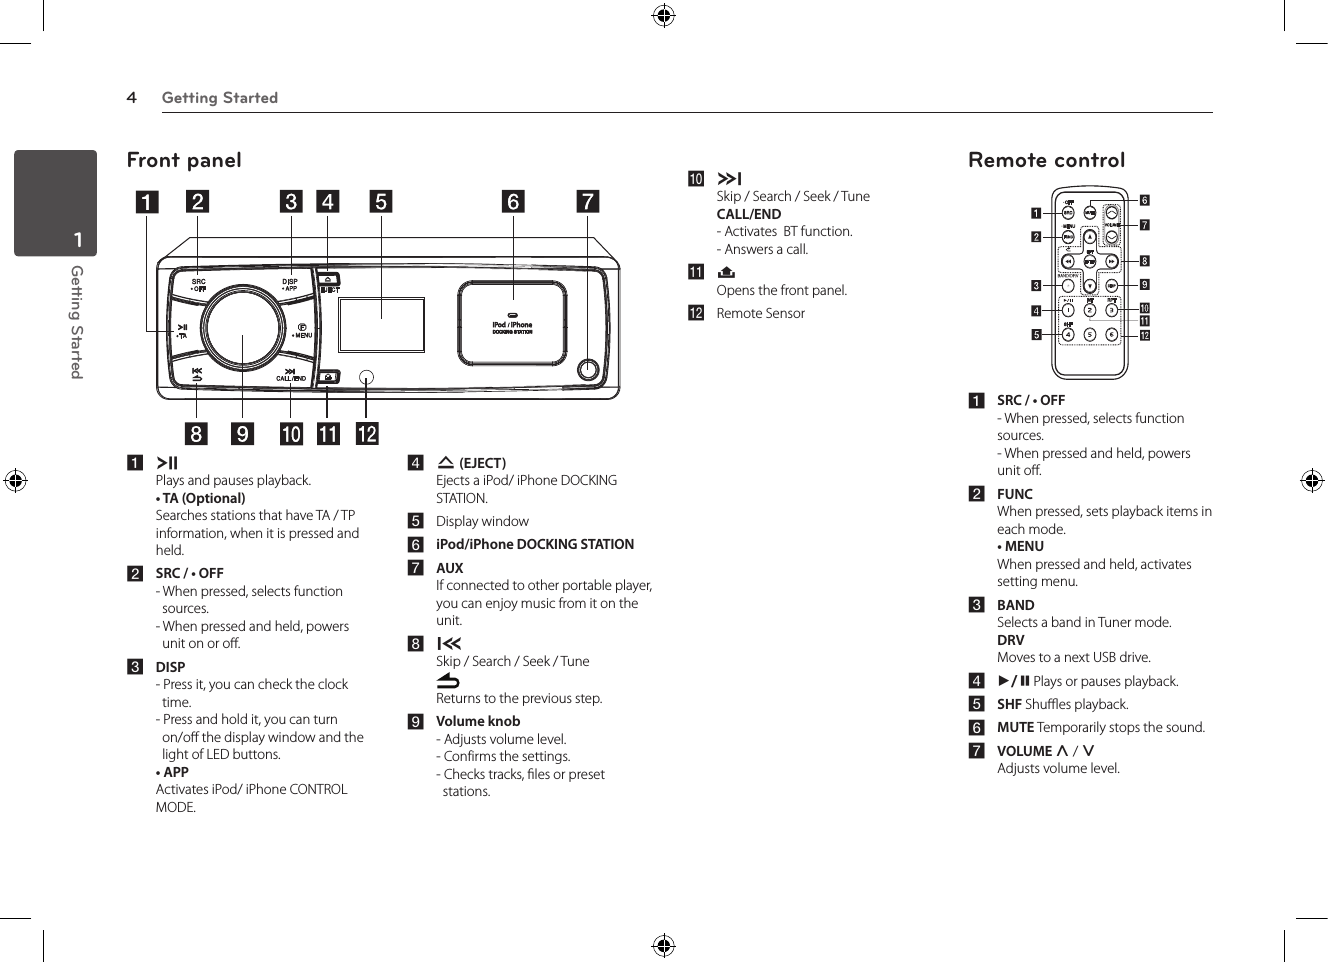
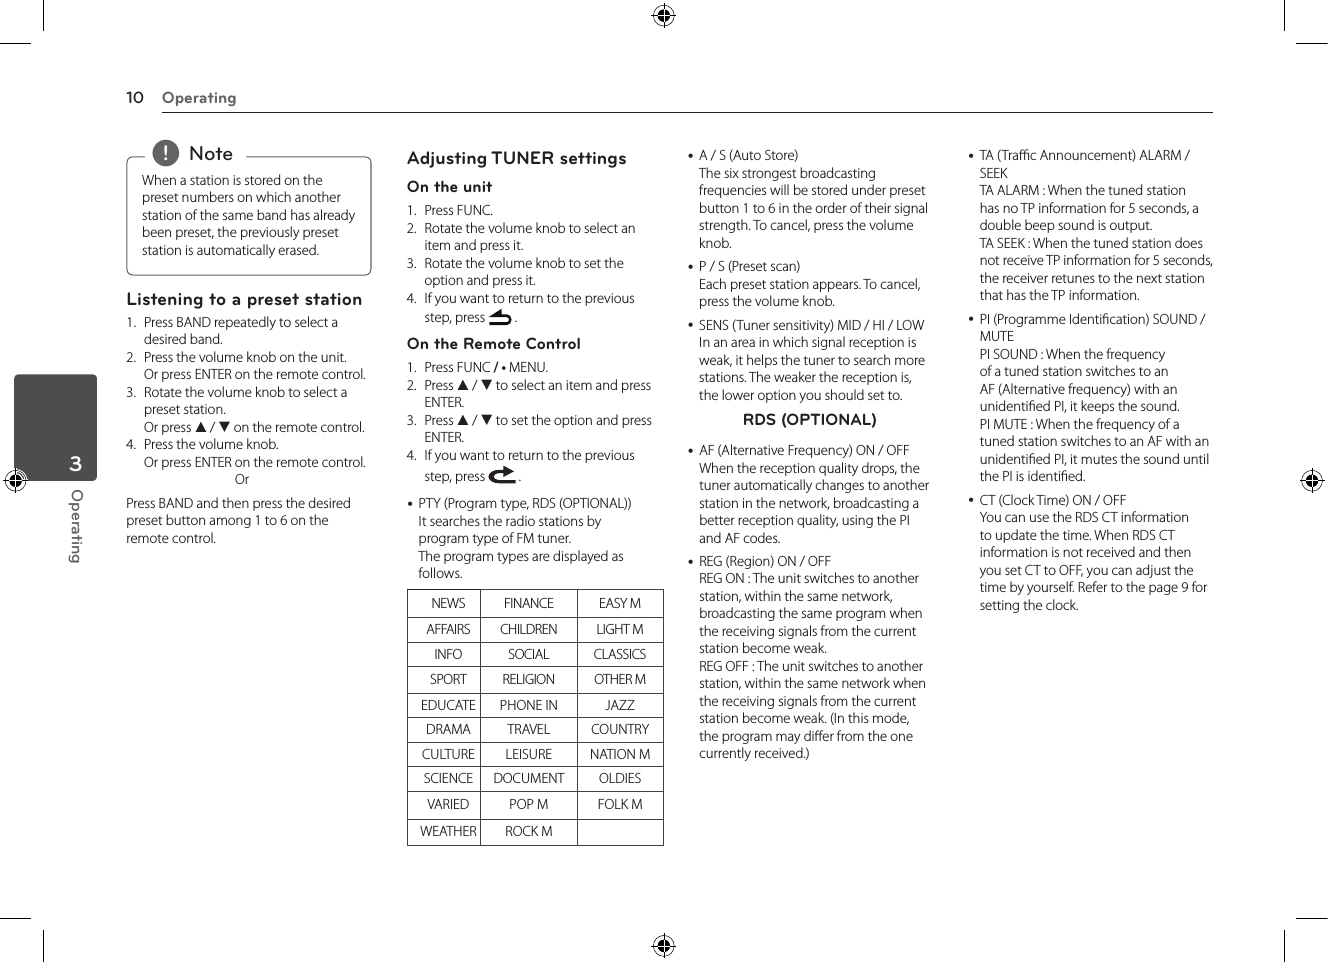
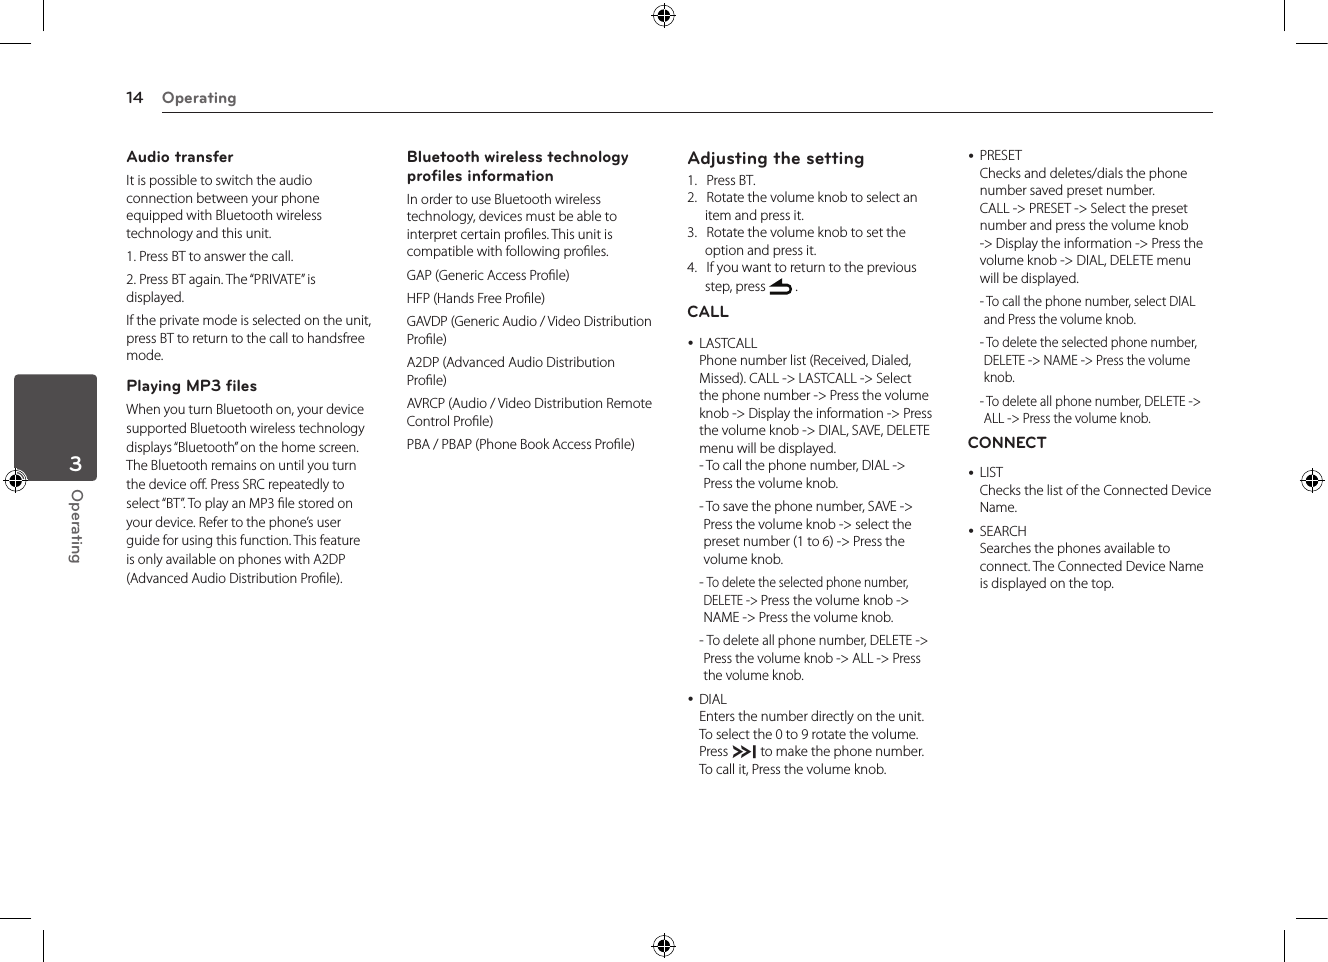
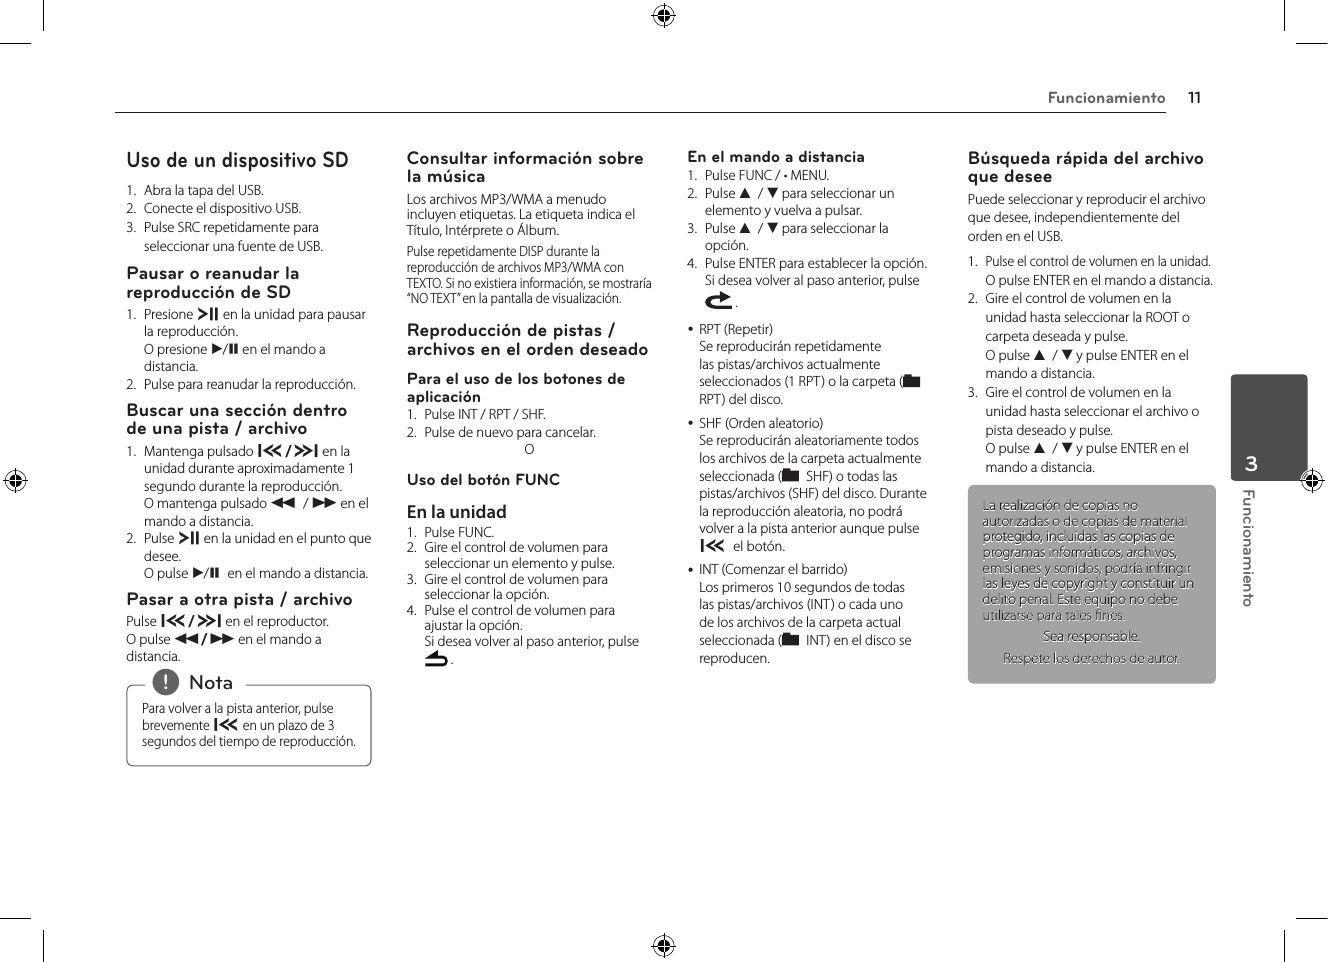
![3 Funcionamiento8Funcionamiento3FuncionamientoFuncionamientoFuncionamiento básico1. Encienda la unidad pulsando cualquier tecla.2. Seleccione una fuente presionando SRC.3. Ajuste el volumen de la unidad girando el control del volumen. O pulse VOLUME (VOLUMEN) W/S en el mando a distancia. Desactivar el sonido de forma temporal1. Pulse MUTE para desactivar el sonido de la unidad. O pulse MUTE (SILENCIO) en el mando a distancia.2. Pulse de nuevo para cancelar.Uso del EQ (Ecualizador)La función de EQ es aumentar o reducir la potencia de la señal de las frecuencias de audio. Esta función le ayuda a lograr un disfrute más pleno del sonido. Presione repetidamente EQ en la unidad. El indicador se ilumina siguiendo este orden.FLAT /XDSS+ / POP / CLASSIC / ROCK / JAZZ / VOCAL / SALSA / SAMBA / REGGAE / RUSSY / USER1 / USER2Uso del 3D SOUNDEste modo proporciona un excelente sonido envolvente.1. MantengapulsadoEQ/•3D.2. Mantenga pulsado de nuevo para cancelar.Comprobación del reloj1. Pulse DISP. 2. Pulse de nuevo para cancelar.Apagar la pantalla de visualización1. Mantenga pulsado DISP. 2. Mantenga pulsado de nuevo para volver a encenderla. Cuando la pantalla esté apagada, pulse cualquier tecla, la luz se encenderá y volverá a apagarse automáticamente si no se pulsa a los pocos segundos. , NotaRestablecer la unidad Se puede reiniciar el equipo si no funciona correctamente.1. Extraiga el panel de control. Consulte la página 6 para información sobre cómo extraer el panel de control.2. Pinche en el agujero RESET con un objeto punzante.Realización de los ajustes generalesPuede ajustar la conguración de [SOUND], [LIGHT] y [OTHER].En la unidad1. Mantengapulsado•MENU.2. Gire el control de volumen para seleccionar [SOUND], [LIGHT], u [OTHER] y púlselo.3. Gire el control de volumen para seleccionar el elemento y púlselo.4. Gire el control de volumen hacia la izquierda o hacia la derecha para ajustar el nivel.5. Pulse el control del volumen para confirmar la configuración. Si desea volver al paso anterior, pulse .En el mando a distancia 1. MantengapulsadoFUNC/•MENU.2. Pulse w / s para seleccionar [SOUND], [LIGHT], u [OTHER] y pulse ENTER.3. Pulse w / s para seleccionar el modo y pulse ENTER.4. Pulse w / s para ajustar el nivel.5. Pulse ENTER para confirmar el ajuste. Si desea volver al paso anterior, pulse .Configuración de sonido [SOUND]Puede ajustar la calidad del sonido ajustando el nivel de BAL (altavoces izquierdos / derechos), FAD (altavoces delanteros / traseros), SW (Subwoofer), SW-F (Frecuencia de subwoofer), A-EQ (Auto EQ).- Cuando ajuste el EQ en modo USER 1/2. : Puede ajustar el nivel de sonido de (BAS (graves), MID (medios), TRB (agudos). ySW (Subwoofer) Puede ajustar el volumen del subwoofer. ySW-F (Subwoofer freqency) OFF/ SW 55 Hz/ SW 85 Hz/ SW 120 Hz Puede desactivar el subwoofer. yA-EQ (Auto EQ) ON/ OFF La función AUTO EQ funciona solamente en los archivos de música admitidos por Género en el dispositivo. Si congura la opción AUTO EQ como ON (Activada), POP, CLASSIC (CLÁSICA), ROCK, o JAZZ, se seleccionará automáticamente dependiendo del género musical del archivo de música.](https://usermanual.wiki/LG-Electronics-USA/9QK-MAX620/User-Guide-1657424-Page-28.png)
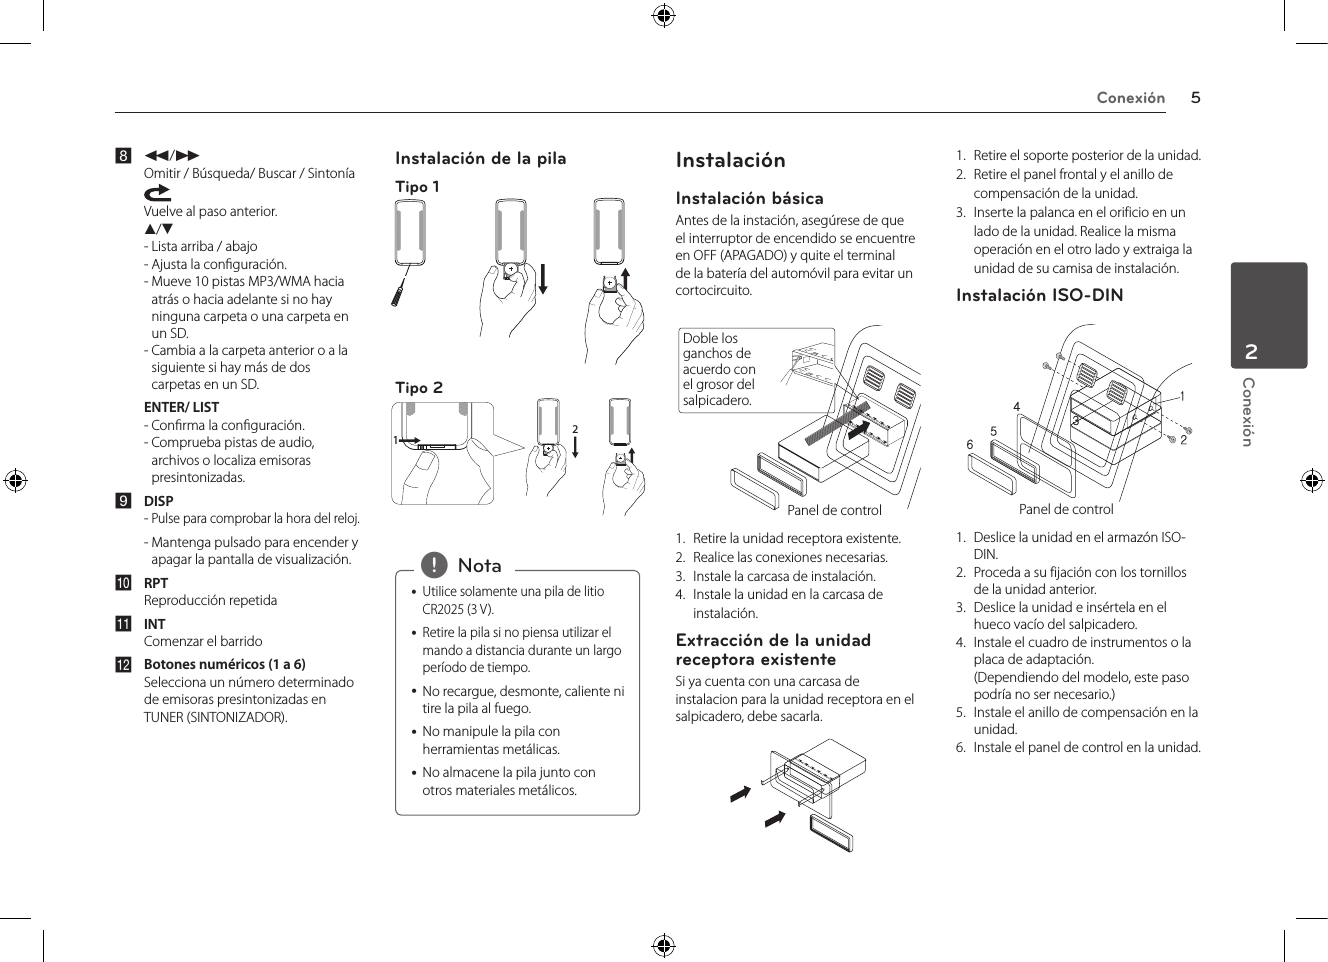
![Funcionamiento 9Funcionamiento3Configuración de las luces [LIGHT]Puede ajustar los efectos de luz ajustando LED, DIM o DIM LV. yLED COL1/ COL2/ AUTO: Puede cambiar el color de la pantalla LED. yDIM (Regulador) OFF/ ON: Puede cambiar el brillo de la pantalla de visualización durante el encendido.Conguración DescripciónDIM ONLa pantalla de visualización se oscurece.DIM OFF Aumenta el brillo de la pantalla yDIM LV (NIVEL DEL REGULADOR): Si ajusta la opción DIM como ON (Activada), podrá ajustar el nivel del regulador.(-2, -1, 0, +1, +2)Otras configuraciones [OTHER] yAUX (Auxiliar) ON/ OFF Se puede utilizar un equipo auxiliar con esta unidad. Active la conguración auxiliar cuando conecte un equipo auxiliar a esta unidad. yDEMO OFF/ ON Puede cambiar la indicación inicial de la pantalla para que aparezca información como el nombre de la función, del ecualizador, etc., mientras escucha una fuente. yBEEP 2ND/ ALL BEEP 2ND: Se genera la señal acústica cuando se pulsa una tecla durante más de 2 segundos. BEEP ALL: Oirá una señal acústica al pulsar cualquier tecla. yCLK (Reloj) Para el modelo RDS no es compatible con la unidad o incluso para una unidad de apoyo RDS.- Cuando no se recibe la información RDS CT y selecciona C-T como OFF, puede ajustar la hora usted mismo. Ajuste el reloj de la siguiente manera: 1. Seleccione una fuente para el TUNER (SINTONIZADOR). 2. Pulse FUNC para seleccionar CT y ajuste CT en OFF. (Consulte la sección "Ajuste de la conguración del SINTONIZADOR" en las páginas 11 de conguración del CT (hora del reloj) ON / OFF).3. Mantenga pulsado •MENUenlaunidad para seleccionar [OTHER] y luego seleccione CLK haciendo girar el control de volumen.4. Ajuste la hora girando el control de volumen.5. Pulse el control de volumen para confirmar la hora.6. Ajuste los minutos girando el control de volumen.7. Pulse el control de volumen para confirmar los minutos.- Cuando la información RDS CT se recibe; El reloj se muestra de acuerdo con la información RDS CT.- Si no es compatible con RDS, configure el reloj de acuerdo con los pasos 3 a 7.Escuchar música desde un dispositivo externo1. Conecte un aparato externo en la toma AUX con el cable de entrada de línea.2. Seleccione una fuente como AUX.3. Reproduzca el equipo auxiliar conectado.Evitar cambios radicales de volumen al cambiar de fuentesSólo cuando ajuste AUX en ON como fuente de conexión podrá ajustar el nivel de volumen de cada fuente para evitar cambios radicales de volumen seleccionando GAIN 0/ +6.1. Pulse FUNC en la unidad. OpulseFUNC/•MENUenelmandoadistancia.2. Gire el control de volumen en la unidad. O pulse w / s en el mando a distancia para ajustar la opción. (GAIN 0 / +6)3. Pulse el control de volumen en la unidad. O pulse ENTER en el mando a distancia para confirmar el ajuste.4. Si desea volver al paso anterior, pulse . O pulse en el mando a distancia.Cómo escuchar el SINTONIZADOR1. Pulse repetidamente SRC para seleccionar una fuente para el TUNER(SINTONIZADOR).2. Presione BAND repetidamente para seleccionar la banda que desea almacenar.3. Para hacer una búsqueda manual, mantenga pulsado Y/U en la unidad hasta que aparezca en la pantalla “MANUAL”. Entonces pulse repetidamente para seleccionar la frecuencia deseada. O mantenga pulsado c / v en el mando a distancia. Para la búsqueda automática, pulse Y/U en la unidad. A continuación, se muestra “SEARCH” (buscar). (Excepto MW) O pulse c / v en el mando a distancia.Guardar las frecuencias deseadas manualmente1. Pulse BAND para seleccionar la banda que desea almacenar.2. Seleccione la frecuencia deseada con Y/U en la unidad. O pulse c / v en el mando a distancia.3. Pulse el dial de volumen y gírelo para seleccionar una emisora presintonizada del 1 al 6, y después pulse y mantenga pulsado el dial hasta escuchar un sonido. O mantenga pulsado uno de los botones de presintonización entre 1 y 6 en el mando a distancia hasta oír la señal sonora.4. Repita los pasos del 1 al 3 para presintonizar otras emisoras.](https://usermanual.wiki/LG-Electronics-USA/9QK-MAX620/User-Guide-1657424-Page-29.png)

![Funcionamiento 15Funcionamiento3SETUP (Inalámbrica) yVISIBLE Imposibilita la búsqueda de la unidad. (SHOWN <-> HIDDEN) yAUTO CON (Con.) Ajuste la conexión automáticamente o no. (ON <-> OFF) yAUTO ANS Ajusta la respuesta automática o no. (MANUAL <-> AUTO) yMIC VOL Ajusta el volumen del micrófono del teléfono de 1 a 5. Estando al teléfono con Bluetooth, pulse Y/U ( o c / ven el mando a distancia) para ajustar el volumen del micrófono. yREDIAL (Rellamada) Ajusta los intentos de rellamada. (1 TIME <-> 2 TIMES)INFO yNAME (Nombre) Cambia el nombre de esta unidad. yADDRESS (Dirección) Comprueba la dirección. yPIN-CODE Cambiar el código PIN. Por defecto es 1234.WICS (Controlador inalámbrico y sincronización)Se puede controlar la unidad con la aplicación "WICS".1. Busque la aplicación “WICS” e instálela. [Se muestra la aplicación "WICS" instalada]2. Enlaces de acoplamiento de su unidad y un iPhone con tecnología inalámbrica Bluetooth. (Consulte la página 24).3. Cuando ejecute al aplicación “WICS”, se mostrará la fuente de aplicación tras la pantalla inicial. A continuación, puede controlar la unidad en el iPhone. [Pantalla inicial] [Pantalla de sintonizador]- Puede seleccionar una fuente pulsando "SOURCE". [Pantalla de modo fuente]](https://usermanual.wiki/LG-Electronics-USA/9QK-MAX620/User-Guide-1657424-Page-35.png)