LG Electronics USA 9QK-MAX620 Car CD/MP3/WMA Receiver User Manual
LG Electronics USA Car CD/MP3/WMA Receiver
user manual

OWNER’S MANUAL
DIGITAL MEDIA RECEIVER
Please read this manual carefully before operating
your set and retain it for future reference.
MAX620BO
ENGLISH
www.lg.com.mx
1 Getting Started
Getting Started2
Getting Started
1
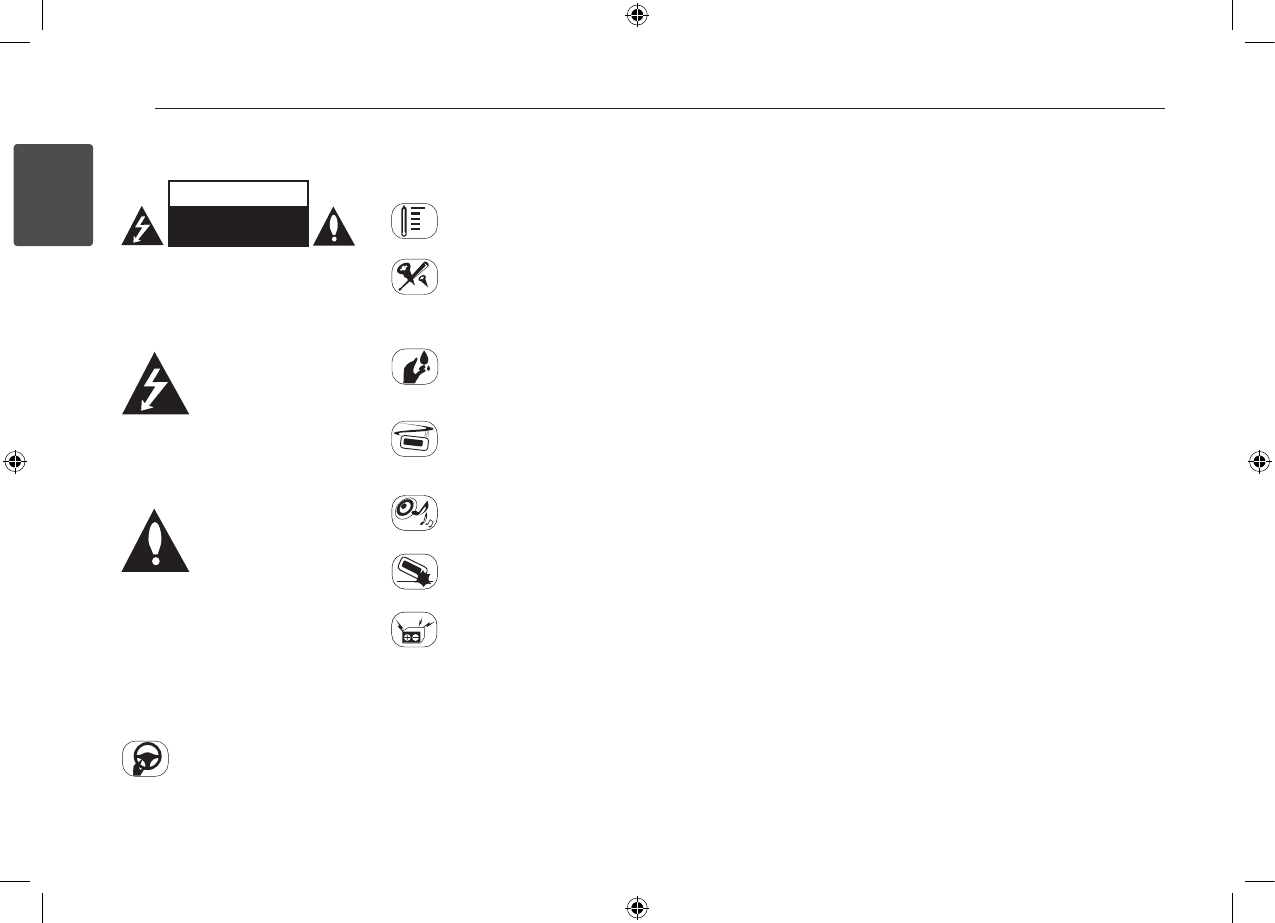
Safety Information
CAUTION
RISK OF ELECTRIC SHOCK
DO NOT OPEN
CAUTION: TO REDUCE THE RISK OF
ELECTRIC SHOCK DO NOT REMOVE COVER
(OR BACK) NO USER-SERVICEABLE PARTS
INSIDE REFER SERVICING TO QUALIFIED
SERVICE PERSONNEL.
This lightning ash with
arrowhead symbol within
an equilateral triangle is
intended to alert the user to
the presence of uninsulated
dangerous voltage within the product’s
enclosure that may be of sucient
magnitude to constitute a risk of electric
shock to persons.
The exclamation point within
an equilateral triangle is
intended to alert the user to
the presence of important
operating and maintenance
(servicing) instructions in the literature
accompanying the product.
WARNING: TO PREVENT FIRE OR ELECTRIC
SHOCK HAZARD, DO NOT EXPOSE THIS
PRODUCT TO RAIN OR MOISTURE.
WARNING: Do not install this equipment
in a conned space such as a book case or
similar unit.
Always operate the vehicle in
a safe manner. Do not become
distracted by the vehicle while
driving, and always be fully aware of all
driving condition. Do not change settings,
or any functions. Pull over in a safe and
legal manner before attempting such
operations.
Do not use for many hours
at extremely low or high
temperature. (-10 °C to 60 °C)
To reduce the risk of electric
shock, do not remove the cover
or back of this product. There
are no user-serviceable parts inside. Refer
servicing to qualied service personnel.
To reduce the risk of re or
electric shock, do not expose this
product to dripping or splashing
water, rain, or moisture.
The temperature of unit’s outside
can be extremely high, please use
the unit after proper installation
in your vehicle.
While driving, keep the sound
volume at a proper level.
Do not drop it and avoid heavy
impacts at anytime.
This unit is for vehicles with a
12-volt battery and negative
grounding. Before installing it in
a recreational vehicle, lorry or bus, check
the battery voltage. To avoid shorts in the
electrical system, be sure to disconnect
the E battery cable before beginning the
installation.
This device is equipped with a portable
battery or accumulator.
Safe way to remove the battery or the
battery from the equipment:
Remove the old battery or battery pack,
follow the steps in reverse order than the
assembly. To prevent contamination of
the environment and bring on possible
threat to human and animal health, the
old battery or the battery put it in the
appropriate container at designated
collection points. Do not dispose of
batteries or battery together with other
waste. It is recommended that you
use local, free reimbursement systems
batteries and accumulators.
The battery shall not be exposed to
excessive heat such as sunshine, re or
the like.
FCC Compliance Statement
This device complies with part 15 of the
FCC rules. Operation is subject to the
following two conditions:
(1) This device may not cause harmful
interference, and
(2) This device must accept any
interference received, including
interference that may cause undesired
operation.
NOTE: This equipment has been tested
and found to comply with the limits
for a Class B digital device, pursuant to
Part 15 of the FCC Rules. These limits
are designed to provide reasonable
protection against harmful interference in
a residential installation. This equipment
generates, uses, and can radiate radio
frequency energy and, if not installed and
used in accordance with the instructions,
may cause harmful interference to radio
communications. However, there is no
guarantee that interference will not occur
in a particular installation.
If this equipment does cause harmful
interference to radio or television
reception, which can be determined
by turning the equipment o and on,
the user is encouraged to try to correct
the interference by one or more of the
following measures:
• Reorient or relocate the receiving
antenna.
• Increase the separation between the
equipment and receiver.
• Connect the equipment into an outlet
on a circuit dierent from that to which

Table of Contents 3
1
2
3
4
5
Table of Contents
1 Getting Started
2 Safety Information
4 Front panel
4 Remote control
5 – Battery Installation
2 Connecting
5 Installation
5 – Basic Installation
5 – Removing the existing
receiver unit
5 – ISO-DIN Installation
6 About detachable control
panel
7 Connection
7 – Connecting to a car
3 Operating
8 Operation
8 – Basic operations
8 – Turning off the sound
temporarily
8 – Using EQ (Equalizer)
8 – Using 3D SOUND
8 – Checking the clock
8 – Turning off the display light
8 – Resetting the unit
8 – Adjusting the general
settings
9 Listening to music from an
external device
9 – Preventing radical changes
in volume as switching
sources
9 Listening to the radio
9 – Storing desired
frequencies manually
10 – Listening to a preset
station
10 – Adjusting TUNER settings
11 Using an SD card
11 – Pausing or restarting SD
card playback
11 – Searching for a section
within a file
11 – Skipping to another file
11 – Checking information
about your music
11 – Playing back files in a way
you want
11 – Quick search of a desired
file
12 Listening to music by
connecting iPod/iPhone
12 – Pausing or restarting
playback
12 – Searching for a section
within a file
12 – Skipping to another file
12 – Checking information
about your music
12 – Playing back files in a way
you want
12 – Playing back files by music
menus
12 – iPod / iPhone CONTROL
MODE
12 – Compatible iPod / iPhone
models
13 Connecting a Bluetooth
wireless technology
13 – Using a Bluetooth wireless
technology
15 – WICS (Wireless Controller
& Synchronization)
16 – Phone compatibility list
4 Troubleshooting
18 Troubleshooting
5 Appendix
19 Specifications
the receiver is connected.
• Consult the dealer or an experienced
radio/ TV technician for help.
CAUTION: Any changes or modications
not expressly approved by the party
responsible for compliance could void the
user’s authority to operate this equipment.
FCC RF Radiation Exposure
StatementCompliance Statement
FCC RF Radiation Exposure Statement:
This equipment complies with FCC
radiation exposure limits set forth for
an uncontrolled environment. This
equipment should be installed and
operated with minimum distance 20 cm
between the radiator and your body. End
users must follow the specic operating
instructions for satisfying RF exposure
compliance.
This transmitter must not be co-located or
operating in conjunction with any other
antenna or transmitter.
CAUTION: Regulations of the FCC and
FAA prohibit airborne operation of radio-
frequency wireless devices because their
signals could interfere with critical aircraft
instruments.
Responsible Party :
LG Electronics USA, Inc.1000 Sylvan
AvenueEnglewood Clis, NJ 07632
TEL. : +1-800-243-0000
Getting Started4
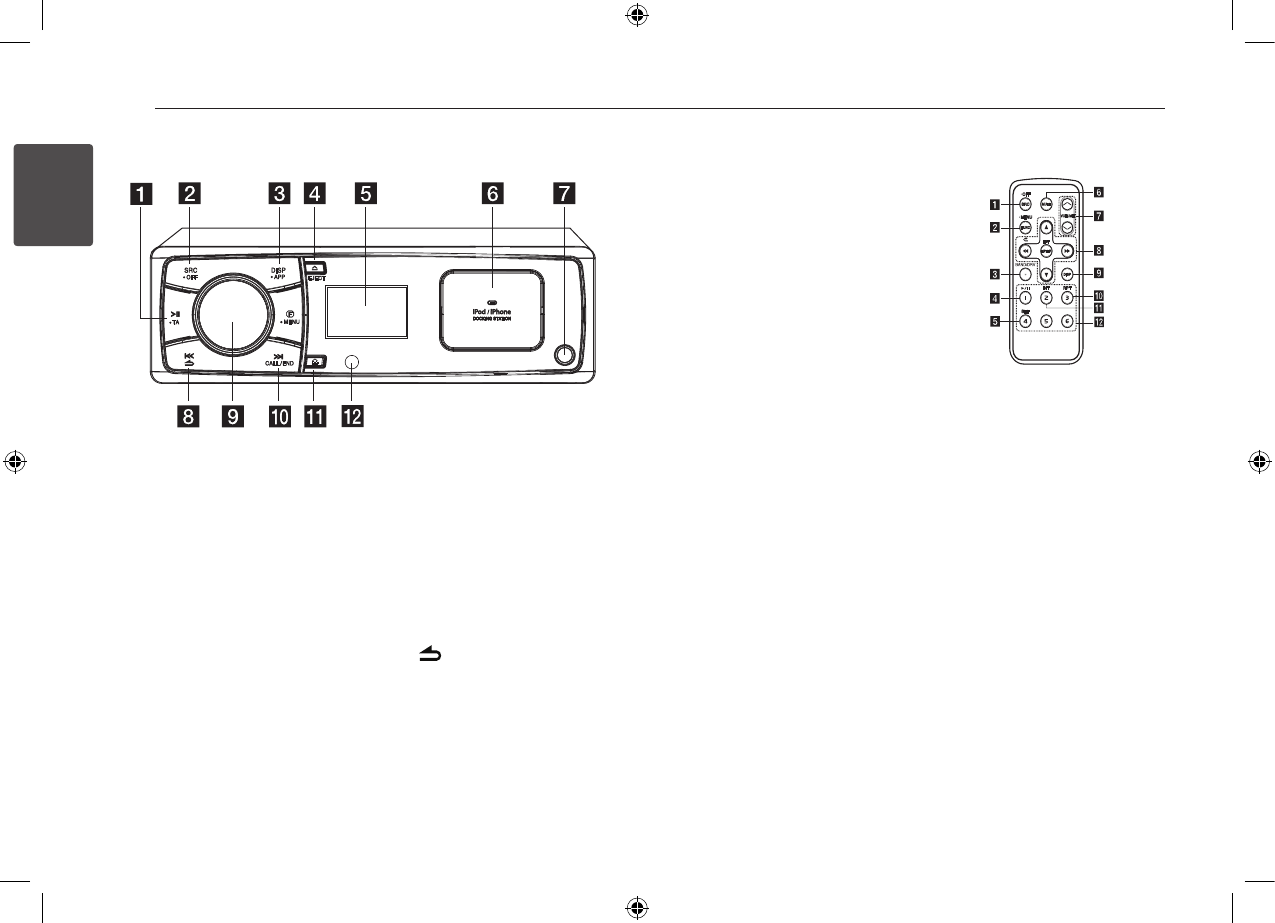
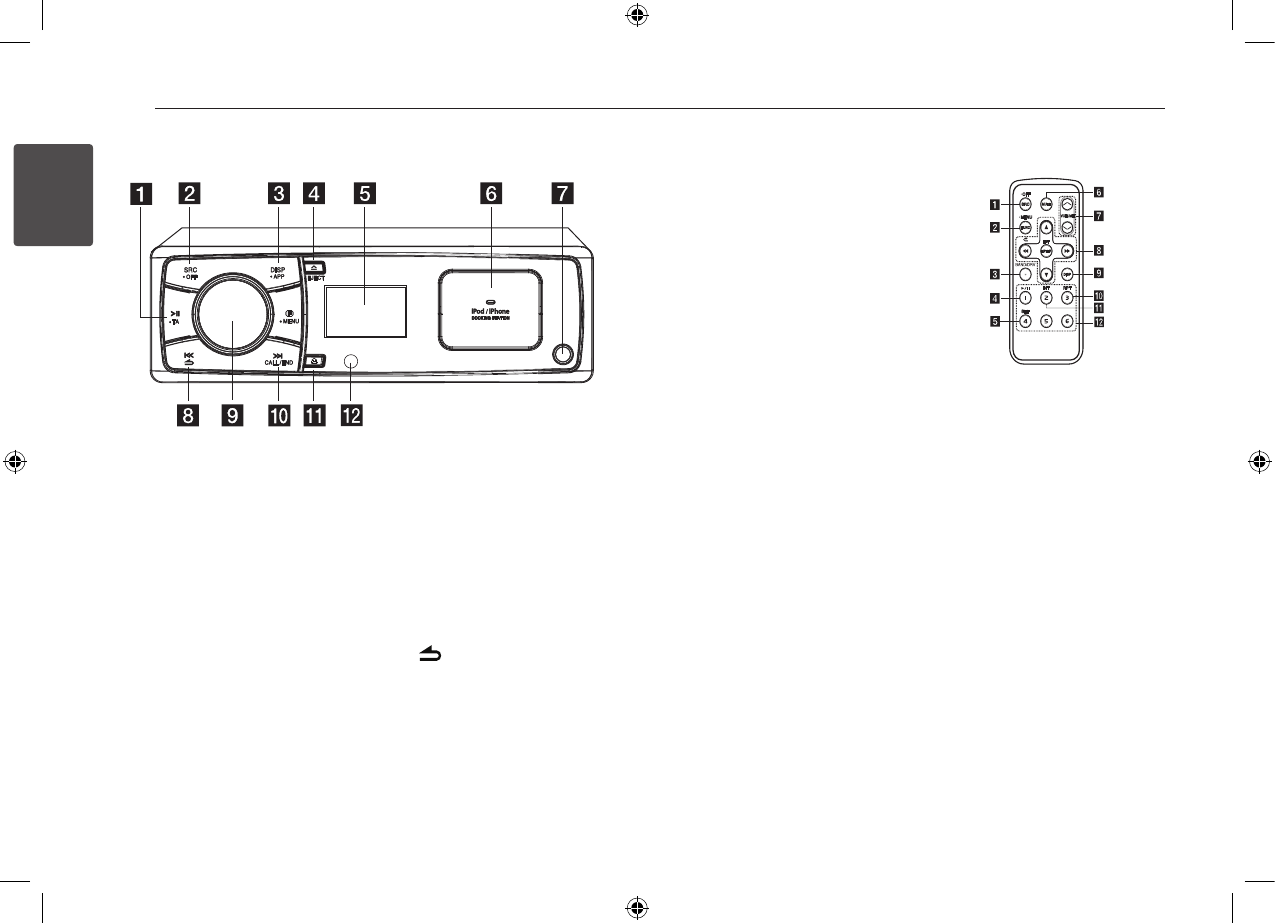
Getting Started
1
j U
Skip / Search / Seek / Tune
CALL/END
- Activates BT function.
- Answers a call.
k 6
Opens the front panel.
l Remote Sensor
Remote control
a SRC / • OFF
- When pressed, selects function
sources.
- When pressed and held, powers
unit o.
b FUNC
When pressed, sets playback items in
each mode.
• MENU
When pressed and held, activates
setting menu.
c BAND
Selects a band in Tuner mode.
DRV
Moves to a next USB drive.
d d/M Plays or pauses playback.
e SHF Shues playback.
f MUTE Temporarily stops the sound.
g VOLUME W / S
Adjusts volume level.
Front panel
a T
Plays and pauses playback.
• TA (Optional)
Searches stations that have TA / TP
information, when it is pressed and
held.
b SRC / • OFF
- When pressed, selects function
sources.
- When pressed and held, powers
unit on or o.
c DISP
- Press it, you can check the clock
time.
- Press and hold it, you can turn
on/o the display window and the
light of LED buttons.
• APP
Activates iPod/ iPhone CONTROL
MODE.
d R (EJECT)
Ejects a iPod/ iPhone DOCKING
STATION.
e Display window
f iPod/iPhone DOCKING STATION
g AUX
If connected to other portable player,
you can enjoy music from it on the
unit.
h Y
Skip / Search / Seek / Tune
Returns to the previous step.
i Volume knob
- Adjusts volume level.
- Confirms the settings.
- Checks tracks, les or preset
stations.

2 Connecting
Connecting 5
Connecting
2
h c / v
Skip / Search / Seek / Tune
Returns to the previous step.
w / s
- List up / down
- Adjusts settings.
- Moves 10 MP3 / WMA tracks
backward or forward if there is no
folder or one folder on a SD.
- Moves to the previous or next
folder if there are more than 2 folders
on a SD.
ENTER / LIST
- Conrms the settings.
-
Checks tracks, les or preset stations.
i DISP
- Press it, you can check the clock
time.
- Press and hold it, you can turn on/
o the display window and the light
of LED buttons.
j RPT
Repeats playback.
k INT
Intro scan.
l Numeric buttons (1 to 6)
Selects a numbered preset station in
TUNER.
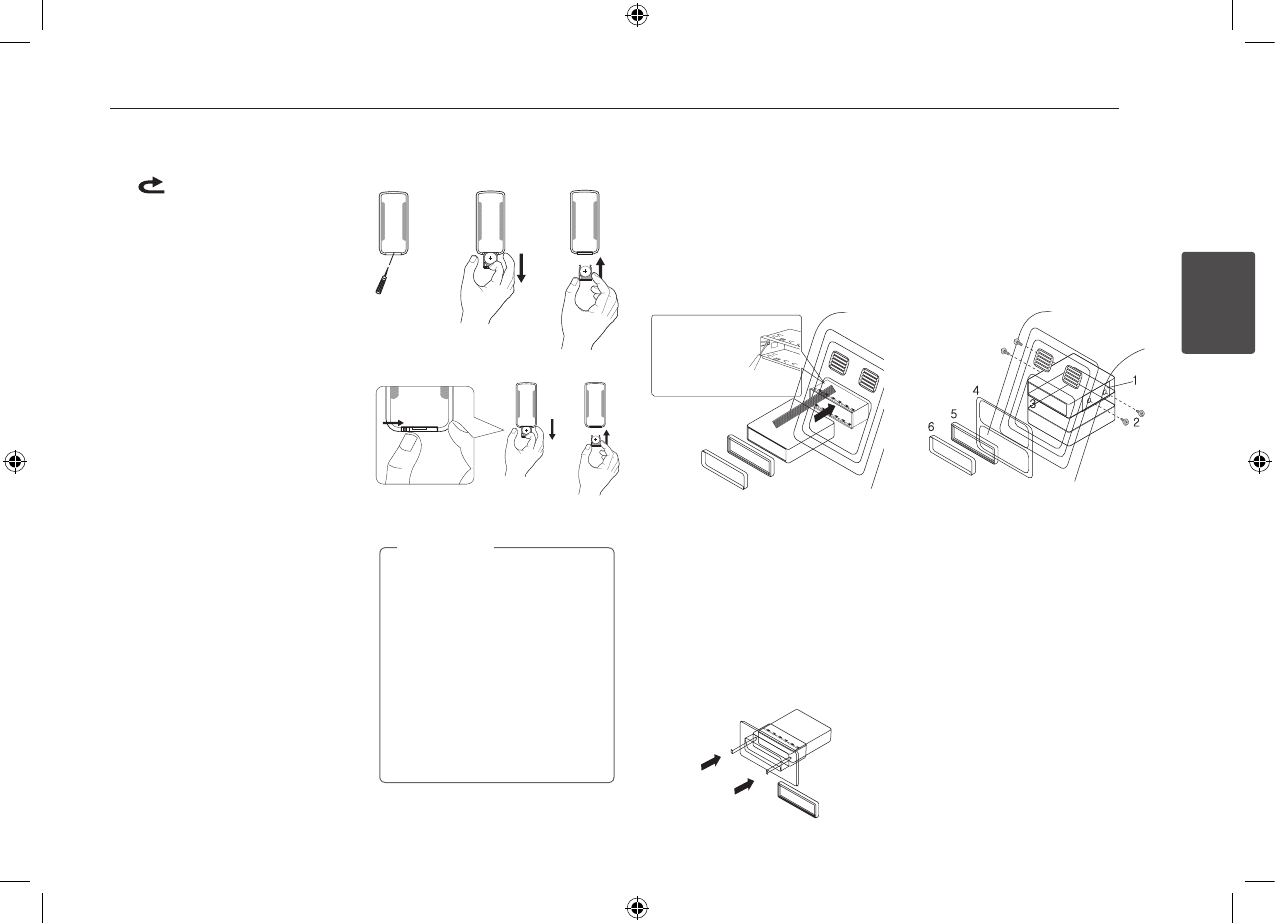
Battery Installation
Type 1
Type 2
2
1
1
yUse only one CR2025 (3 V) lithium
battery.
yRemove the battery if the remote
control is not used for a long
period of time.
yDo not leave the product in a hot
or humid place.
yDo not handle the battery with
metallic tools.
yDo not store the battery with
metallic materials.
, Note
Installation
Basic Installation
Before installing, make sure that the
ignition-switch is set to OFF and remove
the terminal of the car battery to avoid
short-circuiting.
Bend the claws
according to
the thickness of
the dashboard.
Control panel
1. Remove the existing receiver unit.
2. Make the necessary connections.
3. Install the installation sleeve.
4. Install the unit into the installation
sleeve.
Removing the existing
receiver unit
If there is already an installation sleeve for
the receiver unit in the dashboard, it must
be removed.
1. Remove the rear support from the unit.
2. Remove the control panel and trim
ring from the unit.
3. Insert the lever into the hole on one
side of the unit. Perform the same
operation on the other side and pull
the unit out from the mounting sleeve.
ISO-DIN Installation
Control panel
1. Slide the unit into the ISO-DIN frame.
2. Fit screws removed from the old unit.
3. Slide the unit and frame into the dash
opening.
4. Install the dash panel or adapter plate.
(According to models, this step may
not be needed.)
5. Install the trim ring to the unit.
6. Install the control panel to the unit.

Connecting6
Connecting
2
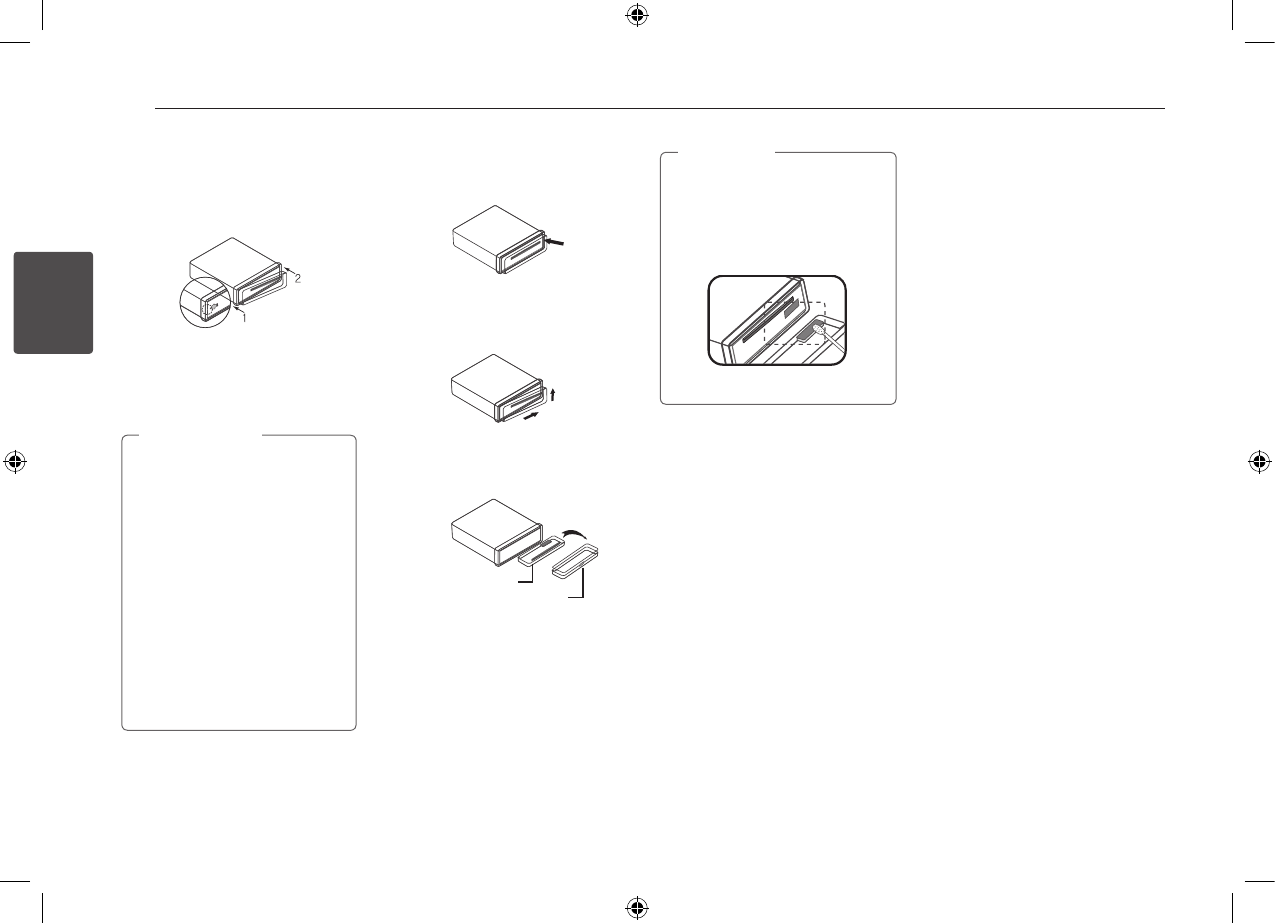
About detachable
control panel
Attaching the control panel
1. Align the left side of the panel with the
stopper.
2. Push the right side of panel into the
unit until it clicks.
yThe control buttons may not work
properly if the control panel is not
attached properly. If this occurs,
gently press the display.
yDo not leave the control panel
in any area exposed to high
temperatures or direct sunlight.
yDo not drop the control panel
or otherwise subject it to strong
impact.
yDo not allow such volatile agents
as benzine, thinner, or insecticides
to come into contact with the
surface of the control panel.
> Caution
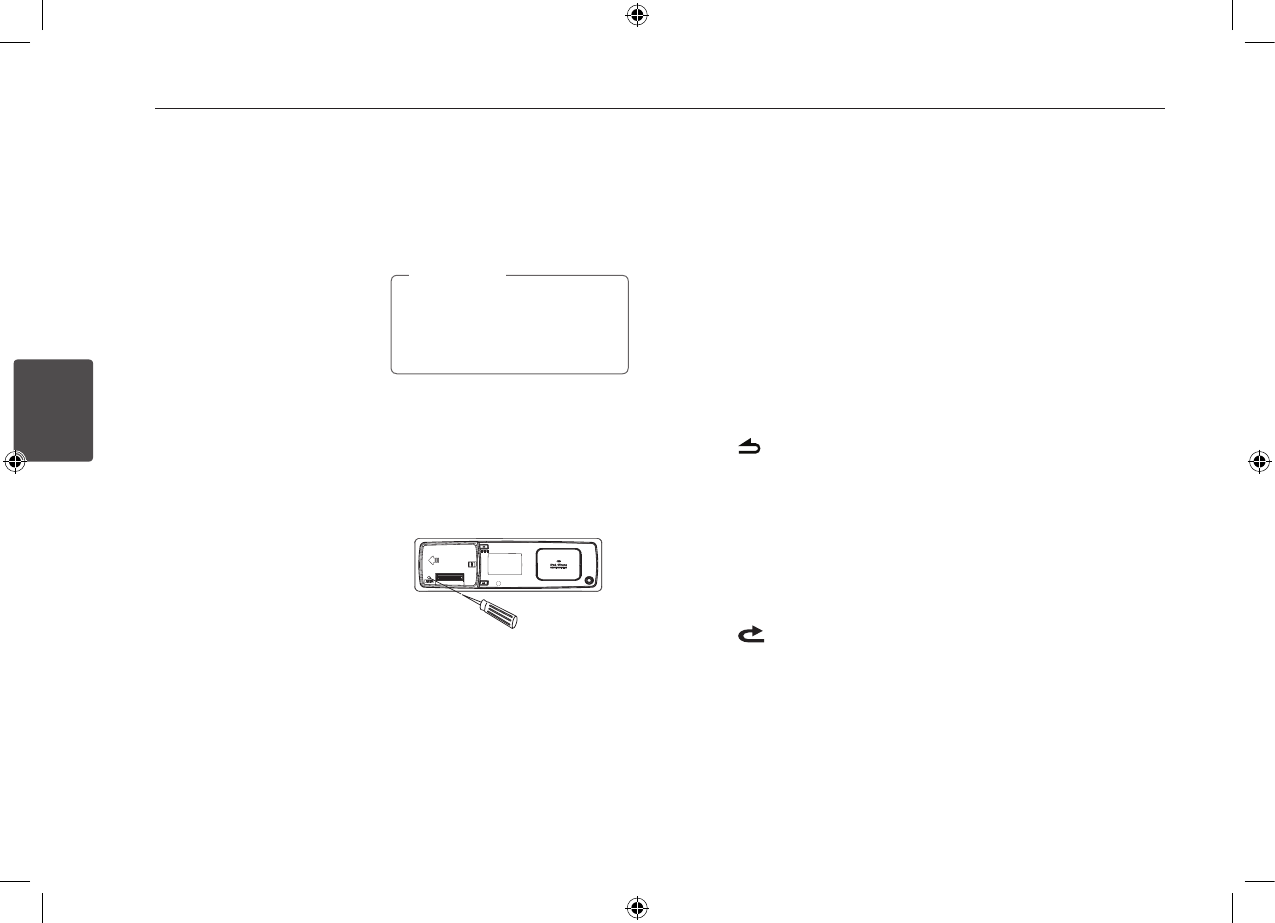
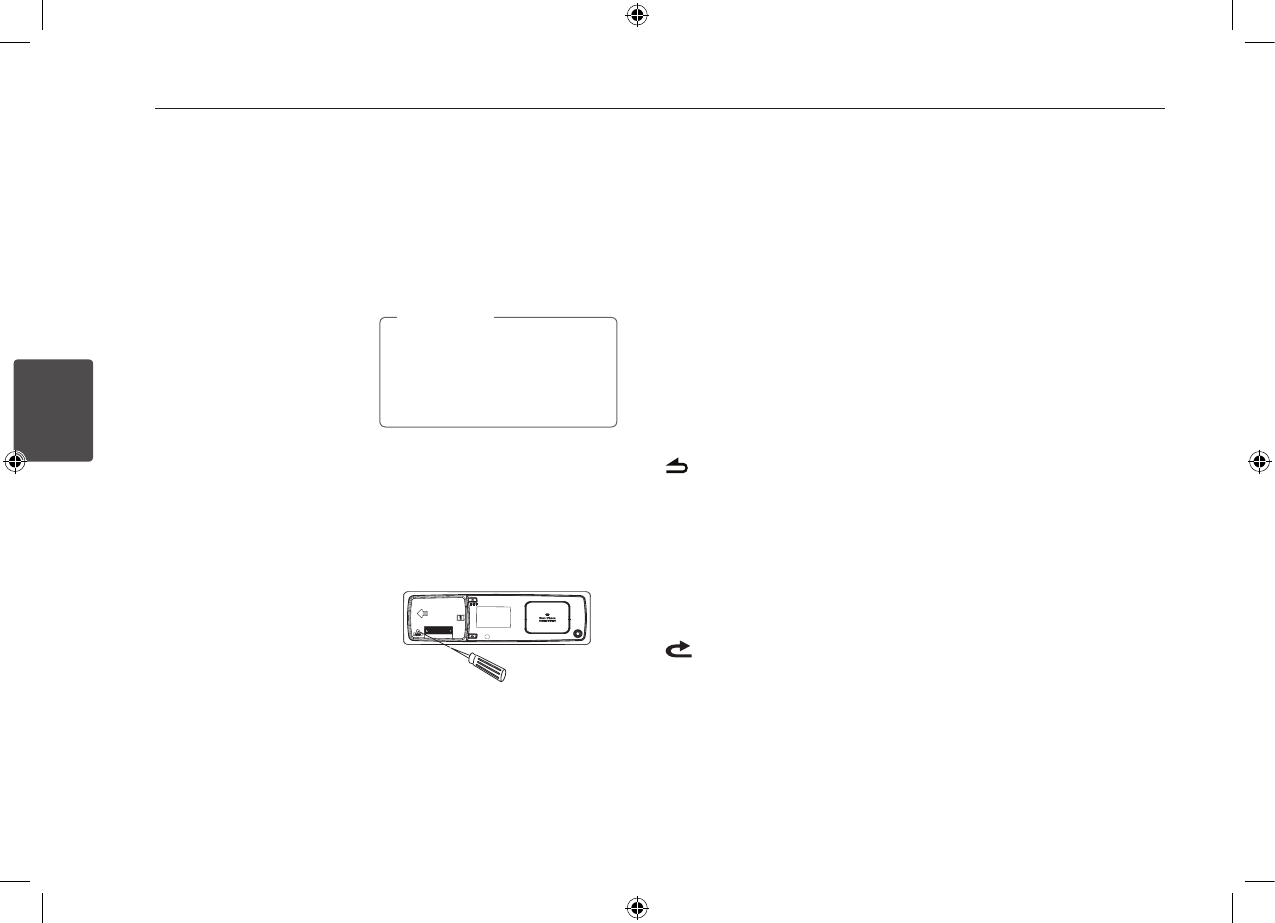
Detaching the control panel
1. Press the 6 to open the control
panel.
2. Lift the control panel slightly.
3. Push the control panel to right.
3
2
4. Pull the control panel out of the unit.
5. Put the detached control panel into
the protective case.
Control panel
Protective Case
Periodically wipe the contacts on
the back of the control panel with a
cotton swap moistened with alcohol.
For safety, turn o the ignition before
cleaning, and remove the key from the
ignition switch.
, Note

Connecting 7
Connecting
2
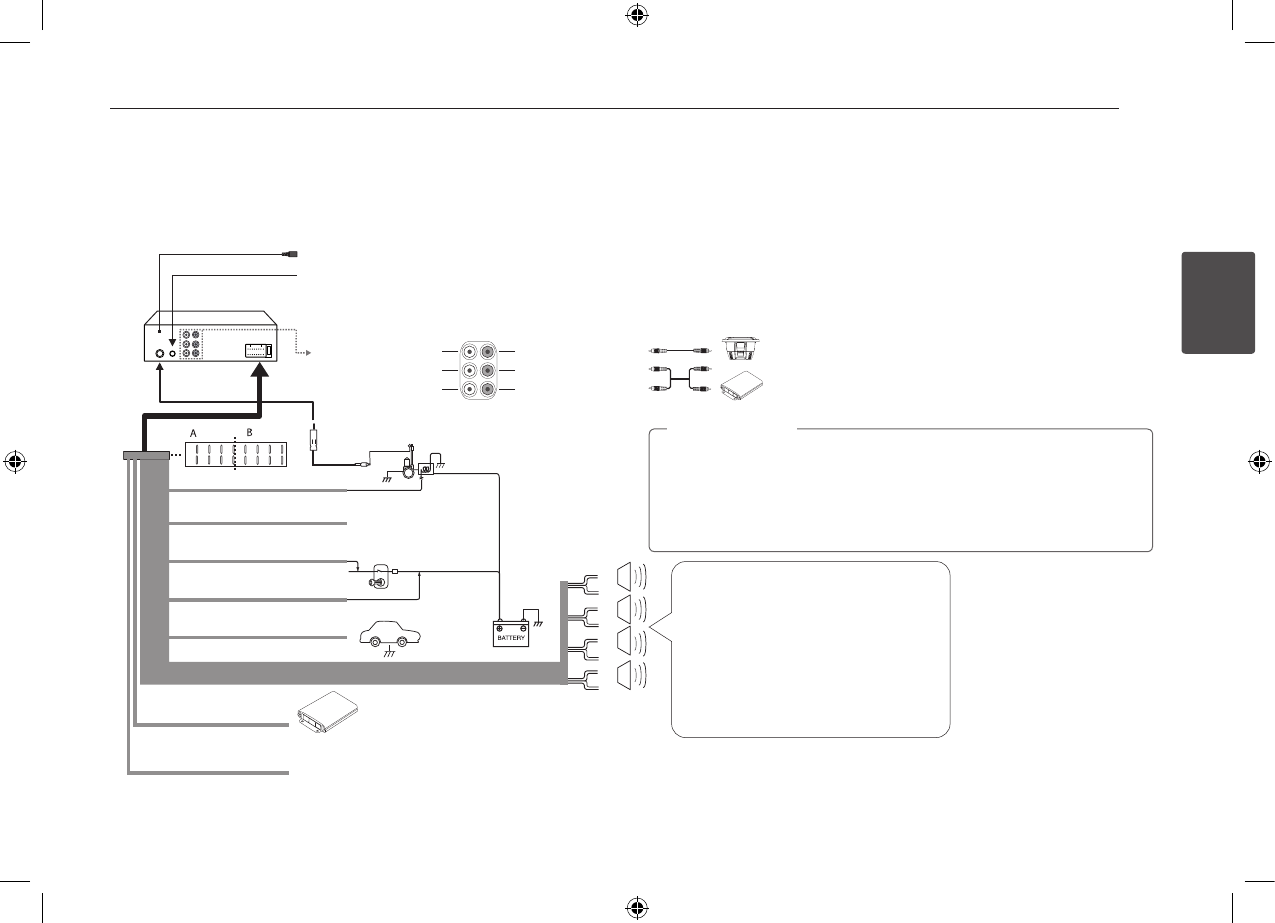
Connection
Connecting to a car
Before installing, make sure that the ignition-switch is set to OFF and remove the terminal of the car battery to avoid short-circuiting.
B a Not connected
abcd
efgh
abcd
efgh
a
b
c
d
e
f
g
h
A
A
A
A
A
A
A
A
A a Gray : Front Right +
A b Gray / Black Stripe: Front Right -
A c Violet : Rear Right +
A d Violet / Black Stripe: Rear Right -
A e White : Front Left +
A f White / Black Stripe: Front Left -
A g Green : Rear Left +
A h Green / Black Stripe: Rear Left -
Power
Antenna
Control Relay
To Audio out To Audio in
Amplier
Sub-woofer Left Sub-woofer Right
Front Left Front Right
Rear Left Rear Right
Amplier
B f Power Antenna (Blue)
B g Not connected
B c To Ignition (Red)
B h Ground (-) (Black)
B d To Battery (+) (Yellow)
B e Remote On
(Blue / White)
B b Not connected
Ignition Switch
Wired mic
Wired remote input (Black): Hard-wired control adapter can be connected.
Sub-woofer
When being connected in a wrong way, the unit displays as follows.
- Antenna / Remote port short: "ANTENNA/ REMOTE ON PORT SHORT CIRCUIT
CHECK"
After connecting it again, restart the unit.
> Caution
3 Operating
Operating8
Operating
3
Operation
Basic operations
1. Turn the unit on by pressing any key
on the unit.
2. Select a source by pressing SRC.
3. Rotate the volume knob to adjust the
volume on the unit.
Or press VOLUME W / S on the
remote control.
Turning off the sound
temporarily
1. Press MUTE to mute your unit.
Or press MUTE on the remote control.
2. Press it again to cancel
Using EQ (Equalizer)
EQ is to increase or decrease the signal
strength of audio frequencies. The
function helps you to enjoy sound more
plentifully.
Press EQ on the unit repeatedly. The
indicator lights up in the following order.
FLAT /XDSS+ / POP / CLASSIC /
ROCK / JAZZ / VOCAL / SALSA /
SAMBA / REGGAE / RUSSY / USER1
/ USER2
Using 3D SOUND
This mode delivers outstanding surround
sound.
1. Press and hold EQ/ • 3D.
2. Press and hold it again to cancel.
Checking the clock
1. Press DISP.
2. Press it again to cancel.
Turning off the display light
1. Press and hold DISP.
2. Press and hold it again to turn it on.
Under the light-o condition, press
any key, the light is turned on and
then o automatically if you don't
press it within a few seconds.
, Note
Resetting the unit
You can reset the unit when it does not
operate properly.
1. Detach the control panel.
Refer to page 6 for detaching the
control panel.
2. Press the RESET hole with a sharp
object.
Adjusting the general
settings
You can adjust [SOUND], [LIGHT] and
[OTHER] settings.
On the unit
1. Press and hold • MENU.
2. Rotate the volume knob to select
[SOUND], [LIGHT], or [OTHER] and press
it.
3. Rotate the volume knob to select the
item and press it.
4. Rotate the volume knob clockwise or
counterclockwise to adjust the level.
5. Press the volume knob to confirm the
setting.
If you want to return to the previous
step, press .
On the Remote Control
1. Press and hold FUNC / • MENU.
2. Press
w / s to select [SOUND], [LIGHT],
or [OTHER] and press ENTER.
3. Press
w / s to select the mode and
press ENTER.
4. Press
w / s to adjust the level.
5. Press ENTER to confirm the setting.
If you want to return to the previous
step, press .
For [SOUND] setting
You can adjust sound quality by adjusting
the level BAL (left/right speaker), FAD
(front/rear speaker), SW (Subwoofer), SW-F
(Subwoofer frequency), A-EQ (Auto EQ).
- When you set the EQ to USER 1/2 mode.
: You can adjust the level of BAS (bass),
MID (middle), TRB(treble).
ySW (Subwoofer)
You can adjust the volume of
subwoofer.
ySW-F (Subwoofer frequency)
OFF/ SW 55 Hz/ SW 85 Hz/ SW 120 Hz
You can enable the subwoofer.
yA-EQ (Auto EQ) ON / OFF
AUTO EQ operates only in the music
le supported with genre in the device.
When you set AUTO EQ to ON, POP,
CLASSIC, ROCK, or JAZZ is automatically
selected according to the music genre.
Operating 9
Operating
3
For [LIGHT] setting
You can adjust the light eects by
adjusting LED, DIM, or DIM LV.
yLED COL1 / COL2 / AUTO : You can
change the LED window color.
yDIM (Dimmer) OFF / ON : You can
change the brightness of the display
window during the power-on status.
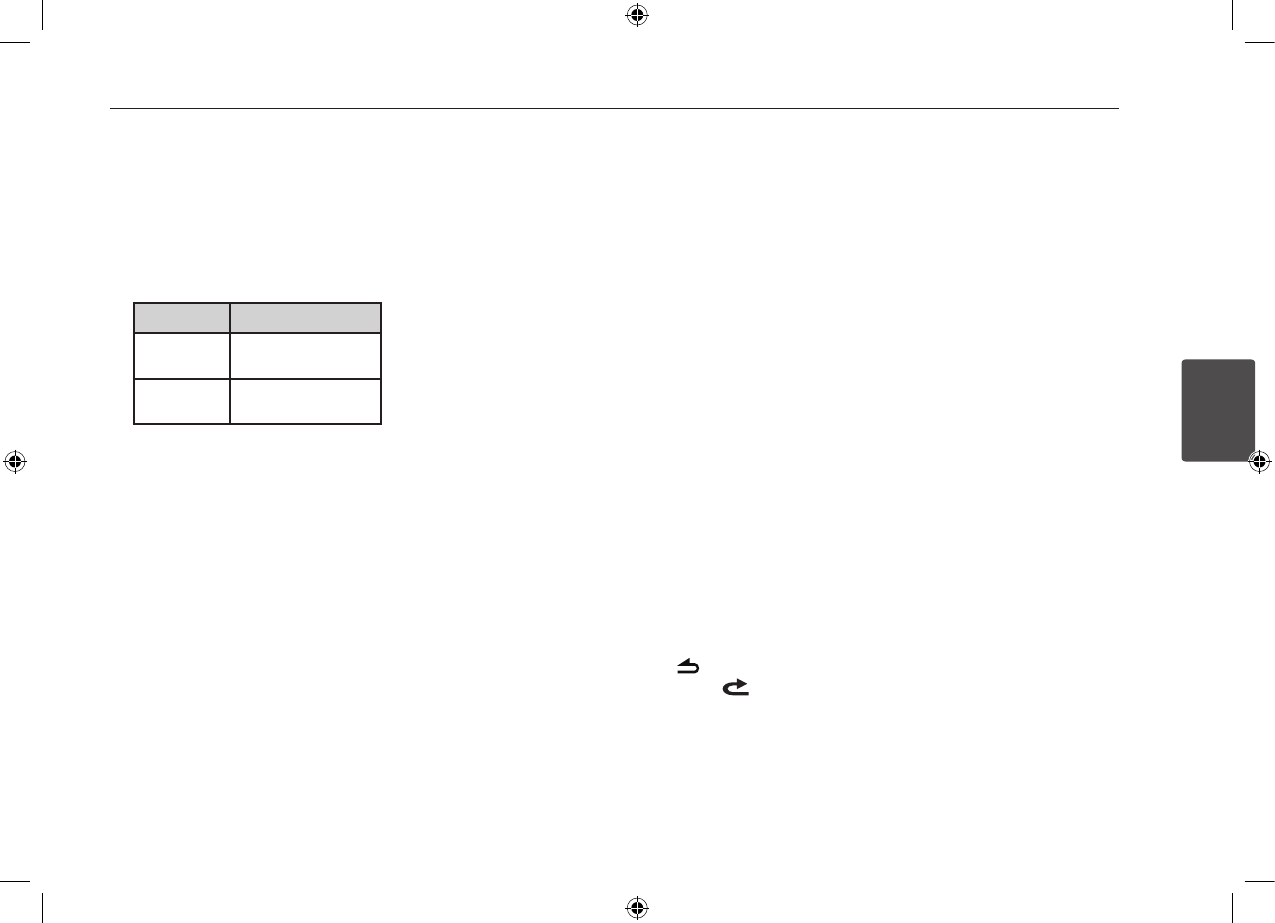
Settings Description
DIM ON The display window
becomes dark.
DIM OFF The display window
becomes bright.
yDIM LV (Dimmer Level) : When you set
DIM to ON, you can adjust the dimmer
level. (-2, -1, 0, +1, +2)
For [OTHER] setting
yAUX (Auxiliary) ON / OFF
It is possible to use auxiliary equipment
with this unit. Activate the auxiliary
setting when using auxiliary equipment
connected to this unit.
yDEMO OFF / ON
You can change the initial indication
on the display to information name
(function name, EQ name, etc...) while
listening to a source.
yBEEP 2ND / ALL
BEEP 2ND : The beep is generated
when a key is pressed for longer than 2
seconds.
BEEP ALL : The beep is generated when
any key is pressed.
yCLK (Clock)
For the model RDS is not supported unit
or even for a RDS supported unit.
- When RDS CT information is not
received and then you set CT to OFF,
you can adjust the time by yourelf. Set
the clock as follows ;
1. Select a source to TUNER.
2. Press the FUNC to select the CT and
then set CT to OFF. (Refer to the
" Adjusting TUNER settings " on
the page 11 for setting the CT
(Clock Time) ON / OFF.)
3. Press and hold • MENU on the unit to
select [OTHER] and then select CLK
by rotating the volume knob.
4. Set the hour by rotating the volume
knob.
5. Press the volume knob to confirm
the hour.
6. Set the minute by rotating the
volume knob.
7. Press the volume knob to confirm
the minute.
- When RDS CT information is received;
The clock is displayed according to
the RDS CT information.
- When RDS is not supported, set the
clock according to 3 to 7 steps.
Listening to music from
an external device
1. Connect an external device to the AUX
jack with line input cable.
2. Select a source to AUX.
3. Play the connected Auxiliary
Equipment.
Preventing radical changes in
volume as switching sources
Only when you set AUX to ON as
switching sources, you can adjust the
volume level of each source to prevent
radical changes in volume by selecting
GAIN 0 / +6.
1. Press FUNC on the unit.
Or press FUNC / • MENU on the remote
control.
2. Rotate the volume knob on the unit.
Or press w / s on the remote control
to set the option. (GAIN 0 / +6)
3. Press the volume knob on the unit.
Or press ENTER on the remote control
to confirm the setting.
4. If you want to return to the previous
step, press .
Or press on the remote control.
Listening to the radio
1. Press SRC repeatedly to select a source
to TUNER.
2. Press BAND repeatedly to select a
desired band.
3. For manual search, press and hold
Y/U on the unit until “MANUAL“
is displayed. Then press it repeatedly to
select a desired frequency.
Or press and hold c / v on the
remote control.
For auto search, press Y/U on
the unit. Then “SEARCH” is displayed.
(Except MW)
Or press c / v on the remote
control.
Storing desired frequencies
manually
1. Press BAND to select a desired band
you want to store.
2. Select the desired frequency by using
Y/U on the unit.
Or use c / v on the remote
control.
3. Press the volume knob and rotate the
volume knob to select a preset station
among 1 to 6 and then press and hold
the volume knob until the beep sound
is heard.
Or press and hold one of preset
buttons among 1 to 6 on the remote
control until the beep sound is heard.
4. Repeat steps 1 to 3 to preset other
stations.

Operating10
Operating
3
When a station is stored on the
preset numbers on which another
station of the same band has already
been preset, the previously preset
station is automatically erased.
, Note
Listening to a preset station
1. Press BAND repeatedly to select a
desired band.
2. Press the volume knob on the unit.
Or press ENTER on the remote control.
3. Rotate the volume knob to select a
preset station.
Or press w / s on the remote control.
4. Press the volume knob.
Or press ENTER on the remote control.
Or
Press BAND and then press the desired
preset button among 1 to 6 on the
remote control.
Adjusting TUNER settings
On the unit
1. Press FUNC.
2. Rotate the volume knob to select an
item and press it.
3. Rotate the volume knob to set the
option and press it.
4. If you want to return to the previous
step, press .
On the Remote Control
1. Press FUNC / • MENU.
2. Press
w / s to select an item and press
ENTER.
3. Press
w / s to set the option and press
ENTER.
4. If you want to return to the previous
step, press .
yPTY (Program type, RDS (OPTIONAL))
It searches the radio stations by
program type of FM tuner.
The program types are displayed as
follows.
NEWS FINANCE EASY M
AFFAIRS CHILDREN LIGHT M
INFO SOCIAL CLASSICS
SPORT RELIGION OTHER M
EDUCATE PHONE IN JAZZ
DRAMA TRAVEL COUNTRY
CULTURE LEISURE NATION M
SCIENCE DOCUMENT OLDIES
VARIED POP M FOLK M
WEATHER ROCK M
yA / S (Auto Store)
The six strongest broadcasting
frequencies will be stored under preset
button 1 to 6 in the order of their signal
strength. To cancel, press the volume
knob.
yP / S (Preset scan)
Each preset station appears. To cancel,
press the volume knob.
ySENS (Tuner sensitivity) MID / HI / LOW
In an area in which signal reception is
weak, it helps the tuner to search more
stations. The weaker the reception is,
the lower option you should set to.
RDS (OPTIONAL)
yAF (Alternative Frequency) ON / OFF
When the reception quality drops, the
tuner automatically changes to another
station in the network, broadcasting a
better reception quality, using the PI
and AF codes.
yREG (Region) ON / OFF
REG ON : The unit switches to another
station, within the same network,
broadcasting the same program when
the receiving signals from the current
station become weak.
REG OFF : The unit switches to another
station, within the same network when
the receiving signals from the current
station become weak. (In this mode,
the program may dier from the one
currently received.)
yTA (Trac Announcement) ALARM /
SEEK
TA ALARM : When the tuned station
has no TP information for 5 seconds, a
double beep sound is output.
TA SEEK : When the tuned station does
not receive TP information for 5 seconds,
the receiver retunes to the next station
that has the TP information.
yPI (Programme Identication) SOUND /
MUTE
PI SOUND : When the frequency
of a tuned station switches to an
AF (Alternative frequency) with an
unidentied PI, it keeps the sound.
PI MUTE : When the frequency of a
tuned station switches to an AF with an
unidentied PI, it mutes the sound until
the PI is identied.
yCT (Clock Time) ON / OFF
You can use the RDS CT information
to update the time. When RDS CT
information is not received and then
you set CT to OFF, you can adjust the
time by yourself. Refer to the page 9 for
setting the clock.
Operating 11
Operating
3
Using an SD card
1. Open the USB cover.
2. Connect the USB device.
3. Press SRC repeatedly to select a source
to USB.
Pausing or restarting SD
card playback
1. PressT on the unit to pause
playback.
Or press d/M on the remote control.
2. Press it to resume playback.
Searching for a section
within a file
1. Press and hold Y/U on the unit
for about 1 second during playback.
Or press and hold c / v on
remote control.
2. Press
T on the unit at the point you
want.
Or press d/M on the remote control.
Skipping to another file
Press Y/U on the unit.
Or press c / v on the remote
control.
To skip to previous le, press briey
Y within 3 seconds of playing
time.
, Note
Checking information about
your music
MP3 / WMA les often come with tags.
The tag gives the Title, Artist or Album.
Press DISP repeatedly during MP3 / WMA
le playback. If there is no information,
"NO TEXT" will be shown in the display
window.
Playing back files in a way
you want
For using applicable buttons
1. Press INT / RPT / SHF.
2. Press it again to cancel.
Or
Using the FUNC button
On the unit
1. Press FUNC.
2. Rotate the volume knob to select an
item and press it.
3. Rotate the volume knob to select the
option.
4. Press the volume knob to set the
option.
If you want to return to the previous
step, press .
On the Remote Control
1. Press FUNC / • MENU.
2. Press
w / s to select an item and press
it.
3. Press
w / s to select the option.
4. Press ENTER to set the option.
If you want to return to the previous
step, press .
yRPT (Repeat)
The current selected le (1 RPT) or les
in the current selected folder ( RPT)
is played repeatedly.
ySHF (Shue)
All les (SHF) or each les in the current
selected folder ( SHF) are played
randomly. During random playback,
even if you press Y, you won't go
back to the previous le.
yINT (Intro Scan)
The rst 10 seconds of all les (INT) or
each les in the current selected folder
( INT) are played.
Quick search of a desired file
1. Press the volume knob on the unit.
Or press ENTER on the remote control.
2. Rotate the volume knob on the unit
to select a desired ROOT or folder and
press it.
Or press w / s and press ENTER on the
remote control.
3. Rotate the volume knob on the unit to
select a desired file and press it.
Or press w / s and press ENTER on the
remote control.
The making of unauthorized copies
of copy-protected material, including
computer programs, les, broadcasts
and sound recordings, may be an
infringement of copyrights and
constitute a criminal oense. This
equipment should not be used for
such purposes.
Be responsible
Respect copyrights
Operating12
Operating
3
Listening to music by
connecting iPod/iPhone
You can enjoy iPod / iPhone-stored music
on the unit by connecting it to the USB
connector using the appropriate cable.
1. Open the USB cover.
2. Connect the iPod / iPhone.
3. Press SRC to select a source to USB.
Pausing or restarting
playback
1. Press
T on the unit to pause
playback.
Or press d/M on the remote control.
2. Press it to resume playback.
Searching for a section
within a file
During playback, press and hold Y/
U and then release at a point you want.
Skipping to another file
Press Y/U on the unit.
Or press c / v on the remote
control.
Or
1. Press the volume knob on the unit.
Or press ENTER on the remote control.
2. Rotate the volume knob on the unit to
select a desired category and press it.
Or press w / s and press ENTER on the
remote control.
3. Rotate the volume knob on the unit to
select a desired file and press it.
Or press w / s and press ENTER on the
remote control.
Checking information about
your music
MP3 / WMA les often come with tags.
The tag gives the Title, Artist or Album.
Press DISP repeatedly during MP3 / WMA
le playback. If there is no information,
"NO TEXT" will be shown in the display
window.
Playing back files in a way
you want
On the Unit
1. Press FUNC.
2. Rotate the volume knob to select an
item and press it.
3. Rotate the volume knob to select the
option.
4. Press the volume knob to set the
option.
If you want to return to the previous
step, press .
On the Remote Control
1. Press RPT / SHF.
2. Press it again to cancel.
Or
1. Press FUNC / • MENU.
2. Press
w / s to select an item and press
ENTER.
3. Press
w / s to select the option.
4. Press ENTER to set the option.
If you want to return to the previous
step, press .
yRPT (Repeat)
The current selected le (1 RPT) or
les on the iPod / iPhone is played
repeatedly.
ySHF (Shue)
Each le in the currently selected album
( SHF) or all of the les (SHF) on the
iPod / iPhone are played randomly.
During random playback, even if you
press Y, you won't go back to the
previous le.
ySPD (BOOK SPEED)
You can adjust the audiobook speed of
iPod / iPhone to NOR (Normal), SLOW or
FAST.
Playing back files by music
menus
You can check les by music menus and
play it back.
The music menus are as follows.
PLAYLISTS / ARTISTS / ALBUMS /
GENRES / SONGS / COMPOSER /
AUDIO BOOK / PODCAST / ...
1.
Press the volume knob on the unit.
Or press ENTER on the remote control.
2. Rotate the volume knob on the unit to
select a music menu and press it.
Or press w / s on the remote control.
3. Rotate the volume knob on the unit to
select a file.
Or press w / s on the remote control.
4. Press the volume knob on the unit to
confirm the setting.
Or press ENTER on the remote control.
5. If you want to return to the previous
step, press .
Or press on the remote control.
iPod / iPhone CONTROL
MODE
You can control on the unit and iPod /
iPhone.
yPress iPOD on the unit. Then playback
is paused. And you can control on the
unit and iPod / iPhone.
yWhile using the iPod/iPhone CONTROL
MODE, any functions are not available
on the unit.
yPress iPOD again to cancel the iPod /
iPhone CONTROL MODE.
Compatible iPod / iPhone
models
yiPod classic
yiPod nano 6th generation
yiPod touch 4th generation
yiPhone 3G / 3GS / 4
We recommend that you use the
OS Version 4.2.1 or more.
Operating 13
Operating
3
“Made for iPod” and “Made for iPhone”
mean that an electronic accessory has
been designed to connect specically
to iPod or iPhone respectively, and has
been certied by the developer to meet
Apple performance standards. Apple is
not responsible for the operation of this
device or its compliance with safety and
regulatory standards.
Please note that the use of this accessory
with iPod, iPhone may aect wireless
performance.
Connecting a Bluetooth
wireless technology
Before you start the pairing procedure,
make sure the Bluetooth wireless
technology is turned on in to your phone.
Refer to your phone’s user guide. Pairing
links your unit and phone with Bluetooth
wireless technology, and is required only
once for the initial setup. If the connection
is successful, the phone is registered
(Device 1 to 10). The process of pairing
may be dierent depend on the phones.
The PIN CODE is 1234.
ON PLAYER
1. Enter the menu. BT
2. Find the
"CONNECT" menu.
Rotate the
volume knob
3. Enter the
"CONNECT" menu.
Press the
volume knob
4. Select the
"SEARCH" menu.
Rotate the
volume knob
5. Search the phones
supported Bluetooth
wireless technology.
Press the
volume knob
6. Select a phone you
want to connect.
Rotate the
volume knob
7. Connect the
phone.
Press the
volume knob
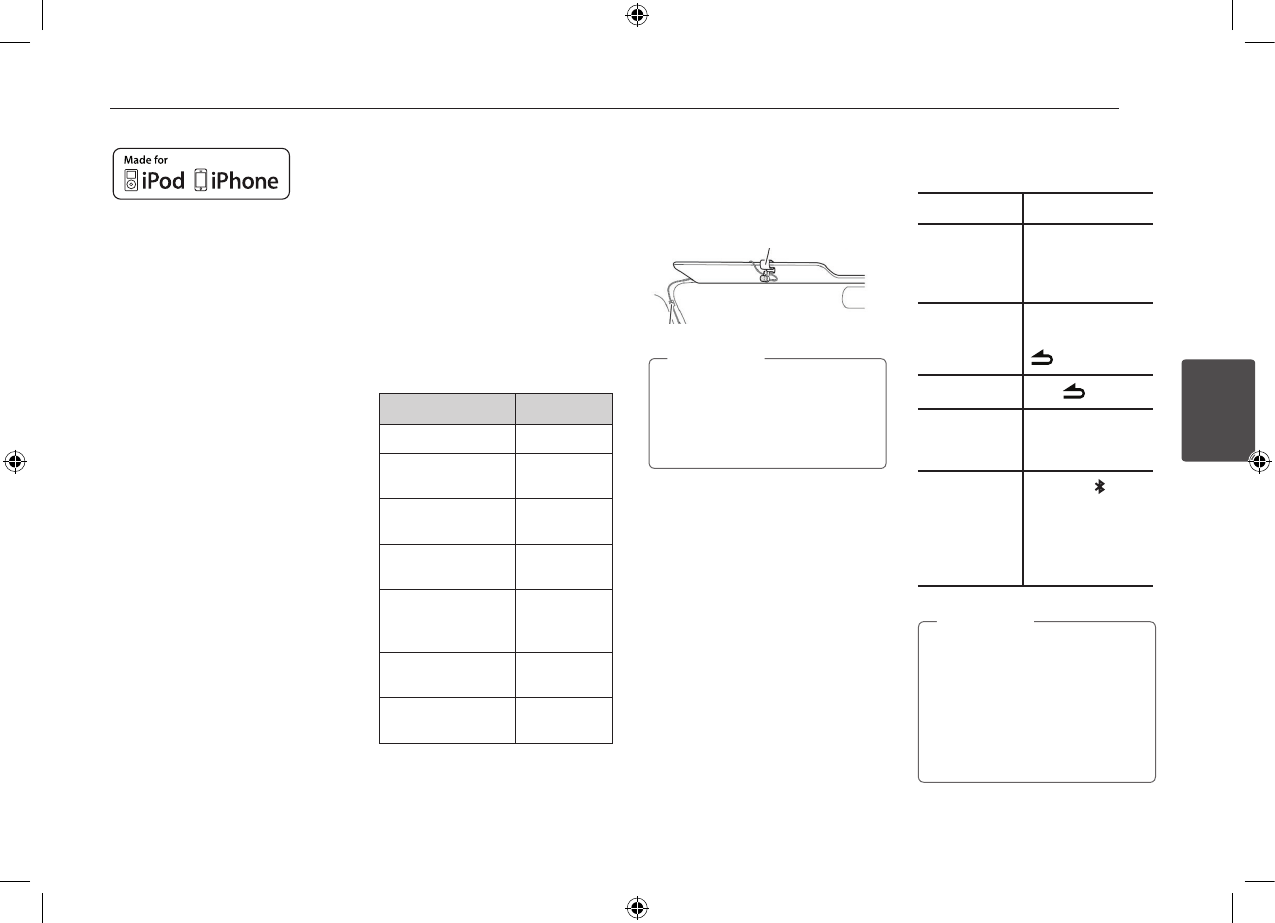
Microphone
The microphone needs to be close to
and pointed toward the person speaking.
Install the microphone as shown below.
Microphone unit
If you power o the unit while talking
on the phone through the unit by
using the BT function, the function is
deactivated and you can talk on the
phone directly.
, Note
Using a Bluetooth wireless
technology
To Do this
Disconnecting
a phone
(BT -> CONNECT ->
LIST -> Connected
device name ->
DISCONN).
Answering and
Ending a call
press BT
To end a call, press
Rejecting a call press
Making a call
saved as a
preset number
Press BT and a
preset number (1 to
6).
Checking
missed calls
When the “ ? ”
appears, go to the
menu (BT-> CALL
-> LASTCALL). You
can check the list of
missed call.
yThe lists of LASTCALL are sorted
from newest to oldest entries.
yWhen you want to make an
international call, press U to add
“+” and to delete it press again.
y“+” can only be added when the
detail list of LASTCALL is selected.
, Note

Operating14
Operating
3
Audio transfer
It is possible to switch the audio
connection between your phone
equipped with Bluetooth wireless
technology and this unit.
1. Press BT to answer the call.
2. Press BT again. The “PRIVATE” is
displayed.
If the private mode is selected on the unit,
press BT to return to the call to handsfree
mode.
Playing MP3 files
When you turn Bluetooth on, your device
supported Bluetooth wireless technology
displays “Bluetooth” on the home screen.
The Bluetooth remains on until you turn
the device o. Press SRC repeatedly to
select “BT”. To play an MP3 le stored on
your device. Refer to the phone’s user
guide for using this function. This feature
is only available on phones with A2DP
(Advanced Audio Distribution Prole).
Bluetooth wireless technology
profiles information
In order to use Bluetooth wireless
technology, devices must be able to
interpret certain proles. This unit is
compatible with following proles.
GAP (Generic Access Prole)
HFP (Hands Free Prole)
GAVDP (Generic Audio / Video Distribution
Prole)
A2DP (Advanced Audio Distribution
Prole)
AVRCP (Audio / Video Distribution Remote
Control Prole)
PBA / PBAP (Phone Book Access Prole)
Adjusting the setting
1. Press BT.
2. Rotate the volume knob to select an
item and press it.
3. Rotate the volume knob to set the
option and press it.
4. If you want to return to the previous
step, press .
CALL
yLASTCALL
Phone number list (Received, Dialed,
Missed). CALL -> LASTCALL -> Select
the phone number -> Press the volume
knob -> Display the information -> Press
the volume knob -> DIAL, SAVE, DELETE
menu will be displayed.
- To call the phone number, DIAL ->
Press the volume knob.
- To save the phone number, SAVE ->
Press the volume knob -> select the
preset number (1 to 6) -> Press the
volume knob.
-
To delete the selected phone number,
DELETE ->
Press the volume knob ->
NAME -> Press the volume knob.
-
To delete all phone number, DELETE ->
Press the volume knob -> ALL -> Press
the volume knob.
yDIAL
Enters the number directly on the unit.
To select the 0 to 9 rotate the volume.
Press U to make the phone number.
To call it, Press the volume knob.
yPRESET
Checks and deletes/dials the phone
number saved preset number.
CALL -> PRESET -> Select the preset
number and press the volume knob
-> Display the information -> Press the
volume knob -> DIAL, DELETE menu
will be displayed.
- To call the phone number, select DIAL
and Press the volume knob.
- To delete the selected phone number,
DELETE -> NAME -> Press the volume
knob.
- To delete all phone number, DELETE ->
ALL -> Press the volume knob.
CONNECT
yLIST
Checks the list of the Connected Device
Name.
ySEARCH
Searches the phones available to
connect. The Connected Device Name
is displayed on the top.
Operating 15
Operating
3
SETUP
yVISIBLE
Makes it is impossible to search this unit.
(SHOWN <-> HIDDEN)
yAUTO CON
Adjusts connection with automatically
or not. (ON <-> OFF)
yAUTO ANS
Adjusts answering automatically or not.
(MANUAL <-> AUTO)
yMIC VOL
Adjusts microphone volume on the
phone from 1 to 5. While you are on
the phone with Bluetooth wireless
technology, press Y/U (or c /
v on the remote control) to adjust
the MIC volume.
yREDIAL
Adjusts the counts of redial. (1 TIME <->
2 TIMES)
INFO
yNAME
Changes the name of this unit.
yADDRESS
Checks the address.
yPIN-CODE
Changes the PIN code. Default is 1234.
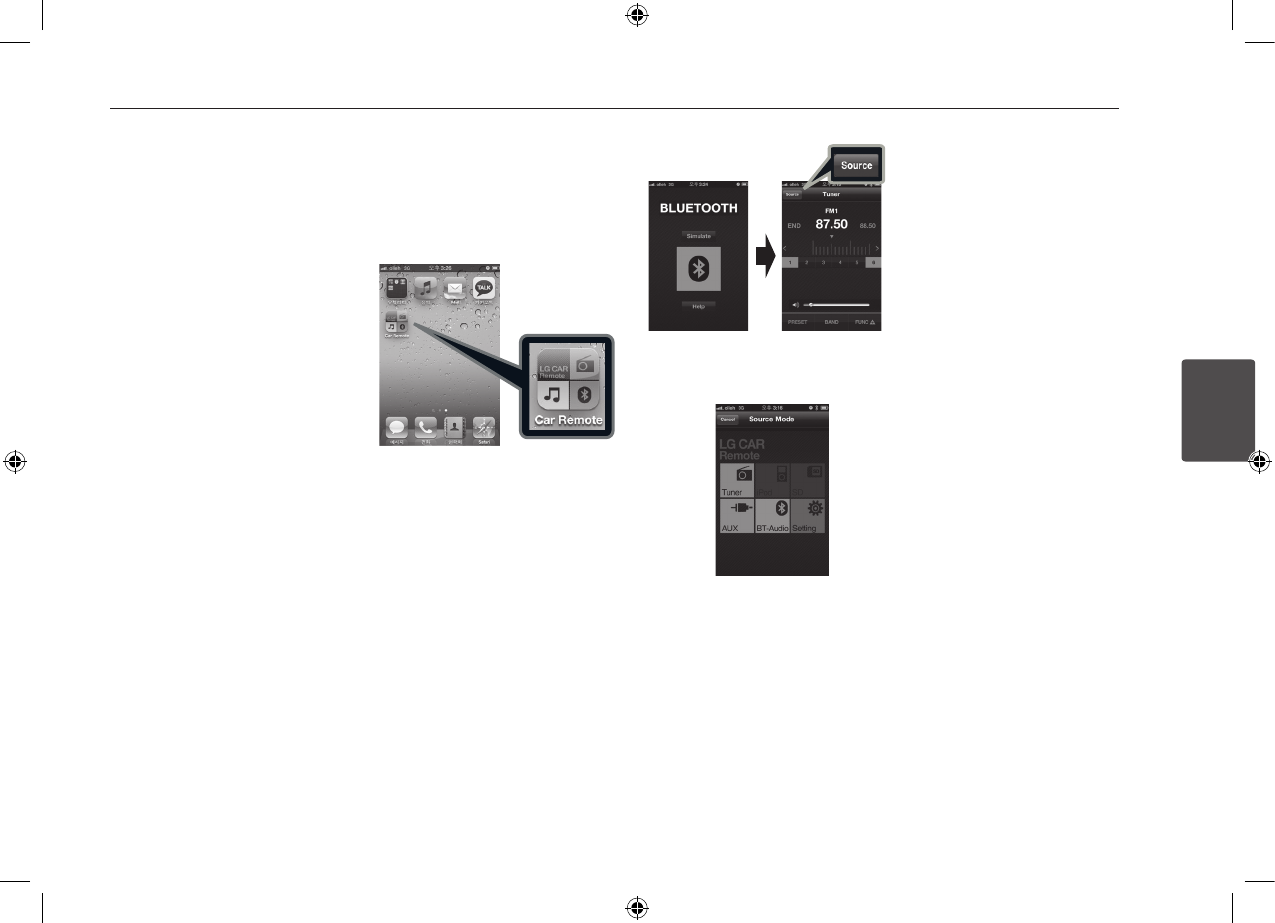
WICS (Wireless Controller &
Synchronization)
You can control the unit by using the
"WICS" application.
1. Search the “WICS” application and
install it.
[Displays installed "WICS" application]
2. Pairing links your unit and iPhone with
Bluetooth wireless technology. (Refer
to the page 15.)
3. When you run the “WICS” application,
activating source is displayed after
initial screen. Then you can control the
unit on iPhone.
[Initial screen] [Tuner screen]
You can select a source by pressing
"SOURCE".
[Source Mode screen]
Appendix16
Appendix
5
Phone compatibility list
Bluetooth list and manufacturing company applicable.
A : Audio Streming H : Handsfree P : Phonebook Sync
Company List H A P Company List H A P Company List H A P Company List H A P
Nokia E61
5200
N80
N70
N72
N91
3250
6110
6288
E90
N73
N95
N77
E71
E75
N97
5800 (Xpress
music)
C6
E5
E52
X6
N97-1
N900
6710 (Navigator)
0
0
0
0
0
0
0
0
0
0
0
0
0
0
0
0
0
0
0
0
0
0
0
0
0
0
0
0
0
0
0
0
0
0
0
0
0
0
0
0
0
0
0
0
0
0
0
0
0
0
0
0
Motorola
SAMSUNG
ROKR E6
V3x
RIZR K1
V9
Z8
V9r
XT701
XT720
(MOTOROI)
Milestone
Droid
D900
SGH-U600
SGH-Z240
SGH-F300
SGH-E890
SGH-E950
SGH-F210
SGH-G600
i-900
F330
F480
L878
M8800 PIXON
S5603
0
0
0
0
0
0
0
0
0
0
0
0
0
0
0
0
0
0
0
0
0
0
0
0
0
0
0
0
0
0
0
0
0
0
0
0
0
0
0
0
0
0
0
0
0
0
SAMSUNG
SONY
ERICSSON
S8003 JET(8GB)
i8510 INNOV8 (16G)
i8910 Omnia HD
U808
B5722
B7330 (Omnia Pro)
B7620 (Giorgio
Armani)
C3303K (Champ)
M5650U (Lindy)
M8910 (Pixon12)
S7350
S8500 (Wave)
i5503 (Galaxy 5)
i5700 (Galaxy Spica)
i9000 (Galaxy S(16G))
T959
Galaxy Tab
W880
Z610
W300
K800i
P990i
W910i
C702i
0
0
0
0
0
0
0
0
0
0
0
0
0
0
0
0
0
0
0
0
0
0
0
0
0
0
0
0
0
0
0
0
0
0
0
0
0
0
0
0
0
0
0
0
0
0
0
0
0
0
0
0
0
0
0
0
0
0
0
0
0
0
0
0
0
0
SONY
ERICSSON
LG
G705
W595
W705
W980i
Xperia-X1
Vizaz
Xperia-X2
Xperia-X10
KE850
KU250
KU970
KS10
KC550
KC780
KC910(Renoir)
KF350(IceCream)
KF600
KF700
KF750(Secret)
KF900(PRADA2)
KM380
KM900(Arena)
KP500(Cookie)
KT520
0
0
0
0
0
0
0
0
0
0
0
0
0
0
0
0
0
0
0
0
0
0
0
0
0
0
0
0
0
0
0
0
0
0
0
0
0
0
0
0
0
0
0
0
0
0
0
0
0
0
0
0
0
0
0
0
0
0
Appendix 17
Appendix
5
Bluetooth list and manufacturing company applicable.
A : Audio Streming H : Handsfree P : Phonebook Sync
Company List H A P Company List H A P
LG
Rim
KT610
KU990
GD900
BL40 (New
Chocolate)
KM335
GD510 (POP)
GD880
GM730
GS500 (Cookie Plus)
GT505
GT540
GW305
GX500
Bold 9700
Storm2 9550
0
0
0
0
0
0
0
0
0
0
0
0
0
0
0
0
0
0
0
0
0
0
0
0
0
0
0
0
0
0
0
0
0
0
0
0
0
0
0
0
APPLE
ASUS
HTC
iPhone
iPhone 3GS
(16GB)
iPhone 3GS
(32GB)
iPhone 4G
(16GB)
I-Pad
P750
Goole G1
Magic G2
Hero G3
Touch2
Legend
Nexus One
Desire
0
0
0
0
0
0
0
0
0
0
0
0
0
0
0
0
0
0
0
0
0
0
0
0
0
0
0
0
0
0
0
0
yWhen the phone features <Bluetooth Power Save> function, you should make the
function turned on to maintain connection.
yWhen you switch the call mode from handsfree to phone, the connection may be
disconnected.
ySome phones don’t support Reject function.
yLow battery in phone may cause the problems.
, Note
“The Bluetooth word mark and logos are owned by the Bluetooth SIG, Inc. and any use of
such marks by LG Electronics is under license. Other trademarks and trade names are those
of their respective owners.”
Bluetooth® wireless technology is a system which allows radio contact between electronic
devices within a max range of 10 meters.
Connecting individual devices under Bluetooth® wireless technology does not incur any
charges. A mobile phone with Bluetooth® wireless technology can be operated via the
Cascade if the connection was made via Bluetooth® wireless technology.
Operating condition for using a Bluetooth wireless
technology function
yClose windscreen.
yTurn o the air conditioner / heater.
yStop the vehicle or drive at low speed.
yMake the call in a quiet location.
- There may be differences in call quality depending on phone type, road conditions
weather, etc.
- Using the phone while driving may cause unexpected accidents.
- The Bluetooth wireless technology function may not operate properly with certain
types of phones equipped with Bluetooth wireless technology.
4 Troubleshooting
Troubleshooting18
Troubleshooting
4
Troubleshooting
Symptoms Cause Solution
Power doesn't turned on.
The unit doesn't operate.
Leads and connectors are not properly. Conrm once more that all connections are correct.
The fuse is blown.
Rectify the problem that caused the fuse to blow, and then replace it. Be very sure
to install the correct fuse with the same rate.
Noise and other factors are causing the built in
microprocessor to operate incorrectly.
Turn the unit o and then on again.
No sound is heard. Cables are not connected correctly. Connect the cables correctly.
There's audio skipping. This unit is not rmly secured. Secure this unit rmly.
The playback is not possible. The disc is dirty. Clean the disc.
The disc of unplayable type is loaded. Check what type the disc.
Radio stations cannot be tuned in. The signal strength of the stations is too weak. (When tuning
in with automatic tuning.)
Tuned in the stations manually.
No station has been preset or preset stations have been
cleared. (When tuning by scanning preset stations.)
Preset the stations.
iPod/ iPhone does not work. Check whether iPod / iPhone is connected to the unit
correctly.
Connect it to the unit correctly.
The unit does not operate correctly
even when the appropriate remote
control buttons are pressed.
Battery power is low. Load a new battery.

5 Appendix
Appendix 19
Appendix
5
Specifications
General
Output Power : 53 W x 4 CH (Max.)
Power Source : DC 12 V
Speaker impedance : 4 Ω
Ground System : Negative
Dimensions (W x H x D) : (178 x 50 x168)
mm (without Control Panel)
Net Weight : 1.32 kg
TUNER
FM Tuning Range :
87.5 MHz to 108.0 MHz
S / N Ratio : 55 dB
Distortion : 0.7 %
Usable Sensitivity : 12 dBµV
AM (MW) Tuning Range :
(520 to 1720) kHz or (522 to 1620) kHz
S / N Ratio : 50 dB
Distortion : 1.0 %
Usable Sensitivity : 28 dBµV
AUX
Frequency Response : 20 Hz to 20 kHz
S / N Ratio : 80 dB
Distortion : 0.1 %
Channel Separation (1 kHz) : 45 dB
Max Input Level (1 kHz) : 1.1 V
SD
Distortion : 0.1 %
Bluetooth
TX POWER 4 dBm
Version Bluetooth Speci cation 2.1 + EDR
Line OUT
Frequency Response : 20 Hz to 20 kHz
Output Voltage : 2 V (Max.)
Subwoofer
Frequency Response : 20 Hz to 120 Hz
Output Voltage : 2 V (Max.)
yDesign and specications are subject to
change without notice.

Av. Sor Juana Inés de la Cruz No 555
Col. San Lorenzo
Tlalnepantla, Estado de México CP 54033
Tel. (55) 5321-1919
Lada sin costo 01 (800) 347 1919
LG Electronics México S.A. de C.V.
MAX620BO
Lea atentamente este manual antes de utilizar su equipo estéreo y consérvelo para
futuras referencias.
MANUAL DEL PROPIETARIO
Receptor de Medios Digitales
ESPAÑOL
www.lg.com.mx
1 Preparación
Preparación
1
Preparación2
Información de seguridad
ADVERTENCIA
RIESGO DE DESCARGA
ELÉCTRICA NO ABRIR
ADVERTENCIA:
PARA REDUCIR EL RIESGO
DE DESCARGA ELÉCTRICA NO EXTRAIGA LA
CUBIERTA (O PARTE POSTERIOR). NO HAY EN
EL INTERIOR NINGUNA PARTE QUE PUEDA
REEMPLAZAR EL USUARIO. PARA CUALQUIER
REPARACIÓN CONTACTE CON PERSONAL DE
MANTENIMIENTO CUALIFICADO.
Este símbolo de un relámpago
con cabeza de echa dentro
de un triángulo equilátero está
destinado para alertar al
usuario de la presencia de una
potencia no aislada peligrosa dentro del
producto que puede ser de la magnitud
suciente como para constituir un riesgo de
descarga eléctrica a las personas.
El signo de exclamación dentro
de un triángulo equilátero está
destinado para alertar al
usuario de la presencia de
instrucciones de
mantenimiento y funcionamiento en la
documentación que acompaña al producto.
ADVERTENCIA: NO EXPONGA ESTE
PRODUCTO A LA LLUVIA O HUMEDAD, A
FIN DE EVITAR EL RIESGO DE INCENDIO O
DESCARGA ELÉCTRICA.
ADVERTENCIA: no instale este equipo
en un espacio cerrado, como en una
estantería o mueble similar.
Conduzca siempre de forma segura.
Evite distraerse con el sistema de
navegación durante la conducción,
y esté siempre al tanto de todas las
condiciones de conducción. No modique las
conguraciones o ninguna función. Apártese
de la calzada de forma segura y legal antes de
iniciar tales acciones.
No utilice el equipo durante
muchas horas seguidas o a
temperaturas extremadamente
bajas o altas. (-10 °C a 60 °C)
No desmonte la cubierta o el panel
posterior de este producto a n de
reducir el riesgo de descargas
eléctricas. No existen piezas reparables por el
usuario en el interior de esta unidad. Delegue
todas las labores de reparación al personal de
mantenimiento cualicado.
A fin de reducir el riesgo de
descargas eléctricas, no exponga
el producto a salpicaduras de
agua, lluvia o a la humedad.
Las unidades instaladas en el
exterior del vehículo pueden
experimentar temperaturas
extremadamente altas. Le rogamos que use la
unidad en el interior del vehículo únicamente
y tras haberla instalado debidamente.
Durante la conducción,
mantenga el volumen del sonido
a un nivel adecuado.
No lo deje caer, y evitar siempre
los golpes fuertes.
Esta unidad es para vehículos
con batería de 12 voltios y masa
negativa. Antes de instalarlo en
un vehículo recreativo, camión o autobús,
compruebe el voltaje. Para evitar
cortocircuitos en el sistema eléctrico,
asegúrese de desconectar el cable E antes
de comenzar la instalación.
Este dispositivo está provisto de una
batería o acumulador portátil.
Forma segura de extraer la batería o el
acumulador del equipo:
Retire la batería o juego de baterías antiguo
y siga los pasos en orden inverso a su
colocación. Para impedir la contaminación
del medioambiente o los posibles efectos
adversos en la salud de humanos y animales,
coloque la batería antigua o el acumulador
en el contenedor apropiado de los puntos de
recogida designados para tal fin. No elimine
las baterías o el acumulador junto con la
basura doméstica. Se recomienda utilizar
baterías y acumuladores con sistema de
reembolso gratuito en su localidad. La batería
no debe exponerse a calor intenso, como la
luz del sol, un incendio o similar.

3
1
2
3
4
5
Contenido
Table of Contents
1 Preparación
2 Información de seguridad
4 Panel frontal
4 Mando a distancia
5 – Instalación de la pila
2 Conexión
5 Instalación
5 – Instalación básica
5 – Extracción de la unidad
receptora existente
5 – Instalación ISO-DIN
6 Acerca del panel de control
extraíble
7 Conexión
7 – Conexión al automóvil
3 Funcionamiento
8 Funcionamiento
8 – Funcionamiento básico
8 – Desactivar el sonido de
forma temporal
8 – Uso del EQ (Ecualizador)
8 – Uso del 3D SOUND
8 – Comprobación del reloj
8 – Apagar la pantalla de
visualización
8 – Restablecer la unidad
8 – Realización de los ajustes
generales
9 Escuchar música desde un
dispositivo externo
9 – Evitar cambios radicales
de volumen al cambiar de
fuentes
9 Cómo escuchar el
SINTONIZADOR
9 – Guardar las frecuencias
deseadas manualmente
10 – Escuchar una emisora
presintonizada
10 – Ajuste de la configuración
del SINTONIZADOR
11 Uso de un dispositivo SD
11 – Pausar o reanudar la
reproducción de SD
11 – Buscar una sección dentro
de una pista / archivo
11 – Pasar a otra pista / archivo
11 – Consultar información
sobre la música
11 – Reproducción de pistas
/ archivos en el orden
deseado
11 – Búsqueda rápida del
archivo que desee
12 Escuchar música conectando
un iPod/iPhone
12 – Pausar o reiniciar la
reproducción
12 – Buscar una sección dentro
de una archivo
12 – Pasar a otra archivo
12 – Consultar información
sobre la música
12 – Reproducción de archivos
en el orden deseado
12 – Reproducir archivos
mediante menús de
música
12 – MODO DE CONTROL
iPod/iPhone
12 – Modelos iPod/iPhone
compatibles
13 Conexión de la tecnología
inalámbrica Bluetooth
13 – Utilización de la tecnología
inalámbrica Bluetooth
15 – WICS (Controlador
inalámbrico y
sincronización)
16 – Lista de compatibilidad de
teléfonos
4
Solución de problemas
18 Solución de problemas
5 Apéndice
19 Especificaciones
Preparación4
Preparación
1
j U
Omitir / Búsqueda/ Buscar / Sintoní
CALL/END
- Activa el botón BT.
- Responde una llamada.
k 6
Abre el panel frontal.
l Sensor del mando a distancia
Mando a distancia
a SRC / • OFF
- Cuando se pulsa, selecciona las
fuentes de función.
- Mantenga pulsado para apagar la
unidad.
b FUNC
Pulse para establecer los elementos
de reproducción en cada modo.
• MENU
Mantenga pulsado para activar el
menú de conguración.
c BAND
Selecciona una banda en el modo
SINTONIZADOR.
DRV
Cambia a la siguiente unidad USB.
d d/M Reproduce y detiene en pausa
la reproducción.
e SHF Reproducción aleatoria.
f MUTE Detiene el sonido
temporalmente.
g VOLUME W/S
Ajusta el nivel de volumen.
Panel frontal
a T
Inicia y pausa la reproducción.
• TA (Opcional)
Busca emisoras con información TA/
TP, cuando se mantiene pulsado.
b SRC / • OFF
- Cuando se pulsa, selecciona las
fuentes de función.
- Cuando se mantiene pulsado, se
enciende o apaga el equipo.
c DISP
-
Pulse para comprobar la hora del reloj.
-
Puede encender y apagar la pantalla
de la unidad y la luz de los
botones
LED pulsando y manteniendo pulsado.
• APP
Activa el control de iPod/iPhone.
MODO.
d R(EJECT)
Abre el iPod/iPhone DOCKING
STATION.
e Ventana de visualización
f iPod/iPhone DOCKING STATION
g AUX
Si se le conecta otro reproductor
portátil, puede escucharse música de
ese dispositivo en esta unidad.
h Y
Omitir / Búsqueda/ Buscar / Sintonía
Vuelve al paso anterior.
i Volume knob
- Ajusta el nivel de volumen.
- Confirma la configuración.
- Comprueba pistas de audio,
archivos o localiza emisoras
presintonizadas.
2 Conexión
5
Conexión
2
Conexión
h c/v
Omitir / Búsqueda/ Buscar / Sintonía
Vuelve al paso anterior.
w/s
- Lista arriba / abajo
- Ajusta la conguración.
- Mueve 10 pistas MP3/WMA hacia
atrás o hacia adelante si no hay
ninguna carpeta o una carpeta en
un SD.
- Cambia a la carpeta anterior o a la
siguiente si hay más de dos
carpetas en un SD.
ENTER/ LIST
- Conrma la conguración.
- Comprueba pistas de audio,
archivos o localiza emisoras
presintonizadas.
i DISP
-
Pulse para comprobar la hora del reloj.
- Mantenga pulsado para encender y
apagar la pantalla de visualización.
j RPT
Reproducción repetida
k INT
Comenzar el barrido
l Botones numéricos (1 a 6)
Selecciona un número determinado
de emisoras presintonizadas en
TUNER (SINTONIZADOR).
Instalación de la pila
Tipo 1
Tipo 2
2
1
1
yUtilice solamente una pila de litio
CR2025 (3 V).
yRetire la pila si no piensa utilizar el
mando a distancia durante un largo
período de tiempo.
yNo recargue, desmonte, caliente ni
tire la pila al fuego.
yNo manipule la pila con
herramientas metálicas.
yNo almacene la pila junto con
otros materiales metálicos.
, Nota
Instalación
Instalación básica
Antes de la instación, asegúrese de que
el interruptor de encendido se encuentre
en OFF (APAGADO) y quite el terminal
de la batería del automóvil para evitar un
cortocircuito.
Doble los
ganchos de
acuerdo con
el grosor del
salpicadero.
Panel de control
1. Retire la unidad receptora existente.
2. Realice las conexiones necesarias.
3. Instale la carcasa de instalación.
4. Instale la unidad en la carcasa de
instalación.
Extracción de la unidad
receptora existente
Si ya cuenta con una carcasa de
instalacion para la unidad receptora en el
salpicadero, debe sacarla.
1. Retire el soporte posterior de la unidad.
2. Retire el panel frontal y el anillo de
compensación de la unidad.
3. Inserte la palanca en el orificio en un
lado de la unidad. Realice la misma
operación en el otro lado y extraiga la
unidad de su camisa de instalación.
Instalación ISO-DIN
Panel de control
1. Deslice la unidad en el armazón ISO-
DIN.
2. Proceda a su fijación con los tornillos
de la unidad anterior.
3. Deslice la unidad e insértela en el
hueco vacío del salpicadero.
4. Instale el cuadro de instrumentos o la
placa de adaptación.
(Dependiendo del modelo, este paso
podría no ser necesario.)
5. Instale el anillo de compensación en la
unidad.
6. Instale el panel de control en la unidad.
Conexión6
Conexión
2
Acerca del panel de
control extraíble
Fijación del panel de control
1. Alinee el lado izquierdo del panel con
el soporte.
2. Presione el lado derecho o el panel
contra la unidad hasta que oiga un clic.
yLos botones de control pueden
no funcionar correctamente si
el panel de control no esta bien
colocado. Si este es el caso, pulse
ligeramente el panel de control.
yNo exponga el panel de control
a altas temperaturas ni a la luz
directa del sol.
yNo deje caer ni golpee el panel
de control, de lo contrario podria
danarse.
yEvite el contacto de la supercie
del panel de control con
sustancias volatiles como bencina,
disolventes o insecticidas.
> Atención
Extraccion del panel de control
1. Pulse el boton 6 para desbloquear el
panel de control.
2.
Levante ligeramente el panel de control.
3. Empuje el panel de control hacia la
derecha.
3
2
4. Retire el panel de control de la unidad.
5. Introduzca el panel de control en el
estuche de proteccion.
Panel de control
Estuche de protección
Periódicamente limpie los contactos
de la parte trasera de el panel de
control con un algodón humedecido
con alcohol. Por seguridad apague el
estéreo antes de limpiarlo y retire la
llave de el switch de encendido.
, Nota
Conexión 7
Conexión
2
abcd
efgh
abcd
efgh
a
b
c
d
e
f
g
h
A
A
A
A
A
A
A
A
Conexión
Conexión al automóvil
Antes de la conexión asegúrese de que el interruptor de encendido se encuentre en OFF y desconecte el terminal de la batería para evitar cortocircuitos.
B a No conectado
A a Gris: frontal derecho +
A b Gris c/negro: frontal derecho –
A c Violeta: trasero derecho +
A d Violeta c/negro: trasero derecho –
A e Blanco: frontal izquierdo +
A f Banco c/negro: frontal izquierdo –
A g Verde: trasero izquierdo +
A h Verde c/negro: trasero izquierdo –
Antena de
potencia
Relé de control
A la salida de audio A la salida de audio
Amplicador
Subwoofer izquierdo
Frontal izquierdo
Trasero izquierdo
Subwoofer derecho
Frontal derecho
Trasero derecho
Amplicador
B f Antena de potencia (azul)
B g No conectado
B c Al encendido (rojo)
B h Puesta a tierra (-) (negro)
B d A la batería (+) (amarillo)
B e Mando a distancia
(azul/blanco)
B b No conectado
Llave de contacto
Entrada de mando a distancia cableado (Negro): Puede conectar un adaptador de control cableado. (Opcional)
Si se conecta en forma errónea, la unidad mostrará la siguiente información:
- Cortocircuito de puerto de Antena / Remoto :
"ANTENNA / REMOTE ON PORT SHORT CIRCUIT CHECK"
(COMPROBAR CORTOCIRCUITO EN EL PUERTO DE ANTENA / REMOTO)
Tras volver a conectarlo, reinicie la unidad.
> Atención
Sub-woofer
Micrófono por cable (Opcional)
3 Funcionamiento
8
Funcionamiento
3
Funcionamiento
Funcionamiento
Funcionamiento básico
1. Encienda la unidad pulsando cualquier
tecla.
2.
Seleccione una fuente presionando SRC.
3. Ajuste el volumen de la unidad girando
el control del volumen.
O pulse VOLUME (VOLUMEN) W/S en
el mando a distancia.
Desactivar el sonido de
forma temporal
1. Pulse MUTE para desactivar el sonido
de la unidad.
O pulse MUTE (SILENCIO) en el mando
a distancia.
2. Pulse de nuevo para cancelar.
Uso del EQ (Ecualizador)
La función de EQ es aumentar o reducir la
potencia de la señal de las frecuencias de
audio. Esta función le ayuda a lograr un
disfrute más pleno del sonido.
Presione repetidamente EQ en la unidad. El
indicador se ilumina siguiendo este orden.
FLAT /XDSS+ / POP / CLASSIC /
ROCK / JAZZ / VOCAL / SALSA /
SAMBA / REGGAE / RUSSY / USER1
/ USER2
Uso del 3D SOUND
Este modo proporciona un excelente
sonido envolvente.
1. MantengapulsadoEQ/•3D.
2. Mantenga pulsado de nuevo para
cancelar.
Comprobación del reloj
1. Pulse DISP.
2. Pulse de nuevo para cancelar.
Apagar la pantalla de
visualización
1. Mantenga pulsado DISP.
2. Mantenga pulsado de nuevo para
volver a encenderla.
Cuando la pantalla esté apagada,
pulse cualquier tecla, la luz se
encenderá y volverá a apagarse
automáticamente si no se pulsa a los
pocos segundos.
, Nota
Restablecer la unidad
Se puede reiniciar el equipo si no funciona
correctamente.
1. Extraiga el panel de control.
Consulte la página 6 para información
sobre cómo extraer el panel de control.
2. Pinche en el agujero RESET con un
objeto punzante.
Realización de los ajustes
generales
Puede ajustar la conguración de
[SOUND], [LIGHT] y [OTHER].
En la unidad
1. Mantengapulsado•MENU.
2. Gire el control de volumen para
seleccionar [SOUND], [LIGHT], u
[OTHER] y púlselo.
3. Gire el control de volumen para
seleccionar el elemento y púlselo.
4. Gire el control de volumen hacia la
izquierda o hacia la derecha para
ajustar el nivel.
5. Pulse el control del volumen para
confirmar la configuración.
Si desea volver al paso anterior, pulse
.
En el mando a distancia
1. MantengapulsadoFUNC/•MENU.
2. Pulse w / s para seleccionar [SOUND],
[LIGHT], u [OTHER] y pulse ENTER.
3. Pulse w / s para seleccionar el modo
y pulse ENTER.
4. Pulse w / s para ajustar el nivel.
5. Pulse ENTER para confirmar el ajuste.
Si desea volver al paso anterior, pulse
.
Configuración de sonido
[SOUND]
Puede ajustar la calidad del sonido
ajustando el nivel de BAL (altavoces
izquierdos / derechos), FAD (altavoces
delanteros / traseros), SW (Subwoofer),
SW-F (Frecuencia de subwoofer), A-EQ
(Auto EQ).
-
Cuando ajuste el EQ en modo USER 1/2.
: Puede ajustar el nivel de sonido de (BAS
(graves), MID (medios), TRB (agudos).
ySW (Subwoofer)
Puede ajustar el volumen del subwoofer.
ySW-F (Subwoofer freqency)
OFF/ SW 55 Hz/ SW 85 Hz/ SW 120 Hz
Puede desactivar el subwoofer.
yA-EQ (Auto EQ) ON/ OFF
La función AUTO EQ funciona solamente en
los archivos de música admitidos por Género
en el dispositivo. Si congura la opción
AUTO EQ como ON (Activada), POP, CLASSIC
(CLÁSICA), ROCK, o JAZZ, se seleccionará
automáticamente dependiendo del género
musical del archivo de música.
Funcionamiento 9
Funcionamiento
3
Configuración de las luces [LIGHT]
Puede ajustar los efectos de luz ajustando
LED, DIM o DIM LV.
yLED COL1/ COL2/ AUTO: Puede cambiar
el color de la pantalla LED.
yDIM (Regulador) OFF/ ON:
Puede cambiar el brillo de la pantalla de
visualización durante el encendido.
Conguración Descripción
DIM ON
La pantalla de visualización
se oscurece.
DIM OFF Aumenta el brillo de la
pantalla
yDIM LV (NIVEL DEL REGULADOR):
Si ajusta la opción DIM como ON
(Activada), podrá ajustar el nivel del
regulador.(-2, -1, 0, +1, +2)
Otras configuraciones [OTHER]
yAUX (Auxiliar) ON/ OFF
Se puede utilizar un equipo auxiliar con
esta unidad. Active la conguración
auxiliar cuando conecte un equipo
auxiliar a esta unidad.
yDEMO OFF/ ON
Puede cambiar la indicación inicial de la
pantalla para que aparezca información
como el nombre de la función, del
ecualizador, etc., mientras escucha una
fuente.
yBEEP 2ND/ ALL
BEEP 2ND: Se genera la señal acústica
cuando se pulsa una tecla durante más
de 2 segundos.
BEEP ALL: Oirá una señal acústica al
pulsar cualquier tecla.
yCLK (Reloj)
Para el modelo RDS no es compatible
con la unidad o incluso para una unidad
de apoyo RDS.
-
Cuando no se recibe la información RDS
CT y selecciona C-T como OFF, puede
ajustar la hora usted mismo. Ajuste el reloj
de la siguiente manera:
1. Seleccione una fuente para el
TUNER (SINTONIZADOR).
2. Pulse FUNC para seleccionar CT y
ajuste CT en OFF.
(Consulte la sección "Ajuste
de la conguración del
SINTONIZADOR" en las páginas 11
de conguración del CT (hora del
reloj) ON / OFF).
3. Mantenga pulsado •MENUenla
unidad para seleccionar [OTHER]
y luego seleccione CLK haciendo
girar el control de volumen.
4.
Ajuste la hora girando el control
de volumen.
5. Pulse el control de volumen para
confirmar la hora.
6. Ajuste los minutos girando el
control de volumen.
7. Pulse el control de volumen para
confirmar los minutos.
-
Cuando la información RDS CT se recibe;
El reloj se muestra de acuerdo con la
información RDS CT.
- Si no es compatible con RDS,
configure el reloj de acuerdo con los
pasos 3 a 7.
Escuchar música desde
un dispositivo externo
1. Conecte un aparato externo en la toma
AUX con el cable de entrada de línea.
2. Seleccione una fuente como AUX.
3. Reproduzca el equipo auxiliar
conectado.
Evitar cambios radicales
de volumen al cambiar de
fuentes
Sólo cuando ajuste AUX en ON como
fuente de conexión podrá ajustar el
nivel de volumen de cada fuente para
evitar cambios radicales de volumen
seleccionando GAIN 0/ +6.
1. Pulse FUNC en la unidad.
OpulseFUNC/•MENUenelmandoa
distancia.
2. Gire el control de volumen en la
unidad.
O pulse w / s en el mando a distancia
para ajustar la opción.
(GAIN 0 / +6)
3. Pulse el control de volumen en la
unidad.
O pulse ENTER en el mando a distancia
para confirmar el ajuste.
4. Si desea volver al paso anterior, pulse
.
O pulse en el mando a distancia.
Cómo escuchar el
SINTONIZADOR
1. Pulse repetidamente SRC para
seleccionar una fuente para el
TUNER(SINTONIZADOR).
2.
Presione BAND repetidamente para
seleccionar la banda que desea almacenar.
3. Para hacer una búsqueda manual,
mantenga pulsado Y/U en
la unidad hasta que aparezca en la
pantalla “MANUAL”. Entonces pulse
repetidamente para seleccionar la
frecuencia deseada.
O mantenga pulsado c / v en el
mando a distancia.
Para la búsqueda automática, pulse
Y/U en la unidad. A continuación,
se muestra “SEARCH” (buscar).
(Excepto MW)
O pulse c / v en el mando a distancia.
Guardar las frecuencias
deseadas manualmente
1. Pulse BAND para seleccionar la banda
que desea almacenar.
2. Seleccione la frecuencia deseada con
Y/U en la unidad.
O pulse c / v en el mando a distancia.
3.
Pulse el dial de volumen y gírelo para
seleccionar una emisora presintonizada
del 1 al 6, y después pulse y mantenga
pulsado el dial hasta escuchar un sonido.
O mantenga pulsado uno de los
botones de presintonización entre 1 y
6 en el mando a distancia hasta oír la
señal sonora.
4. Repita los pasos del 1 al 3 para
presintonizar otras emisoras.

Funcionamiento10
Funcionamiento
3
Al intentar programar una
emisora en un botón numérico de
presintonía ya congurado para
otra emisora de la misma banda, la
conguración anterior se eliminará
automáticamente.
, Nota
Escuchar una emisora
presintonizada
1. Pulse BAND repetidamente para
seleccionar la banda que desee.
2. Pulse el control de volumen en la
unidad.
O pulse ENTER en el mando a distancia.
3. Gire el control de volumen
para seleccionar una emisora
presintonizada.
O pulse w / s en el mando a
distancia.
4. Presione el control de volumen .
O pulse ENTER en el mando a distancia.
O
Presione BAND y después el botón
programado deseado de entre 1-6.
Ajuste de la configuración
del SINTONIZADOR
En la unidad
1. Pulse FUNC.
2. Gire el control de volumen para
seleccionar un elemento y pulse.
3. Gire el control de volumen para
establecer la opción y pulse.
4. Si desea volver al paso anterior, pulse
.
En el mando a distancia
1. PulseFUNC/•MENU.
2. Pulse w / s para seleccionar un
elemento y pulse ENTER.
3. Pulse w / s para establecer la opción
y pulse ENTER.
4. Si desea volver al paso anterior, pulse
.
yPTY (Tipo de programa, RDS (OPCIONAL))
Busca las emisoras de radio según el
tipo de programa del sintonizador de
FM, del modo siguiente.
Los tipos de programa se muestran
como se indica a continuación.
NEWS FINANCE EASY M
AFFAIRS CHILDREN LIGHT M
INFO SOCIAL CLASSICS
SPORT RELIGION OTHER M
EDUCATE PHONE IN JAZZ
DRAMA TRAVEL COUNTRY
CULTURE LEISURE NATION M
SCIENCE DOCUMENT OLDIES
VARIED POP M FOLK M
WEATHER ROCK M
yA/S (Almacenamiento automático)
Las seis frecuencias más potentes se
almacenarán en las presintonías (1 a
6) según la fuerza de su señal. Para
cancelar, presione el control de volumen.
yP/S (Barrido presintonías)
Aparece cada emisora. Para cancelar, pulse
el control de volumen.
ySENS (Sensibilidad del sintonizador) MID/
HI/ LOW
En una zona donde la recepción
de la señal es débil, ayuda a que el
sintonizador busque más emisoras.
Cuanto más débil es la recepción, menor
es la opción que debe establecerse.
RDS (OPCIONAL)
yAF (Frecuencia alternativa) ON/ OFF
Cuando la calidad de la recepción
empeore, el sintonizador pasará
automáticamente a otra emisora de
la red que emita una mejor calidad de
recepción, empleando los códigos PI y
AF.
yREG (Región) ON/ OFF
REG ON: La unidad sintonizará otra
emisora, dentro de la misma red, que
emita el mismo programa cuando las
señales de recepción de la emisora
actual sean demasiado débiles.
REG OFF: La unidad cambia a otra
emisora dentro de la misma red al
recibir señales más débiles de la emisora
actual. (En este modo, el programa
puede variar con respecto al que se está
recibiendo en estos momentos.)
yTA (Avisos de tráco) ALARM/ SEEK
TA ALARM: Cuando la emisora
sintonizada no proporcione información
TP durante 5 segundos, se emitirá un
doble pitido.
TA SEEK: Cuando la emisora sintonizada
no reciba información TP durante 5
segundos, el receptor sintonizará la
siguiente emisora con información TP.
yPI (Identicación del programa)
SOUND/ MUTE
PI SOUND: Cuando la frecuencia de
una emisora sintonizada cambia a AF
(Frecuencia alternativa) con un PI sin
identicar, se mantiene el sonido.
PI MUTE: Cuando la frecuencia de una
emisora sintonizada cambia a AF con un
IP no identicado, se silencia el sonido
hasta que se identica el PI.
yCT (Reloj) ON/ OFF
Puede utilizar la información RDS CT
para actualizar la hora. Cuando no
se recibe la información RDS CT y
selecciona CT como OFF, puede ajustar
la hora usted mismo. Consulte la página
9 para congurar el reloj.
Funcionamiento 11
Funcionamiento
3
Uso de un dispositivo SD
1. Abra la tapa del USB.
2. Conecte el dispositivo USB.
3. Pulse SRC repetidamente para
seleccionar una fuente de USB.
Pausar o reanudar la
reproducción de SD
1. Presione T en la unidad para pausar
la reproducción.
O presione d/M en el mando a
distancia.
2. Pulse para reanudar la reproducción.
Buscar una sección dentro
de una pista / archivo
1. Mantenga pulsado Y/U en la
unidad durante aproximadamente 1
segundo durante la reproducción.
O mantenga pulsado c / v en el
mando a distancia.
2. Pulse
T en la unidad en el punto que
desee.
O pulse d/M en el mando a distancia.
Pasar a otra pista / archivo
Pulse Y/U en el reproductor.
O pulse c/v en el mando a
distancia.
Para volver a la pista anterior, pulse
brevemente
Y
en un plazo de 3
segundos del tiempo de reproducción.
, Nota
Consultar información sobre
la música
Los archivos MP3/WMA a menudo
incluyen etiquetas. La etiqueta indica el
Título, Intérprete o Álbum.
Pulse repetidamente DISP durante la
reproducción de archivos MP3/WMA con
TEXTO. Si no existiera información, se mostraría
“NO TEXT” en la pantalla de visualización.
Reproducción de pistas /
archivos en el orden deseado
Para el uso de los botones de
aplicación
1. Pulse INT / RPT / SHF.
2. Pulse de nuevo para cancelar.
O
Uso del botón FUNC
En la unidad
1. Pulse FUNC.
2. Gire el control de volumen para
seleccionar un elemento y pulse.
3. Gire el control de volumen para
seleccionar la opción.
4. Pulse el control de volumen para
ajustar la opción.
Si desea volver al paso anterior, pulse
.
En el mando a distancia
1. PulseFUNC/•MENU.
2. Pulse w / s para seleccionar un
elemento y vuelva a pulsar.
3. Pulse w / s para seleccionar la
opción.
4. Pulse ENTER para establecer la opción.
Si desea volver al paso anterior, pulse
.
yRPT (Repetir)
Se reproducirán repetidamente
las pistas/archivos actualmente
seleccionados (1 RPT) o la carpeta (
RPT) del disco.
ySHF (Orden aleatorio)
Se reproducirán aleatoriamente todos
los archivos de la carpeta actualmente
seleccionada ( SHF) o todas las
pistas/archivos (SHF) del disco. Durante
la reproducción aleatoria, no podrá
volver a la pista anterior aunque pulse
Y el botón.
yINT (Comenzar el barrido)
Los primeros 10 segundos de todas
las pistas/archivos (INT) o cada uno
de los archivos de la carpeta actual
seleccionada ( INT) en el disco se
reproducen.
Búsqueda rápida del archivo
que desee
Puede seleccionar y reproducir el archivo
que desee, independientemente del
orden en el USB.
1.
Pulse el control de volumen en la unidad.
O pulse ENTER en el mando a distancia.
2. Gire el control de volumen en la
unidad hasta seleccionar la ROOT o
carpeta deseada y pulse.
O pulse w / s y pulse ENTER en el
mando a distancia.
3. Gire el control de volumen en la
unidad hasta seleccionar el archivo o
pista deseado y pulse.
O pulse w / s y pulse ENTER en el
mando a distancia.
La realización de copias no
autorizadas o de copias de material
protegido, incluidas las copias de
programas informáticos, archivos,
emisiones y sonidos, podría infringir
las leyes de copyright y constituir un
delito penal. Este equipo no debe
utilizarse para tales nes.
Sea responsable.
Respete los derechos de autor.
Funcionamiento12
Funcionamiento
3
Escuchar música conectando
un iPod/iPhone
Puede disfrutar de la música almacenada
en su iPod/ iPhone en la unidad
conectando su reproductor portátil a ésta
mediante un cable USB.
1. Abra la tapa del USB.
2. Conecte el iPod/ iPhone.
3. Pulse SRC para seleccionar una fuente
al USB.
Pausar o reiniciar la reproducción
1. Presione T en la unidad para pausar
la reproducción.
O presione d/M en el mando a distancia.
2. Pulse para reanudar la reproducción.
Buscar una sección dentro
de una archivo
Durante la reproducción, pulse y mantenga
pulsado Y/U y suelte cuando desee.
Pasar a otra archivo
Pulse Y/U en el reproductor.
O pulse c/v
en el mando a distancia.
O
1.
Pulse el control de volumen en la unidad.
O pulse ENTER en el mando a distancia.
2. Gire el botón de volumen hasta la
categoría seleccionada y púlselo.
O pulse w / s y pulse ENTER en el
mando a distancia.
3. Gire el control de volumen en la
unidad hasta seleccionar el archivo o
pista deseado y pulse.
O pulse w / s y pulse ENTER en el
mando a distancia.
Consultar información sobre
la música
Los archivos MP3/WMA a menudo
incluyen etiquetas. La etiqueta indica el
Título, Intérprete o Álbum.
Presione repetidamente DISP durante
la reproducción de archivos MP3/WMA
con TEXTO. Si no existiera información,
se mostraría “NO TEXT” en la pantalla de
visualización.
Reproducción de archivos en
el orden deseado
En la unidad
1. Pulse FUNC.
2. Gire el control de volumen para
seleccionar un elemento y pulse.
3. Gire el control de volumen para
seleccionar la opción.
4. Pulse el control de volumen para
ajustar la opción.
Si desea volver al paso anterior, pulse
.
En el mando a distancia
1. Pulse RPT / SHF.
2. Pulse de nuevo para cancelar.
O
1. Pulse FUNC/ • MENU.
2. Pulse
w / s para seleccionar una
opción y pulse ENTER.
3. Press
w / s to select the option.
4. Press ENTER to set the option.
Si desea volver al paso anterior, pulse
.
yRPT (Repeat)
Se reproducen repetidamente el archivo
(1 RPT) o archivos seleccionados en el
iPod/iPhone.
ySHF (Shue)
Se reproduce de forma aleatoria cada
archivo del álbum seleccionado
( SHF) o todos los archivos (SHF) del
iPod/iPhone.
Durante la reproducción aleatoria,
incluso si pulsa Y, no volverá a la
pista anterior.
ySPD (Velocidad del audiolibro)
Puede ajustar la velocidad del audiolibro
del iPod en NOR (Normal) SLOW (Lento)
o FAST (Rápido).
Reproducir archivos
mediante menús de música
Puede seleccionar archivos mediante
menús de música y reproducirlos.
Los menus de musica se crean como se
indica a continuacion:
PLAYLISTS / ARTISTS / ALBUMS /
GENRES / SONGS / COMPOSER /
AUDIO BOOK / PODCAST / ...
1.
Pulse el control de volumen en la unidad.
O pulse ENTER en el mando a distancia.
2. Gire el dial de volumen de la unidad
para seleccionar un menú de música y
púlselo.
O pulse w / s en el mando a distancia.
3. Gire el dial de volumen de la unidad
para seleccionar un archivo.
O pulse w / s en el mando a
distancia.
4. Pulse el dial de volumen de la unidad
para confirmar el ajuste.
O pulse ENTER en el mando a distancia.
5. Si desea volver al paso anterior, pulse
.
O pulse en el mando a distancia.
MODO DE CONTROL iPod/
iPhone
Puede controlar la unidad y un iPod /
iPhone.
yPulse IPOD en la unidad. A continuación,
se hace una pausa en la reproducción.
Puede controlar la unidad y un iPod /
iPhone.
yDurante la utilización del MODO
DE CONTROL iPod/iPhone, no está
disponible ninguna función de la
unidad.
yPulse IPOD de nuevo para cancelar el
MODO DE CONTROL iPod/iPhone.
Modelos iPod/iPhone
compatibles
yiPod classic
yiPod nano 6ª generación
yiPod touch 4ª generación
yiPhone 3G / 3GS / 4
Recomendamos que utilice una
versión OS 4.2.1 o superior.
Funcionamiento 13
Funcionamiento
3
"Made for iPod" (fabricado para iPod) y
"Made for iPhone" (fabricado para iPhone)
signica que un accesorio electrónico ha
sido diseñado para su conexión especíca
a un iPod, o iPhone respectivamente, y
ha sido certicado por el desarrollador
para cumplir con las normas de
funcionamiento estándar de Apple. Apple
no es responsable del funcionamiento de
este aparato o de su cumplimiento con
normas de seguridad y reglamentaciones.
Favor de tomar nota que el uso de este
accesorio con iPod ó iPhone puede
afectar el desempeño inalámbrico.
Conexión de la
tecnología inalámbrica
Bluetooth
acoplamiento, asegúrese de que se
haya activado la función Bluetooth
del teléfono. Consulte el manual de su
teléfono. El acoplamiento conecta su
unidad y el teléfono con tecnología
inalámbrica Bluetooth, y se necesita sólo
una vez para la con guración inicial. Si la
conexión se hace con éxito, se registra el
teléfono (Dispositivo 1 a 10). El proceso
de acoplamiento puede ser diferente,
dependiendo de los diferentes teléfonos.
El CÓDIGO PIN es 1234.
ON PLAYER
1. Acceda al menú. BT
2. Encuentre el menú
“CONNECT” (Conectar).
Gire el
mando
del volumen
3. Acceda al menú.
“CONNECT” (Conectar).
Pulse el
mando del
volumen
4. Seleccione el menú
"SEARCH".
Gire el
mando
del volumen
5. Busque los teléfonos
compatibles con la
tecnología
inalámbrica
Bluetooth.
Pulse el
mando del
volumen
6. Seleccione el
teléfono que
desea conectar.
Gire el
mando
del volumen
7. Conecte el teléfono.
Pulse el
mando del
volumen
Micrófono
El micrófono tiene que estar cerca y
apuntando hacia la persona que habla.
Instale el micrófono, como se muestra a
continuación.
Unidad de micrófono
Si usted apague la unidad mientras
se habla por teléfono a través de
la unidad utilizando la función BT,
la función se queda desactivada
y se puede hablar por teléfono
directamente.
, Nota
Utilización de la tecnología
inalámbrica Bluetooth
To Do this
Desconexión
de un teléfono
(BT -> CONNECT
-> LIST -> Nombre
del dispositivo
conectado ->
DISCONN).
Responder o
nalizar una
llamada
pulse BT
Para nalizar una
llamada, pulse
Rechazar una
llamada pulse
Realizar una
llamada con un
número prede
nido
Pulse BT un número
prede nido (1 a 6).
Comprobación
de llamadas
perdidas
Cuando aparezca
“ ? ”, vaya al
menú (BT -> CALL
-> LASTCALL).
Puede comprobar
la lista de llamadas
perdidas.

Funcionamiento14
Funcionamiento
3
yLas listas de LASTCALL (ÚLTIMAS
LLAMADAS) se ordenan desde las
más recientes hasta la más antigua.
yCuando desee hacer una llamada
internacional, pulse U para
añadir “+” y púlselo de nuevo para
borrarlo.
y“+” sólo se puede añadir cuando
se seleccione la lista detallada de
últimas llamadas.
, Nota
Transferencia de audio
Se puede cambiar la conexión de audio
entre el teléfono equipado con Bluetooth
y esta unidad.
1. Pulse BT para responder la llamada.
2. Pulse BT de nuevo. Se muestra "PRIVATE"
(privado)
Si se ha seleccionado el modo privado en
la unidad, pulse BT para volver al modo de
manos libres.
Reproducción de archivos MP3
Cuando se enciende el Bluetooth, el
dispositivo compatible con la tecnología
inalámbrica Bluetooth muestra “Bluetooth”
en la pantalla de inicio. El Bluetooth
permanece encendido hasta que se apaga
el dispositivo. Pulse SRC repetidamente
para seleccionar "BT". Para reproducir un
archivo MP3 guardado en su dispositivo.
Para utilizar esta función, consulte la guía
de usuario del teléfono. Esta función sólo
está disponible en teléfonos con A2DP
(Per l de distribución avanzada de audio).
Información de perfi les de
tecnología Bluetooth
Para utilizar la tecnología inalámbrica
Bluetooth, los aparatos deben cumplir
con ciertos per les. Esta unidad es
compatible con los per les siguientes.
GAP (Per l de acceso genérico)
HFP (Per l de manos libres)
GAVDP (Per l genérico de distribución de
audio / vídeo)
A2DP (Per l de distribución avanzada de
audio)
AVRCP (Per l de control remoto de
distribución de audio/vídeo)
PBA / PBAP (Per l de acceso de guía
telefónica)
Ajustes de la confi guración
1. Pulse BT.
2. Gire el control de volumen para
seleccionar un elemento y pulse.
3. Gire el mando del volumen para
seleccionar la opción y púlselo.
4. Si desea volver al paso anterior, pulse
.
CALL (Llamar)
yLASTCALL (Última llamada)
Lista de llamadas (recibidas, marcadas,
perdidas) CALL -> LAST CALL ->
Seleccionar el número de teléfono ->
Pulsar la tecla de volumen -> Mostrar
la información -> Pulsar la tecla de
volumen -> se mostrará el menú DIAL,
SAVE, DELETE - Para llamar al número
de teléfono, DIAL -> Pulsar la tecla de
volumen.
- Para guardar el número de teléfono,
SAVE -> Pulsar la tecla de volumen->
seleccionar el número programado (del
1 al 6) -> Pulsar la tecla de volumen.
- Para eliminar el número de teléfono
seleccionado, DELETE -> Pulsar la tecla
de volumen-> NAME -> Pulsar la tecla de
volumen.
- Para eliminar todos los números de
teléfono, DELETE -> Pulsar la tecla de
volumen -> ALL -> Pulsar la tecla de
volumen.
yDIAL (Marcar)
Introducir los números directamente
en la unidad. Para seleccionar del 0 al 9,
gire el volumen. Pulse U para volver
al número de teléfono. Si desea llamar,
pulse la tecla de volumen.
yPRESET (Prede nido)
Comprobar y eliminar/marcar al número
de teléfono guardado como programado.
CALL -> PRESET -> Seleccionar el
número programado y pulsar la tecla de
volumen-> Mostrar la información ->
Pulsar la tecla de volumen-> se mostrará
el menú DIAL, DELETE.
- Para llamar al número de teléfono,
seleccione DIAL y pulse la tecla de
volumen.
- Para eliminar el número de teléfono
seleccionado, DELETE -> NAME -> Pulsar
la tecla de volumen.
- Para eliminar todos los números de
teléfono, DELETE -> ALL -> Pulsar la tecla
de volumen.
CONNECT (Conectar)
yLIST (Lista)
Comprueba la lista Nombre de
dispositivo conectado.
ySEARCH (Buscar)
Busca los teléfonos disponibles para
su conexión. Se muestra en la parte
superior el Nombre de dispositivo
conectado.
Funcionamiento 15
Funcionamiento
3
SETUP (Inalámbrica)
yVISIBLE
Imposibilita la búsqueda de la unidad.
(SHOWN <-> HIDDEN)
yAUTO CON (Con.)
Ajuste la conexión automáticamente o
no. (ON <-> OFF)
yAUTO ANS
Ajusta la respuesta automática o no.
(MANUAL <-> AUTO)
yMIC VOL
Ajusta el volumen del micrófono del
teléfono de 1 a 5. Estando al teléfono
con Bluetooth, pulse Y/U ( o c
/ ven el mando a distancia) para
ajustar el volumen del micrófono.
yREDIAL (Rellamada)
Ajusta los intentos de rellamada.
(1 TIME <-> 2 TIMES)
INFO
yNAME (Nombre)
Cambia el nombre de esta unidad.
yADDRESS (Dirección)
Comprueba la dirección.
yPIN-CODE
Cambiar el código PIN. Por defecto es
1234.
WICS (Controlador
inalámbrico y sincronización)
Se puede controlar la unidad con la
aplicación "WICS".
1. Busque la aplicación “WICS” e instálela.
[Se muestra la aplicación "WICS" instalada]
2. Enlaces de acoplamiento de su unidad y
un iPhone con tecnología inalámbrica
Bluetooth. (Consulte la página 24).
3. Cuando ejecute al aplicación “WICS”, se
mostrará la fuente de aplicación tras la
pantalla inicial. A continuación, puede
controlar la unidad en el iPhone.
[Pantalla inicial] [Pantalla de sintonizador]
- Puede seleccionar una fuente pulsando
"SOURCE".
[Pantalla de modo fuente]
Funcionamiento16
Funcionamiento
3
Lista de compatibilidad de teléfonos
Lista de Bluetooth y empresas fabricantes aplicables.
H: Manos libres P: Sinc de guía telefónica A: Streaming de audio
Company List H A P Company List H A P Company List H A P Company List H A P
Nokia E61
5200
N80
N70
N72
N91
3250
6110
6288
E90
N73
N95
N77
E71
E75
N97
5800 (Xpress
music)
C6
E5
E52
X6
N97-1
N900
6710 (Navigator)
0
0
0
0
0
0
0
0
0
0
0
0
0
0
0
0
0
0
0
0
0
0
0
0
0
0
0
0
0
0
0
0
0
0
0
0
0
0
0
0
0
0
0
0
0
0
0
0
0
0
0
0
Motorola
SAMSUNG
ROKR E6
V3x
RIZR K1
V9
Z8
V9r
XT701
XT720
(MOTOROI)
Milestone
Droid
D900
SGH-U600
SGH-Z240
SGH-F300
SGH-E890
SGH-E950
SGH-F210
SGH-G600
i-900
F330
F480
L878
M8800 PIXON
S5603
0
0
0
0
0
0
0
0
0
0
0
0
0
0
0
0
0
0
0
0
0
0
0
0
0
0
0
0
0
0
0
0
0
0
0
0
0
0
0
0
0
0
0
0
0
0
SAMSUNG
SONY
ERICSSON
S8003 JET(8GB)
i8510 INNOV8 (16G)
i8910 Omnia HD
U808
B5722
B7330 (Omnia Pro)
B7620 (Giorgio
Armani)
C3303K (Champ)
M5650U (Lindy)
M8910 (Pixon12)
S7350
S8500 (Wave)
i5503 (Galaxy 5)
i5700 (Galaxy Spica)
i9000 (Galaxy S(16G))
T959
Galaxy Tab
W880
Z610
W300
K800i
P990i
W910i
C702i
0
0
0
0
0
0
0
0
0
0
0
0
0
0
0
0
0
0
0
0
0
0
0
0
0
0
0
0
0
0
0
0
0
0
0
0
0
0
0
0
0
0
0
0
0
0
0
0
0
0
0
0
0
0
0
0
0
0
0
0
0
0
0
0
0
0
SONY
ERICSSON
LG
G705
W595
W705
W980i
Xperia-X1
Vizaz
Xperia-X2
Xperia-X10
KE850
KU250
KU970
KS10
KC550
KC780
KC910(Renoir)
KF350(IceCream)
KF600
KF700
KF750(Secret)
KF900(PRADA2)
KM380
KM900(Arena)
KP500(Cookie)
KT520
0
0
0
0
0
0
0
0
0
0
0
0
0
0
0
0
0
0
0
0
0
0
0
0
0
0
0
0
0
0
0
0
0
0
0
0
0
0
0
0
0
0
0
0
0
0
0
0
0
0
0
0
0
0
0
0
0
0
Funcionamiento 17
Funcionamiento
3
Lista de Bluetooth y empresas fabricantes aplicables.
H: Manos libres P: Sinc de guía telefónica A: Streaming de audio
Company List H A P Company List H A P
LG
Rim
KT610
KU990
GD900
BL40 (New
Chocolate)
KM335
GD510 (POP)
GD880
GM730
GS500 (Cookie Plus)
GT505
GT540
GW305
GX500
Bold 9700
Storm2 9550
0
0
0
0
0
0
0
0
0
0
0
0
0
0
0
0
0
0
0
0
0
0
0
0
0
0
0
0
0
0
0
0
0
0
0
0
0
0
0
0
APPLE
ASUS
HTC
iPhone
iPhone 3GS
(16GB)
iPhone 3GS
(32GB)
iPhone 4G
(16GB)
I-Pad
P750
Goole G1
Magic G2
Hero G3
Touch2
Legend
Nexus One
Desire
0
0
0
0
0
0
0
0
0
0
0
0
0
0
0
0
0
0
0
0
0
0
0
0
0
0
0
0
0
0
0
0
ySi el teléfono incorpora la función <Ahorro de energía de Bluetooth>, deberá
activar la función para mantener la conexión.
yCuando se cambia el modo de llamada de manos libres a teléfono, puede
desactivarse la conexión.
yAlgunos teléfonos no tienen la función de rechazo de llamadas.
yLa carga de batería baja en el teléfono puede causar problemas.
, Nota
"El término, la marca y los logotipos Bluetooth son
propiedad de Bluetooth SIG, Inc. y cualquier uso que
LG Electronics haga de ellos estará bajo licencia.
Otras marcas comerciales y nombres comerciales son
propiedad de sus respectivos propietarios".
La tecnología inalámbrica Bluetooth® es un sistema que permite conectar por radio
aparatos electrónicos con un alcance máximo de 10 metros.
La conexión de aparatos individuales bajo tecnología inalámbrica Bluetooth® no incurre en
ningún cargo. Se puede utilizar un teléfono móvil con tecnología inalámbrica Bluetooth® a
través de Cascade, si la conexión se ha realizado con tecnología inalámbrica Bluetooth®.
Estado operativo para la utilización de la función de
tecnología inalámbrica Bluetooth
yCierre el parabrisas.
yApague el aire acondicionado / calefacción.
yPare el vehículo o conduzca a velocidad baja.
yRealice la llamada en un lugar sin ruido.
- Pueden producirse diferencias en la calidad de la llamada dependiendo del tipo de
teléfono, condiciones atmosféricas en la carretera, etc.
- La utilización del teléfono durante la conducción puede causar accidentes.
- La función de tecnología inalámbrica Bluetooth puede no funcionar correctamente
con determinados tipos de teléfonos equipados con tecnología inalámbrica Bluetooth.

4 Solución de problemas
18
Solución de problemas
4
Solución de problemas
Solución de problemas
Síntomas Causa Solución
La unidad no se enciende.
La unidad no funciona.
La toma de alimentación y el conector están incorrectamente
conectados.
Conrme una vez más que todas las conexiones sean correctas.
El fusible se ha fundido. Rectique el problema que causó el fusible fundido y cámbielo. Asegúrese de
instalar el fusible correcto de la misma resistencia.
El ruido y otros factores son la causa de que el
microprocesador incorporado funcione incorrectamente.
Apague y encienda la unidad.
No se escucha ningún sonido. Los cables no están correctamente conectados. Conecte los cables correctamente.
Experimenta saltos del audio. Esta unidad no está rmemente asegurada. Asegure rmemente esta unidad.
La reproducción no es posible. El disco está sucio. Limpie el disco.
El disco cargado es de un tipo que esta unidad no puede
reproducir.
Compruebe el tipo del disco.
No se pueden sintonizar emisoras de
radio.
La potencia de la senal de las emisoras es demasiado debil
(al buscarlas con la sintonizacion automatica.)
Sintonice las emisoras manualmente.
No se han predenido ninguna emisora o se han borrado.(Al
sintonizar explorando las emisoras predenidas.)
Predena las emisoras.
El iPod/iPhone no funciona. Compruebe que el iPod/iPhone está bien conectado a la
unidad.
Conéctelo correctamente a la unidad.
La unidad no funciona correctamente
incluso al presionar los botones
correctos en el mando a distancia.
La potencia de la batería es baja. Cargue la nueva batería.

5 Apéndice
19
Apéndice
5
Apéndice
Especificaciones
GENERALES
Potencia de salida: 53 W x 4 CH (Max.)
Alimentación: DC 12 V
Impedancia de altavoces: 4 Ω
Sistema de toma a tierra: Negativo
Dimensiones (An x Al x Lg): 178 x 50 x168 mm
(sin el panel fronta)
Peso neto: 1,32 kg
TUNER (SINTONIZADOR)
Rango de sintonización FM:
87,5 MHz a 108,0 MHz
Relación S/N: 55 dB
Distorsión: 0,7 %
Sensibilidad utilizable: 12 dBµV
Rango de sintonización AM(MW):
520 a 1720 kHz o 522 a 1620 kHz
Relación S/N: 50 dB
Distorsión: 1,0 %
Sensibilidad utilizable: 28 dBµV
AUX
Respuesta en frecuencia: 20 Hz a 20 kHz
Relación S/R: 80 dB
Distorsión: 0,1 %
Separación de canales (1 kHz): 45 dB
Nivel máximo de entrada (1 kHz): 1,1 V
SD
Distorsión : 0.1 %
Bluetooth
ENERGÍA TX 4 dBm
Versión Especi cación Bluetooth 2.1 +
EDR
SALIDA de línea
Respuesta en frecuencia: 20 Hz a 20 kHz
Voltaje de salida: 2 V (Max.)
Subwoofer
Respuesta en frecuencia: 20 Hz a 120 Hz
Voltaje de salida: 2 V (Max.)
yEl diseño y las especicaciones están
sujetos a cambio sin previo aviso.

Av. Sor Juana Inés de la Cruz No 555
Col. San Lorenzo
Tlalnepantla, Estado de México CP 54033
Tel. (55) 5321-1919
Lada sin costo 01 (800) 347 1919
LG Electronics México S.A. de C.V.