LG Electronics USA DT-CK PERSONAL COMPUTER User Manual CKDK
LG Electronics USA PERSONAL COMPUTER CKDK
Contents
- 1. USER MANUAL 1 OF 4
- 2. USER MANUAL 2 OF 4
- 3. USER MANUAL 3 OF 4
- 4. USERS MANUAL 4 OF 4
USER MANUAL 2 OF 4

19Using the system
ⓡIf you turn the power on the computer for the first time, you have to register your
copy of Windows XP. The registration process may differ depending on the model,
but the difference does not affect the use of your computer.
ⓠInternet connection option screen appears, follow the instruction.
ⓢ"Who will use this computer?" message appears on the screen. Type the names
of the users and click [Next].
20 Using the system
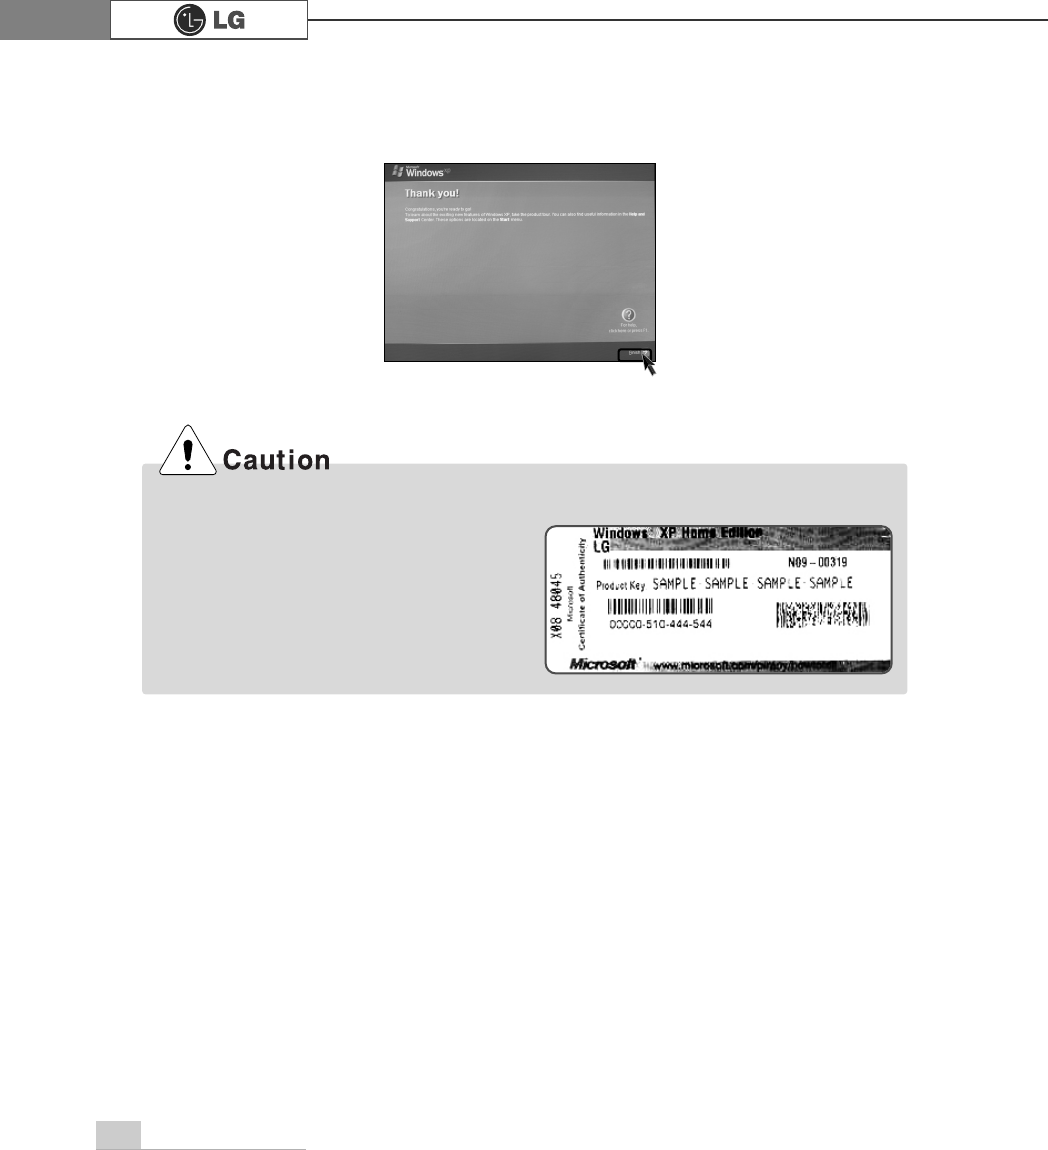
The certificate of authenticity includes the
Windows product key. This certificate is the
unique indication that proves your Windows is
authentic. Do not damage or remove this
sticker (attached on the side of the product.).
ÚThe certificate provided may be different
from this image.
Certificate of Authenticity
ⓣ"Thank you!" message appears on the screen.
Click [Finish] to complete the registration process.
21Using the system
2-2.Using W
g Windows XP
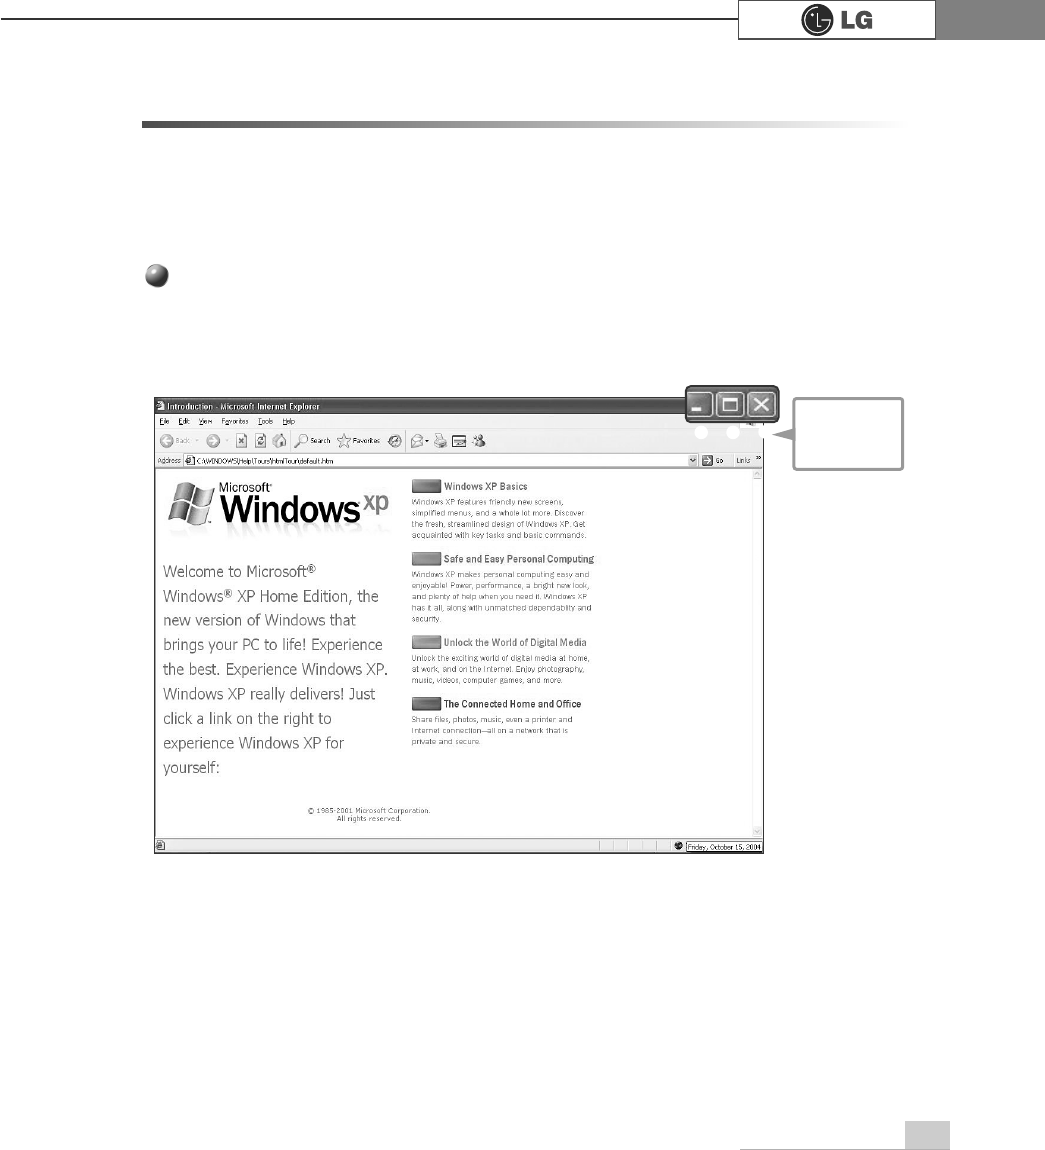
Windows XP is brilliant, fresh, and easy to use. The desktop and task bar images are sim-
plified, and you can easily access applications through the Start menu. There are more
"Desktop" options for you to customize the environment.
Click the [Start] button and click Windows XP Tour.
Then, the window will appear. Select a feature of Windows XP to view detailed
description.
Windows is an operation system of the computer. It is recommended to know basic func-
tionality of Windows for better use of a computer.
Windows XP Tour
℘ℙℚ
℘Minimize
ℙMaximize
ℚClose
22 Using the system
Windows XP Desktop
Click the Start button to view Start menus.
By clicking [All Programs] you can display a list of pro-
grams currently installed on the computer.
Include necessary applications to start Windows.
Indicates currently running programs.
You can set the screen resolution, color, audio, and
date/time by clicking icons.
You can delete files and folders which will be saved auto-
matically in the Recycle Bin. Running Empty Recycle Bin
will delete files and folders permanently from your com-
puter.
℘[Start button
ℙStart Menu
ℚTaskbar
ℛTaskbar Icons and
Clock
ℜRecycle Bin
ℜ
ℙ
℘ℚℛ
23Using the system
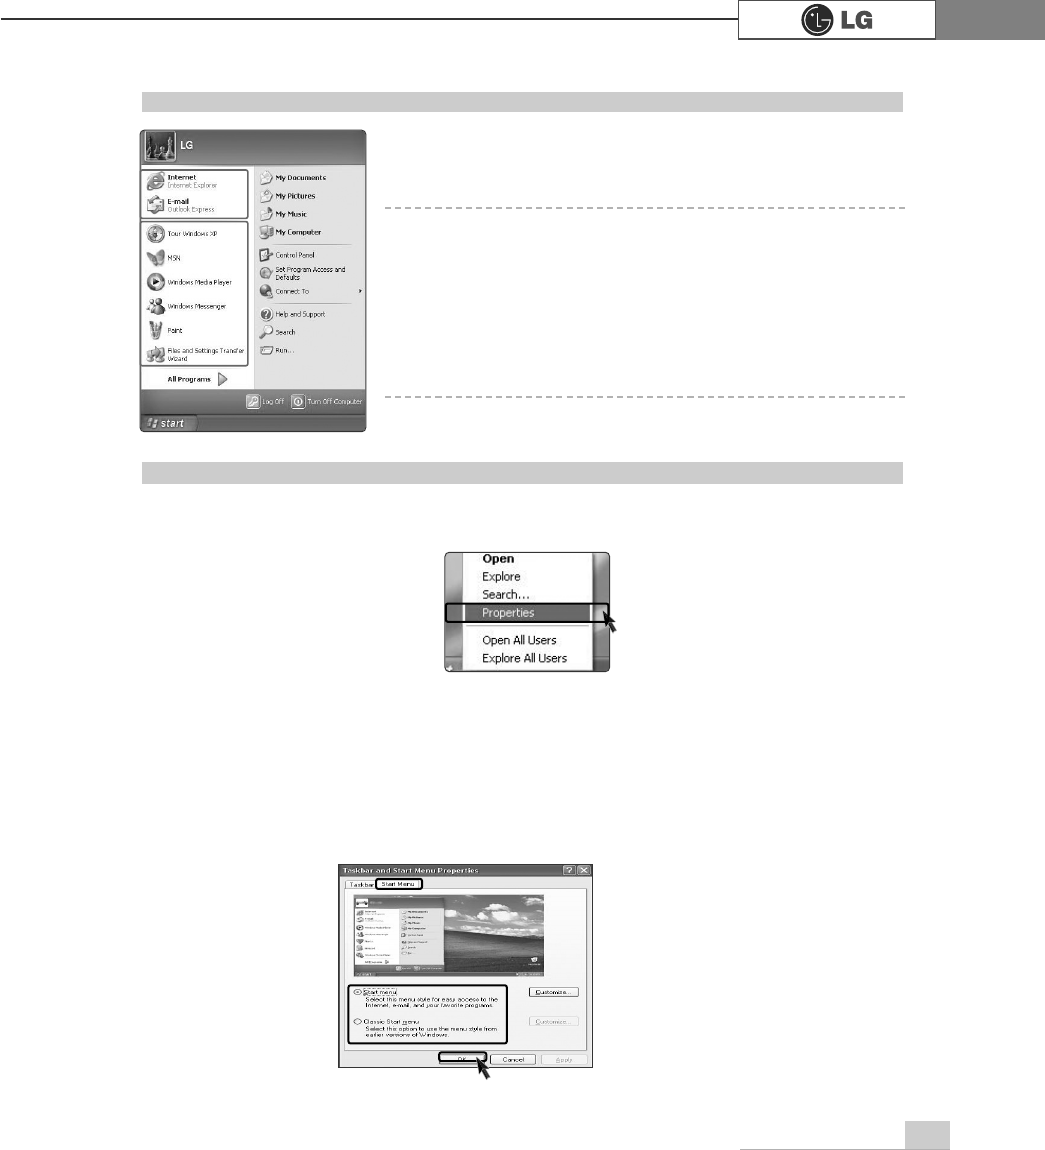
Start menu
Click the [Start] button to view menus that are most com-
monly used on the computer.
℘Fixed Topics
ℙRecently Used Programs
ℚAll Programs
ℛControl Panel: Enables to customize computer setting.
ℜMy Computer: Displays information on drives and networks,
and enables you to retrieve or run files and folders
℘
ℙℛ
ℜ
ℚ
To Change Start Menu Style
ⓞRight-click the [Start] button, and click [Properties]. Then, click an option under the
Start menu tab.
ⓟTo select the default start menu, click [Start Menu] on the [Taskbar and Start
Menu Properties] tab.
ⓠTo select the style in an older version of Windows, click the Classic Start Menu.
ⓡClick [OK] to apply the new settings.

24 Using the system
Fixed
items
Control Panel
Category View, a New View grouping similar topics, has been added to Control
Panel. Classic View displays all topics individually. You can select either Category
View or Classic View according to your taste.
To Display Recent Documents on Start Menu
ⓞRight-click the [Start] button, and click the [Properties].
ⓟClick Start menu on the Start Menu tab, and click
[Customize]. Select [List my most recently opened
documents] on the Advanced tab, and click [OK].
ⓠClick [Apply]
èè
[OK] in [Taskbar and Start Menu
Properties] window to save the new settings. Then, click
the Start button to display the Recently Opened
Documents folder where recent documents and files are
saved will be displayed on the Start menu.
To Display Programs at the top of Start Menu
ⓞSelect and right-click a program to display at the top of Start menu.
ⓟClick [Pin to Start Menu].
ⓠThe selected program will be displayed on the upper part of bound-
ary as a fixed topic.
ãTo empty My Recent Documents folder, click the Clear List on the Advanced tab.
Although the list is cleared, the documents will not be deleted in the computer.
Note
Category View Classic View
25Using the system
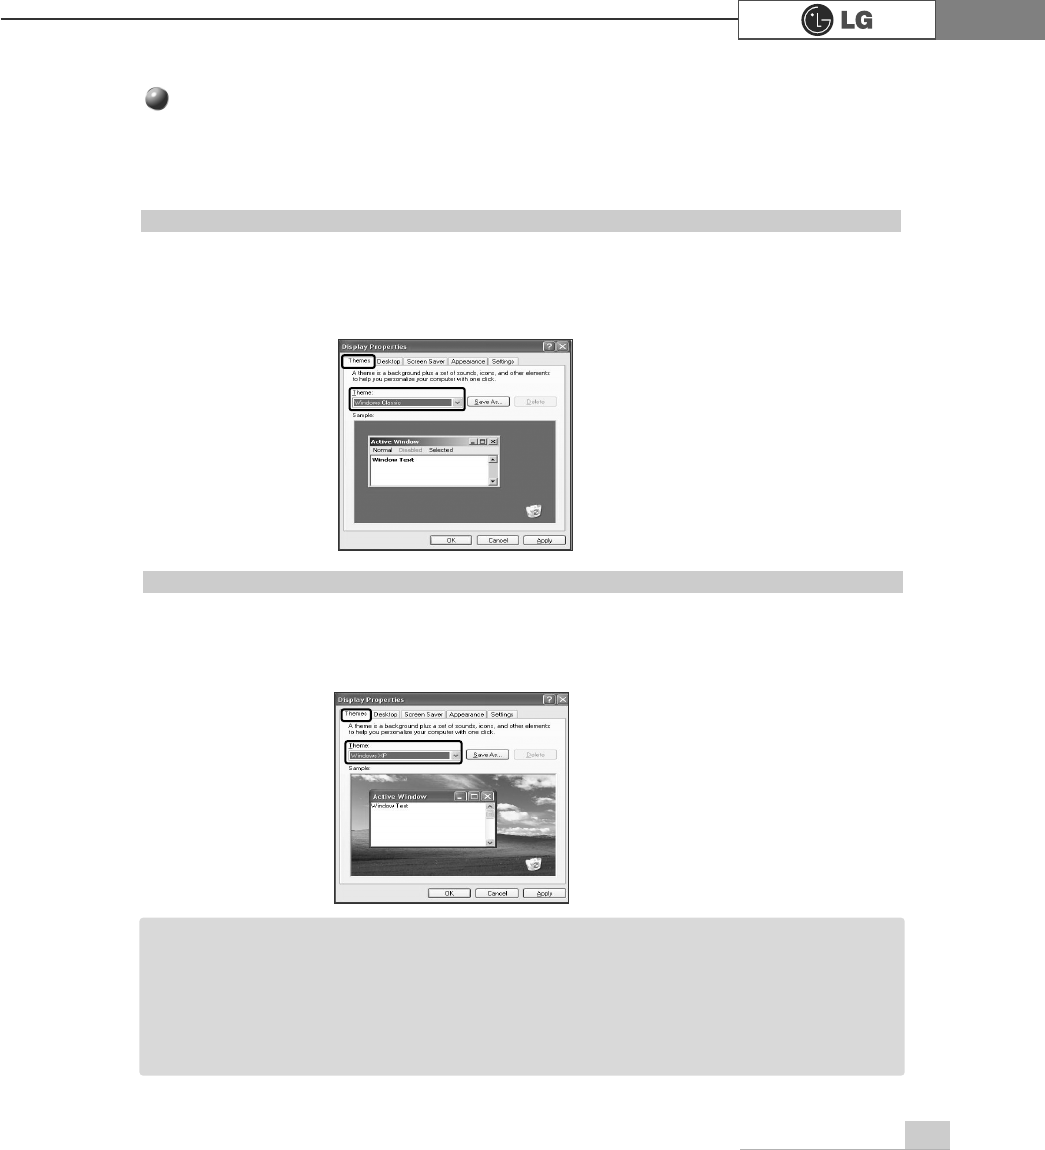
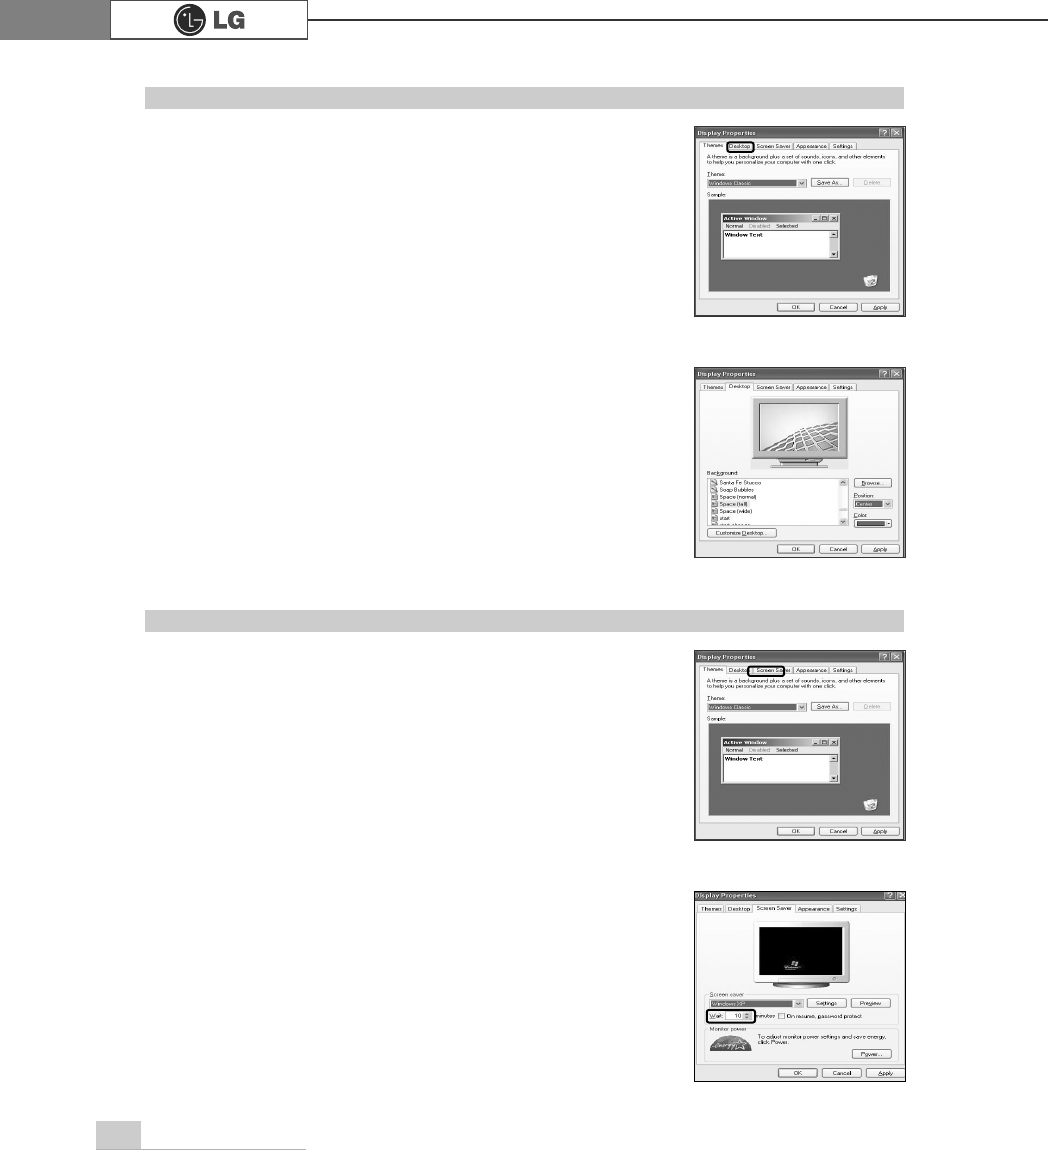
To Use Windows Classic Configuration
To Select an Other Theme
ⓞClick [Start]èè[Control Panel]è[Switch to Classic View]èè[Display].
ⓟClick [Themes] tab.
ⓠSelect another theme from the [Theme] drop down menu.
Changing Desktop Appearance and Theme
ⓞClick [Start]èè[Control Panel]è[Switch to Classic View]èè[Display].
ⓟClick [Themes] tab.
ⓠSelect [Windows Classic] from the [Theme] drop down menu.
ãTo view display properties, click [Start]
èè
[Control Panel]
è
[Switch to Classic View]
and double-click Display.
After selecting Windows Classic, you can customize Windows elements such as window
borders, icons, and menus.
Select Appearance tab, and click Advanced.
Note
With Theme menu, you can customize the desktop including the background, the
screen saver, icons, windows, the mouse pointer, and sound. If there are multiple
users, each user can customize his/her own desktop using Theme menu.
26 Using the system
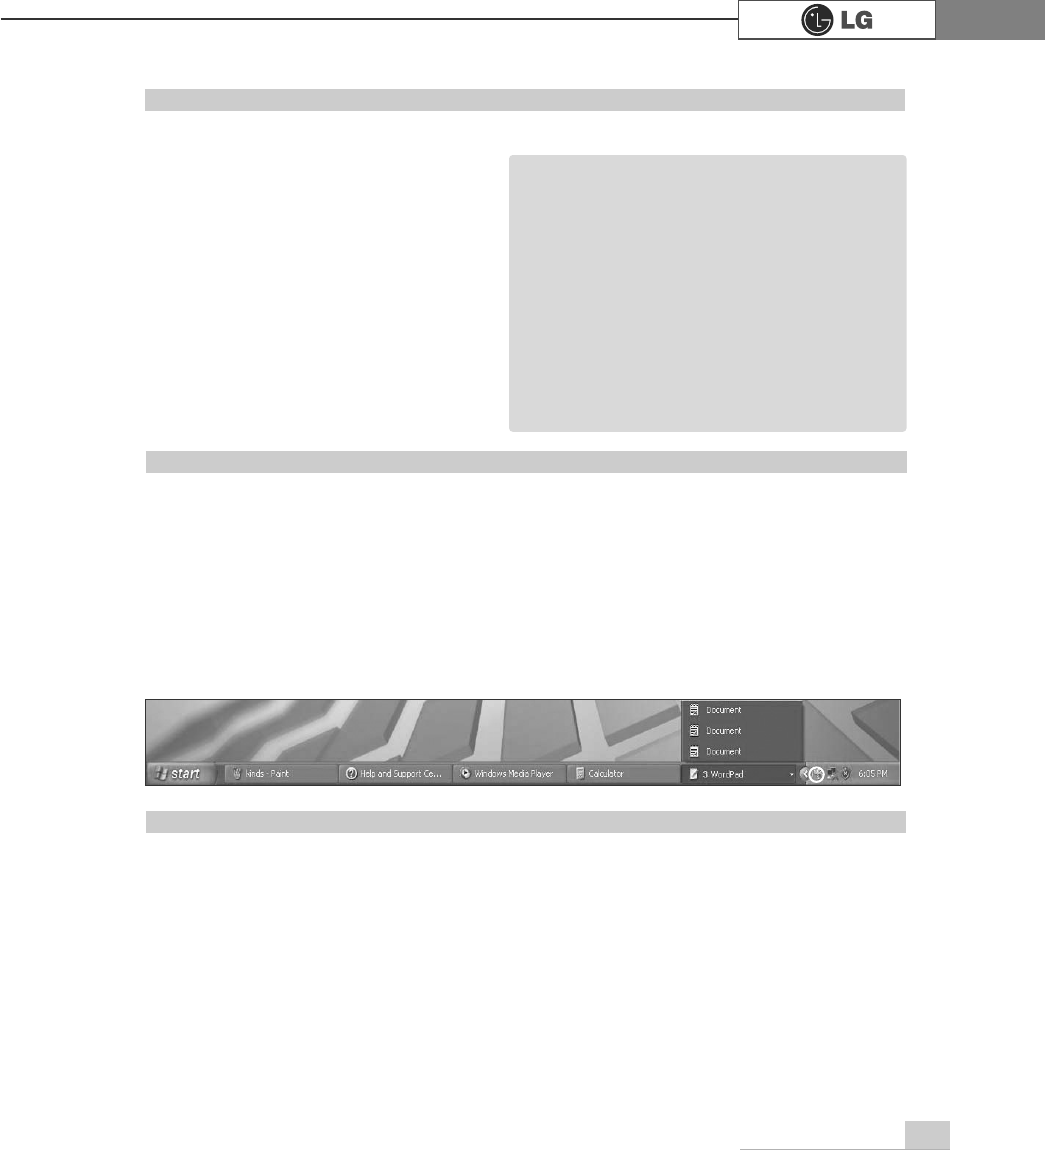
To Change Background
ⓞ
Click [Control Panel]
èè
[Switch to Classic View]
è
[Display], and select the Background tab. (Or locate the
mouse point on the Windows background, and right-click it.
Then, a popup menu will appear. Select [Properties] from
the popup menu.)
ⓟClick the scroll (triangle down) button, and check the
image list. Select an image to use it as the background,
and click [Apply]. Then, the background will be changed.
However, if there is no image that you would like to use
as the background, click [Browse] and select an image
file.
To Set Screen Saver
ⓞ
Run [Control Panel]
èè
[Switch to Classic View]
è
[Display]. And select [Screen Saver] tab.
ⓟSelect a screen saver from the list.
Click the scroll button of Wait field and set the time to wait
till the screen saver is activated. Select Password
Protected check box, then you will be requested to enter
the password when restarting Windows while the screen
saver is running. This feature is convenient for preventing
others from accessing data and damaging them.
27Using the system
Desktop Cleanup
With Desktop Cleanup Wizard, you can delete hot icon paths that are not used on the
desktop. Desktop Cleanup Wizard will be automatically executed every 60 days, or you
can run this program when necessary.
To delete unused icons on the desktop, do the following
ⓞOpen [Control Panel]
⍛⍛
[Switch to Classic View]
⍛
[Display].
ⓟClick [Customize Desktop] under Background tab.
ⓠClick [Clean Desktop Now] under Desktop Cleanup tab.
ⓡFollow instructions of [Desktop Cleanup Wizard].
Taskbar
If there are multiple documents and programs are running on the computer, the taskbar will group
tasks and display each group. For example, if there are three Word Pad documents are running
on the computer with other seven windows, three Word Pad tasks will be grouped under one
Word Pad button. To view a Word Pad document, click the Word Pad group button and select the
corresponding document.
For simple display of the taskbar, icons that are not used for a long time and located next to the
clock icon will be hidden. Click the arrow button to display hidden icons. Or click on the icon to
display it again.
To Customize Background
ⓞRun [Control Panel] èè[Switch to
Classic View] è[Display]
ⓟClick the theme to change under
[Themes] tab.
ⓠChange the theme.
ⓡAfter changing the theme, click
[Apply] under Theme tab of Display
Properties dialogue box and select
[Save As].
ⓢInput the name of the theme, and
click [OK].
ãTo view display properties, click [Start]
èè
[Control Panel]
è
[Switch to Classic
View], and double-click on display.
If you change the theme without inputting
the theme name, the new theme will be
named previous name (modified).
However, if you select another theme, the
changed theme will be deleted.
The new theme will be saved under My
Documents folder. To open My Documents
folder, click Start and My Documents.
Note
28 Using the system
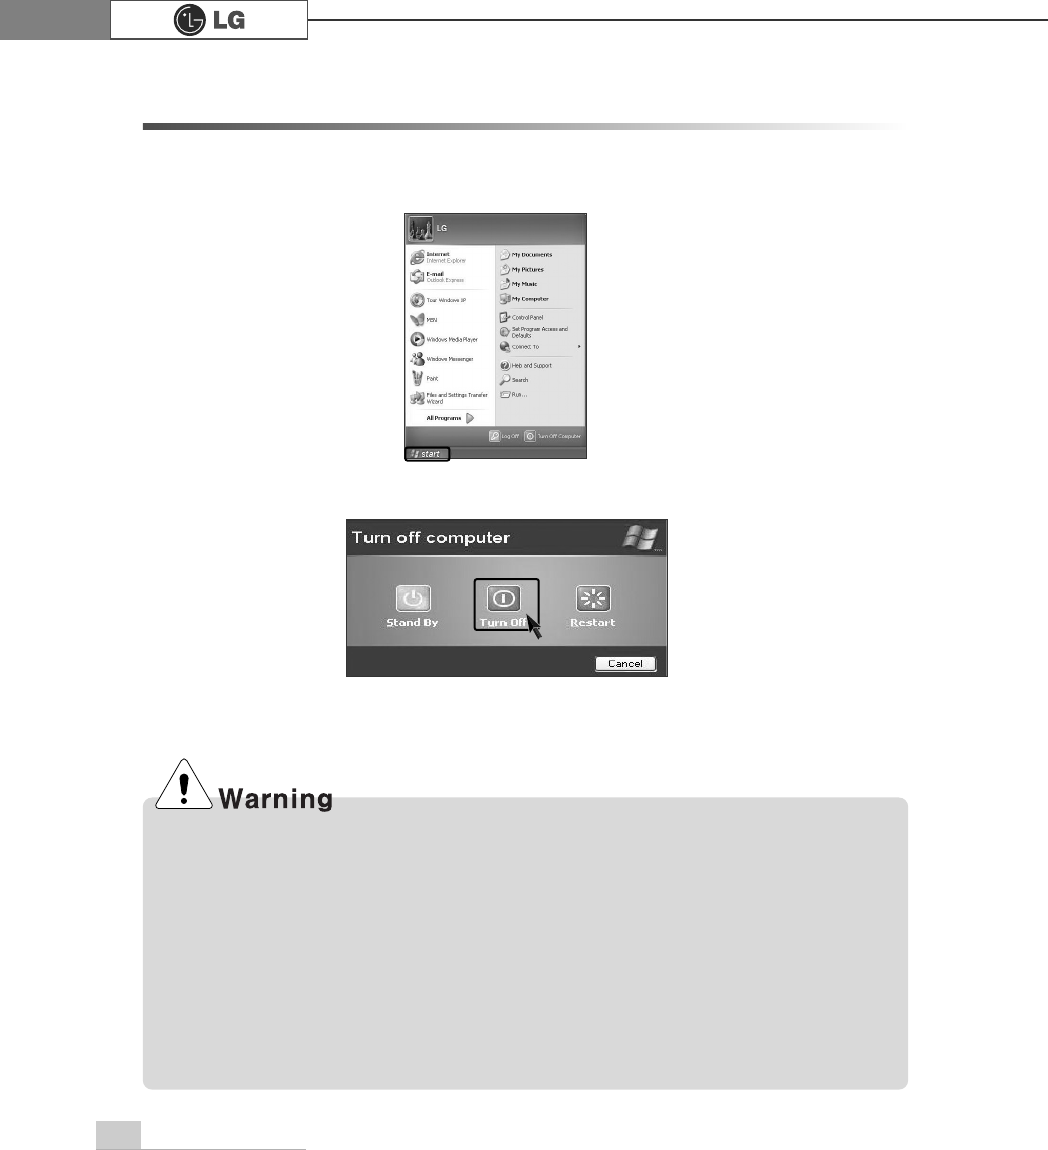
ⓞClick the [Start] button and select Turn Off Computer.
ⓟWhen Shutdown screen appears, click [Turn Off].
ãYou may not be able to normally turn off the computer in Windows. When this happens,
press the Power button for five seconds.
However, this is an emergency measure and taking this measure may result in errors in the
system. It is recommended to click the [Start] button and select Turn off Computer menu on
Windows desktop to shut down the computer.
Abnormal turning-off of the computer may damage data stored in the hard disk.
ãWhen the program suddenly stops, click [Ctrl] + [Alt] + [Delete] keys and terminate the pro-
gram through Windows Task Manager or restart the system. If the some program files of
Windows has been damaged due to abnormal turning-off of the computer, reinstall damaged
programs. LG Electronics is not responsible for data loss caused by your mistakes and negli-
gence.
ⓠThe computer will be automatically turned off.
2-3.Turning Off Computer
Abnormal turning-off of the computer may damage data stored in the hard disk.
29Using the system
2-4. Restarting the Computer
The computer needs rebooting sometimes due to abnormal operation or incorrect
use. When this happens, reboot the program as described below.
ⓞPress [Ctrl] + [Alt] + [Delete] keys to terminate the program or restart the computer.
ⓟIn case the measure described above does not work, press the Power button for five
seconds to turn off the computer. Then, restart the computer after 10 seconds.
CK DK
30 Using the system
This chapter describes functions of the generally used mouse. Depending on the
model, a different mouse is provided.
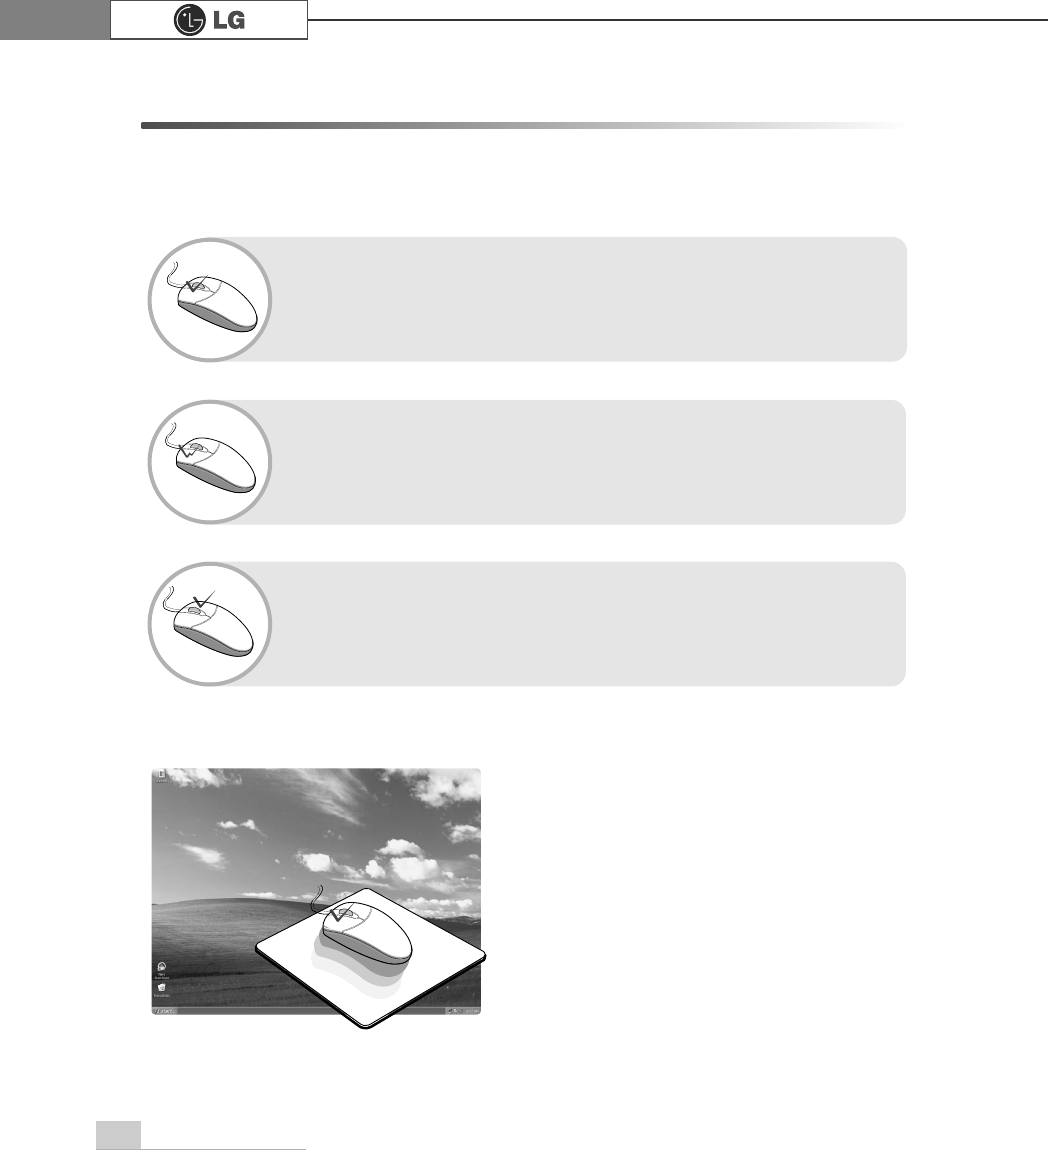
What Is Drag (Move while holding
down)?
You can move an icon or a window by
keeping pressing the left button and
dragging the mouse pointer to the intend-
ed destination. This is called Drag.
Drag
What Is Double-click (Run)?
You can run the program by clicking the left button of the mouse
twice consecutively on the program icon. This is called "Double-
click."
What Is Right-click (Undo/Popup Menu)?
By clicking the right button of the mouse, you can open the popup
menu that includes auxiliary functions of the corresponding program
such as Copy, Move, and Rename.
What Is Click (Select)?
You can select a program by clicking the left button of the mouse
on the program. The mouse enables you to select or run the pro-
gram by clicking on it without using the keyboard
2-5 Using the Mouse
31Using the system
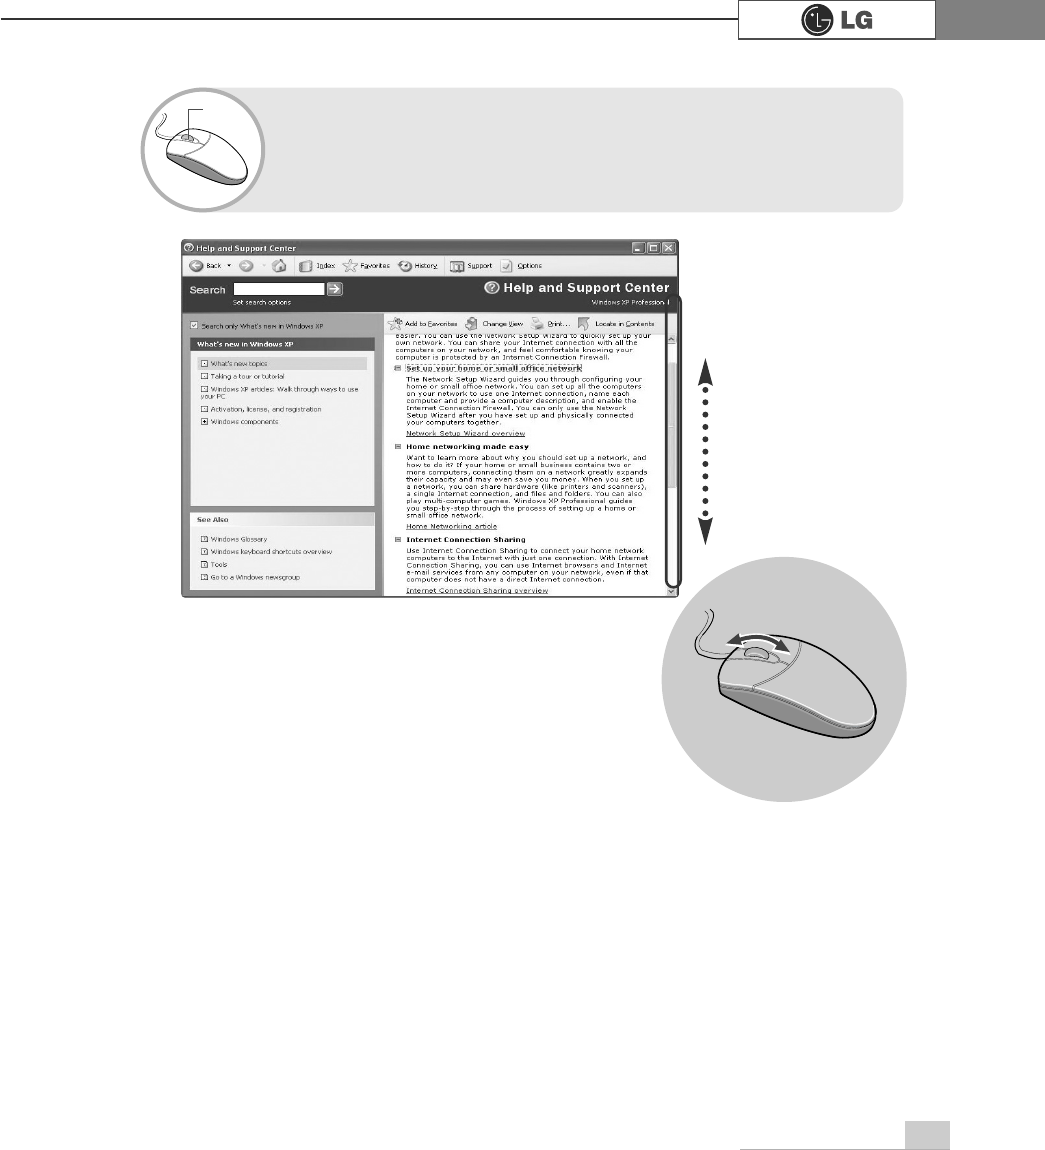
What is Wheel (Move by rolling the wheel)?
If the program is displayed with a scroll bar, you can view the
upper and the lower parts of the program by rolling the wheel of
the mouse.
Wheel
32 Using the system
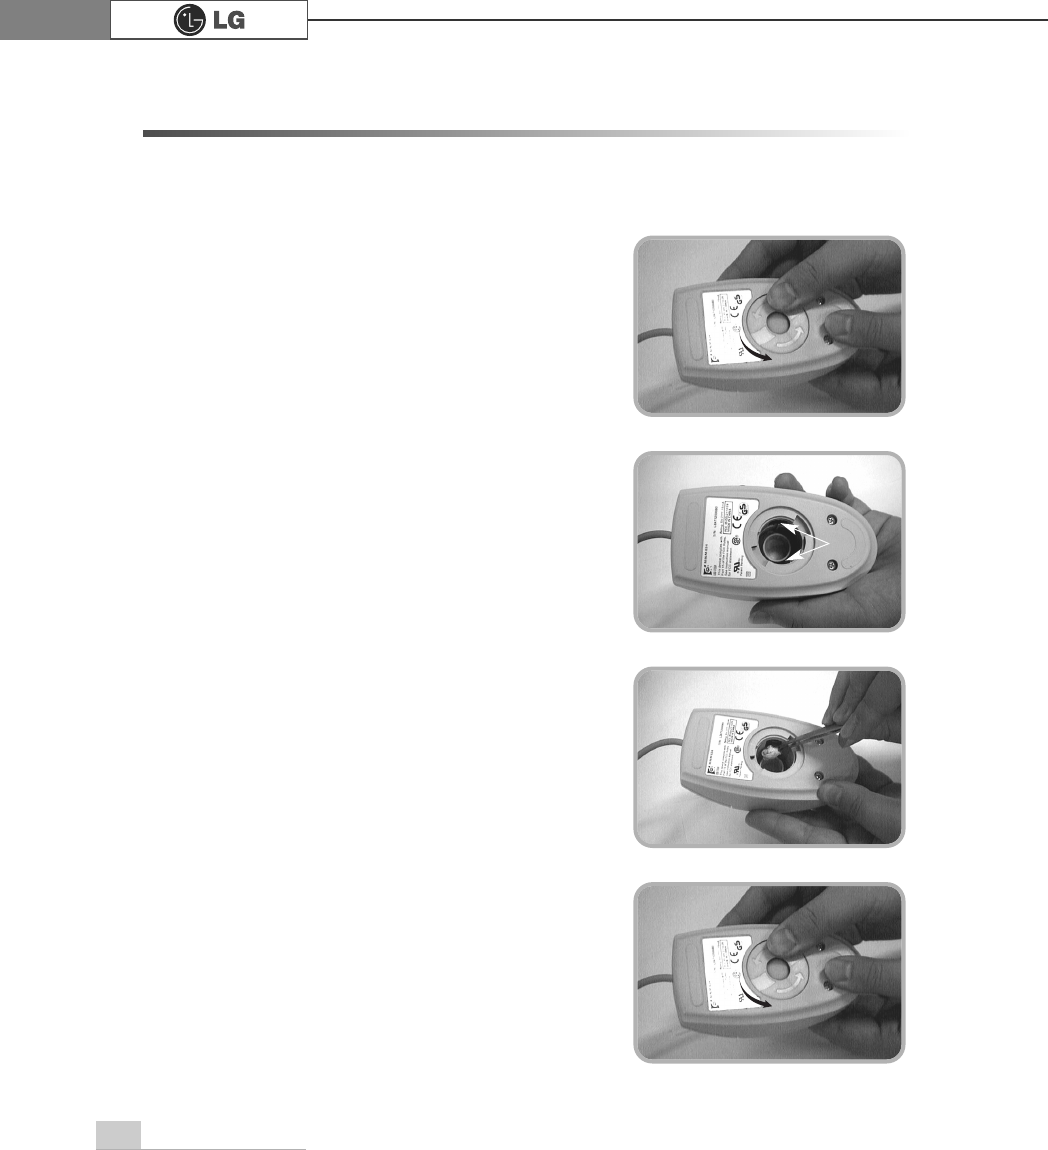
2-6.Cleaning the mouse
If the mouse does not work,clean up the mouse with cotton swap.
Do as follows.
ⓞOpen up the cover in the direction of the arrow
as shown on the picture and take out the ball.
ⓡClose the cover in the direction of the arrow
and use the mouse.
ⓠClean with cotton swab and alcohol.
ⓟSee if inside of the mouse is filled with dust.
5ROOHU
33Using the system
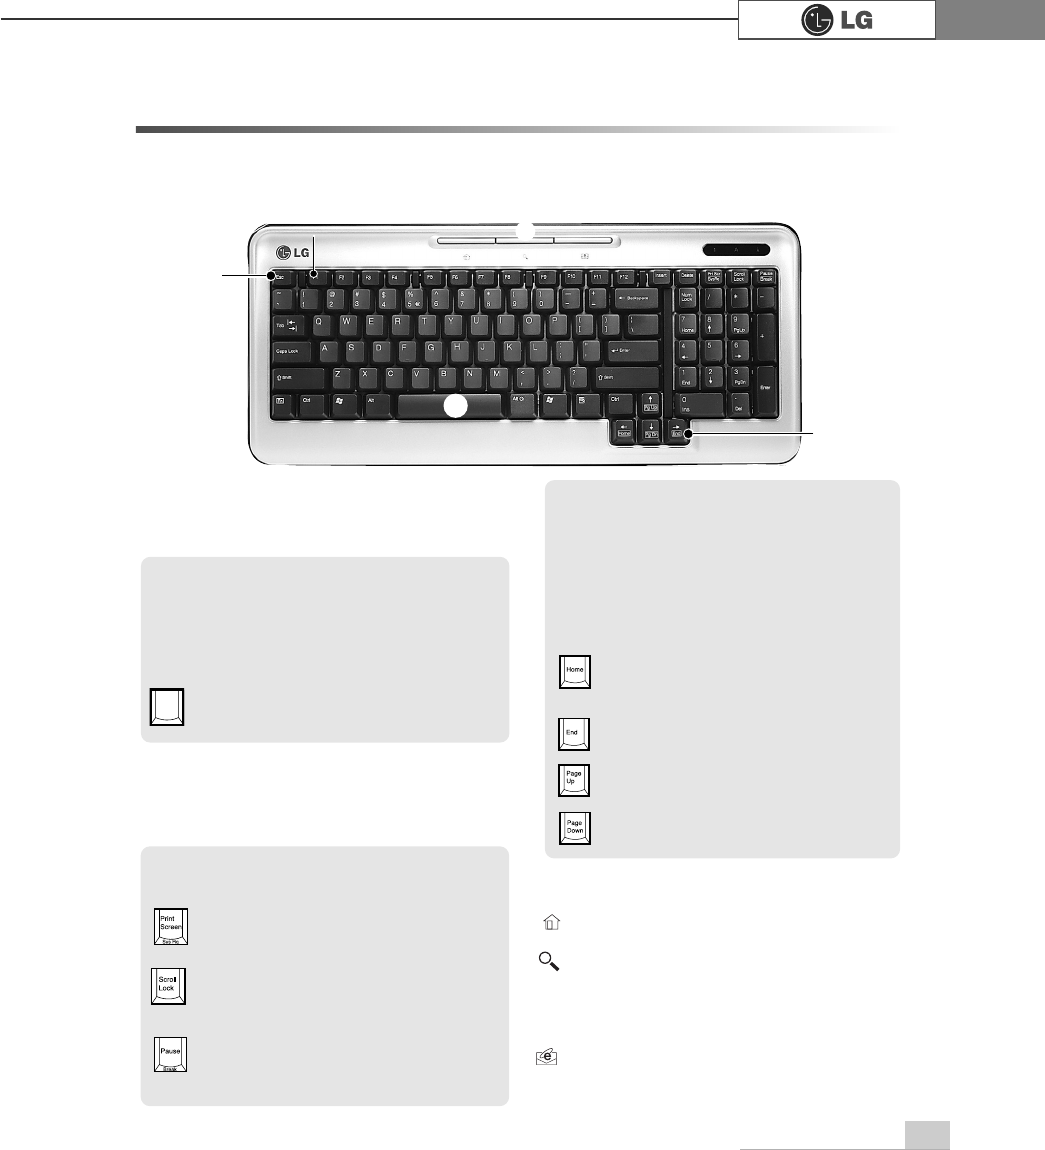
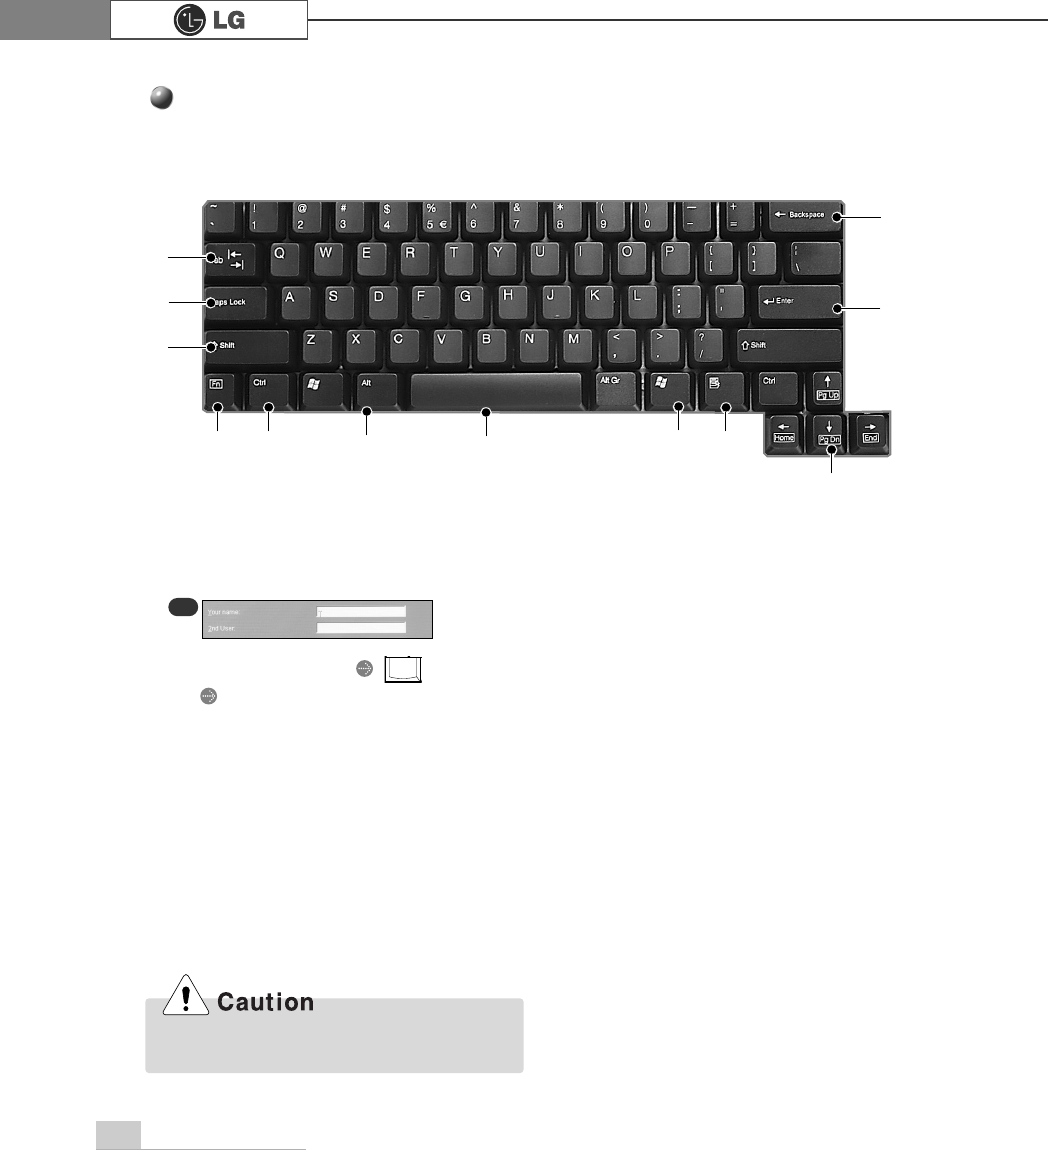
2-7. Using the Keyboard
The keyboard is a kind of communication tool between the computer and the user.
You can input the data, execute commands, and perform certain types of tasks on
the computer through the keyword.
ℚTypewriter Keypad
(See page 36 of the user manual.)
℘ESC key
Terminates or stops the program.
ℛOther Keys (Special Control Key)
Scroll Lock
Moves the entire screen while the cursor
is not moving.
Print Screen
Prints or temporarily saves the screen.
Pause/Break
Temporarily stops the operation of the
computer.
ℙFunction Keypads
F1 ~ F12 keys are called function
keys, and each function key has a
unique role depending on the oper-
ating system and program.
F1 IGenerally displays Help menu of the
application.
F1
℘
ℙℝ
ℚ
ℝℝMultimedia/Internet Function Keys
ℜCursor Keypad and Numeric
Keypad
These keys are used to move the cursor
on the monitor screen (up, down, right
and left.) If Num Lock lamp is off on the
numeric keypad, the numeric keypad
functions the same as the cursor keypad.
End
Moves the cursor to the end of the line.
Home
Moves the cursor to the beginning of
the line.
Page Up
Moves the cursor to the previous page.
Page Down
Moves the cursor to the next page.
Home
launches the Internet Explorer on your system.
Search
Functions while the Internet explorer or
Windows Explorer is running. Functions as
"Access Internet Search Engine" in Internet
Explorer and "Find Files" in Windows Explorer.
E-mail
Runs e-mail programs installed in the system
such as Outlook Express.
34 Using the system
Spilling the water on the keyboard causes
disfunction to the computer.
The typewriter keypad functions the same as keys on the typewriter. The typewriter
keypad includes alphabet, numeric, and Korean characters as well as [Shift] + [Alt] +
[Backspace] keys.
℘Tab key
Used to input data in the data input
window and to move to the next data
input window.
ℙCaps Lock
Toggle cases.
ℚShift key
Used to input the upper characters of
keys or capital English letters.
ℛ,℟Ctrl and Alt Keys
Ctrl and Alt keys are not normally used
alone, but they are used with other
keys in combination. They function dif-
ferently for each program.
Inputting a name
Inputting initials of the name
Tab
Typewriter Keypad
LG
LG User
⌆
ℚ
ℙ
℘
℟℡
ℛ⌅℞℠
ℝ
ℜ
ℝEnter
Used to inform the computer of the
completion of one command or to
change the line
ℜBackspace
Used to move the cursor to the left
place by one column and delete each
character.
℞Space
Used to make a blank space on the right.
℠Windows
Used to select the Start menu without
using the mouse.
℡Press Shortcut menu key to view
Press Shortcut menu key to view Shortcuts
for the current porgram(Shortcut menu
key works the same as the right-click
ing the mouse button).
⌅⌆ This key is used in conjunction
with [Fn]
key to move on to the next or previous
page.
EX
35Using the system
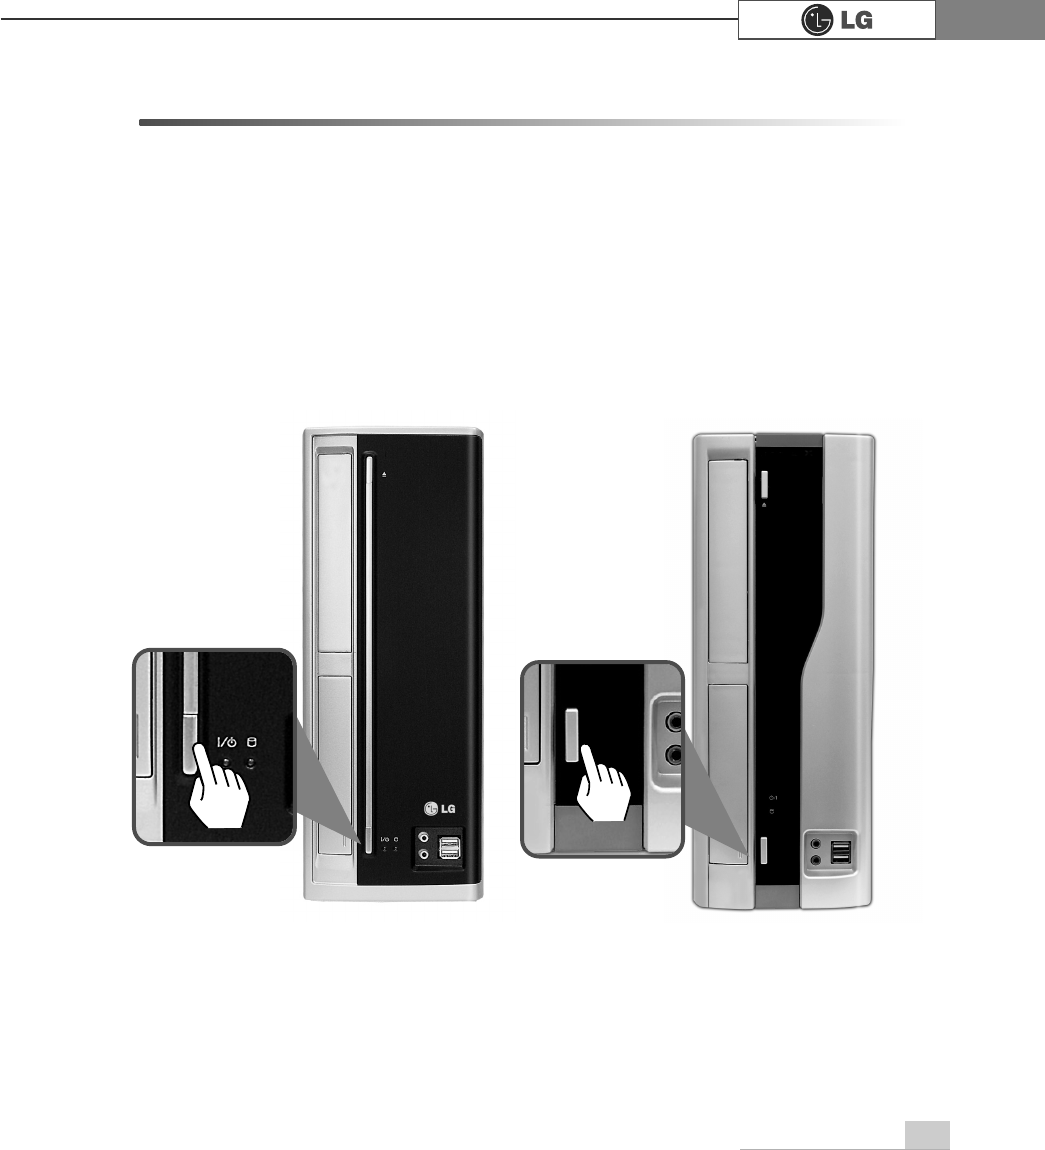
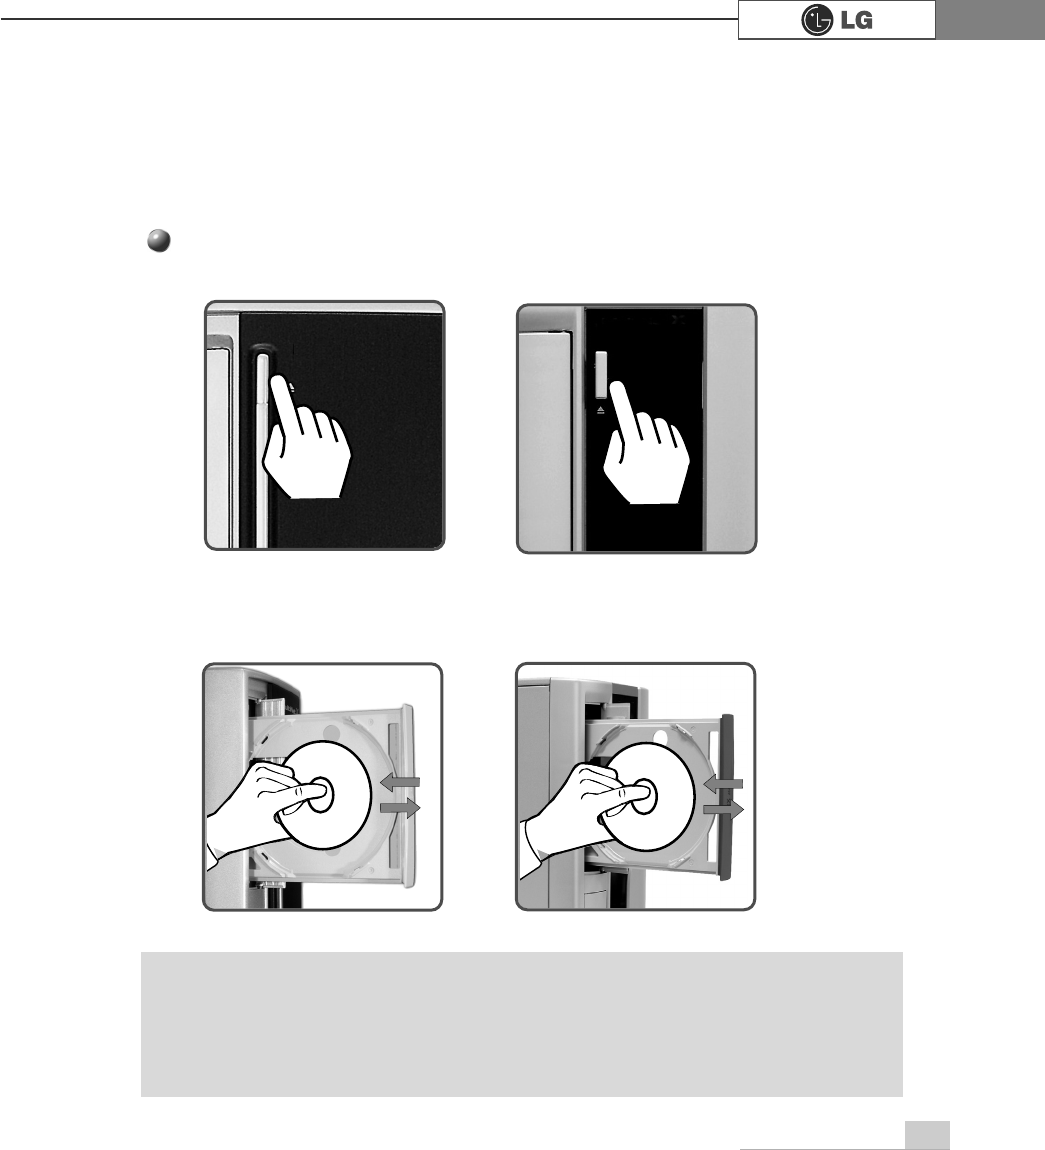
Turn on the computer, and press the Open/Eject button.
Put the CD with its labeled side up, and insert the CD in CD-ROM tray without touching
the playing part. (ÚThe trademark must face upward.)
CD stands for Compact Disc, and ROM stands for Read Only Memory. Unlike other auxil-
iary devices, you cannot write or delete data on the CD-ROM but only can read the data.
The CD-ROM drive can read the CD and play audio and video CDs
2-8.Using the optical disk drive
Inserting a CD
Note
ãAfter inserting a CD, press the CD-ROM cover or press the Eject button again.
ÚThis model adopted slim design for efficient use of space and the CD-ROM
(RW/DVD/COMBO) drive is vertically installed. Therefore, a small-sized CD titles
(80mm) may not be properly inserted. If necessary, lay down the product to insert
such small-sized CD titles.
DK
CK
36 Using the system
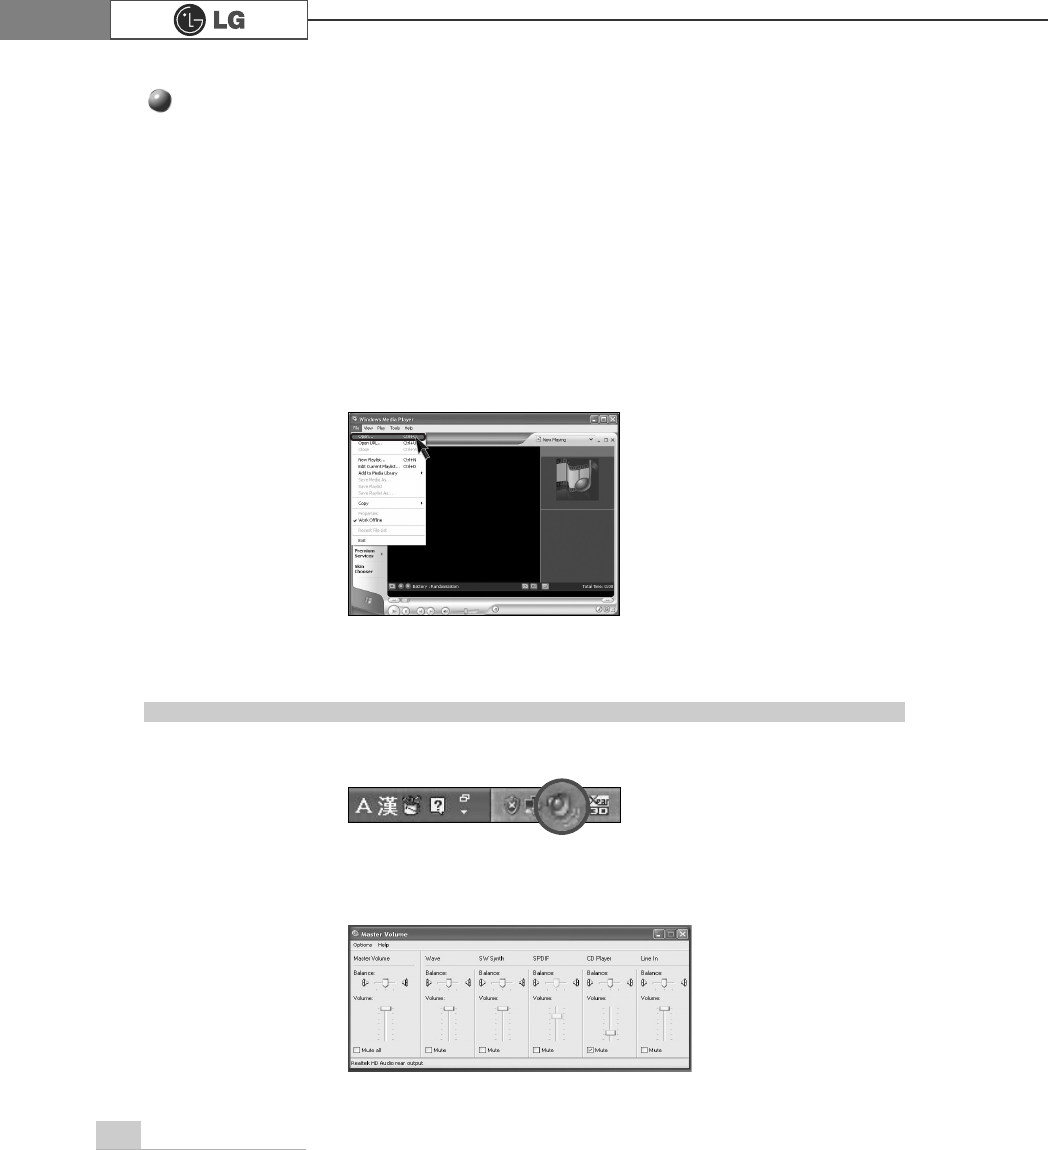
Using Windows Media Player
The Windows Media Player can play various kinds of audio and video files. You can
play and reproduce a CD. If the computer is equipped with a DVD driver, you can play
the DVD title, listen to Internet radio programs, play movie clips, and watch music video
on an Internet sites. You can also create his/her own music CD with the Windows
Media Player.
ⓞ
Click the [Start] button on the desktop, and select All Programs èèAccessories è
Entertainment èèWindows Media Player.
ⓞClick [Volume Control] icon from the taskbar.
ⓟWhen the Windows Media Player is executed, click the [Open] button and select
audio or video file to play.
ⓟDrag the mouse to move the slide bar to adjust the volume.
Adjusting volume
37Using the system
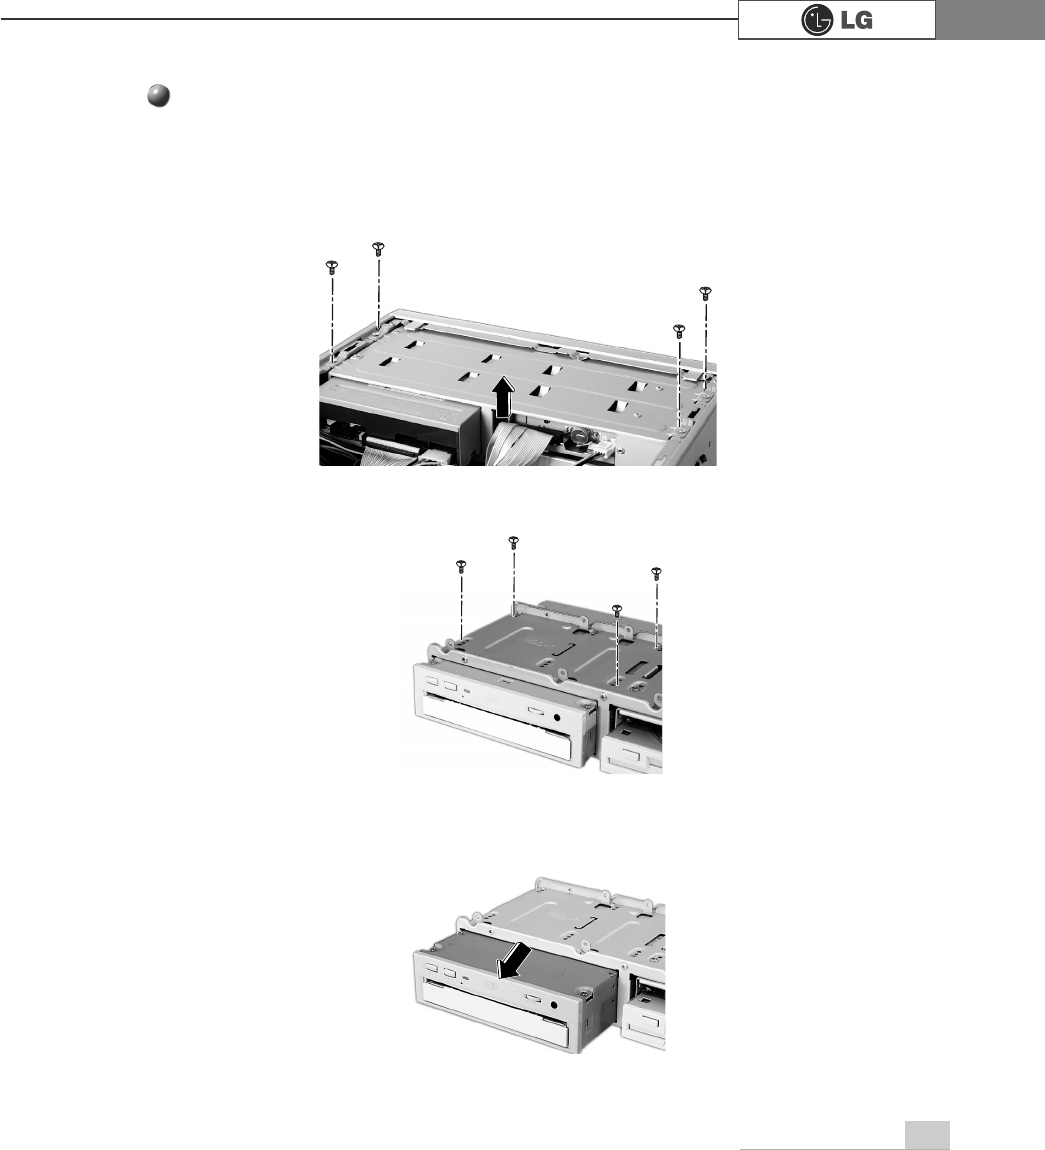
Replacing CD-ROM(RW/DVD/COMBO)
ⓞRemove the computer cover reffering to the Opening the computer cover.
ⓟRemove 4 screws and then take out the cover as the direction of arrow.
ⓠRemove 4 screws from CD-ROM drive.
ⓡRemove the cable from CD-ROM drive and then push it as the direction of arrow to
remove the CD-ROM drive.
38 Using the system
ãwhen replacing CD-ROM,
use only the product that is
approved by LG.
Note
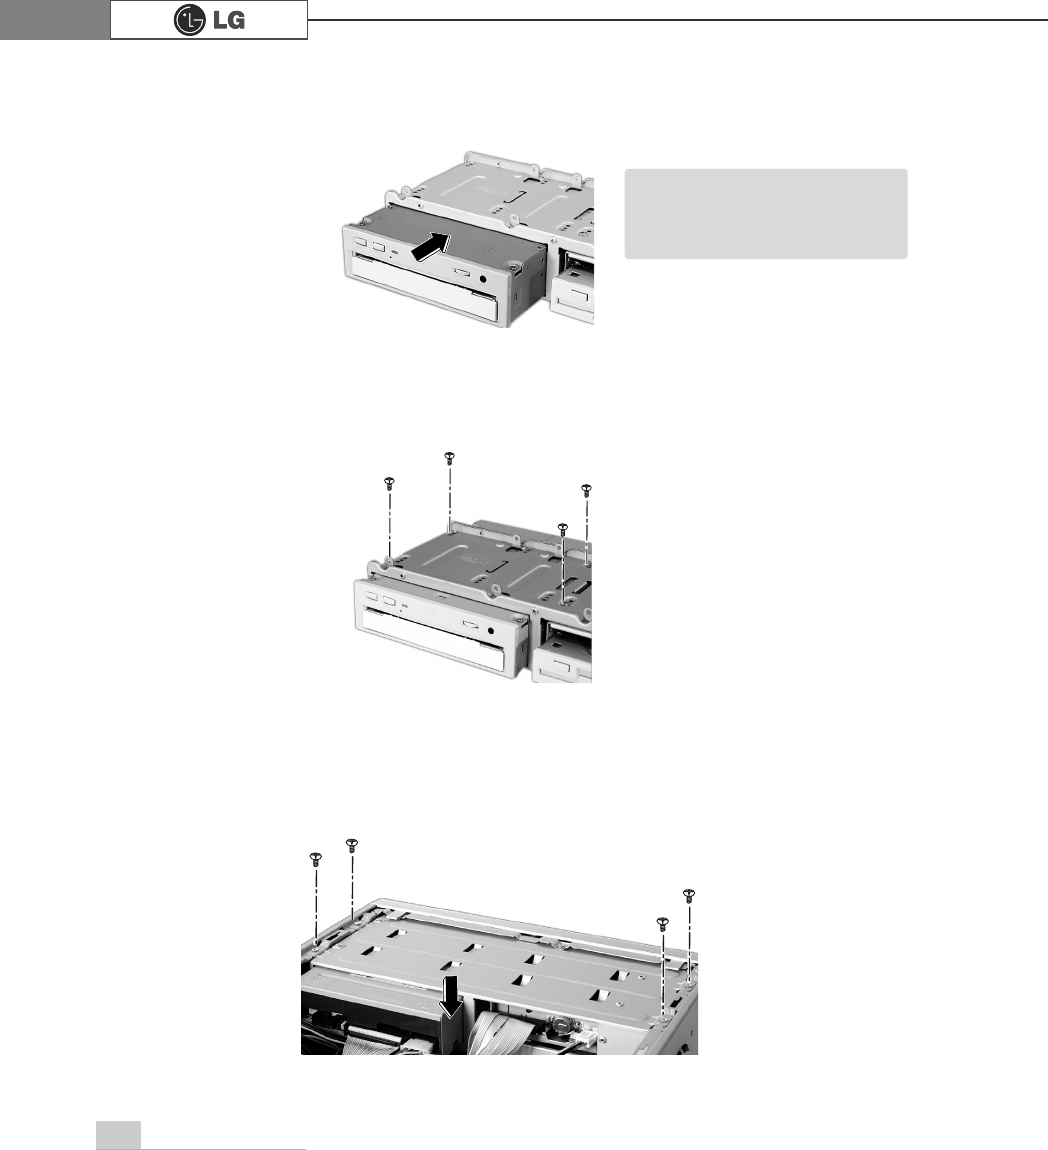
ⓢAfter fastening 4 screws, close the computer cover. Refer to the Closing the com
puter cover (Page 66).
ⓣAfter istalling CD-ROM drive into the case, fasten 4 screws.
ⓢPush the new CD-ROM drive as the direction of the arrow.
39Using the system
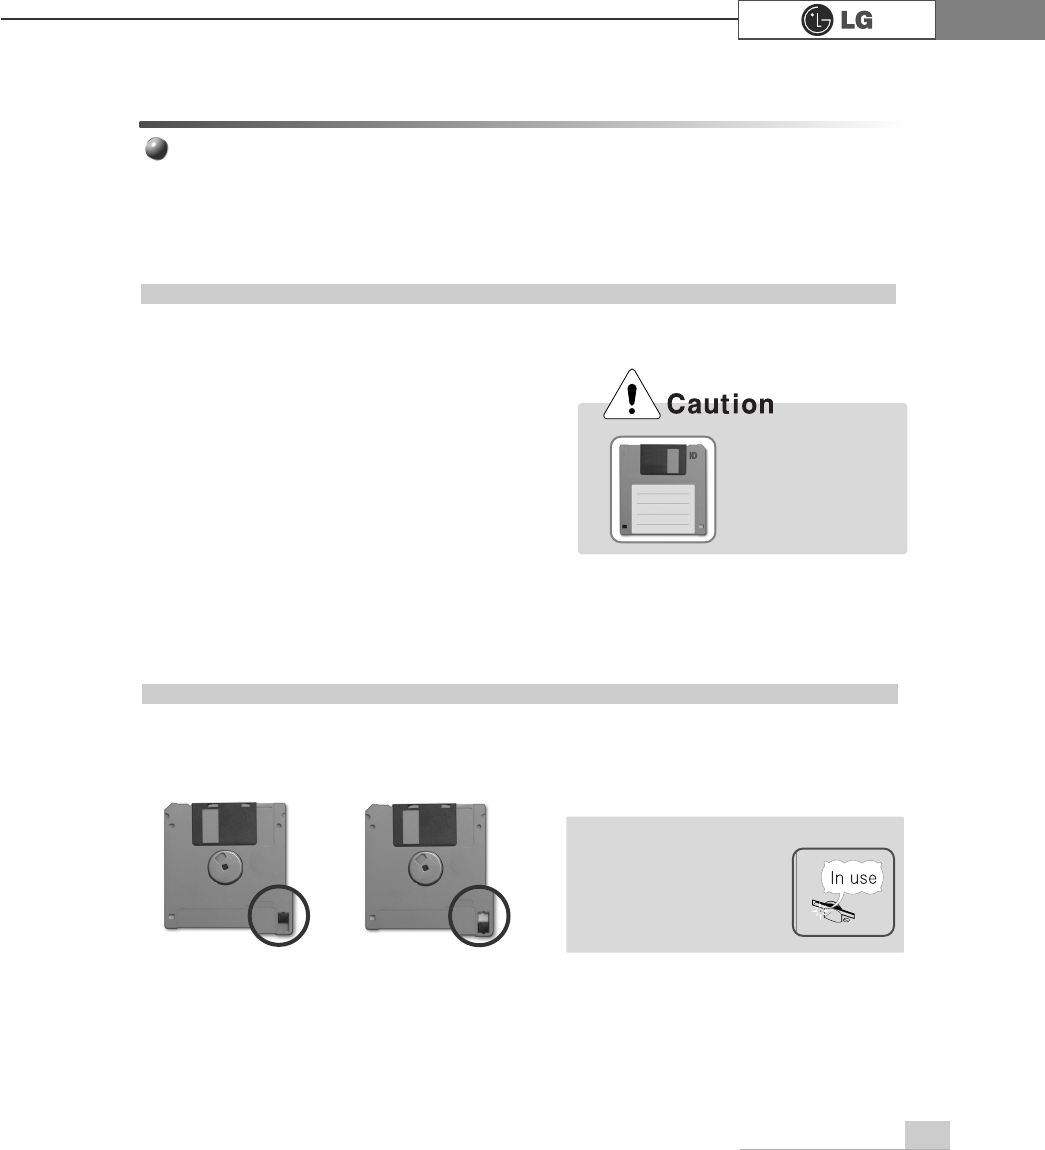
Prohibiting data access into the floppy
With this floppy disk. you can read, write, delete and change data. But by positioning the
tap as shown on the right, you can only read data from the floppy disk.
Using floppy disk
Always make back up files for your important information.
2-9.Using disk drive
Using floppy disk drive
Floppy disk drive is built in your computer. After inserting floppy into the drive, you can
read and write data. The capacity of floppy disk is less than your hard disk however, it
is easily carry on your hands and smaller than other disk drives.
Closed
read/write Open
Read only
⍀Keep your
floppy
disk in a safe space.
⍀Use the label part when you pick up or hold the
floppy
disk.
⍀Attach labels after writing letters on it.
⍀Handle
floppy
disk with care.
⍀Use only one label to each
floppy
disk.
⍀Keep
floppy
disk away from magnetic product
such as TV.
⍀Keep
floppy
disk from direct sunlight.
ãwhen inserting
the floppy disk,
label should face
upward.
ãWhen the floppy disk
status indicator is on,
do not attempt to take
floppy out of computer.
Note

40 Using the system
Using the Hard Disk Drive
The hard disk drive is an auxiliary memory installed in the computer. The hard disk drive
reads and writes data at a fast speed and saves large amount of data. As both the disk
and the disk drive are installed in the hard disk, the "hard disk" and the "hard disk drive"
are used as the same terms. After installing a new hard disk, set up the system and for-
mat the hard disk while referring to the "System Setup" part
⍀Before removing or installing a computer, turn off the computer and correctly connect
cables. In the case where cables are incorrectly linked, the hard disk may get damaged.
⍀When installing a hard disk, use designated nuts only. Otherwise, defects may occur on
the hard disk. If you uses thicker nuts than standard ones, critical damage may be done to
electronic parts.
⍀For stable use of the hard disk, fix the hard disk in the main body of the computer without
any gap or vibration.
Notes on Removal or Separation of the Computer
⍀The hard disk may get damaged by external shocks during transportation.
⍀Avoid direct sunlight and damp place because the hard disk is sensitive to high temperature
and humidity.
⍀Cover the hard disk with a static electricity-resistant envelope.
⍀Put the hard disk away from appliances with strong magnets such as TV and stereo set.
⍀The hard disk can get damaged by an electric shock from lightning. It is recommended,
therefore, not to use the computer during thunder and lightening, and disconnect the power
cord when not using the computer.
Notes on Operating Environment of the Computer
⍀Shocks on the hard disk during transportation may cause file damage or bad sectors.
⍀When the computer is abruptly reset (rebooted) due to power failure, the hard disk may get
damaged.
⍀The hard disk may get damaged when infected with computer viruses.
⍀BIO setup with wrong hard disk parameter values may damage the hard disk.
⍀If necessary files are deleted by your mistake, the computer may not properly function.
⍀Abrupt turning-off of the computer can damage the computer.
Notes on Operation of the Computer
A hard disk is sensitive to the external environments and shocks. The manufacturer is
not responsible for data loss or damage of the hard disk caused by errors. Therefore,
it is recommended to back up important data
Upon Data Damage in Hard Disk.
41Using the system
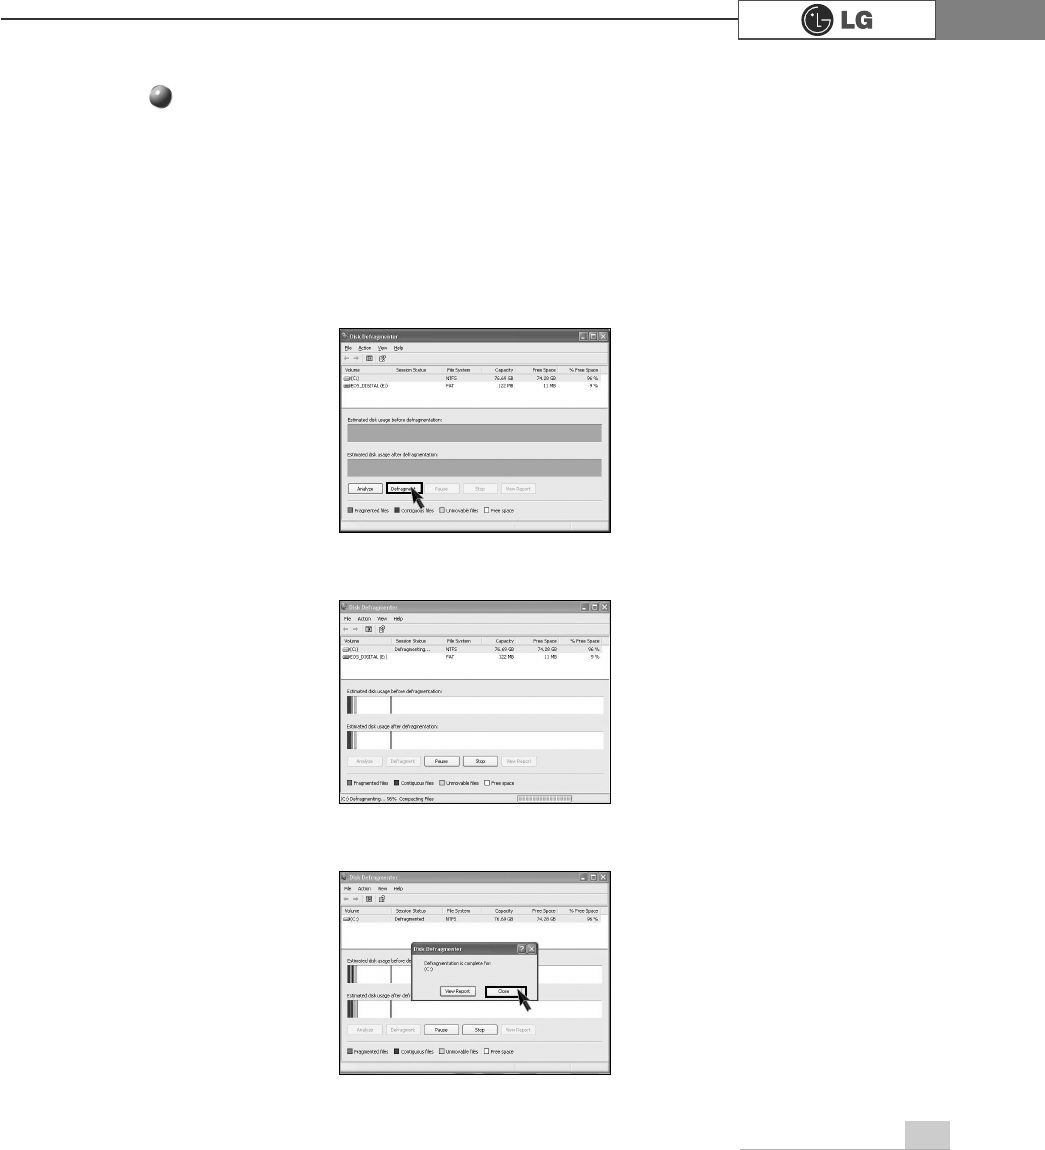
The disk defragmenter will collect fragmented volumes so that the computer can operate effi-
ciently and fast. Finish other application programs before running the Disk Defragmenter.
ⓞClick the [Start] button on the desktop, and select Accessories
èè
System
Tools
è
Disk Defragmenter.
ⓟWhen the following screen appears, select the drive, and click the [Defragment]
button.
ⓠThe progress bar will appear.
Disk Defragmenter
ⓡAfter the defragmentation is finished, click the [Close] button.
42 Using the system
Computer viruses are programs that penetrate other programs and files. Computer
viruses infect other files through replication, leaving the infected files and programs
damaged and unusable. We provide "Norton AntiVirus," a vaccine program, to fight
viruses. Services and automatic upgrades of Norton AntiVirus through LiveUpdate
are available for one year after initial installation.
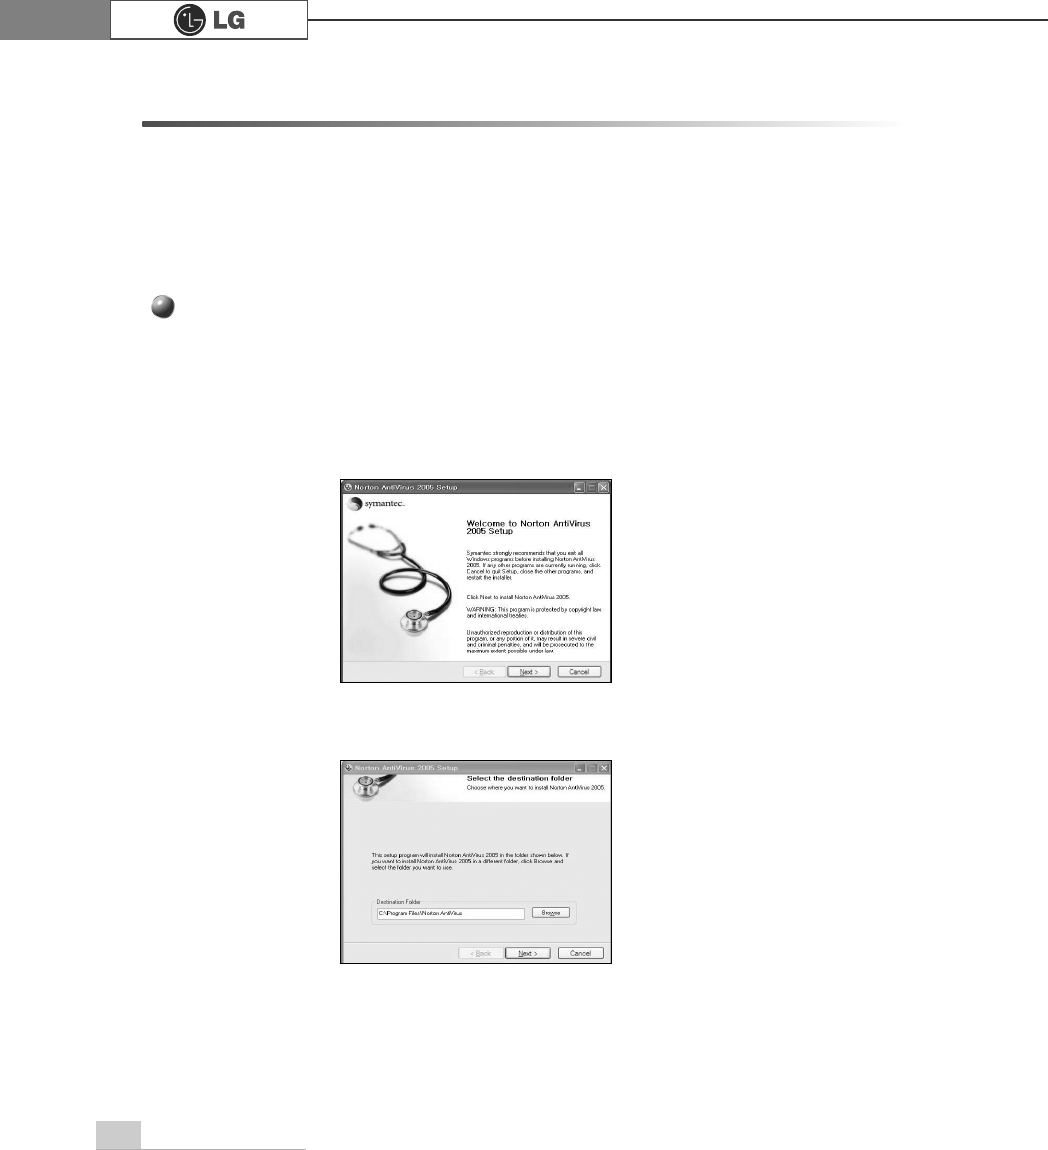
2-10.Computer virus
ⓞClick the Norton Antivirus icon on the desktop.
ⓟFollowing windows appears. Click [Next].
ⓠClick [Next] to install Norton Antivirus.
Installing Norton Antivirus
43Using the system
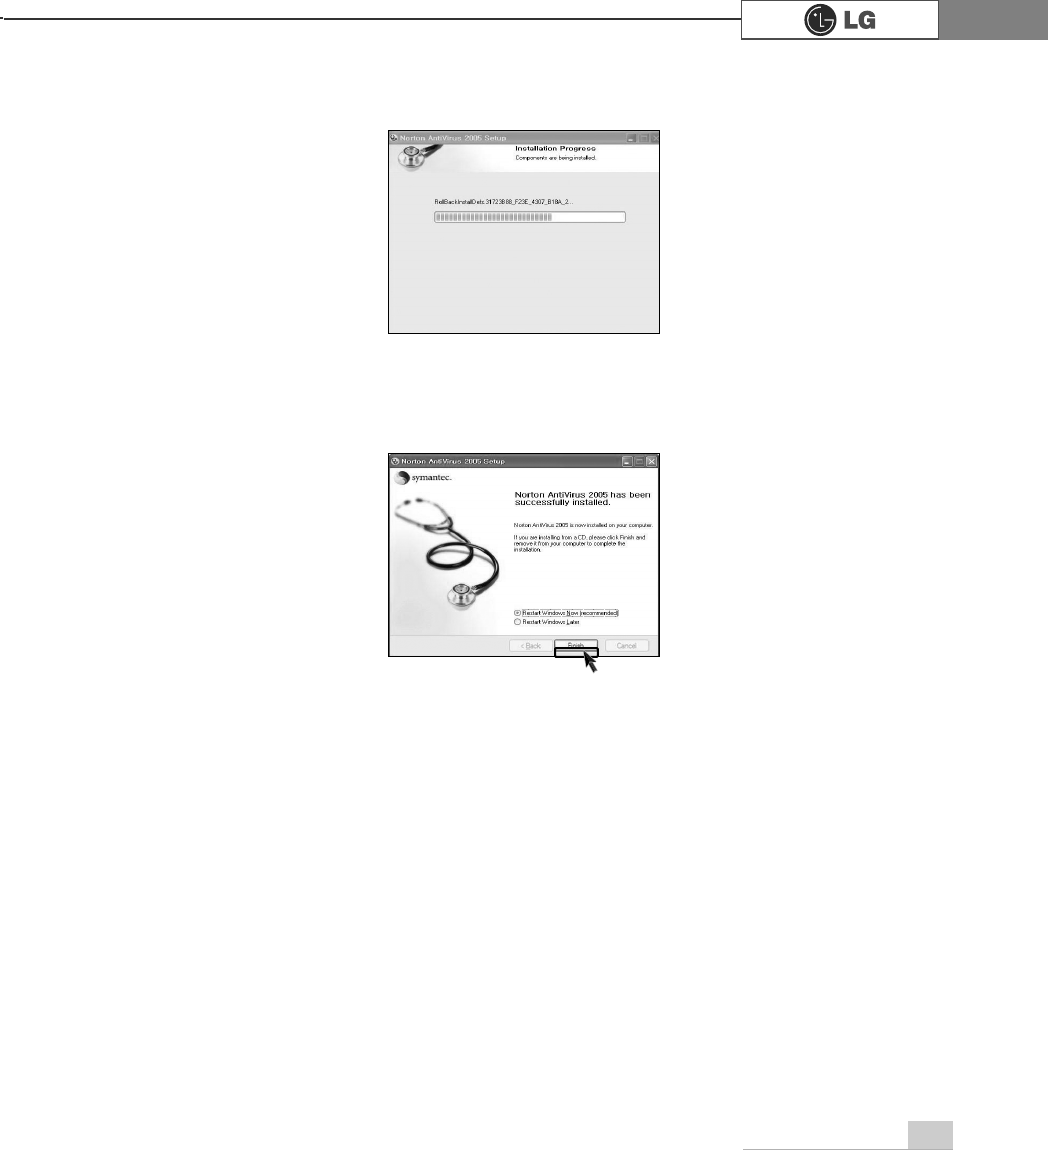
ⓡFollowing window appears.
ⓢ"Norton Antivirus installation is complete" message appears. Click [Finish].