LG Electronics USA DT-CK PERSONAL COMPUTER User Manual CKDK
LG Electronics USA PERSONAL COMPUTER CKDK
UserManual.wiki
>
LG Electronics USA
>
DT-CK User Manual
>
USER MANUAL 3 OF 4
Contents
1.
USER MANUAL 1 OF 4
2.
USER MANUAL 2 OF 4
3.
USER MANUAL 3 OF 4
4.
USERS MANUAL 4 OF 4
USER MANUAL 3 OF 4
Navigation menu
Upload a User Manual
Namespaces
Wiki Guide
HTML
PDF
Info
Views
User Manual
Discussion / Help
Navigation
![44 Using the systemⓞClick [Start] and [All programs]⍛[Norton Antivirus]⍛[LiveUpdate]⍛[Norton AntiVirus].ⓟClick [Next].ⓠFollowing window appears.You should have an internet access to process Norton Antivirus update. Norton Antivirus updateⓡClick [Next].](https://usermanual.wiki/LG-Electronics-USA/DT-CK.USER-MANUAL-3-OF-4/User-Guide-570603-Page-1.png)
![45Using the systemⓢDownloading update-items online.ⓣClick [Finish]. Norton Antivirus Update is complete.](https://usermanual.wiki/LG-Electronics-USA/DT-CK.USER-MANUAL-3-OF-4/User-Guide-570603-Page-2.png)
![46 Using the systemⓞClick [Start]⍛[All programs]⍛[Norton Antivirus]⍛[Norton AntiVirus2005]. ⓟClick [Scan for virus] and select an item to scan.ⓠNorton AntiVirus is scanning virus.ⓡClick [Finish]. Virus scanning is complete.Running Norton AntivirusãIf any virus is detected,click [Fix] to repair.Note](https://usermanual.wiki/LG-Electronics-USA/DT-CK.USER-MANUAL-3-OF-4/User-Guide-570603-Page-3.png)

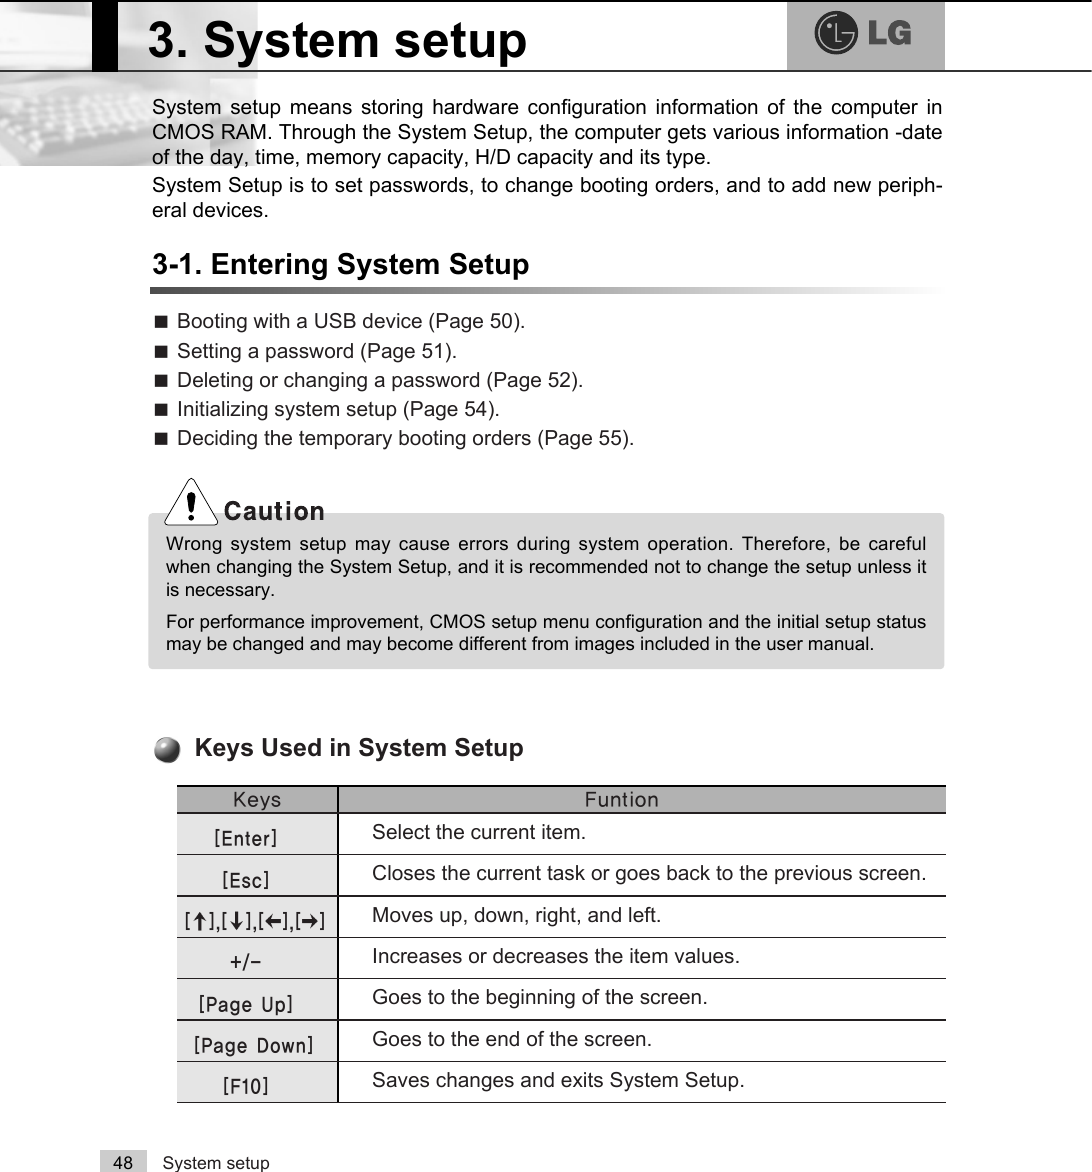
![System setup 49ⓞTurn on the computer and the monitor.ⓟWhile the LG logo screen is on, press [Delete] key.ⓠThe initial setup screen will appear.ãCursor PadThese keys are used to move the cursors on themonitor screen up, down, right, and left. When the Num Lock button is off on the numerickeypad, the numeric keypad functions the same asthe cursor keypad.Note<Cursor Keypad><Numeric Keypad>&0266HWXS8WLOLW\&RS\ULJKW&$ZDUG6RIWZDUHĚ 6WDQGDUG&026)HDWXUHV Ě 3&+HDOWK6WDWXVĚ $GYDQFHG%,26)HDWXUHV Ě )UHTXHQF\9ROWDJH&RQWUROĚ $GYDQFHG&KLSVHW)HDWXUHV /RDG2SWLPL]HG'HIDXOWVĚ ,QWHJUDWHG3HULSKHUDOV 6HW3DVVZRUGĚ 3RZHU0DQDJHPHQW6HWXS 6DYH([LW6HWXSĚ 3Q33&,&RQILJXUDWLRQV ([LW:LWKRXW6DYLQJ(VF4XLW êëè é 6HOHFWOWHP)4)ODVK )6DYH([LW6HWXS9LUXV3URWHFWLRQ%RRW6HTXHQFH](https://usermanual.wiki/LG-Electronics-USA/DT-CK.USER-MANUAL-3-OF-4/User-Guide-570603-Page-6.png)
![System setup503-2. Booting with a USB DriveA booting with a USB device (USB-FDD, USB-ZIP, USB-CD-ROM, or USB-HDD)proceeds as follows.ⓞExecute the initial screen of System Setup, and select Advance Bios Featuresby pressing >Ⓑ@>Ⓒ@>⒵@, and >Ⓐ@keys. Then, press [Enter] key.ⓟWhen the following screen appears, select First Boot Device by pressing>Ⓑ@>Ⓒ@>⒵@, and >Ⓐ@keys. Then, select the device and press [Enter] key.ⓠTo save changes in System Setup, press the [F10] key.ⓡWhen the following message appears on the screen, press the [Enter] key torestart the screen.SAVE to CMOS and EXIT(Y/N)? Y Bootable devices will be dis-played only when bootabledevices are equipped.CMOS Setup Utility-Copyright(C)1984-2004 Award SoftwareAdvanced BIOS Featuresêëèé:Move Enter:Select +/-/PU/PD:Value F10:Save ESC:Exit F1:General HelpF5:Previous Values F7:Optimized DefaultsĚHard Disk Boot Priority [Press Enter]BIOS Flash Protection [Auto]First Boot Device [CDROM]Second Boot Device [USB-FDD] Third Boot Device [Hard Disk]Boot Up Floppy Seek [Disabled]Boot Up Num-Loce [On]Passward Check [System]Interrupt Mode [APIC]Boot to OS2 or DR-DOS [Disabled]HDD S,M,A,R,T, Capability [Enabled]CPU Hyper-Threading [Enabled]Limit CPUID Max.to3 [Enabled]Full Screen LOGO Show [Enabled]Summary Screen Show [Disabled]Item HelpMemu Level ĚSelect Your Boot Device PriorityFirst Boot Device USB-FDDNote](https://usermanual.wiki/LG-Electronics-USA/DT-CK.USER-MANUAL-3-OF-4/User-Guide-570603-Page-7.png)
![51System setupⓟWhen the next screen appears, select Password Check by pressing>Ⓑ@>Ⓒ@>⒵@, and >Ⓐ@keys and the Setup or System by pressing the [Page Up]and [Page Down] keys. Then, press [Enter] key.ⓞExecute the initial screen of System Setup and select Advanced Bios Featuresby pressing >Ⓑ@>Ⓒ@>⒵@, and >Ⓐ@keys. Then, press [Enter] key.ⓠSelect Set Password by pressing >Ⓑ@>Ⓒ@>⒵@, and >Ⓐ@keys on the initial setup screen, and press [Enter].3-3. Setting a PasswordTo prevent other users from changing computer settings, you can register a pass-word. A password can be registered during booting or System Setup.Without the registered password, if any, access to the system will be denied. Write downand keep your password in a safe place.ãYou will be asked to input the password only when you select "Setup" in Security Option orwhen you select "Setup" by pressing [Delete] key on the initial screen. The password pro-tects the computer by stopping others from changing computer settings and system setup. NoteCMOS Setup Utility-Copyright(C)1984-2004 Award SoftwareAdvanced BIOS Featuresêëèé:Move Enter:Select +/-/PU/PD:Value F10:Save ESC:Exit F1:General HelpF5:Previous Values F7:Optimized DefaultsĚHard Disk Boot Priority [Press Enter]BIOS Flash Protection [Auto]First Boot Device [CDROM]Second Boot Device [USB-FDD] Third Boot Device [Hard Disk]Boot Up Floppy Seek [Disabled]Boot Up Num-Loce [On]Passward Check [System]Interrupt Mode [APIC]Boot to OS2 or DR-DOS [Disabled]HDD S,M,A,R,T, Capability [Enabled]CPU Hyper-Threading [Enabled]Limit CPUID Max.to3 [Enabled]Full Screen LOGO Show [Enabled]Summary Screen Show [Disabled]Item HelpMemu Level ĚSelect Your Boot Device PriorityPassward Check Setup](https://usermanual.wiki/LG-Electronics-USA/DT-CK.USER-MANUAL-3-OF-4/User-Guide-570603-Page-8.png)
![52 System setup3-4. Deleting or Changing a Password You can delete or change the password only after inputting the current password.ⓞExecute the initial screen of System Setup, enter the password, and press the[Enter] key.ⓢWhen asked to confirm the password, input the password again and press [Enter]key. ⓣTo save changes in System Setup, press [F10].ⓤWhen the following message appears, press [Enter] key to restart the computer. ⓡWhen the following message appears on the screen, input the password andpress [Enter] key. The password must be alphanumeric and not exceed eightdigits.SAVE to CMOS and EXIT(Y/N)? Y Confirm Password : Enter Password :&0266HWXS8WLOLW\&RS\ULJKW&$ZDUG6RIWZDUHĚ 6WDQGDUG&026)HDWXUHV Ě 3&+HDOWK6WDWXVĚ $GYDQFHG%,26)HDWXUHV Ě )UHTXHQF\9ROWDJH&RQWUROĚ $GYDQFHG&KLSVHW)HDWXUHV /RDG2SWLPL]HG'HIDXOWVĚ ,QWHJUDWHG3HULSKHUDOV 6HW3DVVZRUGĚ 3RZHU0DQDJHPHQW6HWXS 6DYH([LW6HWXSĚ 3Q33&,&RQILJXUDWLRQV ([LW:LWKRXW6DYLQJ(VF4XLW êëè é 6HOHFWOWHP)4)ODVK )6DYH([LW6HWXS9LUXV3URWHFWLRQ%RRW6HTXHQFH(QWHU3DVVZRUG](https://usermanual.wiki/LG-Electronics-USA/DT-CK.USER-MANUAL-3-OF-4/User-Guide-570603-Page-9.png)
![53System setupĚChanging the PasswordChange the password in the same procedure as that of password setting.ĚĚDeleting the PasswordⓟSelect Set Password by pressing >Ⓑ@>Ⓒ@>⒵@, and >Ⓐ@keys on the initial screenof the Setup menu, and press the [Enter] key.ⓠWhen the following message appears, press the [Enter] key.ⓡA message will appear saying that the password has been deleted.Press the [Enter] key.ⓢTo save the change in System Setup, press the [F10].ⓣWhen the following message appears on the screen, press the [Y] key and the[Enter] key. Then, the computer will restart. PASSWORD DISABLD!!!Press any key to continue...Enter Password : SAVE to CMOS and EXIT(Y/N)? Y CMOS Setup Utility-Copyright(C)1984-2004 Award SoftwareĚStandard CMOS Features ĚPC Health StatusĚAdvanced BIOS Features ĚFrequency/Voltage ControlĚAdvanced Chipset Features Load Optimized Defaults ĚIntegrated Peripherals Set PasswordĚPower Management Setup Save & Exit SetupĚPnP/PCI Configurations Exit Without SavingEsc : Quit êëè é : Select ltemF8: Q-Flash F10 : Save & Exit SetupVirus Protection, Boot Sequence...6HW3DVVZRUG](https://usermanual.wiki/LG-Electronics-USA/DT-CK.USER-MANUAL-3-OF-4/User-Guide-570603-Page-10.png)
![54 System setup3-5. Initializing System Setup If you changed the system setup by mistake, it can be recovered to the default set-ting.ⓞExecute the initial screen of System Setup, and select the Load OptimizedDefaults item by pressing arrow keys. Then, press [Enter].ⓟWhen the following message appears on the screen, press [Y] and [Enter].System setup will be return to the factory setting.ⓠTo save the change in System Setup, press [F10]. ⓡWhen the following message appears, press the [Enter] key to restart the com-puter.SAVE to CMOS and EXIT(Y/N)? Y Load Optimized Defaults (Y/N) ? Y](https://usermanual.wiki/LG-Electronics-USA/DT-CK.USER-MANUAL-3-OF-4/User-Guide-570603-Page-11.png)
![55System setupThe following instruction explains a way to decide the temporary booting orders with-out affecting CMO setup.3-6. Deciding the Temporary Booting OrdersⓞTurn on the computer and the monitor.ⓠSelect USB-FDD from the Boot Menu to restart the computer.ⓟWhile LG logo screen is on, press [F12]. ãThe menus may differ by product model :USB-FDD, USB-ZIP, USB-HDD, and USB-CD-ROM. Bootable devices will be dis-played only when they are equipped inbefore turning the computer onNote](https://usermanual.wiki/LG-Electronics-USA/DT-CK.USER-MANUAL-3-OF-4/User-Guide-570603-Page-12.png)
![56 System setupRegardless of BIOS setup, you can use the Power Saver mode in Windows as fol-lows.3-7. Setting the Power Saver ModeⓡPress the advanced tab and set options appropriately. Then, click the [OK] button.ⓠAfter setting Power Scheme items in the Power Schemes tab, click the [OK]button.ⓞSelect [Start] èè[Control Panel] è[Switch to Classic View].ⓟDouble-click the Power option icon on the Control Panel window.TWhen the device connected tothe computer does not supportPower Saver functions, theStandby mode or Hibernatemode may not be properly func-tion. In this case, deactivate PowerSaver feature.ãHibernate Mode :The currentwork states are saved intact on theH/D before the power goes off.The states will be recovered asthey were when the power is onlater.Note](https://usermanual.wiki/LG-Electronics-USA/DT-CK.USER-MANUAL-3-OF-4/User-Guide-570603-Page-13.png)
![57System setupThe Hyper-threading feature improves the performance of the CPU greatly as iftwo CPUs were running. This feature is especially efficient for multimedia taskssuch as games and graphic jobs. Hyper-threading is supported only by the CPUwith Hyper-Threading (HT) feature. Check the "Intel" sticker on the side of thecomputer to see if the CPU supports hyper-threading.3-8. Using Hyper-Threading FeatureⓞExecute the initial screen of System Setup, and select Advanced BiosFeatures by pressing >Ⓑ@>Ⓒ@>⒵@, and >Ⓐ@keys. Then, press the [Enter] key.ⓟWhen the following screen appears, select Hyper-Threading Technology andEnabled.ⓠTo save changes in System Setup, press [F10].ⓡWhen the following message appears, press the [Enter] key to restart the com-puter.SAVE to CMOS and EXIT(Y/N)? Y ãHyper-threading is supported only by Windows XP. If you execute software or gamesthat does not support hyper-threading, an error may occur. When this happens, disablethe "Hyper-Threading Technology" featuree.NoteCMOS Setup Utility-Copyright(C)1984-2004 Award SoftwareAdvanced BIOS Featuresêëèé:Move Enter:Select +/-/PU/PD:Value F10:Save ESC:Exit F1:General HelpF5:Previous Values F7:Optimized DefaultsĚHard Disk Boot Priority [Press Enter]BIOS Flash Protection [Auto]First Boot Device [CDROM]Second Boot Device [USB-FDD] Third Boot Device [Hard Disk]Boot Up Floppy Seek [Disabled]Boot Up Num-Loce [On]Passward Check [System]Interrupt Mode [APIC]Boot to OS2 or DR-DOS [Disabled]HDD S,M,A,R,T, Capability [Enabled]CPU Hyper-Threading [Enabled]Limit CPUID Max.to3 [Enabled]Full Screen LOGO Show [Enabled]Summary Screen Show [Disabled]Item HelpMemu Level ĚSelect Your Boot Device PriorityHyper-Threading Technology Enabled](https://usermanual.wiki/LG-Electronics-USA/DT-CK.USER-MANUAL-3-OF-4/User-Guide-570603-Page-14.png)
![System Recovery58You can restore the system in two ways depending on the current status of the sys-tem. However, to restore the hard disk, you need to back up necessary softwareand data files in advance. After completing Windows installation, you need to regis-ter the User Properties when booting the system as if you did your new computer.4.System RecoveryⓞBack up the data stored in the computer.ⓟInsert the Restore CD in the CD-ROM drive. When "Press any key to bootfrom CD..." message appears on the screen, press the [Enter] key. ⓠContinue installation by following instructions on the screen. ⓡAfter completing installation of Windows, remove the CD and restart the sys-tem. When the following screen appears, register the User Properties accordingto instructions on the screen. Installation with Recovery CDInstallationⓢAfter the Windows operating system installation is complete, install the LG GILJABICD (software installation CD) on your computer, and then you can use all applicationprograms and device drivers.](https://usermanual.wiki/LG-Electronics-USA/DT-CK.USER-MANUAL-3-OF-4/User-Guide-570603-Page-15.png)
![System Recovery 59For Windows usersIf Windows XP is already installed on the hard disk, you can upgrade existingWindows XP without formatting the hard diskIn the case that Windows XP is already running on the hard disk, upgradeWindows XP as follows.ⓟClick the [Start] and [Run] button.ⓠInsert the Restore CD, and input D:\i386\winnt32.exe/unattend. Then, click the[OK] button. (When the CD-ROM drive is D drive.)ⓞTurn on the system where Windows XP is installed.Installation of Windows XP UpgradeãTo execute "winnt32.exe" without using"Unattend" option, you must input theproduct key attached on the computer.You also need to have the computer cer-tified within 30 days after thisNote](https://usermanual.wiki/LG-Electronics-USA/DT-CK.USER-MANUAL-3-OF-4/User-Guide-570603-Page-16.png)
![5. Reinstallation of Drivers60 Reinstallation of DriversYou must install the printer driver after connecting the printer. Windows XP canautomatically detect printer drivers. However, if Windows XP does not detect yourprinter driver, install the printer driver as follows.5-1.Reinstalling Printer DriverⓟDouble click the [Printer and Fax] on the Control Panel window.ⓠWhen the following screen appears, click the [Add Printer] button.ⓞSelect [Start] èè[Control Panel] è[Class Desktop].ⓡWhen the Add Printer Wizard appears, click the [Next] button.](https://usermanual.wiki/LG-Electronics-USA/DT-CK.USER-MANUAL-3-OF-4/User-Guide-570603-Page-17.png)
![61Reinstallation of DriversⓢWhen the following screen appears, check the connection type of the printer -local or network. Then, select a printer and click the [Next] button.ⓣNew Printer Detection screen will appear. Click the [Next] button.ⓤWhen Set Printer Port screen appears, select LPT1 or LPT2 before clicking the[Next] button.ⓥSelect the manufacturer and model of your printer on the Select Printer screen.If your printer came with an installation disk, click [Have Disk]. If not, just clickthe [Next] button.](https://usermanual.wiki/LG-Electronics-USA/DT-CK.USER-MANUAL-3-OF-4/User-Guide-570603-Page-18.png)
![62 Reinstallation of DriversⓧWhen Print Test Page screen appears, click the [Yes] and [Next].ⓦInsert the diskette or driver CD in the driver and click the [OK] button.ⓦName the printer, and click the [Next] button.When [Have Disk] is selected.When [Next] is selected](https://usermanual.wiki/LG-Electronics-USA/DT-CK.USER-MANUAL-3-OF-4/User-Guide-570603-Page-19.png)
![63Reinstallation of DriversⓨAfter the test page is properly printed out, click the [OK] button. ⓩWhen the following screen appears, check the printer and click the [Finish]button.⓪Now, the printer has been added. .](https://usermanual.wiki/LG-Electronics-USA/DT-CK.USER-MANUAL-3-OF-4/User-Guide-570603-Page-20.png)