LG Electronics USA E2341VX Part15 Subpart B-LCD Monitor User Manual W19 2243S T ENG
LG Electronics USA Part15 Subpart B-LCD Monitor W19 2243S T ENG
Contents
- 1. BEJE2341VX_User Manual 1
- 2. BEJE2341VX_User Manual 2
- 3. BEJE2341VX_User Manual 3
BEJE2341VX_User Manual 2
10
Control Panel Functions
INPUT Button
Use this button to turn the display on or off.
The power indicator stays blue if the display is running
properly (On Mode). If the display is in Sleep Mode
blue.
Power Button &
Power Indicator
When more than two input signals are connected, you can
select the input signal (D-SUB/DVI/HDMI) you want. When
only one signal is connected, it is automatically detected.
The default setting is D-Sub.
(SOURCE Hot key)
Exit the OSD(On Screen Display).
EXIT Button
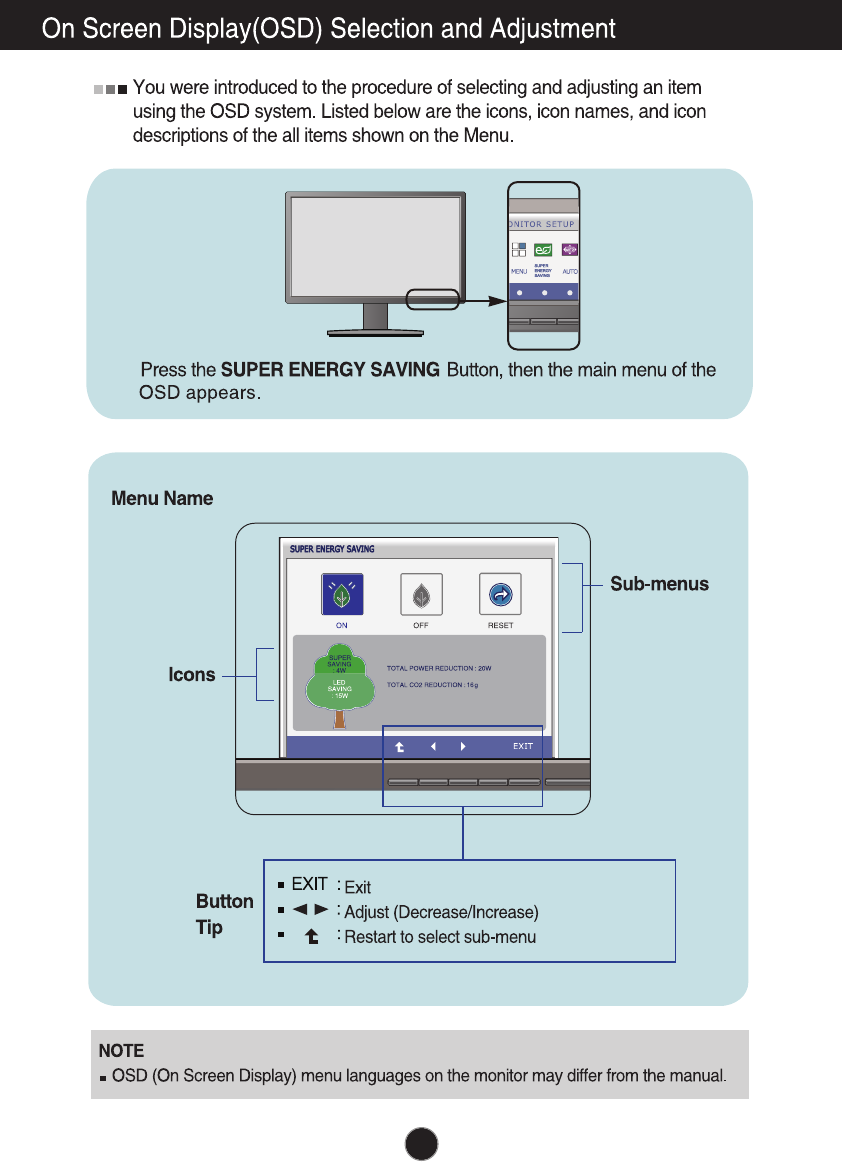
SUPER ENERGY
SAVING Button
Use this button to enter SUPER ENERGY SAVING
menus.For more information, refer to page 15 .
, the
power indicator is blinking
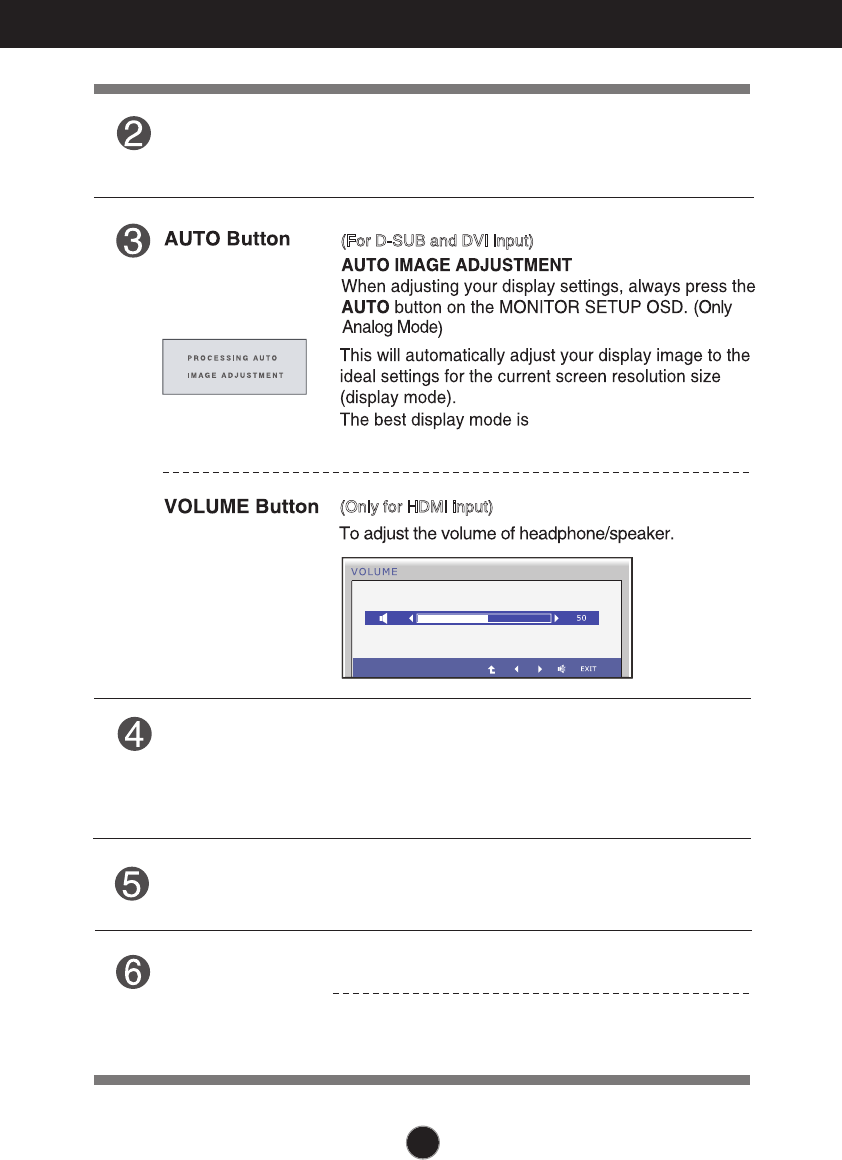
(For D-SUB and DVI input)
(Only for HDMI input)
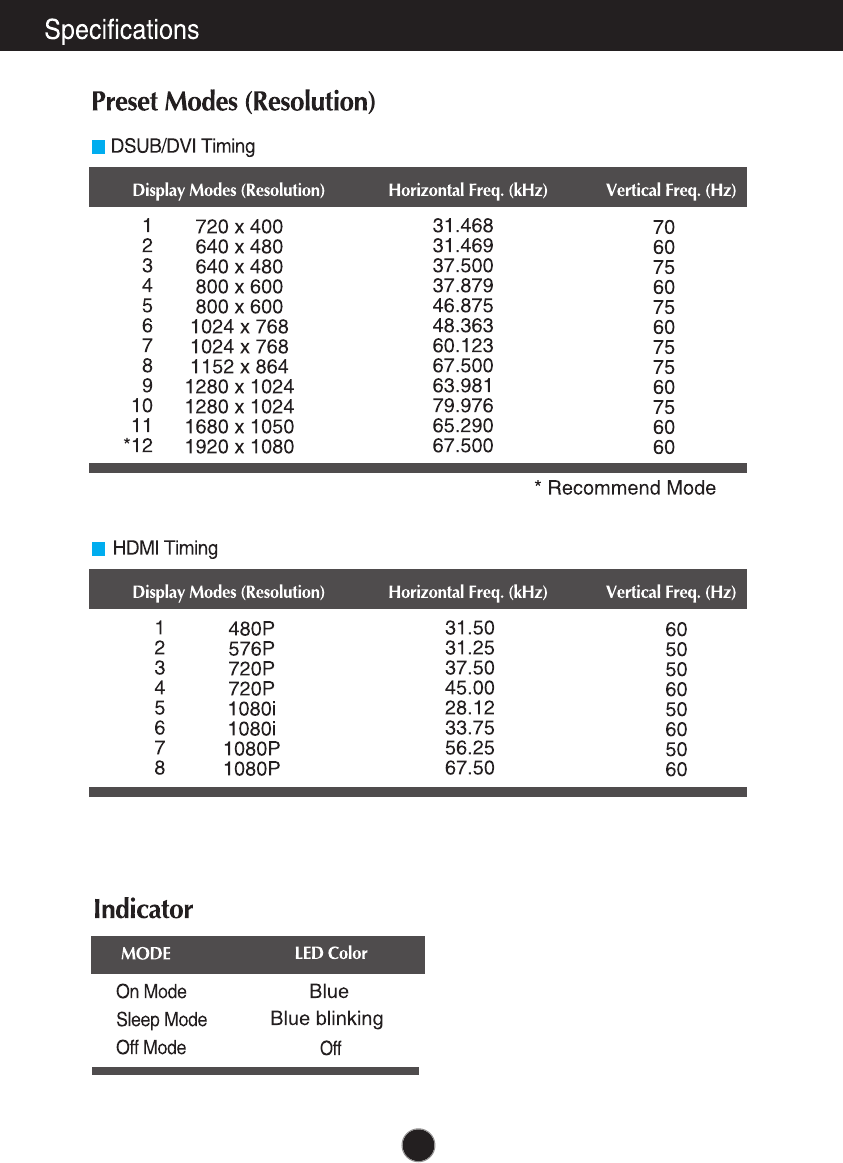
E2241V/E2341V/E2341VG/E2441V:1920 x 1080
e
n.
s.
/ /
.
n
1
2
3
4
11
12
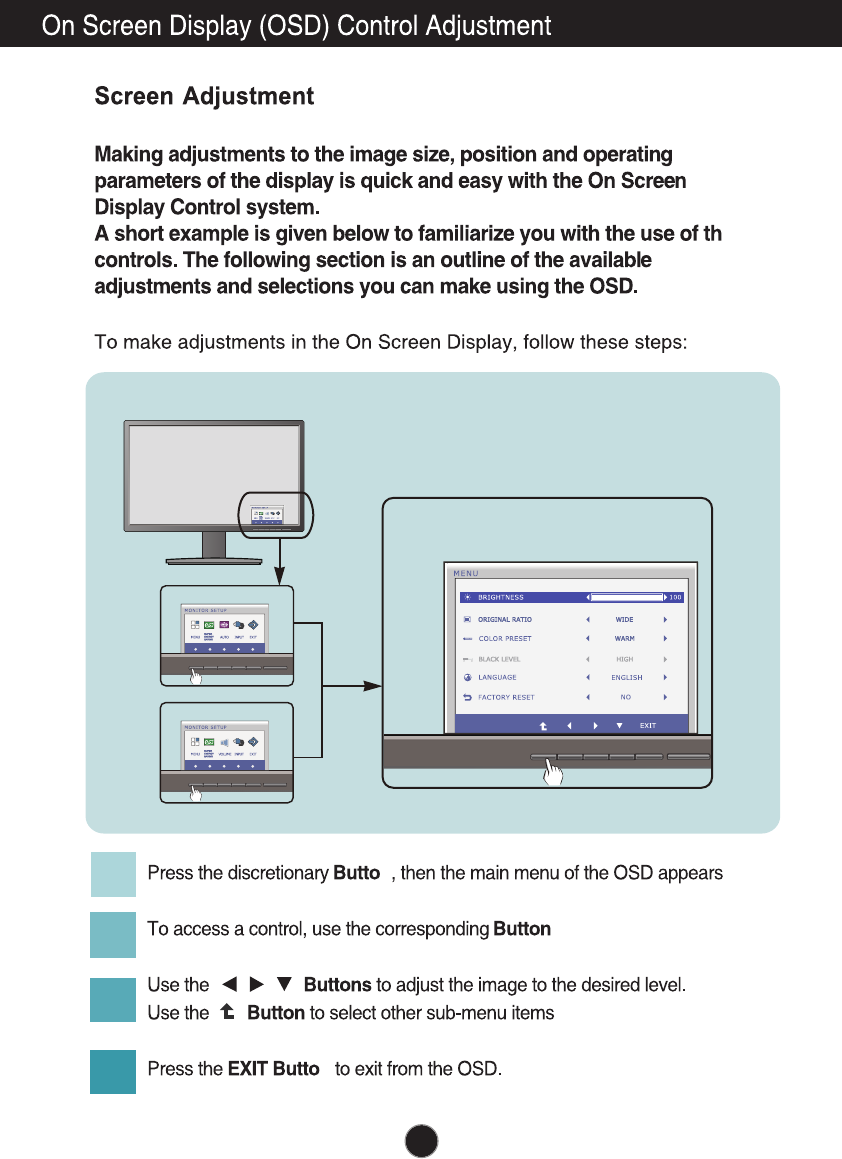
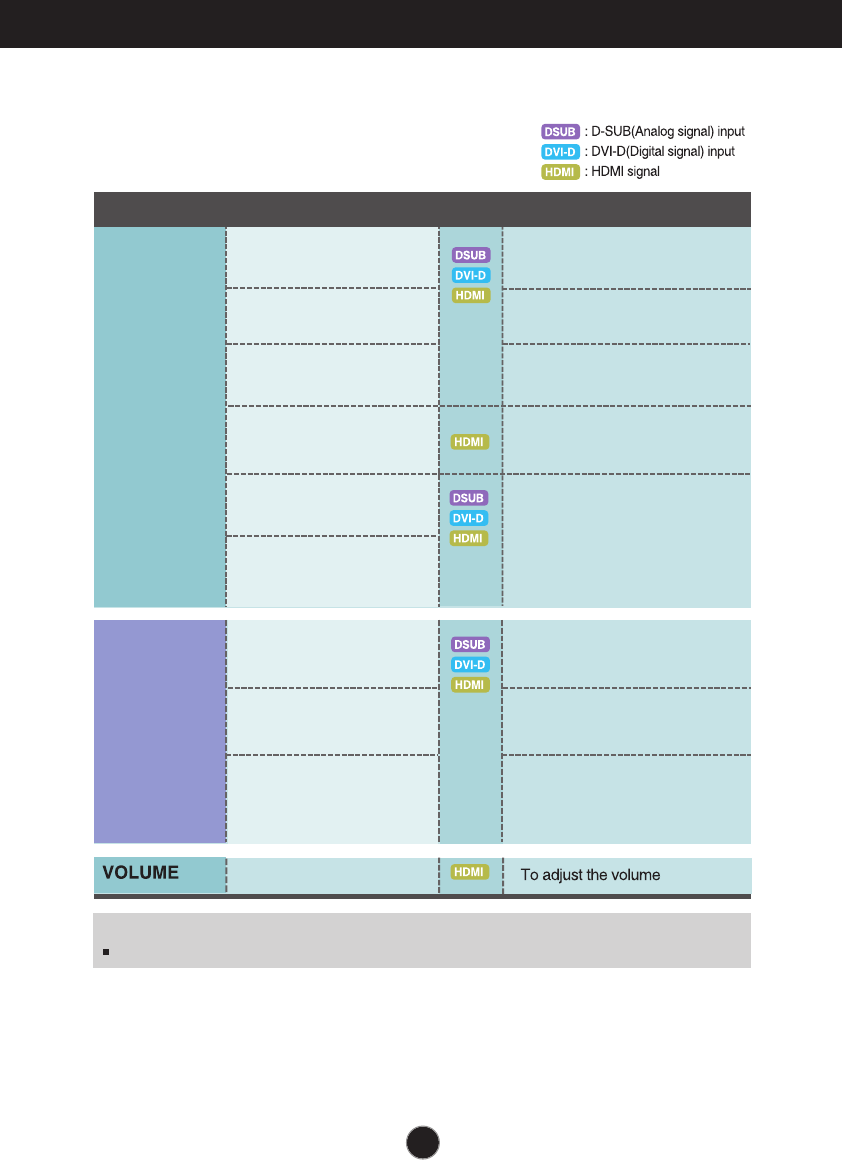
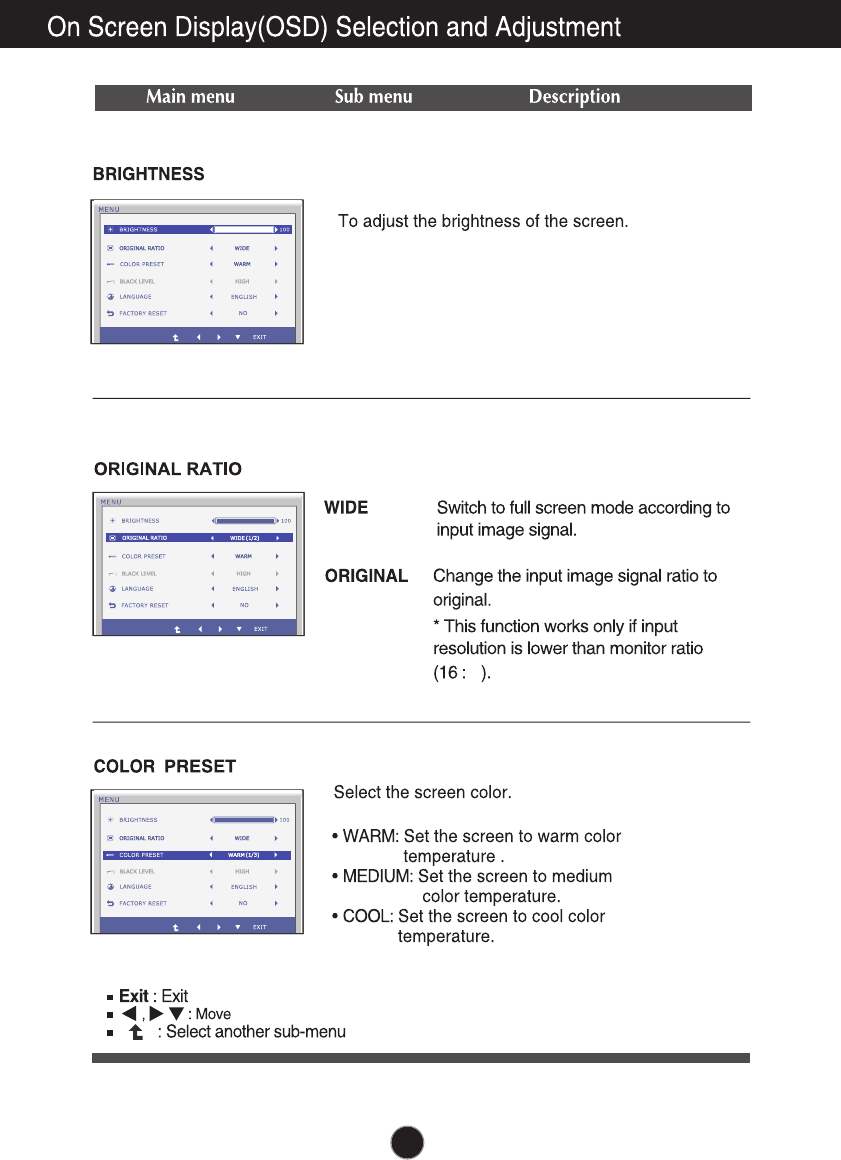
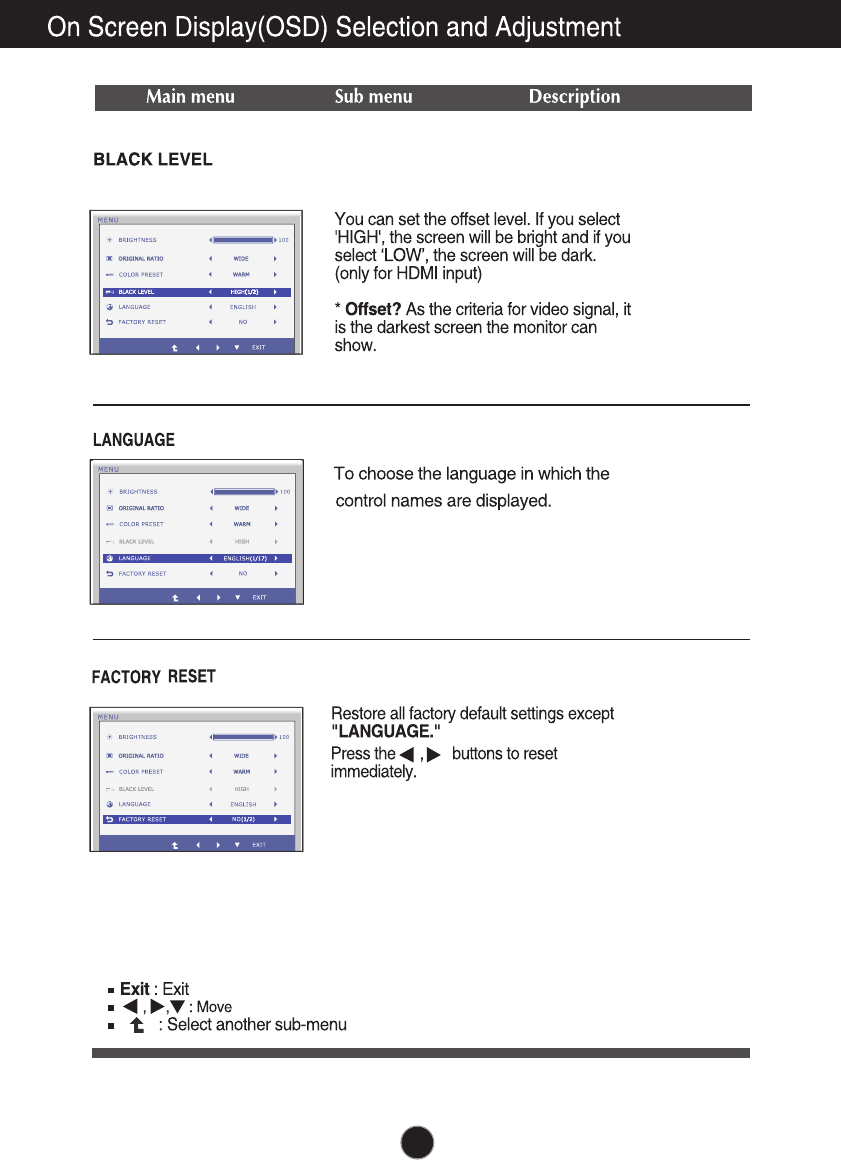
On Screen Display(OSD) Selection and Adjustment
The following table indicates all the On Screen Display control, adjustment,
and setting menus.
To customize the screen status
for a user's operating
environment
COLOR PRESET
LANGUAGE
MENU To adjust the brightness of
the screen
NOTE
The order of icons may differ depending on the model (13~17).
BRIGHTNESS
ORIGINAL RATIO
To
To adjust the black level of the
screen
adjust the image size
Main menu Sub-menu
Supported input
Description
To customize the color of the
screen
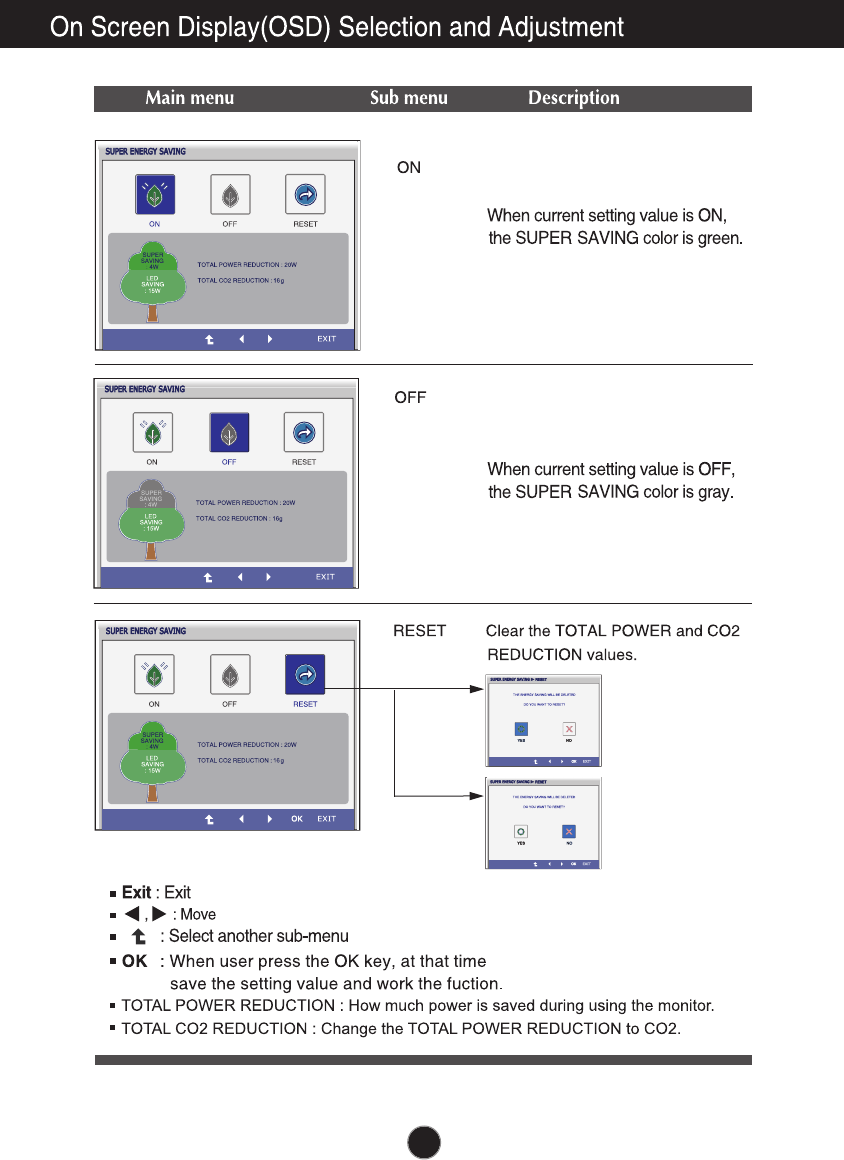
SUPER
ENERGY
SAVING
Turn on the SUPER ENERGY
SAVING function.
Initialize the SUPER ENERGY
SAVING and set to "OFF" mode.
Turn off the SUPER ENERGY
SAVING function.
FACTORY RESET
BLACK LEVEL
ON
OFF
RESET
9
13
,
14
(Only HDMI input)
15
16
Turn on the SUPER ENERGY SAV-
ING function.
Turn off the SUPER ENERGY SAV-
ING function. Now the monitor is
LED SAVING function.

Saving Data depends on the Panel. So, those values should be different from each
panel and panel vendor.
LG accumulate those values using integrated function with 10 minutes broadcast v-
ideo signal.
LED Saving means that how much power can be saved using WLED Panel instead
of CCFL panel.
SUPER Saving means that how much power can be more saved using SUPER E-
NERGY SAVING function.
17
19 inch 20 inch 22 inch 23 inch 24 inch
SAVING DATA:
18
Troubleshooting
No image appears
Check the following before calling for service.
No image appears
Do you see a "OSD LOCKED" message on the screen?
●Is the power cord of the
display connected?
●Is the power indicator
light on?
●Is the power indicator
flickering?
●Do you see an "OUT OF
RANGE" message on
the screen?
●Do you see a "CHECK
SIGNAL CABLE"
message on the
screen?
•
Check and see if the power cord is connected
properly to the power outlet.
•
Press the Power button.
•
If the display is in power saving mode, try moving
the mouse or pressing any key on the keyboard to
bring up the screen.
• Try to turn on the PC
.
•
This message appears when the signal from the
PC (video card) is out of horizontal or vertical
frequency range of the display. See the
'Specifications' section of this manual and
configure your display again.
•
This message appears when the signal cable
between your PC and your display is not
connected. Check the signal cable and try again.
• You can secure the current control settings,
so that they cannot be inadvertently changed.
You can unlock the OSD controls at any time
by pushing the MENU button for several
seconds: the message
“OSD UNLOCKED” will appear.
●
Do you see “OSD
LOCKED” when you
push MENU button?
19
Troubleshooting
Display image is incorrect
●Display Position is
incorrect.
●On the screen
background, vertical
bars or stripes are
visible.
●Any horizontal noise
appearing in any
image or characters
are not clearly
portrayed.
•
Press the AUTO button to automatically adjust
your display image to the ideal setting.
•
Press the AUTO button to automatically adjust
your display image to the ideal setting.
•
Press the AUTO button to automatically adjust
your display image to the ideal setting.
•
Check Control Panel --> Display --> Settings
and adjust the display to the recommended
resolution or adjust the display image to the ideal
setting. Set the color setting higher than 24 bits
(true color).
IMPORTANT
Check Control Panel --> Display --> Settings and see if the frequency or the
resolution were changed. If yes, readjust the video card to the recommend
resolution.
If the recommended resolution (optimal resolution) is not selected, letters may be
blurred and the screen may be dimmed, truncated or biased. Make sure to select
the recommend resolution.
The setting method can differ by computer and O/S (Operation System),
and resolution mentioned above may not be supported by the video card
performance. In this case, please ask to the computer or the video card
manufacturer.
20
Display image is incorrect
Troubleshooting
●The screen color is
mono or abnormal.
●The screen blinks.
•
Check if the signal cable is properly connected
and use a screwdriver to fasten if necessary.
•
Make sure the video card is properly inserted in
the slot.
•
Set the color setting higher than 24 bits (true color)
at Control Panel - Settings.
•
Check if the screen is set to interlace mode and if
yes, change it to the recommend resolution.
Do you see an "Unrecognized monitor, Plug&Play (VESA
DDC) monitor found" message?
●
Have you installed the
display driver?
•
Be sure to install the display driver from the display
driver CD (or diskette) that comes with your
display. Or, you can also download the driver from
our web site: http://www.lg.com.
•
Make sure to check if the video card supports
Plug&Play function.
The Audio function is not working
●
Picture OK & No sound.
• Check whether volume is "0".
• Check sound muted.
• HDMI cable installed properly.
• Head phone cable installed properly.
• Check sound format. Not supply to compressed
sound format.
21
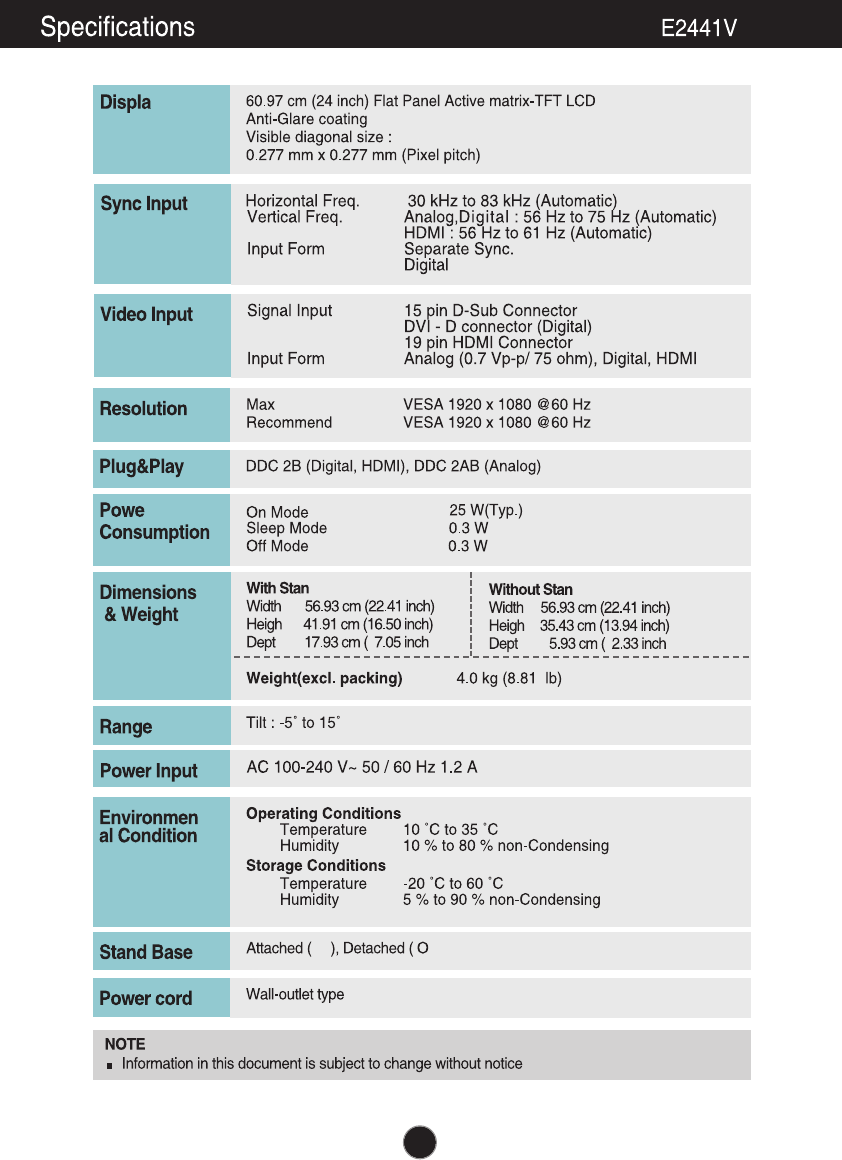
Specifications E2241V
54.6 cm (21.5 inch) Flat Panel Active matrix-TFT LCD
Anti-Glare coating
Visible diagonal size :
54.6
cm
0.248 mm x 0.248 mm (Pixel pitch)
Display
Max VESA 1920 x 1080 @60 Hz
Recommend VESA 1920 x 1080 @60 Hz
Resolution
Plug&Play
On Mode :
24 W(Typ.)
Sleep Mode ≤0.3 W
Off Mode ≤0.3 W
Power
Consumption
Operating Conditions
Temperature 10 ˚C to 35 ˚C
Humidity 10 % to 80 % non-Condensing
Storage Conditions
Temperature -20 ˚C to 60 ˚C
Humidity 5 % to 90 % non-Condensing
Environment
al Conditions
With Stand
Width 50.90 cm (19.80 inch)
Heigh 38.80 cm (15.27 inch)
Depth 16.60 cm ( 6.54 inch)
Weight(excl. packing) 2.9 kg (6.39 lb)
Dimensions
& Weight
Tilt : -5˚ to 15˚
Range
Attached ( ), Detached ( O )
Stand Base
Wall-outlet type
Power cord
DDC 2B(Digital,HDMI), DDC 2AB(Analog)
Without Stand
Width 50.90 cm (19.80 inch)
Height 32.20 cm (12.67 inch)
Depth 5.80 cm ( 2.28 inch)
NOTE
Information in this document is subject to change without notice.
AC 100-240 V~ 50 / 60 Hz 1.0 A
Power Input
Specifications E2341V/E2341VG
23
60.97
cm
y
:
≤
≤
r
t
s
d
t
h )
)
d
t
)
.
24

Installing the Wall mount plate
This monitor satisfies the specifications of the Wall mount plate or
the interchange device.
1. Place the monitor with its front facing downward on a soft cloth.
2. Remove the Stand Body and Stand Base from product in correct direction
as shown in the picture.
25
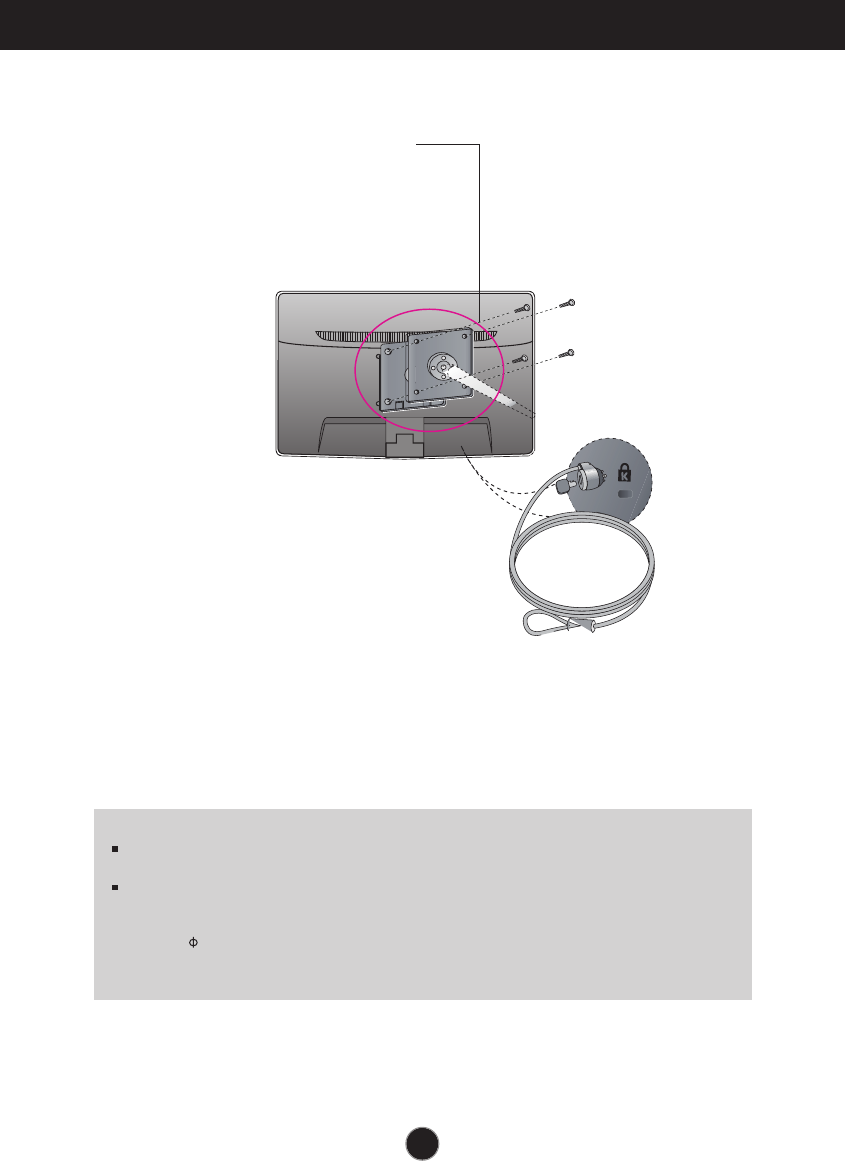
26
Installing the Wall mount plate
Wall mount plate(Separate purchase)
This is stand-type or wall mount type and is
connectable with Wall mount plate.
Please refer to the installation guide for more
details, which is provided when Wall mount
plate is purchased.
Kensington Security Slot
Connected to a locking cable that can
be purchased separately at most
computer stores.
<Screw Mounting Interface Dimension>
Hole spacing : 75 mm x 75 mm.
3.
Install the Wall mount plate.
NOTE
VESA compatible only with respect to screw mounting interface dimensions and mounting screw
specifications
Please use VESA standard as below.
* 784.8 mm and under (30.9 inch)
- Wall Mount Pad Thickness : 2.6 mm
- Screw : 4.0 mm x Pitch 0.7 mm x Length 10 mm
* 787.4 mm and above (31.0 inch)
- Please use VESA standard wall mount pad and screws.
Make sure to read the Safety Precautions
before using the product.
Keep the OWNER’S MANUAL(CD) in an
accessible place for furture reference.
The model and serial number of the SET is
located on the back or one side of the SET.
Record it below should you ever need service.
MODEL
SERIAL
As an ENERGY STAR Partner LGE U. S. A.,Inc.
has determined that this product meets the
ENERGY STAR guidelines for energy efficiency.
ENERGY STAR is a set of power-saving
guidelines issued by the U.S.Environmental
Protection Agency(EPA).