LG Electronics USA IS11LG Cellular CDMA Phone with WLAN and Bluetooth User Manual
LG Electronics MobileComm USA, Inc. Cellular CDMA Phone with WLAN and Bluetooth
UserManual.wiki
>
LG Electronics USA
>
IS11LG User Manual
Users Manual
Navigation menu
Upload a User Manual
Namespaces
Wiki Guide
HTML
PDF
Info
Views
User Manual
Discussion / Help
Navigation

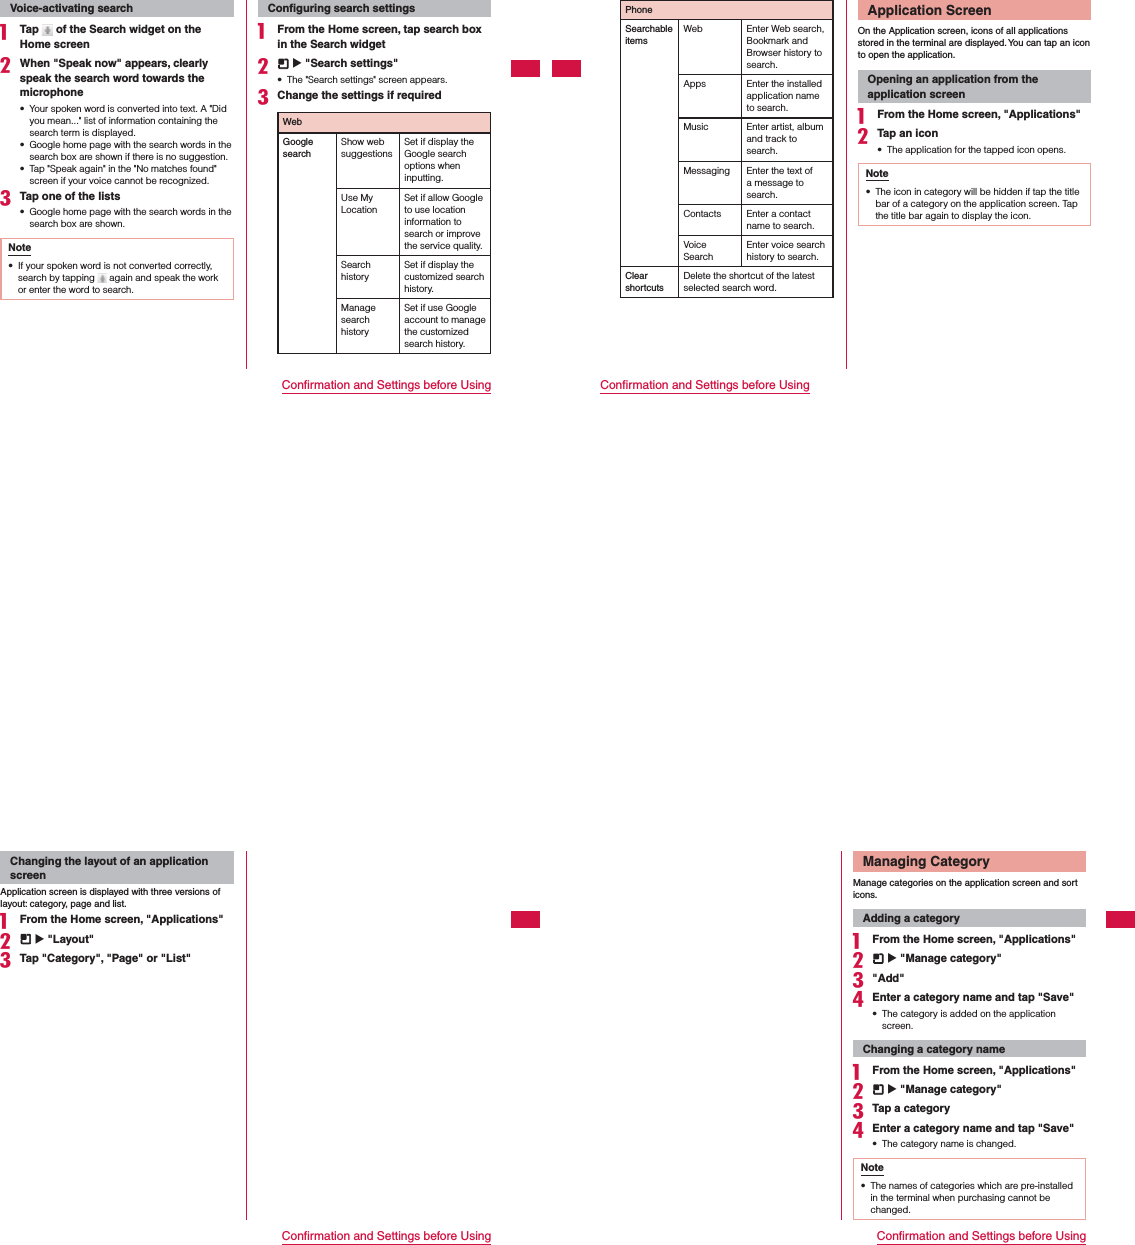

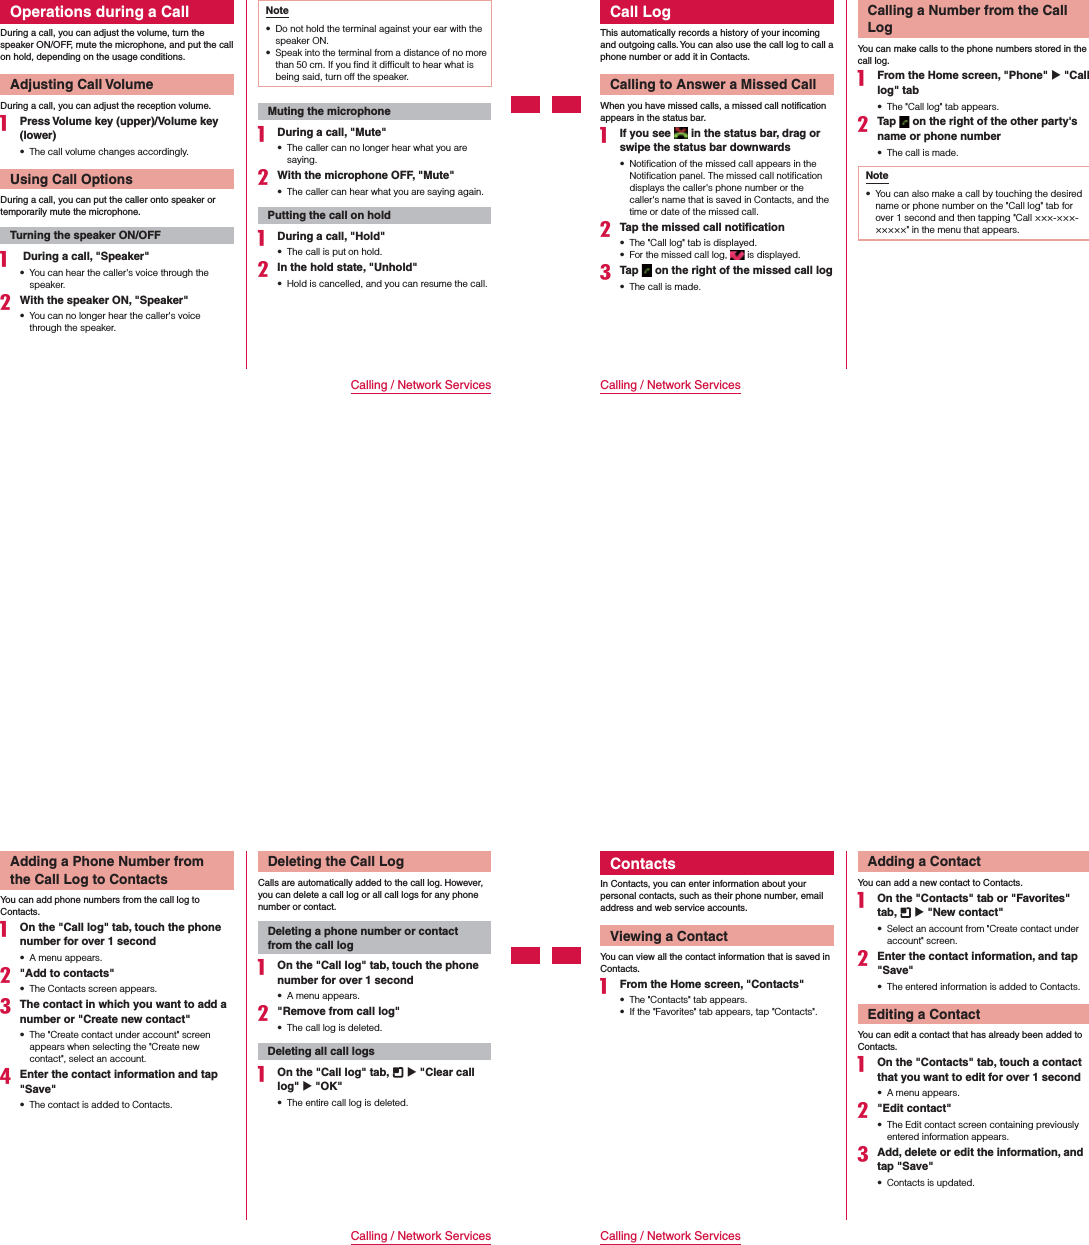
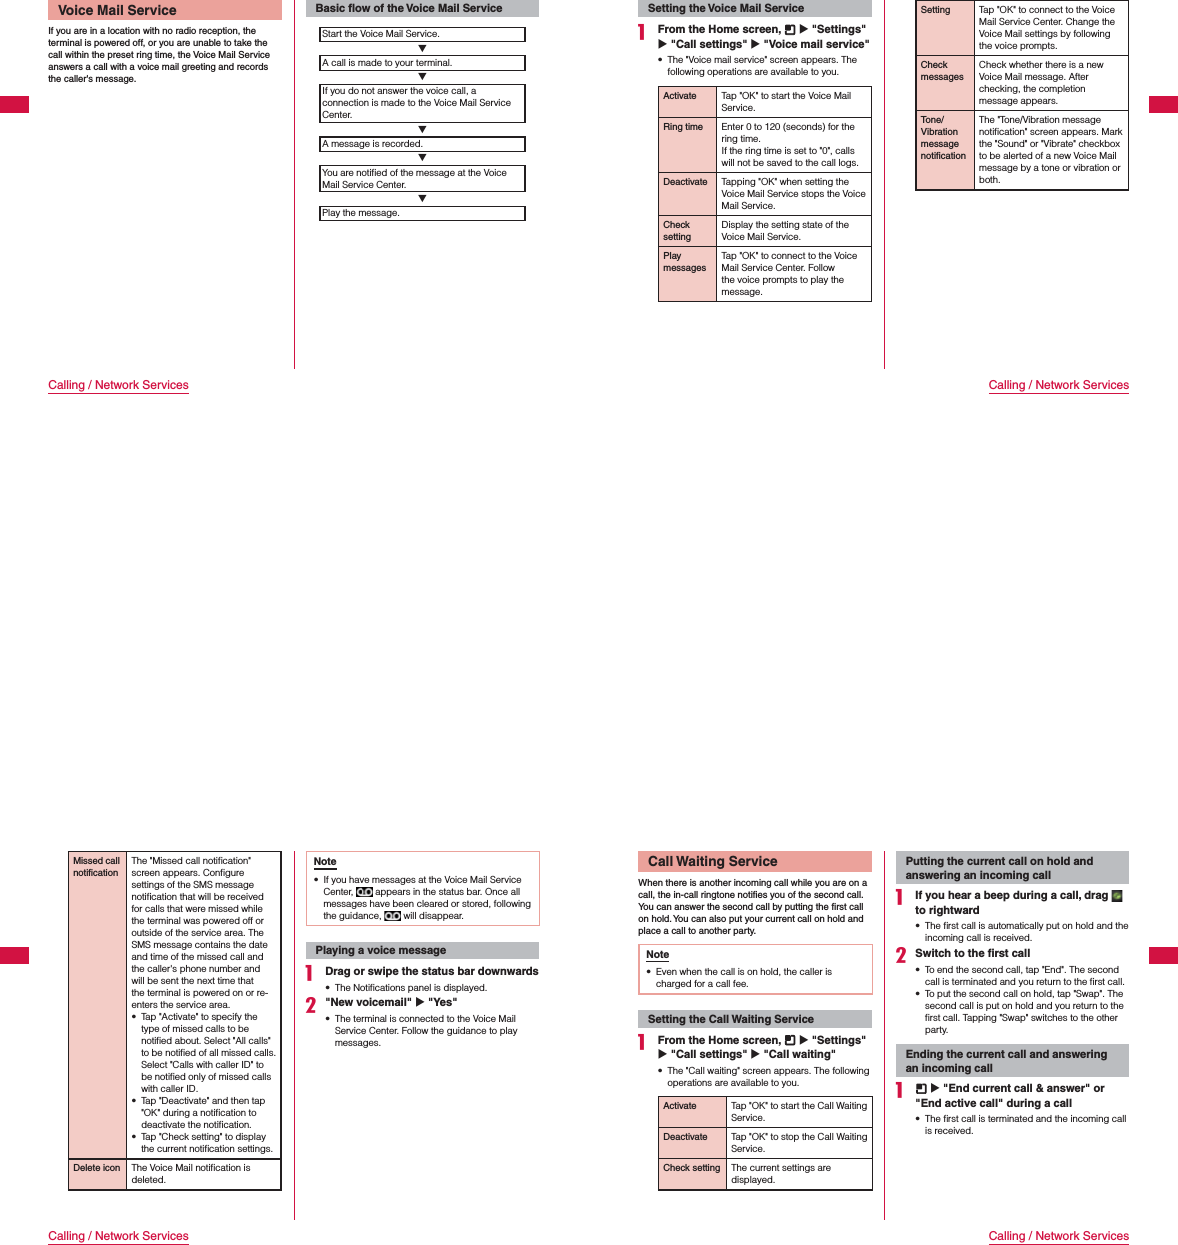
![Putting the current call on hold and making a call to another party During a call, "Add call" sThe "Phone" tab appears.Enter the other party's phone number, and tap sThe first call is automatically put on hold and you are put through to the new call. You can also search for a contact if you tap the "Contacts" tab or "Call log" tab.Switch to the first call sTo terminate the new call, tap "End". The new call is terminated and you return to the first call. sTo put the new call on hold, tap "Swap". The new call is put on hold and you return to the first call. Tapping "Swap" switches to the other party.Call Forwarding ServiceThe Call Forwarding Service forwards a call to a preset forwarding number if you do not answer the call within the preset ring time, or are outside of the service area or if the terminal is powered off. Note sIf you do not answer an incoming call when the Call Forwarding Service is set to "Activate", the call is saved in "Call log" as a missed call, and appears in the status bar.Basic flow of the Call Forwarding ServiceRegister the forwarding number.TSet the Call Forwarding Service to start.TA call is made to your terminal.TIf you do not answer a call, it is automatically forwarded to the specified forwarding number.92Calling / Network ServicesCall charge for the Call Forwarding ServiceCallerTCall charges are incurred by the caller.Subscriber to the Call Forwarding ServiceTCall charges are incurred by the subscriber to the Call Forwarding Service.Forwarding numberNote sEven when the Call Forwarding Service is active, you can answer a call while the ringtone sounds.Setting the Call Forwarding Service From the Home screen, X "Settings" X "Call settings" X "Call forwarding" sThe "Call forwarding" screen appears. The following operations are available to you.Activate Change forwarding numberEnter the forwarding number.Register ring timeEnter 0 to 120 (seconds) for the ring time. If the ring time is set to "0", incoming calls are not saved in the call log.Deactivate Tap "OK" to stop the Call Forwarding Service.Register number Enter a new forwarding number and tap "OK" to change the forwarding number. You can also activate the Call Forwarding Service by marking the "Activate" checkbox when the service is deactivated.93Calling / Network ServicesForwarding number busyTap "Connect" to automatically connect an incoming call to the Voice Mail Service Center if the forwarding number is busy*.Check setting The current Call Forwarding Service settings are displayed. * A subscription to the Voice Mail Service is required.Setting on/off the Call Forwarding voice prompts From the Home screen, "Phone" sThe "Phone" tab appears."1" X "4" X "2" X "9" X sFollow the voice prompts to configure the setting. For details, refer to "Mobile Phone User's Guide [Network Services]".Caller ID Notification ServiceWhen making a call, your phone number can be shown in the display of the other party's phone.Note sThe Caller ID Notification Service is not available when (out of service area) is displayed. sThe service is only in operation when the other party's phone can display the caller ID. sIf an announcement requesting caller ID is heard when making a call, activate Caller ID Notification or add the "186" prefix to the phone number and call again. From the Home screen, X "Settings" X "Call settings" X "Caller ID notification" sThe "Caller ID notification" screen appears. The following operations are available to you.Check settingThe current Caller ID Notification settings are displayed.Setting Set whether the other party is notified of your caller ID. Tap "Notify" to enable notification, and "Not notify" to disable notification. 94Calling / Network ServicesAdditional ServicesWhen a new network service is introduced by au, you can use it after registering it in the menu.Note sWhen using the service, enter "Special Numbers" or "service code" informed by au. "Special Numbers" is the number to access service center. "service code (USSD)" is the number to inform to service center.Setting additional services From the Home screen, X "Settings" X "Call settings" X "Additional service" sThe "Additional service" screen appears."Add USSD functions" X "Add USSD functions" sThe "Add USSD functions" menu appears.Enter "Service name" and "USSD string", and tap "OK" sEnter "Service name" using 20 double-byte characters or 20 single byte characters.Registering the response message when using the service From the Home screen, X "Settings" X "Call settings" X "Additional service" sThe "Additional service" screen appears."Add message" X "Add message" sThe "Add message" menu appears.Enter "Answer word" and "USSD string" and tap "OK" sThe new service is added. sEnter "Answer word" using 20 double-byte characters or 20 single byte characters.Using the registered service From the Home screen, X "Settings" X "Call settings" X "Additional service" sThe "Additional service" screen appears."Add USSD functions" X Tap the registered service sThe registered service is available to use.95Calling / Network Services](https://usermanual.wiki/LG-Electronics-USA/IS11LG/User-Guide-1591583-Page-13.png)
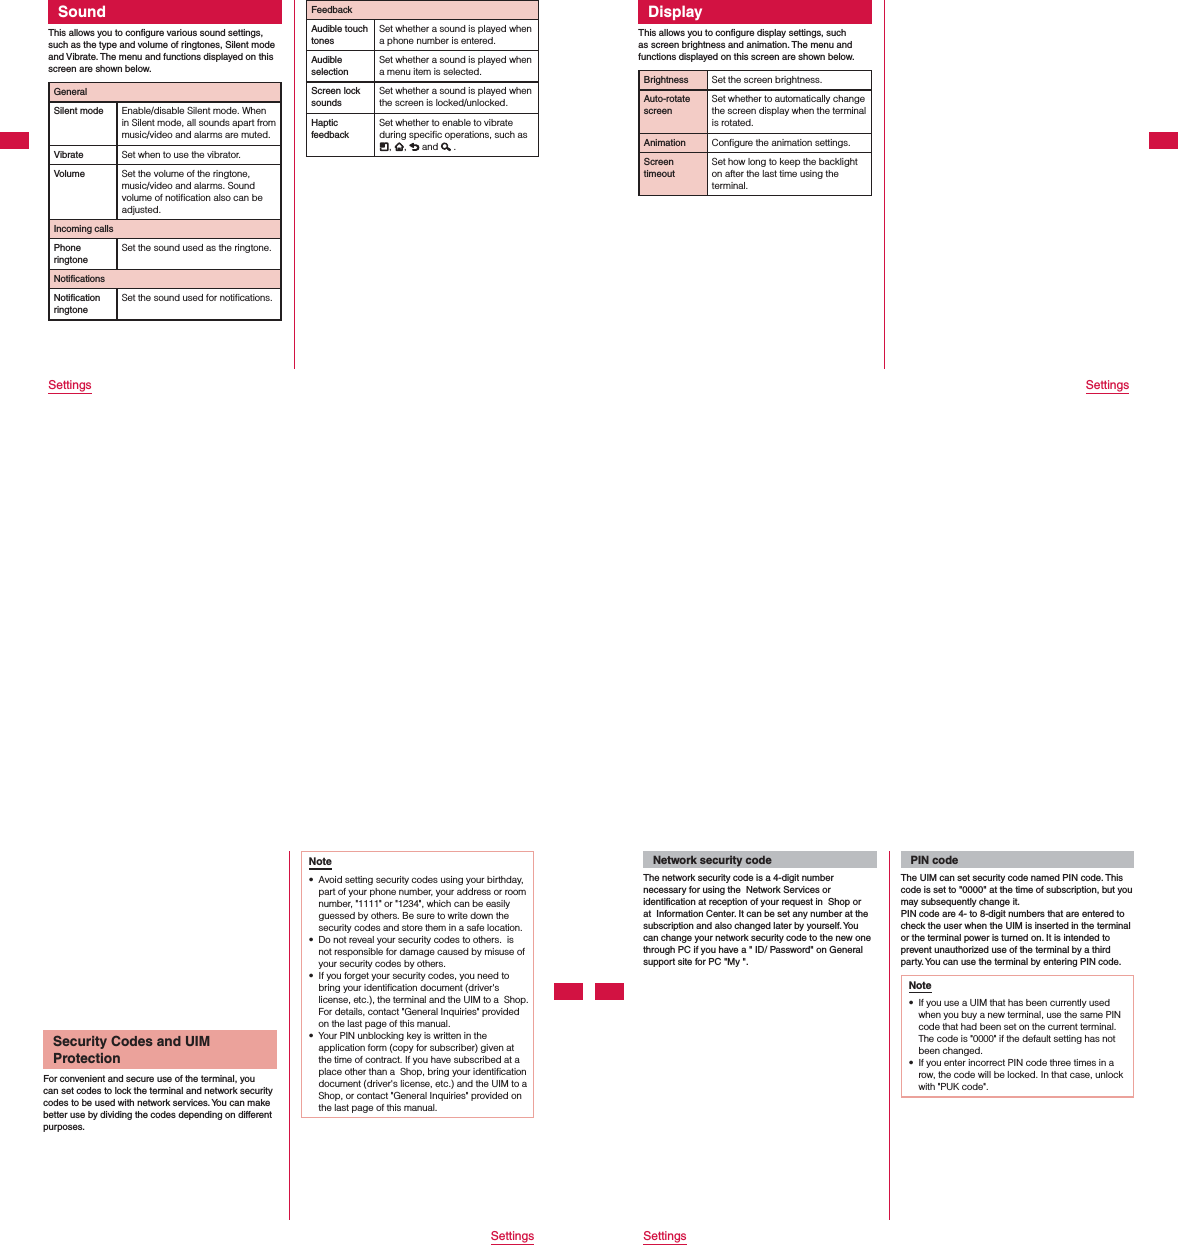
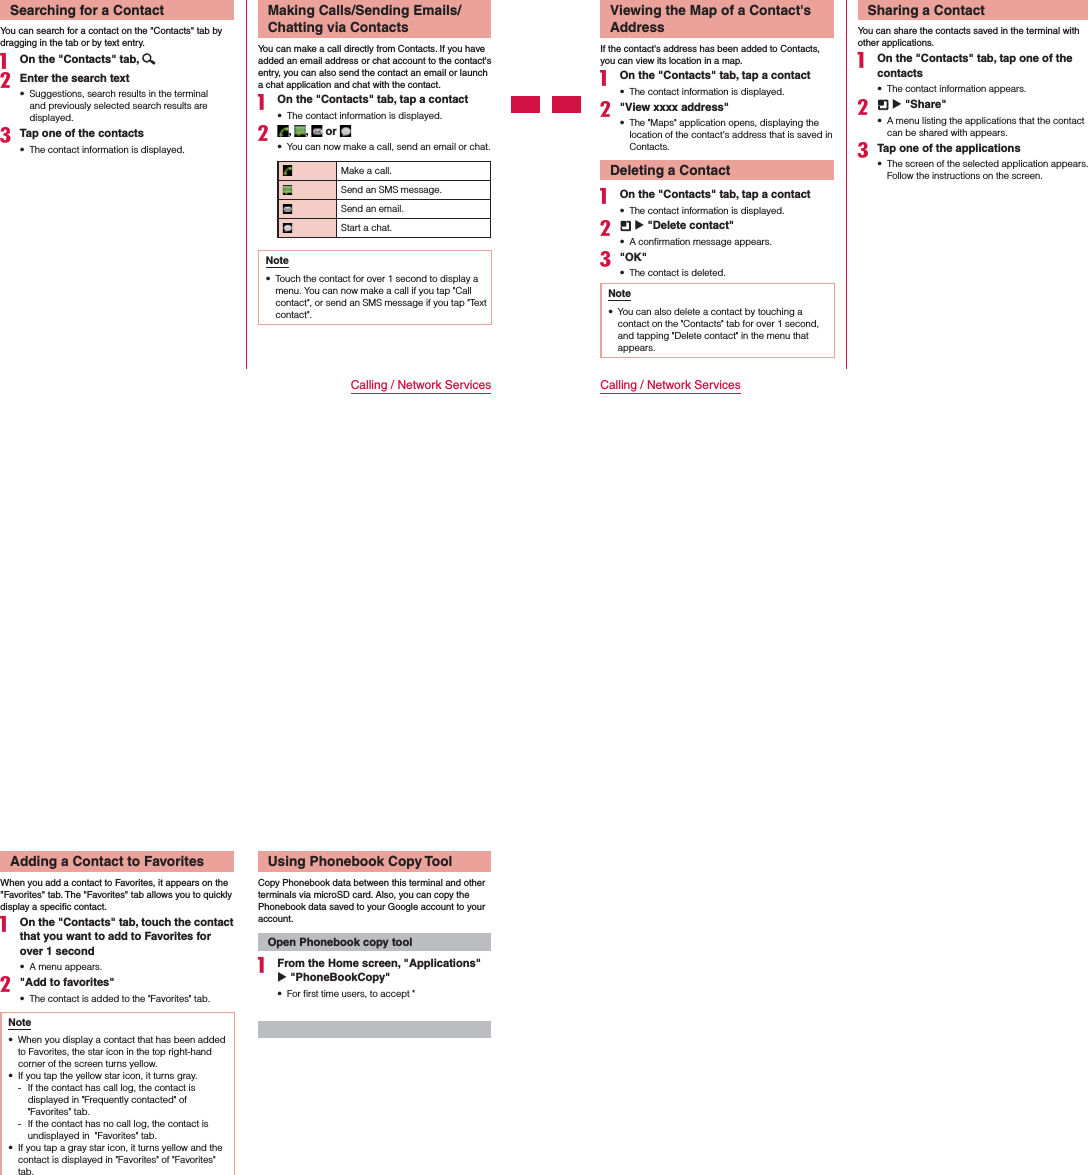
![sp-mode MailThis allows you to send and receive emails using an i-mode mail address.It allows you to use Pictograms and Deco-mail, and also supports auto receive.For details about sp-mode, refer to "Mobile Phone User's Guide (sp-mode <Smart phone>)". From the Home screen, "Applications" X "sp モードメール (sp-mode mail)" sFollow the instruction on the screen.GmailIf you have a Google account, you can send and receive emails using Gmail. If you do not have a Google account, you must open an account before using Gmail.Opening Gmail From the Home screen, "Applications" X "Gmail" sGmail opens, and the "Inbox" screen appears.Note sIf your Google account settings have not been completed, the "Add a Google Account" screen appears. Follow the on-screen instructions to add the account. If you do not have a Google account, operations to get an account are available. sFor details about Gmail, refer to X "More" X "Help".117Mail / InternetCreating and Sending an Gmail From the "Inbox" screen, X "Compose" s"Compose" screen appears.Enter email address in "To" boxEnter a subject in "Subject" boxEnter a message in "Compose Mail" box sOn "Compose" screen, X Tap "Send" to send an email.SMSYou can send and receive text messages containing up to 70 double-byte characters (or 160 single-byte alphanumerical characters) to other terminals.Sending an SMS Message From the Home screen, "Messaging" sThe "Messaging" screen appears."New message"Tap the "To" box X Enter the recipient phone number sA list of contacts beginning with the entered number or name appears.Tap the "Type to compose" box X Enter your message"Send" sThe message is sent.118Mail / InternetNote sYou can insert a smiley if you tap X "Insert smiley" when entering your message. Although an emoticon appears on your "Type to compose" box, the smiley is displayed if the message is received on an Android compatible phone. sTo receive notification that the SMS message is received, tap X "Settings" on the "Messaging" screen, and mark the "Delivery reports" checkbox. sYou can also send/receive SMS messages to/from users of overseas network operators other than . For available countries/compatible overseas network operators, refer to "Mobile Phone User's Guide [International Services]" or the "International Services website". sTo send SMS messages to users of overseas network operators other than , enter "+" X "Country code" X "the recipient mobile phone number". Omit "0" if the recipient phone number starts with "0". You can also send an SMS message by entering "010", "Country code" and "the recipient mobile phone number". (To reply to an SMS message sent from overseas, enter "010".)Receiving/Viewing an SMS Message From the Home screen, "Messaging" sThe "Messaging" screen appears.Tap one of the threads sThe message is displayed.Note sWhen you receive an SMS message, appears in the status bar. To read the message, drag or swipe the status bar downwards to open the Notification panel, and tap a new message.119Mail / InternetBrowserBrowser allows you to view web pages in the same way that you can from a PC.Opening Browser From the Home screen, "Applications" X "Browser" sBrowser opens, displaying the last web page that you viewed. The home page appears if you have not been recently using Browser.Note sWhen viewing a web page that has been designed for PCs, it is displayed in full size for the first time use. However, you may zoom in or out, or scroll through the page. For more details, refer to "Touch Screen Operations" (P39). sWeb page operations may vary depending on their format and content. sFor information on the file formats that can be viewed and played on the terminal, refer to "File formats" (P212).Viewing a Web PageViewing a web page by entering its URL Tap the search box on the Browser screenEnter the URL of the web page sBefore you finish entering the URL, a list of web page suggestions and search suggestions that match the entered characters appears.Tap one of the listed web pages or finish entering the URL, and tap sThe web page for the specified URL appears.Note sTo stop displaying a web page, tap or X "Stop".120Mail / Internet](https://usermanual.wiki/LG-Electronics-USA/IS11LG/User-Guide-1591583-Page-17.png)