LG Electronics USA L01C PCS GSM Phone User Manual L 03B E Cover 100126
LG Electronics USA PCS GSM Phone L 03B E Cover 100126
UserManual.wiki
>
LG Electronics USA
>
L01C User Manual
>
User manual 1
Contents
1.
User manual 1
2.
User manual
User manual 1
Navigation menu
Upload a User Manual
Namespaces
Wiki Guide
HTML
PDF
Info
Views
User Manual
Discussion / Help
Navigation

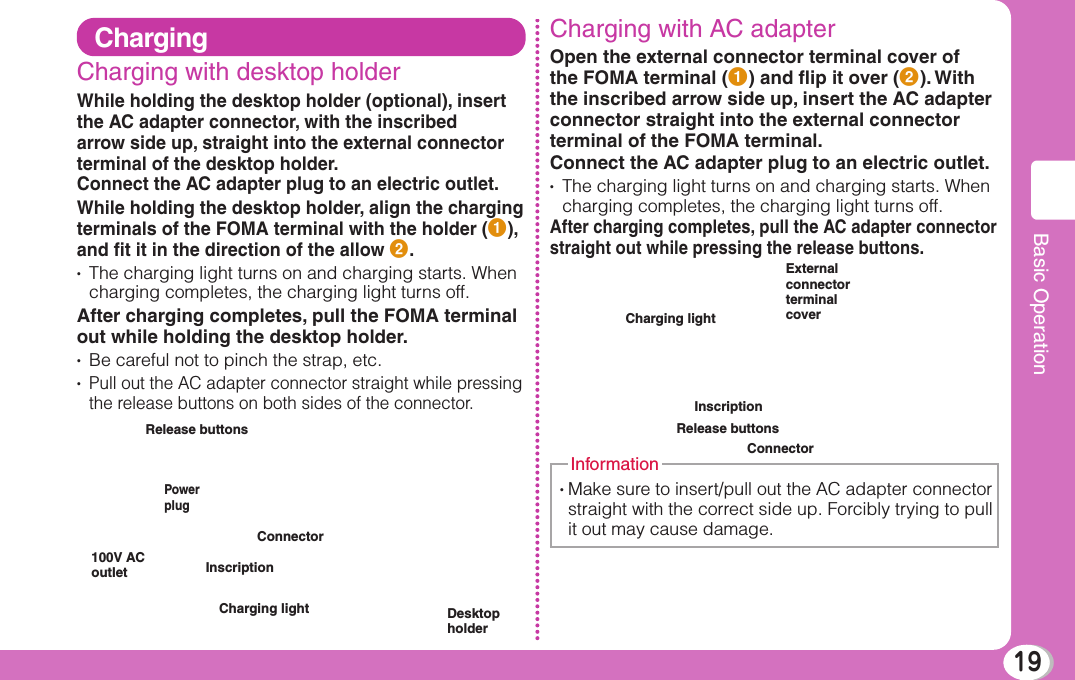
![20Basic OperationTurning Power ONTurning power ON1With the power turned OFF, P (for over 2 seconds)After the Wake-up screen is displayed, the Stand-by display appears.Turning power OFF1With the power turned ON, P (for over 2 seconds) in Stand-byThe Exit screen appears and the power is turned OFF.Confi guring Default SettingAfter turning the power ON for the fi rst time, set "Set Date&Time", "Change security code", and "KeyPad Sound(ON/OFF)" as default settings.1Turn the power ON X "Yes"2Set the date and time3Set the Terminal security code4Set the keypad tone (select "ON" or "OFF")Checking Your Own Phone NumberView your phone number (own number) saved on the UIM.• For procedures on checking/changing your mail address, see "Mobile Phone User's Guide [i-mode] FOMA version".1Stand-by display X M X "Own Number"](https://usermanual.wiki/LG-Electronics-USA/L01C.User-manual-1/User-Guide-1321157-Page-11.png)
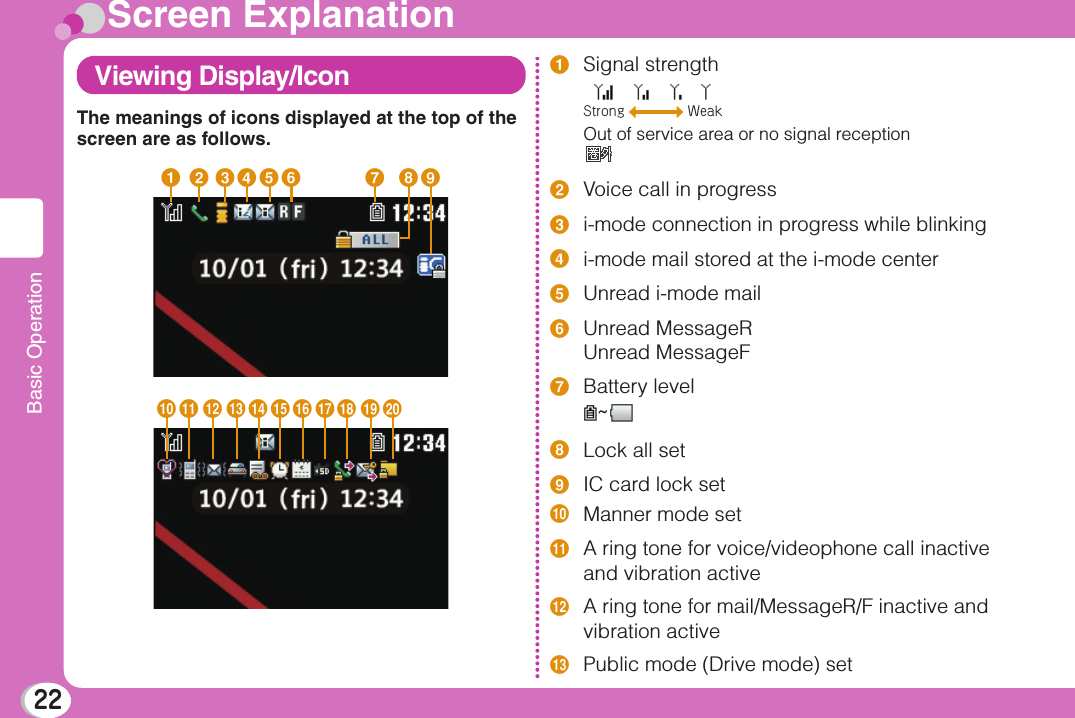
![21Basic OperationEditing your own number1Stand-by display X M X "Own Number" X C[Detail] X Enter the Terminal security code2M[Menu] X "Edit"3Edit each item X I[Done]Searching for Key OperationsSearch and refer to the function you want to know or use. Depending on the function, you can execute the searched function after searching.• This function is provided in Japanese only.1Stand-by display X 7(for over 1 second)2"Menu search"/"Useful guide"When selecting "Menu search", enter menu item names or keywords to search for your desired function. Press I[Chara] to switch input modes.When selecting "Useful guide", select and check the target function from the list.• If C[Start] appears on the search result screen, press C[Start] to execute the function.InformationPreventing Key MisoperationsWhen you put the FOMA terminal in your bag, it is recommended to set the key lock in order to prevent key misoperation.Setting key lock1l(for over 1 second)Canceling key lock1While the display turns on, l(for over 1 second)• When the display turns off, press l to turn it on, and then perform the operation.• When the key lock is set, appears on the screen.• When a call arrives while setting the key lock, an incoming screen, etc. appears on the display. Some operations are temporarily available depending on the key.Information](https://usermanual.wiki/LG-Electronics-USA/L01C.User-manual-1/User-Guide-1321157-Page-12.png)
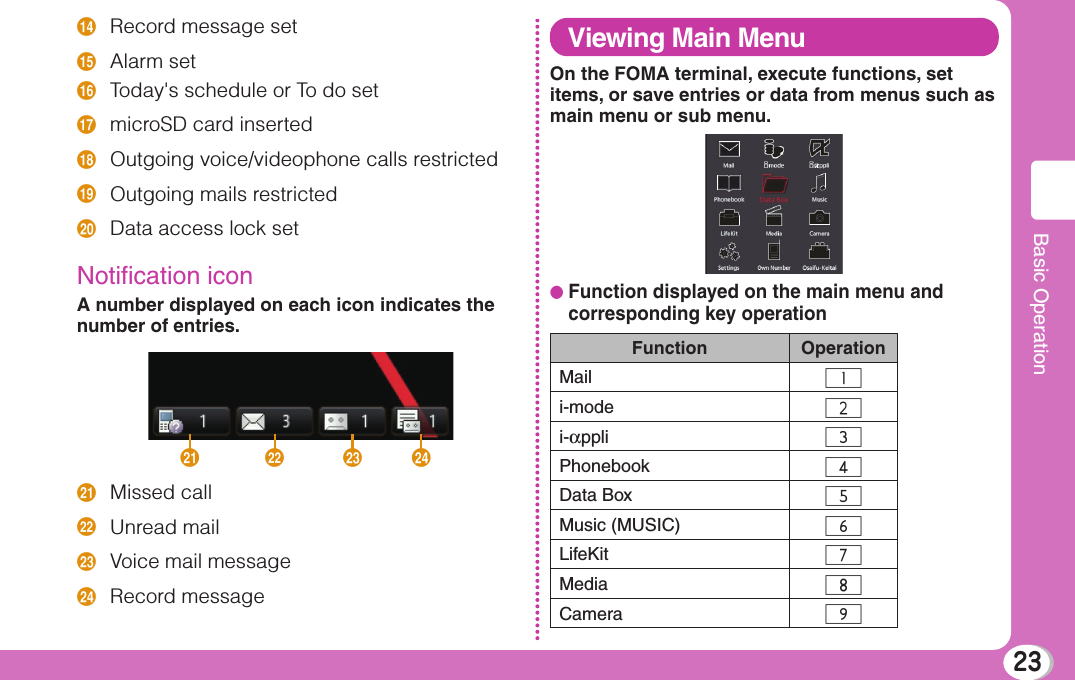
![25Basic OperationMenu OperationThis section explains operations for accessing the main menu from the Stand-by display and displaying the setting screen for "Color theme" in the following two ways.When using Navigation key1In Stand-by, press M to display the Main menu2Use Navigation key to move the cursor to "Settings" and press C[Select] to display the Settings screen3Use Navigation Up/Down key to move the cursor to "Display" and press C[Select] to display the Display screen4Use Navigation Up/Down key to move the cursor to "Color theme" and pressC[Select]When using Dial keys1In Stand-by, press M to display the Main menu2Press * corresponding to "Settings" to display the Settings screen3Press 2 corresponding to "Display" to display the Display screen4Press 3 corresponding to "Color theme"](https://usermanual.wiki/LG-Electronics-USA/L01C.User-manual-1/User-Guide-1321157-Page-16.png)
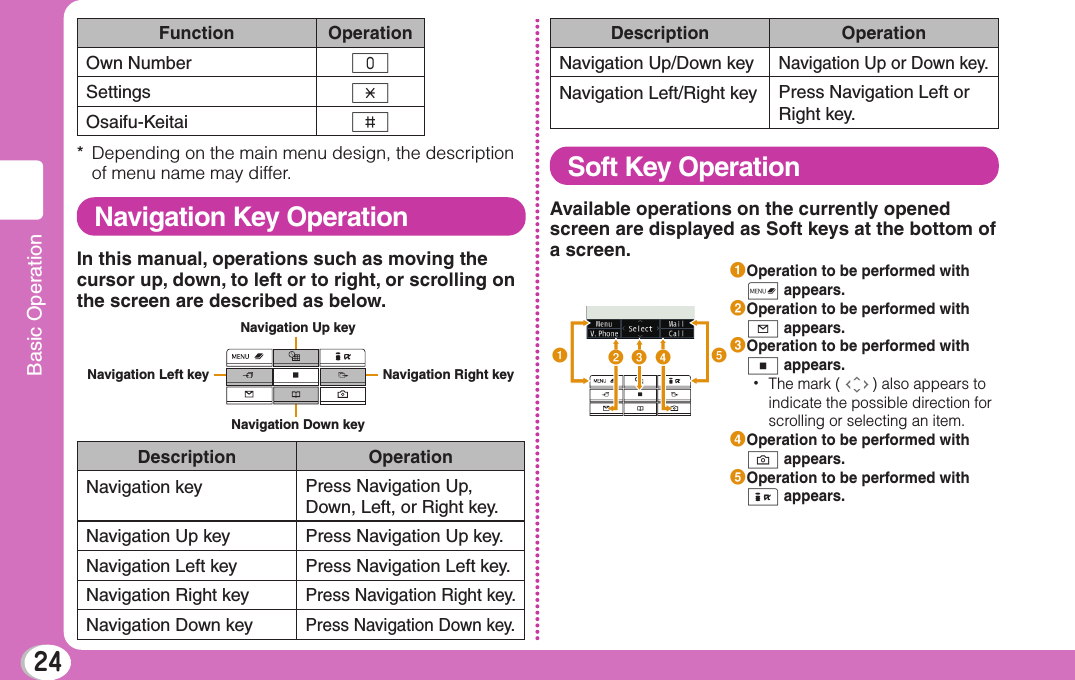
![26Basic OperationCharacter EntryEntering CharactersCharacter entry is required in various situations such as when saving entries to Phonebook or creating mail. Learn how to enter characters beforehand to make use of the FOMA terminal.Character entry screenOn the Character entry screen, the current input mode and operation guide are displayed.Input modeAvailable number of characters or bytes to be input Character entry screenSwitching input modeSwitch the input mode according to the character type to be input. In some input modes, switching between full-pitch and half-pitch characters is available.1Character entry screen XI[Mode]2I[Change]• Each time you press I[Change], input modes are switched. When you press g[To full/To half], full-pitch and half-pitch modes are switched (except for Hiragana and Kanji input mode and Korean input mode).漢カナ (カ): Hiragana and Kanji input mode: Katakana input modeab/AB*1 (a/A*1): Alphabetical input mode12 (1) : Numeric input mode韓*2: Korean input mode*1 Press M[Upper/Lower] to switch between upper and lower cases.*2 Appears when SMS input character is set to "JP/KR(70Chara)".3C[Select]The input mode is set.](https://usermanual.wiki/LG-Electronics-USA/L01C.User-manual-1/User-Guide-1321157-Page-17.png)
![27Basic OperationCharacter entry methodIn Hiragana and Kanji input mode, enter characters using the following two prediction functions. Prediction input function: predicts conversion options. Next phrase prediction function: predicts the next phrase from the characters being entered.Example: Entering characters "ドコモ太郎 (DOCOMOTaro)" in Hiragana and Kanji input mode1On the Character entry screen, enter "どこも (DOCOMO)""ど": 4 fi ve times X * once"こ": 2 fi ve times"も": 7 fi ve timesCharacter input fi eldPrediction option fi eldConversion (Prediction) options predicted by the Prediction input function appear.2Use Navigation Up/Down key to move the cursor to the Prediction option fi eld3Move the cursor to "ドコモ (DOCOMO)" X C[Set]4Enter "たろう (Taro)""た": 4 once"ろ": 9 fi ve times"う": 1 three times5Use Navigation Up/Down key to move the cursor to the Prediction option fi eld6Move the cursor to "太郎 (Taro)" X C[Set]Entering pictograms/symbols/emoticonsPictograms, symbols, and emoticons pre-installed in the FOMA terminal can be used when entering characters.1Character entry screen X G[Pict/Sym]2Use I[Change] to select an input mode3Use M to switch types4Select a pictogram/symbol/emoticon to enter• Depending on the entry screen, pictograms, symbols, or emoticons may not be entered, or input mode/type may not be switched.Information](https://usermanual.wiki/LG-Electronics-USA/L01C.User-manual-1/User-Guide-1321157-Page-18.png)
![28Basic OperationSound/Screen SettingChanging Ring Tone1Stand-by display X M X "Settings" X "Sounds & Vibration" X "Select ring tone"2Select an item and select a fi le3I[Done]Adjusting Volume1Stand-by display X M X "Settings" X "Sounds & Vibration" X "Volume"2Select an item and adjust volume3I[Done]Setting Vibrator1Stand-by display X M X "Settings" X "Sounds & Vibration" X "Vibrator"2Move the cursor to the item to set X C[ON/OFF]3I[Done]Using Manner Mode1Stand-by display X #(for over 1 second)When the Manner mode is set, appears at the top of the screen.• Even while the manner mode is set, the camera shutter tone, shooting start tone and end tone sound.b To cancel the Manner modeIn Stand-by, press #(for over 1 second).Setting Keypad Sound OFF1Stand-by display X M X "Settings" X "Sounds & Vibration" X "Volume" X Move the cursor to "Keypad tone"2Use Navigation Left key to set (Mute)3I[Done]](https://usermanual.wiki/LG-Electronics-USA/L01C.User-manual-1/User-Guide-1321157-Page-19.png)
![29Basic OperationChanging Screen SettingsChanging Stand-by display 1Stand-by display X M X "Settings" X "Display" X "Stand-by display"2Set each item3I[Done]Changing display brightnessSet the backlight duration and brightness of the display.1Stand-by display X M X "Settings" X "Display" X "Backlight"2Set each item3I[Done]Changing main menu designSet the menu design displayed when M is pressed in Stand-by.1Stand-by display X M X M[Menu] X "Menu priority" X "Custom menu"/"Basic menu" X "Yes"• To switch the menu temporarily, press G[Basic]/g[Custom] while the menu is displayed.InformationSetting Kisekae ToolSet ring tones, stand-by display or menu icons, etc. at a time.1Stand-by display X M X "Data Box" X "Kisekae Tool"2Move the cursor to "i-mode"/"Preinstalled" X C[Open]3Move the cursor to a Kisekae Tool X I[Set all] X "Yes"](https://usermanual.wiki/LG-Electronics-USA/L01C.User-manual-1/User-Guide-1321157-Page-20.png)