LG Electronics USA L05A 850/ 1900 GSM/ GPRS/ EDGE and 850 WCDMA USB Dongle User Manual L05A Manual E
LG Electronics USA 850/ 1900 GSM/ GPRS/ EDGE and 850 WCDMA USB Dongle L05A Manual E
Contents
- 1. Users Manual 1
- 2. Users Manual 2
- 3. Revised Users Manual
- 4. Users Manual
Revised Users Manual

Part 15.21 statement
" Change or Modifications that are not expressly approved by the manufacturer could void
the user's authority to operate the equipment. “
Part 15.105 statement
This equipment has been tested and found to comply with the limits for a class B digital
device, pursuant to Part 15 of the FCC Rules.
These limits are designed to provide reasonable protection against harmful interference in
a residential installation. This equipment generates uses and can radiate radio frequency
energy and, if not installed and used in accordance with the instructions, may cause harmful
interference to radio communications. However, there is no guarantee that interference will
not occur in a particular installation. If this equipment does cause harmful interference or
television reception, which can be determined by turning the equipment off and on, the user
is encouraged to try to correct the interference by one or more of the following measures:
- Reorient or relocate the receiving antenna.
- Increase the separation between the equipment and receiver.
- Connect the equipment into an outlet on a circuit different from that to
which the receiver is connected.
- Consult the dealer or an experienced radio/TV technician for help.
This device is not intended for sale in the USA.

Part 15 Class B Compliance
This device and its accessories comply with part15 of FCC rules.
Operation is subject to the following two conditions:
(1) This device & its accessories may not cause harmful interference.
(2) This device & its accessories must accept any interference received,
including interference that may cause undesired operation.
Body-worn Operation
This Mobile Broadband USB Modem, model L-05A, is approved for use in normal size laptop
computers only (typically with 12" or larger display screens). To comply with FCC RF exposure
requirements, this modem should not be used in configurations that cannot maintain at least
5mm (approximately 0.2 inches) from users and bystanders, and 12mm (approximately 0.47 inches)
from the top of the USB modem.
This USB modem has been tested for compliance with FCC/IC RF exposure limits
in the laptop computer(s) configurations with horizontal and vertical USB slots and can be
used in laptop computers with substantially similar physical dimensions, construction,
and electrical and RF characteristics. When using this USB modem in your computer,
it must not be co-located or simultaneously transmit with any other radio
(for example, Bluetooth or Wifi radios) in the computer. If the USB modem will be used with
the mounting folder and extension cable combination, the modem must not be co-located or
simultaneously transmit with any active antenna that may be located on your computer screen.��

DOCOMO W-CDMA・ GSM/GPRS
System
Thank You for Purchasing the「Data Commu-
nication Device L-05A」
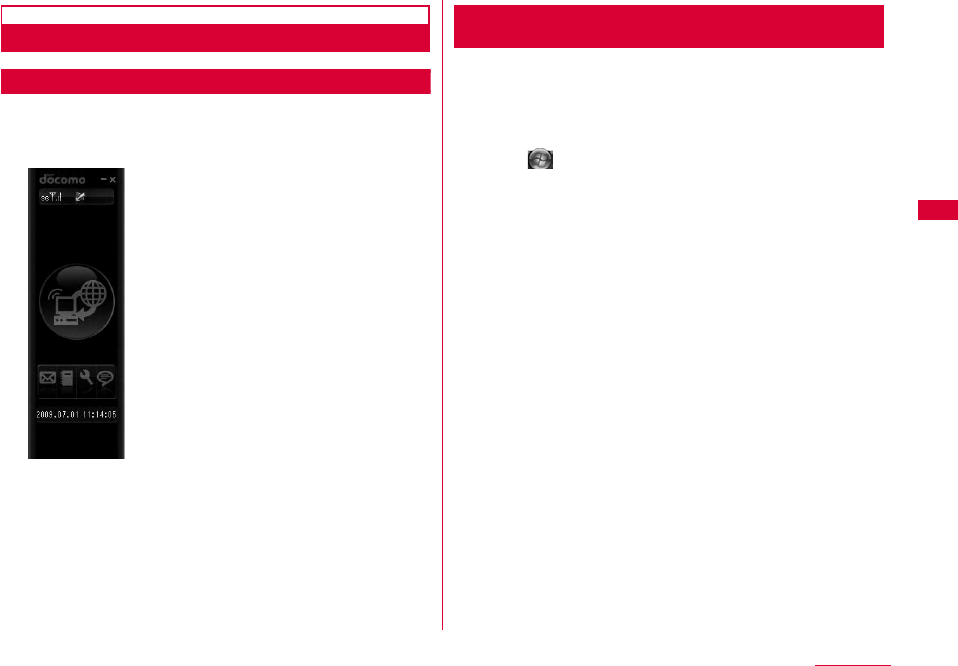
Before or while using the L-05A, be sure to thoroughly
read this manual and the individual manual for other
operation devices to ensure its correct use. For further
information, contact the "docomo Information Center" on
the back of this manual. The L-05A is designed to be your
close partner. Treat it carefully at all times to ensure
longterm performance.
Before Using the FOMA Terminal
•Because the FOMA terminal uses radio waves, it may not
function in locations where it is difficult for radio waves to
penetrate, such as tunnels, underground passages and some
buildings in areas where radio wave signals are weak or out of
the service area. Even when you are on a higher floor of a tall
building or condominium and nothing blocks your view outside,
the FOMA terminal may not be able to receive or transmit
signals. Also communication may be interrupted even when the
Antenna Indication Lamp on the FOMA terminal lights green
indicating a strong signal reception with 3 antenna indication
bar.
•Use the FOMA terminal in ways that do not disturb others in
public places, crowded locations, or quiet locations.
•The FOMA terminal communicates via radio waves by
converting voices into digital signals. If you move into an area
where signal reception is poor, the digital signals may not be
accurately decoded and what you hear may differ slightly from
what was actually said.
•DOCOMO is not responsible for any economic losses incurred
through lost communication opportunities caused by external
factors such as malfunction or failure of the FOMA terminal, or
electrical outage.
•The FOMA terminal can be operated in FOMA Plus-Areas and
FOMA HIGH-SPEED Areas.
•The FOMA terminal can be used only via the FOMA network
provided by DOCOMO and DOCOMO's roaming area.
•This FOMA terminal does not support i-mode functions (i-mode
mail, connection to official i-mode sites or i-αppli, etc.)
For Those Who Use the FOMA Terminal
for the First Time
If this is the first time for you to use the FOMA terminal, it
is recommended that you read this manual in the following
order to learn basic operations.
1. Learning the precautions. . . . . . . . . . . . . . . . . . . . . . . P7
2. Learning the names of parts and functions of the
FOMA terminal. . . . . . . . . . . . . . . . . . . . . . . . . . . . . . . P18
3. Inserting the FOMA terminal into a PC . . . . . . . . . . P24
4. Having the FOMA terminal recognized by your PC. . . P24
5. Setting up the FOMA terminal for communication. . . . P66
The latest version of this manual can be downloaded from the
DOCOMO web site.
■ The URL of PDF for Instruction Manual
http://www.nttdocomo.co.jp/english/support/manual/
index.html
※ The URL and the information contained in the manual are
subject to change without prior notice.

1
How to Read/Refer to This Manual
Contents
L-05A Manual is composed of『L-05A Instruction Manual∼Connection Guide∼』and 『L-05A INSTRUCTION MANUAL
(included CD-ROM)』(this manual) recorded in CD-ROM.
■『L-05A Instruction Manual∼Connection Guide∼』
The following contents such as connection to computer, troubleshooting methods, specifications of L-05A are written.
•Contents/Precautions
•Before Using the FOMA Terminal
•Setting up
•Appendix/Troubleshooting
■『L-05A INSTRUCTION MANUAL (included CD-ROM)』(this manual)
Besides the above contents described in『L-05A Instruction Manual∼Connection Guide∼』, the contents of configuring
communication through special application are also written.
This manual is supplied with PDF. To view this manual, Adobe Reader (Version6.0 or later is recommended) is necessary.
•L-05A Connection Software
•DOCOMO Connection Manager
•Configuring Network Manually
•Overseas Use
2
How to Refer to This Manual
This manual offers you the following methods to easily find a page describing functions or services you want to know
about.
・Please understand that「L-05A Manual」 refers to the「L-05A」as the「FOMA Terminal」.
・This manual describes, some steps and screens may differ depending on your operating environment.
・Reprinting all or parts of this manual is prohibited.
・Information contained in this manual is subject to change without prior notice.
P141
Search from the index when you know the names of functions or
services.
Front
cover
Search functions or services from the index tabs printed on the
front cover.
P5
Search from the contents that categorize functions.
P6
Search from the features when you want to use specific functions.
From the Index
From the Tabs on the Cover
From the Contents
From the Main Features
See next
page for
detailed
descriptions
3
A way to find a destination page is explained with an example of installing L-05A connection software on Windows
(including a driver).
From the
Index
P141
Search or a function
name or a service
name as shown
below.
From the
Index Tabs
on the Front
Cover
Front cover
Search for the
function in the order
of "Front cover"→
"Chapter title page"→
"Target page" as
shown below.
P35
The page describing
installation of L-05A
connection software
on Windows
(including a driver)"
4
Displays a
section title.
Explains
Operation steps
※:The above page is an example.
※:Screen images and illustrations contained in this manual
are for reference only. They may differ from those seen for
the actual product.
Useful
Information or
suggestions
relating to an
operation.
A key screen for an
operation step.
This is an image of
a screen seen on
the PC. Numbers,
settings or
characters entered
are for reference
only.
Index:
Searching each
chapter is available.
5
Contents/Precautions
Contents
How to Read/Refer to This Manual ・・・・・・・・・・・・・・・・・・ 1
Contents ・・・・・・・・・・・・・・・・・・・・・・・・・・・・・・・・・・・・・・・・・・・・ 5
Features of the L-05A・・・・・・・・・・・・・・・・・・・・・・・・・・・・・・・ 6
Safety Precautions (ALWAYS FOLLOW THESE
PRECAUTIONS) ・・・・・・・・・・・・・・・・・・・・・・・・・・・・・・・・・・・・・ 7
Handling and Care・・・・・・・・・・・・・・・・・・・・・・・・・・・・・・・・・ 12
Purchased Product and Accessories ・・・・・・・・・・・・・・ 15
Before Using
the FOMA
Terminal
17
Names of Parts and Functions
Using FOMA Card
Available Communications
Connecting FOMA Terminal with a PC
Setting Up
31
Setting Up
Windows version
Macintosh version
L-05A
Connection
Software
49
L-05A Connection Software
Using Packet Communication
Using SMS
Using Phonebook
Using Application Option
DOCOMO
Connection
Manager
77
DOCOMO Connection Manager
Windows version
Macintosh version
Configuring
Network
Manually
89
Configuring Dial-up Network Manually
Conducting Communication
(Connecting Dial-up)
Overseas
Use
111
International Roaming Service
(WORLD WING)
Services Available Overseas
Confirming before Using Overseas
Setting the Searching Method for
Available Networks
Configuring Network
Appendix/
Trouble-
shooting
119
AT Commands
AT Command List
Troubleshooting
Error Messages
Warranty and After-Sales Service
Software update
Main Specifications
Export Controls of the Product and
Accessories
Intellectual Property Rights
Index
6Contents/Precautions
Features of the L-05A
FOMA (Freedom Of Mobile multimedia Access) is the name of a service provided by DOCOMO based on the W-CDMA
system, which is certified as one of the global standards of 3rd generation mobile communication systems (IMT-2000).
■ Correspondence with the FOMA HIGH-SPEED Area
You can enjoy high speed communication (Best effort
system)at a maximum of 7.2Mbps for receiving and
5.7Mbps for sending.
•The maximum speed of 7.2Mbps for receiving and
5.7Mbps for sending are theoretical values and they do
not show the actual performance.
•Out of High-Speed area, the maximum communication
speed for receiving and sending is 384kbps.
•The actual communication speed varies depending on
surrounding communication conditions and network
condition.
•DOCOMO offers Internet connection services, such as
「mopera U」. For details, visit the mopera U web site
http://www.mopera.net/ (Japanese only)
※ The packet communication in FOMA HIGHSPEED area,
the amount of send/receive data is expected to increase.
Note that the communication fees may become high.
■ International Roaming Service
Communications are available from a PC even in foreign
countries that have adapted the W-CDMA (3G) network
system or GPRS network.P112
※ If you subscribed to the FOMA service after September
1, 2005, a separate subscription is not required.
However, if you unsubscribed to the FOMA service
subscription or canceled the service, a separate
subscription is required.
※ If you initially subscribed to the FOMA service before
August 31, 2005, and have not subscribed to "WORLD
WING", a separate subscription is required.
※ This service is not available with some billing plans.
■ FOMA Card Interchangeability
The same FOMA card can be used in more than one
FOMA terminal.P19
■ SMS Feature
Allows you to send and receive SMS by using L-05A
Connection Software P54
7
Contents/Precautions
Safety Precautions (ALWAYS
FOLLOW THESE PRECAUTIONS)
■ Before using your FOMA terminal, read these ″Safety
Precautions″carefully so that you can use it properly.
After reading the safety precautions, keep this manual in
a safe place for later reference.
■ These precautions are intended to protect you and
others around you. Read and follow them carefully to
avoid injury, damage to the product or damage to
property.
■ The signs below indicate the levels of danger or damage
that may occur if the particular precautions are not
observed .
■ The following symbols indicate special warnings
regarding product usage.
■ "Safety Precautions" are explained in the following
4 sections.
General Precautions for the FOMA Terminal and FOMA
Card ………………………………………………………………… 8
Precautions for the FOMA Terminal ……………………… 9
Precautions for the FOMA Card ………………………… 10
Notes on Using near Electronic Medical Equipment …… 11
This sign indicates that
incorrect handling has a
high possibility of
causing death or serious
injury.
This sign indicates that
incorrect handling poses
a risk of causing death or
serious injury.
This sign indicates that
incorrect handling poses
a risk of causing injury or
damage to the product or
property.
DANGER
WARNING
CAUTION
Denotes things not to do (prohibition).
Denotes not to disassemble.
Denotes not to use where it could get
wet.
Denotes mandatory instructions
(matters that must be complied with).
Not disassembly
Not liquids
8Contents/Precautions
General Precautions for the FOMA
Terminal and FOMA Card
Do not use or leave the FOMA terminal
and FOMA card in places with a high
temperature such as in cars under the
blazing sun.
Deformation, malfunction heating or the
deterioration of performance may result.
Also, part of the case could get heated,
causing bare skin burns.
Do not disassemble Disassemble,
remodel or solder the terminal and FOMA
card.
Fire, injury, electric shock or malfunction
may result.
Do not let FOMA terminal and FOMA
card get wet.
Contact with water or other liquids may
cause heating, electric shock, fire,
malfunction or injury. Take care not to
use the terminal and FOMA card in areas
where they could get wet.
WARNING
Do not put the FOMA terminal or FOMA
card in microwave ovens or other heating.
The FOMA terminal may over heat, smoke
or catch fire, or its circuit parts may burst.
Do not throw the FOMA terminal or FOMA
card, or subject them to severe shocks.
Malfunction or fire may result.
Be careful not to let electro conductive
materials (metal pieces, pencil leads etc.)
contact with the connector terminal. Also,
make sure that these are not entered into
the inside of the FOMA terminal.
Fire or other malfunctions may result from
a short circuit.
Make sure you have the power of the
computer which is connected with FOMA
terminal switched off before you go near a
flammable gas such as gasoline fumes.
Using the terminal in such an environment
may result in a fire.
Not disassembly
Not liquids
9
Contents/Precautions
CAUTION
Do not place the FOMA terminal or FOMA
card on unstable locations such as wobbly
tables or slanted locations.
The FOMA terminal or FOMA card may fall,
resulting in injury or malfunction.
Do not store the FOMA terminal or FOMA
card in humid or dusty places, or in hot
areas.
Malfunction may result.
If children use the FOMA terminal or
FOMA card, a guardian should explain the
precautions and correct operations. The
guardian should also make sure that the
instructions are followed during use.
Injury may result.
Keep out of reach of babies and infants.
Accidental swallowing or injury may result.
Precautions for the FOMA Terminal
WARNING
Do not put the FOMA terminal in the place
where it could be affected by an expanded
airbag, e.g. on the dashboard.
If the airbag expands, the FOMA terminal
could hit you and others, causing
accidents such as injury and the FOMA
terminal could get malfunction or
damaged.
Do not place the terminal in breast or
inner pocket when electronic medical
equipment is near by.
Using FOMA terminal closed to electronic
medical equipment may result malfunction.
Do not allow liquids such as water, or
foreign materials such as metal pieces or
flammable materials to get into the FOMA
card opening in the FOMA terminal.
Fire, electronic shock or malfunction may
result.
10 Contents/Precautions
Turn off the FOMA terminal in places
where use is prohibited such as airplanes
or hospitals.
Electronic and electronic medical
appliances may be adversely affected.
For use inside medical facilities, make sure
that you comply with their regulations.
Remove FOMA terminal from the USB port
in places near high-precision electronic
devices or devices using weak electronic
signals.
The FOMA terminal may possibly cause
these devices to malfunction.
※ Electronic devices that may be affected
Hearing aids, implanted cardiac pacemakers,
implanted defibrillators, other medical
electronic devices, fire alarms, automatic
doors and other automatically controlled
devices.
If you are using an implanted cardiac pace
maker, implanted defibrillator or any other
electronic medical device, consult the
manufacturer or retailer of the device for
advice regarding possible effects from radio
waves.
CAUTION
Electronic devices in some types of cars
can be affected by use of the FOMA
terminal.
For safety's sake, do not use the FOMA
terminal inside such cars.
Itching, rash or eczema may be caused
depending on your physical conditions or
predisposition.
If an abnormality occurs, stop using the
FOMA terminal immediately, and then seek
medical attention.
Metal(chrome plating) is used to the
following parts.
Parts that are used: USB connector
Precautions for the FOMA Card
CAUTION
Be careful when removing the FOMA
card(IC portion).
Your hands or fingers may be injured.
11
Contents/Precautions
Notes on Using near Electronic Medical
Equipment
■The description below meets ″Guideline on the
Use of Radio-communication Equipment such as
Cellular Telephones - Safeguards for Electronic
Medical Equipment″ by the Electromagnetic
Compatibility Conference.
WARNING
Be sure to adhere to the following
regulations inside medical facilities.
●Keep the FOMA terminal out of operating
rooms, intensive care units (ICUs) or
coronary care units (CCUs).
●Turn off the PC in hospital wards.
●Turn off the PC in hospital lobbies and
corridors if electrical medical devices
could be nearby.
●If the medical facility has specific zones
where use or possession of mobile
terminals is prohibited, follow those
regulations.
●If the function which automatically turns
on the power is set, cancel the setting
before turning off your PC.
Turn off the PC in crowded trains or other
public places where implanted cardiac
pacemaker or defibrillator wearers could
be nearby.
Signals from the FOMA terminal may
affect the operation of implanted cardiac
pacemakers or defibrillators.
If you use an implanted cardiac
pacemaker or implanted defibrillator, use
the mobile terminal 22cm or more away
from the implanted cardiac pacemaker or
implanted defibrillator.
Operation of an implanted cardiac
pacemaker or implanted defibrillator may
be affected by radio waves.
Patients using electronic medical
equipment other than implanted cardiac
pacemakers or implanted defibrillators
(using outside medical facilities for
treatment at home, etc.) should check the
influence of radio waves upon the
equipment by consulting the
manufacturer.
Operation of electronic medical equipment
may be affected by radio waves.

12 Contents/Precautions
Handling and Care
General Usage Guidelines
■Keep the FOMA terminal away from water.
The FOMA terminal and FOMA card are not
waterproof. Do not use the terminal in places with
high humidity such as a bath or where rain may
get it wet. If you carry the card close to your body,
moisture from sweat may corrode the internal
parts causing a malfunction. Note that
malfunctions deemed to be caused by water are
not covered by the warranty, and may be
impossible to repair. Since these malfunctions are
not under warranty, even when repair is possible,
it will be done at the user's expense.
■Clean the FOMA terminal with a dry, soft cloth
(Lens cleaning cloth).
If the FOMA terminal is wiped with alcohol, paint
thinner, benzine or detergent, the printing may
disappear or color may fade.
■Keep the connector contacts clean with a dry,
soft cloth.
Dirty contacts can result in intermittent
connections.
■Do not place the equipment near air conditioner
outlets.
Condensation may form due to rapid changes in
temperature, and this may corrode internal parts
and cause malfunction.
■Do not place the FOMA terminal where excessive
force will be applied to it.
If FOMA terminal is inserted to a full bag, or
placed in a pocket and sat on, its internal PCBs
may be damaged or malfunction. Such damage is
not covered by warranty.
■Read the individual manual attached to the FOMA
terminal.
FOMA Terminal
■Avoid using in extremely high or low
temperatures.
The FOMA terminal should be used within a
temperature range from 5 °C to 35 °C and a
humidity range from 45 % to 85 %.
■FOMA terminal may affect fixed phones,
televisions or radios in use nearby. Use as far as
possible from such appliances.
■Keep a separate record of any information stored
on the FOMA terminal and store the copies in a
safe location.
DOCOMO assumes no responsibility for the loss
of any of your data.

13
Contents/Precautions
■Remove the FOMA terminal from the PC when
transporting.
Malfunction or damage may result.
■It is normal for the FOMA terminal to become
warm during use. You can continue to use it even
when it is warm.
■Take care not to drop the FOMA terminal when
removing the FOMA terminal from the carrying
case.
■When it is not in use, keep the FOMA terminal in
its carrying case to keep the connector contacts
clean.
Dirty contacts may result in intermittent
connections.
■When putting the FOMA terminal in carrying case,
keep it away from wet or high temperature place.
Pay attention not to put excessive force on the
FOMA terminal.
Transformation, tarnish, color staining may result.
FOMA Card
■Do not put excessive force on the FOMA card
when inserting or removing it into the FOMA
terminal.
■It is normal for the FOMA card to become warm
during use. You can continue to use it even when
it is warm.
■Always keep the IC portion of the FOMA card
clean.
■Clean the FOMA card with a soft, dry cloth (Lens
cleaning cloth).
■Be sure to keep a separate note of the
information registered to the FOMA terminal.
DOCOMO is not responsible for any losses of
registered information.
■Visit DOCOMO shop to return the FOMA card for
the environmental purpose.
■Avoid extreme temperature.
■Do not scratch, touch carelessly or short circuit
the IC portion.
Data loss or malfunction may result.
■Do not drop or give shock to the FOMA card .
Malfunction may result.
■Do not bend or put heavy things on the FOMA card.
Malfunction may result.
■Do not insert UIM into the FOMA terminal with
labels or stickers attached on.

14 Contents/Precautions
CAUTION
■Do not use the modified FOMA terminal. Using
modified FOMA terminal result in violating the law
of Electromagnetic Compatibility.
FOMA terminal has been complied with technical
standard of wireless equipment stipulated by law
of Electromagnetic Compatibility. As for the proof,
the technical standard compliance mark, is
indicated in the inscription seal. If FOMA terminal
is modified by turning the screw to the left to
disassemble, technical standard compliance
becomes invalid.
Please do not use FOMA terminal during the time
when technical standard compliance is being
invalid, since you are in violation of the law of
Electromagnetic Compatibility.
15
Contents/Precautions
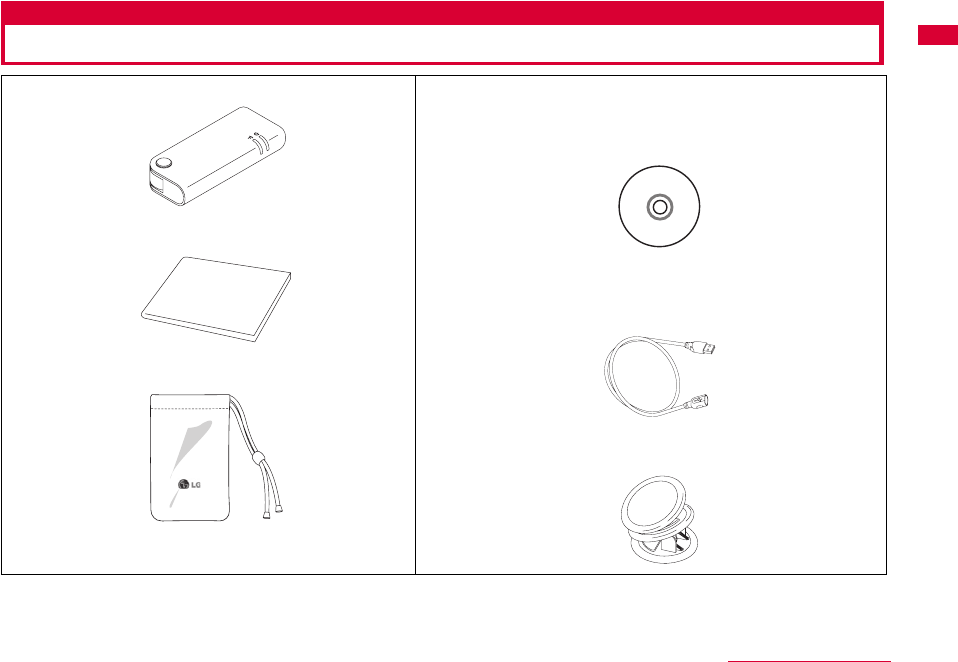
Purchased Product and Accessories
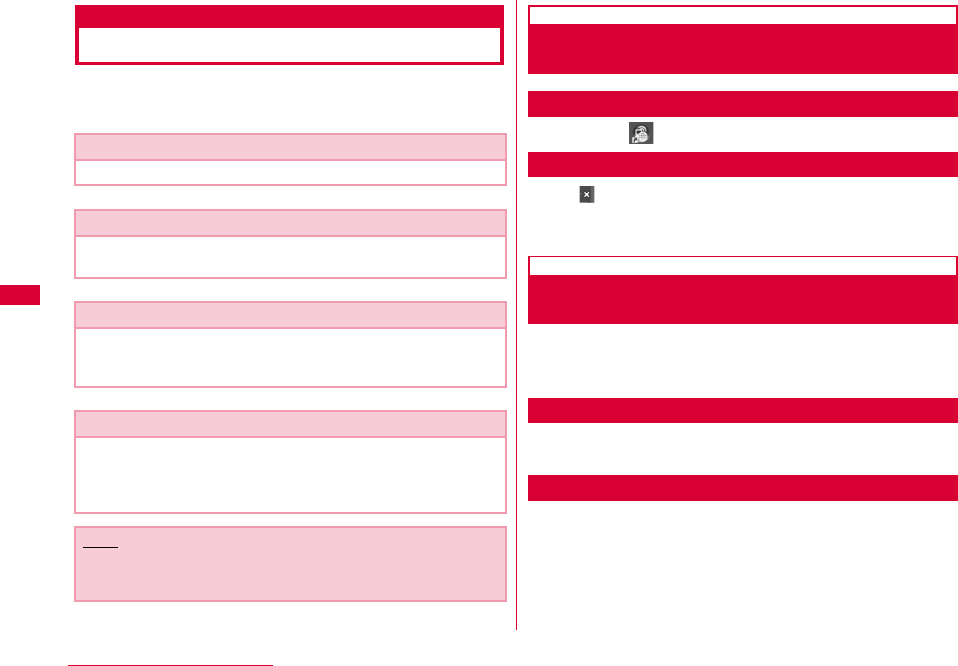
■ L-05A Terminal (With Rear Cover L13, Warranty)
■ L-05A Instruction Manual∼Connection Guide∼
■ Carrying Case (Sample)
■ L-05A CD-ROM
•L-05A Connection Software (For Windows/Macintosh)
•DOCOMO Connection Manager (For Windows/Macintosh)
•L-05A INSTRUCTION MANUAL(PDF)
※ Software specifications are subject to change without
prior notice.
■ USB Extension Cable (Sample)
Use when "USB Extension Cable" is written in this manual.
■ Mounting folder (Sample)
Use when "A mounting Folder" is written in this manual.


18 Before Using the FOMA Terminal
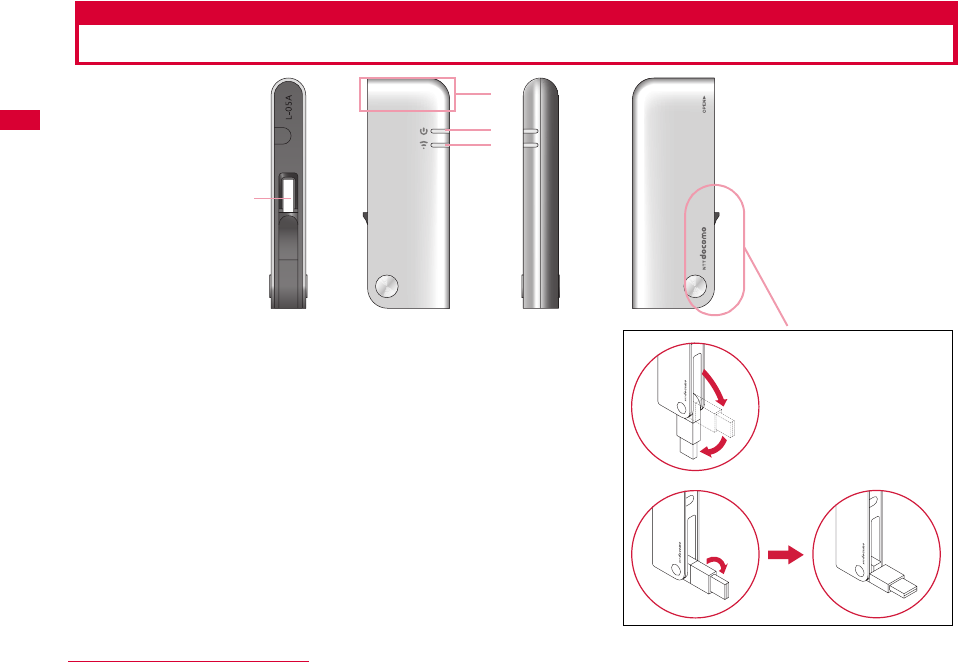
Names of Parts and Functions
aUSB Connector→P25
Connection contacts to a PC.
※Pull out from the FOMA terminal and use.
The tip part of the USB connector is able to turn 90 degree.
However, only one direction is available to turn.
bAntenna Part
The antenna is inside the FOMA terminal.
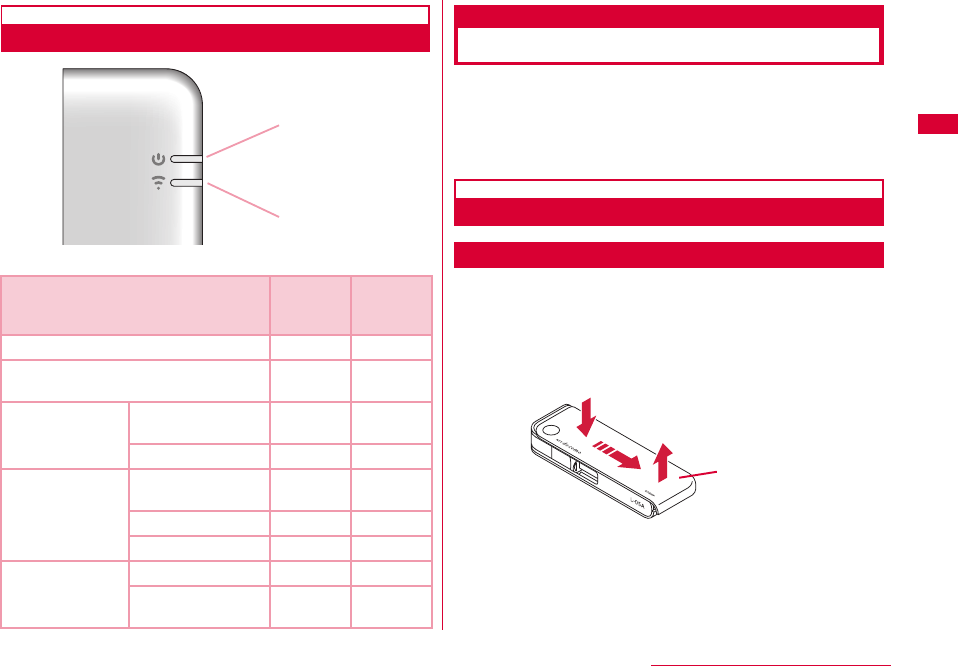
cPWR Lamp→P19
Indicates the power supply conditions.
dIDLE/BUSY Lamp→P19
Indicates the FOMA terminal status.
d
c
b
a
Examples of a
Ex. 1:
Ex. 2:
19
Before Using the FOMA Terminal
Mode Indication Lamp
※ Operation indicating lamp
Using a FOMA Card
The FOMA card is an IC card that stores personal
information such as your phone number. Without a FOMA
card installed in the FOMA terminal, you cannot use data
communication. For detailed information, refer to FOMA
Card Manual.
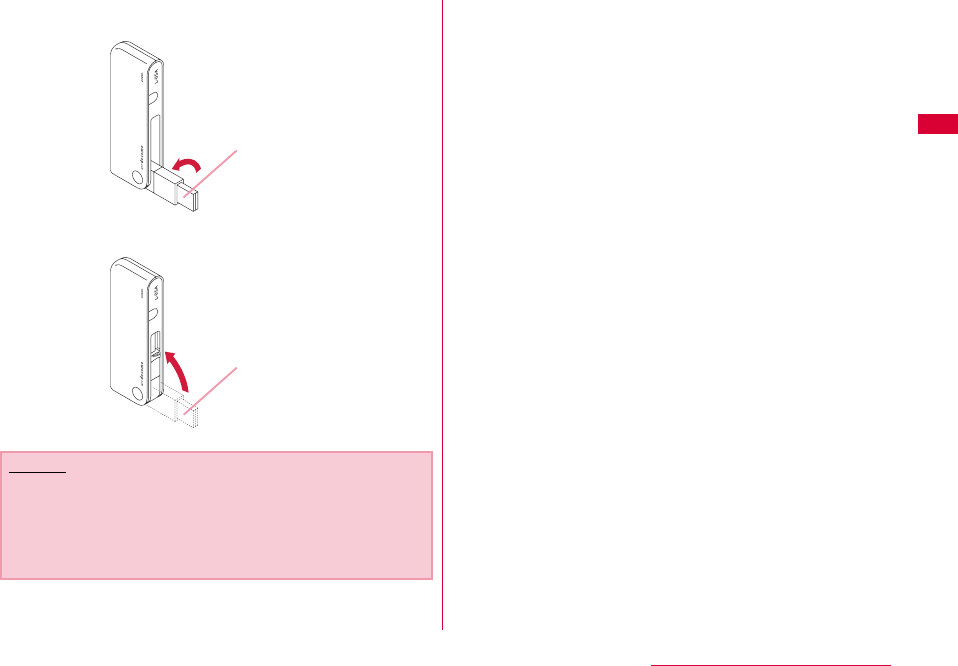
Inserting/Removing
Inserting
Inserting the UIM with two hands.
aWhile pushing the cover in the direction of a,
slide the rear cover in the direction of b. Lift
the cover as shown by c.
FOMA Terminal Status
aPower
Indication
Lamp
bMode
Indication
Lamp
When powered on - -
Waiting to connect to the FOMA
network Green Green
Packet
communication
Attempting to
communicate Green Blue
(Flash)
Communicating Green Blue
SMS
While receiving Green
(Flash) Green
Opening SMS Green Green
Sending SMS Green Green
PIN
PIN Lock Green -
Waiting to unlock
PIN1 Green -
a
b
a
bc
R
Rear Cover

20 Before Using the FOMA Terminal
bInsert the UIM into slot at the direction of
arrow with the IC chip side down
cFit the rear cover to the ditch of FOMA
terminal at approximately 3mm from the top
tip of the FOMA terminal. While pressing along
direction b, slide the rear cover along
direction a till hear rear cover clicked.
Removing
Remove the UIM with two hands.
aWhile pushing the cover in the direction of a,
slide the rear cover in the direction of b. Lift
the cover as shown by c.
bSlide the UIM in the direction of arrow and
remove it from the FOMA Card slot.
IC is faced
Notch
FOMA card slot
FOMA card
a
b
Approx.3mm
a
bc
Rear Cover
FOMA card
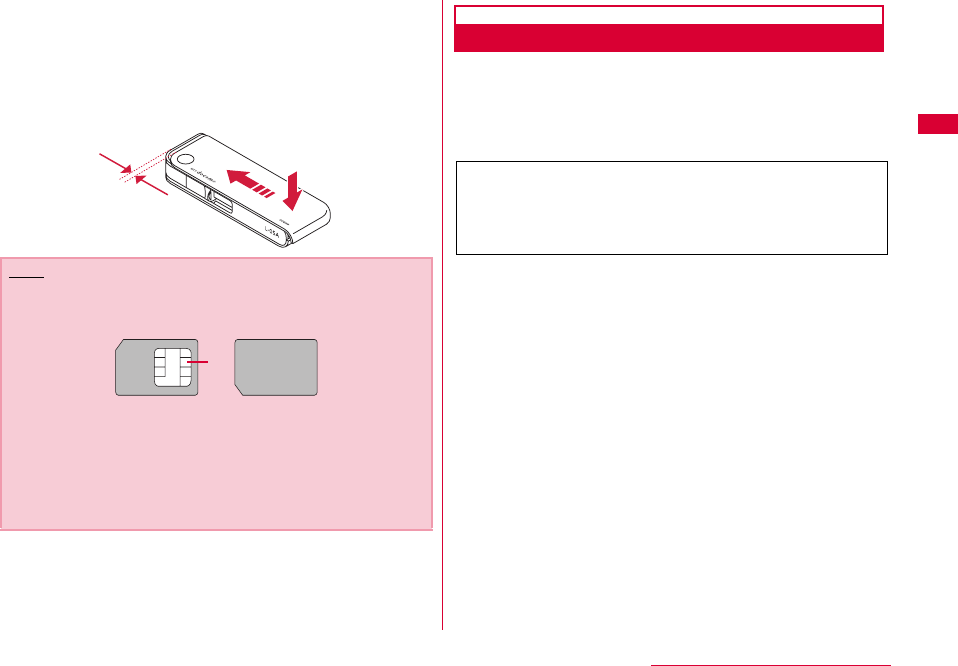
21
Before Using the FOMA Terminal
cFit the rear cover to the ditch of FOMA
terminal at approximately 3mm from the top
tip of the FOMA terminal. While pressing along
direction b, slide the rear cover along
direction a till hear rear cover clicked.
PIN1 Code
You can set PIN codes (Personal Identification Number)
for FOMA Card. The default setting for the PIN1 code is
"0000". The PIN1 code is a 4 to 8-digit security code to be
entered every time the FOMA terminal is turned on for user
verification to prevent any unauthorized use by others.
■ Changing the PIN1 Code
You can change the PIN1 code to any number. To
prevent any unauthorized use by third parties, change it
to your own number. If you improperly enter the PIN1
code 3 times in a row, further entry is locked
automatically (PIN lock), so be sure to keep a separate
note of the numbers you set.
•Entering PIN1 Code/ Changing PIN1 code→P70
■ PIN Unblocking Code
The PIN Unblocking Code is the number used to unblock
the PIN1 code. You are notified of your PIN Unblocking
Code when you purchase your FOMA terminal. Entering
the Unblocking Code (8-digit) unblocks the PIN lock.
If you improperly enter the Unblocking Code 10 times in a
row, the FOMA card locks automatically, so be sure to
keep a separate note of the number.
Note
•Make sure not lose the removed FOMA card.
•Make sure to check the direction of FOMA card.
•Be careful not to scratch FOMA card's IC parts.
•Inserting FOMA card in the reverse direction may cause
malfunction.
•Inserting and removing FOMA card with an excessive force
may cause damage to your FOMA card.
•Do not remove FOMA card while FOMA terminal is inserted
to a PC, it may causes damage to your FOMA card.
a
b
Approx.3mm
IC
If your FOMA card is set to require a PIN1 code, data
communication cannot be performed until the PIN1 is
entered. Start the L-05A High Speed Utility and verify
the PIN1 code, or set (P69)not to verify the PIN1 code
in advance.
22 Before Using the FOMA Terminal
FOMA Card Types
Please be aware that the FOMA card (Blue) has different
functions from the FOMA card (Green/White) as follows:
WORLD WING
WORLD WING is DOCOMO's FOMA international roaming
service that provides telephone and other types of mobile
communications. It allows the subscriber to use the
same phone number overseas as in Japan by inserting a
FOMA card(green/white) into a FOMA terminal or a
mobile phone designed for overseas use.
•If you subscribed to the FOMA service after September 1,
2005, a separate subscription is not required. However, if
you unsubscribed to the FOMA service subscription or
canceled the service, a separate subscription is required.
•If you initially subscribed to the FOMA service before
August 31, 2005 and have not subscribed to "WORLD
WING", a separate subscription is required.
•This service is not available with some billing plans.
•Your FOMA card (green/white) is lost or stolen overseas,
contact DOCOMO immediately and temporarily suspend
your subscription. For contact information, see "docomo
Information Center" on the back of this manual. Call and
communication charges after the terminal was lost or
stolen are still charged to you.
Start up L-05A Connection Software
The PIN1 code Verification screen appears
Enter PIN1 Code
Incorrect entry 3 times in a row
Enter Unblocking PIN Code
OK Incorrect entry 10 times in a row
You can set a new
PIN1 code Contact a DOCOMO shop
Function FOMA card
(Blue)
FOMA card
(Green/White)
The number of digits of a
phone number that can be
saved to the FOMA card
Phonebook
Up to 20 digits Up to 26 digits
This terminal allows
up to 20 digits.
WORLD WING Not available Available
23
Before Using the FOMA Terminal
Available Communications
Packet Communication
Fees for this communication method are based on the
amount of exchanged data. You can perform data
communication at a maximum of 7.2Mbps for receiving and
5.7Mbps for transmitting by using a connection that allows
FOMA communication such as 「mopera U」, one of
DOCOMO's Internet connection services.
※ The maximum speed of 7.2Mbps for receiving and 5.7Mbps
for sending is theoretical values and does not show the
actual ones. The actual communication speed depends on
communication environment and network congestion.
•You can perform communication using international roaming
under「mopera U」
•Out of High-Speed area, the maximum communication speed
for receiving and sending is 384kbps.
•The communication speed varies depending on the access
point and radio wave status.
•The communication speed varies depending on the access
point under international roaming.
•Use the「DOCOMO Connection Manager」in the CD-ROM to
check the approximate number of transmission bytes and
charges under the communication.
Note
•Communication fees become high when performing
communications with large amount of data such as
browsing websites with many graphics or downloading
data.
•Data communication fees under international roaming
differ from those in Japan.
•FOMA terminal does not support 64K data
communication.
•This FOMA terminal does not support Remote Wakeup.
•This FOMA terminal does not support FAX communication.

24 Before Using the FOMA Terminal
Usage Notes
■ Internet service provider fees
Fees to an Internet service provider may be required to
connect to the Internet. These fees are added to the
FOMA service fees and are paid to your Internet service
provider directly. For details on connection fees, contact
your Internet service provider.
You can subscribe to such as「mopera U」, one of
DOCOMO's Internet connection services. Charge for
subscribing 「mopera U」 is required.
For service and connection/settings of 「mopera」, visit
the「mopera」 web site.
http://www.mopera.net/mopera/index.html (Japanese
only)
■ User authentication to access networks
Depending on the access point, user authentication (ID
and password) may be required to connect. If required,
enter the ID and password from the dial-up network. The
ID and password will be provided by the network
administrator of your Internet service provider or the
access point. For details, contact your provider or access
point network administrator.
■ Requirements for packet communication
The following conditions must be met to perform
communications using the FOMA terminal. However, a
connection may not be established if traffic is heavy at
the base station or if radio signals are weak.
•The FOMA terminal must be in a FOMA network or
DOCOMO's roaming service area.
•The access point corresponds to the FOMA packet
communication.
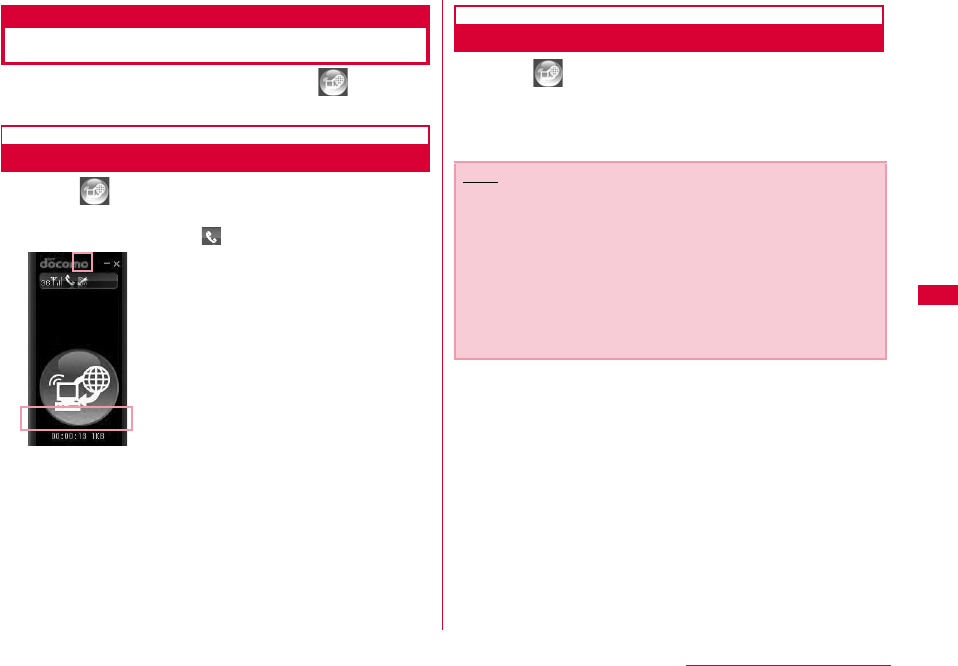
Connecting FOMA Terminal to
a PC
When connecting FOMA terminal with computer for the
first time, it is required to install L-05A connection
software (including a driver).
For installing L-05A connection software, refer to the
followings.
•For Windows: "Preparation for using L-05A" (P35)
•For Macintosh: "Preparation for using L-05A" (P42)
Inserting
aTurn on a PC
bConnecting the FOMA terminal with a PC
■When using a mounting folder and a USB extension
cable
•Use a mounting folder and a USB extension cable to fix
on the top of a PC
25
Before Using the FOMA Terminal
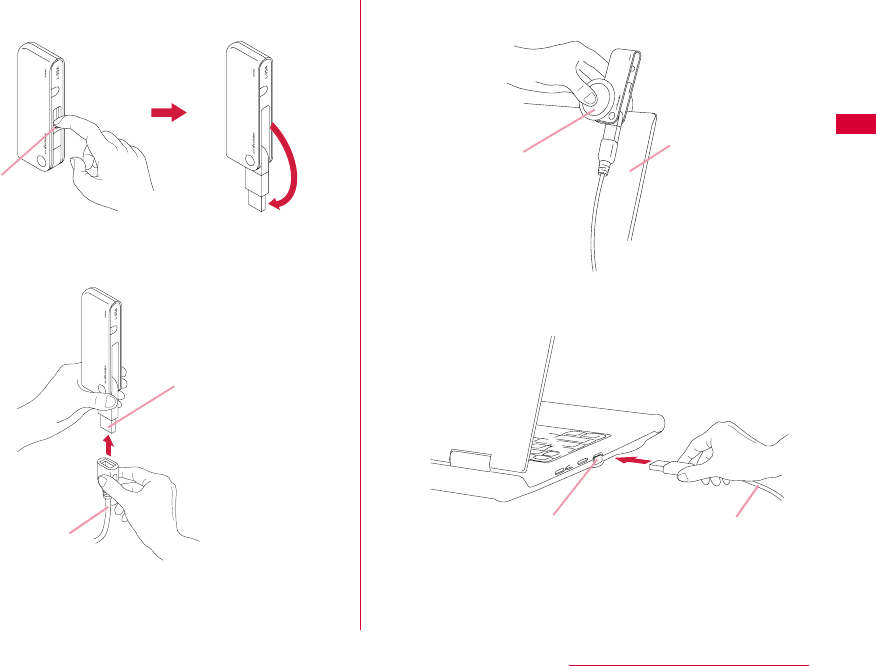
aPull out the projection part of USB connector 180
degree by fingertip
bHold the connector part of USB extension cable and
insert into the USB connector near the FOMA terminal
along arrow direction
cPut the FOMA terminal between the mounting folder
and fix on the top of the PC
dHold the connector part of USB cable and insert into PC
USB port along arrow direction
Projection
part
USB connector
USB extension
cable
Mounting folder
PC
USB port USB extension cable
26 Before Using the FOMA Terminal
■When connecting with a PC directly
•Insert the FOMA terminal into a PC USB port and use it
directly.
•The USB connector of FOMA terminal is able to turn 90
degree complying to directions of USB port
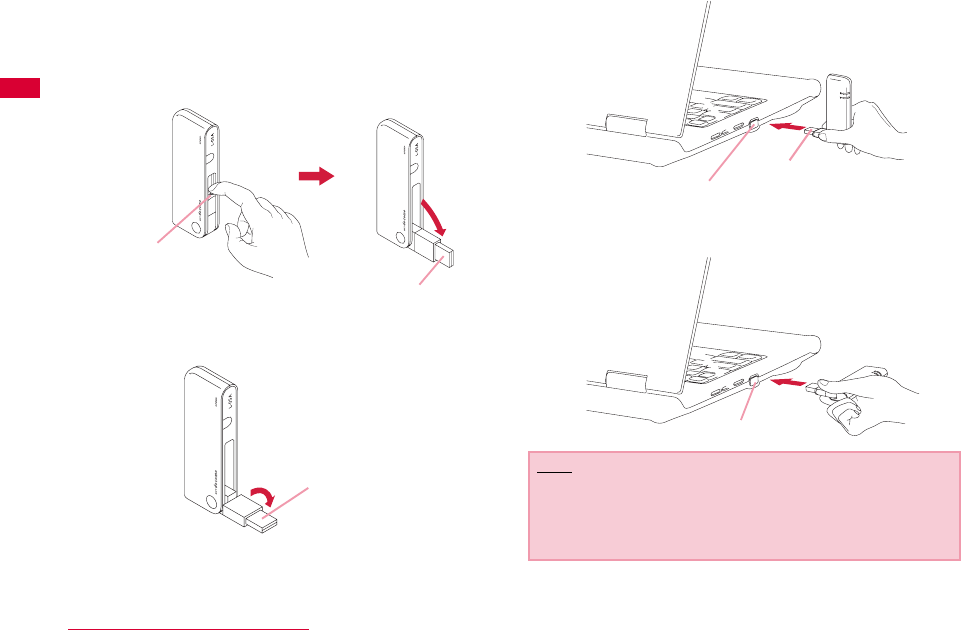
aPull out the projection part of USB connector 90
degree by fingertip
bThe FOMA terminal body turn the tip part of USB
connector 90 degree as shown in the illustration
cInsert the USB connector of FOMA terminal into a PC
USB port
•It is available to use without turning USB connector 90
degree as the above-mentioned procedure b.
•
Projection
part
USB connector
USB connector
Note
•Refrain from turning the FOMA terminal after inserting USB
connector into PC USB port.
Malfunction or damage may result when subject the FOMA
terminal to severe shocks due to carelessness.
USB port
USB connector
USB port
27
Before Using the FOMA Terminal
cStart communication connecting
Removing
aEnd data communication
•If the L-05A connection software/DOCOMO connection
manager is already running, exit the L-05A connection
software/DOCOMO connection manager. Verify that data
connection is disconnected.
bRemove the FOMA terminal
■When using a mounting folder and a USB extension
cable
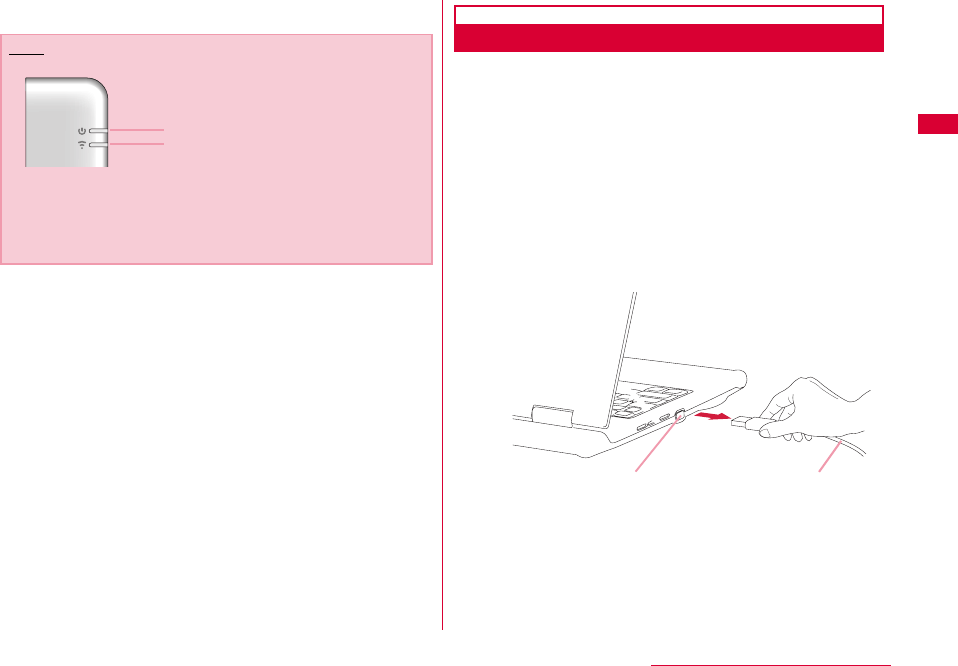
aHold the connector part of a USB extension cable and
pull out the FOMA terminal from PC USB port along
arrow direction
Note
•Confirm whether power indication lamp changes to red and
mode indication lamp changes to green.
•Using "L-05A connection software"→P49
•Using "DOCOMO connection manager"→P77
•Configuring manually (OS Standard)→P89
Power Indication lamp
Mode Indication Lamp
USB port USB extension cable
28 Before Using the FOMA Terminal
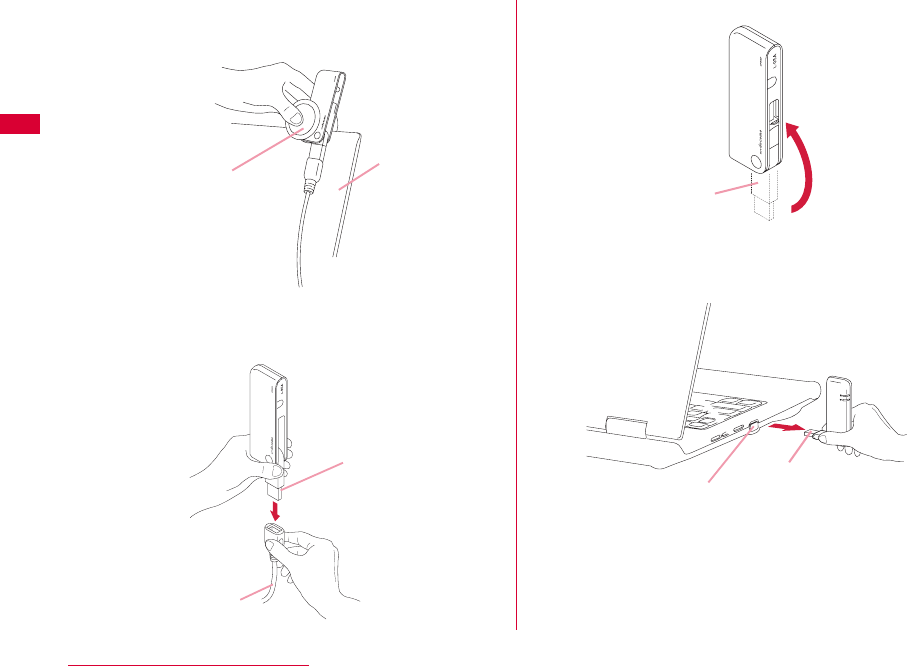
bRemove the FOMA terminal along with the mounting
folder from the top of the PC. Remove the mounting
folder from the FOMA terminal
cHold the connector part of the USB extension cable and
pull out from the USB connector near the FOMA
terminal along arrow direction
dPack the USB connector into the FOMA terminal
■When connecting to a PC directly
aHold the USB connector part of FOMA terminal. Pull out
the FOMA terminal straightly from PC USB port
Mounting
folder
PC
USB connector
USB extension cable
USB
connector
USB port
USB connector
29
Before Using the FOMA Terminal
bTurn the tip part of the USB connector 90 degree as
shown in the illustration
cPack the USB connector into FOMA terminal
Caution
•If you force to remove FOMA terminal and pull out the USB
extension cable, this may result malfunction.
•Removing FOMA terminal from USB connector during data
communication may suspend data communication and
result malfunction or data losses.
USB connector
USB connector


32 Setting up
Setting up
■ Data communication with L-05A
"Communication configuration file (Driver)" and "L-05A connection software" are required to install for a PC to recognize
the FOMA terminal. "Communication configuration file (Driver)" will be installed along with "L-05A connection software".
Although data communication is available with only L-05A connection software, if necessary using it after installing
DOCOMO connection manager in addition is also available.
Data communication is also available based on configuring manually after installing L-05A connection software.
■ Installation of L-05A connection software
Since L-05A has zero installation, when connecting the FOMA terminal to a PC for the first time, "L-05A connection
software" installation screen appears automatically. "Zero installation" is supported by the PC with Windows OS in it. If
zero installation works improperly, install L-05A connection software with the included CD-ROM.
In addition, although Macintosh does not support the zero installation feature, installation continues through the CD-
ROM icon appears when connecting the FOMA terminal to a PC.
The procedure of setting up is described on the next page.
33
Setting up
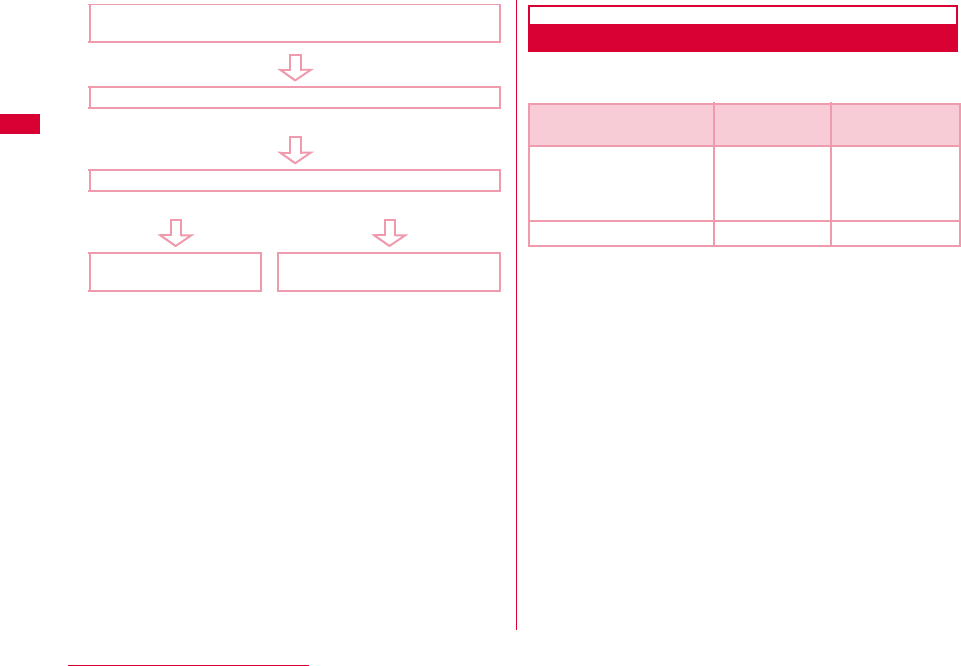
Work Flow of Setting up
Connecting the FOMA terminal with a PC
・ Windows VersionP35
・ Macintosh VersionP42
Preparing the included CD-ROM
・ Windows VersionP38
・ Macintosh VersionP45
Installing L-05A connection software (Driver)
Confirmation after Setup
・ Windows VersionP39/・ Macintosh VersionP45
Operation configurations of L-05A
connection softwareP66
Communication connection with L-05A
connection softwareP50
Installing DOCOMO connection manager
・ Windows VersionP79
・ Macintosh VersionP83
Operatino configuration/communication
connection
with DOCOMO connection manager
『DOCOMO connection manager manual』
Communication configuring
manuallyP90
Communication configuring manually
with OS functionP109
Using L-05A
connection
software
Using DOCOMO
connection manager
Configuring
manually(Only
Windows)
34 Setting up
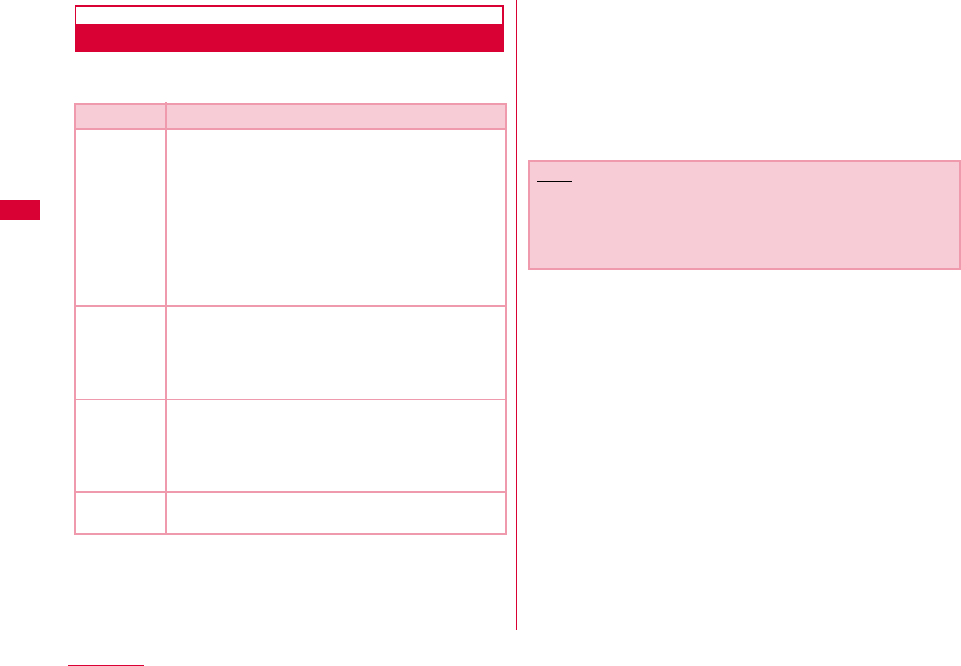
Operating Environments
Using this FOMA terminal under the following operational
environments.
※1 DOCOMO does not guarantee the operation under the
supported OS of the OS is changed through update.
※2 Required memory or available hard disk space may vary
depending on the system environment of a PC.
※3 Only Mac with CPU made by Intel Corporation is available.
For latest information of operation environment, visit
DOCOMO's "international web site"
Item Requirement
PC Main
Unit
•Available CD-ROM drive to use from PC-AT
compatible.
•USB port (Comply with Universal Serial Bus
Specification Rev1.1/2.0)
•DOCOMO is not responsible for any
incompatibility of the operation performed
through the USB Hub (including USB port
available from the monitor, keyboard, etc.)
•Display resolution of 800×600 pixels, High
Color (65.536) or higher is recommended.
OS※1Windows 2000 SP4 or later (Japanese versions)
Windows XP SP2 or later (Japanese versions)
Windows Vista SP1 or later (Japanese versions)
Mac OS X 10.4.11 (Japanese versions)※3
Mac OS X 10.5.6 (Japanese versions)※3
Required
Memory※2
Windows 2000 : 64Mbytes or more
Windows XP : 128Mbytes or more
Windows Vista : 512Mbytes or more
Mac OS X 10.4.11:512Mbytes or more
Mac OS X 10.5.6:512Mbytes or more
Hard Disk
Space※2 50Mbytes or more available space
Note
•The software may not work depending on the operating
system environment. DOCOMO does not guarantee any
operation other than the environment operation described
on the left side.
35
Setting up
Windows Version
The L-05A connection software only need to be installed
when you connect the FOMA terminal to your PC for the
first time.
Preparation for Using L-05A
Setting Zero Installation (Auto)
■ For Windows Vista
aConnect the FOMA terminal with a PC
The setup screen of L-05A connection software is
automatically displayed by zero installation.
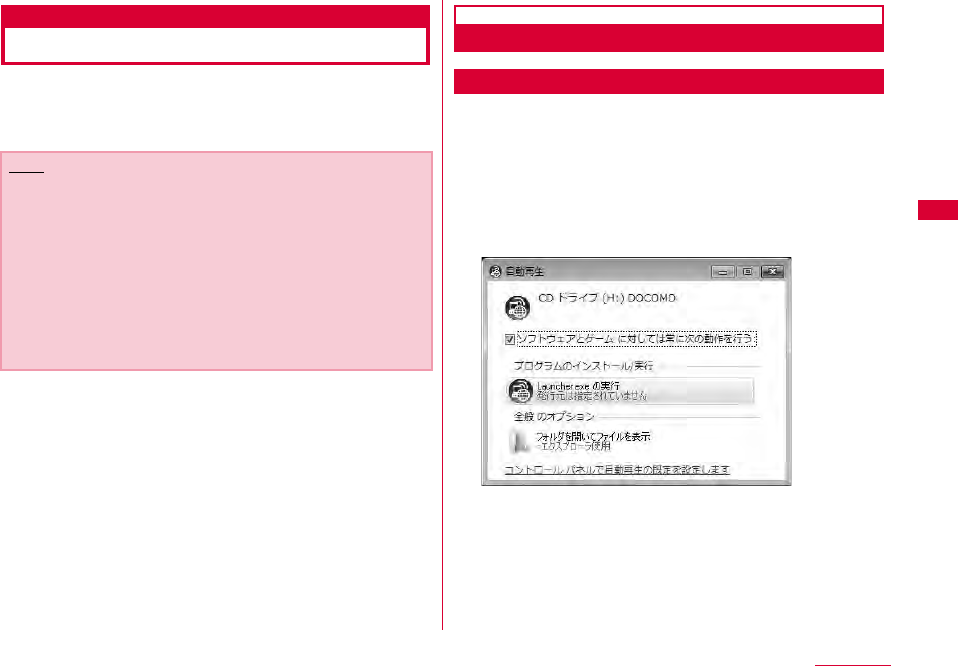
"自動再生" screen will be displayed depending on setting.If the
screen is displayed, check "ソフトウェアとゲームに対しては常に
次の動作を行う" and select "Launcher.exeの実行"
np
※ When the Setting up screen of L-05A connection
software is not automatically displayed, install with the
included CD-ROM (P38)
Note
•Do not remove the FOMA terminal while installing.
•Installation may take several minutes depending on the PC
you use.
•Do not install or uninstall during data communication.
•When installing, make sure to install from the account with
PC supervisor privileges. An error will occur during
installation if you install from the account without these
privileges.
•For details on setting up PC supervisor privileges, contact
your computer manufacturer or Microsoft Corporation.
36 Setting up
bClick "許可(Allow)" on "ユーザーアカウント制御
(User account control)" screen
■For Windows XP/2000
•Because "ユーザーアカウント制御(User account control)"
screen is not displayed, follow the next step
cClick "次へ(Next)"
dClick "同意する (I Agree)"
Installation starts.
eClick "次へ(Next)"
37
Setting up
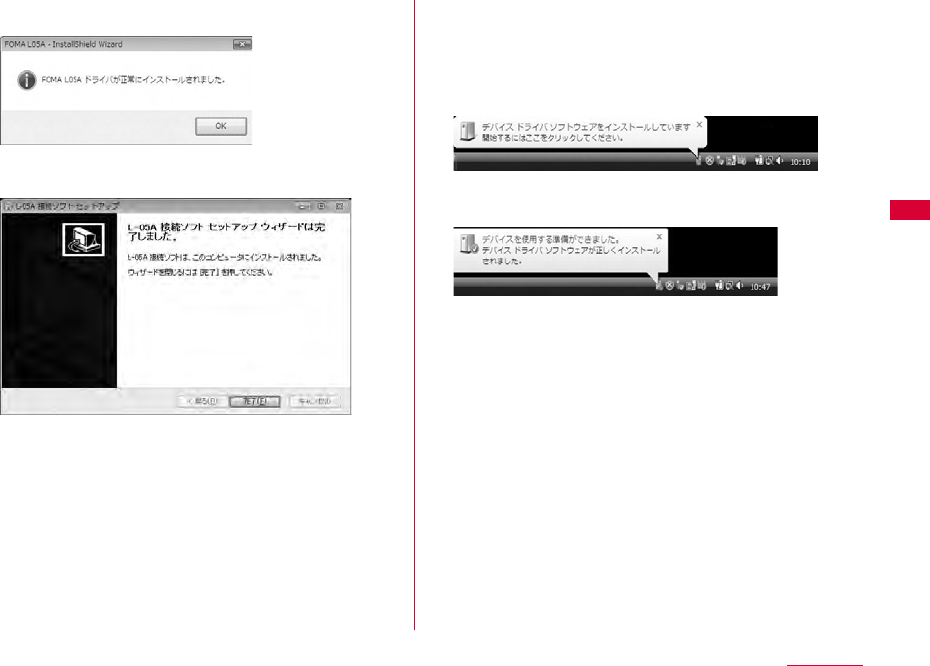
fClick [OK]
gClick "完了(Finish)"
Installation of L-05A communication configuration file
(Driver) continues.
hConfirm whether the FOMA terminal is
recognized by PC
On the lower right side of task tray, "デバイスドライバソフト
ウェアをインストールしています(Device driver software is being
installed)" message is displayed, and the FOMA terminal is
recognized automatically.
If the FOMA terminal is recognized properly, "デバイスを使用す
る準備ができました(The device is ready for use)" message is
displayed.
38 Setting up
■For Windows XP
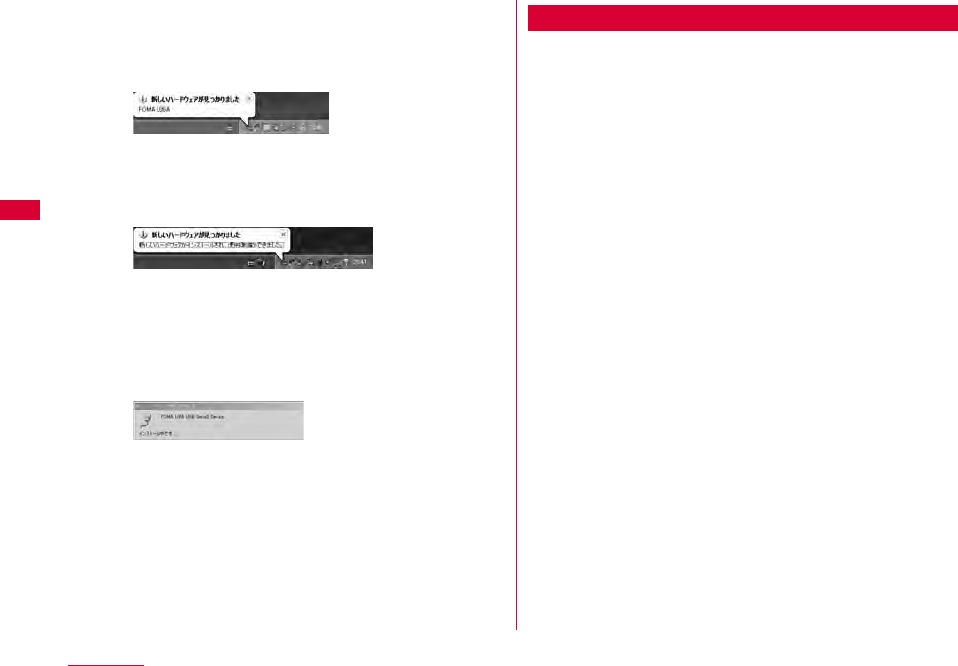
• On the lower right side of task tray, "新しいハードウェア
が見つかりました。 (A new hardware has been found.)"
message is displayed, and the FOMA terminal is
recognized automatically.
• If the FOMA terminal is recognized properly, "新しいハー
ドウェアがインストールされ、使用準備ができました。(A new
hardware has been installed and ready for use.)"
message is displayed.
■For Windows 2000
• The warning screen of removing device is displayed
which has nothing to do with using continually.
• "新しいハードウェアが見つかりました(A new hardware has
been found.)" message is displayed, and the FOMA
terminal is recognized automatically.
Setting Manually (CD)
■ For Windows Vista
aAfter starting a PCInsert the included CD-
ROM into the PC
b"スタート(Start)""すべてのプログラム(All
programs)""アクセサリ(Accessory)"Click
"ファイル名を指定して実行(Specify a file name
and run)"
■For Windows XP/2000
Click [スタート(Start)] 「ファイル名を指定して実行
(Specify a file)」
cEnter "<CD-ROMドライブ名>:¥Windows¥
L-05A 接続ソフト¥StartCD.exe" in "名前
(Name)" Click "OK"
"自動再生" screen will be displayed depending on setting.If the
screen is displayed, check "ソフトウェアとゲームに対しては常に
次の動作を行う" and select "Launcher.exeの実行"
dPerform the same operations as those after
step 2 or later on "Setting Zero Installation
(Auto) (→P36)"
39
Setting up
Confirmation after Installation
Confirming L-05A Connection Software
aDouble click L-05A connection software icon
When the following screen is displayed, the confirmation of
installation finishes.
Confirming the Installed L-05A Configuration File
(Drivers)
Confirm whether L-05A Communication Configuration File
(Drivers) is set in a PC.
■ For Windows Vista
aClick "スタート(Start)""コントロールパネル
(Control panel)""システムとメンテナンス
(System and maintenance)""デバイス マネー
ジャ(Device manager)""続行(Continue)"
■For Windows XP
Click "スタート(Start)""コントロールパネル(Control
panel)""パフォーマンスとメンテナンス(Performance
and maintenance)""システム(System)""デバイス マ
ネージャ(Device manager)" of "ハードウェア(Hardware)"
tab
■For Windows 2000
Click "スタート(Start)""設定(Settings)""コントロール
パネル(Control panel)""システム(System)""デバイス マ
ネージャ(Device manager)" of "ハードウェア(Hardware)"
tab
40 Setting up
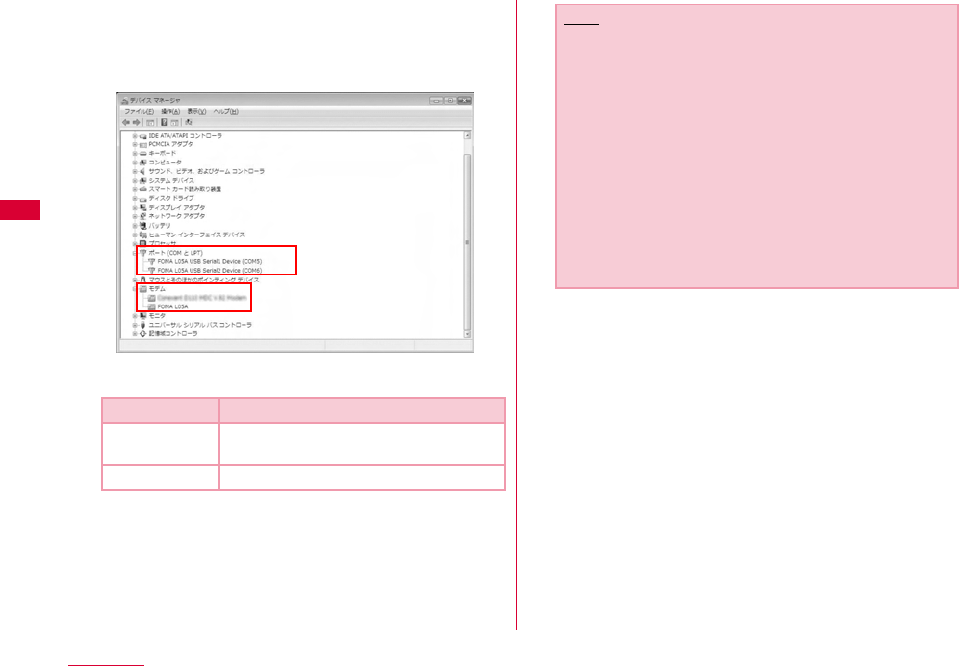
bClick each device display to confirm the driver
name installed
•Confirm whether the driver name is displayed below "ポート
(COM とLPT)(Port (COM and LPT))", "モデム(Modem)"
•COM port number differs depending on user and PC.
Device name Driver name
Port
(COM and LPT)
FOMA L05A USB Serial1 Device
FOMA L05A USB Serial2 Device
Modem FOMA L05A
Note
•If FOMA terminal is not recognized through the PC's
USB port, try other available USB port. FOMA terminal
may not be recognized properly with some USB port of
PC.
•When communicating data with L-05A connection
software, application operation of L-05A is required.
→P66
•When communicating data with DOCOMO connection
manager without L-05A connection software,
installation of DOCOMO connection manager is
required.→P79
•When communicating data with neither L-05A
connection software nor DOCOMO connection
manager, configure it manually.→P90
41
Setting up
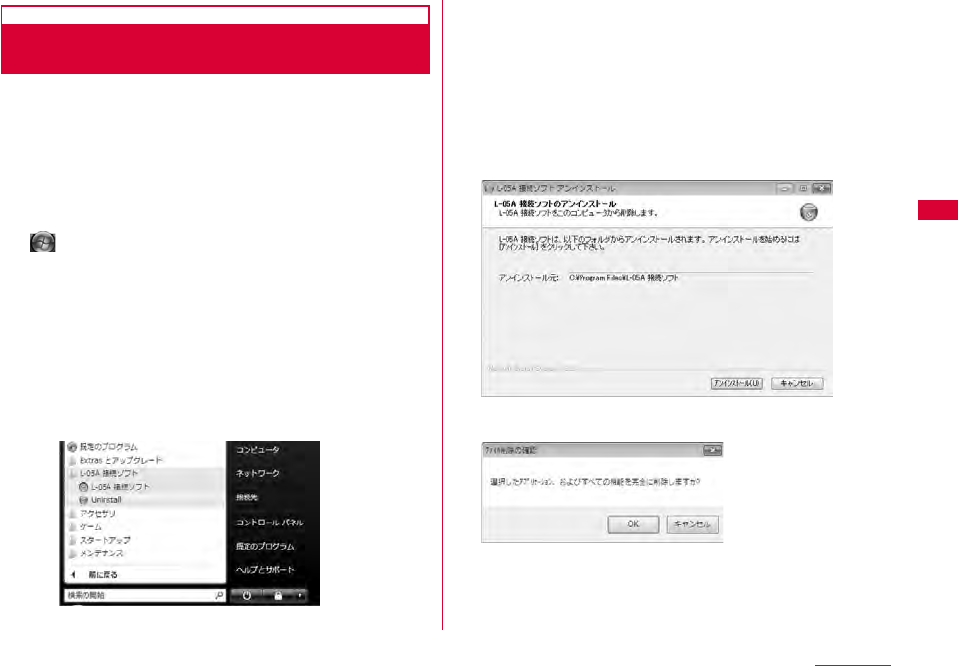
Uninstalling L-05A Connection Software
(including a driver)
•Before uninstalling, remove the FOMA terminal from the PC.
•When uninstalling, make sure to install from the account with
PC supervisor privileges.
•Make sure to save important data in FOMA card. Uninstallation
will results in data loss when Phonebook or SMS data is saved
in PC.
■ For Windows Vista
a "スタート(Start)""すべてのプログラム (All
programs)""L-05A接続ソフト (L-05A
connection software)"Click "Uninstall"
■For Windows XP
•"スタート (Start)""すべてのプログラム (All programs)"
"L-05A 接続ソフト(L-05A connection software)"Click
"Uninstall"
■For Windows 2000
•"スタート (Start)""プログラム (Program)""L-05A 接続ソ
フト(L-05A connection software)"Click "Uninstall"
bClick "許可(Allow)" on "ユーザーアカウント制御
(User account control)" screen
If "キャンセル(Cancel)" is clicked, uninstallation will be
stopped.
■For Windows XP/2000
•Since "ユーザーアカウント制御 (User account control)"
screen is not displayed, follow the next procedure.
cClick "アンインストール (Uninstall)"
dClick [OK]
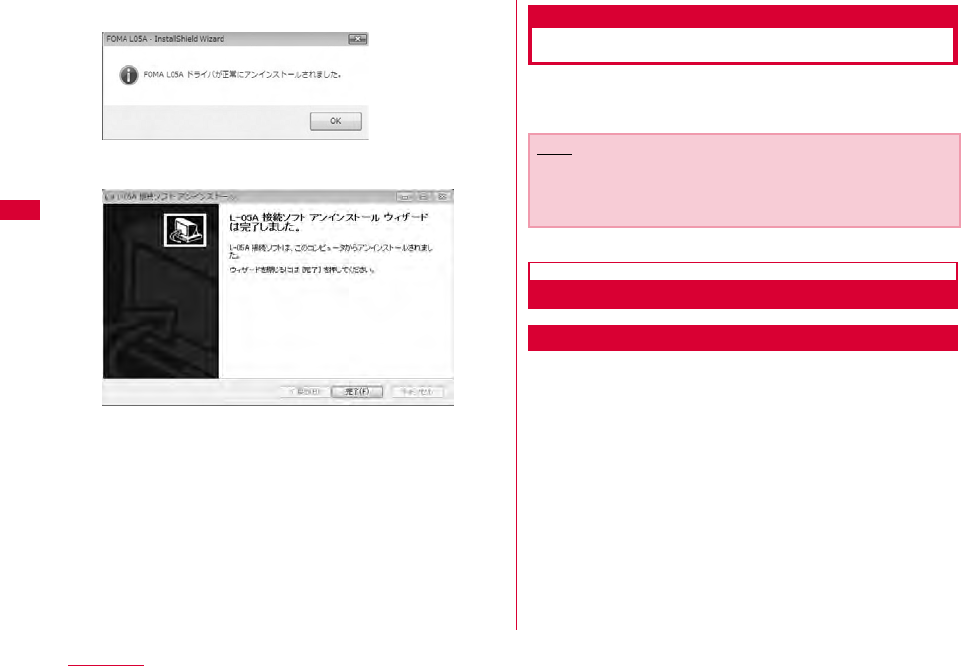
42 Setting up
eClick [OK]
fClick "完了 (Finish)"
Uninstallation finishes.
Macintosh Version
When installing L-05A connection software, make sure to
finish "ドコモ コネクションマネージャ (DOCOMO connection
manager)" first.
Preparation for Using L-05A
Setting Zero Installation (Auto)
aConnect the FOMA terminal with a Mac
CD-ROM icon is displayed on the desktop.
bDouble click the CD-ROM icon
Note
•Do not remove the FOMA terminal while installing.
•When installing, make sure to install from the account with
PC supervisor privileges.
43
Setting up
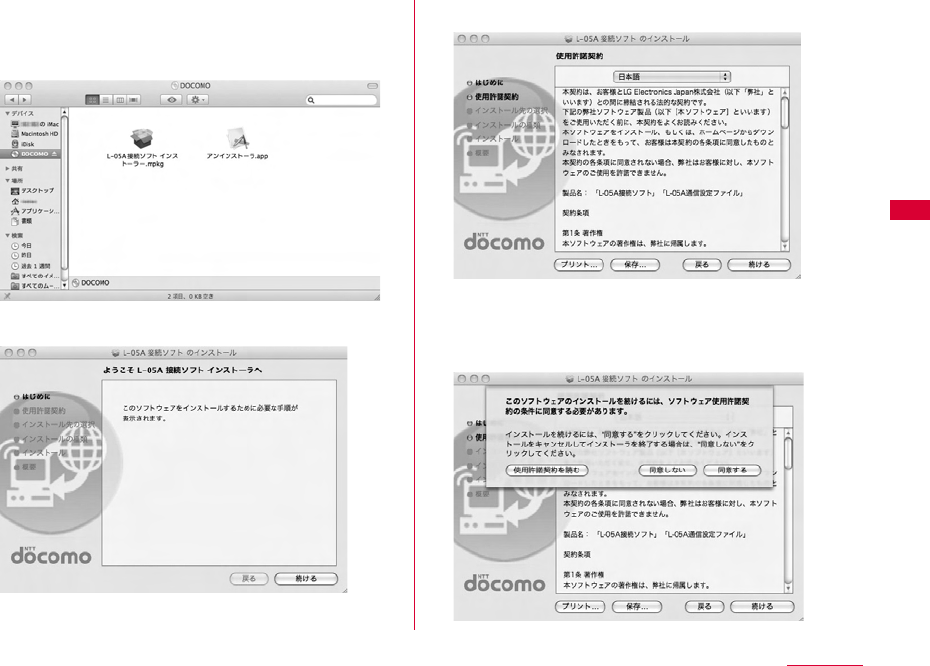
cDouble click "L-05A 接続ソフト インストーラー
.mpkg (L-05A connection software
installer.mpkg)"
dClick "続ける (Continue)"
eClick "続ける (Continue)"
fConfirm "使用許諾契約 (The license
agreement)". If agree with the content, click
"同意する (I Agree)"
44 Setting up
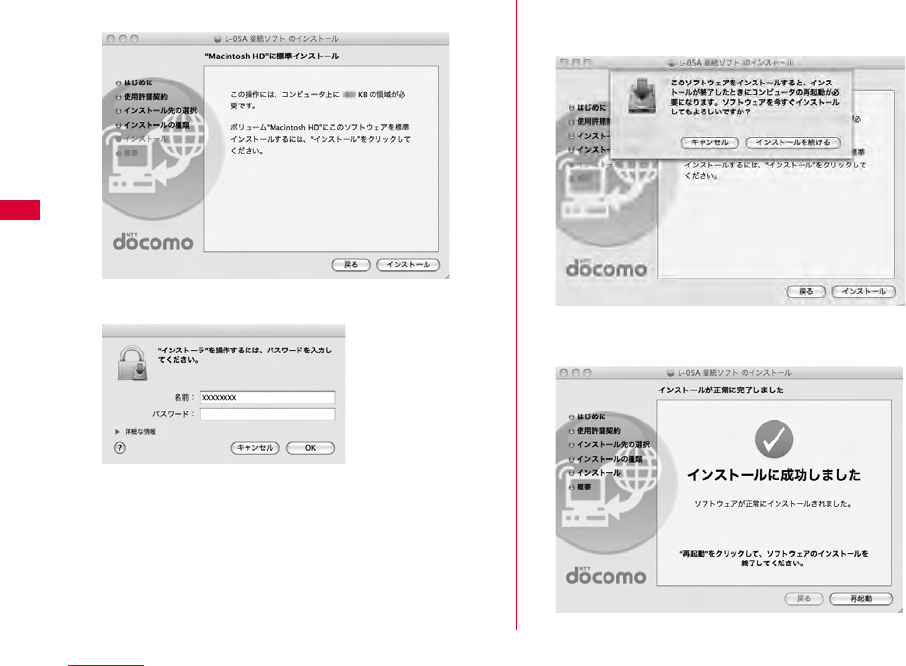
gClick "インストール (Install)"
h Enter administrator passwordClick "OK"
iClick "インストールを続ける(Continue
installing)"
jClick "再起動(Restart)"
Mac restarts. Installation finishes.
45
Setting up
Setting Manually (CD)
aStart MacInsert the CD-ROM into Mac
CD-ROM icon on desktop appears.
bDouble click CD-ROM icon"Mac""L-05A
connection software"
cFor subsequent steps, operate the same
procedures as those after procedure 3 in "Set
Zero Installation (Auto)" (→P43)
Confirmation after Installation
Confirming L-05A Connection Software
aDouble click L-05A connection software icon
When the following screen is displayed, the confirmation of
installation finishes.
Note
•
When communicating data with L-05A connection software,
setting application operations of L-05A is required.→P66
•When communicating data with DOCOMO connection
manager without L-05A connection software, installation
of DOCOMO connection manager is required.→P79
46 Setting up
Uninstalling L-05A Connection Software
(including a driver)
•Before uninstalling, remove the FOMA terminal from the Mac.
•When uninstalling, make sure to install from the account with
PC supervisor privileges.
•Make sure to save important data in FOMA card. Uninstallation
will results in data loss when Phonebook or SMS data is saved
in PC.
•End "DOCOMO connection manager" when uninstalling L-05A
connection software.
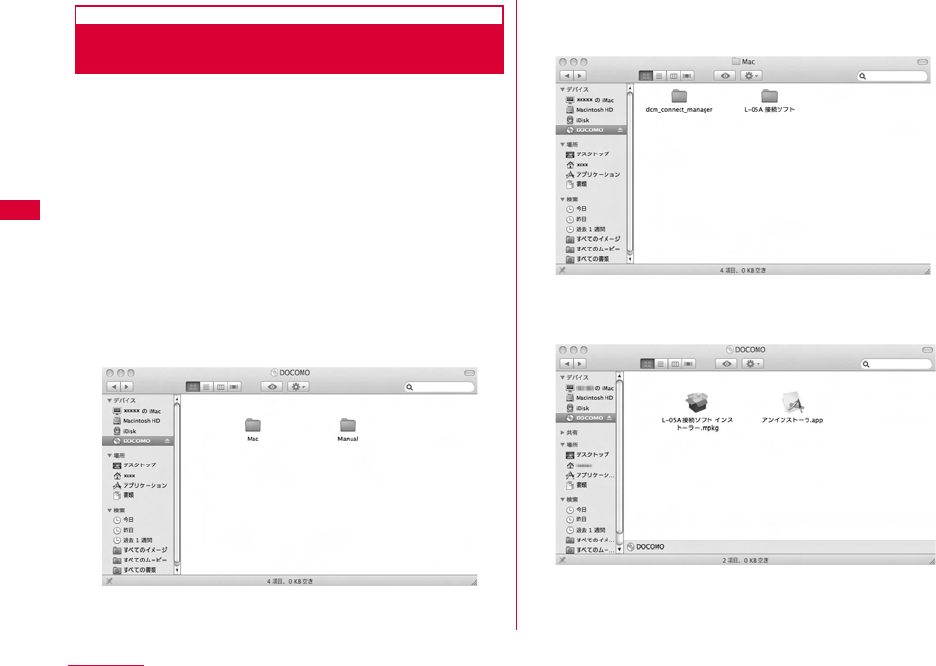
aInsert the included CD-ROM into a Mac
CD-ROM icon is displayed on the desktop.
bDouble click the CD-ROM icon
cDouble click "Mac"
dDouble click "L-05A接続ソフト (L-05A
connection software)"
eDouble click "アンインストーラ.app
(Uninstaller.app)"
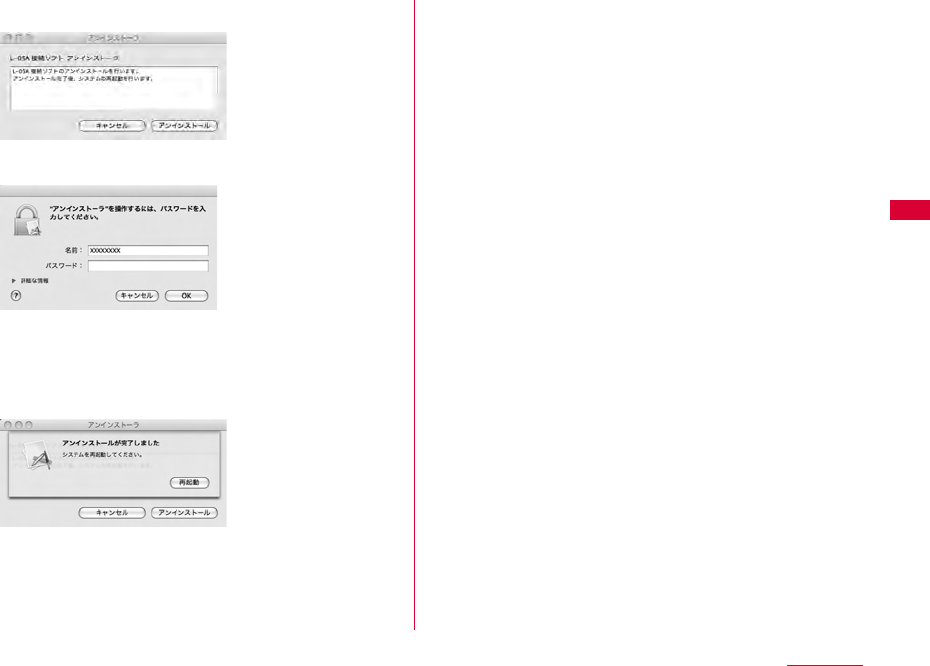
47
Setting up
fClick "アンインストール(Uninstall)"
gEnter administrator password Click "OK"
hConfirm whether the FOMA terminal is
connected to USB port before restarting
iClick "再起動(Restart)"
Mac restarts. Uninstallation finishes.


49
L-05A Connection Software
L-05A Connection Software ・・・・・・・・・・・・・・・・・・・・・ 50
Using Packet Communication ・・・・・・・・・・・・・・・・・・・ 53
Using SMS ・・・・・・・・・・・・・・・・・・・・・・・・・・・・・・・・・・・・・・・ 54
Using Phonebook ・・・・・・・・・・・・・・・・・・・・・・・・・・・・・・・・ 63
Using Application Option・・・・・・・・・・・・・・・・・・・・・・・・・ 66
L-05A connection software is available to use on either Windows or Macintosh. Despite the display images of
Windows version and Macintosh version are a little different, icons on the screen and available functions are same.
Please note that in this chapter the descriptions are based on screen images of Windows.
50 L-05A Connection Software
L-05A Connection Software
The L-05A connection software allows you to use packet
communication/SMS/Phonebook.
Launching and Exiting Connection
Software (For Windows)
Launching
•Double click created on the desktop.
Exiting
•Click located on the top of main application screen.
Launching and Exiting Connection
Software (For Macintosh)
If connect with L-05A, it will be recognized as a CD-ROM
first. For recognizing as a modem, drug the CD-ROM icon
into trash.
Launching
•Launch "Finder" "アプリケーション(Application)" "L-05A 接続
ソフト.app (L-05A connection software.app)"
Exiting
•Menu bar "L-05A 接続ソフト(L-05A connection software)"
"L-05A 接続ソフトを終了(Quit L-05A connection software)"
•Using Packet Communication→P53
Allows you to easily use packet communication.
•Using SMS→P54
Features of composing messages, Inbox, Outbox, Drafts box
and Saving to FOMA card are available.
•Using Phonebook→P63
Features of composing messages, adding and deleting new
group, transferring group, adding new item, modifying user,
delection are available.
•Using Application Option→P66
Confirm the amount of packet communication data usage,
configure internet option, configure FOMA card, enter PIN1
code, configure the connection type (PDP), reset FOMA
terminal, configure network are available.
Note
•Data of L-05A connection software will be saved in PC if no
destination is specified.
51
L-05A Connection Software
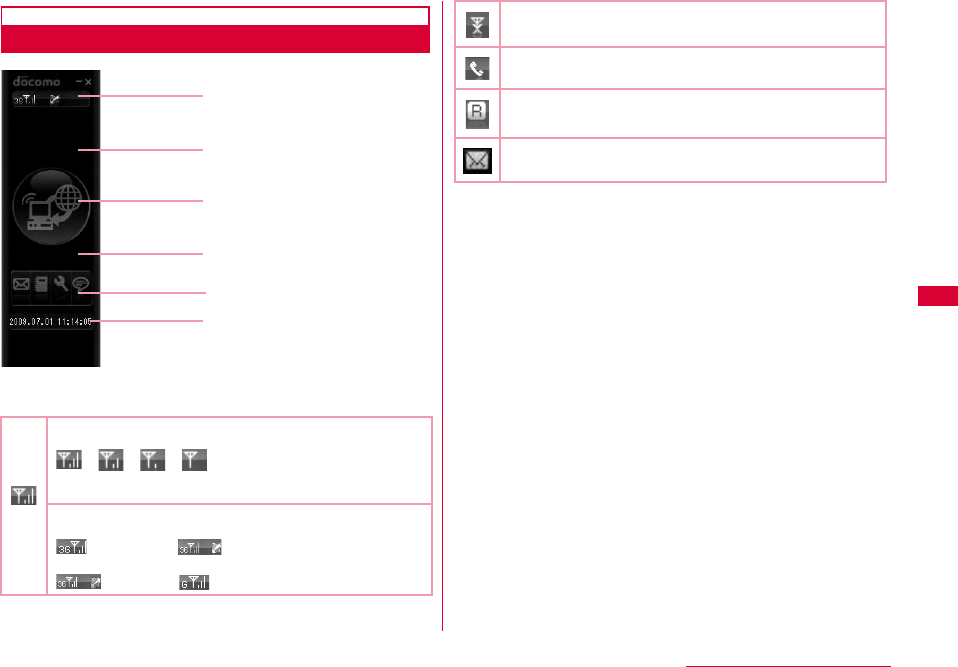
Main Application Screen
aList of icon indicating FOMA terminal status
※1 W-CDMA (3G)
A third generation mobile communication network complying
with 3GPP Global standards. 3Gpp means 3rd Generation
Partnership Project. The local standardization organization
established for the development of common technical
specifications related to 3rd Generation Mobile
Communication Systems (IMT-2000).
※2 HSDPA (Short for High Speed Downlink Packet Access)
HSUPA (Short for High Speed Uplink Packet Access)
A high speed type of W-CDMA data communication. It is called
"3.5G" since it is the improvement version of 3rd generation
(3G) cell phone (W-CDMA).
※3 GSM (Short for Global System for Mobile Communication)
The second generation mobile communication network in a
digital communication system that is most widely used around
the world.
※4 GPRS (Short for General Packet Radio Service)
GPRS is the 2.5 generation mobile communication system
that enables highspeed packet communication using GSM.
Signal reception level
Strong ← → Weak
Network type
W-CDMA※1, HSDPA※2,
HSUPA※2, GSM
※3/GPRS※4
a
b
e
c
d
f
(Out of service area) In no signal reception area
Internet Connection
International Roaming
Unopened message found
52 L-05A Connection Software
bStatus/Message display area
•FOMA terminal,warning messages, operation status,
network name.
•
The information of currently accessed network operator is
displayed when "network information" is set to "display"→P116
cButtons for connecting and disconnecting to
Internet
•Click this button when connecting or disconnecting
Internet.
dData communication information display area
•During connecting to Internet, connection time and
amount of loaded data are displayed.
eOperation button
•Buttons are available for SMS, Phonebook, Settings and
Information.
fCurrent time/data display area
•Current date and time are displayed.
•Time is set conformable to PC time.
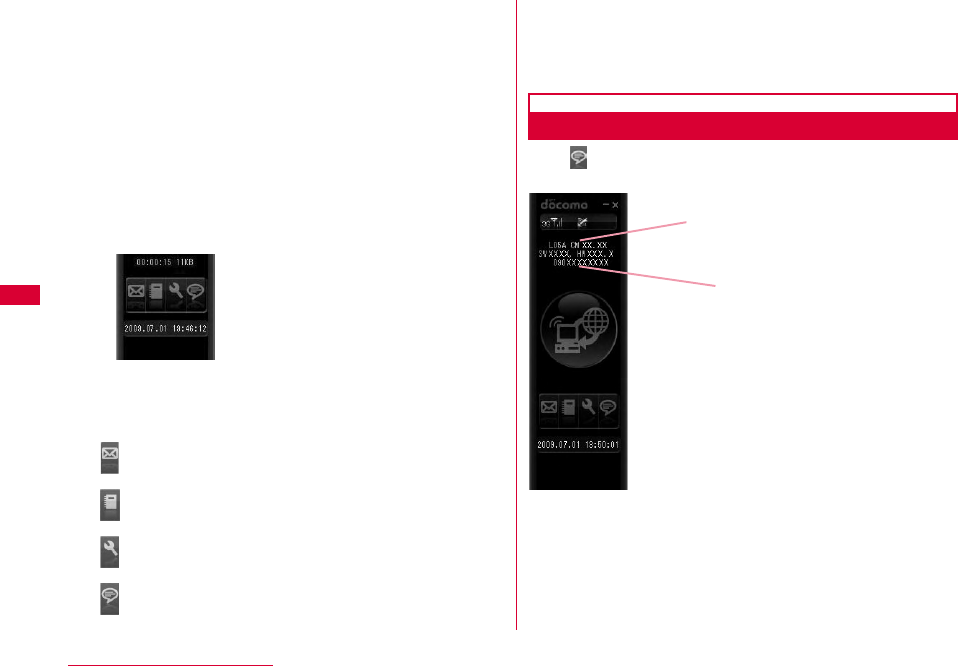
Confirming My Number
Click from the main application screen, and then you
will see the following messages displayed.
: SMS(P54)
: 電話帳 (Phonebook)(P63)
: 設定(Settings)(P66)
:インフォメーション(Information)
(P51)
My number
Version information
53
L-05A Connection Software
Using Packet Communication
You can use packet communication if click from the
main application screen.
Start Packet Communication
aClick from the main application screen
•Displays connection time, amount of downloaded data
connection status icon .
Disconnecting to Packet Communication
aClick from the main application screen
•Packet communication will be disconnected after the
messages displayed "切断しています。(Connection is being
disconnected)".
Note
•The packet communication may be automatically
disconnected depending on the network status or location.
•In packet communication, fees apply on the amount of
sent/received data. Note that the communication fees may
become high if you perform heavy communications such as
by browsing websites which include large
multimediacontents or if you download a lot of data.
•Data communication fees under international roaming
differ from those in Japan.
54 L-05A Connection Software
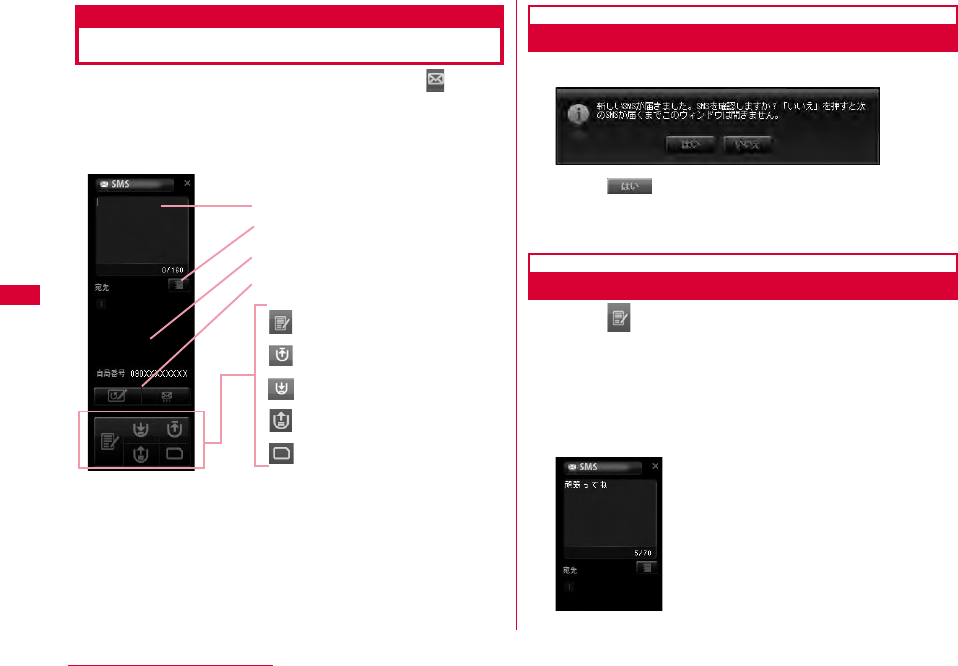
Using SMS
Allows you to use various SMS features if click from
the main application screen.
•Maximum number of SMS stored in PC is 1000. Depending on
PC's available hard disk space, number may differ. (Excluding
FOMA card SMS box)
When Receiving SMS
The following screen appears when receiving SMS.
aClick
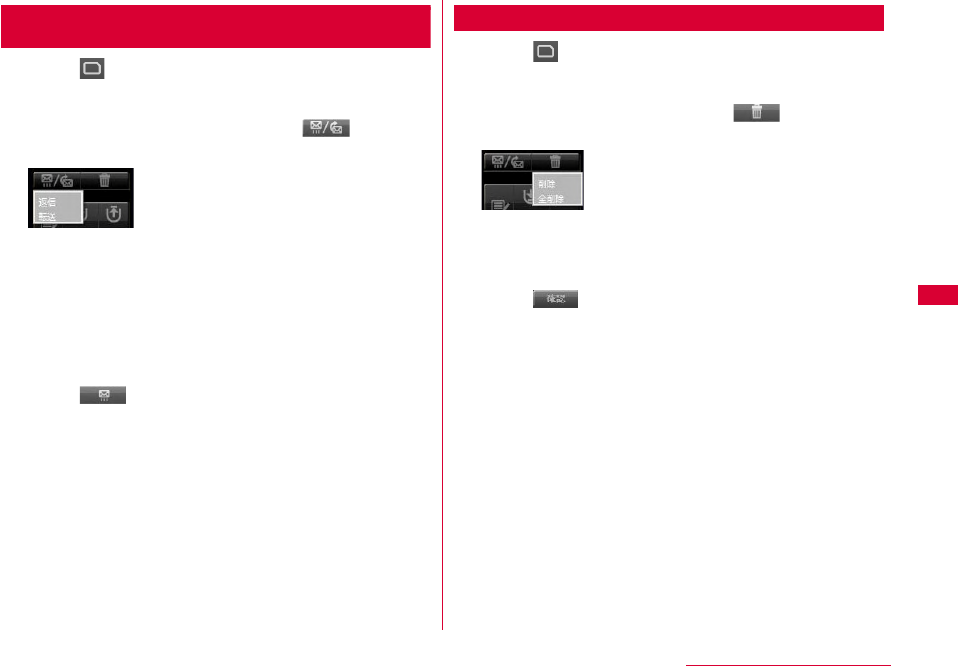
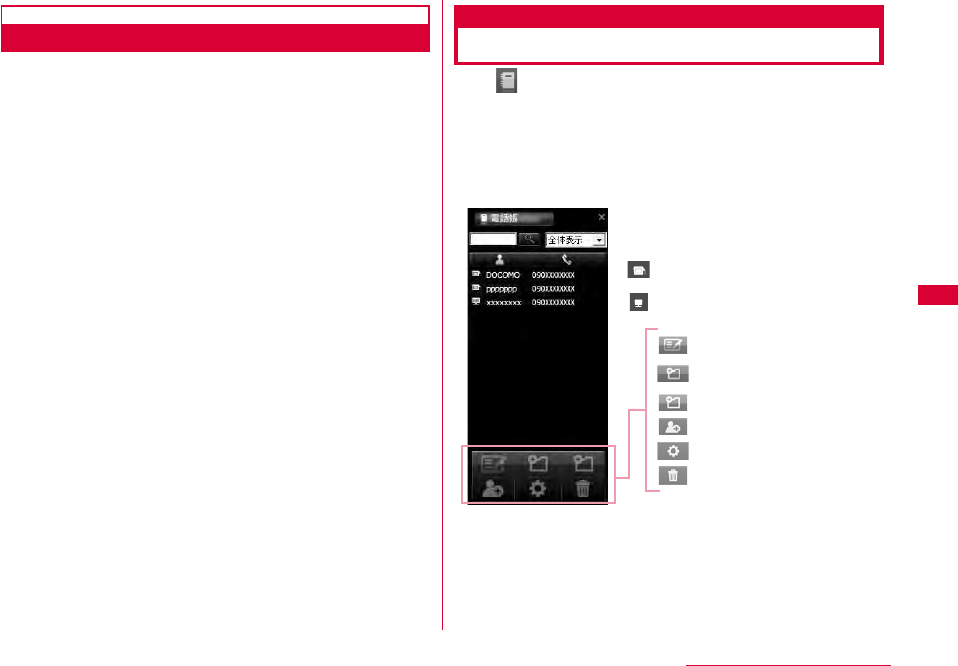
Composing SMS
aClick from the SMS application screen
bEnter the SMS from the SMS composing
screen
•SMS can be entered up to 70 characters (English alphabet
& numeric characters can be entered up to 160
characters)
:Composing SMS
:Outbox
:Inbox
:Drafts box
:FOMA card SMS box
Composing SMS
Transferring to phonebook
Entering receiver's phone number
Message/receiversreset,
sending SMS
55
L-05A Connection Software
cEnter the receiver's phone number
•Enter the receiver's phone number by clicking the input or
click to display phonebook and decide a receiver.
•If you edit SMS or receiver, enter directly in SMS edit
screen or phone number field to modify.
dClick
•SMS are being sent.
•Result of sending SMS.
Note
•You will be prompted whether you want to save the SMS to
Drafts box or not, when moving to other applications or
when failure incurred in transmission. If you click ,
the SMS will be saved to Drafts box. If you click , the
SMS will not be saved to Drafts box.
•Setting "SMS一括拒否(Multi-refuse SMS)"
By using the following AT command, SMS is set in terminal
software.
For details of terminal software, refer to "通信の手動設定
(Configuring Network Manually)" P90
SMS refuse: AT+CUSD=1,"*141*1#",15
Unlock SMS refuse: AT+CUSD=1,"*141#",15
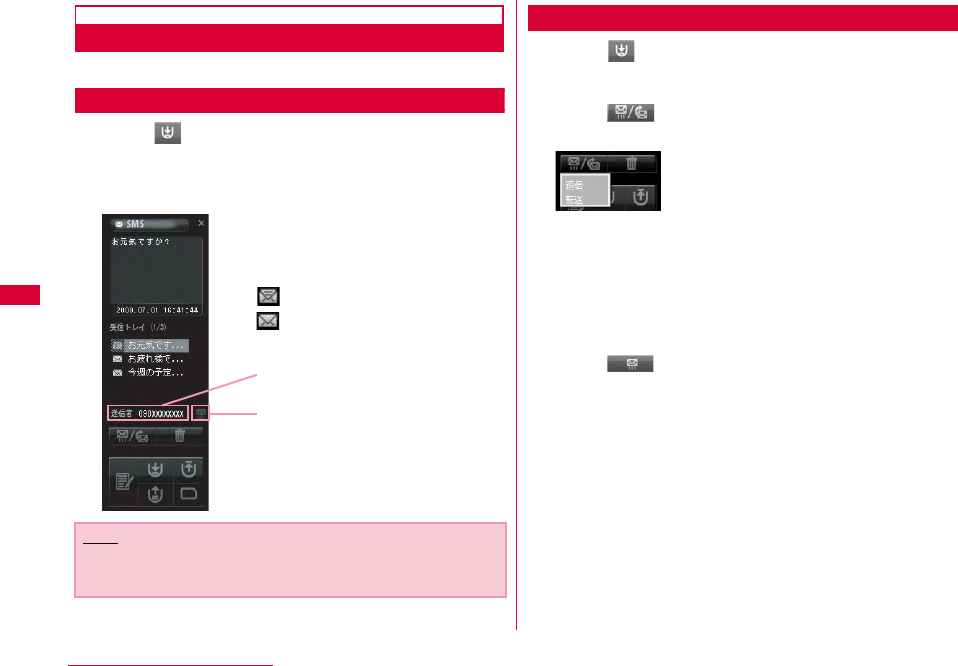
56 L-05A Connection Software
Inbox
•Allows you to store SMS to Inbox.
Confirming SMS from Inbox
aClick from the SMS application screen
•Displays the list of received SMS.
bSelect and confirm the SMS from the SMS list
Replying and Forwarding SMS from Inbox
aClick from SMS application screen
bSelect the reply/forward from Inbox list
Click
"返信(Reply)/転送(Forward)" menu is displayed
cClick
Note
•The SMS status becomes opened once you click the
received SMS.
: SMS opened
: SMS unopened
Receiver phone number
Browse phonebook application
screen → P64
•"返信(Reply)": Receiver phone number is
automatically entered and move to the
SMS composing screen.
•"転送(Forward)": SMS to be sent are automatically
entered, and move to the SMS
composing screen. The receiver phone
number is required to enter.
57
L-05A Connection Software
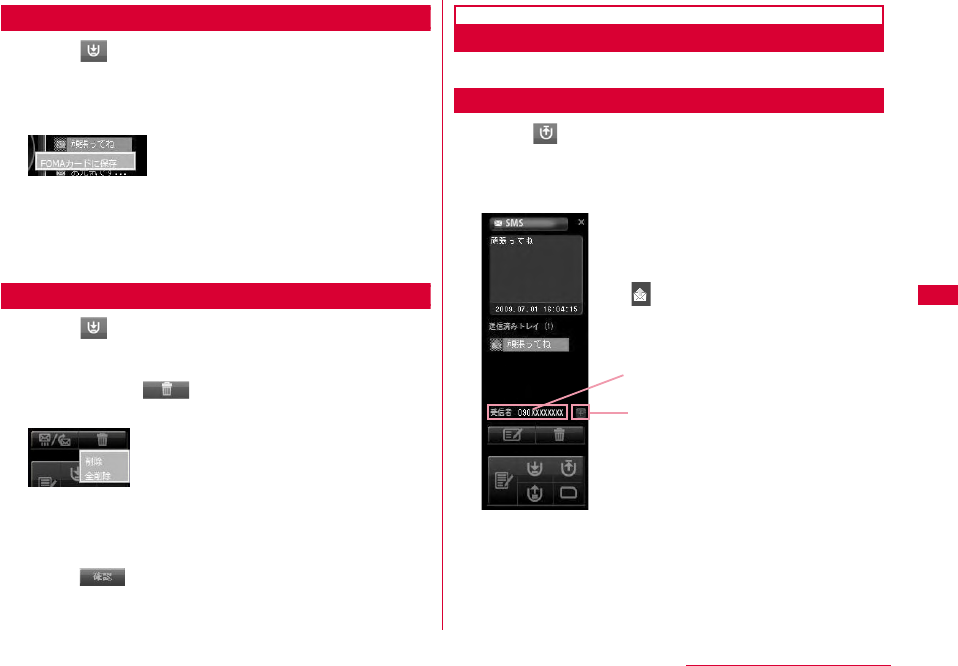
Copying Inbox SMS to FOMA Card
aClick from SMS application screen
bSelect the SMS and right-clickClick "FOMA
カードに保存(Save to FOMA card)"
•"FOMAカードに保存(Save to FOMA card)": Copy the
received SMS of PC to FOMA card.
•You can copy 20 SMS in total including sent and received
to your FOMA card.
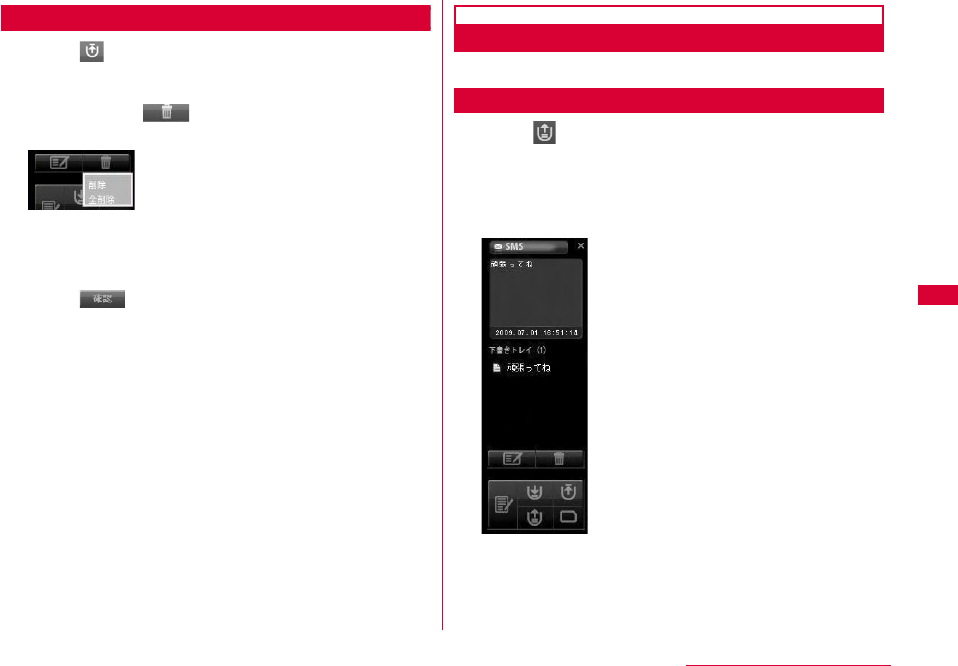
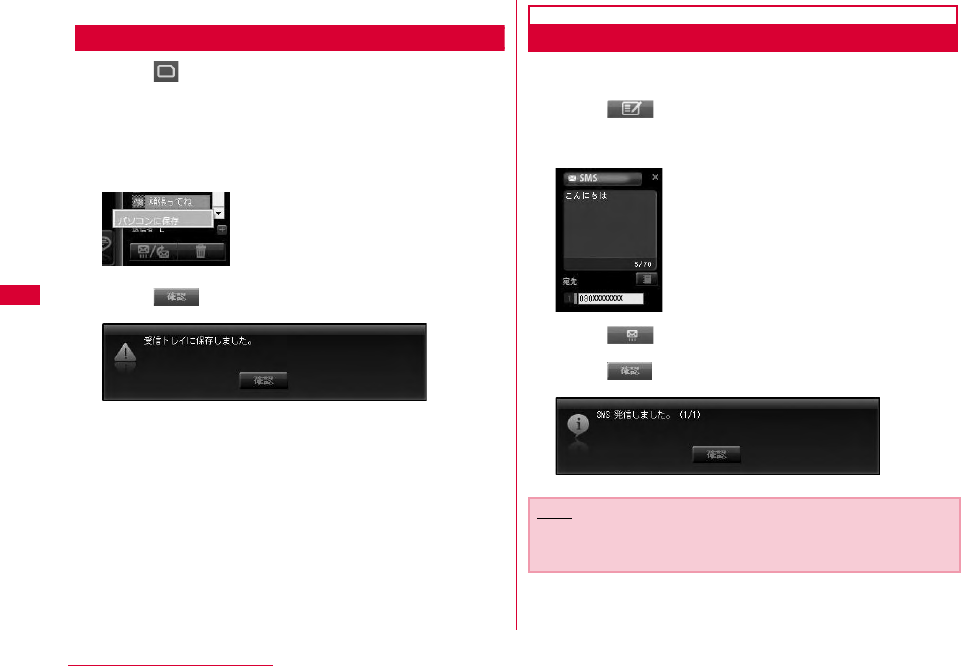
Deleting SMS from Inbox
aClick from SMS application screen
bSelect the SMS to delete from the list of
InboxClick
"削除(Delete)""全削除(Delete all)" menu displayed
The message for confirming is displayed.
cClick
Outbox
•Allows you to store SMS in Outbox.
Confirming SMS from Outbox
aClick from SMS application screen
•Displays the list of sent SMS.
bSelect and confirm the SMS from the list
•"削除(Delete)": Delete the selected SMS.
•"全削除(Delete all)": Delete all SMS
: Sent SMS
Receiver's phone number
Browse phonebook application
screen → P64
58 L-05A Connection Software
Editing SMS from Outbox
aClick from SMS application screen
bSelect the SMS to send from the list of
OutboxClick
•SMS composing screen
•You will be prompted with SMS composing screen as soon
as the receiver phone number and SMS are entered.
•You can add or edit SMS and receiver phone number.
cClick
Copying SMS from Inbox to FOMA Card
aClick from SMS application screen
bSelect the SMS and right clickClick "FOMA
カードに保存(Save to FOMA card)"
•"FOMAカードに保存(Save to FOMA card)": Copy sent SMS
stored in a PC to FOMA card.
•Up to 20 received and sent SMS can be stored in FOMA
card.
Note
•The information of time will not be saved when SMS are
copied from Inbox to FOMA card.
59
L-05A Connection Software
Deleting SMS from Outbox
aClick from SMS application screen
bSelect the SMS to delete from the list of
InboxClick
"削除(Delete)""全削除(Delete all)" menu is displayed.
The message for confirming is displayed.
cClick
Drafts Box
•Allows you store temporary SMS in Drafts box.
Confirming SMS from Drafts box
aClick from SMS application screen
•The list of SMS from Drafts box will be displayed.
bSelect and confirm the SMS from the list of
Drafts box
•"削除(Delete)": Delete the selected SMS.
•"全削除(Delete all)": Delete all SMS.
60 L-05A Connection Software
Editing from Drafts Box
aClick from SMS application screen
bSelect the SMS to edit from the list of drafts
boxClick
•You will be prompted with SMS composing screen as soon
as the receiver's phone number and SMS are entered.
•You can add or edit SMS and receiver's phone number.
cClick
Deleting SMS from Drafts box
aClick from SMS application screen
bSelect the SMS to delete from the list of
drafts boxClick
"削除(Delete)" and "全削除 (Delete all)" menu is displayed.
The message for confirming is displayed.
cClick
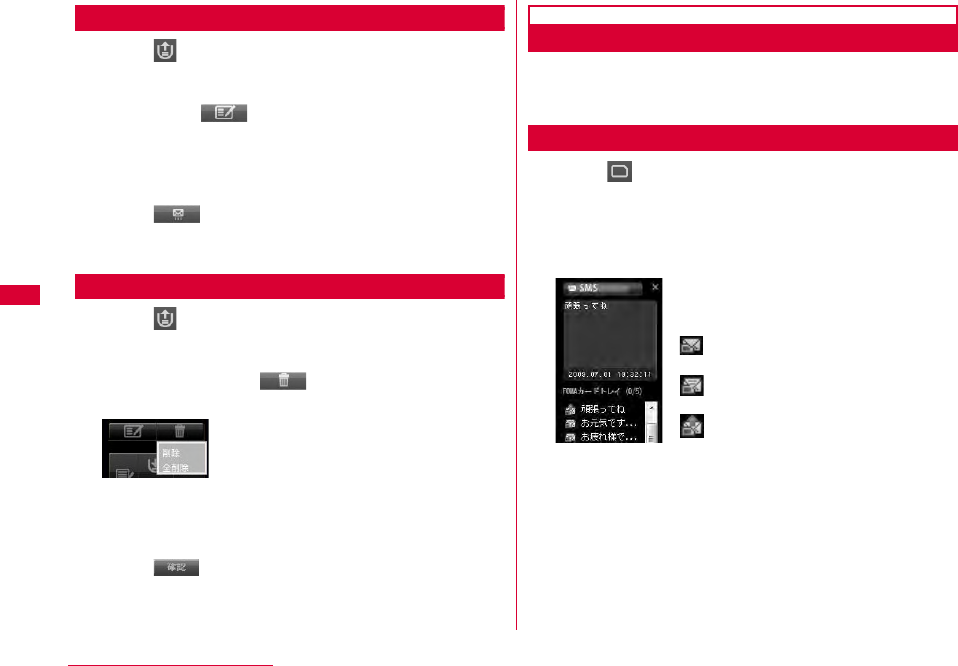
FOMA Card SMS Box
•Allows you to save SMS copied from Inbox or Outbox are to
FOMA card SMS box.
•Up to 20 received and sent SMS can be stored in FOMA card.
Confirming SMS from FOMA Card SMS Box
aClick from SMS application screen
•The list of SMS from Drafts box will be displayed.
bSelect and confirm the SMS from the FOMA
card SMS box
•"削除(Delete)": Delete the selected SMS.
•"全削除(Delete all)": Delete all SMS.
:Received SMS
(SMS unopened)
:Received SMS
(SMS opened)
:Sent SMS
61
L-05A Connection Software
Replying and Forwarding SMS from FOMA Card
SMS Box
aClick from SMS application screen
bSelect the SMS to reply/forward from the list
of FOMA card SMS boxClick
"返信(Reply)""転送(Forward)" menu is displayed.
cClick
Deleting SMS from FOMA Card SMS box
aClick from SMS application screen
bSelect the SMS to delete from the list of
FOMA card SMS boxClick
"削除(Delete)""全削除(Delete all)" menu is displayed.
The message for confirming is displayed.
cClick
•"返信(Reply)": You will be prompted with SMS
composing screen as soon as the
receiptor's phone number and SMS are
entered.
•"転送(Forward)": The SMS to be sent will be
automatically entered, and move to
SMS composing screen. The receiver's
phone number is required to enter.
•"削除(Delete)": Delete the selected SMS.
•"全削除(Delete all)": Delete all SMS.
62 L-05A Connection Software
Saving SMS in FOMA Card SMS Box to PC
aClick from SMS application screen
bSelect the SMS to save from the list of FOMA
card SMS boxRight click
cClick "パソコンに保存(Save to PC)"
dClick
Sending SMS from Phonebook
aSelect the phonebook record to send
bClick from the phonebook application
•Receiver's phone number is automatically entered and
move to the SMS composing screen.
cClick
dClick
Note
•Refert to "SMS作成する (Composing SMS)" to enter the
SMS.(P54)
63
L-05A Connection Software
Sending SMS from Japan to Overseas
■SMS
•You can use the same mobile phone number overseas as is
used in Japan.
•If receiptor's terminal is FOMA terminal Enter "+", and
"country code", in front of receiptor's phone number, if
receiptor is subscribed to overseas carrier other than NTT
DOCOMO. Also, enter the "010" "Country code" "Receiptor's
mobile phone number" in order. (If receiptor's phone number
starts with "0", enter the phone number without "0"
•If the receiptor received unsupported characters of SMS
from the sender who subscribed to other overseas carrier,
the message may not be displayed properly.
Using Phonebook
Click allows you to use various features of phonebook.
The list of stored phonebook records are displayed when
Phonebook records are stored in FOMA card.
•Total number of phonebook records to be stored may be
different depending on PC's available hard disk space. Total
number of phonebook records stored in FOMA card is maximum
50.
:Phone number stored in PC
:Composing SMS
:Transferring group
:New record
:Editing record
:Delete
:Adding and deleting
new group
:Phonebook record
stored in FOMA card

64 L-05A Connection Software
Adding Phonebook Record
•Follow the steps to add new phonebook record
aClick from the Phonebook application
bStart the following operations
•You can enter Kanji, Hiragana, Katakana, English,
number, character. (Full-width 10 character. Half-width
21character). You can enter the 20 character length.
cClick
dClick
Searching Phonebook Record
aEnter the name to be searched
•
You can search phonebook record by entering phone number.
bClick
Editing Phonebook Record
aSelect the phonebook record to be edited
bClick from the phonebook application
•Edit phonebook record number if editing screen appears.
cClick
dClick
•: Save entered information to phonebook.
•: Not save entered information to phonebook.
Select a group
Enter the name to be added
Enter the phonebook to be added
•: Save entered information to phonebook.
•: Not save entered information to phonebook.
65
L-05A Connection Software
Deleting Phonebook Record
aSelect phonebook record to delete
bClick from the phonebook application
Adding New Group
aClick from the phonebook application
bEnter the group name to be added
•You can enter Kanji, Hiragana, Katakana, English,
number, character. (Full-width 20character , Half-width
20character).
cClick
dClick
•: Delete phonebook record.
•: Cancel deleting phonebook record.
Note
•If you have many phonebook record to delete, multi-select
phonebook records by using shift or Ctrl keys from key
board and then click delete button to delete the selected
phonebook record.
66 L-05A Connection Software
Deleting Group Name
aClick from the phonebook application
bSelect the group name to be deleted
cClick
dClick
Phonebook Record Transfering Other Group
aSelect the phonebook record to be
transferred
bClick from the phonebook application
cSelect the group name to be transferred
dClick
•Transfer the selected phonebook record to the group you
want to transfer to.
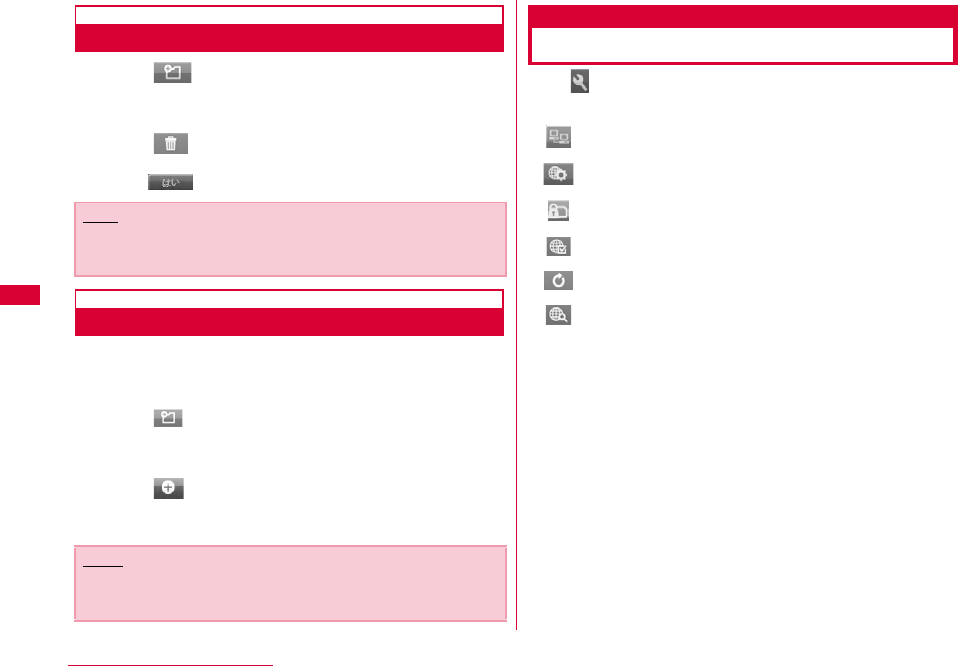
Using Application Option
Click allows you to use various features of application
option by clicking from the main application screen.
The following s are required to connect Internet with L-05A
connection software.
aThe setting of provider information
Register APN with other registration number (<cid>) on
"接続方式設定(Connection type configuration)" screen.
(→P72)
bBasic setting
Configure "*99***<cid>#" as a dial number during packet
communication on "Basic setting (Internet Option)"
screen. Also configure "User name", "Passward" provided
by provider if required.
Based on the above preparations, the APN with
registration number entered in <cid> will be connected to.
Note
•"デフォルト(Default)" group and "FOMAカード (FOMA card)"
group can not be deleted.
Note
•
If selecting two or more record, select records by using Shift or
Ctrl keys and then click "起動(Transfer)" to collectively transfer.
: Amount of downloaded data
: Internet option
: F O M A c a r d
: Connection configuration
: FOMA terminal reset
: Network setup
67
L-05A Connection Software
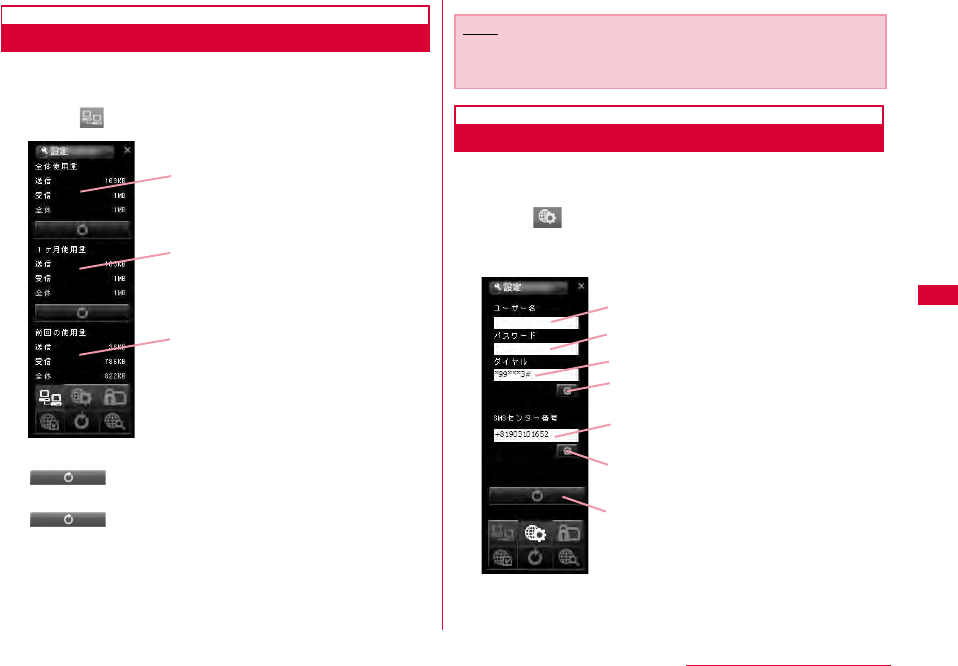
Confirming Packet Communication Volume
•Confirms that the amount of data transmission used in packet
communication
aClick from the application option screen.
全体使用量(Total usage) Accumulated total data usage
:Initialize total usage to zero
1ヶ月使用量(Monthly usage) Monthly usage
:Initialize monthly usage to zero
前回の使用量 data usage of current session
Configuring Internet Option
•Allows you to configure basic settingsfor connecting to
Internet.
aClick from the application option screen
bStart the following operations
1ヶ月使用量 (Monthly usage)
前回の使用量 (Current usage)
全体使用量 (Total usage)
Note
•The data usage displayed on the screen may differ from the
actual volume of packet communication.
ユーザー名 (ID)
パスワード (Password)
ダイヤル (Service number)
設定 (Configuration)
SMS センター番号
(SMS center number)
基本設定リセット (Basic setting reset)
設定 (Configuration)
68 L-05A Connection Software
ユーザー名(ID) ID supplied from service provider
パスワード(Password) The password supplied from
service provider
ダイヤル(Service number) number of service provider
※For packet communication, enter *99***<cid>. Enter the
registration number of APN set in <cid>(P72).
SMSセンター番号(SMS center number)
※Normally, change in setting is not necessary. Enter SMS
center number when using SMS from the network
operator other than DOCOMO.
設定(Configuration) Click to change setting
基本設定リセット(Basic setting reset)
Click to return to basic setting
cClick the applicable
Configuring FOMA Card
•Allows you to configure "PIN1ロック(PIN1 lock)", "PIN1解除
(PIN1 unblocking)", "PIN1暗証番号変更 (PIN1code change)"
aClick from the application option
Note
•Click "設定(Configuration)" to renew the setting.
Always remember to click when setting is changed.
•You will not connect to Internet if ID, password and service
number are incorrect.
•SMS may not be sent or received when SMS service
number has been improperly entered.
•In Macintosh, input any character in user name and
passward.
PIN1 モード
PIN1
(PIN1 Mode)
69
L-05A Connection Software
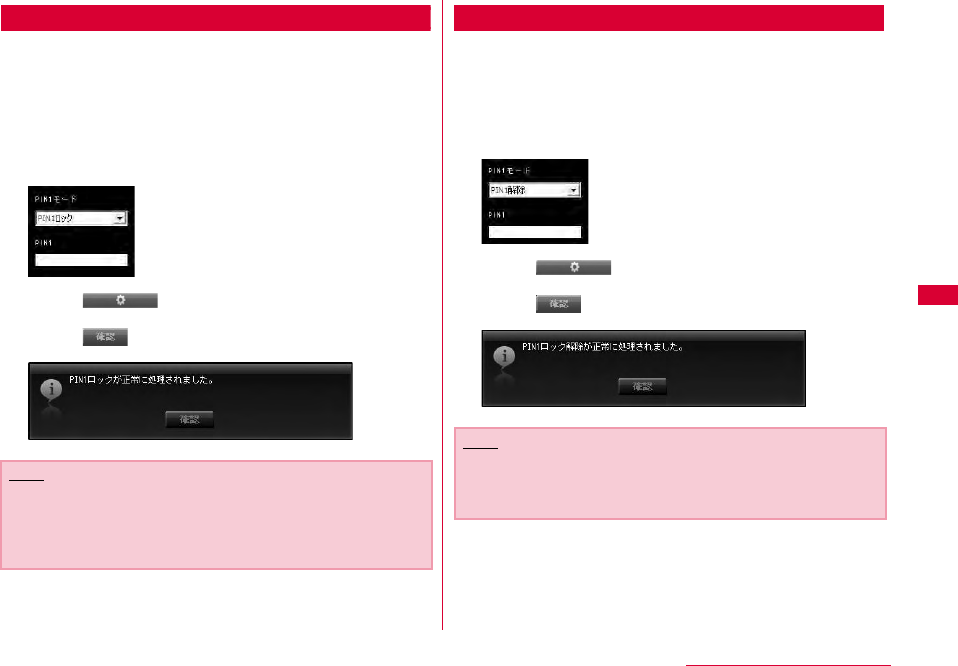
Locking PIN1
•Set security to FOMA card.
aSelect "PIN1ロック(PIN1 locking)" from PIN1
mode
bEnter the PIN1 code configured in FOMA card
to "PIN1"
cClick
dClick
Unblocking PIN1
aSelect "PIN1解除(Unblocking PIN1)" from PIN
mode
bEnter the PIN1 code configured in FOMA card
to "PIN1"
cClick
dClick
Note
•When starting L-05A connection software with PIN1
locked, you need to enter PIN1 code from the screen of
entering PIN1 code.You can not use FOMA terminal
properly unless you enter correct PIN1 code.
Note
•If PIN1 unblocking code is set, you can use FOMA card
information from FOMA terminal without verifying PIN1
code.
70 L-05A Connection Software
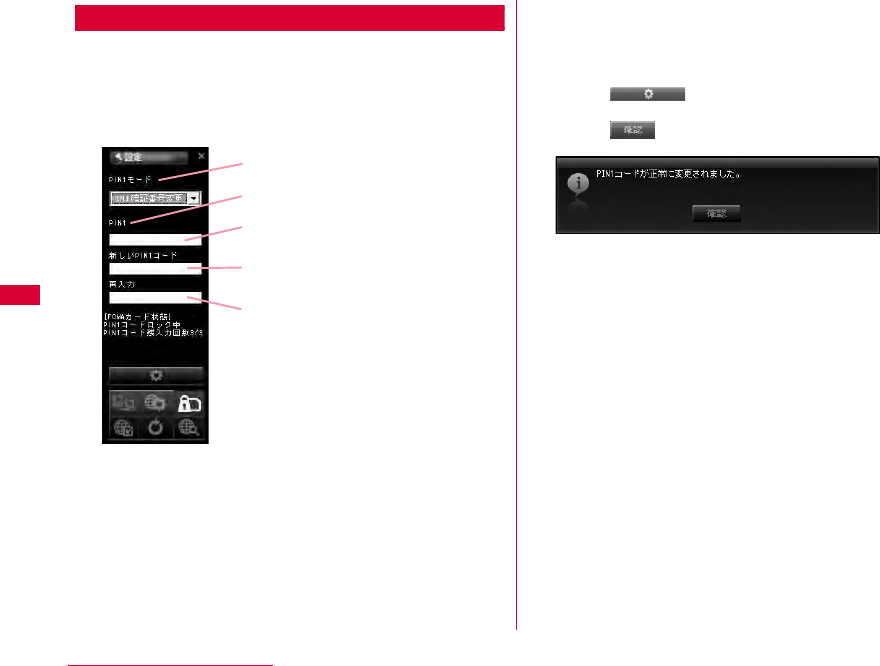
Modifying PIN1 Code
•Set the password required when unlocking or locking PIN1.
•Changing PIN1 code is only available when PIN is locked.
aSelect "PIN1暗証番号変更(Changing password
of PIN1)" from PIN1 mode
bEnter the FOMA card PIN1 code to "PIN1"
cEnter the PIN1 code change in "新しいPIN1
コード(New PIN1 code)"
dEnter the PIN1 code entered in "新しいPIN1
コード (New PIN1code)" code in "再入力
(Confirming New PIN 1code)"again to verify
eClick
fClick
PIN1 コード (PIN1 Code)
PIN1 モード (PIN1 Mode)
現在の PIN1 コード
(Current PIN1 Code)
変更する PIN1 コード
(PIN1 Code to change)
変更する PIN1 コード確認
(Confirming PIN1 Code to change)
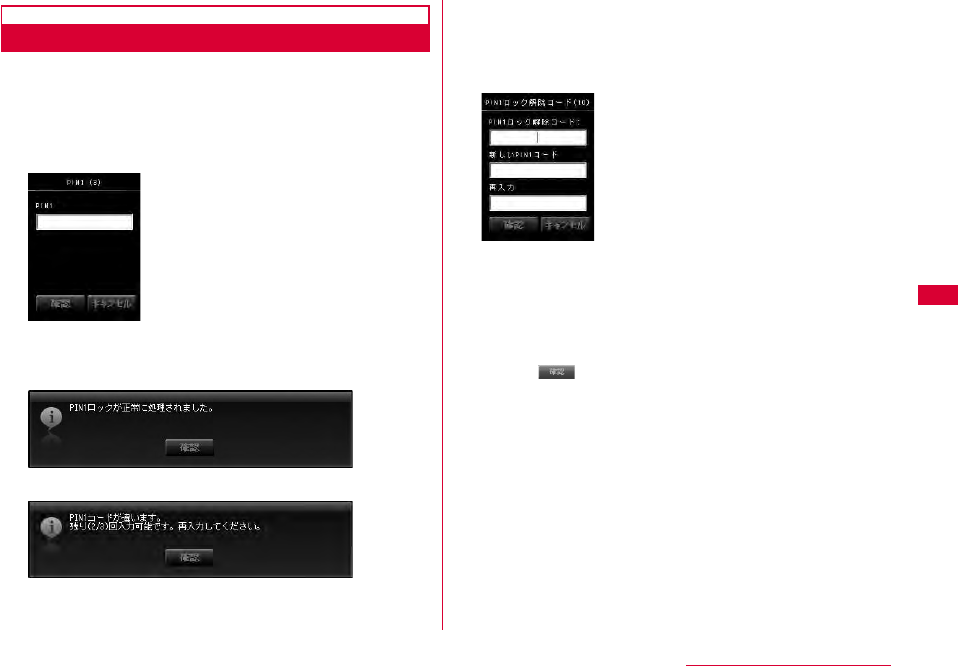
71
L-05A Connection Software
Entering PIN1 Code
•When L-05A connection software is started after setting PIN1
Lock, PIN1 code input screen will appear or it is restart to
reset FOMA terminal.
aEnter PIN1code
Enter the 4 to 8 PIN1 code
bVerify the result after entering PIN1 code
Ex.1: When PIN1 code has been successfully entered.
Ex.2: When PIN1 code has been improperly entered.
Ex.3: When PIN1 code has been improperly entered 3
times in a row.
•If you improperly enter the PIN1 code 3 times in a row,
the verification screen for unblocking PIN1 code will be
displayed.
■Unblocking locked PIN1 code
aEnter the unblocking PIN1 code to "PIN1ロック解除コード
(Unblock)"
bEnter the PIN1 code to "新しいPIN1コード(New PIN1
code)" to change
cEnter the PIN1 entered in "新しいPIN1コード(New PIN1
code)" in "再入力(confirming New PIN1 code)" to confirm
dClick
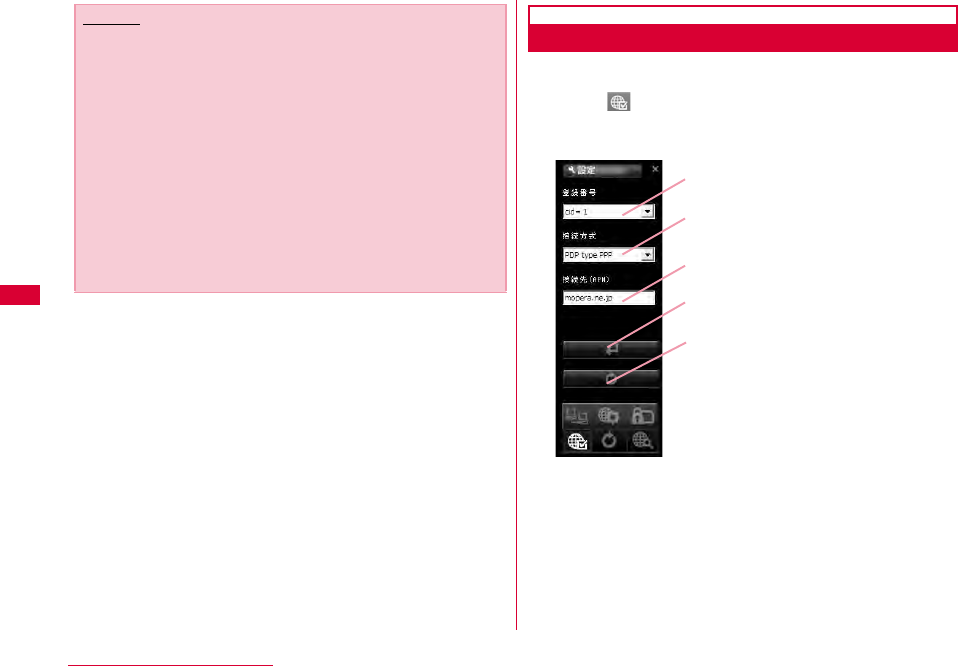
72 L-05A Connection Software
Configuring Connection type (PDP Type)
•Configure connection type.
aClick from Internet Option screen
bStart the following operations
a登録番号(Registration Number(cid))
The registration numbers are available from cid1 to cid 10
in FOMA terminal. To connect to a provider other than
「mopera U」or 「mopera」, you can set the access point
name (APN) to any of cid2 or cid4 to cid10.
b接続方式(Connection type)
PDP type IP and PDP type PPP are available for Internet
connection type. You can select the Internet connection
type you want to use or check the currently configured
internet connection type.
Caution
•Be careful not to lose FOMA card. DOCOMO is not
responsible for the lost or stolen device.
•Do not transfer FOMA card to others.
•Treat it carefully as the data stored in FOMA card can be
easily damaged from scratching or bending.
•When connecting FOMA terminal to a PC for the first time,
you are required to enter PIN1 code to use FOMA card.
•If an incorrect PIN1 code is entered 3 times in a row, the
service will be suspended. To use it again, you must enter
unblocking PIN1 code.
•If an incorrect unblocking PIN1 code is entered 10 times in
a row, FOMA card locks automatically, so be sure to keep a
separate note of the number. Contact a DOCOMO shop if
you are not able to unblock the locked PIN 1.
a
b接続方式 (Connection type)
c
d接続方式登録
e接続方式設定リセット
登録番号 (Registration number (cid)
)
接続先 (Access Point Name (APN))
(Connection type setting reset)
(Connection type registration)
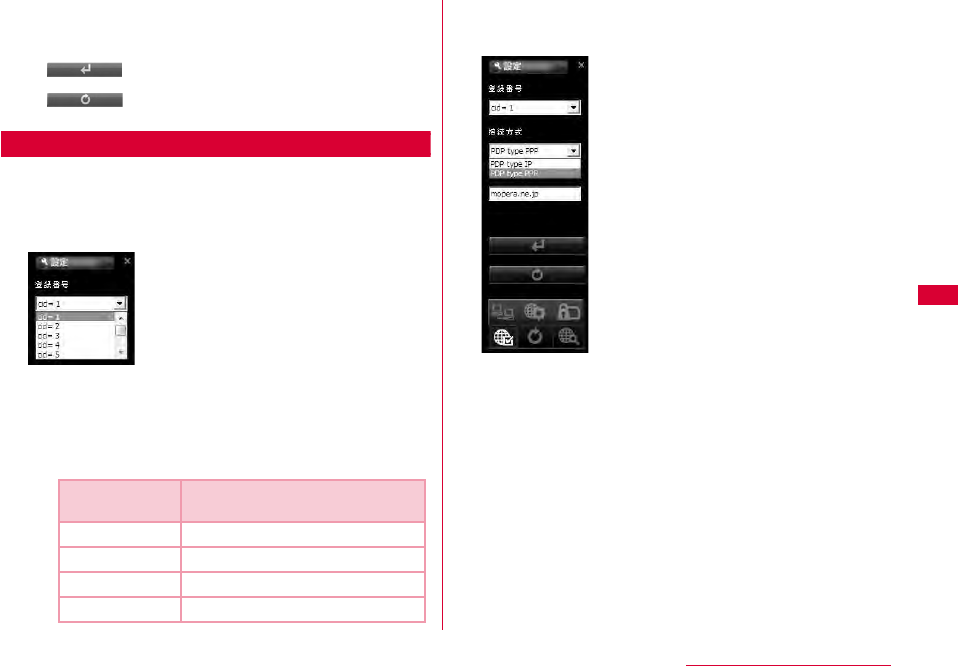
73
L-05A Connection Software
c接続先(Access Point Name (APN))
Configure APN for packet communication. You can
configure APN of provider you want to use or check the
currently configured APN.
d(Connection type registration)
Save the modified information to FOMA terminal.
e(Connection type setting reset)
Reset all PDP configurations.
Saving and Editing the Provider Information
•Save or edit the provider information you want to use.
aSelect cidSelect the registration number to
save/edit
■cid
The registration numbers are available from cid1 to
cid 10 in FOMA terminal.
•To connect to a provider other than「mopera U」or
「mopera」, you can set the access point name (APN)
to any of cid2 or cid4 to cid10.
bSelect the Internet connection type
supporting Access Point.
cEnter APN
•When "cid=3"selected "PDP type IP" Configure mopera.net
This service provides a maximum data speed of 7.2Mbps
for receiving and 5.7Mbps for sending.
•When "cid=1" selected "PDP type PPP" onfigure
mopera.ne.jp This service provides a maximum data speed
of 384kbps for receiving and 384kbps for sending.
Registration
number(cid) Access Point name(APN)
1 mopera.ne.jp「mopera」
2 Unassigned
3 mopera.net「mopera U」
4∼10 Unassigned
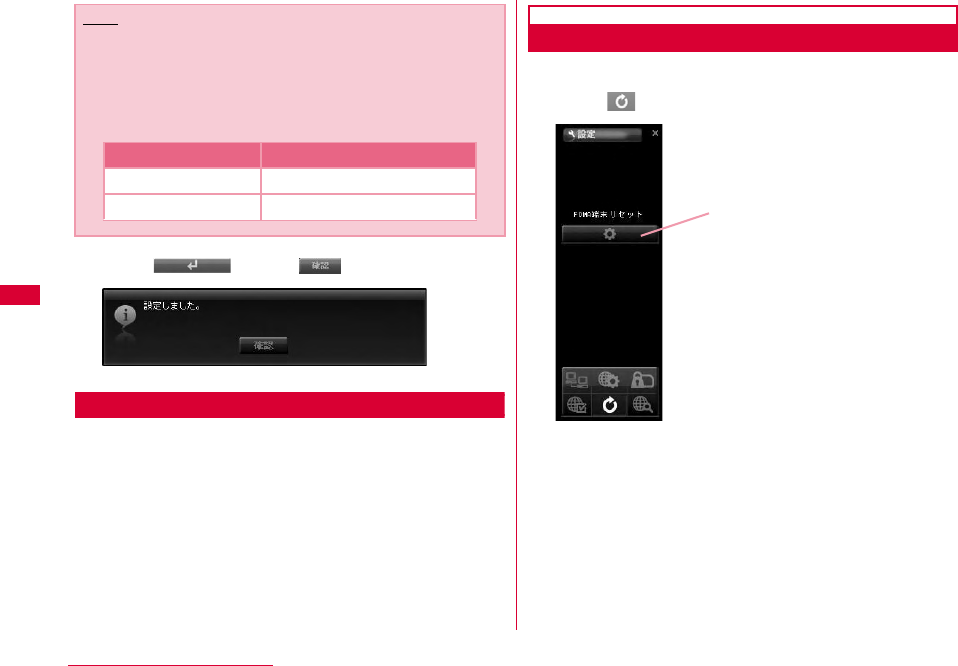
74 L-05A Connection Software
dClick Click
Retrieving Provider Information
aIf select the cid of the "登録番号(Registration
Number(cid))" b"接続方式(connection type)" and c"接続先
(Access Point Name (APN))"will be displayed.
Resetting FOMA Terminal
•Allows you to reset FOMA terminal.
aClick from the application option
■ FOMA端末リセット(FOMA terminal reset)
Reset FOMA terminal for the following cases
•When FOMA terminal is operating improperly.
•When FOMA card is reinserted while inserting the FOMA
terminal to a PC.
Note
■ Configuring sender ID
You can configure to display sender ID or not by
adding 186/184 before APN.
•Add "186." before APN if you want to display sender ID.
•Add "184." before APN if you don't want to display sender.
Registration APN
Display sender ID 186.mopera.net
Not display Sender ID 184.mopera.net FOMA 端末リセット
(FOMA terminal reset)
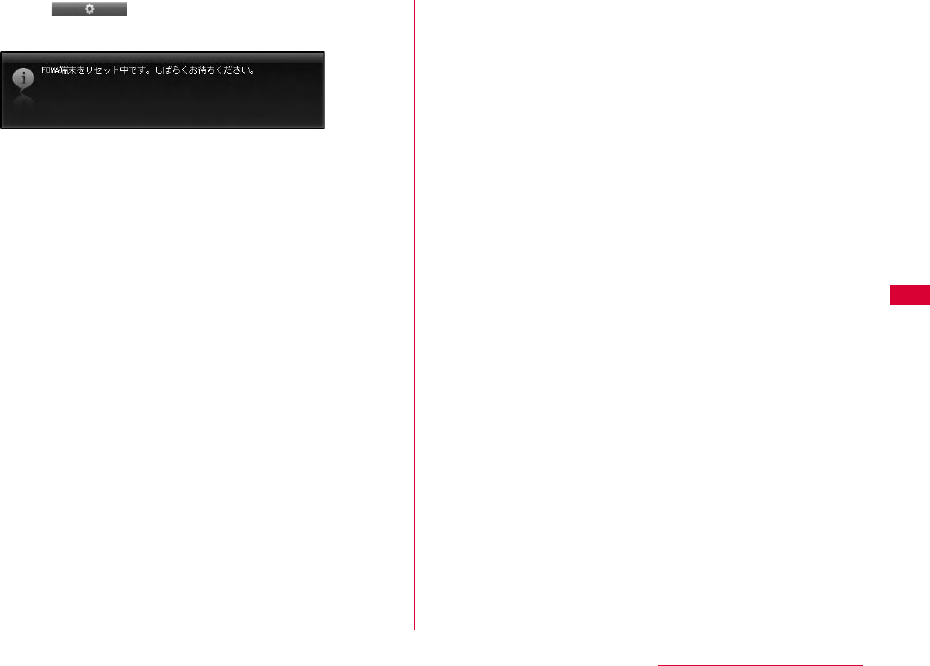
75
L-05A Connection Software
bClick
•FOMA terminal is restarting.


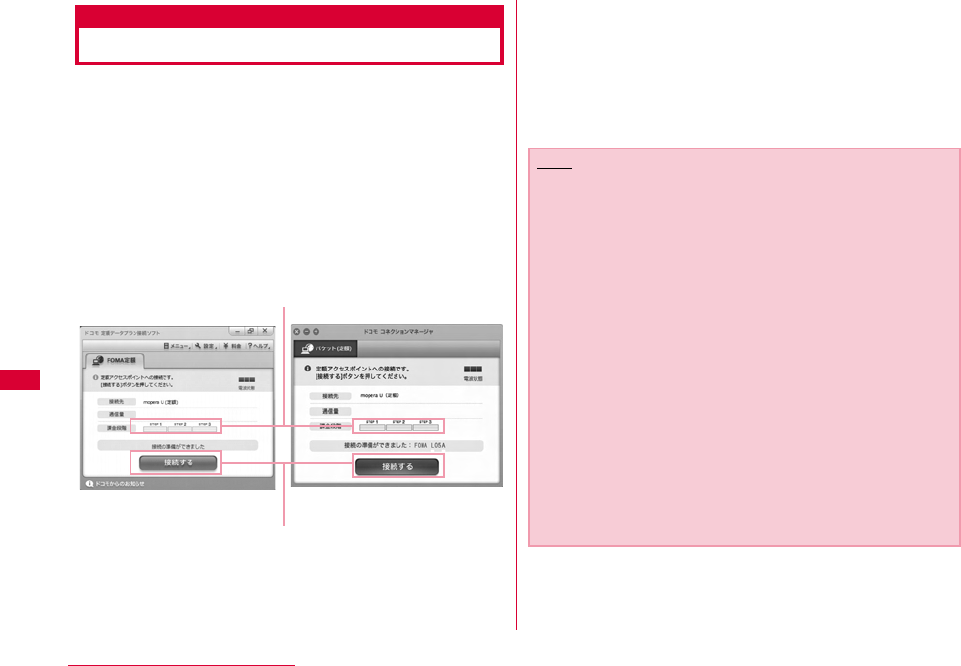
78 DOCOMO Connection Manager
DOCOMO Connection Manager
DOCOMO connection manager is a software packets the
necessary connection software to operate "定額データプラ
ン接続ソフト (Flat-rate data plan connection software)" and
measured data communication which are necessary when
using flat-rate data plan.
「DOCOMO connection manager」is a software to connect
data communication terminal by data communication
correponding terminal. Subscribing 「mopera U」or
configuring a PC operates easily.
Also, confirming amount of data communication and
charges through charge counter feature is available.
This manual introduces the installation method of
DOCOMO connection manager.
For connecting the terminal with Internet, agreement with
the Internet service provider (「mopera U」 etc.) supporting
service and data communication is required.
View DOCOMO web site for detailed information (Japanese
only).
Connect/disconnect
Charge counter
Windows version Macintosh version
Note
■ Using a flat-rate data plan
•For using a flat-rate data plan, the agreement with the
charge plan corresponding to the flat-rate data
communication and internet service provider is required.
View DOCOMO web site for further information.
■ Using measured-rate data communication
•Note that the communication fees may come high if you
perform heavy packet communications such as viewing
home page with pictures inside, downloading data (Ex.:
Application/Music/Data/OS/anti-virus software update)
etc.
Note that when performing data communication after
connecting this FOMA terminal with a PC by a USB cable,
「パケ・ホーダイ (Pake-hodai) 」、「パケ・ホーダイフル (Pake-
hodaifull)」、「Biz・ホーダイ (Biz-hodai)」 and「Biz・ホーダイ ダ
ブル (Biz-hodai double)」 are not included in the FOMA
packet Flat-rate service.
■ Using mopera
•For connection configuration, view mopera web site.
http://www.mopera.net/mopera/support/index.html
(Japanese only)
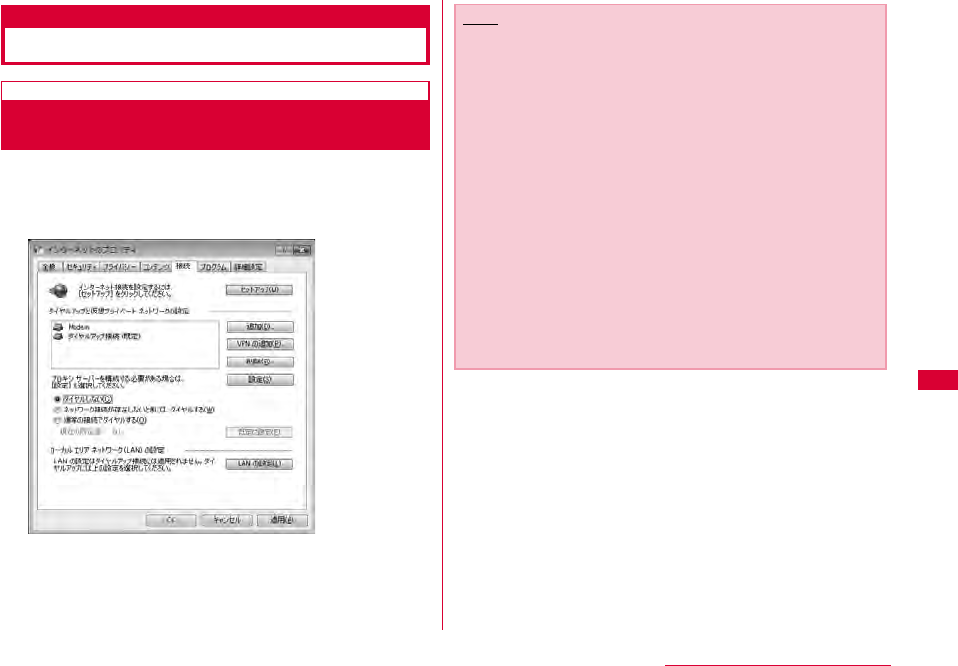
79
DOCOMO Connection Manager
Windows Version
Before Installing DOCOMO Connection
Manager
■ Setting Internet Explorer
Before installing this software, set connection setting to
"ダイヤルしない (Do not dial)" in Internet Option of Internet
Explorer.
aStart Internet ExplorerSelect "ツール (Tool)"−"インター
ネットオプション (Internet Option)"
bSelect "接続 (Connection)" tabSelect "ダイヤルしない (Do
not dial)"
cClick "OK"
Note
■ Use other connection software besides DOCOMO
connection manager
This software has equate features with the following
software. Therefore, it is not necessary to use the following
software at the same time.
※ If required, change the setting to not start or uninstall.
- mopera U start up tools
- mopera U connection & setting tool
- FOMA PC configuration software
- FOMA byte counter
Also, when using Mzone (Public Wireless LAN Connection)
in this software, uninstall the following public wireless LAN
connection software.
※ When the following software are installed at the same
time, the Mzone connection of this software is not
available.
- U Public Wireless LAN Utility Software
- DOCOMO Public Wireless LAN Utility Software
- DOCOMO Public Wireless LAN Utility Program
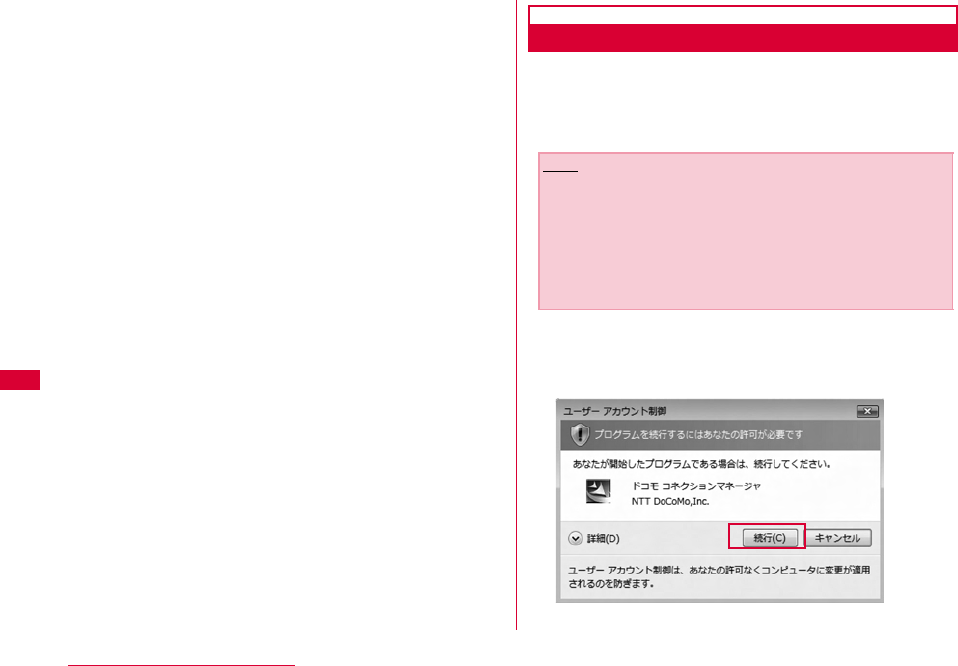
80 DOCOMO Connection Manager
aLog on by DOCOMO connection manager user
■For Windows Vista
An administrator is required. When logged on by other
people than the administrator, entering user name
and password will be asked.
■For Windows XP/2000
The user belongs to administrators group or the user
of "コンピュータの管理者 (Administrator of computer)"
operates log-on.
bExiting all the applications launched
Besides anti-virus software, programs resident in Windows
are also finished.
•Ex: Right click the icon shown on task bar, and select "閉じ
る (Close)" or "終了 (Finish)".
Installing DOCOMO Connection Manager
aLaunch the installer of DOCOMO connection
manager using the included CD-ROM
Select "付属CD-ROM (the included CD-ROM)" "Windows"
"dcm_connect_manager""dcm_connect_full_setup.exe"
bClick "続行 (Continue)"
For Windows XP/2000, "ユーザーアカウント制御 (User
account control)" screen is not displayed. Setup program
starts right away.
Note
•When Windows XP does not contain MSXML6 and
Wireless LAN API, installation is required before installing
DOCOMO connection manager. Press "Install" when the
confirmation screen is displayed.
•After finishing installing MSXML6 and Wireless LAN API,
if reboot Windows, the installation of DOCOMO
connection manager starts automatically.
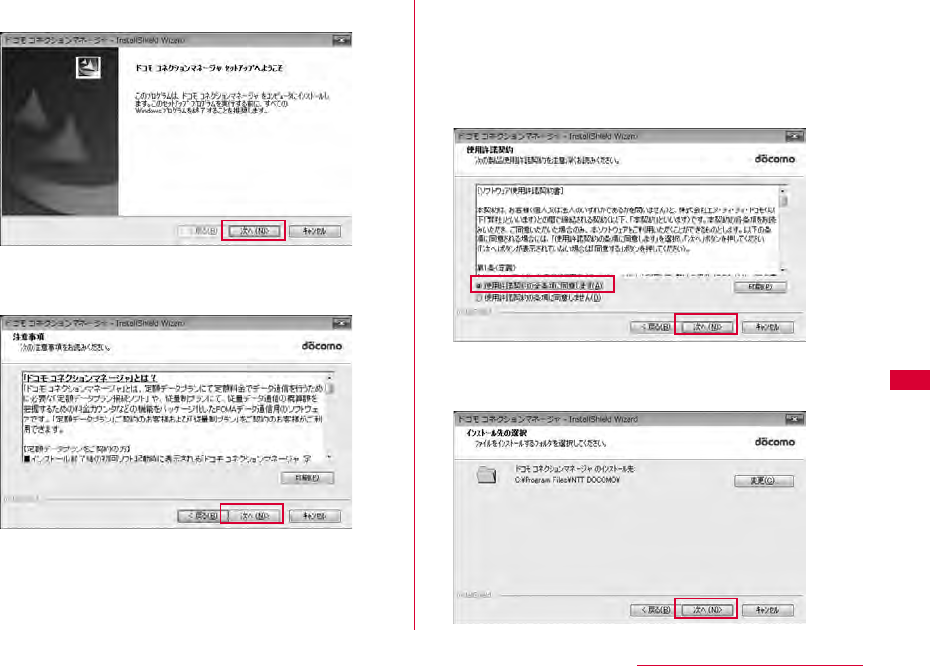
81
DOCOMO Connection Manager
cClick "次へ (Next)"
dMake sure to confirm the caution and then
click "次へ (Next)"
eConfirm the content of the license agreement.
When agree with the content, select "使用許諾
契約の全条項に同意します (I agree with the
license agreement stipulations)" and click "次
へ (Next)"
fConfirm the destination folder and click "次へ
(Next)"
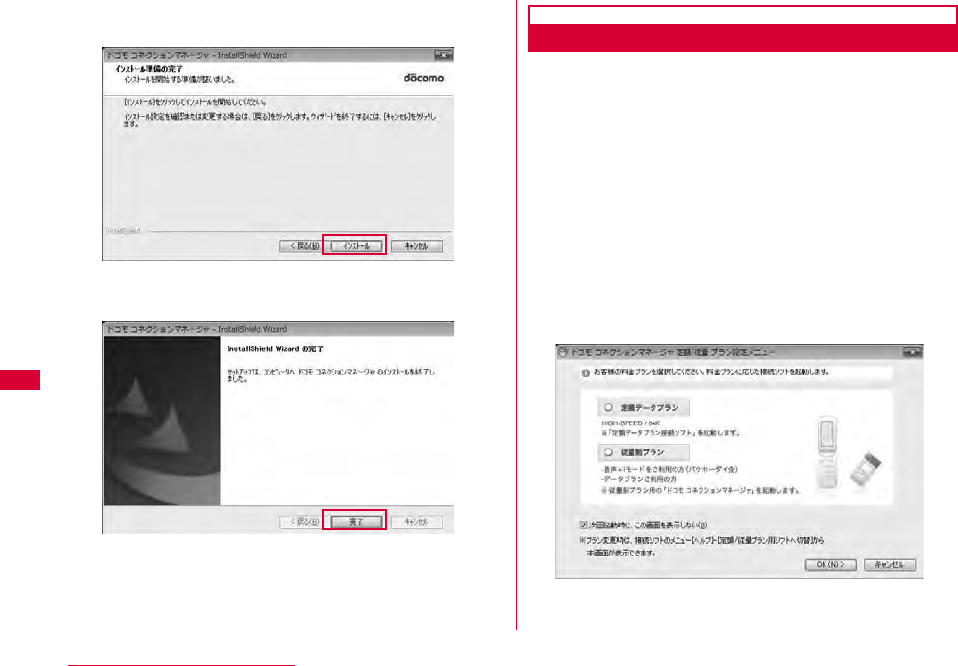
82 DOCOMO Connection Manager
gClick "インストール (Install)"
Installing starts.
hClick "完了 (Finish)"
Installing finishes.
Launching DOCOMO Connection Manager
a"スタート (Start)""すべてのプログラム(All
programs)""NTT DOCOMO""ドコモ コネク
ションマネージャ (DOCOMO connection
manager)""ドコモ コネクションマネージャ
(DOCOMO connection manager)"
DOCOMO connection manager starts.
bFor the first launching, the wizard setting is
displayed automatically.
The connection with Internet gets prepared when operating
or setting following the instruction of software.
Refer to 『ドコモ コネクションマネージャ操作マニュアル
(DOCOMO connection manager operation manual).pdf』 for
detailed information.
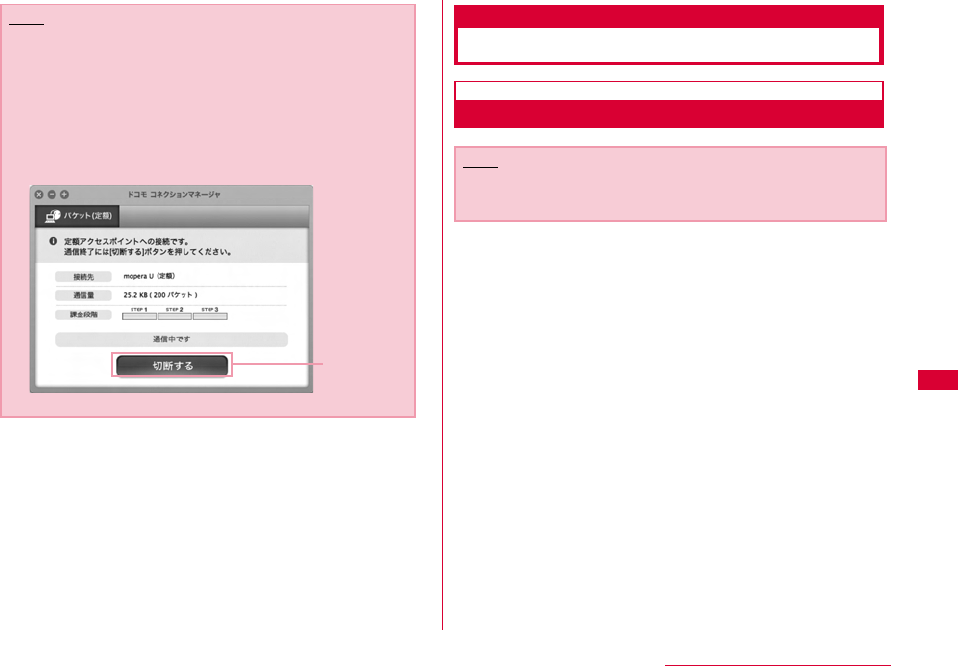
83
DOCOMO Connection Manager
Macintosh Version
Installing DOCOMO Connection Manager
aLaunch the installer of DOCOMO connection
manager from the included CD-ROM
•Select "付属CD-ROM (included CD-ROM)" "Mac"
"dcm_connect_manager" "dcm_for_Mac" "インストール
(Install)" Select "ドコモ コネクションマネージャをインストー
ルします (Install DOCOMO connection manager)" and click
"OK"
Note
•Just exiting the Internet browser or mail software does
not disconnect the connection.
When do not use communication, make sure to press "切
断する (Disconnect)" button to disconnect the
connection.
For OS update, if auto update is set, the software will be
updated automatically. Note that the packet
communication fee may come high.
Disconnect
Note
•Use Ver. 1.00.0003 or later for "DOCOMO connection
manager for Mac".
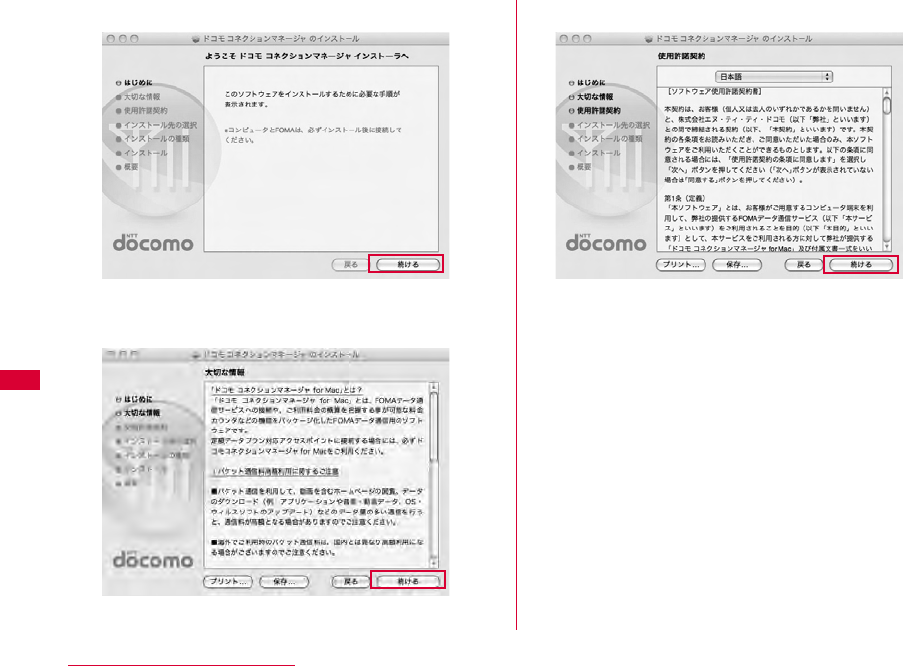
84 DOCOMO Connection Manager
bClick "続ける (Continue)"
cMake sure to confirm "大切な情報 (Important
information)", and click "続ける (Continue)"
dClick "続ける (Continue)"
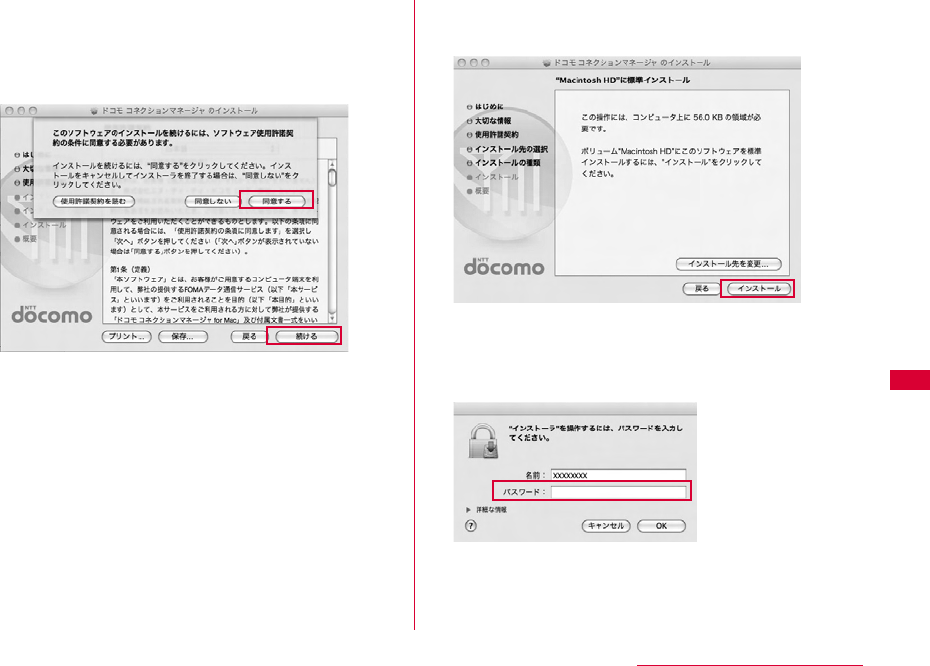
85
DOCOMO Connection Manager
eConfirm "使用許諾契約 (The license
agreement)", when agree with the content,
click "同意する (I Agree)"Click "続行
(Continue)"
fConfirming the destination folder to install
and click "インストール (Install)"
gEnter administrator name and
passwordClick "OK"
The user account created after Mac OS X is set becomes
the administrator of PC. Enter the used name and password.
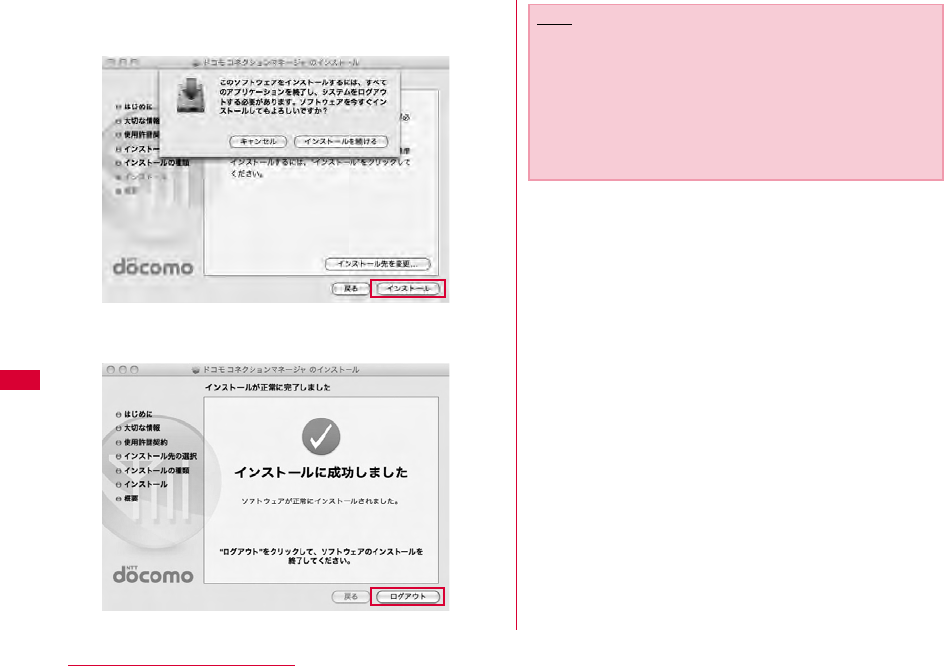
86 DOCOMO Connection Manager
hClick "インストールを続ける (Continue
installing)"
iClick "ログアウト (Log out)"
Installing finishes.
Note
•If click "ログアウト (Log out)", setting assistant screen is
displayed.
The connection with Internet gets prepared when
operating or setting following the instruction of
software.
Refer to 『ドコモ コネクションマネージャ操作マニュアル
(DOCOMO connection manager operation manual)』 for
detailed information.
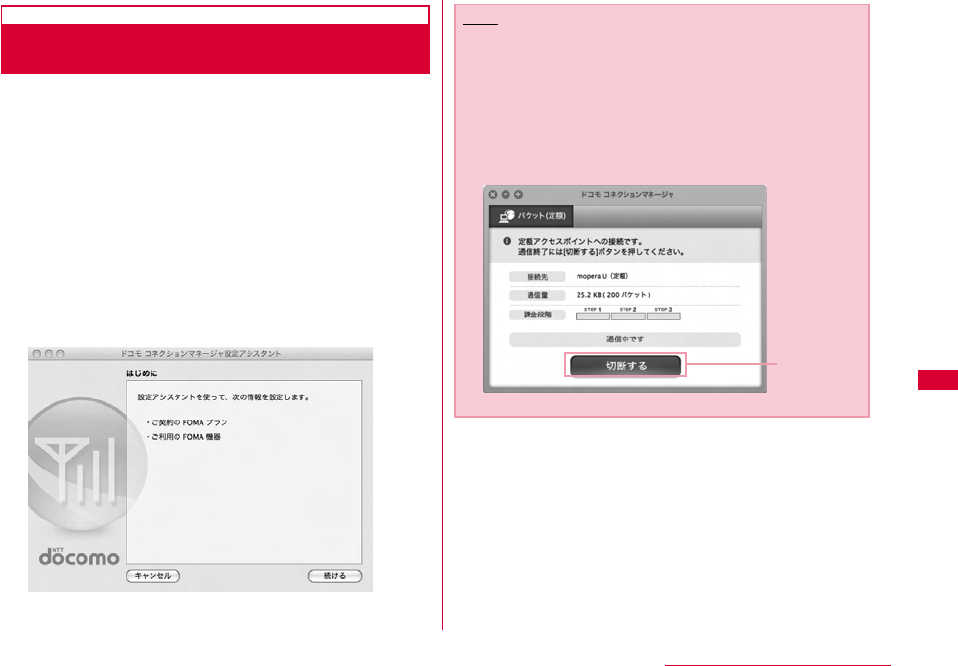
87
DOCOMO Connection Manager
Launching DOCOMO Connection
Manager
a"アプリケーション (Application)" "ドコモ コネク
ションマネージャ (DOCOMO connection
manager)" "ドコモ コネクションマネージャ
(DOCOMO connection manager)"
•DOCOMO connection manager starts.
bFor the first launching, the wizard setting is
displayed automatically
The connection with Internet gets prepared when operating
or setting following the instruction of software.
Refer to 『ドコモ コネクションマネージャ操作マニュアル
(DOCOMO connection manager operation manual.pdf)』 for
detailed information.
Note
•Just exiting the Internet browser or mail software does
not disconnect the connection.
When do not use communication, make sure to press "切
断する (Disconnect)" button to disconnect the
connection.
For OS update, if auto update is set, the software will be
updated automatically. Note that the packet
communication fee may come high.
Disconnect


90 Configuring Network Manually
Configuring a Dial-up Network
Manually
This section describes the steps to configure settings for
packet communication without using L-05A connection
software or DOCOMO connection manager.
Setting APN
Set the access point (APN) in packet communication. Up
to 10 APN can be set up and they are managed with cid's.
Communication software is required to enter AT
commands. This section describes the steps necessary for
using the "ハイパーターミナル(Hyper Terminal)" that comes
with Windows.
•The registration number (cid) 1 is set to mopera.ne.jp and the
registration number 3 is set to mopera.net by default. Use cid
2 or from 4 to 10 when setting another access point.
•"ハイパーターミナル(Hyper Terminal)" does not come with
Windows Vista. To configure the settings in Windows Vista,
use communication software compatible with Windows Vista.
For the setting procedures, refer to the instruction manual and
other documentation that came with the software to be used.
• For a connection (APN) other than 「mopera U」 or 「mopera」
, contact your ISP or network administrator.
For Windows XP
aConnect the FOMA terminal with a PC
•Connecting method→P24
bClick "スタート(Start)" "すべてのプログラ ム
(All programs)" "アクセサリ (Accessories)"
"通信(Communication)" "ハイパーターミナル
(Hyper Terminal)"
Hyper Terminal starts.
■For Windows 2000
Click "スタート(Start)" "プログラム (Programs)" "ア
クセサリ(Accessories)" "通信(Communication)" "ハ
イパーターミナ ル(Hyper Terminal)".
cEnter a connection name in the "名前 (Name)"
field Click "OK"
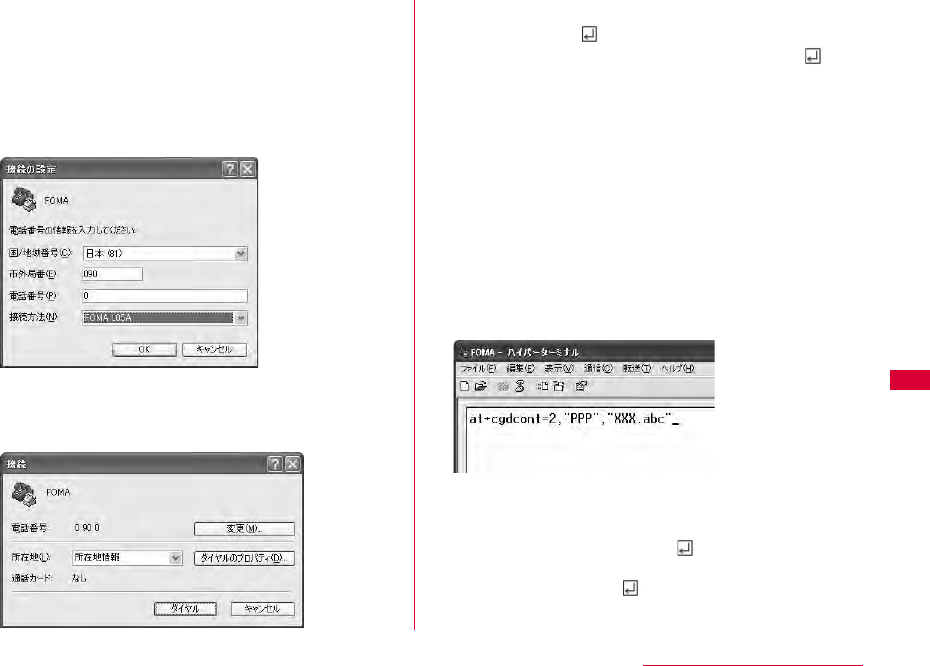
91
Configuring Network Manually
dEnter a non-existing phone number (such as
"0") in the "電話番号(Phone Number)" field
Check that "FOMA L05A" is displayed for "接
続方法(Connection Method)" Click "OK"
•If more than one modem name are displayed in the "接続方
法(Connection Method)" field, check the FOMA terminal
modem name and select the proper one.→P40
o
eClick "キャンセル(Cancel)" on the connection
screen
The Hyper Termina screen opens.
fEnter the APN in the following
formatPress
Enter AT+CGDCONT=<cid>,"<PDP type>","<APN>"
Enter the following information in the corresponding <cid>,
<PDP type> and <APN> sections.
If "OK" appears after you enter the information, the APN has
been setup.
•If the entered characters do not appear, enter ATE1.
If register an access point with PPP in the PDP type and
XXX.com in the APN of cid2
■To reset the specified APN settings
Enter AT+CGDCONT=<cid>
■To view the registered APN
Enter AT+CGDCONT
cid : Enter any number from 2, and from 4 to 10.
※ Keep in mind that the old setting
information will be overwritten if you select
a cid number which has already been set.
PDP type : Select either PPP or IP for the connection
method supported by the access point, and
then enter the information enclosed in
quotation marks ("").
APN : Enter the connection (APN) enclose it in
quotation marks " ".
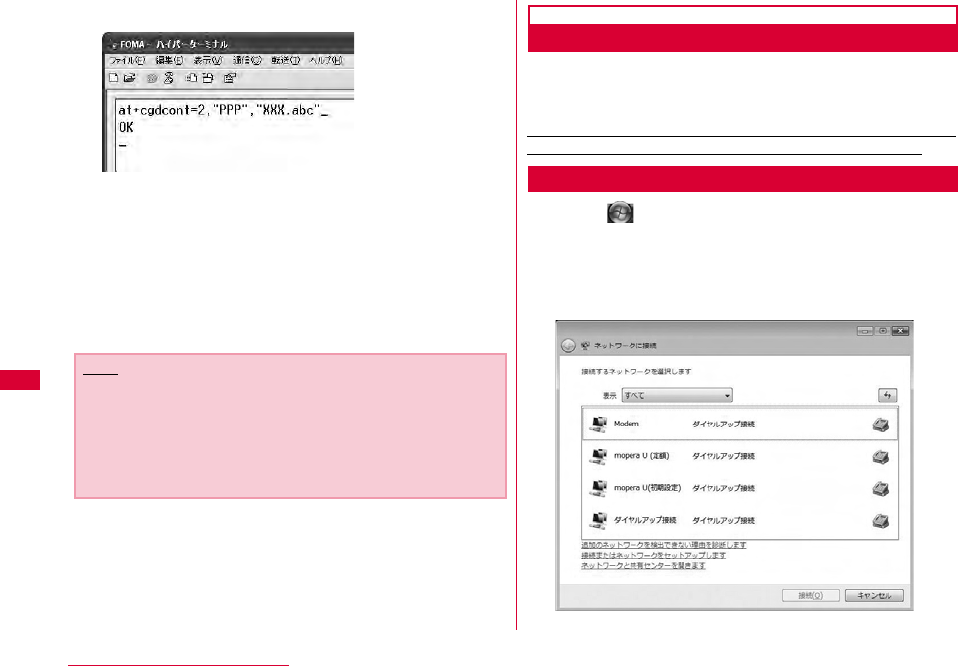
92 Configuring Network Manually
gCheck if "OK" is displayed
hClick "ファイル(File)" "ハイパーターミナル の終
了(Exit Hyper Terminal)"
iClick "はい(Yes)" on the confirming
disconnection screen Click "いいえ(No)" on
the confirming to save screen
Hyper Terminal will quit, and the setting of the APN
completes.
Configuring Dial-up Network
Set up the dial-up network on the PC.
•For setting up a connection to other than 「mopera U」 or
「mopera」, contact your ISP or network administrator.
Example: Connecting to the DOCOMO Internet connection
service 「mopera U」, which is registered to <cid>=3
For Windows Vista
aClick "スタート(Start)" "接続先
(Connection)"
bClick "接続またはネットワークをセットアップしま
す(Set up connection or network)"
Note
•The APN information is saved in the FOMA terminal. If you
connect a different FOMA terminal, save the APN
information again.
•If you want to use the APN information registered on the
PC, register the same APN in the same cid of the FOMA
terminal.
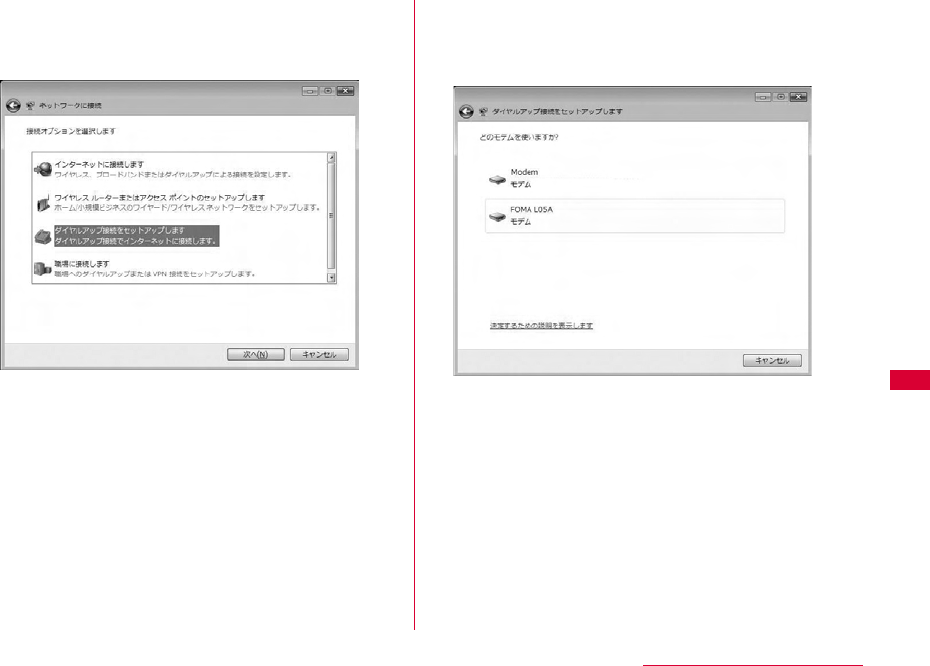
93
Configuring Network Manually
cSelect "ダイヤルアップ接続をセットアップします
(Set up dial-up connection)" Click "次へ
(Next)"
dWhen the modem selection screen appears,
click "FOMA L05A"
The modem selection screen opens only when the PC has
more than one modem.
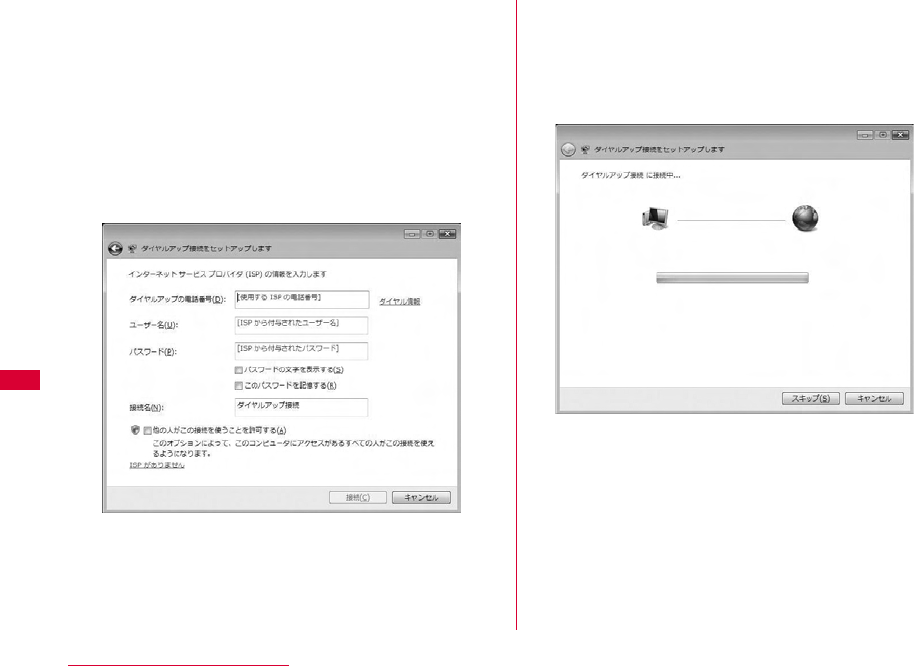
94 Configuring Network Manually
eConfigure various settings, then click "接続
(Connect)"
• Enter the APN number in the "ダイヤルアップの電話番号
(Phone number to a dial-up connection)".
•Enter the user name and password specified by your ISP or
network administrator in the "ユーザー名(User name)" and "
パスワード(Password)" fields.
•You can leave the user name and password fields unfilled
when connecting to 「mopera U」/「mopera」.
•Enter a connection name in the "接続名 (Connection Name)"
field.
fClick "スキップ(Skip)" on the "(接続名)に接続中...
(Connecting to (APN))" screen
The connection test will not be performed. Only the settings
will be checked.
•If you do not click "スキップ(Skip)", the connection to the
Internet will be established.
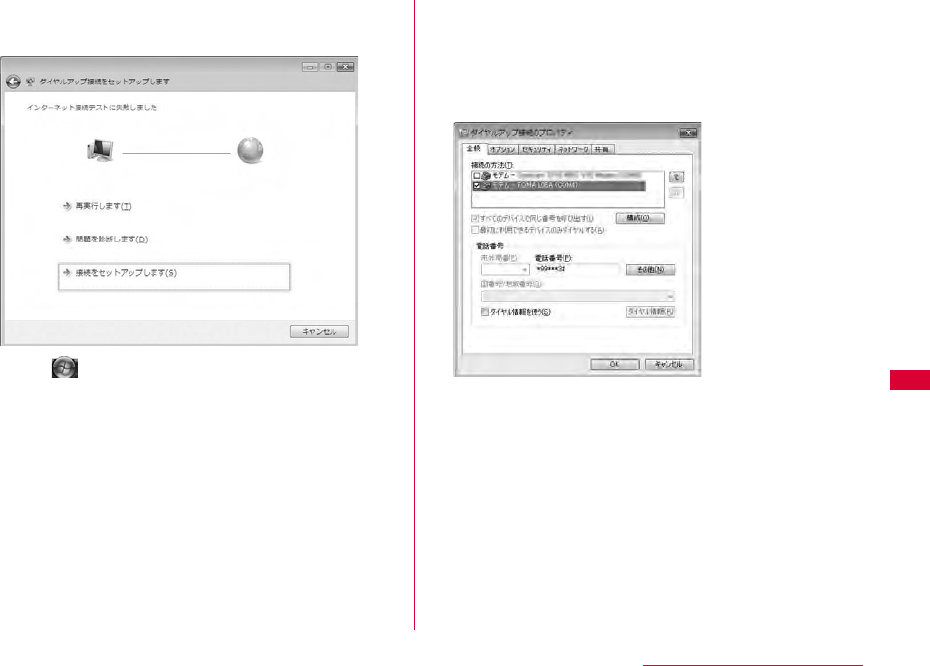
95
Configuring Network Manually
gClick "接続をセットアップします(Set up the
connection)" "閉じる(Close)"
hClick "スタート(Start)" "接続先
(Connection)"
iSelect the created dial-up connection icon
Right click "プロパティ (Properties)"
jCheck the settings on the "全般(General)" tab
window
If two or more modems are connected to a PC, enable only "
モデム - FOMA L05A (Modem - FOMA L05A)" in the "接続方法
(Connection Method)" field.
•Disable "ダイヤル情報を使う(Use dialing information)".

96 Configuring Network Manually
kClick "ネットワーク(Networking)" tab
Configure each setting
Place a checkmark next to the "インターネッ トプロトコルバー
ジョン4 (TCP/IPv4) (Internet Protocol 4 (TCP/IPv4))"
checkbox in the "この接続は次の項目を使用します(This
connection uses the following items)" field. Obtain the
settings for "QoSパケットスケジューラ(QoS Packet
Scheduler)" from your ISP or network administrator.
•To set up TCP/IP, click "プロパティ (Properties)". Contact
your ISP or network administrator for setting up.
lClick the "オプション(Option)" tab Click
"PPP設定(PPP Settings)"
mRemove checkmarks from all items Click
"OK"
nOn the "オプション(Option)" tab window, click
"OK"
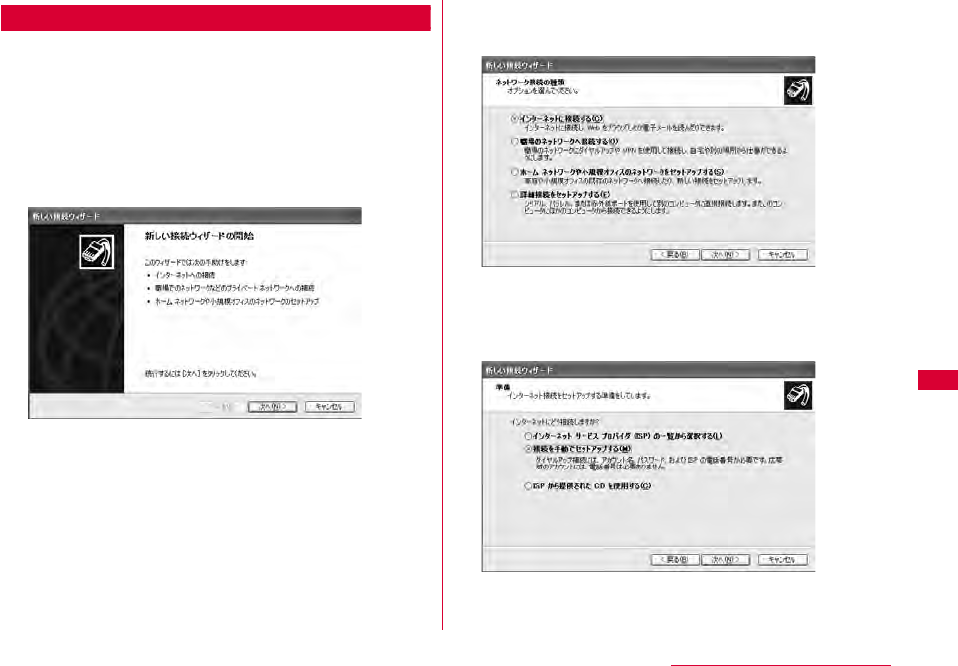
97
Configuring Network Manually
For Windows XP
aClick "スタート(Start)" "すべてのプログラム
(All programs)" "アクセサリ (Accessories)"
"通信(Communication)" "新しい接続ウィザー
ド(New Connection Wizard)"
bOn the New connection wizard screen, click "
次へ(Next)"
cSelect "インターネットに接続する(Connect to
the Internet)" Click "次へ(Next)"
dSelect "接続を手動でセットアップする(Set up
the connection manually)" Click "次へ
(Next)"
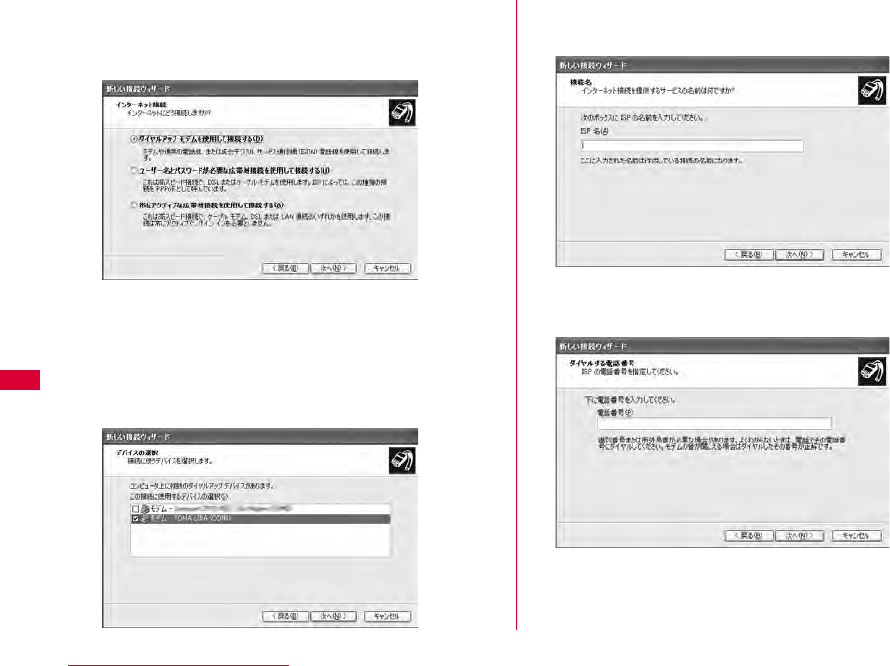
98 Configuring Network Manually
eSelect "ダイヤルアップモデムを使用して接続する
(Use a dial-up modem to connect)" Click "次
へ(Next)"
fIf "デバイスの選択(Select a device)" screen
appears, check in "モデム - FOMA L05A
(COM4) (Modem - FOMA L05A(COM4))"
checkbox Click "次へ(Next)"
The "デバイスの選択(Select a device)" screen appears only
when the PC has more than one modem.
gEnter a name in the "ISP名(ISP Name)"field
Click "次へ(Next)"
hEnter the APN phone number in the "電話番号
(Phone Number)" field Click " 次へ (Next)"
■For packet communication
Enter "*99***<cid>#". Enter the registered number of
APN in <cid>. (P73)
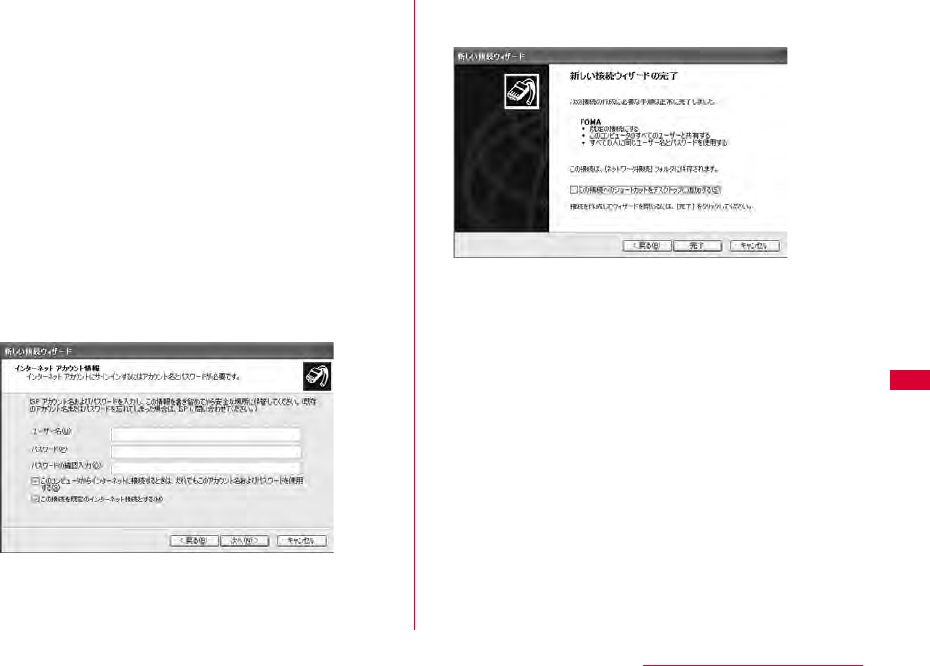
99
Configuring Network Manually
iSelect the connection usage range Click "
次へ(Next)"
Select a user.
• Depending on the PC settings, this screen may not
appear.
jFill in the "ユーザー名(User Name)", "パスワード
(Password)", and "パスワードの確認入力
(Confirm password)" fields Click "次へ
(Next)"
Enter the information provided by your ISP or network
administrator.
•Enter "ユーザ名(User name)" and "パスワード (Password)"
correctly according to the instruction from the provider.
Pay attention to the capital characters.
•To connect to 「mopera U」 or 「mopera」, these fields can
be left unfilled.
kClick "完了(Finish)"
The new connection wizard appears.
lClick "スタート(Start)" "すべてのプログラム
(All programs)" "アクセサリ(Accessories)"
"通信(Communication)" "ネットワーク接続
(Network Connection)"
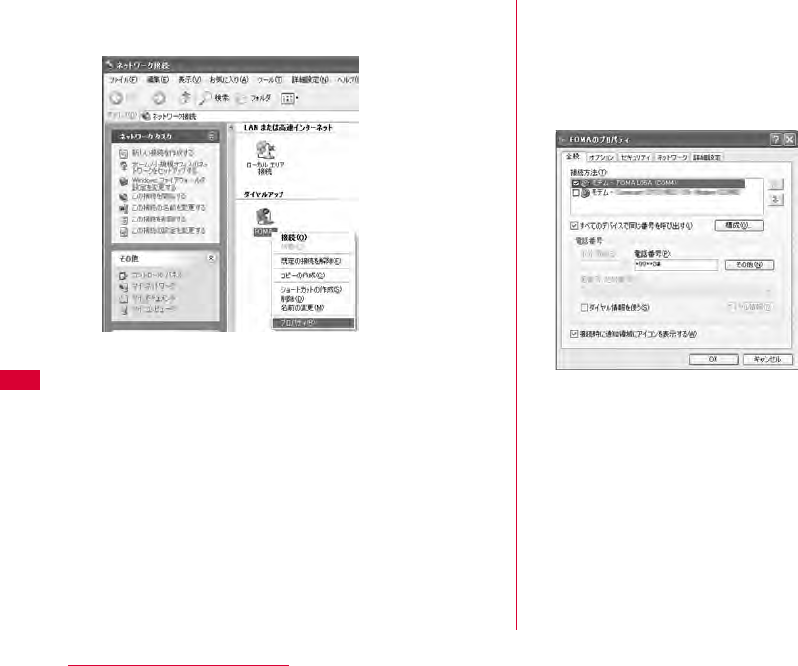
100 Configuring Network Manually
mSelect the created dial-up connection icon
Right click Click "プロパティ(Properties)" nCheck the settings on the "全般(General)" tab
window
•If more than one modem is connected to a PC, enable only
"モデム - FOMA L05A (COM4) (Modem - FOMA L05A
(COM4))" in the "接続方法 (Connection Method)" field.
•Disable "ダイヤル情報を使う(Use dialing information)".
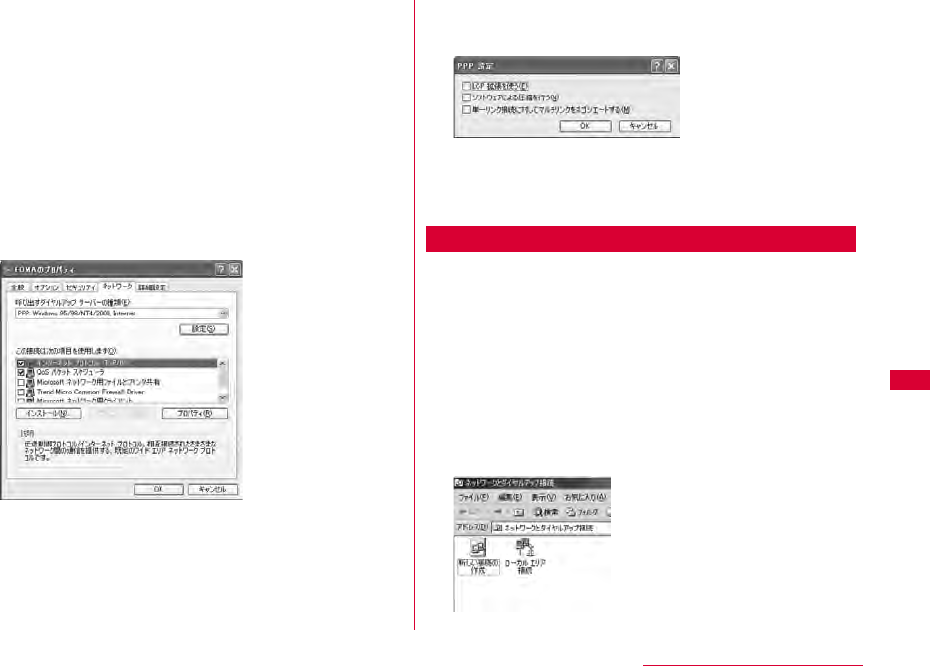
101
Configuring Network Manually
oClick the "ネットワーク(Networking)"
tabConfirm each itemClick "設定
(Settings)"
•Select "PPP:Windows 95/98/NT4/2000, Internet" in the "
呼び出すダイヤルアップ サーバ ーの種類(Dial-up server type to
call)" field
•Enable "インターネットプロトコル(Internet Protocol) (TCP/
IP)" in the "この接続は次の項目を使用します(This connection
uses the following items)" field. You cannot change the
settings of "Qosパケットスケジューラ (QoS Packet
Scheduler)". Use it as usual.
•When connecting to provider, to confirm the TCP/IP
setting contact the provider or network administrator.
pClick "設定(Settings)"
qRemove checkmarks from all items Click
"OK"
rclick "OK" on the "ネットワーク(Networking)"
tab window
For Windows 2000
aClick "スタート(Start)" "プログラム
(Programs)" "アクセサリ(Accessories)" "
通信(Communication)" "ネットワークとダイヤ
ルアップ接続(Network and Dialup
Connections)"
bOn the Network and Dial-up connection
screen, double-click the"新しい接続の作成
(Create new connection)" icon
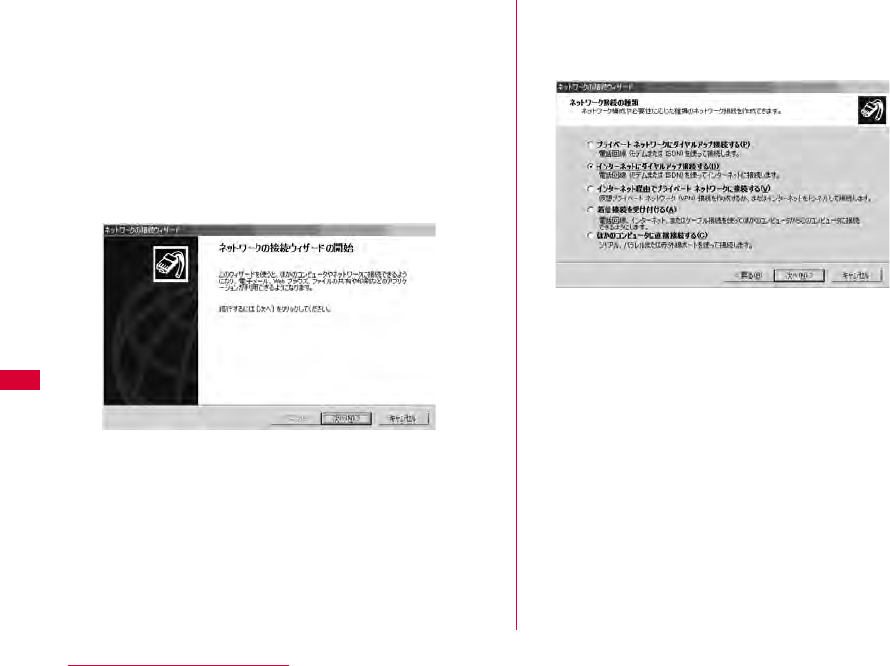
102 Configuring Network Manually
cIf the location information screen appears,
enter "市外局番(City code)" Click "OK"
This appears only when "新しい接続の作成 (Create new
connection)" is launched for the first time. Go to Step 5 when
launching this for the second time or later.
dOn the phone and modem option screen, click
"OK"
eOn the Network connection wizard screen,
click "次へ(Next)"
fSelect "インターネットにダイヤルアップ接続する
(Connect to Internet via dial-up)" Click "次へ
(Next)"
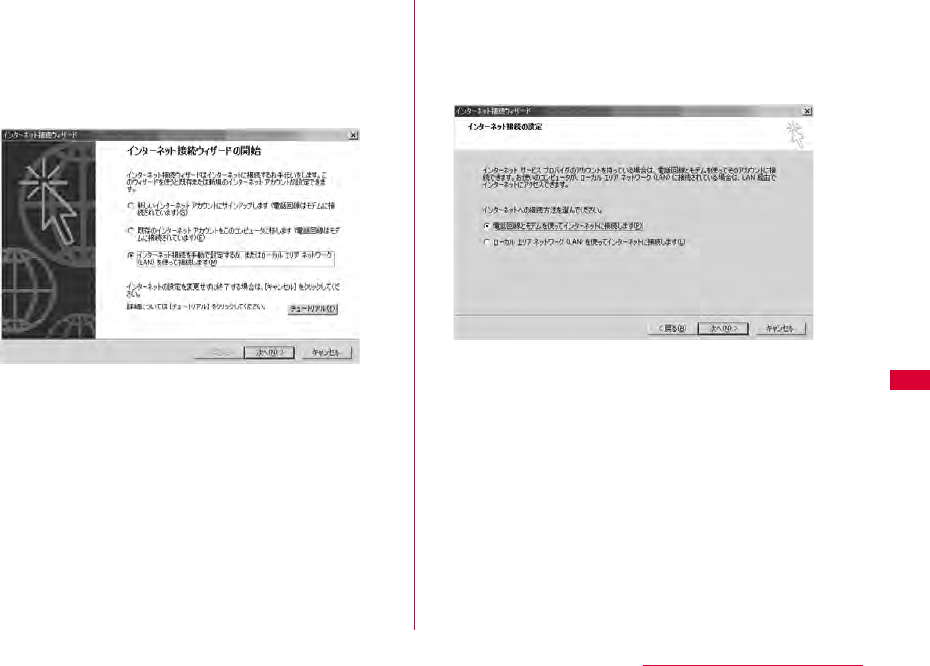
103
Configuring Network Manually
gSelect "インターネット接続を手動で設定するか、ま
たはローカルエリアネットワーク(LAN)を使って接
続します(Set up the Internet connection
manually, or connect to the Internet using
LAN)" Click "次へ(Next)"
hSelect "電話回線とモデムを使ってインターネット
に接続します(Connect to the Internet using a
telephone line and a modem)" Click "次へ
(Next)"
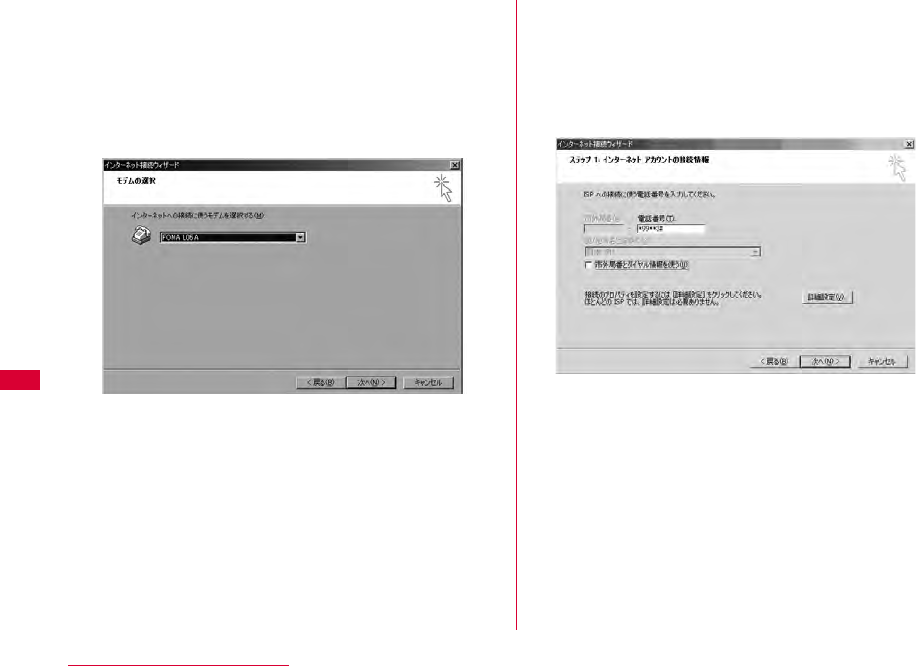
104 Configuring Network Manually
iIf the modem selection screen opens, select
"FOMA L05A" Click "次へ (Next)"
The modem selection screen opens only when the PC has
more than one modem.
•If "FOMA L05A" is not displayed, click "インターネットへの接
続に使うモデムを選択する (Select the modem used to
connect to the Internet)" field and then select "FOMA
L05A".
jEnter the APN phone number in the "電話番号
(Phone Number)" field Click "詳細設定
(Advanced settings)"
•Do not enter anything in "市外局番(City code)" field
•Disable "市外局番とダイヤル情報を使う(Use the city code and
dialing information)".
■Packet communication information
Enter "*99***<cid>#". Enter registration number of
APN in <cid>.
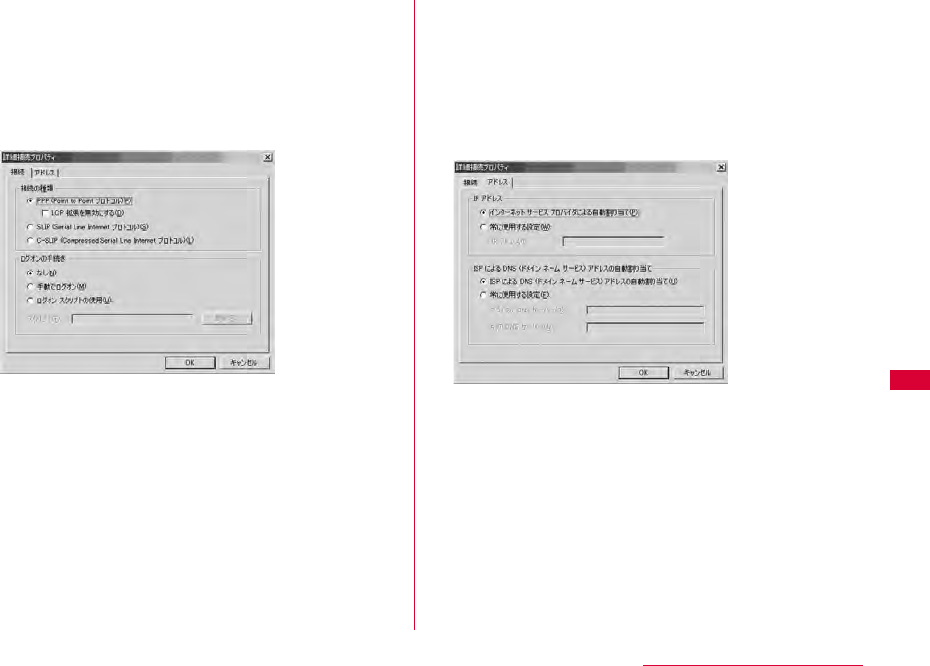
105
Configuring Network Manually
kConfigure the settings on the "接続
(Connection)" tab window according to the
examples on the screen.
•If you are connecting to other than「mopera U」 or
「mopera」, fill in the "接続の種類 (Connection type)" and " ロ
グオンの手続き (Log on procedures)" fields according to the
information provided by your ISP or network administrator.
lClick the "アドレス(Address)" tabSet each
itemClick "OK"
•If you are connecting to other than 「mopera U」 or
「mopera」, fill in the "IPアドレス (IP address)" and "ISPによ
るDNS (ドメインネームサービス) アドレスの自動割り当て
(Assign DNS address automatically by ISP)" fields
according to the information provided by your ISP, and
follow the instruction from provider.
mOn the "インターネットアカウントの接続情報
(Internet account connection information)"
screen, click "次へ(Next)"
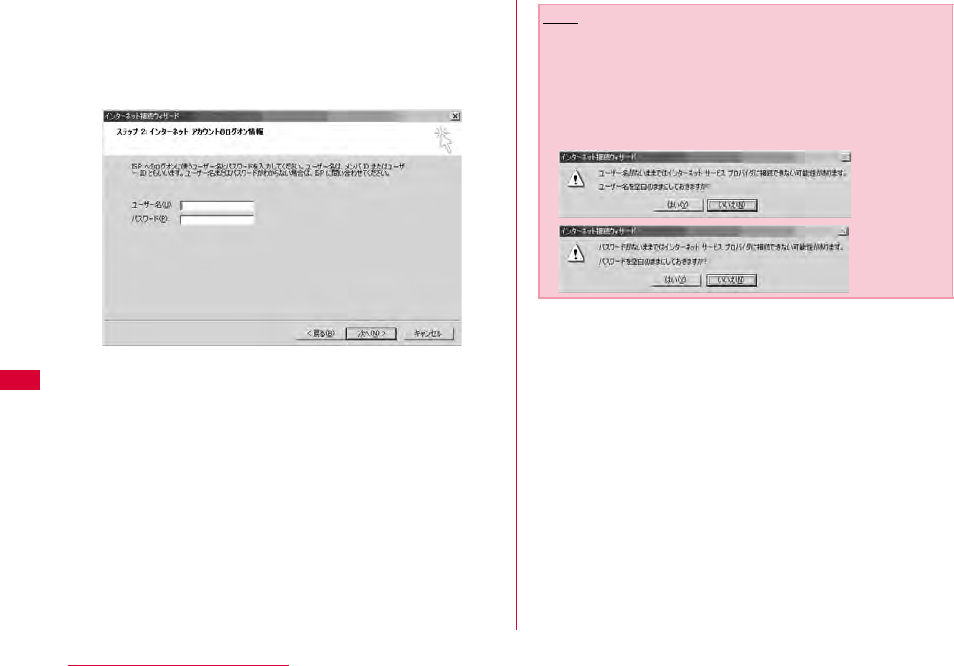
106 Configuring Network Manually
nEnter "ユーザー名(User Name)" and "パスワード
(Password)" Click "次へ(Next)"
•Enter "ユーザ名(User name)」 and "パスワード(Password)"
correctly according to the instruction from the provider.
Pay attention to the capital characters.
Note
•For 「mopera U」 or 「mopera」, connection is operated
even when "ユーザ名(User name)" field and "パスワード
(Password)" field are empty. The screen "ユーザ名を空白の
ままにしておきますか? (Is it OK to enter nothing in User
name?)" is displayed in this case. Click "はい(OK)" in each
screen.
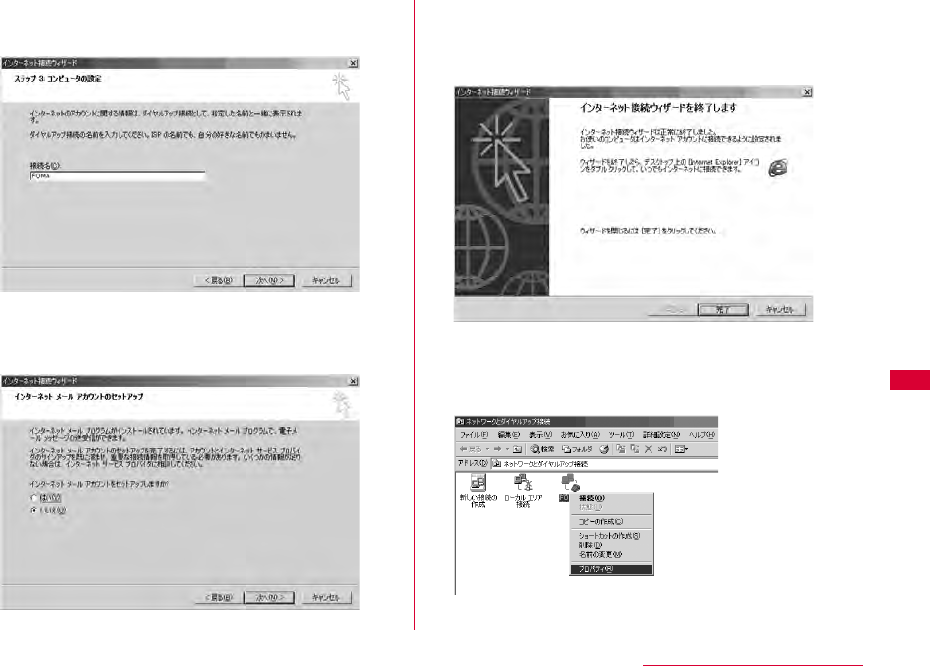
107
Configuring Network Manually
oEnter a connection name in the "接続名
(Connection Name)" field Click "次へ (Next)"
pSelect "いいえ(No)" Click "次へ(Next)"
•When setting Internet mail, select "はい(OK)". Contact the
provider for detailed information of setting.
qClick "完了(Finish)"
•If "今すぐインターネットに接続するにはここを選び完了をクリッ
クしてください(Select this to connect to the Internet now
and click Finish)" appears, disable the option.
rSelect the created dial-up connection icon
Click "ファイル(File)" "プロパティ
(Properties)"
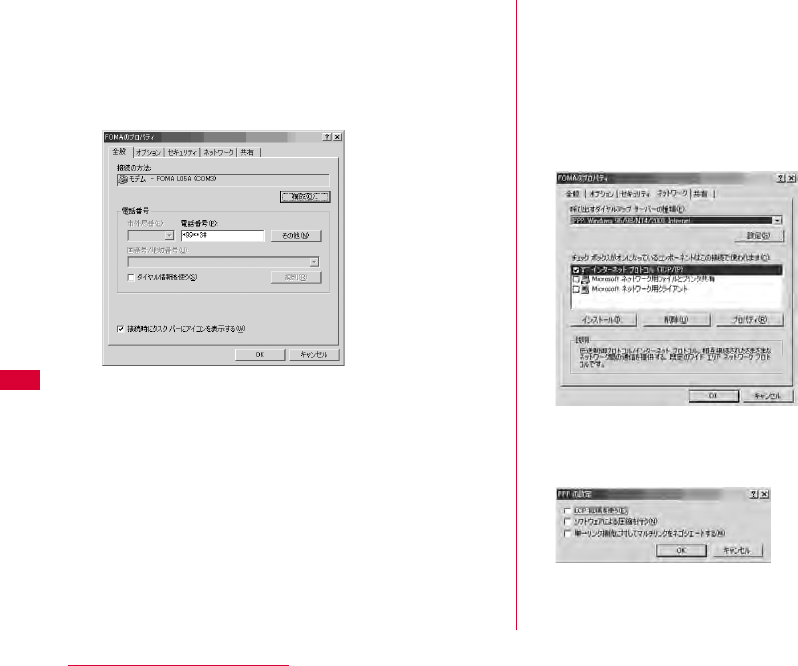
108 Configuring Network Manually
sCheck the settings on the "全般(General)" tab
window
•If more than one modem is connected to a PC, enable only
"モデム - FOMA L05A (COM3) (Modem - FOMA L05A
(COM3))" in the "接続の方法 (Connection Method)" field
•Disable "ダイヤル情報を使う(Use dialing information)".
tClick the "ネットワーク(Networking)"
tabConfirm each itemClick "設定
(Settings)"
•Select "PPP:Windows 95/98/NT4/2000, Internet" in the "
呼び出すダイヤルアップサーバーの種類(Dial-up server type to
call)" field.
•Enable only "インターネットプロトコル (Internet protocol)
(TCP/IP)" in the "コンポーネント(Components)" field.
uClick "設定(Settings)"
v
Remove checkmarks from all items
Click "OK"
wClick "OK" on the "ネットワーク(Networking)"
tab window
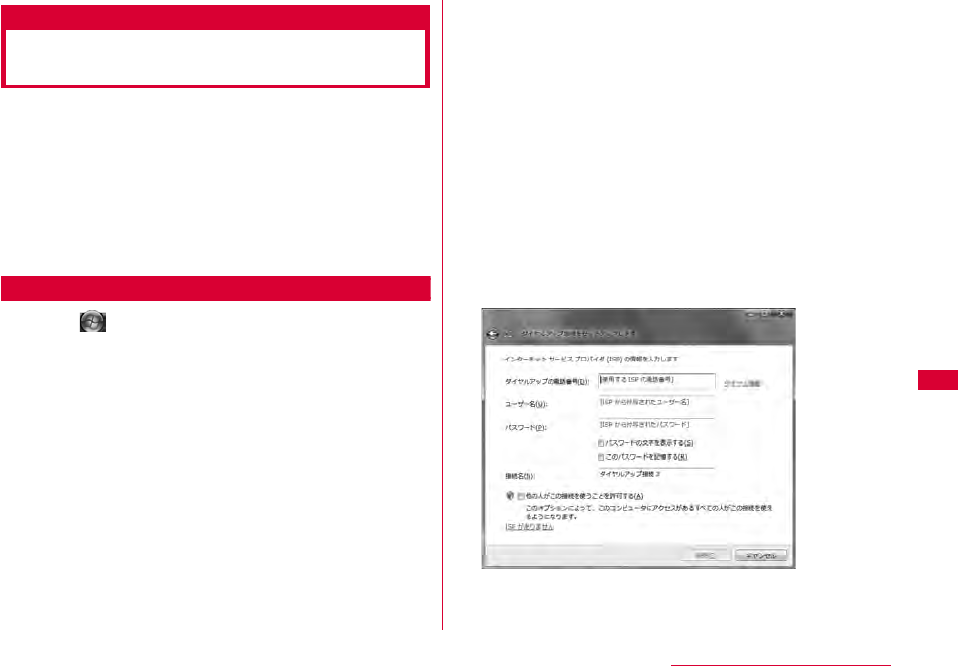
109
Configuring Network Manually
Communicating (Connecting by
Dial-up)
イヤルアップ接続する
This section describes steps to start and terminate
communication without using L-05A connection software
or DOCOMO connection manager.
•Check whether the FOMA terminal and the PC are connected
properly before starting communication.→P24
•When performing communication, connect the FOMA terminal
you used to configure the settings. If a different FOMA terminal
is connected, L-05A Communication Configuration Files
(Drivers) may need to be reinstalled.
For Windows Vista
aClick "スタート(Start)" "接続先 (Connect
to)" Select the access point that has been
set up Click "接続 (Connect)."
■For Windows XP
Click " スタート(Start)" "すべてのプログラム(All
programs)" "アクセサリ (Accessories)" "通信
(Communication)" "ネットワーク接続(Network
connection)" Double click the APN that has been
set up
■For Windows 2000
Click "スタート(Start)" "プログラム (Programs)" "ア
クセサリ(Accessories)" "通信(Communication)" "
ネットワークとダイヤルアップ接続(Network and Dialup
Connections)" Double-click the APN icon that has
been set up.
bEnter "ユーザー名(User Name)" and "パスワード
(Password)" Click "ダイヤル(Dial)"
The APN will be connected.
•To connect to 「mopera U」 or 「mopera」 , you can leave
the " ユーザー名(User Name)" and "パスワード(Password)"
fields unfilled and click "ダイヤル(Dial)". If another ISP or
dialup connection is selected, fill in the "ユーザー名(User
Name)" and "パスワード (Password)" fields and click "ダイヤ
ル (Dial)".
•You can save the user name and password or just the
password to skip entering them next time.
•Depending on the operating system, a connection
completion screen may appear when the dial-up
connection is established. However, the connection
completion screen does not appear if you previously set
the completion message not to appear.
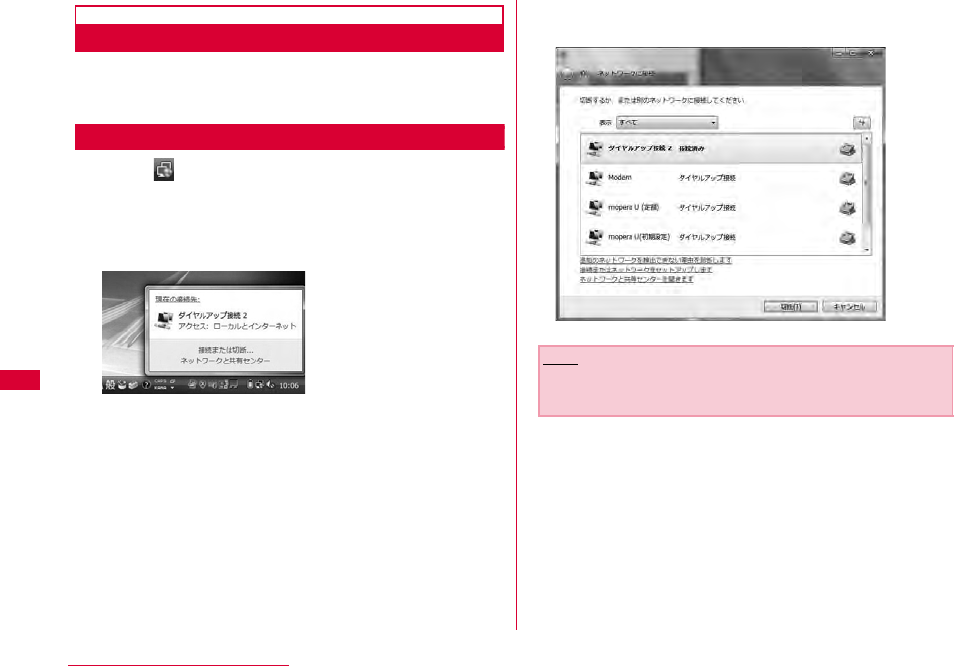
110 Configuring Network Manually
Disconnecting Communication
Exiting the Internet browser may not terminate the
connection. Perform the following steps to terminate the
connection securely.
For Windows Vista
aClick the dial-up icon in the task tray of
the PC
A screen indicating the connection status appears.
bClick "接続または切断(Connect or disconnect)"
■For Window XP/2000
The above screen will not be displayed. Follow the
next procedure.
cClick "切断(Disconnect)"
The communication will be terminated.
Note
•The communication speed shown on the PC screen may
be different from the actual communication speed.

111
Overseas Use
International Roaming Service (WORLD WING) ・・ 112
Services Available Overseas ・・・・・・・・・・・・・・・・・・・・ 112
Before Using Overseas ・・・・・・・・・・・・・・・・・・・・・・・・・・ 113
Setting the Searching Method for Available
Networks ・・・・・・・・・・・・・・・・・・・・・・・・・・・・・・・・・・・・・・ 115
Configuring Network・・・・・・・・・・・・・・・・・・・・・・・・・・・ 116
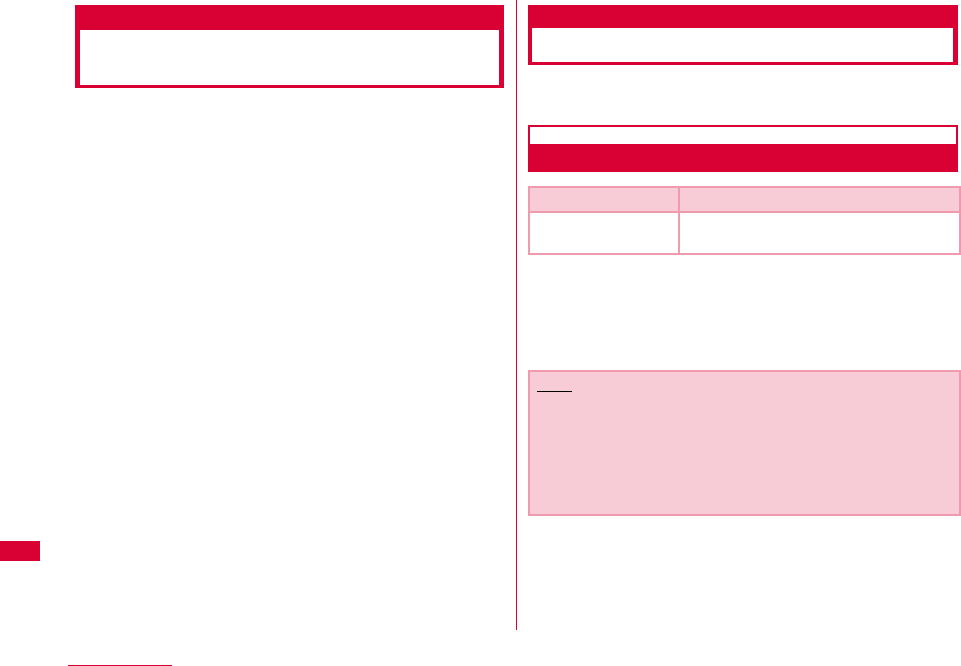
112 Overseas Use
International Roaming Service
(WORLD WING)
WORLD WING is DOCOMO's international roaming service
that provides telephone and other types of communication
services overseas out of the service area of FOMA
network, using affiliated overseas network.
•The following 3 types of communication are included in
overseas network.
■3G network
A third generation mobile communication network
complying with 3GPP Global standards. (3rd Generation
Partnership Project)※
※ The local satandardization organization established for
the development of common technical specifications
related to 3rd Generation Mobile Communication Systems
(IMT-2000)
■GSM (Global System for Mobile Communication) network
The second generation mobile communication network in
a digital communication system that is most widely used
around the world.
■GPRS (3General Packet Radio Service) network
GPRS is the 2.5 generation mobile communication
system that enables high speed packet communication
using GSM.
•It is available to use 3G network or GSM/GPRS network service
within service area. For countries/areas support 3G850MHz/
GSM850MHz, it is also available to use.
•Before using the FOMA terminal overseas, refer to the
followings.
- "Mobile Phone User's Guide [International Services]"
- DOCOMO "International Service Web site"
Services Available Overseas
Available communication services may vary depending on
the overseas carrier or network.
Available Communication Services
※ Sending and receiving SMS may be available in overseas.
Please understand that communication fee is counted
when sending SMS.
※ Packet communication is not available for GSM network
communication type.
Service Description
Data
Communication
Available for data communication using
packets communication.
Note
•For details on available communication services while
using international roaming, refer to Mobile Phone User's
Guide [International Services] or visit DOCOMO
"International Service Web site".
•Voice call or video telephony features are not supported by
L-05A.
113
Overseas Use
Before Using Overseas
STEP1:Before Leaving Japan
STEP2:While Overseas
STEP3:After Coming Back to Japan
Before Leaving Japan
Before using the FOMA terminal overseas, refer to the
followings.
•"Mobile Phone User's Guide [International Services]"
•"Mobile Phone User's Guide [Network Services]"
•DOCOMO "International Service Web site"
■ Subscription
•
If you subscribed to the FOMA service after September 1,
2005, no separate subscription is required to use ″WORLD
WING″. If you subscribed to the FOMA service on or before
August 31, 2005 and have not subscribed to ″WORLD
WING″, a separate subscription is required to use it.
•A FOMA card (green/White) made available for WORLD
WING must be inserted in the FOMA terminal.
■ Power source and voltage in the country or region of
stay
•Countries and regions may have different power sources,
voltages or power outlet shapes. Check these in the
instruction manual for your PC or web sites of the PC
manufacturer in advance.
■ Network setup
•You can change network setup from overseas.→P116
■ Internet access
•For overseas access points or settings for using the
Internet overseas, contact your Internet service provider.
•If you subscribe to mopera U, visit the mopera U web site.
http://www.mopera.net/ (Japanese only)
While Overseas
■ Switching networks
Searching for and connecting to an access point are
performed automatically by default. No special settings
are required.
■ Main screen display area
The name of the connected carrier can be viewed in the
display area of the Main screen.→P116
Inquries overseas
If your FOMA card (green/white) is lost or stolen overseas,
contact DOCOMO immediately and temporarily suspend
your subscription. For inquiry information, see "docomo
Information Center" on the back of this manual. Call or data
communication charge will still on you after the terminal
was lost or stolen.
Note
•You can manually switch networks if you want to connect
to a particular network. See procedure 3 of "ネットワークを
設定する (Configuring Networks)" (P116)
差替え予定
114 Overseas Use
■ Country Codes for Major Countries
※ For country code or detailed information, refer to "Mobile
Phone User's Guide [International Services]" or DOCOMO
"International Service Web site".
■ International Access Codes for Major Countries (Table 1)
※ For codes of other countries or details, visit DOCOMO
"International Service Web site".
Area Code Area Code
U.S.A 1 Germany 49
U.K. 44 Turkey 90
Italy 39 Japan 81
India 91 New Caledonia 687
Indonesia 62 New Zealand 64
Egypt 20 Norway 47
Australia 61 Hungary 36
Austria 43 Fiji 679
Netherlands 31 Philippines 63
Canada 1 Finland 358
Korea 82 France 33
Greece 30 Brazil 55
Singapore 65 Vietnam 84
Switzerland 41 Peru 51
Sweden 46 Belgium 32
Spain 34 Hong Kong 852
Thailand 66 Macau 853
Taiwan 886 Malaysia 60
Tahiti 689 Maldives 960
Czech 420 Russia 7
China 86
Area Code Area Code
Ireland 00 Germany 00
U.S.A. 011 Turkey 00
U.A.E. 00 New Zealand 00
U.K. 00 Norway 00
Italy 00 Hungary 00
India 00 Philippines 00
Indonesia 001 Finland 00
Australia 0011 France 00
Netherlands 00 Brazil 0021
Canada 011 0014
Korea 001 Vietnam 00
Greece 00 Belgium 00
Singapore 001 Poland 00
Switzerland 00 Portugal 00
Sweden 00 Hong Kong 001
Spain 00 Macau 00
Thailand 001 Malaysia 00
Taiwan 002 Monaco 00
Czech 00 Luxembourg 00
China 00 Russia 810
Denmark 00
115
Overseas Use
■ International Phone Codes for Universal Number(Table 2)
※ For codes of other countries or details, visit DOCOMO
"International Service Web site".
After Coming Back to Japan
After coming back to Japan, the FOMA network will be
connected automatically.
■ If connection can not be established
Set to "自動検索(Auto)" from "ネットワーク検索(Search
Network )" of "ネットワークを設定する(Configuring network)"
(P116)
Setting the Searching Method
for Available Networks
Switching Carriers Manually
The FOMA terminal is set to automatically find and switch
to an available network in the country of stay by default.
However, if you have a preferred network in the area or
network cannot be found automatically, you can set to a
network manually. For details, see "Configuring Networks"
(P116).
Area Code Area Code
Ireland 00 Taiwan 00
U.S.A. 011 China 00
Argentina 00 Denmark 00
U.K. 00 Germany 00
Israel 014 New Zealand 00
Italy 00 Norway 00
Australia 0011 Hungary 00
Austria 00 Philippines 00
Netherlands 00 Finland 990
Canada 011 France 00
Korea 001 Brazil 0021
Colombia 009 Belgium 00
Singapore 001 Portugal 00
Switzerland 00 Hong Kong 001
Sweden 00 Malaysia 00
Spain 00 South Africa 09
Thailand 001 Luxembourg 00
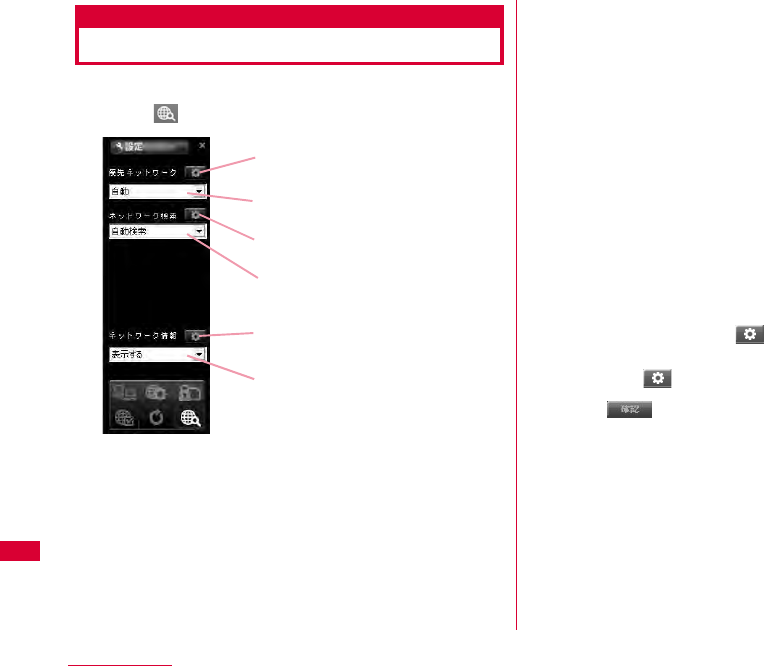
116 Overseas Use
Configuring Network
•Allow you to configure network by L-05A connection software.
aClick from the application option screen
bSpecify a "優先ネットワーク(Prior network)"
(Network priority order selection setting)
cSearching network
■自動検索(Auto)
Network can be searched automatically.
■手動検索(Manual)
Connect to the listed networks manually.
※ If network search mode is set to "manual" overseas,
reset to "Auto" after coming back to Japan.
dSpecify if display or hide the network
information
■表示する(Display)
The name of the network receiving current service is
displayed on the screen.
■表示しない(Hide)
The name of the network receiving current service is
not displayed on the screen.
eClick the applicable
•The information entered will not be set without clicking the
applicable
fClick
適用 (Application)
優先ネットワーク (Prior network)
ネットワーク検索
(Network Search)
適用 (Application)
適用 (Application)
ネットワーク情報
(Network Information)
117
Overseas Use
Note
•How to manually configure network
- Select "手動選択(Manual)"
- The available network list will be displayed after
searching.
- Select one from the available networks.
- Click
•Network is not displayed in FOMA area when even if
"display" is set in network information.
•Connecting to Internet or sending SMS may not be able to
operate properly when network setting is changed
manually.
•While using Oversea→P111
- When you are in roaming area and set FOMA terminal to
automatically find and you can have automatic roaming
service. If network can not be found automatically,
select the available network service manually.
- Some communication services may not available
depending on the overseas carrier or network.


119
Appendix/Troubleshooting
AT Commands ・・・・・・・・・・・・・・・・・・・・・・・・・・・・・・・・・・・ 120
AT Command List・・・・・・・・・・・・・・・・・・・・・・・・・・・・・・・・ 121
Troubleshooting ・・・・・・・・・・・・・・・・・・・・・・・・・・・・・・・・・ 130
Error Messages・・・・・・・・・・・・・・・・・・・・・・・・・・・・・・・・・・ 132
Warranty and After-Sales Service ・・・・・・・・・・・・・・・ 134
Updating software ・・・・・・・・・・・・・・・・・・・・・・・・・・・・・・・ 135
Main specifications ・・・・・・・・・・・・・・・・・・・・・・・・・・・・・・ 136
Export Controls of the Product and Accessories ・・・ 137
Intellectual Property Rights ・・・・・・・・・・・・・・・・・・・・・ 139
Index ・・・・・・・・・・・・・・・・・・・・・・・・・・・・・・・・・・・・・・・・・・・・・ 141
120 Appendix/Troubleshooting
AT Commands
AT commands are used to check the FOMA terminal
function settings or status by using a PC. Usually, the
communication software issues AT commands so you do
not need to be concerned about them. Use AT commands if
you want to control the FOMA terminal in your own way.
Form of AT Commands
AT commands should be entered on the Terminal Mode
screen of the communication software. Use only single-
byte alphanumeric characters.
<Example>
•An AT command must be entered on a single line including
parameters (numbers and symbols) following the command. On
the Terminal Mode screen of the communication software,"one
line" is from the first character to the character before .
Note
•In the Terminal mode, a PC functions as a communication
terminal. Characters entered from the keyboard are sent to
a line connected to a communication port.
A
TD * 99 *** 3#
Hard Return
Parameter: Content
Command Name
121
Appendix/Troubleshooting
AT Command List
The following AT commands can be used on the ″L-05A″modem port.
•[&F]:A command to initialize settings used as AT&F command.
•[?][=?]:The current settings appear when adding″?″at the end of the command, and the effective range of the current
settings appears when adding″=?″at the end of the command.
Command Overview Parameters/Description Comments
Examples
AT&C<n> Select the operating conditions of the
circuit CD for DTE
n=0: Always keeps CD singal ON
n=1 (default): CD changes depending
on the other party's modem status.
AT&C1
OK
AT&F<n> Reset the FOMA terminal AT command
set values to factory defaults If
executed during a communication, the
line is disconnected.
Only n=0 can be set (Skippable) -
AT+CGDCONT [?] [=?] Set APN when sending Packet
communication.
Refer to P128 Refer to P128
AT+CGEQMIN [?] [=?] Register criteria value for determining if
QoS (Quality of Service) sent from
network when PPP Packet
communication is established, is
acceptable or not.
Refer to P128 Refer to P128
AT+CGEQREQ [?] [=?] Set QoS(Quality of Service) to request
for the network when PPP Packet
communication is established.
Refer to P128 Refer to P128
AT+CGMR Display the version of the AT+CGMR
FOMA terminal.
- AT+CGMR
1234567890123
456
OK
122 Appendix/Troubleshooting
AT+CGREG=<n>
[&F]
[?] [=?]
Set whether to be notified of the
network registration status.
<n>
n=0(default): Do not note.
n=1: Notify when outside and inside the
service area is changed.
Execute「AT+CGREG?」
then appears as
「+CGREG:<n>,<state>」
<state>
0:Not registered
1:Registered Home Network
4: Unknown
5: Registered (while roaming)
AT+CGREG?
+CGREG: 0,1
OK
AT+CGREG=?
+CGREG: (0-2)
OK
AT+CGSN Display the serial number of the FOMA
terminal.
- AT+CGSN
12345678901
2345
OK
AT+CMEE=<n>
[&F]
[?] [=?]
Set the error report form of the FOMA
terminal.
n=0: Display「ERROR」
n=1: Display in the form of 「+CMEE
ERROR: xxxx」(where xxxx are
numbers)
n=2(default): Display in the form of
「+CMEE ERROR: xxxx」(where xxxx
are text)
※ If using ATZ or AT&F command to
default, "0" is setup.
Note that when connecting L-05A to
power, the value of ATZ or AT&F
command differs.
AT+CMEE=0
OK
AT+CMEE?
+CMEE: 0
OK
AT+CMEE=?
+CMEE: (0, 1, 2)
OK
Command Overview Parameters/Description Comments
Examples

123
Appendix/Troubleshooting
AT+ CNUM Display the own number of the FOMA
terminal
Executing「AT+CNUM」displays in the
form of「+CNUM: <number>, <type>」
number: phone number
type=129: Excluding the international
access code+
type=145: Including the international
access code+
AT+CNUM
+CNUM:,″
09080189242″
,129
OK
AT+COPS=
〔<mode>〔,<format>
〔,<oper>〔,<stat>
〕〕〕〕
[?] [=?]
Select and set carrier's name/Plmn
Number.
<mode>
0:Auto (Searching network
automatically and then change
communication service)
1:Manual(to connect <oper>
communication service)
2:Disconnection communication
service
※Not supported
3:Mapping don't excute.
4:Auto manual(In case, to disconnect
<oper>communication service that
excute automatically)
※Not supported
<format>
2:Fixed number
<oper> represents country code(MCC)
plus network code(MNC).
“ 44010”is displayed for MCC=440
and MNC=10
AT+COPS?
+COPS: 0,0,””,2
OK
AT+COPS=?
+COPS:(2,””,””
,”44010”,2),
(3,””,””,”
44020”,2),,
(0,1,2,3,4),
(0,1,2)
OK
Command Overview Parameters/Description Comments
Examples

124 Appendix/Troubleshooting
AT+CPAS
[=?]
Display FOMA terminal state Displays in the form of「+CPAS : <n>」.
n=0: Available to set AT commands.
n=3: Available and receiving
n=4: Available and receiving
AT+CPAS
+CPAS:0
OK
AT+CPAS=?
+CPAS :(0,3,4)
OK
AT+CPIN=″PIN″/
AT+CPIN=″PUK″
″PIN″
[?]
Command to enter the PIN code or
unblocking PIN code for FOMA card.
Enter the PIN1 code for ″PIN″, and
enter unblocking PIN code for ″PUK″.
Executing「AT+CPIN?」displays
「+CPIN: <n>」.
n=READY: Authenticated
n=SIM PIN: Waiting for entry
n=SIM PUK: Waiting for
unblocking PIN1 code entry
n=ERROR: Locked
(+CPIN:SIM PIN
status) AT+CPIN=
″1234″
OK
(+CPIN:SIM PUK
status) AT+CPIN=
″
12345678″,″
1234″
OK
AT+CUSD
[&F]
Inquire the change or setting contents
of Internet configuration related to the
extra service.
Form : AT+CUSD=<n>,"<str>"[,0]
n=0 : middle result
Do not send <m>[<str>,<dcs>]
(default)
n=1 : middle result
Send <m>[<str>,<dcs>]
Middle result :
m=0 : setting finishes
m=1 : information requirement from
network exists.
str :0∼9、#、*のみ使用可能。
<str>は""で囲む
AT+CUSD=0,
"xxxxxxxxx"
OK
AT+CUSD=1,"*
148*1*
0000#",0
+CUSD:0,"148*
7#",0
OK
AT+CUSD=?
+CUSD: 0
OK
AT+CUSD=?
+CUSD:(0-2)
OK
Command Overview Parameters/Description Comments
Examples
125
Appendix/Troubleshooting
AT*DANTE Display the signal strength (number of
antenna bars) of the FOMA terminal.
Result format:
*DANTE:<m>
m=0 :Out of the service area
m=1 : State of 0 or 1 antenna bar
displayed
m=2 : State of 2 antenna bars displayed
m=3 : State of 3 antenna bars displayed
AT*DANTE
*DANTE:3
OK
AT+GCAP Display the capability list of the FOMA
terminal.
- AT+GCAP
+GCAP:
+CGSM,+DS,+ES
OK
AT+GMI Display the manufacturer of the FOMA
terminal.
-AT+GMI
LG Electronics Inc.
OK
AT+GMM Display the name of the FOMA terminal. - AT+GMM
FOMA L05A
OK
AT+GMR Display the s/w version of the FOMA
terminal.
-AT+GMR
L05A-01-Vxxx-
440-10
OK
Command Overview Parameters/Description Comments
Examples
126 Appendix/Troubleshooting
AT+IFC=<n>,<m>
[&F]
[?] [=?]
Set the local flow control method
between the PC and the FOMA terminal.
n : DCE by DTE control
n=0 : No flow control.
n=1 : Perform XON/XOFF control.
n=2 (default): Perform RS/CS (RTS/
CTS) flow control.
m : DTE by DCE control.
m=0 : Perform No flow control.
m=1: XON/XOFF control.
m=2(default) : Perform RS/CS (RTS/
CTS) flow control
AT+IFC=2, 2
OK
AT+IFC?
+IFC: 2,2
OK
AT+WS46=<n>
[&F]
[?] [=?]
Set the wireless network to be used by
the FOMA terminal when dialing.
12: GSM
22: 3G (WCDMA)
25: GSM+3G (WCDMA)
AT+WS46?
25
OK
A/ Retry a command just before performing is not needed after entering
command.
A/
OK
ATD Sending packet Sending packet:ATD*99***
<cid>#
<cid>1∼10: +
Display the APN that configured
+CGDCONT
ATD*99***3#
CONNECT
7200000
ATE<n>
[&F]
Set whether to echo back the text sent
from a PC.
n=0 : Not echo back.
n=1(default) : Echo back.
ATE1
OK
ATI<n> Display the recognition code n=0 : Display [NTT DOCOMO]
n=1 : Display the name of the FOMA
terminal(Same as +GMM)
n=2 : Display the FOMA terminal version
(same as +GMR)
n=3 : Display OK
n=4 : Display the details of
communication functions of the
FOMA terminal.
ATIO
NTT DoCoMo
OK
Command Overview Parameters/Description Comments
Examples
127
Appendix/Troubleshooting
ATS3=<n>
[&F] [?]
Set the return character (CR) to
recognize the end of AT command text
string.
n=13(default) : only n=13 can be
specified.
ATS3=13
OK
ATS4=<n>
[&F] [?]
Set the line feed (LF) character. It is
positioned next to the return character
(CR) if displaying the result code in
alphanumeric characters.
Only n=10 (default) can be specified. ATS4=10
OK
ATS5=<n>
[&F] [?]
Set the back space (BS) character to
delete the last character in the input
buffer while AT commands are entered.
Only n=8 (default) can be specified. ATS5=8
OK
ATV<n>
[&F]
Set the display method of the result
code.
n=0 :Display in numeric characters.
n=1(default): Display in text.
ATV1
OK
ATZ Reset the settings on the FOMA
terminal with the nonvolatile memory
contents. If performed during a
communication, the line is
disconnected.
-ATZ
OK
Command Overview Parameters/Description Comments
Examples

128 Appendix/Troubleshooting
Supplementary Explanation of AT
Commands
■ Command name:+CGDCONT
•Overview
Set APN when sending packet connection.
•Form
+CGDCONT=[<cid>[,″<PDP type>″[,″<APN>″]]]
•Parameter descriptions
Set the destination (APN) when sending packets. See
the following examples for command operations.
<cid>※1:1∼10
<PDP type>※2:PPP or IP
<APN>※3:Optional
※1 <cid> is the number used to control the destination
(APN) for the packet communication to be registered in
FOMA terminal. 1 to 10 can be registered. The default
value of <cid>=1 is 「mopera.ne.jp」 and <cid>=3 is
「mopera.net」. Set cid to 2 or a number between 4 and
10.
※2 <PDP type> is a protocol for packet communication.
※3 <APN> is optional string that indicates each destination.
•Command examples
Command to register an APN with the name of abc
(When PDP type is PPP, cid is 3)
AT+CGDCONT=2,″IP″,″abc″
OK
•Operations without a parameter
AT+CGDCONT=
:Clear all the settings of <cid>.
However, the setting of <cid>=1 or <cid>=3 is reset to
the value when purchasing.
AT+CGDCONT?:Display the current settings.
■ Command name: +CGEQMIN=[Parameter]
•Overview
Register the threshold to accept the QoS (Quality of
Service) sent from the network when packet
communication is established.
•Format
+CGEQMIN=<cid>[,,<Maximum bitrateUL>[,<Maximum
bitrate DL>]]]
•Parameter description
<cid>※1:1∼10
<Maximum bitrate UL>※2:None (default)
<Maximum bitrate DL>※2:None (default)
※1 <cid> is a number used to manage the access point
(APN) for the packet communication registered in the
FOMA terminal.
※2 <Maximum bitrate UL> and <Maximum bitrate
DL>indicate the minimum communication speed [kbps] of
upload and download traffic respectively between the
FOMA terminal and the base station. If these are set to
None (default), all speeds are permissible. Be aware that a
packet communication may not be established because
any other speed than this is not permissible.
•Command examples
(1) Command to permit all speeds for both upload and
download (When cid=2)
AT+CGEQMIN=2
OK
(2) Command to permit only 5,700kbps for upload and
7,232kbps for download (When cid=2)
AT+CGEQMIN=2,,5700,7232
OK
(3) Command to permit 5,700kbps for upload and all speeds
for download (When cid=2)
AT+CGEQMIN=2,,5700
OK
129
Appendix/Troubleshooting
(4) Command to permit all speeds for upload and only
7,232kbps for download (When cid=4)
AT+CGEQMIN=4,,,7232
OK
•Operations without a parameter
AT+CGEQMIN=:Reset all <cid> to their defaults.
AT+CGEQMIN=<cid>:Reset the specified <cid> to its
default.
■ Command name: +CGEQREQ=[Parameter]
•Overview
Set the QoS (Quality of Service) requested to the
network when packet communication is dialed.
•Format
+CGEQREQ=[<cid>[,,<Maximum bitrate UL>[,<Maximum
bitrate DL>]]]
•Parameter description
<cid>※1:1∼10
<Maximum bitrate UL>※2:None (default)
<Maximum bitrate DL>※2:None (default)
※1 <cid> is a number used to manage the access point
(APN) for the packet communication registered in the
FOMA terminal.
※2 <Maximum bitrate UL> and <Maximum bitrate
DL>indicate the minimum communication speed [kbps] of
upload and download traffic respectively between the
FOMA terminal and the base station. If these are set to
None (default), all speeds are permissible. Be aware that a
packet communication may not be established because
any other speed than this is not permissible.
•Command example
Command to require 5,700kbps for upload and
7,232kbps for download (When cid=2)
AT+CGEQREQ=2,2,5700,7232
OK
•Operations without a parameter
AT+CGEQREQ=:Reset all <cid> to their defaults
AT+CGEQREQ=<cid>:Set the specified <cid> as
default.
Result Codes
■ List of result codes
Note
•This command, (+CGDCONT, +CGEQMIN, + CGEQREQ) is
not reset by [&F] and [Z], either.
Numeric
display Text display Description
0 OK Operation performed properly
1 CONNECT Connected to other party
3 NO CARRIER Line disconnected
4 ERROR Unable to accept command
130 Appendix/Troubleshooting
Troubleshooting
First, check whether software is required to update.
Update software if necessary. (Updating Software⇒P135)
Contact General Inquiries specified by DOCOMO located in
"Repairs" at the last page of the manual if the symptom is
not improved after confirming the check box.
■ The FOMA terminal is not recognized
Symptom Check
FOMA terminal
is not
recognized
Reinsert the FOMA terminal all the way into
the USB port securely.
Verify the L-05A Communication
Configuration Files (Drivers) for the FOMA
terminal functioning properly.→P35, P42
Communication may fail and the FOMA
terminal cannot be properly recognized and
functioned, if the PC is started up or restarted
with the FOMA terminal FOMA terminal left
inserted in it. In this case, remove and reinsert
the FOMA terminal. If communication fails
even after the FOMA terminal is inserted
again, remove it once, restart the PC, then
insert the FOMA terminal into the PC again.
When connecting the FOMA terminal with a
USB port, if data communication is not
available without being recognzied, double
click the "DOCOMO" icon recognized as a CD
drive or start "L-05A connection software" or
"DOCOMO connection manager" to recognize
the FOMA terminal as a modem.
The FOMA card will not be able to use if PIN1
unlock code is wrongly entered 10 times in a
low. For further information, visit DOCOMO
shop.
131
Appendix/Troubleshooting
■ Communication problems
■ Problems with AT Commands
■ Other problems
Symptom Check
Communications
are not possible
Verify that signals are received in the
service area.
In the setting of Send Caller ID does not
conform to the provider's instructions,
communication may not be performed.→
P74, P90
Check if you set the FOMA Card Setting to
″PIN1 unblocking″.→P69
If set to (PIN1 Lock), launch the L-05A
connection software, then change FOMA
card setting to ″PIN1 unblocking″.→P71
Check the property settings of the modem
and the registration of the destination (APN)
Symptom Check
[ERROR]
appears when a
command is
entered
Verify that you entered a correct
ATcommand.
Check the properties of the terminal
software to see whether a device other than
the FOMA terminal is selected
[OK] does not
appear after an
AT command is
entered.
Check the L-05A Communication
Configuration Files (Drivers) have been
installed and functioned properly.
Verify that the commands start with "AT" or
"at".
Symptom Check
The terminal
stopped working
suddenly
Verify that the FOMA CARD is properly
inserted to FOMA terminal.→P19
Your PC operating environments may have
changed because a new peripheral or
software was installed. Make a confirmation
with manufacturer or maker of accessory or
software.
The FOMA
terminal is not
detected if it is
inserted into a
USB port while
installing the
L-05A
Communication
Configuration
Files (Drivers).
Please confirm the followings.
•Whether the PC or OS you are using is in
the latest condition?
(If required, apply revision program of OS or
a maker.)
•Whether the FOMA terminal recognizes
normally when other USB devices are
inserted into the USB port?
•Whether the FOMA terminal operates
normally when being inserted into another
PC?
•Whether the FOMA terminal operates
normally when being reset to its default?
※:For inquiries related to OS or PC,
contact Microsoft or PC
manufactures.
Internet
connection
speed
decreased
significantly
Inserting FOMA terminal directly to a PC
may result in deterioration of performance
depending on the type of PC, specification
and degree of electromagnetic interference.
Deterioration of performance may occur to
the service areas where W-CDMA/HSDPA/
GSM network are unstable. In this case,
move to other area and try to connect again.
132 Appendix/Troubleshooting
Error Messages
Error Messages Description
圏外 You are out of service area or available network.
サービス地域ではありません。ネットワークを
再検索しますか?
You may be out of service area or available network, or network error. Please do network
setting again.
端末の認証に失敗しました。顧客センターまた
は代理店にお問い合わせください。
Communication may fail and the FOMA terminal cannot be properly recognized if the PC
is started up or restarted with the FOMA terminal left inserted in it. In this case, remove
and reinsert the FOMA terminal. If communication fails even after the FOMA terminal is
inserted again, remove it once, restart the PC, then insert the FOMA terminal into the
PC again. Contact DOCOMO shop if the same problems persist.
データ通信中には設定できません。終了後に設
定してください。
You cannot customize setting during data communication. Try again after closing data
communication.
変更するPIN1コードと確認用のPIN1コード
が異なります。
Two of new PIN1 are not identical each other. New PIN1 you want to change is not
matched to the PIN1 you entered for verification purpose. Enter correct PIN1.
FOMAカードが挿入されているか確認してくだ
さい。
Make sure to insert FOMA card into FOMA terminal before inserting to a PC.
FOMA端末が取り外されました。 Do not remove FOMA card while using FOMA terminal.
FOMA端末が取り付けられていません。 Verify the FOMA terminal is properly inserted into a PC. Verify that the FOMA terminal is
properly recognized by the PC.
PIN1を複数回間違えたため使用できなくなり
ました。(PIN1 blocked)PIN1コードがロッ
クされています。
An incorrect PIN1wasimproperly entered 3 times in a row. Available functions will be
limited. Enter PIN unblocking code to unlock.
PIN1コードが違います。残り(○/3)回入力
可能です。再入力してください。
An incorrect PIN1 code has been entered. Enter the correct PIN1 code again
PIN1コードが間違います。(PIN1コードは
0123456789のみ使用できます。)
You can use 0,1,2,3,4,5,6,7,8,9 as a valid PIN1 code. Others are invalid.
PIN1コードは4∼8文字です。 Valid PIN1 code is from 4 to 8 digit.
133
Appendix/Troubleshooting
PIN1コードの変更はPINロックが設定されて
いるときに可能です。
To change the PIN1, PIN must be locked. Switch PIN unblocking to PIN blocking.
PINロック解除コードが違います。残り(○/
10)回入力可能です。再入力してください。
An incorrect PIN was imporperly entered 10 times in a row. Available functions will be
limited. Please enter the contact unblocking PIN code
SMS送信に失敗しました。 You may be out of service or available network.You may encounter problems due to the
network error.
PIN1ロック解除コードがブロックされている
ためFOMAカードを使用できません。顧客セン
ターにお問い合わせください。
You are no longer able to use FOMA card that PIN unblocking code has been improperly
entered10 times in a row. Please contact DOCOMO shop.
FOMA端末の初期化に失敗しました。FOMA端
末をリセットしてください。
Communication may fail and the FOMA terminal cannot be properly recognized, if the PC
is started up or restarted with the FOMA terminal left inserted in it. In this case, remove
and reinsert the FOMA terminal. If communication fails even after the FOMA terminal is
inserted again, remove it once, restart the PC, then insert the FOMA terminal into the
PC again.
送受信データなし。待ち受けモードに入りま
す。
When no data transmission has been incurred for a certain period of time.
Communication will be resumed when data transmission is incurred, so stay as it is.
Error Messages Description
135
Appendix/Troubleshooting
■ Replacement parts
Basically, replacement parts (parts required to maintain
product function) will be kept in stock for at least 4 years
after termination of production. Please note that the
product may not be repaired even during this period,
depending on the malfunctioning parts due to a shortage
of those parts. Depending on the nature of the required
repairs, it may still be possible to repair your terminal
even after this period. Contact ″Repairs″ listed on the
back of this manual.
Pay attention
•Do not modify the FOMA terminal, the FOMA card or its
accessories.
- Fire, injury or damage may result.
- If the FOMA terminal is modified (part replacement,
modification, painting, etc.), it will be repaired only after the
modified parts have been restored to the condition at the
time of purchase. However, repair may be refused depending
on the nature of modification.
・ Using sticker to decorate the FOMA terminal.
・ Exchanging the packing with those other than DOCOMO
product.
- Repair of failures or damage caused by modification are
charged even during the warranty period.
•Do not remove any inscription stickers attached to the FOMA
terminal. The inscription stickers certify that the FOMA
terminal satisfies specific technical standards. If stickers are
removed intentionally or are reattached in such a way that
confirmation of the sticker's contents is impossible, repair or
servicing may be refused because confirmation of whether or
not the device conforms to relevant technical standards
cannot be made.
Updating software
Download the modification file of FOMA terminal from
download site on the Internet and then update the
software. If software update is necessary, you will be
informed at the DOCOMO web site with "お知らせ
(Information)".
Note
•Do not unplug the FOMA terminal with the computer during
software update.
•Software update (downloading and rewriting) may take a
while.
•If software update fails, all operations become unavailable.
In this case, bring your FOMA terminal to a DOCOMO
service center.

136 Appendix/Troubleshooting
Main specifications
■ Operation system
Windows 2000 Professional Japanese version
(Service Pack 4 or later)
Windows XP Home Edition Japanese version
(Service Pack 2 or later)
Windows XP Professional Japanese version
(Service Pack 2 or later)
Windows Vista 32 bit Japanese version (Service Pack1
or later)
Windows Vista 64 bit Japanese version (Service Pack1
or later)
Mac OS X 10.4.11 Japanese version
Mac OS X 10.5.6 Japanese version
■ Communication Speed
Packet Communication:
Maximum receiving: 7.2Mbps(Best effort)
Maximum sending: 5.7Mbps(Best effort)
※ The maximum speed of 7.2Mbps for receiving and
5.7Mbps for sending is theoretical values and does not
show the actual ones.The actual communication speed
depends on communication environment and network
congestion.
※ Out of High-Speed area, the maximum communication
speed for receiving and sending is 384kbps
■ Operating environment
Temperature:5℃∼35℃
Humidity:45%∼85%
■ Power source
Power voltage
DC5V±5%(Supplied from PC)
Max Current consumption
Max Current consumption while communicating
3G: Approx. 550mA or below
GSM/GPRS: Approx. 300mA or below
Average Current consumption while communicating
3G: Approx. 180mA or below
GSM/GPRS: Approx. 170mA or below
Average Current consumption while Standby:
3G: Approx. 90mA or below
GSM/GPRS: Approx. 90mA or below
※ Depending on the usage, power consumption fluctuates.
■ Form factor
USB connection type
■ Dimensions
Height: approx. 80mm
Width: approx. 32mm
Depth: approx. 13mm
■Weight
Approx. 37g
137
Appendix/Troubleshooting
Export Controls of the Product
and Accessories
Japan Export Control Regulations (″Foreign Exchange
and Foreign Trade Law″ and relevant laws and
regulations) and U.S. Reexport Regulations (Export
Administration Regulations: EAR) apply to this product and
its accessories. If you export or re-export this product or
its accessories, please follow the necessary procedures at
your own risk and expense. For details on the procedures,
contact the Ministry of Economy, Trade and Industry or the
U.S. Department of Commerce.
European Union Directives Conformance
Statement
Hereby, LG Electronics, Inc. declares that this
product is in compliance with:
•The essential requirements and other relevant
provisions of Directive 1999/5/EC
•All other relevant EU Directives
The above gives an example of a
typical Product Approval Number.
FCC Regulations
Statement
This equipment has been tested and found to comply with
the limits for a class B digital device, pursuant to Part 15
of the FCC Rules. These limits are designed to provide
reasonable protection against harmful interference in a
residential installation. This equipment generates uses and
can radiate radio frequency energy and, if not installed and
used in accordance with the instructions, may cause
harmful interference to radio communications. However,
there is no guarantee that interference will not occur in a
particular installation. If this equipment does cause harmful
interference or television reception, which can be
determined by turning the equipment off and on, the user is
encouraged to try to correct the interference by one or
more of the following measures:
•Reorient or relocate the receiving antenna.
•Increase the separation between the equipment and receiver.
•Connect the equipment into an outlet on a circuit different from
that to which the receiver is connected.
•Consult the dealer or an experienced radio/TV technician for
help.
Change or Modifications that are not expressly approved
by the manufacturer could void the user's authority to
operate the equipment.
0168

138 Appendix/Troubleshooting
Class B Compliance
This device and its accessories comply with part15 of FCC
rules.
Operation is subject to the following two conditions:
•This device & its accessories may not cause harmful
interference.
•This device & its accessories must accept any interference
received, including interference that may cause undesired
operation.
Body-worn Operation
This device has been tested for typical body-worn
operations with the distance of 0.19inches (0.5cm) from
the user's body.
To comply with FCC RF exposure requirements, a minimum
separation distance of 0.19inches(0.5cm) must be
maintained from the user's body.
Consumer Information on SAR (Specific Absorption
Rate)
THIS DEVICE MEETS THE GOVERNMENT'S
REQUIREMENTS FOR EXPOSURE TO RADIO WAVES.
Your wireless device is a radio transmitter and receiver. It
is designed and manufactured not to exceed the emission
limits for exposure to radiofrequency (RF) energy set by
the Federal Communications 'Commission of the U.S.
Government. These limits are part of comprehensive
guidelines and establish permitted levels of RF energy for
the general population. The guidelines are based on
standards that were developed by independent scientific
organizations through periodic and thorough evaluation of
scientific studies.
The standards include a substantial safety margin
designed to assure the safety of all persons, regardless of
age and health. The exposure standard for wireless
devices employs a unit of measurement known as the
Specific Absorption Rate, or SAR.
The SAR limit set by the FCC is 1.6W/kg.
※ Tests for SAR are conducted using standard operating
positions specified by the FCC with the device
transmitting at its highest certified power level, the actual
SAR level of the device while operating can be well below
the maximum value. This is because the device is
designed to operate at multiple power levels so as to use
only the power required to reach the network. In general,
the closer you are to a wireless base station antenna, the
lower the power output.
Body-worn Operation
This Mobile Broadband USB Modem, model L-05A, is
approved for use in normal size laptop computers only
(typically with 12" or larger display screens). To comply
with FCC RF exposure requirements, this modem
should not be used in configurations that cannot
maintain at least 5mm (approximately 0.2 inches) from
users and bystanders, and 12mm (approximately 0.47
inches)from the top of the USB modem. This USB
modem has been tested for compliance with FCC/IC RF
exposure limits in the laptop computer(s) configurations
with horizontal and vertical USB slots and can be used
in laptop computers with substantially similar physical
dimensions, construction, and electrical and RF
characteristics. This USB modem must not be used with
any other antenna or transmitter that has not been
approved to operate in conjunction with this modem.

139
Appendix/Troubleshooting
Before a device is available for sale to the public, it must be
tested and certified to the FCC that it does not exceed the
limit established by the government-adopted requirement
for safe exposure. The tests are performed in positions and
locations (e.g., worn on the body) as required by the FCC
for each model.
The highest SAR value for this device when worn on the
body is 1.17W/kg.
The FCC has granted an Equipment Authorization for this
device with all reported SAR levels evaluated as in
compliance with the FCC RF emission guidelines. SAR
information on this device is on file with the FCC and can
be found under the Display Gant section of http://
www.fcc.gov/ after searching on FCC ID BEJL05A.
Additional information about Specific Absorption Rates
(SAR) can be found on the Cellular Telecommunications
Industry Association (CTIA) web-site
at http://www.wow-com.com.
Intellectual Property Rights
Copyrights and Rights of Portrait
Without permission of the copyright owner you may not
duplicate, modify, transmit over public communication
lines, etc. any document, image, music, software, or other
content owned by a third party that you have used this
product to download from an Internet web site, etc., except
for private uses such as duplication and indexing that are
allowed by copyright law.
1.3W/kg.