LG Electronics USA LNM1880NNTL CAR NAVIGATION User Manual
LG Electronics USA CAR NAVIGATION
UserManual.wiki
>
LG Electronics USA
>
LNM1880NNTL User Manual
User Manual
Navigation menu
Upload a User Manual
Namespaces
Wiki Guide
HTML
PDF
Info
Views
User Manual
Discussion / Help
Navigation
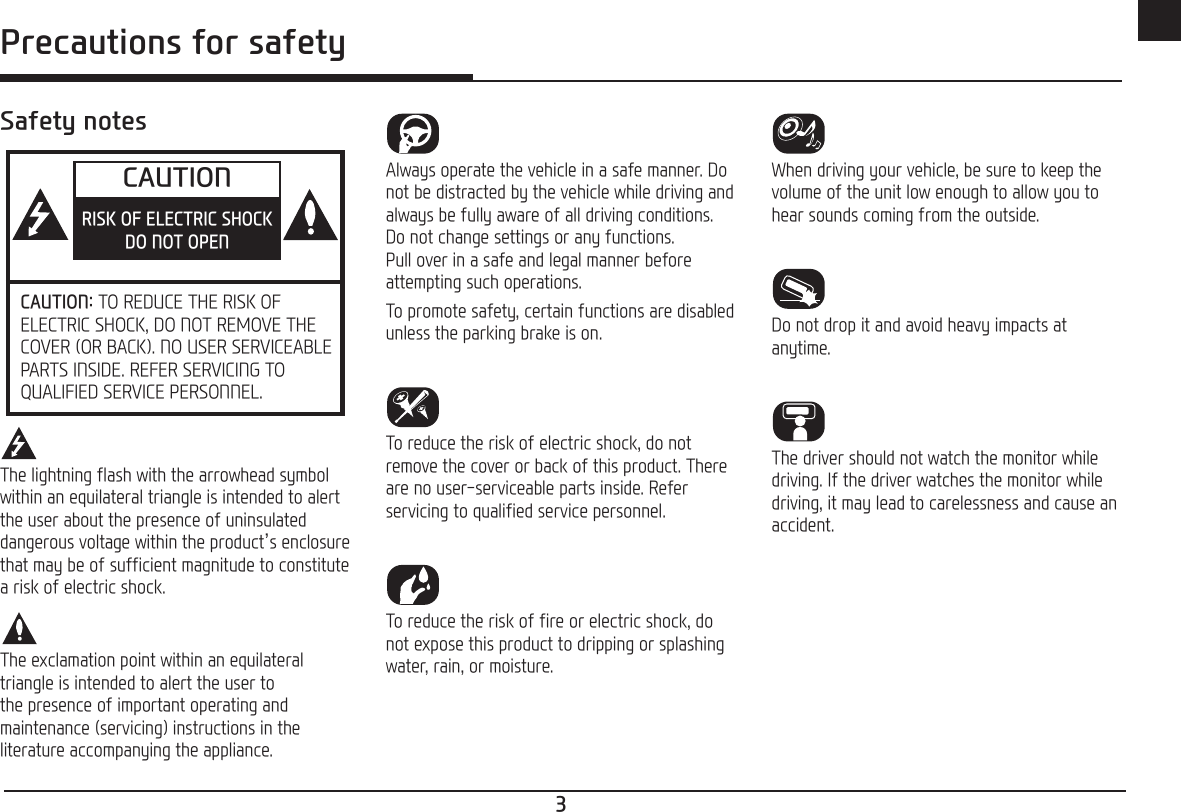
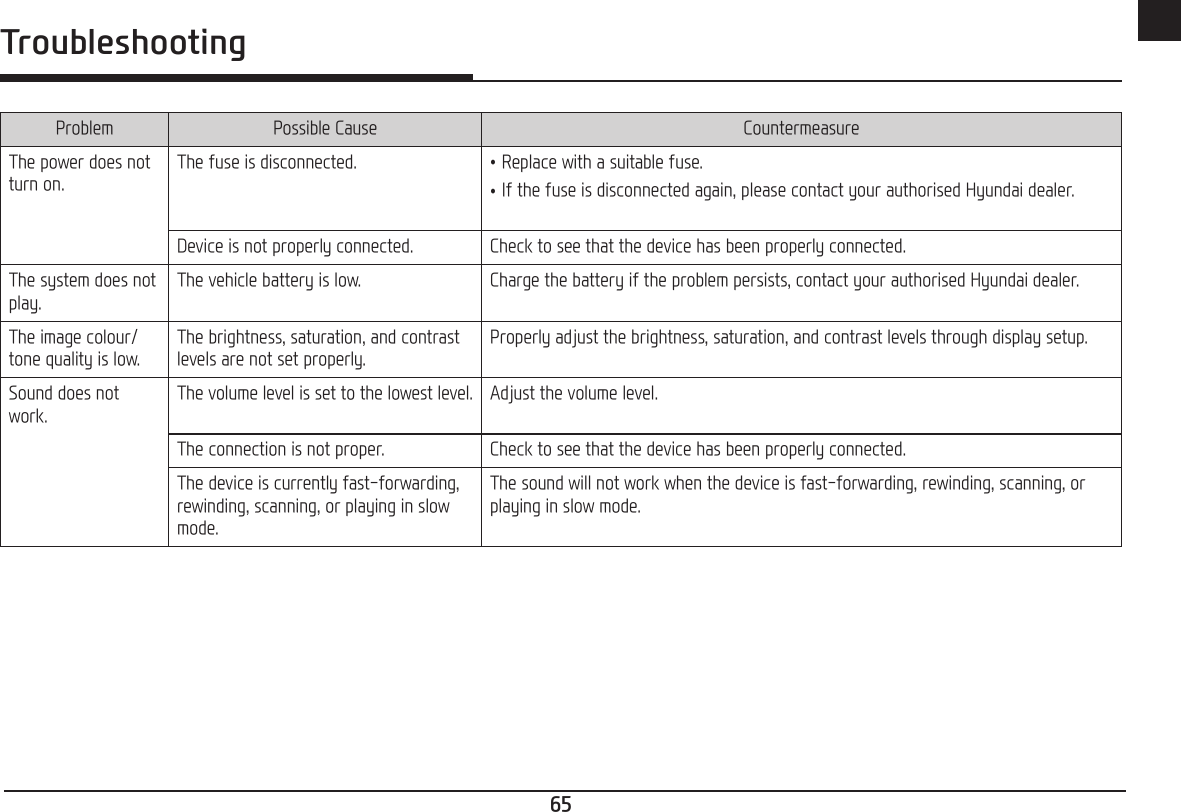
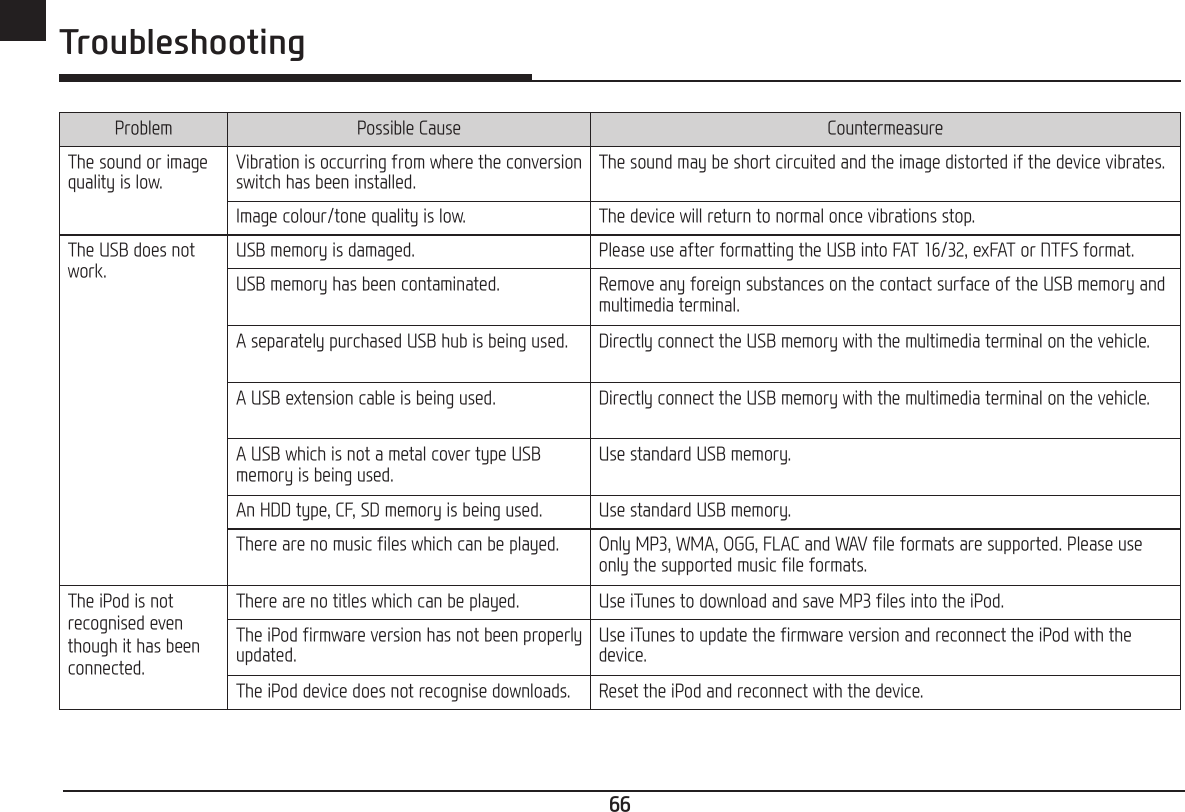
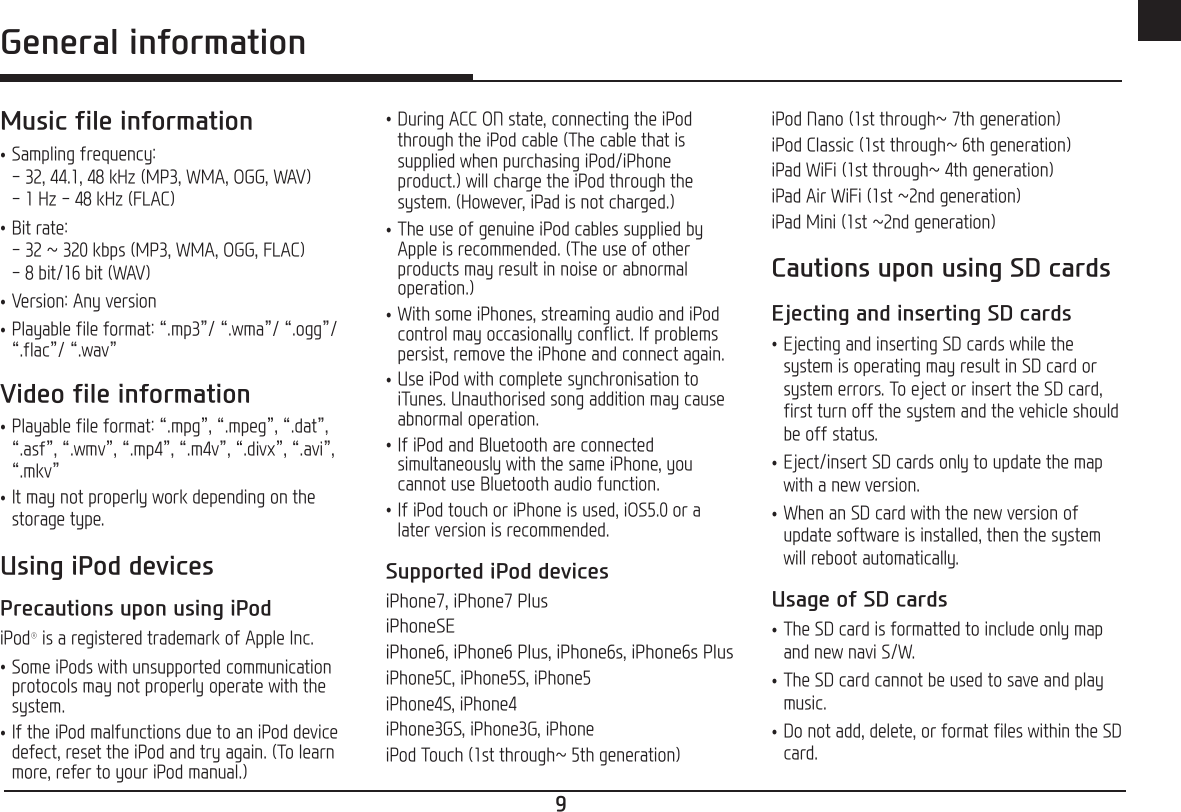
![5ENGPrecautions for safety 3Safety notes � � � � � � � � � � � � � � � � � � � � � � � � � 3Table of contents 5General information 8About USB � � � � � � � � � � � � � � � � � � � � � � � � � � � 8Music file information � � � � � � � � � � � � � � � � � � 9Video file information � � � � � � � � � � � � � � � � � � 9Using iPod devices � � � � � � � � � � � � � � � � � � � � 9Precautions upon using iPod ........................9Supported iPod devices .................................9Cautions upon using SD cards � � � � � � � � � � � 9Ejecting and inserting SD cards ..................9Usage of SD cards .......................................... 9Name of each component 10Head unit � � � � � � � � � � � � � � � � � � � � � � � � � � � �10Steering wheel remote control � � � � � � � � � � �12Basic operation 13Starting the system for the first time � � � � �13Turning the system on � � � � � � � � � � � � � � � � �13Turning the system off � � � � � � � � � � � � � � � � �13AV OFF � � � � � � � � � � � � � � � � � � � � � � � � � � � � �13AV ON � � � � � � � � � � � � � � � � � � � � � � � � � � � � � �13Adjusting the volume � � � � � � � � � � � � � � � � � �13Resetting the system � � � � � � � � � � � � � � � � � �14[Home] screen � � � � � � � � � � � � � � � � � � � � � � �14Configuration for Home screen .................14Basic operation for [Home] screen .........15Editing the [All menus] ................................ 15Adding your favourite menu items to [My Menu] ......................................................16Rearranging the favourite menu items of [My Menu] ................................................17Deleting the favourite menu items of [My Menu] ......................................................17Playing last media source .......................... 17Radio operation 18Listening to AM � � � � � � � � � � � � � � � � � � � � � � �18Opening the station list sorted in numerical order..............................................18Auto search ....................................................18Saving AM favourites ................................... 19Listening to FM � � � � � � � � � � � � � � � � � � � � � � �19Opening the station list ...............................20Saving FM favourites ...................................20Scan � � � � � � � � � � � � � � � � � � � � � � � � � � � � � � � �20Sound settings � � � � � � � � � � � � � � � � � � � � � � �20USB operation 21Playing USB music � � � � � � � � � � � � � � � � � � � �21Pause ................................................................21Skip ...................................................................21Search ..............................................................21Seek ..................................................................21Delete current file ......................................... 22List .....................................................................22Repeat ..............................................................23Shuffle .............................................................23Sound settings ...............................................23Viewing USB video � � � � � � � � � � � � � � � � � � � �23Switching to menu screen or full screen ..23Pause ................................................................23Skip ...................................................................23Search ..............................................................24Seek ..................................................................24List .....................................................................24Repeat ..............................................................24Info .................................................................... 24Sound settings ...............................................24Display settings .............................................. 24iPod operation 25Playing iPod � � � � � � � � � � � � � � � � � � � � � � � � �25Pause ................................................................25Skip ...................................................................25Search ..............................................................25Seek ..................................................................25List .....................................................................25Repeat ..............................................................25Shuffle .............................................................25Sound settings ...............................................25Auxiliary device operation 26Playing an AUX source � � � � � � � � � � � � � � � � �26Sound settings ...............................................26Table of contentsTable of contents](https://usermanual.wiki/LG-Electronics-USA/LNM1880NNTL/User-Guide-3712165-Page-5.png)
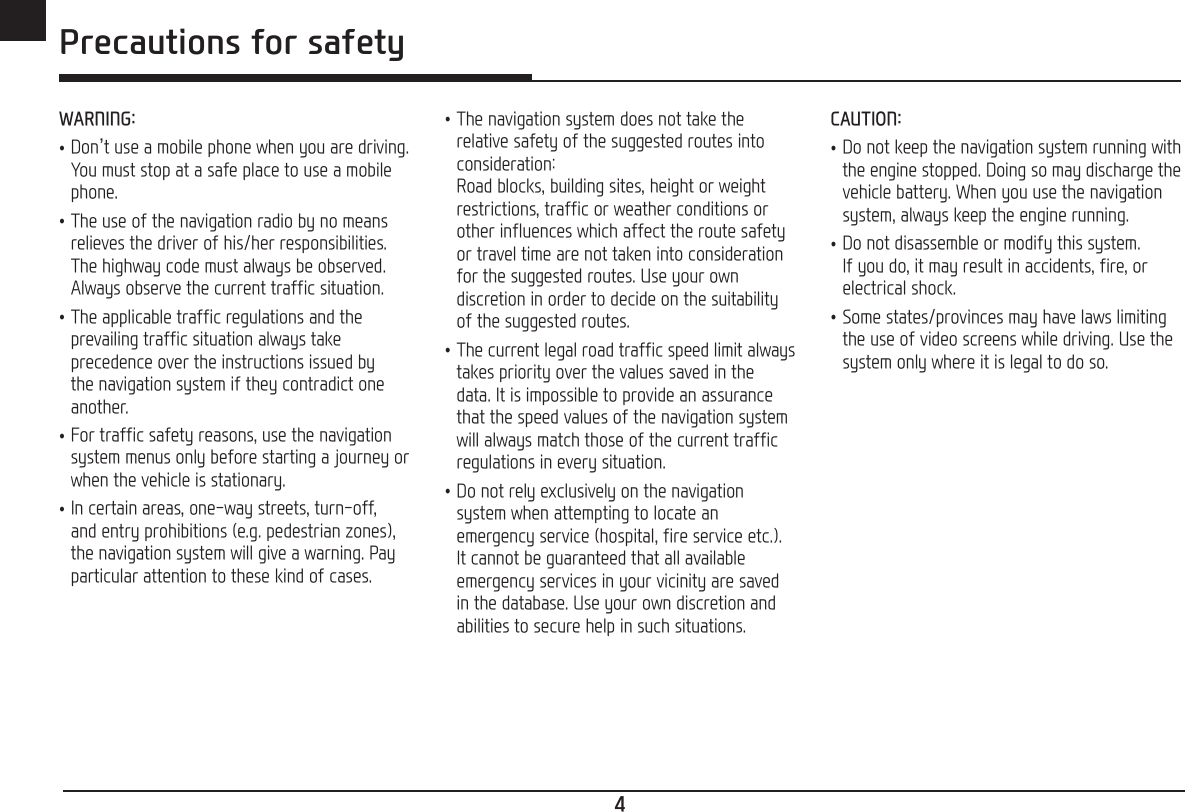
![6ENGBluetooth® audio 27Playing Bluetooth audio � � � � � � � � � � � � � � � �27Starting the Bluetooth audio ...................... 27Pause ................................................................27Skip ...................................................................27Repeat ..............................................................27Shuffle .............................................................27Connection settings ......................................27Sound settings ...............................................27Getting started with navigation 28Precautions for safe driving � � � � � � � � � � � � �28What is GNSS? � � � � � � � � � � � � � � � � � � � � � � �28About satellite signals � � � � � � � � � � � � � � � � � �28Acquiring satellite signals � � � � � � � � � � � � � � �28Operating navigation screen � � � � � � � � � � � � �29Map screen .....................................................29Zoom in / Zoom out .....................................30Quick menu .....................................................30Sound setting for navigation ......................30Scrolling the map screen .............................30Main Menu � � � � � � � � � � � � � � � � � � � � � � � � � �31Sub-menu operation � � � � � � � � � � � � � � � � � � �31Searching for destination 32Address search � � � � � � � � � � � � � � � � � � � � � � �32POI (Points of interest) � � � � � � � � � � � � � � � �32Searching for POI by [POI] ........................32Keyword search � � � � � � � � � � � � � � � � � � � � � �33Favorite � � � � � � � � � � � � � � � � � � � � � � � � � � � � �34Adding favorite ..............................................34Finding favorite ..............................................34Viewing favorite.............................................35Editing favorite ..............................................35Deleting favorite ............................................35Recent � � � � � � � � � � � � � � � � � � � � � � � � � � � � � �35Hyundai service � � � � � � � � � � � � � � � � � � � � � � �35Coordinate � � � � � � � � � � � � � � � � � � � � � � � � � � �35Intersection � � � � � � � � � � � � � � � � � � � � � � � � � �36Category � � � � � � � � � � � � � � � � � � � � � � � � � � � �36Current Position � � � � � � � � � � � � � � � � � � � � � �36Using the route menu 37Itinerary � � � � � � � � � � � � � � � � � � � � � � � � � � � � �37Adding itinerary's way points ....................37Viewing the map information ..................... 37Saving itinerary to [My Itinerary] ............37Rearranging itinerary's way points ..........38Vacating itinerary's way points from [Itinerary] ........................................................ 38Loading itinerary from [My Itinerary] into [Itinerary] ...............................................38Renaming itinerary from [My Itinerary] ..38Deleting itinerary from [My Itinerary] .... 38Route Options � � � � � � � � � � � � � � � � � � � � � � � �38Turn List � � � � � � � � � � � � � � � � � � � � � � � � � � � �39Best Fit � � � � � � � � � � � � � � � � � � � � � � � � � � � � �39Cancel Route � � � � � � � � � � � � � � � � � � � � � � � � �39Demo � � � � � � � � � � � � � � � � � � � � � � � � � � � � � � �39Stop Demo � � � � � � � � � � � � � � � � � � � � � � � � � � �40Bypass Waypoint � � � � � � � � � � � � � � � � � � � � � �40Detour � � � � � � � � � � � � � � � � � � � � � � � � � � � � � �40Restricted Area � � � � � � � � � � � � � � � � � � � � � � �40Settings for navigation 41Settings � � � � � � � � � � � � � � � � � � � � � � � � � � � � �41Map ...................................................................41Display .............................................................. 41Language .........................................................42POI Icon ...........................................................42Guidance ..........................................................42Unit ....................................................................43Speed Alert .....................................................43Sound................................................................43Trail ...................................................................44Factory Default ..............................................44Safe Mode .......................................................44Checking on navigation system 45Information � � � � � � � � � � � � � � � � � � � � � � � � � �45My Data � � � � � � � � � � � � � � � � � � � � � � � � � � � � �45Android Auto/Apple CarPlay - option 46What is Android Auto/Apple CarPlay? � � � � �46Cautions ...........................................................46Using Android Auto or Apple CarPlay � � � � �47NOTICE .............................................................47NOTICE-Android Auto ..................................47NOTICE-Apple CarPlay ................................. 47Table of contents](https://usermanual.wiki/LG-Electronics-USA/LNM1880NNTL/User-Guide-3712165-Page-6.png)
![7ENGTable of contentsBluetooth® Wireless Technology 48Before using the Bluetooth hands-free� � � �48What is Bluetooth Wireless Technology? ...48Precautions for safe driving.......................48Cautions upon connecting Bluetooth phone................................................................48Pairing and connecting the unit and a Bluetooth phone � � � � � � � � � � � � � � � � � � � � � �48When no phones have been paired..........48When a phone is already paired ...............49When pairing additional device .................49Disconnecting the connected phone ........50Deleting Bluetooth devices .........................50Making a call by entering phone number � �50Making a call by redialling � � � � � � � � � � � � � �50Answering/Rejecting a call � � � � � � � � � � � � � �51Switching call to the mobile phone � � � � � � �51Ending a call � � � � � � � � � � � � � � � � � � � � � � � � �51Using the menu during a phone call� � � � � � �51Calling list � � � � � � � � � � � � � � � � � � � � � � � � � � �52Making a call from calling list .................... 52Downloading call history .............................52Contacts � � � � � � � � � � � � � � � � � � � � � � � � � � � �52Making a call from contacts ......................52Downloading mobile phone contacts .......53Searching by name or number ..................53Favourites � � � � � � � � � � � � � � � � � � � � � � � � � � �53Calling favourites ........................................... 53Adding as a favourite ...................................54Deleting favourites ........................................54Phone settings � � � � � � � � � � � � � � � � � � � � � � �54Settings 55[Settings] menu overview � � � � � � � � � � � � � � �55Sound � � � � � � � � � � � � � � � � � � � � � � � � � � � � � �55Display � � � � � � � � � � � � � � � � � � � � � � � � � � � � � �56Bluetooth � � � � � � � � � � � � � � � � � � � � � � � � � � � �57Bluetooth connections .................................57Auto connection priority .............................57System Bluetooth info .................................58Vehicle name ..................................................58Passkey ............................................................58Default ..............................................................58Phone projection � � � � � � � � � � � � � � � � � � � � �58Custom button � � � � � � � � � � � � � � � � � � � � � � � �59Date/Time � � � � � � � � � � � � � � � � � � � � � � � � � � �59Language � � � � � � � � � � � � � � � � � � � � � � � � � � � �59Screensaver � � � � � � � � � � � � � � � � � � � � � � � � � �60Advanced � � � � � � � � � � � � � � � � � � � � � � � � � � � �60System info � � � � � � � � � � � � � � � � � � � � � � � � � �60Version info.....................................................60Update .............................................................. 61Default ..............................................................61Using rear camera 62About rear camera � � � � � � � � � � � � � � � � � � � �62Before thinking there is a product defect 63Troubleshooting 65Trademarks and licenses 67Bluetooth® Wireless Technology ...............67iPod® ................................................................67OPEN SOURCE SOFTWARE NOTICE .........67DivX® ................................................................67Specification 68](https://usermanual.wiki/LG-Electronics-USA/LNM1880NNTL/User-Guide-3712165-Page-7.png)
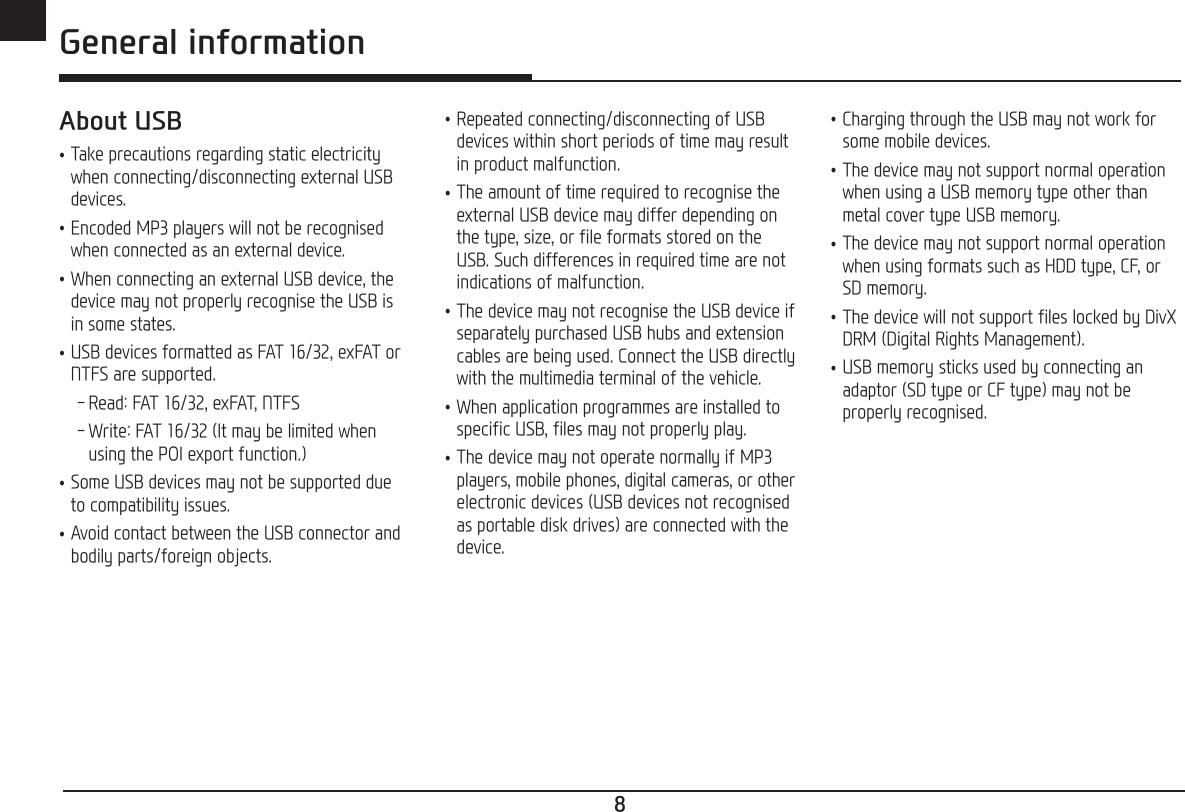
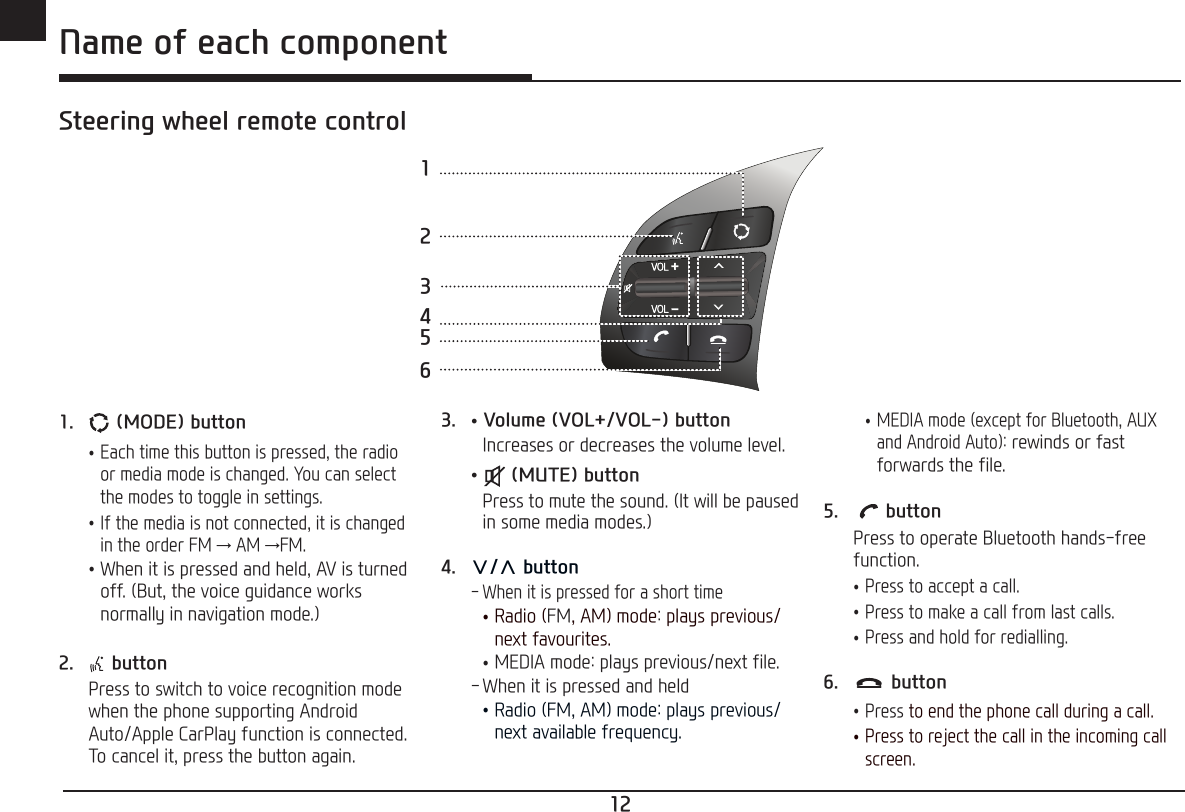
![10ENG Name of each component1. Cover for protecting SD card (SD card insert slot) Insert the SD card into the slot.2. RADIO button Converts to the last played radio mode (FM, AM).3. Reset hole Press with a thin object to reset the unit when it does not operate normally.4. MEDIA button If the playable media source is one, it moves to the corresponding screen. If the playable media sources are more than two, it moves to the [Media] screen. You can select a media source. ([USB Music]/[USB Video]/[iPod]/[Apple CarPlay]/[AUX]/[Bluetooth Audio]/[Android Auto])5. • POWER PUSH button - Power on Press this button in system OFF status. - Power off Press and hold this button in power ON status. • Volume control knob (VOL) Turn anticlockwise or clockwise to control volume. • AV on/off Press this button to turn AV on or off in power ON status.Name of each componentHead unit13245](https://usermanual.wiki/LG-Electronics-USA/LNM1880NNTL/User-Guide-3712165-Page-10.png)
![11ENGName of each component6. SSEEK/TRACKW button - When it is pressed for a short time •AM mode: plays previous/next available frequency. •FM mode: plays previous/next available station existing within [List] menu. (If there is no or one station in the [List] menu, the “Auto tuning” function is executed.) •MEDIA mode: plays previous/next file. - When it is pressed and held •AM mode: plays previous/next available frequency. •FM mode: plays previous/next available station existing within [List] menu. •MEDIA mode (except for Bluetooth, AUX and Android Auto): rewinds or fast forwards the file.7. MAP button Press to display the map screen of the current location.8. NAV button Press to move to the navigation menu screen.9. SETUP button Press to go to the [Settings] menu.10. (Custom button) Press to go to the [Custom button settings] menu. After setting, press to use desired function.11. ENTER/TUNE/FILE button - AM mode: turn left/right to tune manually. - MEDIA mode (except for Bluetooth, AUX, Apple CarPlay and Android Auto): turn left/right to search for the desired file and press. - Navigation mode: turn to the left/right to change the map scale on the map screen.78910116](https://usermanual.wiki/LG-Electronics-USA/LNM1880NNTL/User-Guide-3712165-Page-11.png)
![13ENGBasic operationStarting the system for the first time1. Press the engine start button or set the ignition key to On or ACC. Once the system is turned on, the booting process will start and the safety warning page is displayed.2. Press [Confirm]. If you want to change the system language, press [Language]. For more details, refer to “Language” on page 59.Notes •You cannot operate the system while it is booting up. It may take some time for all of the features to be ready. •The safety warning page is displayed every time the ignition is turned on. The displayed warnings are related to safety, please closely read and comply with the safety warnings. •If there is no operation for 10 seconds in the safety warning screen the system automatically switches to the last played mode.Turning the system onPress [POWER PUSH] on the head unit in system OFF status.NotePay attention to the volume setting when turning the system on. A sudden output of extreme volume upon turning the system on could lead to hearing impairment. Adjust the volume to a suitable levels before turning off the system.Turning the system offPress and hold [POWER PUSH] on the head unit in system ON status.AV OFFPress [POWER PUSH] on the head unit to turn AV off in power ON status.AV ONPress [POWER PUSH] on the head unit to turn AV on in AV OFF status.Adjusting the volumeTurn the volume control knob (VOL) on the head unit to the left/right. Mode DescriptionRadio or media During the radio or media playback, turn to the left/right.Bluetooth call During a Bluetooth call, turn it to the left/right.Bluetooth bell During an incoming call, turn to the left/right.Basic operation](https://usermanual.wiki/LG-Electronics-USA/LNM1880NNTL/User-Guide-3712165-Page-13.png)
![14ENGResetting the systemThis feature is used to reset the system in the occurrence of an unforeseen error or problem. Press “RESET” button. (The use of a clip or pin is recommended when resetting the system.)[Home] screenConfiguration for Home screen142531. Date/Time •Shows the current date and time. •Press the area to move to date and clock settings.2. AV widget •Shows brief information on the radio or media currently playing. •Press the area to move to the mode for what you are listening to.3. All menus Press [All menus] to move to all of the items of the system menu. •[Phone]: Operates Bluetooth hands-free function. •[Android Auto]: Runs [Android Auto] function. •[Apple CarPlay]: Runs [Apple CarPlay] function. •[Quick guide]: Moves to the quick guide menu. ([Using the touch screen], [Home], [Bluetooth], [Phone projection]) •[Radio]: Converts to the last played radio mode. •[Music]: Converts to the last played music mode. •[USB Video]: Converts to the last played video mode. •[Current position]: Displays the map screen of the current position. •[Navigation]: Moves to the [Navigation] menu. •[Settings]: Moves to the [Settings] menu. •[My Menu]: Moves to the [My Menu] menu.4. Navigation Press to move to the [Navigation] menu.5. My Menu •You can add and save up 24 menu items. •You can add your favourite menu items to have quick and easy access.Basic operation](https://usermanual.wiki/LG-Electronics-USA/LNM1880NNTL/User-Guide-3712165-Page-14.png)
![15ENGBasic operation for [Home] screen1. Press [ ] on the screen.2. Select a desired item and it moves to the corresponding screen. Editing the [All menus]1. Press [All menus] on the [Home] screen.2. Press [Edit] on the [All menus] screen.3. Select the desired menu item from the list, then drag and drop it to a desired place.4. Press [ ].Basic operation](https://usermanual.wiki/LG-Electronics-USA/LNM1880NNTL/User-Guide-3712165-Page-15.png)
![16ENG Basic operationAdding your favourite menu items to [My Menu]1. Press [My Menu] on the [Home] screen or [All menus] screen.2. Press [Add to My Menu]. If your favourite menu items are already added, press [Menu] > [Add].3. Select one of the [Radio favourites], or [Menu shortcuts] on the screen.<For example: the [Menu shortcuts] screen>4. Select one of the categories.5. Mark the subcategories.6. Press [Add] > [Yes]. •[Mark all]: Marks all items. •[Unmark all]: Unmarks all items.Note •Press [ ] to move to the previous screen. •Up to 24 menu items can be added to [My Menu]. •If you select the menu item added to [My Menu], it moves to the corresponding screen.](https://usermanual.wiki/LG-Electronics-USA/LNM1880NNTL/User-Guide-3712165-Page-16.png)
![17ENGBasic operationRearranging the favourite menu items of [My Menu]1. Press [My Menu] on the [Home] screen.2. Press [Menu] > [Rearrange].3. Select the desired menu item from the list, then drag and drop it to a desired place.4. Press [ ].Deleting the favourite menu items of [My Menu]1. Press [My Menu] on the [Home] screen.2. Press [Menu] > [Delete].3. Select the desired items, then press [Delete] > [Yes]. •[Mark all]: Marks all items. •[Unmark all]: Unmarks all items.Playing last media source When you press the Engine Start button or set the ignition key to ON/ACC ON, the media source played the last time will play automatically. But, the message "Reconnect last media source to play." is displayed on the home screen if you set the ignition key to ON/ACC ON with the existing media source disconnected or removed.](https://usermanual.wiki/LG-Electronics-USA/LNM1880NNTL/User-Guide-3712165-Page-17.png)
![18ENG Radio operationListening to AM1. Press [RADIO] on the head unit.2. Press [AM] on the screen. The AM screen of the most recent listened station is displayed.NoteEach time the [RADIO] button on the head unit is pressed, the mode is changed in the order AM → FM → AM.3. Auto tuning: Press [SSEEK/TRACKW] on the head unit. - Plays next/previous available station. Manual tuning: Turn the right knob of the head unit left/right. - The frequency moves up and down accordingly. Favourites tuning: Press [Favourites]. Press the favourites numbers of the desired broadcast station.Opening the station list sorted in numerical orderYou can see station list with superior reception.1. Press [AM] on the screen.2. Press [List].Auto searchThis function lets you automatically search the broadcast stations with superior reception.1. Select the AM band.2. Press [List].3. Press [ ].NoteIf you want to save the stations to [Favourites] menu, press [ ] and then press the desired favourites number.Radio operation](https://usermanual.wiki/LG-Electronics-USA/LNM1880NNTL/User-Guide-3712165-Page-18.png)
![19ENGRadio operationSaving AM favouritesIt manually saves the listening frequency to desired favourites list.1. Select the AM band.2. Select the frequency to save. 3. Press [Favourites].4. Press the desired favourites number. If you want to overwrite an existing favourites, press and hold the respective favourites number.Listening to FM1. Press [RADIO] on the head unit.2. Press [FM] on the screen. The FM screen of the most recent listened station is displayed.NoteEach time the [RADIO] button on the head unit is pressed, the mode is changed in the order FM → AM → FM.3. Auto tuning (When there are no or one station in [List] menu): •Press [SSEEK/TRACKW] on the head unit. - Plays next/previous available station. List tuning (When there are two or more stations in [List] menu): •Press [SSEEK/TRACKW] on the head unit. - Plays next/previous available station existing within [List] menu. Manual tuning: •In the FM mode, press [Menu] > [Manual tune FM].Station bar - Drag the station bar to the left/right to find the radio station that you want. - Press [C/V]. - Turn the right knob of the head unit left/right, then press it when the desired station is displayed in a highlighted colour. Favourites: •Press [Favourites]. Press the favourites numbers of the desired broadcast station. •Press [S/W] on the steering wheel remote control.](https://usermanual.wiki/LG-Electronics-USA/LNM1880NNTL/User-Guide-3712165-Page-19.png)
![20ENGOpening the station listYou can see the station list with superior reception.1. Press [FM] on the screen.2. Press [List]. •If you want to save the stations to the [Favourites] menu, press [ ] and then press the desired favourites number. •Press [Station] or [Programme type] to arrange the list in station or programme type order.Saving FM favouritesIt saves the listening station to the desired favourites list.1. Press [FM] on the screen.2. Select the desired station.3. Press [Favourites].4. Press the desired favourites number. If you want to overwrite an existing favourites, press and hold the respective favourites number.ScanThis function scans all stations and plays only stations with good signal strength for 5 seconds each.Press [d Scan]. Press [Z Stop] to stop the scan function.Sound settings1. Press [Menu] > [Sound settings].2. For details refer to page 55 (“Sound”).Radio operation](https://usermanual.wiki/LG-Electronics-USA/LNM1880NNTL/User-Guide-3712165-Page-20.png)
![21ENGUSB operationPlaying USB musicYou can play music files stored in a USB memory device.Connect a USB device to the USB port and playback starts automatically.NoteTo play USB music while a different source is playing, press [MEDIA] > [USB Music].PauseYou can pause the playing file.Press [M] during playback.Press [d] to play it again.SkipYou can play the previous or next file.Position DescriptionScreen •Press [C/V]. •Pressing [C] after 3 seconds of playback time plays the current file from the beginning.Head unit •Press [SSEEK/TRACKW]. •Pressing [SSEEK] after 3 seconds of playback time plays the current file from the beginning.SearchYou can fast rewind/forward to a specific point of a file.Position DescriptionScreen Press and hold [C/V] and then release at the point you want.Head unit Press and hold [SSEEK/TRACKW]and then release at the point you want.NoteWhen you drag or touch the desired part on the progress bar, the music of the selected part plays.SeekYou can play the file directly by searching for the desired file.1. To search for a desired file, turn the right knob of the head unit left/right.2. If the desired file is displayed, press the right knob of the head unit to play the file.USB operation](https://usermanual.wiki/LG-Electronics-USA/LNM1880NNTL/User-Guide-3712165-Page-21.png)
![22ENG USB operationDelete current fileYou can delete the currently playing file in a USB.1. Press [Menu] > [Delete current file].2. Press [Yes].ListYou can play the desired file by searching for the file list of the USB menu.1. Press [List].2. Press the desired file after searching for a category. The category can be sorted by [File], [Artist], [Song], [Album] or [Recently added].NotePress [ ] to move to an upper folder.Using the list menu1. Press [Menu] in list screen.2. Press [Show current track]. The screen moves to the file list currently playing.](https://usermanual.wiki/LG-Electronics-USA/LNM1880NNTL/User-Guide-3712165-Page-22.png)
![23ENGUSB operationRepeatYou can play a set of files repeatedly.1. Press [Repeat].2. Select the desired mode by pressing [Repeat] repeatedly. •[ ]: Plays all files sequentially. •[]: Repeats all files within the current folder. •[]: Repeats the current file, only. •[]: Plays the files sequentially within the [Artist], [Song], [Album] or [Recently added].ShuffleYou can play files in random order.1. Press [Shuffle].2. Select the desired mode by pressing [Shuffle] repeatedly. •[]: Plays all files randomly.Sound settings1. Press [Menu] > [Sound settings].2. For details, refer to page 55 (“Sound”).Viewing USB videoYou can watch video files saved in a USB memory device.1. Connect a USB device to the USB port.2. Press [MEDIA]. To play video file while a different source is playing, press [MEDIA] > [USB Video].Switching to menu screen or full screenPress the screen repeatedly.(If there is no operation for 10 seconds on menu screen mode, it switches to full screen mode.)PauseYou can pause the playing file. For details, refer to page 21 (“Pause”).SkipYou can play the previous or next file. For details, refer to page 21 (“Skip”).](https://usermanual.wiki/LG-Electronics-USA/LNM1880NNTL/User-Guide-3712165-Page-23.png)
![24ENG USB operationSearchYou can fast forward/rewind to a specific point of a file. For details refer to page 21 ("Search").SeekYou can play the file directly by searching for the desired file. For details refer to page 21 ("Seek").ListYou can search for a desired video using the video list.1. Press [List]. •To move to the file list screen currently playing, press [Menu] > [Now playing]. •Press [ ] to move to an upper folder.2. Press the desired video.RepeatYou can play a set of files repeatedly.1. Press [Repeat].2. Select the desired mode by pressing [Repeat] repeatedly. •[]: Plays all files sequentially. •[]: Repeats all files within the current folder. •[]: Repeats the current file, only.InfoThis menu shows File name, Resolution and Total time of the currently playing video.Press [Info].Sound settings1. Press [Menu] > [Sound settings].2. For details refer to page 55 (“Sound”).Display settings1. Press [Menu] > [Display settings].2. For details refer to page 56 ("Display").](https://usermanual.wiki/LG-Electronics-USA/LNM1880NNTL/User-Guide-3712165-Page-24.png)
![25ENGiPod operationPlaying iPod1. Use an iPod exclusive cable to connect an iPod to the USB connector.2. Press [MEDIA]. To play an iPod while a different source is playing, press [MEDIA] > [iPod].PauseYou can pause the playing file. For details, refer to page 21 (“Pause”).SkipYou can play the previous or next file. For details, refer to page 21 (“Skip”).SearchYou can fast rewind/forward to a specific point of a file. For details, refer to page 21 (“Search”).SeekYou can play the file directly by searching for the desired file. For details, refer to page 21 (“Seek”).ListYou can play the desired file by searching in the files list in the iPod Menu.1. Press [List].2. Press the desired file after searching for [Playlist], [Artist], [Album], [Song], or [Other]. RepeatYou can play a set of files repeatedly.1. Press [Repeat].2. Select the desired mode by pressing [Repeat] repeatedly. •[]: Plays all files sequentially. •[]: Repeats the current file, only.ShuffleYou can play files in random order.1. Press [Shuffle].2. Select the desired mode by pressing [Shuffle] repeatedly. •[]: Plays all files randomly.Sound settings1. Press [Menu] > [Sound settings].2. For details, refer to page 55 (“Sound”).iPod operation](https://usermanual.wiki/LG-Electronics-USA/LNM1880NNTL/User-Guide-3712165-Page-25.png)
![26ENG Auxiliary device operationPlaying an AUX source1. Connect an auxiliary device to the AUX terminal.2. Play the auxiliary device.NoteTo play an auxiliary device while a different source is playing, press [MEDIA] > [AUX].Sound settings1. Press [Menu] > [Sound settings].2. For details refer to page 55 (“Sound”).Auxiliary device operation](https://usermanual.wiki/LG-Electronics-USA/LNM1880NNTL/User-Guide-3712165-Page-26.png)
![27ENGBluetooth® audioPlaying Bluetooth audio •Music stored in the mobile phone can be played in the car through Bluetooth audio streaming. •Bluetooth audio can be played only when a Bluetooth phone or Bluetooth audio device has been connected. To play Bluetooth audio, connect the Bluetooth phone to the car system. For more information on connecting Bluetooth, please refer to the owner’s manual [Pairing and connecting the unit and a Bluetooth phone] on page 48. •If Bluetooth is disconnected while playing Bluetooth audio, the audio stream will be interrupted. •The audio streaming function may not be supported in some mobile phones. Only one function can be used at a time. You can not use the Bluetooth hands-free and the Bluetooth audio function at the same time. For example, if you convert to the Bluetooth hands-free while playing Bluetooth audio, the music stream is paused. •Playing music from the car is not possible when there are no music files saved in the mobile phone.Starting the Bluetooth audio1. Connect your Bluetooth device to the head unit. 2. Press [MEDIA]. The Bluetooth audio screen is displayed.NoteTo play Bluetooth audio while a different source is playing, press [MEDIA] > [Bluetooth Audio].PausePress [ ] during playback.Press [ ] to play it again.SkipYou can play the previous or next file.For details refer to page 21 (“Skip”).RepeatYou can play a set of files repeatedly. Select the desired mode by pressing [Repeat] repeatedly.ShuffleYou can play files in random order. Select the desired mode by pressing [Shuffle] repeatedly.NoteThese features may not be supported in some Bluetooth devices.Connection settings1. Press [Menu] > [Connection settings].2. For details refer to page 57 (“Bluetooth connections”).Sound settings1. Press [Menu] > [Sound settings].2. For details refer to page 55 (“Sound”).Bluetooth® audio](https://usermanual.wiki/LG-Electronics-USA/LNM1880NNTL/User-Guide-3712165-Page-27.png)
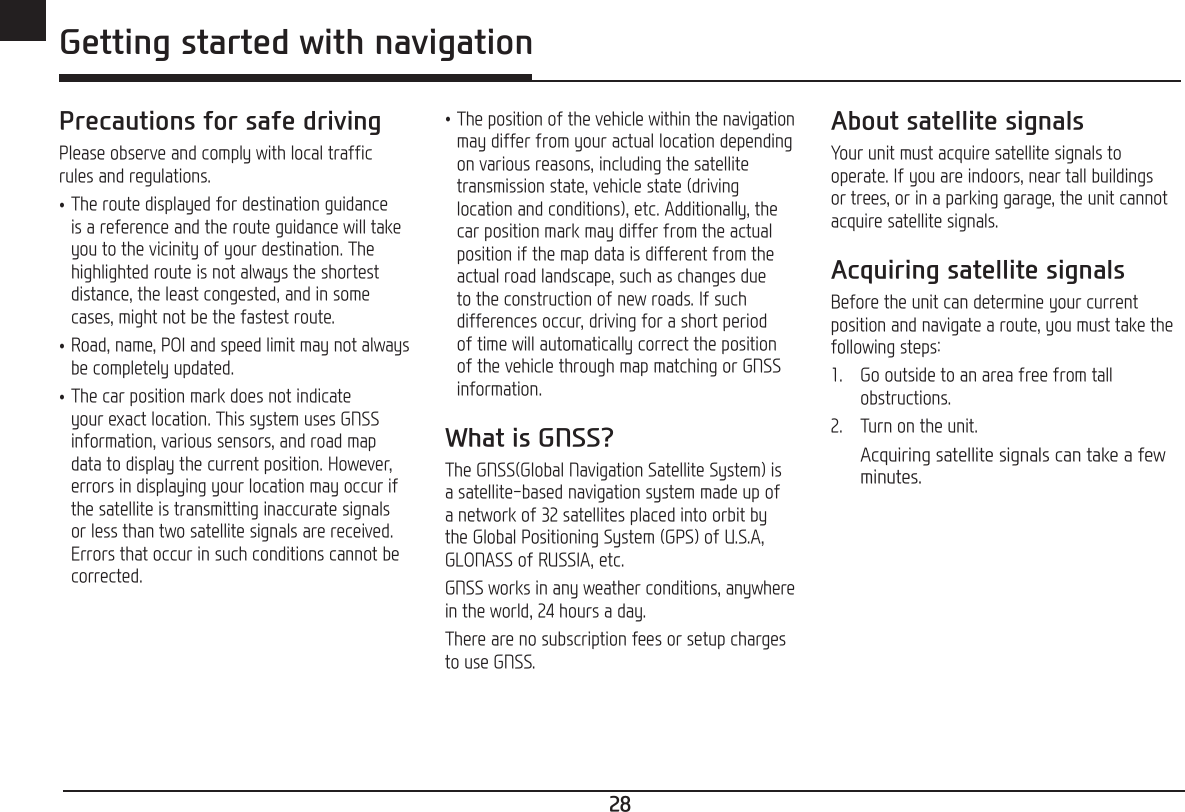
![29ENGGetting started with navigationOperating navigation screenThe navigation system displays various information on the map screen.Map screenPress [MAP] or [NAV] > [Map] to access the map screen.1234 5 6 7 9108111413121. Displays the distance to next turn, maneuver at next turn and serial turn. Press to repeat voice instructions.2. Displays speed cameras.3. [ / ] button Press [ / ] button to set the zoom level on the map screen.4. Clock display Displays the current time.5. Map view button Changes the map view perspectives. Press [ ] repeatedly to switch them. - 2D North-up: The map always points north regardless of the direction that the vehicle is moving. - 2D Heading-up: The map always displays the vehicle’s direction as proceeding towards the top of the screen. - 3D Heading-up: The map always displays the basic outline and details of the surrounding roads and general area.6. Remaining distance display Displays the remaining distance to the destination.7. Street/city information display Displays the current street information or city information. Press to switch the display.8. Arrival time display Displays the estimated time until the arrival at the destination.9. Displays GPS receiver status. Press to check GPS information. - The status is green: GPS signal good. - The status is red: GPS signal lost.10. [ ] button Displays functions in the sub menu.11. PIP (Picture In Picture) Displays the upcoming route with the enlarged and simple picture when driving.12. Vehicle position mark Displays current vehicle position and direction. - The mark is green: GPS signal good. - The mark is Yellow: GPS signal weak. - The mark is red: GPS signal lost. - The mark is grey: When simulating.13. Displays speed limit information on the road.14. Displays the instruction for current turn. Press to access the turn list.](https://usermanual.wiki/LG-Electronics-USA/LNM1880NNTL/User-Guide-3712165-Page-29.png)
![30ENG Getting started with navigationZoom in / Zoom outTo set the zoom level on the map screen, turn the right knob of the head unit left/right.Quick menu1. Press [ ] on the map screen. 2. Press the desired item. •[ ]: Press [ ] to open or close the sub menu. •[]: Cancels the route when it is set. •[]: Moves to the home when it is set. •[]: Moves to the sound settings screen. •[ ]: Finds a destination by searching for POI near the current position. •[]: Starts simulation when the route is set. (Page 39)Sound setting for navigation1. Press [ ] on the quick menu.2. Set the guidance volume of navigation by pressing [a]/[d], then press [Apply].NoteYou can access the sound setting menu for navigation by pressing [ ] > [Sound].Scrolling the map screenDrag and drop the map screen to the desired direction, then touch the desired point. Information on the point is displayed on the screen. It can be used as an electronic map.123 45671. Displays compass. Press to change the orient of map.2. button Press the button to switch the map screen to 2D or 3D.3. Selected location mark Displays selected location (road or POI) with information panel about it.](https://usermanual.wiki/LG-Electronics-USA/LNM1880NNTL/User-Guide-3712165-Page-30.png)
![31ENGGetting started with navigation4. Displays scale ruler.5. [ ] button Rotates the map screen. Press [ ] repeatedly to rotate or stop it.6. [ ] button Returns to current vehicle position.7. [Main Menu] button Moves to the main menu of navigation.Main Menu1. Press [NAV] or touch anywhere on the map screen.2. Press the desired option. •[Find]: Finds a destination by using the [Find] menu. (Pages 32-36) •[Map]: Moves to the map screen or navigation/free run screen. •[Route]: Accesses the current route, itinerary, statistics and map information. (Pages 37-40) •[] (Settings): Changes the software settings of navigation. (Pages 41-44) •[] (My Data): Maintains user specific information like [My Favorite], [My Itinerary], [My Trail], and [Clear Data]. (Page 45) •[] (Information): Displays [GPS], [Statistics] and information about the navigation system. (Page 45)Sub-menu operationAll sub-menus of navigation have the following features at the top of the screen. •[]: Moves to navigation/free run screen. •[]: Moves to the main menu. •[]: Moves to the previous screen.](https://usermanual.wiki/LG-Electronics-USA/LNM1880NNTL/User-Guide-3712165-Page-31.png)
![32ENG Searching for destinationAddress searchYou can find the destination by searching for an address.1. Press [Find] > [Address].2. Enter the city name, then press [Done].3. Select the desired item from the list (over and over). •If you want to search for a list of nearby POI or streets, press [Nearby]. •If you want to save the location as the [My Favorite], press [Save As]. •If you want to know information about the selected location, press [Info]. •If you want to add intermediate waypoint in route to your destination or set the location as the start point to simulate the route, press [Advanced].4. Press [Go To]. •When the destination already set exists, press [Replace] to move to another destination recently set. •Press [Extend] to extend the destination already set. •Press [Cancel] if you don’t want the [Replace], [Extend]. POI (Points of interest)You can set a POI as the destination using different search methods.Searching for POI by [POI]When searching for POI by POI name in [POI]1. Press [Find] > [POI].2. Enter a POI name, then press [Done].3. Follow steps 3-4 of the “Address search” on page 32.Searching for destination](https://usermanual.wiki/LG-Electronics-USA/LNM1880NNTL/User-Guide-3712165-Page-32.png)
![33ENGSearching for destinationWhen searching for POI by [Nearby] in [POI]1. Press [Find] > [POI].2. Press [Nearby], then select one of the [Around City]/[Near Car].3. 1) When selecting the [Around City], follow steps 2-4 of the “Address search” on page 32. 2) When selecting the [Near Car], follow steps 3-4 of the “Address search” on page 32.When searching for POI by [Phone] in [POI]1. Press [Find] > [POI] > [Phone].2. Enter a phone number, then press [Done].3. Follow steps 3-4 of the “Address search” on page 32.Keyword searchYou can find the destination by searching for a key word.1. Press [Find] > [Keyword].2. Enter a key word, then press [Done].](https://usermanual.wiki/LG-Electronics-USA/LNM1880NNTL/User-Guide-3712165-Page-33.png)
![34ENG Searching for destination3. Select one of the [POI], [City Center], [Street], [All]. •If you want to stop a search, press [Stop].4. Follow steps 3-4 of the “Address search” on page 32.FavoriteIf your favorites are already in the [Favorite] menu, they can be easily retrieved by pressing them. First of all, store a favorite through [Save As] of the “Address search” in order to activate the [My Favorite] menu. Then, you can store favorites in the [My Favorite] menu.Adding favorite1. Press [ ] > [My Favorite].2. Press [Add], then select the desired position through the destination search function.3. Press [OK].4. Press [>] to change the name and select one of the Most Favorite, Home, Special Location, then press [Save]. It is saved in the [My Favorite] menu automatically.NoteYou can also store a favorite in the [My Favorite] menu through [Save As] of the “Address search”. (Page 32)Finding favorite1. Press [Find] > [Favorite].2. Follow steps 3-4 of the “Address search” on page 32.](https://usermanual.wiki/LG-Electronics-USA/LNM1880NNTL/User-Guide-3712165-Page-34.png)
![35ENGSearching for destinationViewing favorite1. Press [ ] > [My Favorite].2. Select the desired item from the list, then press [View]. Switches to the map screen on what you select.3. Press [Info] to check information on what you select. Press [Map] to switches to the map screen again.Editing favorite1. Press [ ] > [My Favorite].2. Select the desired item from the list, then press [Edit].3. Press [>] to change the name if you want and select one of the Most Favorite, Home, Special Location, then press [Save].Deleting favorite1. Press [ ] > [My Favorite].2. Select the desired item from the list, then press [Delete] > [Yes].RecentThe destinations set through the search function are automatically saved in the [Recent] menu. You can reset them as the destination from the [Recent] menu.1. Press [Find] > [Recent].2. Follow steps 3-4 of the “Address search” on page 32.Hyundai serviceYou can set the facilities of Hyundai dealers as the destination.1. Press [Find] > [Hyundai]. •You can also search for the facilities of Hyundai dealers by pressing [Keyword].2. Follow steps 3-4 of the “Address search” on page 32.NoteThe information for the dealers facilities may not correspond with a result of map information, since the information can be provided up to date.CoordinateYou can find a destination by entering the coordinates of latitude and longitude.1. Press [Find] > [Coordinate].](https://usermanual.wiki/LG-Electronics-USA/LNM1880NNTL/User-Guide-3712165-Page-35.png)
![36ENG Searching for destination2. Press <Enter Longitude> and <Enter Latitude> respectively.<For example: the Longitude screen>3. Enter the coordinates and press [Done] respectively.4. Press [Done] again, then follow steps 3-4 of the “Address search” on page 32.IntersectionYou can use this menu to determine the intersection of two streets.1. Press [Find] > [Intersection].2. Enter each search box, then press [Done].3. Follow steps 3-4 of the “Address search” on page 32.CategoryYou can search for a POI by the [Category] menu.1. Press [Find] > [Category].2. Follow steps 3-4 of the “Address search” on page 32.Current PositionPress [Current Position] if you want to know information on the current positon.1. Press [Find] > [Current Position].2. Follow steps 3-4 of the “Address search” on page 32.](https://usermanual.wiki/LG-Electronics-USA/LNM1880NNTL/User-Guide-3712165-Page-36.png)
![37ENGUsing the route menuItineraryThe itinerary is a list of users who have defined their way points to their destination. The itinerary can be added/deleted/edited and its order can be changed.Adding itinerary's way points1. Press [Route] > [Itinerary].2. Press [Add].3. Select a way point through the destination search function, then press [OK].4. If you want to add a way point (over and over), follow steps 2-3.5. Press [Go] if you want to start the itinerary's route guidance.Viewing the map information1. Press [Route] > [Itinerary].2. Press the desired item from the list.3. Press [Info] to check information on what you select. Press [Map] to switches to the map screen again.Saving itinerary to [My Itinerary]If the itineraries are already saved in the [My Itinerary] menu, they can be easily retrieved to set the route.First of all, you can save a itinerary to the [My Itinerary] menu when you add the Itinerary’s way points.1. Press [Route] > [Itinerary].2. Press [Save].3. Enter the itinerary name, then press [Done]. It is saved in the [My Itinerary] menu automatically.Using the route menu](https://usermanual.wiki/LG-Electronics-USA/LNM1880NNTL/User-Guide-3712165-Page-37.png)
![38ENG Using the route menuRearranging itinerary's way points1. Press [Route] > [Itinerary].2. Press [Edit].3. Select the desired item from the list, then press [Move Up] or [Move Down].4. Press [Done].Vacating itinerary's way points from [Itinerary]This operation doesn’t mean the itinerary saved in the [My Itinerary] menu is deleted, but mean the itinerary from the [Itinerary] menu is vacated.1. Press [Route] > [Itinerary].2. Press [Edit].3. Select the desired item from the list, then press [Delete].4. Press [Done].Loading itinerary from [My Itinerary] into [Itinerary]1. Press [ ] > [My Itinerary].2. Select the desired item from the list, then press [Load]. •When the itinerary already set exists in the [Itinerary] menu, press [Yes] to replace it. •Press [No] if you don’t want to replace it.Renaming itinerary from [My Itinerary]1. Press [ ] > [My Itinerary].2. Select the desired item from the list, then press [Rename].3. Enter a desired name, the press [Done].Deleting itinerary from [My Itinerary]1. Press [ ] > [My Itinerary].2. Select the desired item from the list, then press [Delete].3. Press [Yes].Route OptionsYou can modify various route options according to your needs.1. Press [Route] > [Route Options].2. Set the desired options, then press [Apply]. •[Routing Method]: This option allows you to set the routing method as the Shorter (distance), Faster (time). •[Avoid Highway]: Highway is not considered as route solutions. •[Avoid Toll Road]: Toll roads is not considered as route solutions. •[Avoid Minor Road]: Minor roads in communities or paved for walker is not considered as route solutions. •[Avoid Ferry]: Ferry is not considered as route solutions.](https://usermanual.wiki/LG-Electronics-USA/LNM1880NNTL/User-Guide-3712165-Page-38.png)
![39ENGUsing the route menu •[Ask every time before planning]: This option allows you to set route options each time you plan your route.NoteThe options set by user may not be supported depending on condition.Turn ListThis function allows you to view the distance to the next guide point and the turning direction at that guide point.1. Press [Route] > [Turn List].2. Press the desired items to view a turn. A map showing the location of the turn is load.Best FitYou can check the entire route between your current location and your destination.Press [Route] > [Best Fit].Cancel RouteIf you want to stop the route guidance with a route set, press [Route] > [Cancel Route] > [Yes]. DemoThis function allows the user to simulate a route guidance when a route is set.1. Press [Route] > [Demo]. •[1x], [2x], [4x], [Full]: Set the speed of driving simulation by pressing [a]/[d]. •[Repeat]: Select whether to repeat driving simulation.](https://usermanual.wiki/LG-Electronics-USA/LNM1880NNTL/User-Guide-3712165-Page-39.png)
![40ENG Using the route menu2. Press [Start Demo]. •[/ ]: Pauses or plays the driving simulation. •[ ]: Ends the driving simulation. •[]: Sets the speed of driving simulation slowly. •[]: Sets the speed of driving simulation fastly.Stop DemoWhen you press [NAV] during driving simulation, press [Route] > [Stop Demo] to stop driving simulation.Bypass WaypointThe route is recalculated to bypass waypoint around the location or street when an itinerary has more than 2 way points.Press [Route] > [Bypass Waypoint] > [Yes].DetourThe route is recalculated to take a detour around the location or street. 1. Press [Route] > [Detour].2. Select the desired item from the list. The route is recalculated and the map screen is displayed automatically.Restricted AreaBy using this menu, the most efficient traffic plan will be provided to you according to having or not having permission to enter different traffic zones. When the planned route passes through the restricted area without permission, the navigation system will display a warning message “You don’t have permission! Can you go through restricted area now?”. If you press [Yes], the system starts navigation according to the original route, otherwise it will calculate another one.1. Press [Route] > [Restricted Area].2. Select the desired options, then press [Apply].](https://usermanual.wiki/LG-Electronics-USA/LNM1880NNTL/User-Guide-3712165-Page-40.png)
![41ENGSettingsThe navigation system offers a high degree of personalization settings as well as normal system settings.Press [ ] on the main menu screen to change the software settings of navigation.MapFor dual language map, this option could be selected to dispaly the default language on the map screen.1. Press [ ] > [Map].2. Select the desired language displayed on the map screen by pressing [a]/[d], then press [Apply].DisplayThis menu allows you to change the display features used by the navigation.You can adjust the colour scheme to suit your current lighting conditions for ease of visibility and font size.1. Press [ ] > [Display].2. Select the desired options by pressing [D] > [Done] or pressing [a]/[d].3. Press [Apply].Settings for navigationSettings for navigation](https://usermanual.wiki/LG-Electronics-USA/LNM1880NNTL/User-Guide-3712165-Page-41.png)
![42ENG Settings for navigationLanguageThis menu allows you to change languages in using the navigation system.1. Press [ ] > [Language].2. Select the desired options by pressing [D]/[a]/[d], then press [Apply]. •[Text]: In the navigation system, there are 2 texts to be selected. •[Voice]: In the navigation system, there are 5 voice prompts to be selected •[Input Method]: In the navigation system, you can select the input method to be the default keyboard when entering words.POI IconAll POI icons or several POI icons can be revealed or hidden on the map screen for the improvement of visibility.1. Press [ ] > [POI Icon].2. Select the desired items to reveal or hide them, then press [Done]. •[Show All]: Shows all POI icons on the map screen. •[Hide All]: Hides all POI icons on the map screen.GuidanceThis menu allows you to adjust Map Orientation and set Auto Zoom, Approaching View, Turn PIP and Next Street as Enable/Disable.1. Press [ ] > [Guidance].2. Select the desired options by pressing [a]/[d], then press [Apply].](https://usermanual.wiki/LG-Electronics-USA/LNM1880NNTL/User-Guide-3712165-Page-42.png)
![43ENGSettings for navigationUnitThis menu allows you to change the measurement units (distance) in using the navigation system.1. Press [ ] > [Unit].2. Select the desired option by pressing [a]/[d], then press [Apply].Speed AlertYou can set whether you will be notified about speed cameras on the map screen and warned against driving too fast.1. Press [ ] > [Speed Alert].<For example: the [Over Speed] screen><For example: the [Speed Camera] screen>2. On each screen, select the desired options by pressing [a]/[d], then press [Apply].SoundYou can set the sound setting for navigation. For example, you can set Mute as On/Off and adjust the guidance volume of navigation.1. Press [ ] > [Sound].2. Select the desired options by pressing [a]/[d], then press [Apply].NoteYou can access the sound setting menu for navigation by pressing [ ] on the quick menu.](https://usermanual.wiki/LG-Electronics-USA/LNM1880NNTL/User-Guide-3712165-Page-43.png)
![44ENG Settings for navigationTrailTo enable the trail function, you can log the trail. You can set the file name to save, interval and file size.When the file size reach the set value, the navigation system stops logging the trail.1. Press [ ] > [Trail].2. Select the desired options by pressing [D]/[a]/[d], then press [Start Log]. •[Name]: Change the trail’s name, then press [Done]. •[Interval]: Set the interval as 1sec, 3secs, 5secs, 10secs, 1min, 5mins. •[File Size]: Set the file size as 1M, 5M, 10M.3. Press [Trail] > [Stop Log] if you want to stop the log.Factory DefaultIf you would like to clear all the settings in the navigation system, you could restore them through the factory default menu.Press [ ] > [Factory Default] > [Yes] > [OK].Safe ModeThis menu allow you not to touch the screen when the vehicle speed is above 40km/hr. This is to prevent you form dangerous operation when driving.To touch the screen is possible when the vehicle speed is below 40km/hr.1. Press [ ] > [Safe Mode].2. Set the safe mode as On/Off by pressing [a]/[d], then press [Apply].](https://usermanual.wiki/LG-Electronics-USA/LNM1880NNTL/User-Guide-3712165-Page-44.png)
![45ENGChecking on navigation systemInformationThis menu gives you information about your route, itineraries, destinations, locations, and maps.Press [ ] on the main menu screen. •[GPS]: Accesses information about satellite coverage, current time, longitude, latitude, altitude, quality of the signals received and the status. •[Statistics]: Accesses information about your current location, heading, velocity, time, etc. •[Map]: Accesses information about the maps the navigation system is using and what maps you have available. •[About]: Accesses information about the navigation system, version number, memory usage, etc.My DataIn My Data, the navigation system offers the UI to access your personal data such as My Favorite, My Itinerary and My Trail. You can save, edit or delete the personal data for the conveniences of next time usage.Press [ ] on the main menu screen. •[My Favorite]: You can edit your favorite destinations by accessing the my favorite menu. •[My Itinerary]: You can retrieve a planned itinerary by pressing Load button. After having a loaded itinerary (current itinerary), you can add, edit or save the itinerary. If a route already exists before you retrieve an itinerary, a warning message will be shown. •[My Trail]: You can use [Rename] or [Delete] to manage the trails, also show a trail on the map screen by pressing [Show]. •[Clear Data]: You can clear the data you have saved here.Checking on navigation system](https://usermanual.wiki/LG-Electronics-USA/LNM1880NNTL/User-Guide-3712165-Page-45.png)
![46ENG ※ Android Auto and Apple CarPlay aren't available in some countries.What is Android Auto/Apple CarPlay?Securely access your mobile phone while driving. Various functions of your mobile phone are displayed on and operable from the screen of the multimedia device (e.g. navigation, making a call, listening to music etc.)When connected, an Android Auto/Apple CarPlay icon appears on the screen. Available functions and operations may differ depending on the company model.For more information, visit the Google or Apple website. - Google: http://support.google.com/androidauto/ - Apple: http://www.apple.com/ios/carplay/Cautions •Android Auto is a registered trademark of Google Inc. •Apple CarPlay is a registered trademark of Apple Inc. •Android Auto and Apple CarPlay are unavailable if the phone OS is not the latest version or if the phone cannot be recognized due to a shutdown caused by a failure or defect in the device itself. •Your phone may not be recognised if its battery is low. Charge your phone then try again. •If your phone is shut down due to a defect in the device itself, reset your phone and try again. •If the USB cable of the Android Auto/Apple CarPlay device is repeatedly disconnected and reconnected in a short period of time, the phone may malfunction. This can also cause a device failure. •The device recognition time may differ depending on the device type and firmware/OS version. •Using the USB cable that came with the phone is recommended. (Using a non-genuine product may cause noise or malfunction.) •Normal operations cannot be guaranteed if the phone is arbitrarily manipulated while Android Auto/Apple CarPlay is active. •Apple CarPlay cannot be run while making a call via Bluetooth. •Android Auto or Apple CarPlay may not operate normally due to mobile phone issues. •Carrier charges may apply when using Android Auto or Apple CarPlay. ※ Some features may not operate normally according to the version of iOS and Android. •The following problems may occur due to phone-related issues: [Android Auto] - Intermittent black screens appear when entering Android Auto. - Differentiation of phones that support Android Auto and those which do not, may not be possible. - Black screens appear in some areas of the screen due to app errors.[Apple CarPlay] - Intermittent black screens appear when entering Apple CarPlay. - Black screens appear in some areas of the screen due to app errors when navigating between screens in Apple CarPlay. - The audio volume control may not operate depending on the status of connected phone. Apple CarPlay can control the volume on the head unit regardless of phone volume. Even if the phone volume is set to 0, the sound can be outputted by controlling the volume of head unit. - The sound output of a call may be cut upon disconnecting Apple CarPlay during a call via Apple CarPlay. ※ If services do not work properly due to problems similar to the specified above, check your phone, and if necessary, reconnect your phone after restarting.Android Auto/Apple CarPlay - optionAndroid Auto/Apple CarPlay - option](https://usermanual.wiki/LG-Electronics-USA/LNM1880NNTL/User-Guide-3712165-Page-46.png)
![47ENGAndroid Auto/Apple CarPlay - optionUsing Android Auto or Apple CarPlay1. Make sure only genuine USB cables are used that were provided by the mobile phone´s manufacturer.2. Enter Android Auto /Apple CarPlay from the home screen or from the submenu [All menus].3. Now the features such as navigation, music and phone are ready to be used.NOTICE •Before connecting your mobile phone, check whether Android Auto or Apple CarPlay is activated in the [Phone projection] menu. •After connecting the mobile phone, the phone has to be unlocked and the disclaimers on the phone have to be accepted in order to launch Android Auto or Apple CarPlay. •The screens and features displayed on the multimedia system correspond to the screens and features provided by Google or Apple. They are subject to changes according to the policy of the respective company.NOTICE-Android Auto •Bluetooth media features will be disabled when Android Auto is activated. After removing the USB cable, these features will be available again. •If Android Auto is not activated even after a successful connection, follow these steps: - Check whether an error occurred on the phone. - Check whether Android Auto has been closed on the phone. - Check whether Android Auto is activated in the [Phone projection] menu. •If Android Auto does not work normally even after a reconnection has been made, visit the Google website http://support.google.com/ androidauto/NOTICE-Apple CarPlay •Bluetooth phone/media features will be disabled when Apple CarPlay is activated. After removing the USB cable, these features will be available again. •If Apple CarPlay is not activated even after a successful connection, follow these steps: - Check whether Apple CarPlay is disabled in the iPhone´s application settings. - Check whether Apple CarPlay is activated in the [Phone projection] menu. •If Apple CarPlay does not work normally even after a reconnection has been made, visit the Apple website http://www.apple.com/ios/carplay/](https://usermanual.wiki/LG-Electronics-USA/LNM1880NNTL/User-Guide-3712165-Page-47.png)
![48ENG Bluetooth® Wireless TechnologyBefore using the Bluetooth hands-freeWhat is Bluetooth Wireless Technology? •Bluetooth Wireless Technology refers to a short-distance wireless networking technology which uses a 2402 MHz ~ 2480 MHz frequency to connect various devices within a certain distance. •Supported within PCs, external devices, Bluetooth phones, PDAs, various electronic devices, and automotive environments, Bluetooth Wireless Technology is transmitted at high speeds without having to use a connector cable. •Bluetooth hands-free refers to a device which allows the user to conveniently make phone calls with Bluetooth mobile phones through the system. •The Bluetooth hands-free feature may not be supported in some mobile phones.Precautions for safe driving •Bluetooth hands-free is a feature that enables drivers to practice safe driving. Connecting the head unit with a Bluetooth phone allows the user to conveniently make calls, receive calls, and manage the phone book. Before using Bluetooth Wireless Technology, carefully read the contents of this owner’s manual. •Excessive use or operations while driving may lead to negligent driving practices and be the cause of accidents. Do not operate the device excessively while driving. •Viewing the screen for prolonged periods of time is dangerous and may lead to accidents. When driving, view the screen only for short periods of time.Cautions upon connecting Bluetooth phone •Before connecting the head unit with the mobile phone, check to see that the mobile phone supports Bluetooth features. •If you do not want automatic connection with your Bluetooth device, turn the Bluetooth feature off on the Bluetooth device. •Park the vehicle when pairing the head unit with the mobile phone. •Some Bluetooth features may occasionally not operate properly depending on the firmware version of your mobile phone. If such features can be operated after receiving a S/W upgrade from your mobile phone manufacturer, unpair all devices and pair again before use.Pairing and connecting the unit and a Bluetooth phoneTo use the Bluetooth feature, make sure the Bluetooth on your phone is turned on. Refer to your phone’s user guide.When no phones have been paired1. Press [ ] > [All menus] > [Phone]. Or press [ ] on the steering wheel remote control. •[Cancel]: Cancels Bluetooth connection.2. In your phone, initiate a search for Bluetooth devices. (The default vehicle name is HYUNDAI MOTORS.)3. 1) If the SSP (Secure Simple Pairing) is not supported, enter the passkey on your Bluetooth device. (The default passkey is 0000.) 2) If the SSP (Secure Simple Pairing) is supported, press [Yes] on the pop-up screen of your Bluetooth device. ( The pop-up screen may differ from the actual information of the Bluetooth device.)Bluetooth® Wireless Technology](https://usermanual.wiki/LG-Electronics-USA/LNM1880NNTL/User-Guide-3712165-Page-48.png)
![49ENGBluetooth® Wireless Technology4. Bluetooth device is connected. The mobile phone contacts and the calling list are downloaded. When the connection fails, a failure message is displayed on the screen.When a phone is already paired1. Press [ ] > [All menus] > [Phone]. Or press [ ] on the steering wheel remote control.2. Press the device from the Bluetooth device list pop-up screen. If you want to pair additional device, press [Add new]. Follow the steps 3-4 of “When no phones have been paired”.When pairing additional device1. 1) When using [SETUP] button, press [SETUP] > [Bluetooth] > [Bluetooth connections]. 2) When using [ ] button, press [ ].2. 1) Select the device you want to connect. 2) If there is no device you want to connect, press [Add new].3. In your phone, initiate a search for Bluetooth devices. (The default vehicle name is HYUNDAI MOTORS.)4. 1) If the SSP (Secure Simple Pairing) is not supported, enter the passkey on your Bluetooth device. (The default passkey is 0000.) 2) If the SSP (Secure Simple Pairing) is supported, press [Yes] on the pop-up screen of your Bluetooth device. (The pop-up screen may differ from the actual information of the Bluetooth device.)5. Bluetooth device is connected. The mobile phone contacts and the calling list are downloaded. When the connection fails, failure message is displayed on the screen.Notes •For safety reasons, pairing a Bluetooth phone is not possible when the vehicle is in motion. Park the vehicle in a safe location to pair a Bluetooth phone. It is possible to pair up to 5 mobile phones. In order to pair new phone, you must first delete one of the previously paired phones. •Some functions may not be supported due to limited Bluetooth compatibility. •When a Bluetooth device is connected, a new device cannot be paired.](https://usermanual.wiki/LG-Electronics-USA/LNM1880NNTL/User-Guide-3712165-Page-49.png)
![50ENG Bluetooth® Wireless TechnologyDisconnecting the connected phone1. Press [SETUP] > [Bluetooth] > [Bluetooth connections].2. Select the connected phone. 3. Press [Yes].NoteIf you want to connect the disconnected phone again, select the disconnected phone.Deleting Bluetooth devicesIf you do not need to use a phone any longer, you can delete it. Note that deleting a Bluetooth device will delete all calling list and contact entries.1. Press [SETUP] > [Bluetooth] > [Bluetooth connections] > [Delete devices].2. Select the desired devices, then press [Delete] > [Yes]. •[Mark all]: Marks all items. •[Unmark all]: Unmarks all items.Making a call by entering phone numberConnect your unit and Bluetooth phone before making a call.1. Enter the phone number using the keypad on the phone screen.2. Press [ ] on the phone screen or [ ] on the steering wheel remote control.NoteIf you press the wrong number, press [ ] to delete one digit of the entered number.Making a call by rediallingPress and hold [ ] on the phone screen or [ ] on the steering wheel remote control.NoteRedialling is not possible when there is no number in the dialled calls list.](https://usermanual.wiki/LG-Electronics-USA/LNM1880NNTL/User-Guide-3712165-Page-50.png)
![51ENGBluetooth® Wireless TechnologyAnswering/Rejecting a call1. If there is an incoming call, a pop-up message will appear.2. Press [Accept] in the pop-up message or [ ] on the steering wheel remote control. To reject a call, select [Reject] in the pop-up message or [ ] on the steering wheel remote control. Notes •If the Call-ID service is available, the caller’s phone number is displayed. •If caller’s phone number is saved in the phone book, the caller’s name is displayed on the unit. •Upon receiving a call, the [Reject] function may not be supported in some mobile phones.Switching call to the mobile phone1. If you want to switch the call to the mobile phone while talking on the car hands-free, press [Use private] on the screen or press and hold [ ] on the steering wheel remote control. As shown below, the call is switched to the mobile phone.2. If you want to switch the call to the car hands-free while talking on the mobile phone, press [Use hands-free] on the screen or press and hold [] on the steering wheel remote control. The call is switched to the car hands-free.Ending a call1. To end a call, press [ ] on the phone screen or [ ] on the steering wheel remote control.2. The call is ended.Using the menu during a phone callWhen making a call, you can use the following menu items.ADCBEPosition DescriptionA Switches a voice call from the car hands-free to the mobile phone.B Ends a call.C Moves to a screen for entering ARS numbers.D Displays the Mic volume settings. You can adjust the in-call volume that the other party hears.E Displays the contacts list.](https://usermanual.wiki/LG-Electronics-USA/LNM1880NNTL/User-Guide-3712165-Page-51.png)
![52ENG Bluetooth® Wireless TechnologyCalling listMaking a call from calling list1. Press [ ] on the phone screen.2. Press [All], [Dialled], [Received], or [Missed]. •[All]: Displays all calling list. •[Dialled]: Displays the outgoing calling list. •[Received]: Displays the incoming calling list. •[Missed]: Displays the missed calling list.3. Press the entry you want to call.NoteThe calling list may not be saved in some mobile phones.Downloading call historyYou can download the call history information from your mobile phone.1. Press [ ] on the phone screen.2. Press [Menu] > [Download] > [Yes].Notes •Up to 50 received, dialled, and missed call history lists can be downloaded. •The download feature may not be supported in some mobile phones. Check to see that the Bluetooth device supports the download feature.ContactsMaking a call from contacts1. Press [ ] on the phone screen. The contacts are displayed on the screen.2. Select the contact you want to call from the list of contacts.](https://usermanual.wiki/LG-Electronics-USA/LNM1880NNTL/User-Guide-3712165-Page-52.png)
![53ENGBluetooth® Wireless TechnologyDownloading mobile phone contactsYou can download contacts from your mobile phone.1. Press [ ] on the phone screen.2. Press [Menu] > [Download] > [Yes].Notes •Upon downloading mobile phone contacts, the previous data is deleted. •This feature may not be supported in some mobile phones.Searching by name or numberYou can search contacts for the name or number that you enter.1. Press [ ] > [Menu] > [Search] on the phone screen.2. Enter the name or number, then press [OK].3. Select the contact you want to call.FavouritesCalling favouritesIf the phone number has already been stored in the favourites, it can be easily called by tapping on it.First of all, add the phone number in the favourites. Refer to the “Adding as a favourite” on page 54.1. Press [ ] on the phone screen. <Favourites screen>2. Select the desired favourite.](https://usermanual.wiki/LG-Electronics-USA/LNM1880NNTL/User-Guide-3712165-Page-53.png)
![54ENGAdding as a favouriteUp to 10 contacts can be added to favourites menu.1. Press [ ] > [Add new] on the phone screen. 2. Select one of the contacts. 3. Press [ ] > [Close] > [ ].NoteIf the phone numbers have already been stored in the favourites, you can add or delete them by pressing [Menu] > [Edit].Deleting favourites1. Press [ ] on the phone screen. 2. Press [Menu] > [Delete items].3. Select the desired item, then press [Delete] > [Yes]. •[Mark all]: Marks all items. •[Unmark all]: Unmarks all items.Phone settingsThis menu describes phone settings.1. Press [ ] on the phone screen. 2. For details, refer to the “Bluetooth” on page 57.Bluetooth® Wireless Technology](https://usermanual.wiki/LG-Electronics-USA/LNM1880NNTL/User-Guide-3712165-Page-54.png)
![55ENGSettings[Settings] menu overview[Settings] menuSoundDisplayBluetoothPhone projectionCustom buttonDate/TimeLanguageScreensaverAdvancedSystem infoSoundThis menu is used to adjust the sound effects for the whole system. (It may vary depending on the type of vehicle.)1. Press [SETUP] > [Sound].2. Select the desired items. •[Position]: This menu allows you to set the sound position. For example, you can set the sound close to the driver-seat so that the volume is relatively lower in the passenger or rear seats. - Press [ ]/[ ]/[ ]/[ ] to control the sound positioning. - Drag and drop the dot to a desired place to adjust the sound position. - Press [ ] to concentrate the sound in the centre of the vehicle. • [Equaliser]: This menu allows you to set the Bass [BASS]/Middle [MID]/Treble [TREBLE]. - Press [-]/[+] to control bass/middle/treble settings. - Drag the slide bar to control bass/middle/treble settings. - Press [Centre] to initialize the settings. •[Volume ratio]: - [Navigation prioritised]: Lowering of all other audio volumes during playback of navigation prompts. - [Reverse warning priority]: Lowering of audio volumes when the shift lever is set to reverse. - [Volume limitation on startup]: If the audio volume is exceeding the defined maximum upon vehicle start, it is lowered accordingly. •[Advanced]: This menu allows you to control automatically the audio volume according to eh speed of the vehicle. Press [SDVC]. •[Default]: Resets the sound settings to factory default. •[Beep]: This menu allows you to play a beep sound whenever you operate the touch screen. Press [Beep].Settings](https://usermanual.wiki/LG-Electronics-USA/LNM1880NNTL/User-Guide-3712165-Page-55.png)
![56ENG SettingsDisplayThis menu is used to change the display environment settings.1. Press [SETUP] > [Display].2. Select the desired items. •[Dimming]: Sets the display brightness according to mode changes. - [Auto-illumination]: Adjusts the brightness automatically according to surrounding brightness. - [Daylight]: Always keeps the brightness high regardless of surrounding brightness. - [Night]: Always keeps the brightness low regardless of surrounding brightness. • [Brightness]: - Press [-]/[+] to set display brightness for daylight or night mode. - Drag the slide bar to control the display brightness settings. - Press [Centre] to initialize the settings. •[Adjust]: This menu can be set in video mode. - Press [-]/[+] to control [Brightness]/ [Contrast]/[Saturation] settings. - Drag the slide bar to control [Brightness]/[Contrast]/[Saturation] settings. - Press [Centre] to initialize the settings. •[Ratio]: Sets the display ratio according to mode changes. - [Normal]: Adjusts the screen to 4:3. - [Full]: Adjusts the screen to full screen display. - [Wide]: Adjusts the screen to 16:9. •[Default]: Resets the display settings to factory default. •[Display Off]: Press [Display Off] to turn the screen off. Press the screen itself again to turn the screen on.](https://usermanual.wiki/LG-Electronics-USA/LNM1880NNTL/User-Guide-3712165-Page-56.png)
![57ENGSettingsBluetoothThis menu describes Bluetooth phone settings.Bluetooth connectionsThis menu is used to pair and connect the head unit and a Bluetooth phone.Press [SETUP] > [Bluetooth] > [Bluetooth connections].ADCBEFA Paired device list: Displays the paired Bluetooth device list. When selecting from the list, the device is either connected or disconnected.B Bluetooth audio connection status: An icon appears when you make a Bluetooth audio connection.C Bluetooth hands-free connection status: An icon appears when you make a Bluetooth hands-free connection.D [Add new]: Registers a new Bluetooth device.E [Delete devices]: Moves to "Delete devices".F [Help]: Switches to the Bluetooth connection help screen.Auto connection priorityIf auto connection priority is turned on, a Bluetooth device will automatically be connected according to the option setting when the car ignition is turned on.1. Press [SETUP] > [Bluetooth] > [Auto connection priority].2. Select the desired items.NoteIf there is no phone selected, the previously connected phone will be automatically connected. If there are no previously connected phones, the system will try to connect to devices in the list in order.](https://usermanual.wiki/LG-Electronics-USA/LNM1880NNTL/User-Guide-3712165-Page-57.png)
![58ENG SettingsSystem Bluetooth infoVehicle nameYou can change the Bluetooth device name of the vehicle.1. Press [SETUP] > [Bluetooth] > [System Bluetooth info] > [Vehicle name].2. Enter the desired name using the keypad, then press [OK].NoteThe default vehicle name is set to HYUNDAI MOTORS.PasskeyYou can change the passkey used for Bluetooth device authentication. 1. Press [SETUP] > [Bluetooth] > [System Bluetooth info] > [Passkey].2. Enter the passkey using the keypad.NoteThe passkey is a 4-digit authentication code used for a Bluetooth connection between the mobile phone and car system. The default passkey is set to 0000.DefaultThis menu is used to reset the Bluetooth settings to factory default.Press [SETUP] > [Bluetooth] > [Default] > [Yes].Phone projectionThis menu describes phone projection settings.1. Press [SETUP] > [Phone projection].2. Press the desired items. •[Android Auto]: If Android Auto is checked, you can use the functions of your Android device with a USB cable connected. •[Apple CarPlay]: If Apple CarPlay is checked, you can use the functions of your iPhone with a USB cable connected.](https://usermanual.wiki/LG-Electronics-USA/LNM1880NNTL/User-Guide-3712165-Page-58.png)
![59ENGSettingsCustom buttonYou can assign a function to custom button.1. Press [SETUP] > [Custom button].2. Select the desired function.Date/TimeThis menu describes date and clock settings.1. Press [SETUP] > [Date/Time].2. Select the desired items. •[GPS time]: Displays time according to the received GNSS (Global Navigation Satellite System) time. •[24-hour]: Switches to 12 hour or 24 hour. •[Daylight savings time]: Turns the daylight savings time on or off. When daylight savings time is turned on, the clock is moved forward one hour.LanguageThis menu is used to set the language of the system.1. Press [SETUP] > [Language].2. Select the desired language.](https://usermanual.wiki/LG-Electronics-USA/LNM1880NNTL/User-Guide-3712165-Page-59.png)
![60ENG SettingsScreensaverThis menu is used to select the screen displayed when the screen or power is turned off.1. Press [SETUP] > [Screensaver].2. Select the desired item. •[Digital]: The digital clock and date is displayed. •[Analogue]: The analogue clock and date is displayed. •[None]: Nothing is displayed.AdvancedThis menu describes advanced settings.1. Press [SETUP] > [Advanced].2. Select the desired items. •[Media change notifications]: If the box is checked, the notification pop-up for media information will be shown on the top of the screen, whenever a content changes. •[Steering whl mode button]: Selects the desired feature when you press [ (MODE)] on the steering wheel to toggle media modes.System infoVersion infoYou can view software version and firmware version.Press [SETUP] > [System info] > [Version info].](https://usermanual.wiki/LG-Electronics-USA/LNM1880NNTL/User-Guide-3712165-Page-60.png)
![61ENGSettingsUpdateFor system’s software security, new function addition, and map update, you need an update.1. Press [SETUP] > [System info] > [Version info].2. Insert the SD card with latest file downloaded into the SD card slot.3. Press [Update] > [OK]. Once updating is completed, the system will automatically restart.Notes •This product requires regular updates for software corrections, new functions and map updates. Updating may require up to 1 hour depending on the data size. •Turning off the power or ejecting the SD card during the update process may result in data loss. •Please use only the SD card that was included with the vehicle purchase. •The use of a separately purchased SD card may result in damage due to heat related deformation. •Product malfunctions caused by the use of separately purchased SD cards shall not be covered within the product warranty. •Repeatedly connecting/disconnecting the SD card in a short period of time may cause damage to the device.DefaultThis menu is used to reset all settings specified by the user.1. Press [SETUP] > [System info] > [Default].2. Press [Default] > [Yes].NoteThis [Default] menu cannot be operated if any USB device, iPod or Android Auto/Apple CarPlay device has been connected to the system.](https://usermanual.wiki/LG-Electronics-USA/LNM1880NNTL/User-Guide-3712165-Page-61.png)
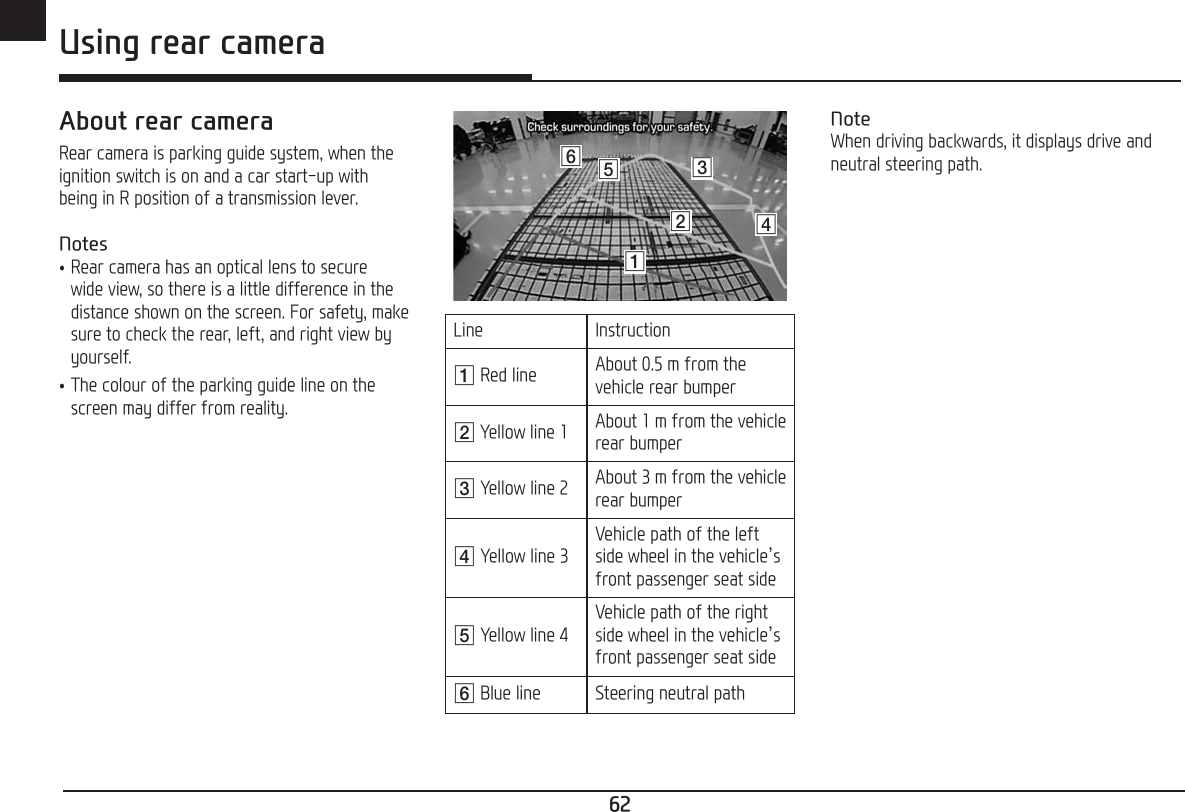
![64ENG Before thinking there is a product defect1. Errors which occur during the operation or installation of the device may be mistaken as a malfunction of the actual device.2. If you are having problems with the device, try the suggestions listed below.3. If the problems persist, contact your authorised Hyundai dealer.Problem Possible CauseThere are small red, blue, or green dots on the screenBecause the LCD is manufactured with technology requiring high point density, a pixel or lighting deficiency may occur within 0.01% of total pixels.The sound or image is not working •Has the switch for the vehicle been turned to [ACC] or [ON]? •Has the system been turned off?The screen is being displayed but sound is not working •Has the volume been set to a low level? •Has the volume been muted?When the power is turned on, the corners of the screen are dark •The display appearing somewhat dark after prolonged periods of use is normal with LCD panels. It is not a malfunction. •If the screen is very dark, contact your nearest authorised Hyundai dealer for assistance.Sound is working from only one speaker Are the positions of fader or balance sound controls adjusted to only one side?Sound does not work in AUX mode Are the audio connector jacks fully inserted into the AUX terminal?The external device is not working Is the external device connected with a standard connector cable?When turning power on, the most recent mode screen is not displayedWithin modes that play files by reading external sources, such as USB, iPod, or Bluetooth® streaming mode, the most recently played mode screen prior to turning off power may not properly load. •If the corresponding device is not connected, the mode operated prior to the most recent mode will operate. •If the previous mode still cannot be properly played, the mode operated prior to that will operate.](https://usermanual.wiki/LG-Electronics-USA/LNM1880NNTL/User-Guide-3712165-Page-64.png)