LG Electronics USA M237WDJ LCD TV MONITOR User Manual User s Manual H ok
LG Electronics USA LCD TV MONITOR User s Manual H ok
UserManual.wiki
>
LG Electronics USA
>
M237WDJ User Manual
USERS MANUAL
Navigation menu
Upload a User Manual
Namespaces
Wiki Guide
HTML
PDF
Info
Views
User Manual
Discussion / Help
Navigation

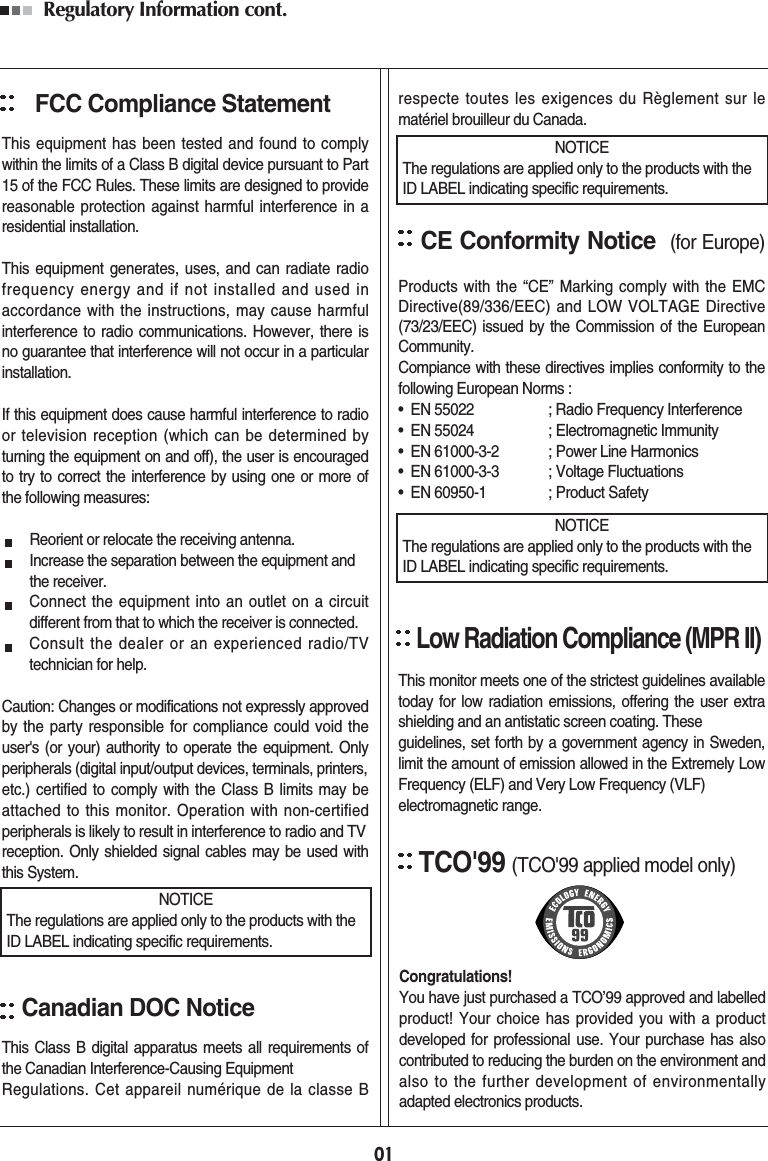
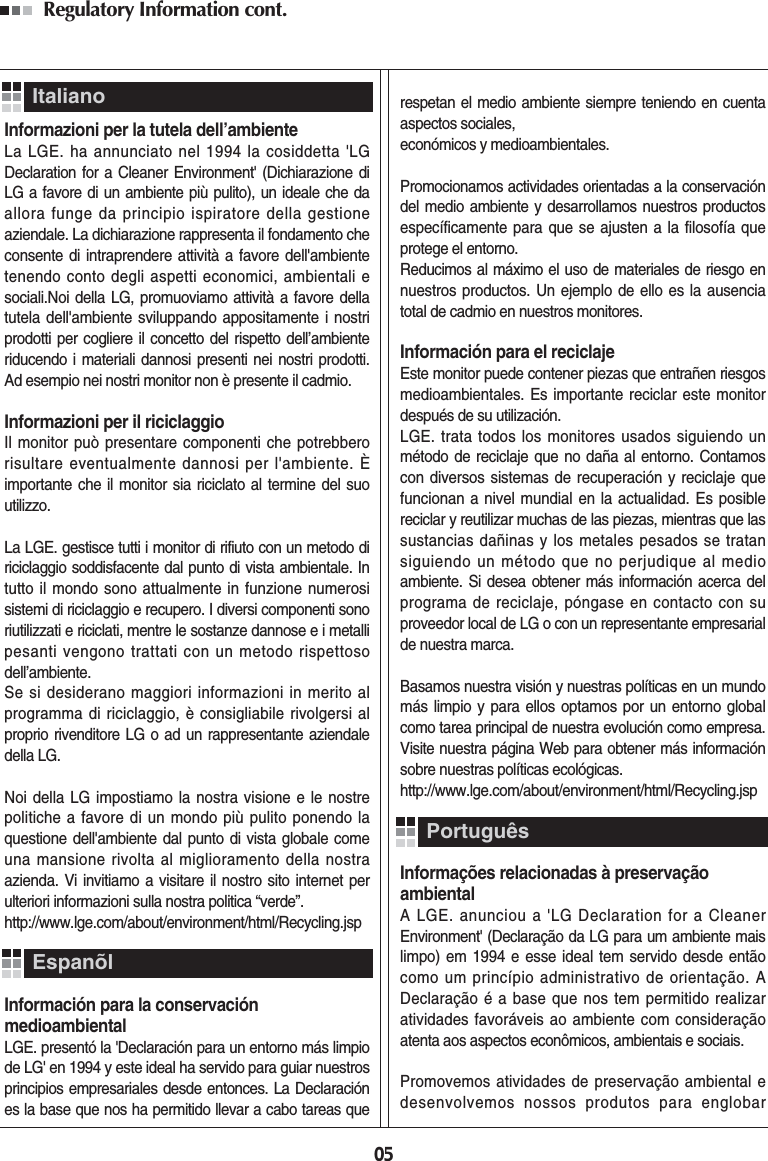
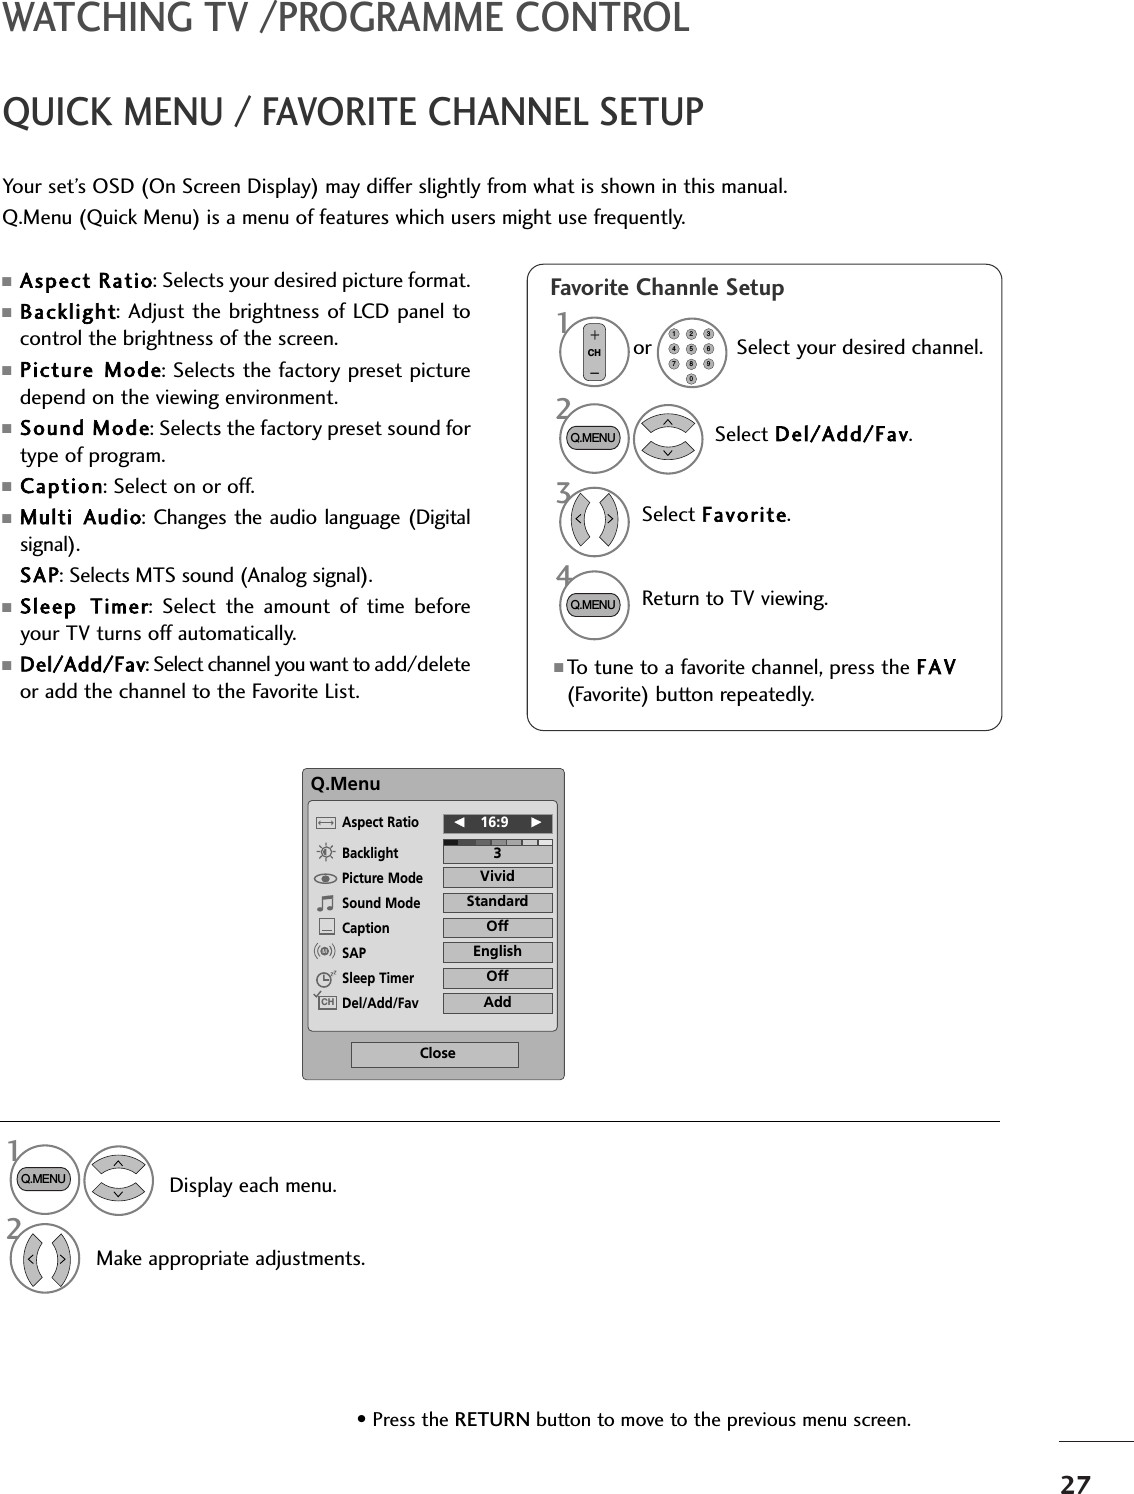
![18EXTERNAL EQUIPMENT SETUPRGB/DVI[PC] HDMI[DTV] supported mode6060505060606060502424303050606031.4731.531.2537.544.964533.7233.7528.12526.972333.71633.7556.2567.4367.5Resolution720x480/60p720x576/50p1280x720/60p1280x720/50pHorizontalFrequency(kHz) VerticalFrequency(Hz)1920x1080/60i1920x1080/50i1920x1080/24p1920x1080/30p1920x1080/50p1920x1080/60pResolution640x480800x600720x4001024 x 768HorizontalFrequency(kHz) VerticalFrequency(Hz)706075607560757560756060606031.46831.46937.50037.87946.87548.36360.12367.50063.98179.97664.67465.29075.00066.58712 8 0 x 10 24115 2 x 8 6 41680x10501920x10801600x1200](https://usermanual.wiki/LG-Electronics-USA/M237WDJ/User-Guide-1047310-Page-20.png)
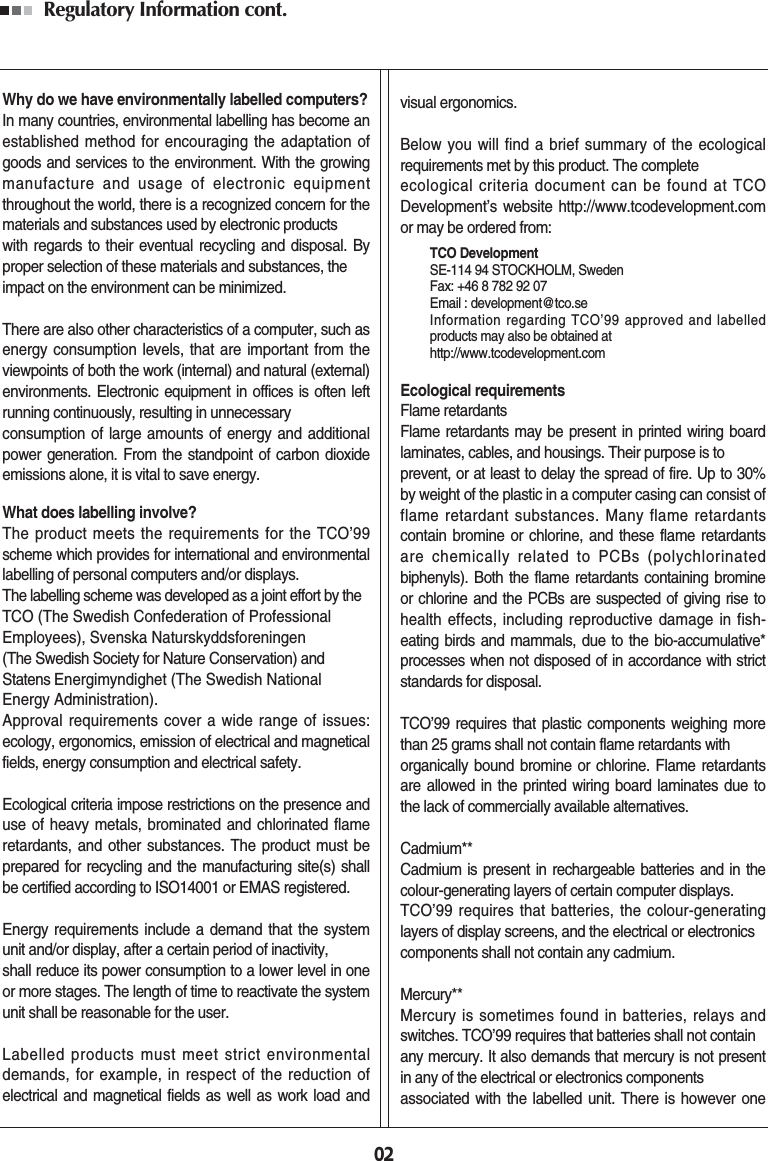
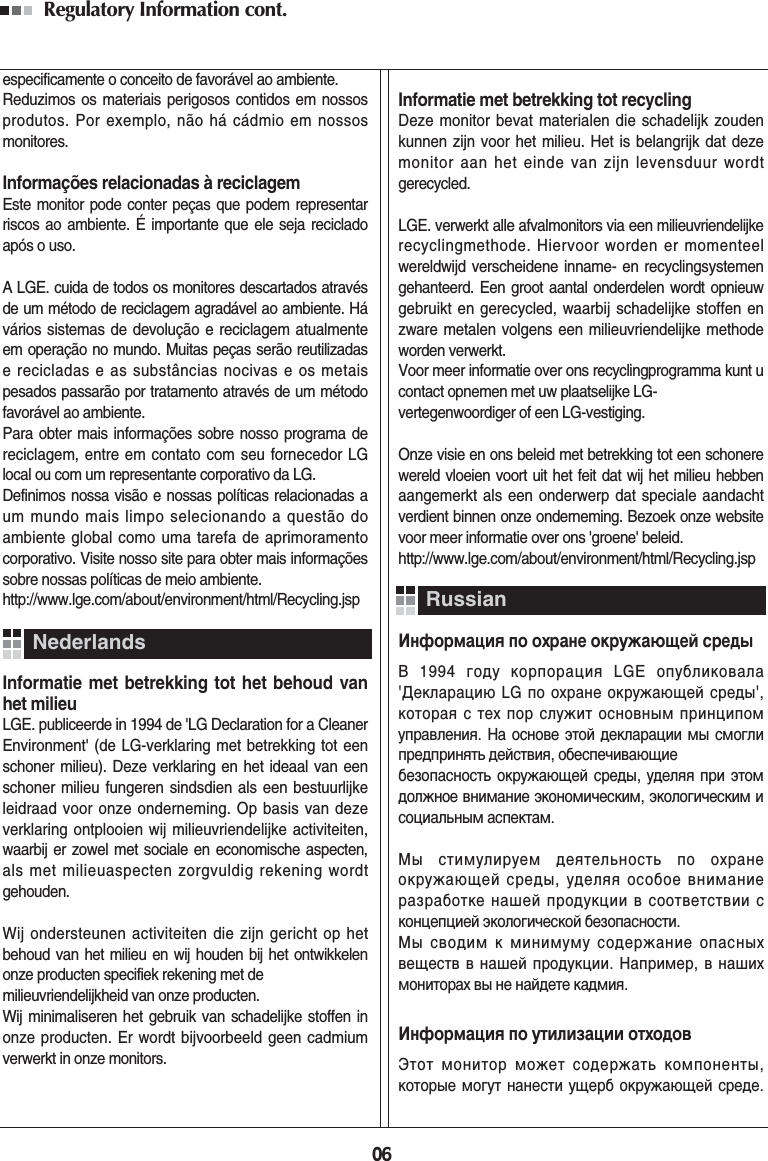
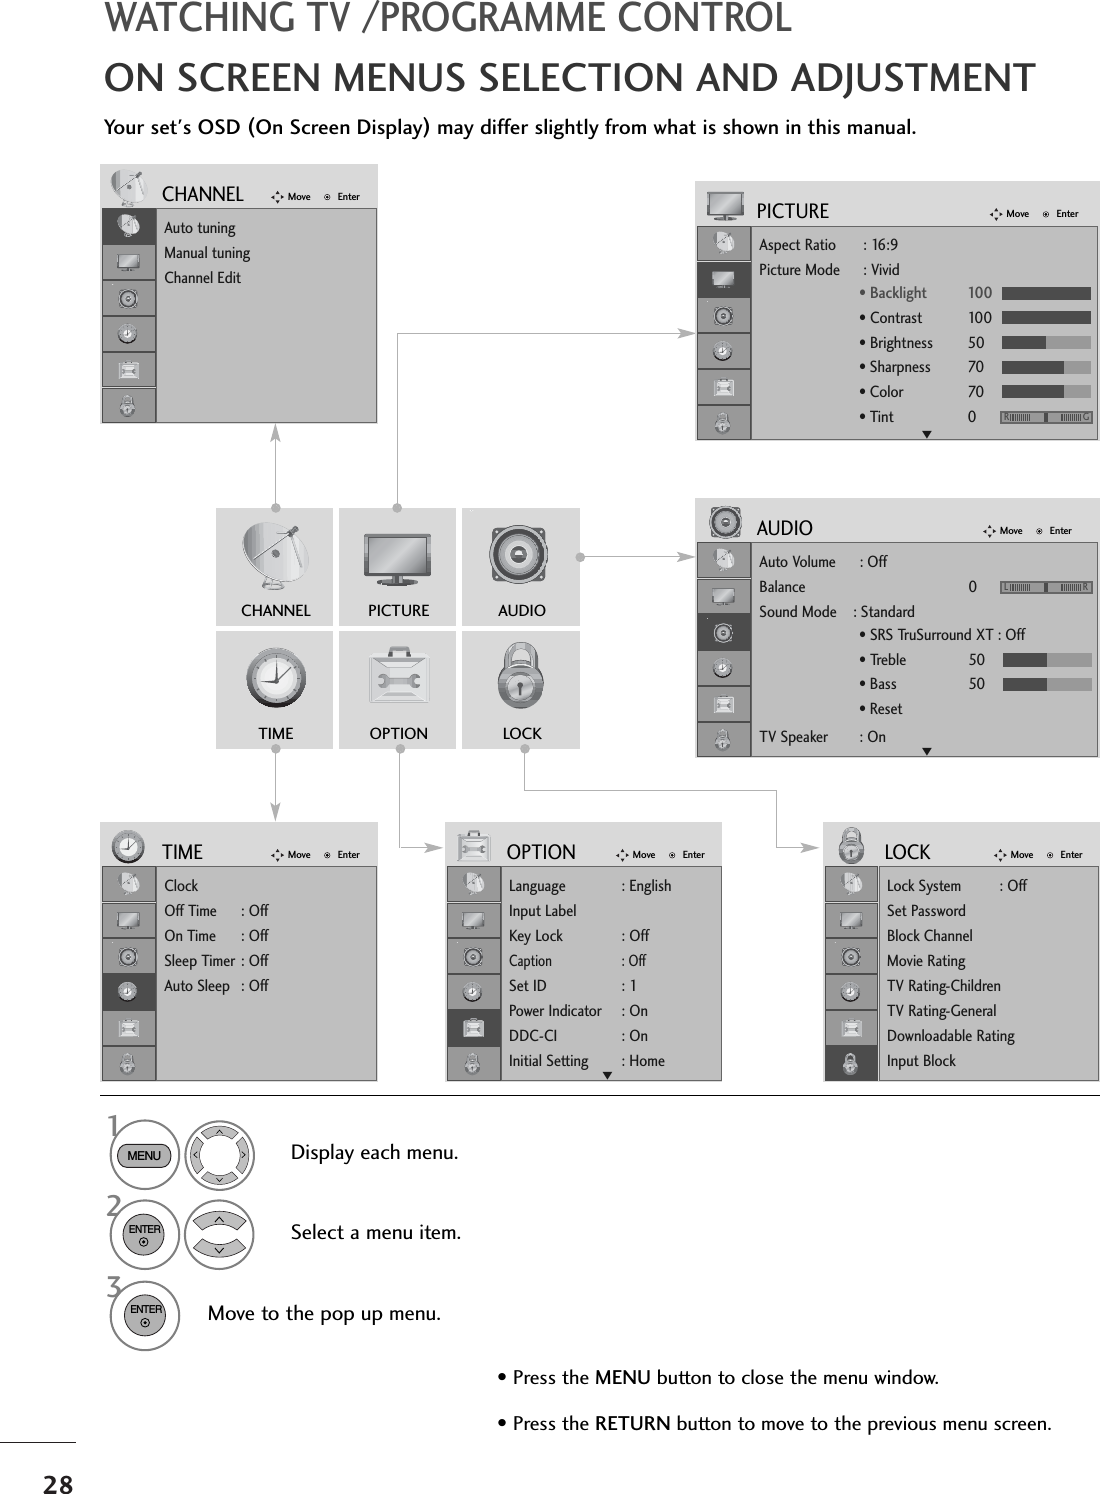
![19EXTERNAL EQUIPMENT SETUPSCREEN SETUP FOR PC MODEReturns Position, Size and Phase to the default factory settings.This function works in the following mode: RGB[PC].Screen Reset1MENUSelect PICTURE.2Select SCREEN(RGB-PC).3ENTERSelect Reset.5ENTERRun Reset.• Contrast : 90• Brightness : 50• Sharpness : 70• Colour : 50• Tint : 0• Advanced Control• ResetPICTUREMove EnterDScreen(RGB-PC)Initialize Settings.Auto Config.SCREENMove Prev.BACKResolutionPositionSizePhaseResetGENTER4ENTERSelect Yes .• Press the MENU button to close the menu window.• Press the RETURN button to move to the previous menu screen.RG](https://usermanual.wiki/LG-Electronics-USA/M237WDJ/User-Guide-1047310-Page-21.png)
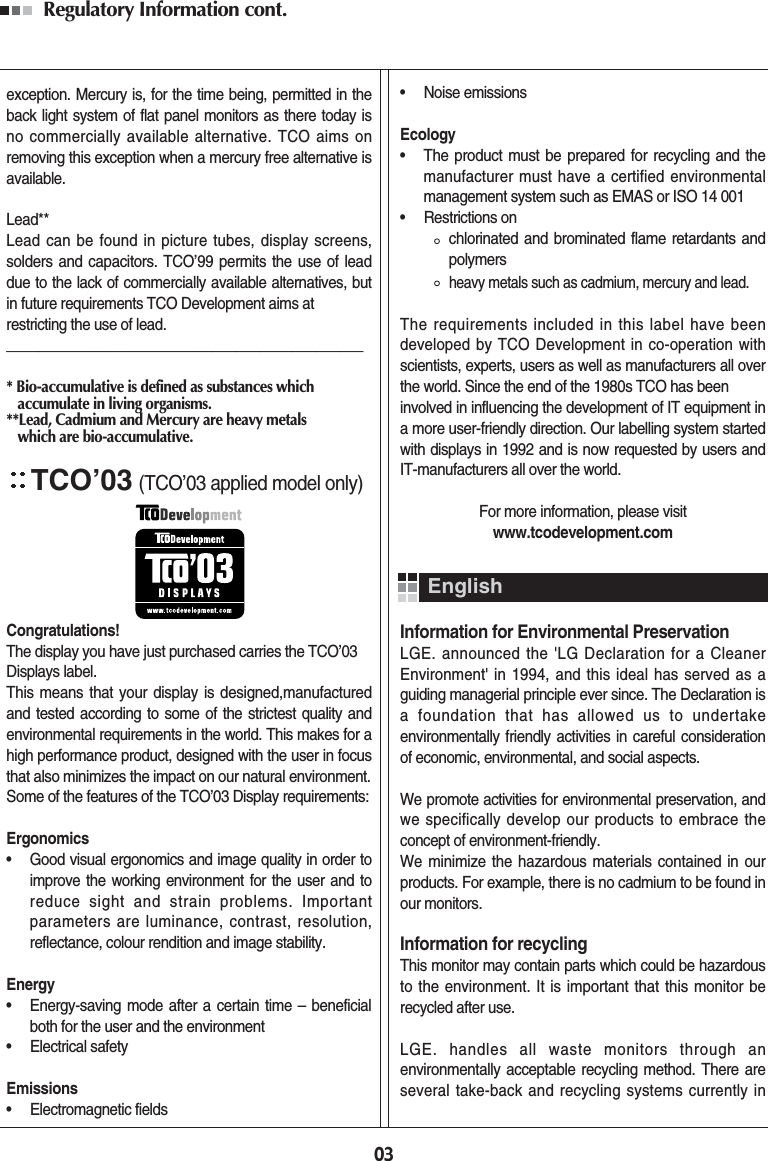
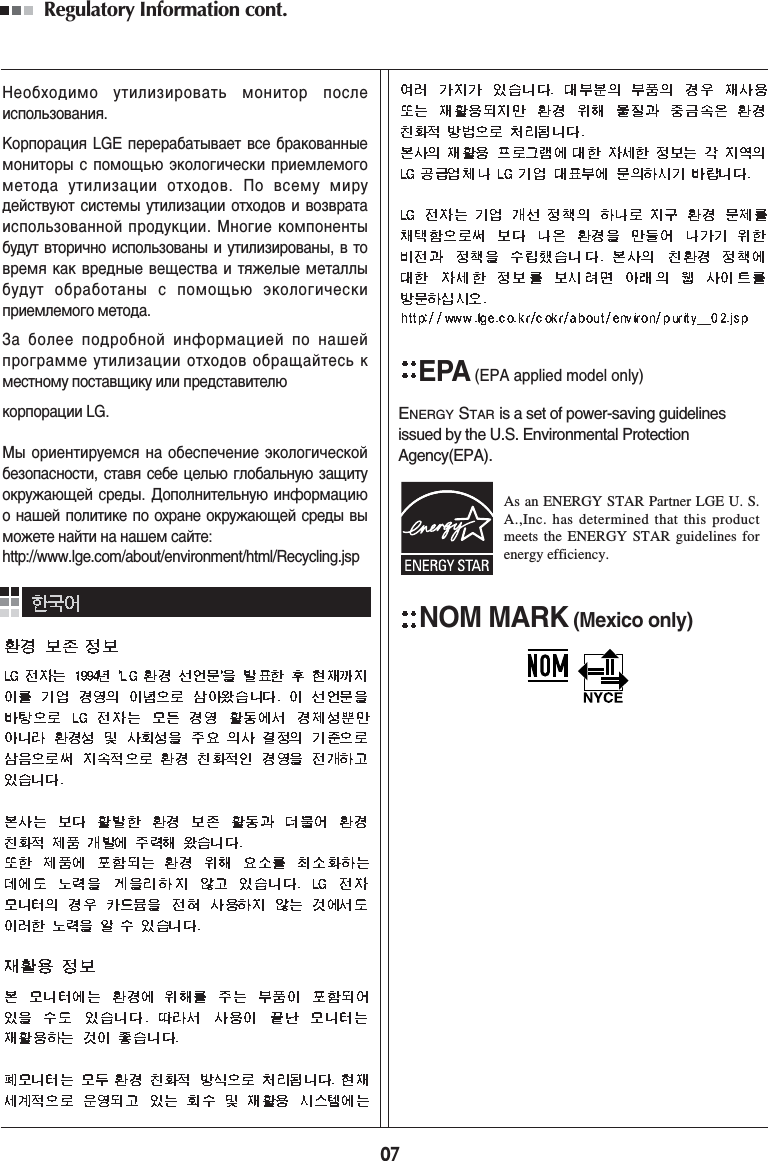
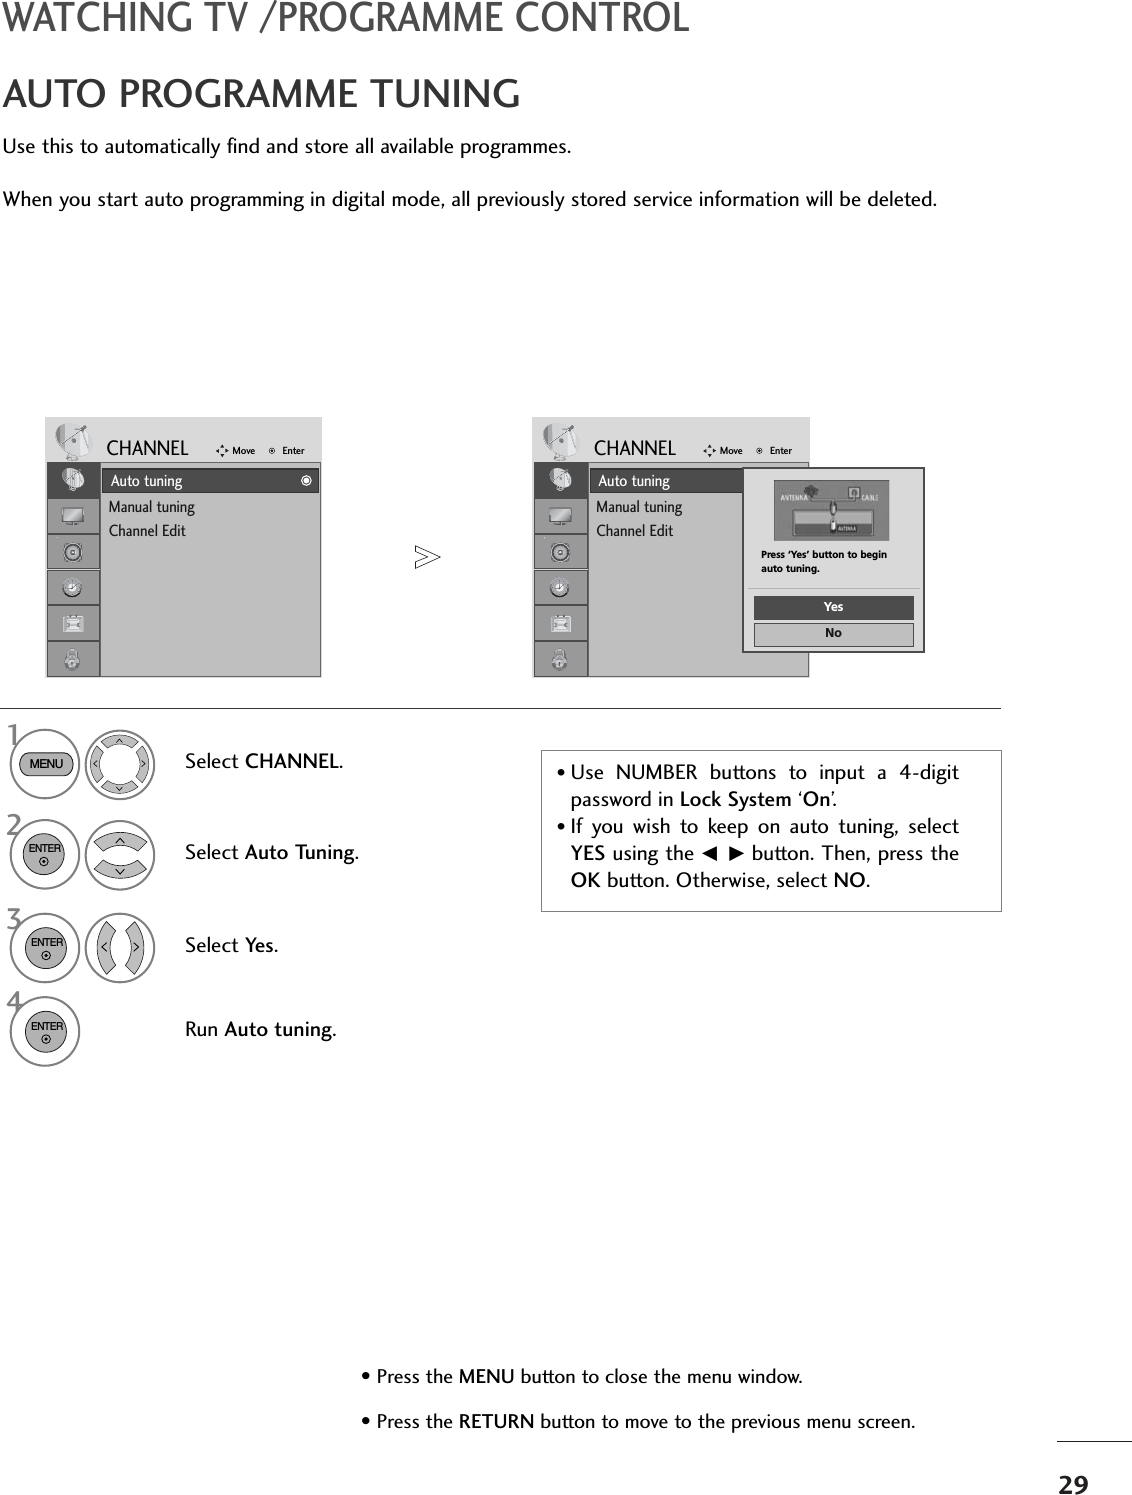
![20EXTERNAL EQUIPMENT SETUPIf the picture is not clear after auto adjustment and especially if characters are still shaky, adjust the pic-ture phase manually.This function works in the following mode: RGB[PC].Adjustment for screen Position, Size, Phase1Select PICTURE.2Select SCREEN(RGB-PC).3Select Position, Size or Phase.4Make appropriate adjustments.Auto Config.SCREENMoveResolutionPositionGSizePhaseResetGFDEMENUENTERENTER• Press the MENU button to close the menu window.• Press the RETURN button to move to the previous menu screen.Prev.BACK• Contrast : 90• Brightness : 50• Sharpness : 70• Colour : 50• Tint : 0• Advanced Control• ResetPICTUREMove EnterDScreen(RGB-PC)RG](https://usermanual.wiki/LG-Electronics-USA/M237WDJ/User-Guide-1047310-Page-22.png)
![21EXTERNAL EQUIPMENT SETUPTo view a normal picture, match the resolution of RGB mode and selection of PC mode.This function works in the following mode: RGB[PC] mode.Selecting Resolution1Select PICTURE.2Select SCREEN(RGB-PC).3Select Resolution.4Select the desired resolution.MENUENTERENTER• Press the MENU button to close the menu window.• Press the RETURN button to move to the previous menu screen.1400 x 10501680 x 1050Auto Config.SCREENMoveResolutionGPositionSizePhaseResetPrev.BACK• Contrast : 90• Brightness : 50• Sharpness : 70• Colour : 50• Tint : 0• Advanced Control• ResetPICTUREMove EnterDScreen(RGB-PC)RG](https://usermanual.wiki/LG-Electronics-USA/M237WDJ/User-Guide-1047310-Page-23.png)
![22EXTERNAL EQUIPMENT SETUP1Automatically adjusts picture position and minimizes image instability. After adjustment, if the image is stillnot correct, your set is functioning properly but needs further adjustment.Auto configureThis function is for automatic adjustment of the screen position, clock, and phase The displayed image willbe unstable for a few seconds while the auto configuration is in progress.Auto Configure (RGB [PC] mode only)•If the position of the image is still not correct,try Auto adjustment again.•If picture needs to be adjusted again after Autoadjustment in RGB (PC), you can adjust thePosition, Size or Phase.Select PICTURE.1. Using OSD2Select SCREEN(RGB-PC).3Select Auto Config.To SetAuto Config.GSCREENMoveResolutionPositionSizePhaseResetMENUENTERENTERPrev.BACKRun Auto Config.ENTER45Select Yes .ENTER• Contrast : 90• Brightness : 50• Sharpness : 70• Colour : 50• Tint : 0• Advanced Control• ResetPICTUREMove EnterDScreen(RGB-PC)RG• Press the MENU button to close the menu window.• Press the RETURN button to move to the previous menu screen.](https://usermanual.wiki/LG-Electronics-USA/M237WDJ/User-Guide-1047310-Page-24.png)
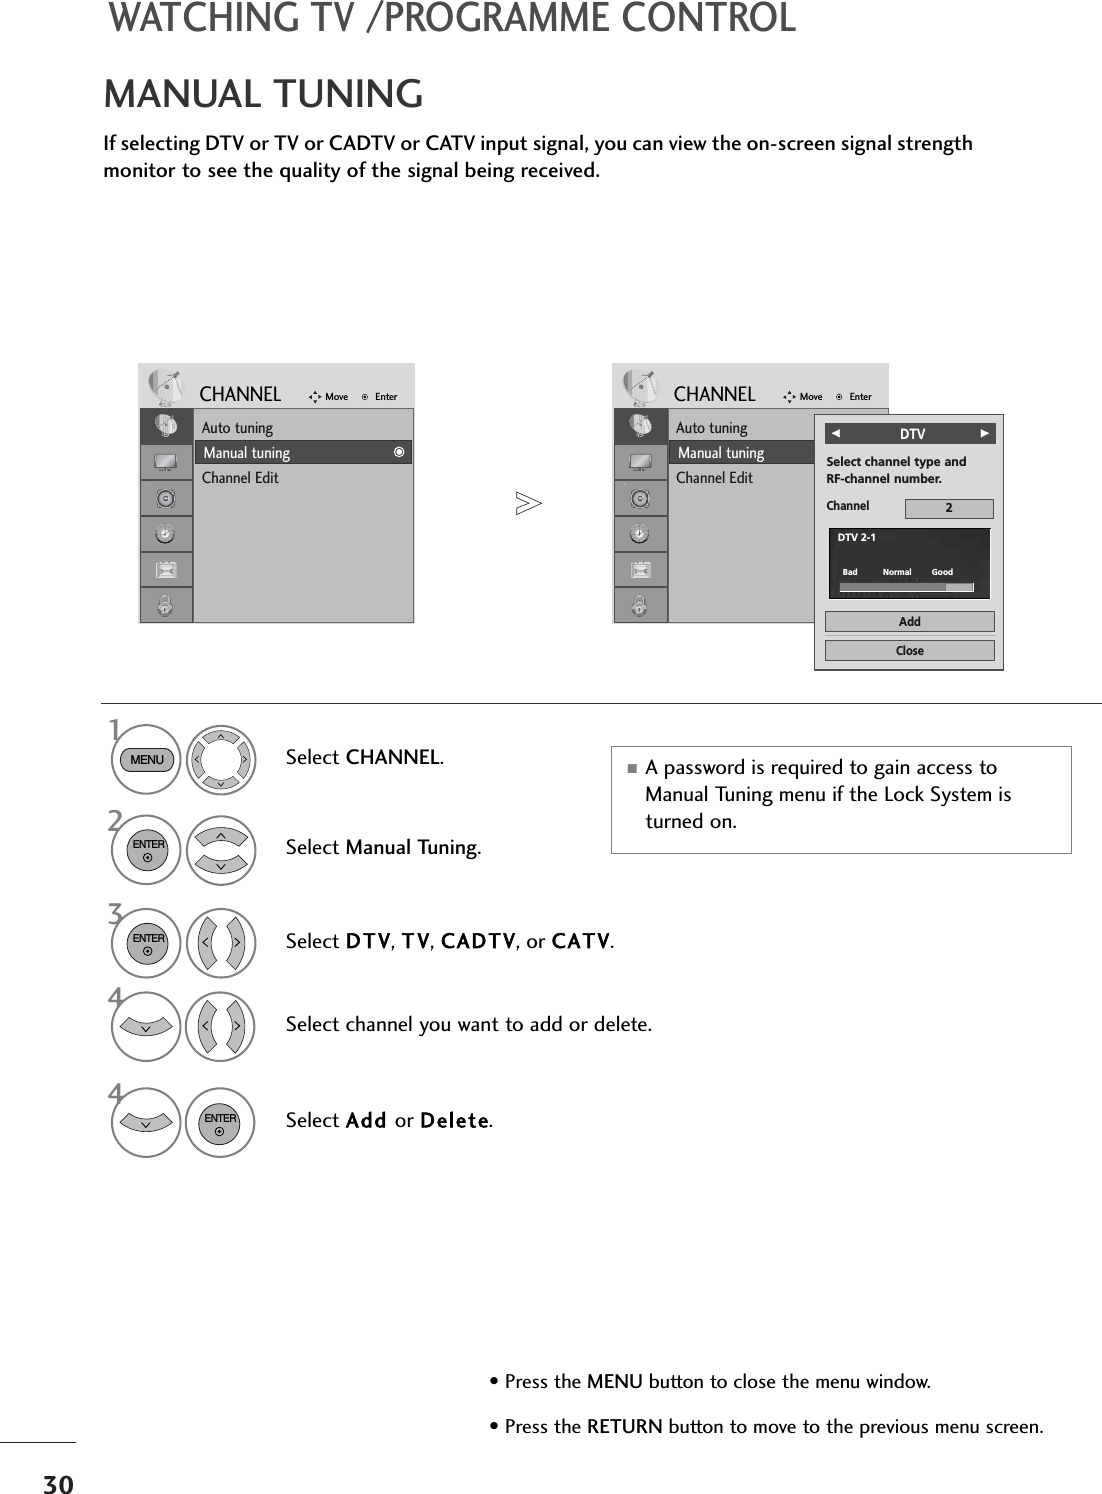


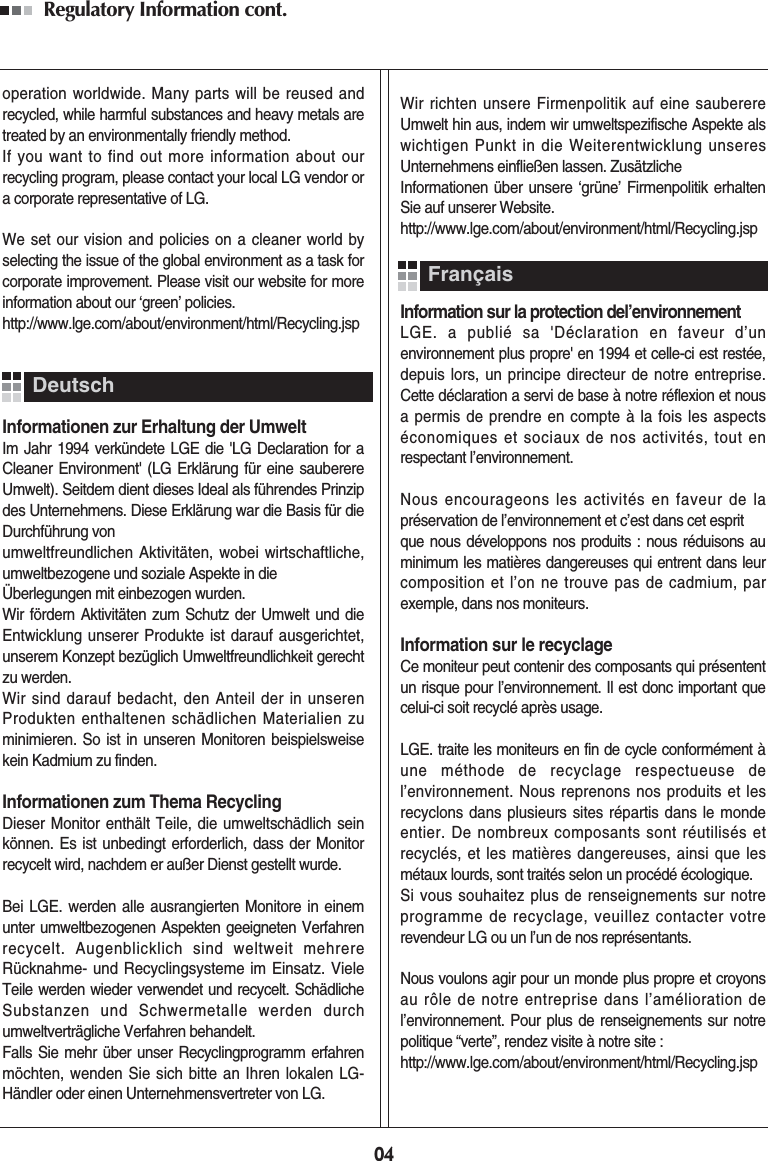
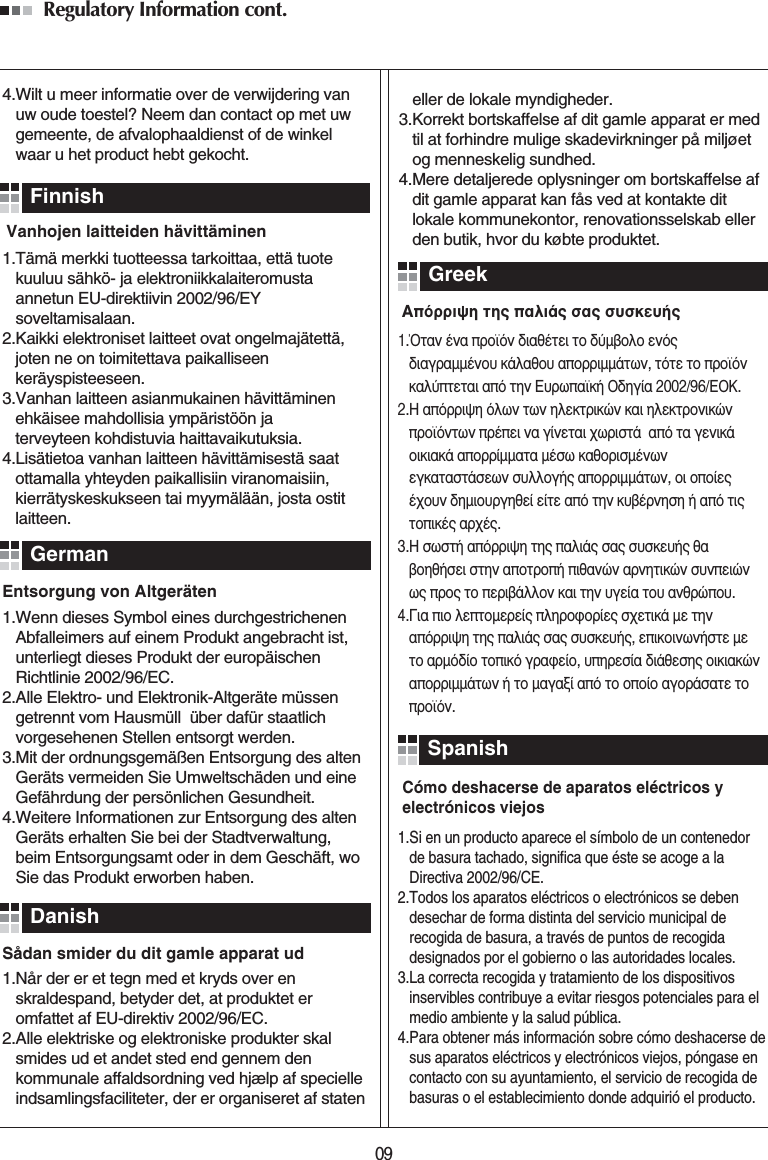
![81APPENDIX01. Power k a 00 ~0102. Aspect Ratio k c Refer to p. 8203. Screen Mute k d 00 ~0104. Volume Mute k e 00 ~0105. Volume Control k f 00 ~6406. Contrast k g 00 ~6407. Brightness k h 00 ~6408. Colour k i 00 ~6409. Tint k j 00 ~6410. Sharpness k k 00 ~6411. OSD Select k l 00 ~0112 . Remote control lock modek m 00 ~0113. Balance k t 00 ~6414 . Colour Temperaturek u 00 ~0215. Abnormal Status k z 00 ~0916. Auto Configure j u 0117. Equalize j v Refer to p. 8418 . Tune Commandm a Refer to p. 8519 . Channel Add/Skipm b 00 ~0120. Key m c Key Code21. Control Backlight m g 00 ~6422. Input select (Main) x b Refer to p. 85Communication ParametersABaud rate : 9600 bps (UART)AData length : 8 bitsAParity : NoneAStop bit : 1 bitACommunication code : ASCII codeAUse a crossed (reverse) cable.Transmission* [Command 1] : First command to control the TV.(j, k, m or x)* [Command 2] : Second command to control the TV.* [Set ID] : You can adjust the set ID to choosedesired monitor ID number in optionmenu. Adjustment range is 1 ~99. When selecting Set ID ‘0’, everyconnected set is controlled.Set ID is indicated as decimal (1~99)on menu and as Hexa decimal(0x0~0x63) on transmission/receiving protocol.* [DATA] : To transmit command data.Transmit ‘FF’ data to read status ofcommand.* [Cr] : Carriage ReturnASCII code ‘0x0D’* [ ] : ASCII code ‘space (0x20)’[Command1][Command2][ ][Set ID][ ][Data][Cr]OK Acknowledgement* The TV transmits ACK (acknowledgement) based onthis format when receiving normal data. At this time, ifthe data is in data read mode, it indicates present sta-tus data. If the data is in data write mode, it returns thedata of the PC computer.[Command2][ ][Set ID][ ][OK][Data][x]Error Acknowledgement* The TV transmits ACK (acknowledgement) based onthis format when receiving abnormal data fromnonviable functions or communication errors.[Command2][ ][Set ID][ ][NG][Data][x]Transmission / Receiving ProtocolCommand Reference List*When setting 15 ~22, a menu does not appear on screen.COMMAND1COMMAND2DATA(Hexadecimal)](https://usermanual.wiki/LG-Electronics-USA/M237WDJ/User-Guide-1047310-Page-54.png)