LG Electronics USA NT-LGX14 NOTEBOOK PC User Manual Golf X140 Win7 UG ENG 100209
LG Electronics USA NOTEBOOK PC Golf X140 Win7 UG ENG 100209
UserManual.wiki
>
LG Electronics USA
>
NT-LGX14 User Manual
>
Users Manual 2
Contents
1.
Users Manual 1
2.
Users Manual 2
3.
Users Manual 3
Users Manual 2
Navigation menu
Upload a User Manual
Namespaces
Wiki Guide
HTML
PDF
Info
Views
User Manual
Discussion / Help
Navigation
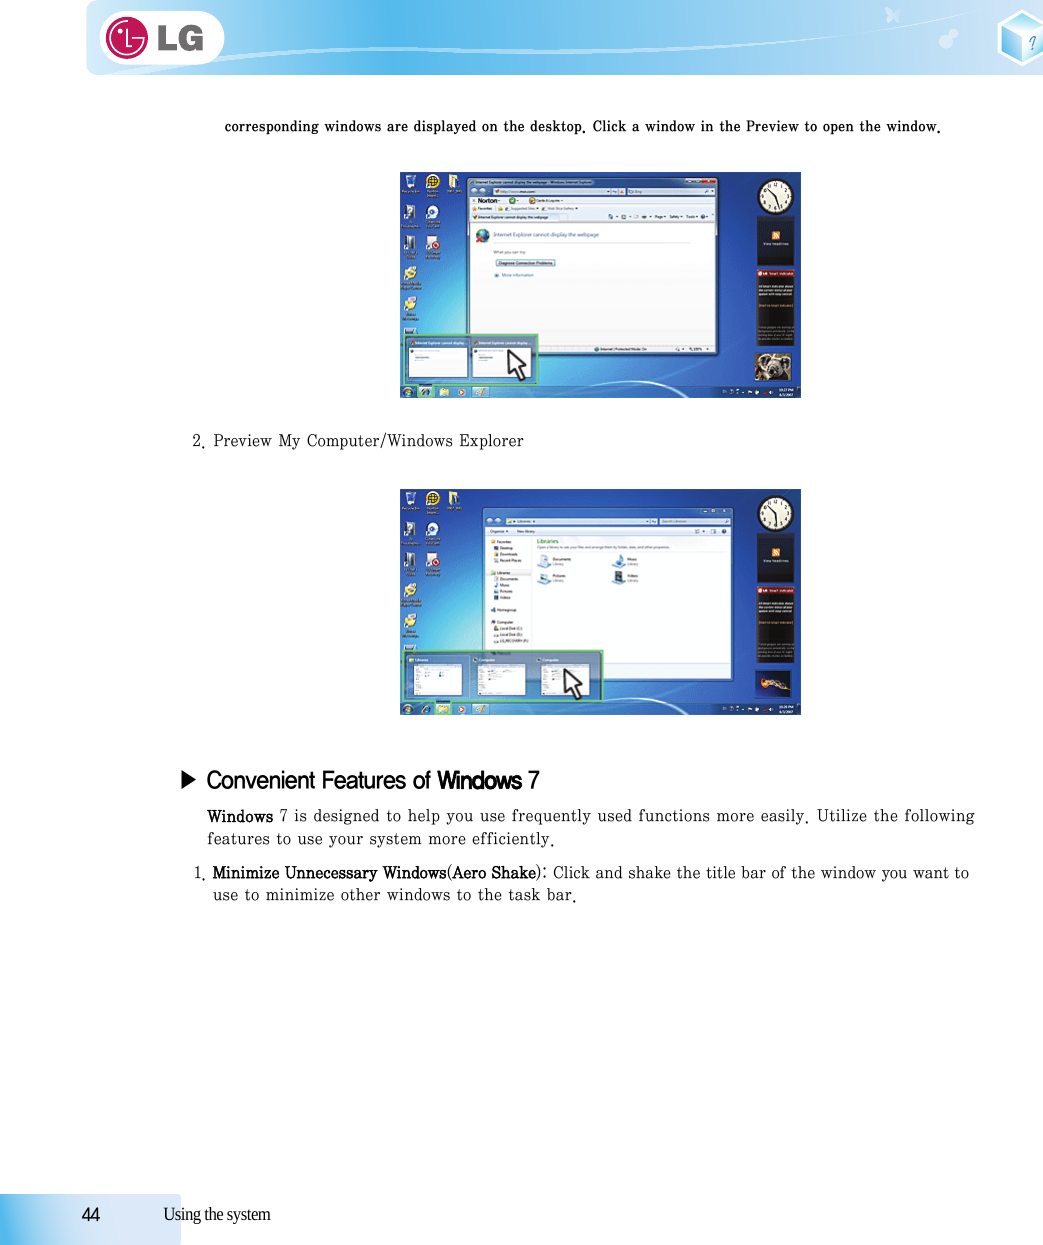
![46 Using the system▶ Changing User Account Control SettingsUser Account Control prevents any unauthorized alteration to system configurations. When someonetries to change settings or install a program that could affect others' system use, User AccountControl confirms his or her authority first.We recommend that User Account Control not be disabled. If this feature is disabled, enable itimmediately to protect the system.1. Select Start > Control Panel > View by > Small icons > User Accounts > Change User Account Control Settings.2. After changing User Account Control settings, click [OK].※ It is recommended to use the default settings for the security and safety of your system.▶Enable Windows AeroWindows Aero delivers the exquisite visual effects of Windows 7. It presents window animations innew transparent and delicate visualization.※ Windows Aero may be enabled by default depending on model type and software version.1. Right-click the desktop to display a popup window. Then click [Personalize].2. Once the [Change Visual Effect and Sound] screen appears, select the Aero theme you want to use. 3. The Aero theme where the transparence feature is applied becomes enabled.▶Disable Windows Aero1. Right-click the desktop to display a popup window. Then click [Personalize].](https://usermanual.wiki/LG-Electronics-USA/NT-LGX14.Users-Manual-2/User-Guide-1256087-Page-3.png)
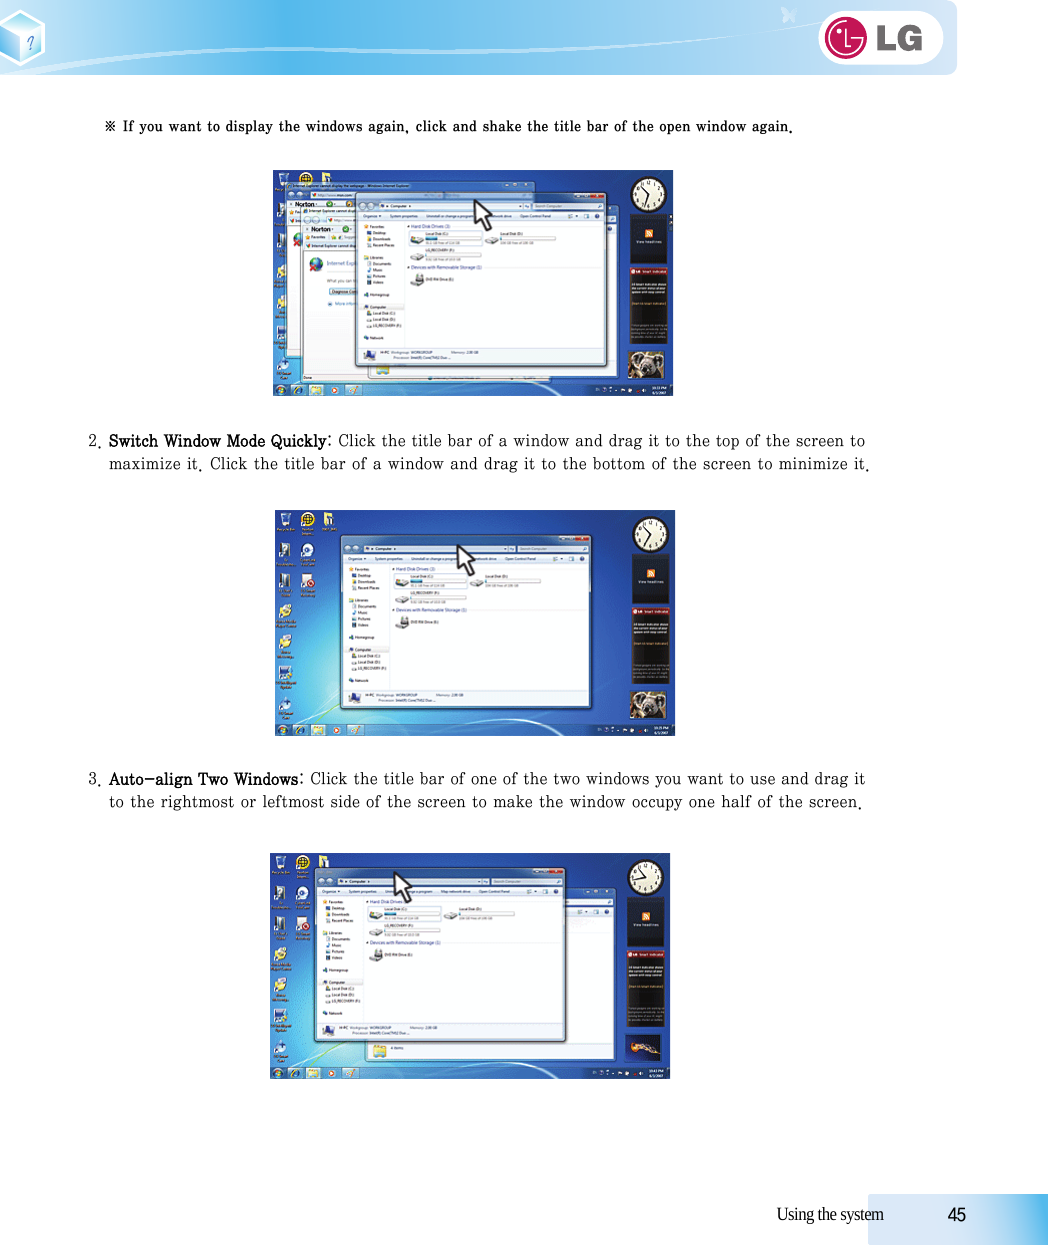
![Using the system 472. When the Change Visual Effect and Sound window appears, select [Windows 7 Basic ] in the [Basic and High Contrast Theme] menu. 3. The Aero theme is disabled.▶Using Windows Flip 3DWindows Flip 3D allows you to view all the open windows on the Desktop on one screen. Flip 3Ddisplays all the open windows in 3D, stacked view.※ To use Windows Flip 3D, the Windows Aero feature must be enabled.1. Press the Windows logo key ( ) + Tab to enable or disable Flip 3D.2. To flip through the open windows, hold down the Windows logo ( ) key, and press Tab key or simply rotate the mouse wheel. To flip over the windows clockwise or anti-clockwise one by one,hold down the Windows logo key and press the Left or Right arrow key.](https://usermanual.wiki/LG-Electronics-USA/NT-LGX14.Users-Manual-2/User-Guide-1256087-Page-4.png)
![48 Using the system3. When the intended window is displayed at the top, release the Windows logo ( ) key. To display a window without flipping through the stack, hold down the Windows logo key and click the intendedwindow.▶Windows 7 Power ManagementWindows 7 provides a more simple and reliable power management environment than that ofprevious Windows. With that, you can make Notebook PC consume power more effectively.1. Select Start > Control Panel > View by > Small icons > Power Options.2. When the [Select a power plan] window appears, select one of the items displayed under Battery Meter Plans.※ If the High Performance Settings tab is not displayed, click the down arrow on the right of [Display More PowerPlans] to display it.- Balanced: Ensures the maximum performance when needed and saves power when the system is not used.- Power saver: Reduces system performance to save power. This plan maximizes battery life.- High performance: Increases system performance and response time to their maximum. In this plan, the battery does notlast long.▶ System Termination OptionsIn Windows 7, you can use the shortcut menu to log off from user account, lock or restart the system■ If you want to display windows in the Flip 3D state constantly, press Ctrl + Windowslogo ( ) + Tab keys. In this state, to flip over the windows one by one, press Tab.In this state, to flip over the windows clockwise or anti-clockwise one by one, pressthe Left/Down or Right/Up arrow key. Press Enter to end the Flip 3D state and openthe selected window.](https://usermanual.wiki/LG-Electronics-USA/NT-LGX14.Users-Manual-2/User-Guide-1256087-Page-5.png)
![Using the system 49and switch users fast without logging off.Click the arrow button on the right of the [Shutdown] button to display more shutdown options.1. Switch User- Logs on using another user account registered in the system.2. Log Off- Exits all programs and logs off from the user account.3. Lock- Locks the user account.4. Start Again- Exits all programs and reboots the system.5. Sleep- Turns off the devices you are not using to minimize the power consumption.6. Hibernate- Stores the user programs and turns off the system.■ The sleep mode reduces the power consumption. If you use the sleep mode, youcan go back to your work quickly. It is recommended to save all the data in all openprograms before using this mode.](https://usermanual.wiki/LG-Electronics-USA/NT-LGX14.Users-Manual-2/User-Guide-1256087-Page-6.png)

![Input/Output Device 57Fn + F4 Windows Executes the mode defined in the Power Save Mode. (Example: StandbyMode, Maximum Power Saving Mode)Fn + F5When the user presses Fn + F5 keys, the touchpad mode toggles from TouchpadDisable, to Touchpad Auto-Disable (upon connection of external USB mouse), toTouchpad Enable in order. (Initialization takes 1 - 2 seconds. It is recommended touse after the initialization.)Fn + F6Turns the wireless devices (incl. Wireless LAN and Bluetooth) on and off( Bluetooth is optional, and so it may not be installed in some models.)Through hot key settings in the OSD Tray menu, the user can customize [Fn]+[F6]features. Default setting is, for all wireless devices (incl. Wireless LAN and Bluetooth),ON/Off.Fn + F7The following screen appears when you press Fn + F7 keys. (Windows 7 Starter doesnot support the Monitor Extension mode)Select the mode you want to use and press [Enter] to switch the monitor.Fn + F8Switches between the SRS Off, SRS WOW HD, SRS TruSurround HD modes for eachpressing the Fn + F8 keys.Fn + F9 Mute (Sound ON / Sound OFF)Fn + F10indicating the embedded numeric keys are available. If you press [Fn] + [Num Lk]again, you can enter text characters.Fn + F11Works as [Scroll Lock].Fn + F12Hibernate mode (When OSD is installed)Fn + Increases LCD brightness, which can have eight different levels.Fn + Decreases LCD brightness, which can have eight different levels.Fn + Turns down the volume.Fn + Turns up the volume.Fn + PgUpWorks as Home.Fn + PgDnWorks as End.Fn + Prt ScWorks as Pause.](https://usermanual.wiki/LG-Electronics-USA/NT-LGX14.Users-Manual-2/User-Guide-1256087-Page-14.png)

![62 Input/Output Device1. Click [Mouse Properties] icon in Notification Area.2. Select Activate click-free dragging (T) and click [Setup] button to adjust the time span for which you should press the left button to execute the feature.▶ ScrollingThe touch pad supports the scrolling feature.To scroll vertically or horizontally, glide your finger along the right or bottom edge. Now the screenfollows your finger movements if there is a scroll bar on either edge.](https://usermanual.wiki/LG-Electronics-USA/NT-LGX14.Users-Manual-2/User-Guide-1256087-Page-19.png)

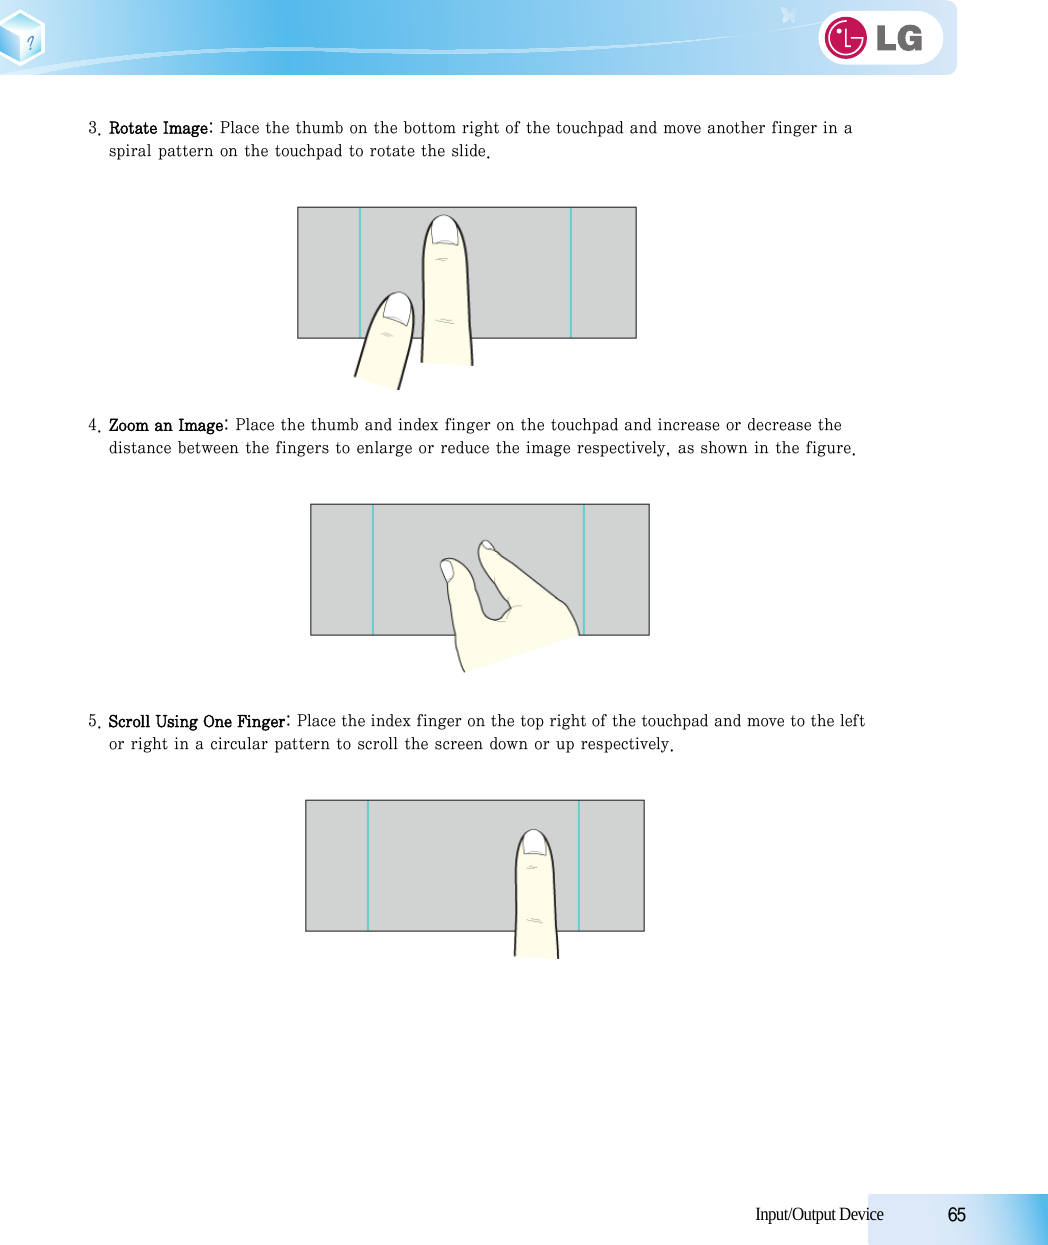
![66 Input/Output Device6. Scroll Using Two Fingers: Place two fingers on the touchpad and move up/down/left/right to scroll the screen.▶ Setting Touchpad FunctionsYou can change the touchpad functions or enable/disable the gesture function.※ The figures herein may differ by language selection and be subject to change without prior notice.1. Click [Mouse Properties] icon in Notification Area.※ If you cannot find the Mouse Properties icon in Notification Area, Select Start > Control Panel > View by > Smallicons > Mouse menu.](https://usermanual.wiki/LG-Electronics-USA/NT-LGX14.Users-Manual-2/User-Guide-1256087-Page-23.png)
![Input/Output Device 672. When the following screen appears, select the [Device Settings] tab and click [Settings...].3. When the following screen appears, change the settings as required and click [OK].](https://usermanual.wiki/LG-Electronics-USA/NT-LGX14.Users-Manual-2/User-Guide-1256087-Page-24.png)

![72 Connecting Peripherals5-3. Using IVT BlueSoleilIVT BlueSoleil is a Windows-based IVT software which establishes wireless connection betweenBluetooth-enabled desktop or notebook PC and other Bluetooth-enabled devices. IVT BlueSoleilallows the user to access various Bluetooth-enabled digital devices such as camera, cell phone,headset, printer, GPS receiver, etc. It can also establish network and exchange data with otherBluetooth-enabled computer or PDA.※ Bluetooth is optional, and so it may not be installed in some models.※ The figures herein may differ by language selection and be subject to change without prior notice.※ For more details about how to use Bluesoleil, refer to the corresponding help.▶Bluesoleil1. Double-click the icon on the right bottom of the taskbar.2. Bluesoleil screen appears.※ If Bluetooth is turned on, it searches the Bluetooth devices in the area and displays them on the screen.※ If a Bluetooth device is not displayed on the screen, press [F5] or [Fn]+[F6] to see if Bluetooth is turned on.1. Bluesoleil Menu Button: Provides menus such as Find Device, Sorting Criteria, My Device and Help.](https://usermanual.wiki/LG-Electronics-USA/NT-LGX14.Users-Manual-2/User-Guide-1256087-Page-29.png)


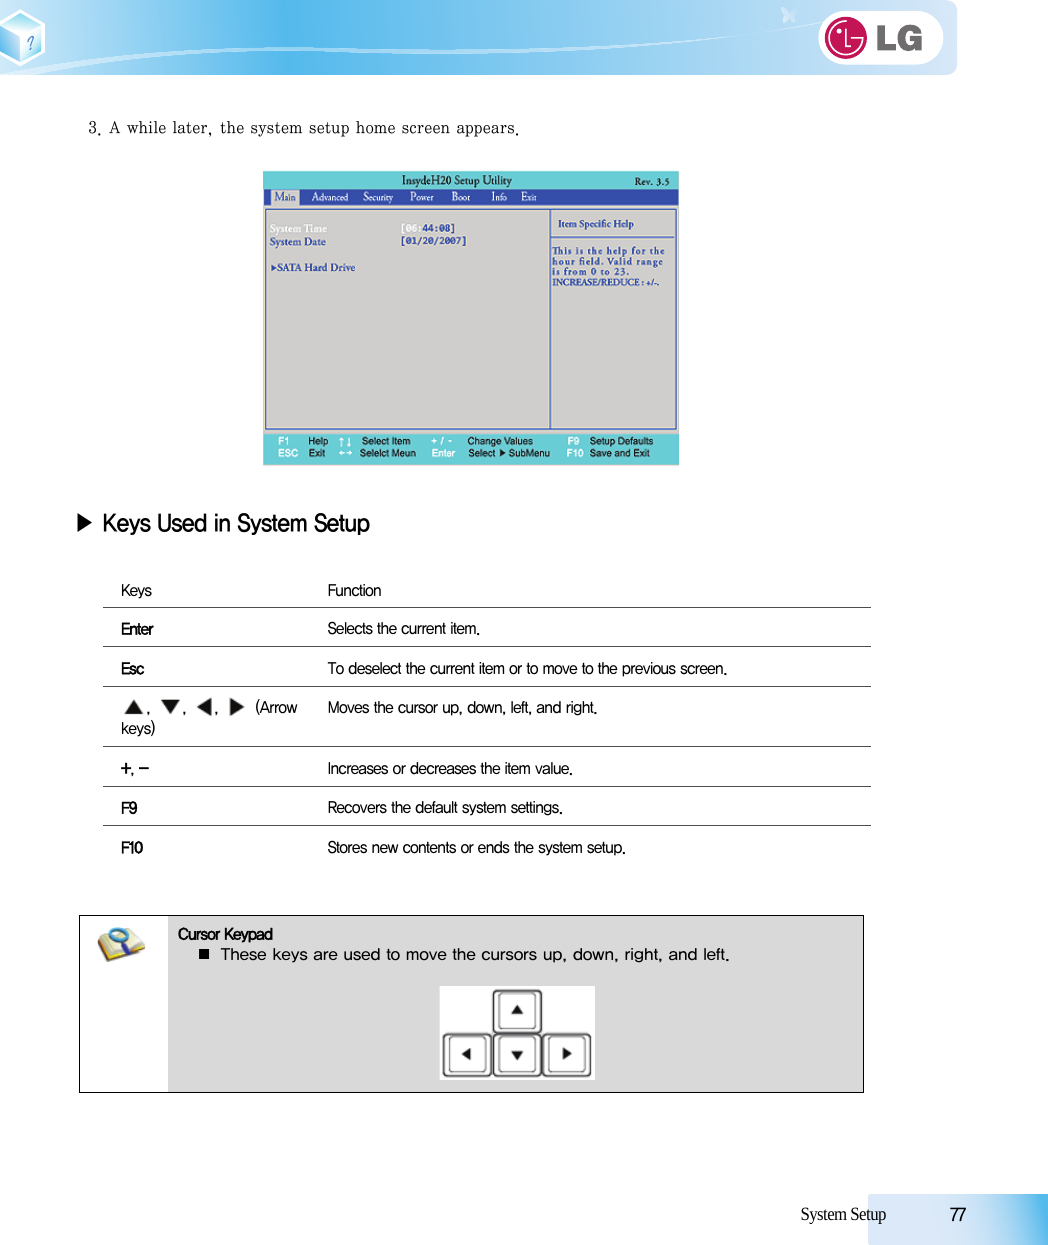
![76 System Setup6-1. Starting System SetupSystem setup means storing the hardware configuration information of the computer in the CMOSRAM. Through system setup, the computer retrieves various information including current date andtime, memory capacity, and hard disk capacity and type.You setup the system when you set passwords, change the booting order, and add new peripheraldevices to the machine.※ Items displayed on the Setup screen may differ by model type and spec.■ Refer to [Setting the Password].■ Refer to [Changing or Deleting the Password].■ Refer to [Restore the Default Settings].1. Turn on the notebook PC.2. Press [F2] while "[F2]: BIOS Setup, [F12]: Boot Menu" appears on the bottom of the LG logo screen.■ Do not change the system setup unless necessary. Incorrect system setup may causeerrors during system operation. Take caution when changing the system setup.■ For performance improvement, CMOS setup menu configuration and the initial setupstatus may be changed and may become different from images included in the usermanual.](https://usermanual.wiki/LG-Electronics-USA/NT-LGX14.Users-Manual-2/User-Guide-1256087-Page-33.png)
![78 System Setup6-2. Setting the PasswordThis process is to set a password so that other people cannot use the notebook PC or change thesettings.The user can set a password while booting the system or setting up the system.▶Set Supervisor PasswordThe password prevents unauthorized people from accessing the notebook PC. By default, nopassword is set for the machine. If an unauthorized person changes the password in the CMOSSetup, you will be unable to access the system.1. After opening the system setup screen, use the arrow keys to move to [Security]. 2. When the following screen appears, select [Set Supervisor Password] with the arrow keys and press [Enter]. 3. When the following message appears, input the password and press [Enter]. The password must not exceed 8 characters of letter (A - Z), number (0 - 9) or their combination.■ Without the registered password, if any, access to the system will be denied. Write downand keep the password in a safe place.](https://usermanual.wiki/LG-Electronics-USA/NT-LGX14.Users-Manual-2/User-Guide-1256087-Page-35.png)
![System Setup 794. When the following message appears, press [Enter]. 5. To save the changes in system setup, press [F10].6. When the following message appears, select [Yes] and press [Enter]. The notebook PC will restart.▶Set User PasswordThe password set by the Set User Password process is lower than that set by the Set SupervisorPassword process, and so the user can use theSet User Password only after setting a password inthe Set Supervisor Password menu.1. After opening the system setup screen, use the arrow keys to move to Security . ■With Supervisor Password, the user will be authorized to set all items in the CMOSsetup menu. In case other people also use the notebook PC, it is recommended toset the User Password.](https://usermanual.wiki/LG-Electronics-USA/NT-LGX14.Users-Manual-2/User-Guide-1256087-Page-36.png)
![80 System Setup2. When the following screen appears, select Set User Password with the arrow keys and press [Enter]. 3. When the following message appears, input the password and press [Enter]. The password must not exceed 8 characters of letter (A - Z), number (0 - 9) or their combination.4. When the following message appears, press [Enter]. 5. To save the changes in system setup, press [F10].](https://usermanual.wiki/LG-Electronics-USA/NT-LGX14.Users-Manual-2/User-Guide-1256087-Page-37.png)
![System Setup 816. When the following message appears, select [Yes] and press [Enter]. The notebook PC will restart.▶Power on PasswordPower on password feature protects the system by requesting Set Supervisor Password or Set UserPassword during boot up.1. After opening the system setup screen, use the arrow keys to move to Security. 2. When the following screen appears, set Set Supervisor Password only or both Set Supervisor Password and Set User Password.■UserPassword allows limited access to the items in CMOS setup compared to theSupervisor Password item.](https://usermanual.wiki/LG-Electronics-USA/NT-LGX14.Users-Manual-2/User-Guide-1256087-Page-38.png)
![82 System Setup3. Select Power on passwrod, and change Disable into Enable using + and - keys.▶Set All Hdd PasswordSet All Hdd Password is to set a password in the HDD separately from the Supervisor Password.1. After opening the system setup screen, use the arrow keys to move to Security. 2. When the following screen appears, select Set All Hdd Password with the arrow keys and press [Enter]. ■ If the user presses both [Shift] and [+], he/she can select between [Enabled] and[Disabled].](https://usermanual.wiki/LG-Electronics-USA/NT-LGX14.Users-Manual-2/User-Guide-1256087-Page-39.png)
![System Setup 833. When the following message appears, input the password and press [Enter]. The password must not exceed 8 characters of letter (A - Z), number (0 - 9) or their combination.4. When the following message appears, press [Enter]. 5. To save the changes in system setup, press [F10].6. When the following message appears, select [Yes] and press [Enter]. The notebook PC will restart.Without the HDD password, it is impossible to recover the HDD.■ The replacement of the HDD due to missing of the HDD Password is not covered by thewarranty.](https://usermanual.wiki/LG-Electronics-USA/NT-LGX14.Users-Manual-2/User-Guide-1256087-Page-40.png)
![84 System Setup6-3. Changing or Deleting the PasswordYou can delete or change the password only after inputting the current password.▶ Changing the Password1. Execute the System Setup, enter the password, and press [Enter] .2. Change the password in the same way as setting one.▶ Deleting the Password1. Execute the System Setup, enter the password, and press [Enter].2. After opening the system setup screen, use the arrow keys to move to Security. 3. Select a password to change, press [Enter], and enter the current password.](https://usermanual.wiki/LG-Electronics-USA/NT-LGX14.Users-Manual-2/User-Guide-1256087-Page-41.png)
![System Setup 854. When the following screen appears, press [Enter].5. When the following screen appears, press [Enter].6. When the following screen appears, check the settings and press [Enter].7. To save the changes in system setup, press [F10].8. When the following message appears, select [Yes] and press [Enter]. The notebook PC will restart.](https://usermanual.wiki/LG-Electronics-USA/NT-LGX14.Users-Manual-2/User-Guide-1256087-Page-42.png)