LG Electronics USA SA565JP LASER PROJECTOR User Manual
LG Electronics USA LASER PROJECTOR
Contents
- 1. User Manual 1
- 2. User Manual 2
- 3. User Manual 3
User Manual 1

Owner's Manual
LASER PROJECTOR
SA560
SA565
Please read the safety information carefully before using the product.
www.lg.com
(Brazil : www.lge.com)
P/NO: SAC30666052 (1212-REV01)

2
LICENSE
LICENSE
Supported licenses may differ by model. For more information about licenses,
visit www.lg.com.
Manufactured under license from Dolby Laboratories. “Dolby “and
the double-D symbol are trademarks of Dolby Laboratories.
ABOUT DIVX VIDEO: DivX® is a digital video format created by
video.
must be registered in order to play purchased DivX Video-on-
Demand (VOD) movies. To obtain your registration code, locate
com for more information on how to complete your registration.
premium content.”
Rovi Corporation or its subsidiaries and are used under license.”
“Covered by one or more of the following U.S. patents :
Manufactured under license under U.S. Patent Nos: 5,956,674;
Inc. Product includes software. © DTS, Inc. All Rights Reserved.
NOTE
y Image shown may differ from your projector.
y Your projector’s OSD (On Screen Display) may differ slightly from that shown in
this manual.
This device meets the EMC requirements for home appliances (Class B) and is
intended for home usage. This device can be used in all regions.
3
Safety Precautions
FCC NOTICE
Warning - Class B
(b) For a Class B Digital device or
peripheral, the instructions furnished
the user shall include the following or
similar statement, placed in a prominent
NOTE: This equipment has been tested
and found to comply with the limits for
a Class B digital device, pursuant to
are designed to provide reasonable
protection against harmful interference
in a residential installation. This
equipment generates, uses and can
radiate radio frequency energy and, if
not installed and used in accordance
with the instructions, may cause harmful
interference to radio communications.
interference will not occur in a particular
installation. If this equipment does
cause harmful interference to radio
or television reception, which can be
determined by turning the equipment off
and on, the user is encouraged to try to
correct the interference by one or more
of the following measures:
- Reorient or relocate the receiving
antenna.
- Increase the separation between the
equipment and receiver.
- Connect the equipment into an outlet
on a circuit different from that to which
the receiver is connected.
radio/TV technician for help.
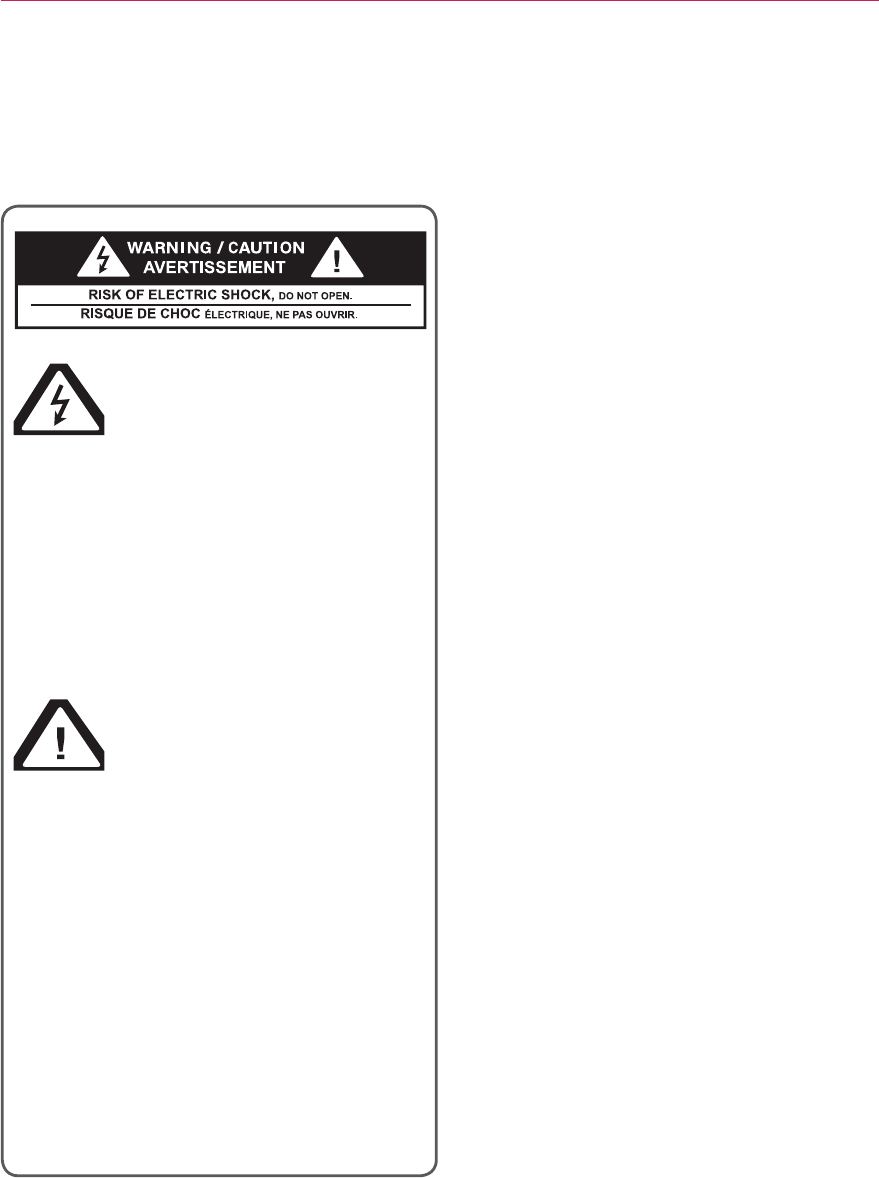
SAFETY INSTRUCTIONS
Please take note of the safety instructions to prevent any potential ac-
cident or misuse of the projector.
arrowhead symbol, within
an equilateral triangle, is
intended to alert the user to the
presence of uninsulated “dangerous
voltage” within the product’s
magnitude to constitute a risk of
electric shock to persons.
within an equilateral
triangle is intended to alert
the user to the presence
of important operating and
maintenance (servicing) instructions
in the literature accompanying the
appliance.
WARNING/CAUTION
OR MOISTURE.

4
Safety Precautions
Read these instructions.
Follow all instructions.
Indoor Installation
WARNING
y Do not place the projector in direct
sunlight or near heat sources such as
radiators, fires, stoves, etc
.
- This may result in fire.
y Do not place flammable materials
such as aerosols near the projector.
- This may result in fire.
y Do not allow children to cling to or
climb up to the projector.
- This may cause the projector to fall,
causing injury or death.
y Do not install the product in a place
with no ventilation (e.g., on a book-
shelf or in a closet) or on a carpet or
cushion.
- This may result in fire due to the
increase in internal temperature.
y Do not place the projector close to
sources of steam or oil such as a
humidifier or kitchen counter.
- This may result in fire or electric
shock.
y Do not place the projector where it
- This may result in fire.
y Do not use the projector in a damp
place such as a bathroom where it is
likely to get wet.
- This may result in fire or electric
shock.
y Do not allow a tablecloth or curtain to
block the air vent.
- This may result in fire due to the
increase in the internal temperature.
y Ensure good ventilation around the
projector. The distance between the
projector and the wall should be
at
.
- This will prevent fire due to the
increase in the internal temperature.
y When installing the projector on a
ceiling or wall, a professional techni-
cian should install the product using
the authorized tools.
- If installed improperly, the projec-
tor may fall, causing personal injury
or property damage. To install the
product, please contact the customer
support center.
y When installing or adjusting a
mounting
device, do not use oil or
lubricant for the purpose to prevent
loosening of screws
. If you apply an
adhesive oil or lubricant
to the projec-
tor,
this may cause the case to crack
and the projector to fall. This may
also cause serious personal injury
and damage to the projector when
there is a person under the mounting
device.

5
Safety Precautions
CAUTION
y When placing the projector on a table
or shelf, be careful not to put it near
the edge.
- The projector could fall due to bal- The projector could fall due to bal-The projector could fall due to bal-
ance problems, which may cause
personal injury or damage to the
product. Make sure to use the pro-
jector cabinet or stand that fits the
projector.
y When moving the projector
, make
sure to switch it off
and remove the
power plug and cords.
- The power cord may be damaged,
resulting in fire or electric shock.
y Do not place the projector on an
unstable or vibrating surface such as
a wobbly shelf or a slope.
- It may fall and cause injury.
y Be careful not to tip the projector over
the projector.
- This may cause personal injury or
damage to the projector.
Power
WARNING
y The grounding wire should be con-
nected.
- Ensure that you connect the ground-
ing cable to avoid electric shock.
If it is not possible to ground the unit,
separate circuit breaker.
Do not try to ground the projector
by connecting it to telephone wires,
lightning rods or gas pipes.
y The power plug should be inserted
fully into the power outlet.
- An unstable connection may cause
a fire.
y Do not place heavy objects on the
power cord.
- This may result in fire or electric
shock.
y Never touch the power plug with wet
hands.
- This may result in electric shock.
y Do not plug too many devices into
one multi-power outlet.
- This may result in fire due to the
power outlet overheating.
y Prevent dust from collecting on the
power plug pins or outlet.
- This may result in fire.
y To turn off the main power, remove
the power plug, which should be
positioned so it is easy to access for
operation.

6
Safety Precautions
CAUTION
y
- A damaged wire may create a fire
hazard.
y Ensure the power cord and plug are
not damaged, modified, severely
bent, twisted, pulled, sandwiched
or hot. Do not use the product if the
power outlet is loose.
- This may result in fire or electric shock.
y
devices.
-
The wire's sheath may melt, which
may result in fire or electric shock
.
y Place the projector where people will
not trip over or tread on the power
cord to protect the power cord and
plug from any damage.
- This may result in fire or electric shock.
y Do not turn the projector on or off
by
plugging in the power plug or unplug-
ging it from the power outlet.
(Do not use the power plug as a switch.)
- This may result in electric shock or
damage to the product.
y Do not insert a conductor into the other
side of the wall outlet while the power
plug is inserted into the wall outlet.
In addition, do not touch the power
plug immediately after it is disconnected
from the wall outlet.
- This may result in electric shock.
y Only use the official power cord pro-
vided by LG Electronics. Do not use
other power cords.
- This may result in fire or electric
shock.
y Check the power cord specifications.
Do not use an inappropriate power
cable.
- This may result in electric shock.
When in Use
WARNING
y Do not place anything containing
liquid on top of the projector such as
a vase, flower pot, cup, cosmetics, or
medicine; or ornaments, candles, etc.
- This may result in fire or electric
shock, or cause injury due to falling.
y When there is smoke or a strange
smell coming out from the projector
or a foreign object falls into the pro-
jector, please switch it off and unplug
it from the power outlet and contact
our service center.
-
Otherwise, this may result in fire or
electric shock.
y In the event that there is a heavy
impact or the cabinet is damaged,
switch it off, unplug it from the power
outlet and contact an authorized ser-
vice
center
.
- This may result in electric shock.
y Do not insert pieces of metal such as
coins, hairpins or metal debris, nor
flammable materials such as paper or
matches into the projector.
- This is to prevent electric shock or fire.
y In the event that liquid or a foreign
object falls into the projector, switch it
off and unplug it from the power outlet
and contact our service center.
- This may result in fire or electric
shock.
y Make sure that a child does not swal-
low the batteries when you replace
the old remote control batteries with
of children.
- If a child swallows a battery, consult
a doctor immediately.
y Never open any cover on the projector.
-
There is a high risk of electric shock
.

7
Safety Precautions
y Do not look directly into the lens
when the projector is in use.
- The bright light may damage your
eyes.
y When the lamp is on or has just been
turned off, avoid touching the air vent
or lamp, because these will be very hot.
y If there is a gas leak in the room with
the projector, do not touch the projector
or power outlet. Open the windows
for ventilation.
- Sparks may cause fire or burns.
y Unplug the power cord from
the outlet
during a lightning storm.
- This will prevent shock or damage
to the projector.
y Do not use the projector near
electronic devices that generate a
strong magnetic field.
y Do not put the plastic package used
to pack the projector around your
head.
- This may cause suffocation.
y Do not keep your hand on the projector
for a long time when it is running.
y When you play a game by connecting
a game console to a projector, it is
recommended that you maintain
a
distance of more than four times the
diagonal length of the screen.
- Make sure that the connecting cable is
long enough.
Otherwise, the product
may fall causing
personal injury or
damage to the product.
y Do not place the projector or its
remote control with battery in an
environment.
- This may result in fire.
CAUTION
y Do not place heavy objects on the
projector.
- It may fall down and cause personal
injury.
y Be careful not to allow any impact to
the lens during transport.
y Do not touch the lens of the projector.
- The lens may be damaged.
y Do not use any sharp tools on the
projector such as a knife or hammer,
because this may damage the casing.
y In the event that no image appears
on the screen or no sound is heard,
stop using the projector. Switch off the
projector, unplug it from the power out-
let
and contact our service center
.
- This may result in fire or electric shock.
y Do not drop anything onto
the projector or allow anything to
bang into the projector.
- This may cause damage to the projector
or personal injury.
y It is recommended that you maintain
a distance of more than 5 - 7 times
the diagonal length of the screen.
- If you watch the screen at a close
distance for a long time, your eye
sight may become worse.
y Do not block the light beam emitted
from the projector using a book or
other object.
-
beam may result in fire. In addition,
the lens may be overheated and
damaged by the reflected heat
.
Disable the AV function to stop projection
temporarily or turn off the power.
y Do not start the projector with the
volume turned up high.
-
8
Safety Precautions
Cleaning
WARNING
y Do not spray the projector with
water when cleaning. Make sure water
does not flow into the projector
.
- This may result in fire or electric
shock.
y Use air spray, a soft cloth or
a cotton swab moistened with a
lens cleaning chemical
or alcohol to
remove dust or stains on the front
projection lens.
CAUTION
y Contact your seller or our service
center once a year to clean the inter-
nal parts of the projector.
- If you do not clean the projector for
a long period of time, dust will
accumulate, which may result in fire
or damage to the projector.
y When cleaning plastic parts such as
the projector case,
unplug the power
first and wipe with a soft cloth.
Do not
spray with water or wipe with a wet
cloth. Never use glass cleaner, auto-
mobile or industrial shiner, abrasives,
can damage the projector.
- This can result in fire, electric
shock or cause damage to the product
(deformation and corrosion).
y Remove the plug from the outlet before
cleaning the product.
- Otherwise, this may result in electric
shock.
Others
WARNING
y When you go out, place the projector
out of reach of animals, and remove
the power plug from the wall outlet.
- Using a damaged power cord may
result in short circuit or fire.
y Do not use the projector near
high-precision electronic devices
or those that transmit weak radio
signal.
- This may affect the operation of the
product, causing an accident.
y Only a qualified technician can
disassemble or modify the projector.
For diagnosis, adjustment, or repair,
contact your seller or our service
center.
- This may result in fire or electric
shock.

9
Safety Precautions
CAUTION
y Do not use or store the projector out-
doors for a long time
.
y
ones.
- Burst or leaking batteries may result
in damage or injury.
y Be sure to unplug if the projector is not
to be used for a long
period
.
- Accumulated dust may result in fire or
electric shock
due to overheating, igni-
tion, or poor insulation.
y Only use the specified type of battery.
- Burst or leaking batteries may result in
damage or injury.
y Do not charge the battery using any
devices other than the one provided with
the product.
- This may result in damage to the
battery or fire.
y Dispose of used batteries properly.
-
correct method of disposal may vary
depending on your country or region.
Dispose of the battery pack
as instructed.
y Do not throw or disassemble the battery.
-
to damage to the battery.
y Always use batteries approved and
certified by LG Electronics.
- This will prevent damage or fire.
y Store batteries away from metallic
objects, such as keys and paper clips.
-
increase in temperature, resulting in
fire or burns.
y Do not store the batteries near any
heat source, such as a heater.
- This may result in fire or damage to
the product.
y Do not store batteries at temperatures
y
reach of children.
- This will prevent personal injury or
damage to the product.
y Make sure that the battery is installed
correctly.
y The battery contains lithium-ion, so it
must be handled with care.
y Make sure you use the same type of
batteries for replacement.
y Incorrect battery replacement may
cause fire.
10
Safety Precautions
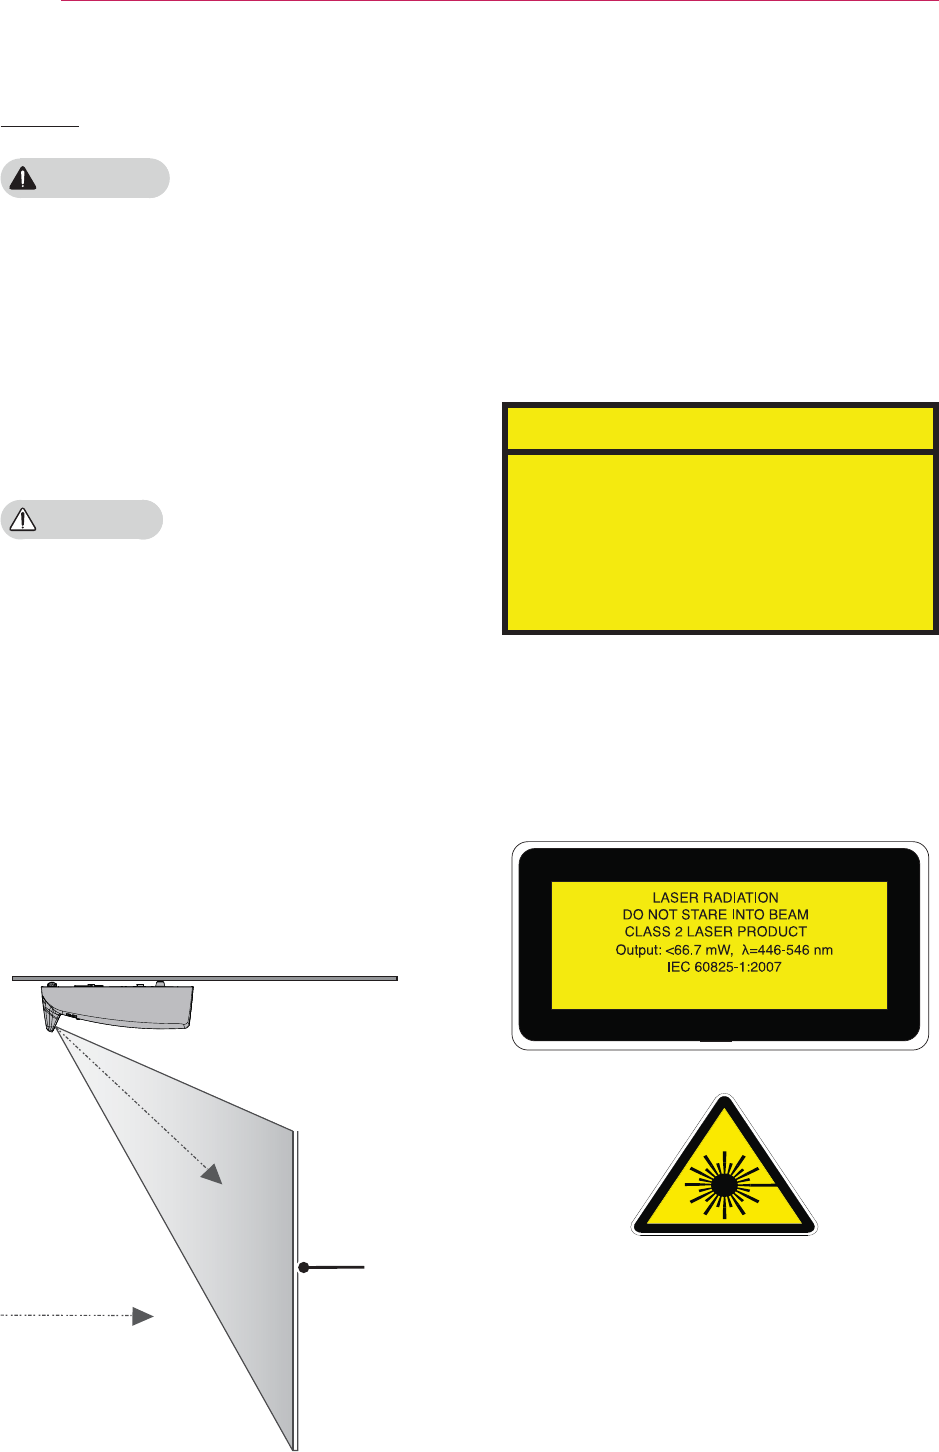
Laser
#WARNING
y This laser projector contains a laser
module.
Do not disassemble or
modify the projector as this could be
dangerous.
y
radiation if you manipulate or alter the
projector in a way not specified in the
user manual.
#CAUTION
y This laser projector is a class 2 laser
device that meets safety standard IEC
Laser projector standard:
class 2 laser product
Wavelength: 446 nm - 546 nm
Wave source: 66.7mW or less
Radiation angle: 71 °
Built-in laser standard:
Class 4 laser module
Wavelength: 446 nm - 546 nm
Power: 1.6 W * 24 EA
Viewing
direction
Laser beam
direction
Screen
MEZ38075821
LASER RADIATION
DO NOT STARE INTO BEAM
CLASS 2 LASER PRODUCT
- This laser projector is a Risk Group 2 device
standard.
Risk Group 2
CAUTION. Possibly hazardous optical
radiation emitted from this product. Do not
stare at operating lamp. May be harmful to
the eye.
The label of this laser projector is attached to
the bottom of the product.
Odvhu#surmhfwru#odeho

11
Contents
-One-Click Network Connection 29
-
Connection 29
-
-
-
To Use the Wi-Fi
Screen Share
Function 32
-To Connect the Wi-Fi direct 32
Using WiDi 33
-WiDi (Wireless Display) Setup 33
SMARTSHARE 34
-Connecting a USB Storage Device
34
-To disconnect the USB storage
device 34
-Connecting DLNA 35
Using SmartShare™ 38
-Watching Videos 39
-Viewing Photos 42
-Listening to Music 44
-Viewing Files 45
Using Magical Mirroring 46
-Installing Magical Mirroring 46
-Running Magical Mirroring 47
-MirrorOp Sender 49
CUSTOMIZING SETTINGS 52
SETUP Menu 52
PICTURE Settings 53
AUDIO Settings 56
TIME Settings 57
OPTION Settings 58
NETWORK Settings 59
SUPPORT 60
LICENSE 2
SAFETY INSTRUCTIONS 3
PREPARATION 13
Accessories 13
Optional Extras 14
Parts and Components 15
-
-
-
-
Projector Status Indicators 19
Installation 20
-
-Projection Distance per Screen Size
-Assembling the Cover 22
-
REMOTE CONTROL 23
OPERATING THE PROJECTOR
25
-Turning on the Projector 25
-Focus and Position of the Screen
Image 25
-Watching with the Projector 25
Additional Options 26
-Adjusting Aspect Ratio 26
-
-Using the Input List 27
Using the Quick Menu 28
ENTERTAINMENT 29
Network Settings 29
Contents

12
Contents
CONNECTING DEVICES 61
Connecting to HD Receiver, DVD, or
VCR Player 62
-
-
PC Connection 63
-RGB Connection 63
-
-
-RGB to DVI Connection 64
Connecting to External Devices 65
-AV Connection 65
-Component Connection 65
Connecting to a Microphone 66
-Microphone Connection 66
Connecting to Headphones 66
-
Connecting to a Laptop 67
-RGB Connection 67
-
INTERACTIVE FUNCTION 69
To Connect the Interactive Pen to the PC
69
Using The Interactive Pen 70
-
-
-To Charge the Interactive Pen 72
-Description of LED Interactive Pen
Indicators 73
-To Replace the Pen tip 74
-
-Operating Range with Interactive
Pen 75
-To Use the Interactive Pen Functions
76
-Troubleshooting the Interactive Pen
Function 77
SERIAL COMMUNICATION
FUNCTION 78
Using Serial Communication 78
Establishing Serial Communication 78
Communication Protocol 79
MAINTENANCE 87
Cleaning 87
-
-
Updating Software 88
WIRELESS SPECIFICATIONS
89
Wireless LAN module(TWFM-B003D)
Dongle/Pen
89
SPECIFICATIONS 90
13
PREPARATION
PREPARATION
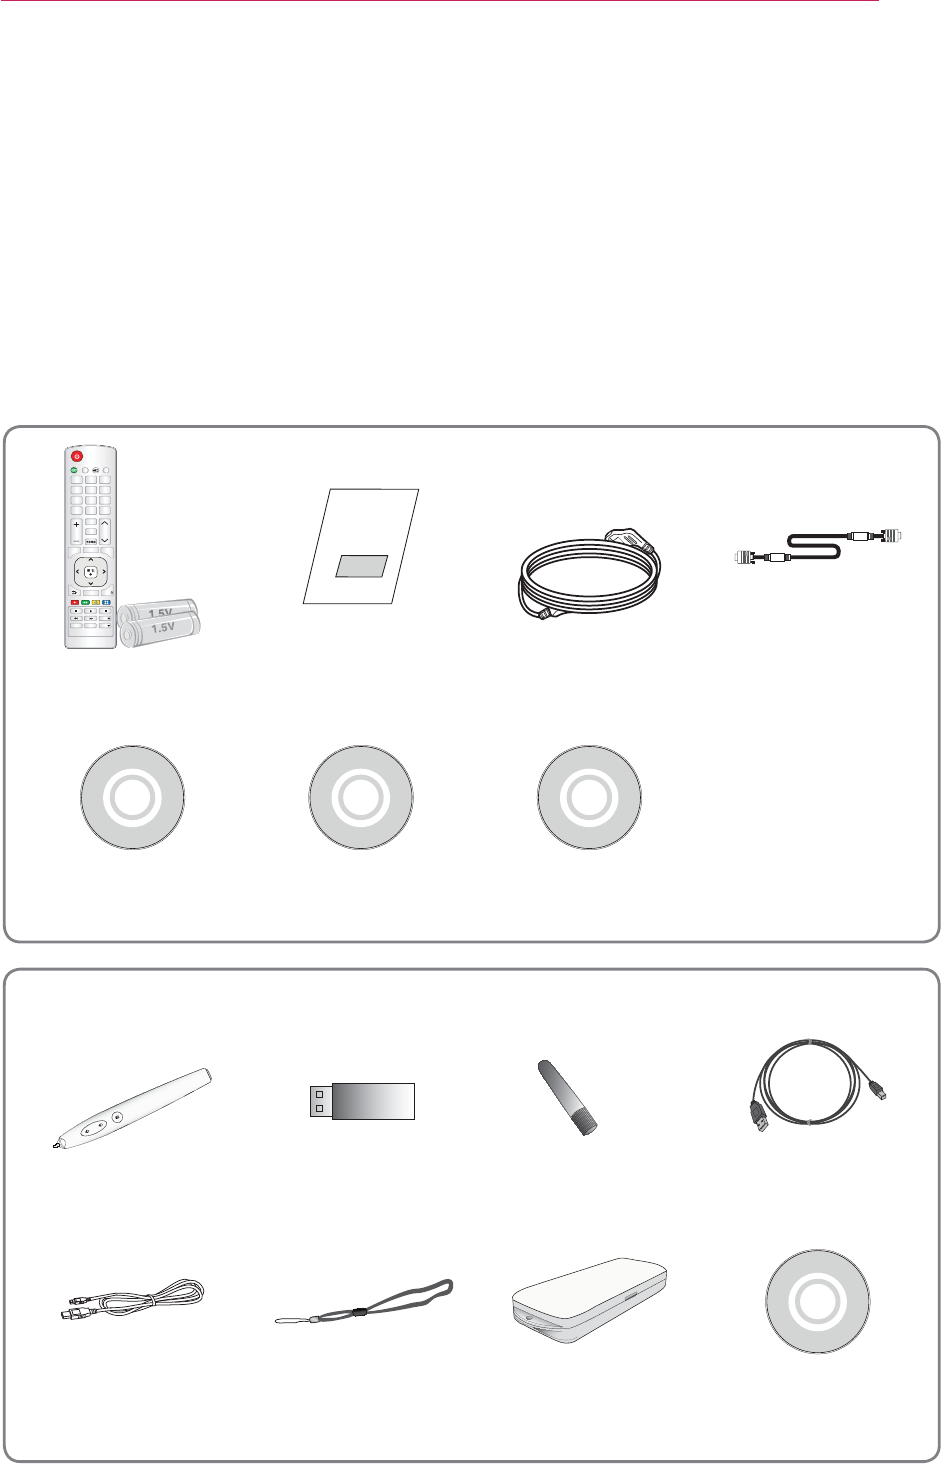
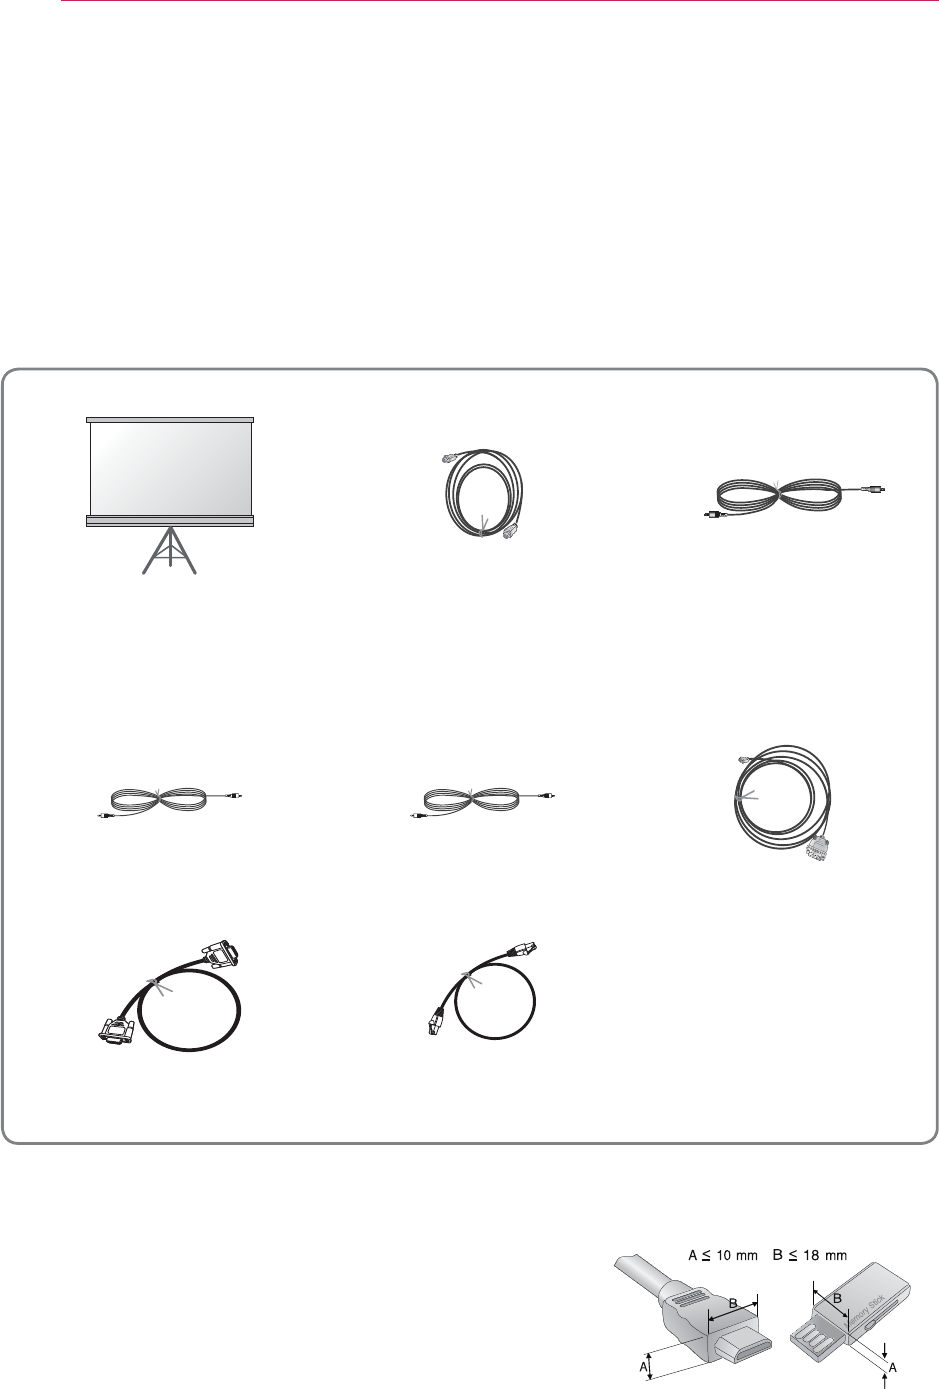
Accessories
Accessories included with the project are show below. The pictures may differ slightly
from the actual product. Accessories are subject to change without prior notice. New
accessories may be added or old ones removed.
ᇡ᯦ಆษᯕⓍᱩᱥ༉ऽ 64#
≉⋉༉ऽ ⪵໕ᱶḡ
ᮭప ⟹ᯕḡ
⪵໕aฝ
⪵໕Ⓧʑ
ᖅᱶີە ᯱ࠺᳑ᱶ e⠙ᖅᱶ
ᩢᔢ༉ऽ ӹaʑ
┅ᜅ★
┅ᜅ★
ᰆᖅᱶ ᯱaḥ݉
͢
͡
ͪͩͨ
ͧ
ͦͥ
ͤͣ
Remote Control
Two AAA Batteries Owner's Manual Power Cord Computer Cable
h]0Qhw#Pdqdjhu#
Surjudp#FG
Pdjlfdo#Pluurulqj#
Surjudp#FG
FG#Rzqhu*v#
pdqxdo
Lqwhudfwlyh#Shq Lqwhudfwlyh#Grqjoh Wls XVE#D#wr#E##
Fdeoh
Uhfkdujh#Fdeoh Zulvw#vwuds Kdug#fdvh Zl}Whdfk
Vriwzduh#FG
(For SA565 only)
14
PREPARATION
Optional Extras
To purchase optional accessories, visit an electronics store or online shopping site or
contact the retail store where you purchased the product. Optional accessories are
subject to change without prior notice.
Projection Screen PC Audio Port Connection
Cable
Video Cable Audio Cable
RS232C cable LAN cable
y
make sure to use a standard sized jack.
15
PREPARATION
Parts and Components
y The projector is manufactured using high-precision technology. You may, however,
see tiny black dots and/or bright colored dots (red, blue or green) that continuously
appear on the projector screen. This is a normal result of the manufacturing process
and does not indicate a malfunction.
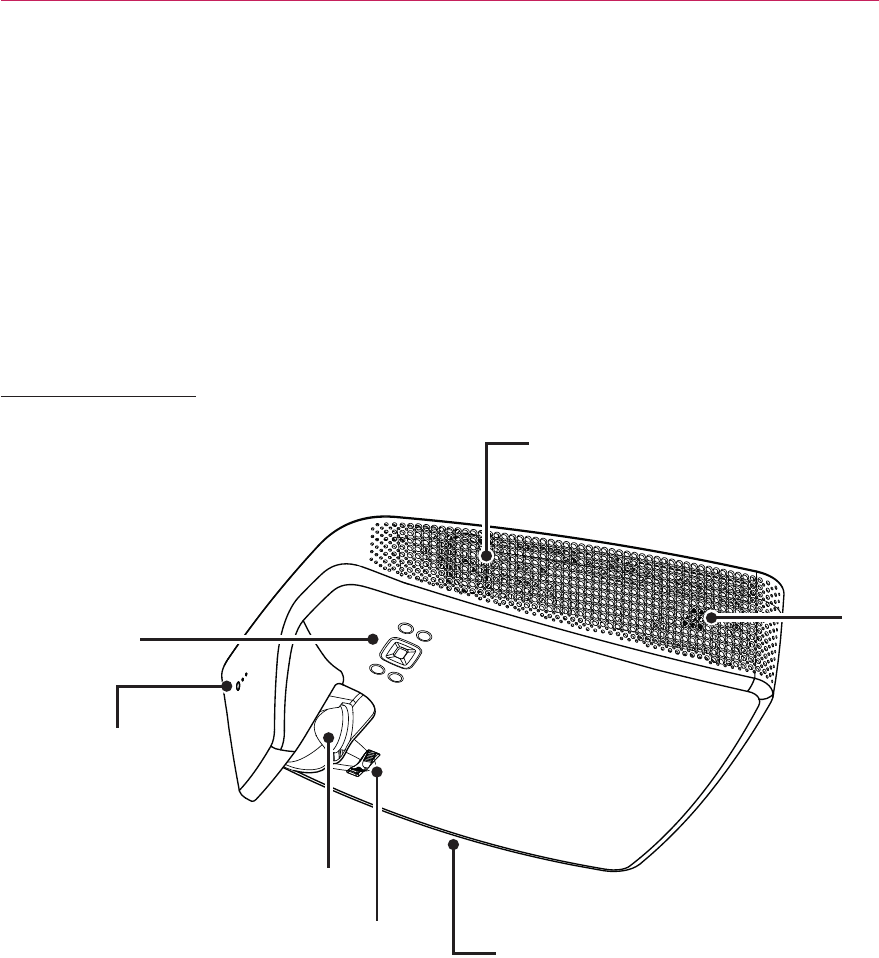
Front & Top
Vent
Lens
2
Focus
Ring Speaker
Speaker
Remote Control
Signal Receiver
2 Do not touch the lens while using the projector. The lens may be damaged.
Control
Panel
16
PREPARATION
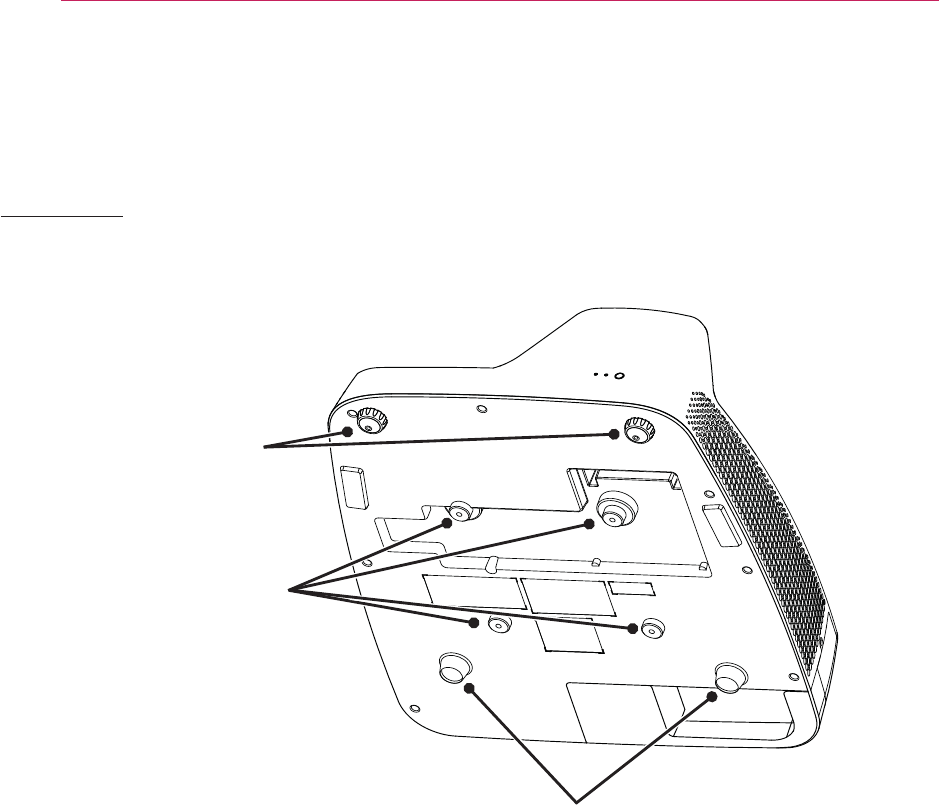
Bottom
y When installing the projector on a ceiling or wall, a professional technician should
install the product using the authorized tools. If installed improperly, the projector
may fall.
- This may cause personal injury or property damage. For installation of the product,
please contact the customer support center.
y When installing or adjusting a mounting device, do not use oil or lubricant for the
purpose
to prevent loosening of screws. If you apply an adhesive, oil, or lubricant to the
projector,
this may cause cracks in the projector case or the projector may fall
.
- This may also cause serious personal injury and damage to the projector if there is
a person under the mounding device.
Front Adjustable
Foot
Ceiling Mount
Four Attachment Points
Rear Foot
17
PREPARATION
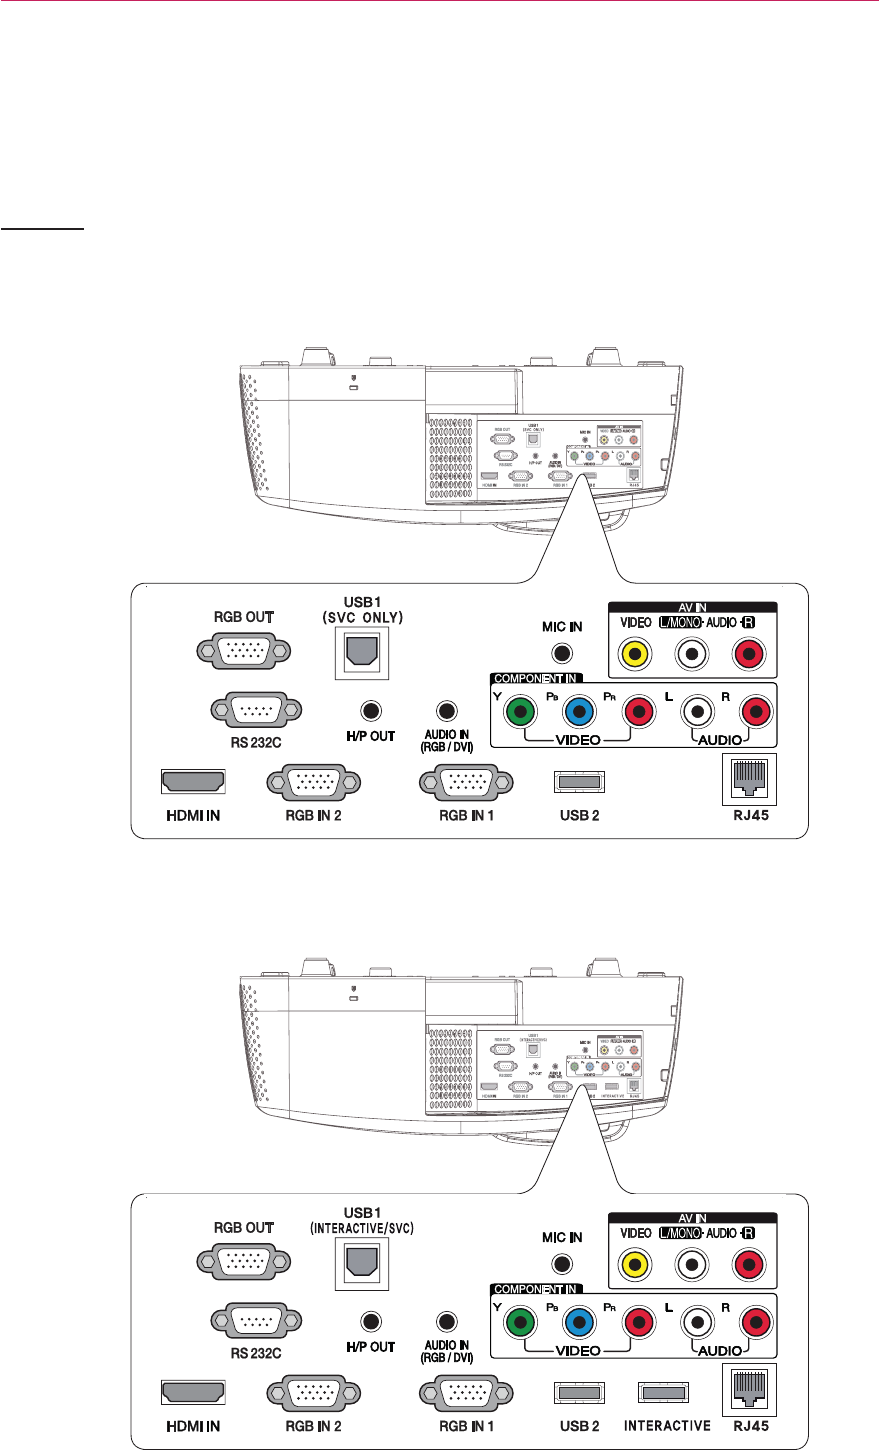
Back
(For SA565 only)
18
PREPARATION
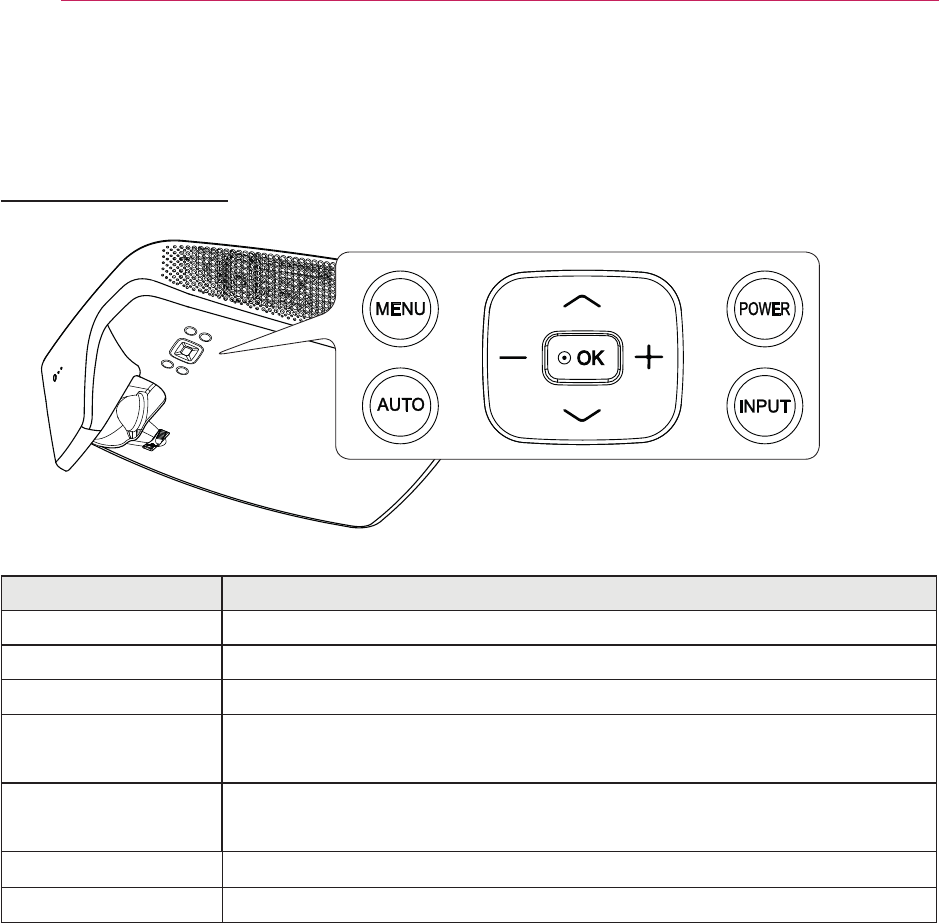
Control Panel
Button Description
POWER Turns the projector on or off.
MENU Displays or closes the Settings menu.
AUTO Adjusts the picture position and minimizes image shaking.
INPUT
input).
-, +
Adjusts the volume level, or enters a sub menu and changes
the
settings.
䌻,䌼
Moves between menus and changes the settings.
ᯙOK Shows the current mode and saves changes to the settings.
19
PREPARATION
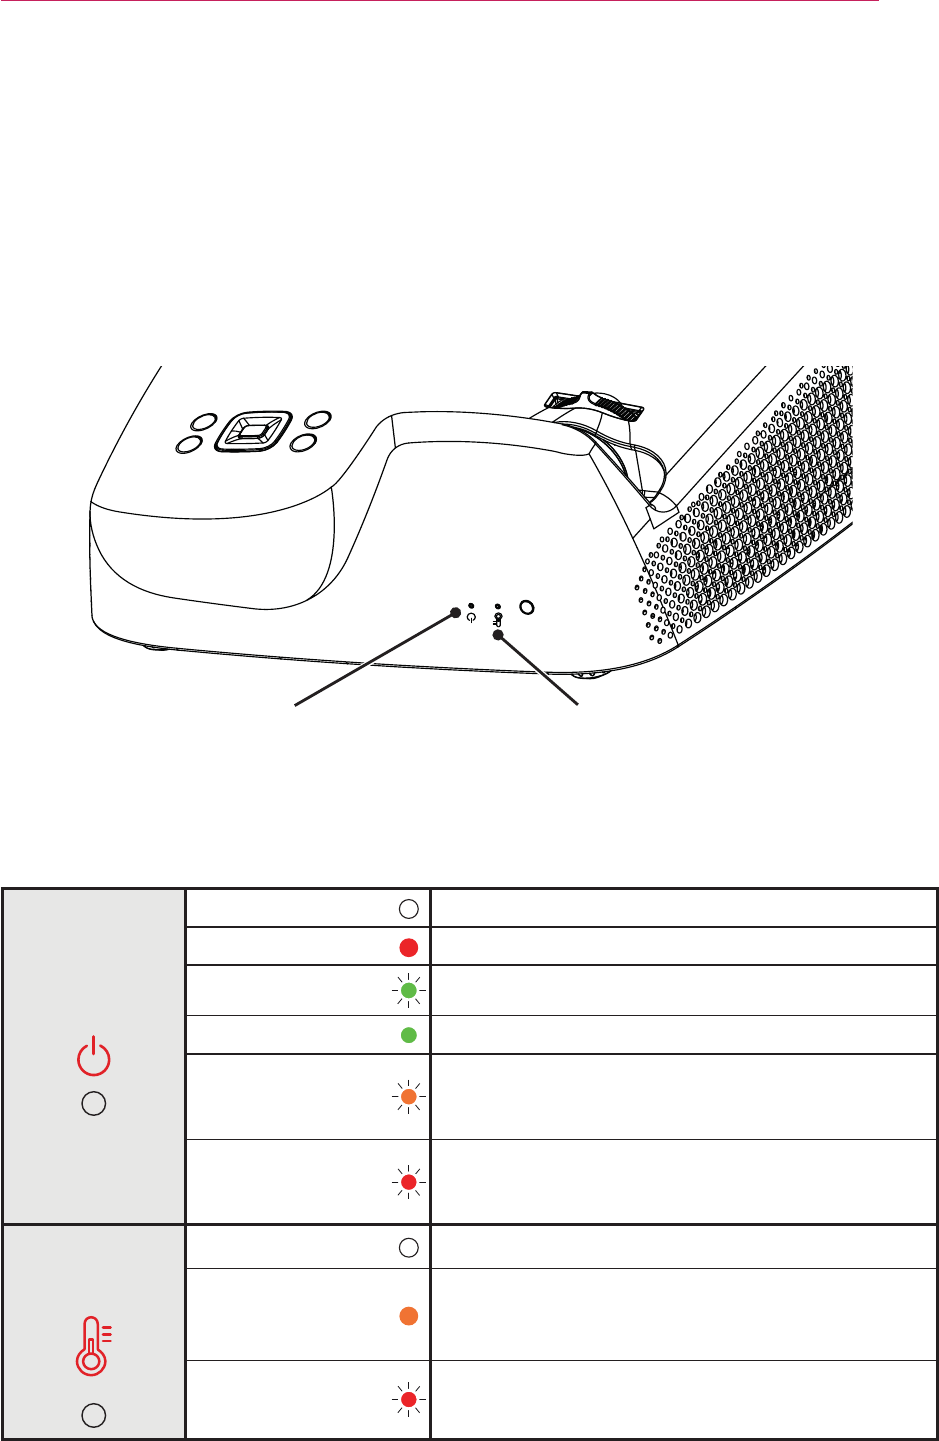
Projector Status Indicators
LED Indicator Temperature Indicator
LED Indicator
Off Power off state
Red Power standby state
Green (blinking)
The projector is being turned on or off.
Green The projector is being operated.
Orange (blinking)
The projector has been turned off due to a prob-
lem related to a projector color wheel.
Please
contact a local service center.
Red (blinking) The projector has been turned off due to a
problem related to an internal fan.
Please contact a local service center.
Temperature
Indicator
Off Normal operation
Orange
Turn off the power and check around the
projector.
Red (blinking)
The projector has been turned off due to high
temperature inside or outside of the projector.
20
PREPARATION
Installation
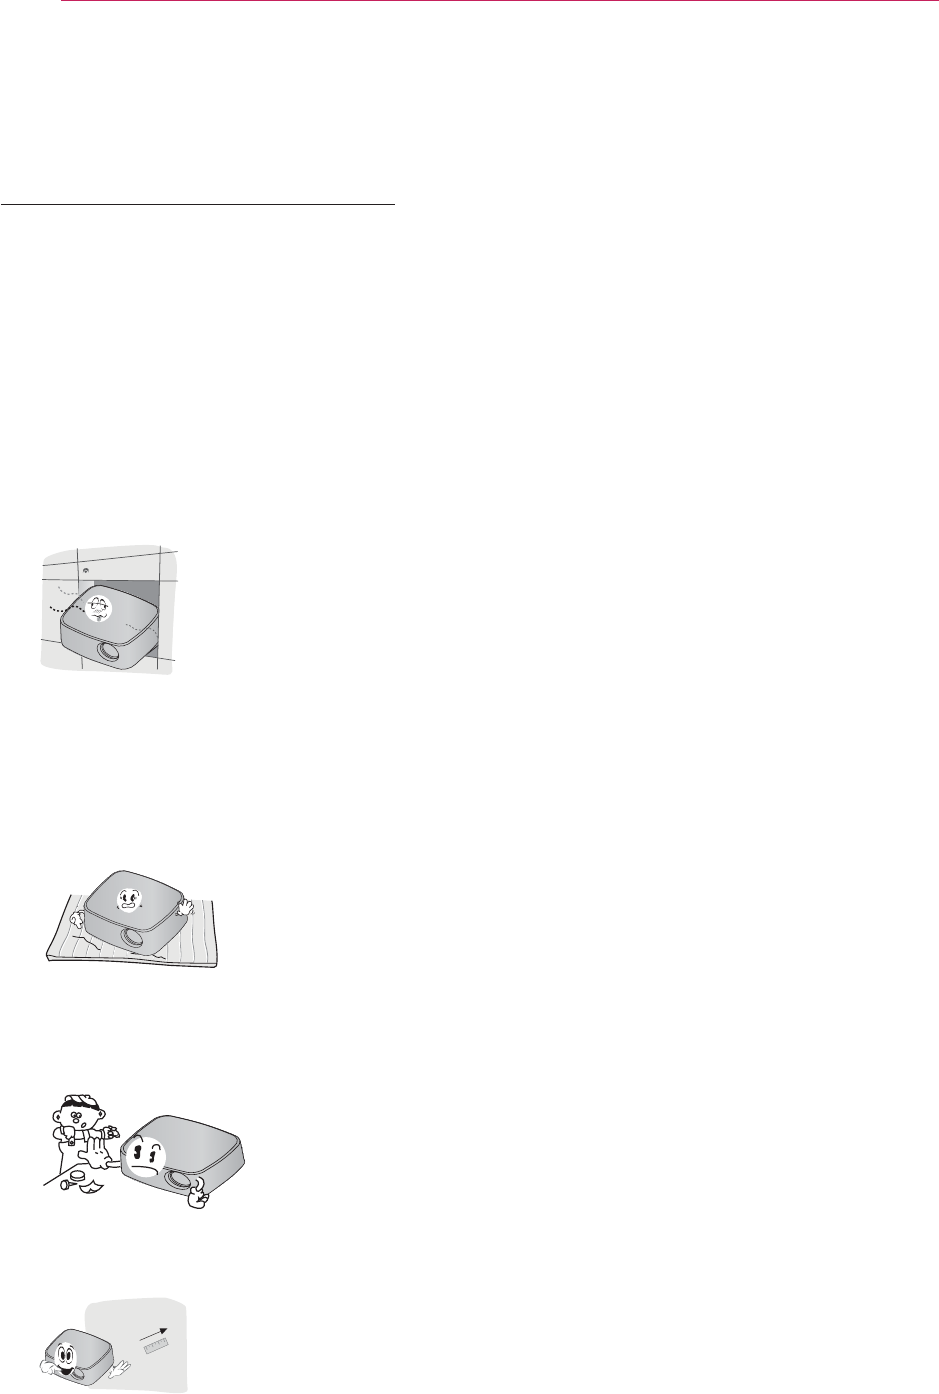
Installation Precautions
y Place the projector in a well-ventilated
environment.
- To prevent internal heat build-up,
install the projector in a well-ventilated
place.
Do not place anything near the
projector as this may block its air
vents. If the air vents are blocked,
the internal temperature will increase.
- Do not place the projector on a
carpet or rug. If the vent is on the
bottom, use the projector on a solid
level surface
and ensure the vent
is
not blocked.
- Be sure to prevent foreign objects
such as paper debris from entering
the projector.
more) around the projector.
y Do not place the projector in a hot
or humid environment.
- Do not place the projector in a hot,
cold, or humid environment.
y Do not place the projector in a place
where it will easily attract dust.
- This may result in fire.
y Never open any cover on the projector.
There is a high risk
of electric shock.
y The projector is manufactured using
high-precision technology. You may,
however, see tiny black dots and/
or bright colored dots (red, blue or
green) that continuously appear on
the projector screen. This is a normal
result of the manufacturing process
and does not indicate a malfunction.
y The remote control may not work
in an environment where a lamp
equipped with electronic ballasts or
a three-wavelength fluorescent lamp
is installed. Replace the lamp with an
international standard lamp for the
remote control to work normally.
21
PREPARATION
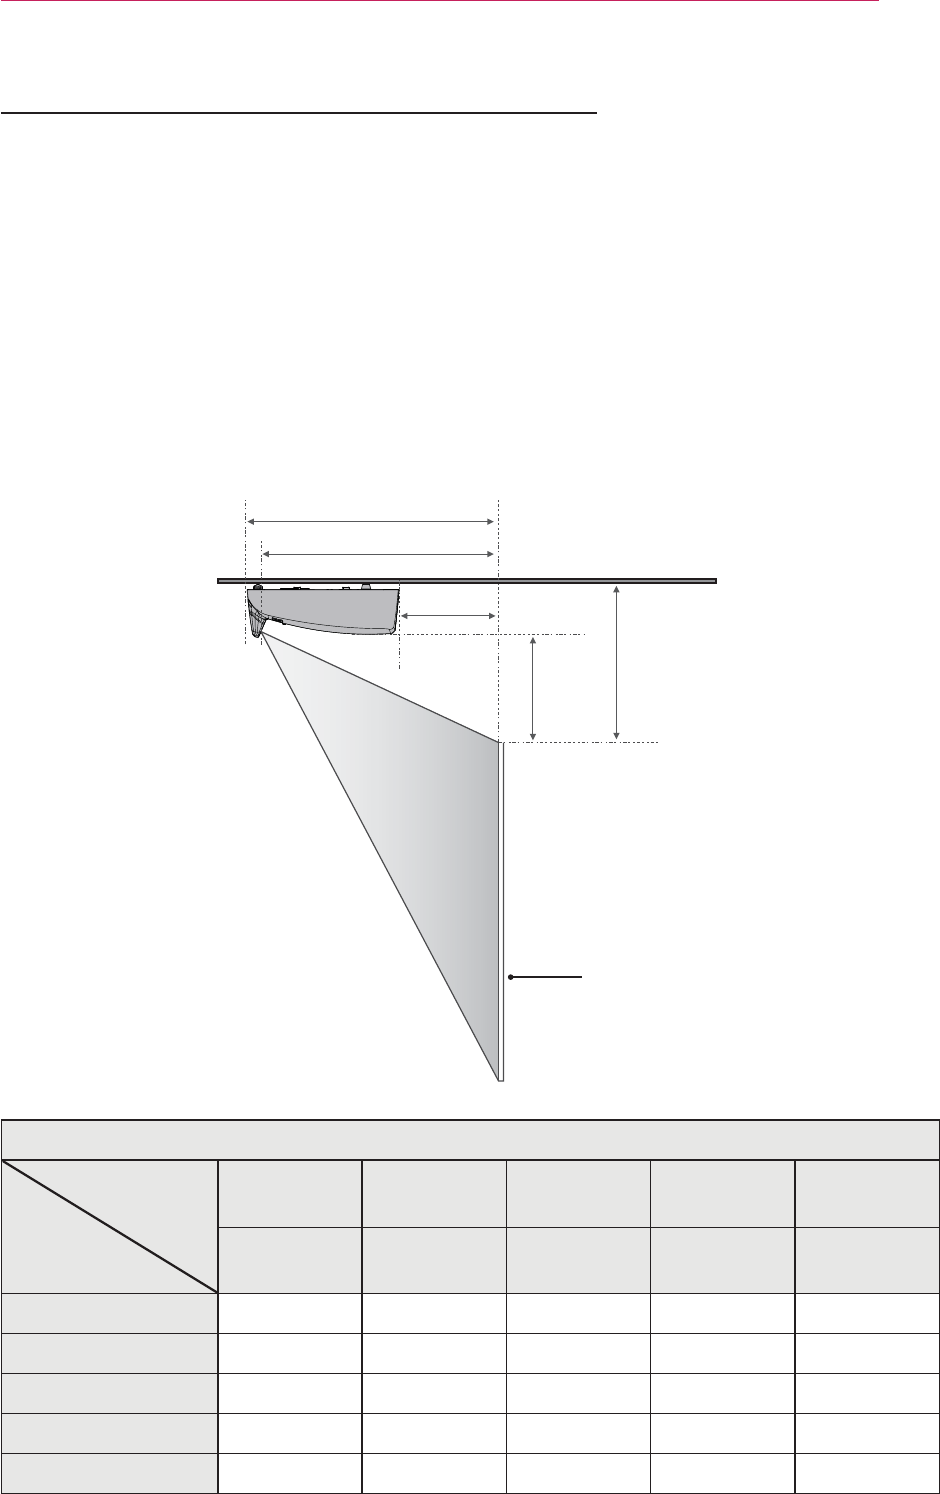
Projection Distance per Screen Size
1
Place the projector on a sturdy, level surface, together with the PC or audio/video
source.
2
Place the projector an appropriate distance away from the screen. The distance
between the projector and the screen determines the actual size of the image.
3
Position the projector so that the lens is at a right angle to the screen. If the projector
is not at a right angle, the projected image will look distorted.
To correct the distortion, use the Keystone function.
4
Connect the power cord of the projector and the connected device to the wall outlet.
A
B
C
D
E
Screen
(Unit: mm)
1778 2032 2286 2540 2794
A497 562 627 756
B452 646
C29 94 223
D349 423 497
E 233 344
ARC

22
PREPARATION
Kensington Security System
y
Security System cable as shown below.
y
y
y
-
tronic devices.
Website: http://www.kensington.com
Assembling the Cover
߃Insert the upper edge of the cover into the groove.
߄Slide the cover to the right until it latches into the groove.
߅Insert the screw into the hole and tighten it.
Check that the cover is securely fastened and cannot move.
* You can remove the cover in reverse order.
* If you locate the projector on the desk to use, remove the cover before using.
Otherwise, the cover may not be closed properly by a cable.
߃߄
߅
23
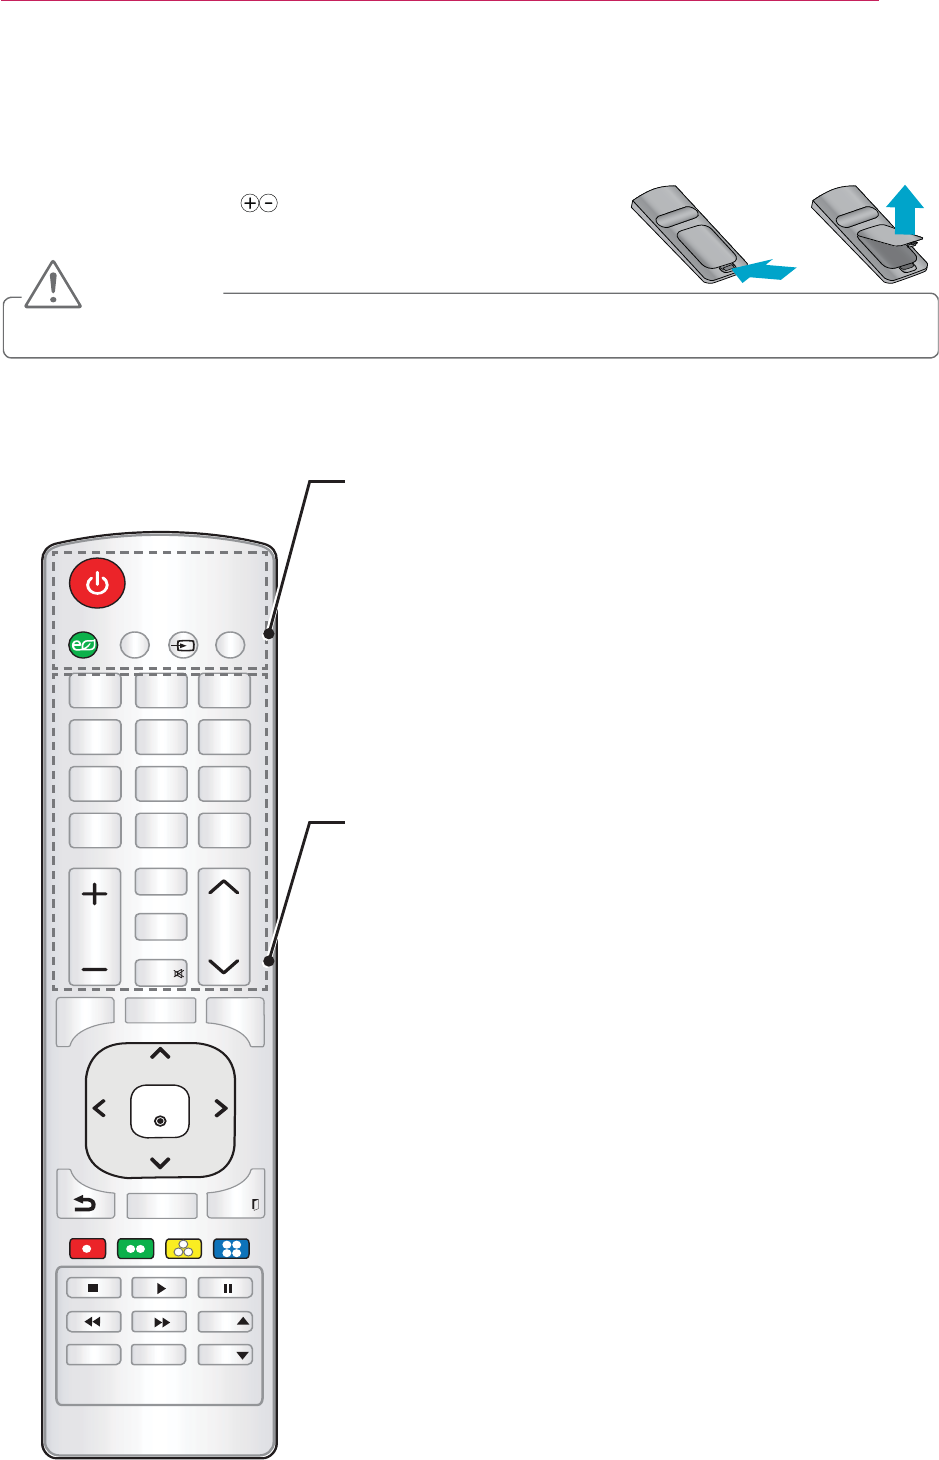
Remote Control
REMOTE CONTROL
Open the lid at the back of the remote control and insert the bat-
teries as described in the
instructions.
CAUTION
y
*/165.*$&/&3(: 64#
4-&&1 45*--
70- 1"(&
#-"/,
3"5*0
.&/6 "650 2.&/6
1*$563& &9*5
,&:4
,&:4
"7.PEF )&-1
͢
͡
ͪͩͨ
ͧ
ͦͥ
ͤͣ
4"7*/(
.65&
0,
POWER
Turns the projector on or off.
ENERGY SAVING
Adjusts the screen brightness.
MIC
Turns the microphone on/off.
INPUT
Changes the input source.
USB
Shows the SmartShare menu.
Number buttons
Enters a number.
SLEEP
Sets the sleep timer.
STILL
Stops the video being played.
VOL +, -
Adjusts the volume level.
BLANK
Blanks the screen.
RATIO
Changes the aspect ratio of the screen per pressing of the
button.
MUTE
Mutes the sound of the projector.
PAGE
24
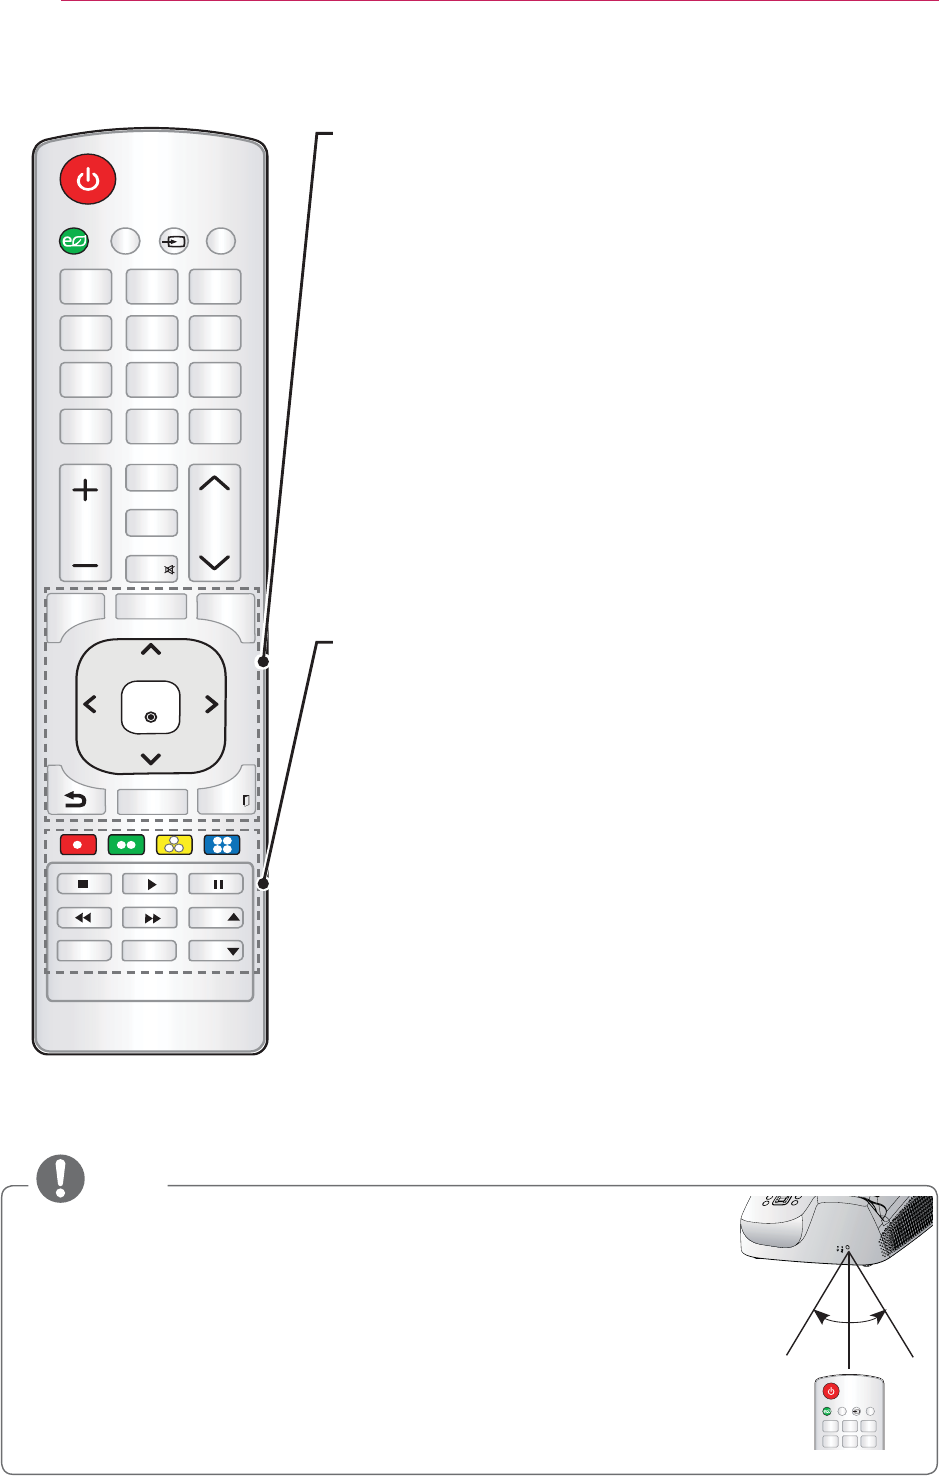
Remote Control
MENU
Brings up or closes the Settings menu.
AUTO
Optimizes the screen automatically in RGB-PC input mode.
Q.MENU
Allows you to change the settings easily.
Up/Down/Left/Right buttons
Selects or sets an option of the selected menu.
OK ᯙ
Shows the current mode and saves changes to the settings.
ᰳ
Returns to the previous screen.
PICTURE
Changes the picture mode per press of the button.
EXIT 弁
Color buttons
Sets additional settings for each menu.
Playback control buttons
Controls the playback of multimedia content on the Smart Share.
AV MODE
Selects AV mode for the genre of the program being watched.
HELP
Enables the self-diagnosis.
NOTE
y When using the remote control, the optimal operation range is 6 meters
receiver.
y If a cable is connected to the back port, the optimal operating range
remote control IR receiver.
y For seamless operation, do not block the IR receiver.
*/165.*$&/&3(: 64#
͢
ͧ
ͦͥ
ͤͣ
4"7*/(
*/165.*$&/&3(: 64#
4-&&1 45*--
70- 1"(&
#-"/,
3"5*0
.&/6 "650 2.&/6
1*$563& &9*5
,&:4
,&:4
"7.PEF )&-1
͢
͡
ͪͩͨ
ͧ
ͦͥ
ͤͣ
4"7*/(
.65&
0,
25
Watching with the Projector
Operating the Projector
Turning on the Projector
1
Connect the power cord correctly.
2
After waiting for a moment, press the
POWER button on the remote control
or the control panel.
3
On the Language Selection screen,
select the language you want.
4
Connect the projector to a wireless
network.
(This step can be skipped because
a wireless network connection is not
required.)
5
Select the input signal you want us-
ing the INPUT button on the remote
control.
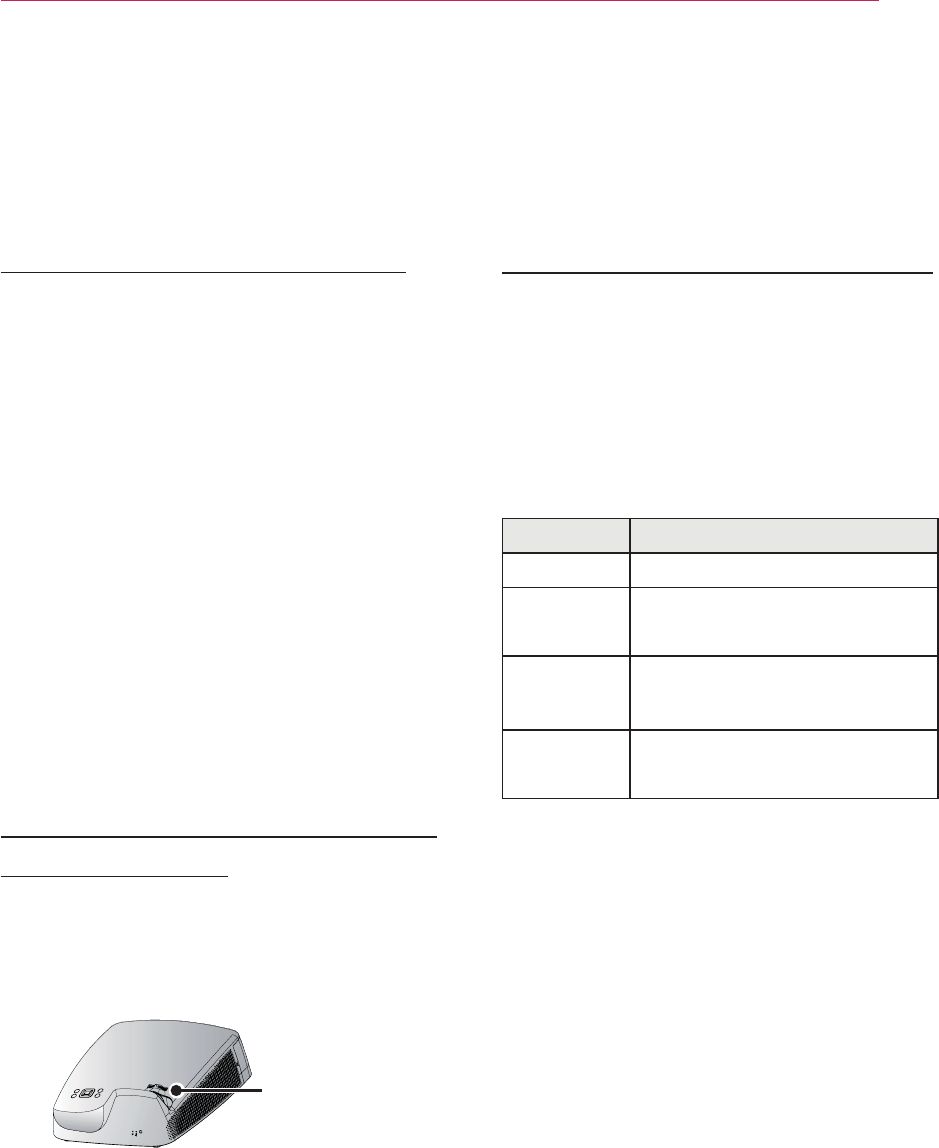
Focus and Position of the
Screen Image
When an image appears on the screen,
properly.
Focus Ring
y To adjust the focus of the image,
rotate the focus ring.
Watching with the Projector
1
In Standby mode, press the POWER
button to turn the projector on.
2
Press the INPUT button and select
the input signal you want.
3
Control the projector using the following
buttons while watching projec tor.
Button Description
VOL -, + Adjusts the volume level.
MUTE Mutes the sound of the
projector.
Q.MENU Enters the quick menu.
KEY.S
function.
4
To turn the projector off, press the
POWER button.
26
Watching with the Projector
Additional Options
Adjusting Aspect Ratio
You can adjust the aspect ratio of the
picture by pressing RATIO while watch-
ing with the projector.
NOTE
y Available options may vary depend-
ing on the input signal.
y You can also use the
Q.MENU or
MENU
button.
-
Full: Displays the picture in full
screen regardless of the aspect
ratio.
-
16:9
ratio
.
-
Just Scan: Displays the picture in
the original size without cutting off
the edges.
Just Scan
NOTE
y For Just Scan, you may see image
noises at the edges of the screen.
-
Set By Program: Displays the pic-
ture in the same aspect ratio as the
original image.
Set By Program
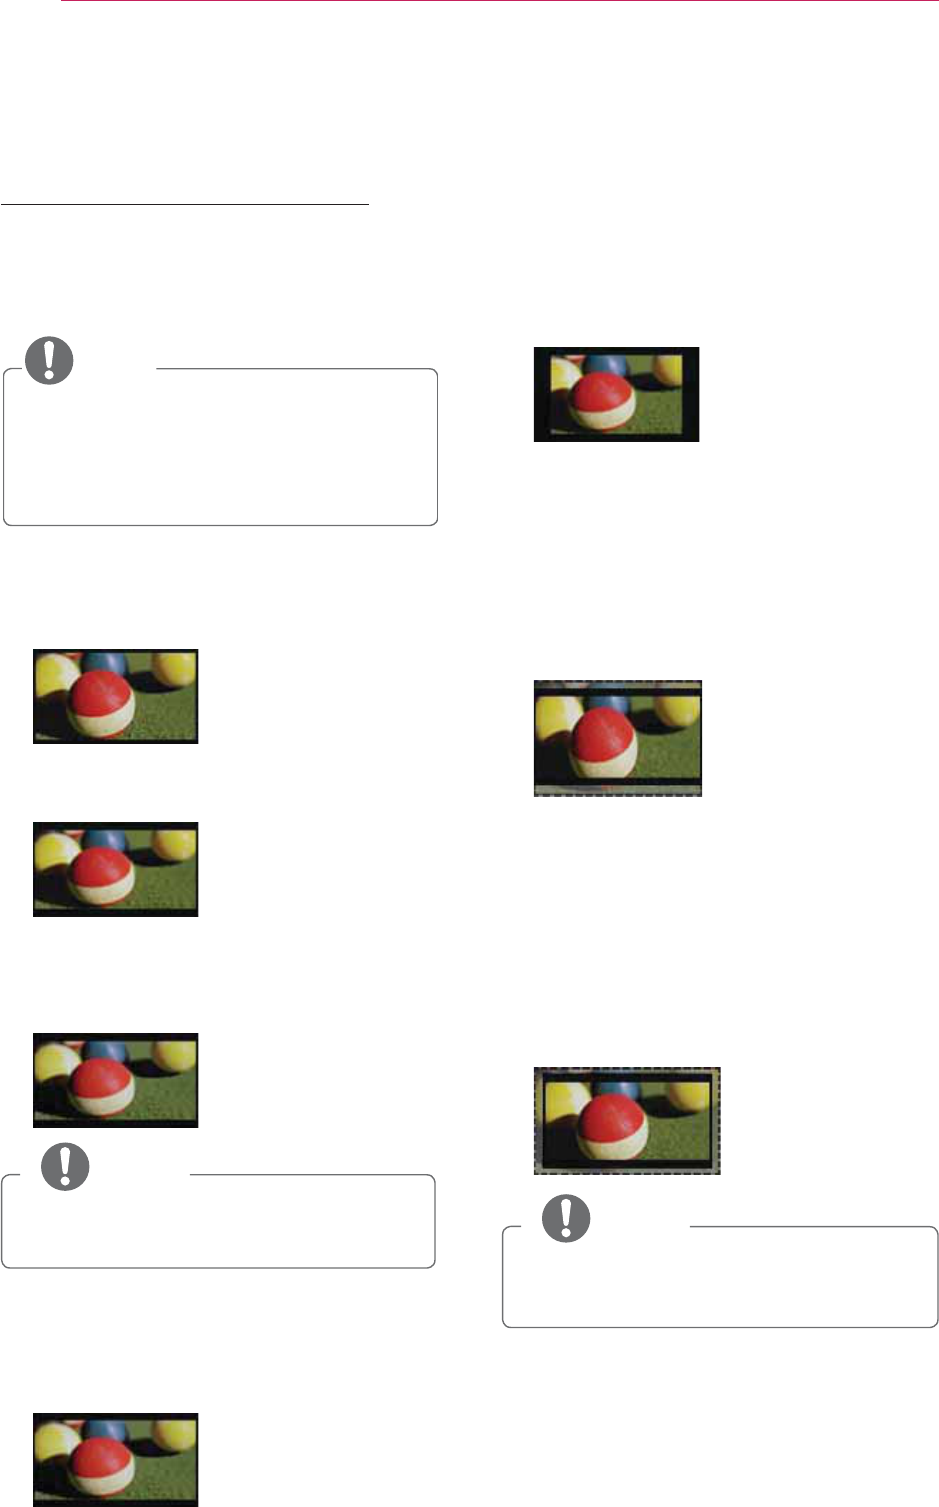
-
4:3: Resizes the picture with a 4:3
ratio.
-
Zoom
screen width. The top and bottom of
the image may be truncated.
y Press the or button to zoom in
or out of the image.
y Press the or button to move
the image.
-
Cinema Zoom 1: Resizes the
picture with a cinemascope ratio of
y Press the or button to zoom in
or out of the image.
y Press the or button to move
the image.
NOTE
y If you enlarge or reduce the picture,
it may be distorted.
27
Watching with the Projector
Using the Keystone Function
To prevent the screen image from
becoming trapezoidal, Keystone adjusts
the top and bottom width of the image
if the projector is not set up at a right
angle to the screen.
Because the Keystone function may
cause inferior screen image quality, use
this function only when it is not possible
to set up the projector at an optimal
angle.
CLOSE
1
Press the KEY.S ᯜ or KEY.Sᯝ but-
ton to adjust the picture.
y Keystone can be adjusted from -40
to 40.
2
Press the OK button when done.
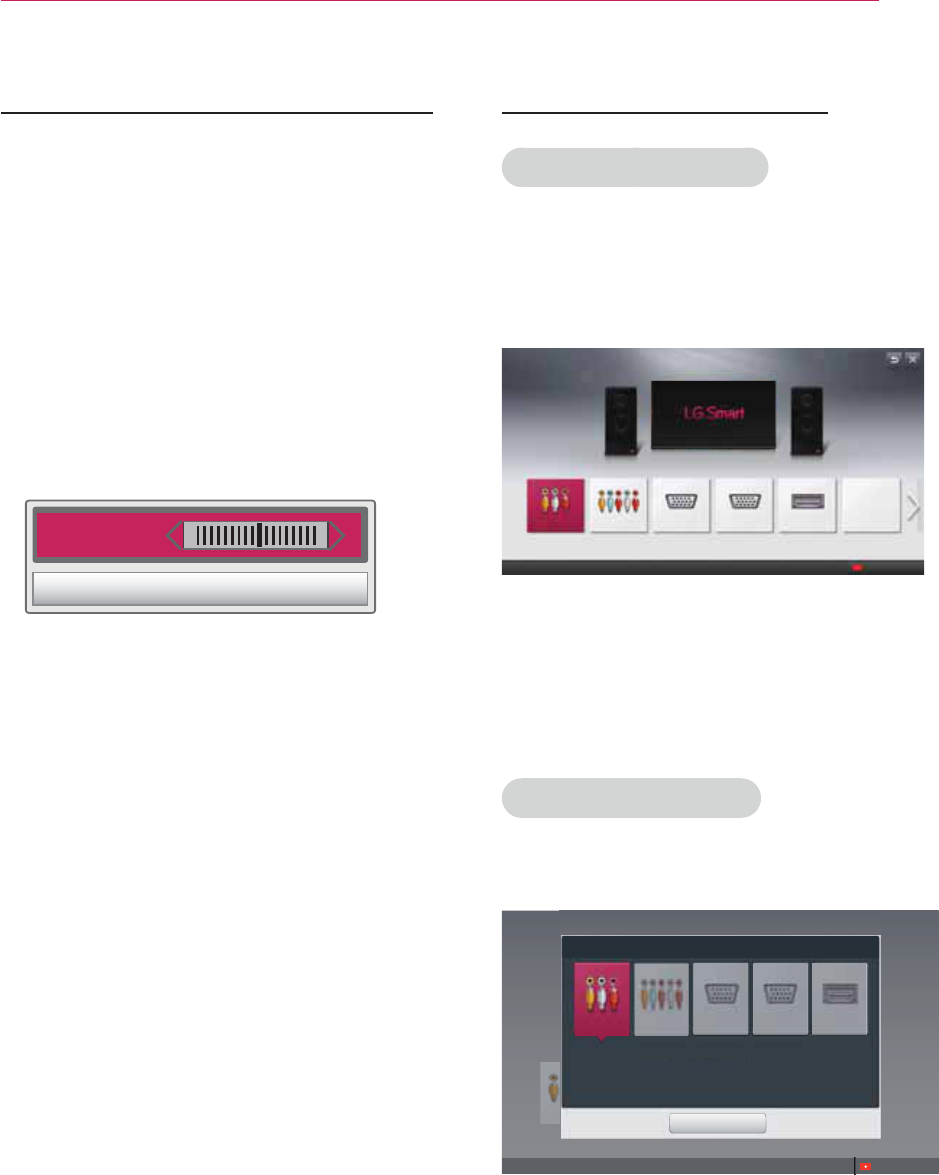
Using the Input List
Using the Input List
1
Press the INPUT button to display the
input selection screen.
- The connected input mode appears
2
Select an input signal using the
remote control's INPUT button to
connect the projector to the desired
input. You can use the
or button
to switch between all the input modes
.
Adding Input Label
Displays which devices are connected to
which input ports.
Lqsxw#Olvw
Vhohfw#dq#lqsxw#ghylfh#wr#ylhz1
1
Press the INPUT button to display the
input selection screen.
2
Press the red button.
3
Press the or button to go to the
desired input and press the OK button.
4
User the , , or button to
select a device name.
AV
Component RGB-PC2
Change Device name
Lqsxw#Olvw
Vhohfw#dq#lqsxw#ghylfh#wr#ylhz1
AV
Component RGB-PC2
Select a device to change name.
Close
Change Device name
28
Watching with the Projector
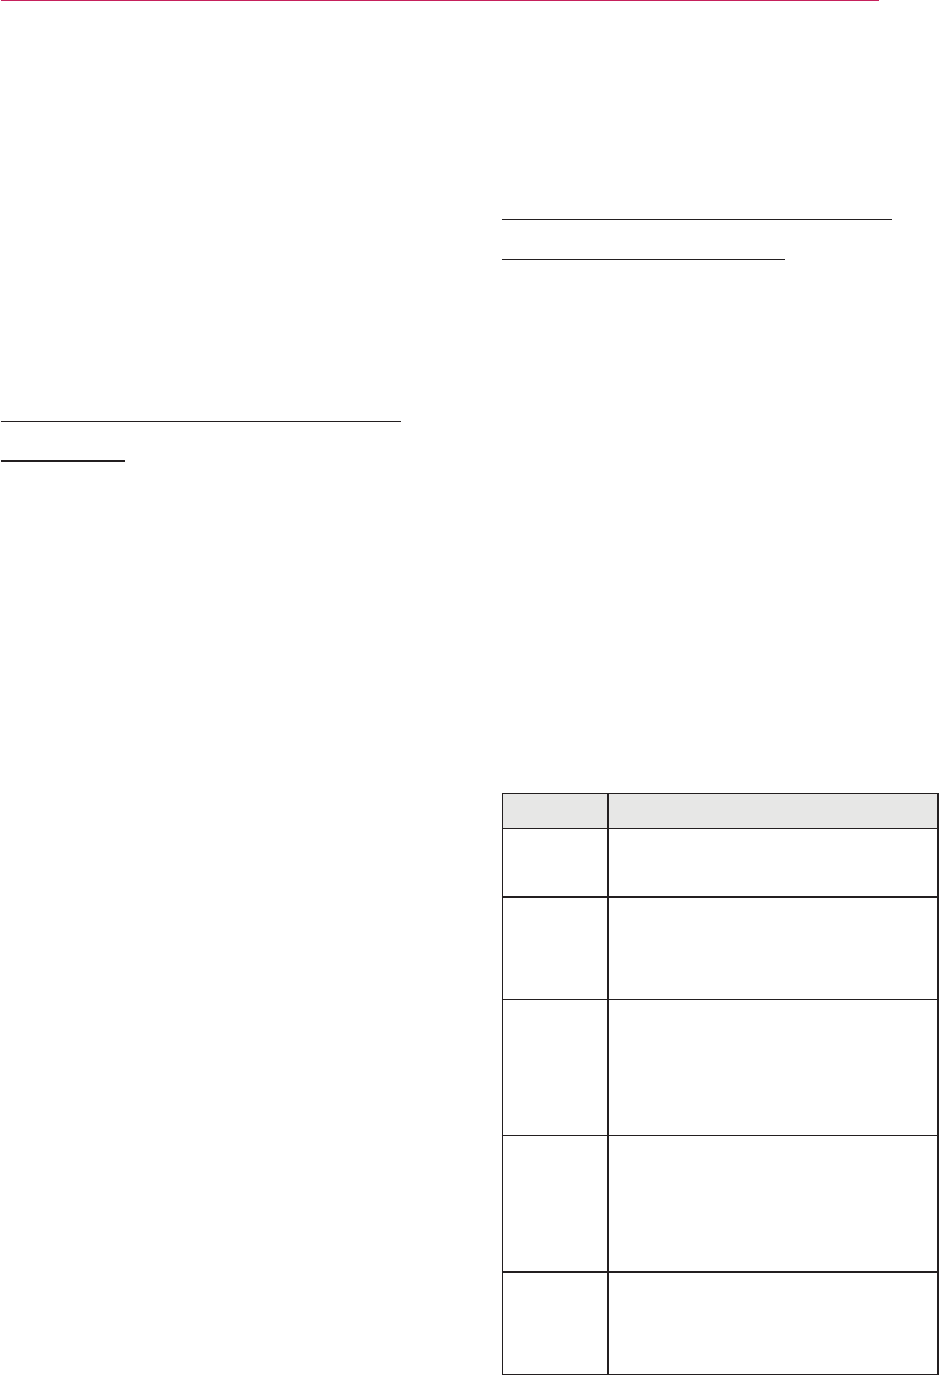
Using the Quick Menu
You can customize frequently used
menus.
1
Select the Q.MENU button.
2
User the or button to select a
desired item and press OK.
Menu Description
Aspect
Ratio Resizes the picture.
Picture
Mode
Changes the picture
mode.
Sound
Mode Sets the sound mode.
Sleep
Timer
Sets the projector to be
time.
Energy
Saving Adjusts the brightness.
AV Mode Sets the genre.
USB
Device
Allows you to remove a
connected USB device in
a safe manner.
(Displayed only when a
USB device is connected.)
3
Use the , , , or button
to scroll through the menu items.
29
ENTERTAINMENT
ENTERTAINMENT
Network Settings
To use the DLNA function and the Magi-
cal Mirroring function, the wireless con-
nection to the Internet is required.
One-Click Network Con-
nection
You can make a wireless network con-
nection easily.
1
Press the MENU button.
2
Use the , , , or button to
select Network and press the OK
button.
3
Use the , , , or button to
specify the Network Connection and
press the OK button.
4
The network is connected automati-
cally.
projector.
Expert Settings for Net-
work Connection
used).
1
Press the MENU button.
2
Use the , , , or button to
select Network and press the OK
button.
3
Use the , , , or button to
specify the Network Connection and
press the OK button.
4
Select Set Expert
in
the network con-
nection list.
5
Select one of the following network
connection methods.
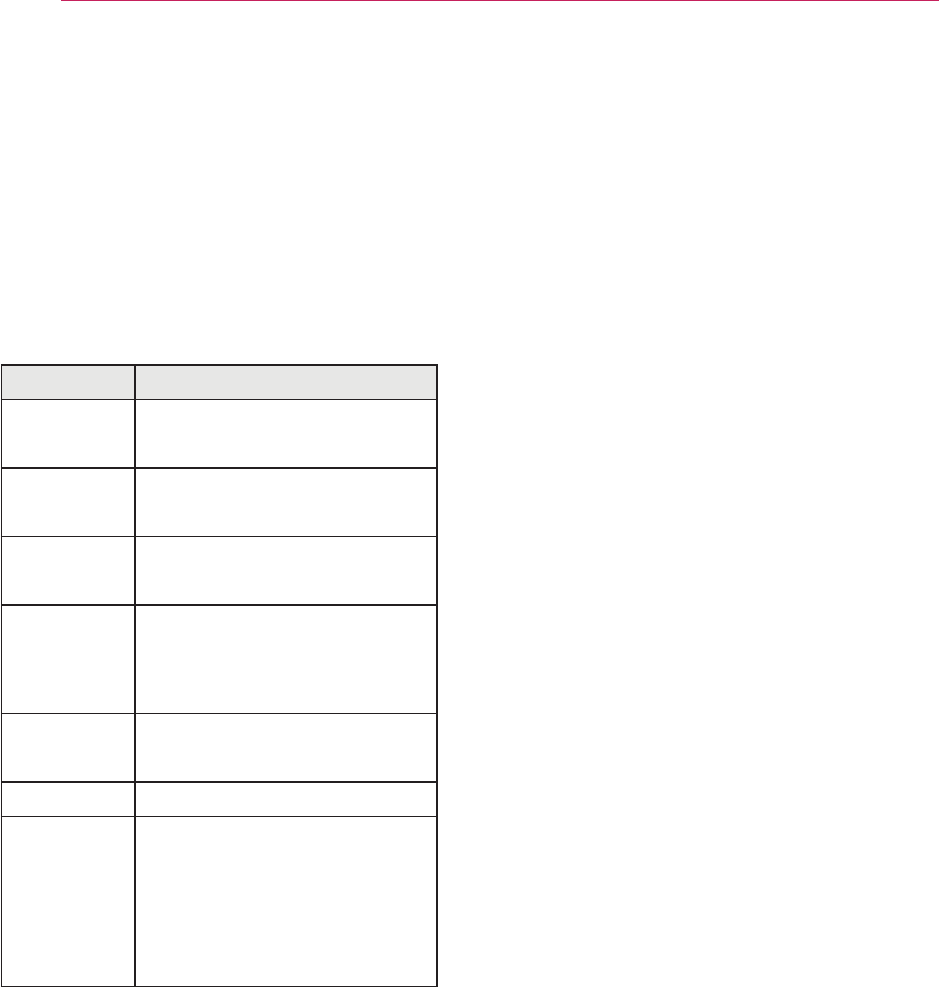
Item Description
AP List Select a network from a
router list.
Enter
the
SSID
Directly enter the name of
the wireless router to con-
nect.
WPS-
PBC
Press the WPS button on the
wireless router (if supported)
to connect to the router in a
simple manner.
WPS-
PIN
Enter the PIN number from
the menu of the wireless
router to connect to the
router in a simple manner.
Ad-hoc
Use to connect directly to
the projector with out using
a router.
30
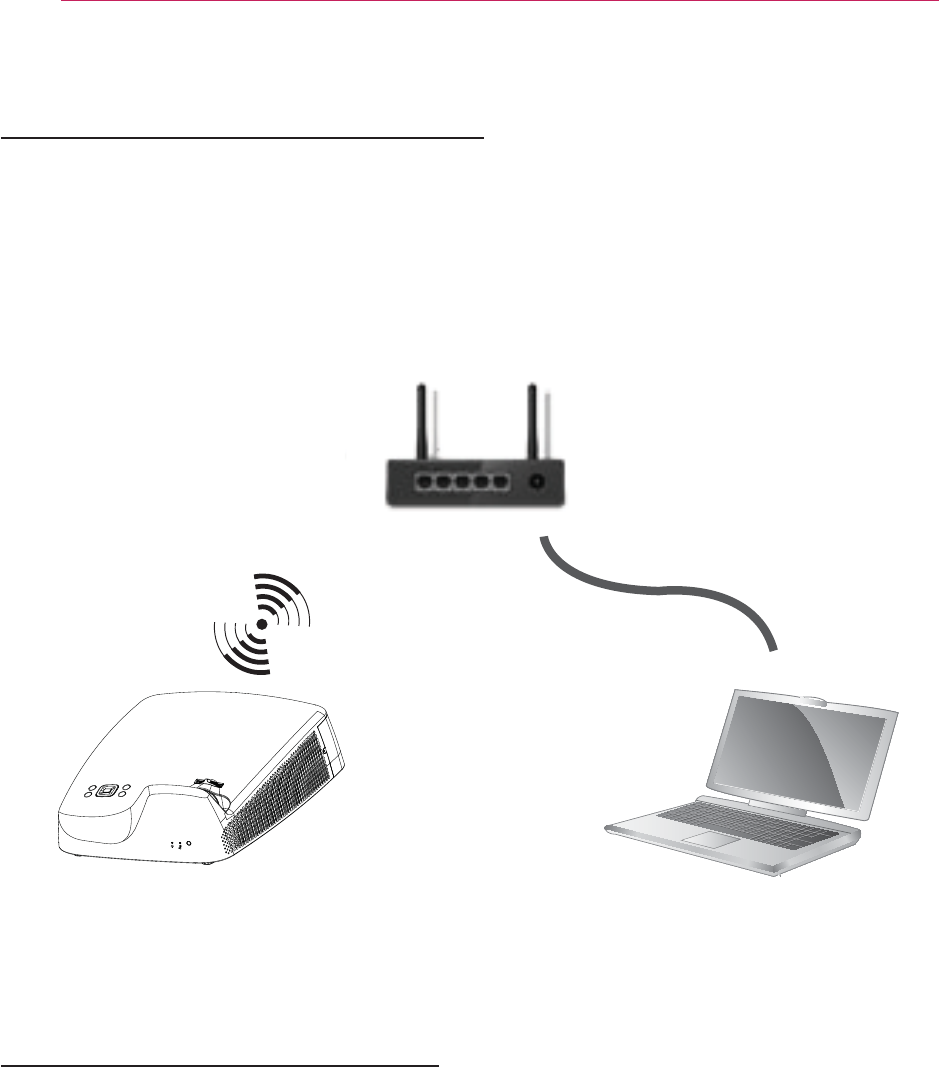
ENTERTAINMENT
Wireless network connection
You can use a wireless network by using the built-in wireless network module as shown
below.
A wireless router must be installed and operating at this time. Refer to the wireless
router's user manual to see how to install it.
The network settings and connection may be different depending on the network envi-
ronment. Set up the router as instructed in its user manual.
Wireless Network Settings
This function allows you to use the wireless connection with Wi-Fi direct and WiDi.
You can share the screen of the device connected by Wi-Fi Screen Share on the
SmartShare.
Enable the Wi-Fi Screen Share. A list of devices available for connection is displayed.
Select a device to connect. A connection request message is displayed. Select Yes.
Then, Wi-Fi Screen Share is connected.
1
Press the MENU button.
2
Use the , , , or button to select NETWORK and press the OK button.
3
Use the , , , button to select the Wi-Fi Screen Share and then press OK
button.
Wired/Wireless
Router
PCProjector

31
ENTERTAINMENT
Tips for Network Settings
y Modem reconfiguration may cause
network connection problems. If it
does, turn off the modem and discon-
nect it from the projector; then turn on
the modem again.
y LG Electronics is not responsible for
any Internet connection problems, or
any failure, error or malfunction due
to your Internet connection.
y The network connection may not be
working properly because of the Inter-
net Service Provider (ISP).
y DSL service requires a DSL modem,
and cable service requires a cable
modem. Internet connections may be
limited due to an agreement with an
Internet service provider (ISP), and
the projector might not connect to a
network.
(When only one device is
allowed per line, if a PC is already
connected, other devices are not
available for use.
)
y The wireless network may be affected by
interference from a device that uses 2.4
-
phone, Bluetooth device or microwave.
Interference may also be caused by a
as Wi-Fi devices.
y The wireless network service may run
slowly depending on surrounding wireless
environment.
y Some devices may have network traf-
fic jam if any of local home networks is
turned on.
y To connect to a wireless router, a router
that supports wireless connection is nec-
essary; the wireless connection function
of the corresponding router must also be
activated. Ask the router manufacturer
whether the router supports wireless con-
nection.
y To connect to a wireless router, verify the
SSID and security settings of the wireless
router. Please refer to the user guide
of the corresponding router regarding
SSID and security settings of the wireless
router.
y The projector may not work properly if
network devices (wire/wireless router or
hub, etc.) are incorrectly set up
. Be sure
to install the devices correctly by
referring to their user guides before
configuring network connection.
y When Ad-hoc is used, it may not be
able to connect depending on the
connected.
y The connection method may vary
according to the manufacturer of the
wireless router.