LG Electronics USA SA565JP LASER PROJECTOR User Manual
LG Electronics USA LASER PROJECTOR
Contents
- 1. User Manual 1
- 2. User Manual 2
- 3. User Manual 3
User Manual 3
69
Interactive Function
Interactive Function
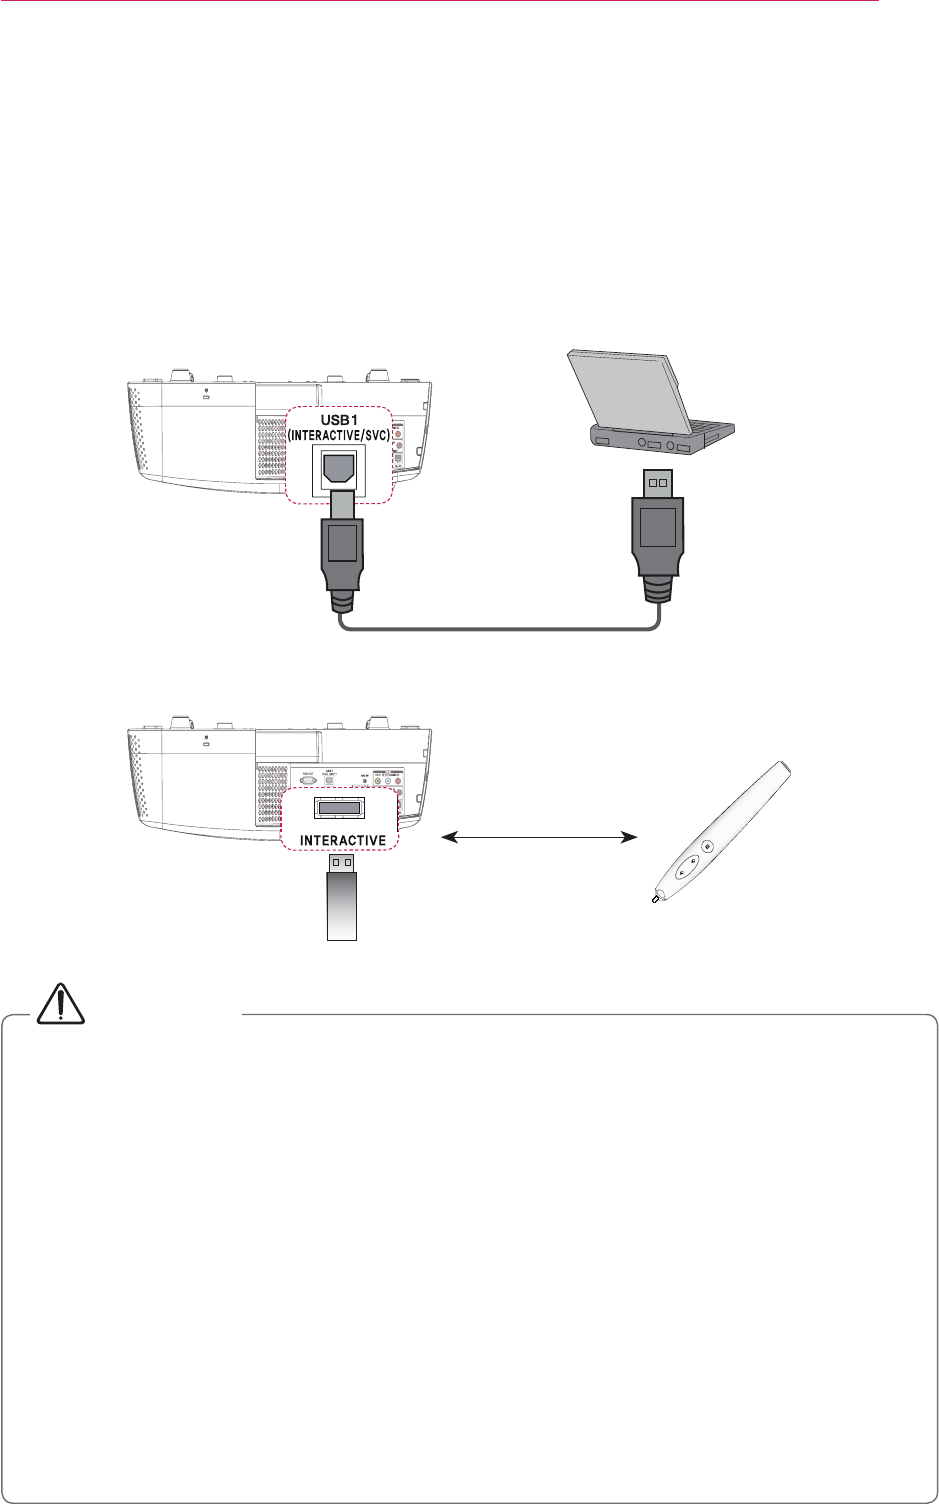
To Connect the Interactive Pen to the PC
and a PC USB port.
Pairing
#CAUTION
y Up to two pens can be used at the same time.
y Pairing is not available when one of the paired pens is in use.
y
y You must install the WizTeach program in the CD provided with the accessories
on your PC before using the Annotation Software .
y
power mode. Press any button to return the pen to normal mode.
y Use the remote control within the specified range (see "Operating Range with
device outside the coverage area or if there are obstacles within the coverage area.
y
such as a microwave oven and wireless LAN operate in the same frequency band
y Make sure not to block the image when using the interactive pen.
Connect the interactive dongle to the projector's INTERACTIVE port.
(For SA565 only)
70
Interactive Function
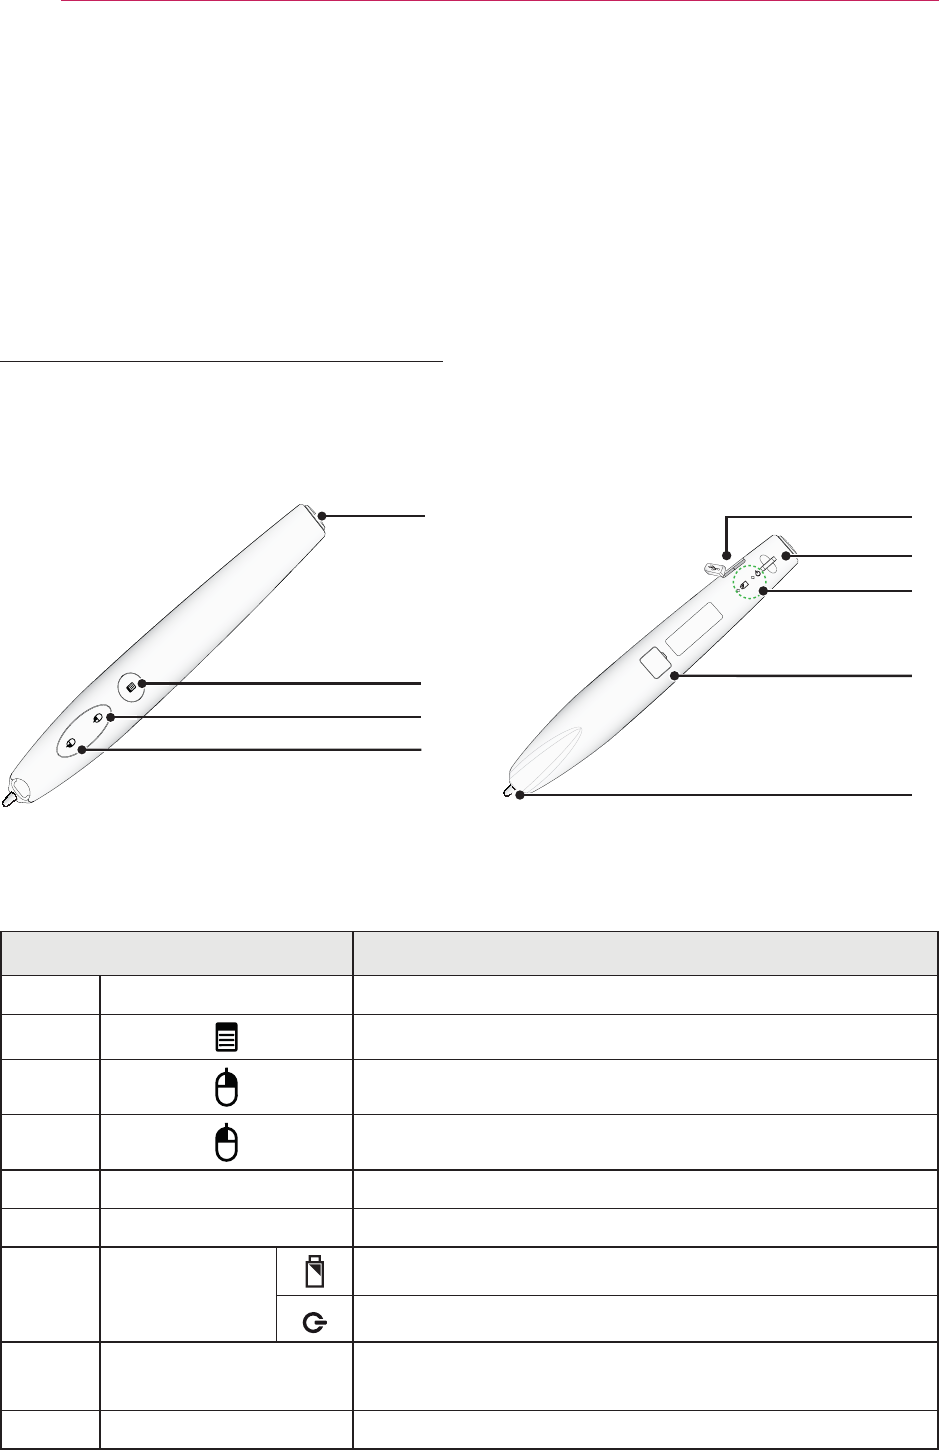
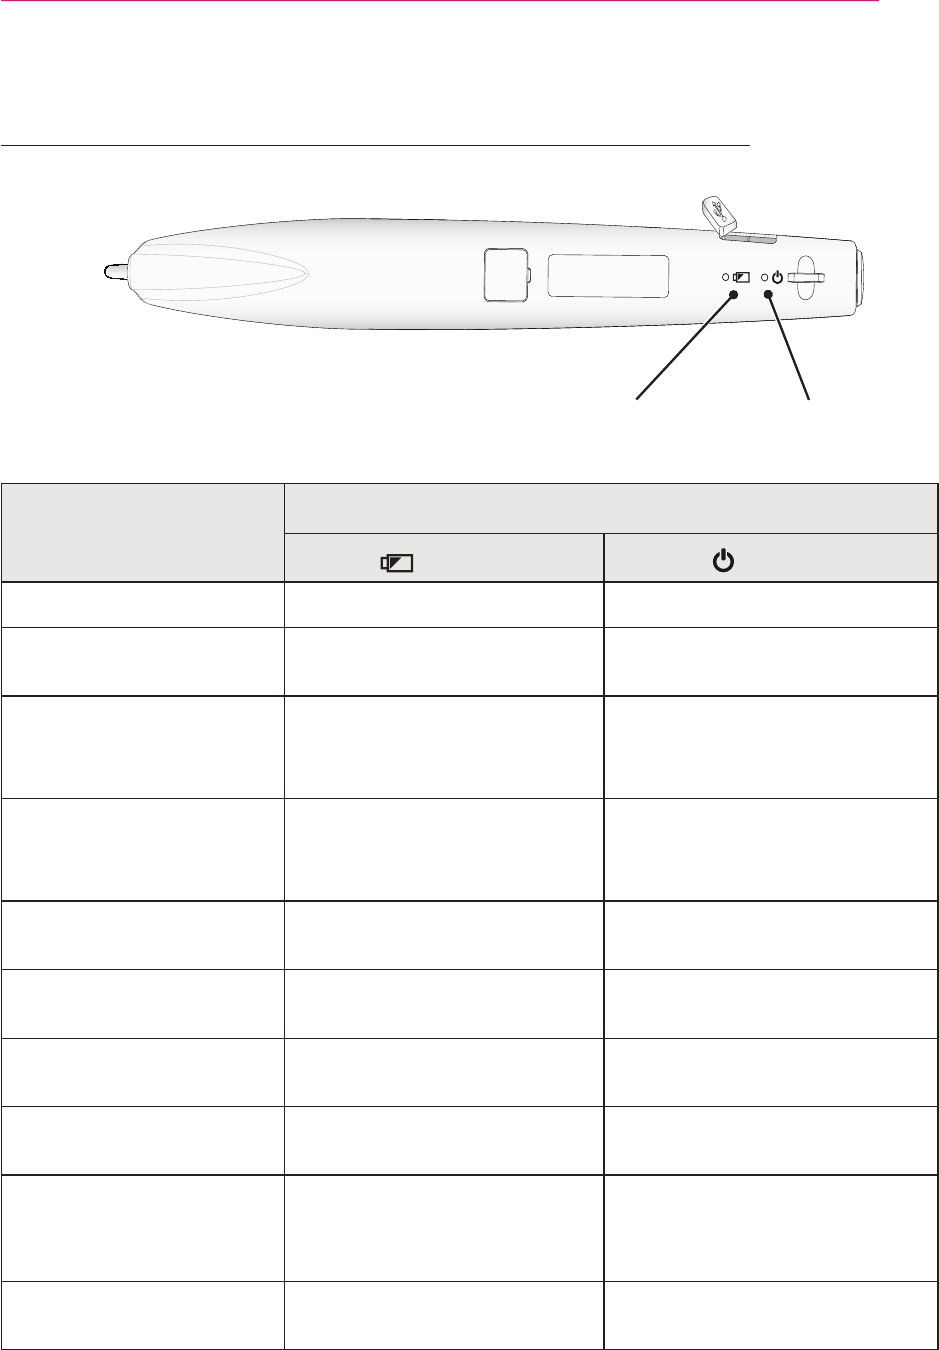
Function/ Button Description
❶
Power Button Turns the interactive pen on/off.
❷
Used for pairing.
❸
Functions the same as a right mouse button.
❹
Functions the same as a left mouse button.
❺
USB charging port Charges the product using the charging cable.
❻
Eyelet for strap Connects the strap to the interactive pen.
❼
LED
Indicators
Shows the battery status.
Shows the pen status.
❽
Firmware upgrade
port
maintenance.
❾
Pen tip
❺
❻
❽
❾
❼
Back
❶
❷
❸
❹
Front
Using The Interactive Pen
Interactive Pen and Button
(For SA565 only)
71
Interactive Function
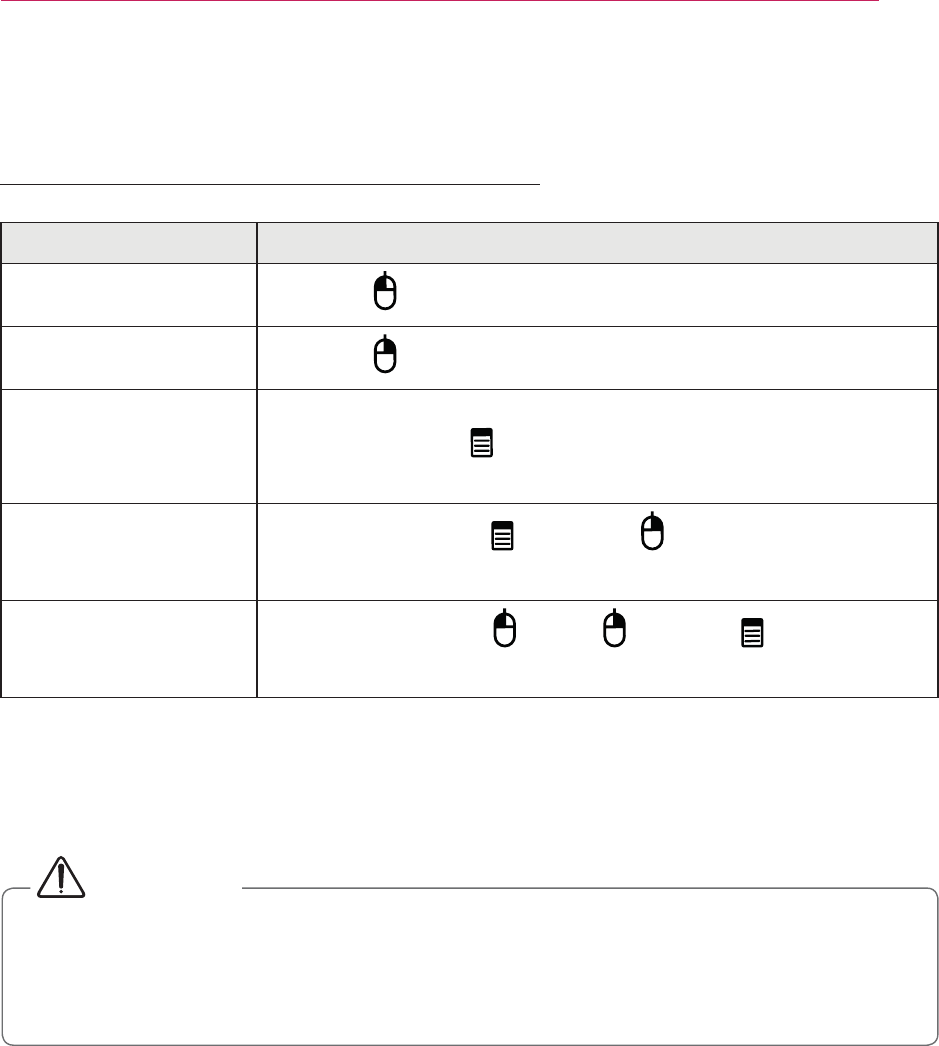
Using the Interactive Pen Button
Function Description
Left Mouse Click Press the button or push the Pen tip.
Right Mouse Click Press the button.
Enter Fixed mode
Go to Interactive and set Pairing Mode to Fixed. Then,
press and hold the button more than three seconds within
ten seconds.
Enter Open mode Press both the pen's button and button simultaneously
for 3 seconds.
Wake Up Press any one of the button, button, or button.
Or, push the pen tip.
y Make sure that the interactive pen is not pointing toward the screen when entering
each mode.
(For SA565 only)
#CAUTION
y If there are foreign objects or dust on the lens at the tip of the interactive pen,
gently wipe with a cotton swab.
y Foreign objects or dust on the lens surface may cause malfunction of the interactive
pen.
72
Interactive Function
#ZDUQLQJ
y Do not replace or repair the battery yourself.
y To charge the interactive pen, use the charging cable provided to connect the pen
to USB port of the PC.
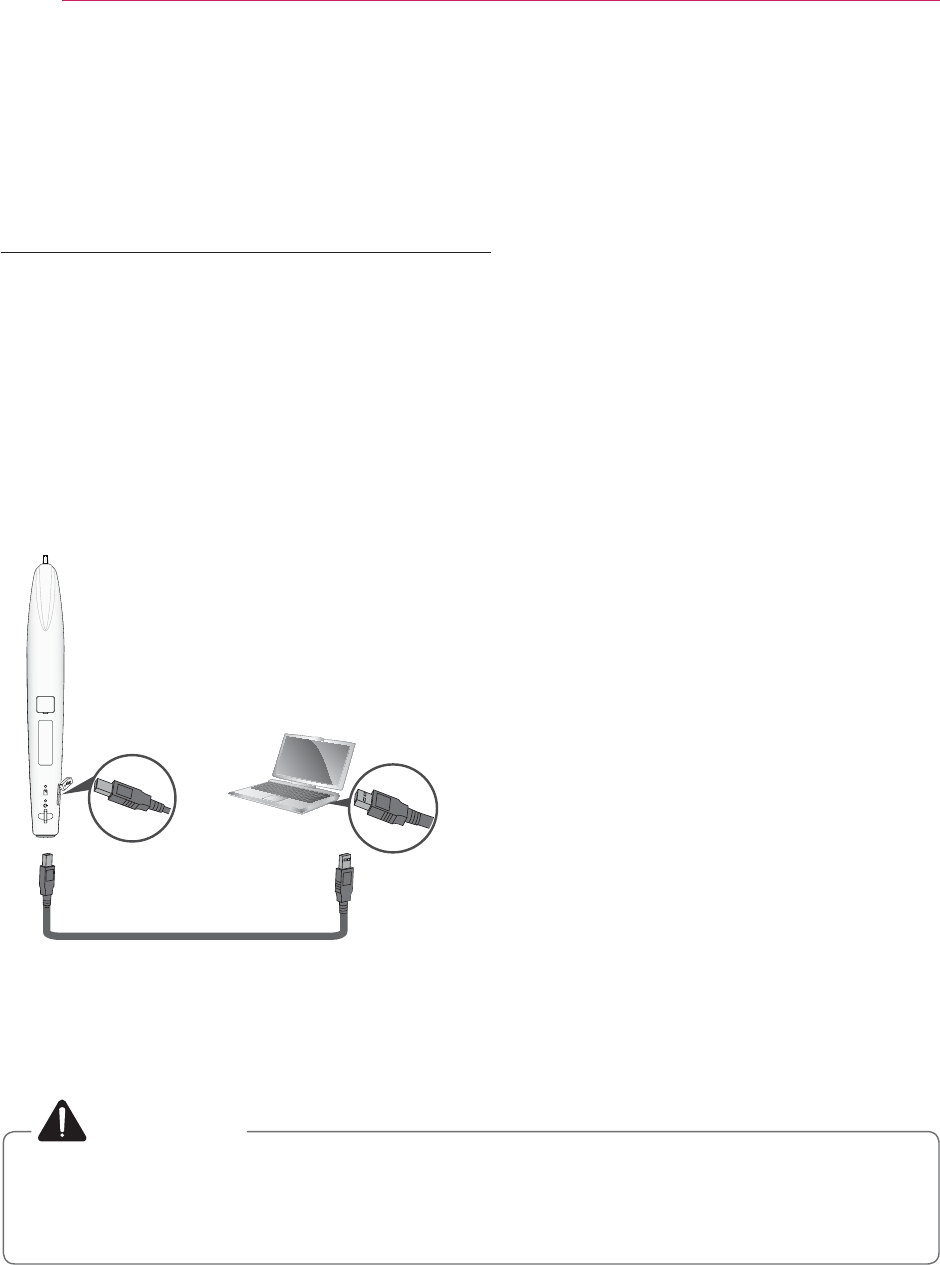
To Charge the Interactive Pen
To charge the battery, connect the interactive pen to the PC with the charging cable.
(Check that the PC is turned on before connection.)
The battery light stays on during charging and will turn off when charging is complete.
When charging is complete, disconnect the charging cable in order to use it. Alternatively, use
the interactive pen while connected by the charging cable if charging is not complete.
y Warning message (low battery)
- When the battery voltage is 3.6 V or
lower, the low battery warning message
is displayed. The interactive pen will
message is displayed.
- The interactive pen may not work
when the battery level is 3.4 V or lower.
y When you use the pen for the first time,
charge the battery for at least 3 hours.
when it is continuously used, or four
weeks in standby mode.
(For SA565 only)
73
Interactive Function
Pen Operation
LED Indicators
(LED 1)
(LED 2)
Charging battery The green light is on -
Battery charging
required
⢫ⅳᖛ#OHG#7ⶲᩲᎎ
#4㜶◓#༆Ჿ⠮ -
Open Mode
- Searching a projector
to connect
-The green light quickly
- Searching a projector
to connect
-
second.
Attempting to pair -
quickly.
Enter Open mode, or
pairing is complete
-
three times.
Pairing failed -
The pen is connected to
the projector -
three seconds.
When the pen is pointing
the projector screen -
quickly.
Entering low power
mode
once.
once.
y
of the interactive pen.
Description of LED Interactive Pen Indicators
OHG#4 OHG#5
(For SA565 only)
74
Interactive Function
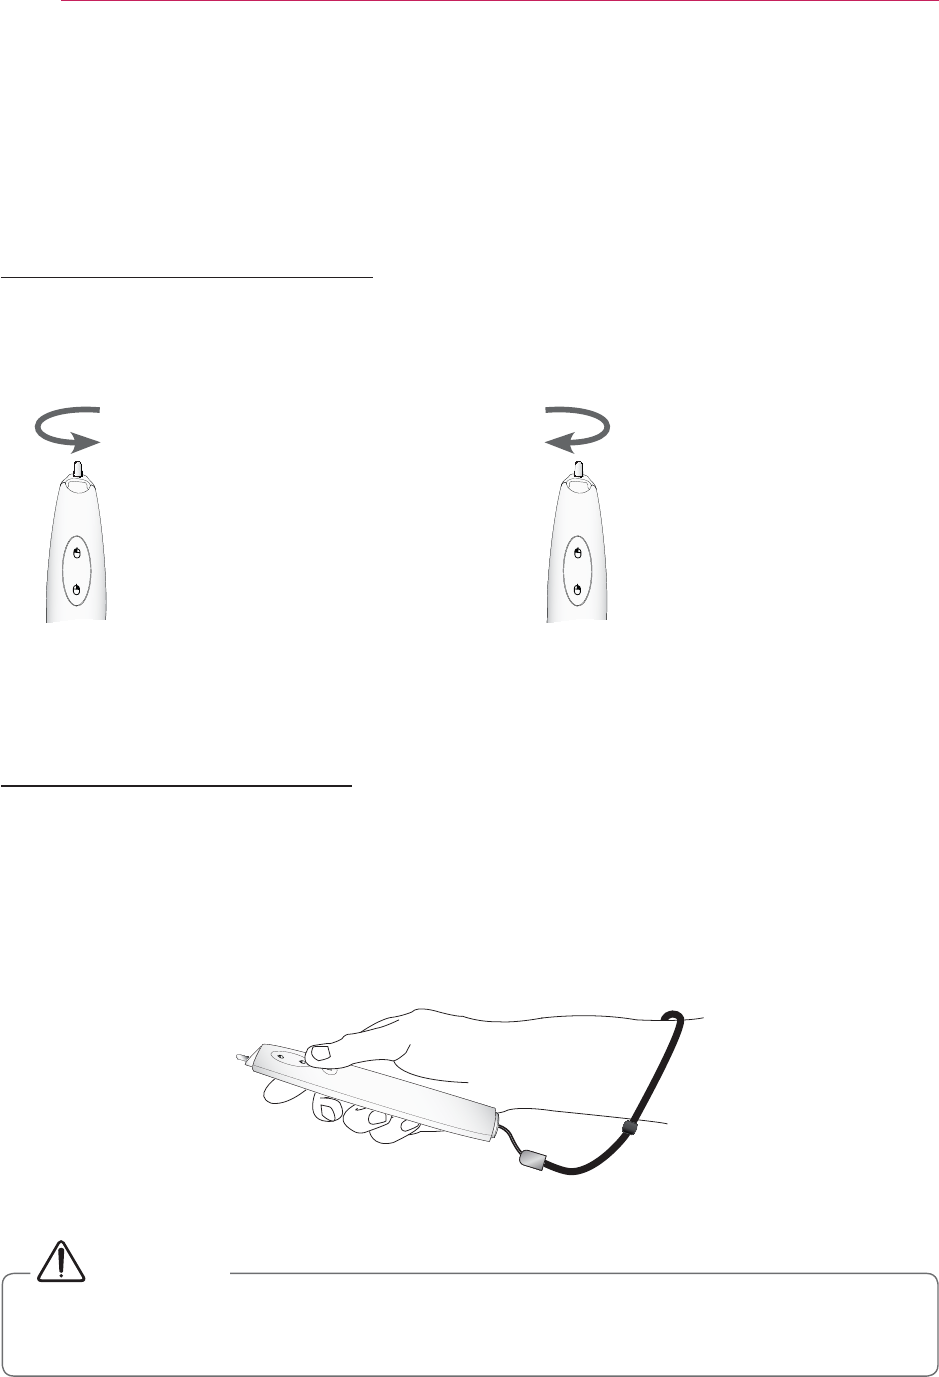
To Replace the Pen tip
Turn the pen tip to the right to
remove it from the interactive
pen, as shown in the figure
below.
Turn the pen tip to the left to
install it onto the interactive
pen, as shown in the figure
below.
Open Close
How to Use the Strap
Use the strap to prevent dropping the interactive pen. Use the pen safely so as not to cause
injury or damage to nearby objects.
(For SA565 only)
#CAUTION
y Be sure to wear the strap on your wrist when using the interactive pen.
y Store the interactive pen in the hard case.
75
Interactive Function
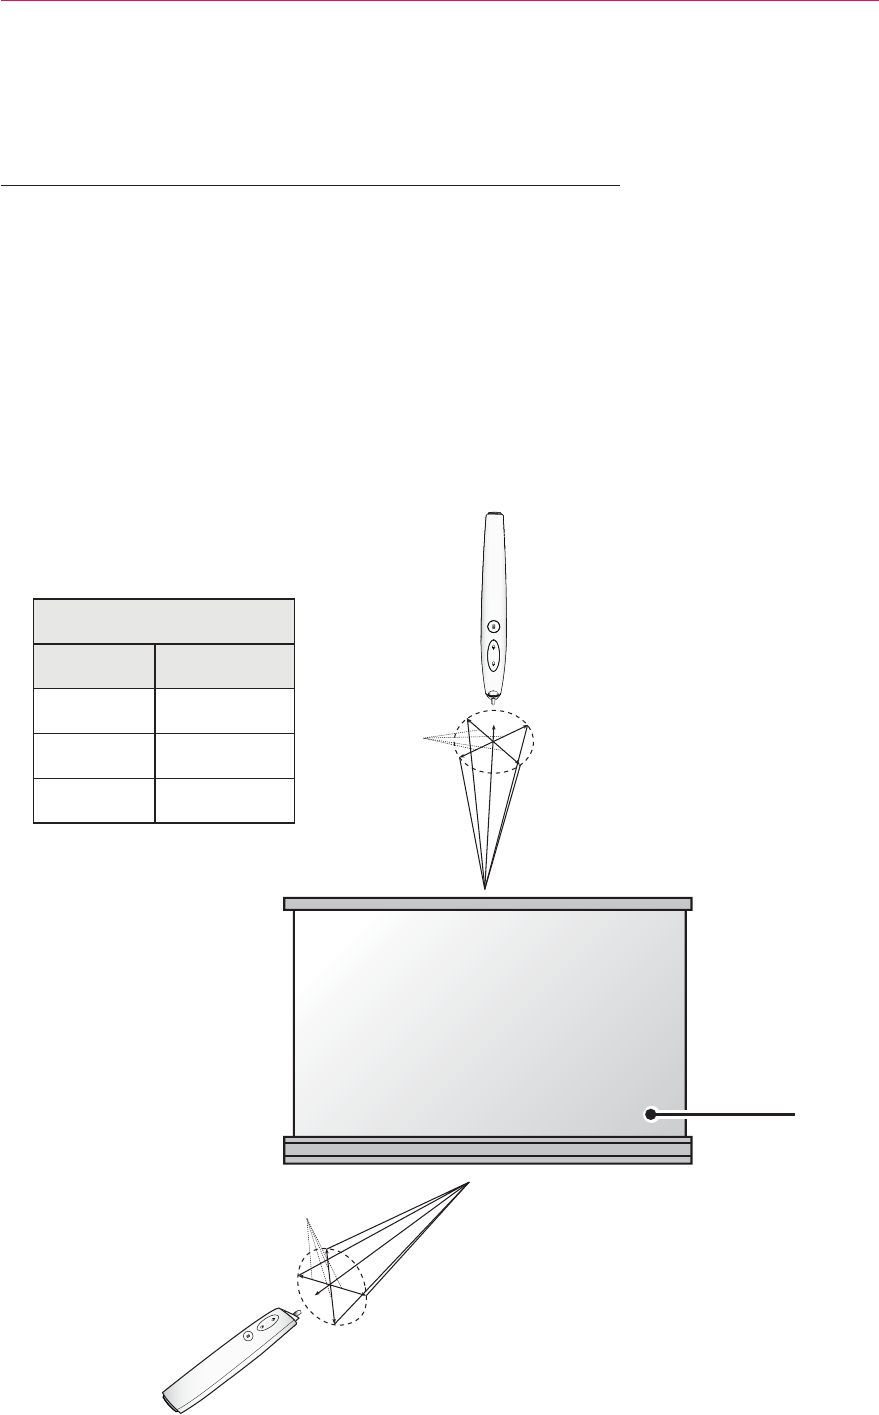
Operating Range with Interactive Pen
y
y You can use two Interactive pens at the same time.
y Actual operating range may slightly differ from the diagram.
y If the projector screen darkens due to the surrounding environment, the operating
range of the interactive pen may be affected.
Operating range
Angle Distance
9 m
7m
5m
Screen
(For SA565 only)
Angle
Distance
Angle
Distance
76
Interactive Function
(For SA565 only)
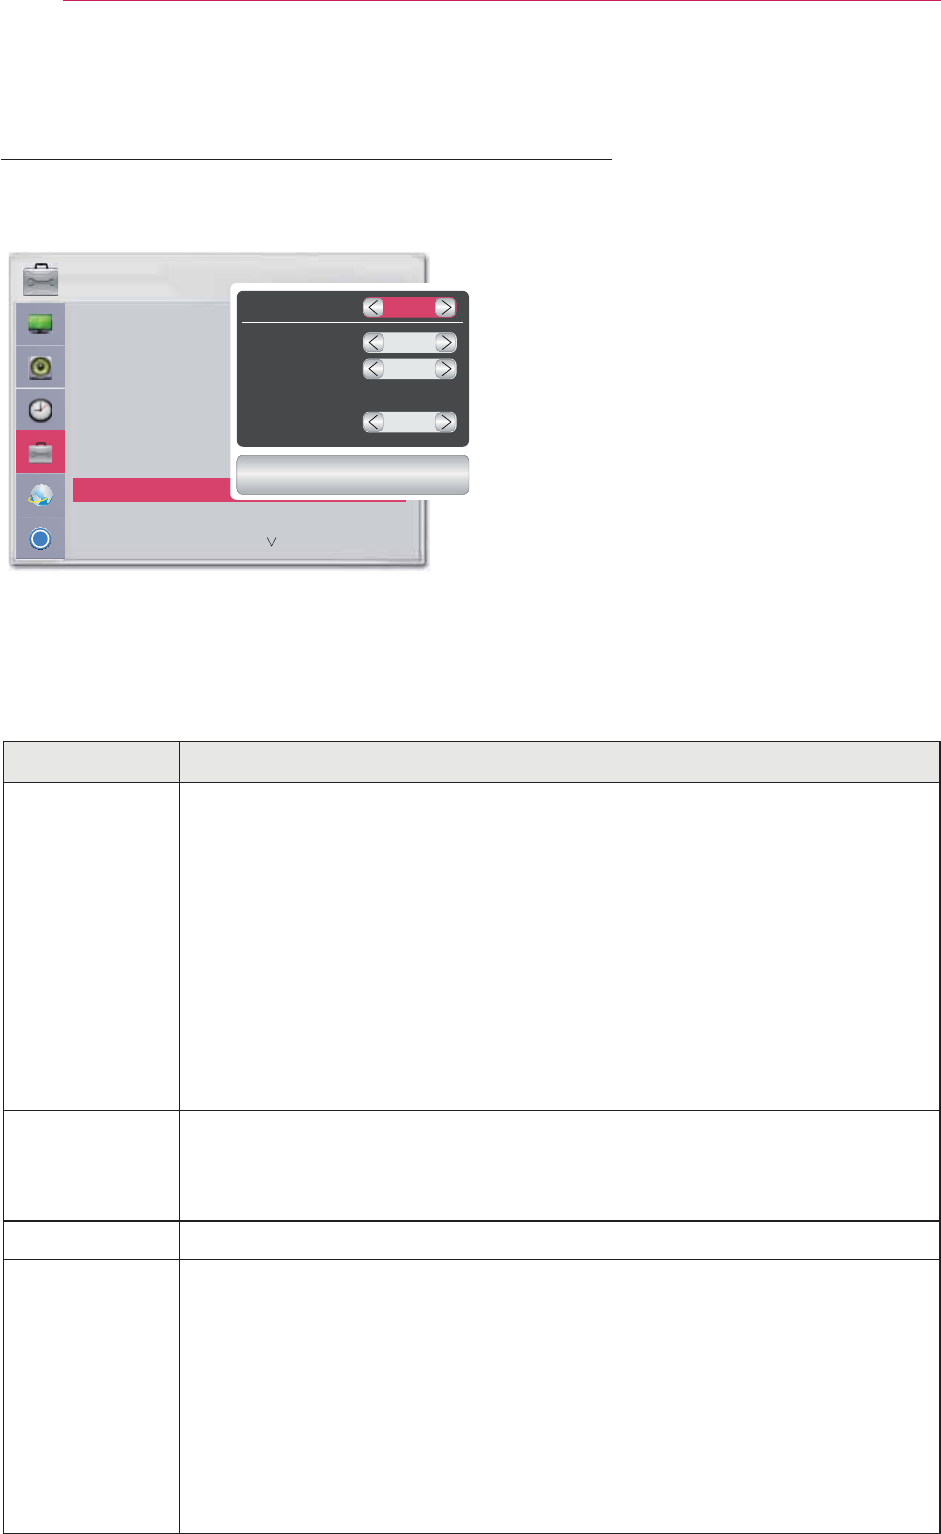
To Use the Interactive Pen Functions
4
#Press the MENU button.
5
#
Select OPTION using the
and
6
#
Select Interactive using the
,
,
and
- To return to the previous screen,
press the ᰳ button.
7
#Select which item you want using the
,
,
and
buttons, and press
0
##After the settings have been
changed, press the Close button to
close the window.
The interactive function settings are as follows:
Item Description
Interactive
There are four function modes: Off/Single, Pen/Double, or Pen/Multi
Touch.
y Off: Disables the interactive pen function.
y Single Pen: Use one interactive pen.
y Double Pen: Use two interactive pens at the same time.
(It is recommended to install the
WizTeach program
provided on your PC prior to use.)
y Multi Touch: Use various functions, such as zoom in, zoom out,
or rotation, with two interactive pens.
(Supported in Windows 7 only)
channel
You can select a channel in Auto or Manual mode.
y Auto: A channel is automatically selected.
y Manual: Select a channel manually.
Set Channel
Pairing Mode
y Open mode: Follow the on-screen instructions to set the interactive
pen to Open mode.(While the interactive pen is pointing at a screen,
the pen can be used with any projector.)
y
(The interactive pen can be used only with a
paired projector.)
Ͱ
237,21
ؒ /DQJXDJH
ؒ 6HW,'
ؒ 3-7PRGH
ؒ .H\6WRQH
ؒ %ODQN,PDJH
ؒ $XWR3RZHU
ؒ ,QWHUDFWLYH
,QWHUDFWLYH
6LQJOH3HQ
&KDQQHO
$XWR
ؒ 6HW&KDQQHO
3HQ6HWWLQJ
ؒ 3DLULQJ0RGH
2SHQ
&ORVH
y Make sure that the Computer/Laptop screen is displayed on the projector screen.

77
Interactive Function
Troubleshooting the Interactive Pen Function
Problem Troubleshooting
I can't use or connect
the interactive pen.
Check that the interactive pen function is turned on.
Check that the interactive dongle is connected to the
projector.
Press the interactive pen's power button to check that the
power is turned on.
Check that the Interactive pen is paired.
Make sure that the computer screen is displayed on the
projector screen.
The interactive pen
does not work from
time to time.
Connect the interactive USB cable to another USB port
and try to use the interactive pen again.
The projector screen
looks abnormal when
the interactive pen
function is enabled.
Check that the projector and computer are connected
properly.
The interactive pen is
showing in a different
position.
Make sure that the computer screen is displayed on the
projector screen.
The interactive pen does
not work smoothly.
Check whether the projector is too far away from the
computer or if there are too many obstacles between them.
Check whether too many applications are running on the
PC.(It is not recommended to run other applications while
running the interactive program (WizTeach software).)
The LED is not
working.
#$%;=
on the pen once every
second, indicating a
battery issue.
The battery is low.Charge the interactive pen.
(For SA565 only)
78
Serial Communication Function
Serial Communication Function
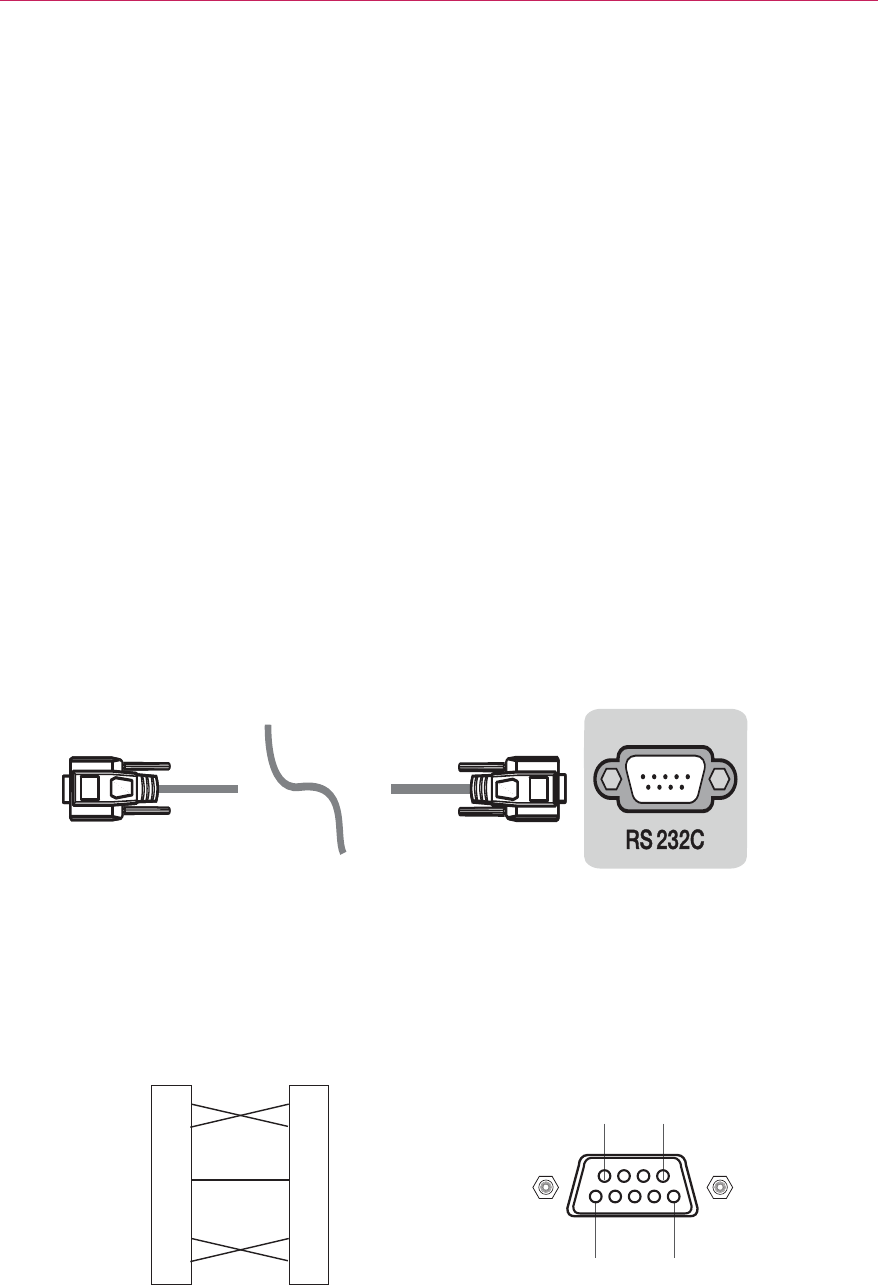
Using Serial Communication
If the projector is connected to a PC through an RS-232C cable, you can use the PC to
control functions of the projector such as power On/Off or input selection, etc.
It cannot be used with the Ez-Net Manager
concurrently. For
serial communication, use
RJ45 Off in the Network Settings.
Establishing Serial Communication
Connect the RS-232C (serial connector) of the PC to the RS-232C connector at the back
of the projector.
You need to purchase a cable to connect the RS-232C connectors as it is not provided as
an accessory.
2
3
4
5
6
7
8
PC
RXD
TXD
DTR
GND
DSR
RTS
CTS
RXD 96
15
TXD
DTR
GND
DSR
RTS
CTS
Projector
2
3
4
5
6
7
8
PC Projector

79
Serial Communication Function
Communication Protocol
[Cr]
The first command to control the projector
* [Command2]: The second command to control the
* [Set ID]: Used to select the set to control; ID can be
granted for each set listed in the Special Menu,
control all the sets. In the command line, a
* [Data]: Used to send data needed for the commands
mentioned above. If it is in ASCII code, 2
characters are sent.
* If the data is ‘FF’, it means data read mode.
* [Cr]: Carriage Return
* [ ]: ASCII code character corresponding to “Space Bar”
separating command, Set ID, and data.
Communication Parameter Setup
* If a set receives the data successfully, it returns
information from the projector indicating the
current status of the projector if it is in data read
mode. The projector itself will return the data from
the PC if it is in data write mode.
3. Error Acknowledgement
* If a set receives an abnormal piece of data such
as a non-supported function or there is a
format.
illegal code
(This command is not supported.)
(This function is not supported.)
(Wait and try again after a while.)
Data Structure
29 33 3D 47 5B
22 32 42 2A 52 34 62 3E 72 52 92 5C
23 33 43 2B 53 35 63 3F 73 49 53 93 5D
24 34 22 44 2C 54 36 64 74 4A 54 94 5E
25 35 23 45 2D 55 37 65 75 4B 55 95 5F
26 36 24 46 2E 56 66 42 76 4C 56 96
27 37 25 47 2F 57 39 67 43 77 4D 57 97
26 3A 44 4E 62
29 39 27 49 59 3B 69 45 79 4F 59 99 63
32 3C 46 5A 64
2
3
4
5
6
7
9
80
Serial Communication Function
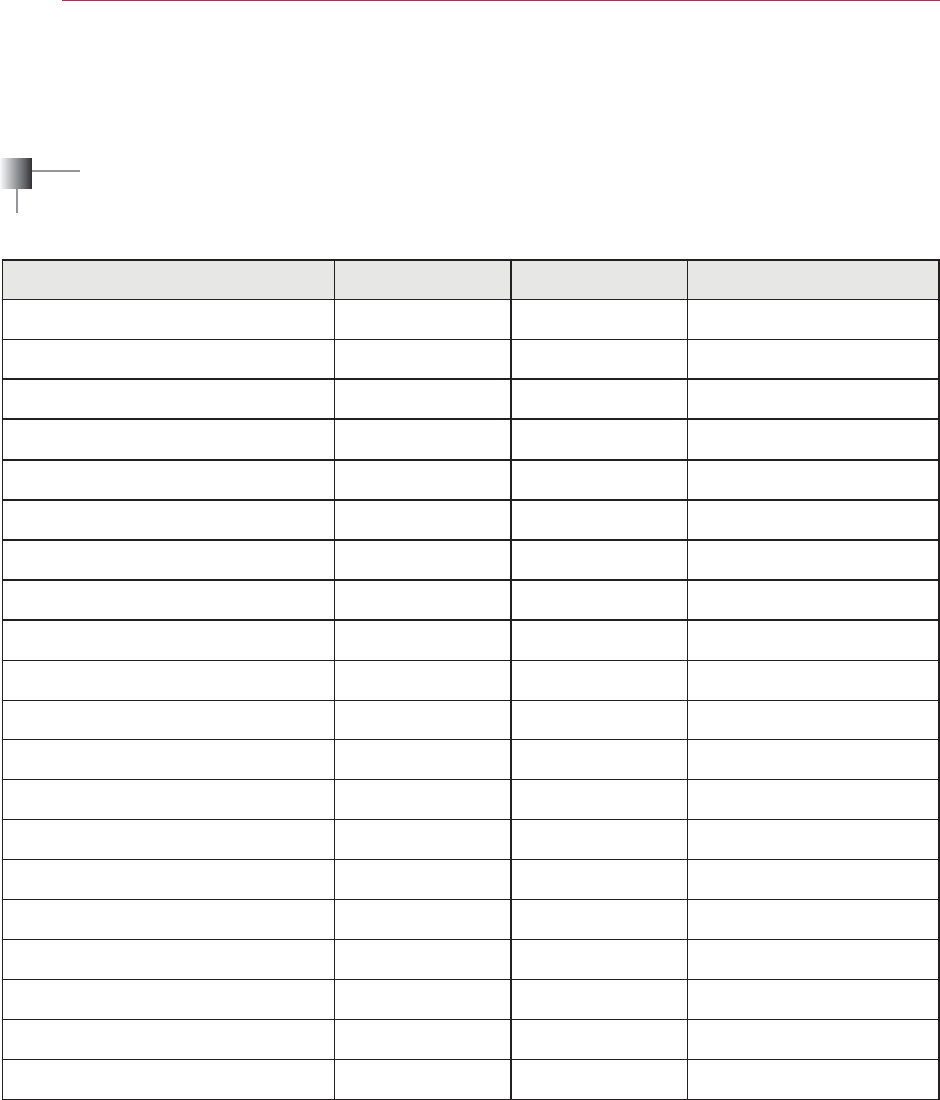
Command Reference List
Command 1 Command 2 Data
01. Power k a
02. Aspect Ratio kc *
03. Blank Image k d
04. Contrast k g
05. Brightness k h
06. Color k i
07. Tint k j
08. Sharpness k k
09. OSD Select k
10.
Key Lock k m
11. Color Temperature k u
12. Black Level n m
13. Energy Saving n p
?@!" ju
15. Input b *
16. Key mc *
17. Picture Mode n s
18. Mute k e
19. Volume k f
20. Monitor Out n r
y

81
Serial Communication Function
01. Power (Command: ka)
ފ Powers the set on/off.
When Magical Mirroring or Wi-Fi Screen
Share is running, only the Power function is
available to use.
Transmission
[k][a][][Set ID][][Data][Cr]
Ack
ފ Shows the power on/off status.
Transmission
[k][a][][Set ID][][FF][Cr]
Ack
* As with other functions, if data is transmitted
format,
the current status
of each function is returned as a feedback
in Ack
data.
02. Screen size (Command: kc)
ފ
Adjusts the screen size.
Transmission
[k][c][][Set ID][][Data][Cr]
Ack
03. Blank Image (Command: kd)
ފ
Enables/disables the blank image.
Transmission
[k][d][][Set ID][Data][Cr]
Ack
82
Serial Communication Function
04. Contrast (Command: kg)
ފ
Adjusts the contrast.
Disabled when the Black Mode is selected.
Transmission
[k][g][][Set ID][][Data][Cr]
* See the data structure.
Ack
05. Brightness (Command: kh)
ފ
Adjusts the brightness.
Disabled when the Black mode is selected.
Transmission
[k][h][][Set ID][][Data][Cr]
* See the data structure.
Ack
06. Color (Command: ki)
ފ
Adjusts the color.
Disabled when the Black mode is selected.
Transmission
[k][i][][Set ID][][Data][Cr]
* See the data structure.
Ack
07. Tint (Command: kj)
ފ
Adjusts the tint.
Disabled when the Black mode is selected.
Transmission
[k][j][][Set ID][][Data][Cr]
* See the data structure.
Ack

83
Serial Communication Function
08. Sharpness (Command: kk)
ފ
Adjusts the sharpness.
Disabled when the Black mode is selected.
Transmission
[k][k][][Set ID][][Data][Cr]
* See the data structure.
Ack
10. Key Lock (Command: km)
ފ
Enables the lock function for
the remote control and local keypad.
Transmission
[k][m][][Set ID][][Data][Cr]
Ack
* This function is used when the remote control
is not being used.
If remote control lock is on
,
none of the buttons of the local keypad and
remote control will work.
11. Color Temperature (Command: ku)
ފ
Adjusts the color temperature.
Disabled when the Black mode is selected.
Transmission
[k][u][][Set ID][][Data][Cr]
Cool
Warm
Ack
Cool
Warm
09. OSD Select (Command: kl)
ފ
Selects OSD On/Off.
Transmission
[k][l][][Set ID][][Data][Cr]
Ack
84
Serial Communication Function
13. Energy Saving (Command: np)
ފ
Sets the energy saving mode.
Transmission
[n][p][][Set ID][][Data][Cr]
Ack
?@!"[!\\$]^_
ފ
Adjusts the video position in RGB mode
and minimizes image shaking.
Transmission
[j][u][][Set ID][][Data][Cr]
Ack
15. Input Select (Command: xb)
ފ
Select the input signal of the set.
Transmission
Ack
12. Black Level (Command: nm)
ފ
Adjusts the black level.
Disabled when the Black mode is selected.
Transmission
[n][m][][Set ID][][Data][Cr]
Ack

85
Serial Communication Function
16. Key (Command: mc)
ފ
Sends a key code of the IR remote control.
Transmission
[m][c][][Set ID][][Data][Cr]
.
Ack
20. Monitor Out (Command: nr)
ފ
Transmission
[n][r][][Set ID][][Data][Cr]
Ack
18. Mute (Command: ke)
ފ
Enables/disables the mute function.
Transmission
[k][e][][Set ID][][Data][Cr]
Ack
19. Volume (Command: kf)
ފ
Adjusts the volume.
Transmission
[k][f][][Set ID][][Data][Cr]
* See the data structure.
Ack
17. Picture Mode (Command: ns)
ފ
Sets the
picture mode.
Transmission
[n][s][][Set ID][][Data][Cr]
Cinema
Ack
Cinema

86
Serial Communication Function
Key Name Key Code Key Name Key Code
ޟ
Blue
ه
>
<
Mic
POWER USB
IINPUT
MUTE
MENU PAGE
ޟ
PAGE
ޠ
ENERGY SAVING STILL
RATIO EXIT
弁
PICTURE
AUTO
2
Q.MENU
3
SLEEP
4
AV MODE 5
VOL + 6
VOL - 7
Red
Green 9
Yellow
<Key Code>

87
MAINTENANCE
MAINTENANCE
Clean your projector to keep it in optimal
condition.
Cleaning
Cleaning the Lens
If there is any dust or staining on the
lens surface, you must clean the lens.
Use an air spray or a cleaning cloth to
clean the lens.
To remove dust or stains, use an air
spray or apply a small amount of clean-
ing agent onto a swab or soft cloth to
lightly rub the lens.
into the lens if the product is sprayed
directly onto the lens.
Cleaning the projector
case
the power cord.
To remove dust or stains, use only a dry,
lint-free, nonabrasive cloth to polish the
lens.
Do not use alcohol, benzene, thinners
or other chemicals, which may damage
the case.

88
MAINTENANCE
Updating Software
When software update is required, run the software update to obtain the latest software
version.
You can manually check for and download any software updates.
1
Press the MENU button.
2
Select SUPPORT and go to Software Update.
Item Description
Software Update Enable this option.
When an update file is found, it is downloaded
automatically.
When the update file is finished downloading, a software
update window appears.
Check Update
Version
the latest update version, you can proceed with the
update manually.
y The update service to get the latest version is provided through an Internet connection.
y If the software is not updated, some functions may not work well.
89
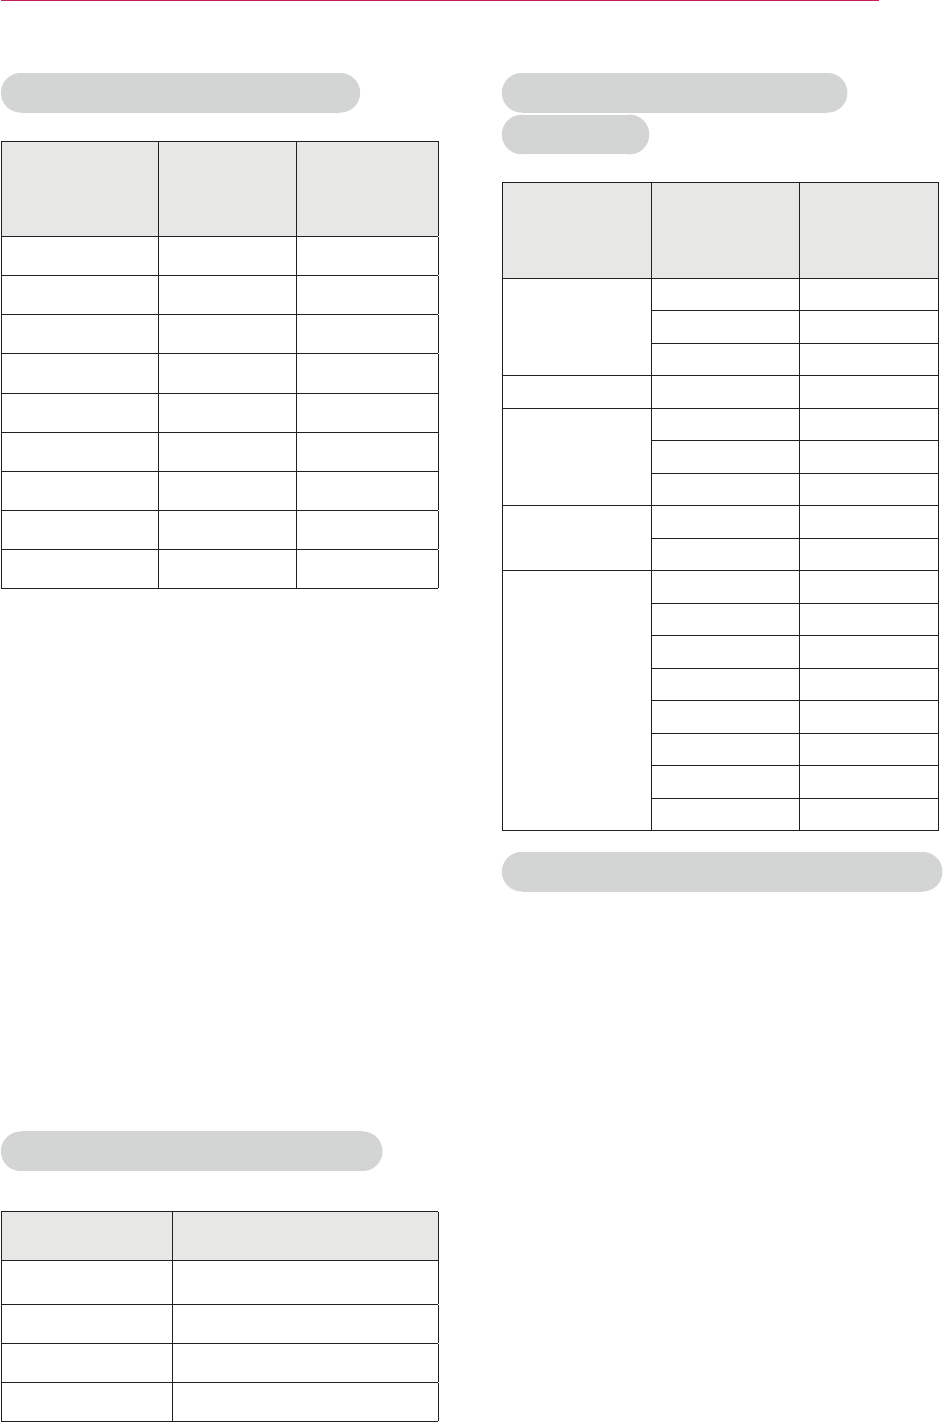
%`\$[`?{{_
Standard
Frequency Range
Modulation
Output Power
(Typical)
Data Rate
Antenna Gain
(Typical)
Occupied bandwidth
y Because band channel used by the country could be different, the user can not
change or adjust the operating frequency and this product is set for the regional
frequency table.
;"|}
(For SA565 only)
y The interactive pen communicates with the interactive a projector's interactive dongle.
Frequency Range
Modulation
Transmission power
Receive sensitivity
Data Rate

90
SPECIFICATIONS
SPECIFICATIONS
Model SA560 (SA560-JP) /
SA565(SA565-JP)
Aspect ratio
Panel size (mm)
Projection distance
(Video size)
Ratio of upward
projection
Working range of the
remote control 6 m
Audio output 7 W + 7 W
Reception type
Width (mm)
Depth (mm)
Weight (kg)
-
phone
Jack thickness: 3.5 mm
USB Device
POWER
Operation environ-
ment
Temperature
Operation
Storage
Relative humidity
Operation
Storage
91
SPECIFICATIONS
HDMI/DVI-DTV/WiDi mode
supported
Resolution
Horizontal
Frequency
(kHz)
Vertical
Frequency
(Hz)
59.94
576p
37.5
44.96 59.94
45
33.75
56.25
67.432 59.94
67.5
67.432 59.939
27 24
26.97 23.976
33.75
29.97
Open Source Software Information
To obtain the source code under the
GPL, LGPL, MPL and other open source
licenses, which is contained in this prod-
uct, please visit
http://opensource.lge.com.
In addition to the source code, all refer-
enced license terms, warranty disclaim-
ers and copyright notices are available
for download.
lge.com to request the software’s open
source code installed on the projector
within three years of purchase, we will
send you a CD-ROM. You will only be
charged a minimum for packaging and
delivery.
y If an invalid signal is input into the
projector, it will not be displayed prop-
erly on the screen or a message such
as “No Signal” or “Invalid
Mode” will be
displayed.
y
-
tion of PC monitor).
y PC sync signals supported: Separate
Sync.
y
for the best picture quality.
y
may not be
supported depending on the PC type.
Component Port Connection
Signal Component
480i / 576i o
480p / 576p o
720p / 1080i o
1080p o
Supported Monitor Display
Resolution
Horizontal
Frequency
(kHz)
Vertical
Frequency
(Hz)
59.94
59.979
65.3

ederal Communications Commission(FCC) Statement) Federal Communications Commission(FCC) Statement
You are cautioned that changes or modifications not expressly approved by You are cautioned that changes or modifications not expressly approved by
the part responsiblethe part responsible
for compliance could void the user
’
s authority to operate the equipmentfor compliance could void the user
’
s authority to operate the equipment
for
compliance
could
void
the
user s
authority
to
operate
the
equipment
.
for
compliance
could
void
the
user s
authority
to
operate
the
equipment
.
This equipment has been tested and found to comply with the limits for a This equipment has been tested and found to comply with the limits for a
Class B digital device, pursuant to part 15 of the FCC rules.Class B digital device, pursuant to part 15 of the FCC rules.
These limits are designed to provide reasonable protection against harmful These limits are designed to provide reasonable protection against harmful
it f i id tili tlltiit f i id tili tllti
i
n
t
er
f
erence
i
n a res
id
en
ti
a
l
i
ns
t
a
ll
a
ti
on.
i
n
t
er
f
erence
i
n a res
id
en
ti
a
l
i
ns
t
a
ll
a
ti
on.
This equipment generates, uses and can radiate radio frequency energy This equipment generates, uses and can radiate radio frequency energy
and, if not installed and used in accordance with the instructions, may and, if not installed and used in accordance with the instructions, may
cause harmful interference to radio communications.cause harmful interference to radio communications.
However, there is no guarantee that interference will not occur in a However, there is no guarantee that interference will not occur in a
particular installationparticular installation
particular
installation
.
particular
installation
.
If this equipment does cause harmful interference to radio or television If this equipment does cause harmful interference to radio or television
reception, which can be determined by turning the equipment off and on, reception, which can be determined by turning the equipment off and on,
the user is encouraged to try to correct the the user is encouraged to try to correct the
interference by one or more of the following measures:interference by one or more of the following measures:
--. Reorient or relocate the receiving antenna.. Reorient or relocate the receiving antenna.
--. Increase the separation between the equipment and receiver.. Increase the separation between the equipment and receiver.
--. Connect the equipment into an outlet on a circuit different from that to . Connect the equipment into an outlet on a circuit different from that to
which the receiver is connectedwhich the receiver is connected
which
the
receiver
is
connectedwhich
the
receiver
is
connected
--. Consult the dealer or an experienced radio/TV technician for help.. Consult the dealer or an experienced radio/TV technician for help.

This device complies with Part 15 of the FCC Rules.This device complies with Part 15 of the FCC Rules.
Operation is subject to the following two conditions:Operation is subject to the following two conditions:
1) this device may not cause harmful interference, and1) this device may not cause harmful interference, and
2) this device must accept any interference received, including interference 2) this device must accept any interference received, including interference
that may cause undesired operation of the device.that may cause undesired operation of the device.
Id lId l
I
n
d
oor use on
lyI
n
d
oor use on
ly
FCC Caution: Any changes or modifications not expressly approved by the FCC Caution: Any changes or modifications not expressly approved by the
party responsible for compliance could void the user's authority to operate party responsible for compliance could void the user's authority to operate
this equipment.this equipment.

The model and serial number of the projec-
tor are located on the back or on the side
of the projector. Record them below should
you ever need service.
MODEL
SERIAL