LG Electronics USA V700 Portable Tablet with WLAN and Bluetooth User Manual 1
LG Electronics MobileComm USA, Inc. Portable Tablet with WLAN and Bluetooth Users Manual 1
Contents
- 1. Users Manual
- 2. Users Manual 1
- 3. Users Manual 2
Users Manual 1

User Guide
ENGLISH
• Screendisplaysandillustrationsmaydifferfromthoseyouseeonactual
device.
• Someofthecontentsofthisguidemaynotapplytoyourdevice,depending
onthesoftwareandyourserviceprovider.Allinformationinthisdocumentis
subjecttochangewithoutnotice.
• Thisdeviceisnotsuitableforpeoplewhohaveavisualimpairmentduetothe
touchscreenkeyboard.
• Copyright©2014LGElectronics,Inc.Allrightsreserved.LGandtheLG
logoareregisteredtrademarksofLGGroupanditsrelatedentities.Allother
trademarksarethepropertyoftheirrespectiveowners.
• Google™,GoogleMaps™,Gmail™,YouTube™,Hangouts™andPlayStore™are
trademarksofGoogle,Inc.

2
About this user guide ......................... 5
About this user guide ........................... 5
Trademarks ............................................. 5
DivX HD .................................................. 6
Dolby Digital Plus .................................. 6
For Your Safety .................................... 7
Safety Guidelines .............................. 13
Important notice ...............................23
Getting to know your device ............27
Tablet Overview ....................................27
Charging your tablet ...........................29
Optimizing Battery Life ......................30
To extend the life of your battery ....... 30
To view the battery charge level ...........31
To monitor and control what uses
the battery .....................................................31
Inserting a microSD card .....................31
Removing the microSD card ..............32
Formatting the microSD card ............33
Locking and unlocking the screen.....33
Your Home screen ............................ 34
Touch Screen tips ................................34
Tap or touch ............................................... 34
Touch and hold ......................................... 34
Drag ............................................................... 34
Swipe or slide ............................................. 35
Double-tap .................................................. 35
Pinch-to-Zoom ......................................... 35
Rotate the screen ..................................... 35
KnockON ..................................................... 36
Home screen ........................................36
Customizing the Home screen .......... 38
Returning to recently-used
applications ..........................................38
Notifications .........................................39
Swipe down for notifications &
settings ......................................................... 39
Quick Settings on Notification
Panel ............................................................. 40
To rearrange Quick Setting items
on the Notification Panel .......................40
QSlide apps on the Notifications
panel ............................................................. 40
Using the QSlide apps .............................41
Indicator icons on the Status Bar ........41
Multiple Users ......................................42
Slide aside ............................................44
Plug & Pop ...........................................44
Capturing a Screenshot ......................45
Using QuickMemo to capture a
screenshot .................................................. 45
Using Capture plus to capture a
screenshot .................................................. 45
Entering Text.........................................46
Entering accented letters ...................... 46
Google account setup ....................... 47
Connecting to Networks and
Devices .............................................. 48
Table of contents

3
Wi-Fi .....................................................48
Connecting to Wi-Fi networks ............ 48
Turning Wi-Fi on and connecting
to a Wi-Fi network .................................... 48
Bluetooth ..............................................49
Turning on Bluetooth and pairing up
your tablet with a Bluetooth device ... 49
Send data using the Bluetooth
wireless feature ..........................................50
Receive data using the Bluetooth
wireless feature ..........................................50
SmartShare ...........................................51
Enjoying the content via a variety of
devices ...........................................................51
Playing/Sending .........................................51
Enjoying the content from Nearby
devices ...................................................51
Connecting devices ..................................51
Searching other devices........................ 52
Using the content from the Cloud ....52
Using the Cloud ....................................... 52
PC connections with a USB cable .....52
Transferring music, photos and
videos using the USB mass storage
mode ............................................................ 52
Synchronize with Windows Media
Player ............................................................ 53
Contacts .............................................54
Searching for a contact ......................54
Adding a new contact .........................54
Favorite Contacts .................................54
Creating a group ..................................55
E-mail .................................................56
Managing an E-mail account .............56
Working with account folders ............57
Composing and sending E-mail ........57
Receiving emails .................................. 57
Camera ...............................................58
Getting to know the viewfinder ..........58
Using the advanced settings .............. 59
Taking a quick photo ..........................60
Once you've taken a photo ..................61
Viewing your saved photos .................62
Video camera .....................................63
Getting to know the viewfinder ..........63
Using the advanced settings ..............64
Recording a quick video .....................65
After recording a video .......................65
Watching your saved videos ...............66
Adjusting the volume when
viewing a video ..................................... 66
Multimedia .........................................67
Gallery ................................................... 67
Viewing pictures ........................................67
Zooming in and out ................................ 68
Playing videos ............................................ 68
Deleting images and videos ................ 68
Setting as wallpaper ................................ 68
Slideshow .............................................. 69
Videos ...................................................69
Playing a video .......................................... 69
Music ..................................................... 70
Playing a song ............................................ 70
Tools ....................................................73

4
QPair .....................................................73
QSlide ................................................... 74
QuickMemo .......................................... 76
QuickRemote ....................................... 78
QuickTranslator ....................................80
Voice Mate .............................................81
Alarm .....................................................82
Calculator .............................................83
Calendar ...............................................83
Tasks ......................................................84
Voice Recorder .....................................84
Task Manager .......................................85
POLARIS Office 5 ..............................85
Google+.................................................86
Voice Search .........................................87
Downloads ............................................87
BOX .......................................................87
The Web ............................................ 88
Internet..................................................88
Opening a page ....................................... 88
Searching the web by voice................. 89
Bookmarks .................................................. 89
History ........................................................... 89
Using QSlide .............................................. 89
Chrome .................................................89
Viewing webpages ................................... 90
Opening a page ....................................... 90
Searching the web by voice................. 90
Syncing with other devices ...................90
Adding and Viewing bookmarks .......90
Chrome Options menu ...........................91
Settings ..............................................92
Access the Settings menu .................92
WIRELESS NETWORKS ....................92
DEVICE .................................................95
PERSONAL .......................................... 99
SYSTEM ...............................................101
LG Backup ........................................105
About backing up and restoring
device data .........................................105
LG Backup your tablet data ..............106
Scheduling automatic backups .......106
Restoring tablet data ........................106
Tablet software update ................... 108
Tablet software update .....................108
LG Tablet Software update via
Over-the-Air (OTA) ............................108
Accessories .......................................110
Troubleshooting .................................111

5
About this user guide
•Beforeusingyourdevice,pleasecarefullyreadthismanual.Thiswillensure
thatyouuseyourdevicesafelyandcorrectly.
•Someoftheimagesandscreenshotsprovidedinthisguidemayappear
differentlyonyourtablet.
•Yourcontentmaydifferfromthefinalproduct,orfromsoftwaresupplied
byserviceprovidersorcarriers,Thiscontentmaybesubjecttochange
withoutpriornotice.Forthelatestversionofthismanual,pleasevisitthe
LGwebsiteatwww.lg.com.
•Yourdevice'sapplicationsandtheirfunctionsmayvarybycountry,region,
orhardwarespecifications.LGcannotbeheldliableforanyperformance
issuesresultingfromtheuseofapplicationsdevelopedbyprovidersother
thanLG.
•LGcannotbeheldliableforperformanceorincompatibilityissuesresulting
fromeditedregistrysettingsbeingeditedoroperatingsystemsoftware
beingmodified.Anyattempttocustomizeyouroperatingsystemmay
causethedeviceoritsapplicationstonotworkastheyshould.
•Software,audio,wallpaper,images,andothermediasuppliedwithyour
devicearelicensedforlimiteduse.Ifyouextractandusethesematerials
forcommercialorotherpurposesis,youmaybeinfringingcopyrightlaws.
Asauser,youarefullyareentirelyresponsiblefortheillegaluseofmedia.
•Additionalchargesmaybeappliedfordataservices,suchasmessaging,
uploadinganddownloading,auto-syncing,orusinglocationservices.To
avoidadditionalcharges,selectadataplantoissuitableforyourneeds.
Contactyourserviceprovidertoobtainadditionaldetails.
Trademarks
•LGandtheLGlogoareregisteredtrademarksofLGElectronics.
•Allothertrademarksandcopyrightsarethepropertyoftheirrespective
owners.
About this user guide

6
DivX HD
ABOUT DIVX VIDEO:DivX®isadigitalvideoformatcreatedbyDivX,LLC,a
subsidiaryofRoviCorporation.ThisisanofficialDivXCertified®devicethat
haspassedrigoroustestingtoverifythatitplaysDivXvideo.Visitdivx.com
formoreinformationandsoftwaretoolstoconvertyourfilesintoDivXvideos.
ABOUT DIVX VIDEO-ON-DEMAND:ThisDivXCertified®devicemustbe
registeredinordertoplaypurchasedDivXVideo-on-Demand(VOD)movies.
Toobtainyourregistrationcode,locatetheDivXVODsectioninyourdevice
setupmenu.Gotovod.divx.comformoreinformationonhowtocomplete
yourregistration.
DivX Certified® to play DivX® video up to HD 720p, including premium
content.
DivX®, DivX Certified® and associated logos are trademarks of Rovi
Corporation or its subsidiaries and are used under license.
Notice: Open Source Software
ToobtainthecorrespondingsourcecodeunderGPL,LGPL,MPLand
otheropensourcelicences,pleasevisithttp://opensource.lge.com/
Allreferredlicenceterms,disclaimersandnoticesareavailablefor
downloadwiththesourcecode.
Dolby Digital Plus
ManufacturedunderlicensefromDolbyLaboratories.Dolby,DolbyDigital
Plus,andthedouble-DsymbolaretrademarksofDolbyLaboratories.
7
Important Information
Thisuserguidecontainsimportantinformationontheuseandoperationof
thisdevice.Pleasereadalltheinformationcarefullyforoptimalperformance
andtopreventanydamageormisuseofthedevice.Anychangesor
modificationsnotexpresslyapprovedinthisuserguidecouldvoidyour
warrantyforthisequipment.
Before You Start
Safety Instructions
WARNING
Notice for Battery replacement
•Foryoursafety,donotremovethebatteryincorporatedintheproduct.
Ifyouneedtoreplacethebattery,takeittothenearestauthorized
LGElectronicsservicepointordealerforassistance.
•Li-IonBatteryisahazardouscomponentwhichcancauseinjury.
•Batteryreplacementbynon-qualifiedprofessionalcancausedamageto
yourdevice.
WARNING
Toreducethepossibilityofelectricshock,donotexposeyourdeviceto
highhumidityareas,suchasthebathroom,swimmingpool,etc.
For Your Safety

8
Always store your device away from heat.Neverstoreyourdeviceinsettings
thatmayexposeittotemperatureslessthan32°F(0°C)orgreaterthan
104°F(40°C),suchasoutsideduringextremeweatherconditionsorinyour
caronahotday.Exposuretoexcessivecoldorheatwillresultinmalfunction,
damageand/orcatastrophicfailure.
Be careful when using your device near other electronic devices.RF
emissionsfromyourdevicemayaffectnearbyinadequatelyshielded
electronicequipment.Youshouldconsultwithmanufacturersofanypersonal
medicaldevicessuchaspacemakersandhearingaidestodetermineifthey
aresusceptibletointerferencefromyourdevice.
Turnoffyourdeviceinamedicalfacilityoratagasstation.Neverplaceyour
deviceinamicrowaveovenasthiswillcausethebatterytoexplode.
Safety Information
Readthesesimpleguidelines.Breakingtherulesmaybedangerousor
illegal.Furtherdetailedinformationisgiveninthisuserguide.
•Neveruseanunapprovedbatterysincethiscoulddamagethedeviceand/
orbatteryandcouldcausethebatterytoexplode.
•Neverplaceyourdeviceinamicrowaveovenasitwillcausethebatteryto
explode.
•Yourdevicecontainsaninternalbattery.Donotdisposeofyourbatteryby
fireorwithhazardousorflammablematerials.
•Makesurethatnosharp-edgeditemscomeintocontactwiththebattery.
Thereisariskofthiscausingafire.
•Storethebatteryinaplaceoutofreachofchildren.
•Becarefulthatchildrendonotswallowanypartssuchasrubberplugs
(earphone,connectionpartsofthedevice,etc.).Thiscouldcause
asphyxiationorsuffocation.

9
•Unplugthepowercordandchargerduringlightningstormstoavoid
electricshockorfire.
•Whenridinginacar,donotleaveyourdeviceorsetupthehands-freekit
neartotheairbag.Ifwirelessequipmentisimproperlyinstalledandtheair
bagisactivated,youmaybeseriouslyinjured.
•Donotuseahand-helddevicewhiledriving.
•Donotusethedeviceinareaswhereitsuseisprohibited.(Forexample:
aircraft).
•Donotexposethebatterychargeroradaptertodirectsunlightoruseitin
placeswithhighhumidity,suchasabathroom.
•Neverstoreyourdeviceintemperatureslessthan-4°F(-20°C)orgreater
than122°F(50°C).
•Donotuseharshchemicals(suchasalcohol,benzene,thinners,etc.)or
detergentstocleanyourdevice.Thereisariskofthiscausingafire.
•Donotdrop,strike,orshakeyourdeviceseverely.Suchactionsmayharm
theinternalcircuitboardsofthedevice.
•Donotuseyourdeviceinhighexplosiveareasasthedevicemaygenerate
sparks.
•Donotdamagethepowercordbybending,twisting,pulling,orheating.
•Donotusetheplugifitislooseasitmaycauseafireorelectricshock.
•Donotplaceanyheavyitemsonthepowercord.Donotallowthepower
cordtobecrimpedasitmaycausefireorelectricshock.
•Donothandlethedevicewithwethandswhileitisbeingcharged.Itmay
causeanelectricshockorseriouslydamageyourdevice.
•Donotdisassemblethedevice.
•Onlyusethebatteries,antennas,andchargersprovidedbyLG.The
warrantywillnotbeappliedtoproductsprovidedbyothersuppliers.

10
•Onlyauthorizedpersonnelshouldservicethedeviceanditsaccessories.
Faultyinstallationorservicemayresultinaccidentsandconsequently
invalidatethewarranty.
•Useaccessories,suchasearphonesandheadsets,withcaution.Ensure
thatcablesaretuckedawaysafelyanddonottouchtheantenna
unnecessarily.
FCC RF Exposure Information
WARNING
Readthisinformationbeforeoperatingthedevice.
InAugust1996,theFederalCommunicationsCommission(FCC)ofthe
UnitedStates,withitsactioninReportandOrderFCC96-326,adopted
anupdatedsafetystandardforhumanexposuretoradiofrequency(RF)
electromagneticenergyemittedbyFCCregulatedtransmitters.Those
guidelinesareconsistentwiththesafetystandardpreviouslysetbybothU.S.
andinternationalstandardsbodies.
ThedesignofthisdevicecomplieswiththeFCCguidelinesandthese
internationalstandards.
CAUTION
Useonlythesuppliedandapprovedantenna.Useofunauthorizedantennas
ormodificationscouldimpaircallquality,damagethedevice,voidyour
warrantyand/orresultinviolationofFCCregulations.Donotusethedevice
withadamagedantenna.Ifadamagedantennacomesintocontactwith
skin,aminorburnmayresult.Contactyourlocaldealerforareplacement
antenna.

11
Body-worn Operation
Thisdevicewastestedfortypicalbody-wornoperationswiththebackofthe
devicekept0cm(0inches)betweentheuser’sbodyandthebackofthe
device.
FCC Part 15 Class B/IC RSS-Gen Compliance
Thisdevicecomplieswithpart15ofFCCrulesandIC RSS Genrequirements
forIndustryCanada.
Operationissubjecttothefollowingtwoconditions:
(1)Thisdevicemaynotcauseharmfulinterference,and(2)thisdevicemust
acceptanyinterferencereceived,includinginterferencethatmaycause
undesiredoperationofthedevice.
Cautions for Battery
• Donotdisassemble.
• Donotshort-circuit.
• Donotexposetohightemperature:140°F(60°C).
• Donotincinerate.
Battery Disposal
• Pleasedisposeofyourbatteryproperlyorbringtoyourlocalwirelesscarrier
forrecycling.
• Yourdevicecontainsaninternalbattery.Donotdisposeofyourbatteryby
fireorwithhazardousorflammablematerials.

12
Adapter (Charger) Cautions
•Usingthewrongbatterychargercoulddamageyourdeviceandvoidyour
warranty.
•Theadapterorbatterychargerisintendedforindooruseonly.
•Donotexposetheadapterorbatterychargertodirectsunlightoruseitin
placeswithhighhumidity,suchasthebathroom.
Avoid damage to your hearing
•Damagetoyourhearingcanoccurifyouareexposedtoloudsoundsfor
longperiodsoftime.Wethereforerecommendthatyoudonotturnon
oroffthedeviceclosetoyourear.Wealsorecommendthatmusicand
volumesaresettoareasonablelevel.
•Ifyouarelisteningtomusicwhilstoutandabout,pleaseensurethatthe
volumeisatareasonablelevelsothatyouareawareofyoursurroundings.
Thisisparticularlyimperativewhenattemptingtocrossthestreet.

13
TIA Safety Information
ProvidedhereinisthecompleteTIASafetyInformationforWirelessHandheld
devices.InclusionofthetextcoveringPacemakers,HearingAids,andOther
MedicalDevicesisrequiredintheowner’smanualforCTIACertification.Use
oftheremainingTIAlanguageisencouragedwhenappropriate.
Exposure to Radio Frequency Signal
Yourwirelesshandheldportabledeviceisalowpowerradiotransmitterand
receiver.WhenitisON,itreceivesandalsosendsoutradiofrequency(RF)
signals.InAugust,1996,theFederalCommunicationsCommissions(FCC)
adoptedRFexposureguidelineswithsafetylevelsforhandheldwireless
devices.
Thoseguidelinesareconsistentwiththesafetystandardspreviouslysetby
bothU.S.andinternationalstandardsbodies:
ANSIC95.1(1992)*
NCRPReport86(1986)
ICNIRP(1996)
Thosestandardswerebasedoncomprehensiveandperiodicevaluationsofthe
relevantscientificliterature.Forexample,over120scientists,engineers,and
physiciansfromuniversities,governmenthealthagenciesandindustryexperts
reviewedtheavailablebodyofresearchtodeveloptheANSIStandard(C95.1).
*AmericanNationalStandardsInstitute;NationalCouncilonRadiation
ProtectionandMeasurements;InternationalCommissiononNon-Ionizing
RadiationProtection
ThedesignofyourdevicecomplieswiththeFCCguidelines(andthose
standards).
Safety Guidelines

14
Antenna Care
Useonlythesuppliedoranapprovedreplacementantenna.Unauthorized
antennas,modifications,orattachmentscoulddamagethedeviceandmay
violateFCCregulations.
Tips on Efficient Operation
Foryourdevicetooperatemostefficiently:
Donottouchtheantennaunnecessarilywhenthedeviceisinuse.Contact
withtheantennaaffectscallqualityandmaycausethedevicetooperateat
ahigherpowerlevelthanotherwiseneeded.
Driving
Checkthelawsandregulationsontheuseofwirelessdevicesintheareaswhere
youdrive.Alwaysobeythem.Also,ifusingyourdevicewhiledriving,please:
•Givefullattentiontodriving-drivingsafelyisyourfirstresponsibility;
•Usehands-freeoperation,ifavailable;
•Pullofftheroadandparkbeforeusingit.
Electronic Devices
MostmodernelectronicequipmentisshieldedfromRFsignals.However,
certainelectronicequipmentmaynotbeshieldedagainsttheRFsignals
fromyourwirelessdevice.
Pacemakers
TheHealthIndustryManufacturersAssociationrecommendsthata
minimumseparationofsix(6”)inchesbemaintainedbetweenahandheld

15
wirelessdeviceandapacemakertoavoidpotentialinterferencewiththe
pacemaker.Theserecommendationsareconsistentwiththeindependent
researchbyandrecommendationsofWirelessTechnologyResearch.Persons
withpacemakers:
•ShouldALWAYSkeepthedevicemorethansixinchesfromtheir
pacemakerwhenthedeviceisturnedON.
•Shouldnotcarrythedeviceinabreastpocket.
•Shouldusetheearoppositethepacemakertominimizethepotentialfor
interference.
•Ifyouhaveanyreasontosuspectthatinterferenceistakingplace,turn
yourdeviceOFFimmediately.
Hearing Aids
Somedigitalwirelessdevicesmayinterferewithsomehearingaids.Inthe
eventofsuchinterference,youmaywanttoconsultyourserviceprovider.
Other Medical Devices
Ifyouuseanyotherpersonalmedicaldevice,consultthemanufacturer
ofyourdevicetodetermineiftheyareadequatelyshieldedfromexternal
RFenergy.Yourphysicianmaybeabletoassistyouinobtainingthis
information.
Health Care Facilities
TurnyourdeviceOFFinhealthcarefacilitieswhenanyregulationspostedin
theseareasinstructyoutodoso.Hospitalsorhealthcarefacilitiesmayuse
equipmentthatcouldbesensitivetoexternalRFenergy.

16
Vehicles
RFsignalsmayaffectimproperlyinstalledorinadequatelyshieldedelectronic
systemsinmotorvehicles.Checkwiththemanufactureroritsrepresentative
regardingyourvehicle.
Youshouldalsoinformthemanufacturerofanyequipmentthathasbeen
addedtoyourvehicle.
Posted Facilities
TurnyourdeviceOFFinanyfacilitywherepostednoticessorequire.
Aircraft
FCCregulationsprohibitusingyourdevicewhileintheair.Turnyourdevice
OFFbeforeboardinganaircraft.
Blasting Areas
Toavoidinterferingwithblastingoperations,turnyourdeviceOFFwhenina
blastingareaorinareasposted:‘Turnofftwo-wayradio’.Obeyallsignsand
instructions.
Potentially Explosive Atmosphere
TurnyourdeviceOFFwheninanyareawithapotentiallyexplosive
atmosphereandobeyallsignsandinstructions.Sparksinsuchareascould
causeanexplosionorfireresultinginbodilyinjuryorevendeath.
Areaswithapotentiallyexplosiveatmosphereareoften,butnotalways,
markedclearly.Potentialareasmayinclude:fuelingareas(suchasgasoline
stations);belowdeckonboats;fuelorchemicaltransferorstoragefacilities;

17
vehiclesusingliquefiedpetroleumgas(suchaspropaneorbutane);areas
wheretheaircontainschemicalsorparticles(suchasgrain,dust,ormetal
powders);andanyotherareawhereyouwouldnormallybeadvisedtoturn
offyourvehicleengine.
For Vehicles Equipped with an Air Bag
Anairbaginflateswithgreatforce.DONOTplaceobjects,including
installedorportablewirelessequipment,intheareaovertheairbagorin
theairbagdeploymentarea.Ifin-vehiclewirelessequipmentisimproperly
installedandtheairbaginflates,seriousinjurycouldresult.
Safety Information
Pleasereadandobservethefollowinginformationforsafeandproperuse
ofyourdeviceandtopreventdamage.Also,keeptheuserguideinan
accessibleplaceatalltimesafterreadingit.
Charger and Adapter Safety
•Thechargerandadapterareintendedforindooruseonly.
Battery Information and Care
•Pleasedisposeofyourbatteryproperlyortakeittoyourlocalwireless
carrierforrecycling.
•Thebatterydoesnotneedtobefullydischargedbeforerecharging.
•UseonlyLG-approvedchargersspecifictoyourdevicemodelsincethey
aredesignedtomaximizebatterylife.
•Donotdisassembleorimpactthebatteryasitmaycauseelectricshock,
short-circuit,andfire.Storethebatteryinaplaceoutofreachofchildren.

18
•Replacethebatterywhenitnolongerprovidesacceptableperformance.
Ifyouneedtoreplacethebattery,takeittothenearestauthorizedLG
Electronicsservicepointordealerforassistance.
•Rechargethebatteryafterlongperiodsofnon-usetomaximizebattery
life.
•Batterylifewillvaryduetousagepatternsandenvironmentalconditions.
•Useofextendedbacklighting,MediaNetBrowsing,anddataconnectivity
kitsaffectbatterylifeandtalk/standbytimes.
•Actualbatterylifewilldependonnetworkconfiguration,productsettings,
usagepatterns,batteryandenvironmentalconditions.
Explosion, Shock, and Fire Hazards
•Donotputyourdeviceinaplacesubjecttoexcessivedustandkeepthe
minimumrequireddistancebetweenthepowercordandheatsources.
•Unplugthepowercordpriortocleaningyourdevice,andcleanthepower
plugpinwhenitisdirty.
•Whenusingthepowerplug,ensurethatitisfirmlyconnected.Ifitisnot,it
maycauseexcessiveheatorfire.
•Ifyouputyourdeviceinapocketorbagwithoutcoveringthereceptacle
ofthedevice(powerplugpin),metallicarticles(suchasacoin,paperclip
orpen)mayshort-circuitthedevice.Alwayscoverthereceptaclewhennot
inuse.
•Donotshort-circuitthebattery.Metallicarticlessuchasacoin,paperclip
orpeninyourpocketorbagmayshort-circuitthe+and–terminalsofthe
battery(metalstripsonthebattery)uponmoving.Short-circuitingofthe
terminalmaydamagethebatteryandcauseanexplosion.

19
General Notice
•Usingadamagedbatteryorplacingabatteryinyourmouthmaycause
seriousinjury.
•Donotplaceitemscontainingmagneticcomponentssuchasacreditcard,
devicecard,bankbookorsubwayticketnearyourdevice.Themagnetism
ofthedevicemaydamagethedatastoredinthemagneticstrip.
•Talkingonyourdeviceforalongperiodoftimemayreducecallquality
duetoheatgeneratedduringuse.
•Whenthedeviceisnotbeingusedforalongperiodtime,storeitinasafe
placewiththepowercordunplugged.
•Usingthedeviceinproximitytoreceivingequipment(i.e.,TVorradio)may
causeinterferencetothedevice.
•Donotusethedeviceiftheantennaisdamaged.Ifadamagedantenna
contactsskin,itmaycauseaslightburn.PleasecontactanLGAuthorized
ServiceCentretoreplacethedamagedantenna.
•Donotimmerseyourdeviceinwater.Ifthishappens,turnitoff
immediately.Ifthedevicedoesnotwork,takeittoanLGAuthorized
ServiceCentre.
•Donotpaintyourdevice.
•Thedatasavedinyourdevicemightbedeletedduetocarelessuse,repair
ofthedevice,orupgradeofthesoftware.Pleasebackupyourimportant
devicenumbers.(Ringtones,textmessages,voicemessages,pictures,and
videoscouldalsobedeleted.)Themanufacturerisnotliablefordamage
duetothelossofdata.
•Whenyouusethedeviceinpublicplaces,settheringtonetovibrationso
asnottodisturbothers.
•Donotturnyourdeviceonoroffwhenputtingitnearyourear.
•Yourdeviceisanelectronicdevicethatgeneratesheatduringnormal
operation.Extremelyprolonged,directcontactwithskinintheabsenceof

20
adequateventilationmayresultindiscomfortorminorburns.Therefore,
usecarewhenhandlingyourdeviceduringorimmediatelyafteroperation.
•Donotattempttorepairormodifythedeviceyourself.Yourdeviceis
equippedwithaninternalrechargeablebatterywhichshouldbereplaced
onlybyLGoranauthorizedLGrepaircenter.Youshouldneverattemptto
openordisassemblethisdeviceyourselfanddoingsomaycausedamage
thatwillvoidyourwarranty.
Consumer Information on SAR
(Specific Absorption Rate)
This Model Phone Meets the Government’s Requirements for Exposure to
Radio Waves.
Yourwirelessphoneisaradiotransmitterandreceiver.Itisdesigned
andmanufacturednottoexceedtheemissionlimitsforexposureto
radiofrequency(RF)energysetbytheFederalCommunicationsCommission
(FCC)oftheU.S.Government.Theselimitsarepartofcomprehensive
guidelinesandestablishpermittedlevelsofRFenergyforthegeneral
population.Theguidelinesarebasedonstandardsthatweredeveloped
byindependentscientificorganizationsthroughperiodicandthorough
evaluationofscientificstudies.Thestandardsincludeasubstantialsafety
margindesignedtoassurethesafetyofallpersons,regardlessofageand
health.
Theexposurestandardforwirelessmobilephonesemploysaunitof
measurementknownastheSpecificAbsorptionRate,orSAR.TheSARlimit
setbytheFCCis1.6W/kg.*TestsforSARareconductedusingstandard
operatingpositionsspecifiedbytheFCCwiththephonetransmittingatits
highestcertifiedpowerlevelinalltestedfrequencybands.

21
AlthoughSARisdeterminedatthehighestcertifiedpowerlevel,theactual
SARlevelofthephonewhileoperatingcanbewellbelowthemaximum
value.Becausethephoneisdesignedtooperateatmultiplepowerlevelsto
useonlythepowerrequiredtoreachthenetwork,ingeneral,thecloseryou
aretoawirelessbasestationantenna,thelowerthepoweroutput.
Beforeaphonemodelisavailableforsaletothepublic,itmustbetested
andcertifiedbytheFCCthatitdoesnotexceedthelimitestablishedbythe
governmentadoptedrequirementforsafeexposure.Thetestsareperformed
inpositionsandlocations(e.g.,attheearandwornonthebody)asrequired
bytheFCCforeachmodel.
ThehighestSARvalueforthisdevicewhenwornonthebody,asdescribed
inthisuserguide,is1.02W/kg.(Body-wornmeasurementsdifferamong
devicesmodels,dependinguponavailableaccessoriesandFCC/IC
requirements.)WhiletheremaybedifferencesbetweenSARlevelsofvarious
devicesandatvariouspositions,theyallmeetthegovernmentrequirement
forsafeexposure.
TheFCChasgrantedanEquipmentAuthorizationforthismodelphone
withallreportedSARlevelsevaluatedasincompliancewiththeFCCRF
emissionguidelines.SARinformationonthismodelphoneisonfilewiththe
FCCandcanbefoundundertheDisplayGrantsectionof
http://www.fcc.gov/oet/ea/fccidaftersearchingonFCCID:ZNFV700.
AdditionalinformationonSpecificAbsorptionRates(SAR)canbefound
ontheCellularTelecommunicationsIndustryAssociation(CTIA)websiteat
http://www.ctia.org/
*IntheUnitedStatesandCanada,theSARlimitformobilephones
usedbythepublicis1.6watts/kg(W/kg)averagedoveronegramof
tissue.Thestandardincorporatesasubstantialmarginofsafetytogive
additionalprotectionforthepublicandtoaccountforanyvariationsin
measurements.
x.xx

22
*ProductmeetscurrentFCC&ICRadioFrequencyExposureGuidelines.
FCCID:ZNFV700
ICID:2703C-V700
Wi-Fi Caution!
(i)Thedeviceforoperationintheband5150-5250MHzisonlyforindoor
usetoreducethepotentialforharmfulinterferencetoco-channelmobile
satellitesystems;
(ii)themaximumantennagainpermittedfordevicesinthebands5250-
5350MHzand5470-5725MHzshallcomplywiththee.i.r.p.limit;and
(iii)themaximumantennagainpermittedfordevicesintheband5725-
5825MHzshallcomplywiththee.i.r.p.limitsspecifiedforpoint-to-point
andnonpoint-to-pointoperationasappropriate.
*High-powerradarsareallocatedasprimaryusers(i.e.priorityusers)of
thebands5250-5350MHzand5650-5850MHzandtheseradars
couldcauseinterferenceand/ordamagetoLE-LANdevices.
How to update your tablet
Accesstolatestfirmwarereleases,newsoftwarefunctionsand
improvements.
•Update your tablet without a PC. Select Update Center > Software
Update.
•Update your tablet by connecting it to your PC.
Formoreinformationaboutusingthisfunction,pleasevisit
http://www.lg.com/common/index.jspselectcountryandlanguage.
23
Please read this before you start using your tablet!
Pleasechecktoseewhetheranyproblemsyouencounteredwithyourtablet
aredescribedinthissectionbeforetakingthetabletinforserviceorcalling
aservicerepresentative.
1. Tablet Memory
Youneedtocheckyourtabletmemoryanddeletesomedata,suchas
applicationstomakemorememoryavailable.
To uninstall applications:
1 Tap > >Appstab>Settings>Apps.
2 Onceallapplicationsappear,scrolltoandselecttheapplicationyouwant
touninstall.
3 TapUninstall.
2. Before installing an open source application and
OS
WARNING
IfyouinstallanduseanOSotherthantheoneprovidedbythe
manufactureritmaycauseyourtablettomalfunction.Inaddition,your
tabletwillnolongerbecoveredbythewarranty.
Important notice
24
WARNING
Toprotectyourtabletandpersonaldata,onlydownloadapplicationsfrom
trustedsources,suchasPlayStore™.Ifthereareimproperlyinstalled
applicationsonyourtablet,thetabletmaynotworknormallyoraserious
errormayoccur.Youmustuninstallthoseapplicationsandallassociated
dataandsettingsfromthetablet.
3. Using an unlock pattern
Setanunlockpatterntosecureyourtablet.Tap > >Appstab>
Settings>Display>Lock screen>Select screen lock>Pattern.This
opensascreenthatwillguideyouthroughhowtodrawascreenunlock
pattern.YouhavetocreateaBackupPINasasafetymeasureincaseyou
forgetyourunlockpattern.
Caution:CreateaGoogleaccountbeforesettinganunlockpatternand
remembertheBackupPINyoucreatedwhencreatingyourpatternlock.
WARNING
Precautions to take when using pattern lock.
Itisveryimportanttoremembertheunlockpatternyouset.Youwillnot
beabletoaccessyourtabletifyouuseanincorrectpattern5times.You
have5opportunitiestoenteryourunlockpattern,PINorpassword.Ifyou
haveusedall5opportunities,youcantryagainafter30seconds.
When you can’t recall your unlock Pattern, PIN or Password:
< If you have forgotten your pattern >
IfyouloggedintoyourGoogleaccountonthetabletbutfailedtoenterthe
correctpattern5times,taptheForgot pattern?buttonatthebottomofthe

25
screen.YouarethenrequiredtologinwithyourGoogleAccountoryouhave
toentertheBackupPINwhichyouenteredwhencreatingyourPatternLock.
IfyouhavenotcreatedaGoogleaccountonthetabletoryouforgotBackup
PIN,youhavetoperformahardreset.
< If you have forgotten your PIN or Password >
IfyouforgetyourPINorPassword,youwillneedtoperformahardreset.
Caution:Ifyouperformahardreset,alluserapplicationsanduserdatawill
bedeleted.
NOTE:IfyouhavenotloggedintoyourGoogleAccountandhave
forgottenyourUnlockPattern,youwillneedtoenteryourBackupPIN.
4. Using the Hard Reset (Factory Reset)
Ifyourtabletdoesnotrestoretoitsoriginalcondition,useaHardReset
(FactoryReset)toinitializeit.
1 Turnthetabletoff.
2 PressandholdthePower/Lock key + Volume Down keyontherightside
ofthetablet.
3 ReleaseonlythePower/Lock KeywhentheLGlogoisdisplayedandkeep
pressingtheVolume Down Key.
4 ImmediatelypressandholdthePower/Lock Key + Volume Up Keyatthe
sametimewhilemaintainingtheVolume Down Keypressed.
5 ReleaseallkeyswhentheFactoryhardresetscreenisdisplayed.
6 PressthePower/Lock KeytocontinueoreitheroftheVolume Keysto
cancel.
7 PressthePower/Lock KeyoncemoretoconfirmoreitheroftheVolume
Keystocancel.
8 Yourdevicewillperformahardreset.

26
WARNING
IfyouperformaHardReset,alluserapplications,userdataandDRM
licenseswillbedeleted.Pleaseremembertobackupanyimportantdata
beforeperformingaHardReset.
5. Opening and switching applications
Multi-taskingiseasywithAndroid,youcankeepmorethanoneapplication
runningatthesametime.Thereisnoneedtoquitanapplicationbefore
openinganotherone.
Useandswitchbetweenseveralopenapplications.Androidmanageseach
application,stoppingandstartingthemasneededtoensurethatidle
applicationsdon'tconsumeresourcesunnecessarily.
1 TouchandholdtheHome Key.Alistofrecentlyusedapplications
willbedisplayed.
2 Taptheapplicationyouwanttoaccess.Thisdoesnotstoptheprevious
apprunninginthebackgroundonthetablet.MakesuretotapBack Key
toexitanappafterusingit.
•Tostopapplications,tapTask Managerfromtherecentappslist,thentap
StoporStop all.
•Toremoveanappfromtherecentappslist,swipetheapppreviewtothe
leftorright.Toclearallapps,tapClear all.
6. When the screen freezes
If the screen freezes or the tablet does not respond when you try to operate
it:PressandholdthePower/Lock key for8secondstorestartyourtablet.
Ifitstilldoesnotwork,pleasecontacttheservicecenter.
27
Getting to know your device
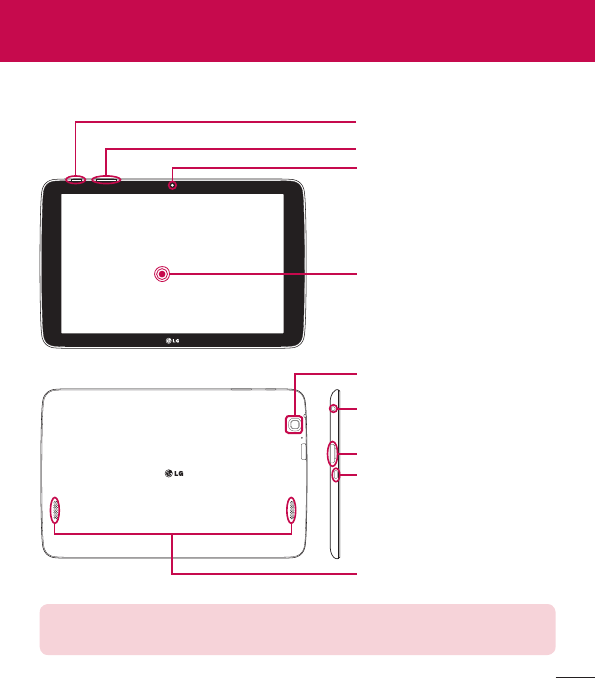
Tablet Overview
Touch screen
Volume keys
Front-Facing Camera lens
Power/Lock key
Camera lens
Earphone Jack
microSD Card Slot
Charger/USB port
Speakers
NOTE:Ensurethemicrophoneisnotblockedwhenrecordingavideoor
audioclip.

28
Front-Facing
Camera lens
Usetotakepicturesandrecordvideosofyourself.You
canalsousethisforvideochatting.Keepitcleanfor
optimalperformance.
microSD Card
Slot
InsertmicroSDCardforstoringfilessuchasmusic,
videosandphotos.
Earphone Jack
Allowsyoutopluginanoptionalheadsetforconvenient,
hands-freeconversations.Youcanalsoplugin
headphonestolistentomusic.
Ambient Light
Sensor
MeasuresthesurroundinglightandadjuststheLCD
brightnesstoprovideavividscreen.
Power/Lock key
Presstolock/unlockthescreen.Pressandholdtoturn
thetableton/off,restartit,activate/deactivateairplane
mode,andchangethesoundsettings.
Volume keys
Allowyoutoadjustthemediavolumes.Pressandhold
bothkeysatthesametimetoaccesstheQuickMemo
feature.
Charger/USB
port
AllowsyoutoconnectthetabletandtheUSBCable
forusewiththechargeradapter,orothercompatible
accessories.
Camera lens Usetotakephotosandrecordvideos.Keepitcleanfor
optimalperformance.
Speakers Usetolistentotheaudiofromtheselectedfunction
(e.g.,music,videos,soundclips,etc.).
Microphone Recordyourvoiceandisusedforvoice-activated
functions.
IR LED UsedasasensorfortheQuickRemoteapp.
29
WARNING
PlacingaheavyobjectonthetabletorsittingonitcandamagetheLCD
andtouchscreenfunctions.DonotcovertheLCDproximitysensorwith
protectivefilm.Thiscouldcausethesensortomalfunction.
TIP!
•TaptheMenu Keywheneveryouopenanapplicationtocheckwhat
optionsareavailable.
•Ifthedeviceislockedanddoesnotwork,pressandholdthePower/
Lock Keyfor8secondstoturnitoff.
Charging your tablet
ArechargeableLi-ionbatteryisusedtopoweryourtablet.AUSBadapter,
whichisincludedwithyourtablet,isusedtochargethebattery.Beforeusing
yourtabletforthefirsttime,makesurethebatteryisfullycharged.
NOTE:Yourdevicehasaninternalrechargeablebattery.Foryoursafety,do
notremovethebatteryincorporatedintheproduct.
Warning!Ifthetouchscreendoesnotfunctionwhilethetablet’sinthe
processofcharging,thismaybeduetoanunstablepowersupply.As
aresult,disconnecttheUSBcablefromthedeviceorunplugtheUSB
adapterfromthepoweroutlet.
30
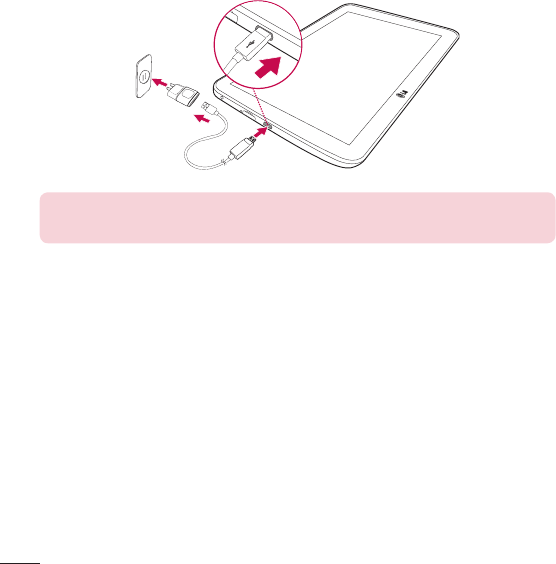
1 ConnecttheUSBadapterandUSBcable.
2 PlugtheUSBcable(asshownbelow)intothetablet’sCharger/USBport.
3 Plugthechargerintoanelectricalsocket."
NOTE:Thebatterymustbefullychargedinitiallytoimprovebattery
lifetime.
Optimizing Battery Life
Youcanextendyourbattery’slifebetweenchargesbyturningofffeatures
thatyoudon’tneedtorunconstantlyinthebackground.Youcanalso
monitorhowapplicationsandsystemresourcesconsumebatterypower.
To extend the life of your battery
•Turnoffradiocommunicationsthatyouaren’tusing,suchasWi-Fi,
Bluetooth,orGPS.
•Lowerscreenbrightnessandsetashorterscreentimeout.
•TurnoffautomaticsyncingforGmail™,Calendar,Contacts,andother
applications.
31
•Someapplicationsyouhavedownloadedmaycauseyourbatterypowerto
bereduced.
•Whileusingdownloadedapplications,checkthebatterychargedlevel.
To view the battery charge level
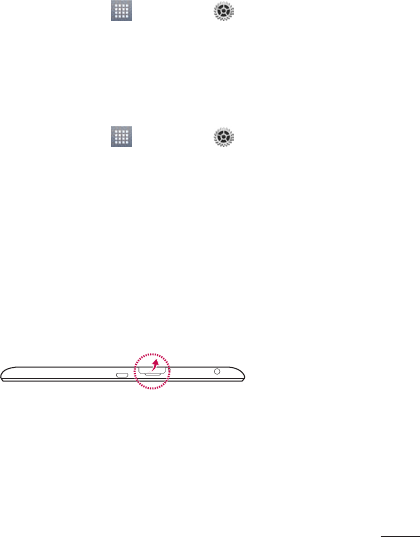
1 FromtheHomescreen,tapApps>Settings>About tablet>
Battery.
2 Thebatterystatus(chargingordischarging)andlevelaredisplayedonthe
topmenuofthescreen.
To monitor and control what uses the battery
1 FromtheHomescreen,tapApps>Settings>About tablet>
Battery>Battery use.
2 Thebottomofthescreendisplaysbatteryusagetimeandalsolists
applicationsorservicesusingbatterypowerfromgreatestamounttoleast.
Inserting a microSD card
YourdevicesupportstheuseofmicroSDmemorycardsofupto64GB
capacity.MultimediacontentscanbesavedinthemicroSDcard.
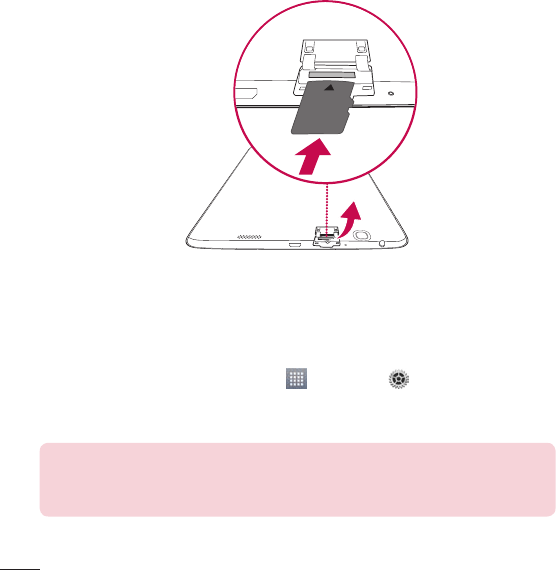
1 TurnthetabletoffbeforeinsertingorremovingthemicroSDcard.
32
2 PlaceyourfingernailinthecutoutandpullthemicroSDcardtrayout.
InsertthemicroSDcardintotheslotwiththecontactsfacingdown.
Carefullypushthetraygentlyintothedevice.
Removing the microSD card
TosafelyremovethemicroSDcardfromyourtablet,firstyouneedto
unmountit.
1 FromtheHomescreen,tapApps>Settings>Storage>
Unmount SD card.
2 GentlypullthemicroSDcardfromtheslot.
Warning!DonotremovethemicroSDcardwithoutunmountingitfirst.
Otherwise,itmaydamagethemicroSDcardaswellasyourtablet,and
thedatastoredonthemicroSDcardmaybecorrupted.

33
Formatting the microSD card
Warning!AllfilesstoredonyourmicroSDcardaredeletedwhenyou
formatthecard.
1 FromtheHomescreen,tapApps>Settings>Storage.
2 TapErase SD card(twice).
3 Ifyousetanunlockpattern,enteritandtapErase everything.Thecard
willthenbeformattedandreadytouse.
NOTE:IfthereiscontentonyourmicroSDcard,thefolderstructuremay
bedifferentafterformattingsinceallthefileswillhavebeendeleted.
Locking and unlocking the screen
Ifyoudonotusethetabletforawhile,thescreenwillbeautomatically
turnedoffandlocked.Thishelpstopreventaccidentaltouchesandsaves
batterypower.Whenyouarenotusingtheyourtablet,pressthePower/Lock
Keytolockyourtablet.
Ifthereareanyprogramsrunningwhenyoulockyourscreen,theymaybe
stillrunninginLockmode.Itisrecommendedthatyouexitallprograms
beforeenteringLockmodetoavoidunnecessarycharges(e.g.webaccess,
datacommunications).
Towakeupyourtablet,pressthePower/Lock Key.TheLockscreenwill
appear.TouchandslidetheLockscreeninanydirectiontounlockyour
Homescreen.Thelastscreenyouviewedwillopen.

34
Touch Screen tips
Herearesometipsonhowtonavigateonyourtablet.
NOTE:
•Toselectanitem,touchthecenteroftheicon.
•Donotpresstoohard;thetouchscreenissensitiveenoughtopickupa
light,yetfirmtouch.
•Usethetipofyourfingertotouchtheoptionyouwant.Becarefulnotto
touchanyotherkeys.
Tap or touch
Asinglefingertapselectsitems,links,shortcutsandlettersonthe
on-screenkeyboard.
Touch and hold
Touchandholdanitemonthescreenbytouchingitandnotliftingyour
fingeruntilanactionoccurs.Forexample,toopenacontact'savailable
options,touchandholdthecontactintheContactslistuntilthecontext
menuopens.
Drag
Touchandholdanitemforamomentandthen,withoutliftingyourfinger,
moveyourfingeronthescreenuntilyoureachthetargetposition.Youcan
dragitemsontheHomescreentorepositionthem.
Your Home screen

35
Swipe or slide
Toswipeorslide,quicklymoveyourfingeracrossthesurfaceofthescreen,
withoutpausingwhenyoufirsttouchit(soyoudon’tdraganiteminstead).
Forexample,youcanslidethescreenupordowntoscrollthroughalist,or
browsethroughthedifferentHomescreensbyswipingfromlefttoright(and
viceversa).
Double-tap
Double-taptozoomonawebpageoramap.Forexample,quicklydouble-
tapasectionofawebpagetoadjustthatsectiontofitthewidthofthe
screen.Youcanalsodouble-taptozoominandoutaftertakingapicture
(usingtheCamera),andwhenusingMaps.Double-tapawordtohighlightit.
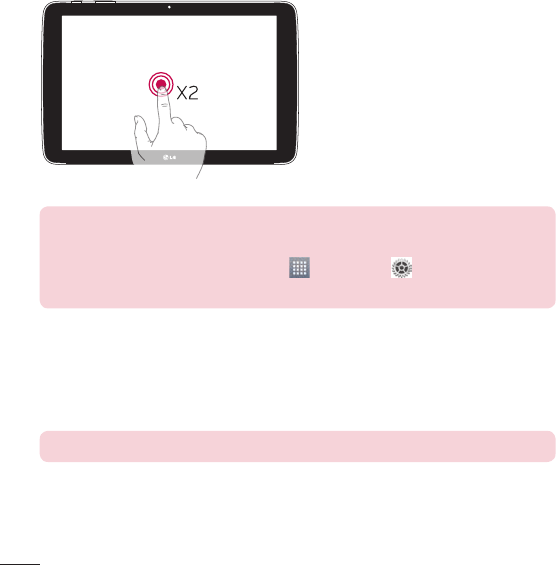
Double-tapcanalsoactivatetheKnockONfeaturetoturnthetouchscreen
onoroff.
Pinch-to-Zoom
Useyourindexfingerandthumbinapinchingorspreadingmotiontozoom
inoroutwhenusingthebrowserorMaps,orwhenbrowsingpictures.
Rotate the screen
Frommanyapplicationsandmenus,theorientationofthescreenadjuststo
thedevice'sphysicalorientation.
36
KnockON
TheKnockONfeatureallowsyoutodouble-tapthescreentoeasilyturnthe
screenonoroff.
•Quicklydouble-tapthecenterof
thescreentoturnthescreenon.
•Quicklydouble-taptheStatus
Bar,anemptyareaontheHome
screen,ortheLockscreentoturn
thescreenoff.
NOTE:
•YoucandisablethisfeatureintheDisplay settings.
FromtheHomescreen,tapApps>Settings>Display>
KnockON>taptheKnockONcheckbox.
Home screen
Simplyswipeyourfingertotheleftorrighttoviewthepanels.Youcan
customizeeachpanelwithapps,downloads,widgetsandwallpapers.
NOTE:Somescreenimagesmaybedifferentdependingonyourregion.
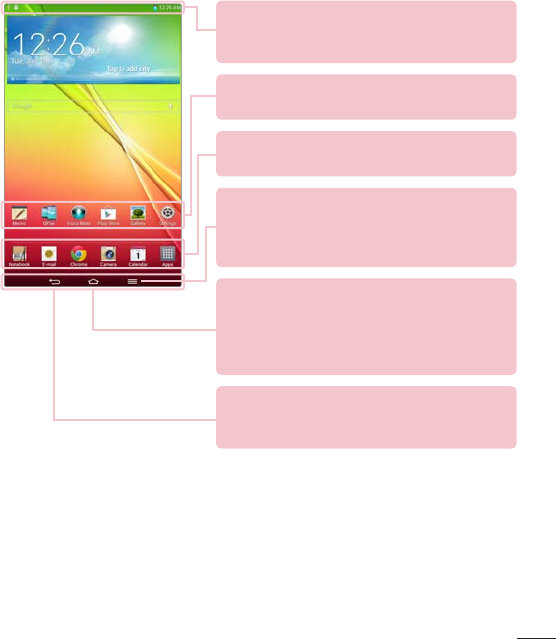
OnyourHomescreen,youcanviewmenuiconsatthebottomofthescreen.
Menuiconsprovideeasy,one-touchaccesstothefunctionsyouusethe
most.
37
Status bar –Showsdevicestatusinformation,
includingthetime,signalstrength,batterystatus,
andnotificationicons.
Back key –Returnstothepreviousscreen.Also
closespop-upitemssuchasmenus,dialogboxes,
andtheon-screenkeyboard.
Application icons –Tapanicon(application,widget,
folder,etc.)toopenanduseit.
Quick keys –Provideeasy,one-touchaccesstothe
functionsusedmostoften.
Home key –ReturnstotheHomescreen(orreturns
toyourdefaultHomescreencanvasfromanyofthe
Homescreenextensioncanvases).Touchandhold
ittodisplayrecentlyusedapplicationswithaccess
totheTaskManagerapplication.
Menu key –OpensanOptionsmenuwithoptions
thataffectthecurrentscreenorapplication.This
onlyapplieswhenavailable,dependingonthe
screenorapplication.

38
Customizing the Home screen
YoucancustomizeyourHomescreenbyaddingapps,downloads,widgets
orwallpapers.Formoreconvenienceusingyourtablet,addyourfavoriteapps
andwidgetstotheHomescreen.
To add items on your Home screen:
1 TouchandholdtheemptypartoftheHomescreen.
2 TaptheAppsorWidgets tab.
3 Dragthedesireditemtothedesiredlocationandliftyourfinger.
To remove an item from the Home screen:
Touchandholdtheiconyouwanttoremove,dragitto ,andliftyour
finger.
TIP! ToaddanapplicationicontotheHomescreenfromtheApps
screen,touchandholdtheapplicationyouwanttoaddanddragittothe
desiredlocation.
TIP! Youcanaddseveralappiconsinafolder.Droponeappiconover
anotheroneonaHomescreen,andafolderwillbecreated.
Returning to recently-used applications
1 TouchandholdtheHome Key.Thescreendisplaysapop-up
containingtheiconsofapplicationsyouusedrecently.
2 Touchanicontoopentheapplication.OrtouchtheBack Keyto
returntoyourpreviousscreen.
39
Notifications
Notificationsalertyoutothearrivalofnewmessages,calendarevents,and
alarms,aswellastoongoingevents,suchasvideodownloads.
FromtheNotificationsPanel,youcanviewyourtablet’scurrentstatusand
pendingnotifications.
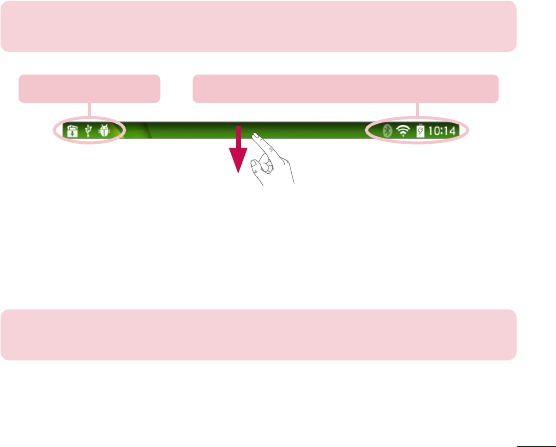
Whenanotificationarrives,itsiconappearsatthetopofthescreen.Icons
forpendingnotificationsappearontheleft,andsystemiconsshowingthings
likeWi-Fiorbatterystrengthontheright.
NOTE:Theavailableoptionsmayvarydependingontheregionorservice
provider.
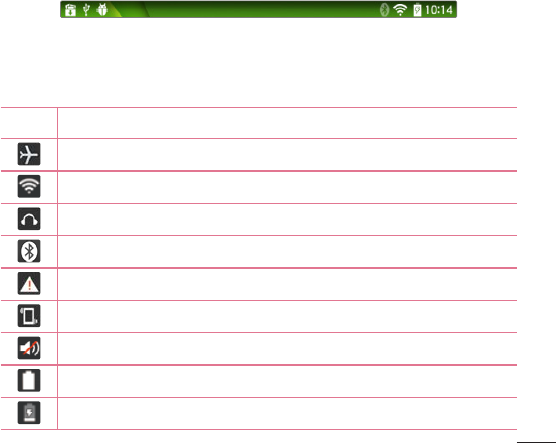
Pending notifications System icons like Bluetooth, Wi-Fi & battery status
Swipe down for notifications & settings
SwipetheStatusBardowntoopentheNotificationsPanel.Toclosethe
NotificationsPanel,swipethebarthatisatthebottomofthescreen
upwards.
NOTE:TouchandholdaniconfromtheQuickSettingstoviewthe
function'ssettingsmenu.
40
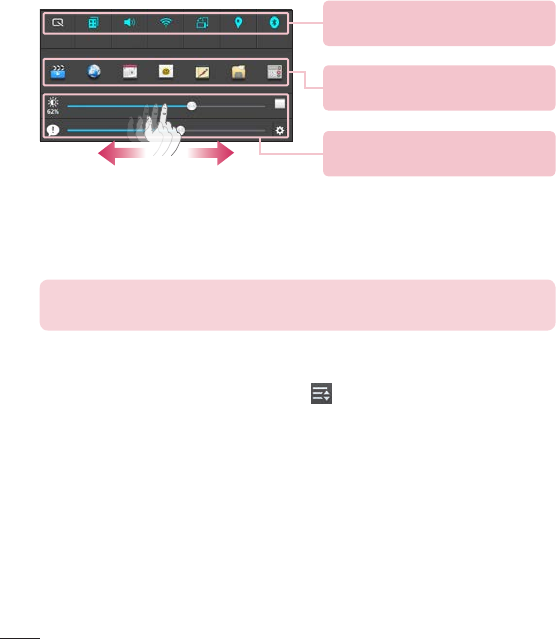
Quick Settings Bar–Flickrightorleft
toscrollthroughthelist.
QSlide Apps Bar–Taptoactivatea
QSlidefeature.
Slidetotheleftandrighttoadjustthe
BrightnessofthescreenorVolume.
Quick Settings on Notification Panel
UseQuickSettingstoeasilytogglefunctionsettingslikeWi-Fi.TheQuick
SettingsarelocatedatthetopoftheNotificationsPanel.
NOTE:TouchandholdaniconintheQuickSettingsBartoviewthe
function'ssettingsmenu.
To rearrange Quick Setting items on the Notification Panel
OpentheNotificationsPanelandtouch .Youcanthenviewand
rearrangethedesireditemsontheQuickSettingsmenu.
QSlide apps on the Notifications panel
QSlideappsaredisplayedinabarontheNotificationspanelbelowthe
Quicksettingsbar.Theseiconsprovideaquick,convenientwaytomultitask
onthesamescreen(similartopicture-in-pictureonaTV).QSlidedisplaysa
smallapplicationwindowonthescreenthatcanbemoved,resized,ormade
transparent.
41
Using the QSlide apps
TapanyoftheQSlideappsinthebartoactivateit.Whenactivated,the
QSlidefeatureopenstheapplicationinawindowintheforeground,allowing
youtoaccessotherapplicationsinthebackground.Youcanopenuptotwo
QSlidewindowsatatime.
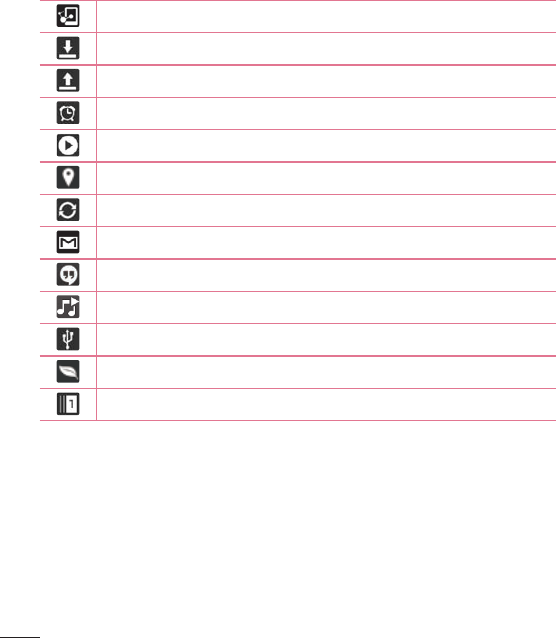
Indicator icons on the Status Bar
IndicatoriconsappearontheStatusBaratthetopofthescreentoreport
calendarevents,devicestatusandmore.
Theiconsdisplayedatthetopofthescreenprovideinformationaboutthe
statusofthedevice.Theiconslistedinthetablebelowaresomeofthe
mostcommonones.
Icon Description
Airplanemode
ConnectedtoaWi-Finetwork
Wiredheadset
Bluetoothison
Systemwarning
Vibratemodeison
Silentmodeison
Batteryfullycharged
Batteryischarging
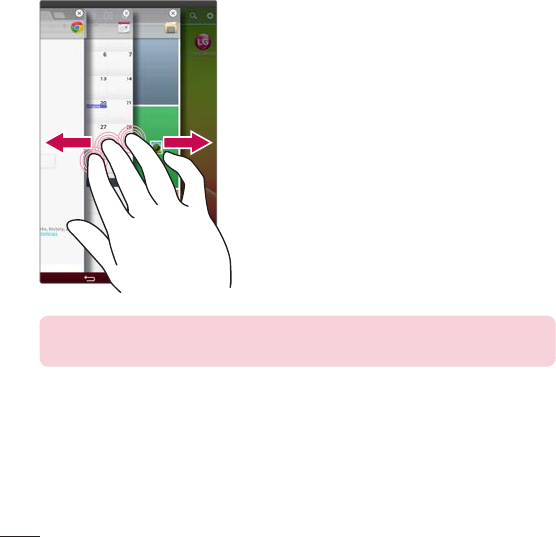
42
DLNAison
Downloadingdata
Uploadingdata
Alarmisset
SmartSharemusicplaying
GPSison
Dataissyncing
NewGmail
NewHangoutsmessage
Songisplaying
TabletisconnectedtoPCviaUSBcableorUSBtetheringisactive
Powersavingmodeison
Slideasideison
Multiple Users
OnlyonetabletownerIDcanbecreated,butmultipleuserIDscanbe
addedsothatotherscanloginandusethetabletindependently.Eachuser
canconfiguretheirowntabletsettings,usetheirownstoragespace,and
havetheirownappupdateprivileges.

43
Tablet owner privileges
•OnlythetabletownerIDcanaddanewuserloginIDandremoveuser
IDs.
•OnlythetabletownerIDcanaccessandusethemicroSDcard.
•TheTabletownercanuninstallanyoftheuser'sapps.
Multiple tablet user limitations
• Alluserssharethesamebattery,internalmemory,anddatausagewithallof
theotherusers.
• Thelanguagesettingssetbyoneuserappliestoalloftheotherusers.
• Eachusercanconfigureanduseonlytheirowncontentanddata(e.g.,Home
screensettings,Soundsettings,etc.).
• Anyusercanacceptupdatedapppermissionsonthebehalfofallofthe
otherusers.
• Alarmswillsoundatthesettimenomatterwhichuseractivatedthealarm(s).
• Messagesandscheduledcalendareventswillbesenttonotifythespecified
userIDonly.
• OnceauserstartsprintingadocumentusingMobilePrint,theprintjobwill
continueeveniftheuserIDischanged.
• Datatransfer,download,multimediaplay,andcommunicationserviceswill
stopiftheuserIDischanged.
To add a new user on your tablet
1 Fromthehomescreen,tapApp>Settings>Users>Add user.
2 Set-upwizardopenstohelpyoutosetup.StartSet-upwizard.
• YoushouldfollowSetupWizardwhenyoufirstlogintoyourtabletasa
newuser.
3 Nowyoucanchooseausernamewhenyouloginyourtablet.
44
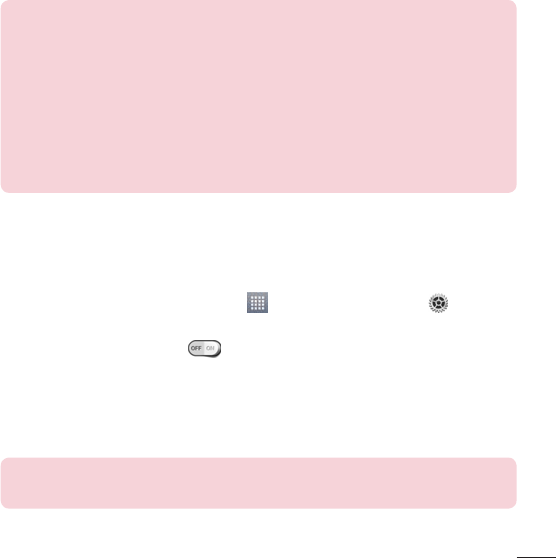
Slide aside
Usethree-fingerswipetosaverunningappstotheleftorbringthemback
tothedisplay.Tobringthembacklater,someappsmayrestart.Youcansave
uptothreeapps.
1 Whileanapplicationisopen,placethree
fingersonthescreenandslidetotheleft.
ThecurrentscreenissavedandtheHome
screenappears.
2 Tore-openthesavedapps,placethree
fingersonthescreenandslidetotheright.
Tapthedesiredappyouwanttoopen.
Tip!TheSlide Asidefeaturedoesnotrecognizefewerfingers,additional
fingers,oryourpalm.
Plug & Pop
Plug&Popallowsyoutoquicklychooseappstousewhenplugginginan
earphoneorOn-the-Godevice,suchasamouseorkeyboard.
1 PluginearphoneorOTG(On-the-Go)device(i.e.,mouse,keyboard,etc.).
2 Theapplicationspanelwilldisplayandyoucanselectanapptorun.

45
NOTE:Youcanedittheapplicationstodisplayonthepanelandsetnotto
showtheapplicationspanel.
Tap > >Settings>Accessory.
Capturing a Screenshot
PressandholdtheVolumeDown keyandPower/Lock Key atthesametime
foraround2secondstocaptureascreenshot.
Toviewthecapturedimage,gotoApps>Gallery >Screenshots
Folder.
TIP!Youcannotcaptureacamera/videoscreen.
Using QuickMemo to capture a screenshot
Onthescreenyouwanttocapture,dragthestatusbardownwardandselect
QuickMemo .
OR
PressandholdtheVolume Up/Down Keyatthesametime.
Using Capture plus to capture a screenshot
Thisfeatureallowsyoutocaptureaportionofthescreeninthedefault
Internetbrowser.
1 WhileconnectedtoInternet,tap ,andthentapCapture plus.
2 Adjusttheblueboxtothedesiredsize,andthentapOK.Theselected
areaissavedtotheGallery.

46
Entering Text
Youcanentertextusingtheon-screenkeyboard.Theon-screenkeyboard
appearsautomaticallyonthescreenwhenyouneedtoentertext.To
manuallydisplaythekeyboard,simplytouchatextfieldwhereyouwantto
entertext.
Using the keypad & entering text
Taponcetocapitalizethenextletteryoutype.Double-tapforallcaps.
Taptoswitchtothenumbersandsymbolskeyboard.
Taptousethehandwritingfunction.
Taptoenteraspace.
Taptocreateanewlineinthemessagefield.
Taptodeletethepreviouscharacter.
Entering accented letters
Theon-screenkeyboardallowsyoutoenterspecialcharacters(e.g."á").
Forexample,touchandholdthedesiredkey(forexample,the"a"key).After
thedesiredcharacterappears,slideyourfingeroveritandliftitofftoenter
it.

47
Whenyoufirstturnonyourtablet,youhavetheopportunitytoactivatethe
network,tosignintoyourGoogleAccountandselecthowyouwanttouse
certainGoogleservices.
To set up your Google account
•SignintoaGoogleAccountfromthepromptedset-upscreen.
OR
•FromtheHomescreen,tapApps>Appstab>Settings >
Accounts & sync>Add account>Google.
IfyouhaveaGoogleaccount,touchExisting,enteryouremailaddressand
password,thentouch .Otherwise,touchNewandenterthenecessary
informationtocreateanewGoogleAccount.
OnceyouhavesetupyourGoogleaccountonyourtablet,yourtablet
automaticallysynchronizeswithyourGoogleaccountontheWeb.
Yourcontacts,Gmailmessages,Calendareventsandotherinformationfrom
theseapplicationsandservicesontheWebaresynchronizedwithyourtablet.
(Thiswilldependonyoursynchronizationsettings.)
Aftersigningin,youcanuseGmail™andtakeadvantageofGoogleservices
onyourtablet.
Google account setup

48
Wi-Fi
WithWi-Fi,youcanusehigh-speedInternetaccesswithinthecoverageof
thewirelessaccesspoint(AP).EnjoywirelessInternetusingWi-Fi,without
extracharges.
Connecting to Wi-Fi networks
TouseWi-Fionyourtablet,youneedtoaccessawirelessaccesspointor
‘hotspot’.Someaccesspointsareopenandyoucansimplyconnecttothem.
Othersarehiddenorusesecurityfeatures;youmustconfigureyourtabletto
beabletoconnecttothem.TurnoffWi-Fiwhenyou'renotusingittoextend
thelifeofyourbattery.
Turning Wi-Fi on and connecting to a Wi-Fi network
1 FromtheHomescreen,tapApps>Appstab>Settings>Wi-Fi.
2 Tap toturnitonandstartscanningforavailableWi-Finetworks.
3 TapSearchtoseealistofactiveandin-rangeWi-Finetworks.
• Securednetworksareindicatedbyalockicon.
4 Touchanetworktoconnecttoit.
• Ifthenetworkissecured,youarepromptedtoenterapasswordor
othercredentials.(Askyournetworkadministratorfordetails)
5 TheStatusBardisplaysiconsthatindicateWi-Fistatus.
Connecting to Networks and Devices
49
Bluetooth
YoucanuseBluetoothtosenddatabyrunningacorrespondingapplication,
butnotfromtheBluetoothmenuasonmostothermobilephones.
NOTE:
•LGisnotresponsiblefortheloss,interceptionormisuseofdatasentor
receivedviatheBluetoothwirelessfeature.
•Alwaysensurethatyoushareandreceivedatawithdevicesthatare
trustedandproperlysecured.Ifthereareobstaclesbetweenthedevices,
theoperatingdistancemaybereduced.
•Somedevices,especiallythosethatarenottestedorapprovedby
BluetoothSIG,maybeincompatiblewithyourdevice.
Turning on Bluetooth and pairing up your tablet with a Bluetooth
device
Youmustpairyourdevicewithanotherdevicebeforeyouconnecttoit.
1 FromtheHomescreen,tapApps>Appstab>Settings >
Bluetooth.
2 TaptheBluetoothswitch toturniton.
3 Tapthecheckboxnexttoyourtablet'snametomakeyourtabletvisibleto
otherBluetoothdevices.
4 Alistofavailabledeviceswillbedisplayed.Tapthedeviceyouwanttopair
withfromthelist.
NOTE:Dependingonthetypeofdevice,youmayhavetoentermatching
codes,confirmmatchingcodes,orthedevicesmayautomaticallypair.
Oncepairingissuccessful,yourtabletwillconnecttotheotherdevice.
50
NOTE:Yourtabletdoesn'tsupportHandsfreeProfile.Therefore,theuse
ofcallfeatureswithsomeofaccessoriessuchasBluetoothheadsetsor
Bluetooth-enableddevicesmaynotbeavailableforthisdevice.
Send data using the Bluetooth wireless feature
1 Opentheitemandtap .
OR
TouchandholdtheitemandselectShare.
OR
OpentheitemandtaptheMenu Key>Share.
2 TapBluetoothtoshareviaBluetooth.
NOTE:Themethodforselectinganoptionmayvarybydatatype.
3 SearchforandpairwithaBluetooth-enableddevice.
Receive data using the Bluetooth wireless feature
1 FromtheHomescreen,tapApps>Appstab>Settings >
Bluetooth.
2 Tap toturnBluetoothonandmarkthecheckboxnexttothetablet
nametomakethetabletvisibleonotherdevices.
NOTE:Toselectthelengthoftimethatyourdevicewillbevisible,tapthe
Menu Key>Visibility timeout.
3 PairthedevicesandtapAcceptwhenyoureceiveaBluetooth
AuthorizationRequesttoacceptthefile(s).
51
SmartShare
YoucanusetheSmartSharefeatureeasilyintheGallery,Music,Videoapps,
etc.
Enjoying the content via a variety of devices
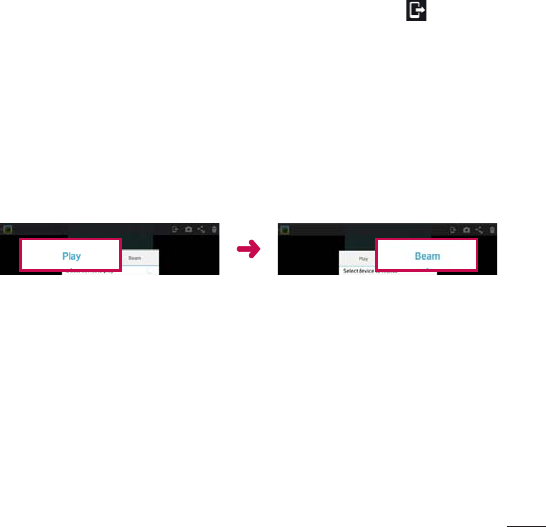
Youcanshareyourtablet'scontentwithavarietydevices.Tap toshare
thecontentintheGallery,Music,Videos,POLARIS Viewer 5.
Playing/Sending
Play–YoucanplaythecontentviaaTV,aBluetoothspeakeroretc.
Beam–YoucansendthecontenttothedeviceofBluetoothand
SmartShareBeamsupported.
•SmartShare Beam–Thisallowstotransferthecontentfeaturefastvia
Wi-FiDirect.
< Play > < Beam >
Enjoying the content from Nearby devices
Youcanenjoythecontentfromnearbydevices(i.e.PC,NAS,Mobile)inthe
Gallery,Music,Videosapp.
Connecting devices
ConnectyourdeviceandotherdevicessupportedbyDLNAinthesame
Wi-Finetwork.

52
Searching other devices
TapNearbydevices,thenyoucanseetheDLNA-supporteddevices.
Connecttothedevicetoviewthecontent.
Using the content from the Cloud
Youcanusethecontentfromthecloud(i.e.,Dropbox)intheGallery,Music,
Videos app,etc.
Using the Cloud
NOTE:Thesupportedfeaturesmayvarydependingonthecloud.
Retrievingdatamaytakesometimedependingonthecloud.
1 SelectCloudintheGallery,Music,Videosapp,etc.
2 Selectthecloudwhatyouwanttouseandlogin.
3 Youcanusethecontentofthecloudafterloggingin.
4 Setthecloudsettingstoselecttheapptousethecloud.
PC connections with a USB cable
YoucanconnectyourtablettoyourPCtochargeit,transferitemstothePC
fromthetabletandviceversa.
Transferring music, photos and videos using the USB mass
storage mode
1 ConnectyourtablettoaPCusingaUSBcable.
2 Ifyouhaven'tinstalledtheLGAndroidPlatformDriveronyourPC,you
willneedtomanuallychangethesettings.ChooseSystem settings>PC
connection>Select USB connection method,thenselectMedia sync
(MTP).

53
3 YoucannowviewthemassstoragecontentonyourPCandtransferthe
files.
Synchronize with Windows Media Player
EnsurethatWindowsMediaPlayerisinstalledonyourPC.
1 UsetheUSBcabletoconnectthetablettoaPConwhichWindows
MediaPlayerhasbeeninstalled.
2 SelecttheMedia sync (MTP)option.Whenconnected,apop-upwindow
willappearonthePC.
3 OpenWindowsMediaPlayertosynchronizemusicfiles.
4 Editorenteryourdevice’snameinthepop-upwindow(ifnecessary).
5 Selectanddragthemusicfilesyouwanttothesynclist.
6 Startsynchronization.
•ThefollowingrequirementsmustbesatisfiedtosynchronizewithWindows
MediaPlayer.
Items Requirement
OS MicrosoftWindowsXPSP2,Vistaor
higher
WindowMediaPlayerversion WindowsMediaPlayer10orhigher
•IftheWindowsMediaPlayerversionislowerthan10,installversion10or
higher.
54
Youcanaddcontactsonyourtabletandsynchronizethemwiththecontacts
inyourGoogleAccountorotheraccountsthatsupportsyncingcontacts.
Searching for a contact
1 FromtheHomescreen,tapContactstoopenyourcontactlist.
2 TaptheSearch contactsboxandenterthecontact'sname.Youcanalso
tapaletteralongtheleftsideofthescreentoaccessnamesstartingwith
thechosenletter.
Adding a new contact
1 FromtheHomescreen,tapContacts .
2 Tapthe .Selectthedesiredaccount(ifapplicable).
3 Ifyouwanttoaddapicturetothenewcontact,tap .Choosefrom
Take photototakeapictureusingthecameraorSelect from Gallery.
Thenbrowseforanimageandselectit.
4 Tap toentermorespecificnameinformation.
5 Enterthedetailsaboutyourcontact.
6 TapSave.
Favorite Contacts
Youcanclassifyfrequentlycalledcontactsasfavorites.
To add a contact to your favorites
1 FromtheHomescreen,tapContactstoopenyourcontacts.
2 Tapacontacttoviewitsdetails.
Contacts
55
3 Tapthestar totherightofthecontact’sname.Thestarturnsgold
andthecontactisaddedtoyourfavorites.
To remove a contact from your favorites list
1 FromtheHomescreen,tapContactstoopenyourcontacts.
2 TaptheFavoritestabtoviewyourfavoritecontacts.
3 Tapacontacttoviewitsdetails.
4 Tapthegoldstartotherightofthecontact’sname.Thestarturnsgrey
andthecontactisremovedfromyourfavorites.
Creating a group
1 FromtheHomescreen,tapContactstoopenyourcontacts.
2 TouchtheGroupstab ,thentouch .
3 Enteranameforthenewgroup.
•TapAdd memberstoaddcontactentriestoyournewgroup.
•TaptheACCOUNTfieldtochangetheaccount(s)youwanttosavethe
newgroupto.
4 TouchSavetosavethegroup.
NOTE:Ifyoudeleteagroup,thecontactsassignedtothatgroupwillnot
belost.Theywillremaininyourcontacts.

56
YoucanusetheE-mailapplicationtoreademailsfromserviceslikeGmail.
TheE-mailapplicationsupportsthefollowingaccounttypes:POP3,IMAP
andExchange.
Yourserviceproviderorsystemadministratorcanprovideyouwiththe
accountsettingsyouneed.
Managing an E-mail account
TaptheEmail ontheHomescreen.ThefirsttimeyouopentheE-mail
application,aset-upwizardopenstohelpyoutosetupanE-mailaccount.
Aftertheinitialsetup,E-maildisplaysthecontentsofyourinbox.Ifyouhave
addedmorethanoneaccount,youcanswitchamongaccounts.
To add another E-mail account:
•OpentheE-mailapplicationandtaptheMenu Key>Settings > .
To switch between accounts
Ifyou'veaddedmorethanoneaccount,youcaneasilyswitchbetweenthem.
Fromanyemailfolder,tapthecurrentaccount(atthetopofthescreen),
thentaptheaccountyouwanttoaccess.
To change an E-mail account’s settings:
OpentheE-mailapplicationandtaptheMenu Key>Settings >
General settingstoconfiguresettingsthatapplytoallofyouraccounts.Tap
anindividualaccounttoconfiguresettingsonlyforthatparticularaccount.
To delete an E-mail account:
•OpentheE-mailapplicationandtaptheMenu Key>Settings > tap
theMenu Key>Remove account>touchanaccountyouwantto
delete>Remove>Yes.
E-mail

57
Working with account folders
OpentheE-mailapplicationandtaptheMenu KeyandselectFolders.
EachaccounthasanInbox,Outbox,SentandDraftsfolder.Dependingon
thefeaturessupportedbyyouraccount’sserviceprovider,youmayhave
additionalfolders.
Composing and sending E-mail
1 WhileintheE-mailapplication,tapWrite .
2 Enteranaddressforthemessage’sintendedrecipient.Asyouenter
text,matchingaddresseswillbeproposedfromyourContacts.Separate
multipleaddressesusingsemicolons.
3 TapAttach toattachfiles,ifrequired.
4 Enterthesubjectandyourmessage
5 TaptheSendtosendthemessage.
Ifyouaren’tconnectedtoanetwork,forexample,ifyou’reworkingin
airplanemode,themessagesthatyousendwillbestoredinyourOutbox
folderuntilyouconnecttoanetworkagain.Ifitcontainsanypending
messages,theOutboxwillbedisplayedontheAccountsscreen.
Receiving emails
WhenanewemailarrivesinyourInbox,you'llbenotifiedbyasound
orvibration(dependingonyoursoundandvibrationsettings)andits
notificationiconappearsontheStatusBar.
58
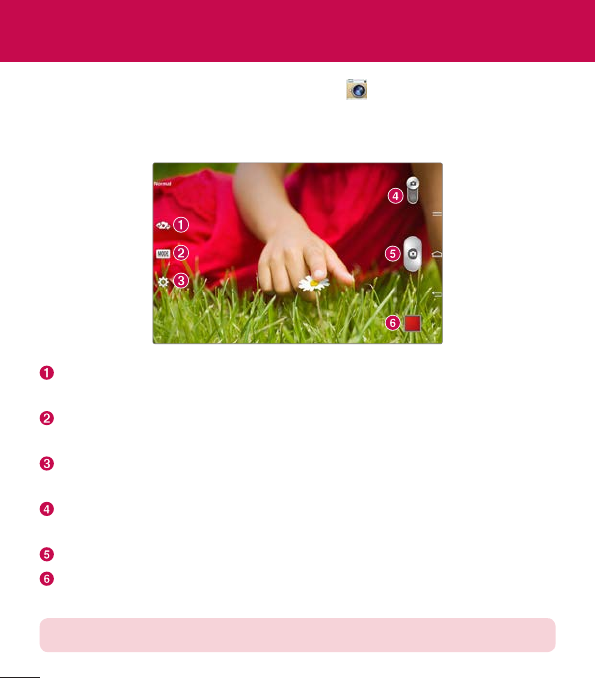
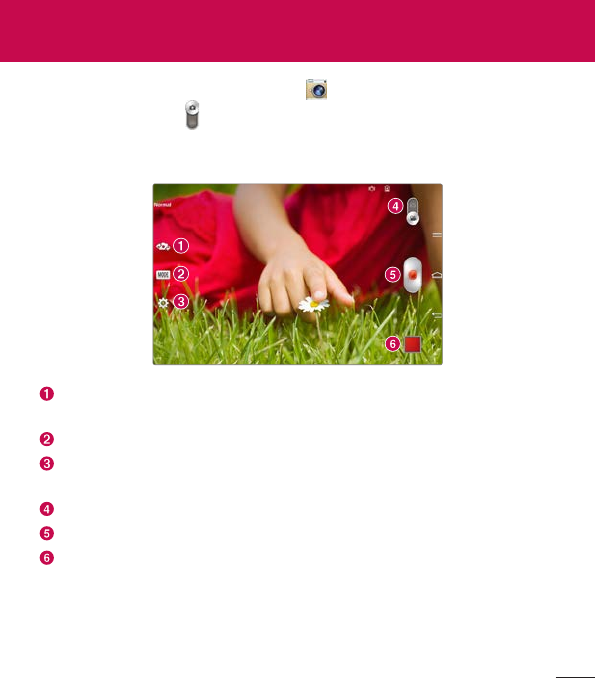
ToopentheCameraapplication,tapCameraontheHomescreen.
Getting to know the viewfinder
Swap camera–Switchbetweenthecameralensandthefront–facing
cameralens.
Record Mode–Allowsyoutochoosearecordmodetodefinehowthe
videowillberecorded.
Settings–Touchthisicontoopenthesettingsmenu.SeeUsing the
advanced settingsonthefollowingpage.
Video mode–Tap(orslide)totogglebetweenCameramodeandVideo
mode.
Capture–Takesapicture.
Gallery–Touchtoviewthelastphotoyoucaptured.Thisenablesyouto
accessyourGalleryandviewsavedphotoswhileincameramode.
NOTE:Pleaseensurethecameralensiscleanbeforetakingpictures.
Camera
59
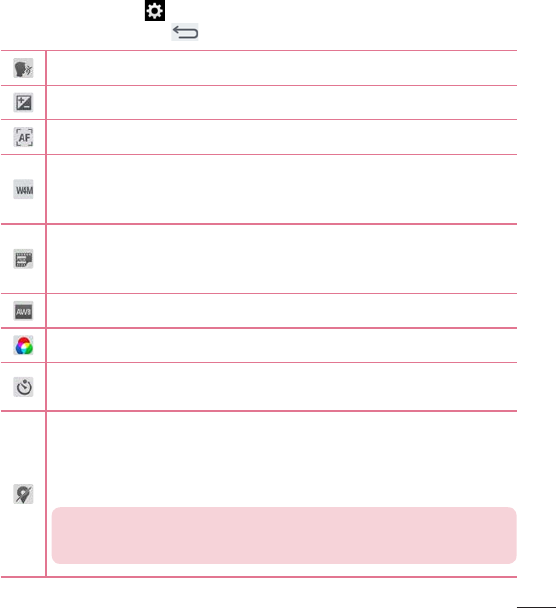
Using the advanced settings
Intheviewfinder,tap toopentheadvancedoptions.Afterselectingthe
option,taptheBack Key .
Takephotosbyvoicecommand.
Definesandcontrolstheamountofsunlightenteringthephoto.
Focusesonaspecificspot.
Selectsphotoresolution.Ifyouchoosehighresolution,filesizewill
increase,whichmeansyouwillbeabletostorefewerphotosinthe
memory.
TheISOratingdeterminesthesensitivityofthecamera'slight
sensor.ThehighertheISO,themoresensitivethecamera.Thisis
usefulindarkerconditionswhenyoucannotusetheflash.
Improvescolourqualityinvariouslightingconditions.
Appliesartisticeffectstoyourpictures.
Setsadelayafterthecapturebuttonispressed.Thisisidealifyou
wanttobeinthephoto.
Activatethistouseyourtablet'slocation-basedservices.Take
pictureswhereveryouareandtagthemwiththelocation.Ifyou
uploadtaggedpicturestoablogthatsupportsgeotagging,you
canseethepicturesdisplayedonamap.
NOTE:ThisfunctionisonlyavailablewhentheGPSfunctionis
active.
60
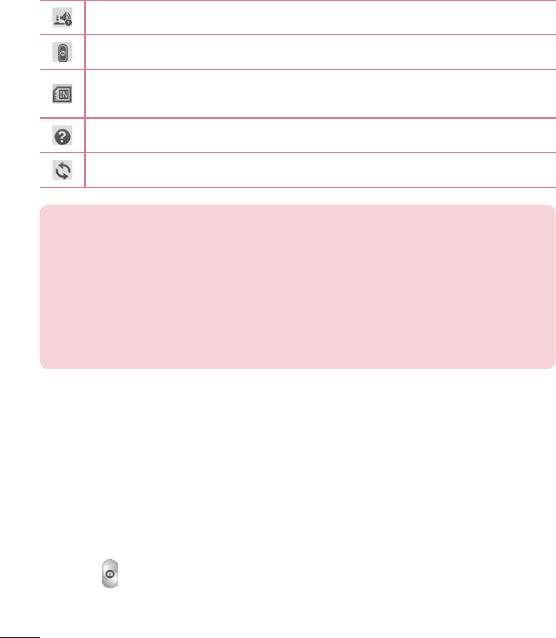
Setashuttersound.
SettheVolumeKeywhethertouseforthecaptureorzoom.
Setthestoragelocationforyourpictures.ChoosefromInternal
memoryandSDcard.
Opensthehelpguidetoknowhowafunctionoperates.
Restoresallcameradefaultsettings.
TIP!
•Whenyouexitthecamera,somesettingsreturntotheirdefaults,such
aswhitebalance,coloureffect,timerandscenemode.Checkthese
beforeyoutakeyournextphoto.
•Thesettingmenuissuperimposedovertheviewfinder,sowhenyou
changephotocolourorqualityelements,youwillseeapreviewofthe
changedimagebehindtheSettingsmenu.
Taking a quick photo
1 OpentheCameraapplication.
2 Pointthelenstowardsthesubjectyouwanttophotograph.
3 Afocusboxwillappearinthecenteroftheviewfinderscreen.Youcan
alsotapanywhereonthescreentofocusonthatspot.
4 Whenthefocusboxturnsgreen,thecamerahasfocusedonyoursubject.
5 Touch tocapturethephoto.
61
Once you've taken a photo
1 Taptheimagepreviewinthelower-rightcornerofthescreentoviewthe
lastphotoyoucaptured.
2 TapGallery,thentapAlwaysorJust once.
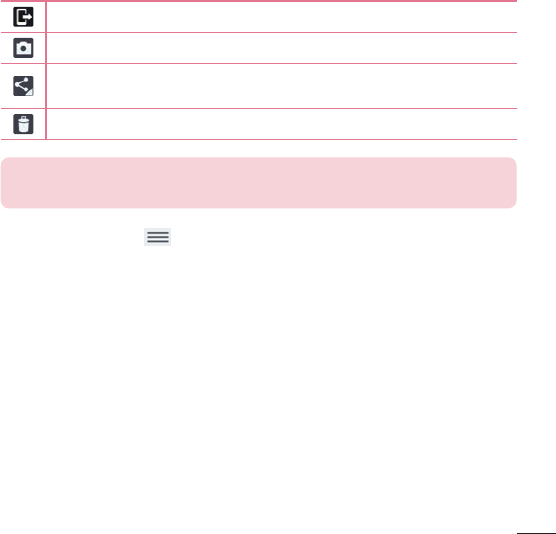
TouchtoshareyourphotousingtheSmartSharefunction.
Touchtotakeanotherphotoimmediately.
Touchtosendyourphototoothersorshareitviasocialnetwork
services.
Touchtodeletethephoto.
TIP!Ifyouhaveasocialnetworkingaccountandsetituponyourtablet,
youcanshareyourphotowithyoursocialnetworkingcommunity.
TouchtheMenuKey toopenalladvancedoptions.
Set image as–TouchtousethephotoasaContact photo,Home screen
wallpaper,Lock screen wallpaperorWallpaper.
Move–Touchtomovethephototoanotherplace.
Copy–Touchtocopytheselectedphotoandsaveittoanotheralbum.
Copy to Clip Tray–TaptocopythephotoandstoreintheClipTray.
Rename–Touchtoeditthenameoftheselectedphoto.
Rotate left/right–Torotateleftorright.
Crop–Cropyourphoto.Moveyourfingeracrossthescreentoselectthe
areatobecropped.
Edit–Viewandeditthephoto.

62
Slideshow–Automaticallyshowsyoutheimagesinthecurrentfolderone
aftertheother.
Add location–Toaddthelocationinformation.
Details–Findoutmoreinformationaboutthecontents.
Viewing your saved photos
Youcanaccessyoursavedphotoswhenincameramode.Justtapthe
imagepreviewinthebottomofthescreenandyourGallerywillbedisplayed.
1 Choosetheapptousetoviewand/oredityourphotos.TapGalleryor
Photos.
2 TapAlwaysorJust once.
•Toviewmorephotos,scrollleftorright.
•Tozoominorout,double-tapthescreenorplacetwofingersand
spreadthemapart(moveyourfingersclosertogethertozoomout).
63
Toopenthevideocamera,tapCameraontheHomescreen,thentap
theVideo modeicon (ontheviewfinder)toswitchtovideomode.
Getting to know the viewfinder
Swap camera–Switchbetweenthecameralensandthefront–facing
cameralens.
Shot mode–Defineshowtheshotwillbetaken.
Settings–Touchthisicontoopenthesettingsmenu.SeeUsing the
advanced settingsonthefollowingpage.
Camera mode–Touchandslideupthisicontoswitchtocameramode.
Record–Touchtostartrecordingavideo.
Gallery–Touchtoviewthelastvideoyourecorded.Thisenablesyouto
accessyourGalleryandviewyoursavedvideoswhileinvideomode.
Video camera
64
TIP!Whenrecordingavideo,placetwofingersonthescreenandpinch
tousetheZoomfunction.
NOTE:Ensurethemicrophoneisnotblockedwhenrecordingavideoor
audioclip.
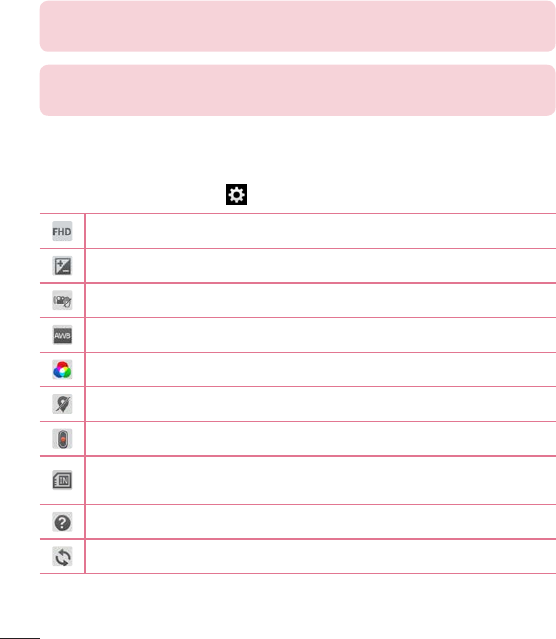
Using the advanced settings
Usingtheviewfinder,touch toopenalltheadvancedoptions.
Taptosetthesize(inpixels)ofthevideoyouarerecording.
Definesandcontrolstheamountofsunlightenteringthevideo.
Preventshakingwhilevideorecordingtogethighvideoquality.
Improvescolourqualityinvariouslightingconditions.
Chooseacolourtonetouseforyournewview.
Activatethistouseyourtablet'slocation-basedservices.
SettheVolumeKeywhethertousefortherecordorzoom.
Thissetsthelocationwhereyouwanttosaveyourvideos.Choose
fromInternalmemoryandSDcard.
Opensthehelpguidetoknowhowafunctionoperates.
Restoresallcameradefaultsettings.
65
Recording a quick video
1 OpentheCameraapplicationandtouchtheVideo modeicon .
2 Thevideocameraviewfinderappearsonthescreen.
3 Holdingthetablet,pointthelenstowardsthesubjectyouwishtocapture
inyourvideo.
4 Touch oncetostartrecording.
5 Atimershowingthelengthofthevideowillappear.
6 Touch onthescreentostoprecording.
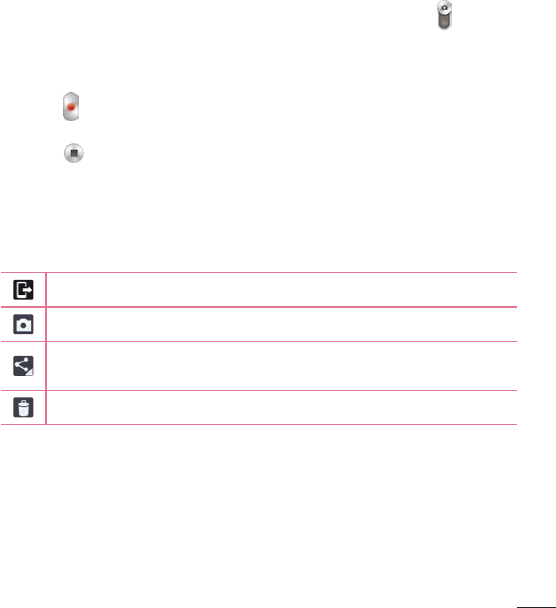
After recording a video
Taptheimagepreviewatthebottomofthescreentoviewthelastvideoyou
recorded.
TouchtoshareyourvideousingtheSmartSharefunction.
Touchtorecordanothervideoimmediately.
Touchtosendyourvideotoothersorshareitviasocialnetwork
services.
Touchtodeletethevideo.

66
Watching your saved videos
Accessyoursavedvideoswheninvideocameramodebytappingtheimage
previewinthelower-rightcorneroftheviewfinder.
1 Intheviewfinder,taptheimagepreviewinthelower-rightcornerofthe
screen.
2 YourGallerywillappearonthescreenwithyourmostrecentrecorded
videodisplayed.Swipetothelefttoscrolltoyourothervideos.
3 TapthePlayicon onavideotoplayitautomatically.
NOTE:YoucanalsoviewyourvideosintheGalleryapportheVideosapp.
NOTE:Donottopresstoohard;thetouchscreenissensitiveenoughto
pickupalight,butfirmtouch.
Adjusting the volume when viewing a video
Toadjustthevolumeofavideowhileitisplaying,usetheVolumeKeyson
therightsideofthetablet.

67
Gallery
Youcanstoremultimediafilesininternalmemoryforeasyaccesstoallyour
multimediafiles.Usethisapplicationtoviewmultimediafileslikepictures
andvideos.
1 FromtheHomescreen,tapApps>Appstab>Gallery .
YoucanmanageandshareallyourimageandvideofileswithGallery.
NOTE:
•Somefileformatsarenotsupported,dependingonthesoftware
installedonthedevice.
•Somefilesmaynotplayproperly,dependingonhowtheyareencoded.
•Ifthefilesizeexceedstheavailablememory,anerrorcanoccurwhen
youopenfiles.
Viewing pictures
LaunchingGallerydisplaysyouravailablefolders.Whenanotherapplication,
suchasE-mail,savesapicture,thedownloadfolderisautomaticallycreated
tocontainthepicture.Likewise,capturingascreenshotautomaticallycreates
theScreenshotsfolder.Tapafoldertoopenit.
Picturesaredisplayedbycreationdateinafolder.Selectapicturetoviewit
fullscreen.Scrollleftorrighttoviewthenextorpreviousimage.
Multimedia
68
Zooming in and out
Useoneofthefollowingmethodstozoominonanimage:
•Double-tapanywheretozoomin.Double-tapagaintoreturntofullscreen
view.
•Placetwofingersanywhereontheimageandspreadthemaparttozoom
in.Tozoombackout,pinchthemtogetherordouble-tapthescreen.
Playing videos
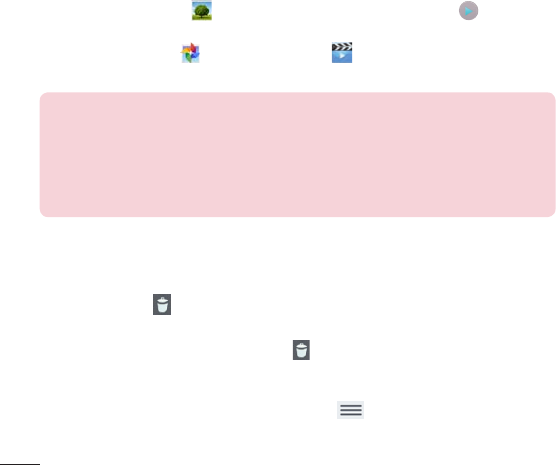
OpentheGalleryapp andselectanalbum.ThePlayicon is
displayedonvideofiles.Tapanimagetoselectit.Selecttheapptoplayit
(tapthePhotosapp ortheVideosapp ),thentapAlwaysorJust
onceandthevideobeginsplayback.
NOTE:
•Wheninvideoplaybackmode,slidethescreenupordowntoadjustthe
screenbrightness.
•Wheninvideoplaybackmode,slidethescreenleftorrighttorewindor
fast-forward.
Deleting images and videos
Useoneofthefollowingmethods:
•Inafolder,tap andselectthephotosandvideosyouwanttodelete,
thentapDelete.
•Whenviewingaphotoorvideo,tap .
Setting as wallpaper
Whenviewingaphoto,touchtheMenu Key>Set image asandselect
Contact photo,Home screen wallpaper,Lock screen wallpaperorWallpaper.
69
Slideshow
Youcanviewyourphotosinaslideshowbyalbumorbyselectingallofyour
photos.FromtheHomescreen,tapGallery .
•Tapthealbumwiththephotosyouwanttoview,thentaptheMenukey
>Slideshow>verifytheslideshowsettings>Start.
•TaptheMenukey >Viewallfiles>Menukey >Slideshow>verify
theslideshowsettings>Start.
TaptheBackkey tostopplayingtheslideshow.
Videos
Yourtablethasavideoplayerthatletsyouplayallofyourfavoritevideos.
Playing a video
1 FromtheHomescreen,tapApps>Appstab>Videos .
2 Selectthevideoyouwanttoplay.
Touchtopausevideoplayback.
Touchtoresumevideoplayback.
Touchandholdtofast-forwardin3secondincrements.Taponceto
fast-forward10seconds.
Touchandholdtorewindin3secondincrements.Taponceto
rewind10seconds.
Touchtomanagethevideovolume.
Touchtochangetheratioofthevideoscreen.
70
TouchaccessQSlideanddisplaythevideoinsmallwindow.
TouchtoshareyourvideoviatheSmartSharefunction.
Taptolockthevideoscreen.
Tochangethevolumewhilewatchingavideo,presstheVolumeKeysonthe
rightsideofthetablet.
Touchandholdavideointhelisttoaccessthefollowingoptions:
Share,Delete,TrimandDetails.
TIP!Whilewatchingavideo,slideupanddownalongtheleftsideofthe
screentoadjustthescreenbrightness.Slideupanddownalongtheright
sideofthescreentoadjustthevolume.
Music
Yourtablethasamusicplayerthatletsyouplayallyourfavoritetracks.To
accessthemusicplayer,fromtheHomescreen,tapApps>Appstab>
Music .
Playing a song
1 FromtheHomescreen,tapApps>Appstab>Music .
2 TouchtheSongstab.
3 Selectthesongyouwanttoplay.
71
TouchtofindthefileswithYouTube.
TouchtoshareyourmusicviaSmartSharefunction.
Touchtosetshufflemode.
Touchtosetrepeatmode.
Touchtomanagethemusicvolume.
Touchtopauseplayback.
Touchtoresumeplayback.
Touchtoskiptothenexttrackonthealbumorintheplaylist.
Touchtogobacktothebeginningofthesong.Touchtwiceto
returntotheprevioussong.
Touchtosetthecurrentsongasafavorite.
Touchtoseethecurrentplaylist.
Touchtosettheaudioeffect.
Tochangethevolumewhilelisteningtomusic,presstheVolumeKeyson
therightsideofthetablet.
Touchandholdanysonginthelisttoaccessthefollowingoptions:
Play,Add to playlist,Share,Delete,DetailsandSearch.

72
NOTE:
•Somefileformatsarenotsupported,dependingonthedevicesoftware.
•Ifthefilesizeexceedstheavailablememory,anerrorcanoccurwhen
youopenfiles.
•Musicfilecopyrightsmaybeprotectedbyinternationaltreatiesand
nationalcopyrightlaws.
Therefore,itmaybenecessarytoobtainpermissionoralicenceto
reproduceorcopymusic.Insomecountries,nationallawsprohibit
privatecopyingofcopyrightedmaterial.Beforedownloadingorcopying
thefile,checkthenationallawsoftherelevantcountryconcerningthe
useofsuchmaterial.
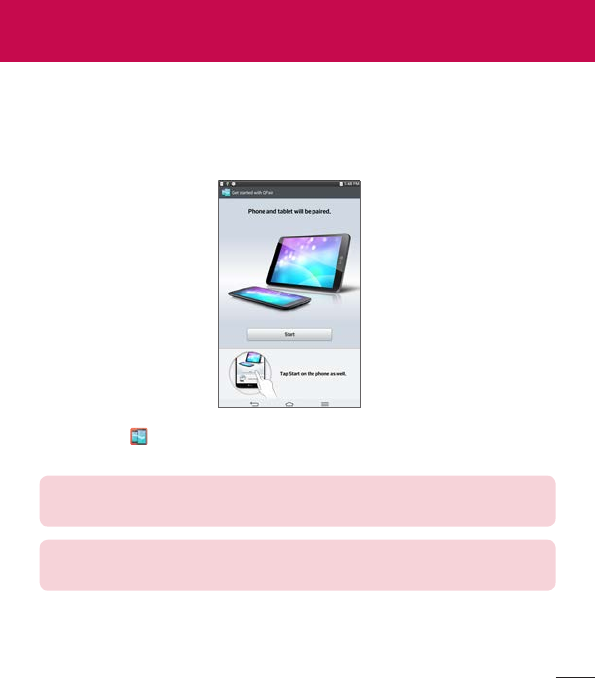
73
QPair
ByconnectingyourtabletandmobilephoneviaQPair,youcansync
incomingcalls,messages,andsocialnetworkingnotificationsbetweenyour
tabletandmobilephone.
1 RunQPair andtapGet started>Startonyourtabletfirstandthenrun
thesamestepsonyourphone.
TIP!QPairmaynotbepre-installedonthephone.GotoGooglePlay
StoreandsearchforQpairandinstall.
NOTE:QPairworkswithphonesrunningAndroid4.1orlater.Some
featuresmaybelimiteddependingonyourphonemodel.
2 Bluetoothconnectionwillbeturnedonautomatically.
Tools

74
QPair features
Call–Sendsthetabletanotificationwhenthephonereceivesacall.The
notificationdisplaysthecaller'snumberandallowsyoutodeclinethecall.
Message–Sendsthetabletanotificationwhenthephonereceivesa
message.
Social network Notifications–DisplaysSNSnotificationsonyourtablet's
Statusbarwhenitarrivesonyourphone.
NOTE:Toenablethisfeature,turntheQPair social network notifications
optiononyourphone(Settings>Accessibility>QPair social network
notifications).Thisoptionallowsyoutobenotifiedofsocialnetworking
notificationsonyourtablet.
QuickMemo transfer–SavesyourcurrentQuickMemointhetablet'sGallery,
andthensyncsthisGallerywiththeGalleryonyourphone.
Internet connection via mobile phone–Automaticallyconnectsyourtablet
totheInternetthroughyourmobilephone(asaWi-Fihotspot).Usingthis
featuremayincurdatacharges.Tosavedatausageonthephone,thephone
automaticallyconnectstoanytrustedWi-Fihotspotswithinrange.
Recent app sticker–Whenthepaireddevice'sscreenisunlocked,asticker
willdisplaythelastappusedontheotherdeviceiftheappisinstalledboth
onthetabletandthephone.
QSlide
TheQSlidefunctionenablesanoverlaywindowonyourtablet’sdisplayfor
easymultitasking.QSlidewindowscanbeopenedfromtheQSlideappsbar
ontheNotificationspanel,ordirectlyfromtheapplicationsthatsupportthe
QSlidefunction.
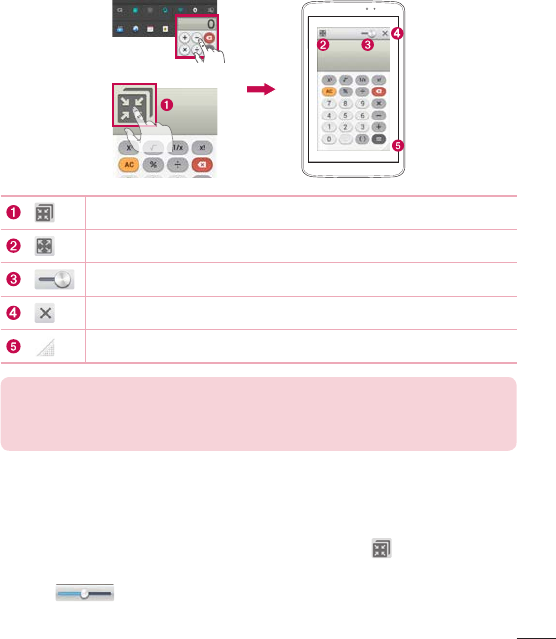
75
OR
TaptorunQSlide.
TaptoexittheQSlideandreturntofullwindow.
Taptoadjusttransparency.
TaptoendtheQSlide.
Taptoadjustthesize.
NOTE:TheQSlidefunctioncansupportuptotwowindowsatthesame
time.QSlideonlysupportsthefollowingapplications:Videos,Internet,
Memo,Calendar,Calculator,Email,FileManager.
1 OpentheNotificationsPanelandtapthedesiredappfromtheQSlide
appssection.
OR
WhileusinganapplicationthatsupportsQSlide,tap .Thefunctionwill
bedisplayedcontinuouslyasasmallwindowonyourscreen.
2 Slide toadjustthetransparencylevel.AnddragtheQSlidetitle
bartomoveittoanotherpositiononthescreen.
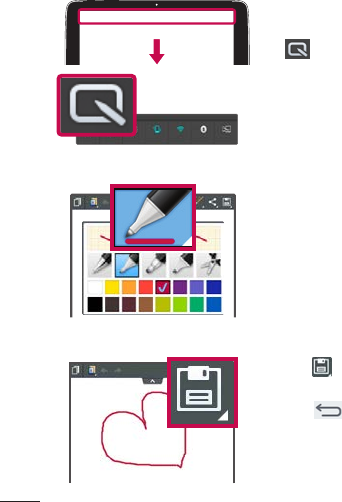
76
QuickMemo
TheQuickMemofeatureallowsyoutocreatememosandcapturescreen
shots.Capturescreens,drawonthem,andsharethemwithfamilyand
friendswithQuickMemo.
Creating a QuickMemo
1 AccesstheQuickMemofeature,slide
theStatusBardownwardsandtouch
.
OR
PressbothoftheVolume Keysatthe
sametimeforonesecond.
2 Selectthedesiredmenuoptionfrom
Pen type,Colour,andEraser.Then
createamemo.
3 Tap tosavethememo.Toexit
QuickMemoatanytime,taptheBack
Key .
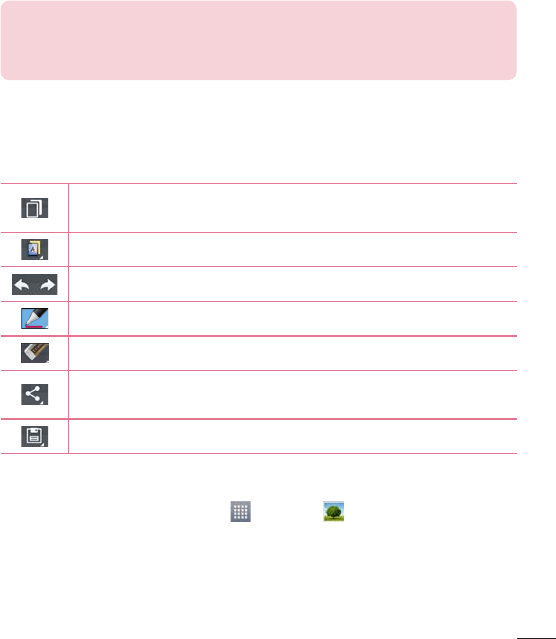
77
NOTE:
•PleaseuseafingertipwhileusingtheQuickMemo.Donotuseyour
fingernail.
Using the QuickMemo options
ThefollowingoptionsareavailableintheQuickMemotoolbaratthetopof
thescreen.
Touchtokeepthecurrentmemoonthescreenandusethe
tabletsimultaneously.
Selectswhethertousethebackgroundscreenornot.
Allowsyoutoundoandredopreviousactions.
Selectsthepentypeandthecolour.
Erasesthememothatyoucreated.
Touchtosendyourmemotoothersorshareitviasocialnetwork
services.
SavesthememointheNotebookor Gallery.
Viewing the saved QuickMemo
FromtheHomescreen,tapApps>Galleryandselectthe
QuickMemoalbum.
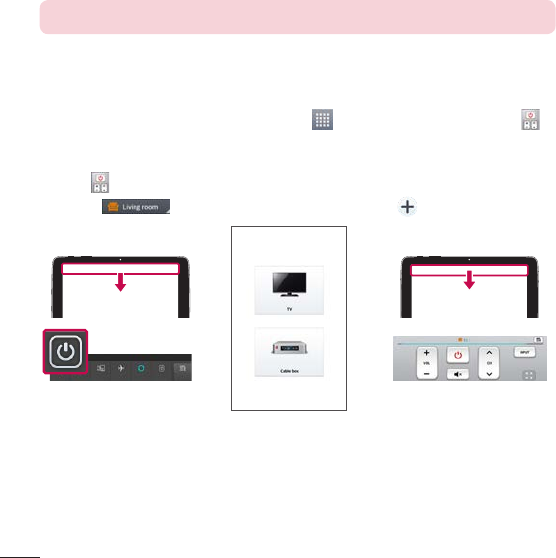
78
QuickRemote
QuickRemoteturnsyourtabletintoaUniversalRemoteforyourhomeTV,
DVDorBlu-ray.
NOTE:QuickRemotemaynotbeavailableforsomedevicesandareas.
To open the QuickRemote application and set up your
QuickRemote(s)
1 FromtheHomescreen,taptheApps>Apptab>QuickRemote .
YoucanalsoperformtheinitialsetupofyourQuickRemotefromthe
NotificationsPanel.SwipetheStatusBardownward,taptheQuickRemote
icon .
2 Touch toselectaroomtypeandtouch toaddthedevice.
3 Selectthetypeandbrandofdevice,thenfollowtheon-screeninstructions
toconfigurethedevice(s).

79
NOTE:TheQuickRemoteoperatesthesamewayasanordinaryinfrared
(IR)remotecontrolinyourregionorcountry.Becarefulnottocoverthe
infraredsensoratthetopofthetabletwhenyouusetheQuickRemote
function.Thisfunctionmaynotbesupporteddependingonthemodel,
themanufacturerorservicecompany.
Using QuickRemote
1 FromtheHomescreen,taptheApps>QuickRemotetoopena
QuickRemotebarwithalloftheremotesyousetup.
2 Selecttheremoteyouwantbytappingitstype/nameatthetopofthe
QuickRemotebar.
3 Tapthebuttonsonthedisplayedremote.
NOTE:WhenaddingremotecontrolofTV,QuickRemotecouldusethe
INPUTbuttontoconfigureappropriateremotecontrol.Whenconfiguring
theINPUTbutton,inputsourceofTVcouldbechanged.Toresetinput
sourceofyourTV,taptheINPUTbuttononQuickRemoteseveraltimes
(dependingonthenumberofdevicesconnectedtotheTV).
QuickRemote options
ToaccesstheQuickRemoteOptionsmenu,taptheMenu Key(inthe
FrontTouchKeysbar)toselectthedesiredoption.
NOTE:Whileplayingmusicinthebackground,pressinganyQuickRemote
buttonwillmutethesoundforasecond.
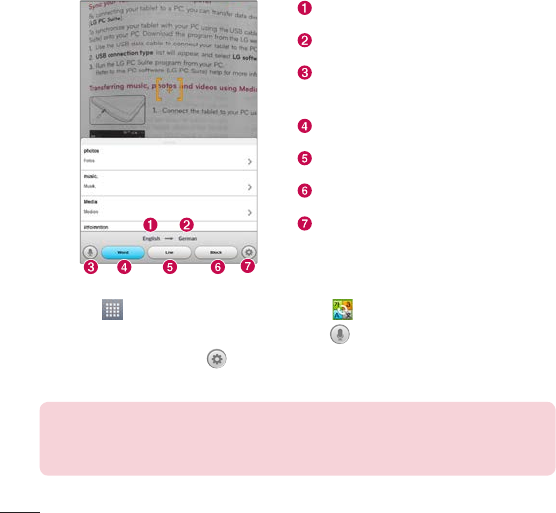
80
QuickTranslator
Simplyaimthecameraofyoursmarttabletattheforeignsentenceyouwant
tounderstand.Youcangetthereal-timetranslationanywhereandanytime.
YoucanbuyadditionaldictionariesforofflinetranslationfromtheGoogle
PlayStore.
Homelanguage.
Destinationlanguage.
SwitchestoVoicemode.Tapthe
languagebutton,thenspeak.
Translationofawrittenword.
Translationofawrittensentence.
Translationofaparagraph.
AccessestheQuickTranslator
settings.Youcansetthehomeand
destinationlanguageshere.
1 Touch >Appstab>QuickTranslator .
2 Tapthetranslationformat.Choosefrom ,Word,Line,orBlock.
3 TaptheSettingsicon andsetthehomeanddestinationlanguages.
4 Holdthetablettowardthesubjectyouwanttotranslateforafewseconds.
NOTE:Onlyonedictionaryisprovidedfreeofcharge.Additional
dictionariesmustbepurchased.Pleaseselectfromthelistbelowthe
dictionaryyouwouldliketoinstallasyourcomplimentarydictionary.

81
NOTE:Theremaybeadifferenceintherateofrecognizationdepending
onthesize,font,colour,brightnessandangleofthelettersthatneedto
betranslated.
Voice Mate
YoucanaskVoice Matetoperformtabletfunctionsusingyourvoice,such
assettingalarms,orsearchingtheweb.WhenyouaccessVoiceMateforthe
firsttime,itdisplayshelpinformationtoassistyouinlearninghowtousethis
function.
To open the Voice Mate application
•FromtheHomescreen,taptheApps>Voice Mate .
Using the Voice Mate application
1 OpentheVoice Mateapplication.
2 TaptheSpeakicon (atthebottomofthescreen)toturniton.Say
whatyouwantittodoforyou.
• Ifyousay“Wakemeupat6AM",VoiceMatewillsetthealarmforthat
time.
NOTE:AccesstheVoiceMatesettingstocheckmarkSkip confirmation
sothatfoundexactname(ornumber)matchrequestswillbeexecuted
withoutconfirmingitfirst.
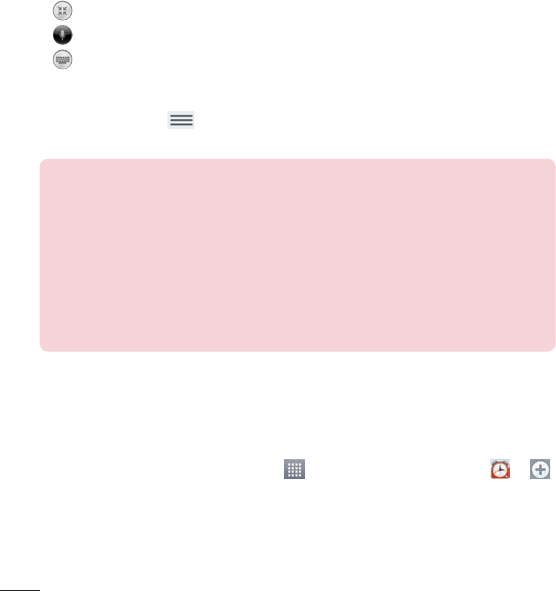
82
Voice Mate Icons
ThefollowingVoiceMateiconsaredisplayedatthebottomofthescreen:
• TaptodisplaytheVoiceMateQSlidewindowontheHomescreen.
• Taptosayavoicecommandtoexecute.
• Taptotypeacommandtoexecute.
Voice Mate Options menu
TaptheMenu KeytoaccesstheOptionsmenutoselectSettingsor
Help.
NOTE:
•WhenthelanguagesettingforVoiceMateisnotthesameasthe
defaultlanguagesettingonyourtablet,somecommandssuchas
launchingappsmaynotwork.
•Whenenteringtext,youcanonlyuselettersornumbers.
•VoiceMaterecognizesyourspeechbetterwhenyouspeakslowly.
•YoucanviewexamplesofvariouscommandsbyswipingtheVoiceMate
mainscreentotheleft.
Alarm
Setting your alarm
1 FromtheHomescreen,tapApps>Appstab>Alarm/Clock> .
2 Setthedesiredalarmtime.
3 SetRepeat,Snooze duration,Vibration,Alarm sound,Alarm volume,Auto
app starter,Puzzle lockandMemo.
4 TouchSave.
83
NOTE:Tochangealarmsettingsinthealarmlistscreen,touchtheMenu
KeyandselectSettings.
Calculator
Using your calculator
1 FromtheHomescreen,tapApps>Appstab>Calculator .
2 Touchthenumberkeystoenternumbers.
3 Forsimplecalculations,touchthefunctionyouwanttoperform
(, , or )followedby .
NOTE:
•Formorecomplexcalculations,touchtheMenu Key,selectthe
Scientific calculator,thenchoosethedesiredfunction.
•Toviewthecalculationhistory,tapMenu Key>Calculation history.
Calendar
Adding an event to your calendar
1 FromtheHomescreen,tapApps>Appstab>Calendar .
2 Taptheleft-topbuttontochangethecalendarview(Day,Week,Month,
Year,Agenda).
3 Taponthedateforwhichyouwishtoaddaneventandtap .
4 TouchtheEvent namefieldandentertheeventname.
5 TouchtheLocationfieldandenterthelocation.Checkthedateandenter
thetimeyouwishyoureventtostartandfinish.
84
6 Ifyouwishtoaddanotetoyourevent,touchtheDescriptionfieldand
enterthedetails.
7 Ifyouwishtorepeatthealarm,setREPEATandsetREMINDERS,if
necessary.
8 TouchSavetosavetheeventinthecalendar.
NOTE:Touchandholdaspotonthecalendartoquicklysaveacalendar
eventonthatdate.Simplyentertheeventnameandtime,thentapSave.
YoucantapDetailsandentermoreinformation,orupdatetheeventwith
additionaldetailslater.
Tasks
TheTasksappcanbesynchronizedwithyourMSExchangeaccount.You
cancreateandmanageyourtasksusingyourtabletorfromMSOutlookor
MSOfficeOutlookWebAccess.
1 FromtheHomescreen,tapApps>Tasks .
2 TaptheAddtaskicon (intheupper-rightcornerofthescreen).
3 EntertheSubject,Due date,Description,Repeat,andReminder,as
necessary.
4 TapSave(atthebottomofthescreen).
Voice Recorder
Usethevoicerecordertorecordvoicememosorotheraudiofiles.
Recording a sound or voice
1 FromtheHomescreen,tapApps>Appstab>Voice Recorder .
2 Touch tobeginrecording.

85
3 Touch toendtherecording.
4 Touch tolistentotherecording.
NOTE:Touch toaccessyourlistofrecordings.Youcanlistentothe
savedrecordings.Theavailablerecordingtimemaydifferfromactual
recordingtime.
Sending the voice recording
1 Onceyouhavefinishedrecording,youcansendtheaudioclipby
touching .
2 Choosefromanyoftheavailablemethodsforsharing.
Task Manager
YoucanmanageyourapplicationsusingTaskManager.Youcaneasilycheck
thenumberofapplicationsthatarecurrentlyrunningandshutdowncertain
applications.
Task Manager Options
•TouchStoptostopindividualapps.
•TapStop alltostopallcurrentlyrunningapps.
•TaptheMenu KeytoaccessHelp,Sortby,andSettings.
POLARIS Office 5
POLARISOffice5isaprofessionalmobileofficesolutionthatletsusers
convenientlyviewvarioustypesofofficedocuments,includingWord,Excel
andPowerPointfiles,anywhereoranytime,usingtheirmobiledevices.
86
To create a New Document
1 FromtheHomescreen,tapApps>Appstab>POLARIS Office 5
.
2 RegisteryouremailaddressontheRegistrationpage.
NOTE:YoucantapSkiptoignoretheregistrationinformation.
3 Tap tostartanewdocument.
4 Tapadocumenttypefromthedrop-downlist,thenchooseatemplate.
5 Entercontentsinthedocumentusingthetoolsatthetopofthescreen
andtheon-screenkeyboard.
6 Whenyou'redoneworkingonthedocument,tap (inthetopleftcorner
ofthescreen),thentapSaveandEnterthedocumentname.
To view and edit a document on your device
Youcannoweasilyviewandeditawidevarietyoffiletypes,including
MicrosoftOfficedocumentsandAdobePDF,rightontheirmobiledevices.
Tapanofficedocumenttabatthetopofthescreentosearchfor
documentsonyourtablet.
Tapthedocumentthatyouwanttovieworedit.
WhenviewingdocumentsusingPOLARISOffice5,theobjectsandlayout
remainthesameasintheoriginaldocuments.
Toeditit,tap .
Google+
UsetheGoogle+apptostayconnectedwithpeopleviaGoogle’ssocial
networkservice.
FromtheHomescreen,tapApps>Appstab>Google+ .
87
NOTE:Thisapplicationmaynotbeavailabledependingontheregionor
serviceprovider.
Voice Search
TheVoiceSearchappallowsyoutosearchwebpagesusingyourvoice
insteadoftyping.
1 FromtheHomescreen,tapApps>Appstab>Voice Search .
2 SayakeywordorphrasewhenSpeak nowappearsonthescreen.Select
oneofthesuggestedkeywordsthatappear.
NOTE:Thisapplicationmaynotbeavailabledependingontheregionor
serviceprovider.
Downloads
UsetheDownloadsapptoseewhatfileshavebeendownloaded.
FromtheHomescreen,tapApps>Appstab>Downloads .
BOX
TheBOXappmakesyoueasytoaccessandedityourfiles,sharecontent
andstayconnectedwithyourfilesfromanywhereonanydevice.
To open the BOX application
•FromtheHomescreen,tapApps >Appstab>BOX .
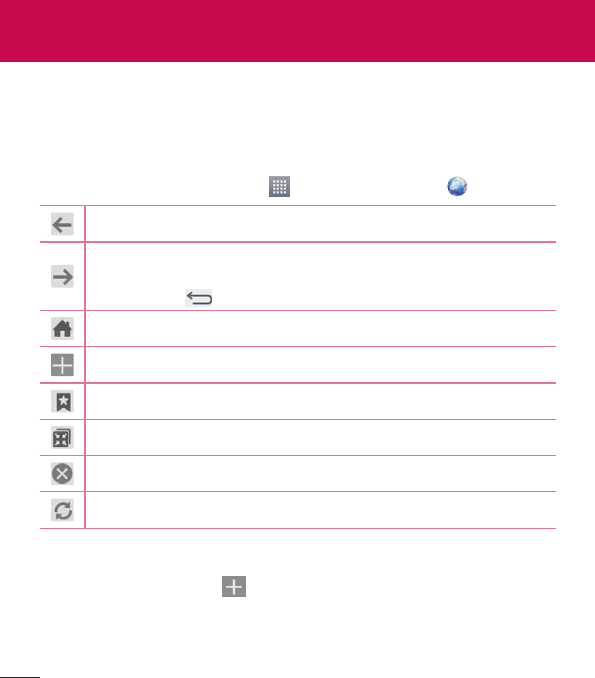
88
Internet
UsethisapplicationtobrowsetheInternet.Browsergivesyouafast,full-
colourworldofgames,music,news,sports,entertainmentandmuchmore,
rightonyourtabletwhereveryouareandwhateveryouenjoy.
FromtheHomescreen,tapApps>Appstab>Internet .
Taptogobackonepage.
Taptogoforwardonepage,tothepageyouconnectedtoafterthe
currentone.Thisistheoppositeofwhathappenswhenyoutouch
theBack Key,whichtakesyoutothepreviouspage.
TaptogototheHomepage.
Taptoaddanewtab.
Taptoaccessyourbookmarks.
TaptouchtorunQSlide.
Taptoclosethecurrenttab.
Taptorefreshorstopthecurrentpage.
Opening a page
•Toopenanewpage,tap .
•Togotoanotherwebpage,tapthepagetoviewit.
The Web
89
Searching the web by voice
Tapthewebaddressfield,tap ,speakakeyword,andthenselectoneof
thesuggestedkeywordsthatappear.
NOTE:Thisfeaturemaynotbeavailabledependingontheregionor
serviceprovider.
Bookmarks
Toopenabookmarkedwebpage,tap ontheBrowsertoolbarandselect
one.
History
Tap ontheBrowsertoolbarandselecttheHistorytabtoopena
webpagefromthelistofrecently-visitedwebpages.Toclearthehistory,tap
theMenu Key>Clear all history.
Using QSlide
UsethisfeaturetoaccesstheInternetwithoutclosingthecurrent
application.
WhileviewingcontentontheBrowser,tap .Youcanthenbrowseother
informationonyourtablet.Toviewthebrowserinfullscreen,tap .
Chrome
UseChrometosearchforinformationandbrowsewebpages.
FromtheHomescreen,tapApps>Appstab>Chrome .
NOTE:Thisapplicationmaynotbeavailable,dependingonyourregion
andserviceprovider.
90
Viewing webpages
Taptheaddressfield(atthetopofthescreen),enterawebaddressor
searchcriteria,andtap onthekeyboard.
Opening a page
•Togotoanewpage,tap .
•Togotoanotherwebpage,tapthepageyouwanttoselectit.
Searching the web by voice
Taptheaddressfield,tap ,speakakeywordandselectoneofthe
suggestedkeywordsthatappear.
NOTE:Thisfeaturemaynotbeavailabledependingontheregionor
serviceprovider.
Syncing with other devices
SyncopentabsandbookmarkstousewithChromeonanotherdevicewhen
youareloggedinwiththesameGoogleaccount.
Toviewopentabsonotherdevices,taptheMenu Key>Other devices.
YoumustbesignedintothesameGoogleaccountonalldevices.Selecta
webpagetoopen.
Adding and Viewing bookmarks
Toaddbookmarks,tap .
Toopenabookmarkedwebpage,taptheMenu Key >Bookmarks.

91
Chrome Options menu
•New tab–Taptocreateanewwebpagetab.
•New incognito tab–Taptocreateanewincognitotab.
•Bookmarks–Displaysyourbookmarkedwebpages.
•Other devices–Displaysyouropenwebpagesonotherdevices.
•History–Displaysyourbrowsingdata(webpagesyou'vevisited).
•Share...–AlloswstosharetheURL.
•Print...–Taptoprintthepicture.Choosetoautomaticallyfindaprinteron
yournetwork,ormanuallyenteronetouse.
•Find in page–Allowsyoutosearchfortextonthecurrentwebpage.
•Request desktop site–Checkmarktoaccessthedesktopsitewhenyou
viewwebpagesonyourtablet.
•Settings–AllowsyoutochangethesettingsspecifictotheChromeapp.
•Help–DisplaysinformationaboutusingtheChromeapponyourtablet.

92
Access the Settings menu
1 FromtheHomescreen,tapApps>Appstab>Settings .
OR
FromtheHomescreen,taptheMenu Key>System settings.
2 Selectasettingcategoryandselectanoption.
WIRELESS NETWORKS
Wi-Fi
Wi-Fi–TurnsonWi-FitoconnecttoavailableWi-Finetworks.
ThelistofalloftheWi-Finetworksthathavebeenaccessed.Taponeto
connecttoit.
NOTE:TapSearch(atthebottomofthescreen)toscanforavailable
Wi-Finetworks.
TaptheMenukey intheWi-FimenutoaccesstheWi-FiOptions
menu:
WPS Push Button–InformationtoconnecttoasecuredWi-Finetworkwith
aWPSbutton.
WPS Pin Entry–InformationtoconnecttoasecuredWi-Finetworkwitha
WPSPIN.
Add network–AllowsyoutomanuallyenteranewWi-Finetwork.
Settings
93
Wi-Fi Direct–AllowsdirectconnectionwithWi-Fideviceswithoutany
accesspoint.
Advanced Wi-Fi–AccessesthefollowingadvancedWi-Fisettings.
Interactive tutorial–DisplayssomeusefultutorialsfortheWi-Fifunction.
TIP! How to obtain the MAC address
TosetupaconnectioninsomewirelessnetworkswithMACfilters,you
mayneedtoentertheMACaddressofyourtabletintherouter.
YoucanfindtheMACaddressinthefollowinguserinterface:Fromthe
Homescreen,tapApps>Settings>Wi-Fi>Menu Key >
Advanced Wi-Fi>MAC address.
Bluetooth
TurntheBluetoothwirelessfeatureonorofftouseBluetooth.ONallowsyou
topairandconnecttootherBluetoothdevices.
TaptheMenukey intheBluetoothmenutoaccesstheBluetooth
Optionsmenu.
Edit tablet name–Changesyourtabletnameforeasyidentificationwhen
pairingandconnecting.Enteryournewtabletname,thentapSave.
Visibility timeout–SetstheamountoftimeotherBluetoothdevicescansee
yourtabletforpairingandconnection.Choosefrom2minutes,5minutes,
1hour,andNever time out.
Show received files–DisplaysalistofyourBluetoothreceivedfiles.
Interactive tutorial–DisplayssomeusefultutorialsaboutBluetoothfeatures.

94
Data usage
Displaysthedatausage.
More...
Allowsyoutosharefolderswithotherdevicesviawirelessconnection.
Airplane mode–CheckmarktheAirplane modetoseton.Activating
Airplanemodedisablesallwirelessconnections.
Wireless storage–Youcanmanagefilesonyourtabletinthecomputeror
copyfilestothetabletfromthecomputerwithoutaUSBconnection.Make
surethatthetabletandcomputerareconnectedtothesamenetwork.
Then,enterthewebaddressesshownonyourtabletintheaddressbarof
thebrowseronyourcomputer.
Miracast–Allowsyoutowirelesslymirroryourtabletscreenandsoundonto
aMiracastdongleorTV.
SmartShare Beam–Allowsyoutoreceivemultimediacontentvia
SmartShareBeamfromLGphonesortablets.
Media server–Allowstosharemediacontentswithnearbydevicesvia
DLNA.
VPN–DisplaysthelistofVirtualPrivateNetworks(VPNs)thatyou've
previouslyconfigured.AllowsyoutoadddifferenttypesofVPNs.
NOTE:YoumustsetalockscreenPINorpasswordbeforeyoucanuse
credentialstorage.

95
DEVICE
Sound
Sound profile–ChoosetheSound,eitherVibrateonlyorSilent.
Volumes–ManagethevolumeofNotificationsound,Touchfeedback&
system,Music,video,gamesandothermedia.
Notification sound–Allowsyoutosetyourdefaultnotificationringtone.
Touch sounds–Allowsyoutosetyourtablettoplayasoundwhenyoutouch
buttons,iconsandotheronscreenitemsthatreacttoyourtouch.
Screen lock sound–Allowsyoutosetyourtablettoplayasoundwhen
lockingandunlockingthescreen.
Vibrate on touch–Allowsyoutosetthevibrationfeedbackwhenthetablet
screenistouched.
Display
Home screen
Theme–Setsthescreenthemeforyourdevice.
Wallpaper–SetsthewallpapertouseonyourHomescreen.
Screen swipe effect–Setstheeffectwhenyouswipetochangescreens.
Allow Home screen looping–CheckmarktosettheHomescreensto
scrollcontinuously,eliminatingtheneedtoscrollbackintheopposite
directionwhenyoureachoneend.
Home backup & restore–Allowsyoutobackupandrestoreappand
widgetconfigurationsandthemes.
Do you know?–EnablethisoptiontodisplaythehelppageDo you know?
ontodisplayanadditionalhomescreen.
Help–DisplaysinformationabouttheoperationoftheHomeScreen.

96
Lock screen
Select screen lock–Setascreenlocktypetosecureyourtablet.Opensa
setofscreensthatguideyouthroughdrawingascreenunlockpattern.If
youhaveenabledaPatternlocktypewhenyouturnonyourtabletorwake
upthescreen,youwillbeaskedtodrawyourunlockpatterntounlockthe
screen.
Screen swipe effect–Setsthescreenswipeeffectoptions.
Weather animation–Checkmarktoshowweatheranimationforcurrent
locationorprimarycitysetinWeatherbasedonautodataupdates.
Wallpaper–SetsyourLockscreenwallpaper.SelectitfromGalleryor
Wallpaper gallery.
Shortcuts–AllowsyoutochangetheshortcutsontheSwipeLockscreen.
Contact info for lost phone–Checkmarktosetthedeviceowner’sname
tobedisplayedontheLockscreen.Taptoenterthetexttobedisplayed
astheOwnerinfo.
Portrait view only–CheckmarktoalwaysdisplaytheLockscreenin
portraitview.
Lock timer–Setstheamountoftimebeforethescreenautomatically
locksafterthescreenhastimed-out.
Power button instantly locks–Checkmarktoinstantlylockthescreen
whenthePower/LockKeyispressed.ThissettingoverridestheSecurity
locktimersetting.
Brightness–Adjustthescreenbrightness.
Screen timeout–Setthetimeforscreentimeout.
KnockON–CheckmarktoenableKnockONtoturnthescreenonandoff.
Quicklydouble-tapcenterscreentoturniton.Double-taptheStatusBar,
anemptyareaontheHomescreen,ortheLockscreentoturnthescreen
off.Forthebestresults,donotmovethetabletwhileusingtheKnockON
feature.

97
Screen-off effect–Setsthescreen-offeffect.
Auto-rotate screen–Settoswitchorientationautomaticallywhenyourotate
thetablet.
Daydream–TaptheDaydreamswitchtotoggleitOnorOff.Onallowsthe
setscreensavertobedisplayedwhenthetabletissleepingwhiledocked
and/orcharging.ChoosefromClock,Colour,PhotoFrame,andPhotoTable.
NOTE:Chargingmightbeslowwhilethescreensaverison.
Font type–Changethetypeofdisplayfont.
Font size–Changethesizeofthedisplayfont.
Smart screen–Keepscreenonwhendevicedetectsyoureyeslookingat
thescreen.
Smart video–Checkmarktopausethevideowhenitdoesn'tdetectyour
eyeslookingatthescreen.
Front touch buttons–SettheFrontTouchKeysdisplayedatthebottom
ofallofthescreens.Setwhichonesaredisplayed,theirpositiononthe
bar,andwhattheylooklike.Selectthekeysandorder,thetheme,andthe
background.
Motion sensor calibration–Allowsyoutoimprovetheaccuracyofthetilt
andspeedofthesensor.
Storage
INTERNAL STORAGE–Displaysthetotalamountofspaceinthedevice’s
memoryandlistswhattypeofdataisusingupspace.
SD CARD–DisplaysthetotalamountofmemoryspaceonthemicroSD
card.

98
Total space
Mount/Unmount SD card–MountsandunmountsthemicroSDcard
fromyourtabletsothatyoucanaccessthedatastoredinit,formatthe
card,orsafelyremoveit.Thissettingisdimmedifthere’snomicroSD
cardinstalled,ifyou’vealreadyunmountedit,orifyou’vemountedthe
microSDcardonyourcomputer.
Erase SD card–PermanentlyeraseseverythingonthemicroSDcardand
preparesitforusewithyourtablet.
Battery
BATTERY INFORMATION–Seehowmuchbatterypowerisusedfordevice
activities.Thebatteryleveldisplaysinapercentage.Theremainingtimeof
useisalsodisplayed.
Battery percentage on status bar –Displaysthebatterypercentageonthe
StatusBar.
Battery saver–Managethebatteryforthepowersavingitems.Tapthe
switch toturnthisfeatureon.TapBattery saverforthefollowing
options.
• Auto-sync:TurnsoffAuto-sync.
• Wi-Fi:TurnsoffWi-Fiifdataisnotinuse.
• Bluetooth:TurnsoffBluetoothifnotconnected.
• Vibrate on touch:Turnsofftouchfeedback.
• Brightness:Adjustthebrightness.
• Screen timeout:Adjustthescreentimeout.
Help–TouchtoaccesssometipsforPowersaver.

99
Apps
Displaythelistofapplicationssuchascurrentlyrunningordownloaded.
Swipeleftandrighttoviewoneofthethreetabsacrossthetopofthe
screentoviewdetailedinformationforDOWNLOADED,RUNNING,andALL
applications.
Tapanentrytoviewmoreinformation,tapForce stop,thenOKtostopit
fromrunning.
Slide Aside
Youcanusethree-fingerswipetosaverunningappstotheleftorbring
thembacktothedisplay.
PERSONAL
Accounts & sync
Permitsapplicationstosynchronizedatainthebackground,whetherornot
youareactivelyworkinginthem.Deselectingthissettingcansavebattery
powerandlower(butnoteliminate)datausage.
Cloud
TapAdd accounttousecloudfeature.
Users
Checkmarktosetthedeviceowner’snametobedisplayedontheLock
screen.Tap toenterthetexttobedisplayedastheOwnerinfo.
Add user–AllowsyoutoaddnewaccountfortabletanduseMulti-user
feature.

100
Location access
Mode
High accuracy–UseGPS,Wi-Fi,andmobilenetworkstoestimatelocation.
Battery saving–UseWi-Fiandmobilenetworkstoestimatelocation.
Device sensors only–UseGPStopinpointyourlocation.
RECENT LOCATION REQUESTS-Displaysappsthathaverecently
requestedyourlocationinformation.
LOCATION SERVICES
Google Location Reporting–AllowsyoutoviewyourGooglelocation
settings.
Security
Encrypt tablet–Allowsyoutoencryptdataonthetabletforsecurity.Youwill
berequiredtoenteraPINorpasswordtodecryptyourtableteachtimeyou
poweriton.
Encrypt SD card storage–AllowsyoutoencryptdataontheMicroSDfor
security.
Password typing visible–Showthelastcharacterofthehiddenpasswordas
youtype.
Tablet administrators–Viewordeactivatetabletadministrators.
Unknown sources–Defaultsettingtoinstallnon-Playstoreapplications.
Verify apps–Disalloworwarnbeforeinstallationofappsthatmaycause
harm.
Storage type–Displaysthestoragetype.

101
Trusted credentials–DisplaytrustedCAcertificates.
Install from storage–Choosetoinstallencryptedcertificates.
Clear credentials–Removeallcertificates.
Language & input
UsetheLanguage&inputsettingstoselectthelanguageforthetexton
yourtabletandtoconfiguretheon-screenkeyboard,includingwordsyou've
addedtoitsdictionary.
Backup & reset
Backup my data–Settobackupyoursettingsandapplicationdatatothe
Googleserver.
Backup account–Settheaccounttowhichyouwanttobackupdatato.
Automatic restore–Settorestoreyoursettingsandapplicationdatawhen
theapplicationsarereinstalledonyourdevice.
LG Backup service–Backsupallinformationonthedeviceandrestoresitin
theeventofdatalossorreplacement.
Factory data reset–Resetyoursettingstothefactorydefaultvaluesand
deleteallyourdata.Ifyouresetthetabletthisway,youarepromptedto
re-enterthesameinformationaswhenyoufirststartedAndroid.
SYSTEM
Date & time
UseDate & timesettingstosethowdateswillbedisplayed.Youcanalso
usethesesettingstosetyourowntimeandtimezoneratherthanobtaining
thecurrenttimefromthemobilenetwork.
102
Accessibility
UsetheAccessibilitysettingstoconfigureaccessibilityplug-insyouhave
installedonyourtablet.
NOTE:Requiresadditionalplug-instobecomeselectable.
TalkBack–AllowsyoutosetuptheTalkBackfunctionwhichassistspeople
withimpairedvisionbyprovidingverbalfeedback.TaptheTalkBackswitch
atthetoprightcornerofthescreentoturniton.TapSettingsatthe
bottomofthescreentoadjusttheTalkBacksettings.
Large text–Checkmarktoincreasethesizeofthetext.
Invert colours–Checkmarktoinvertcolour.
Colour adjustment–Allowstodisplayscreenwithgreatercolourcontrast.
Taptheswitch toturnthisfeatureon.
Touch zoom–Allowsyoutozoominandoutbytriple-tappingthescreen.
Screen shades–Setthescreentobeshadeofblack.
Mono audio–Checkmarktoallowheadsetsoundroutedbothrightandleft
channel.
Captions–Allowstocustomizecaptionsettingsforthosewithhearing
impairments.Taptheswitch toturnthisfeatureon.
Touch feedback time–Setsthetouchandfeedbacktime.Choosefrom
Short,Medium,andLong.
Universal touch–Switch totogglebetweenonandoff.Universal
touchcanreplaceallhardwarebuttons.
Auto-rotate screen–Checkmarktoallowthedevicetorotatethescreen
dependingonthedeviceorientation(portraitorlandscape).

103
Read passwords–Checkmarktohaveverbalconfirmationwheninputting
passwords.
Accessibility settings shortcut–Setsquick,easyaccesstoselectedfeatures
whenyoutriple-tapHome key.
Text-to-speech output–Text-to-speechoutputprovidesaudiblereadoutof
text,forexample,thecontentsoftextmessages.
PC connection
Select USB connection method–Setthedesiredmode:Charge tablet,
Media sync (MTP),LG softwareorSend images (PTP).
Ask upon connecting–AskinUSBconnectionmodewhenconnectingtoa
computer.
Help–HelpforUSBconnection.
PC Suite–CheckthistouseLGPCSuitewithyourWi-Ficonnection.Please
notethatWi-FinetworkshouldbeconnectedtoLGPCSuiteviaaWi-Fi
connection.
Help–HelpforLGsoftware.
Accessory
Quick Cover–ActivatetheQuickCovertoturnonoroffautomatically.
USB storage Plug & Pop–SetsthePlug&PopfeatureforUSBstorage.
Checkmarktheapppaneloptiontoautomaticallydisplaytheapppanel
whenconnectinganOTG(On-the-Go)USBcable.TapEdit app panelto
changetheapplicationsyouwanttomakeavailable.
Earphone Plug & Pop –SetsthePlug&Popfeatureforearphones.
Checkmarktheapppaneloptiontoautomaticallydisplaytheapp
panelwhenconnectinganearphone.TapEditapppaneltochangethe
applicationsyouwanttomakeavailable.

104
Dock Plug & Pop–SetsthePlug&PopfeaturesforDock.Checkmarkthe
apppaneloptiontoautomaticallydisplaytheapppanelwhenconnecting
adock.TapEdit app paneltochangetheapplicationsyouwanttomake
available.
Printing
Allowsyoutoprintthecontentofcertainscreens(suchaswebpages
displayedinChrome)toaprinterconnectedtothesameWi-Finetworkas
yourAndroiddevice.
About tablet
Thismenuallowsyoutomanageyoursoftwareupdatesandviewvarious
informationrelatingtoyourtablet.
Tablet name–Allowsyoutosetyourtabletname.
Update Center–Allowsyoutocheckforappandsoftwareupdates.
Battery–Allowsyoutoviewbatterystatus,batterylevel,andbatteryuse
information.
Hardware information–Allowsyoutoviewthemodelnumber,IPaddress,
uptime,CSN,Wi-FiMACaddressandBluetoothaddress.
Software information–AllowsyoutoviewAndroidversion,kernelversion,
buildnumber,andsoftwareversion.
Legal information–AllowsyoutoviewopensourcelicensesandGoogle
legalinformation.

105
About backing up and restoring device data
Itisrecommendedthatyouregularlycreateandsaveabackupfileonthe
internalstorage,especiallybeforeupdatinganysoftware.Maintaininga
currentbackupfileinstoragememorymayallowyoutorecoverdevicedata
ifyourdeviceislost,stolen,orcorruptedbyanunforeseenissue.
ThisLGBackupapplicationissupportedbetweenLGsmartphonesand
tablets,otherS/WorOSversions.Asaresult,whenyoubuythenewLG
smartphonesandtablets,youcanbackupthecurrentdevicedatatoyour
newdevice.
IfyouhavetheBackupapplicationpreloadedonyoursmartphonesand
tablets,youcanbackupandrestoremostofyourdata,includingdownloaded
andpre-installedapplications,bookmarks,calendarentries,contacts,home
screensettings,andsystemsettings.Youmayalso:
•PerformamanualLGBackupofyourdevice.
•Scheduleautomaticbackupsofyourdevice.
•Restoreyourdevicedata.
NOTE:PleasenotethattheBackupfunctiondoesnotsupportthebackup
ofUserdata&Mediadata(Picture/Video/Music).Pleasebackupthose
filesusingtheMediasync(MTP).Connectyourtablettoyourcomputer
usingaUSBcableandtouchMediasync(MTP).
Warning! Toprotectagainstunexpectedshutoffduringbackuporrestore
operations,duetoinsufficientbatterypower,youshouldalwayskeepyour
batteryfullycharged.
LG Backup
106
LG Backup your tablet data
1 FromtheHomescreen,tapApps>Appstab>LG Backup >
Backup.
2 SelectthecheckboxyouwanttobackupandselectNext.
3 OntheBackupLocationscreen,touchInternal storageorSD card,then
tapStart.
4 Whenallselectedfileshavebeenbackedup,youwillseethemessage
Backup completed.
Scheduling automatic backups
Youcanalsoprogramautomaticbackupsforthedataonyourtablet
accordingtoyourschedulesetting.Todothis,completethefollowingsteps:
1 FromtheHomescreen,tapApps>Appstab>LG Backup >
Scheduled backup.
2 TapBackup itemsandselectthecheckboxnexttotheitemyouwantto
backup.
3 TapBackup location,touchInternal storageorSD card.
4 TapSet timetosetrepeatintervalamongWeekly,Every to weeks,
MonthlyandtapDone.
5 Taptheswitch nexttothetimetoactivateautomaticbackups.
Restoring tablet data
NOTE:Allfilesthatarestoredonyourtabletaredeletedbeforethe
backupfileisrestored.

107
1 FromtheHomescreen,tapApps>Appstab>LG Backup >
Restore.
2 OntheRestorescreen,selectabackupfilethatcontainsthedatayou
wishtorestore.
3 SelectthecheckboxnexttotheitemyouwishtorestoreandselectNext
torestoreittoyourtablet.
NOTE:Pleasenotethatyourtabletdatawillbeoverwrittenwiththe
contentofyourbackup.
4 Ifthebackupfileisencrypted,typethepasswordthatyoucreatedto
encryptit.
5 Whenallselectedfileshavebeenrestored,thetabletwillautomaticallybe
restart.
NOTE:YoucansetEnableencryptiontoencryptyourbackupfilesfor
extraprotection.
Touch fromtheLG Backupscreen,andenterapasswordandhintin
caseyouforgotyourpassword.Onceyouhavesetupapassword,youneed
toenteriteverytimeyouwanttodobackup/restore.

108
Tablet software update
Thisfeatureallowsyoutoupdatethefirmwareofyourtablettothelatest
versionconvenientlyfromtheinternetwithouttheneedtovisitaservice
center.Formoreinformationonhowtousethisfunction,pleasevisit:
http://www.lg.com
Asthetabletfirmwareupdaterequirestheuser’sfullattentionforthe
durationoftheupdateprocess,pleasemakesuretocheckallinstructions
andnotesthatappearateachstepbeforeproceeding.Pleasenotethat
removingtheUSBcableorbatteryduringtheupgrademayseriously
damageyourtablet.
LG Tablet Software update via Over-the-Air (OTA)
Thisfeatureallowsyoutoupdatethefirmwareofyourtablettothenewer
versionconvenientlyviaOTAwithoutconnectingtheUSBdatacable.This
featureisonlyavailableifandwhenLGmakesthenewerversionofthe
firmwareavailableforyourdevice.First,youcancheckthesoftwareversion
onyourtablet:
FromtheHomescreen,taptheMenu Key>System settings>About
tablet>Software information.
Toperformthetabletsoftwareupdate,fromtheHomescreen,taptheMenu
Key>System settings>About tablet>Update Center>Software
Update>Check now for update.
Tablet software update

109
NOTE:LGreservestherighttomakefirmwareupdatesavailableonly
forselectedmodelsatitsowndiscretionanddoesnotguaranteethe
availabilityofthenewerversionofthefirmwareforalltabletmodels.
NOTE:Yourpersonaldata—includinginformationaboutyourGoogle
accountandanyotheraccounts,yoursystem/applicationdataand
settings,anydownloadedapplicationsandyourDRMlicence—might
belostintheprocessofupdatingyourdevice'ssoftware.Therefore,LG
recommendsthatyoubackupyourpersonaldatabeforeupdatingyour
tablet'ssoftware.LGdoesnottakeresponsibilityforanylossofpersonal
data.
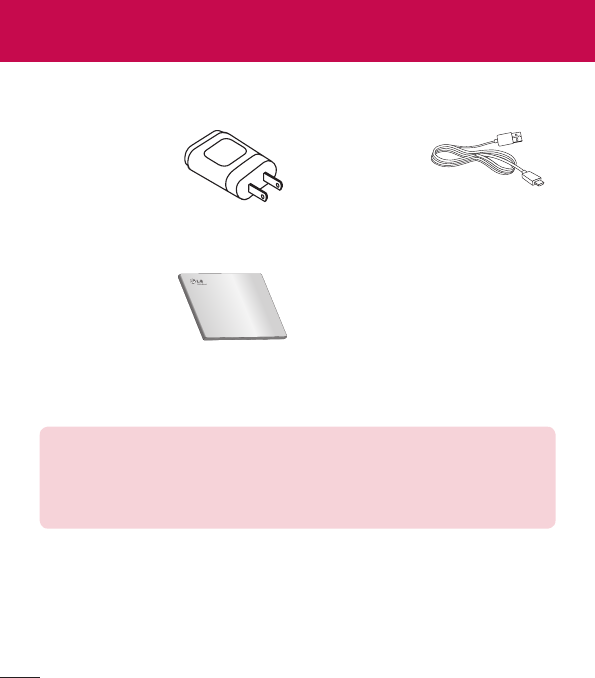
110
Theseaccessoriesareavailableforusewiththeyourtablet.(Items described
below may be optional.)
Travel adaptor Data cable
Quick Start Guide
NOTE:
•AlwaysusegenuineLGaccessories.Failuretodothismayvoidyour
warranty.
•Accessoriesmayvaryindifferentregions.
Accessories
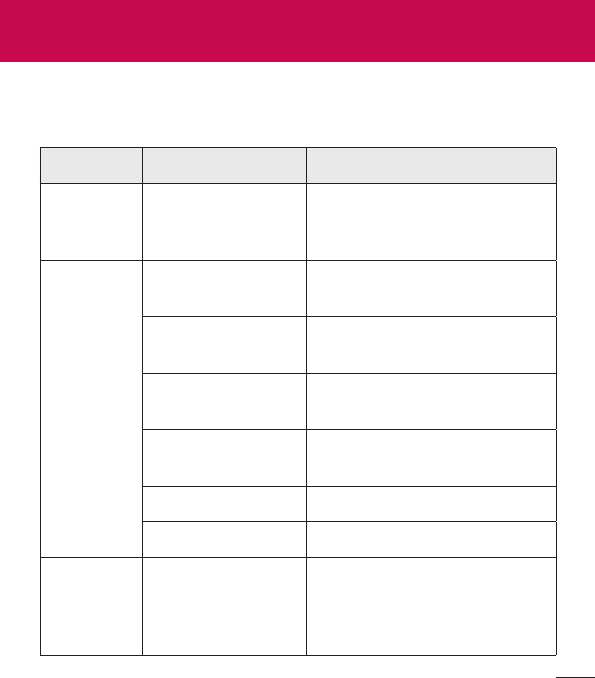
111
Thischapterlistssomeproblemsyoumightencounterwhenusingyour
tablet.Someproblemsrequireyoutocallyourserviceprovider,butmostare
easytofixyourself.
Message Possible causes Possible corrective measures
No
applications
canbeset
Notsupportedby
serviceprovideror
registrationrequired.
Contactyourserviceprovider.
Charging
error
Batteryisnot
charged. Chargebattery.
Outsidetemperature
istoohotorcold.
Makesuretabletischargingata
normaltemperature.
Contactproblem Checkthechargerandits
connectiontothetablet.
Novoltage Plugthechargerintoadifferent
socket.
Chargerdefective Replacethecharger.
Wrongcharger UseonlyoriginalLGaccessories.
Impossible
toreceive
/send
photos
Memoryfull Deletesomeimagesfromyour
tablet.
Troubleshooting

112
Message Possible causes Possible corrective measures
Filesdonot
open
Unsupportedfile
format Checkthesupportedfileformats.
Nosound Vibrationmode
Checkthesettingsstatusin
thesoundmenutomakesure
youarenotinvibrationorsilent
mode.
Hangsup
orfreezes
Intermittentsoftware
problem
Trytoperformasoftwareupdate
viathewebsite.
1. WHAT THIS WARRANTY COVERS:
LG oers you a limited warranty that the enclosed subscriber unit
and its enclosed accessories will be free from defects in material and
workmanship, according to the following terms and conditions:
1.
The limited warranty for the product extends for ONE (1) year beginning
on the date of purchase of the product by the original end user.
2. The limited warranty extends only to the original end user of the
product and is not assignable or transferable to any subsequent
purchaser/end user.
3. This warranty is good only to the original end user of the product
during the warranty period as long as it is in Canada.
4. Upon request from LG, the consumer must provide information to
reasonably prove the date of purchase.
5. During the applicable warranty period, LG will repair or replace at LG’s
sole option, without charge to the original end user, any defective
component of the tablet or accessory.
6. LG may use rebuilt, reconditioned or new parts or components
when repairing any product or replace a product with a rebuilt,
reconditioned or new product.
2. WHAT THIS WARRANTY DOES NOT COVER:
1. Defects or damages resulting from use of the product in other than
its normal and customary manner.
2.
Defects or damages from abnormal use, abnormal conditions, improper
storage, exposure to moisture or dampness, unauthorized modications,
unauthorized connections, unauthorized repair, misuse, neglect, abuse,
accident, alteration, improper installation or other acts which are not the
fault of LG, including damage caused by spills of food or liquids.
3. Breakage or damage to antennas unless caused directly by defects in
material or workmanship.
4. The fact that the Customer Service Department at LG was not notied
by the original end user of the alleged defect or malfunction of the
product, during the warranty period.
LIMITED WARRANTY STATEMENT

5. Products which have had their serial numbers removed or made
illegible.
6. Damage resulting from use of non-LG approved accessories.
7. All plastic surfaces and all other externally exposed parts that are
scratched or damaged due to normal customer use.
8. Products serviced by non-authorized persons or companies.
Notes:
1. This limited warranty supersedes all other warranties, expressed or
implied either in fact or by operations of law, statutory or otherwise,
including, but not limited to any implied warranty of merchantability
or tness for a particular purpose.
2. Shipping damage is the sole responsibility of the shipping company.
3. EXCLUSION OF LIABILITY:
No other express warranty is applicable to this product.
THE DURATION OF ANY IMPLIED WARRANTIES, INCLUDING THE IMPLIED
WARRANTY OF MARKETABILITY, IS LIMITED TO THE DURATION OF THE
EXPRESS WARRANTY HEREIN. LG ELECTRONICS CANADA, INC. SHALL NOT
BE LIABLE FOR THE LOSS OF THE USE OF THE PRODUCT, INCONVENIENCE,
LOSS OR ANY OTHER DAMAGES, DIRECT OR CONSEQUENTIAL, ARISING
OUT OF THE USE OF, OR INABILITY TO USE, THIS PRODUCT OR FOR ANY
BREACH OF ANY EXPRESS OR IMPLIED WARRANTY, INCLUDING THE IMPLIED
WARRANTY OF MARKETABILITY APPLICABLE TO THIS PRODUCT.
4. HOW TO GET WARRANTY SERVICE:
To obtain warranty service, please call the following telephone number
from anywhere in Canada:
LG Electronics Canada, Inc.
Tel. 1-888-LG-Canada (1-888-542-2623)
http://www.lg.com/ca_en/support/mobile-support
Electronics Canada Inc.
North York, Ontario

Guide de l'utilisateur
FRANÇAIS
• Lescapturesd'écranetlesillustrationspeuventdifférerdecellesquevous
voyezsurvotretablette.
• Ilestpossiblequecertainsrenseignementsdeceguidenes'appliquentpas
àvotretablette,carilspeuventvarierselonlelogicieldelatabletteouvotre
fournisseurdeservices.Touteslesinformationsdecedocumentpeuventêtre
modifiéessanspréavis.
• Cettetabletten'estpasappropriépourlespersonnesmalvoyantespuisquele
clavierestsurl'écrantactile.
• ©LGElectronics,Inc.,2014.Tousdroitsréservés.LGetlelogoLGsontdes
marquesdéposéesdeLGGroupetdesesstructuresannexes.Toutesles
autresmarquesdecommercesontlapropriétédeleursdétenteursrespectifs.
• Google™,GoogleMaps™,Gmail™,YouTube™,Hangouts™etPlayStore™sont
desmarquesdecommercedeGoogle,Inc.

2
À propos de ce guide de l'utilisateur ........ 5
À propos de ce guide de l'utilisateur ........... 5
Marques de commerce .................................. 6
DivX HD ........................................................... 6
Dolby Digital Plus ............................................7
Pour votre sécurité ...................................... 8
Directives de sécurité ................................15
Avertissement important .........................27
Utilisation de la tablette ..........................32
Présentation de la tablette ..........................32
Charger la tablette .......................................34
Optimisation de la durée de vie de la
batterie ..........................................................36
Pour augmenter la durée de charge
de votre batterie ..................................................36
Pour voir le niveau de charge de la
batterie .................................................................... 36
Pour surveiller et contrôler l'utilisation
de la batterie ........................................................36
Insertion de la carte microSD .....................37
Retrait de la cartemicroSD ........................38
Formatage de la carte microSD .................38
Verrouillage et déverrouillage de l'écran ...39
Votre écran d'accueil ................................40
Conseils relatifs à l'écran tactile .................40
Tapez ou touchez ...............................................40
Maintenir le doigt ................................................40
Glisser ......................................................................40
Glisser ou balayer ................................................41
Appuyer deux fois ...............................................41
Pincer pour zoomer ............................................41
Faire pivoter l'écran ............................................. 41
Allumez l'écran ..................................................... 41
Écran d'accueil..............................................42
Personnalisation de l'écran d'accueil .........44
Retour aux applications récemment
utilisées .......................................................... 45
Notifications ..................................................45
Balayez vers le bas pour les
notifications et les paramètres ......................46
Réglages rapides sur le panneau de
notifications ...........................................................46
Pour réorganiser les éléments de réglage
rapide du panneau de notifications ............ 47
Applications QSlide du panneau de
notifications ........................................................... 47
Utiliser les applications QSlide ...................... 47
Icônes d'indication de la barre d'état ......... 47
Utilisateurs multiples ...................................49
Glissez à côté .................................................51
Plug & Pop .....................................................51
Effectuer une Screenshots..........................52
Utiliser QuickMemo pour effectuer une
capture d'écran ...................................................52
Utiliser Capture plus pour effectuer une
capture d'écran ...................................................52
Clavier à l'écran ............................................53
Entrée d'une lettre accentuée .......................53
Configuration du compte Google ............ 54
Connexion aux réseaux et aux
appareils .....................................................55
Table des matières

3
Wi-Fi ..............................................................55
Connexion aux réseaux Wi-Fi ........................55
Activation de la connexionWi-Fi et
connexion à un réseauWi-Fi .........................55
Bluetooth .......................................................56
Activation de la fonction Bluetooth et
association de votre tablette avec un
dispositif Bluetooth.............................................56
Envoi de données à l'aide de la fonction
sans fil Bluetooth ................................................ 57
Réception de données à l'aide de la
fonction sans fil Bluetooth ............................... 57
SmartShare ...................................................58
Utilisation du contenu sur une variété
d'appareils .............................................................58
Lecture et envoi...................................................58
Utilisation du contenu sur des appareils à
proximité .......................................................59
Connexion de périphériques .........................59
Recherche d'autres appareils ........................ 59
Connexions à un ordinateur au moyen
d'un câble USB ............................................. 59
Transfert de musique, de photos et de
vidéos à l'aide du mode de stockage de
masseUSB .......................................................... 59
Synchronisation avec le lecteur
multimédia Windows Media Player .............60
Répertoire ...................................................61
Recherche d'un contact ...............................61
Ajout d'un contact.........................................61
Contacts favoris ............................................ 62
Création d'un groupe ...................................62
Courriel ....................................................... 64
Gestion d'un compte de messagerie .........64
Utilisation des dossiers de compte ............ 65
Composition et envoi d'un courriel ............65
Recevoir des courriels ..................................66
Appareil Photo........................................... 67
Utilisation du viseur ..................................... 67
Utilisation des paramètres avancés ...........68
Prise d'une photo rapide ............................ 70
Après avoir pris une photo ..........................70
Affichage des photos sauvegardées ...........71
Caméra vidéo ............................................. 73
Utilisation du viseur ..................................... 73
Utilisation des paramètres avancés ........... 74
Enregistrement rapide d'une vidéo ............ 75
Après l'enregistrement d'une vidéo ........... 75
Lecture des vidéos enregistrées .................76
Réglage du volume pendant le
visionnement d'une vidéo ........................... 76
Multimédia ................................................. 77
Galerie............................................................ 77
Visualisation de photos .....................................77
Zoom avant et arrière ....................................... 78
Lecture de vidéos ............................................... 78
Supprimer des images et des vidéos ........ 78
Sélection comme papier peint ..................... 79
Diaporama ....................................................79
Vidéos ............................................................ 79
Lecture d'une vidéo ........................................... 79
Musique .......................................................... 81
Lecture d'une chanson ..................................... 81
Outils ..........................................................83
QPair ..............................................................83
QSlide ............................................................84
QuickMemo...................................................86

4
QuickRemote ................................................ 88
QuickTranslator.............................................90
Voice Mate ....................................................92
Alarme ...........................................................93
Calculatrice ...................................................94
Calendrier ...................................................... 94
Tâches ..........................................................95
Gest. fichs .....................................................96
Dictaphone .................................................... 96
Gest. de tâches ............................................. 97
POLARIS Office 5 ....................................... 97
Google+ .........................................................99
Recherche vocale .........................................99
Téléchargements ..........................................99
BOX..............................................................100
Le Web .......................................................101
Internet ......................................................... 101
Ouverture d'une page ..................................... 101
Pour effectuer une recherche vocale
sur le Web ...........................................................102
Favoris ...................................................................102
Historique .............................................................102
Utilisation de QSlide ........................................ 102
Chrome ........................................................102
Visualisation de pages Web ......................... 103
Ouverture d'une page ....................................103
Pour effectuer une recherche vocale
sur le Web ...........................................................103
Synchronisation avec d'autres
appareils ............................................................... 103
Ajouter et afficher des signets ....................104
Menu Options de Chrome............................104
Paramètres ...............................................105
Accès au menu Paramètres ......................105
RÉSEAUX SANS FILS............................... 105
APPAREIL ...................................................108
PERSONNEL ............................................... 113
SYSTÈME ..................................................... 116
LG Backup ................................................ 120
À propos de la sauvegarde et de la
restauration des données de l'appareil ....120
Sauvegarde des données de votre
tablette à l'aide de l'application de
sauvegarde LG ............................................. 121
Planification de sauvegardes
automatiques .............................................. 122
Restauration des données de la
tablette ........................................................ 122
Mise à jour du logiciel de la tablette .... 124
Mise à jour du logiciel de la tablette ........ 124
Mise à niveau du logiciel de
tabletteLG par liaison radio...................... 124
Accessoires .............................................. 126
Dépannage ............................................... 127
