LG Electronics USA X169NV Microwave Oven User Manual 49 80706 EN Review4 HiRes
LG Electronics USA Microwave Oven 49 80706 EN Review4 HiRes
UserManual.wiki
>
LG Electronics USA
>
X169NV User Manual
Users Manual
Navigation menu
Upload a User Manual
Namespaces
Wiki Guide
HTML
PDF
Info
Views
User Manual
Discussion / Help
Navigation

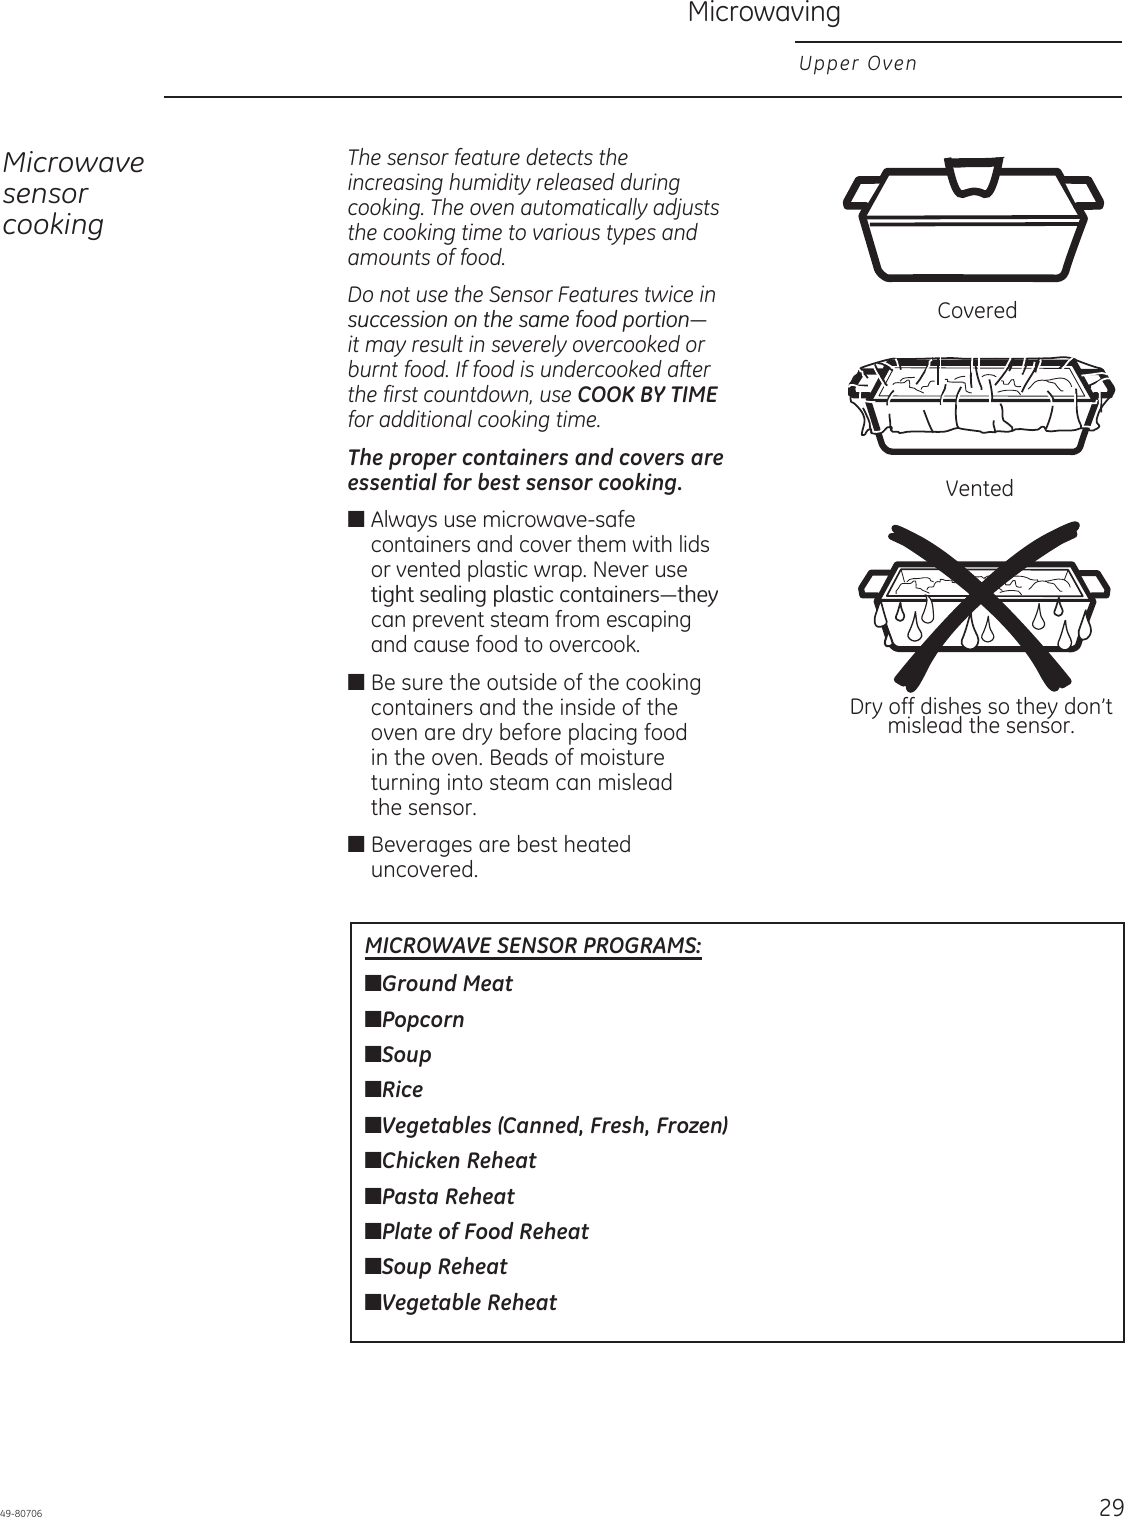
![949-80706SAVE THESE INSTRUCTIONSŶ 'RQRWVWRUHRUXVHIODPPDEOHPDWHULDOVLQRUQHDUan oven, including paper, plastic, pot holders, linens, wall coverings, curtains, drapes and gasoline or other flammable vapors and liquids.Ŷ 1HYHUZHDUORRVHILWWLQJRUKDQJLQJJDUPHQWVZKLOHusing the appliance. These garments may ignite if they contact hot surfaces, causing severe burns.Ŷ 'RQRWOHWFRRNLQJJUHDVHRURWKHUIODPPDEOHPDWHULDOVDFFXPXODWHLQRUQHDUWKHRYHQ*UHDVHin the oven or near the oven may ignite. KEEP FLAMMABLE MATERIALS AWAY FROM THE OVENFailure to do so may result in fire or personal injury.Ŷ 'RQRWXVHZDWHURQJUHDVHILUHV1HYHUSLFNXSa flaming pan. Ŷ ,IWKHUHLVDILUHLQWKHRYHQGXULQJEDNLQJsmother the fire by closing the oven door and turning the oven off or by using a multi-purpose dry chemical or foam-type fire extinguisher.Ŷ ,IWKHUHLVDILUHLQWKHRYHQGXULQJVHOIFOHDQWXUQthe oven off and wait for the fire to go out. 'Rnot force the door open. Introduction of fresh air at self-clean temperatures may lead to a burst of flame from the oven. Failure to follow this instruction may result in severe burns. IN THE EVENT OF A FIRE, TAKE THE FOLLOWING STEPS TO PREVENT INJURY AND FIRE SPREADINGŶ 6WDQGDZD\IURPWKHRYHQZKHQRSHQLQJWKHoven door. Hot air or steam which escapes can cause burns to hands, face and/or eyes.Ŷ .HHSWKHRYHQYHQWXQREVWUXFWHGŶ .HHSWKHRYHQIUHHIURPJUHDVHEXLOGXS*UHDVHin the oven may ignite. Ŷ Place oven racks in desired location while oven is cool. If rack must be moved while oven is hot, do not let pot holder contact hot heating element in oven.Ŷ :KHQXVLQJFRRNLQJRUURDVWLQJEDJVLQWKHoven, follow the manufacturer’s directions.Ŷ 3XOOLQJRXWWKHVWDQGDUGUDFNVWRWKHLUVWRSORFNVor the extension rack to its fully open position is a convenience in lifting heavy foods. It is also a precaution against burns from touching hot surfaces of the door or oven walls.Ŷ 'RQRWOHDYHLWHPVVXFKDVSDSHUFRRNLQJutensils or food in the oven when not in use. Items stored in an oven can ignite.Ŷ 1HYHUSODFHFRRNLQJXWHQVLOVSL]]DRUEDNLQJstones, or any type of foil or liner on the oven floor. These items can trap heat or melt, resulting in damage to the product and risk of shock, smoke or fire. OVEN SAFETY INSTRUCTIONSWARNINGWARNINGWARNINGThe self-cleaning feature operates the oven at temperatures high enough to burn away food soils in the oven. Follow these instructions for safe operation.Ŷ 'RQRWWRXFKRYHQVXUIDFHVGXULQJVHOIFOHDQRSHUDWLRQ.HHSFKLOGUHQDZD\IURPWKHRYHQduring self-cleaning. Failure to follow these instructions may cause burns.Ŷ %HIRUHVHOIFOHDQLQJWKHRYHQUHPRYHVKLQ\silver colored oven racks (on some models), the probe, any aluminum foil, and any broiler pan, grid, and other cookware. Only porcelain coated oven racks may be left in the oven.Ŷ %HIRUHRSHUDWLQJWKHVHOIFOHDQF\FOHZLSHgrease and food soils from the oven. Excessive amount of grease may ignite, leading to smoke damage to your home.Ŷ ,IWKHVHOIFOHDQLQJPRGHPDOIXQFWLRQVWXUQWKHoven off and disconnect the power supply. Have it serviced by a qualified technician.Ŷ 'RQRWFOHDQWKHGRRUJDVNHW7KHGRRUJDVNHWLVessential for a good seal. Care should be taken not to rub, damage or move the gasket.Ŷ 'RQRWXVHRYHQFOHDQHUV1RFRPPHUFLDORYHQcleaner or oven liner protective coating of any kind should be used in or around any part of the oven. SELF-CLEANING OVEN SAFETY INSTRUCTIONSWARNINGSAFETY INFORMATION](https://usermanual.wiki/LG-Electronics-USA/X169NV/User-Guide-2207960-Page-9.png)

![1149-80706Thank You! ... for your purchase of a GE Brand appliance.WARRANTYGE Electric Range WarrantyGEAppliances.comAll warranty service is provided by our Factory Service Centers, or an authorized Customer Care® technician. 7RVFKHGXOHVHUYLFHRQOLQHYLVLWXVDWZZZJHDSSOLDQFHVFRPVHUYLFHBDQGBVXSSRUWRUFDOO*(&$5(6(800.432.2737). Please have serial number and model number available when calling for service.6HUYLFLQJ\RXUDSSOLDQFHPD\UHTXLUHWKHXVHRIWKHRQERDUGGDWDSRUWIRUGLDJQRVWLFV7KLVJLYHVD*(IDFWRU\VHUYLFHWHFKQLFLDQWKHDELOLW\WRTXLFNO\GLDJQRVHDQ\LVVXHVZLWK\RXUDSSOLDQFHDQGKHOSV*(LPSURYHLWVSURGXFWVE\SURYLGLQJ*(ZLWKLQIRUPDWLRQRQ\RXUDSSOLDQFH,I\RXGRQRWZDQW\RXUDSSOLDQFHGDWDWREHVHQWWR*(SOHDVHDGYLVH\RXUWHFKQLFLDQQRWWRVXEPLWWKHGDWDWR*(DWWKHWLPHRIVHUYLFH)RUWKHSHULRGRIRQH\HDUIURPWKHGDWHRIWKHRULJLQDOSXUFKDVH*(ZLOOSURYLGHDQ\SDUWRIWKHUDQJHZKLFKIDLOVGXHWRDGHIHFWLQPDWHULDOVRUZRUNPDQVKLS'XULQJWKLVOLPLWHGRQH\HDUZDUUDQW\*(ZLOODOVRSURYLGHIUHHRIFKDUJHDOOlabor and in-home service to replace the defective part.What GE will not cover:Ŷ Service trips to your home to teach you how to use the product. Ŷ Improper installation, delivery or maintenance. Ŷ Failure of the product if it is abused, misused, modified or used for other than the intended purpose or used commercially. Ŷ Replacement of house fuses or resetting of circuit breakers. Ŷ 'DPDJHWRWKHSURGXFWFDXVHGE\DFFLGHQWILUHIORRGVRUDFWVRI*RGŶ Incidental or consequential damage caused by possible defects with this appliance. Ŷ 'DPDJHFDXVHGDIWHUGHOLYHU\Ŷ Product not accessible to provide required service.Ŷ 6HUYLFHWRUHSDLURUUHSODFHOLJKWEXOEVH[FHSWIRU/('lamps.EXCLUSION OF IMPLIED WARRANTIES<RXUVROHDQGH[FOXVLYHUHPHG\LVSURGXFWUHSDLUDVSURYLGHGLQWKLV/LPLWHG:DUUDQW\$Q\LPSOLHGZDUUDQWLHVincluding the implied warranties of merchantability or fitness for a particular purpose, are limited to one year or the shortest period allowed by law. This warranty is extended to the original purchaser and any succeeding owner for products purchased for home use ZLWKLQWKH86$,IWKHSURGXFWLVORFDWHGLQDQDUHDZKHUHVHUYLFHE\D*($XWKRUL]HG6HUYLFHULVQRWDYDLODEOH\RXPD\EHUHVSRQVLEOHIRUDWULSFKDUJHRU\RXPD\EHUHTXLUHGWREULQJWKHSURGXFWWRDQ$XWKRUL]HG*(6HUYLFHORFDWLRQfor service. In Alaska, the warranty excludes the cost of shipping or service calls to your home. Some states do not allow the exclusion or limitation of incidental or consequential damages. This warranty gives you specific legal rights, and you may also have other rights which vary from state to state. To know what your legal rights DUHFRQVXOW\RXUORFDORUVWDWHFRQVXPHUDIIDLUVRIILFHRU\RXUVWDWH¶V$WWRUQH\*HQHUDOWarrantor: General Electric Company. Louisville, KY 40225Extended Warranties:3XUFKDVHD*(H[WHQGHGZDUUDQW\DQGOHDUQDERXWVSHFLDOGLVFRXQWVWKDWDUHDYDLODEOHZKLOHyour warranty is still in effect. You can purchase it on-line anytimewww.geappliances.com/service_and_support/shop-for-extended-service-plans.htmRUFDOOGXULQJQRUPDOEXVLQHVVKRXUV*(&RQVXPHU+RPH6HUYLFHVZLOOVWLOOEHWKHUHDIWHU\RXUwarranty expires.Register Your Appliance: Register your new appliance on-line at your convenience! www.geappliances.com/service_and_support/register/Timely product registration will allow for enhanced communication and prompt service under the terms of your warranty, should the need arise. You may also mail in the pre-printed registration card included in the packing material.Staple your receipt here. Proof of the original purchase date is needed to obtain service under the warranty.](https://usermanual.wiki/LG-Electronics-USA/X169NV/User-Guide-2207960-Page-11.png)
![12 49-80706Schedule Service: ([SHUW*(UHSDLUVHUYLFHLVRQO\RQHVWHSDZD\IURP\RXUGRRU*HWRQOLQHDQGVFKHGXOH\RXUservice at www.geappliances.com/service_and_support/ 2UFDOO*(&$5(6GXULQJQRUPDObusiness hours.Parts and Accessories: Individuals qualified to service their own appliances can have parts or accessories sent GLUHFWO\WRWKHLUKRPHV9,6$0DVWHU&DUGDQG'LVFRYHUcards are accepted).Order on-line today, 24 hours every day or by phone at 800.626.2002 during normal business hours.Instructions contained in this manual cover procedures to be performed by any user. Other servicing generally should be referred to qualified service personnel. Caution must be exercised, since improper servicing may cause unsafe operation.Real Life Design Studio: *(VXSSRUWVWKH8QLYHUVDO'HVLJQFRQFHSWRISURGXFWVVHUYLFHVDQGHQYLURQPHQWVthat can be used by people of all ages, sizes and FDSDELOLWLHV:HUHFRJQL]HWKHQHHGWRGHVLJQIRUDZLGHrange of physical and mental abilities and impairments. )RUGHWDLOVRI*(¶V8QLYHUVDO'HVLJQDSSOLFDWLRQVLQFOXGLQJkitchen design ideas for people with disabilities, check out RXU:HEVLWHWRGD\)RUWKHKHDULQJLPSDLUHGSOHDVHFDOO7''*($&Contact Us: If you are not satisfied with the service you UHFHLYHIURP*(FRQWDFWXVRQRXU:HEVLWHZLWKDOOWKHdetails including your phone number, or write to:General Manager, Customer RelationsGE Appliances, Appliance Park Louisville, KY 40225ASSISTANCE / ACCESSORIES7U\WKH*($SSOLDQFHV:HEVLWHwww.geappliances.com/service_and_support/) 24 hours a day, any day of the year! For greater convenience and faster service, you can now download Owner’s Manuals, order parts or even schedule service on-line.Have a question or need assistance with your appliance? AccessoriesLooking For Something More?GE offers a variety of accessories to improve your cooking and maintenance experiences!To place an order visit us online at:www.GEApplianceParts.com86RUwww.GEAppliances.ca (Canada) or call 800.626.200286800.661.1616 (Canada)The following products and more are available:How to Remove Protective Shipping Film and Packaging TapeCarefully grasp a corner of the protective shipping film with your fingers and slowly peel it from the appliance VXUIDFH'RQRWXVHDQ\VKDUSLWHPVWRUHPRYHWKHILOPRemove all of the film before using the appliance for the first time.To assure no damage is done to the finish of the product, the safest way to remove the adhesive from packaging tape on new appliances is an application of a household liquid dishwashing detergent. Apply with a soft cloth and allow to soak.NOTE: The adhesive must be removed from all parts. It cannot be removed if it is baked on.Accessories 6PDOO%URLOHU3DQô´[ó´[ò³ :%;86'*&DQDGD /DUJH%URLOHU3DQô´[ó´[ò³ :%;86'*&DQDGD ;/%URLOHU3DQ´[ó´[³ :%;861RWDYDLODEOHLQ&DQDGDParts Oven racks Part numbers vary by model Oven elements Part numbers vary by model /LJKWEXOEV 3DUWQXPEHUVYDU\E\PRGHOCleaning Supplies &LWUX6KLQH6WDLQOHVV6WHHO:LSHV :;; &HUDPD%U\WH6WDLQOHVV6WHHO$SSOLDQFH&OHDQHU 30; *UDSKLWH/XEULFDQW :%77KHODUJHEURLOHUSDQGRHVQRWILWLQ´´UDQJHV7KH;/EURLOHUSDQGRHVQRWILWLQ´ZDOORYHQV´GURSLQVRU´´UDQJHV](https://usermanual.wiki/LG-Electronics-USA/X169NV/User-Guide-2207960-Page-12.png)
![14 49-80706Settings & OptionsThere are several different special features on your wall oven. To change the settings of these special features, press the BAKE and BROIL pads at the same time and hold for three seconds. "SF" will appear in the display. 6HOHFWWKHIHDWXUH\RXZDQWWRFKDQJH:KHQWKHFKDQJHKDVEHHQPDGHSUHVVWKHSTART key to save the change and return to the time of day.Adjust the Oven TemperatureThis feature allows the oven baking and convection EDNLQJWHPSHUDWXUHWREHDGMXVWHGXSWR)KRWWHURUGRZQWR)FRROHU8VHWKLVIHDWXUHLI\RXEHOLHYHyour oven temperature is too hot or too cold and wish to change it. For double oven models, the upper and lower ovens are adjusted separately. This adjustment DIIHFWV%DNHDQG&RQYHFWLRQ%DNH5DFN0XOWLPRGHV1RRWKHUFRRNLQJPRGHVDUHDIIHFWHGPress the Bake pad to select the oven to be adjusted. Press the Bake pad again to enter the temperature DGMXVWPHQWPRGH$QXPEHUEHWZHHQDQGZLOOGLVSOD\8VHWKHQXPEHUSDGVWRVHWWKHGHVLUHGtemperature adjustment and use the Bake pad to change between negative and positive.Press the Start pad to save the temperature adjustment.End of Timer SignalsThis is the tone that signals the end of a timer. The tone can be continuous (Con bEEP) or one repeating beep (bEEP). A continuous setting will continue to sound a tone until a button on the control is pressed. Press the Broil pad to view the current setting and then to change the setting.Fahrenheit or Celsius Temperature DisplayThe oven control is set to use Fahrenheit temperatures (F), but you can change it to use Celsius temperatures (C). Press the number 6 and 8 pads at the same time to view the current setting, press again to change the setting.Clock DisplayThis feature specifies how the time of day will be displayed or if no time of day will be displayed. You can select a standard 12-hour clock (12 H), 24-hour military time display (24 H), or for no clock displayed (oFF). Press the Clock pad to view the current setting, press again to change the setting.Auto Recipe Conversion:KHQXVLQJ&RQYHFWLRQ%DNH5DFNRU&RQYHFWLRQ%DNHMulti Rack cooking options, Auto Recipe Conversion will automatically convert the regular baking temperatures entered to convection bake cooking temperatures ZKHQWXUQHGRQ1RWHWKDWWKLVRSWLRQGRHVQRWFRQYHUWconvection bake cooking times, it only converts temperatures. Press the Convection Bake (1 Rack/Multi) pad to view the conversion setting, press again to toggle between On (Con On) and Off (Con oFF).Sound VolumeThis feature allows the oven tone volume to be adjusted between high (HI bEEP HI), medium (Std bEEP Std), ORZ/RE((3/RDQGRIIR))E((3R))3UHVVWKHnumber 1 and 5 pads at the same time to view the current setting or to change the setting. The control will sound the oven tone at the new volume level each time the sound level is changed.12-hour auto shut-off and Sabbath2SWLRQVIRUWKLVIHDWXUHDUH³6+GQ´³QR6+GQ´DQG³6$EE$W+´12-hour auto shut-off turns off the oven after 12 hours of continuous operations.Sabbath mode disables the oven lights (the oven light will not turn on when the door is opened), all sounds (the control will not beep when a button is pressed), &RQYHFWLRQ%URLO:DUP3URRI&RRN7LPH7LPHU&ORFNDQG'HOD\7LPHIXQFWLRQV6DEEDWKPRGHFDQRQO\EHXVHGZLWK%DNH7KLVIHDWXUHFRQIRUPVWRWKH6WDU.-HZLVK6DEEDWKUHTXLUHPHQWVPress and hold the Bake and Broil pads for 3 seconds to enter special features.Press the Delay Time pad to view the current setting and then to change the setting.7RXVH6DEEDWKPRGHVHOHFW³6$EE$W+´DQGSUHVVStart. A ] will appear in the display and the clock will not display. 1RWHWKDWLI\RXKDYHDGRXEOHZDOORYHQZKHQ\RXplace the control into Sabbath mode, both ovens are now in Sabbath mode and available for cooking.Once in Sabbath mode, at any time you can press Bake, use the number pads to enter a temperature between )DQG)DQGSUHVVStart1RVRXQGZLOOEHJLYHQwhen the keys are pressed. At a random time between 30 seconds and 1 minute, ][, will appear in the display indicating the oven is running.1RWHWKDWERWKRYHQVRIDGRXEOHZDOORYHQFDQEHXVHGin Sabbath mode. Each oven can be programmed to a different temperature and each oven must be programmed separately.If you need to adjust the temperature, press Bake, use the number pads to enter a new temperature between )DQG)DQGSUHVVStart.To turn the oven off, press Cancel/Off at any time. The oven will immediately turn off and ][ will change to ] indicating that the oven has turned off.1RWHWKDWHDFKRYHQRIDGRXEOHZDOORYHQPXVWEHturned off separately.To exit Sabbath mode, make sure that the oven is turned off. Press and hold the Bake and Broil pads for 3 seconds to enter special features then press Delay Time XQWLOHLWKHU³6+GQ´RU³QR6+GQ´LVLQWKHGLVSOD\DQGpress Start.NOTE: If power outage occurs during Sabbath mode the unit will remain in Sabbath mode but off when power is restored.USING THE OVEN: Settings & OptionsLower Oven](https://usermanual.wiki/LG-Electronics-USA/X169NV/User-Guide-2207960-Page-14.png)
![1749-80706Upper OvenSpeedcookingUpper oven is already pre-set to cook over 175 popular dishes.1. Press the speedcook pad. If no selection is made within 15 seconds, the display will revert back to the time of day.2. Turn the selector dial to select the type of food category you want. Press the dial to enter.3. Turn the selector dial to select the specific food (menu selection).Press the dial to enter. 4. Turn the selector dial to select DPRXQWVL]HDQGRUGRQHQHVVLIUHTXLUHGWKHRYHQZLOOSURPSW\RXPress the dial after each selection.5. Once the display shows EDIT or START, either press start or the selector dial to start cooking.Turn the food over when the oven signals TURN FOOD OVER (for certain foods).When the oven signals CHECK for DONENESS, check to see if your food is done to your liking (for certain foods).To review settings during cooking, press the selector dial.If you enter an undesired selection at any time, simply press the BACK pad and reenter the desired selections.Using speedcook featuresCAUTION: When using speedcook programs, remember that the oven, door and dishes will be very hot!PRECAUCIÓN: cuando utilice los programas de cocción rápida, recuerde que el horno, compuerta y los platos se ¡encontrarán muy calientes!3ULRUWRWKH¿UVWXVHRI\RXURYHQWKHFORFNPXVWEHVHWBefore you begin, make sure the turntable is in place. Use the nonstick metal tray and your own glass or ceramic cookware, if needed. The turntable must always be in place when using the oven.Put food directly on the non-stick metal tray to speedcook.SPEEDCOOK PRESET FOOD SELECTIONS:■ Appetizers ■ Desserts ■ Pizza ■ Sandwich■ Breads ■ Entrees ■ Potatoes ■ Seafood■ Breakfast ■ Meats ■ Poultry ■ Side DishTo use a preset speedcook menu■ Early in a speedcook program, you will see OPTIMIZING COOK TIME on the display. The oven automatically senses the electrical voltage level in your home and adjusts the cooking time up or down for proper cooking.■ If the door is opened during cooking, the oven will stop and PAUSE will appear in the display. Close the door and press the START/PAUSE pad to resume cooking.■ At anytime during cooking you can turn the selector dial to change the cooking time. You can change power levels by pressing the dial to edit setting. ■ To assure consistent cooking results, the oven may adjust power levels downward if the oven is hot at the beginning of a program.■ At the end of cooking, the automatic fan may continue to run for a short time to cool internal components.■ To cook for additional time after a cooking cycle has been completed, use the resume feature.](https://usermanual.wiki/LG-Electronics-USA/X169NV/User-Guide-2207960-Page-17.png)
![18 49-80706SpeedcookingUpper OvenCooking tips for great tasting resultsTo ensure consistent and even browning when cooking foods directly on the metal tray, arrange food as shown below.Foods can touch but should not overlap.Circular pattern([DPSOHELVFXLWVFRRNLHVSpoke pattern([DPSOHFUHVFHQWUROOVEUHDGVWLFNVSingle layer(Example: appetizers)Side by side pattern(Example: meats and poultry))UHVKPHDWFKLFNHQ¿VKRUVHDIRRGWKDWKDVEHHQIUR]HQVKRXOGEHthawed before cooking (the microwave defrost feature can be used). For other frozen prepackaged foods, follow package directions.](https://usermanual.wiki/LG-Electronics-USA/X169NV/User-Guide-2207960-Page-18.png)

![24 49-80706MicrowavingUpper OvenUsing the microwave featuresMake sure the turntable and clear glass tray are in place.Place food or microwavable container directly on the clear glass tray to cook your food.■ Beverage –Water (8-12 oz.) –Coffee (8-12 oz.) –Tea (8-12 oz.) –Milk (8-12 oz.) –Hot Cocoa (8-12 oz.) ■ Popcorn –Popcorn Sensor■ Melt –Butter –Caramel –Cheese –Chocolate Chips –Marshmallow ■ Simmer■ Cook –By Food Type –By Time –By Time 1 & 2 ■ Soften –Butter –Cream Cheese –Frosting (16 oz.) –Ice Cream■ Defrost –1.0 lb Quick –By Time –By Weight –By Food Type –Melt –Soften■ Reheat –Beverage –Casserole –Chicken –Pasta –Pizza –Plate of Food –Rice –Soup –Steaks/Chops –VegetablesMICROWAVE PRESET SELECTIONS:The turntable must always be in place when using the oven.The clear glass tray should always be in place when microwaving.How to use pre-set microwave selections1. Press the MICROWAVE pad.If no selection is made within 15 seconds, the display will revert back to the time of day.2. Turn the dial to find the food \RXZDQWWRFRRNGHIURVWRU reheat. Press the dial to enter.3. Turn the selector dial to select the W\SHDPRXQWZHLJKWDQGRUVL]H $VUHTXLUHGWKHRYHQZLOOSURPSWyou.) Press the dial after each selection.4. Press the dial or the START/PAUSE pad to start cooking.To review or edit settings during cooking, press the selector dial.If the door is opened during cooking, the oven will stop and PAUSE will appear in the display. Close the door and press START/PAUSE to resume cooking.If you enter an undesired selection at any time, simply press the %$&.pad and reenter the desired selections.Cookware■ Make sure that cookware is suitable for microwaving. ■ Place food or microwavable container directly on the clear glass tray to cook your food.](https://usermanual.wiki/LG-Electronics-USA/X169NV/User-Guide-2207960-Page-24.png)
![2549-80706MicrowavingUpper OvenCook By Time and Cook By Time 1 & 2Use COOK BY TIME and COOK BY TIME 1 & 2 to microwave food that is not in the recipe section and at the time(s) you set.■ The power level is automatically set DWKLJKEXW\RXFDQFKDQJHLWIRUmore flexibility.1. Press the MICROWAVE pad.2. 7XUQWKHGLDOWRVHOHFW&22.%<7,0(RU&22.%<7,0(DQGpress the dial to enter. 3. Turn the dial to set the cook time and press the dial to enter.4. Select power level setting.If you selected COOK BY TIME 1 & 2, turn the dial to set the second cook time, second power level setting and press the dial to enter. 5. Press the dial or the START/PAUSE pad to start cooking.You may open the door during COOK BY TIME and COOK BY TIME 1 & 2 to check the food. Close the door and press START/PAUSE to resume cooking. Press ADD 30 SEC repeatedly for 30-second increments of microwave cooking time. Oven starts immediately. Use this feature to instantaneously start microwave. Also use this button to add 30 seconds to cooking.Add 30 SecMicrowave power level(s)■ You can change the power level during most cooking program. 1. Press the dial to edit2. Rotate dial to change time and/or press dial to enter.3. Turn the dial clockwise to increase and counterclockwise to decrease the power level. Press the dial to enter.Here are some examples of uses for various power levels:High 10: )LVKEDFRQYHJHWDEOHVboiling liquids.Med-High 7: Gentle cooking of meat and poultry; baking casseroles and reheating.Medium 5: Slow cooking and tenderizing for stews and less tender cuts of meat.Low 2 or 3: 'HIURVWLQJVLPPHULQJdelicate sauces.Warm 1: .HHSLQJIRRGZDUPsoftening butter.■:KHQFRRNLQJEDFRQOD\HUVWULSVon a plate. Cover each layer with a paper towel.■:KHQFRRNLQJYHJHWDEOHVXVHDmicrowave-safe casserole or bowl. Cover with a microwave-safe lid or vented plastic wrap. ■ )RUIUR]HQYHJHWDEOHVIROORZWKHpackage instructions for adding water. ■ )RUIUHVKYHJHWDEOHVDGGtablespoons of water for each serving. Cooking tips](https://usermanual.wiki/LG-Electronics-USA/X169NV/User-Guide-2207960-Page-25.png)
![26 49-80706MicrowavingUpper OvenDefrost by food typeAuto Defrost automatically sets the defrosting times and power levels to JLYHHYHQGHIURVWLQJUHVXOWVIRUPHDWVpoultry and fish weighing up to 6 pounds.1. Remove food from the package and place it on a microwave-safe dish.2. Press the MICROWAVE pad and select defrost.3. Turn the dial to DEFROST BY FOOD TYPE. Press the dial to enter.4. Turn the dial to select food type. Press the dial to enter. 7XUQWKHGLDOWRWKHIRRGZHLJKWusing the Conversion Guide at the ULJKW)RUH[DPSOHGLDOIRUSRXQGVSRXQGR]3UHVVWKHdial to enter.6. Press the dial or START/PAUSE pad to start defrosting. 7. Turn the food over when the oven signals TURN FOOD OVER. ■ Remove defrosted meat or shield warm areas with small pieces of foil for even defrosting.■ After defrosting, most meats need to stand 5 minutes to complete defrosting. Large roasts should stand for about 30 minutes. Conversion GuideIf the weight of food is stated in pounds and ounces, the ounces must be converted to tenths (.1) of a pound. Weight of Food Enter Food Weight in Ounces (tenths of a pound) 1–2 .1 3 .2 4–5 .3 6–7 .4 8 .5 9–10 .6 11 .7 12–13 .8 14–15 .9Use DEFROST BY TIME to defrost for a selected length of time.1. Press the MICROWAVE pad and select defrost.2. Turn the selector dial to DEFROST BY TIME. Press the dial to enter.3. Turn the dial to select the time you want. Press the dial to enter.4. Press the dial or START/PAUSE pad to start defrosting.5. Turn the food over when the oven signals TURN FOOD OVER. Power level is automatically set at 3, but can be changed. To change the power levels, see the Microwave Power Level(s) section. You can defrost small items quickly by raising the power level after entering the time. Power level 7 cuts the total defrosting time in about half; power level 10 cuts the total time to about 1/3. When defrosting at high power levels, food will need more frequent attention than usual.Defrost by time](https://usermanual.wiki/LG-Electronics-USA/X169NV/User-Guide-2207960-Page-26.png)
![2749-80706Use DEFROST BY WEIGHT to defrost for a selected length of time.1. Press the MICROWAVE pad and select defrost.2. Turn the selector dial to DEFROST BY WEIGHT. Press the dial to enter.3. Turn the dial to select the weight you want. Press the dial to enter.4. Press the dial or START/PAUSE pad to start defrosting.5. Turn the food over when the oven signals TURN FOOD OVER. Power level cannot be changed during this setting.Use 1.0 lb. QUICK DEFROST for quick defrost of 1.0 lb. of frozen food.1. Press the MICROWAVE pad and select 1.0 Lb. quick defrost.2. Press dial or START/PAUSE pad to start defrosting. Press the dial to enter.3. Turn the food over when the oven signals TURN FOOD OVER.Power level cannot be changed during this setting.Defrost by weight1.0 lb. Quick DefrostMicrowavingUpper OvenDefrosting tips■ Foods frozen in paper or plastic can be time defrosted in theSDFNDJHbut foods should be taken out of the package when using DEFROST BY FOOD TYPE. Closed packages VKRXOGEHVOLWSLHUFHGRUYHQWHGafter food has partially defrosted. Plastic storage containers should be partially uncovered.■)DPLO\VL]HSUHSDFNDJHGIUR]HQdinners can be defrosted and microwaved. If the food is in a IRLOFRQWDLQHUWUDQVIHULWWRDmicrowave-safe dish.■ Foods that spoil easily should not be allowed to sit out for more than one hour after defrosting. Room temperature promotes the growth of harmful bacteria.■ For more even defrosting of larger IRRGVVXFKDVURDVWVXVHDEFROST BY TIME. Be sure large meats are completely defrosted before cooking.■:KHQGHIURVWHGIRRGVKRXOGEHcool but softened in all areas. If still VOLJKWO\LF\UHWXUQWRWKHPLFURZDYHYHU\EULHIO\RUOHWLWVWDQGDIHZminutes.](https://usermanual.wiki/LG-Electronics-USA/X169NV/User-Guide-2207960-Page-27.png)


![46 49-80706Questions?Use this problem solverUpper OvenProblem Possible Causes What To Do/ExplanationDISPLAYThe display is blank Power saver mode • Check the SETTINGS menu for clock may be activated. display settings. Turn the display on.“Control is LOCKED” The control has • Press and hold CLEAR/OFF for appears in display been locked. 3 seconds to unlock the control.Control display is Clock is not set. • Set the clock.lit yet oven Door not securely closed. • Open the door and close securely.will not start START/PAUSE pad or dial • Press START/PAUSE or dial. not pressed after entering cooking selection. Another selection already • Press CLEAR/OFF. entered in oven and CLEAR/OFF pad not pressed to cancel it. 6L]HTXDQWLW\RUFRRNLQJ 0DNHVXUH\RXKDYHHQWHUHGFRRNLQJ time not entered after time after selecting. final selection. CLEAR/OFF was pressed • Reset cooking program and press accidentally. START/PAUSE.OTHER PROBLEMSThe door and inside The heat lamps • This is normal. of the oven feels hot produce intense heat • Use oven mitts to remove food when in a small space. when ready.Oven will not start A fuse in your home • Replace fuse or reset circuit breaker. may be blown or the circuit breaker tripped.TroubleshootingProblem Possible Cause What To DoCannot edit cooking featuresSome pre-programmed cooking features may not be able to be edited to prevent degradation of cooking performance.This is normal.Problem Possible Cause What To DoDisplay goes blank A fuse in your home may be blown or the circuit breaker tripped.Replace the fuse or reset the circuit breaker.Power outage or surge Reset the clock. If the oven was in use, you must reset it by pressing the Clear/Off pad, setting the clock and resetting any cooking function.](https://usermanual.wiki/LG-Electronics-USA/X169NV/User-Guide-2207960-Page-46.png)