LG Electronics USA X169NV Microwave Oven User Manual 49 80706 EN Review4 HiRes
LG Electronics USA Microwave Oven 49 80706 EN Review4 HiRes
Users Manual

PT9800 - 30" Double Wall Oven
CT9800 - 30" Double Wall Oven
Owner’s Manual
GEAppliances.com
Safety Information ...........2
Warranty .......................6
Assistance / Accessories .....7
Using The Oven
Oven Controls .....................8
Special Features .................10
Oven Racks and Rack Positions . . .11
Cookware ........................12
Cooking Modes ..................13
Cooking Guide ...................14
Care and Cleaning
Control Panel ....................15
Oven Exterior ....................15
Stainless Steel Surfaces ..........15
Oven Interior .....................15
Oven Racks ......................16
Maintenance .....................17
Troubleshooting Tips ........18
Wall Oven
Write the model and serial
numbers here:
Model # __________________
Serial # ___________________
You can find them on a label on
the side trim or on the front of the
(lower) oven behind the oven door.
Printed in the United States
Printed on
Recycled Paper
For a Spanish version of this
manual, visit our Website at
GEAppliances.com.
Para consultar una version
en español de este manual
de instrucciones, visite
nuestro sitio de internet
GEAppliances.com.
Built-In Advantium® Electric Combination
49-80706 02-14 GE

249-80706
FEDERAL COMMUNICATIONS COMMISSION
RADIO FREQUENCY INTERFERENCE STATEMENT (U.S.A. ONLY)
This equipment generates
and uses ISM frequency
energy and if not installed and used properly, that
is in strict accordance with the manufacturer's
instructions, may cause interference to radio and
television reception. It has been type tested and
found to comply with limits for an ISM Equipment
pursuant to part 18 of FCC Rules, which are
designed to provide reasonable protection against
such interference in a residential installation.
However, there is no guarantee that interference
will not occur in a particular installation. If this
equipment does cause interference to radio or
television reception, which can be determined
by turning the equipment off and on, the user is
encouraged to try to correct the interference by one
or more of the following:
ŶReorient the receiving antenna of radio or
television.
ŶRelocate the Microwave oven with respect to the
receiver.
ŶMove the microwave oven away from the
receiver.
ŶPlug the microwave oven into a different outlet so
that microwave oven and receiver are on different
branch circuits.
The manufacturer is not responsible for any
radio or TV interference caused by unauthorized
modification to this microwave oven. It is
the responsibility of the user to correct such
interference.
WARNING
IMPORTANT SAFETY INFORMATION.
READ ALL INSTRUCTIONS BEFORE USING.
SAFETY INFORMATION

3
49-80706
■ Read all instructions before using
this appliance. When using electrical appliances, basic
safety precautions should be followed, including the
following:
■ Read and follow the specific precautions in the
PRECAUTIONS TO AVOID POSSIBLE EXPOSURE TO EXCESSIVE
MICROWAVE ENERGY section on page 2.
■ Be sure your appliance is properly installed and grounded
by a qualified technician in accordance with the provided
installation instructions.
■ Install or locate this appliance only in accordance with the
provided installation instructions.
■ Some products such as whole eggs and sealed
FRQWDLQHUV³IRUH[DPSOHFORVHGMDUV³DUHDEOHWRH[SORGH
and should not be heated in this oven. Such use of the
RYHQFRXOGUHVXOWLQLQMXU\
■ Do not mount this appliance over a sink.
■ Do not store anything directly on top of this appliance
surface when this appliance is in operation.
■ This oven is not approved or tested for marine use.
■ This oven is UL listed for standard wall installation.
■ Do not operate this appliance if it has been damaged or
dropped.
■$VZLWKDQ\DSSOLDQFHFORVHVXSHUYLVLRQLVQHFHVVDU\ZKHQ
used by children.
■ Use this appliance only for its intended use as described in
this manual.
■ Do not use corrosive chemicals or vapors in this appliance.
■7KLVRYHQLVVSHFLILFDOO\GHVLJQHGWRKHDWGU\RUFRRNIRRG
and is not intended for laboratory or industrial use.
■ This appliance must only be serviced by qualified service
personnel. Contact nearest authorized service facility for
H[DPLQDWLRQUHSDLURUDGMXVWPHQW
■ Do not cover or block any openings on the appliance.
■ Do not store this appliance outdoors. Do not use this
SURGXFWQHDUZDWHU³IRUH[DPSOHLQDZHWEDVHPHQWQHDU
DVZLPPLQJSRROQHDUDVLQNRULQVLPLODUORFDWLRQV
■ See door surface cleaning instructions in the Care and
Cleaning of the Oven section of this manual.
■ To reduce the risk of fire in the oven cavity:
³'RQRWRYHUFRRNIRRG&DUHIXOO\DWWHQGDSSOLDQFHZKHQ
SDSHUSODVWLFRURWKHUFRPEXVWLEOHPDWHULDOVDUHSODFHG
inside the oven while microwave cooking.
³5HPRYHZLUHWZLVWWLHVDQGPHWDOKDQGOHVIURPSDSHURU
plastic containers before placing them in the oven.
³ 'RQRWXVHWKHRYHQIRUVWRUDJHSXUSRVHV'RQRWOHDYHSDSHU
SURGXFWVFRRNLQJXWHQVLOVRUIRRGLQWKHRYHQZKHQQRWLQXVH
³,IPDWHULDOVLQVLGHWKHRYHQLJQLWHNHHSWKHRYHQGRRU
FORVHGWXUQWKHRYHQRIIDQGVKXWRIISRZHUDWWKHIXVHRU
FLUFXLWEUHDNHUSDQHO,IWKHGRRULVRSHQHGWKHILUHPD\
spread.
³'RQRWXVHWKH6HQVRU)HDWXUHVWZLFHLQVXFFHVVLRQRQWKH
same food portion. If food is undercooked after the first
FRXQWGRZQXVH&22.%<7,0(IRUDGGLWLRQDOFRRNLQJWLPH
PRECAUTIONS TO AVOID POSSIBLE EXPOSURE TO
EXCESSIVE MICROWAVE ENERGY
(a) Do Not Attempt to operate this oven with the door
open since open-door operation can result in harmful
exposure to microwave energy. It is important not to
defeat or tamper with the safety interlocks.
(b) Do Not Place DQ\REMHFWEHWZHHQWKHRYHQIURQW
face and the door or allow soil or cleaner residue to
accumulate on sealing surfaces.
(c) Do Not Operate the oven if it is damaged.
It is particularly important that the oven door close
properly and that there is no damage to the:
GRRUEHQW
KLQJHVDQGODWFKHVEURNHQRUORRVHQHG
(3) door seals and sealing surfaces.
(d) The Oven Should Not EHDGMXVWHGRUUHSDLUHGE\
anyone except properly qualified service personnel.
WARNING!
SAFETY PRECAUTIONS
To reduce the risk of burns, electric shock, fire, injury to persons
or exposure to excessive microwave energy:
Upper Oven
IMPORTANT SAFETY INSTRUCTIONS
SAVE THESE INSTRUCTIONS

449-80706
WARNING!
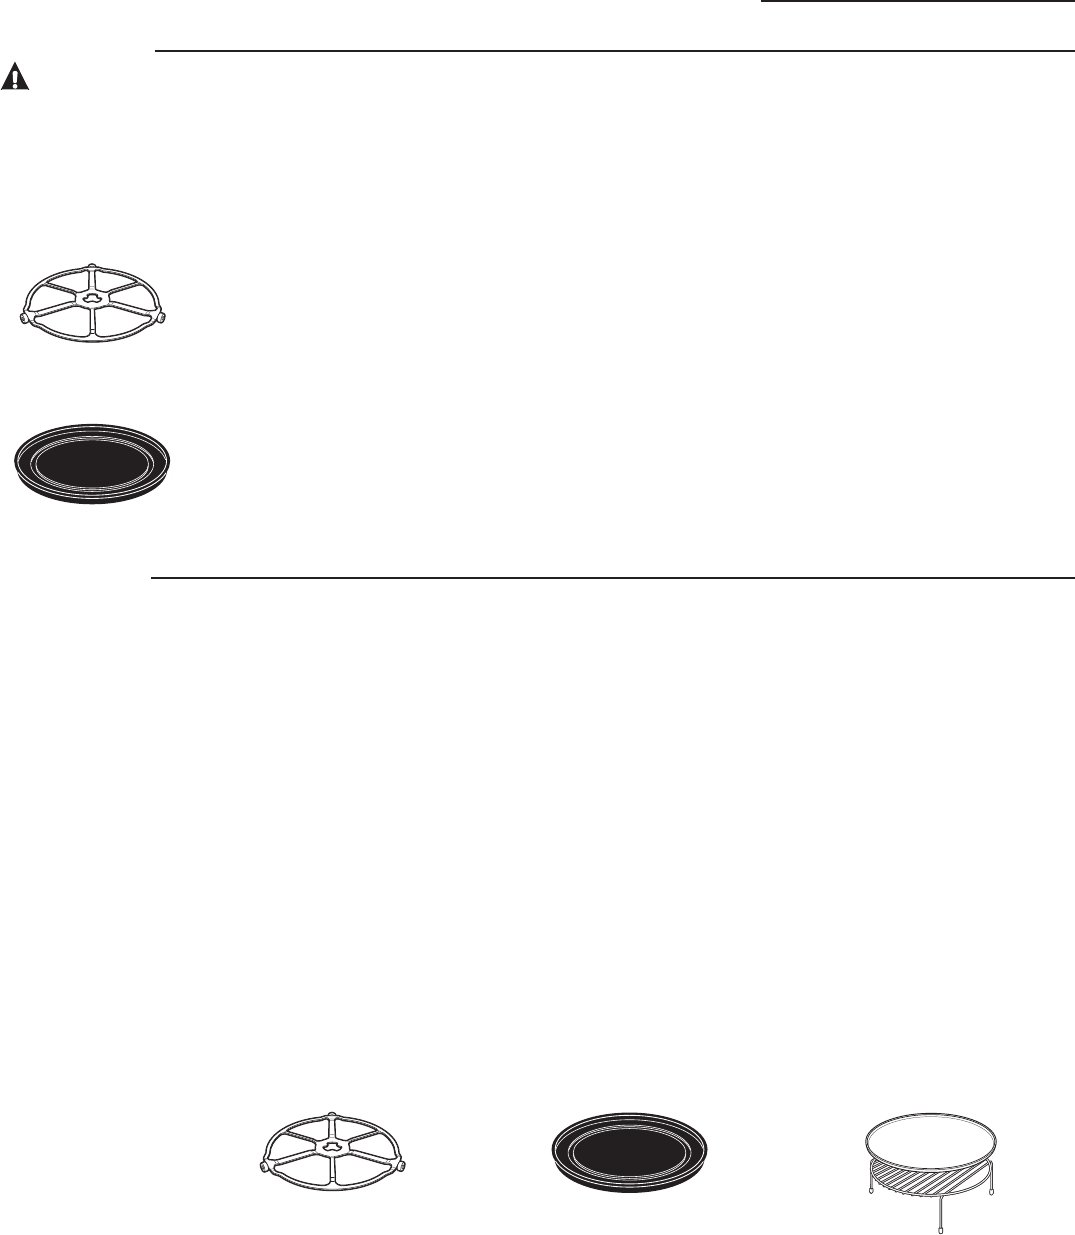
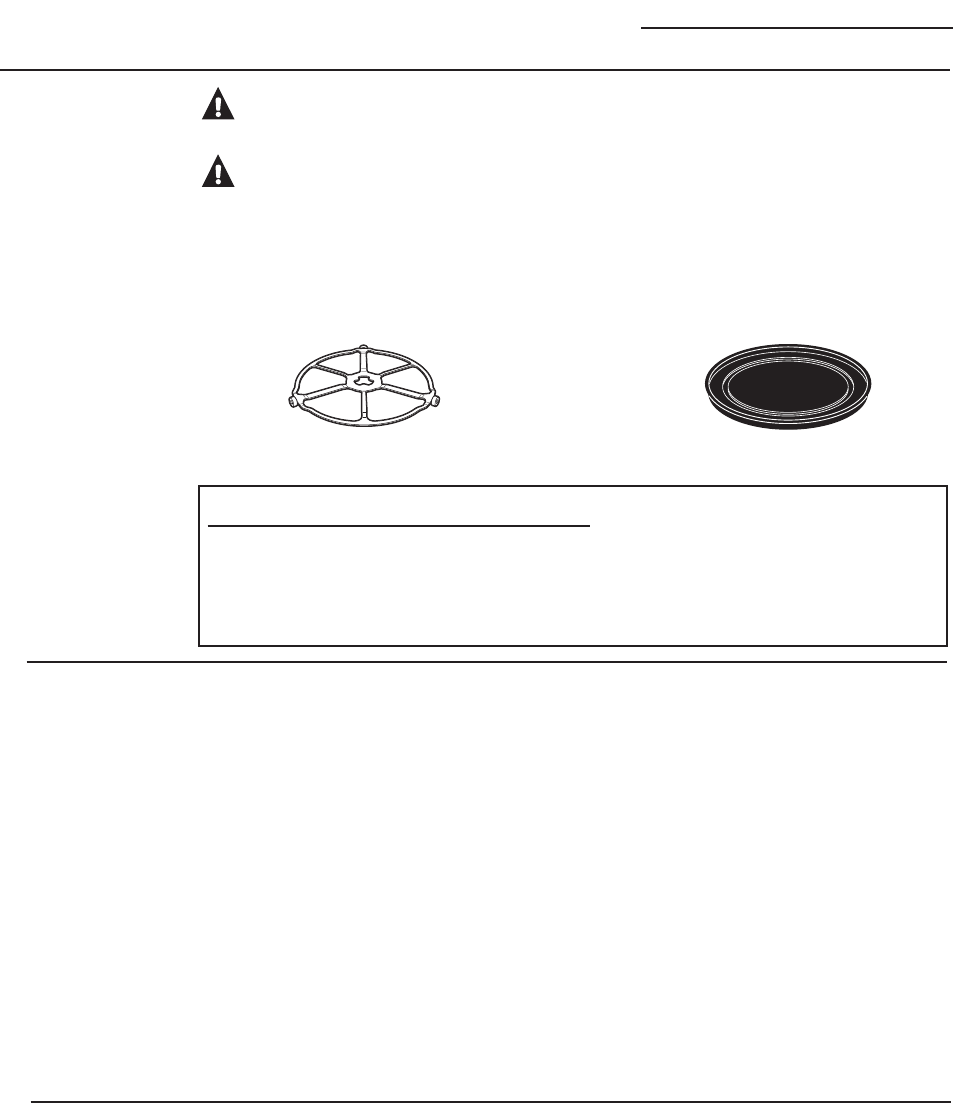
■ Do not operate the oven without the
turntable in place. The turntable must be
unrestricted so it can turn.
■ Potentially hot surfaces include the
RYHQGRRUIORRUZDOOVRYHQUDFNDQG
turntable.
SAFETY PRECAUTIONS
Arcing is the microwave term for sparks in the
oven. Arcing is caused by:
■ Metal or foil touching the side of the oven.
■ Foil not molded to food (upturned edges act
like antennas).
■ Use foil only as recommended in this manual.
■ Metal cookware used during either
speedcook or microwave cooking (except for
the pans provided with the oven).
■0HWDOVXFKDVWZLVWWLHVSRXOWU\SLQVRU
JROGULPPHGGLVKHVLQWKHRYHQ
■ Recycled paper towels containing small
metal pieces being used in the oven.
ARCING
Arcing can occur during both speedcooking and microwave cooking. If you see arcing,
press the CANCEL/OFF pad and correct the problem.
Upper Oven
IMPORTANT SAFETY INSTRUCTIONS
■:KHQPLFURZDYLQJSODFHDOOIRRGVDQG
containers on the clear glass tray.
■ Do not pop popcorn in your oven unless in
a special microwave popcorn accessory or
unless you use popcorn labeled for use in
microwave ovens.
■ Do not boil eggs in this oven. Pressure will
build up inside egg yolk and will cause it to
EXUVWSRVVLEO\UHVXOWLQJLQLQMXU\
■ Do not operate the oven without food
inside. This may cause damage to the
oven. It increases the heat around the
magnetron and can shorten the life of the
oven.
■ Foods with unbroken outer “skin” such as
SRWDWRHVKRWGRJVVDXVDJHVWRPDWRHV
DSSOHVFKLFNHQOLYHUVDQGRWKHUJLEOHWVDQG
egg yolks should be pierced to allow steam
to escape during cooking.
■ SUPERHEATED WATER
Liquids, such as water, coffee or tea, are able
to be overheated beyond the boiling point
without appearing to be boiling. Visible bubbling
or boiling when the container is removed
from the microwave oven is not always
present. THIS COULD RESULT IN VERY HOT
LIQUIDS SUDDENLY BOILING OVER WHEN THE
CONTAINER IS DISTURBED OR A SPOON OR
OTHER UTENSIL IS INSERTED INTO THE LIQUID.
7RUHGXFHWKHULVNRILQMXU\WRSHUVRQV
³ 'RQRWRYHUKHDWWKHOLTXLG
³ 6WLUWKHOLTXLGERWKEHIRUHDQGKDOIZD\WKURXJK
heating it.
³ 'RQRWXVHVWUDLJKWVLGHGFRQWDLQHUVZLWK
narrow necks.
³ $IWHUKHDWLQJDOORZWKHFRQWDLQHUWRVWDQGLQ
the microwave oven for a short time before
removing the container.
³ 8VHH[WUHPHFDUHZKHQLQVHUWLQJDVSRRQRU
other utensil into the container.
FOODS
SAVE THESE INSTRUCTIONS
5
49-80706
WARNING!
■ The oven and door will get very hot
when speedcooking.
■ Cookware will become hot because of
heat transferred from the heated food.
Oven mitts will be needed to handle the
cookware.
■'RQRWXVHFRYHULQJVFRQWDLQHUV
or cooking/roasting bags made
RIIRLOSODVWLFZD[RUSDSHUZKHQ
speedcooking.
■'RQRWFRYHUWKHWXUQWDEOHZLUHRYHQ
UDFNWUD\VRUDQ\SDUWRIWKHRYHQZLWK
metal foil. This will cause arcing in the
oven.
■ Use the nonstick metal tray in the same
way you would use a shallow baking pan
or baking tray.
■ Place food directly on the trays when
cooking unless prompted by the oven to
do otherwise.
■ Any oven-safe dish can be used in
your oven. Recipes in the Advantium
Cookbook were tested in Pyrex® glass
cookware and Corningware® ceramic
casseroles. Cook times and results may
vary when using other types of oven-safe
dishes. Place them directly on the trays.
■ Do not use the oven to dry newspapers.
■ Use of the clear glass tray when
speedcooking will result in inferior
cooking performance.
Speedcook
oven-safe
cookware
The turntable must
always be in place
when using the oven.
Put food directly on
the non-stick metal
tray to speedcook.
IMPORTANT SAFETY INSTRUCTIONS
■ The oven and door will get very hot
when baking, broiling, warming,
proofing or toasting.
■ Cookware will become hot. Oven mitts
will be needed to handle the cookware.
■'RQRWXVHFRYHULQJVFRQWDLQHUV
or cooking/roasting bags made
RIIRLOSODVWLFZD[RUSDSHUZKHQ
speedcooking.
■'RQRWFRYHUWKHWXUQWDEOHZLUHRYHQ
UDFNWUD\VRUDQ\SDUWRIWKHRYHQZLWK
metal foil. This will cause arcing in the
oven.
■ Use the non-stick metal tray in the same
way you would use a shallow baking pan
or baking tray.
■ Use the aluminum baking sheet on the
ZLUHRYHQUDFNDQGSODFHWKHPRQWKH
non-stick metal tray when baking on two
OHYHOVEURLOLQJRUWRDVWLQJIRRGV
■ Place food directly on the trays when
cooking unless prompted by the oven to
do otherwise.
■ Any oven-safe dish can be used in
your oven. Recipes in the Advantium
Cookbook were tested in Pyrex® glass
cookware and Corningware® ceramic
casseroles. Cook times and results
may vary when using other types of
oven-safe dishes. Place them directly
on the trays.
■ Do not use the oven to dry newspapers.
■ Use of the clear glass tray when
EDNLQJEURLOLQJZDUPLQJSURRILQJRU
toasting will result in inferior cooking
performance.
Oven-safe
cookware
for
Baking,
Broiling,
Warming,
Proofing &
Toasting
The turntable must
always be in place
when using the oven.
Put food directly on the
non-stick metal tray
to bake on one level. Put food directly on the aluminum
EDNLQJVKHHWRQWKHZLUHRYHQUDFN
and place them on the non-stick
PHWDOWUD\ZKHQEDNLQJRQWZR
OHYHOVEURLOLQJRUWRDVWLQJIRRGV
SAVE THESE INSTRUCTIONS
Upper Oven
649-80706
6
WARNING!
■ Place food or microwavable container
directly on the clear glass tray to cook
your food.
■ Use of the non-stick metal tray during
microwave cooking will result in inferior
cooking performance.
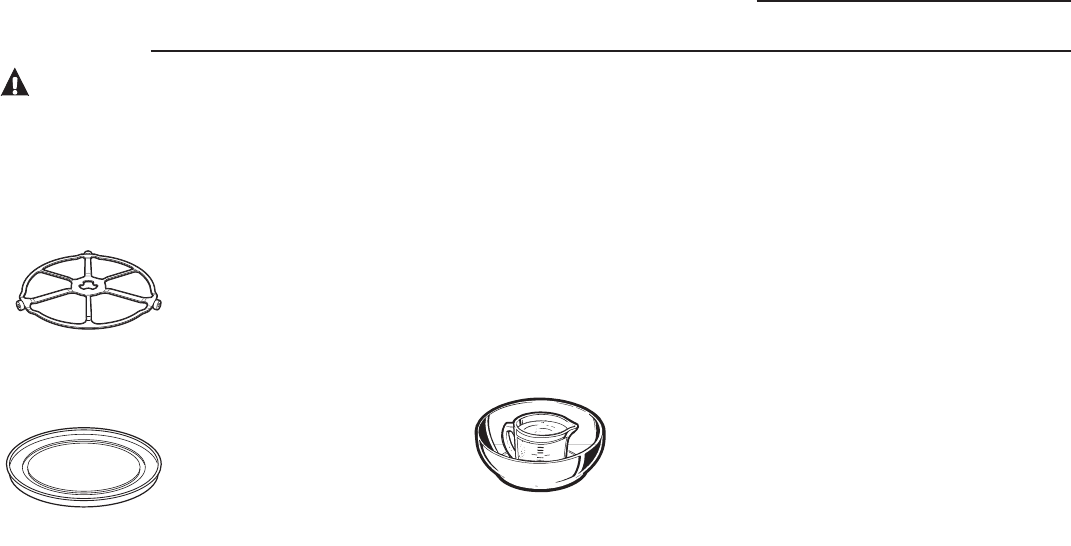
■ If you are not
sure if a dish is
PLFURZDYHVDIH
use this test: Place
in the oven both
the dish you are
testing and a
glass measuring
FXSILOOHGZLWKFXSRIZDWHU³VHWWKH
measuring cup either in or next to the
dish. Microwave 30-45 seconds at high. If
WKHGLVKKHDWVLWVKRXOGQRWEHXVHGIRU
microwaving.
If the dish remains cool and only the
ZDWHULQWKHFXSKHDWVWKHQWKHGLVKLV
microwave-safe.
■ Cookware may become hot because of
heat transferred from the heated food.
Oven mitts may be needed to handle the
cookware.
■ Do not use recycled paper products.
5HF\FOHGSDSHUWRZHOVQDSNLQVDQG
waxed paper can contain metal flecks
which may cause arcing or ignite. Paper
products containing nylon or nylon
ILODPHQWVVKRXOGEHDYRLGHGDVWKH\PD\
also ignite.
■ Use foil only as directed in this manual.
:KHQXVLQJIRLOLQWKHRYHQNHHSWKHIRLO
at least 1” away from the sides of the
oven.
■ Do not use the oven to dry newspapers.
■ If you use a meat thermometer while
FRRNLQJPDNHVXUHLWLVVDIHIRUXVHLQ
microwave ovens.
■ Some foam trays (like those that meat
is packaged on) have a thin strip of
metal embedded in the bottom. When
PLFURZDYHGWKHPHWDOFDQEXUQWKHIORRU
of the oven or ignite a paper towel.
■ 3DSHUWRZHOVZD[HGSDSHUDQGSODVWLF
wrap can be used to cover dishes in
order to retain moisture and prevent
spattering. Be sure to vent plastic wrap
so steam can escape.
■ Not all plastic wrap is suitable for use
in microwave ovens. Check the package
for proper use.
■ “Boilable” cooking pouches and tightly
FORVHGSODVWLFEDJVVKRXOGEHVOLWSLHUFHG
or vented as directed by package. If
WKH\DUHQRWSODVWLFFRXOGEXUVWGXULQJ
RULPPHGLDWHO\DIWHUFRRNLQJSRVVLEO\
UHVXOWLQJLQLQMXU\$OVRSODVWLFVWRUDJH
containers should be at least partially
uncovered because they form a tight
seal. When cooking with containers
WLJKWO\FRYHUHGZLWKSODVWLFZUDSUHPRYH
covering carefully and direct steam away
from hands and face.
■ 3ODVWLFFRRNZDUH³3ODVWLFFRRNZDUH
designed for microwave cooking is very
XVHIXOEXWVKRXOGEHXVHGFDUHIXOO\
Even microwave-safe plastic may not
be as tolerant of overcooking conditions
as are glass or ceramic materials and
PD\VRIWHQRUFKDULIVXEMHFWHGWR
short periods of overcooking. In longer
H[SRVXUHVWRRYHUFRRNLQJWKHIRRGDQG
cookware could ignite.
Follow these guidelines:
1. Use microwave-safe plastics only
and use them in strict compliance
with the cookware manufacturer’s
recommendations.
2. Do not microwave empty containers.
3. Do not permit children to use plastic
cookware without complete supervision.
Microwave-
safe
cookware
The turntable must
always be in place
when using the oven.
The clear glass
tray should always
be in place when
microwaving.
Make sure to use suitable cookware during microwave cooking. Most glass casseroles,
cooking dishes, measuring cups, custard cups, pottery or china dinnerware which does not
have metallic trim or glaze with a metallic sheen can be used. Some cookware is labeled
“suitable for microwaving.”
SAVE THESE INSTRUCTIONS
IMPORTANT SAFETY INSTRUCTIONS
How to test for a
microwave-safe dish.
Upper Oven

7
49-80706
WARNING!
■ Don’t defrost frozen beverages in narrow-
necked bottles (especially carbonated
EHYHUDJHV(YHQLIWKHFRQWDLQHULVRSHQ
pressure can build up. This can cause the
FRQWDLQHUWREXUVWSRVVLEO\UHVXOWLQJLQLQMXU\
■ Foods cooked in liquids (such as pasta)
may tend to boil more rapidly than foods
containing less moisture. Should this
RFFXUUHIHUWRWKHCare and Cleaning of
the oven section for instructions on how
to clean the inside of the oven.
■ Hot foods and steam can cause burns. Be
careful when opening any containers of
KRWIRRGLQFOXGLQJSRSFRUQEDJVFRRNLQJ
pouches and boxes. To prevent possible
LQMXU\GLUHFWVWHDPDZD\IURPKDQGVDQG
face.
■ Do not overcook potatoes. They could
GHK\GUDWHDQGFDWFKILUHFDXVLQJGDPDJHWR
your oven.
■$YRLGKHDWLQJEDE\IRRGLQJODVVMDUVHYHQ
with the lid off. Make sure all infant food is
thoroughly cooked. Stir food to distribute the
heat evenly. Be careful to prevent scalding
when warming formula. The container may
feel cooler than the formula really is. Always
test the formula before feeding the baby.
■ Do not attempt to deep fry in the oven.
SAFETY PRECAUTIONS
SAVE THESE INSTRUCTIONS
IMPORTANT SAFETY INSTRUCTIONS
■ Most pacemakers are shielded from
LQWHUIHUHQFHIURPHOHFWURQLFSURGXFWV
LQFOXGLQJPLFURZDYHV+RZHYHUSDWLHQWV
with pacemakers may wish to consult their
physicians if they have concerns.
1RWLFH³
Pacemakers
Upper Oven

849-80706
SAVE THESE INSTRUCTIONS
Ŷ8VHWKLVDSSOLDQFHRQO\IRULWVLQWHQGHGSXUSRVH
as described in this Owner’s Manual.
Ŷ%HVXUH\RXUDSSOLDQFHLVSURSHUO\LQVWDOOHGDQG
grounded by a qualified installer in accordance
with the provided installation instructions.
Ŷ'RQRWDWWHPSWWRUHSDLURUUHSODFHDQ\SDUWRI
your oven unless it is specifically recommended
in this manual. All other servicing should be
transferred to a qualified technician.
Ŷ%HIRUHSHUIRUPLQJDQ\VHUYLFHGLVFRQQHFWWKH
power supply at the household distribution panel
by removing the fuse or switching off the circuit
breaker.
Ŷ'RQRWOHDYHFKLOGUHQDORQH²FKLOGUHQVKRXOGQRW
be left alone or unattended in an area where an
appliance is in use. They should never be allowed
to climb, sit or stand on any part of the appliance.
Ŷ CAUTION: 'RQRWVWRUHLWHPVRI
interest to children in cabinets above an oven
- children climbing on the oven to reach items
could be seriously injured.
Ŷ8VHRQO\GU\SRWKROGHUV²PRLVWRUGDPSSRW
holders on hot surfaces may result in burns from
VWHDP'RQRWOHWSRWKROGHUVWRXFKKRWKHDWLQJ
HOHPHQWV'RQRWXVHDWRZHORURWKHUEXON\FORWK
in place of pot holders.
Ŷ 1HYHUXVH\RXUDSSOLDQFHIRUZDUPLQJRUKHDWLQJ
the room.
Ŷ 'RQRWWRXFKWKHKHDWLQJHOHPHQWVRUWKHLQWHULRU
surface of the oven. These surfaces may be hot
enough to burn even though they are dark in
FRORU'XULQJDQGDIWHUXVHGRQRWWRXFKRUOHW
clothing or other flammable materials contact any
interior area of the oven; allow sufficient time for
cooling first. Other surfaces of the appliance may
become hot enough to cause burns. Potentially
hot surfaces include the oven vent opening,
surfaces near the opening and crevices around
the oven door.
Ŷ 'RQRWKHDWXQRSHQHGIRRGFRQWDLQHUV3UHVVXUH
could build up and the container could burst,
causing an injury.
Ŷ 'RQRWXVHDQ\W\SHRIIRLORUOLQHUWRFRYHUWKH
oven bottom or anywhere in the oven, except as
described in this manual. Oven liners can trap
heat or melt, resulting in damage to the product
and risk of shock, smoke or fire.
Ŷ $YRLGVFUDWFKLQJRULPSDFWLQJJODVVGRRUVRU
FRQWUROSDQHOV'RLQJVRPD\OHDGWRJODVV
EUHDNDJH'RQRWFRRNRQDSURGXFWZLWKEURNHQ
glass. Shock, fire or cuts may occur.
Ŷ &RRNPHDWDQGSRXOWU\WKRURXJKO\²PHDWWR
at least an internal temperature of 160°F and
poultry to at least an internal temperature of
180°F. Cooking to these temperatures usually
protects against foodborne illness.
GENERAL SAFETY INSTRUCTIONS
IMPORTANT SAFETY INFORMATION.
READ ALL INSTRUCTIONS BEFORE USING.
Read all safety instructions before using the product. Failure to follow these instructions may result in fire,
electrical shock, serious injury or death.
STATE OF CALIFORNIA PROPOSITION 65 WARNING
WARNING
WARNING
SAFETY INFORMATION
7KH&DOLIRUQLD6DIH'ULQNLQJ:DWHUDQG7R[LF(QIRUFHPHQW$FWUHTXLUHVWKH*RYHUQRURI&DOLIRUQLDWR
publish a list of substances known to the state to cause cancer, birth defects or other reproductive harm,
and requires businesses to warn customers of potential exposure to such substances.
WARNING This product contains one or more chemical known to the State of California to
cause cancer, birth defects or other reproductive harm.
Self-clean ovens can cause low-level exposure to some of these substances, including carbon monoxide,
during the cleaning cycle. Exposure can be minimized by venting with an open window or using a
ventilation fan or hood.
Lower Oven

9
49-80706
SAVE THESE INSTRUCTIONS
Ŷ
'RQRWVWRUHRUXVHIODPPDEOHPDWHULDOVLQRUQHDU
an oven, including paper, plastic, pot holders,
linens, wall coverings, curtains, drapes and gasoline
or other flammable vapors and liquids.
Ŷ
1HYHUZHDUORRVHILWWLQJRUKDQJLQJJDUPHQWVZKLOH
using the appliance. These garments may ignite if
they contact hot surfaces, causing severe burns.
Ŷ 'RQRWOHWFRRNLQJJUHDVHRURWKHUIODPPDEOH
PDWHULDOVDFFXPXODWHLQRUQHDUWKHRYHQ*UHDVH
in the oven or near the oven may ignite.
KEEP FLAMMABLE MATERIALS AWAY FROM THE OVEN
Failure to do so may result in fire or personal injury.
Ŷ 'RQRWXVHZDWHURQJUHDVHILUHV1HYHUSLFNXS
a flaming pan.
Ŷ ,IWKHUHLVDILUHLQWKHRYHQGXULQJEDNLQJ
smother the fire by closing the oven door and
turning the oven off or by using a multi-purpose
dry chemical or foam-type fire extinguisher.
Ŷ ,IWKHUHLVDILUHLQWKHRYHQGXULQJVHOIFOHDQWXUQ
the oven off and wait for the fire to go out. 'R
not force the door open. Introduction of fresh air
at self-clean temperatures may lead to a burst
of flame from the oven. Failure to follow this
instruction may result in severe burns.
IN THE EVENT OF A FIRE, TAKE THE FOLLOWING
STEPS TO PREVENT INJURY AND FIRE SPREADING
Ŷ 6WDQGDZD\IURPWKHRYHQZKHQRSHQLQJWKH
oven door. Hot air or steam which escapes can
cause burns to hands, face and/or eyes.
Ŷ .HHSWKHRYHQYHQWXQREVWUXFWHG
Ŷ .HHSWKHRYHQIUHHIURPJUHDVHEXLOGXS*UHDVH
in the oven may ignite.
Ŷ
Place oven racks in desired location while oven is
cool. If rack must be moved while oven is hot, do not
let pot holder contact hot heating element in oven.
Ŷ :KHQXVLQJFRRNLQJRUURDVWLQJEDJVLQWKH
oven, follow the manufacturer’s directions.
Ŷ 3XOOLQJRXWWKHVWDQGDUGUDFNVWRWKHLUVWRSORFNV
or the extension rack to its fully open position is
a convenience in lifting heavy foods. It is also
a precaution against burns from touching hot
surfaces of the door or oven walls.
Ŷ 'RQRWOHDYHLWHPVVXFKDVSDSHUFRRNLQJ
utensils or food in the oven when not in use.
Items stored in an oven can ignite.
Ŷ
1HYHUSODFHFRRNLQJXWHQVLOVSL]]DRUEDNLQJ
stones, or any type of foil or liner on the oven
floor. These items can trap heat or melt, resulting
in damage to the product and risk of shock,
smoke or fire.
OVEN SAFETY INSTRUCTIONS
WARNING
WARNING
WARNING
The self-cleaning feature operates the oven at temperatures high enough to burn away food soils in the
oven. Follow these instructions for safe operation.
Ŷ 'RQRWWRXFKRYHQVXUIDFHVGXULQJVHOIFOHDQ
RSHUDWLRQ.HHSFKLOGUHQDZD\IURPWKHRYHQ
during self-cleaning. Failure to follow these
instructions may cause burns.
Ŷ %HIRUHVHOIFOHDQLQJWKHRYHQUHPRYHVKLQ\
silver colored oven racks (on some models), the
probe, any aluminum foil, and any broiler pan,
grid, and other cookware. Only porcelain coated
oven racks may be left in the oven.
Ŷ %HIRUHRSHUDWLQJWKHVHOIFOHDQF\FOHZLSH
grease and food soils from the oven. Excessive
amount of grease may ignite, leading to smoke
damage to your home.
Ŷ ,IWKHVHOIFOHDQLQJPRGHPDOIXQFWLRQVWXUQWKH
oven off and disconnect the power supply. Have
it serviced by a qualified technician.
Ŷ 'RQRWFOHDQWKHGRRUJDVNHW7KHGRRUJDVNHWLV
essential for a good seal. Care should be taken
not to rub, damage or move the gasket.
Ŷ
'RQRWXVHRYHQFOHDQHUV1RFRPPHUFLDORYHQ
cleaner or oven liner protective coating of any kind
should be used in or around any part of the oven.
SELF-CLEANING OVEN SAFETY INSTRUCTIONS
WARNING
SAFETY INFORMATION

10 49-80706
Notes

11
49-80706
Thank You! ... for your purchase of a GE Brand appliance.
WARRANTY
GE Electric Range Warranty
GEAppliances.com
All warranty service is provided by our Factory Service Centers, or an authorized Customer Care® technician.
7RVFKHGXOHVHUYLFHRQOLQHYLVLWXVDWZZZJHDSSOLDQFHVFRPVHUYLFHBDQGBVXSSRUWRUFDOO*(&$5(6
(800.432.2737). Please have serial number and model number available when calling for service.
6HUYLFLQJ\RXUDSSOLDQFHPD\UHTXLUHWKHXVHRIWKHRQERDUGGDWDSRUWIRUGLDJQRVWLFV7KLVJLYHVD*(IDFWRU\
VHUYLFHWHFKQLFLDQWKHDELOLW\WRTXLFNO\GLDJQRVHDQ\LVVXHVZLWK\RXUDSSOLDQFHDQGKHOSV*(LPSURYHLWVSURGXFWV
E\SURYLGLQJ*(ZLWKLQIRUPDWLRQRQ\RXUDSSOLDQFH,I\RXGRQRWZDQW\RXUDSSOLDQFHGDWDWREHVHQWWR*(SOHDVH
DGYLVH\RXUWHFKQLFLDQQRWWRVXEPLWWKHGDWDWR*(DWWKHWLPHRIVHUYLFH
)RUWKHSHULRGRIRQH\HDUIURPWKHGDWHRIWKHRULJLQDOSXUFKDVH*(ZLOOSURYLGHDQ\SDUWRIWKHUDQJHZKLFKIDLOVGXH
WRDGHIHFWLQPDWHULDOVRUZRUNPDQVKLS'XULQJWKLVOLPLWHGRQH\HDUZDUUDQW\*(ZLOODOVRSURYLGHIUHHRIFKDUJHDOO
labor and in-home service to replace the defective part.
What GE will not cover:
Ŷ Service trips to your home to teach you how to use
the product.
Ŷ Improper installation, delivery or maintenance.
Ŷ Failure of the product if it is abused, misused,
modified or used for other than the intended purpose
or used commercially.
Ŷ Replacement of house fuses or resetting of circuit
breakers.
Ŷ 'DPDJHWRWKHSURGXFWFDXVHGE\DFFLGHQWILUH
IORRGVRUDFWVRI*RG
Ŷ Incidental or consequential damage caused by
possible defects with this appliance.
Ŷ 'DPDJHFDXVHGDIWHUGHOLYHU\
Ŷ Product not accessible to provide required service.
Ŷ 6HUYLFHWRUHSDLURUUHSODFHOLJKWEXOEVH[FHSWIRU/('
lamps.
EXCLUSION OF IMPLIED WARRANTIES
<RXUVROHDQGH[FOXVLYHUHPHG\LVSURGXFWUHSDLUDVSURYLGHGLQWKLV/LPLWHG:DUUDQW\$Q\LPSOLHGZDUUDQWLHV
including the implied warranties of merchantability or fitness for a particular purpose, are limited to one year or the
shortest period allowed by law.
This warranty is extended to the original purchaser and any succeeding owner for products purchased for home use
ZLWKLQWKH86$,IWKHSURGXFWLVORFDWHGLQDQDUHDZKHUHVHUYLFHE\D*($XWKRUL]HG6HUYLFHULVQRWDYDLODEOH\RX
PD\EHUHVSRQVLEOHIRUDWULSFKDUJHRU\RXPD\EHUHTXLUHGWREULQJWKHSURGXFWWRDQ$XWKRUL]HG*(6HUYLFHORFDWLRQ
for service. In Alaska, the warranty excludes the cost of shipping or service calls to your home.
Some states do not allow the exclusion or limitation of incidental or consequential damages. This warranty gives you
specific legal rights, and you may also have other rights which vary from state to state. To know what your legal rights
DUHFRQVXOW\RXUORFDORUVWDWHFRQVXPHUDIIDLUVRIILFHRU\RXUVWDWH¶V$WWRUQH\*HQHUDO
Warrantor: General Electric Company. Louisville, KY 40225
Extended Warranties:3XUFKDVHD*(H[WHQGHGZDUUDQW\DQGOHDUQDERXWVSHFLDOGLVFRXQWVWKDWDUHDYDLODEOHZKLOH
your warranty is still in effect. You can purchase it on-line anytime
www.geappliances.com/service_and_support/shop-for-extended-service-plans.htm
RUFDOOGXULQJQRUPDOEXVLQHVVKRXUV*(&RQVXPHU+RPH6HUYLFHVZLOOVWLOOEHWKHUHDIWHU\RXU
warranty expires.
Register Your Appliance: Register your new appliance on-line at your convenience!
www.geappliances.com/service_and_support/register/
Timely product registration will allow for enhanced communication and prompt service under the terms of your warranty,
should the need arise. You may also mail in the pre-printed registration card included in the packing material.
Staple your receipt here. Proof of the original purchase
date is needed to obtain service under the warranty.

12 49-80706
Schedule Service: ([SHUW*(UHSDLUVHUYLFHLVRQO\RQH
VWHSDZD\IURP\RXUGRRU*HWRQOLQHDQGVFKHGXOH\RXU
service at www.geappliances.com/service_and_support/
2UFDOO*(&$5(6GXULQJQRUPDO
business hours.
Parts and Accessories: Individuals qualified to service
their own appliances can have parts or accessories sent
GLUHFWO\WRWKHLUKRPHV9,6$0DVWHU&DUGDQG'LVFRYHU
cards are accepted).Order on-line today, 24 hours every
day or by phone at 800.626.2002 during normal business
hours.
Instructions contained in this manual cover procedures
to be performed by any user. Other servicing generally
should be referred to qualified service personnel. Caution
must be exercised, since improper servicing may cause
unsafe operation.
Real Life Design Studio: *(VXSSRUWVWKH8QLYHUVDO
'HVLJQFRQFHSWRISURGXFWVVHUYLFHVDQGHQYLURQPHQWV
that can be used by people of all ages, sizes and
FDSDELOLWLHV:HUHFRJQL]HWKHQHHGWRGHVLJQIRUDZLGH
range of physical and mental abilities and impairments.
)RUGHWDLOVRI*(¶V8QLYHUVDO'HVLJQDSSOLFDWLRQVLQFOXGLQJ
kitchen design ideas for people with disabilities, check out
RXU:HEVLWHWRGD\)RUWKHKHDULQJLPSDLUHGSOHDVHFDOO
7''*($&
Contact Us: If you are not satisfied with the service you
UHFHLYHIURP*(FRQWDFWXVRQRXU:HEVLWHZLWKDOOWKH
details including your phone number, or write to:
General Manager, Customer Relations
GE Appliances, Appliance Park Louisville, KY 40225
ASSISTANCE / ACCESSORIES
7U\WKH*($SSOLDQFHV:HEVLWHwww.geappliances.com/service_and_support/) 24 hours a day, any day of the
year! For greater convenience and faster service, you can now download Owner’s Manuals, order parts or even
schedule service on-line.
Have a question or need assistance with your appliance?
Accessories
Looking For Something More?
GE offers a variety of accessories to improve your cooking and maintenance experiences!
To place an order visit us online at:
www.GEApplianceParts.com86RUwww.GEAppliances.ca (Canada)
or call 800.626.200286800.661.1616 (Canada)
The following products and more are available:
How to Remove Protective Shipping Film and Packaging Tape
Carefully grasp a corner of the protective shipping film
with your fingers and slowly peel it from the appliance
VXUIDFH'RQRWXVHDQ\VKDUSLWHPVWRUHPRYHWKHILOP
Remove all of the film before using the appliance for the
first time.
To assure no damage is done to the finish of the
product, the safest way to remove the adhesive from
packaging tape on new appliances is an application of
a household liquid dishwashing detergent. Apply with a
soft cloth and allow to soak.
NOTE: The adhesive must be removed from all parts. It
cannot be removed if it is baked on.
Accessories
6PDOO%URLOHU3DQô´[ó´[ò³ :%;86'*&DQDGD
/DUJH%URLOHU3DQô´[ó´[ò³ :%;86'*&DQDGD
;/%URLOHU3DQ´[ó´[³ :%;861RWDYDLODEOHLQ&DQDGD
Parts
Oven racks Part numbers vary by model
Oven elements Part numbers vary by model
/LJKWEXOEV 3DUWQXPEHUVYDU\E\PRGHO
Cleaning Supplies
&LWUX6KLQH6WDLQOHVV6WHHO:LSHV :;;
&HUDPD%U\WH6WDLQOHVV6WHHO$SSOLDQFH&OHDQHU 30;
*UDSKLWH/XEULFDQW :%7
7KHODUJHEURLOHUSDQGRHVQRWILWLQ´´UDQJHV
7KH;/EURLOHUSDQGRHVQRWILWLQ´ZDOORYHQV´GURSLQVRU´´UDQJHV
13
49-80706
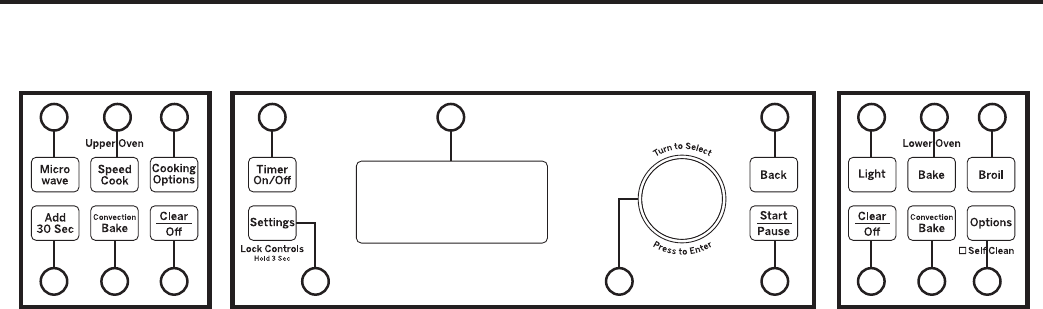
Oven Controls
Common Controls
1. Timer On/Off: :RUNVDVDFRXQWGRZQWLPHU3UHVV
the Timer On/Off pad, select the timer type (hours and
minutes or minutes and seconds), use the knob to set the
time, and press the knob to start the timer countdown.
The oven will continue to operate when the timer
countdown is complete. To turn the timer off press the
Timer On/Off pad.
2. Settings / Lock Controls: Find oven options
+HOS&ORFN6HWWLQJV'LVSOD\0RGH$XWR&RQYHUVLRQ
$XWR6KXW2II%HHSHU9ROXPH5HPLQGHU7HPSHUDWXUH
8QLWV7KHUPRVWDW$GMXVWDQG2YHQ,QIRUPDWLRQXQGHUWKLV
selection. See the Settings & Options section for more
details. Press and hold Settings pad for 3 seconds to
lock or unlock the controls. This locks out the control so
that pressing any of the control pads does not activate
the control. Cancel/Off is always active, even when the
control is locked.
3. Knob: Rotate this knob to select oven settings, upper
and lower oven options and cooking options then press
the knob to confirm the selection. Rotate the knob to
increase or decrease temperatures or time and then press
the knob to confirm the set temperature or time. This knob
is used for both the upper and lower ovens.
4. Back: Press this pad to go back a menu in the display.
5. Start/Pause: Press the Start/Pause pad to start or
pause any cooking, clean or timed function. Cannot pause
lower oven cooking.
6. Display: Information about both the upper and lower
ovens are shown in this display window.
Upper Oven Controls
7. Microwave: Press the Microwave pad for microwaving
RSWLRQV8VHWKHNQREWRILQGWKHPLFURZDYLQJRSWLRQ
desired and press the knob to select it. Options available
LQFOXGH&RRNE\7LPH&RRN'HIURVW%HYHUDJH3RSFRUQ
0HOW5HKHDW6LPPHUDQG6RIWHQ8VHWKHFOHDUJODVV
tray and microwave-safe cookware when using the
microwave features.
8. Add 30 Sec: Press the Add 30 Sec pad for 30
seconds of microwave cooking time. Each time this pad
is pressed an additional 30 seconds is added to the
remaining cooking time. The oven starts immediately.
9. Speed Cook: Press the Speed Cook pad to access
the preset speed cook menu. Place food or oven-safe
dish directly on the metal tray when using the speed cook
IHDWXUH'RQRWXVHSODVWLFRUVLOLFRQHFRRNZDUHZKHQ
using this feature since they could be melted or deformed.
10. Convection Bake: Press the Convection Bake pad
to convection bake in the upper oven. Place food or oven
safe dish on the metal tray when using the convection
EDNHIHDWXUH:KHQFRQYHFWLRQEDNLQJRQWZROHYHOVSODFH
food or oven safe dish on the aluminum baking sheet on
the wire oven rack and place them on the metal tray.
11. Cooking Options: )LQGIHDWXUHV5HSHDW/DVW%URLO
3URRI7RDVWDQG:DUPXQGHUWKLVVHOHFWLRQ6HHWKH
Settings & Options section for more details.
12. Clear/Off: 7KH&OHDU2IISDGFDQFHOV$//XSSHURYHQ
programs except the clock and timer.
Lower Oven Controls
13. Light: Turn the oven light on or off in the lower oven.
1RWHWKDWOLJKWLQORZHURYHQZLOOQRWWXUQRQLIWKHGRRULV
opened while the other oven is in a clean mode.
14. Bake: Press the Bake pad to bake, rotate knob to select
baking temperature and press to select.
15. Broil: Press the Broil pad to broil, rotate knob to select
+L/RDQGSUHVVWRVHOHFW
16. Options: )LQGIHDWXUHV'HOD\6WDUW3UREH3URRI
6DEEDWK6HOI&OHDQ6WHDP&OHDQDQG:DUPXQGHUWKLV
selection. See the Settings & Options section for more
details.
17. Convection Bake: Convection cook modes use
increased air circulation to improve performance. The type
of benefit depends on the mode. Your lower oven has the
IROORZLQJFRQYHFWLRQFRRNLQJPRGHV&RQYHFWLRQ%DNH
(1 Rack/Multi) and Convection Roast. See the Cooking
Modes section for more information.
18. Clear/Off: 7KH&OHDU2IISDGFDQFHOV$//ORZHURYHQ
programs except the clock and timer.
USING THE OVEN: Oven Controls
10 12 18 1617
11 13 14 15
Common Controls
Upper Oven
Controls
Lower Oven
Controls
179 6 4
582 3

14 49-80706
Settings & Options
There are several different special features on your wall oven. To change the settings of these special features,
press the BAKE and BROIL pads at the same time and hold for three seconds. "SF" will appear in the display.
6HOHFWWKHIHDWXUH\RXZDQWWRFKDQJH:KHQWKHFKDQJHKDVEHHQPDGHSUHVVWKHSTART key to save the change
and return to the time of day.
Adjust the Oven Temperature
This feature allows the oven baking and convection
EDNLQJWHPSHUDWXUHWREHDGMXVWHGXSWR)KRWWHU
RUGRZQWR)FRROHU8VHWKLVIHDWXUHLI\RXEHOLHYH
your oven temperature is too hot or too cold and wish
to change it. For double oven models, the upper and
lower ovens are adjusted separately. This adjustment
DIIHFWV%DNHDQG&RQYHFWLRQ%DNH5DFN0XOWL
PRGHV1RRWKHUFRRNLQJPRGHVDUHDIIHFWHG
Press the Bake pad to select the oven to be adjusted.
Press the Bake pad again to enter the temperature
DGMXVWPHQWPRGH$QXPEHUEHWZHHQDQG
ZLOOGLVSOD\8VHWKHQXPEHUSDGVWRVHWWKHGHVLUHG
temperature adjustment and use the Bake pad to
change between negative and positive.
Press the Start pad to save the temperature adjustment.
End of Timer Signals
This is the tone that signals the end of a timer. The tone
can be continuous (Con bEEP) or one repeating beep
(bEEP). A continuous setting will continue to sound a tone
until a button on the control is pressed. Press the Broil pad
to view the current setting and then to change the setting.
Fahrenheit or Celsius Temperature Display
The oven control is set to use Fahrenheit temperatures
(F), but you can change it to use Celsius temperatures
(C). Press the number 6 and 8 pads at the same time
to view the current setting, press again to change the
setting.
Clock Display
This feature specifies how the time of day will be
displayed or if no time of day will be displayed. You can
select a standard 12-hour clock (12 H), 24-hour military
time display (24 H), or for no clock displayed (oFF).
Press the Clock pad to view the current setting, press
again to change the setting.
Auto Recipe Conversion
:KHQXVLQJ&RQYHFWLRQ%DNH5DFNRU&RQYHFWLRQ%DNH
Multi Rack cooking options, Auto Recipe Conversion will
automatically convert the regular baking temperatures
entered to convection bake cooking temperatures
ZKHQWXUQHGRQ1RWHWKDWWKLVRSWLRQGRHVQRWFRQYHUW
convection bake cooking times, it only converts
temperatures. Press the Convection Bake (1 Rack/Multi)
pad to view the conversion setting, press again to toggle
between On (Con On) and Off (Con oFF).
Sound Volume
This feature allows the oven tone volume to be adjusted
between high (HI bEEP HI), medium (Std bEEP Std),
ORZ/RE((3/RDQGRIIR))E((3R))3UHVVWKH
number 1 and 5 pads at the same time to view the
current setting or to change the setting. The control will
sound the oven tone at the new volume level each time
the sound level is changed.
12-hour auto shut-off and Sabbath
2SWLRQVIRUWKLVIHDWXUHDUH³6+GQ´³QR6+GQ´DQG
³6$EE$W+´
12-hour auto shut-off turns off the oven after 12 hours of
continuous operations.
Sabbath mode disables the oven lights (the oven light
will not turn on when the door is opened), all sounds
(the control will not beep when a button is pressed),
&RQYHFWLRQ%URLO:DUP3URRI&RRN7LPH7LPHU
&ORFNDQG'HOD\7LPHIXQFWLRQV6DEEDWKPRGHFDQ
RQO\EHXVHGZLWK%DNH7KLVIHDWXUHFRQIRUPVWRWKH
6WDU.-HZLVK6DEEDWKUHTXLUHPHQWV
Press and hold the Bake and Broil pads for 3 seconds
to enter special features.
Press the Delay Time pad to view the current setting
and then to change the setting.
7RXVH6DEEDWKPRGHVHOHFW³6$EE$W+´DQGSUHVVStart.
A ] will appear in the display and the clock will not display.
1RWHWKDWLI\RXKDYHDGRXEOHZDOORYHQZKHQ\RX
place the control into Sabbath mode, both ovens are
now in Sabbath mode and available for cooking.
Once in Sabbath mode, at any time you can press Bake,
use the number pads to enter a temperature between
)DQG)DQGSUHVVStart1RVRXQGZLOOEHJLYHQ
when the keys are pressed. At a random time between
30 seconds and 1 minute, ][, will appear in the display
indicating the oven is running.
1RWHWKDWERWKRYHQVRIDGRXEOHZDOORYHQFDQEHXVHG
in Sabbath mode. Each oven can be programmed
to a different temperature and each oven must be
programmed separately.
If you need to adjust the temperature, press Bake, use
the number pads to enter a new temperature between
)DQG)DQGSUHVVStart.
To turn the oven off, press Cancel/Off at any time. The
oven will immediately turn off and ][ will change to ]
indicating that the oven has turned off.
1RWHWKDWHDFKRYHQRIDGRXEOHZDOORYHQPXVWEH
turned off separately.
To exit Sabbath mode, make sure that the oven is
turned off. Press and hold the Bake and Broil pads for 3
seconds to enter special features then press Delay Time
XQWLOHLWKHU³6+GQ´RU³QR6+GQ´LVLQWKHGLVSOD\DQG
press Start.
NOTE: If power outage occurs during Sabbath mode the
unit will remain in Sabbath mode but off when power is
restored.
USING THE OVEN: Settings & Options
Lower Oven

15
49-80706
Settings & Options
USING THE OVEN: Settings & Options
Repeat last
1. Press upper oven cook option and
select repeat last.
2. The last preset food will be
displayed.
3. Press the START/PAUSE pad or the
selector dial to start cooking.
Use this time saving feature for
cooking repetitive items like cookies or
appetizers.
NOTE: The last program used is stored
for two hours.
Resume
feature
1. If your food needs to cook a bit
ORQJHU\RXFDQUHVWDUWWKHRYHQE\
pressing the START/PAUSE pad or
selector dial.
2. RESUME COOKING will be displayed
and the oven will restart immediately
at 10% of the original time.
The program stays in memory for 5
minutes. After that you will need to
begin the program again. See To use a
preset speedcook menu.

16 49-80706
Speedcook Menu Guide
Upper Oven
Display
prompts
1. Turn the dial until FOOD
MENU appears. Press
the dial to enter.
2. Turn the dial until
POULTRY appears.
Press the dial to enter.
3. Turn the dial until
CHICKEN, BONELESS
appears.
Press the dial to enter.
4. Turn the dial to
Select SIZE:
MEDIUM (7–9 oz each)
Press the dial to enter.
5. Turn the dial to
Select amount:
1–2 pieces
Press the dial to enter.
6. Use METAL TRAY is
displayed.
NOTE::KHQVSHHGFRRNLQJ
use the metal tray.
$IWHUSUHVVLQJWKH63(('&22.SDG
the oven will prompt you to make
VHYHUDOVHOHFWLRQVVXFKDVWKH
example below.
Preset
speedcook
menu
selections
■ After a cooking cycle has been
FRPSOHWHGXVHWKH5HVXPHIHDWXUH
to cook for additional time.
■ 7RUHYLHZVHWWLQJVGXULQJFRRNLQJ
press the selector dial.
Food Category Menu Selection
Appetizers Bagel Bites
Cheese Sticks
Egg Rolls (Frozen)
Hot Dip (2–4 Cups)
Jalapeno Poppers
Meat Balls (Frozen)
Nachos
Nuts Roasted
Onion Rings
Pizza Rolls
Soft Pretzels (Frozen)
Breads Bagels (frozen)
Biscuits
Bread Sticks
Cheese Bread
Crescent Rolls
Dinner Rolls
Garlic Bread
Quick Bread (9x5)
Sweet Rolls/Danish
Taco Shells (boxed)
Texas Toast
Breakfast Bagels (frozen)
Belgian Waffles
Breakfast Pizza
Casserole (egg 7x11)
Coffee Cake
French Toast
Pancakes (frozen)
Hashbrown Patties
Rolls (refrigerated)
Sausage Biscuit
Sausage
Strudel (frozen)
Sweet Rolls/Danish
Turnovers
Waffles (frozen)
Desserts Brownies
Cakes (mix 9x13)
Cobbler (fresh 7x11)
Coffee Cake
Cookies
Pie (fresh fruit)
Rolls (refrigerated)
Turnovers
Entree Burritos (frozen)
Chimichanga
Casserole
Egg Rolls (frozen)
Enchilada (fresh)
Lasagna
Meatloaf (9x5)
Quesadillas (fresh)
Stuffed Peppers (6)
Food Category Menu Selection
Meats Filet Mignon
Hamburger
Lamb Chops
Pork Chops
Roast – Pork
Roast – Beef
Ribeye Steak
Sirloin Steak
Strip Steak
T-Bone Steak
Tenderloin
Pizza Deli/Fresh
Use Precooked Crust
Frozen Pizza
Potatoes Baked Potato
Hashbrown Patties
Frozen Fries
Frozen Nugget
Sweet Potato/Yam
Poultry Chicken, Bone-In
Chicken, Boneless
Chicken Fillet (frozen)
Chicken Finger (frozen)
Chicken, Fried (frozen)
Chicken Nugget (frozen)
Chicken Patty (frozen)
Chicken Tender (frozen)
Chicken Wings (frozen)
Chicken, Whole
Turkey
Sandwich Corn Dog (frozen)
Crescent Roll Hot Dog
Grilled Sandwich
Hot Dog in a Bun
Pocket Sandwich
Taquitos (frozen)
Seafood Cod Fillets
Fish Sticks (frozen)
Frozen Breaded
Lobster Tails
Orange Roughy Fillet
Salmon
Sea Bass
Shellfish
Swordfish Steak
Tilapia
Tuna Steaks
Whitefish
Side Dish Refried Beans (16 oz)
Roasted Asparagus
Roasted Bell Pepper
Roasted Chilis (6)
Roasted Corn
Roasted Garlic
Roasted Mixed Vegetables
Stuffing (mix)
Stuffed Mushrooms
Stuffed Tomatoes
17
49-80706
Upper Oven
Speedcooking
Upper oven is already pre-set to cook
over 175 popular dishes.
1. Press the speedcook pad.
If no selection is made within 15
seconds, the display will revert back
to the time of day.
2. Turn the selector dial to select the
type of food category you want.
Press the dial to enter.
3. Turn the selector dial to select the
specific food (menu selection).Press
the dial to enter.
4. Turn the selector dial to select
DPRXQWVL]HDQGRUGRQHQHVVLI
UHTXLUHGWKHRYHQZLOOSURPSW\RX
Press the dial after each selection.
5. Once the display shows EDIT or
START, either press start or the
selector dial to start cooking.
Turn the food over when the oven
signals TURN FOOD OVER (for certain
foods).
When the oven signals CHECK for
DONENESS, check to see if your food is
done to your liking (for certain foods).
To review settings during cooking,
press the selector dial.
If you enter an undesired selection at
any time, simply press the BACK pad
and reenter the desired selections.
Using
speedcook
features
CAUTION: When using speedcook programs, remember that the
oven, door and dishes will be very hot!
PRECAUCIÓN:
cuando utilice los programas de cocción rápida, recuerde
que el horno, compuerta y los platos se ¡encontrarán muy calientes!
3ULRUWRWKH¿UVWXVHRI\RXURYHQWKHFORFNPXVWEHVHW
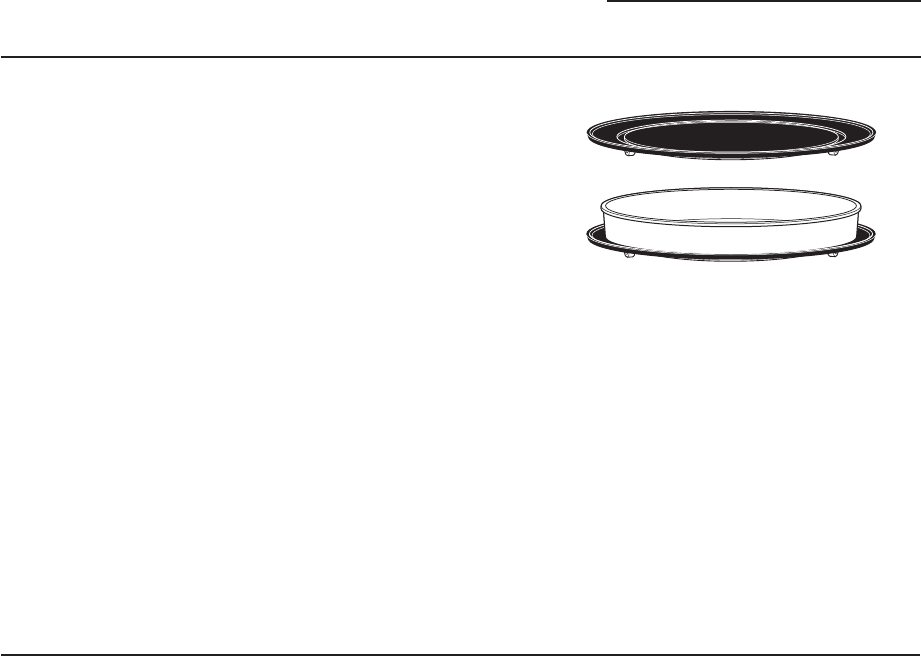
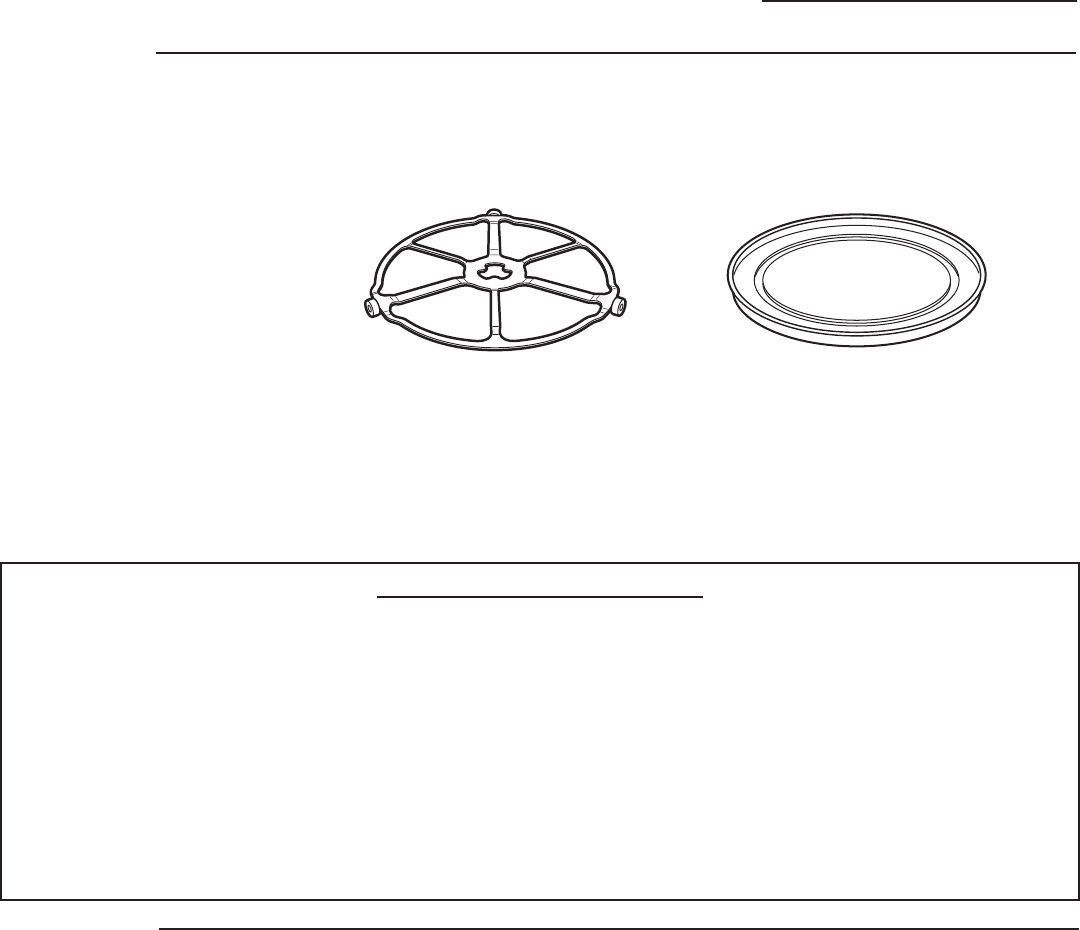
Before you begin, make sure the turntable is in place. Use the nonstick metal tray
and your own glass or ceramic cookware, if needed.
The turntable must always be in
place when using the oven.
Put food directly on the non-stick
metal tray to speedcook.
SPEEDCOOK PRESET FOOD SELECTIONS:
■ Appetizers ■ Desserts ■ Pizza ■ Sandwich
■ Breads ■ Entrees ■ Potatoes ■ Seafood
■ Breakfast ■ Meats ■ Poultry ■ Side Dish
To use
a preset
speedcook
menu
■ Early in a speedcook program, you
will see OPTIMIZING COOK TIME on
the display. The oven automatically
senses the electrical voltage level in
your home and adjusts the cooking
time up or down for proper cooking.
■ If the door is opened during cooking,
the oven will stop and PAUSE will
appear in the display. Close the door
and press the START/PAUSE pad to
resume cooking.
■ At anytime during cooking you can
turn the selector dial to change the
cooking time. You can change power
levels by pressing the dial to edit
setting.
■ To assure consistent cooking results,
the oven may adjust power levels
downward if the oven is hot at the
beginning of a program.
■ At the end of cooking, the automatic
fan may continue to run for a short
time to cool internal components.
■ To cook for additional time after a
cooking cycle has been completed,
use the resume feature.
18 49-80706
Speedcooking
Upper Oven
Cooking tips
for great
tasting results
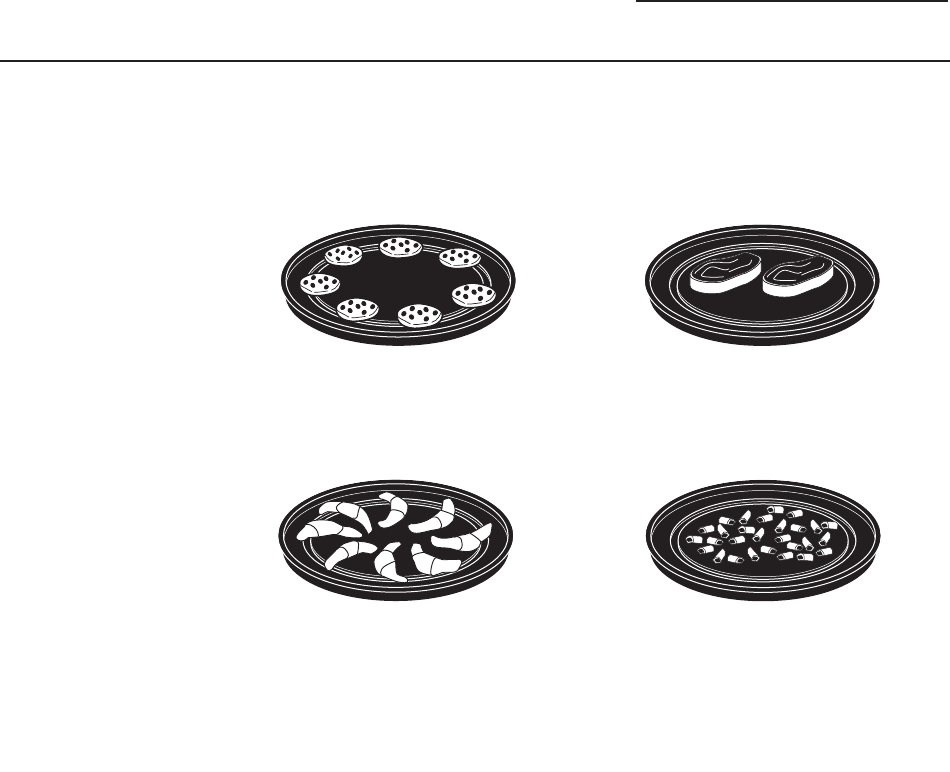
To ensure consistent and even
browning when cooking foods directly
on the metal tray, arrange food as
shown below.
Foods can touch but should not
overlap.
Circular pattern
([DPSOHELVFXLWVFRRNLHV
Spoke pattern
([DPSOHFUHVFHQWUROOVEUHDGVWLFNV
Single layer
(Example: appetizers)
Side by side pattern
(Example: meats and poultry)
)UHVKPHDWFKLFNHQ¿VKRUVHDIRRGWKDWKDVEHHQIUR]HQVKRXOGEHthawed
before cooking (the microwave defrost feature can be used). For other frozen
prepackaged foods, follow package directions.

19
49-80706
Speedcooking
Upper Oven
Speedcook
power level
Upper oven uses power from a
KLJKLQWHQVLW\KDORJHQOLJKWFHUDPLF
heaters and microwaves to cook food
IURPWKHWRSERWWRPDQGLQWHULRU
simultaneously to seal in moisture and
flavor.
When using the preset speedcook
UHFLSHVRQWKHIRRGPHQXWKHSRZHU
levels are already selected for you.
+RZHYHUWKHVHSRZHUOHYHOVFDQEH
DGMXVWHGEHIRUHRUGXULQJFRRNLQJE\
using the dial to select to edit the cook
mode setting. The my recipes feature
allows you to speedcook items not
on the preset food menu by selecting
your own cook time and power level
settings.
Each power level gives you heater
power and microwave energy for a
certain percentage of the time.
UPPER HEATER (UH) controls both
the upper halogen light and upper
ceramic heater. A higher UPPER
HEATER setting will utilize more upper
KHDWHUSRZHUEURZQLQJIRRGIDVWHU
on top.
Select a higher setting for foods such
as pizza and baked goods. Select
a lower setting for foods such as
FDVVHUROHVPHDWDQGILVK
LOWER HEATER (LH) controls the lower
heater.
Select a higher setting to brown
foods more on the bottom. Select a
lower setting for less browning on the
bottom.
Microwave (M) controls the microwave
power. A higher setting will utilize
more microwave power causing food
to cook more evenly.
3UHVVWKH63(('&22.SDGDQGWXUQ
the dial to select FOOD MENU or
)$925,7(5(&,3(RUSUHVV&86720
63(('&22.WRPDQXDOO\VHWSRZHU
level and timer. Press the dial to
enter.
7XUQWKHGLDOWRVHOHFWDIRRGWLPH
or power level as prompted. Press
the dial to enter.
3. To change the power level when
SURPSWHGE\WKHGLVSOD\WXUQ
the dial clockwise to increase or
counterclockwise to decrease the
upper power level. Press the dial to
enter.
4. Microwave levels are set
automatically based on the upper
and lower lamp settings.
5.
Press the START/PAUSE
pad
or the
selector dial to start cooking.
If you do not want to change one of
the settings, just press the dial to move
to the next selection.
NOTE: Be careful when adjusting
power levels so that you do not over-
or undercook food.
UH = Select a higher setting for thin
foods requiring a golden brown
WRSH[DPSOHILVKILOOHWVWRDVW
boneless chicken breasts). Select
a lower setting for thicker foods
and foods with high sugar or fat
FRQWHQWH[DPSOHFDNHVURDVWV
M = Select a higher setting to cook
food more evenly.
LH = Select a higher setting for thick or
dense foods that may not cook
quickly in the center (example:
casseroles). Select a lower setting
for thin foods (example: cookies)
and foods containing high fat or
VXJDUFRQWHQWH[DPSOHSDVWU\
cakes).
Follow these general guidelines when selecting the best UH, LH and M settings
for your favorite recipe:
20 49-80706
Speedcooking
Upper Oven
My recipes
Upper oven gives you the flexibility to
cook your favorite dishes.
If you want to cook a food item that is
QRWDPRQJWKHSUHVHWVHOHFWLRQVXVH
my recipes.
3UHVVWKH63(('&22.SDG
If no entries are made within 15
seconds, the display will revert back to
the time of day.
2. Turn the selector dial to select my
recipes. Press the dial to enter.
3. Press dial to select new recipe.
4. Turn to select cooking time.
The display will prompt you to
select the power level(s).
5. Turn the dial clockwise to increase
or counterclockwise to decrease
the upper heater power level. Press
the dial to enter.
6. Turn the dial to change the lower
heater power level. Press the dial to
enter.
7. Turn the dial to change the
microwave power level press the
dial to enter.
8. Press the START/PAUSE pad or
press the selector dial to start
cooking. Select edit to edit
selections.
For power level and cooking time
suggestions, use your cooking guide or
cookbook.
You can select save to save my recipe
you just programmed for later use.
SPELL THE FOOD NAME appears. Turn
the dial to the first letter of your food
description and press the dial to enter.
Continue this process to spell the rest
of the food name. Press the START/
PAUSE pad to save the recipe and its
name. To access the saved recipe,
press speedcook, my recipes and select
the recipe you saved.
Speedcook
cookware
■ Follow cookware suggestions on
the oven display or in the cookbook
or cooking guide.
■ Cookware will become hot because
of heat transferred from the heated
food. Oven mitts will be needed to
handle the cookware.
■ Place food directly on the nonstick
metal tray when cooking, unless
prompted by the oven to do
otherwise.
■ Use the nonstick metal tray in the
same way you would use a shallow
baking pan or baking tray.
■ In addition to the cookware
provided, you can use non-metal
casserole dishes, pie plates and
other heat-safe cookware. Place
them directly on the turntable.
■ Be sure to select a size that will
rotate easily.
■ Place the nonstick metal tray on the
turntable. Place glass or ceramic
cookware on the tray.
■ Do not use cookware or coverings
made of paper, plastic or foil when
cooking during a speedcook cycle.

21
49-80706
Speedcooking
Upper Oven
My recipes
To edit/delete stored custom
speedcook recipes:
1. Press the SPEEDCOOK pad.
2. Turn dial to my recipes. Press the
dial to enter.
3. Turn dial to select the stored
custom recipe. Press the dial to
enter.
4. Turn dial to edit or delete to edit
or delete the custom recipe. Press
the dial to edit or delete.
22 49-80706
%DNLQJ%URLOLQJDQG7RDVWLQJ
Upper Oven
3UHVVWKH&219%$.(SDG
2. Turn the dial to set the oven temperature
and press to enter.
6HOHFW67$57RU&22.7,0(
Preheat after selecting start:
1. The oven starts preheating immediately.
Do not place the food in the oven.
:KHQWKHRYHQLVILQLVKHGSUHKHDWLQJLW
will signal. If you do not open the door
ZLWKLQKRXUWKHRYHQZLOOWXUQRII
DXWRPDWLFDOO\2SHQWKHRYHQGRRUDQG
XVLQJFDXWLRQSODFHWKHIRRGLQWKHRYHQ
3. Close the oven door. Press the dial twice
to set the cook time and press START/
PAUSE to start cooking. When cooking is
FRPSOHWHWKHRYHQZLOOVLJQDODQGWXUQRII
You may change the oven temperature during
preheating by pressing the dial and turning the
dial to select the new temperature.
If the oven door is opened during cooking,
PAUSE will appear in the display. Close the door
and press START/PAUSE.
Cook times are shown in minutes and can
be a maximum of 179 minutes. Time can be
changed during cooking by turning the dial.
Preheat after selecting cook time:
$IWHUVHOHFWDFRRNWLPHRYHQZLOOSURPSW
you to start cook time or start preheat.
2. Press start cook time to skip preheat or
press start preheat to preheat.
:KHQWKHRYHQLVILQLVKHGSUHKHDWLQJLW
will signal. If you do not open the door
ZLWKLQKRXUWKHRYHQZLOOWXUQRII
DXWRPDWLFDOO\2SHQWKHRYHQGRRUDQG
XVLQJFDXWLRQSODFHWKHIRRGLQWKHRYHQ
4. Close the oven door. Press dial to edit
WHPSHUDWXUHRUFRRNWLPHLIQHHGHGDQG
or press START/PAUSE to start cooking.
When cooking is complete the oven will
signal and turn off.
3UHVVWKH&22.,1*237,216SDG
2. Turn the dial to BROIL or TOAST and press
to enter.
,I%URLOSUHVVWKHGLDOWRVWDUW
,I7RDVWWXUQGLDOWRVHOHFWWLPHDQGSUHVV
to select. Press dial again to start.
If the oven door is opened during cooking,
PAUSE will appear in the display. Close the door
and press START/PAUSE.
How to
Bake
How to
Broil or
Toast
Baking,
Broiling
and
Toasting
Baking allows you to cook foods the same way as a
FRQYHQWLRQDORYHQXVLQJDKHDWLQJHOHPHQWWRUDLVH
the temperature of the air inside the oven. Any oven
temperature from 250°F to 450°F may be set.
Broiling allows you to broil foods in the same way as a
conventional oven.
Toasting allows you to toast foods the same way as a
conventional oven.
A fan gently circulates heated air throughout the
RYHQRYHUDQGDURXQGWKHIRRG%HFDXVHWKHKHDWHG
DLULVNHSWFRQVWDQWO\PRYLQJQRWSHUPLWWLQJDOD\HU
RIFRROHUDLUWRGHYHORSDURXQGWKHIRRGVRPHIRRGV
cook slightly faster than in regular oven cooking.
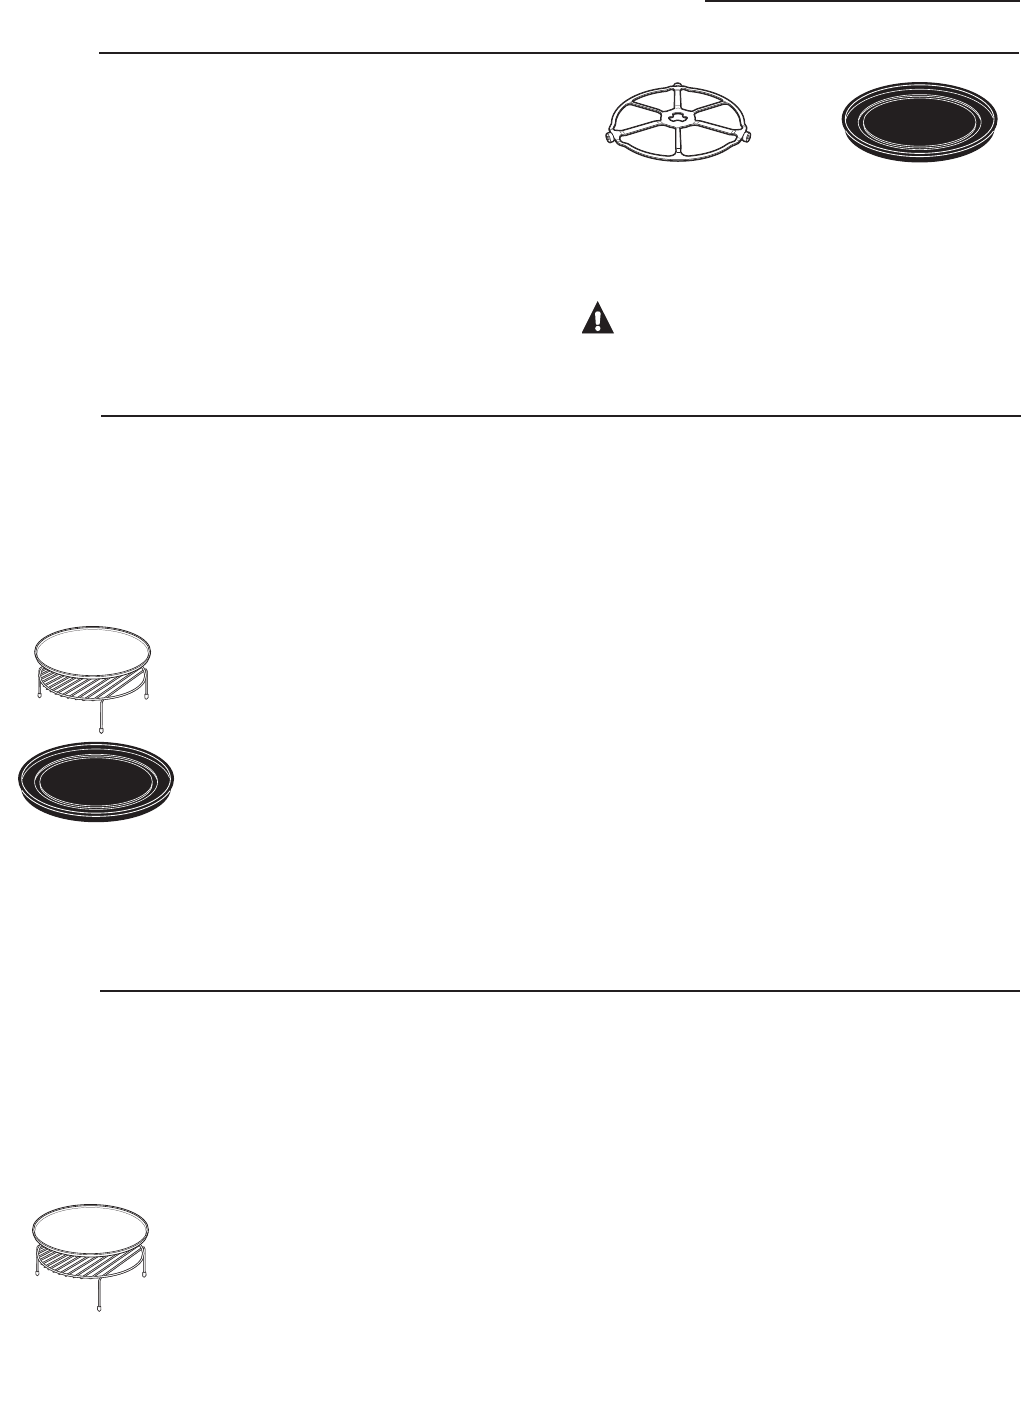
%HIRUH\RXEHJLQPDNHVXUHWKHWXUQWDEOHLVLQSODFH
Use the metal tray at all times when baking.
CAUTION: When baking, remember that
the oven, door and dishes will be very hot!
The turntable must
always be in place when
using the oven.
Put food or oven-safe
cookware directly on the
metal tray to bake.
Put food directly on the aluminum
baking sheet on the wire oven
UDFNDQGSODFHWKHPRQWKHPHWDO
WUD\ZKHQEURLOLQJRUWRDVWLQJ
foods.
)RUWZROHYHOEDNLQJSODFHIRRG
in a metal baking dish or directly
on the non-stick metal tray.
Place the aluminum baking sheet
or your baking dish with food on
top of the wire rack. Stand the
rack with food on the metal tray.
23
49-80706
Warming and Proofing
Upper Oven
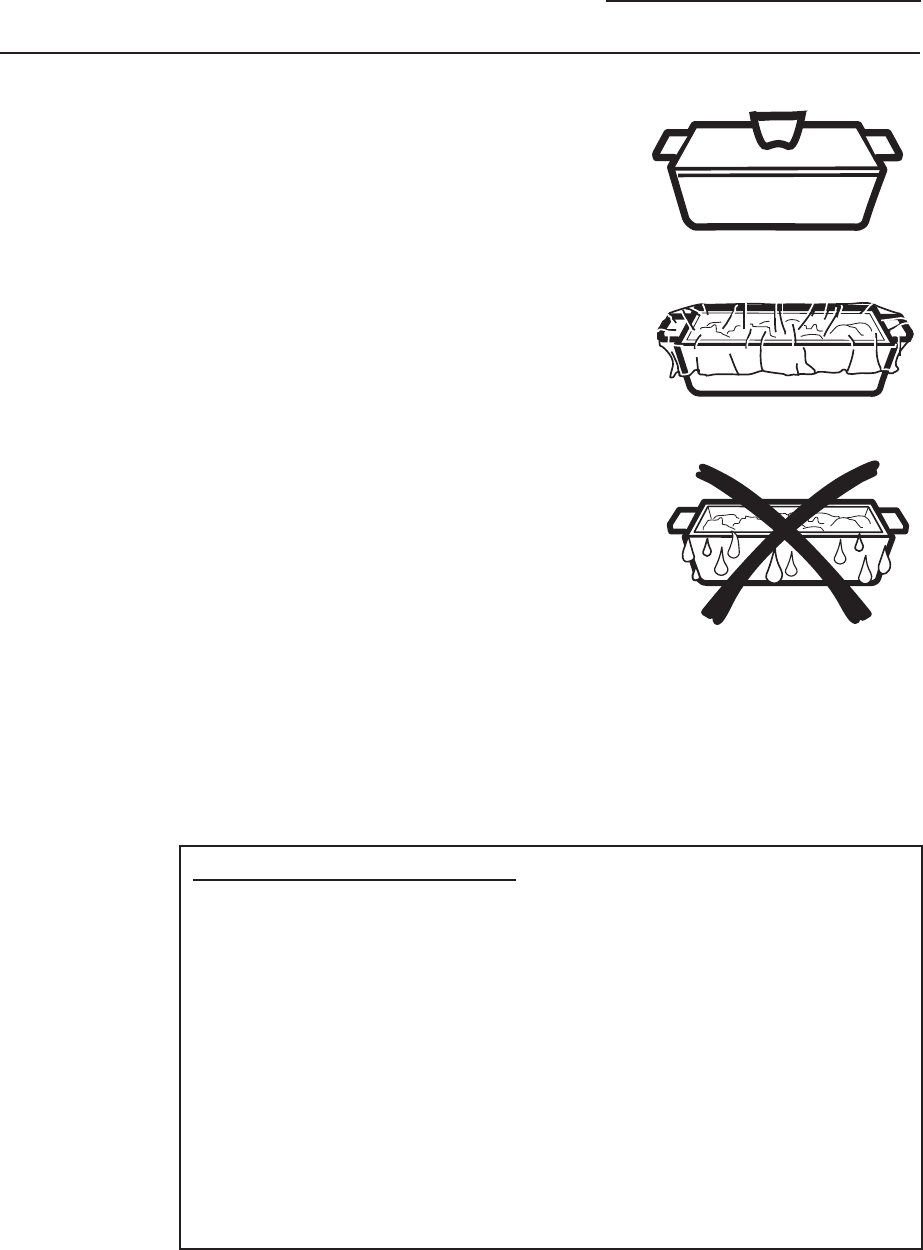
Tips for Crisp Foods:
■ Leave food uncovered.
■ Do not use plastic containers or
plastic wrap.
Tips for Moist Foods:
■ Cover food with lid or
aluminum foil.
■ Do not use plastic containers or
plastic wrap.
Food Type Moisture Setting
Bread, hard rolls CRISP
Bread, soft rolls MOIST
Casseroles MOIST
Fried foods CRISP
Meats* and fish CRISP
Pancakes, waffles CRISP
Pizza CRISP
Potatoes, baked CRISP
Potatoes, mashed MOIST
Poultry MOIST
Tortilla Chips CRISP
Vegetables MOIST
* USDA/FSIS recommends an internal temperature of 145°F
as the minimum doneness for beef. Use a portable meat
thermometer to check internal temperatures.
Temperature and Moisture Selection Chart
Warming
The WARM feature will keep hot, cooked
foods at serving temperature. Always start
with hot food. Use cookware and utensils
that can withstand temperatures up to
Û)
3UHVVWKH&22.,1*237,216SDG
2. Turn the dial to WARM. Press the
dial to enter.
3. Turn the dial to select Moist/Crisp.
Press the dial to enter.
If the oven door is opened during warming,
PAUSE will appear in the display. Close the
door and press START/PAUSE.
To Crisp Stale Items:
■ Place food or dishes directly on the
black metal tray.
■ Check crispness periodically. Add
time as needed.
The proofing feature automatically
provides the optimum temperature for the
proofing process, and therefore does not
have a temperature adjustment.
3UHVVWKH&22.,1*237,216SDG
2. Turn the dial to select PROOF. Press the
dial to enter. The oven starts proofing
immediately and shows the amount of
proofing time completed.
■ To optimize performance avoid
unnecessary door opening.
■ Check bread products early to
avoid over-proofing.
NOTES:
■ Do not use the proofing mode for
warming food or keeping food hot.
The proofing oven temperature is
not hot enough to hold foods at
safe temperatures. Use the WARM
feature to keep food warm.
■ Proofing will not operate if the oven
is too hot. Allow the oven to cool
before proofing.
Proofing
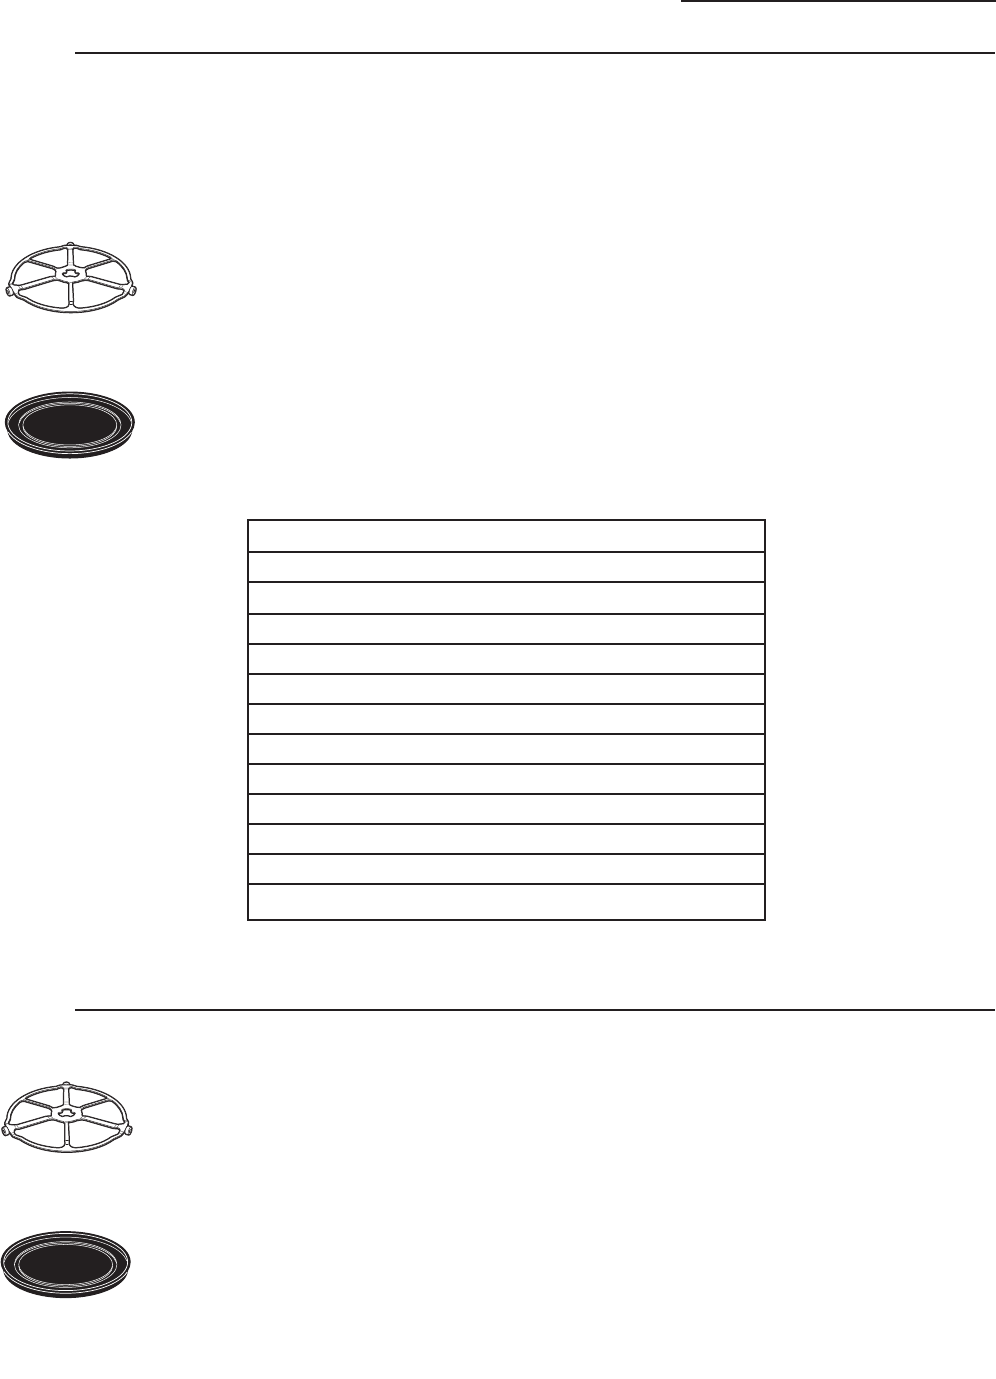
The turntable must always be
in place when using the oven.
Put food directly on the
non-stick metal tray to warm.
The turntable must always be
in place when using the oven.
Put bread dough in a
bowl/bread pan and place on
the metal tray to proof.
24 49-80706
Microwaving
Upper Oven
Using the
microwave
features
Make sure the turntable and clear glass tray are in place.
Place food or microwavable container directly on the clear glass tray
to cook your food.
■ Beverage
–Water (8-12 oz.)
–Coffee (8-12 oz.)
–Tea (8-12 oz.)
–Milk (8-12 oz.)
–Hot Cocoa (8-12 oz.)
■ Popcorn
–Popcorn Sensor
■ Melt
–Butter
–Caramel
–Cheese
–Chocolate Chips
–Marshmallow
■ Simmer
■ Cook
–By Food Type
–By Time
–By Time 1 & 2
■ Soften
–Butter
–Cream Cheese
–Frosting (16 oz.)
–Ice Cream
■ Defrost
–1.0 lb Quick
–By Time
–By Weight
–By Food Type
–Melt
–Soften
■ Reheat
–Beverage
–Casserole
–Chicken
–Pasta
–Pizza
–Plate of Food
–Rice
–Soup
–Steaks/Chops
–Vegetables
MICROWAVE PRESET SELECTIONS:
The turntable must always
be in place when using the oven.
The clear glass tray should always be
in place when microwaving.
How to
use pre-set
microwave
selections
1. Press the MICROWAVE pad.
If no selection is made within 15
seconds, the display will revert
back to the time of day.
2. Turn the dial to find the food
\RXZDQWWRFRRNGHIURVWRU
reheat. Press the dial to enter.
3. Turn the selector dial to select the
W\SHDPRXQWZHLJKWDQGRUVL]H
$VUHTXLUHGWKHRYHQZLOOSURPSW
you.) Press the dial after each
selection.
4. Press the dial or the START/PAUSE
pad to start cooking.
To review or edit settings during
cooking, press the selector dial.
If the door is opened during cooking,
the oven will stop and PAUSE will
appear in the display. Close the door
and press START/PAUSE to resume
cooking.
If you enter an undesired selection at
any time, simply press the %$&.pad
and reenter the desired selections.
Cookware
■ Make sure that cookware is suitable
for microwaving.
■ Place food or microwavable container
directly on the clear glass tray to cook
your food.

25
49-80706
Microwaving
Upper Oven
Cook By Time
and Cook By
Time 1 & 2
Use COOK BY TIME and COOK BY TIME
1 & 2 to microwave food that is not in
the recipe section and at the time(s)
you set.
■ The power level is automatically set
DWKLJKEXW\RXFDQFKDQJHLWIRU
more flexibility.
1. Press the MICROWAVE pad.
2. 7XUQWKHGLDOWRVHOHFW&22.%<
7,0(RU&22.%<7,0(DQG
press the dial to enter.
3. Turn the dial to set the cook time
and press the dial to enter.
4. Select power level setting.
If you selected COOK BY TIME 1 & 2,
turn the dial to set the second cook
time, second power level setting and
press the dial to enter.
5. Press the dial or the START/PAUSE
pad to start cooking.
You may open the door during COOK
BY TIME and COOK BY TIME 1 & 2 to
check the food. Close the door and
press START/PAUSE to resume cooking.
Press ADD 30 SEC repeatedly for
30-second increments of microwave
cooking time. Oven starts immediately.
Use this feature to instantaneously
start microwave. Also use this button
to add 30 seconds to cooking.
Add 30 Sec
Microwave
power level(s)
■ You can change the power level
during most cooking program.
1. Press the dial to edit
2. Rotate dial to change time and/or
press dial to enter.
3. Turn the dial clockwise to increase
and counterclockwise to decrease
the power level. Press the dial
to enter.
Here are some examples of uses for
various power levels:
High 10: )LVKEDFRQYHJHWDEOHV
boiling liquids.
Med-High 7: Gentle cooking of meat
and poultry; baking casseroles and
reheating.
Medium 5: Slow cooking and
tenderizing for stews and less tender
cuts of meat.
Low 2 or 3: 'HIURVWLQJVLPPHULQJ
delicate sauces.
Warm 1: .HHSLQJIRRGZDUP
softening butter.
■:KHQFRRNLQJEDFRQOD\HUVWULSV
on a plate. Cover each layer with a
paper towel.
■:KHQFRRNLQJYHJHWDEOHVXVHD
microwave-safe casserole or bowl.
Cover with a microwave-safe lid or
vented plastic wrap.
■ )RUIUR]HQYHJHWDEOHVIROORZWKH
package instructions for adding
water.
■ )RUIUHVKYHJHWDEOHVDGG
tablespoons of water for each
serving.
Cooking tips

26 49-80706
Microwaving
Upper Oven
Defrost by
food type
Auto Defrost automatically sets the
defrosting times and power levels to
JLYHHYHQGHIURVWLQJUHVXOWVIRUPHDWV
poultry and fish weighing up to 6
pounds.
1. Remove food from the package
and place it on a microwave-safe
dish.
2. Press the MICROWAVE pad and
select defrost.
3. Turn the dial to DEFROST BY FOOD
TYPE. Press the dial to enter.
4. Turn the dial to select food type.
Press the dial to enter.
7XUQWKHGLDOWRWKHIRRGZHLJKW
using the Conversion Guide at the
ULJKW)RUH[DPSOHGLDOIRU
SRXQGVSRXQGR]3UHVVWKH
dial to enter.
6. Press the dial or START/PAUSE pad
to start defrosting.
7. Turn the food over when the oven
signals TURN FOOD OVER.
■ Remove defrosted meat or shield
warm areas with small pieces of foil
for even defrosting.
■ After defrosting, most meats need
to stand 5 minutes to complete
defrosting. Large roasts should
stand for about 30 minutes.
Conversion Guide
If the weight of food is stated in pounds
and ounces, the ounces must be
converted to tenths (.1) of a pound.
Weight of Food Enter Food Weight
in Ounces (tenths of a pound)
1–2 .1
3 .2
4–5 .3
6–7 .4
8 .5
9–10 .6
11 .7
12–13 .8
14–15 .9
Use DEFROST BY TIME to defrost for a
selected length of time.
1. Press the MICROWAVE pad and
select defrost.
2. Turn the selector dial to DEFROST
BY TIME. Press the dial to enter.
3. Turn the dial to select the time you
want. Press the dial to enter.
4. Press the dial or START/PAUSE pad
to start defrosting.
5. Turn the food over when the oven
signals TURN FOOD OVER.
Power level is automatically set at 3,
but can be changed. To change the
power levels, see the Microwave Power
Level(s) section. You can defrost small
items quickly by raising the power level
after entering the time. Power level 7
cuts the total defrosting time in about
half; power level 10 cuts the total time
to about 1/3. When defrosting at high
power levels, food will need more
frequent attention than usual.
Defrost by
time

27
49-80706
Use DEFROST BY WEIGHT to defrost for
a selected length of time.
1. Press the MICROWAVE pad and
select defrost.
2. Turn the selector dial to DEFROST
BY WEIGHT. Press the dial to enter.
3. Turn the dial to select the weight
you want. Press the dial to enter.
4. Press the dial or START/PAUSE pad
to start defrosting.
5. Turn the food over when the oven
signals TURN FOOD OVER.
Power level cannot be changed during
this setting.
Use 1.0 lb. QUICK DEFROST for quick
defrost of 1.0 lb. of frozen food.
1. Press the MICROWAVE pad and
select 1.0 Lb. quick defrost.
2. Press dial or START/PAUSE pad to
start defrosting. Press the dial to
enter.
3. Turn the food over when the oven
signals TURN FOOD OVER.
Power level cannot be changed during
this setting.
Defrost by
weight
1.0 lb. Quick
Defrost
Microwaving
Upper Oven
Defrosting
tips
■ Foods frozen in paper or plastic can
be time defrosted in the
SDFNDJH
but foods should be taken out of
the package when using
DEFROST
BY FOOD TYPE
. Closed packages
VKRXOGEHVOLWSLHUFHGRUYHQWHG
after food has partially defrosted.
Plastic storage containers should be
partially uncovered.
■)DPLO\VL]HSUHSDFNDJHGIUR]HQ
dinners can be defrosted and
microwaved. If the food is in a
IRLOFRQWDLQHUWUDQVIHULWWRD
microwave-safe dish.
■ Foods that spoil easily should not
be allowed to sit out for more than
one hour after defrosting. Room
temperature promotes the growth
of harmful bacteria.
■ For more even defrosting of larger
IRRGVVXFKDVURDVWVXVHDEFROST
BY TIME. Be sure large meats
are completely defrosted before
cooking.
■:KHQGHIURVWHGIRRGVKRXOGEH
cool but softened in all areas. If still
VOLJKWO\LF\UHWXUQWRWKHPLFURZDYH
YHU\EULHIO\RUOHWLWVWDQGDIHZ
minutes.

28 49-80706
Microwaving
Upper Oven
Melt
Simmer
Popcorn
Soften
Beverage
Reheat
29
49-80706
The sensor feature detects the
increasing humidity released during
cooking. The oven automatically adjusts
the cooking time to various types and
amounts of food.
Do not use the Sensor Features twice in
VXFFHVVLRQRQWKHVDPHIRRGSRUWLRQ³
it may result in severely overcooked or
burnt food. If food is undercooked after
the first countdown, use COOK BY TIME
for additional cooking time.
The proper containers and covers are
essential for best sensor cooking.
■ Always use microwave-safe
containers and cover them with lids
or vented plastic wrap. Never use
WLJKWVHDOLQJSODVWLFFRQWDLQHUV³WKH\
can prevent steam from escaping
and cause food to overcook.
■ Be sure the outside of the cooking
containers and the inside of the
oven are dry before placing food
in the oven. Beads of moisture
turning into steam can mislead
the sensor.
■ Beverages are best heated
uncovered.
Microwaving
Upper Oven
Microwave
sensor
cooking
Covered
Vented
Dry off dishes so they don’t
mislead the sensor.
MICROWAVE SENSOR PROGRAMS:
■Ground Meat
■Popcorn
■Soup
■Rice
■Vegetables (Canned, Fresh, Frozen)
■Chicken Reheat
■Pasta Reheat
■Plate of Food Reheat
■Soup Reheat
■Vegetable Reheat

30 49-80706
Microwaving
Upper Oven
To use all
sensor
programs
Upper Oven microwave mode features
sensor cooking. It automatically senses
ZKHQIRRGLVGRQHDQGVKXWVLWVHOIRII³
eliminating the need to program cook
times and power levels.
1. Press the MICROWAVE pad and
WXUQWKHGLDOWR&22.%<)22'
TYPE or REHEAT. Press the dial to
enter. Or press the REHEAT pad.
2. Turn the dial to select the food you
want. Press the dial to enter.
3. Press the dial or press the START/
PAUSE pad to start cooking.
Do not open the oven door until time
is counting down in the display or the
microwave stop cooking. If the door
LVRSHQHGFORVHLWDQGSUHVV67$57
PAUSE immediately. If the food is not
GRQHHQRXJKXVHCOOK BY TIME in the
microwave selector to cook for more
time.
NOTE: Do not use the Sensor Features
twice in succession on the same food
SRUWLRQ³LWPD\UHVXOWLQVHYHUHO\
overcooked or burnt food.
■ If you have been speedcooking
DQGWKHRYHQLVDOUHDG\KRWLWPD\
indicate that it is too hot for sensor
FRRNLQJ2IFRXUVH\RXFDQDOZD\V
continue with COOK BY TIME.
NOTE: If the oven is too hot then it will
automatically change to time cooking.
■ To shorten or lengthen the cook
WLPHZDLWXQWLOWKHWLPHFRXQWGRZQ
shows in the display. Then turn the
dial to add or subtract time.
■ If you open the door while
Sensor CookingSENSOR ERROR
ZLOODSSHDU&ORVHWKHGRRUSUHVV
START/PAUSE to begin again.
Notes about the Reheat program:
Reheated foods may have wide
variations in temperature. Some areas
may be extremely hot.
It is best to use COOK BY TIME and not
REHEAT for these foods:
■ Bread products
■ Food that must be reheated
uncovered.
■ Foods that need to be stirred or
turned.
■ Foods calling for a dry look or crisp
surface after reheating.

31
49-80706
Other Advantium Features
Upper Oven
Cooking
Complete
Reminder
To remind you that you have food in
WKHRYHQWKHRYHQZLOOGLVSOD\COOK
TIME COMPLETED and beep once a
minute until you either open the oven
door or press the CANCEL/OFF pad.
Features
under the
SETTINGS
pad
Clock:
The clock must be set before you can
use your oven for the first time (see
Quick Start for instructions).
7RFKDQJHWKHFORFNWLPHSUHVVWKH
SETTINGS pad and turn the dial to
CLOCK. Press the dial to enter.
2. Turn the dial to set hours. Press the
dial to enter.
3. Turn the dial to set minutes. Press
the dial to enter.
4. Turn the dial to select AM or PM.
Press the dial to enter.
Display Mode:
Use this feature to set your display
to power saver mode or always on.
3UHVVWKH237,216SDGWXUQWKHGLDO
to select CLOCK DISPLAY ON/OFF. Turn
the dial to select ON or OFF. Press the
dial to enter.
Beeper Volume:
Use this feature to turn beeper volume
RQ3UHVVWKH6(77,1*6SDGWXUQWKH
dial to select BEEPER VOLUME, press
the dial to enter some beeper tone are
not mutable.
Reminder:
Use this feature to set an alarm beep
to sound at a specific time of day.
3UHVVWKH237,216SDGWXUQWKHGLDO
to SET/CLEAR REMINDER and press
the dial to enter. Turn the dial to select
the hour and press to enter. Turn the
dial to select the minute and press to
enter. Turn the dial to select AM or PM
and press to enter.
7RUHYLHZWKHVHWWLQJWXUQWKHGLDOWR
SET/CLEAR REMINDER and press the
dial to enter. Turn the dial to REVIEW
and press to enter.
7RFDQFHOWKHVHWWLQJWXUQWKHGLDOWR
SET/CLEAR REMINDER and press the
dial to enter. Turn the dial to CLEAR
and press to enter.

32 49-80706
Other Advantium Features
Upper Oven
Settings
"Help"
NOTE: Not all features of help would
be on your oven model
Use this feature to find out more about
your oven and its features.
1. Press the SETTINGS pad and select
help.
2. Turn the dial to select the feature
name. Press the dial to enter.
The display will show a description for
the program you have chosen.
Adding Time
Auto Conversion
Auto Shut-Off
Back
Bake
Beeper Volume
Beverage
Broil
Clear/Off
Clock
Control Lockout
Cook
Cook by Food
Cook by Time
Cook by Time 1 & 2
Cooking Options (Lower)
Cooking Options (Upper)
Defrost
Defrost by Food
Defrost by Time
Defrost by Weight
Delay Start
Display Mode
Edit
Help
Melt
Micro 30 Secs
Microwave
My recipes
Probe
Proof
Reheat
Reminder
Repeat Last
Resume
Sabbath
Self Clean
Sensor Cooking
Simmer
Soften
Speed Cook
Start/Pause
Steam Clean
Temperature Units
Thermostat Adjust
Timer On/Off
Toast
Warm
Features found in the HELP function.

33
49-80706
Speedcooking
Upper Oven
Things that
are normal
Cooking Times
■ :KHQVSHHGFRRNLQJSUHSURJUDPPHGIRRGV
you may see OPTIMIZING COOK TIME in the
display several seconds after you press
START/PAUSE. The oven automatically
senses the electrical voltage level in your
KRPHDQGDGMXVWVWKHFRRNLQJWLPHXSRU
down for proper cooking.
Fan/Vent
■ The fan will be on during cooking. At the
HQGRIFRRNLQJWKHDXWRPDWLFIDQPD\
FRQWLQXHWRUXQIRUDVKRUWWLPHDQGWKH
display will read Oven is Cooling. The fan
will automatically shut off when the internal
parts of the oven have cooled.
■ The oven vent will emit warm air while the
oven is on.
Lights
■ :KHQWKHRYHQLVRQOLJKWPD\EHYLVLEOH
around the door or outer case.
■ The halogen lights will dim and cycle
RQDQGRIIGXULQJDVSHHGFRRNF\FOH
sometimes even at full power levels. This is
normal. The oven senses the heat level and
DGMXVWVDXWRPDWLFDOO\
Oven Heat
■ No preheating time is required during
Speedcook cycles. The oven begins cooking
immediately.
■ The door and inside of the oven will be very
hot. Use caution when opening the door
and removing food.
■ Do not use cookware or coverings made of
SDSHUSODVWLFRUIRLOZKHQFRRNLQJGXULQJD
speedcook cycle.
■ When cooking for an extended period
RIWLPHWKHRYHQPD\DXWRPDWLFDOO\
reduce the power levels to maintain the
appropriate level of oven heat.
Sounds
■ Clicks and a fan blowing are normal sounds
during cooking. The relay board is turning
components on and off.
Things that
are normal
Interference
■ TV/radio interference might be noticed while
using the microwave. Similar to the interference
FDXVHGE\RWKHUVPDOODSSOLDQFHVLWGRHVQRW
indicate a problem with the microwave. Move
the radio or TV as far away from the microwave
DVSRVVLEOHRUFKHFNWKHSRVLWLRQRIWKH79UDGLR
antenna.
Lights
■ The oven cavity light will come on during a
microwave cooking cycle.
Oven Heat
■ Cookware may become hot because of heat
transferred from the heated food. Oven mitts
may be needed to handle the cookware.
■ Steam or vapor may escape from around the
door.

34 49-80706
Cooking Modes
USING THE OVEN: Cooking Modes
Your new oven has a variety of cooking modes to help you get the best results. These modes are described below.
5HIHUWRWKH&RRNLQJ*XLGHVHFWLRQIRUUHFRPPHQGDWLRQVIRUVSHFLILFIRRGV5HPHPEHU\RXUQHZRYHQPD\SHUIRUP
differently than the oven it is replacing.
Baking and Roasting Modes
Select a mode for baking and roasting based on the
W\SHDQGTXDQWLW\RIIRRG\RXDUHSUHSDULQJ:KHQ
preparing baked goods such as cakes, cookies, and
pastries always preheat the oven first. Follow recipe
recommendations for food placement. If no guidelines
are provided, center food in the oven.
Traditional Bake
The traditional bake mode is intended for single rack
cooking. This mode uses heat primarily from the lower
element but also from the upper element to cook
food. To use this mode, press the Bake pad, enter a
temperature, and then press Start. Preheating is generally
recommended when using this mode.
Convection Bake 1 Rack
7KH&RQYHFWLRQ%DNH5DFNPRGHLVLQWHQGHGIRU
single rack cooking. This mode uses heat from the
lower element and also the upper and rear elements,
along with air movement from the convection fan to
enhance evenness. Your oven is equipped with Auto
Recipe Conversion, so it is not necessary to convert the
temperature when using this mode. To use this mode
press the Convection Bake (1 Rack/Multi) pad, enter
a temperature, and then press Start. Preheating is
generally recommended when using this mode.
Convection Bake Multi Rack
7KH&RQYHFWLRQ%DNH0XOWL5DFNPRGHLVLQWHQGHG
for baking on multiple racks at the same time. This
mode uses heat primarily from the rear element but
also heat from the upper and lower elements, along
with air movement from the convection fan to enhance
cooking evenness. Your oven is equipped with Auto
Recipe Conversion, so it is not necessary to convert the
WHPSHUDWXUHZKHQXVLQJWKLVPRGH%DNLQJWLPHPLJKW
be slightly longer for multiple racks than what would be
expected for a single rack. To use this mode press the
Convection Bake (1 Rack/Multi) Multi Rack pad twice,
enter a temperature, and then press Start. Always
preheat when using this mode.
Convection Roast
The Convection Roast mode is intended for roasting
whole cuts of meat on a single rack. This mode uses heat
from the lower, upper, and rear elements along with air
movement from the convection fan to improve browning
and reduce cooking time. It is not necessary to convert
temperature. Check food earlier than the recipe suggested
time when using this mode, or use a meat probe. To use
this mode press the Convection Roast pad, enter a
temperature, and then press Start. It is not necessary to
preheat when using this mode.
Broiling Modes
Always broil with the door closed. The broil element in
this oven is very powerful. Monitor food closely while
EURLOLQJ8VHFDXWLRQZKHQEURLOLQJRQXSSHUUDFN
positions as placing food closer to the broil element
increases smoking, spattering, and the possibility
of fats igniting. Broiling on rack position 6 is not
recommended.
Try broiling foods that you would normally grill. Adjust
rack positions to adjust the intensity of the heat to the
food. Place foods closer to the broil element when a
seared surface and rare interior is desired. Thicker foods
and foods that need to be cooked through should be
broiled on a rack position farther from the broiler or by
XVLQJ%URLO/R. For best performance center food below
the broil heating element.
Broil Hi
7KH7UDGLWLRQDO%URLO+LPRGHXVHVLQWHQVHKHDWIURP
WKHXSSHUHOHPHQWWRVHDUIRRGV8VH%URLO+LIRUWKLQQHU
cuts of meat and/ or foods you prefer less done on the
interior. To use this mode press the Broil pad once and
then press Start. It is not necessary to preheat when
using this mode.
Broil Lo
7KH7UDGLWLRQDO%URLO/RPRGHXVHVOHVVLQWHQVHKHDWIURP
the upper element to cook food thoroughly while also
SURGXFLQJVXUIDFHEURZQLQJ8VH%URLO/RIRUWKLFNHUFXWV
of meat and/or foods that you would like cooked all the
way through. To use this mode press the Broil pad twice
and then press Start. It is not necessary to preheat when
using this mode.
Proof
Proof mode is designed for rising (fermenting and
proofing) bread doughs. Press the Proof pad and then
press Start. Cover dough well to prevent drying out.
%UHDGZLOOULVHPRUHUDSLGO\WKDQDWURRPWHPSHUDWXUH
1RWHWKDWIRUGRXEOHZDOORYHQVSURRIFDQQRWEHUXQ
when running a clean mode in the lower oven.
Warm
:DUPPRGHLVGHVLJQHGWRNHHSKRWIRRGVKRWIRUXSWR
3 hours. To use this mode, press the Warm pad then
press Start. Cover foods that need to remain moist and
do not cover foods that should be crisp. Preheating is not
required not use warm to heat cold food other than crisping
crackers, chips or dry cereal. It is also recommended that
food not be kept warm for more than 2 hours.
Lower Oven
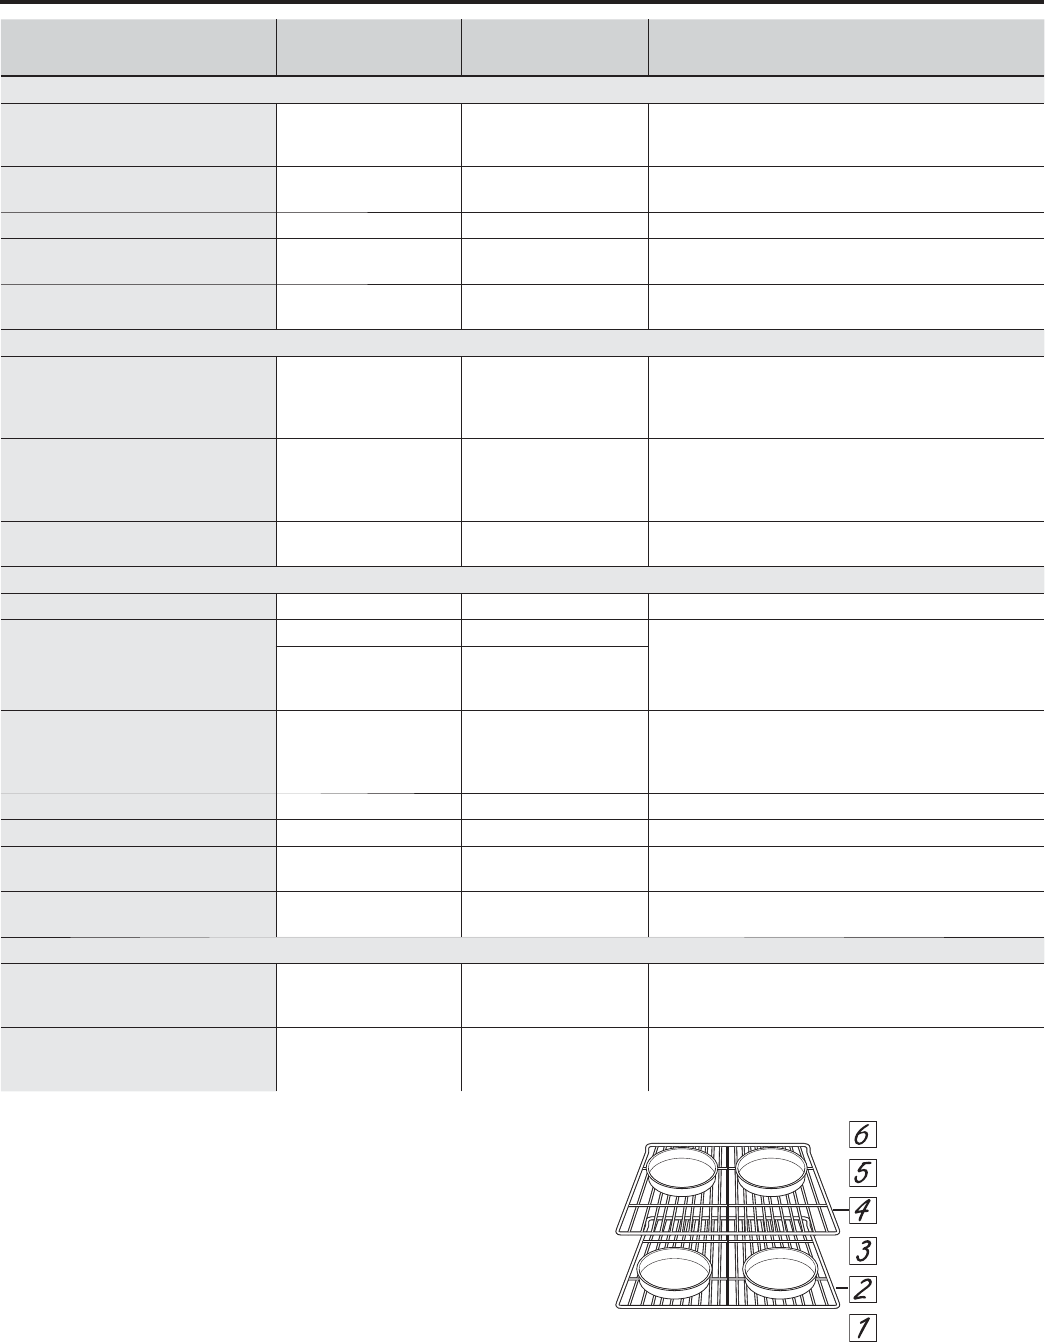
35
49-80706
USING THE OVEN: Cooking Guide
Cooking Guide
FOOD TYPE
RECOMMENDED
MODE(S)
RECOMMENDED
RACK POSITION(S) ADDITIONAL SUGGESTIONS
Baked Goods
/D\HUFDNHVVKHHWFDNHVEXQGW
cakes, muffins, quick breads on
a Single Rack
7UDGLWLRQDO%DNH 38VHVKLQ\FRRNZDUH
/D\HUFDNHVRQ0XOWLSOH5DFNV 7UDGLWLRQDO%DNH 2 and 4 Extension rack in higher position if used. Ensure ad-
equate airflow (see illustration below).
Chiffon cakes (angel food) 7UDGLWLRQDO%DNH 18VHVKLQ\FRRNZDUH
Cookies, biscuits, scones on a
Single Rack 7UDGLWLRQDO%DNH 38VHVKLQ\FRRNZDUH
Cookies, biscuits, scones on
Multiple Racks &RQYHFWLRQ%DNH0XOWL 2 and 4
DQG
Extension rack position 4 for 2 racks, 1 for 3 racks.
Ensure adequate airflow.
Beef & Pork
Hamburgers %URLO+L
8VHWKHH[WHQVLRQUDFNDQGXVHDEURLOSDQPRYH
IRRGGRZQIRUPRUHGRQHQHVVOHVVVHDULQJ:DWFK
food closely when broiling. For best performance
center food below the broil heating element.
Steaks & Chops %URLO+
8VHDEURLOSDQ0RYHIRRGGRZQIRUPRUH
GRQHQHVVOHVVVHDULQJ:DWFKIRRGFORVHO\ZKHQ
broiling. For best performance center food below the
broil heating element.
Roasts Convection Roast 2 or 3 8VHDORZVLGHGSDQVXFKDVDEURLOSDQ
Preheating is not necessary.
Poultry
:KROHFKLFNHQ Convection Roast 2 or 3 8VHDORZVLGHGSDQVXFKDVDEURLOSDQ
%RQHLQFKLFNHQEUHDVWVOHJV
thighs
%URLO+L 1,IEUHDGHGRUFRDWHGLQVDXFHDYRLG%URLO+LPRGHV
%URLOVNLQVLGHGRZQILUVW:DWFKIRRGFORVHO\ZKHQ
broiling. For best performance when broiling, center
food below the broil heating element.
%URLO/R
7UDGLWLRQDO%DNH
&RQYHFWLRQ%DNH5DFN
3
%RQHOHVVFKLFNHQEUHDVWV
%URLO/R
7UDGLWLRQDO%DNH
&RQYHFWLRQ%DNH5DFN
3
Move food down for more doneness/less searing and
up for greater searing/browning when broiling. For best
performance when broiling, center food below the broil
heating element.
:KROHWXUNH\ Convection Roast 1 or 2 8VHDORZVLGHGSDQVXFKDVDEURLOSDQ
7XUNH\%UHDVW Convection Roast 2 or 3 8VHDORZVLGHGSDQVXFKDVDEURLOSDQ
Fish %URLO/R WKLFNRUOHVV
4 (>1/2 inch)
:DWFKIRRGFORVHO\ZKHQEURLOLQJ)RUEHVWSHUIRU-
mance center food below the broil heating element.
Casseroles &RQYHFWLRQ%DNH5DFN
7UDGLWLRQDO%DNH 3
Frozen Convenience Foods
Pizza, french fries, tator tots,
chicken nuggets, appetizers on
a Single Rack
&RQYHFWLRQ%DNH5DFN
7UDGLWLRQDO%DNH 38VHVKLQ\FRRNZDUH
Pizza, french fries, tator tots,
chicken nuggets, appetizers on
Multiple Racks
&RQYHFWLRQ%DNH0XOWL 2 and 4 8VHVKLQ\FRRNZDUH
:KHQEDNLQJIRXUFDNHOD\HUVDWDWLPHXVHUDFNV
and 4. Place the pans as shown so that one pan is not
directly above another.
Cook food thoroughly to help protect against food
borne illness. Minimum safe food temperature
recommendations for food safety can be found at www.
IsItDoneYet.gov. Make sure to use a food thermometer
to take food temperatures.
Lower Oven
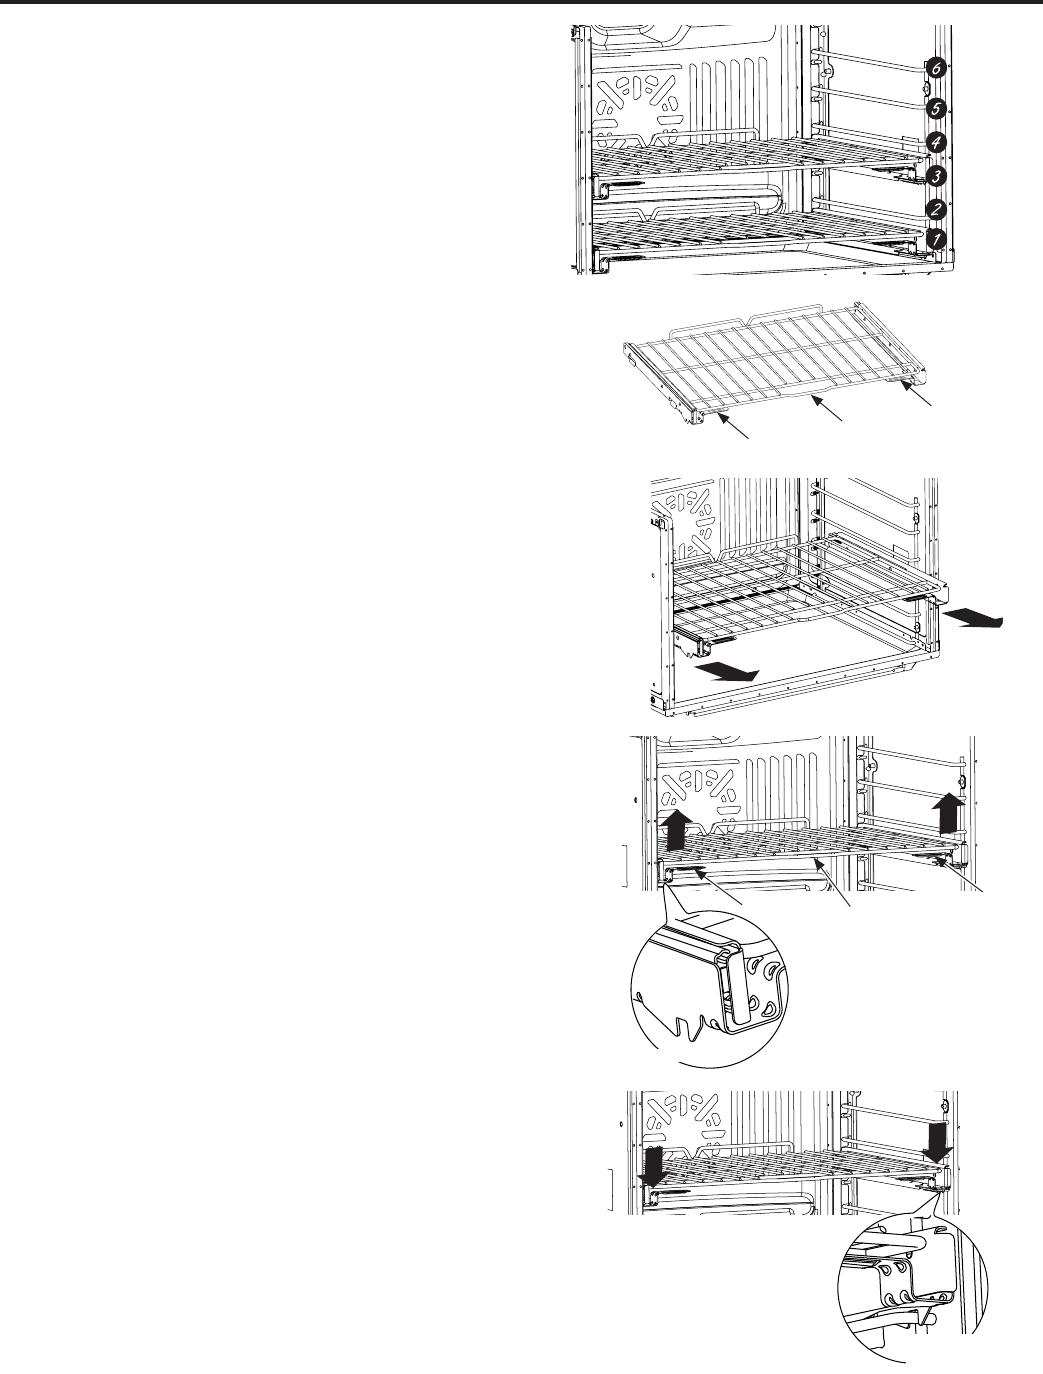
36 49-80706
Your oven has six rack positions. Recommended rack
positions for various types of foods are provided in the
&RRNLQJ*XLGH$GMXVWLQJUDFNSRVLWLRQLVRQHZD\WR
impact cooking results. For example, if you would prefer
darker tops on cakes, muffins, or cookies, try moving
food one rack position higher. If you find foods are too
brown on top try moving them down next time.
:KHQEDNLQJZLWKPXOWLSOHSDQVDQGRQPXOWLSOHUDFNV
HQVXUHWKHUHLVDWOHDVWòEHWZHHQSDQVWRDOORZ
sufficient space for air to flow.
Oven Racks
Your oven may have extension racks and/or traditional
flat racks.
To avoid possible burns, place the racks in the desired
position before you turn the oven on.
Extension Racks
Extension racks have an install feature that locks into the
rack supports (guides) on both sides. Once the install
feature is locked into place, always pull the rack out,
by its upper front rail, to its full extension stop position,
when placing or removing cookware.
If extension racks are difficult to extend, lubricate the
racks with the graphite lubricant provided with your
oven. Remove the rack from the oven, remove debris in
the slide tracks with a paper towel, shake the graphite
lubricant and place 4 small drops on the two bottom
tracks of the left and right sides. Open and close the
rack several times to distribute the lubricant.
To order additional graphite lubricant, read the
Assistance and Accessories section at the beginning of
this manual.
To Remove An Extension Rack:
1. Make sure the rack is pushed all the way into the
oven.
*UDVSWKHUDFNE\ERWKLWVXSSHUIURQWUDLODQGLWV
lower handles on two sides and lift straight up to
unlock the rack from the rack supports.
3. Firmly holding onto both the upper front rail and lower
KDQGOHVRQERWKVLGHVSXOOWKHUDFNIRUZDUG*UDVSWKH
rack on both sides if necessary. Then remove it from
the oven.
To Replace An Extension Rack:
1. Place the rear portion of the rack onto the rack
supports (guides) as shown in the picture.
2. Hold the upper front rail and lower handles and push
the rack all the way in until the install feature locks
into the front rack support.
If extension racks are difficult to replace or remove, wipe
WKHRYHQUDFNVXSSRUWVZLWKFRRNLQJRLO'RQRWZLSHRLO
on the rack slides.
USING THE OVEN: Oven Racks
Oven Racks
The oven
has 6 rack
positions
Upper Front Rail
Handle
Handle
Handle
Handle Upper Front Rail
Lift to unlock
from the rack
support
Install Feature
Front Rack
Lock
Hold the upper front rail and lower
handles and push the rack all the
way in until the install feature locks
on the fron support
Lower Oven
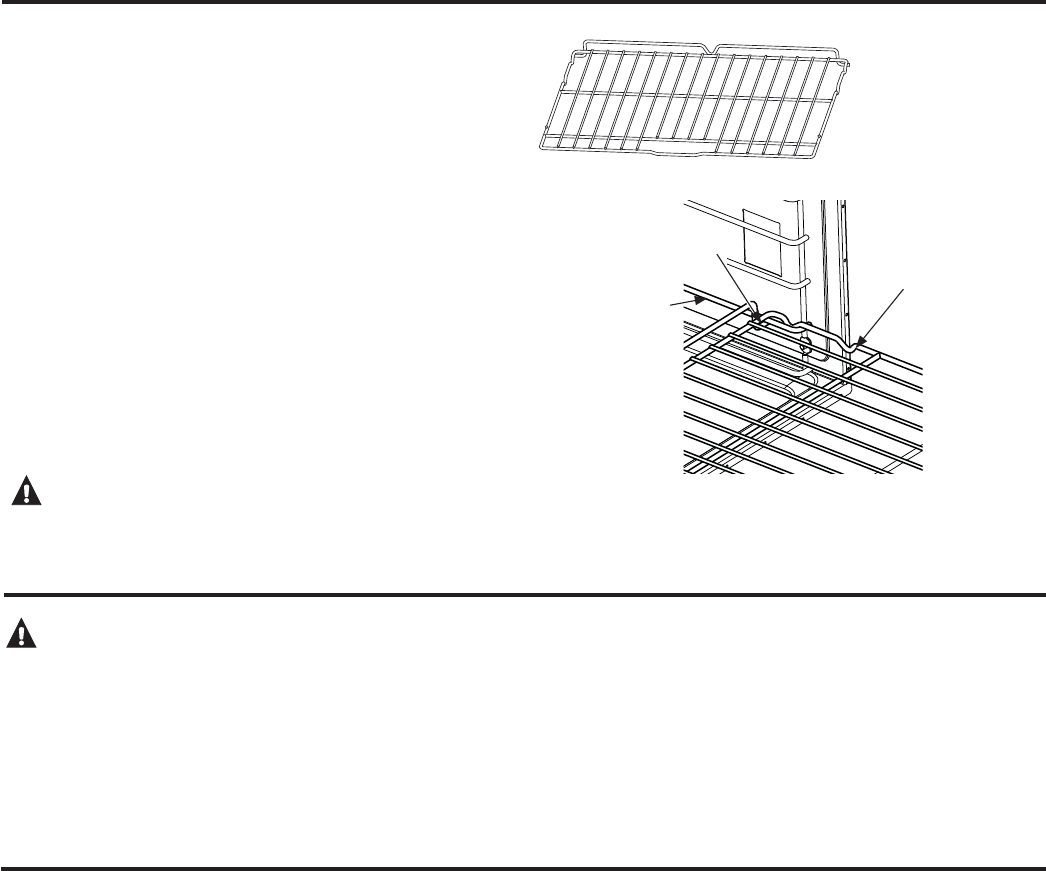
37
49-80706
Traditional Flat Racks
The racks have stops so that when placed correctly on
the supports they will stop before coming completely out
DQGZLOOQRWWLOW:KHQSODFLQJDQGUHPRYLQJFRRNZDUH
pull the rack out until it stops.
To Remove a Rack
Pull it toward you, tilt the front end up and pull it out.
To Replace a Rack
Tilt the front of the rack up, hook the rear locating posts
under the rack supports, push the rack back (past the
stop-locks) and lower it into position. Push the rack all
the way in.
If flat racks are difficult to slide and/or remove, place
some cooking oil on a soft cloth or paper towel and rub
onto the sides of the rack and each rack support.
CAUTION: Use caution when removing a rack from lowest position as door may be hot.
Oven Racks (cont.)
USING THE OVEN: Oven Racks / Aluminum Foil and Oven Liners / Cookware
Cookware
Cookware Guidelines
The material, finish, and size of cookware affect baking
performance.
'DUNFRDWHGDQGGXOOSDQVDEVRUEKHDWPRUHUHDGLO\
than light, shiny pans. Pans that absorb heat more
readily can result in a browner, crisper, and thicker crust.
If using dark and coated cookware check food earlier
than minimum cook time. If undesirable results are
obtained with this type of cookware consider reducing
RYHQWHPSHUDWXUHE\)QH[WWLPH
Shiny pans can produce more evenly cooked baked
goods such as cakes and cookies.
*ODVVDQGFHUDPLFSDQVKHDWVORZO\EXWUHWDLQKHDWZHOO
These types of pans work well for dishes such as pies
and custards.
Air insulated pans heat slowly and can reduce bottom
browning.
.HHSFRRNZDUHFOHDQWRSURPRWHHYHQKHDWLQJ
Flat Rack
Stopper
Rack
Support
Locating
Post
Lower Oven
CAUTION: Do not use any type of foil or oven liner to cover the oven bottom. These items can trap
heat or melt, resulting in damage to the product and risk of shock, smoke or fire. Damage from improper use
of these items is not covered by the product warranty.
)RLOPD\EHXVHGWRFDWFKVSLOOVE\SODFLQJDVKHHWRQDORZHUUDFNVHYHUDOLQFKHVEHORZWKHIRRG'RQRWXVHPRUH
IRLOWKDQQHFHVVDU\DQGQHYHUHQWLUHO\FRYHUDQRYHQUDFNZLWKDOXPLQXPIRLO.HHSIRLODWOHDVW´IURPRYHQZDOOV
to prevent poor heat circulation.
Aluminum Foil and Oven Liners
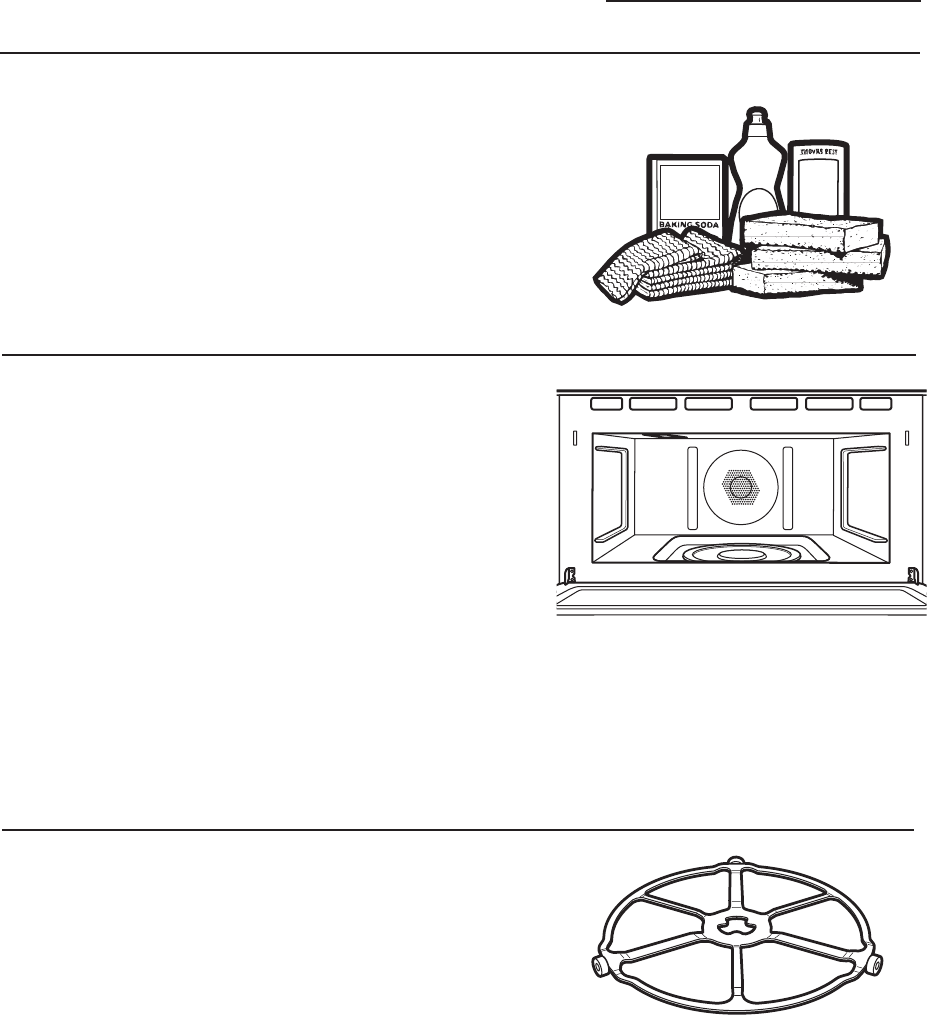
38 49-80706
The area underneath the turntable
should be cleaned frequently to avoid
odors and smoking during a cooking
cycle.
The turntable can be broken if
GURSSHG:DVKFDUHIXOO\LQZDUP
sudsy water. Dry completely and
replace.
7RUHSODFHWKHWXUQWDEOHSODFHLWV
center over the spindle in the center of
the oven and turn it until it seats into
place. (Make sure the smooth side of
the turntable is facing up and that its
center seats securely on the spindle.)
Care and Cleaning
Upper Oven
Helpful
hints
Clean the inside of the oven often for
proper heating performance.
Some spatters can be removed with
DSDSHUWRZHORWKHUVPD\UHTXLUHD
warm soapy cloth. Remove greasy
spatters with a sudsy cloth; then rinse
with a damp cloth.
Do not use abrasive cleaners or sharp
utensils on oven walls.
Never use a commercial oven
cleaner on any part of your oven.
Do not clean the inside of the oven
with metal scouring pads. Pieces can
EUHDNRIIWKHSDGFDXVLQJHOHFWULFDO
shock.
An occasional thorough wiping with
a solution of baking soda and water
keeps the inside fresh.
Be certain the oven control is turned
off before cleaning any part of this
oven.
:DOOV)ORRU,QVLGH:LQGRZ0HWDODQG
Plastic Parts on the Door
Do not use the oven without the
turntable in place.
How to
clean the
inside
Removable
turntable
Turntable
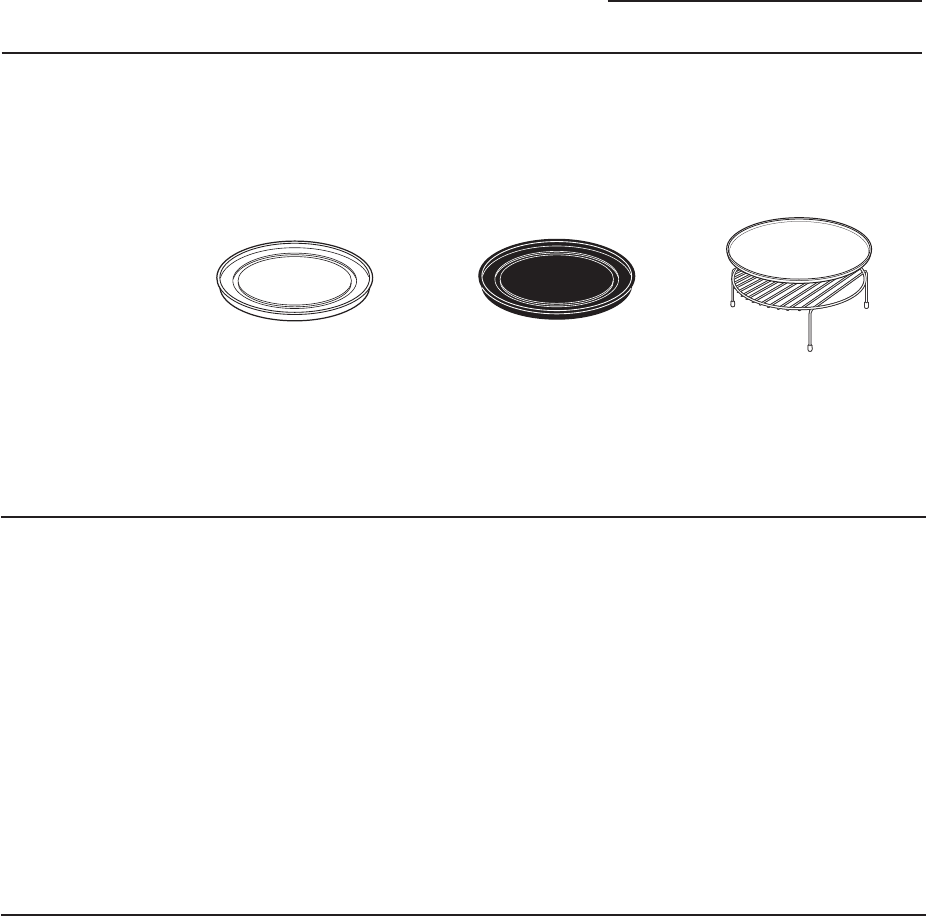
39
49-80706
We recommend against using
cleaners with ammonia or alcohol,
as they can damage the appearance
of the oven. If you choose to use a
common household cleaner, first
apply the cleaner directly to a clean
cloth, then wipe the soiled area.
Case
Clean the outside with a sudsy cloth.
Rinse and then dry. Wipe the window
clean with a damp cloth.
Glass Control Panel and Door
Wipe with a clean damp sponge.
Dry thoroughly. Do not use cleaning
VSUD\VODUJHDPRXQWVRIVRDSDQG
ZDWHUDEUDVLYHVRUVKDUSREMHFWVRQ
WKHSDQHO³WKH\FDQGDPDJHLW
Door Seal
It’s important to keep the area
clean where the door seals against
WKHRYHQ8VHRQO\PLOGQRQDEUDVLYH
detergents applied with a clean
sponge or soft cloth. Rinse well.
Care and Cleaning
Upper Oven
Put food directly on the
aluminum baking sheet on
WKHZLUHRYHQUDFNDQG
place them on the non-
VWLFNPHWDOWUD\ZKHQ
EDNLQJRQWZROHYHOV
broiling or toasting foods.
Clear glass tray for
microwaving
Non-stick metal tray for
speedcooking
Cooking trays
and baking
sheet
7RSUHYHQWEUHDNDJHDOORZWKHWUD\VWR
cool completely before cleaning. Wash
FDUHIXOO\LQZDUPVXGV\ZDWHURULQ
the dishwasher.
Do not use metal scouring pads or
DEUDVLYHVDVWKH\PD\GDPDJHWKH
finish. A soap-filled scouring pad may
be used to clean the trays.
How to clean
the outside
7RFOHDQWKHVWDLQOHVVVWHHOVXUIDFH
XVHZDUPVXGV\ZDWHURUDVWDLQOHVV
steel cleaner or polish. Always wipe
the surface in the direction of the
grain. Follow the cleaner instructions
for cleaning the stainless steel surface.
To inquire about purchasing stainless
VWHHODSSOLDQFHFOHDQHURUSROLVKRUWR
find the location of a dealer nearest
\RXSOHDVHFDOORXUWROOIUHHQXPEHU
800.626.2002 or visit GEAppliances.com.
Stainless
steel (on
some
models)

40 49-80706
Care and Cleaning
%HVXUHHOHFWULFDOSRZHULVRIIDQGDOOVXUIDFHVDUHFRROEHIRUHFOHDQLQJDQ\SDUWRIWKHRYHQ
Control Panel
It’s a good idea to wipe the control panel after each use.
Clean with mild soap and water or vinegar and water,
rinse with clean water and polish dry with a soft cloth.
'RQRWXVHDEUDVLYHFOHDQVHUVVWURQJOLTXLGFOHDQVHUV
plastic scouring pads or oven cleaners on the control
SDQHO²WKH\ZLOOGDPDJHWKHILQLVK
Oven Exterior
'RQRWXVHRYHQFOHDQHUVDEUDVLYHFOHDQVHUVVWURQJ
liquid cleansers, steel wool, plastic scouring pads, or
cleaning powders on the interior or exterior of the oven.
Clean with a mild soap and water or vinegar and water
solution. Rinse with clean water and dry with a soft cloth.
:KHQFOHDQLQJVXUIDFHVPDNHVXUHWKDWWKH\DUHDW
room temperature and not in direct sunlight.
If stain on the door vent trim is persistent, use a mild
abrasive cleaner and a sponge-scrubber for best results.
Spillage of marinades, fruit juices, tomato sauces and
basting liquids containing acids may cause discoloration
DQGVKRXOGEHZLSHGXSLPPHGLDWHO\/HWKRWVXUIDFHV
cool, then clean and rinse.
Oven Interior
The interior of your new oven can be cleaned manually
or by using the Steam Clean or Self Clean modes.
Spillage of marinades, fruit juices, tomato sauces and
basting liquids containing acids may cause discoloration
DQGVKRXOGEHZLSHGXSLPPHGLDWHO\/HWKRWVXUIDFHV
cool, then clean and rinse.
Manual Cleaning
'RQRWXVHRYHQFOHDQHUVDEUDVLYHFOHDQHUVVWURQJ
liquid cleansers, steel wool, scouring pads, or cleaning
powders on the interior of the oven. Clean with a mild
soap and water or vinegar and water solution. Rinse with
FOHDQZDWHUDQGGU\ZLWKDVRIWFORWK:KHQFOHDQLQJ
surfaces, make sure that they are at room temperature.
Steam Clean Mode
Steam clean is intended to clean small spills using water
and a lower cleaning temperature than Self-Clean.
To use the Steam Clean feature, wipe grease and soils
from the oven. Pour one cup of water into the bottom of
the oven. Close the door. Press the Clean pad twice
and then press Start. The oven door will lock. You can
not open the door during the 30 minute steam clean as
this will decrease the steam clean performance. At the
HQGRIWKHVWHDPFOHDQF\FOHWKHGRRUZLOOXQORFN:LSH
out any excess water and any remaining soil.
Self Clean Mode
Read Self-Cleaning Oven Safety Instructions at the
beginning of this manual before using Self Clean Mode.
Self clean uses very high temperatures to clean the oven
interior. The oven door will lock when using this feature.
%HIRUHRSHUDWLQJWKHVHOIFOHDQF\FOHZLSHXSJUHDVHDQG
soils from the oven. Remove all items from the oven other
than enameled (dark color) racks. Shiny or silver racks
and any cookware or other items should all be removed
from the oven before initiating a self-clean cycle. Close
the door. Press the Clean pad once and a default self-
clean time is displayed. The clean time can be changed
WRDQ\WLPHEHWZHHQDQGKRXUVE\XVLQJWKH
number pads to enter a different time and pressing Start.
)RUKHDYLO\VRLOHGRYHQVWKHPD[LPXPKRXUFOHDQWLPH
is recommended. If you wish to use the default time, press
the Start pad immediately after pressing the Clean pad.
The oven will turn off automatically when the self clean
cycle is complete. The door will stay locked until the oven
has cooled down. After the oven has cooled down wipe
any ash out of the oven.
Stainless Steel Surfaces (on some models)
'RQRWXVHDVWHHOZRROSDGLWZLOOVFUDWFKWKHVXUIDFH
To clean the stainless steel surface, use warm sudsy
water or a stainless steel cleaner or polish. Always wipe
the surface in the direction of the grain. Follow the cleaner
instructions for cleaning the stainless steel surface.
To inquire about purchasing cleaning products including
stainless steel appliance cleaner or polish, read the
Assistance and Accessories section at the beginning of
this manual.
CARE AND CLEANING
Lower Oven
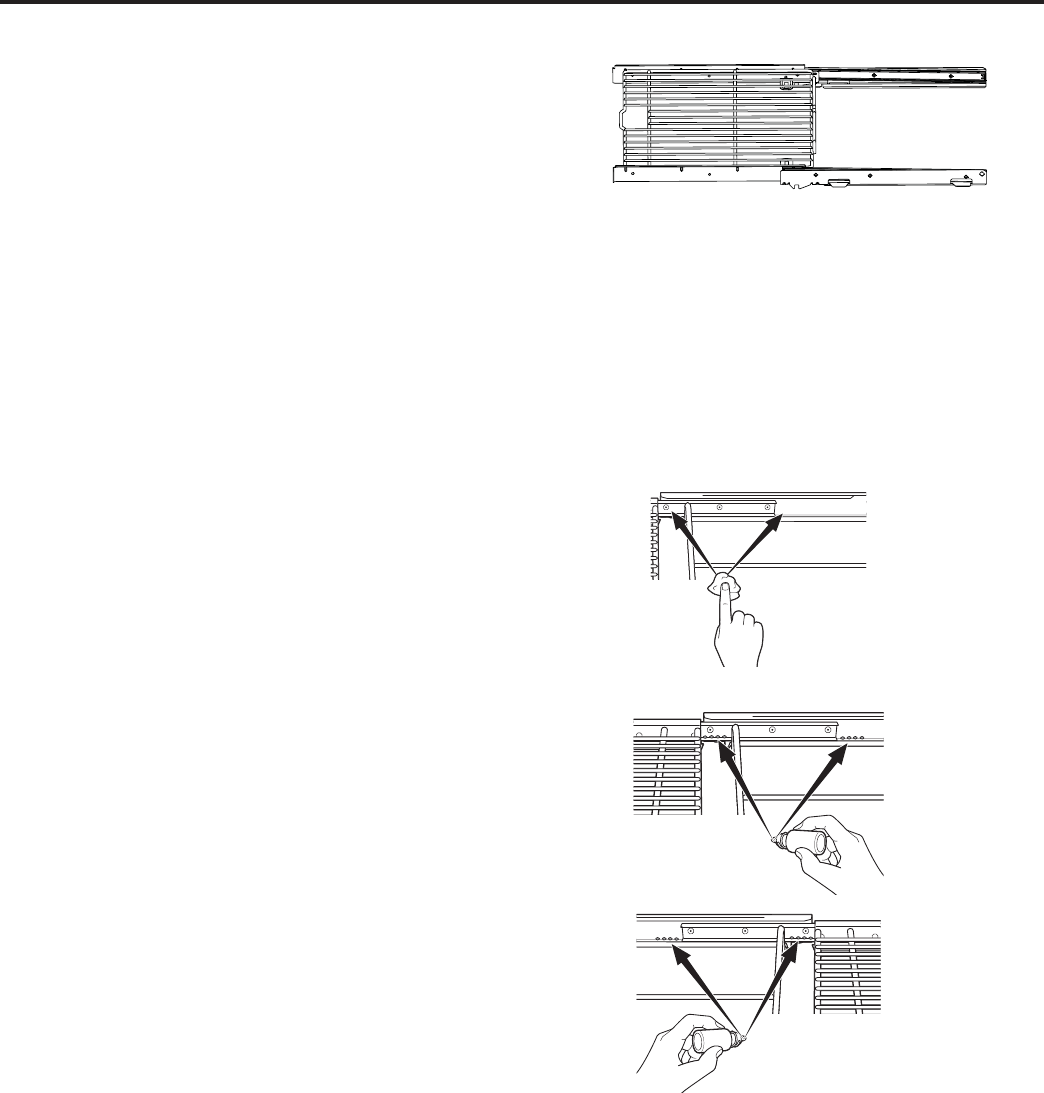
41
49-80706
Oven Racks
The racks that were provided with your oven (dark
enameled racks, not shiny) may remain in the oven
during the self-cleaning cycle without being damaged.
To manually clean racks, use warm, soapy water. Make
sure not to wash the rack slides on an extension rack.
If racks become more difficult to remove from the oven,
put some vegetable oil on a soft cloth or paper towel and
UXERQWRWKHRYHQUDFNVXSSRUWV'RQRWZLSHWKHRLORQ
an extension rack slide.
Periodically, after several self-clean cycles, the extension
rack slides may need to be lubricated using the graphite
lubricant shipped with your wall oven. To order additional
graphite lubricant read the Assistance and Accessories
sections at the beginning of this manual.
1. Remove extension rack from the oven. See the
Extension Oven Racks section.
2. Fully extend the rack on a table or countertop.
1HZVSDSHUPD\EHSODFHGXQGHUQHDWKWKHUDFNIRU
easy clean up.
3. If there is debris in the slide tracks, wipe it away
using a paper towel. NOTE: Any graphite lubricant
wiped away must be replaced.
4. Shake the graphite lubricant before opening it.
Starting with left slide mechanism of the rack, place
four (4) small drops of lubricant on the two (2) bottom
tracks of the slide close to the bearing carriers.
5HSHDWIRUWKHULJKWVOLGHPHFKDQLVPRIWKHUDFN
6. Open and close the rack several times to distribute
the lubricant.
7. Replace the cap on the lubricant and shake it again.
7XUQWKHUDFNRYHUDQGUHSHDWVWHSVDQG
8. Close the rack, turn rack right-side-up and place in
the oven. See the Extension Oven Racks section.
5HSHDWDERYHVWHSVIRUHDFKUDFN
NOTE:'RQRWVSUD\ZLWKFRRNLQJVSUD\RURWKHUOXEULFDQW
sprays.
CARE AND CLEANING: Oven Racks
Lower Oven
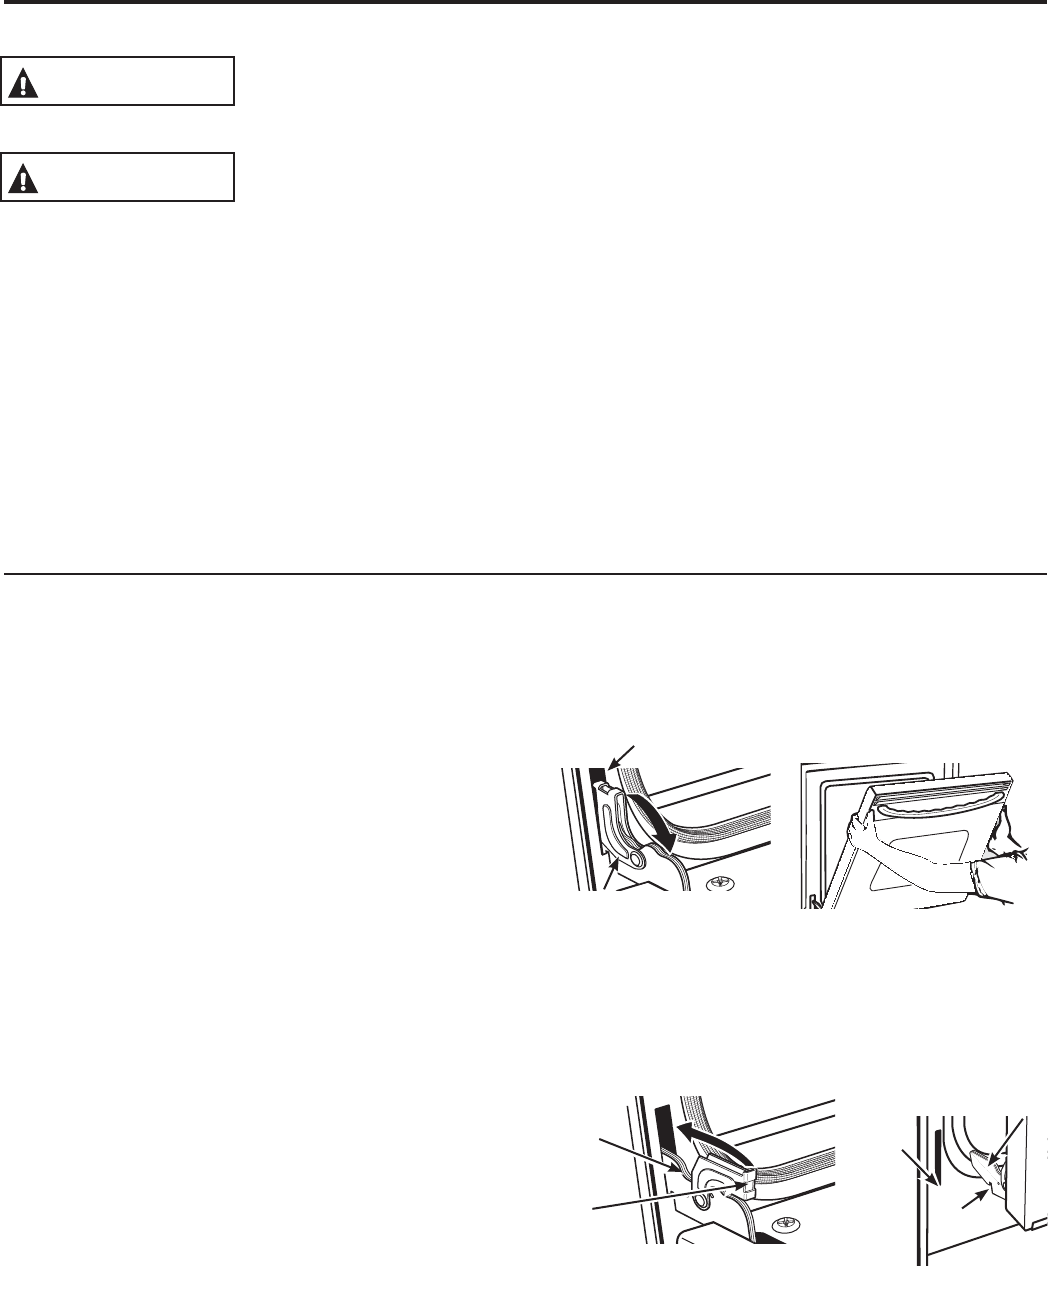
42 49-80706
SHOCK OR BURN HAZARD:%HIRUHUHSODFLQJRYHQOLJKWEXOEGLVFRQQHFWWKHHOHFWULFDO
power to the oven at the main fuse or circuit breaker panel. Failure to do so may result in
electric shock or burn.
WARNING
BURN HAZARD: The glass cover and bulb should be removed when cool. Touching hot
glass with bare hands or a damp cloth can cause burns.
CAUTION
Oven Light Replacement
'LVFRQQHFWSRZHUDWWKHPDLQIXVHRUFLUFXLWEUHDNHU
panel.
2. Remove oven racks.
3. Slide a flat blade screwdriver between the housing
and the glass light cover.
4. Support the glass light cover with two fingers to
prevent the cover from falling to the bottom of the
RYHQ%HFDUHIXOQRWWRFKLSWKHRYHQFRDWLQJ
*HQWO\WZLVWWKHVFUHZGULYHUEODGHWRORRVHQWKHJODVV
light cover.
6. Remove the glass light cover.
7. Remove the bulb by firmly grasping and sliding the
bulb straight out until the two prongs have cleared the
ceramic holder.
'RQRWWRXFKWKHJODVVRIWKHQHZUHSODFHPHQWEXOE
with your fingers. It will cause the bulb to fail when it
OLJKWV*UDVSWKHUHSODFHPHQWEXOEZLWKDFOHDQWRZHO
or facial tissue with the prongs facing down. Align the
two prongs in the ceramic holder, pressing gently until
the bulb is securely in the ceramic socket.
6OLGHWKHSURWHFWLYHOHQVLQWRWKHKROGHUDQGSXVKXQWLO
the clips snap into the housing.
10. Reconnect power.
Lift-Off Oven Door
7KHGRRULVYHU\KHDY\%HFDUHIXOZKHQUHPRYLQJDQGOLIWLQJWKHGRRU
'RQRWOLIWWKHGRRUE\WKHKDQGOH
To remove the door:
1. Fully open the door.
2. Pull the hinge locks down toward the door frame, to
the unlocked position. A tool, such as a small flat-
blade screwdriver, may be required.
3. Firmly grasp both sides of the door at the top.
4. Close door to the door removal position. The door
should be open approximately 3" with no obstruction
above the door.
/LIWGRRUXSDQGRXWXQWLOERWKKLQJHDUPVDUHFOHDURI
the slots.
To replace the door:
1. Firmly grasp both sides of the door at the top.
2. Starting on the left side, with the door at the same
angle as the removal position, seat the indentation of
the hinge arm into the bottom edge of the hinge slot.
The notch in the hinge arm must be fully seated into
the bottom of the slot. Repeat for right side.
3. Fully open the door. If the door will not fully open, the
indentation is not seated correctly in the bottom edge
of the slot.
4. Push the hinge locks up against the front frame of the
oven cavity, to the locked position.
&ORVHWKHRYHQGRRU
Removal position
Hinge lock
Slot
Pull hinge locks down to unlock
Push hinge locks up to lock
Hinge
lock
Hinge
arm
Indentation
Bottom
edge of
slot
Hinge arm
Maintenance
CARE AND CLEANING: Maintenance
Lower Oven

43
49-80706
Notes

44 49-80706
Notes

45
49-80706
Troubleshooting
Upper Oven
Questions?
Use this
problem
solver
Problem Possible Causes What To Do/Explanation
LIGHTS
Light during a This is normal. • This is normal. The oven senses the
speedcook cycle Power level has been KHDWOHYHODQGDGMXVWVDXWRPDWLFDOO\
dims and cycles on automatically reduced
and off, even at full because the oven is hot.
power levels
Light visible around This is normal. • :KHQWKHRYHQLVRQOLJKWPD\
the door and outer be visible around the door and
case while outer case.
speedcooking
FAN
Fan continues to run The oven is cooling. • The fan will automatically shut off
after cooking stops when the internal parts of the oven
have cooled.
Oven vent emits This is normal.
warm air while
oven is on
Fan comes on This is normal.
automatically when
using the microwave
COOKING
The oven makes Clicks and fans blowing • These sounds are normal.
unusual sounds are normal. The relay
while cooking board is turning the
components on and off.
Smoke comes out Food is high in fat • Smoke is normal when cooking
of the oven when content. Aerosol spray high-fat foods.
I open the door used on the pans.
Food is not fully Programmed times • $GMXVWWLPHIRUGRQHQHVVRU
cooked or browned may not match the size DGMXVWWKHXSSHURUORZHUODPSV
at the end of a or amount of food you for browning and doneness.
cooking program are cooking.
SENSOR ERROR Food amount or type • Press the CLEAR/OFF pad. Set the
displayed along with placed in the oven does oven program to match the food or
an oven signal not match the program liquid to be cooked or heated.
that was set.
Steam was not sensed by • 9HQWSODVWLFZUDSXVHDORRVHUOLG
the oven because plastic or uncover liquids when cooking or
ZUDSZDVQRWYHQWHGDOLG KHDWLQJ
too tight was on the dish
or a liquid was covered.

46 49-80706
Questions?
Use this
problem
solver
Upper Oven
Problem Possible Causes What To Do/Explanation
DISPLAY
The display is blank Power saver mode • Check the SETTINGS menu for clock
may be activated. display settings. Turn the display on.
“Control is LOCKED” The control has • Press and hold CLEAR/OFF for
appears in display been locked. 3 seconds to unlock the control.
Control display is Clock is not set. • Set the clock.
lit yet oven Door not securely closed. • Open the door and close securely.
will not start
START/PAUSE pad or dial • Press START/PAUSE or dial.
not pressed after entering
cooking selection.
Another selection already • Press CLEAR/OFF.
entered in oven and
CLEAR/OFF pad not
pressed to cancel it.
6L]HTXDQWLW\RUFRRNLQJ 0DNHVXUH\RXKDYHHQWHUHGFRRNLQJ
time not entered after time after selecting.
final selection.
CLEAR/OFF was pressed • Reset cooking program and press
accidentally. START/PAUSE.
OTHER PROBLEMS
The door and inside The heat lamps • This is normal.
of the oven feels hot produce intense heat • Use oven mitts to remove food when
in a small space. when ready.
Oven will not start A fuse in your home • Replace fuse or reset circuit breaker.
may be blown or the
circuit breaker tripped.
Troubleshooting
Problem Possible Cause What To Do
Cannot edit cooking
features
Some pre-programmed cooking features
may not be able to be edited to prevent
degradation of cooking performance.
This is normal.
Problem Possible Cause What To Do
Display goes blank A fuse in your home may be blown or the
circuit breaker tripped.
Replace the fuse or reset the circuit breaker.
Power outage or surge Reset the clock. If the oven was in use, you must reset
it by pressing the Clear/Off pad, setting the clock and
resetting any cooking function.

47
49-80706
Troubleshooting tips ... Before you call for service
TROUBLESHOOTING TIPS
Problem Possible Cause What To Do
My new oven doesn't
cook like my old one.
Is something wrong
with the temperature
settings?
Your new oven has a different cooking
system from your old oven and
therefore may cook differently than your
old oven.
For the first few uses, follow your recipe times
and temperatures carefully. If you still think your
new oven is too hot or too cold, you can adjust the
temperature yourself to meet your specific cooking
preference. NOTE:7KLVDGMXVWPHQWDIIHFWV%DNH
&RQYHFWLRQ%DNH5DFNDQG&RQYHFWLRQ%DNH0XOWL
temperatures; it will not affect Convection Roast,
%URLORU&OHDQ
Food does not bake
properly
Oven controls improperly set. See the Cooking Modes section.
Rack position is incorrect or rack is
not level.
6HHWKH&RRNLQJ0RGHVVHFWLRQDQG&RRNLQJ*XLGH
Incorrect cookware or cookware of
improper size being used.
See the Cookware section.
Oven temperature needs adjustment. See the Special Features section.
Ingredient substitution Substituting ingredients can change the recipe
outcome.
Food does not broil
properly
Oven controls improperly set. Make sure you select the appropriate broil mode.
Improper rack position being used. 6HH&RRNLQJ*XLGHIRUUDFNORFDWLRQVXJJHVWLRQV
Food being cooked in a hot pan. Make sure cookware is cool.
Cookware not suited for broiling. 8VHDSDQVSHFLILFDOO\GHVLJQHGIRUEURLOLQJ
Aluminum foil used on the broiling pan
and grid has not been fitted properly
and slit as recommended.
If using aluminum foil conform to pan slits.
In some areas the power (voltage)
may be low.
Preheat the broil element for 10 minutes.
Oven temperature too
hot or too cold
Oven temperature needs adjustment. See the Special Features section.
Oven does not work or
appears not to work
A fuse in your home may be blown or
the circuit breaker tripped.
Replace the fuse or reset the circuit breaker.
Oven controls improperly set. 6HHWKH8VLQJWKH2YHQVHFWLRQ
Oven is in Sabbath Mode. Verify, that the oven is not in Sabbath Mode.
See the Special Features section.
“Crackling” or
“popping” sound
This is the sound of the metal heating
and cooling during both the cooking and
cleaning functions.
This is normal.
Why is my range
making a "clicking"
noise when using my
oven?
Your range has been designed to maintain
a tighter control over your oven's
temperature. You may hear your oven's
heating elements "click" on and off more
frequently than in older ovens to achieve
better results during baking, broiling,
convection, and self-clean cycles.
This is normal.
Clock and timer do not
work
A fuse in your home may be blown or
the circuit breaker tripped.
Replace the fuse or reset the circuit breaker.
Save time and money! Review the charts on the following pages first and you may not need to call for service.
Lower Oven

48 49-80706
TROUBLESHOOTING TIPS
Troubleshooting tips ... Before you call for service
Problem Possible Cause What To Do
Oven light does not
work
Light bulb is loose or defective. Tighten or replace bulb.
Pad operating light is broken. Call for service.
Oven will not self-
clean
The temperature is too high to set a
self-clean operation.
Allow the oven to cool and reset the controls.
Oven controls improperly set. See the Cleaning the Oven section.
Excessive smoking
during clean cycle
Excessive soil or grease. Press the Clear/Off pad. Open the windows to rid the
URRPRIVPRNH:DLWXQWLOWKHLOCKED light goes off.
:LSHXSWKHH[FHVVVRLODQGUHVHWWKHFOHDQF\FOH
Excessive smoking
during broiling
Food too close to burner element. /RZHUWKHUDFNSRVLWLRQRIWKHIRRG
Oven door will not
open after a clean
cycle
Oven too hot. Allow the oven to cool below locking temperature.
Oven not clean after
a clean cycle
Oven controls improperly set. See the Cleaning the Oven section.
Oven was heavily soiled. Clean up heavy spillovers before starting the clean cycle.
Heavily soiled ovens may need to self-clean again or for
a longer period of time.
"LOCK DOOR"
flashes in the
display
The self-clean cycle has been selected
but the door is not closed.
Close the oven door.
"DOOR IS LOCK"
show on display
section
The oven door is locked because
the temperature inside the oven has
not dropped below the unlocking
temperature.
Press the Clear/Off pad. Allow the oven to cool.
An oven error and
"SERVICE MAYBE
NEEDED" show in
the display
You have a function error code. Press the Clear/Off pad. Allow the oven to cool for one
hour. Put the oven back into operation.
If the function code repeats. 'LVFRQQHFWDOOSRZHUWRWKHRYHQIRUDWOHDVWVHFRQGV
and then reconnect power. If the function error code
repeats, call for service.
“Burning” or “oily”
odor emitting from
the vent
This is normal in a new oven and will
disappear in time.
To speed the process, set a self-clean cycle for a
minimum of 3 hours. See the Cleaning the Oven section.
Strong odor An odor from the insulation around
the inside of the oven is normal for the
first few times the oven is used.
This is temporary and will go away after several uses or
a self-clean cycle.
Fan noise
A cooling fan may automatically turn on.
This is normal. The cooling fan will turn on to cool
internal parts. It may run for up to 1-1/2 hours after the
oven is turned off.
My oven door glass
appears to be
"tinted" or have a
"rainbow" color. Is
this defective?
No. The inner oven glass is coated with
a heat barrier to reflect the heat back
into the oven to prevent heat loss and
keep the outer door cool while baking.
7KLVLVQRUPDO8QGHUFHUWDLQOLJKWRUDQJOHV\RXPD\
see this tint or rainbow color.
Sometimes the
oven takes longer to
preheat to the same
temperature
Cookware or food in oven The cookware or food in the oven will cause the oven to
take longer to preheat. Remove items to reduce preheat
time.
Number of racks in oven Adding more racks to the oven will cause the oven to
take longer to preheat. Remove some racks.
Different cooking modes The different cooking modes use different preheat
methods to heat the oven for the specific cooking mode.
Some modes will take longer than others (i.e. convection
bake multi).
Lower Oven