LINKSYS WRT54G2V1 Wireless-G Broadband Router User Manual Manual Part 5
LINKSYS LLC Wireless-G Broadband Router Manual Part 5
LINKSYS >
Contents
Manual Part 5
Chapter 3 Advanced Configuration
16
Wireless-G Broadband Router
To modify a service, select it from the list on the right.
Change its name, protocol setting, or port range. Then
click Modify.
To delete a service, select it from the list on the right. Then
click Delete.
When you are finished making changes on the Port
Services screen, click Apply to save the changes. If you
want to cancel your changes, click Cancel. To close the
Port Services screen and return to the Access Restrictions
screen, click Close.
Website Blocking by URL Address
If you want to block websites with specific URL addresses,
enter each URL in a separate field next to Website Blocking
by URL Address.
Website Blocking by Keyword
If you want to block websites using specific keywords,
enter each keyword in a separate field next to Website
Blocking by Keyword.
Click Save Settings to apply your changes, or click Cancel
Changes to cancel your changes.
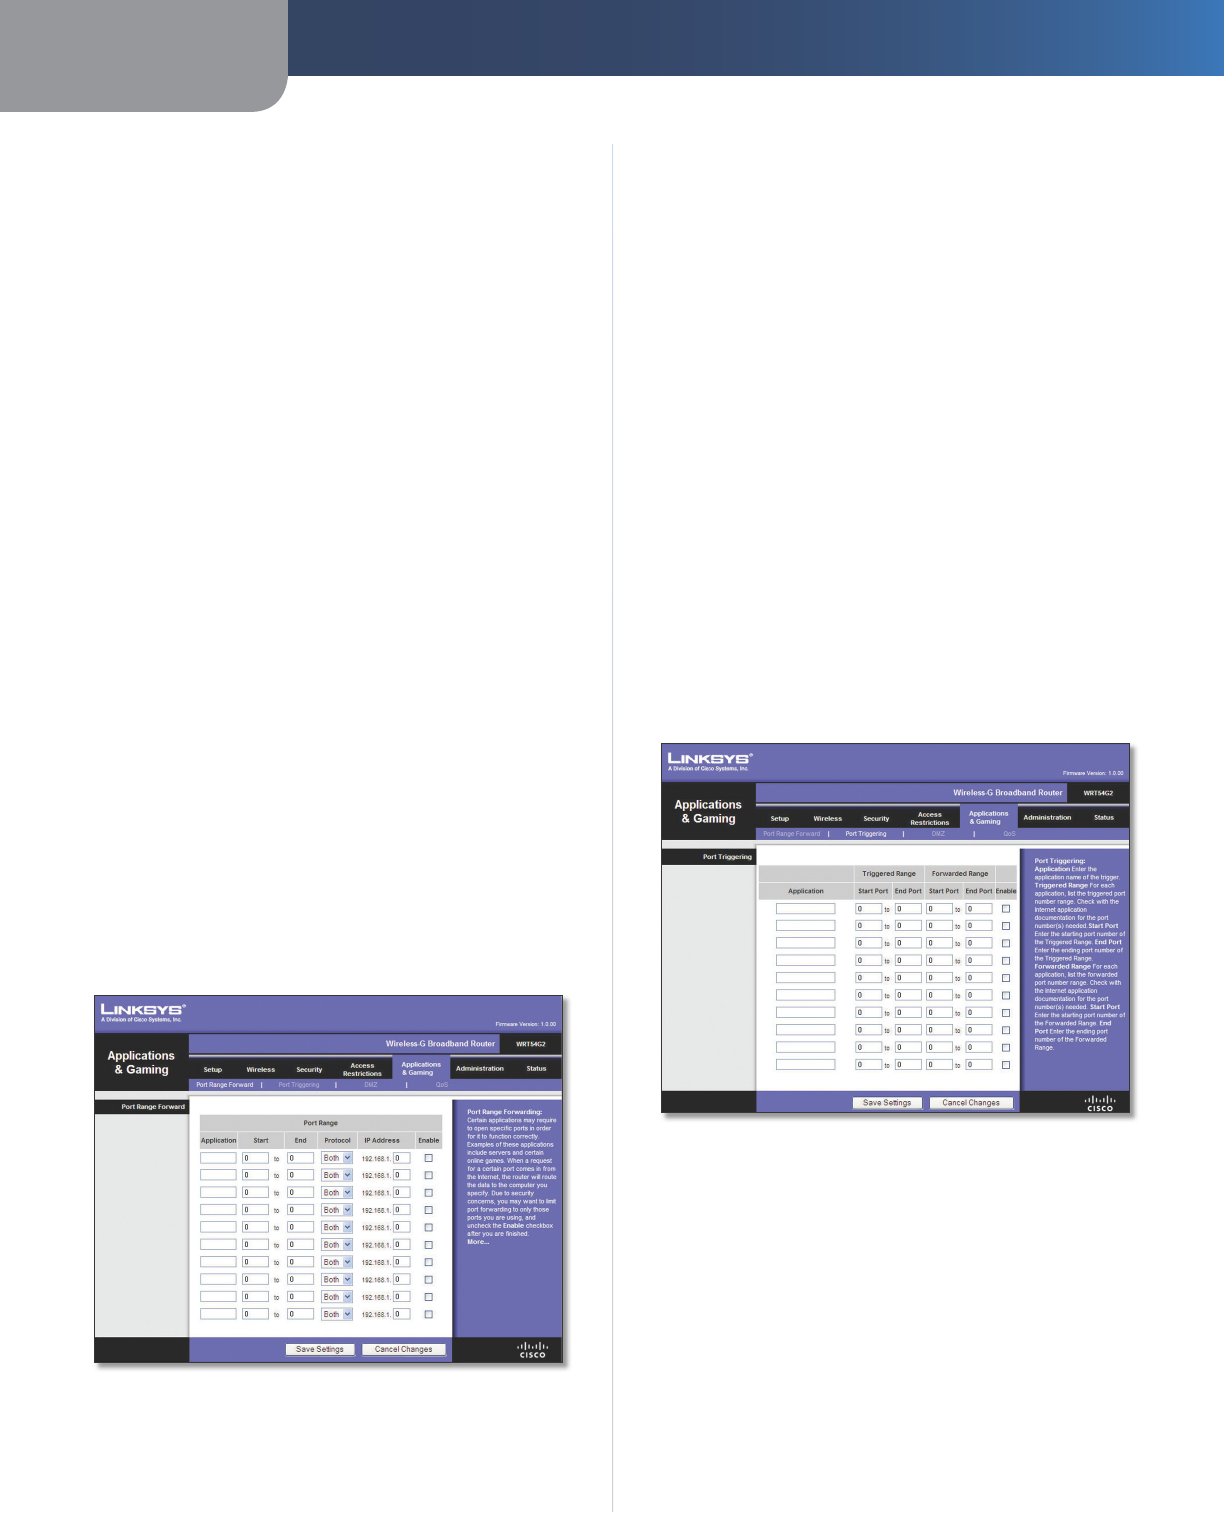
Applications and Gaming > Port Range
Forward
The Applications & Gaming > Port Range Forward screen
allows you to set up public services on your network, such as
web servers, ftp servers, e-mail servers, or other specialized
Internet applications. (Specialized Internet applications are
any applications that use Internet access to perform functions
such as videoconferencing or online gaming. Some Internet
applications may not require any forwarding.)
Applications and Gaming > Port Range Forward
Port Range Forward
To forward a port, enter the information on each line for
the criteria required.
Application In this field, enter the name you wish to give
the application. Each name can be up to 12 characters.
Start/End This is the port range. Enter the number that
starts the port range in the Start column and the number
that ends the range in the End column.
Protocol Select the protocol used for this application,
either TCP or UDP, or Both.
IP Address For each application, enter the IP Address of
the PC running the specific application.
Enable Select Enable to enable port forwarding for the
relevant application.
Click Save Settings to apply your changes, or click Cancel
Changes to cancel your changes.
Applications & Gaming > Port Triggering
The Applications & Gaming > Port Triggering screen allows
the Router to watch outgoing data for specific port
numbers. The IP address of the computer that sends the
matching data is remembered by the Router, so that when
the requested data returns through the Router, the data is
pulled back to the proper computer by way of IP address
and port mapping rules.
Applications and Gaming > Port Triggering
Port Triggering
Application Enter the application name of the trigger.
Triggered Range
For each application, list the triggered port number range.
Check with the Internet application documentation for
the port number(s) needed.
Start Port Enter the starting port number of the Triggered
Range.
End Port Enter the ending port number of the Triggered
Range.
Chapter 3 Advanced Configuration
17
Wireless-G Broadband Router
Forwarded Range
For each application, list the forwarded port number
range. Check with the Internet application documentation
for the port number(s) needed.
Start Port Enter the starting port number of the
Forwarded Range.
End Port Enter the ending port number of the Forwarded
Range.
Enable Select Enable to enable port triggering for the
applicable application.
Click Save Settings to apply your changes, or click Cancel
Changes to cancel your changes.
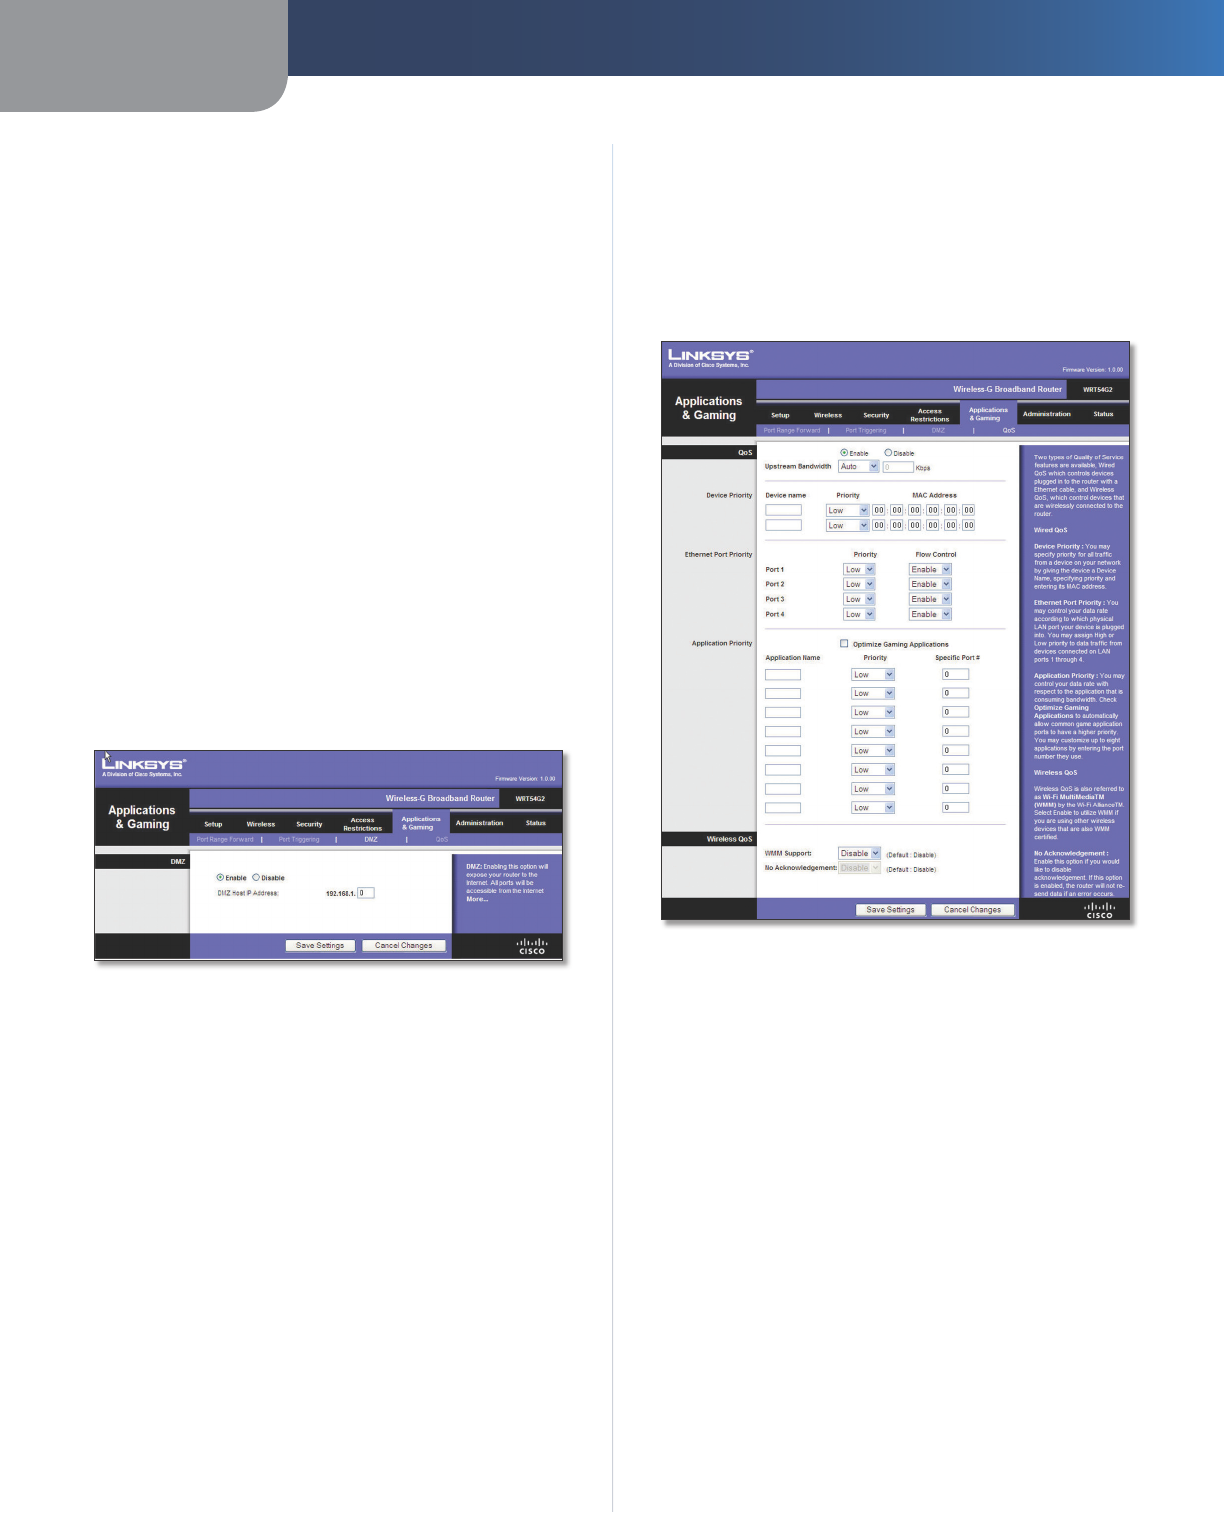
Applications and Gaming > DMZ
The DMZ feature allows one network computer to be
exposed to the Internet for use of a special-purpose
service such as Internet gaming or videoconferencing.
DMZ hosting forwards all the ports at the same time to
one PC. The Port Range Forward feature is more secure
because it only opens the ports you want to have opened,
while DMZ hosting opens all the ports of one computer,
exposing the computer to the Internet.
Applications and Gaming > DMZ
DMZ
Any PC whose port is being forwarded must have its DHCP
client function disabled and should have a new static IP
address assigned to it because its IP address may change
when using the DHCP function.
To expose one PC, select Enable. Then, enter the
computer’s IP address in the DMZ Host IP Address field. This
feature is disabled by default.
Click Save Settings to apply your changes, or click Cancel
Changes to cancel your changes.
Applications and Gaming > QoS
Quality of Service (QoS) ensures better service to
high-priority types of network traffic, which may
involve demanding, real-time applications, such as
videoconferencing.
There are three types of QoS available: Device Priority,
Ethernet Port Priority, and Application Priority.
QoS
Enable/Disable To enable QoS, select Enable. Otherwise,
select Disable. QoS is disabled by default.
Upstream Bandwidth Select Auto or Manual from
the drop-down menu. Manual allows you to specify the
maximum outgoing bandwidth that applications can
utilize.
Applications and Gaming > QoS
Device Priority
Enter the name of your network device in the Device name
field, enter its MAC Address, and then select its priority
from the drop-down menu.
Ethernet Port Priority
Ethernet Port Priority QoS allows you to prioritize
performance for the Router’s four ports, LAN Ports 1-4. For
each port, select the priority and flow control setting.
Priority Select High or Low in the Priority column. The
Router’s four ports have been assigned low priority by
default.
Flow Control If you want the Router to control the
transmission of data between network devices, select
Enabled. To disable this feature, select Disabled. Ethernet
Port Priority QoS does not require support from your ISP
because the prioritized ports LAN ports 1-4 are in your
network. This feature is enabled by default.
Chapter 3 Advanced Configuration
18
Wireless-G Broadband Router
Application Priority
Application Priority QoS manages information as it is
transmitted and received. Depending on the settings of
the QoS screen, this feature will assign information a high
or low priority for the applications that you specify.
Optimize Gaming Applications Select this to
automatically allow common game application ports
to have a higher priority. These games include, but are
not limited to: Counter-Strike, Half-Life, Age of Empires,
Everquest, Quake2/Quake3, and Diablo II. The default
setting is unselected.
Application Name Enter the name you wish to give the
application in the Application Name field.
Priority Select High or Low to assign priority to the
application. The default selection is Low.
Specific Port # Enter the port number for the
application.
Wireless QoS
WMM Support Wi-Fi Multimedia (WMM), formerly
known as Wireless Multimedia Extensions (WME), is
a Wi-Fi Alliance certified feature, based on the IEEE
802.11e standard. This feature provides QoS to wireless
networks. It is especially suitable for voice, music and
video applications; for example, Voice over IP (VoIP), video
streaming, and interactive gaming. If you have other
devices on your wireless network that support WMM,
select Enabled. Otherwise, keep the default, Disabled.
No Acknowledgement This feature prevents the Router
from re-sending data if an error occurs. To use this feature,
select Enabled. Otherwise, keep the default setting,
Disabled.
Click Save Settings to apply your changes, or click Cancel
Changes to cancel your changes.
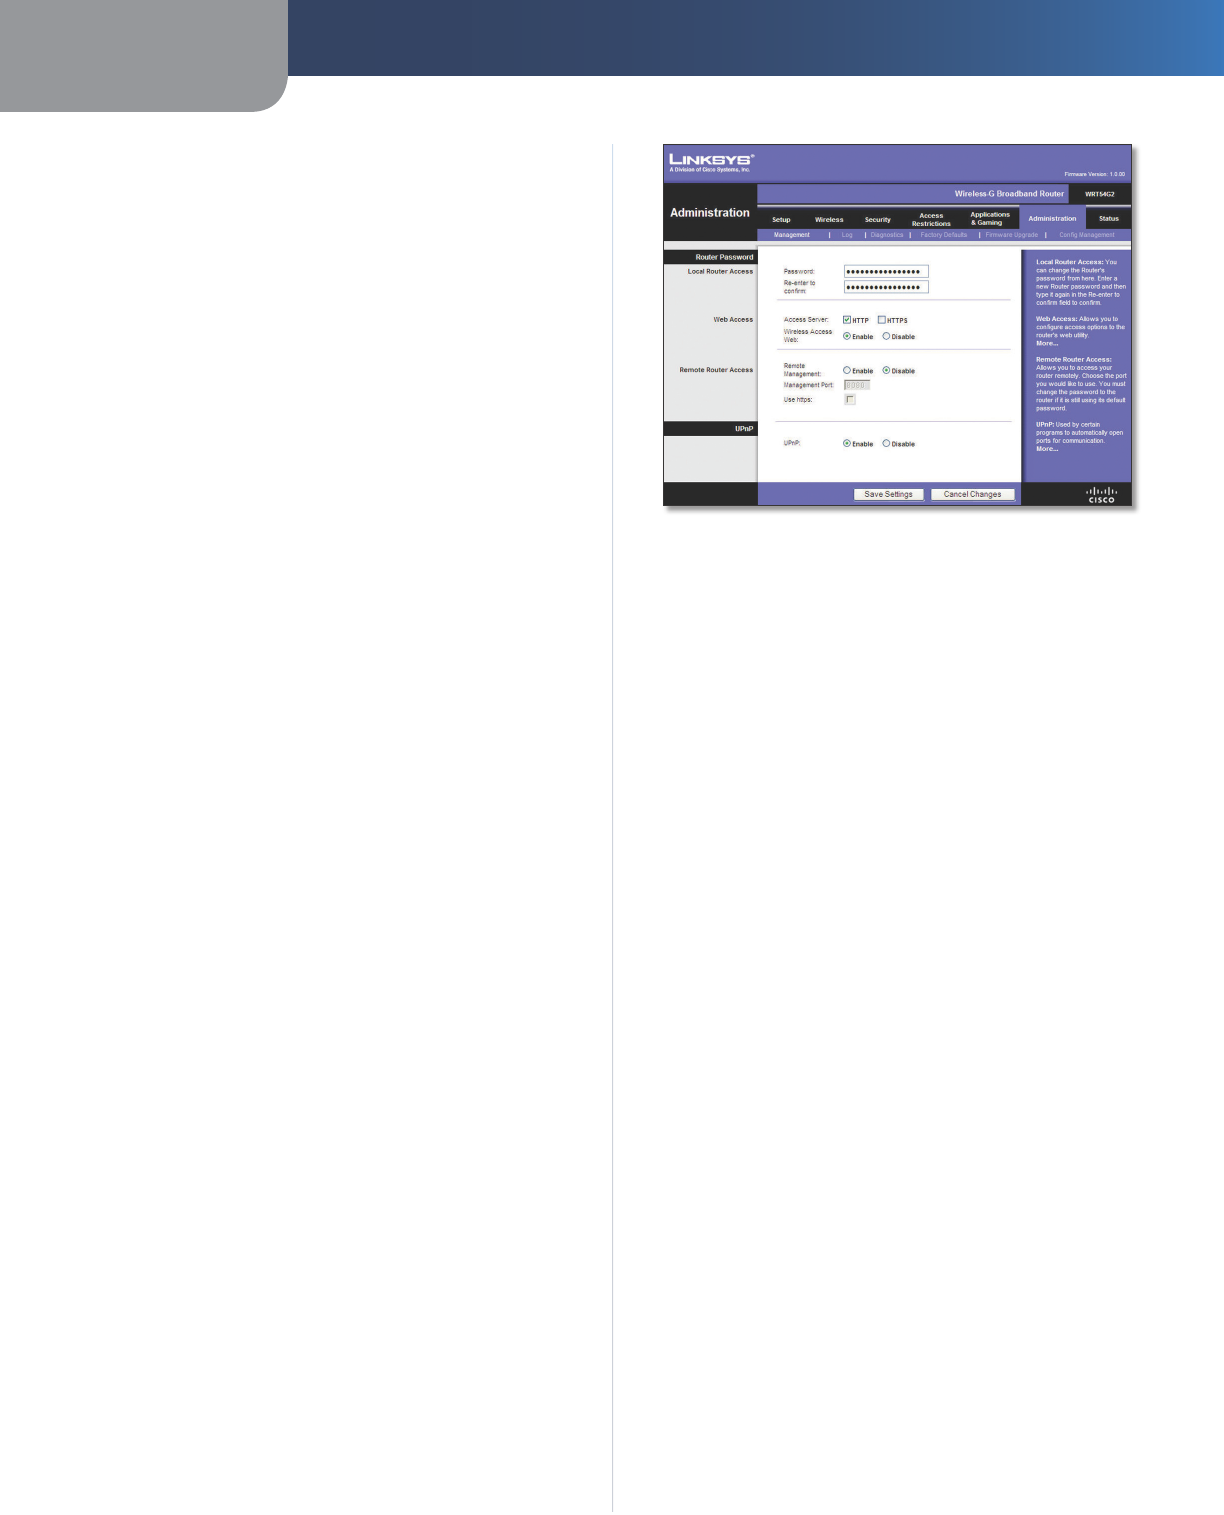
Administration > Management
The Administration > Management screen allows the
network’s administrator to manage specific Router
functions for access and security.
Administration > Management
Router Password
Local Router Access
Router Password Enter a new Password for the Router.
Re-enter to confirm Enter the Password again to confirm.
Web Access
Access Server HTTP (HyperText Transport Protocol) is
the communications protocol used to connect to servers
on the World Wide Web. HTTPS uses SSL (Secured Socket
Layer) to encrypt data transmitted for higher security.
Select HTTP or HTTPS. The default selection is HTTP.
Wireless Access Web If you are using the Router in
a public domain where you are giving wireless access
to your guests, you can disable wireless access to the
Router’s web-based utility. You will only be able to access
the web-based utility via a wired connection if you disable
the setting. Keep the default, Enable, to enable wireless
access to the Router’s web-based utility, or select Disable
to disable wireless access to the utility.
Remote Router Access
Remote Management To access the Router remotely,
from outside the network, select Enable.
Management Port Enter the port number that will be
open to outside access. You will need to enter the Router’s
password when accessing the Router this way, as usual.
Use https To require the use of HTTPS for remote access,
select this feature.
UPnP
UPnP Keep the default, Enable to enable the UPnP
feature; otherwise, select Disable.
Click Save Settings to apply your changes, or click Cancel
Changes to cancel your changes.