LPS Device NEO-4005LS LCD TV & MONITOR User Manual USERS MANUAL 2
LPS Device Co., Ltd. LCD TV & MONITOR USERS MANUAL 2
Contents
- 1. USERS MANUAL 1
- 2. USERS MANUAL 2
- 3. USERS MANUAL 3
USERS MANUAL 2
40LCD TV OWNERS INSTRUCTION
14
NEOVIA
ENGLISH
Analog
RGB
DVI
PC AUDIO
in
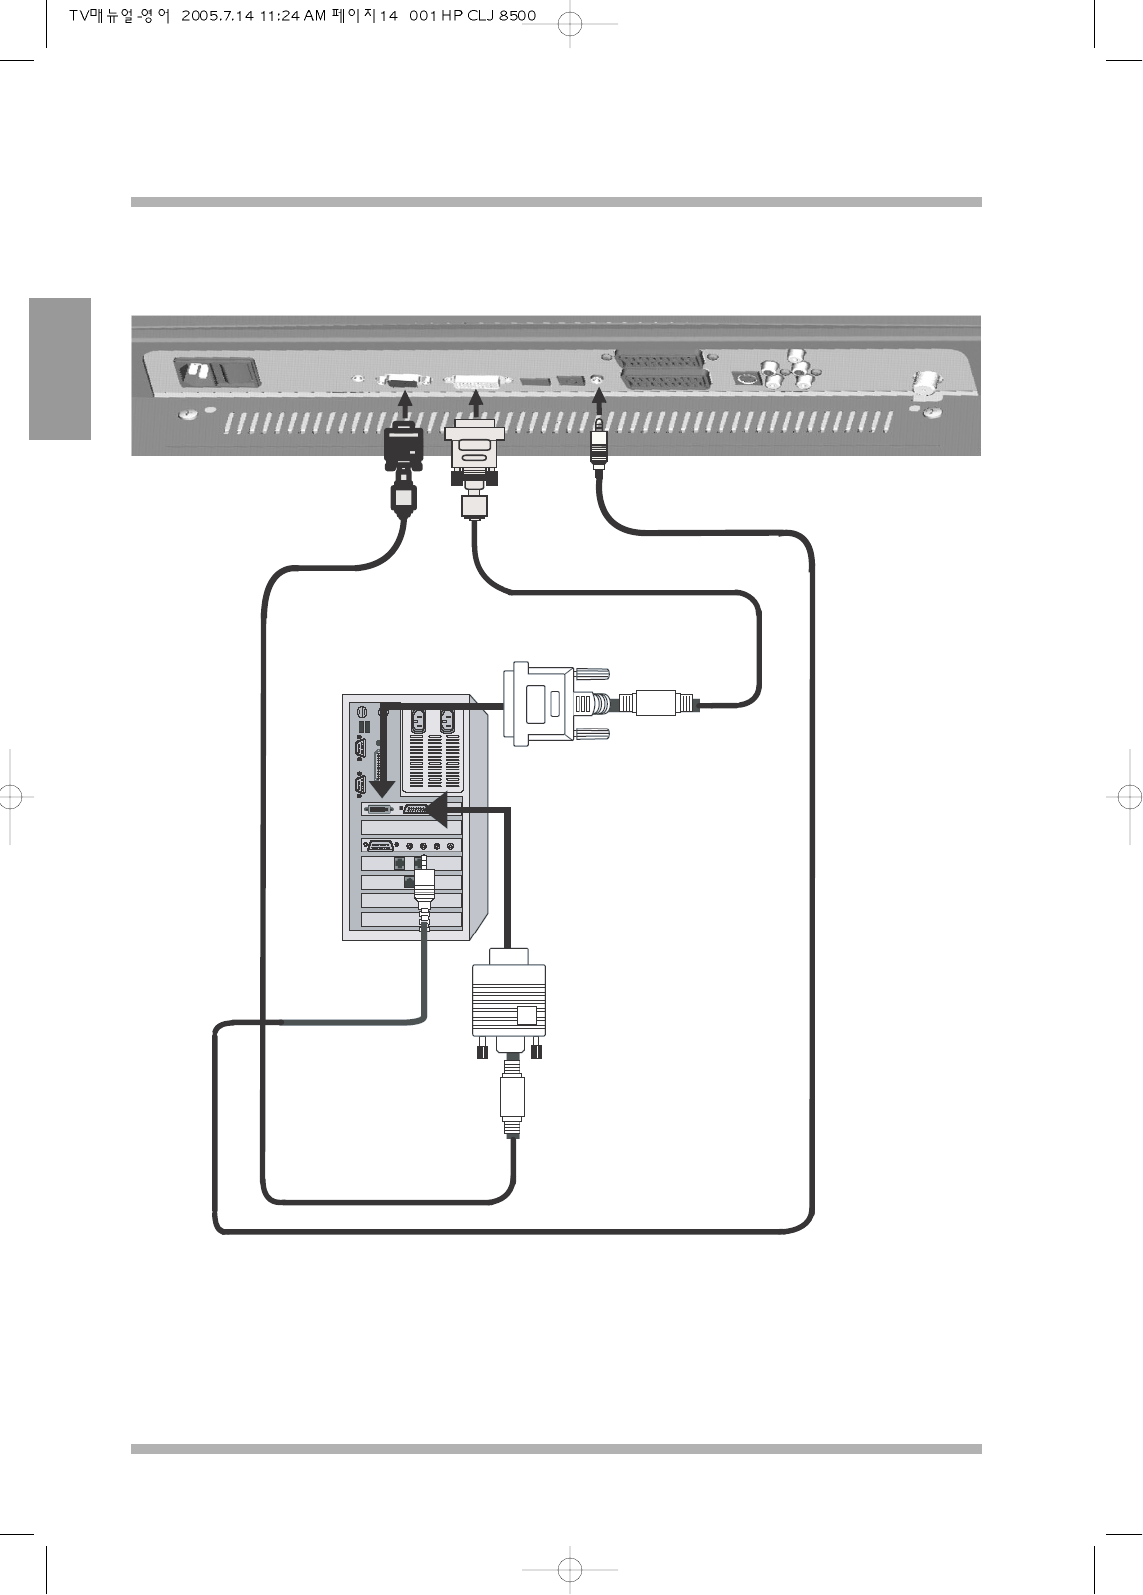
Connecting to PC
Connect the cables as shown above and make sure that both PC and the LCD TV is turned off for precautions.
Please note that especially DVI cables should be connected when the power has been turned off.
NEOVIA
40LCD TV OWNERS INSTRUCTION
15
ENGLISH
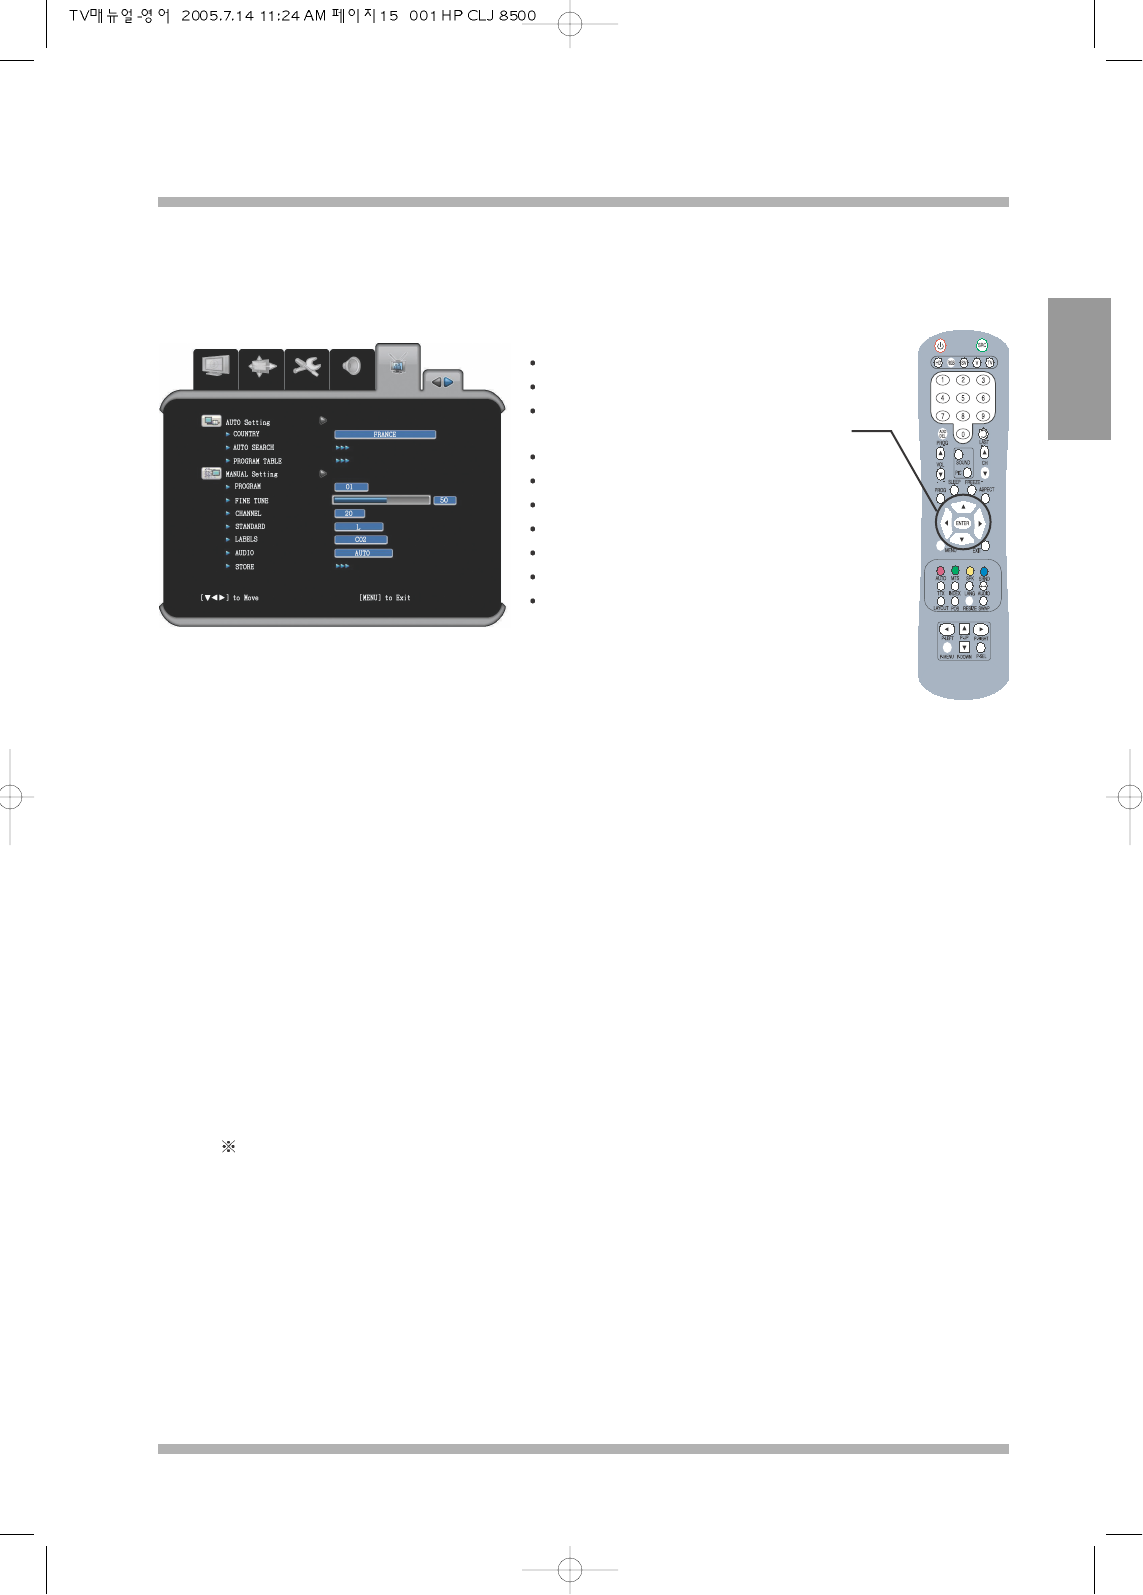
TV SETTING
AUTO SETTING
COUNTRY : Attuned the TV for that particular country, for correct searching of the channels.
AUTO SEARCH : When press “Right” in the remote or “VOL Right” button in the front of the TV, the
TV automatically searches all the available channels that can be displayed.
PROGRAM TABLE : Lists all the available channels that has been searched.
MANUAL SETTING
PROGRAM: Refer to the table of numbers in the program table.
FINE TUNE: To make small adjustments for tuning individual stations.
CHANNEL: Displays the channel currently shown on the display.
Note : Even though channel number has been changed, the program number does not change. The user can set
the channel number and store to the program number in this section.
Please note that there is no manual searching for this LCD TV
STANDARD : Shows the TV standard that it has been set.
LABEL : User changable labels for that particular channel.
AUDIO MODE : To change the sound system used for a program channel.
(If the station is sending alternative sound to that particular program then this TV is
capable of receiving and playing that sound).
STORE : Press right cursor in the remote or “VOL Right” to store currently changed settings.
SETTING
Press the MENU button
Press left cursor to select “TV”
Press down cursor to select functions within
“TV” menu
Press right / left cursor to change the settings
Press MENU or ENTER to save
Press MENU to escape OSD.
ACCESS TV
Adjust the chosen function.
Press ENTER to Save.
Press EXIT to turn the OSD Off.
This is the general TV Setting which is
shown when selecting “TV” in the on
screen display (OSD).
40LCD TV OWNERS INSTRUCTION
16
NEOVIA
ENGLISH
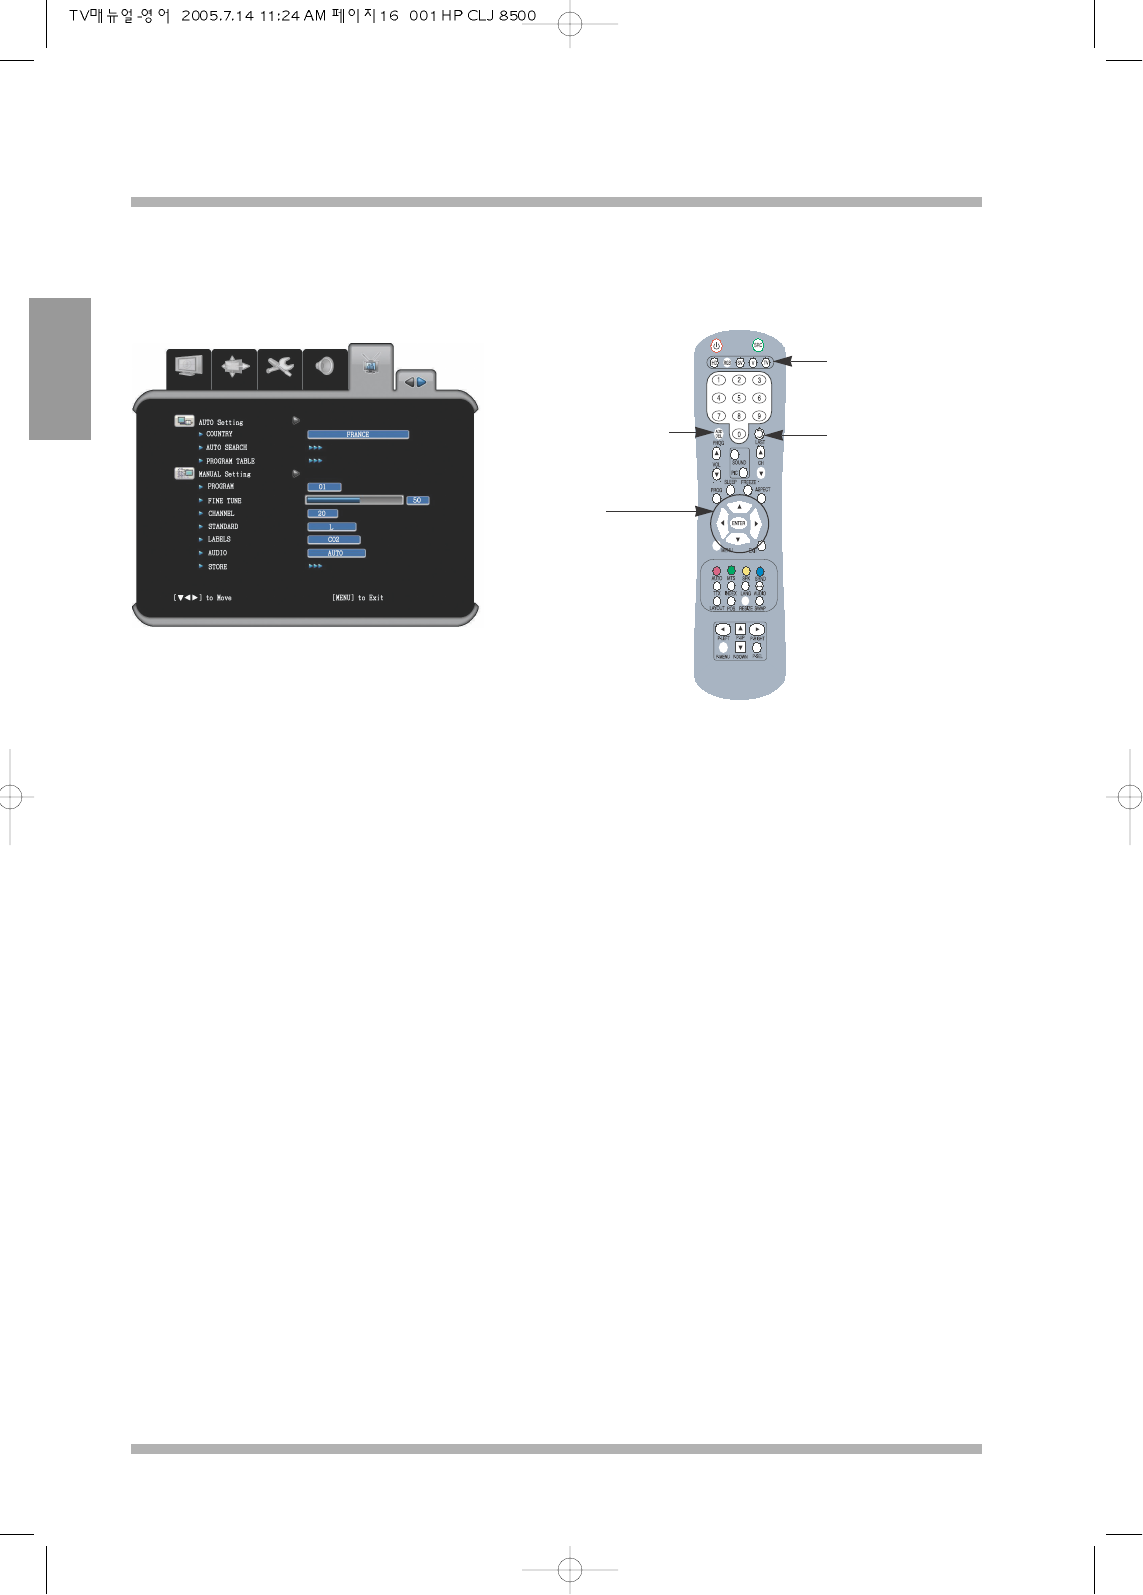
ADD / DEL
To Add and/or
Del channels in the
program table
If in another
source, press TV
to select TV
LAST
To return to
previous channel.
Cursors
To move to desired
position
This is the general TV setting which is
shown when selecting “TV” in the on screen
display (OSD).
When turning on for the first time, the TV should be set in order to receive reception.
For NTSC the channels are preset to all the channels from channel 2 to channel 99.
For other areas the channels (SECAM / PAL), needs to be searched before TV is tunned to areal reception.
For tunning for the first time.
1. First, country needs to be selected before auto searching is enabled. This is also need to be set first in order to
set the tuner according to each countries standards.
2. Once the country has been set then auto search can begin.
3. Move the cursor to auto search channels and begin auto searching.
4. LCD TV then will start searching for all the available channels.
5. Once all the channels have been searched these are stored in the program table.
6. All the channels can be fine tuned.
7. All the channel names can be edited to suit individuals who likes to change the labels for their purposes.
8. Once all the setting has been completed press enter to save and press exit to leave the OSD.

NEOVIA
40LCD TV OWNERS INSTRUCTION
17
ENGLISH
SOURCE SETTING
Press the MENU button.
Press left cursor to select “SOURCE”.
Press down cursor to select functions within
“SOURCE” menu.
Press right / left cursor to change the settings.
Press MENU or ENTER to save.
Press MENU to escape OSD.
ACCESS SOURCE.
Adjust the chosen function.
Press ENTER to save.
Press EXIT to turn the OSD Off.
This is the general “SOURCE” layout which
can be seen when selecting “SOURCE” in
the on screen display (OSD).
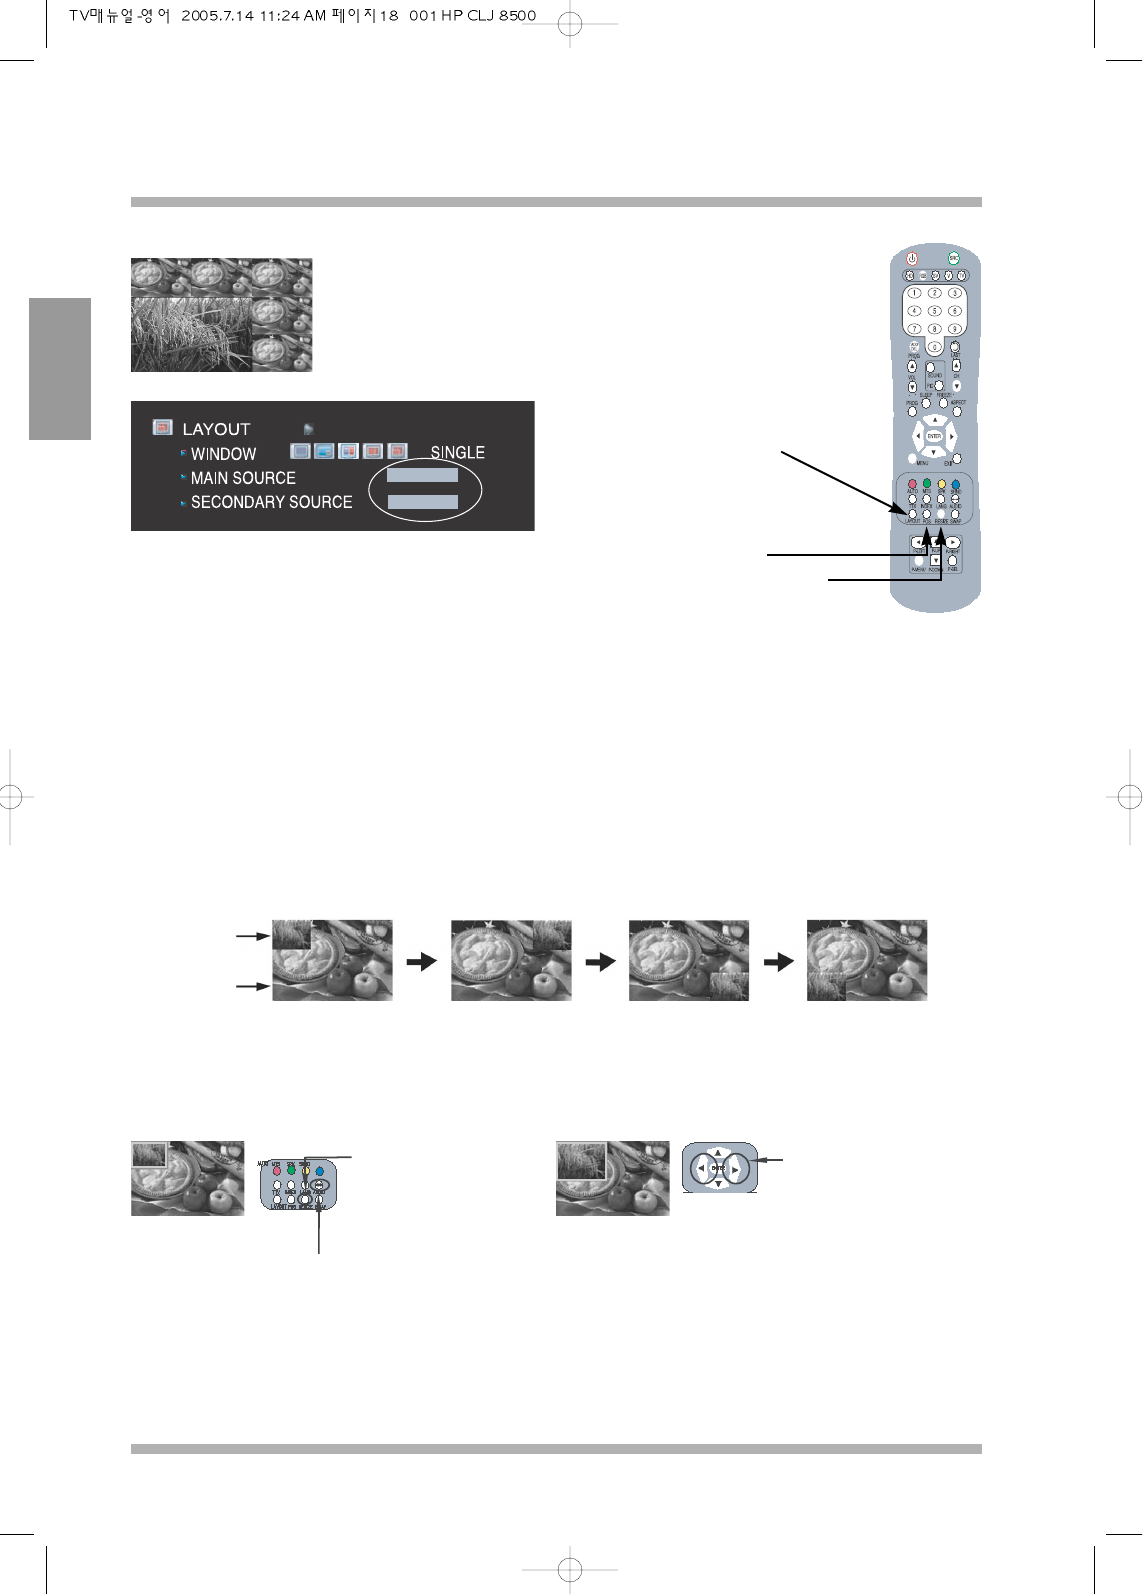
LAYOUT
Selecting various display out modes
Single Main Picture Picture in Picture(PIP) Picture By Picture(PBP) Main Picture with 3 small
separate Picture (POP3) Main Picture with 5 small Picture (POP5).
WINDOW LAYOUT (DEFINITION)
This LCD TV has capable of showing multiple pictures in one display screen.
The various window layout possible for this LCD TV is defined.
MAIN SOURCE
It displays what is the main source modes when in single, POP3 and POP5 picture or the left of the
screen when in picture by picture.
SECONDARY SOURCE
It displays the secondary source modes when in single, POP3 and POP5 picture or the right of the screen
when in picture by picture.
MAIN WINDOW:
Only one source is used
to display it .
PIP:(Picture In Picture)
Here main picture is shown
with another picture shown
in small screen.
PBP:(Picture By Picture)
Here two separate screen
shown in LCD TV
POP3:(Picture On Picture)
Here main screen with
three small pictures from
source
40LCD TV OWNERS INSTRUCTION
18
NEOVIA
ENGLISH
Once the multi display has been chosen, main window
source and secondary window source need to be
selected.
Once the layout is changed user has to set two sources to display for all case other then the main screen. There is
a hot key provided within the remote control that user can quickly access this function.
PIP (Picture in Picture)
Using either the hot key in the remote or access through OSD user can change the size, the postion of the
secondary picture and the audio sound out between secondary and primary audio.
PIP Positioning.
Press POS button in the remote control to change the placement of the secondary picture.
PIP Resizing
Select secondary picture until green border is lit around secondary picture and press RESIZE and then
left and right control to change the secondary picture size.
Pressing audio in the remote control change the sound output of the speakers from primary to secondary.
This audio button works for PIP and PBP.
* If there is no signal for PIP, the size and position of PIP window is not changable.
POP5:(Picture On Picture)
Here main screen with five
small picture from one
source
Secondary
Window
Primary
Window
Press resize to show
the border around
secondary picture
Press the right cursor to change
the size of the display.
LAY OUT
(Hot Key)
Position(Hot Key)
To change the position
of the secondary picture
in PIP
Resize(Hot Key)
To change the size of
secondary picture
NEOVIA
40LCD TV OWNERS INSTRUCTION
19
ENGLISH
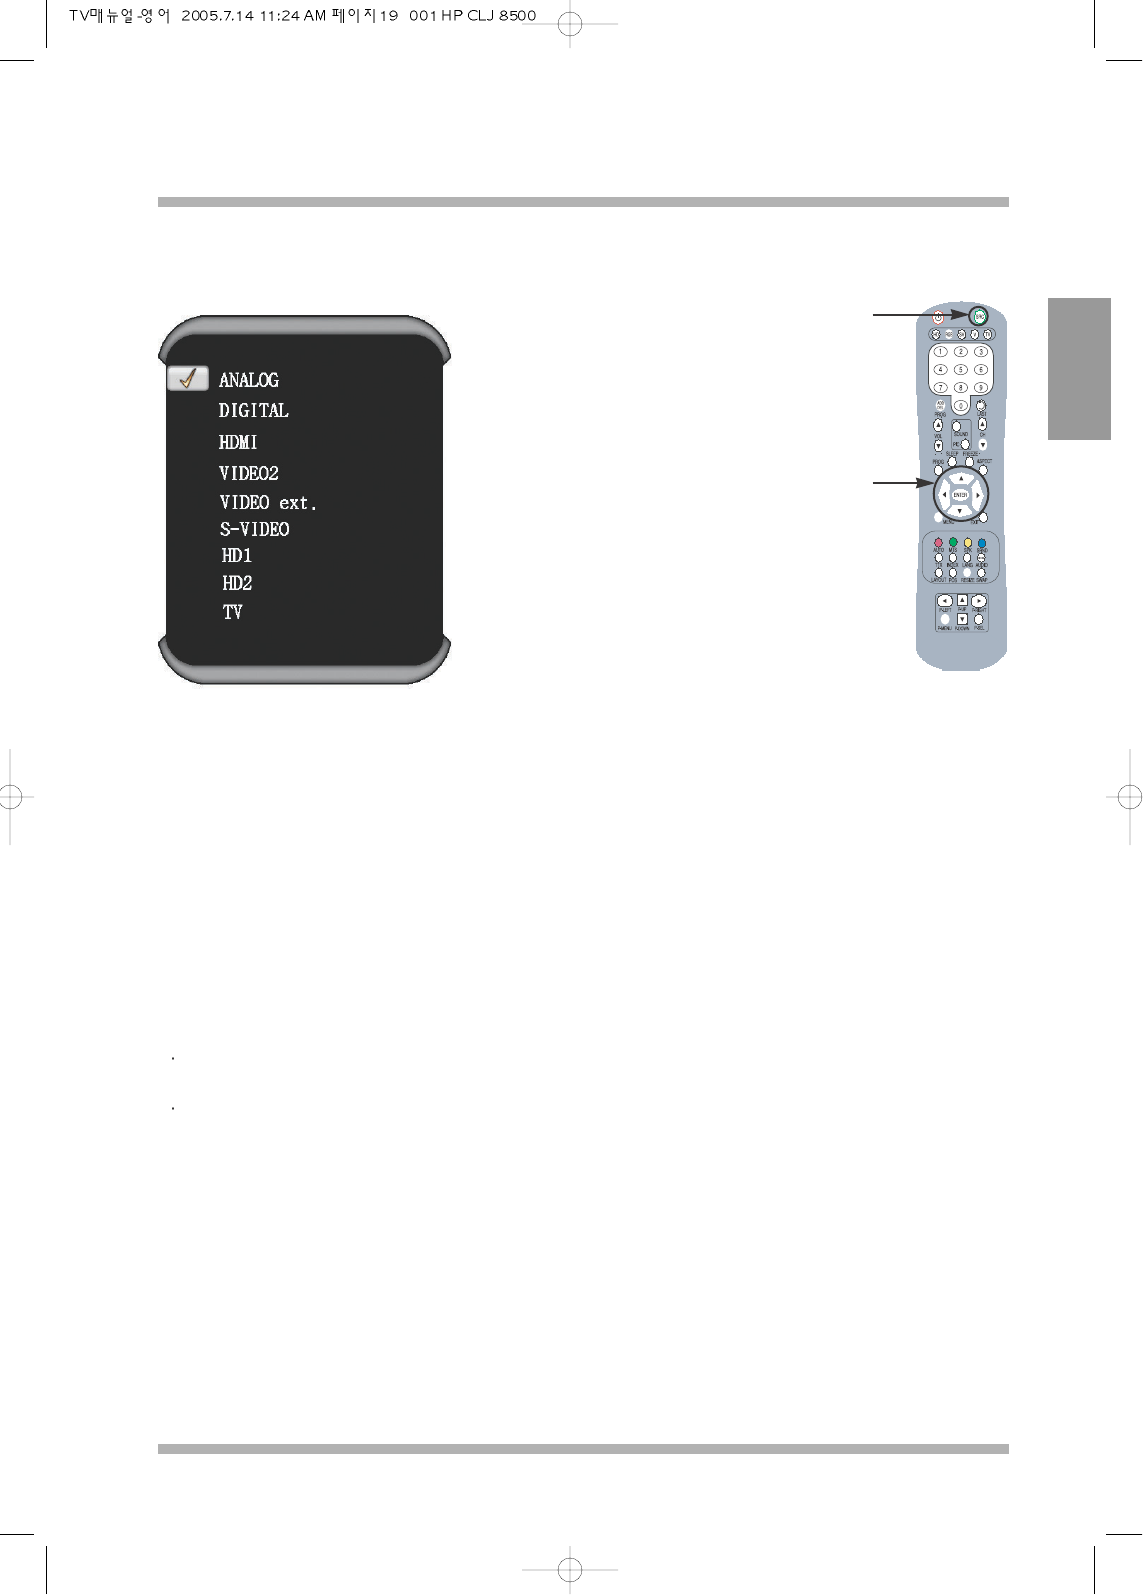
SOURCE SELECTION
This screen is displayed when
“SOURCE” button is pressed.
The display above is shown when the “SOURCE” button has been pressed by either remote control or
“SOURCE” button from the OSD. The source selection displays all the inputs that it can be displayed, if
connected. Use the up / down cursor to move the cursor to desired source and press enter to select the source.
When SCART 1 is connected to the LCD TV, the corresponding “SOURCE” is automatically detected and
shown. Same as, SCART 2 also detects the corresponding “SOURCE” directly.
To manually goes to the corresponding “SOURCE”,
Select “TV” if the source of SCART 1 is SCART-Composite and select “HD 1” if the source of SCART 1 is
SCART-RGB/HD.
Select “VIDEO 2” if the source of SCART 2 is SCART-Composite and select “HD 2” if the source of
SCART 2 is SCART-RGB/HD.
SRC(Source)
Press the source
button to select
the source to be
displayed on the
main screen.
Cursor
Use it to select
the desired
source.
40LCD TV OWNERS INSTRUCTION
20
NEOVIA
ENGLISH
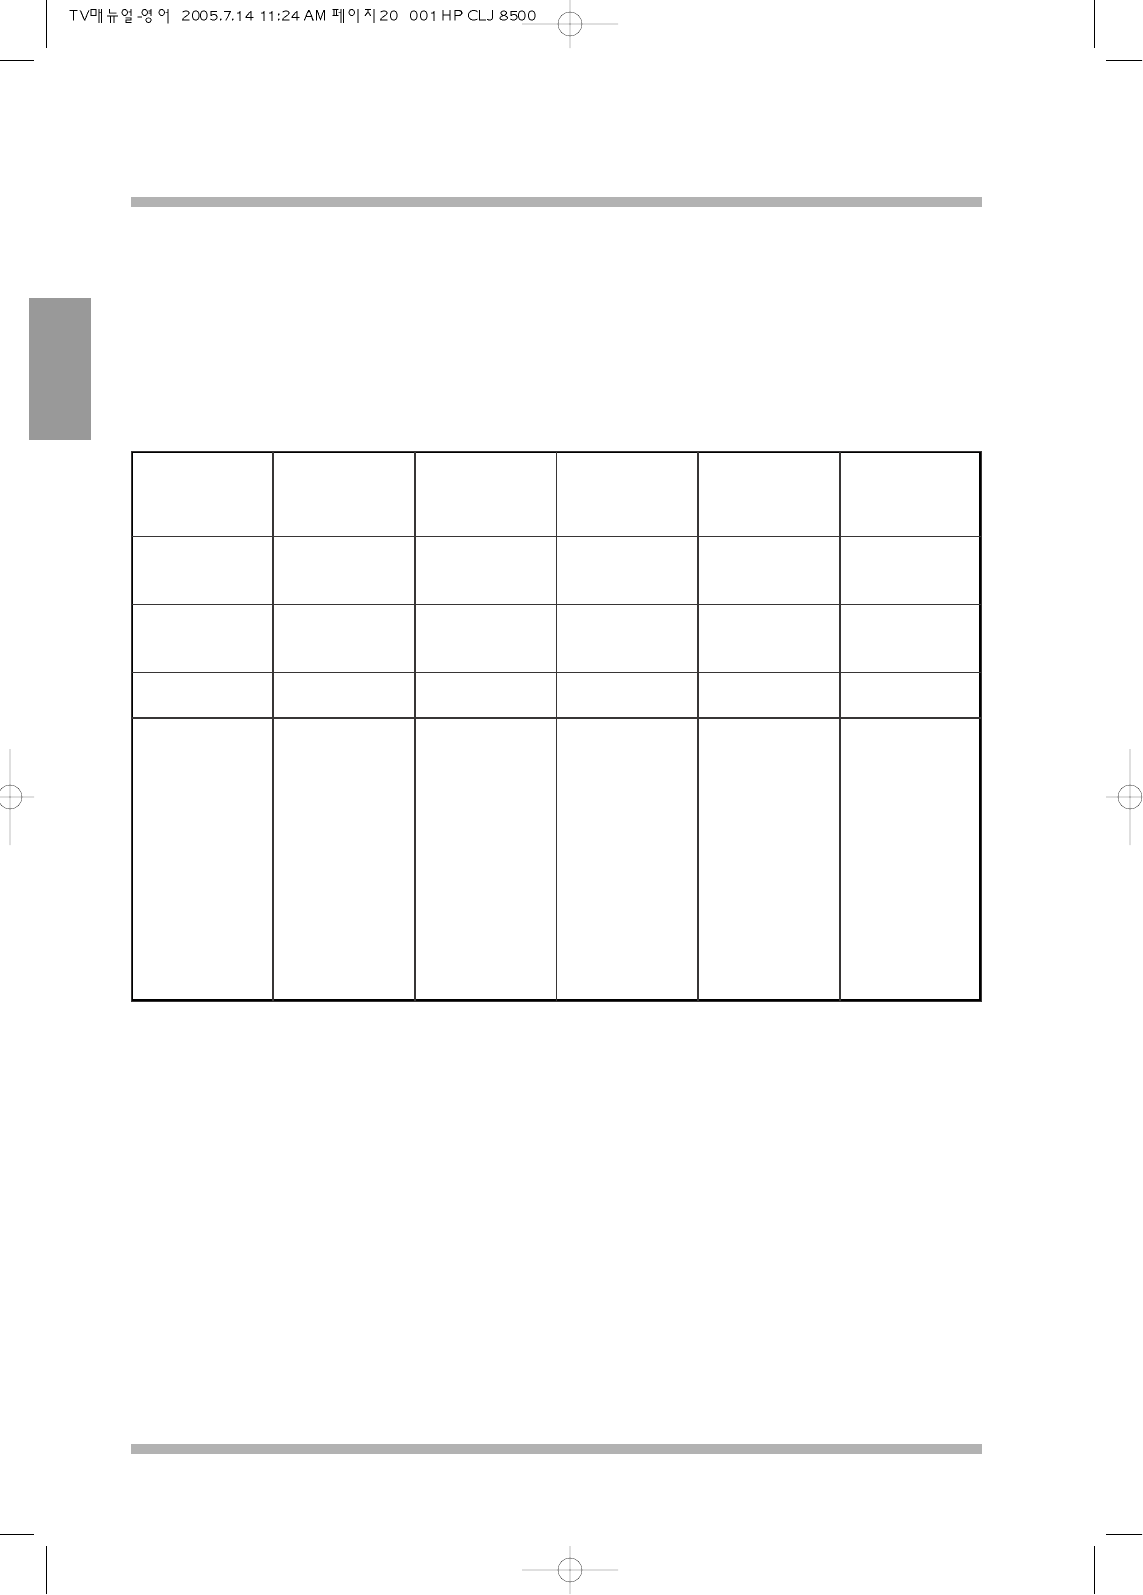
PC RESOLUTION
The list below shows the resolutions that are currently supported by LCD TV. If the signals from PC differes
from the list below then screen might be out of size or may not show at all. Please check to set your video card
correctly and make sure that your video driver is the latest.
Mode Resolution
Horizontal
Frequency
(kHz)
Vertical
Frequency
(Hz)
Pixel Clock
Frequency
(MHz)
Sync Polarity
(H/V)
MAC
MAC
640 X 480
1024 X 768
35.00
60.24
66.67
74.93
30.24
80.00
- / -
- / -
S-VGA
S-VGA
800 X 600
800 X 600
48.08
46.88
72.19
75.00
50.00
49.50
- / -
- / -
XGA 1024 X 768 56.48 70.07 75.00 - / -
VESA
VESA
VESA
VESA
VESA
VESA
VESA
VESA
VESA
VESA
640 X 480
640 X 480
720 X 400
800 X 600
800 X 600
800 X 600
1024 X 768
1024 X 768
1024 X 768
1360 X 768
37.86
37.50
37.927
35.16
37.88
48.08
48.36
56.48
60.02
47.712
72.81
75.00
85.039
56.25
60.32
72.19
60.00
70.07
75.03
60.015
31.5
31.5
35.5
36.0
40.0
50.0
65.0
75.0
78.75
85.5
- / -
- / -
- / +
+ / +
+ / +
+ / +
- / -
- / -
+ / +
+ / +
* The interlace mode is not supported.
* The set might operate abnormally if a non-standard video format is selected.
* For correct display it is recommended to set the resolution at 1360 x 768 at 60Hz Make sure that your graphic card
can support VESA 1360x768@60 standard before selecting this resolution.
NEOVIA
40LCD TV OWNERS INSTRUCTION
21
ENGLISH
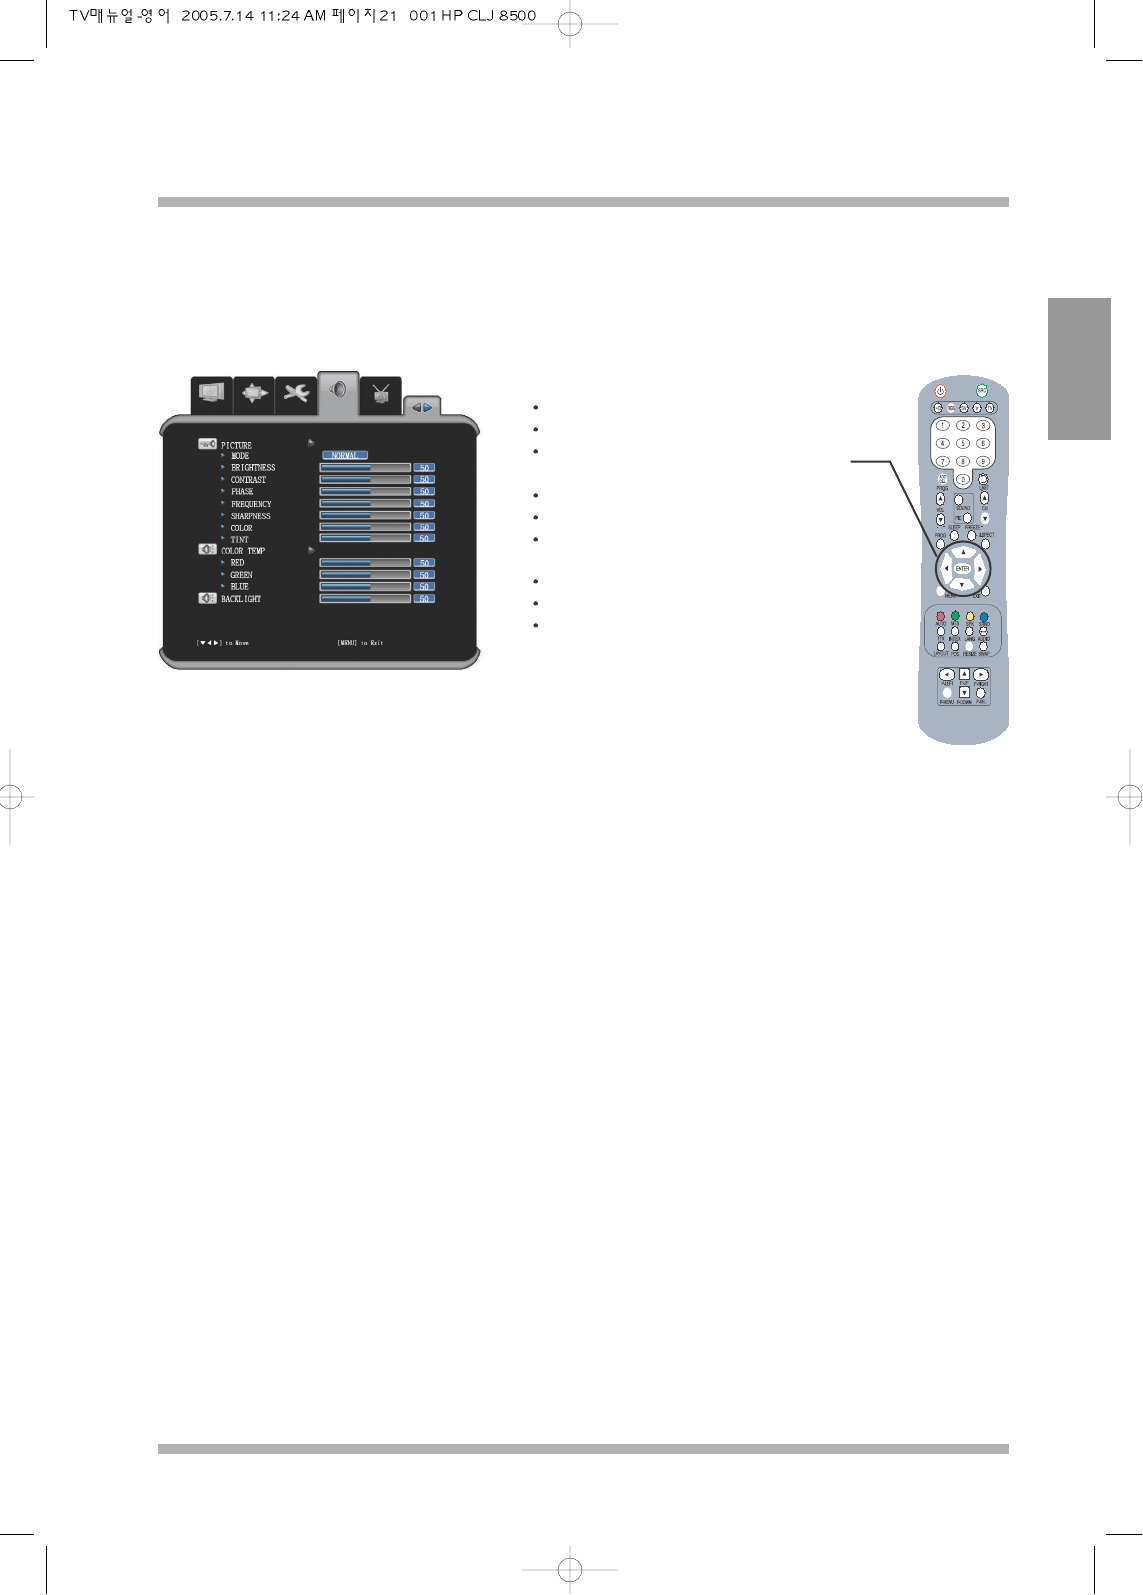
OSD CONTROL
PICTURE
Press the MENU button.
Press left cursor to select “PICTURE”.
Press down cursor to select functions within
“PICTURE” menu.
Press right / left cursor to change the settings.
Press MENU or ENTER to save.
Press MENU to escape OSD ACCESS
PICTURE.
Adjust the chosen function.
Press ENTER to save.
Press EXIT to turn the OSD Off.
This is the general picture layout which can
be seen when selecting “PICTURE” in the
on screen display (OSD).
The Picture quality settings can be made in this menu. From changing simple brightness to the color
temperature to reproduce the pictures as what user wants. Any changes can effect the display of the picture on
the screen.
MODE : There are four presets and a setting for the user. The presets are MOVIE , SOFT, SHARP, NORMAL
and USER.
BRIGHTNESS : More properly called BLACK LEVEL. It adds or subtracts an offset, or bias, into the red,
green, and blue signals. This control should be adjusted to suite the needs of the customer.
CONTRAST : It applies a scale factor (gain) to the red, green, and blue signals . It affects the luminance
(proportional to intensity) that is reproduced for a full white input signal. The control should be adjusted
to suit the needs of the customer.
PHASE/FREQUENCY : It applies the resolution and position of the screen to suit the needs of customer in
analog RGB mode.
SHARPNESS : It applies to richness of detail of the picture. Control the sharpness if need to suite the needs of
the customer.
COLOR : To change the level of color from saturation to black and white .
TINT : To change the level of the HUE
COLOR TEMPERATURE :It applies to level of brightness. By increasing the level causes the overall picture to
be slightly bluish in color. By decreasing the level causes picture to be slightly redish in color.
BACKLIHGT : This changes the level of brightness of the back light of the display