Larcan MXI1503U Television Broadcast Translator User Manual Amplifier control
Larcan Inc Television Broadcast Translator Amplifier control
UserManual.wiki
>
Larcan
>
MXI1503U User Manual
>
Amplifier control
Contents
1.
user manual general info
2.
Power Amplifier
3.
Amplifier control
4.
splitter
5.
control chassis
6.
Operations and maintenance
Amplifier control
Navigation menu
Upload a User Manual
Namespaces
Wiki Guide
HTML
PDF
Info
Views
User Manual
Discussion / Help
Navigation
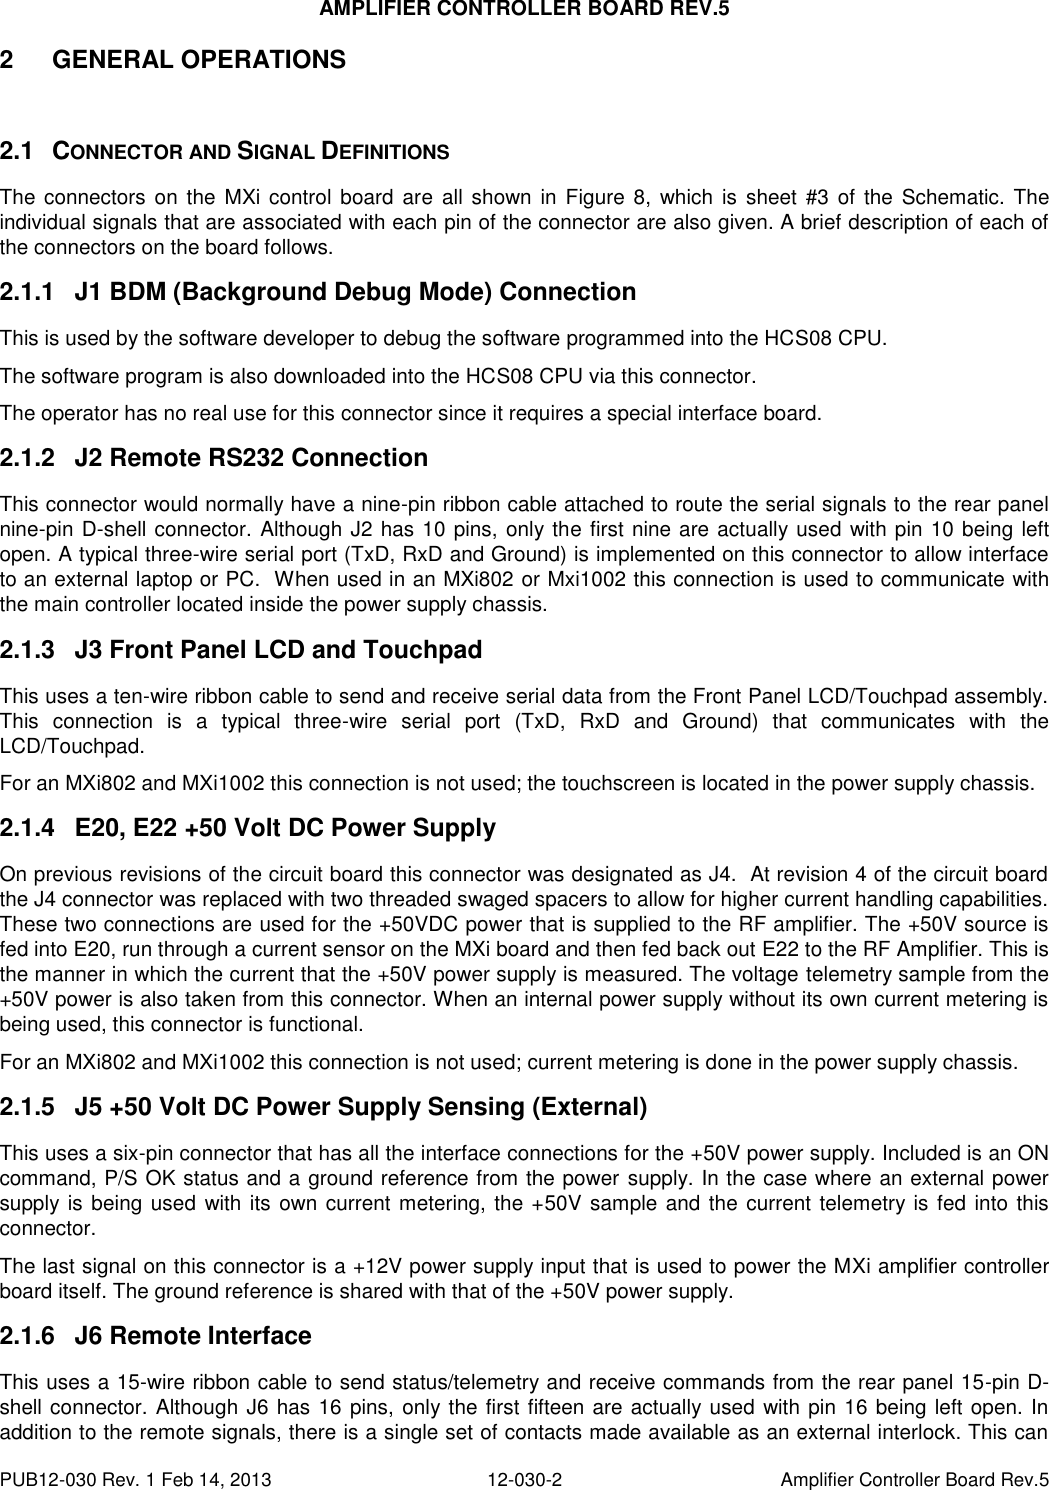

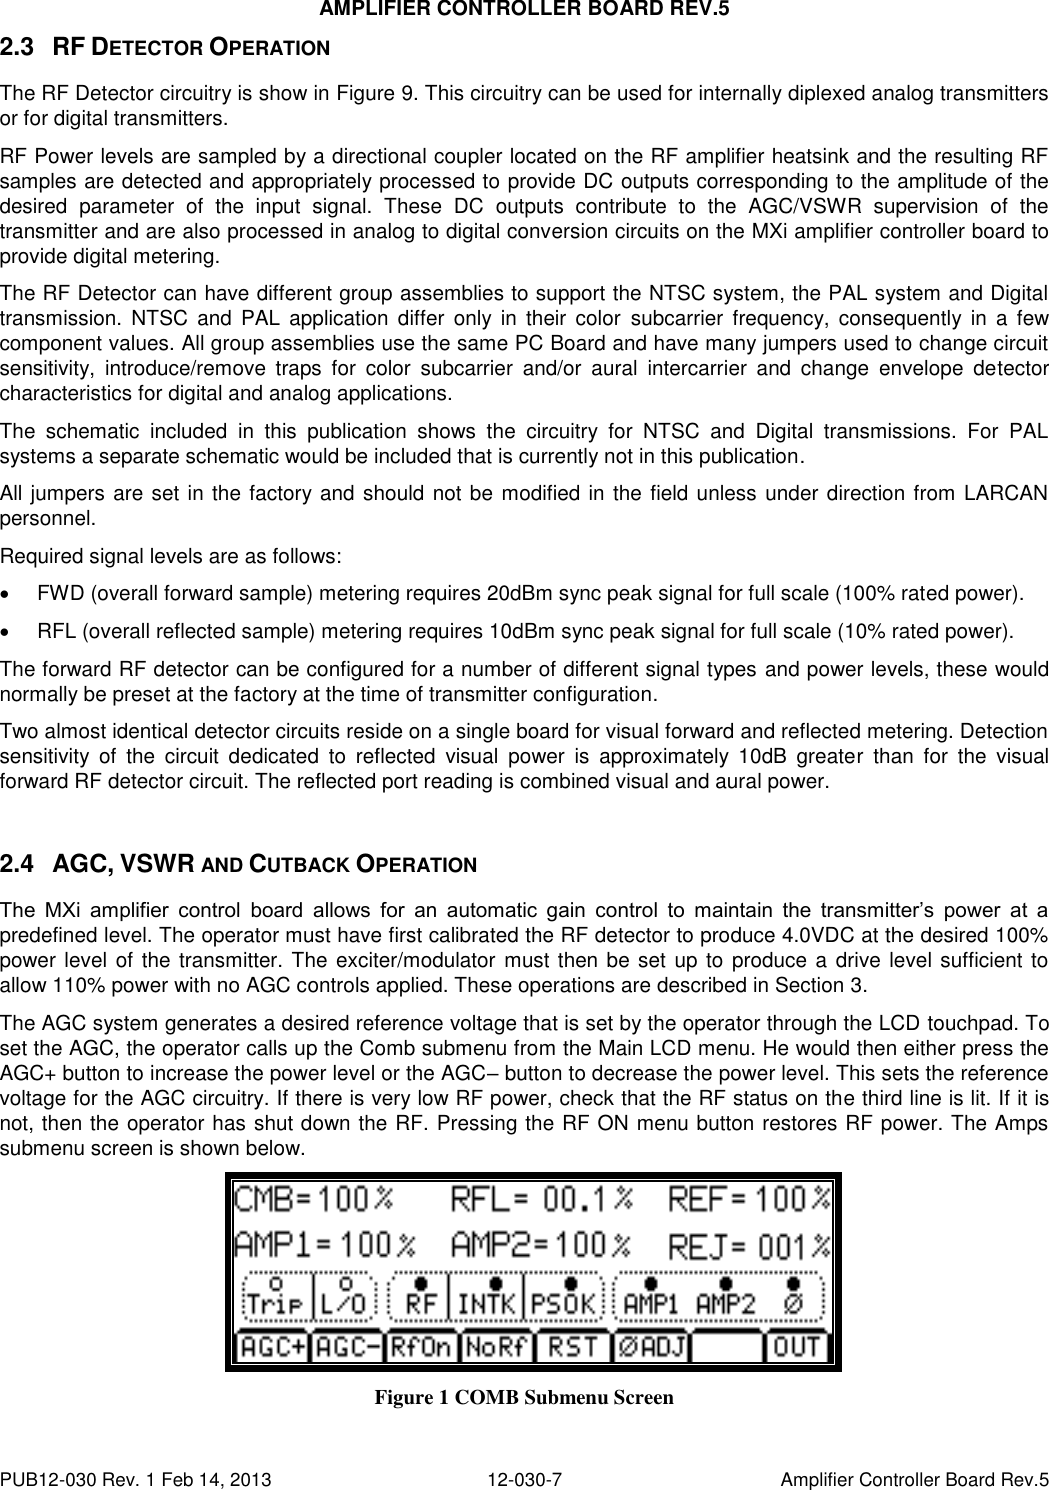
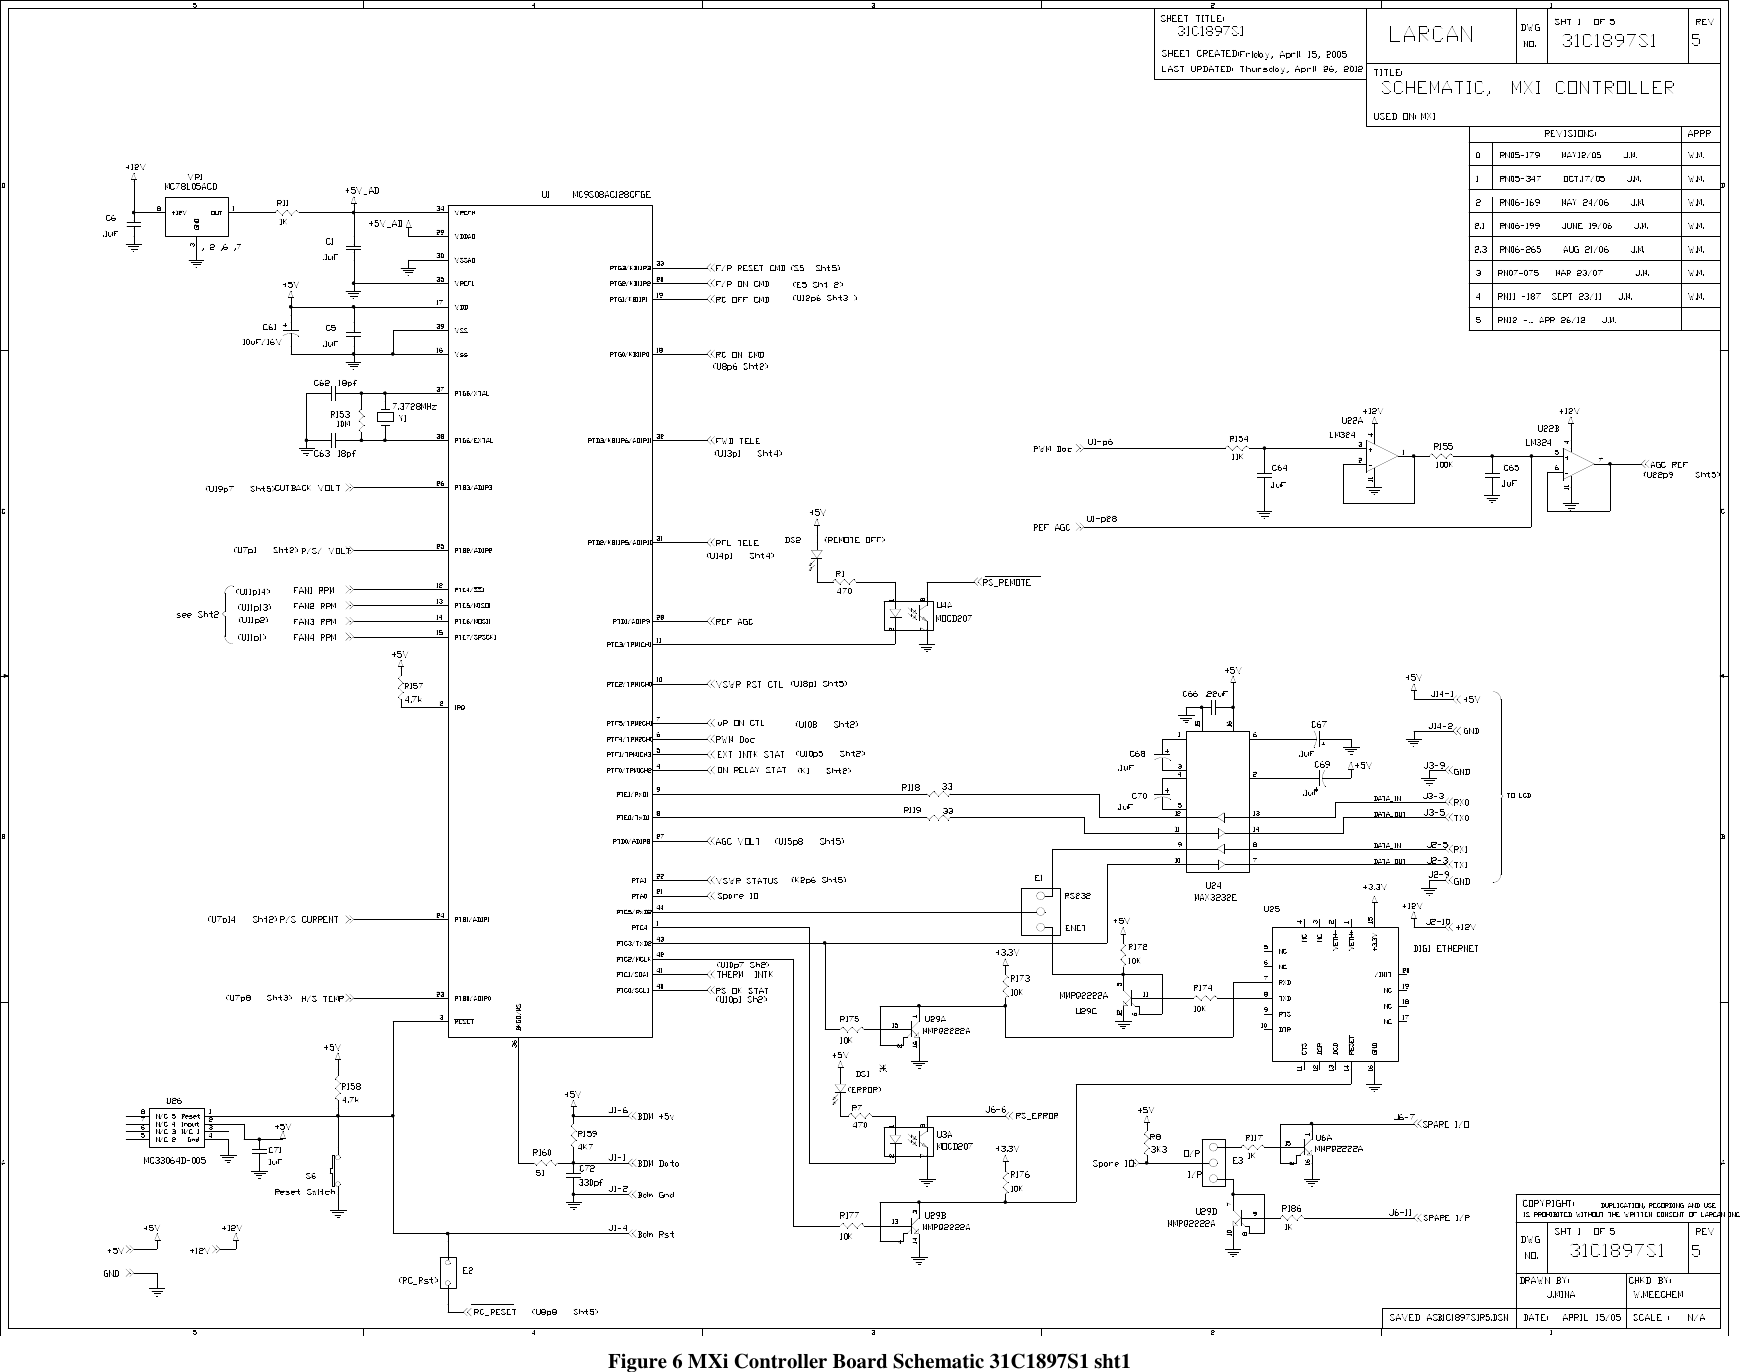
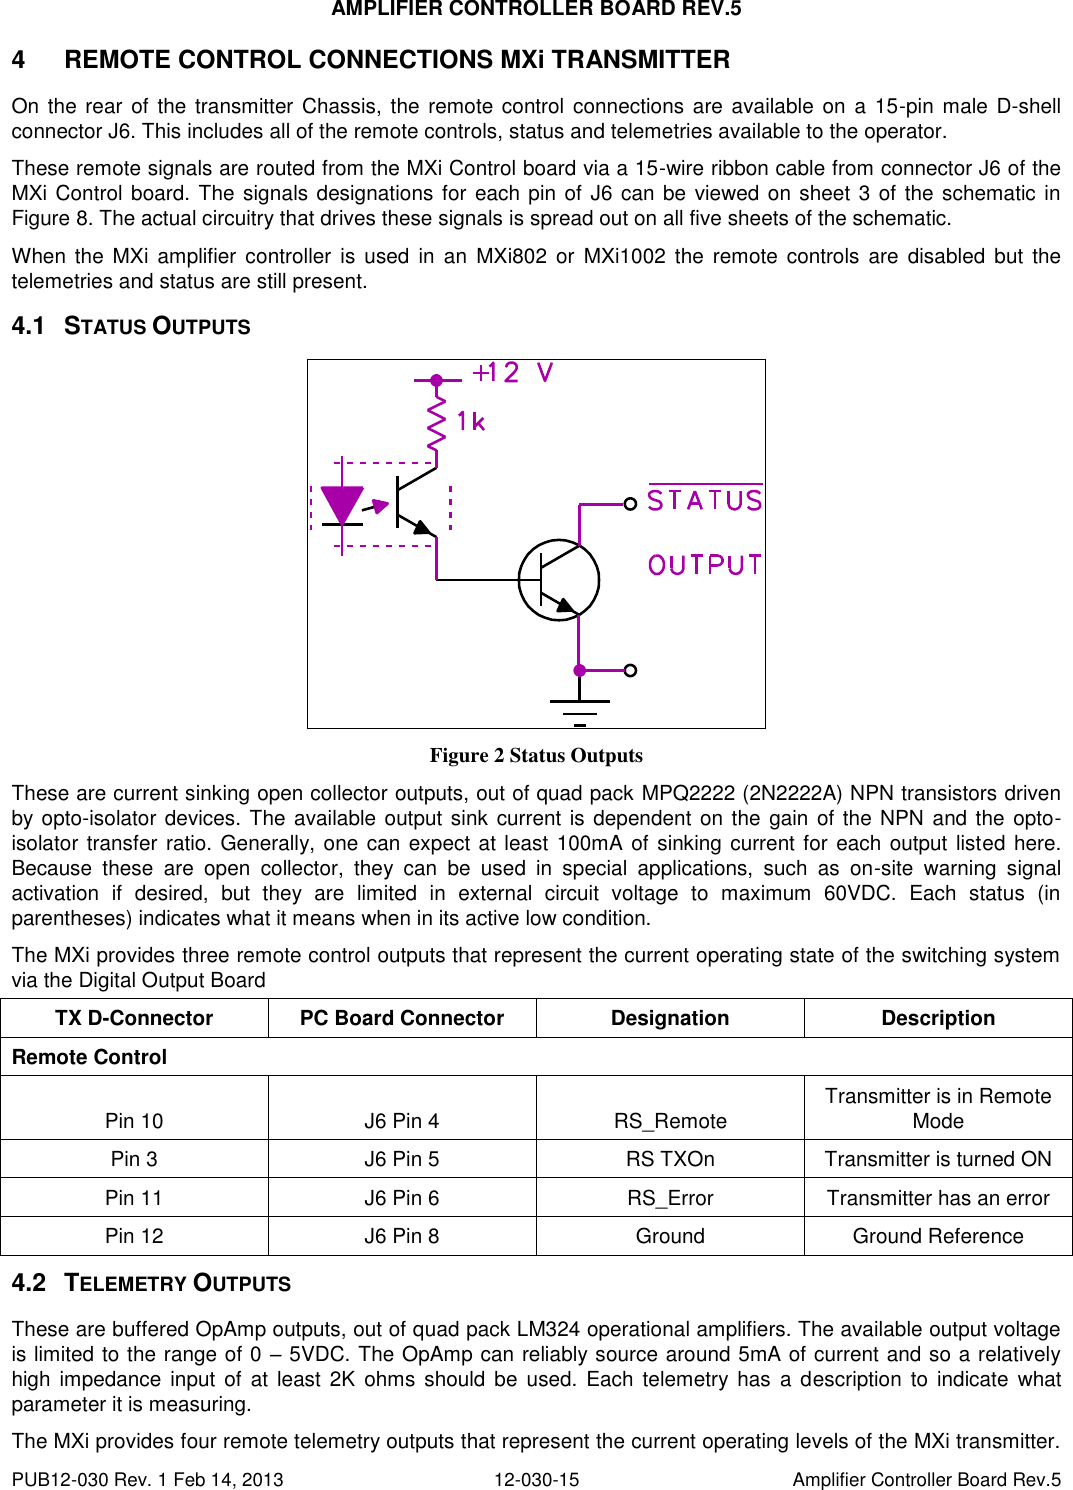
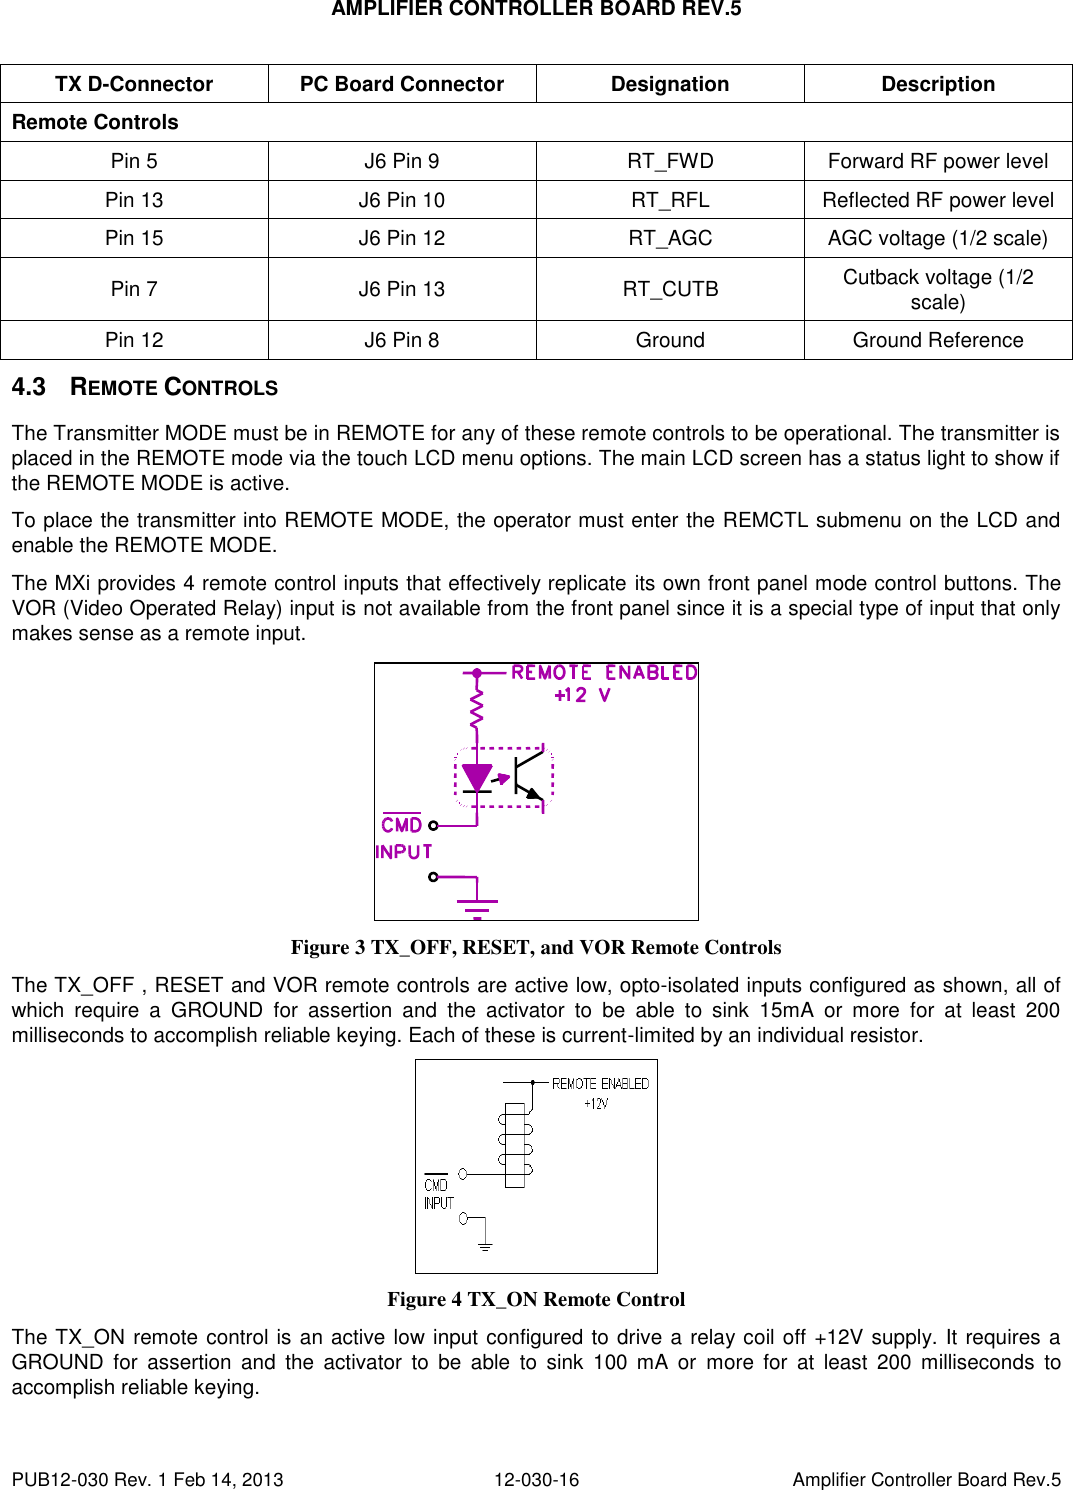
![AMPLIFIER CONTROLLER BOARD REV.5 PUB12-030 Rev. 1 Feb 14, 2013 12-030-8 Amplifier Controller Board Rev.5 The AGC circuit then compares this reference voltage to the actual voltage that is produced from the forward power RF detector. If there is a difference, this is amplified by a high gain OpAmp and this error voltage is fed out to connector J10. An external cable connects J10 to the attenuator on the RF preamp mounted on the heatsink. This will lower the drive to the amplifiers until the transmitter power level agrees with the AGC reference voltage. Note the AGC voltage from the LCD, if it is near to a value of 0 (i.e., under 0.1V), then there is no AGC action left and the power cannot be raised any further. If the amplifier power is under 100%, then check the RFL power level and CUTBACK voltage to verify that the amplifier is not reducing power to protect from a VSWR condition. The cutback circuit checks the level of reflected power as displayed on the LCD screen above [RFL=00.1%]. If this reflected power is greater than 1%, the cutback circuit automatically reduces the amplifier forward power to protect the devices. This indicates a mild VSWR condition such as may be caused by an icy antenna. The cutback function is a safety protection and is therefore permanently in circuit and cannot (or should not) be disabled. If the VSWR condition worsens such that reflected power exceeds 10% of forward power, the MXi shuts the transmitter down. The MXi has built-in VSWR protection to prevent damage to the amplifier from excessive power being reflected back from the output system. This VSWR protection becomes operational when reflected power exceeds 10% of forward power. The system shuts down the amplifier for a few seconds and then tries to restart again. This is done to check if the VSWR was a temporary condition that could have been caused by a lightning strike nearby. The LCD shows the TRIP status light on the third row of the LCD to indicate that a VSWR trip had occurred. If the condition persists such that three VSWR trips occur within 1 minute, the system completely shuts down. The LCD will then illuminate the L/O (Lockout) status light on the LCD to show that a Lockout has occurred. 2.5 INTERLOCKS Interlocks on the MXi amplifier can be divided into two different types: hard interlocks that shut down the amplifier without any CPU intervention and soft interlocks that are generated by the CPU chip in response to abnormal system parameters. 2.5.1 Hard Interlocks There are hardware interlocks that directly affect the ON/OFF relay K1 by removing the +12V arming voltage on its coil and preventing it from turning on. There are four of these interlocks as follows: 2.5.1.1. Amplifier Thermal Heatsink thermal opens if heatsink temperature is too high. Dry Contact across Connector J9 pins 5 and 6. 2.5.1.2. External #1 Interlock supplied for customer use such as RF system interlock or RF Load. Dry Contact across Connector J9 pins 1 and 2. Parallel contact provided across J6 pins 14 and 15, only one of J6 or J9 is required. If not used, then this contact should be shorted out externally. 2.5.1.3. VSWR Relay K2 Contact from VSWR Trip relay K2 pins 11 and 13. Contact will be closed (OK) if there is no VSWR condition. Contact will open whenever a VSWR is detected. Note: Jumper E17 disables this interlock, this is for setup only.](https://usermanual.wiki/Larcan/MXI1503U.Amplifier-control/User-Guide-1989970-Page-10.png)
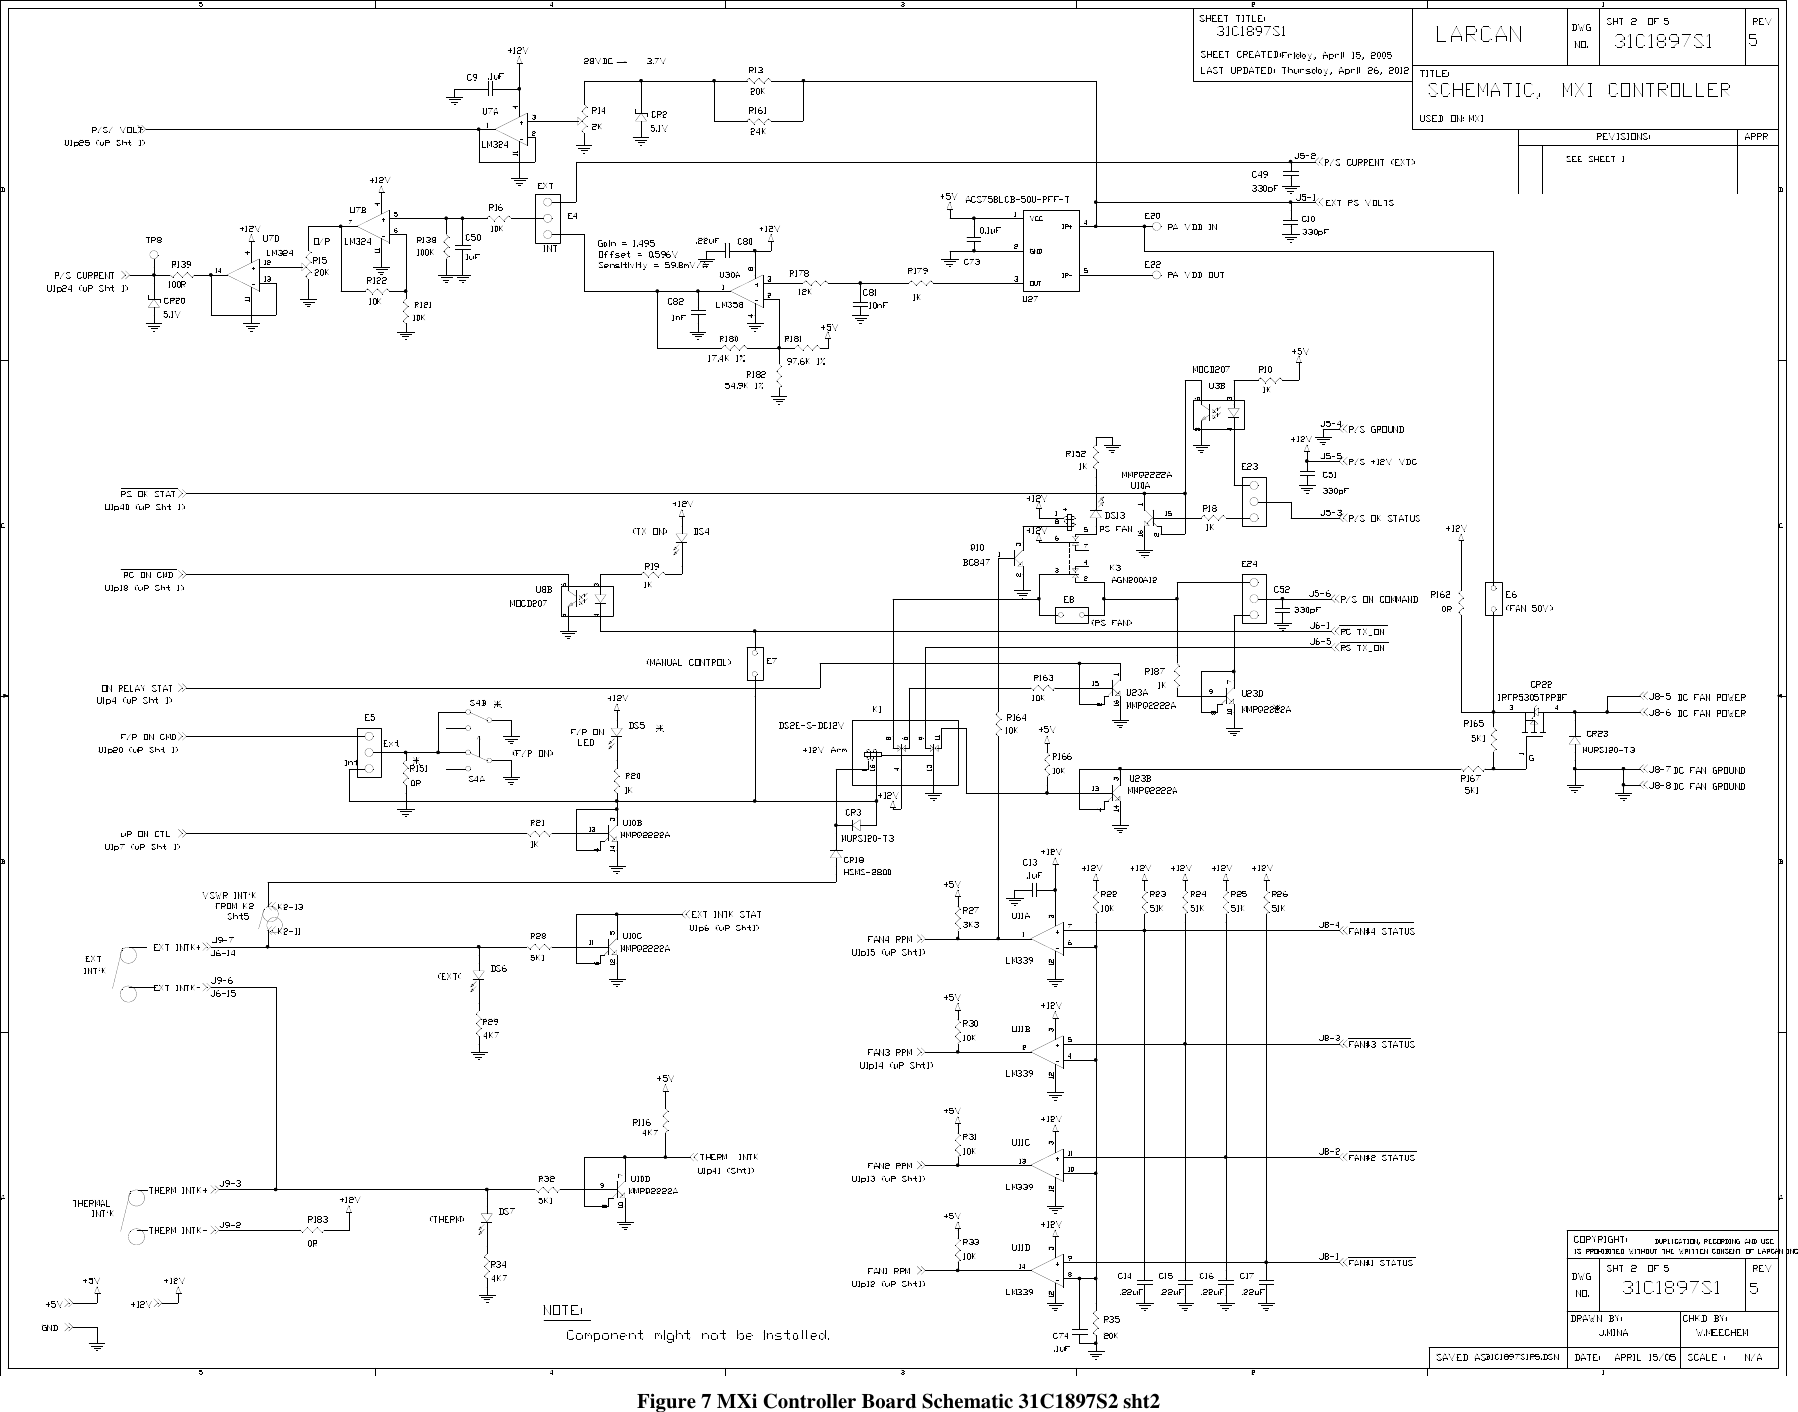
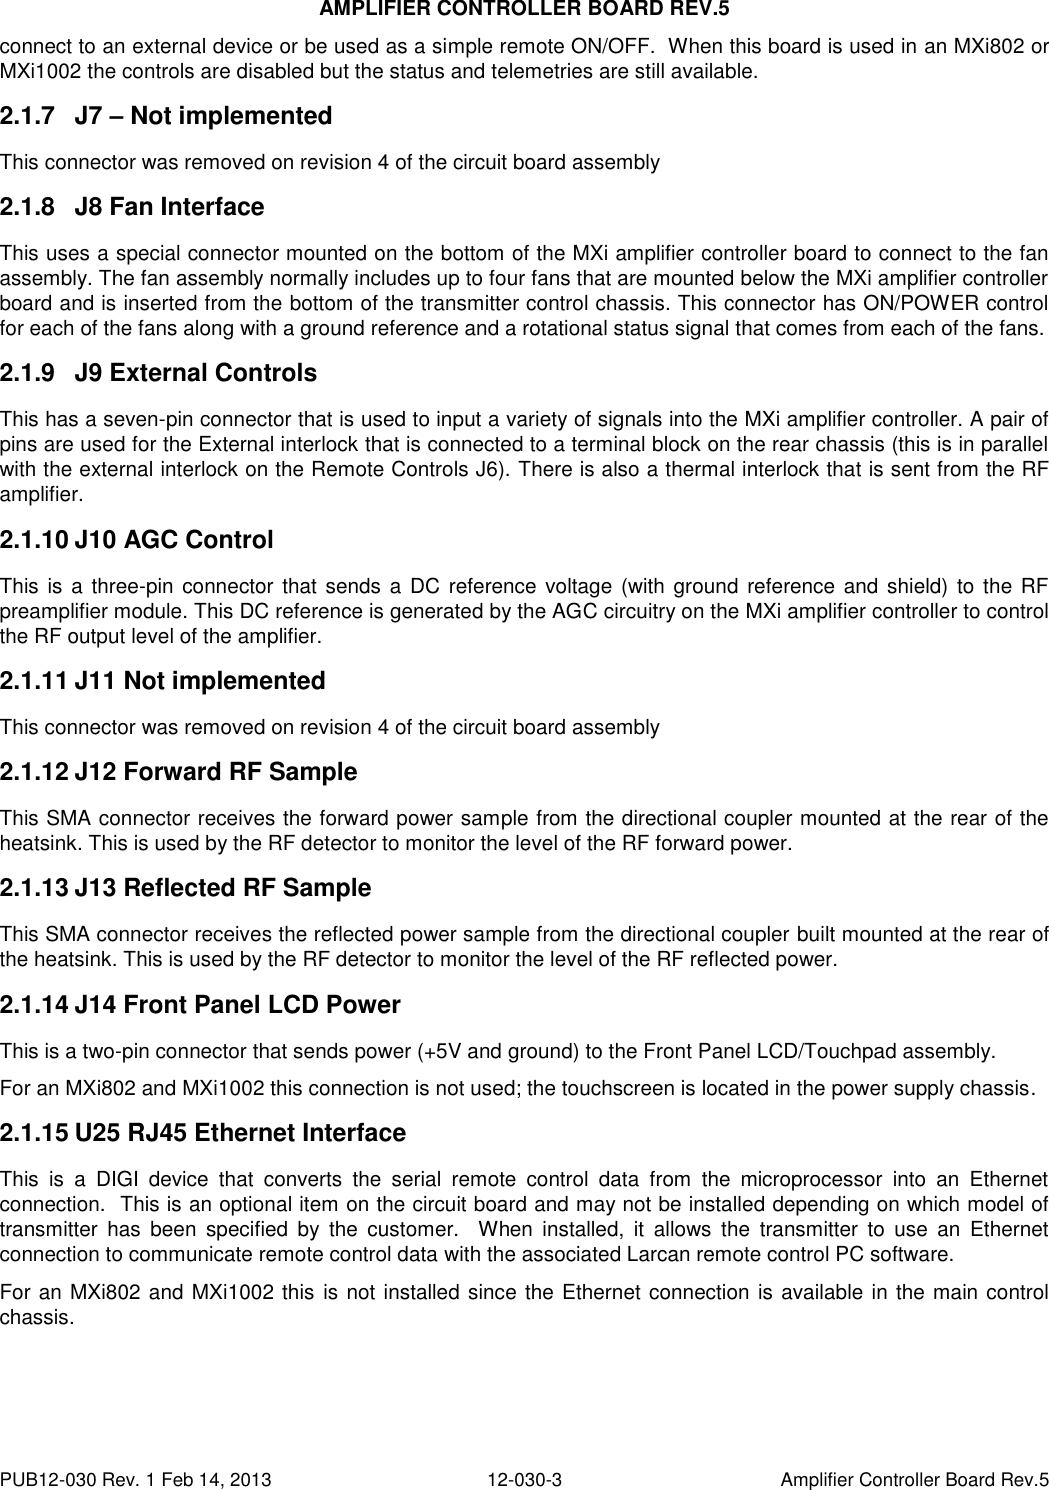
![AMPLIFIER CONTROLLER BOARD REV.5 PUB12-030 Rev. 1 Feb 14, 2013 12-030-19 Amplifier Controller Board Rev.5 5 CIRCUIT DESCRIPTIONS 5.1 MC68HC9S08 MICROPROCESSOR The Motorola MC68HC9S08GT microprocessor (often referred to as the CPU or HCS08) performs all of the control interface and communications in the MXi transmitter system. It is a 44-pin surface mount PLCC type device that is permanently soldered to the circuit board and is not field serviceable or easily replaced without special surface mount tooling. A brief description of the part is given in this section and a portion of the manufacturer’s documentation is given in Appendix A. More detailed information on this part can be obtained from the Motorola web site. The HCS08 chip used in the MXi can come with up to 128 Kbytes of non-volatile flash memory, which can be erased and reprogrammed to allow updating of software code or system parameters. The MXi code is typically smaller than 8k and so would fit into all models of Flash memory. The HCS08 chip has a dedicated serial input pin designated as the BDM (Background Debug Mode) port that is used to program the internal Flash memory and for debug testing. The MXi is programmed at the factory and it is not expected that reprogramming would need be done in the field, although it is possible to do with the proper software. System parameters and status that need to be retained during power failures (such as the LOG entries) are also stored in the Flash memory. Most of the external pins on the HCS08 are configured as programmable Input/Output (I/O) ports, where the software program determines whether a certain pin is to be configured as either an input or output. The pins on the HCS08 are grouped together in sets called PORTs. These Ports will have eight pins (or fewer) to support the byte wide data path in the CPU. Port A is used for general system inputs and outputs. Port B is used as an eight-channel A/D converter to measure system telemetry values. Port C is used for general system inputs and outputs. Port D assigns four pins for the synchronous serial port (SPI) with the other four pins used for system inputs. Port E assigns two pins as a serial communications port (SCI), one pin is the external CPU clock and the other two pins used for general system inputs and outputs. The definition of each Port pin is as follows: PORT A PA0 Input or Output Jumper E3 configures as I/P or O/P PA1 Input VSWR Trip Status PORT B PB0 Telemetry Temperature of Heatsink [Optional] PB1 Telemetry Power Supply Current PB2 Telemetry Power Supply Volts PB3 Telemetry Cutback Volts [Scaled at half the actual value] PORT C PC0 Input 50V Power Supply OK Status PC1 Input Thermal Interlock PC2 Output Digi Ethernet Reset Control PC3 SCI2 Transmit Data Used by Remote Controls PC4 Output Remote Status – Error PC5 SCI2 Receive Data Used by Remote Controls](https://usermanual.wiki/Larcan/MXI1503U.Amplifier-control/User-Guide-1989970-Page-21.png)
![AMPLIFIER CONTROLLER BOARD REV.5 PUB12-030 Rev. 1 Feb 14, 2013 12-030-20 Amplifier Controller Board Rev.5 PORT D PD0 Telemetry AGC Volts [Scaled at half the actual value] PD1 Telemetry Agc Set Reference Level PD2 Telemetry RF Reflected Power [from RF detector] PD3 Telemetry RF Forward Power [from RF detector] PORT E PE0 SCI1 Transmit Data Used by LCD PE1 SCI1 Receive Data Used by LCD PE2 Output VSWR Reset Control PE3 Output Remote Status – Remote Mode PE4 Input Fan#1 Status, Active Low PE5 Input Fan#2 Status, Active Low PE6 Input Fan#3 Status, Active Low PE7 Input Fan#4 Status, Active Low PORT F PF0 Input Power Supply (Relay K1) ON Status PF1 Input External #1 Interlock PF4 Output Agc Reference PWM Dac PF5 Output CPU On Control (to Relay) PORT G PG0 Input Remote Control ON Command PG1 Input Remote Control OFF Command PG2 Input Front Panel ON Command PG3 Input Front Panel VSWR RESET Command PG5 Output Crystal Input #1 PG6 Output Crystal Input #2 The HCS08 provides two separate serial interfaces to external components, these are the asynchronous serial communications interface (SCI1 and SCI2). These two SCI ports implement the standard three-wire serial port (Rx Data, Tx Data and Ground) that would interface to a typical computer port. The baud is set at 9600. The baud is derived from the system oscillator clock at 4.9152MHz. This frequency is recommended by the manufacturer to easily obtain the most common bauds.](https://usermanual.wiki/Larcan/MXI1503U.Amplifier-control/User-Guide-1989970-Page-22.png)