Latitude 523 2.4GHz Full dot Watch User Manual art08 0362manual r0 003
Latitude Limited 2.4GHz Full dot Watch art08 0362manual r0 003
UserManual.wiki
>
Latitude
>
523 User Manual
User Manual
Navigation menu
Upload a User Manual
Namespaces
Wiki Guide
HTML
PDF
Info
Views
User Manual
Discussion / Help
Navigation

![1234512345671.0 Introduction2.0 Button Layout3.0 Major Function Mode - Timekeeping Menu3.1 Major Function Mode - Sensor MenuThank you for purchasing of this Watch. Your Watch features electronic sensors which measures and shows the outdoor conditions: weather fore cast, tempera ture, pressur e, altitude and compass directions.Your Wat ch also p rovide s t he essent ial information about your body or exercise during your exercise, like heart rate, walking steps, traveling speed, distance, etc. These data can be further logged into a logbook for later . also i n c l u d e s c u r r e n t t i m e , d a i l y a l a r m , chronograph, timer review Your Watchand dual time function.To get the most of your purchase, it is a d v i s a b l e t o u s e t h i s s t o p w a t c h i n conformity with the below notes:!Be sure to carefully read this manual and keep it on hand for later reference when necessary. !Avoid exposing your Watch to extreme conditions for an unreasonable time.!Avoid rough usages or severe impacts to your Watch.!Do not open the Watch's case unless a certi fied servi c e a gency beca u se your Watch contains precise electronic sensors and components.!C l e a n y o u r Wa t c h w i t h a s o f t c l o t h occasionally that working for a longer use life of your watch.!Keep your Watch away from magnets or the appliances which contains magnetic objects such as mobi le phones , speaker s and motors.!Store your Watch in a dry place when it is not in use.Mode Button [M]!To select among Current Time, Daily Alarm, C h r o n o g r a p h , Timer and Dual Time Mode.!To select among Distance, Heart Rate, User, Altimeter, Barometer, Compass and Logbook Mode.!To select among the setting items under setting display.Escape button [ESC]!Back light Button [EL]!To turn on the EL back light for about 3 seconds. Note: When 'Night' back light function is ON, pressing any key will turn ON the back light too.To select between timekeeping and sensor menu.!To exit from setting mode.!To go back to the previous screen or function level.Start/Stop Button !To scroll the menu upward.!To activate the 'start' or 'stop' function under Chronograph and Timer Mode.!To increase the setting value under setting display. Lap/Reset Button [ ]!To scroll the menu downward.!To activate the 'Lap'/ Reset' function under Chronograph Mode. To activate the 'Reload' function under Timer Mode (stop counting).!To decrease the setting value under setting display. [S/S] L/R[ESC] [EL] [M] [L/R] [S/S] Alarm ModeMenuDual Time ModeMenuTimekeeping MenuChronograph ModeMenumenuguideTimer ModeMenu[L/R]*[L/R]*[L/R]*[L/R]*[L/R]*Current Time ModeMenuNOTE: +When one of the menus is selected, the corresponding function mode will appear after a few seconds or press [M] to show the function mode instantly.+The menu guide indicates no. (e.g 3) with the total no. of menus (e.g 5).+the current menu*Press [S/S] to move the selection in the reverse direction.NOTE: +When one of the menus is selected, the corresponding function mode will appear after a few seconds or press [M] to show the function mode instantly.+The menu guide indicates no. (e.g ) with the total no. of menus (e.g ).+the current menu 4 7*Press [S/S] to move the selection in the reverse direction.12345123451234512345Timekeeping Menu(Chapter 3.0)Sensor Menu(Chapter 3.1)[ESC][ESC]Compass ModeMenuLogbook ModeMenuBarometer ModeMenuSensor MenuAltimeter ModeMenuUser ModeMenuHeart Rate ModeMenuDistance ModeMenu[L/R]*[L/R]*[L/R]*[L/R]*[L/R]*[L/R]*[L/R]*12345menuguide1234567123456712345671234567123456712345671234567[M] [L/R] [S/S] [ESC] [EL][M] [L/R] [S/S] [ESC] [EL][M] [L/R] [S/S] [ESC] [EL][M] [L/R] [S/S] [ESC] [EL]](https://usermanual.wiki/Latitude/523/User-Guide-1002740-Page-3.png)
![4.0 Current Time Mode - Function Display4.1 Current Time Mode - Weather Forecast 4.2 Current Time Mode - Setting the Watchdatecurrent time Weather Forecast SymbolsWeather Forecast Current Time Mode[S/S][S/S][S/S][S/S][S/S]Day of Week Weather ForecastTemperatureAlttiude GraphSea Level Pressure GraphCloudySunny Cloudy with sunRainingCurrent Time ModeHold[M]NOTE: If the Watch is NOT going to use for a long time, storing the watch in Power Saving Mode (LCD is OFF, but the timekeeping function is still working) can save battery. To activate Power Saving Mode by pressing [L/R] for 5 seconds under Current Time Mode. Press any button under Power Saving Mode will resume normal operation.++NOTE: *1. Press [M] to select among the settings.*2. Press [EL] will turn ON the backlight if 'Normal' is selected. Press any button will turn ON the backlight if 'Night' is selected. *3. The Heart Rate Chest Strap MUST be worn on the chest (i.e heart rate signal is sampling)*4. If 'Chime' is ON ( the ' ' is appeared), the Watch will beep once at the hour i.e 1:00, 2:00, 3:00, etc.IMPORTANT: The Watch predicts the coming weather by using the readings of the changes of air pressure, in order to avoid the changes of pressure is caused by the change of altitude, for at least 24 hours for a higher accurate predication.WARMING:The Watch predicts the weather by adopting general weather prediction principles, it is NOT capable to reflect the extreme changing of weather within a very short period of time. Always double check the predicted weather from this Watch with other credible sources for critical events.it is highly recommended to staying at the same altitude Level 1 Level 2 Level 3Level 31. Time 2. Date 3. System4. User5. Unit +Second*1+Minute*1+Hour*1+12/24format*1+Year*1+Month+Day*1*1+Year*1+Month+Day*1*1+LCD+Sound+Light*2+Pair*3+Gender+Birth+Height+Weight+Stride+Keytone+Chime*4+1+2~15+16+Temperature +Pressure +Speed+Other+Normal+Night++8C8F++FemaleMale++RunWalk +km/h+mi/h+knot+mb+hPa+inHg+Metric +Imperial[L/R]+Scroll the menu [S/S]+Scroll the menu [M]+C o n f i r m t h e selection/setting[ESC]+E x i t t h e c u r r e n t display[M] [L/R] [S/S] [ESC] [EL][M] [L/R] [S/S] [ESC] [EL][M] [L/R] [S/S] [ESC] [EL][M] [L/R] [S/S] [ESC] [EL]](https://usermanual.wiki/Latitude/523/User-Guide-1002740-Page-4.png)
![NOTE: *1. If the 'DAILY' is selected, the alarm is turned ON and the Watch will alarm at the predefined time everyday.*2. If a Weekday (i.e 'MON', 'TUE' and etc ) is selected, the alarm is turned ON and the Watch will alarm at the predefined time that weekday every week.*3. Press [L/R] to move the selection in the reverse order.NOTE: Press [L/R] to move the selection in the reverse order.See 6.0 to erase the recorded Lap Time(s) (reset the chronograph).++NOTE: *1. The Watch can record up to 50 lap times i.e L1 to L50.*2. Hold down [L/R] for 2 seconds (when the c h r o n o g r a p h i s s t o p p e d ) t o r e s e t t h e chronograph. If the Chronograph is reset, the recorded Lap Time(s) will be erased too.[M][M]5.0 Alarm Mode - Setting the Alarm ON and OFF 6.0 Chronograph Mode - Using the Chronograph6.1 Chronograph Mode - Recalling Lap Time 5.1 Alarm Mode - Setting the Alarmlap no.Totalelapsed timealarmtime Alarm ModeResetCountingCountingStop CountingLap Time Display Lap TimeStop CountingChronograph ModeChronograph Mode[S/S] [L/R] *1hold [M] [ESC]hold [L/R] *2[S/S] Lap Times Recall Sequencethe next lap record10 secondsthe 1st lap recordthe 2nd lap recordthe lastlap record'TTL'Total elapsed timelap time (freeze for 10 seconds)[S/S]*[S/S]* [S/S]*[S/S]*[S/S]*[S/S]*[S/S][L/R]orAlarm 1Alarm OFFAlarm ONAlarm 2Daily AlarmWeekly Alarm3. Lap Timetime[S/S] [S/S][S/S][S/S] [L/R] [L/R] [L/R]hold [L/R]hold [L/R]hold [L/R][S/S] [S/S] [S/S]0 10 20 3020020010 10100100010lap 1lap 2 lap 32. Total elapsed time1. Elapsed timeElapsed time, Total Elapsed time and Lap time NOTE: If Daily or Weekly Alarm is ON (the ' ' is appeared), the Watch will beep at the predefined alarm time daily or weekly. The Watch will sound for 30 seconds at the alarm time. While alarm sounds, press any key to stop the sound instantly.Alarm 1 and Alarm 2 can be set to alarm Daily or Weekly, see 5.1 for the details of the setting.+++Alarm Mode[ESC]hourminutealarm ON/OFFHold[M][M][M][M]hold[S/S] or [L/R][S/S] or [L/R]MON*2SUN*2TUE*2SAT*2WED*2FRI*2THU*2Alarm ONAlarm OFFWeekly Alarm Daily Alarm *1[S/S]*3[S/S]*3[S/S]*3[S/S]*3[S/S]*3[S/S]*3[S/S]*3[S/S]*3[S/S]*3DAILY OFFchange setting valuechange the setting value faster [M] [L/R] [S/S] [ESC] [EL][M] [L/R] [S/S] [ESC] [EL][M] [L/R] [S/S] [ESC] [EL][M] [L/R] [S/S] [ESC] [EL]](https://usermanual.wiki/Latitude/523/User-Guide-1002740-Page-5.png)
![Target Time Counting*1'Zero' Stop Counting2' 59'' 5 min45 min10 min15 minTarget Time Setting Sequence User Preset Value *3Quick-Set-Value*2[L/R] [L/R] [L/R][L/R][L/R] [L/R]7.0 Timer Mode - Target Time Setting the 7.1 Timer Mode - Setting the User Preset Value 7.2 Timer Mode - Using the Countdown Timer 3 min Timer Mode Timer Modetargettime *1current timeBeep[S/S][S/S][L/R]NOTE: (*1) The Timer starts counting from the Target Time to zero.(*2) The Watch includes 5 Quick-Set-Values : 3, 5, 10, 15 and 45 minutes for setting the Target Time faster, and these values CANNOT be set by user.(*3) The User Preset Value (for setting the Target Time) CAN be set by user, see 7.1 for the details of the setting. NOTE: The setting range is up to 99 hours 59 minutes 99 seconds.+NOTE: (*1) The Watch will prompt (during the counting) as follows: a) Beep once every minute for the last 10 minutes, i.e 10'00", 9'00" and etc. b) Beep once every 10 seconds for the last minute, i.e 0'50", 0'40" and etc. c) Beep once every seconds for the last 5 seconds. d) Beep for 30 seconds when timer reaches zero (Press any button CAN stop the beep instantly). (*2) The Target Time will be reloaded automatically.change setting valuechange the setting value faster [S/S] / [L/R] hold [S/S] / [L/R]User Preset Value Setting Sequencehold [M]minute secondhour[ESC][M] [M][M]time (minute)[S/S][S/S] [S/S] [S/S] [S/S]03123 22. Multiple Countdown1. Single Countdown3 2 1 0Single and Multiple Countdown[L/R] [L/R]*233dual time current timeNOTE: The 'second' digits of Dual Time and the 'second' digits of Current Time are the same .+Dual Time Modechange setting valuechange the setting value faster [S/S] / [L/R] hold [S/S] / [L/R]Dual Time Setting Sequence8.0 Dual Time Mode - Setting Dual Time minutehour[M]hold [M][ESC][M] [L/R] [S/S] [ESC] [EL][M] [L/R] [S/S] [ESC] [EL][M] [L/R] [S/S] [ESC] [EL][M] [L/R] [S/S] [ESC] [EL]](https://usermanual.wiki/Latitude/523/User-Guide-1002740-Page-6.png)
![[M] [L/R] [S/S] [ESC] [EL][M] [L/R] [S/S] [ESC] [EL][M] [L/R] [S/S] [ESC] [EL][M] [L/R] [S/S] [ESC] [EL]release [S/S] release [S/S] release [S/S]hold[S/S]5 secondskeep holding [S/S]keep holding [S/S]or or or release [S/S] release [S/S] release [S/S]Sensor functionactivatedSensor functiondeactivatedTimer startscountingTimer stopscountingLogbook starts logging (Sensor functionactivated too)Logbook stops logging (Sensor functionactivated too)HeartRateModeUser ModeDistanceModeNote: (2) When the sensor function is activated, the L(1) When enter the Heart Rate, User or Distance Mode, the sensor function will be activated automatically after 5 seconds.ogbook will start automatically too if 'AUTO' start feature is selected. See 16.0.5 for the details of the setting. (3) While the Log function is started, a 'LOG' indicator starts flashing on the screen.(4) The Watch includes a stand-alone count-up timer for timing the accumulative exercise time under Heart Rate, User and Distance Mode. SENSORSTARTTIMERSTARTLOGBOOKSTARTSENSORSTOPTIMERSTOPLOGBOOKSTOP9.0 Sensor Mode: To Start/Stop the Sensor, Timer and Logbook9.1 Sensor Mode: To Reset Screen, Session and Timer hold[L/R]keep holding [L/R]release [L/R]release [L/R]release [L/R]Reset the current screenReset thecurrentsessionReset thetimerHeartRateModeUser ModeDistanceModeNOTE: (1) Follow the above diagram to reset the current screen and/or session if the user intend to neglect the last exercise.(2) Follow the above diagram to reset the exercise timer.re setScreen session timerre setre set](https://usermanual.wiki/Latitude/523/User-Guide-1002740-Page-7.png)
![[S/S][S/S][S/S][S/S][S/S][S/S][S/S][S/S][S/S][S/S]StepsMoving TimeCurrent SpeedAverage SpeedPaceCurrent SpeedCalorie Expenditure Exercise TimeNOTE: (1) The Exercise Timer is counting independently, switched off the sensor or changed the screen to other mode will NOT affect the counting. i.e The same set of exercise time can be checked from either Heart Rate Mode, Distance Mode or User Mode.(2) The Calorie Expenditure is calcuated by Heart Rate and Pedometer, changed the screen to other mode will NOT affect the calculation unless the sensor is switched OFF. i.e The same set of Calorie Expenditure can be checked from either Heart Rate Mode, Distance Mode or User Mode.Distance Mode Function DisplayMaximum SpeedMenu 1 - Save!To save the current session into today's record.Menu 2 - Session!To review the statistical data of the current session.Menu 3 - Daily Record!To Review the Record for 10 days. DailyMenu 4 - Sleep!To set the auto-sleep time for Pedometer.Menu 5 - Sense !T o s e t s e n s i t i v i t y o f t h e Pedometer. Distance Mode Function MenuNOTE: Hold down [M] in Distance Mode to pop up the function menu. This Menu provides the supplementary functions for the Distance Mode. (1)(2) If the last session has NOT been saved, the Watch will auto save that session into today's record at midnight.10.0 Distance Mode - Distance Mode Function 10.2 Distance Mode - Distance Function Display 10.3 Distance Mode - Distance Mode Function Menu 10.1 Distance Mode - To Get the MeasurementCurent Speed +The measurement of the walking/runing speed.Current Pace+The measurement of time which needs to accomplish one kilometer/mile by the current speed.Distance +The calcuation of total walking/running distance. Average Speed+The measurement of the average walking/runing speed.Calorie Expenditure +The calculation of calorie expenditure. Moving Time +The measurement of time that the user is in motion.Step +The calculation of total walking/running steps.Maximum Speed +The measurement of the maximum walking/runing speed.Function OverviewWatchReading CapturedSensor ActivatedFlashing: Pedometer sensor is activated.5 seconds NOTE: (1) When enter Distance Mode, the function (sensor) will be activated automatically after 5 seconds. Which can be activated manually too, see 9.0 for the detailed operations. (2) When the function (sensor) is activated, the Watch will aggregate the readings of the exercise into the current 'session'. (3) The data of the current session can be saved into the 'Daily Record' (10.3.1) or reviewed (10.3.2) by the Function Menu. (4) The 'Daily Record' can be reviewed by the Function Menu too (10.3.3). The Watch can store upto 10 daily records.(5) See 9.1 to reset the current session. [M] [L/R] [S/S] [ESC] [EL][M] [L/R] [S/S] [ESC] [EL][M] [L/R] [S/S] [ESC] [EL][M] [L/R] [S/S] [ESC] [EL]](https://usermanual.wiki/Latitude/523/User-Guide-1002740-Page-8.png)
![10.3.1 Distance Mode - Menu 1, Save (a Session) 10.3.3 Distance Mode - Function Menu 3, Daily Record (Review)10.3.4 Distance Mode - Menu 4, Sleep (Time Setting)10.3.2 Distance Mode - Menu 2, Session (Review)[M][S/S]'Save' Menu 1[S/S] or [L/R] [ESC] Save Today's Data ? YESNO Distance Mode[ESC]Hold[M]Distance Mode[ESC]Hold[M]'Session' Menu 2[M][ESC][6]*[L/R]* [L/R]* [L/R]*[L/R]*[L/R]*[L/R]*[L/R]*Average/Maximum SpeedAverage/Minimum PaceCalorieExpenditure Start Time Duration Heart rate In-ZoneTimeAverage/ Max./Min. HeartRate Moving timeDistance/StepFunction Menu* Press the [S/S] button to move selection in the reverse direction.[L/R]*[S/S] or [L/R] Distance Mode[ESC]'Daily Rd'Hold[M]Menu 3[L/R] or [S/S] [ESC][M][ESC]'Sleep'Hold[M] Menu 4change the setting value faster change setting valueFunction Menu(Setting value)Distance Mode[L/R] or [S/S] [L/R] or [S/S] hold[L/R] or [S/S] [M] [L/R] [S/S] [ESC] [EL][M] [L/R] [S/S] [ESC] [EL][M] [L/R] [S/S] [ESC] [EL][M] [L/R] [S/S] [ESC] [EL]Function Menu[M][ESC]Day 2Day 1 Day 10the next available day[M][ESC][L/R]*[L/R]*[L/R]* [L/R]* [L/R]*[L/R]*[L/R]*[L/R]*[L/R]*[L/R]*Average/Maximum SpeedAverage/Minimum PaceCalorieExpenditureHeart rateIn-ZoneTimeAverage/ Max./Min. HeartRate Distance/Step* Press the [S/S] button to move selection in the reverse direction.Moving time](https://usermanual.wiki/Latitude/523/User-Guide-1002740-Page-9.png)
![[ESC][M][ESC]'Sense'Hold[M]Menu 5change the setting value faster [S/S] / [L/R]hold[S/S] / [L/R]change setting valueFunction Menu:1 (less sensitive) to 7 (more sensitive)[S/S] or [L/R] Distance ModeCurrent Heart RateShow current heart rate in beats per minute and percentage of estiamted maximum heart rate. Heart Rate Zone Alert Alerts the user if the current heart rate falls above or below the defined zone. Calorie Expenditure CalculationShow the Calorie Expenditure which deduces from heart rate and other sensors.Heart Rate Statistics Show the average, minimum and maximum heart rate. Save/view Session and Daily record Logs the heart rate and other readings into a session, and save them into a daily record. View the current session or daily record.Heart Rate Mode FunctionIn Zone Timer Show the elapsed time for which the heart rate falls within the defined Zone.10.3.5 Distance Mode - Menu 5, Sense (Sensitivity Setting)11.0 Heart Rate Mode: Heart Rate Functions 11.2 Heart Rate Mode: To get the Measurement11.1 Heart Rate Mode: Wear Heart Rate Chest Strap on the Chestradio frequency signal heart beatsignalWatchHeart Rate Captured5 to 8secondsSensor Activated5 seconds Heart rate measurement activated Battery Door Elastic bandConnector Contact ContactFront Back231541!Connect one connector with the chest strap. Ensure the connector is completely lodged into !Extend the elastic band for allowing a loose fitting the chest strap on the chest.!C o n n e c t t h e r e m a i n connector with the chest strap. !Fasten the elastic band until it is fitted on your !Turn comfortably.the chest strap back to the front until the two contacts are firmly contacted with the skin of your chest IMPORTANT: DO NOT wearing the chest strap on your cloth, otherwise the chest strap CANNOT get the heart rate signal. NOTE: In dry seasons, wet the contacts with water to make the signal transmission normal.[M] [L/R] [S/S] [ESC] [EL][M] [L/R] [S/S] [ESC] [EL][M] [L/R] [S/S] [ESC] [EL][M] [L/R] [S/S] [ESC] [EL]NOTE: (1) When enter Heart Rate Mode, the function (sensor) will be activated automatically after 5 seconds. Which can be activated manually too, see 9.0 for the detailed operations. (2) When the function (sensor) is activated, the Watch will aggregate the readings of the exercise into the current 'session'. (3) The data of the current session can be saved into the 'Daily Record' (11.8.1) or reviewed (11.8.2) by the Function Menu. (4) The 'Daily Record' can be reviewed by the Function Menu too (11.8.3). The Watch can store up to 10 daily records.(5) See 9.1 to reset the current session. See 11.7 for the resolution if NO heart rate or long response time.NOTE: This setting adjusts the sensitivity of the Watch to well suit user's walking or running pattern, i.e Select a higher sensitivity value, the Watch will be more sensitive to detect a motion.](https://usermanual.wiki/Latitude/523/User-Guide-1002740-Page-10.png)
![The Below Zone Heart Rate Zonebpm or % EMHRThe In Zone (The target heart rate zone for one particular application)The Above Zoneupperlimitlower limitRemarksCANNOT be changedby userCAN be changedby userNOTE:(1) The lower and upper limit of the Zone Alert can be set at 11.8.4.Zone Alert SettingGeneralApplicationLowerLimitUpper Limit41-240 bpm40-239 bpm65%EMHRFitnessCustom 85%EMHRZone Alert OFF Zone Alert ON[L/R]zone alertfunction ON11.3 Heart Rate Mode: Heart Rate Function Displays 11.5 Heart Rate Mode: Lower/Upper Limits of Zone Alert11.6 Heart Rate Mode: To Turn ON/OFF the Zone Alert11.4 Heart Rate Mode: EMHR and %EMHR[S/S][S/S][S/S][S/S][S/S][S/S]Average Heart rate Minimum Heart rate Calorie Expenditure Exercise TimeExercise TimeHeart Rate In-Zone TIme Note: (1) The Exercise Timer is counting independently, switched off the sensor or changed the screen to other mode will NOT affect the counting. i.e The same set of exercise time can be checked from either Heart Rate Mode, Distance Mode or User Mode.(2) The Calorie Expenditure is calculated by Heart Rate and Pedometer, changed the screen to other mode will NOT affect the calculation unless the sensor is switched OFF. i.e The same set of Calorie Expenditure can be checked from either Heart Rate Mode, Distance Mode or User Mode.Heart Rate Mode Function DisplayMaximum Heart rate Beats per minute (bpm)Percentage of Estimated MaximumHeart Rate (%EMHR)Estimated Maximum Heart Rate (EMHR)+EMHR = 220 - age of the user H R %EMHR)+%EMHR = Acquired heart rate / EMHR X100%An Example about EMHR and %EMHR for a user aged 18+EMHR = 220 - 18 (user's age) = 202+Acquired heart rate = 140 (by measurement).+%EMHR = 140/ 202 X100% = 69%Percentage of Estimated Maximum eart ate (NOTE:(1) For general purpose, percentage of Estimated Maximum eart ate ( can be used for Setting Zone Alert. For example, the lower or upper limit of the target Zone can be set as 50% or 85% E Zone Alert H R %EMHR) MHR respectively.WARNING! must be set according to application and one's own health conditions. Check your doctor or trainer before using this Zone Alert function. Heart Rate ModeThe Below Zone Heart Rate ZoneThe In Zone (The target heart rate zone for one particular application)The Above Zoneupper limit%EMHR/bpmlower limitBeep sounds and an icon displays if the acquired heart rate is above the upper limitBeep sounds and an icon displays if the acquired heart rate is below the lower limitBeepBeep[M] [L/R] [S/S] [ESC] [EL][M] [L/R] [S/S] [ESC] [EL][M] [L/R] [S/S] [ESC] [EL][M] [L/R] [S/S] [ESC] [EL]](https://usermanual.wiki/Latitude/523/User-Guide-1002740-Page-11.png)
![1) Cause: Dry Skin.Solution: Apply conductive gel or saliva thoroughly to chest area. (Even water will help if conductive gel is not available).2) Cause: Chest Strap are not placed firmly over the chest.Solution: Make sure the Chest Strap is firmly over the chest and the Watch is placed securely on wrist.3) Cause: Muscle tremors caused by holding the Chest Strap too hard on your chest.Solution: The contacts must make firm contact with the user's skin during measurement. This will ensure good and consistent readings even while walking or jogging with arms swung naturally. 4) Cause: Dead skin on wrist.Solution: Usually rubbing your skin with a towel will help. 5) Cause: A thin layer of body grease can insulate the ECG signal which p r e v e n t s t h e contacts on the back of the Chest Strap from picking up one's ECG.Solution: Wipe chest and the back of Chest Strap with a tissue or soft towel.6) Cause: Hairy chest.Solution: Apply conductive gel to chest area. 7) Cause: Irregular heartbeats.Solution: N/A It is difficult to consistently pick up a reading for those with irregular heart beats. Inconsistent response times are expected for those with arrhythmia.8) Cause: Battery Low.Solution: It might be due to the battery level of the Chest Strap is low. Replace the battery of the Chest Strap.11.7 Heart Rate Mode: Causes for NO Heart Rate Reading or Long Response Time11.8 Heart Rate Mode: Heart Rate Mode Function Heart Rate Mode'Save' Menu 1[S/S] or [L/R] [ESC]Hold[M]11.8.1 Heart Rate Mode: Menu 1, Save (a Session)11.8.2 Heart Rate Mode: Menu 2, Session (Review)[M][ESC][6]*[L/R]* [L/R]* [L/R]*[L/R]*[L/R]*[L/R]*[L/R]*Average/Maximum SpeedAverage/Minimum PaceCalorieExpenditure Start Time Duration Heart rate In-ZoneTimeAverage/ Max./Min. HeartRate Moving timeDistance/StepFunction Menu* Press the [S/S] button to move selection in the reverse direction.[L/R]*Menu 1 - Save!To save the current session into today's record.Menu 2 - Session!To review the statistical data of the current session.Menu 3 - Daily Record!To Review the record for 10 days. DailyMenu 4 - Zone !To set upper and lower limits for the Zone Alert.Heart Rate Mode Function MenuNote: Hold down [M] in Heart Rate Mode to pop up the Function menu. This Menu provides the supplementary functions for the Heart Rate Mode. (1)(2) If the last session has NOT been saved, the Watch will auto save that session into today's record at midnight.Heart Rate Mode[ESC]Hold[M]'Session' Menu 2[M] [L/R] [S/S] [ESC] [EL][M] [L/R] [S/S] [ESC] [EL][S/S] or [L/R] [M][S/S][ESC] Save Today's Data ? YESNO](https://usermanual.wiki/Latitude/523/User-Guide-1002740-Page-12.png)
![radio frequency signal heart beatsignalWatch12.0 User Mode: User Mode Function11.8.3 Heart Rate Mode: Menu 3, Daily Record (Review)12.1 User Mode: To get the Measurement10.8.4 Heart Rate Mode: Menu 4, Zone (Setting)[ESC][M][ESC]'Daily Rd'Hold[M]Function Menu 3[M][ESC][S/S] or [L/R] Heart Rate Mode[L/R]*[L/R]*[L/R]* [L/R]* [L/R]* [L/R]*Average/Maximum SpeedAverage/Minimum PaceCalorieExpenditureHeart rate In-ZoneTimeAverage/ Max./Min. HeartRate Distance/Step* Press the [S/S] button to move selection in the reverse direction.Moving timeFunction Menu[ESC][M][M][ESC]'Zone'Hold[M] Menu 4Fitness(65 - 85%EMHR)Customhold [5] / [6]change the setting value faster [S/S] / [L/R][S/S] / [L/R]hold[S/S] / [L/R]change setting value[M][ESC][S/S] or [L/R] Heart Rate ModeYESLowerlimit NO UpperLimit[S/S][ESC][M]Custom Zone SettingCurent Speed StepExercise Time Maximum Heart Rate CalorieExpenditureMinimumHeart Rate Barometer Temperature CompassHeart rate In-Zone TimeAverageHeart Rate Altitude Current Heart Rate Real Time Average Speed Distance Moving Time Maximum Speed Odometer PaceUser Mode Function ListUser can select one of the above 20 functions to display on the top, middle or bottom row of the display under User Mode.IMPORTANT: This mode functions with the Chest Strap, see chapter 11 before the measurement.Reading Capturedcalorie expenditureheart ratedistance 5 seconds User ModeSensor ActivatedCALORIEH. ratedistance[M] [L/R] [S/S] [ESC] [EL][M] [L/R] [S/S] [ESC] [EL][M] [L/R] [S/S] [ESC] [EL]NOTE: (1) When enter User Mode, the function (sensor) will be activated automatically after 5 seconds. Which can be activated manually too, see 9.0 for the detailed operations. (2) When the function (sensor) is activated, the Watch will aggregate the readings of the exercise into the current 'session'. (3) The data of the current session can be saved into the 'Daily Record' (12.3.1) or reviewed (12.3.2) by the Function Menu. (4) The 'Daily Record' can be reviewed by the Function Menu too (12.3.3). The Watch can store up to 10 daily records.(5) See 9.1 to reset the current session. See 11.7 for the resolution if NO heart rate or long response time.Function MenuDay 2Day 1 Day 10the next available day[L/R]*[L/R]*[L/R]*[L/R]*](https://usermanual.wiki/Latitude/523/User-Guide-1002740-Page-13.png)
![12.2 User Mode: To Change the Function Display 12.3.1 User Mode: Menu 1, Save (a Session) 12.3 User Mode: Function Menu 12.3.2 User Mode: Menu 2, Session (Review)User ModeNote: (1) See 12.3.4 for more detail about changing the display function for the top row.Change the functionfor the bottom row[S/S] [L/R] Select one from the 20 different functionsChange the functionfor the middle rowMenu 1 - Save!To save the current session into today's record.Menu 2 - Session!To review the statistical data of the current session.Menu 3 - Daily Record!To Review the Record for 10 days. DailyMenu 4 - View!To Change the display function ( S e l e c t o n e f r o m t h e 2 0 Functions)User Mode Function MenuNote: Hold down [M] in User Mode to pop up the function menu. This Menu provides the supplementary functions for the User Mode. (1)User Mode'Save'Menu 1[S/S] or [L/R] [ESC]Hold[M]User Mode[M][ESC][6]*[L/R]* [L/R]* [L/R]*[L/R]*[L/R]*[L/R]*[L/R]*Average/Maximum SpeedAverage/Minimum PaceCalorieExpenditure Start Time Duration Heart rate In-ZoneTimeAverage/ Max./Min. HeartRate Moving timeDistance/StepFunction Menu* Press the [S/S] button to move selection in the reverse direction.[L/R]*[ESC]Hold[M]'Session' Menu 2[S/S] or [L/R] [M] [L/R] [S/S] [ESC] [EL][M] [L/R] [S/S] [ESC] [EL][M] [L/R] [S/S] [ESC] [EL][M][S/S][ESC] Save Today's Data ? YESNO](https://usermanual.wiki/Latitude/523/User-Guide-1002740-Page-14.png)
![User ModeUser ModeSelect one function from 20 Functions[S/S] or [L/R] [ESC]'View'Hold[M] Menu 4[S/S] or [L/R] Function MenuTop RowMiddle RowBottom Row[M][M][M][M][ESC]12.3.3 User Mode: Menu 3, Daily Record (Review)12.3.4 User Mode: Menu 4, View (Display Setting)[ESC][M][ESC]'Daily Rd'Hold[M]Menu 3[M][ESC][S/S] or [L/R] [L/R]*[L/R]*[L/R]* [L/R]* [L/R]* [L/R]*Average/Maximum SpeedAverage/Minimum PaceCalorieExpenditureHeart rate In-ZoneTimeAverage/ Max./Min. HeartRate Distance/Step* Press the [S/S] button to move selection in the reverse direction.Moving timeFunction MenuDay 2Day 1 Day 10the next available day[L/R]*[L/R]*[L/R]*[L/R]*](https://usermanual.wiki/Latitude/523/User-Guide-1002740-Page-15.png)
![current time [S/S][S/S][S/S][S/S][S/S]48 hour Altitude Log /RecallAbsoluteAltitude Altitude AlarmAscending/Descending Altitude Function OverviewAltitude GraphAltitude DifferenceTemperature [L/R]hold [L/R]*1AltitudeLockabsolute altitudeAltimeter Mode13.0 Altimeter Mode - Function Overview 13.1 Altimeter Mode - Function Display13.2 Altimeter Mode - Setting the Units and Altitude Lock+Absolute Altitude: The altitude difference between the current altitude and Sea Level (0 m). +Altitude Difference: The altitude difference between the current altitude and the altitude where the altitude difference is set to zero. +48 Hour Altitude Log and readings Recall: The Watch logs the altitude every hour at the hour automatically (i.e 1:00, 2:00, etc.) for 48 hours, and these logged altitude readings can be recalled by user.+Altitude Graph: This altitude graph is plotted from the 48 Hour Altitude Log, the x-axis is the time variable (1 hour) while the y-axis is altitude variable.+Altitude Alarm: An alert will prompt passes through the defined altitude (from below or above the altitude). when the user There are two altitude alarms - Altiutude Alarm 1 and 2.+Ascending/Descending Altitude: The Watch will count the ascending or descending altitude automatically when this function is activated.+Altitude Adjustment: A function to calibrate the Watch to achieve a more accurate altitude reading. +A function to lock the altitude. The altitude will not be changed when Altitude Lock is activatedAltitude Lock: Altitude Graph *4 Temperature *1 Altitude Difference*2Descending Altitude*3Ascending Altitude*3IMPORTANT: *1. In order to get an accurate air temperature, remove the Watch from the wrist for a while (to eliminate body heat effect) before the measurement.NOTE: *2. To get the Altitude Difference of two points, reset the Altitude Difference (Default:100 m) to 0 at the 1st. point. *3. To get Ascending and Descending altitude, start the AS/DS counter prior to the ascent or descent.*4. To read the Altitude Graph on a daily or continual basis, choose 'Daily' or 'History' Chart option at 14.3.6.NOTE: *1 The altitude will NOT be changed when Altitude Lock is activated. Fo r e xa m p l e , ac t i v a t e Altitude Lock when staying in a campsite, it keeps the Watch's altitude unchange even a changing of weather overnight. hold [S/S]FrehenheitCelsiuslockedAltitude LockTemperature unitAltitude unitmeter feetunlockLevel 2 Level 3 Level 4+YES*1+NO+YES*1+NO+Setting+Cur. Alt (Set the Alarm for Current Altitude+Alt. Dif (Set the Alarm for Altitude Difference) +YES*1+NO+YES*1+NO+Setting+Alarm 1/2*2+ON/OFF*3+Start +Clear+Mx. Alt (Maximumaltitude)*4+Mn.Alt (Minimum altitude)+Daily+Historyhold[M]Level 11. Alt. Dif (Reset a l t i t u d e Difference to 0).2. R e f . A l t . ( S e t r e f e r e n c e A l t i t u d e - )3. A l t . A l m . ( S e t Altitude Alarm) 4. A S / D S ( S t a r t / C l e a r Ace n ding / Descending log)5. V w . L o g ( V i e w Max., Min, and t h e 4 8 h o u r altitude)6. Chart (Daily or Histo ry( con tin ua l ) a l t i t u d e chart)Calibration13.3 Altimeter Mode: Altimeter Function Menu NOTE: *1.Press [S/S] to process the selection (Yes) or press [ESC] to escape out of the selection (NO).*2.Press [S/S] to select between Alarm 1 and Alarm 2.*3 Press [L/R] to select between 'ON' and 'OFF' the alarm. Hold down (M) to select setting display.*4 Press [M] to review the logged altitude. Altimeter ModeAltitude Adjustment [L/R]+Scroll the menu +Change the setting [S/S]+Scroll the menu +Change the setting [M]+Confirm the selection/setting+Go to next setting level[ESC]+Exit the current display+Go to last setting level +-1 hour log ( a t t h e p r e c e d i n g hour)+- 2 ~ - 47 hour logs+- 4 8 h o u r log [M] [L/R] [S/S] [ESC] [EL][M] [L/R] [S/S] [ESC] [EL][M] [L/R] [S/S] [ESC] [EL][M] [L/R] [S/S] [ESC] [EL]NOTE: See 13.3.1 - 13.3.6 for more detail of this function menu.](https://usermanual.wiki/Latitude/523/User-Guide-1002740-Page-16.png)
![h750 15i0h750 15i0h750 60i0h900 60i0h900 90i013.3.1 Altimeter Mode: Menu 1, Resetting Altitude Difference 13.3.4 Altimeter Mode: Menu 4, Using AS/DS Counter13.3.2 Altimeter Mode: Menu 2, Calibrating Reference Altitude Absolute and Relative AltitudeAscending and Descending Altitude300m upper row:altitude differencelower row:absolute altitude 300m300m450m750m600m600m900m900mabsolute altitude absolute altitude altitude differenceBBCDEFHCGAA300m600m900m900m200m0m300m300m0mset to zero)(wherethe altitudedifference Why the Altitude Need to be Adjusted+This Watch absolute altitude from air pressure, l the change of air pressure would affect the altitude reading. achieve a more accurate reading, the Watch need to be adjusted from time to time Adjusting the Altitude +Adjusting the altimeter at a place where the altitude is w ell- defi ned, like the plac e with an altitude sign pole (e.g marked 600 m).+nput the reference altitude into the Watch.calculates ike most altimeters As air pressure may change gradually even within hours,See 13.3\Ref.Alt.\ to iIMPORTANT: Input an incorrect altitude, it results a mistaken altitude in future.Absolute Altitude Adjustment300m600m900mabsolute altitude 0mSea Level0mSea Levelbefore theadjustment after theadjustmentB590m 600m600mNOTE:++To get the Altitude Difference of two points (e.g point B and C), reset the Altitude Difference to 0 at the starting point (e.g point B). The watch will show the ).See 13.3\Alt.Dif.\ to reset the Altitude Difference. altitude difference of point B and C at point C (300mNOTE: +To get Ascending/Descending Altitude, start the AS/DS function first. +When the AS/DS Counter is ON, the ' ' indicator will be flashing on the display.+When this function has been activated for over 24 hours in any function Mode (except Altimeter Mode), the AS/DS counting will be turned OFF automatically. +Refer to 13.3\AS/DS\ to start/stop or clear the AS/DS counter.13.3.3 Altimeter Mode: Menu 3, Altitude Alarm Setting IMPORTANT: The altitude alarm will be sounded in Altimeter Mode only.NOTE:Altitude Alarm 1 and 2 are independent alarm. These alarms CAN be set for absolute altitude or altitude difference.The alarm will sound if passing (either from below or from above) the predefined altitude. See 13.3\Alt. Alm\ to set the alarm.++++980mbeepbeepbeepbeepbeepbeepbeepbeep980m980m1980m 1980m1980m2980m 2980m2980m0m(sea level)0m(sea level)0m(sea level)BBBCCCExample I (Using Altitude Alarm 1)Altitude Alarm 1 Altitude Alarm 1 Altitude Alarm 2- Set 980m as alarm- Set 980m as alarm- Set 1980m as alarm- Alarm turned ON- Alarm turned ON- Alarm turned ONAltitude Alarm 2- Set 1980m as alarm- Alarm turned ONExample II (Using Altitude Alarm 2)Example III (Using Altitude Alarm 1 and 2)altitude 1alarmaltitude 1alarmaltitude alarm 2altitude alarm 2AAAh0i0 h300i0 h300 15i0AS/DS Counter ON[M] [L/R] [S/S] [ESC] [EL][M] [L/R] [S/S] [ESC] [EL][M] [L/R] [S/S] [ESC] [EL][M] [L/R] [S/S] [ESC] [EL]](https://usermanual.wiki/Latitude/523/User-Guide-1002740-Page-17.png)
![13.3.5 Altimeter Mode - Menu 5, Reviewing Altitude Log13.3.6 Altimeter Mode - Menu 6, Setting Altitude Graph Chart for Altimeter ModeAltimeter ModeLogged Altitude Readings Altitude GraphDaily Chart History Chart time (hour)time (hour)time (hour)altitude (m/ft.)altitude (m/ft.)altitude (m/ft.)48 Hour Altitude Log+The Watch logs the altitude every hour at the hour for the last 48 hours automatically. For example, the current time is PM 8:38, the altitude readings were logged at PM 8:00 (-1 hour), PM 7:00 (-2 hour), PM 6:00 (-3 hour) and etc. +These readings are further plotted into an altitude-time graph i.e. the Altitude Graph. +The maximum and the minimum altitude with the respective time stamp will be sorted out from the log. These readings and other logged altitude readings of the last 48 hours can be reviewed by this menu.+See 13.3\Vw. Log\ to review the logged altitude readings. Altitude Graph+The Graph shows the logged altitude readings (13.5) by the following two ways:+Daily Chart - Shows the logged altitude readings for the current day only. The 1st. log of the day (AM12:00) will be shown on the 30th column, the 2nd. log (AM1:00) will be shown on the 29th column, and the other readings are shown similarly, or +History (Continual) Chart - Shows the logged altitude readings continuously by First-In-First-Out data structure. The latest log will be shown on the 1st. column, the second latest log will be shown on the 2nd. column, and the other readings are shown similarly. +See 13.3\Chart\ to choose Daily or History Chart.- 1 hour (the preceeding hour)current time the latest reading PM8:00the latest reading PM8:00the firstreading AM12:00the Minimum Altitude - XX hour the Minimum Altitudethe time stampthe max. altitude - XX hour - XX hour - 48 hour -1 Hour (the preceeding hour)- 2 hour- XX hour the loggedaltitudethe Maximum Altitudethe time stampthe time stamp2 211 1117 1723 235 514 1420 2026 2629 298 8Altitude Graphcolumn columncurrent time IMPORTANT: *1. In order to get an accurate air temperature, remove the Watch from the wrist for a while (to eliminate body heat effect) before the measurement. 14.0 Barometer Mode - Function Overview 14.1 Barometer Mode - Function DisplayAbsolute Pressure48 hour Pressure Log /RecallSea Level Pressure AdjustmentSea LevelPressure GraphAbsolute Pressure Adjustment+Absolute Pressure: The pressure readings which detects currently on the current altitude.+48 Hour Sea Level Pressure Log and readings Recall: The Watch logs the pressure readings automatically every hour at the hour, (i.e 1:00, 2:00, etc.) for 48 hours, and these logged pressure readings can be recalled by the user.+Sea Level Pressure Graph: This pressure graph is plotted from the pressure readings which logged by the 48 Hour Sea Level Pressure Log.+Sea Level Pressure Adjustment: A function to adjust the Watch to achieve a more accurate sea level pressure reading. +Absolute Pressure Adjustment: A function to adjust the Watch to achieve a more accurate ambient pressure reading. currentpressure Barometer Mode Temperature *1Sea Level Pressure graphWeather Forecast[S/S][S/S][S/S]Function Overview[M] [L/R] [S/S] [ESC] [EL][M] [L/R] [S/S] [ESC] [EL][M] [L/R] [S/S] [ESC] [EL][M] [L/R] [S/S] [ESC] [EL]](https://usermanual.wiki/Latitude/523/User-Guide-1002740-Page-18.png)
![14.3.2 Barometer Mode - Menu 2, Adjusting Ambient PressureWhy Ambient Pressure need to be Adjusted ++++ For achieve higher accuracy, this Watch includes an adjustment feature which allow user to adjust the ambient pressure. Before adjusting the ambient pressure, obtain another referring barometer to get the ambient pressure of your current position.During the adjustment, input that ambient pressure into the Watch. IMPORTANT: Input a incorrect pressure during the adjustment procedure, it results a mistaken pressure reading in future. See 14.3\Cur. Pres\ to adjust the Ambient Pressure.Ambient Pressure Adjustment300m600m900maltitude 0msea levelbefore theadjustmentget the mbientapressure from another referring barometer after theadjustment940mb 943mb943mb14.3.1 Barometer Mode - Menu 1, Adjusting Sea Level PressureWhy Sea Level Pressure need to be Adjusted ++++++This Watch includes a Sea Level Pressure adjustment feature, which CAN: To achieve a more accurate Sea Level Pressure, To achieve a more accurate Altitude (In case the exact altitude is NOT available for caibrating the reference altitude). Before calibrate the sea level pressure, consult the nearest observatory to get the sea level pressure of your current position.During the adjustment, input that Sea Level Pressure into the Watch. IMPORTANT: Input an incorrect pressure during the adjustment procedure, it results a mistaken pressure reading in future. See 14.3\SLP\ to adjust the Sea Level Pressure. Sea Level Pressure Adjustment300m600m900mabsolute altitude 0msea levelbefore theadjustmentget the sea level pressure from weather stationafter theadjustment1013mb 1016mb1016 mb14.2 Barometer Mode - Setting the UnitsLevel 2Level 3+Adjustment+Adjustmenthold[M]Level 11 . S L P ( S e a L e v e l Pressure setting).2 . C u r. P r e s (Current Pressure calibration)3.Vw.Log (View Max., Min, and the 48 hour altitude)Barometer Mode14.3 Mode: Barometer Function Menu Barometerhold [S/S]FrehenheitCelsiusTemperature unitPressure unitmilibar inHg hPa[L/R][L/R][L/R]Temperature Display+Mx.Tmp (Maximum temperature)+Mn.Tmp (Minimum temperature)+Mx. SLP (Maximum Sea Level Pressure)+Mn. SLP (Minimum Sea Level Pressure)[L/R]+Scroll the menu +Change the setting [S/S]+Scroll the menu +Change the setting [M]+Confirm the selection/setting+Go to next setting level[ESC]+Exit the current display+Go to last setting level NOTE: See 14.3.1 - 14.3.3 for more detail of this function menu. +The pressure and temperature display unit can be changed in Barometer Mode or in Current Time Mode. See 4.2\unit\ for the details of the setting.+-1 hour log ( a t t h e p r e c e d i n g hour)+- 2 ~ - 47 hour logs+- 4 8 h o u r log [M] [L/R] [S/S] [ESC] [EL][M] [L/R] [S/S] [ESC] [EL][M] [L/R] [S/S] [ESC] [EL][M] [L/R] [S/S] [ESC] [EL]](https://usermanual.wiki/Latitude/523/User-Guide-1002740-Page-19.png)
![14.3.3 Barometer Mode- Menu 3, Reviewing Pressure LogsPressure Graph Display Logged Sea LevelPressure Readings pressure graphtime (hour)sea levelpressure (mb/inHg)the latest pressure log- XX hour - XX hour the Minimum Pressurethe Minimum Temperaturethe time stamp the time stamp- 2 hour - 48 hour - 1 hour(the preceding hour)- XX hour - XX hour the loggedpressure the Maximum Pressurethe Maximum Temperaturethe time stampthe time stamp the time stampcurrent time 48 Hour Sea Level Pressure Log+The Watch logs the Sea Level Pressure every hour at the hour for the last 48 hours automatically. For example, the current time is PM 8:38, then the Sea Level Pressure readings were logged at PM 8:00 (-1 hour), PM 7:00 (-2 hour), PM 6:00 (-3 hour) and etc.+These readings are further plotted into a pressure-time graph i.e the Sea Level Pressure Graph. +The Maximum/Minimum Sea Level Pressure readings and the Maximum/Minimum Temperature readings with the respective time stamp will be sorted out from the log. These readings and other logged Sea Level Pressure readings of the last 48 hours can be reviewed by this menu.+See 14.3\Vw. Log\ to review the logged Sea Level Pressure readings.- 1 hour (the preceeding hour)[M] [L/R] [S/S] [ESC] [EL][M] [L/R] [S/S] [ESC] [EL][M] [L/R] [S/S] [ESC] [EL][M] [L/R] [S/S] [ESC] [EL]](https://usermanual.wiki/Latitude/523/User-Guide-1002740-Page-20.png)
![15. Compass Mode - 1 Precautions 14.2 Compass Mode - Compass Directions and BearingsNOTE:+This Watch includes both compass directions and compass bearings.object Bobject Bobject CCompass DirectionsCompass Bearings object Cobject Dobject Dangular differencepoint ANE908SE1358NW3158pointA0808NMarksNNEESESSESSWWNWNNWCompass Directions Compass Bearing North 3498 - 118 NortheastEastSoutheastEast SoutheastSouth SouthwestNorth NorthwestSSWWNWSouthSouthwestWestNorthwestESEENEWSWNNEWest NorthwestWest SouthwestSouth SoutheastEast NortheastNorth Northeast 128 - 338 348 - 568 578 - 788 1028 - 1238 798 - 1018 1248 - 1468 1478 - 1688 1698 - 1918 2148 - 2368 1928 - 2138 2378 - 2588 2598 - 2818 3048 - 3268 2828 - 3038 3278 - 3488 Tips and PrecautionsAvoid measuring direction when:+Close to a magnetic object+Close to metallic object+Close to an electrical appliance+Inside a moving object.Perform compass calibration or magnetic declination compensation process when:+The Watch is using for the first time, +The battery has been replaced,+The bearing direction digits are flashing, and the compass bearing and compass direction are flashing+The compass use in a location that is apart from the place in which the compass had been calibrated, +The user intends to regulate the precision of the digital compass.Keep the Watch away from Magnetic sources, like:+Speakers,+Motors,+Mobile phones and etc.+A way to indicate the direction of an object by using tNorth (08) and the object 8 8 . he angular difference between (0 to 359 )+A way to indicate the direction of an object by divided direction into 4, 8 or 16 directions (N,E,S,W, NE, SE, SW, NW and etc.)+A pointer which always indicate the direction of magnetic north. +The backward bearing indicates the opposite direction from normal bearing.+A the compass bearing, compass direction and the magnetic north pole pointer. function to lock+A process to allow the watch to self regulate the compass to achieve a more accurate compass reading. +A setting to compensate the local magnetic declinaton to achieve a more accurate compass reading.15.0 Compass Mode - Function Overview15.3 Compass Mode - Compass DisplayNOTE: +If NO key has been operated for about 1 minute, the W a t c h w i l l g o t o I D L E M o d e automatically. o .+If distortion is detected, the compass bearing and compass direction are flashing. See 15.6\Calibrate\ to restore the compass to normal operation when distortion occur. Press [S/S] or [L/R] t resume the compass to normal operation Compass Mode Compass Idle Distortion compassbearingnavigating directioncompassdirectionthe north pole pointerNO key has beenoperated for 1 minute[S/S] or [L/R]Function OverviewCompass BearingsNorth Pole PointerCompass CalibrationMagnetic Declination CompensationCompass DirectionsBackward BearingCompass Lock[M] [L/R] [S/S] [ESC] [EL][M] [L/R] [S/S] [ESC] [EL][M] [L/R] [S/S] [ESC] [EL][M] [L/R] [S/S] [ESC] [EL]](https://usermanual.wiki/Latitude/523/User-Guide-1002740-Page-21.png)
![15.5 Compass Mode - Applications of the Compass Level 2+YES +NOhold[M]Level 11.Calibrate (Calibrating the compass)2.Declinate (Setting the ma gn etic declinati on o f y o u r c u r r e n t position)Compass Mode+-90*1+-89 +-88~ +88++89++9015.6 Compass Mode - Compass Function Menu How to Check your Position by Backward Bearing+Spot two distant identifiable landmarks such as mountain, light-house or fort from your current position, like the mountain A and B.+Check out the backward bearing directions of mountain A and B from your current position, i.e 1358 from mountain A and 270 from mountain B.+Use a ruler to draw the line 135 on the map which starting from the mountain A. Draw the lines 270 on the map which starting from the mountain B. +Your current position on the map will be the interchapter point (point A) of the lines 135 and 270How to Check the Trek Course Correct+Mark the points (identifiable landmarks) where the trail turns its direction or the trail branches its way, such as the point A, B, C, D and E on the adjacent +Find out the bearing directions of point B from p o i n t A (315 ), point C from point B (0 ), point D f r o m point C (225 ), and then point E from point D (315 ). +During the trekking, make sure that the heading direction is 315 from point A to point B. Performing the similar checking for other sections of the trail.IMPORTANT: If you are in doubt of the directions and positions of the trail, consult the park administration office before starting the trekking. 8888 8diagram.8 88 884110 m2120 m3120 mpoint A(starting point)point BA Sample Trail on a Mappoint Dpoint E(finish point)point C31582258083158mountain BCheck Current Position By Backward Bearingmountain A27081358point A0015.4 Compass Mode - Backward Bearing and Compass LockNOTE:+When the 'Backward Bearing indicator ' ' is appeared, the Watch is showing the backward bearing direction of the navigating direction. +When the 'Lock' indicator ' ' is appeared, the compass direction, bearing direction and the magnetic north pole pointer are locked.+The Compass Lock will be released automatically when the Watch enter IDLE Mode.08Norm al Bearin g Backward Bearin g315813580808backward bearing indicatornavigating directionnavigating directionDirectio n Unlo ck Directio n Lockedcompasslock indicator [L/R][S/S]NOTE: See 15.6.1 - 15.6.2.2 for more detail of this function menu.*1.See 15.6.2.2 to select the magnetic declination value of the city which is close to your current position.turning axis start turn turn turn Completed object15.6.1 Compass Mode - Menu 1, Calibrating the CompassNOTE: +During the 'rotation' process, ensure the following practices are carrying out:+Turning steadily - Keep the time for the 'rotation' for about 20 to 30 seconds,+IMPORTANT: Keep the Watch parallel to the horizon +Perform the 'rotation' process in a open space.+Locate an object in front of you, then steadily turn your body clockwise along the vertical axis of your body.+The Watch is calibrated if a square appear on the display.+When the calibration is completed, press [ESC] to exit the calibration.+See 15.6\calibrate\for starting the calibration. 'Rota tio n' Process [L/R]+Scroll the menu +Change the setting [S/S]+Scroll the menu +Change the setting [M]+Confirm the selection/setting+Go to next setting level[ESC]+Exit the current display+Go to last setting level [M] [L/R] [S/S] [ESC] [EL][M] [L/R] [S/S] [ESC] [EL][M] [L/R] [S/S] [ESC] [EL][M] [L/R] [S/S] [ESC] [EL]](https://usermanual.wiki/Latitude/523/User-Guide-1002740-Page-22.png)
![True NorthMagnetic DeclinationMagneticDeclinationMagnetic NorthWhat is Magnetic Declination+The Magnetic North Pole which is slightly different from the True North Pole. This Watch, like most magnetic compass, points to the Magnetic North Pole, while everything measure from a map is related to the True North Pole.+The angular difference between Magnetic North Pole and True North Pole is called magnetic declination. Its amount (degrees and minutes) and direction (easterly and westerly) depend on where you are in the world. +For serious compass user or whom intends to perform accurate navigation, this Watch must be adjusted for magnetic declination. Magnetic Declination Information+Most topographic maps include a small arrow which shown magnetic north pole and or the magnetic declination information.+This manual includes the magnetic declination for some major cities. See the coming chapter 'Magnetic Declination at Major Cities' for more detail.+For the cities are not included in the list, please refer to the online magnetic declination calculator at:+http://geomag.nrcan.gc.ca/apps/mdcal_e.php+http://www.ngdc.noaa.gov/seg/geomag/jsp/Declination.jsp15.6.2 Compass Mode - Menu 2, Setting Magnetic Declination15.6.2.1 Compass Mode - Menu 2, Setting Magnetic Declination15.6.2.2 Compass Mode - Menu 2, Setting Magnetic Declination Weste rly (W) Magnetic Declin atio n Easte rly (E) Magnetic Declin atio nmagnetic declination238 Wmagnetic declination228 Etruebearing 3008truebearing 3008magnetic bearing 3238magnetic bearing 2788true north08true north08magnetic northmagnetic northobject Bobject Bpoint Apoint AM a g n e t i c D e c l i n a t i o n C o m p e n s a t i o n Examples+To get an object's true bearing (TB) by subtract westerly (W) magnetic declination or add easterly (E) magnetic declination with the magnetic bearing (MB).+Exa m p l e 1 : 2 3 8 Westerl y m a g n etic declination and the compass needle points 323 . +TB = MB - W. While MB = 323 ; W =23 +TB = 323 - 23 +TB = 300+The true bearing will be 300 .+Example 2: 2 2 E a s t e r l y m a g n e t i c declination and the compass needle points 278 . +TB = MB + E. While MB = 278 ; E = 22 +TB = 278 + 22+TB = 300+The true bearing will be 300 .+The Watch can compensate the compass bearing at a place where the magnetic declination is either Westerly declination or Easterly declination. +88 88 888888 88 888No. Country/Place Major City Declination33 Netherlands Amsterdam -1W34 New Zealand Wellington -22E35 Norway Oslo 036 Pakistan Islamabad +2E37 Philippines Manila -1W38 Portugal Lisbon -5W39 Russia Moscow +9E40 Singapore Singapore 041 South Africa Cape Town -23W42 Spain Madrid -3W43 Sweden Stockholm +3E44 Switzerland Bern 045 Taiwan Tai-pei -3W46 Thailand Bangkok 047 UAE Abu Dhabi +1E48 United Kingdom London -3W49 United States Washington, DC -10W50 Juneau +25E51 Phoenix +12E52 Little Rock +2E53 Sacramento +16E54 Denver +10E55 Atlanta -4W56 Honolulu +10E57 Boston -16W58 Saint Paul +2E59 Jackson +1E60 Santa Fe +10E61 Oklahoma City +6E62 Salem +18E63 Harrisburg -11W64 Salt Lake City +14ENo. Country/Place Major City Declination1 Afghanistan Kabul +2E2 Australia Canberra +12E3 Austria Vienna +2E4 Bahrain Manama +2E5 Bangladesh Dhaka 06 Belgium Brussels -1W7 Brazil Brasilia -19W8 Canada Ottawa -14W9 Chile Santiago +5E10 Beijing -6W11 China Hong Kong -2W12 Costa Rica San Jose 013 Cuba Havana -3W14 Czech Republic Prague +2E15 Denmark Copenhagen +1E16 Egypt Cairo +3E17 Finland Helsinki +6E18 France Paris -1W19 Germany Berlin +1E20 Greece Athens +3E21 Hungary Budapest +4E22 India New Delhi +1E23 Indonesia Jakarta +1E24 Israel 3E25 Italy Rome +1E26 Japan Tokyo -7W27 Jordan Amman +3E28 Kenya Nairobi +1E29 Korea Seoul -7W30 Malaysia Kuala Lumpur +1E31 Mexico Mexico City +6E32 Nepal Kathmandu 0ChinaJerusalem +[M] [L/R] [S/S] [ESC] [EL][M] [L/R] [S/S] [ESC] [EL][M] [L/R] [S/S] [ESC] [EL][M] [L/R] [S/S] [ESC] [EL]](https://usermanual.wiki/Latitude/523/User-Guide-1002740-Page-23.png)
![16.0 Logbook Mode - Logbook Function Menu16.0.1 Logbook Mode - Function Menu 1 - View16.0.2 Logbook Mode - Function Menu 2, Start/Stop the Logbook16.0.3 Logbook Mode - Menu 3, PC LinkLogbook Mode Function MenuMenu 1 - View !To recall the details of the logged record. Menu 2 - Start/Stop !To start or stop the data logging function.Menu - link!To pair the Watch with the 'Wire l e ss D ata Manager' program.!To upload the data from the Watch to PC.3 PC Menu 4 - !To set the sampling rate for the data logging. Log RateMenu 5 - Auto!To set the Auto-Start log function. Menu 6 - Erase !To e r a s e t h e l o g g e d Record. Menu - !To view the free memory capacity.7 MemNote: Hold down [M] in Logbook Mode to pop up the function menu. This Menu provides the supplementary functions for the Logbook Mode. (1)[ESC]Hold[M]'View' Menu 1[M][ESC][6]*[S/S] *[S/S] *[S/S] *[S/S] *[S/S] *[S/S] *[S/S] *[S/S] *[S/S] *[S/S] *[S/S] *[S/S] *[S/S] *[S/S] *[S/S] *[S/S] *Average/Maximum SpeedAverage/Minimum PaceCalorieExpenditureMax. Altitudewith timestampMin. Altitudewith timestampDelta heightAccumulative Ascent & DescentMaximumSea Level pressure with time stampMinimumSea Level pressure with time stampMaximum Temperature with timestampMinimum Temperature with timestampStart Time Duration Heart rateIn-ZoneTimeAverage/ Max./Min. Heart Rate Moving timeDistance/Step[S/S] or [L/R] Logbook Mode~~Press [S/S] or [L/R] button to select a target session (e.g 1/30, 2/30... 30/30) for review.* Press [L/R] button to move selection in the reverse direction.IMPORTANT: If a log is started, the session cannot be viewed.[S/S] or [L/R] [5] 'Start' or 'Stop'Start or Stop the LoggingFunction Menu(Yes or No)[M]YES: Start or Stopthe log [ESC]Note:(1) While the Log function is started, a 'LOG' indicators start flashing on the screen, the Watch will create a new log session and log the readings into a 'record' at the pre-defined log rate. (2) This Log function can be started or stopped at Heart Rate, Distance and User Mode by holding down [S/S], see 9.0 for the detailed operations. Logbook ModeLogbook Mode[ESC][ESC]'PC link'Upload recordHold[M]Hold[M][M][ESC][S/S] or [L/R] Sending MPORTANT: This mode is functioned with the PC Pod, read the corresponding chapter before the upload.Note: (1) Install the connection software 'Data Manager' into the target PC, and execute that software.(2) Connect the PC Pod to the USB port of that PC. (3) Start the upload from the Watch. Menu 2 Menu 3[M] [L/R] [S/S] [ESC] [EL][M] [L/R] [S/S] [ESC] [EL][M] [L/R] [S/S] [ESC] [EL][M] [L/R] [S/S] [ESC] [EL]](https://usermanual.wiki/Latitude/523/User-Guide-1002740-Page-24.png)
![[S/S] or [L/R] Menu 516.0.4 Logbook Mode - Menu 4, Log Rate (Setting)16.0.5 Logbook Mode - Menu 5, Auto (Log Auto Start Setting)16.0.6 Logbook Mode - Menu 6, Erase (Session for Logbook)16.0.7 Logbook Mode - Menu 7, View (Free Memory)Logbook ModeLogbook ModeLogbook Mode~Logbook Mode[ESC][ESC][ESC][ESC]'Log rate'Set Log rateHold[M]Hold[M]Hold[M]Hold[M]Function Menu(Sampling Rate)[M][S/S] [ESC][L/R]Change the rate by backward scolling Change the rate by foreward scolling [S/S] or [L/R] [S/S] or [L/R] [S/S] or [L/R] IMPORTANT: If a log is started, the log rate cannot be changed.'Erase'Erase SessionFunction Menu(Yes or No)[M]YES: Session XX/All Sessions Erased [ESC][S/S][ESC]Function MenuONESession ALLSession[M][ESC]Menu 4 Menu 6Menu 7'Mem.'View Free MemoryFunction Menu(Free memory reading) [M][ESC][S/S] or [L/R] 'Auto'Auto Start a LogON* OFF[M][ESC]Note: If 'ON' is selected, activating the sensor in Distance, Heart Rate or User Mode will start the log function too. [S/S] or [L/R] [M] [L/R] [S/S] [ESC] [EL][M] [L/R] [S/S] [ESC] [EL][M] [L/R] [S/S] [ESC] [EL][M] [L/R] [S/S] [ESC] [EL]~Press the [S/S] or [L/R] button to select a target session (e.g 1/30, 2/30... 30/30) for erase](https://usermanual.wiki/Latitude/523/User-Guide-1002740-Page-25.png)
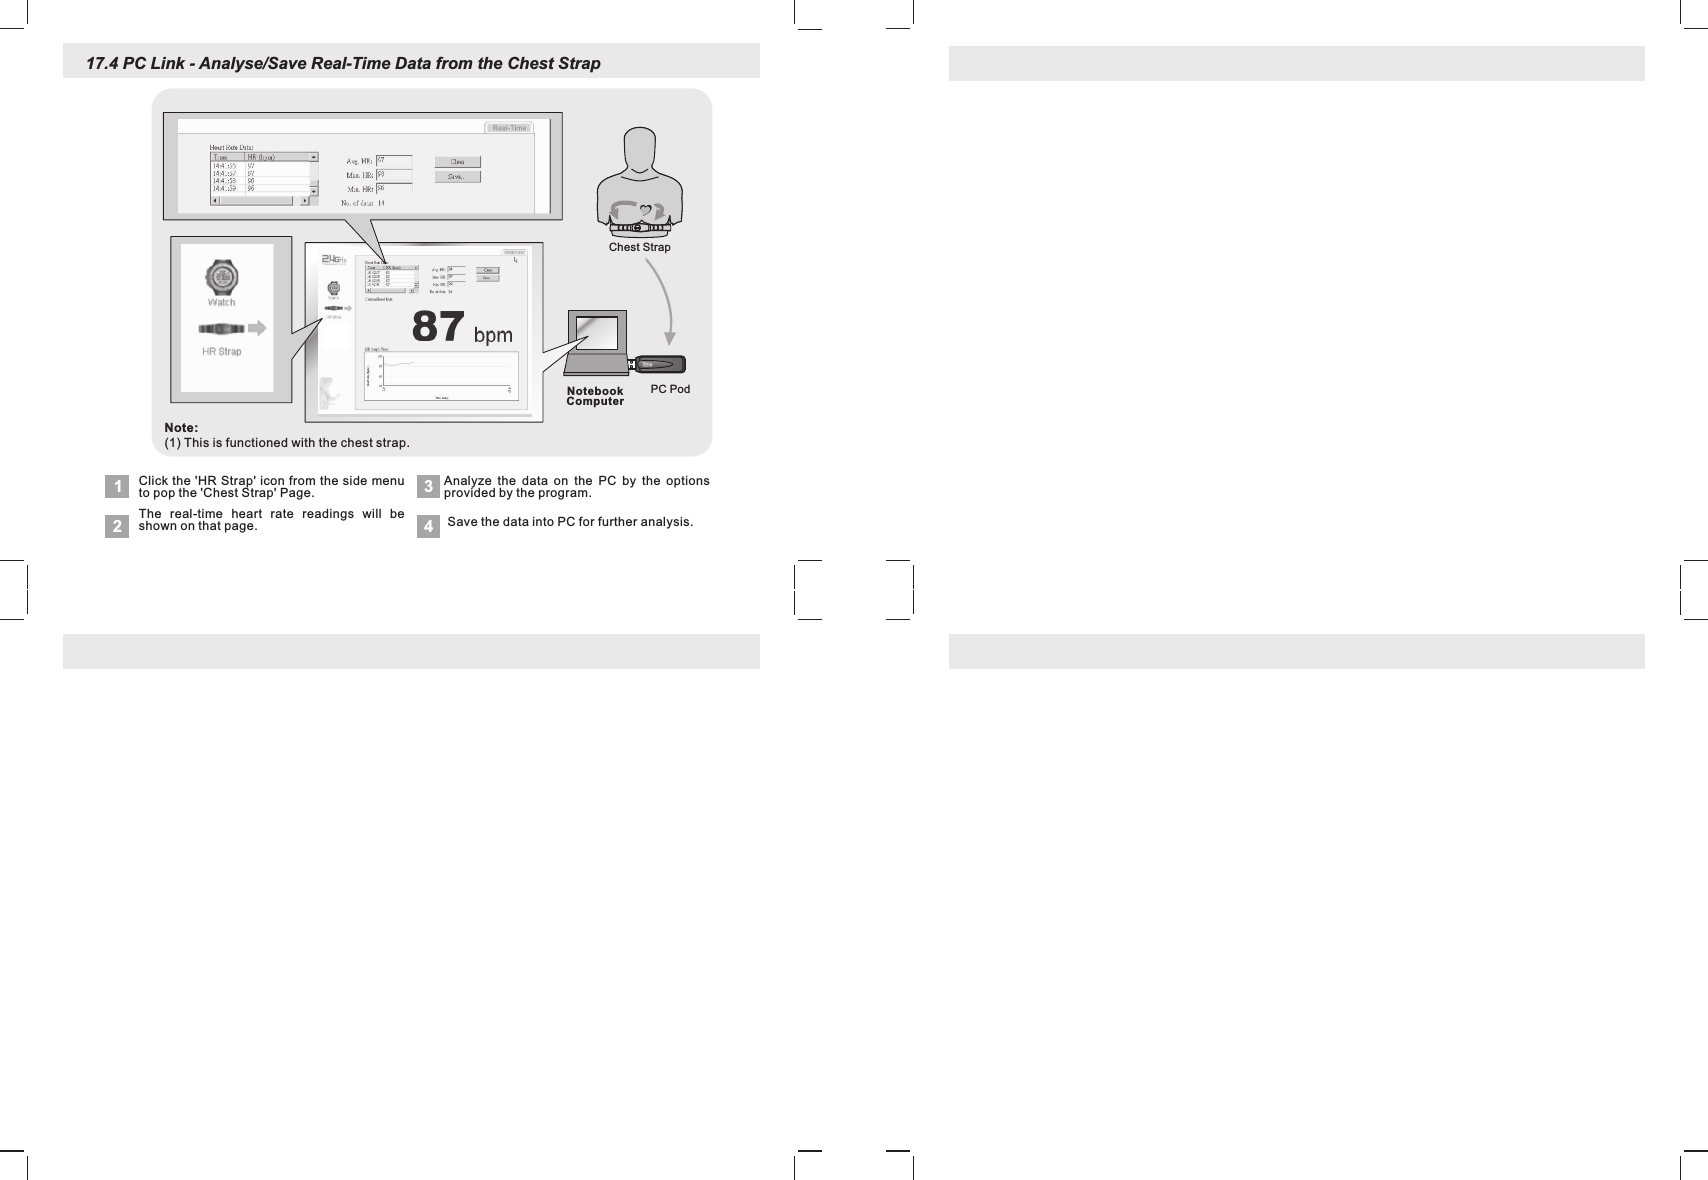
![17.0 PC Link - To Install the Program 17.2 PC Link - Data Send to PC via the PC Pod17.3 PC Link - Download/Analyse/Save Data from the Watch17.1 PC Link - To Pair the Watch & Chest Strap with the Program [M] [L/R] [S/S] [ESC] [EL][M] [L/R] [S/S] [ESC] [EL][M] [L/R] [S/S] [ESC] [EL][M] [L/R] [S/S] [ESC] [EL]Personal ComputerPersonal ComputerClick the 'PC Software' button from the side menu and then the 'here' button to execute the installation wizard.Follow the instructions to install the program into the target PC.23Insert the bundled CD into the CD drive of the target PC. The menu will show automatically.1Personal Computer13When the installation is completed. execute the 'Wireless Data Manger' Program from the Window program menu bar. When the pairing is done. The ID of the Watch, chest strap will be saved into the program.Tips: For some instance, the Watch and the Chest Strap can be paired with the program again under the 'Option' top menu and the 'Setting' option. NOTE: During the pairing, (1) The Watch MUST be switched to PC-Link Display of the Logbook Mode, and activate the PC-link function.(2) The Chest Strap MUST be worn on the chest or press the two contacts (i.e heart rate signal is sampling).2The wizard will guide you to pair the Wa t c h , C h e s t S t r a p w i t h t h e program.It 's the firs t time tha t you use th is softw are. Ple ase inse rt the PC Pod to your PC to sett ing up.1342Click the ' Watch' icon from the side menu to pop the 'Watch' Page. Select the 'Chronograph', '48 Hour Data', 'Logbook' or 'Daily Stat' page from the top menu.Click 'Download' button to download the d a t a f r o m t h e W a t c h t h r o u g h t h e corresponding page. The respective data will be shown on the screen after a while.Analyze the data on the PC by the options provided by the program. Save the data into PC for further analysis.WatchPersonal ComputerPC PodNOTE: The watch MUST be switched to PC-Link Display of the Logbook Mode, and activate the PC-link function.11 22The data send to PC from the Heart Rate Chest Strap: (1) R e a l - t i m e h e a r t r a t e , A v e r a g e H e a r t R a t e , Minimum Heart Rate and Maximum Heart Rate .The data send to PC from the Watch:(1) Chronograph logs: Lap time and split time for every lap, Maximum, Average,Minimum Lap time and the total time.(2) 48 Hour logs: Altitude, temperature and pressure readings for last 48 hours.(3) Logbook logs: Session info (Start time, log rate, no. of session, duration, etc) and the data summary of the Session (Calorie expenditure, etc.) (4) Daily Statistic logs: The daily data summary for Speed, Distance, Calorie, heart rate, etc. PC PodWatchChest Strap Personal ComputerIMPORTANT: Put the Watch or Chest Strap in the place within 6 meters from the PC Pod, otherwise the PC Pod MAY NOT receive the data from the device.](https://usermanual.wiki/Latitude/523/User-Guide-1002740-Page-26.png)