Launch Tech GOLOG5001 Automotive Diagnosis Terminal User Manual golo5 Quick Start Guide
Launch Tech Co., Ltd. Automotive Diagnosis Terminal golo5 Quick Start Guide
User manual

Download App
How to insert SIM card
Keep purple:
Flash in purple :
Flash in blue:
Flash in red:
Fast flash in red:
Fast flash in blue:
golo works properly
Network and GPS error
GPS error
Network error
Firmware updating
golo dormancy
Long press for 10s:
Long press for 5s:
reset WiFi password
restart the connector
Quick Start
website:
www.en.golo365.com/
Help
For more instruction, see
on the App
About golo
carcare
1. Unscrew the back cover .
2. Insert the card parallel with the arrow
marked on the body .
Note: The SIM card is not provided with golo
connector. You have to prepare it.
Scan QR code to
download the
golo carcare App
You can also search in
and to get the
App.
golo carcare
App Store Google play
SIM card
WiFi switch
LED indicator
www.cnlaunch.com/en/
Appearance
OBDII port
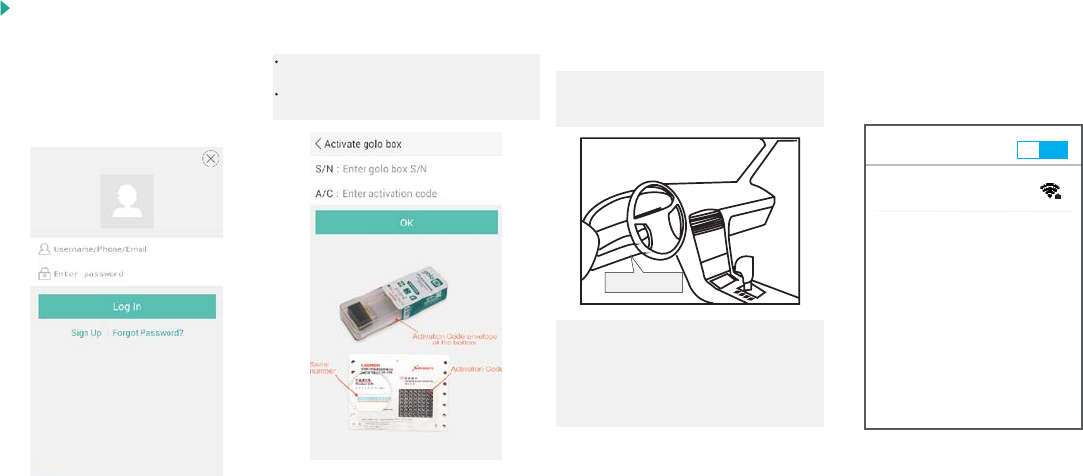
The OBDII port usually locates under the
instrument panel, .
For detailed location, see related vehicle manual.
towards the driver's left knee area
Plug your golo into OBDII port of stopped
car before performing golo functions.
WLAN ON
golo xxxxxxxxxxxx
Connected
Connect to golo WiFi after confirming
the golo works properly (see the LED
indicator).
WiFi: goloxxxxxxxxxxxx
Initial password: 1234567890
OBDII port
Note: For the first time, you are advised to
initialize the connector to make sure that the
monitoring function works properly.
2. Install golo 3. WiFi
1. Activate golo
Initialization: Plug the connector, start the engine
and keep the engine running in idle speed for
about 3 minutes.
For new users, create a golo carcare
account before activating your golo.
For existing users, login to golo carcare
to activate your golo.
To activate a golo, enter your car
information, golo S/N, activation code,
and download required diagnosis file.
Please make sure entered contents are correct
so that all golo functions can work properly.
S/N and Activation Code will be found in the
envelope within the packing box.
Quick Start
FCC statements:
This device complies with part 15 of the FCC rules. Operation is subject to the
following two conditions: (1) this device may not cause harmful interference, and (2)
this device must accept any interference received, including interference that may
cause undesired operation.
NOTE: The manufacturer is not responsible for any radio or TV interference caused
by unauthorized modifications or changes to this equipment. Such modifications or
changes could void the user’s authority to operate the equipment.
NOTE: This equipment has been tested and found to comply with the limits for a
Class B digital device, pursuant to part 15 of the FCC Rules. These limits are designed
to provide reasonable protection against harmful interference in a residential
installation. This equipment generates uses and can radiate radio frequency energy
and, if not installed and used in accordance with the instructions, may cause harmful
interference to radio communications. However, there is no guarantee that
interference will not occur in a particular installation. If this equipment does cause
harmful interference to radio or television reception, which can be determined by
turning the equipment off and on, the user is encouraged to try to correct the
interference by one or more of the following measures:
‐ Reorient or relocate the receiving antenna.
‐ Increase the separation between the equipment and receiver.
‐Connect the equipment into an outlet on a circuit different from that to which the
receiver is connected.
‐Consult the dealer or an experienced radio/TV technician for help.
RF exposure information: The Maximum Permissible Exposure (MPE) level has been
calculated based on a distance of d=20 cm between the device and the human body.
To maintain compliance with RF exposure requirement, use product that maintain a
20cm distance between the device and human body.