Lexmark Pro710 Users Manual Series Quick Reference Guide
C 720 lmadiuser
PRO710 to the manual 9d126007-adf8-4780-8085-958fbffcc0ac
2015-01-23
: Lexmark Lexmark-Pro710-Users-Manual-269143 lexmark-pro710-users-manual-269143 lexmark pdf
Open the PDF directly: View PDF ![]() .
.
Page Count: 55
- Contents
- About your printer
- Ordering and replacing supplies
- Using the printer software
- Printing
- Copying
- Scanning
- E-mailing
- Setting up the printer to fax
- Faxing
- Wireless networking
- Troubleshooting
- Before you troubleshoot
- If Troubleshooting does not solve your problem
- Setup troubleshooting
- Incorrect language appears on the display
- Installation screen did not appear during installation
- Software did not install
- Print job does not print or is missing pages
- Make sure the ink cartridges are inserted correctly
- Select your printer from the Print dialog before sending the print job
- Make sure the print job is not paused
- Make sure your printer is set as the default printer
- Reconnect the printer power supply
- Remove and reconnect the USB cable connected to your printer
- Check the USB connection
- Remove and reinstall the printer software
- Printer is printing blank pages
- Printer is busy or does not respond
- Cannot delete documents from the print queue
- Cannot print through USB
- Fax troubleshooting
- Wireless network troubleshooting
- Wireless troubleshooting checklist
- Printing a network setup page
- Locating IP addresses
- Cannot print over wireless network
- Turn the access point (wireless router) off and then back on
- Disconnect from VPN session
- Make sure Demo Mode is turned off
- Check your WEP key or WPA passphrase
- Check if your access point has an association/registration button
- Move your access point away from other electronic devices
- Move the computer and/or printer closer to the access point
- Check the wireless signal quality
- Check your advanced security settings
- Make sure your computer is connected to your access point
- Make sure that your computer and printer are connected to the same wireless network
- Make sure your OS is compatible with wireless printing through AirPort
- “Communication not available” message appears when printing wirelessly
- Notices
- Index

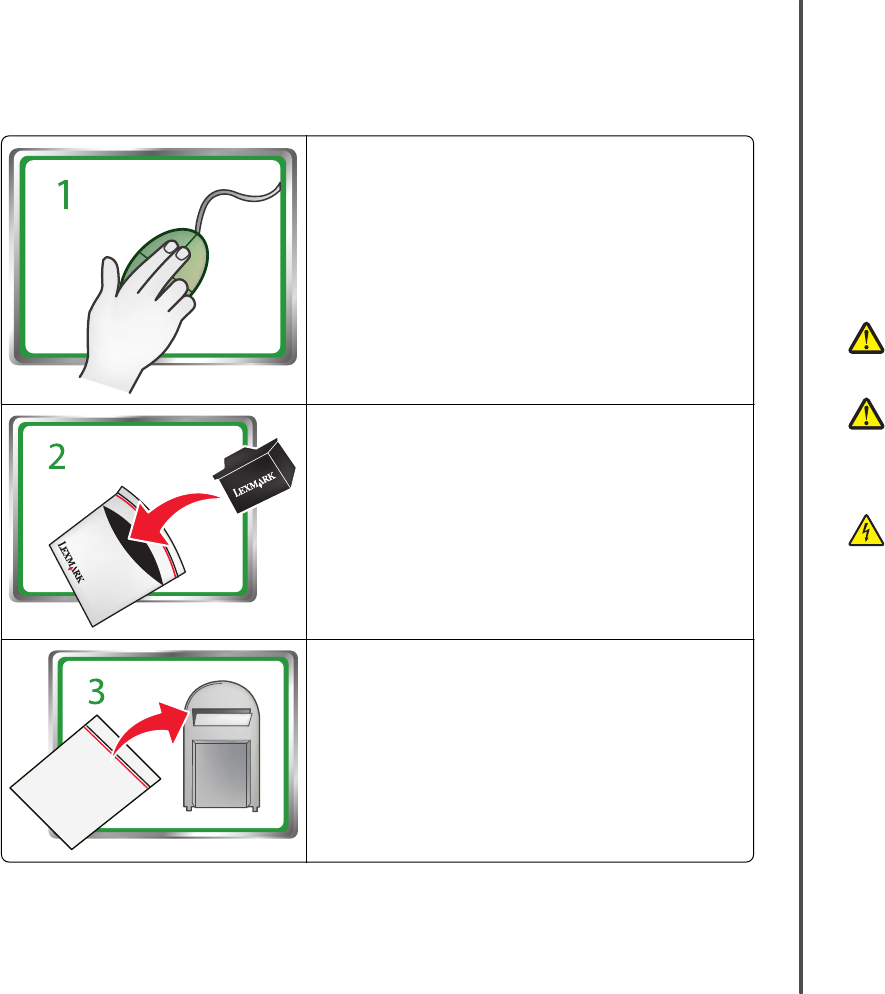
Important Message About Cartridge Recycling!
Please Read Before Opening Your Inkjet Cartridge Box
At Lexmark, we take our commitment to the environment seriously, and we encourage our customers
to participate in our easy, no-cost method for returning empty Lexmark cartridges to Lexmark for proper
recycling. We will insure that cartridges are properly handled with zero waste to landfills.
Go to www.lexmark.com/recycle. Follow instructions to
request postage-paid bags. Bags usually arrive within 7–10 days.
Place the empty Lexmark-branded inkjet cartridge(s) in the
po st age- paid ret urn bag , and then seal t he b ag. If you ’re se nding
single-color tanks, we recommend that you send at least two at
a time to maximize the environmental benefits.
Mail the bag to Lexmark’s recycling partner. The bag is pre-
addressed.
Visit www.lexmark.com/recycle to learn more about recycling.
Lexmark-branded cartridges are always made with all new parts, though components may contain
recycled material. For warranty returns, call 1-800-395-4039.
This patented printer is licensed for, and designed to work with, only genuine Lexmark inkjet cartridges
for the life of the patented printer. You agree to: (1) use only genuine Lexmark inkjet cartridges with this
printer except as otherwise provided below, and (2) pass this license/agreement to any subsequent user
of this printer. The patented Lexmark inkjet cartridges and their contents are licensed subject to a
restriction that they may be used only once. After this single use, the license to use the print cartridges
and their contents terminates, and you agree to return them only to Lexmark for recycling. Replacement
inkjet cartridge(s) sold without these terms are available through www.lexmark.com and may be refilled
by you, or a third party, as the only cartridge alternative to be used with the licensed printer.
Important safety information
Connect the power cord to a properly grounded electrical outlet that is near the product and easily
accessible.
Do not place or use this product near water or wet locations.
Use only the power supply and power cord provided with this product or the manufacturer's authorized
replacements.
CAUTION—POTENTIAL INJURY: To reduce risk of fire, use only the telecommunications (RJ‑11)
cord provided with this product or a UL Listed 26 AWG or larger replacement when connecting
this product to the public switched telephone network.
CAUTION—POTENTIAL INJURY: Do not cut, twist, bind, crush, or place heavy objects on the
power cord. Do not subject the power cord to abrasion or stress. Do not pinch the power cord
between objects such as furniture and walls. If any of these things happen, a risk of fire or
electrical shock results. Inspect the power cord regularly for signs of such problems. Remove the
power cord from the electrical outlet before inspecting it.
CAUTION—SHOCK HAZARD: Do not use the fax feature during a lightning storm. Do not set up
this product or make any electrical or cabling connections, such as the fax feature, power cord,
or telephone, during a lightning storm.

Contents
Important safety information.........................................................2
About your printer..........................................................................5
Finding information about the printer.................................................................................5
Minimizing your printer's environmental impact.................................................................5
Printer models......................................................................................................................6
Printer features....................................................................................................................6
Setting up the printer...........................................................................................................6
Understanding the parts of the printer..............................................................................12
Using the printer control panel..........................................................................................13
Using flash drives................................................................................................................14
Ordering and replacing supplies....................................................16
Ordering ink cartridges.......................................................................................................16
Replacing ink cartridges......................................................................................................16
Maintaining ink cartridges..................................................................................................18
Using the printer software............................................................19
Minimum system requirements.........................................................................................19
Installing the printer software............................................................................................19
Using the Windows printer software.................................................................................19
Using the Macintosh printer software...............................................................................20
Printing.........................................................................................22
Printing a document...........................................................................................................22
Printing on both sides of the paper (duplexing) automatically..........................................22
Printing photos from a flash drive......................................................................................23
Printing documents from a flash drive...............................................................................23
Canceling print jobs............................................................................................................23
Printing from a mobile device............................................................................................24
Copying.........................................................................................25
Tips for copying..................................................................................................................25
Making copies.....................................................................................................................25
Making a two‑sided (duplex) copy automatically...............................................................25
Canceling copy jobs............................................................................................................26
Scanning.......................................................................................27
Tips for scanning.................................................................................................................27
Scanning to a local computer.............................................................................................27
Scanning to a flash drive or memory card..........................................................................27
Scanning directly to e‑mail using the printer software......................................................27
Scanning to a PDF...............................................................................................................28
Canceling scan jobs.............................................................................................................28
E-mailing.......................................................................................29
Sending e-mail....................................................................................................................29
Canceling an e‑mail............................................................................................................29
Setting up the printer to fax..........................................................30
Step 1: Connect the printer to the telephone line.............................................................30
Step 2: Check the dial tone.................................................................................................37
Step 3: Set your fax name and fax number........................................................................37
Step 4: Set the printer to receive faxes automatically or manually...................................37
Step 5: Set the number of rings..........................................................................................38
Step 6: Create a contact list................................................................................................38
Faxing...........................................................................................39
Sending faxes......................................................................................................................39
Receiving faxes...................................................................................................................39
Wireless networking.....................................................................41
Information you will need to set up the printer on a wireless network.............................41
Installing the printer on a wireless network.......................................................................41
What is Wi‑Fi Protected Setup?.........................................................................................41
Contents 3

Configuring Wi‑Fi Protected Setup manually.....................................................................42
Troubleshooting............................................................................43
Notices.........................................................................................52
Edition notice.....................................................................................................................52
Index............................................................................................53
Contents 4
About your printer
Finding information about the printer
The Quick Reference Guide contains instructions on adding your printer to a wireless network, setting up
a fax connection, and accomplishing common printer tasks like printing, copying, scanning, and faxing. It
also includes information on troubleshooting printer setup issues as well as solving basic networking and
faxing problems.
For additional information, see the following:
What are you looking for? Find it here
Initial setup instructions •Quick Setup Sheet
•Hardware Setup Wizard1
Additional setup and instructions for using the
printer
Comprehensive User's Guide installed automatically with
the printer software.2
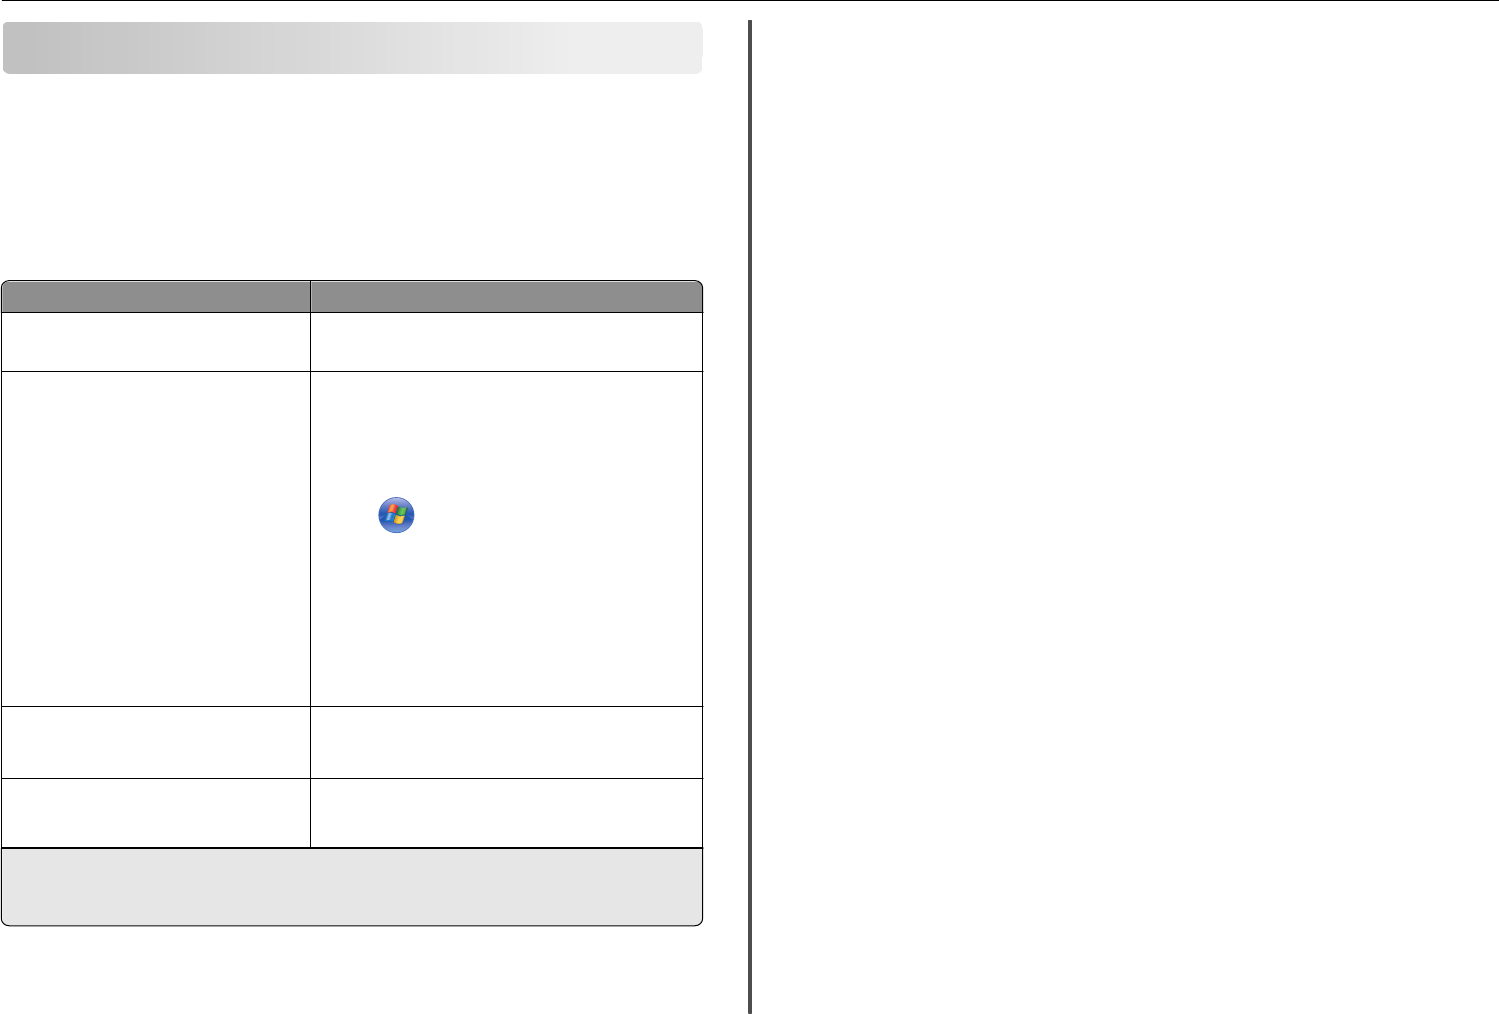
For Windows users
After installing your printer, you can access the User's
Guide from the printer program folder:
1Click or Start.
2Click All Programs or Programs, and then select the
printer program folder from the list.
3Select User's Guide.
For Macintosh users
1From the Finder, navigate to:
Applications > select your printer folder
2Double‑click User's Guide.
Help using the printer software Software Help installed automatically with the printer
software.2 Click Help from any printer software program or
application.
The latest supplemental information, updates,
online customer support, and telephone
support
Support Web site—http://support.lexmark.com
1 Available on the installation software CD.
2 Available on the installation software CD and on the Lexmark Support Web site at
http://support.lexmark.com.
Minimizing your printer's environmental impact
We are committed to protecting the environment and are continually improving our printers to reduce
their environmental impact. By selecting certain printer settings or tasks, you may be able to reduce your
printer's environmental impact even further.
Conserving energy
•Activate Eco-Mode. This feature sets the screen brightness to low and sets the printer to change to
Sleep mode after the printer is left idle for 10 minutes.
•Select the lowest Sleep timeout. The Sleep feature puts the printer in a minimum‑power standby
mode after the printer has been idle for a set amount of time (the Sleep timeout).
•Share your printer. Wireless/network printers allow you to share a single printer among multiple
computers, thus conserving energy and other resources.
Conserving paper
•Print more than one page image on one side of the paper. The Pages per Sheet feature allows you
to print multiple pages on one sheet. You can print up to 16 page images on one side of a sheet of
paper.
•Print on both sides of the paper. Duplexing lets you print on both sides of the paper manually or
automatically (depending on your printer model).
•Preview print jobs before printing. Use the preview features found in Toolbars, the Print or Print
Preview dialog, or the printer display (depending on your printer model).
•Use recycled paper.
•Reduce the margins of documents to be printed.
•Scan and save. To avoid printing multiple copies, you can scan documents or photographs and save
them to a computer program, application, or flash drive for presentation.
Conserving ink
•Use Quick Print or Draft Mode. These modes can be used to print documents using less ink than
normal and are ideal for printing documents that are mostly text.
•Use font types and font settings that require less ink. Most programs or applications let you adjust
the darkness of the colors.
•Use high‑yield cartridges. These cartridges let you print more pages.
Recycling
•Return ink cartridges for reuse or recycling through the Lexmark Cartridge Collection Program. To
return an ink cartridge, go to www.lexmark.com/recycle, and then follow the instructions to request
a postage‑paid bag.
•Recycle the product packaging.
•Recycle your old printer instead of throwing it away.
•Recycle paper from discarded print jobs.
•Use recycled paper.
About your printer 5
To read the Lexmark Environmental Sustainability Report, visit www.lexmark.com/environment.
Note: Your printer may not come with some of these programs or some of the functions of these
programs, depending on the features of the printer that you purchased.
Printer models
The installation software CD that came with your printer works for the following printer models:
•Lexmark Pro715
•Lexmark Pro719
Printer features
Depending on the model, your printer comes with features that will help you manage and accomplish
printing and imaging tasks:
•Wireless or Ethernet networking—Print and scan from anywhere in your home or office over a secure
wireless or Ethernet network, as well as share the printer among multiple computers.
•Intuitive touch screen—Use the full‑featured color touch screen for fast, easy access to all the printer
menus. The large screen also allows you to view and print photos directly from your digital camera or
memory device without using a computer.
•Print—Print documents and PDFs quickly from a computer or from a USB flash drive. Built‑in two‑sided
printing lets you save money and the environment.
•Copy—Copy documents and photos with one‑touch, computer‑free black or color copying. Enjoy 25%
to 400% reduction and enlargement capacity.
•Scan—Scan documents and photos fast and easily with the high‑resolution scanner. Easily scan to a
memory device or to multiple laptops or computers over a secure wireless network with up to 1200 dpi
optical resolution.
•Fax—Do standalone black and color faxing at 33.6Kbps modem speed. Other fax features include 99
speed dials, automatic redial, junk fax blocking, and caller ID.
•Photo printing—Print high‑quality, long‑lasting photos directly from digital memory cards,
PictBridge‑enabled digital cameras, or USB flash drives.
•SmartSolutions—Simplify printer tasks that you frequently repeat by creating and customizing your
printer solutions. Using the SmartSolutions toolkit on the Web, you can choose the printer tasks that
you often perform, apply your custom settings, and download them to your printer as shortcuts that
you can easily access anytime. You can also customize your printer with solutions that display your
online calendars, online photo albums, RSS feeds, and more.
•Shortcuts—Save a set of frequently used printer settings available for a given task and then assign a
shortcut name and shortcut number to it. When you want to perform a task with those settings, you
can simply select the shortcut number on the printer instead of going through the usual process of
adjusting the settings and options.
•Eco‑Mode—Save energy by activating Eco‑Mode. It automatically dims the printer display light and
puts the printer into Sleep mode after a specified period of inactivity.
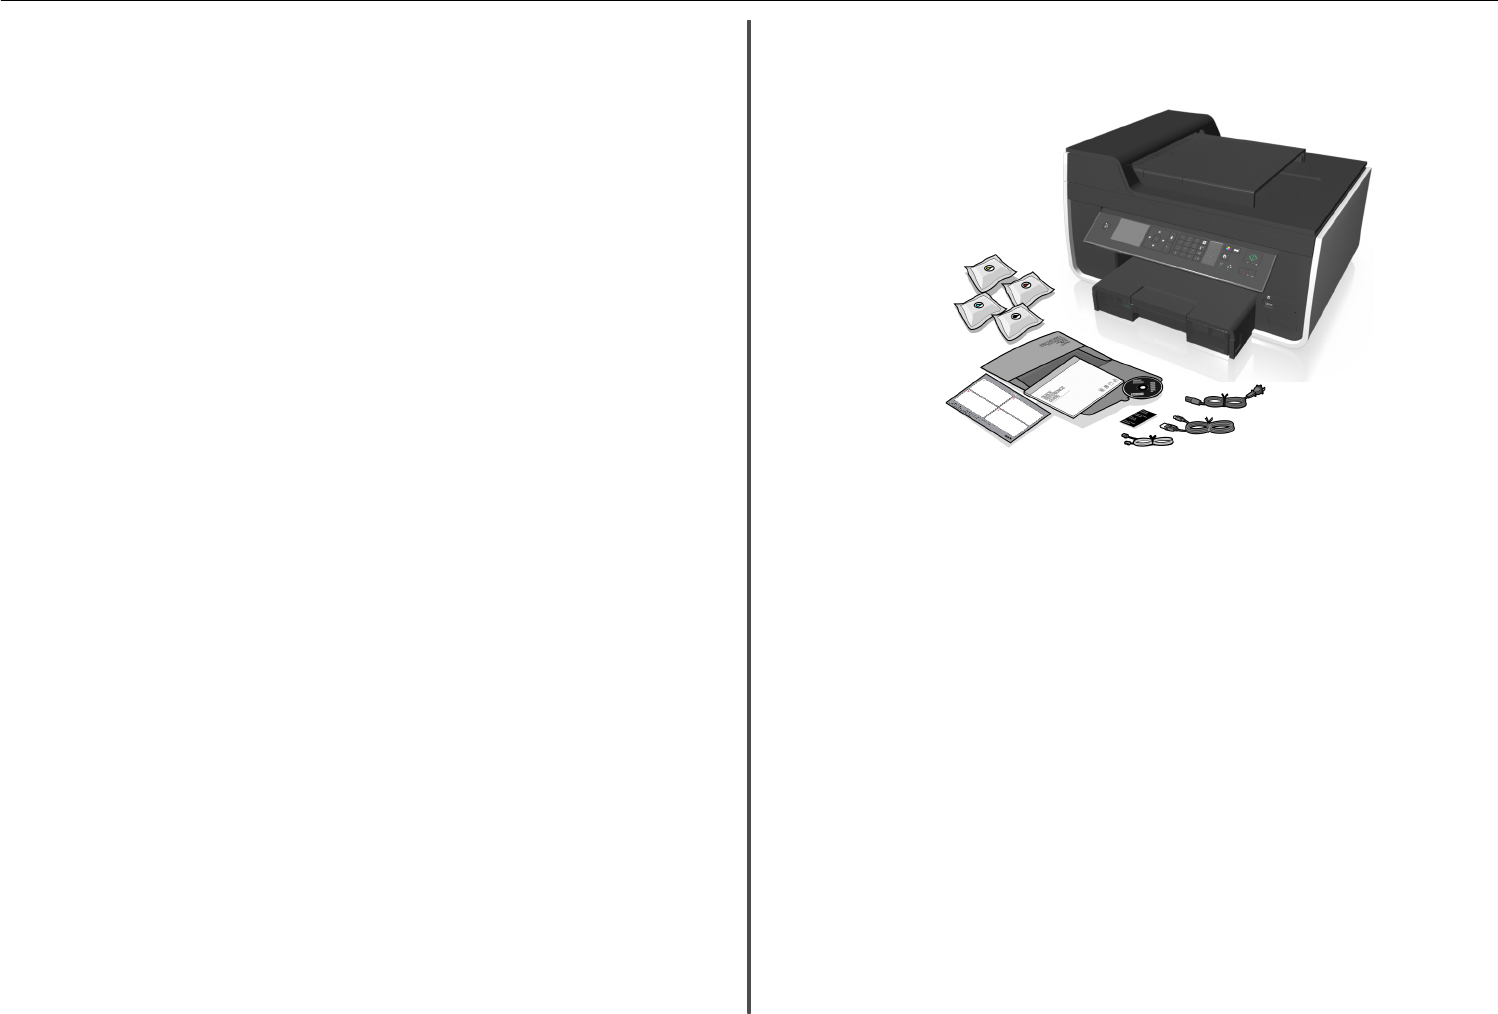
Setting up the printer
1Unpack the printer.
Notes:
•Do not attach the USB cable until prompted to do so.
•Place the printer near the computer during setup. If you are setting up on a wireless network,
then you may move the printer after setup is complete.
•Contents may vary by model and region.
About your printer 6
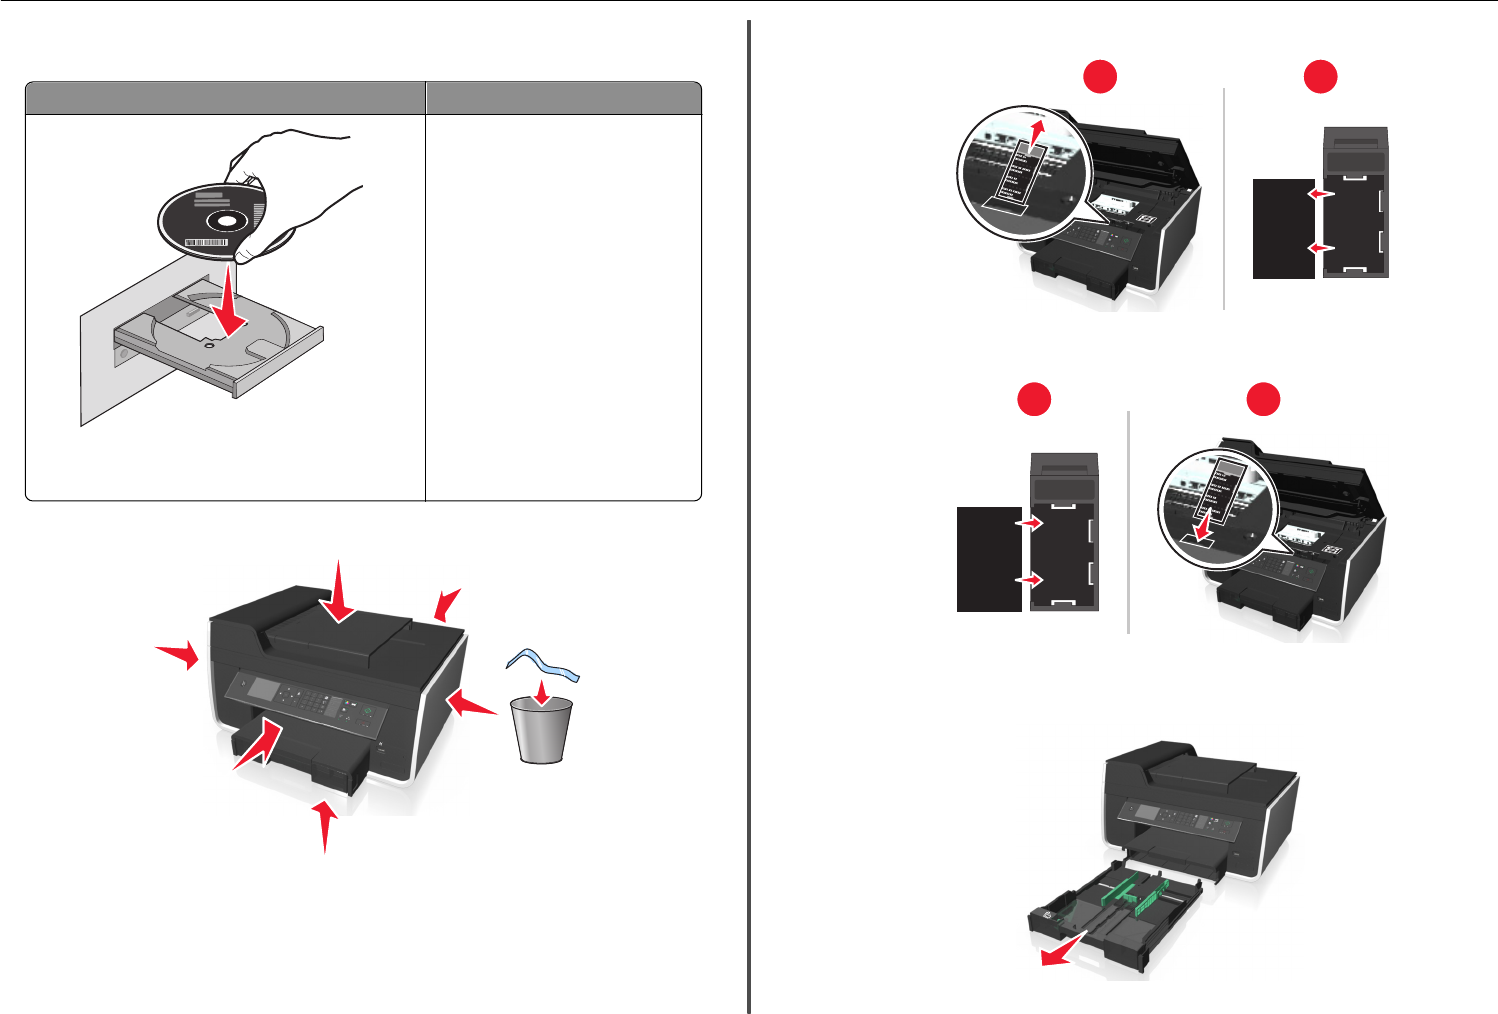
2To initiate printer setup using a computer, insert the installation software CD, or download the printer
driver.
With a CD or DVD drive (Windows/Macintosh) Without a CD or DVD drive or for Linux
Note: If the installation screen does not appear after a
minute, then see “Installation screen did not appear during
installation” on page 43.
Download the printer driver from
www.lexmark.com.
3Remove tape and packing material from all areas of the printer.
4If necessary, lift the scanner unit to replace the language sheet on the printer control panel.
aRemove the language sheet holder from the printer control panel.
xxxx xx
xxxxxxxx
xxxx xx xxxxx
xxxxxxxx
xxxx xx xxxxx
xxxxxxxx
xxxx xx
xxxxxxxx
12
bInsert the preferred language sheet into the language sheet holder, and then attach the language
sheet holder to the printer control panel.
xxxx xx
xxxxxxxx
xxxx xx xxxxx
xxxxxxxx
xxxx xx xxxxx
xxxxxxxx
xxxx xx
xxxxxxxx
12
cClose the scanner unit.
5Pull the paper tray completely out of the printer.
About your printer 7
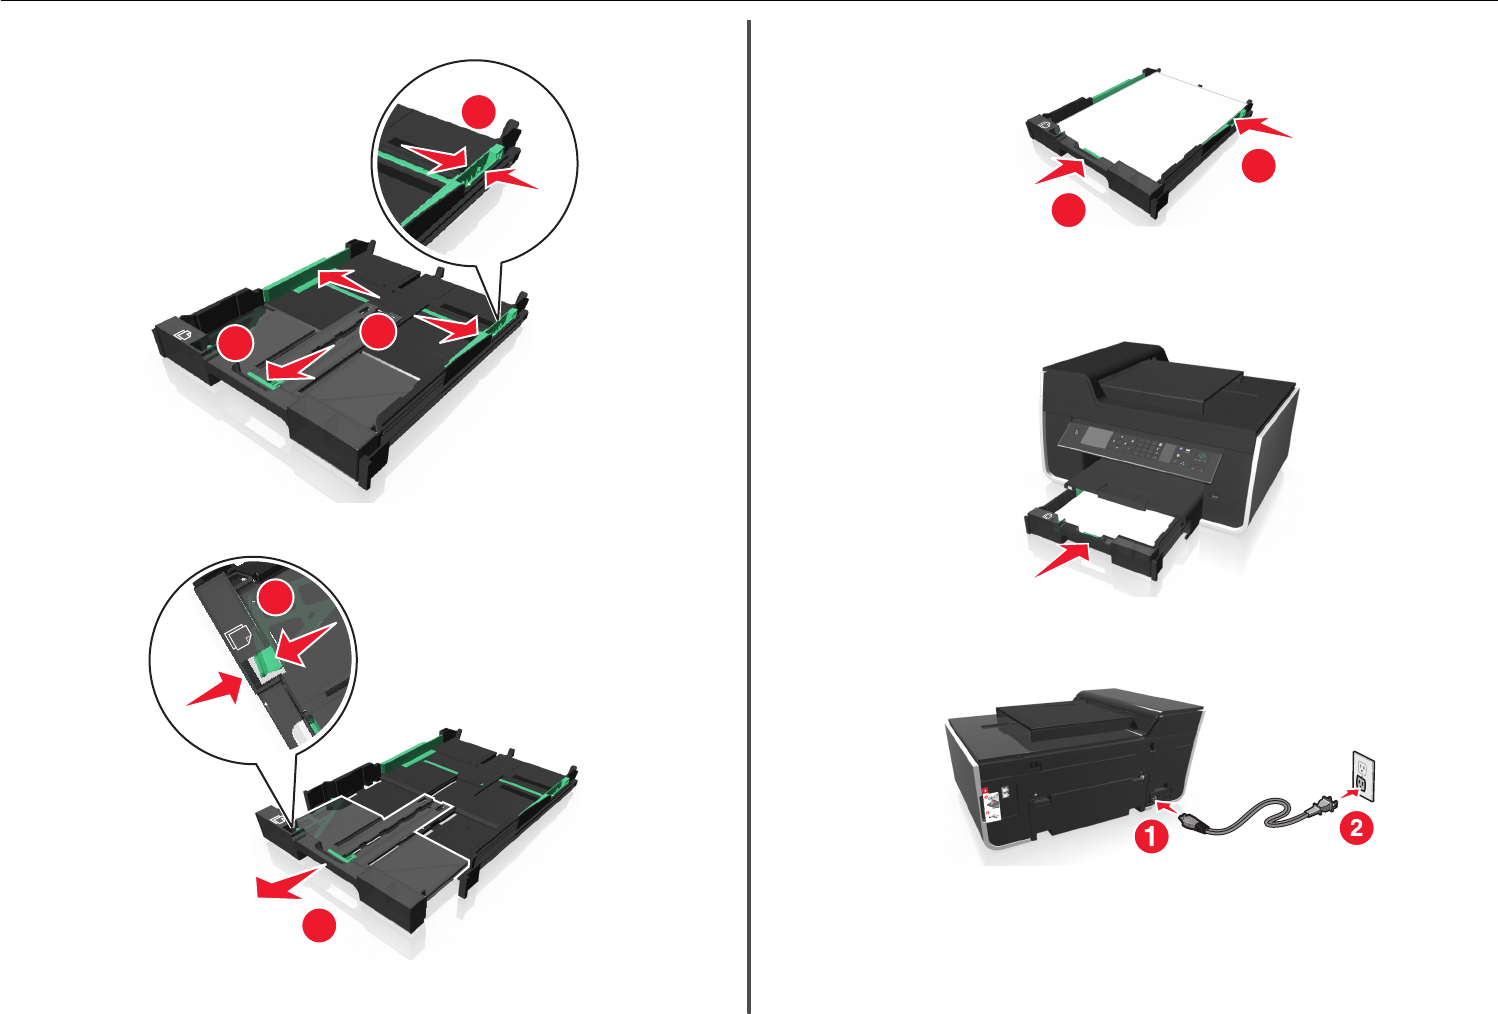
6Move the paper guides to the sides.
2
3
1
7For A4‑ or legal‑size paper, extend the paper tray.
2
1
8Load paper and adjust the paper guides.
1
2
Note: Make sure the paper is below the maximum fill line located on the edge of the paper tray.
Overloading the tray can cause paper jams.
9Insert the paper tray.
10 Connect the power cord only.
Note: Do not attach the USB cable yet.
About your printer 8
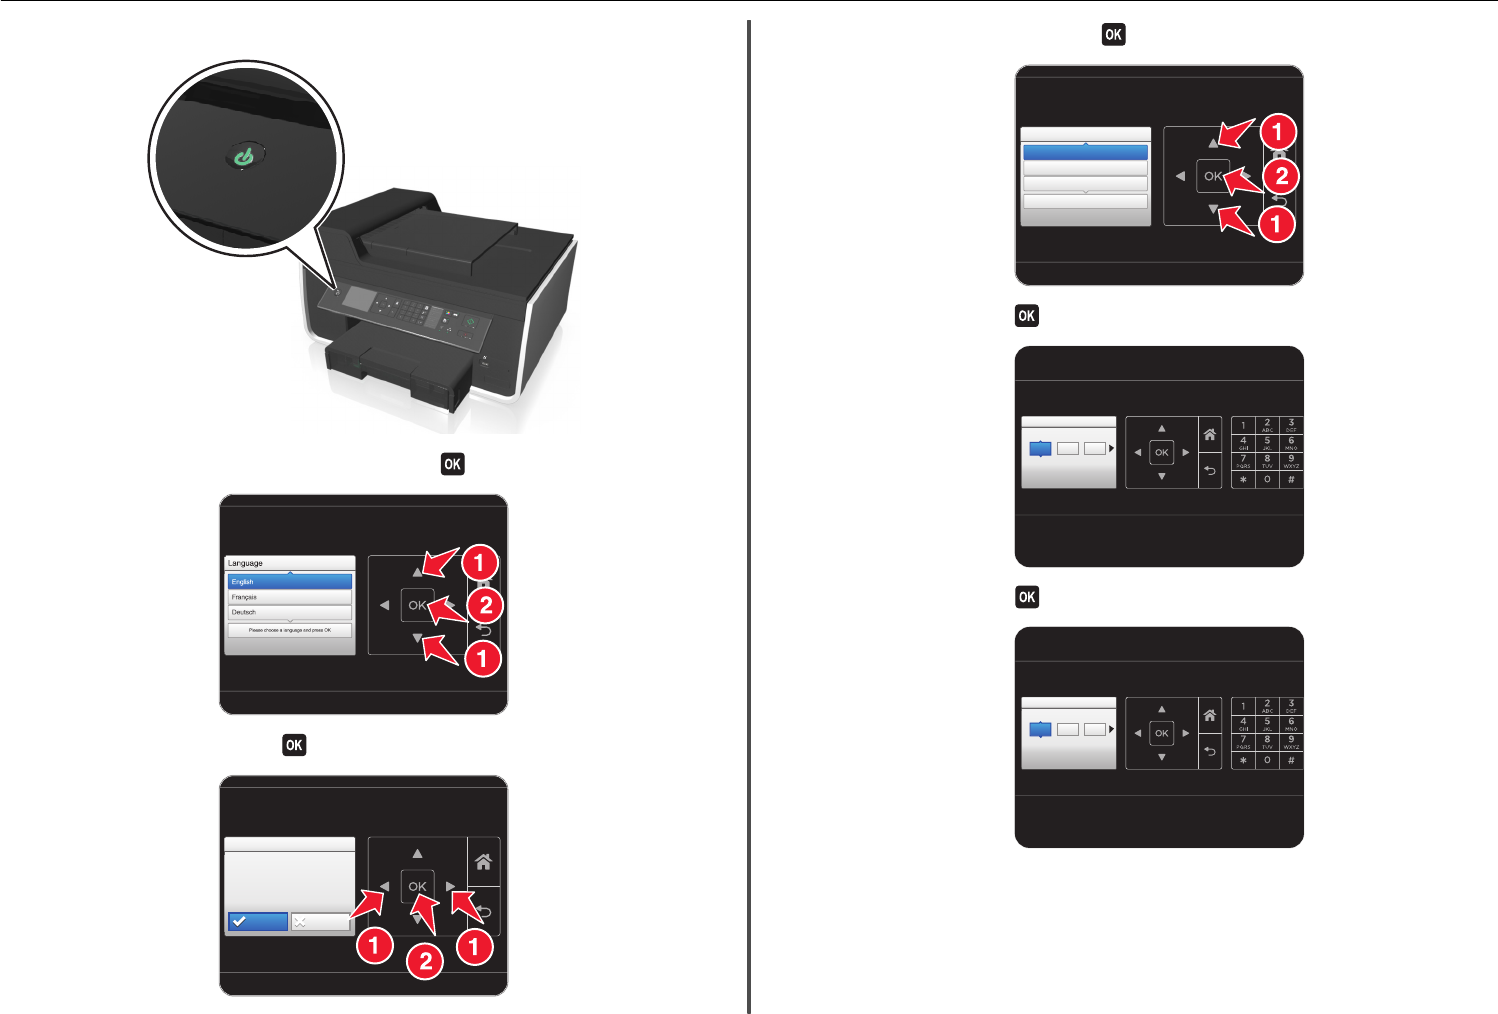
11 Make sure the printer is on.
12 Set the language on the printer control panel, and then press .
13 Confirm the language, and then press .
Language Selection
Language Selection
You have chosen English
as the language for your
Printer
Are you sure?
Yes No
14 Set the country or region, and then press .
Country/Region
Country/Region
United States
Albania
Algeria
Please choose a country or region and press OK
15 Set the date, and then press .
Set Date
Set Date
Press OK when complete.
18 01 2011
//
16 Set the time, and then press .
Set Time
Set Time
Press OK when
complete.
05 55 AM
:
About your printer 9

17 Set the time zone, and then press .
Time Zone
Time Zone
Please choose a time zone and press OK
(UTC-05:00) Eastern Time (USA/Ca..
(UTC-06:00) Central Time (USA/Ca...
.
(UTC-07:00) Mountain Time (USA/C...
18 To configure basic fax functions, press the arrow buttons until Now is highlighted on the display, and
then press .
Fax Setup
Fax Setup
Do you want
to set up fax now?
Now Later
19 Enter your fax number for the printer, and then press . Your fax number identifies you as the sender
in all your sent faxes.
Fax Number
Fax Number
Enter Fax Number and press OK
20 Enter your name or company name, and then press . Your fax name identifies you as the sender
in all your sent faxes.
Fax Name
Fax Name
Enter Fax Name and press OK
21 Configure other advanced fax settings later in the software installation.
Continue
Configure Advanced Features
You can now print, but there are additional steps required to access all the
features of your device.
Configure Lexmark SmartSolutions and standalone email
Get my printer ready to send and receive faxes
What will I be missing if I don’t do this now?
How can I do this later?
Lexmark Pro710 Series Installation
Lexmark Pro710 Series Installation
Get my printer ready to scan directly to my computer
?
Quit
About your printer 10
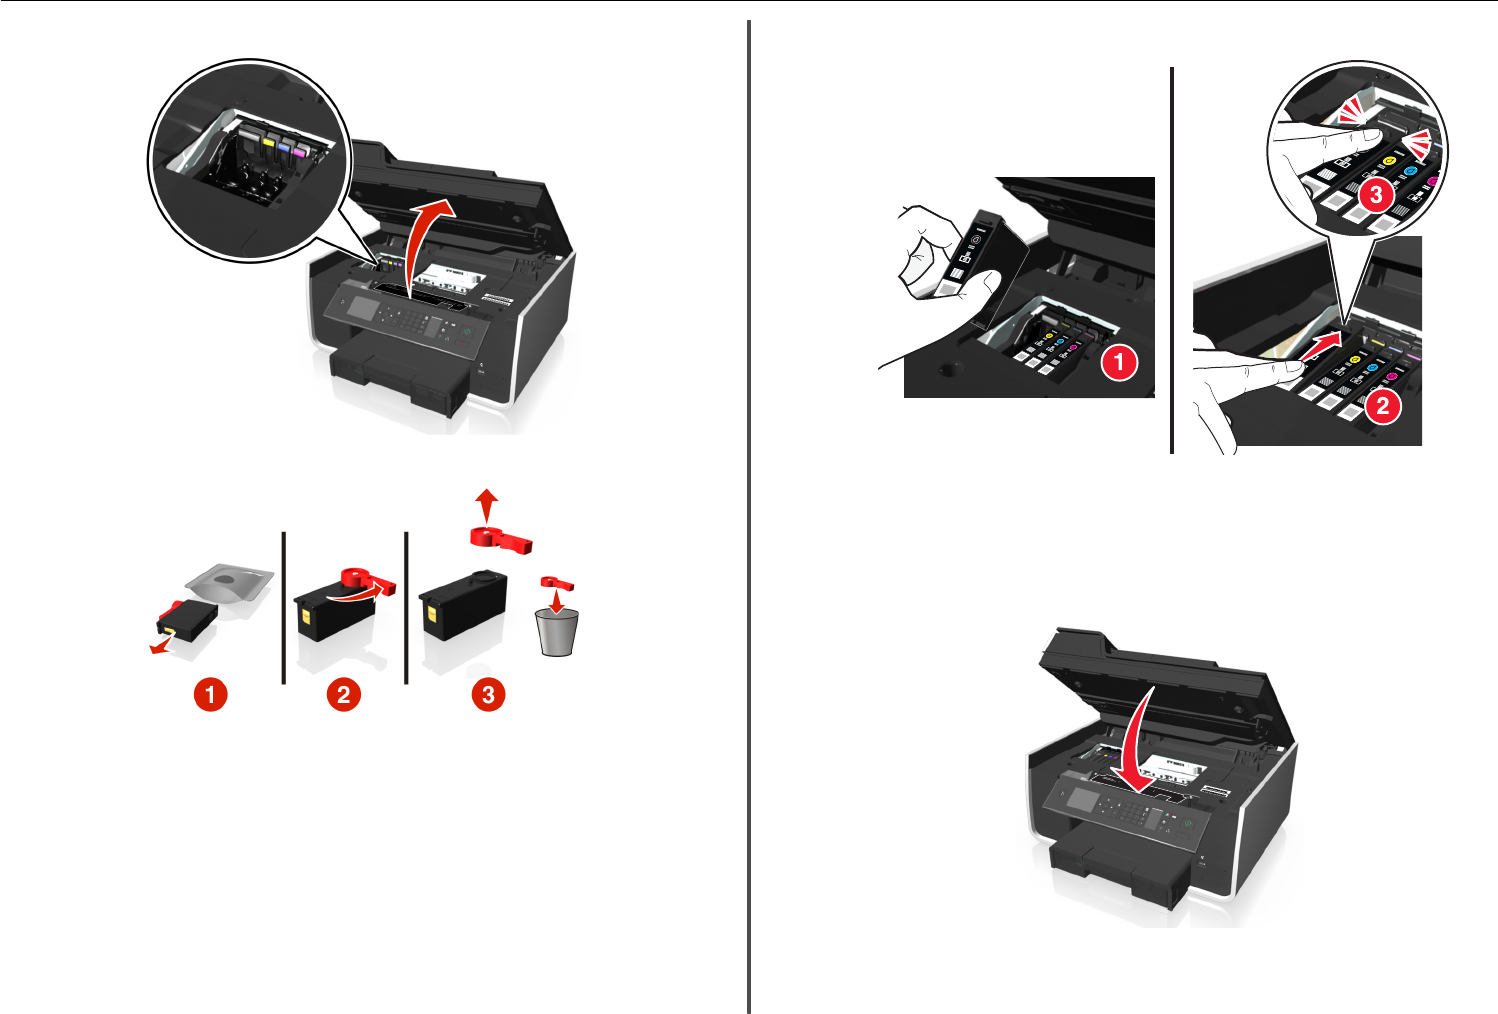
22 Open the printer.
23 Unpack the ink cartridges.
24 Insert each ink cartridge. Slide your finger along the ink cartridge until the cartridge clicks into place.
Notes:
•Install the color ink cartridges first. Then, use two hands to install the black cartridge.
•Install the new ink cartridges immediately after removing the protective cap to avoid exposing
the ink to air.
25 Close the printer.
INK COM
PATIBILIT
YC
H
ART
150, 150A, 150XL, 150XLA, 155, 155AMagenta
150, 150A, 150XL, 150XLA, 155, 155AYellow
150, 150A, 150XL, 150XLA, 155, 155A, 155XL, 155XLABlack
150, 150A, 150XL, 150XLA, 155, 155ACyan
MT/MN: 4449-70E
www.lexmark.
com
V725w
MAC:XX XX XX XX XX XX
xxxxxxxxxxxxxx
The customer support label that is located near the ink cartridge access area contains the ink
compatibility information, model number, product Web site, and technical support number.
About your printer 11
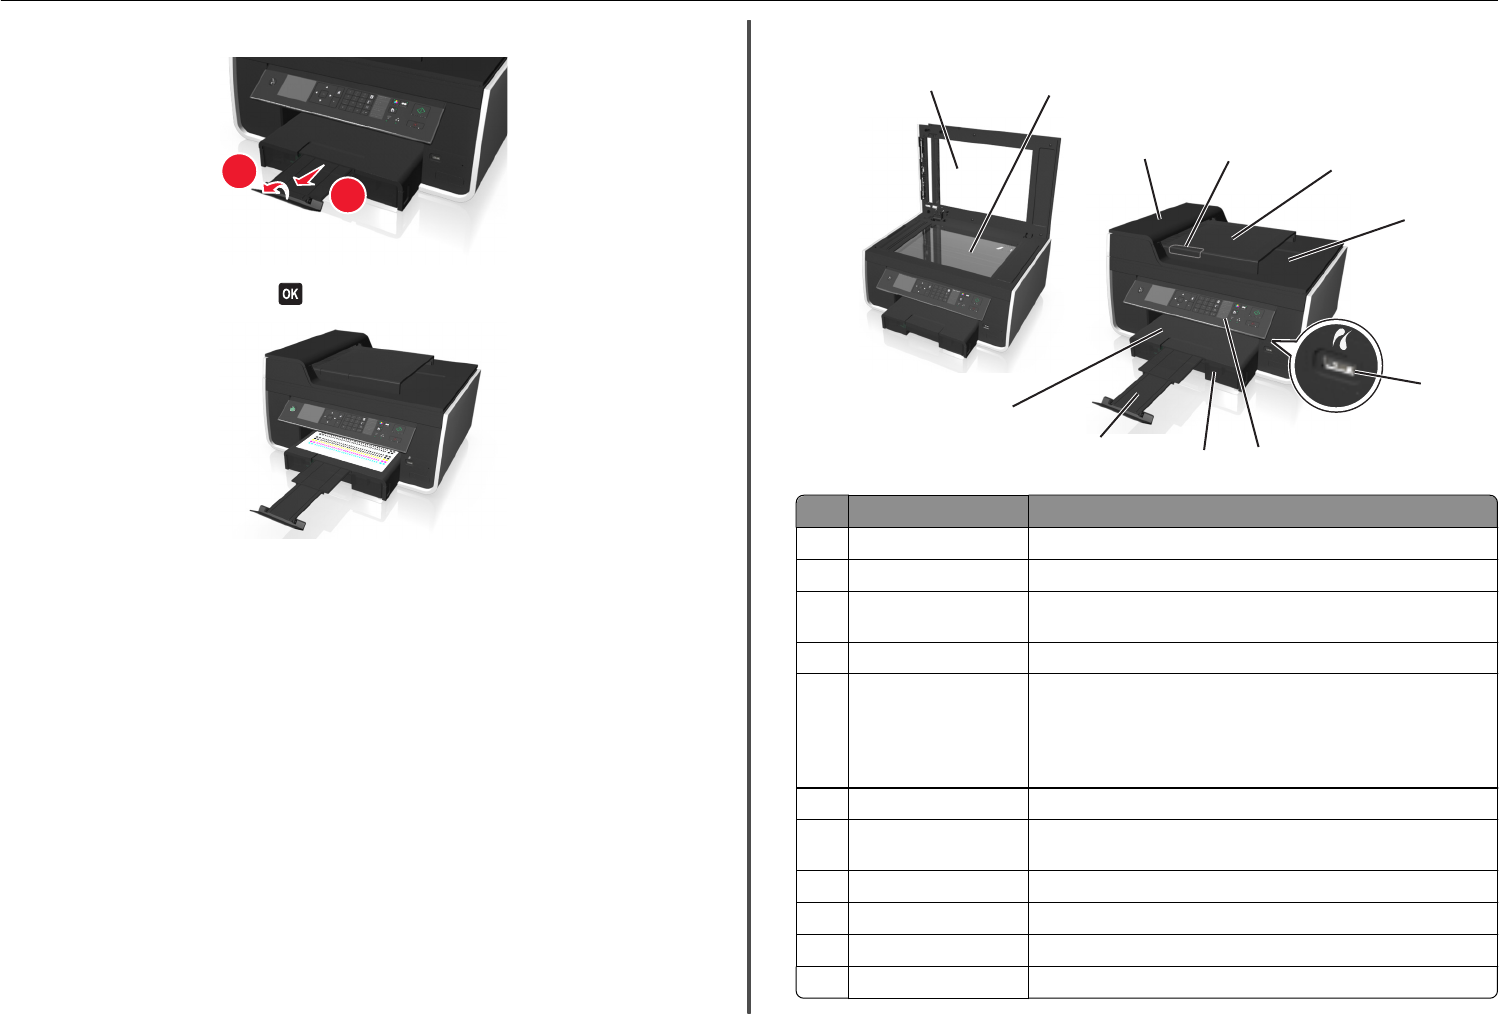
26 Extend and flip out the paper stop.
1
2
27 From the printer control panel, press to print an alignment page.
Notes:
•The alignment page prints.
•Do not remove the page until printing is finished. The alignment page may take a while to print.
•Streaks on the alignment page are normal and not an indication of a problem.
•The alignment page that prints may differ from the one shown.
•Recycle the alignment page.
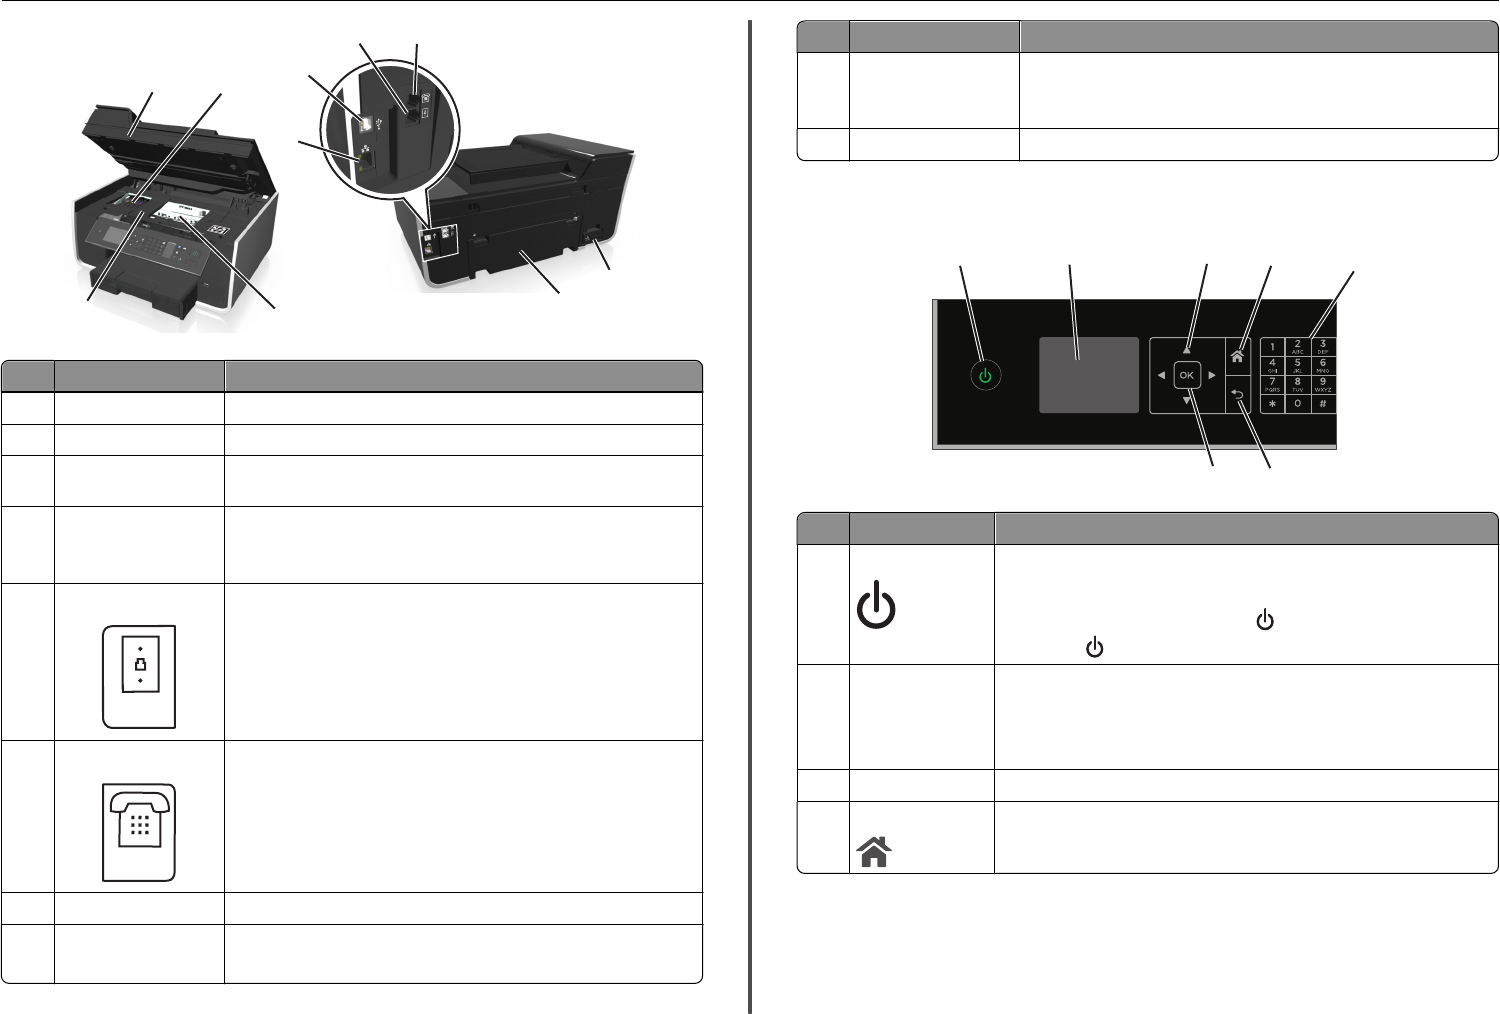
Understanding the parts of the printer
12
345
6
7
8
9
10
11
Use the To
1Scanner cover Access the scanner glass.
2Scanner glass Scan, copy or fax photos and documents.
3Automatic Document
Feeder (ADF)
Scan, copy, or fax multiple‑page letter‑, legal‑, and A4‑size documents.
4ADF paper guide Keep paper straight when feeding into the ADF.
5ADF tray Load original documents into the ADF. This is recommended for scanning,
copying, or faxing multiple-page documents.
Note: Do not load postcards, photos, small items, or thin media (such
as magazine clippings) into the ADF. Place these items on the scanner
glass.
6ADF output tray Hold documents as they exit from the ADF.
7PictBridge and USB port Connect a PictBridge‑enabled digital camera or a flash drive to the
printer.
8Printer control panel Operate the printer.
9Paper tray Load paper.
10 Paper stop Catch the paper as it exits.
11 Paper exit tray Hold paper as it exits.
About your printer 12
12 13
21
18
19
20
LINE
EXT
14
15
17
16
LINE
EXT
Use the To
12 Scanner unit Access the ink cartridges.
13 Ink cartridge access area Install, replace, or remove the ink cartridges.
14 Ethernet port Connect your printer to a computer, a local network, an external DSL, or
a cable modem.
15 USB port Connect the printer to a computer using a USB cable.
Warning—Potential Damage: Do not touch the USB port except when
plugging in or removing a USB cable or installation cable.
16 LINE port Connect the printer to an active telephone line (through a standard wall
jack, DSL filter, or VoIP adapter) to send and receive faxes.
17 EXT port Connect additional devices (telephone or answering machine) to the
printer and the telephone line. Use this port if you do not have a dedicated
fax line for the printer, and if this connection method is supported in your
country or region.
Note: Remove the plug to access the port.
18 Power supply with port Connect the printer to a power source using the power cord.
19 Duplex unit •Print on both sides of a sheet of paper.
•Remove paper jams.
Use the To
20 Printhead access area Install the printhead.
Note: The carrier moves to the printhead access area when no
printhead is installed in the printer.
21 Jam clearance cover Remove jammed pages.
Using the printer control panel
12345
6
7
Use To
1Power •Turn the printer on and off.
•Switch to Sleep mode.
Note: When the printer is on, press to switch to Sleep mode. Press
and hold for three seconds to turn off the printer.
2Display
Note: The display is
turned off in Sleep
mode.
View:
•Printer status
•Messages
•Menus
3Arrow buttons Navigate to menu or submenu items that appear on the display.
4Home Navigate from any level in the menu back to the home screen.
About your printer 13

Use To
5Keypad In Copy mode or Photo mode:
Enter the number of copies or prints you want to make.
In Fax mode:
•Enter fax numbers.
•Operate an automated answering system.
•Select letters when creating a Speed Dial list.
•Type numbers to enter or edit the date and time shown on the display.
6Back •Return to the previous screen.
•Exit from one menu level to a higher one.
7Select •Select menu options.
•Save settings.
•Feed or eject paper. Press and hold the button for three seconds to feed
or eject paper from the printer.
8Redial Display the last number dialed. Press the left or right arrow button to view the
last five numbers dialed.
9Pause Insert a three-second pause in a fax number to wait for an outside line or get
through an automated answering system. Enter a pause only when you have
already begun entering the number.
10 Dial tone Dial the telephone number manually using the keypad before sending the fax.
11 Address Book Access fax numbers from a saved list of numbers.
12 Color Switch to color mode.
13 Black Switch to black‑and‑white mode.
14 Start Start a job, depending on which mode is selected.
15 Cancel •Cancel a print, copy, scan, or fax job in progress.
•Exit from a menu level of the Copy, Scan, Fax, Photo, or File Print menu to
the top level of a menu.
•Exit from a menu level of the Setup menu to the top level of the previous
mode.
•Clear current settings or error messages, and return to default settings.
16 Network indicator Check the network connection status of your printer and access the network
settings.
17 Wi‑Fi indicator Check the wireless connection of your printer.
18 Eco‑Mode •Change to Sleep mode after the printer is left idle for 10 minutes.
•Set screen brightness to low.
Using flash drives
Supported file types
Documents:
•.pdf (Adobe Portable Document Format)
About your printer 14
Images:
•.jpg, .jpeg, .jpe (Joint Photographic Experts Group)
•.tiff, .tif (Tagged Image File Format)
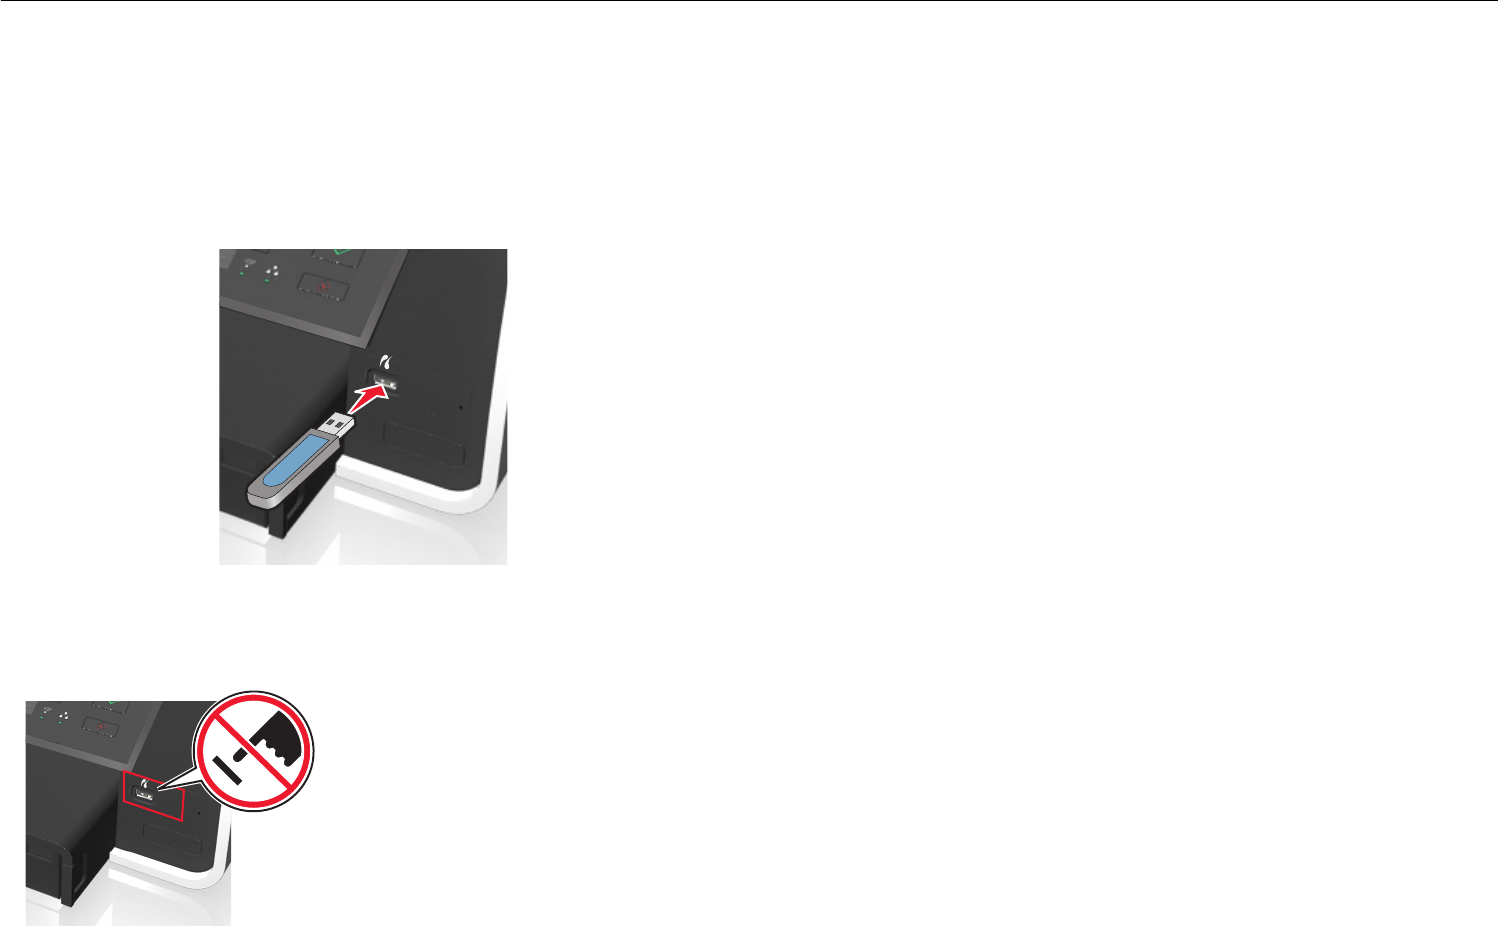
Using a flash drive with the printer
Make sure the flash drive contains files that are supported by the printer. For more information, see
“Supported file types” on page 14.
1Insert a flash drive into the USB port.
Notes:
•The flash drive uses the same port that is used for a PictBridge camera cable.
•An adapter may be necessary if your flash drive does not fit directly into the port.
Warning—Potential Damage: Do not touch any cables,
any network adapter, any connector, the memory
device, or the printer in the areas shown while actively
printing, reading, or writing from the memory device. A
loss of data can occur.
2Follow the instructions or select from available options on the printer display.
Note: If the printer does not recognize the memory device, then remove and reinsert it.
About your printer 15

Ordering and replacing supplies
Ordering ink cartridges
Lexmark Pro710 Series except Pro719
Item Return Program
Cartridge1
Regular cartridge2
Black cartridge 150 Not available
High‑yield black cartridge 150XL, 155XL 150XLA
Yellow color cartridge 150 Not available
High‑yield yellow color cartridge 150XL 150XLA
Cyan color cartridge 150 Not Available
High‑yield cyan color cartridge 150XL 150XLA
Magenta color cartridge 150 Not available
High‑yield magenta color cartridge 150XL 150XLA
1 Licensed for a single use only. After use, return this cartridge to Lexmark for remanufacturing, refilling, or
recycling.
2 Available only on the Lexmark Web site at www.lexmark.com.
Lexmark Pro719 model
Item Return Program
cartridge1
Regular cartridge2
Black cartridge 160 Not available
High‑yield black cartridge 160 XL 160 XLA
Yellow color cartridge 160 Not available
High‑yield yellow color cartridge 160 XL 160 XLA
Cyan color cartridge 160 Not available
High‑yield cyan color cartridge 160 XL 160 XLA
Magenta color cartridge 160 Not available
High‑yield magenta color cartridge 160 XL 160 XLA
1 Licensed for a single use only. After use, return this cartridge to Lexmark for remanufacturing, refilling, or
recycling.
2 Available only on the Lexmark Web site at www.lexmark.com.
Notes:
•To get more ink, order high‑yield ink cartridges.
•Depending on your country or region, you may get the ink cartridges individually or in packs.
•You can order a mix of standard ink cartridges and high‑yield ink cartridges, depending on your
needs.
•Check the yield rate on the ink cartridge box, or visit www.lexmark.com/yields.
•For best results, use only Lexmark ink cartridges.
•The cartridges can be used for printing documents and photos.
•When storing new ink cartridges, make sure they are unopened and placed on their flat side.
•Remove ink cartridges from their packaging only upon installation.
Replacing ink cartridges
Make sure you have a new ink cartridge or cartridges before you begin. You must install new cartridges
immediately after removing the old ones, or the ink remaining in the printhead nozzles may dry out.
Removing ink cartridges
1Turn on your printer.
Ordering and replacing supplies 16
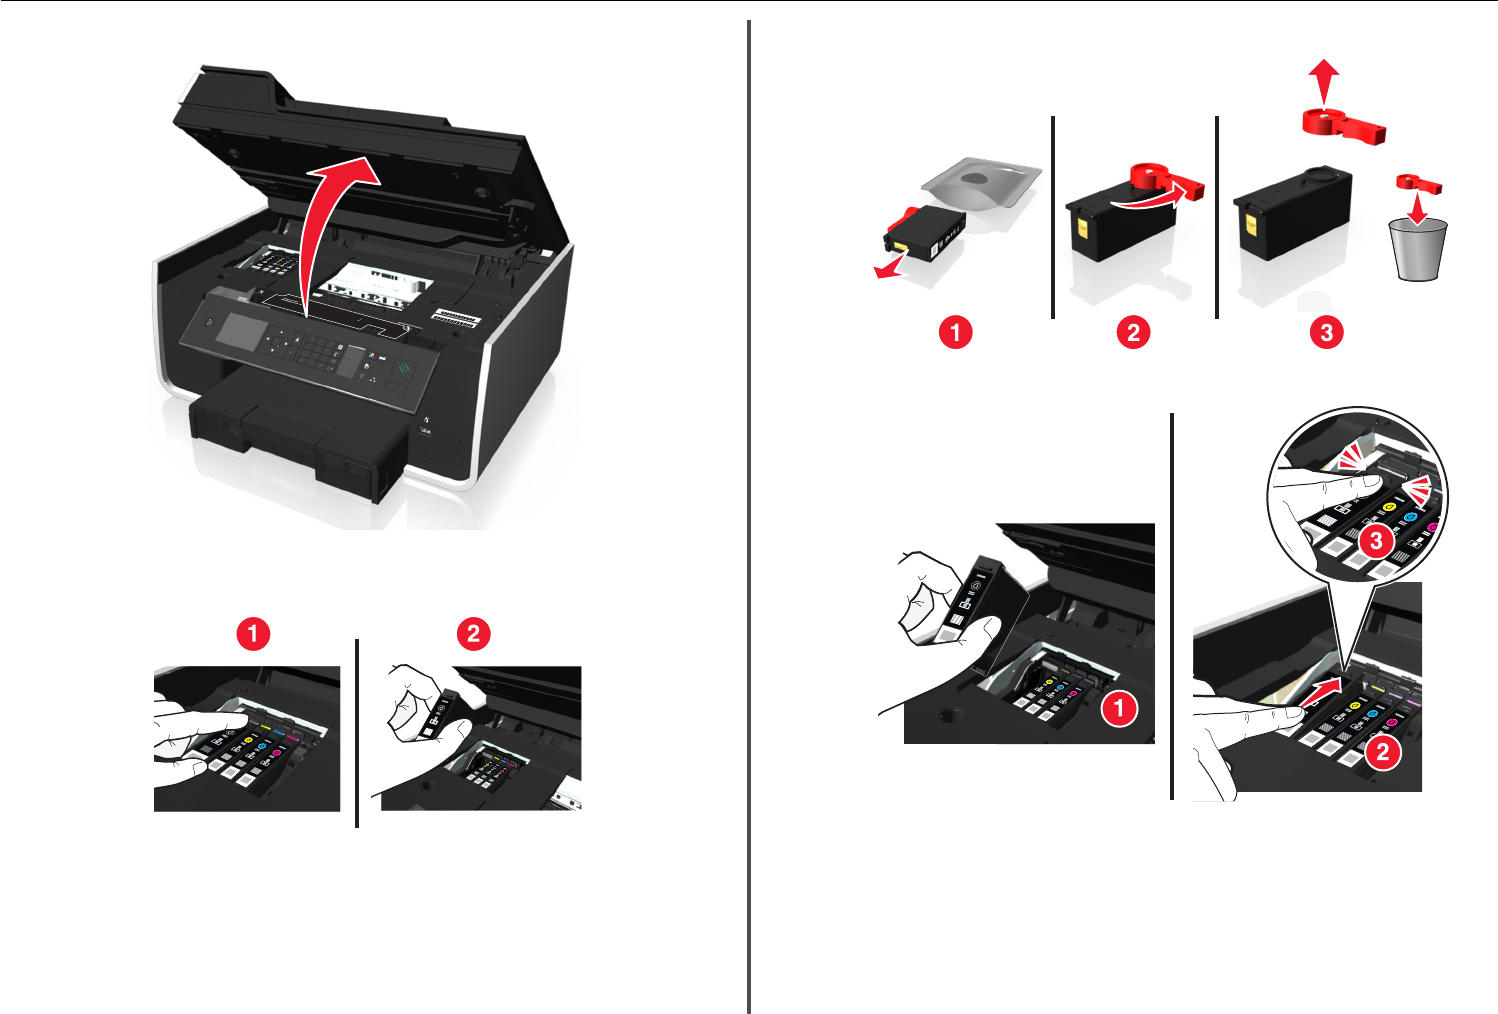
2Open the printer.
INK COM
PATIBILIT
YC
H
ART
150, 150A, 150XL, 150XLA, 155, 155AMagenta
150, 150A, 150XL, 150XLA, 155, 155AYellow
150, 150A, 150XL, 150XLA, 155, 155A, 155XL, 155XLABlack
150, 150A, 150XL, 150XLA, 155, 155ACyan
MT/MN: 4449-70E
www.lexmark.
com
V725w
MAC:XX XX XX XX XX XX
xxxxxxxxxxxxxx
Note: The printhead moves to the cartridge installation position.
3Press the release tab, and then remove the used ink cartridge or cartridges.
Installing ink cartridges
1Remove the ink cartridge from the pack, and then remove the protective cap from the ink cartridge.
If your ink cartridge comes with a twist cap, then remove the cap.
2Insert each ink cartridge. Slide your finger along the ink cartridge until the cartridge clicks into place.
Notes:
•Insert the color cartridges first, and then the black cartridge.
•Insert the new ink cartridges immediately after removing the protective cap to avoid exposing
the ink to air.
3Close the printer.
Ordering and replacing supplies 17

Maintaining ink cartridges
In addition to the following tasks that you can perform, your printer performs an automatic maintenance
cycle every week if it is plugged into an electrical outlet. It will briefly come out of Sleep mode or will
temporarily turn on if it is turned off.
Aligning the printhead
If the characters or lines on your printed image appear jagged or wavy, then you may need to align the
printhead.
1Load plain paper.
2From the printer control panel, navigate to:
> Setup > >Maintenance > > Align Printer >
An alignment page prints.
Note: Do not remove the alignment page until printing is finished.
If you aligned the cartridges to improve print quality, then print your document again. If print quality has
not improved, then clean the printhead nozzles.
Cleaning the printhead nozzles
If you have not been using the printer for a long period, then you may need to clean the printhead nozzles
to improve the quality of your prints. Keep your printer plugged to a properly grounded, working electrical
outlet to allow it to perform automatic maintenance cycles.
Notes:
•Cleaning the printhead nozzles uses ink, so clean them only when necessary.
•Deep cleaning uses more ink, so try the Clean Printhead option first to save ink.
•If the ink levels are too low, you must replace the ink cartridges before you can clean the printhead
nozzles.
1Load paper.
2From the printer control panel, navigate to:
> Setup > > Maintenance >
3Press the up or down arrow button to scroll to Clean Printhead or Deep Clean
Printhead, and then press .
A cleaning page prints.
Ordering and replacing supplies 18

Using the printer software
Minimum system requirements
The printer software requires up to 500MB of free disk space.
Supported operating systems
•Microsoft Windows 7 (SP1)
•Microsoft Windows Server 2008 (R2 SP1)
•Microsoft Windows Server 2008 (SP1)
•Microsoft Windows Server 2003 (SP2)
•Microsoft Windows Vista (SP1)
•Microsoft Windows XP (SP3)
•Macintosh Intel OS X version 10.7.0 or later
•Macintosh Intel OS X version 10.6.0 or later
•Macintosh Intel OS X version 10.5.0 or later
•Macintosh Intel OS X version 10.4.4 or later
•Macintosh PowerPC OS X version 10.5.0 or later
•Macintosh PowerPC OS X version 10.4.0 or later
•Ubuntu Linux 11.04, 10.10, 10.04, and 9.04 LTS*
•Red Hat Enterprise Linux WS 6, WS 5, and WS 4*
•Red Flag Linux Desktop 6.0*
•SUSE Linux Enterprise Server 11 and 10*
•SUSE Linux Enterprise Desktop 11 and 10*
•Linux openSUSE 11.4, 11.3, and 11.2*
•Linpus Linux Desktop 9.6*
•Fedora 14*
•Debian GNU/Linux 6.0 and 5.0*
•Mint 10 and 9*
•PCLinux OS 2010*
* The printer driver for this operating system is available only at http://support.lexmark.com.
Installing the printer software
Note: If you installed the printer software on this computer before but need to reinstall the software,
then uninstall the current software first.
For Windows users
1Close all open software programs.
2Insert the installation software CD.
If the installation dialog screen does not appear after a minute, then launch the CD manually:
aClick , or click Start and then click Run.
bIn the Start Search or Run box, type D:\setup.exe, where D is the letter of your CD or DVD
drive.
cPress Enter, or click OK.
3Click Install, and then follow the instructions on the computer screen.
For Macintosh users
Note: To take advantage of the full features of your printer, select the custom install option, and then
select all packages listed.
1Close all open applications.
2Insert the installation software CD.
If the installation dialog does not appear after a minute, then click the CD icon on the desktop.
3Double-click the software installer package, and then follow the instructions on the computer screen.
Using the Internet
1Go to the Lexmark Web site at http://support.lexmark.com.
2Navigate to:
SUPPORT & DOWNLOADS > select your printer > select your operating system
3Download the driver, and then install the printer software.
Using the Windows printer software
Software installed during printer installation
When you set up the printer using the installation software CD, all the necessary software was installed.
You may have chosen to install some additional programs. The following table provides an overview of
various software programs and what they can help you do.
If you did not install these additional programs during initial installation, then reinsert the installation
software CD, run the installation software, and then click Advanced Options > Install Additional Software.
Using the printer software 19
Printer software
Use the To
LexmarkTM Printer Home
(referred to as Printer Home)
•Launch applications or programs.
•Scan or e‑mail a photo or document.
•Edit scanned documents.
•Scan documents to PDF.
•Adjust settings for the printer.
•Order supplies.
•Maintain ink cartridges.
•Register the printer.
•Contact technical support.
•Access the User's Guide.
Lexmark Phone Book
(referred to as Phone Book)
Manage your fax contacts.
Abbyy Sprint OCR Scan a document and produce text that you can edit with a
word‑processing program.
Lexmark Wireless Setup Utility
(referred to as Wireless Setup
Utility)
•Set up the wireless printer on a wireless network.
•Change the wireless settings of the printer.
Note: This program is installed automatically with the printer software
if the printer has wireless capability.
Lexmark Tools for Office
(referred to as Tools for Office)
Access your favorite settings in Microsoft Office 2007.
Printer Setup Utility Configure the fax and e‑mail settings of your printer.
Status Messenger Learn more about the printing problems encountered.
Status Monitor Center •Check the supplies status of your printer.
•Order supplies online.
Product Update Receive automatic notifications of updates to your printer software
when new updates are available.
Use the To
Printing Preferences When you click File > Print > Properties with a document open, a Printing
Preferences dialog appears. The dialog lets you select options for the
print job, such as the following:
•Select the number of copies to print.
•Print two‑sided copies.
•Select the paper type.
•Add a watermark.
•Enhance images.
•Save settings.
Note: Printing Preferences is installed automatically with the printer
software.
Note: Your printer may not come with some of these programs or some of the functions of these
programs, depending on the features of the printer that you purchased.
Using the Macintosh printer software
Launching the Print dialog
Use the Print dialog to adjust the print settings and schedule print jobs.
With a document or photo open, choose File > Print.
Launching an application
1From the Finder, navigate to:
Applications > select your printer folder
2Double‑click the application that you want to use.
Use the To
Printer Settings •Customize settings for fax jobs.
•Create and edit the Contacts list.
•Configure e‑mail connectivity settings.
•Configure the language, country, date, and time.
Shortcuts Speed up usual tasks with your printer.
Wireless Setup
Assistant
Set up the printer on a wireless network.
Note: This application is automatically installed with the printer software if the
printer has wireless capability.
Uninstaller Remove the printer software from your computer.
Using the printer software 20

Notes:
•Your printer may not come with these applications, depending on the features of the printer that
you purchased or the installation type (standard or custom) chosen when you installed the printer.
•To take advantage of the full features of your printer, select the custom install option during
installation, and then select all packages listed.
Accessing Web links
Web links are links to predefined Web pages that are saved in the printer folder.
1From the Finder, navigate to:
Applications > select your printer folder > Web Links
2Double‑click the Web link that you want to visit.
Use To
Customer Support Contact customer support.
Lexmark Software Updates Download and install the latest printer software.
Lexmark Online Visit the Lexmark Web site.
Order Supplies Online Order ink or supplies.
Printer Registration Register your printer.
Visit Lexmark SmartSolutions •Visit the SmartSolutions Web site.
•Choose your custom solutions.
Note: Your printer may not come with these Web links, depending on the features of the printer that
you purchased.
Using the printer software 21

Printing
Printing a document
For Windows users
1With a document open, click File > Print.
2Click Properties, Preferences, Options, or Setup.
3Select the print quality, the number of copies to print, the type of paper to use, and how the pages
should print.
4Click OK to close any printer software dialogs.
5Click OK or Print.
For Macintosh users
1With a document open, choose File > Page Setup.
2From the Page Setup dialog, set the printer, paper size, and orientation.
3Click OK.
4From the menu bar, choose File > Print.
5From the Printer pop‑up menu, choose your printer.
6From the print options menu, choose the print quality, the number of copies to print, the type of paper
to use, and how the pages should print.
7Click Print.
Printing on both sides of the paper (duplexing)
automatically
Notes:
•The automatic duplex unit supports A4‑ and letter‑size paper. It also supports plain, premium
plain, ColorLok certified plain, heavy plain, and letterhead paper types.
•Do not remove the page until printing is finished.
Warning—Potential Damage: Do not touch the duplex latch or latches while actively printing.
For Windows users
1With a document open, click File > Print.
2Click Properties, Preferences, Options, or Setup.
3Navigate to:
Layout tab > Print on Both Sides (Duplex) area > Print on both sides
•Click Long edge for print jobs with pages that are bound along the long edge of the page.
•Click Short edge for print jobs with pages that are bound along the short edge of the page.
4Click the Paper/Finishing tab, and then select a supported paper type.
5Click OK to close any printer software dialogs.
6Click OK or Print.
To return to single-sided printing, repeat steps 1 and 2, and then navigate to:
Layout tab > Print on Both Sides (Duplex) area > Print on one side only
For Macintosh users
1With a document open, choose File > Page Setup.
2From the Page Setup dialog, set the printer, paper size, and orientation.
3Click OK.
4From the menu bar, choose File > Print.
5From the Printer pop‑up menu, choose your printer.
6From the print options pop‑up menu, choose Quality & Media.
7From the Paper Type pop‑up menu, choose a supported paper type.
8From the print options pop‑up menu, choose Layout.
9From the Two‑Sided pop‑up menu, choose Long‑Edge binding or Short‑Edge binding.
•For Long‑Edge binding, pages are bound along the long edge of the page (left edge for portrait,
top edge for landscape).
Portrait Landscape
1
2
1
2
Printing 22
•For Short‑Edge binding, pages are bound along the short edge of the page (top edge for portrait,
left edge for landscape).
Portrait Landscape
10 Click Print.
Printing photos from a flash drive
1Load photo paper.
2Insert a flash drive or digital camera set to mass storage mode.
If image files and document files are stored in the memory device, then press the left or right arrow
button to select Photos, and then press .
Note: Only files with supported file types will be shown.
3Use the up or down arrow button to select a photo printing option, and then press .
•Select and Print allows you to choose a layout, the number of photos per page, paper
settings, photo size, photo quality, and to sharpen the quality of graphics.
•Print Photos allows you to print all photos, selected photos by photo range, and print photos
using predefined photo size templates.
4To adjust the print settings, press the up or down arrow button to scroll to the option you want to set,
and then press the left or right arrow button to scroll to the setting you want. If necessary, press
to make a selection.
5Press .
Note: For best results, allow the prints to dry at least 24 hours before stacking, displaying, or
storing.
Printing documents from a flash drive
Make sure the flash drive contains document files that are supported by the printer. For more information,
see “Supported file types” on page 14.
1Insert a flash drive.
When the printer detects the memory device, Storage Device Detected appears on the
display.
2If document files are stored on the memory device, then the printer automatically switches to File
Print mode.
If document files and image files are stored on the memory device, then press the left or right arrow
button to scroll to Documents, and then press .
3Press the up or down arrow button to scroll to the document, and then press t o s e l e c t th e d o c u m e n t
for printing.
4From the Print Options menu screen, use the arrow buttons to select your printing options, and then
press , if necessary.
Note: You may select the number of copies, color mode, print quality, paper source, and paper-
saving options. You can also enhance sharpness, and use separator sheets.
5Press .
Canceling print jobs
To cancel a print job from the printer control panel, press , and then press . Printing stops and the
printer returns to the home screen.
To cancel a print job from the computer, do the following:
For Windows users
1Click , or click Start and then click Run.
2In the Start Search or Run box, type control printers.
3Press Enter, or click OK.
The printers folder opens.
4Right‑click the printer, and then select Open or See what's printing.
5Cancel the print job:
•If you want to cancel a particular print job, then right‑click the document name, and then select
Cancel.
•If you want to cancel all print jobs in the queue, then click Printer > Cancel All Documents.
For Macintosh users
1Click the printer icon on the Dock.
The print queue dialog appears.
2Choose the job you want to cancel, and then click Delete.
Printing 23

Printing from a mobile device
What is LexPrint?
LexPrint is a free application that lets you print easily from your iPad, iPhone, or iPod touch using any
Lexmark printer connected to the same wireless network. It lets you print Web pages, photos from the
photo album, or photos you recently captured using the camera of your mobile device, depending on its
features. You can also customize print settings from your mobile device.
Depending on your Lexmark printer model, you may need to download the LexPrint Listener application
from our Web site at www.lexmark.com/lexprint.
Supported printers
LexPrint enables your mobile device to communicate with Lexmark printers found on the same network.
•For select printer models that support Direct Image and Zeroconf or Bonjour, you can print directly
from your mobile device to the printer without using LexPrint Listener. To check if your printer model
supports these features, visit www.lexmark.com/lexprint.
•For other Lexmark printers, your mobile device can send print jobs to your printer as long as the printer
software and LexPrint Listener are installed on the computer where the printer is connected.
Note: The application referred to as Rendezvous in Mac OS X version 10.2 is now called Bonjour by
Apple Inc.
Printing 24

Copying
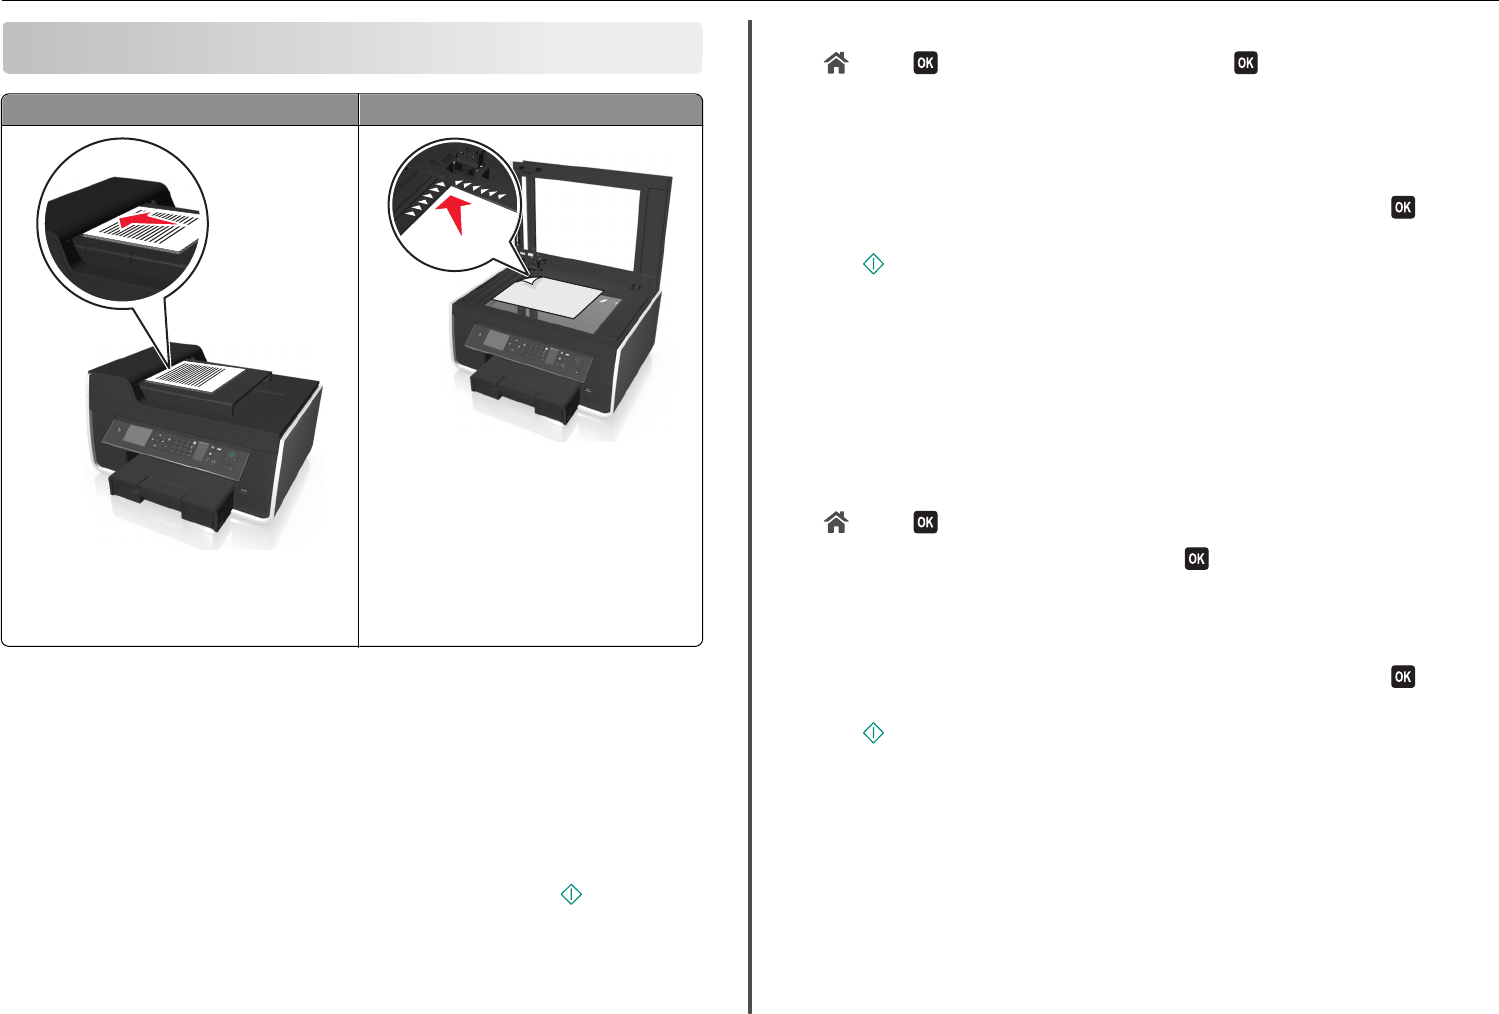
ADF Scanner glass
Use the ADF for multiple‑page documents.
Note: The ADF is available only on select models. If
you purchased a printer without an ADF, then load
original documents or photos on the scanner glass.
Use the scanner glass for single pages, small items
(such as postcards or photos), transparencies, photo
paper, or thin media (such as magazine clippings).
Tips for copying
•Make sure you load the original document faceup into the ADF or facedown at the placement corner
of the scanner glass.
•When using the ADF, adjust the paper guide on the ADF to the width of the original document.
•When using the scanner glass, close the scanner cover, if possible, to avoid dark edges on the scanned
image.
•Do not load postcards, photos, small items, transparencies, photo paper, or thin media (such as
magazine clippings) into the ADF. Place these items on the scanner glass.
•When the document to be copied is in place with the settings you want, press to start copying.
Making copies
1Load paper.
2Load an original document faceup into the ADF or facedown on the scanner glass.
3From the printer control panel, navigate to:
> Copy > > Copies
4Press the left or right arrow button to select the number of copies.
5From the Copy menu screen, press the up or down arrow button to scroll to the option you want to
set, and then press the left or right arrow button to scroll to the setting you want. If necessary, press
to make a selection.
6Select the copy mode:
•Press to switch to color mode.
•Press to switch to black‑and‑white mode.
When you select color or black‑only printing, the light that corresponds to your choice comes on.
7Press .
Note: The selected copy settings are reset to the factory default after two minutes of printer inactivity.
Making a two‑sided (duplex) copy automatically
The automatic duplex unit supports A4‑ and letter‑size paper. If you need to make two‑sided copies using
other paper sizes, then see the instructions for making a two‑sided copy manually.
Note: You cannot make two‑sided copies on envelopes, card stock, or photo paper.
1Load paper.
2Load the original document faceup into the ADF or facedown on the scanner glass.
3From the printer control panel, navigate to:
> Copy > > 2‑Sided Copies
4Press the left or right arrow button to select a two‑sided copying option:
•If you are copying a one‑sided document, then press the arrow buttons to scroll to 1‑sided to
2‑sided.
•If you are copying a two-sided document and using the scanner glass, then press the arrow buttons
to scroll to 2‑sided to 2‑sided.
•If you want to specify the page orientation and layout of the original document and the copy, then
press the arrow buttons to scroll to Advanced. Press every time you make a selection, and
then press until you reach the Copy menu screen.
Notes:
•For long-edged binding, pages are bound along the long edge of the page (left edge for portrait
orientation and top edge for landscape orientation).
Copying 25

•For short-edged binding, pages are bound along the short edge of the page (top edge for
portrait orientation and left edge for landscape orientation).
5Press , and then follow the instructions on the display.
Canceling copy jobs
To cancel a copy job, press , and then press .
Scanning stops and the printer returns to the previous menu.
Copying 26
Scanning
ADF Scanner glass
Use the ADF for multiple‑page documents.
Note: The ADF is available only on select models. If
you purchased a printer without an ADF, then load
original documents or photos on the scanner glass.
Use the scanner glass for single pages, small items
(such as postcards or photos), transparencies, photo
paper, or thin media (such as magazine clippings).
Tips for scanning
•Use the scanner glass when scanning two‑sided pages if your printer does not support duplex scanning
or the ADF does not support the original document size.
•When using the ADF, adjust the paper guide on the ADF to the width of the original document.
•When using the scanner glass, close the scanner cover, if possible, to avoid dark edges on the scanned
image.
•Do not load postcards, photos, small items, transparencies, photo paper, or thin media (such as
magazine clippings) into the ADF. Place these items on the scanner glass.
•When the document to be scanned is in place with the settings you want, press to start scanning.
Scanning to a local computer
1Load the original document faceup into the ADF or facedown on the scanner glass.
2From the printer control panel, navigate to:
> Scan > > Computer > USB‑Connected Computer >
The USB‑connected computer will receive the scan by default.
Note: Make sure the scan software is installed on the destination computer.
3Press the up or down arrow button to scroll to the scan option you want to set, and then press the
left or right arrow button to scroll to the setting you want.
Set the color, quality, original image size, and other scan options. If necessary, press each time
you make a selection.
4Press .
Scanning to a flash drive or memory card
Notes:
•Some features are available only in select printer models.
•Make sure your flash drive or memory card is not write‑protected.
1Load the original document faceup into the ADF or facedown on the scanner glass.
2From the printer control panel navigate to:
> Scan > > Memory Device
3Insert the flash drive or memory card, and then press .
Note: The printer reads only one memory device at a time.
4Press the up or down arrow button to scroll to the scan option you want to set, and then press the
left or right arrow button to scroll to the setting you want.
Set the color, quality, original image size, and other scan options. If necessary, press each time
you make a selection.
5Press .
Follow the instructions on the printer display.
Scanning directly to e‑mail using the printer software
Make sure you have set up your e‑mail settings before proceeding. For more information, see the section
on e‑mailing in the User’s Guide.
For Windows users
1Load an original document faceup into the ADF or facedown on the scanner glass.
Scanning 27

2Click or Start.
3Click All Programs or Programs, and then select the printer program folder from the list.
4Navigate to:
Printer Home > select your printer > Scan
5Select Email photo, Email document, or Email PDF.
Note: You can select Email document only if an OCR application is stored on your computer.
Scanning starts and the scan progress dialog appears. When the scan is finished, a new e‑mail message
is created with the scanned document automatically attached.
6Compose your e‑mail message.
Note: If your e-mail program does not open automatically, then you can scan the document to the
computer and then send it through e-mail as an attachment.
For Macintosh users
1Load an original document faceup into the ADF or facedown on the scanner glass.
2From the Applications folder in the Finder, launch the application you want to use.
Note: Use any application that supports both your printer and an e‑mailing option, such as Image
Capture.
3From the list of devices, select your printer.
Note: For information on finding the list of devices, check the documentation that came with the
application, or search for Scanning an image in the Search field of the Help menu.
4Adjust the scan settings as needed.
If applicable, click
?
on the preview dialog for more information.
5Set the e‑mail application as the scan destination, and then start the scan job.
6Compose your e‑mail message.
Scanning to a PDF
For Windows users
1Load an original document faceup into the ADF or facedown on the scanner glass.
2Click or Start.
3Click All Programs or Programs, and then select the printer program folder from the list.
4Navigate to:
Printer Home > select your printer > Scan > PDF
Scanning starts and the scan progress dialog appears.
5Save the document as a PDF.
For Macintosh users
1Load an original document faceup into the ADF or facedown on the scanner glass.
2From the Applications folder in the Finder, launch the application you want to use.
Note: Use any application that supports your printer.
3From the list of devices, select your printer.
Note: For information on finding the list of devices, check the documentation that came with the
application or search for Scanning an image in the Search field of the Help menu.
4Adjust the scan settings as needed.
If applicable, click
?
on the preview dialog for more information.
5Set the application that supports the PDF format as the scan destination, and then start the scan job.
6Save the document as a PDF.
Canceling scan jobs
Do one or more of the following:
•From the printer control panel, press , and then press .
Scanning stops and the printer returns to the previous menu.
•If you are sending the scan job using the printer software, then cancel the scan job from the software
dialog.
Scanning 28

E-mailing
Sending e-mail
Tips for e‑mailing
•Make sure to enter your e‑mail account information and set up the SMTP server before sending an
e‑mail.
•Make sure the printer is connected to an Ethernet or wireless network before sending an e‑mail.
If necessary, make sure the network is connected to the Internet for the printer to communicate with
the SMTP server. If the printer cannot connect to the Internet, then contact your system support
person.
The printer supports only one active network connection (Ethernet or wireless) at a time.
•Add contacts to your address book. When sending an e‑mail, you can just select contacts from your
address book instead of typing their e‑mail addresses repeatedly.
•Use the scanner glass when scanning two‑sided pages if your printer does not support duplex scanning
or the ADF does not support the original document size.
•When using the ADF, adjust the paper guide on the ADF to the width of the original document.
•To easily retrieve a document after copying or scanning through the ADF, lift the ADF input tray.
•When using the scanner glass, close the scanner cover, if possible, to avoid dark edges on the scanned
image.
•Do not load postcards, photos, small items, transparencies, photo paper, or thin media (such as
magazine clippings) into the ADF. Place these items on the scanner glass.
•When the document to be e-mailed is in place with the settings you want, press to start scanning.
Setting up the e-mail function
For Windows users
1Click or Start.
2Click All Programs or Programs, and then select the printer program folder from the list.
3Navigate to:
Printer Home > select your printer > Settings > Set up the printer to e‑mail
The E‑mail Setup Wizard opens.
4Follow the instructions on the computer screen.
For Macintosh users
1From the Finder, navigate to:
Applications > select your printer folder > Printer Settings > Email
2Follow the instructions on the computer screen, and then click Save Settings.
Canceling an e‑mail
Do one or more of the following:
•From the printer control panel, press , and then press .
•If you are sending the e‑mail using the printer software, then cancel the e-mail from the software
dialog.
E-mailing 29

Setting up the printer to fax
CAUTION—POTENTIAL INJURY: To reduce risk of fire, use only the telecommunications (RJ‑11)
cord provided with this product or a UL Listed 26 AWG or larger replacement when connecting
this product to the public switched telephone network.
CAUTION—SHOCK HAZARD: Do not use the fax feature during a lightning storm. Do not set up
this product or make any electrical or cabling connections, such as the power supply cord or
telephone, during a lightning storm.
Step 1: Connect the printer to the telephone line
Check the scenarios below and follow the setup that is applicable to your telephone service.
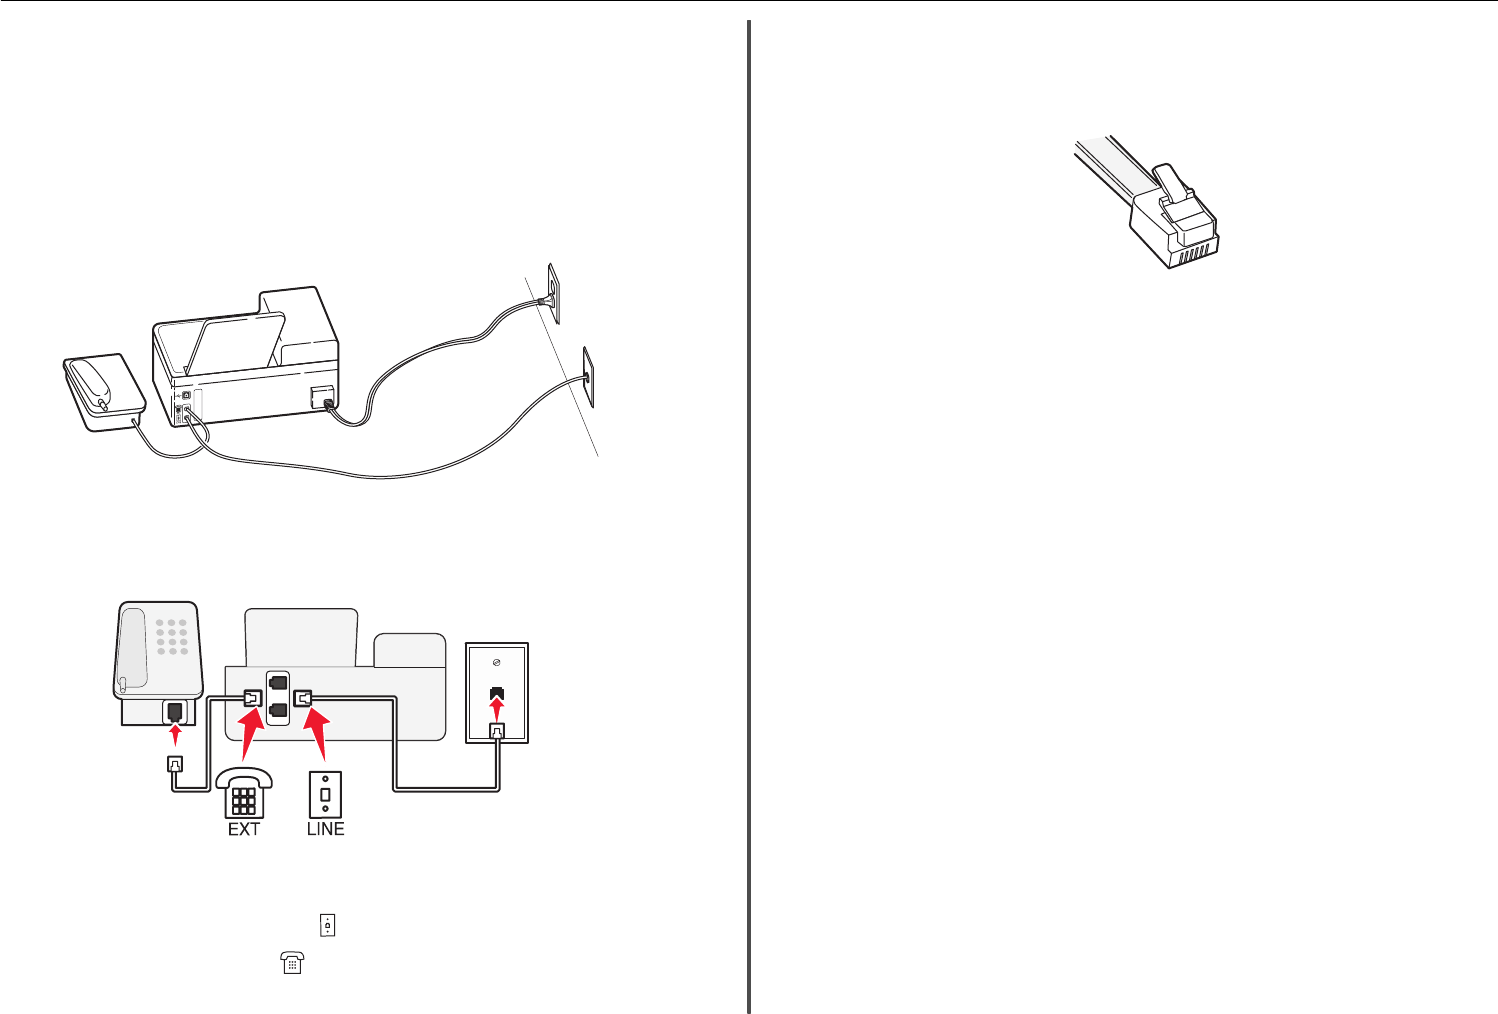
Scenario 1: Standard telephone line
Setup 1: Printer is connected to a dedicated fax line
EXT
LINE
To connect:
Connect the cable from the wall jack to the port of the printer.
Tips for this setup:
•You can set the printer to receive faxes automatically (Auto Answer On) or manually (Auto Answer
Off).
•If you want to receive faxes automatically (Auto Answer On), then set the printer to pick up on any
number of rings that you want.
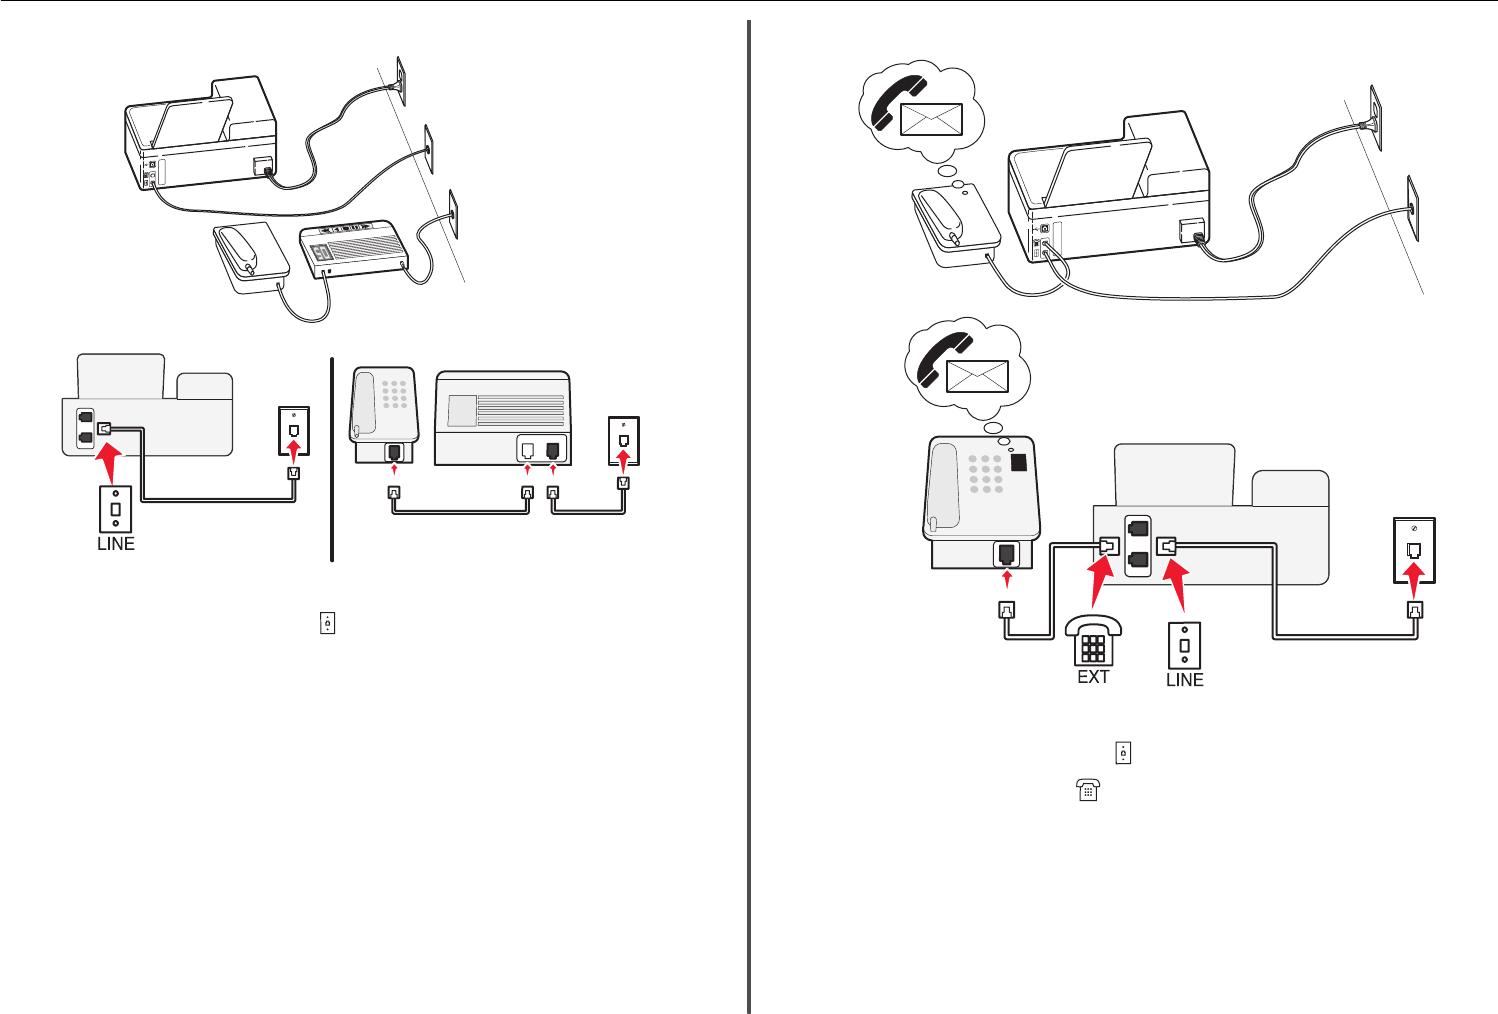
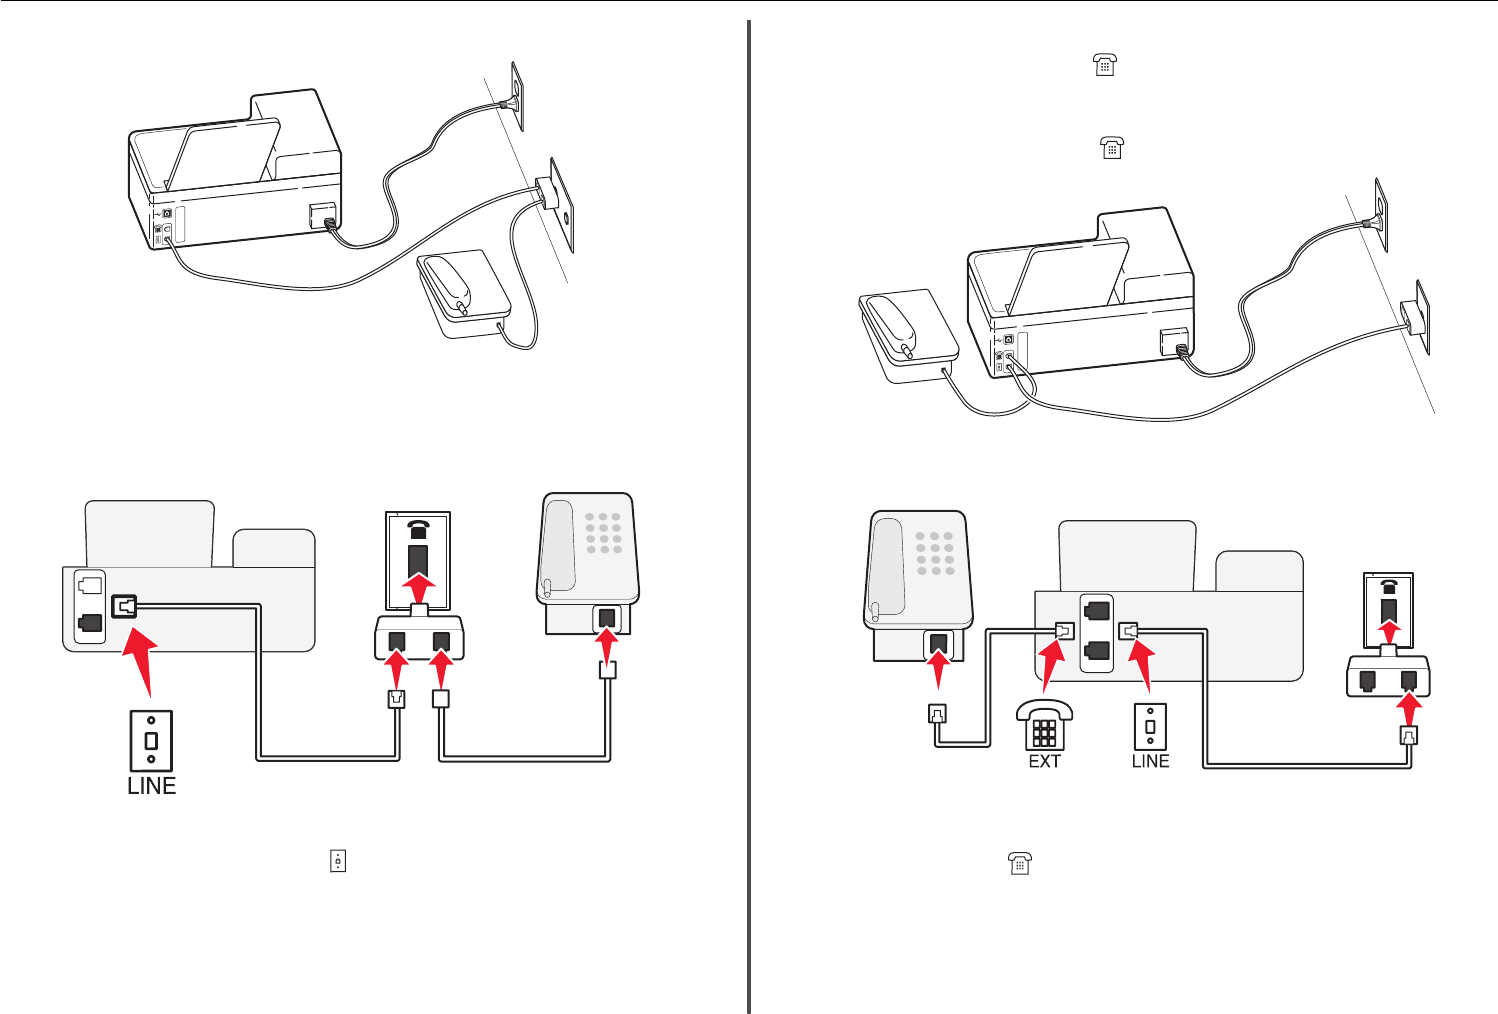
Setup 2: Printer is sharing the line with an answering machine
Connected to the same telephone wall jack
EXT
LINE
PHONE
LINE
To connect:
1Connect the cable from the wall jack to the port of the printer.
2Remove the protective plug from the port of the printer, and then connect the answering machine
to the port.
Setting up the printer to fax 30
Connected to different wall jacks
EXT
LINE
PHONE
LINE
To connect:
Connect the cable from the wall jack to the port of the printer.
Tips for this setup:
•If you have only one telephone number on your line, then you need to set the printer to receive faxes
automatically (Auto Answer On).
•Set the printer to pick up calls two rings after the answering machine. For example, if the answering
machine picks up calls after four rings, then set the printer to pick up after six rings. This way, the
answering machine picks up calls first and your voice calls are received. If the call is a fax, then the
printer detects the fax signal on the line and takes over the call.
•If you subscribe to a distinctive ring service provided by your telephone company, then make sure that
you set the correct ring pattern for the printer. Otherwise, the printer will not receive faxes even if
you have set it to receive faxes automatically.
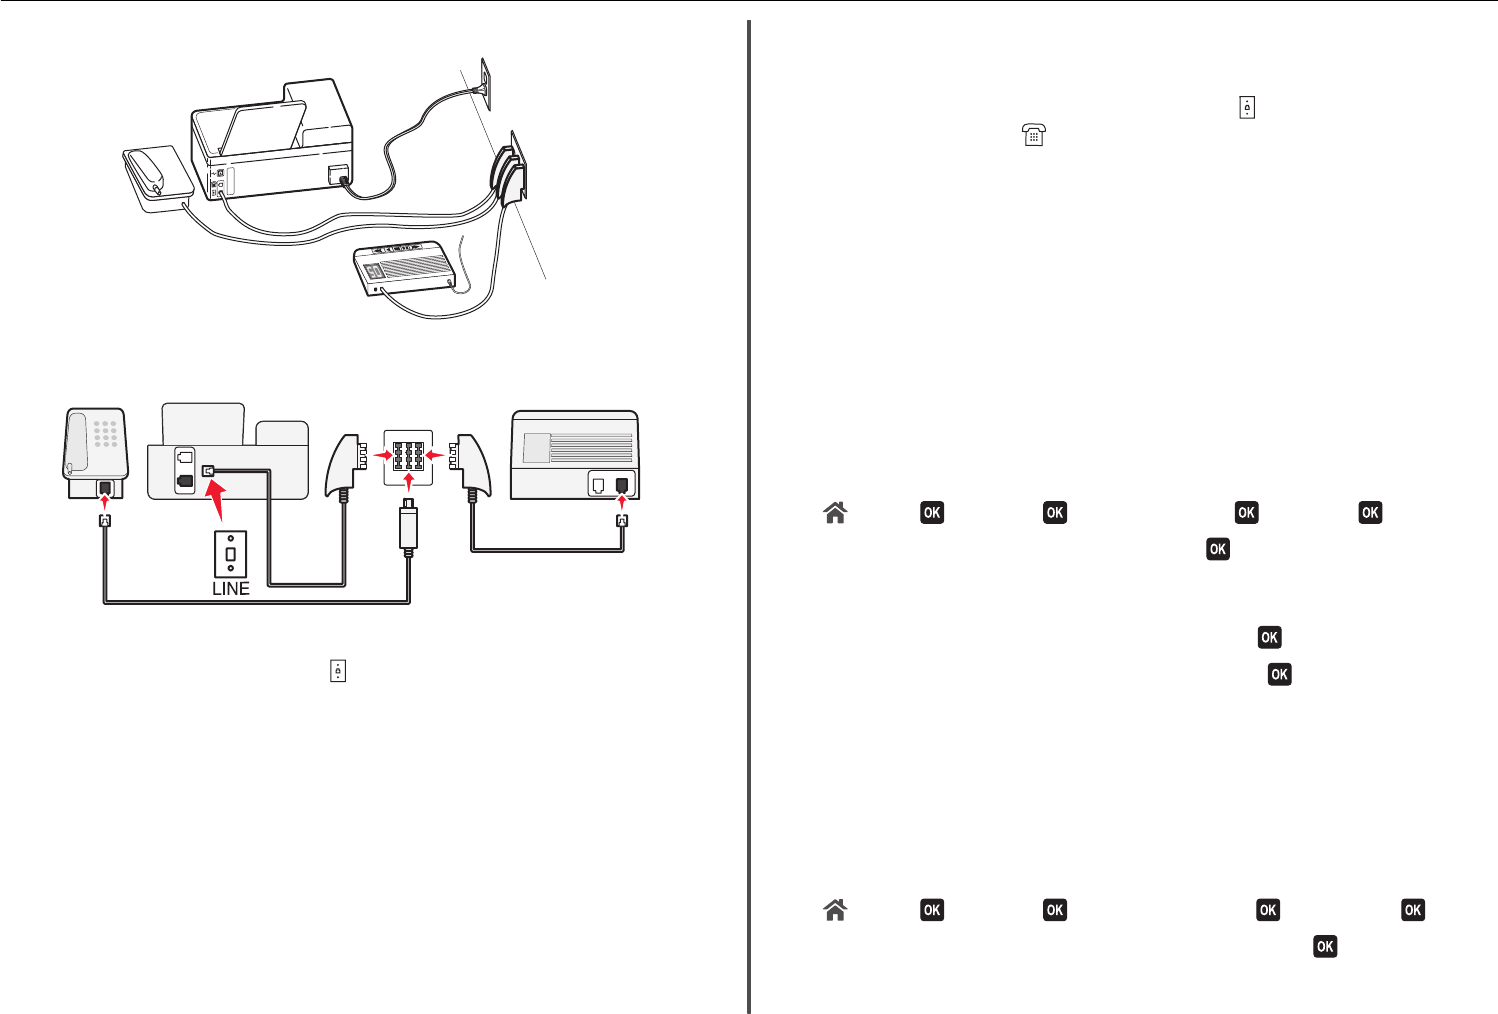
Setup 3: Printer is sharing the line with a telephone subscribed to voice mail service
EXT
LINE
02
To connect:
1Connect the cable from the wall jack to the port of the printer.
2Remove the protective plug from the port of the printer, and then connect the telephone to the
port.
Tips for this setup:
•This setup works best if you subscribe to a distinctive ring service. If you have distinctive ring service,
then make sure that you set the correct ring pattern for the printer. Otherwise, the printer will not
receive faxes even if you have set it to receive faxes automatically.
•If you have only one telephone number on your line, then you need to set the printer to receive faxes
manually (Auto Answer Off).
Setting up the printer to fax 31
When you answer the telephone and you hear fax tones, press *9* or the manual answer code on the
telephone to receive the fax.
•You can also set the printer to receive faxes automatically (Auto Answer On), but you need to turn off
the voice mail service when you are expecting a fax. This setting works best if you are using voice mail
more often than fax.
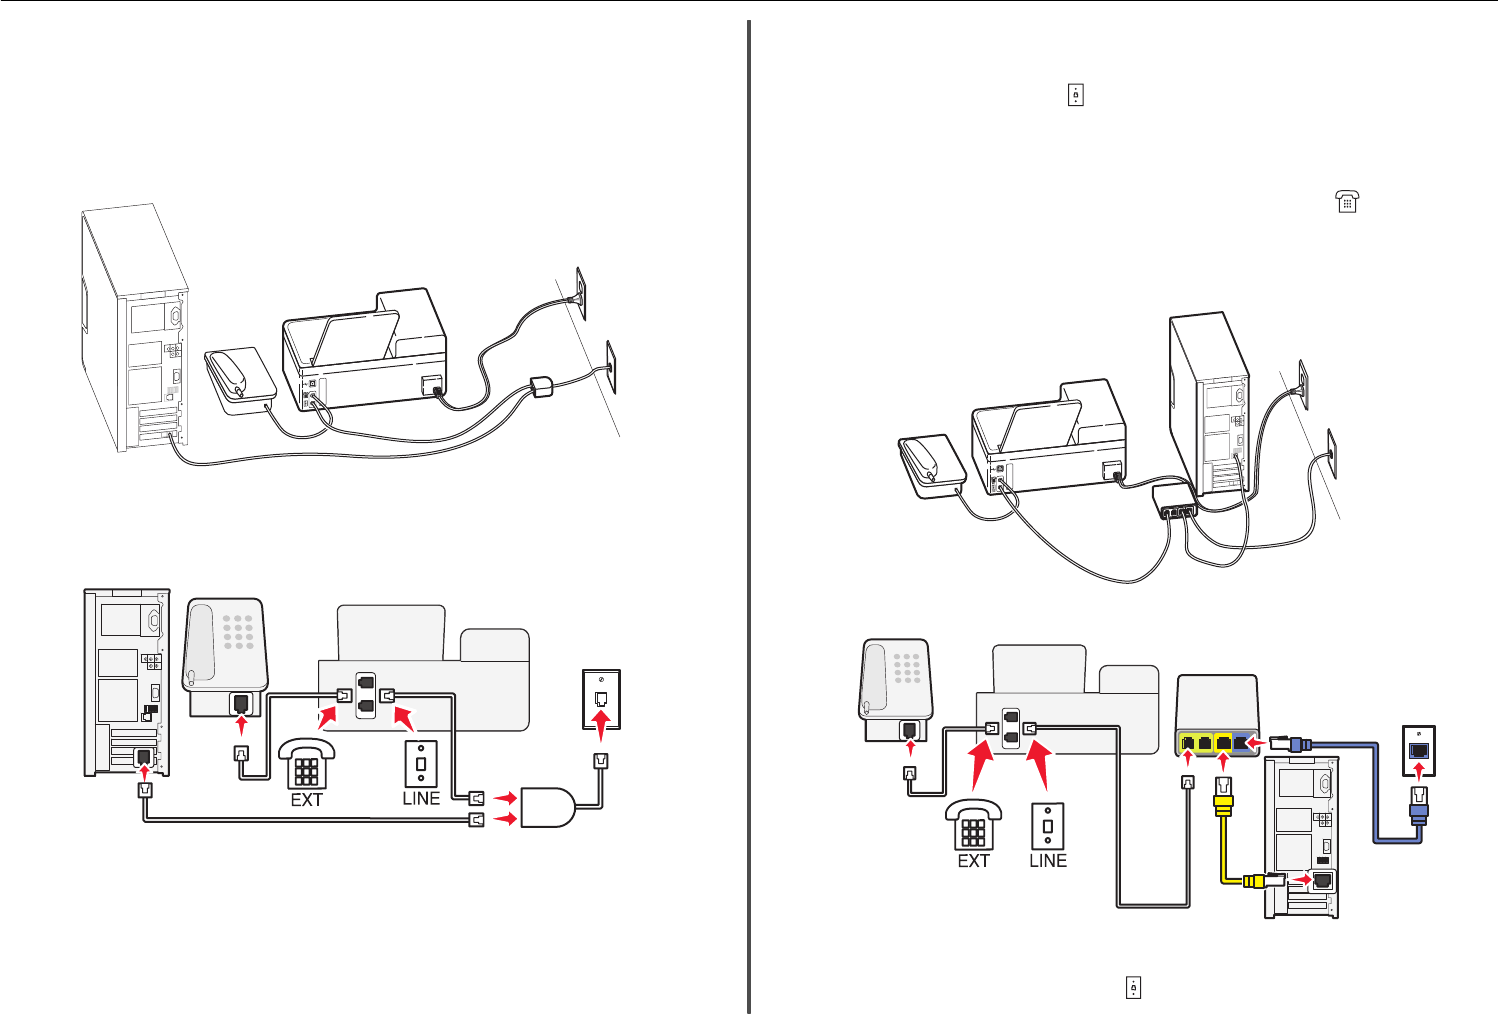
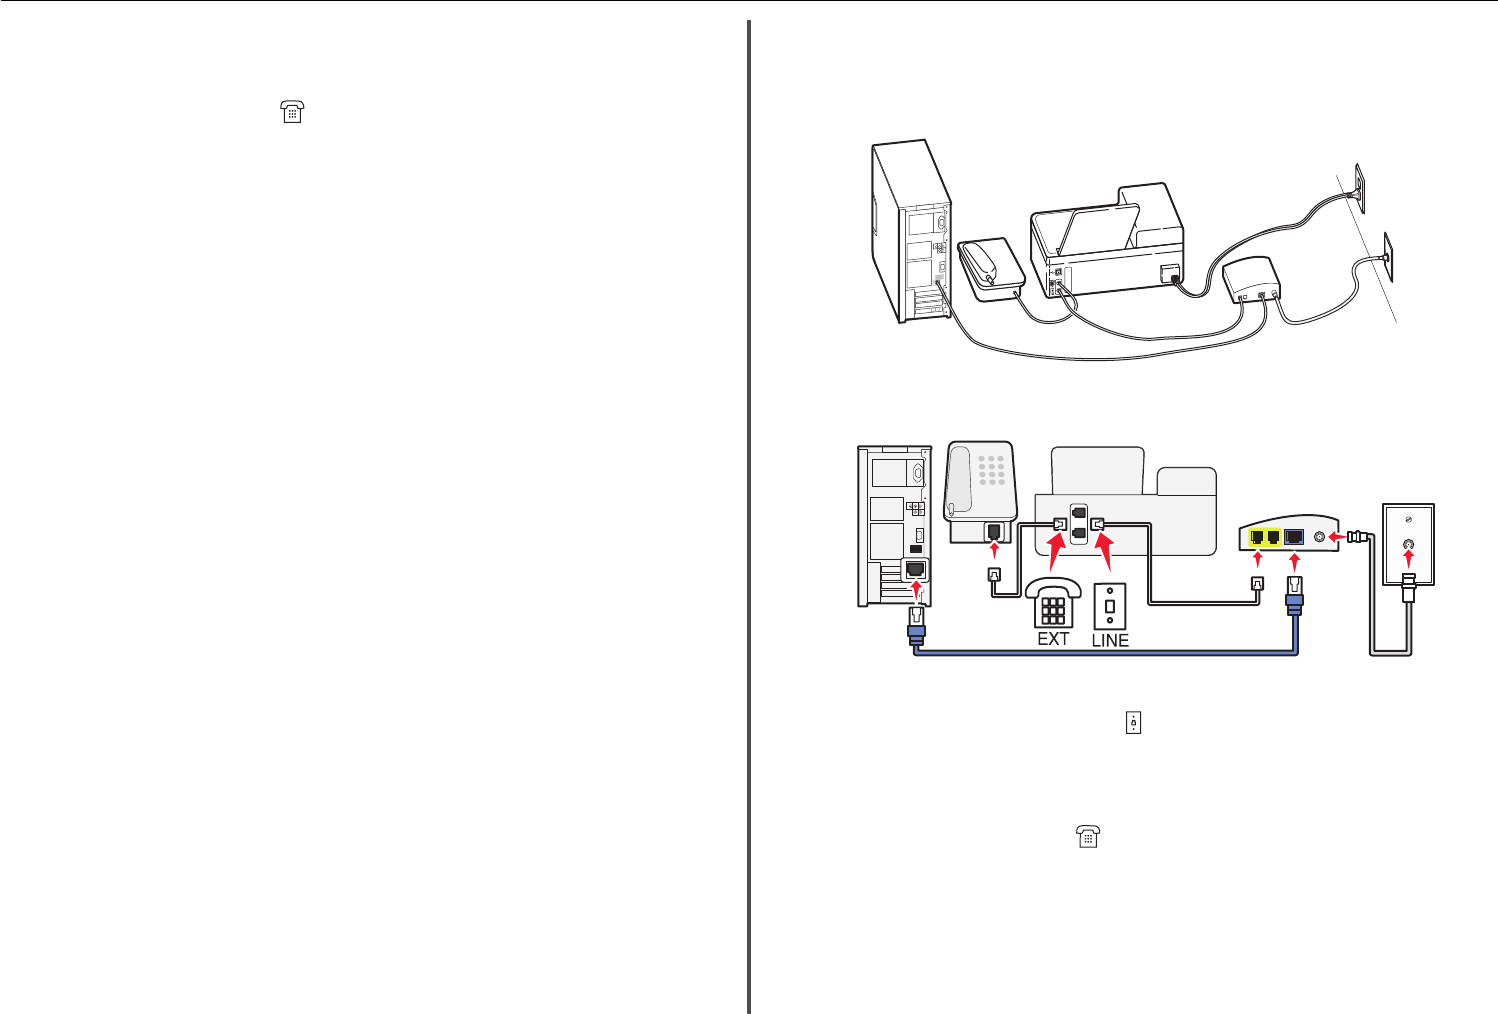
Scenario 2: Digital Subscriber Line (DSL)
EXT
LINE
A Digital Subscriber Line splits your regular telephone line into two channels: voice and Internet. Telephone
and fax signals travel through the voice channel, and Internet signals pass through the other channel. This
way, you can use the same line for analog voice calls (including faxes) and digital Internet access.
To minimize interference between the two channels and ensure a quality connection, you need to install
a DSL filter for the analog devices (fax machine, telephone, answering machine) in your network.
Interference causes noise and static on the telephone, failed and poor quality faxes for the printer, and
slow Internet connection on your computer.
To install a filter for the printer:
1Connect the line port of the DSL filter to the wall jack.
2Connect a telephone cable from the port on the back of the printer to the phone port on the DSL
filter.
3To continue using a computer for Internet access, connect the computer to the DSL HPN port on the
DSL filter.
4To connect a telephone to the printer, remove the protective plug from the port of the printer
and then connect the telephone to the port.
Scenario 3: VoIP telephone service
To connect:
1Connect one end of a telephone cable to the port of the printer.
Setting up the printer to fax 32
2Connect the other end of the cable to the port labeled Phone Line 1 or Phone Port on the VoIP adapter.
The port labeled Phone Line 2 or Fax Port is not always active. You may need to pay extra to your VoIP
provider if you want to activate the second phone port.
3Remove the protective plug from the port of the printer, and then connect the telephone to the
port.
Tips for this setup:
•To make sure that the phone port on the VoIP adapter is active, plug an analog telephone into the
phone port, and then listen for a dial tone. If you hear a dial tone, then the port is active.
•If you need two phone ports for your devices but do not want to pay extra, then do not plug the printer
into the second phone port. You can use a phone splitter. Plug the phone splitter into the Phone Line
1 or Phone Port, and then plug the printer and telephone into the splitter.
Make sure you use a phone splitter, not a line splitter. To make sure that you are using the correct
splitter, plug an analog telephone into the splitter and then listen for a dial tone.
Scenario 4: Digital telephone service through a cable provider
Setup 1: Printer is connected directly to a cable modem
Follow this setup if you normally connect your telephone to a cable modem.
To connect:
1Connect one end of a telephone cable to the port of the printer.
2Connect the other end of the cable to the port labeled Phone Line 1 or Phone Port on the cable modem.
The port labeled Phone Line 2 or Fax Port is not always active. You may need to pay extra to your
cable provider if you want to activate the second phone port.
3Remove the protective plug from the port of the printer, and then connect the telephone to the
port.
Tips for this setup:
•To make sure that the phone port on the cable modem is active, plug an analog telephone into the
phone port, and then listen for a dial tone. If you hear a dial tone, then the port is active.
Setting up the printer to fax 33
•If you need two phone ports for your devices but do not want to pay extra, then do not plug the printer
into the second phone port. You can use a phone splitter. Plug the phone splitter into the Phone Line
1 or Phone Port , and then plug the printer and telephone into the splitter.
Make sure you use a phone splitter, not a line splitter. To make sure that you are using the correct
splitter, plug an analog telephone into the splitter and then listen for a dial tone.
Setup 2: Printer is connected to a wall jack; cable modem is installed elsewhere in
the house
Follow this setup if your cable provider activated the wall jacks in your house so that you do not have to
plug your devices into the cable modem. Your cable telephone service comes from the wall jacks.
To connect:
1Connect the cable from the wall jack to the port of the printer.
2Remove the protective plug from the port of the printer, and then connect the telephone to the
port.
Scenario 5: Country‑ or region‑specific setup
Different countries or regions have different types of telephone wall jacks. The standard wall jack adopted
by most countries or regions is the Registered Jack-11 (RJ-11). You need to have an RJ‑11 plug, or a
telephone cable that has an RJ‑11 connector, so you can connect a device to an RJ‑11 wall jack.
The fax ports on the back of the printer and the telephone cable that comes with the printer have RJ‑11
connectors. If you have a different type of connector in your country or region, then you may need to use
an RJ‑11 adapter.
Setting up the printer to fax 34
Connecting the printer to a non‑RJ‑11 wall jack
EXT
LINE
To connect:
1Connect one end of a telephone cable to the port of the printer.
2Connect the other end of the cable to the RJ‑11 adapter, and then connect the adapter to the wall
jack.
3If you want to connect another device (telephone or answering machine) to the same wall jack, and
if the device has a non‑RJ 11 connector, then connect it directly to the wall jack.
Notes:
•Do not remove the wrap plug from the port of the printer.
•The printer may not come with an RJ-11 adapter in your country or region.
If the additional device (telephone or answering machine) has an RJ-11 connector, then you can remove
the wrap plug and connect the device to the port of the printer.
EXT
LINE
Connecting the printer in countries or regions that use serial connection
In some countries or regions, you need to plug all devices into the wall jack. You cannot plug a telephone
or answering machine into the port of the printer. This is called serial connection.
Austria Germany Portugal
Belgium Ireland Spain
Denmark Italy Sweden
Setting up the printer to fax 35

France Netherlands Switzerland
Finland Norway United Kingdom
Warning—Potential Damage: If your country or region is on the list, then do not remove the wrap plug
from the port of the printer. It is necessary for the proper functioning of the devices on the
telephone line.
EXT
LINE
To connect:
Connect the cable from the wall jack to the port of the printer.
Connecting the printer to a wall jack in Germany
The German wall jack has two kinds of ports. The N ports are for fax machines, modems, and answering
machines. The F port is for telephones.
NFN
Setting up the printer to fax 36
Connect the printer to any of the N ports.
PHONE
LINE
NFN
EXT
LINE
To connect:
1Connect one end of a telephone cable to the port of the printer.
2Connect the other end of the cable to the RJ‑11 adapter, and then connect the adapter to an N port.
3If you want to connect a telephone and answering machine to the same wall jack, then connect the
devices as shown.
Step 2: Check the dial tone
A dial tone lets you know if the telephone line is working or if the printer is properly connected to the
telephone line.
Make sure the telephone line and the wall jack are working
1Plug an analog telephone into the wall jack.
2Listen for a dial tone through the telephone handset.
If you hear a dial tone, then the telephone line and the wall jack are working.
Make sure the printer is properly connected to the telephone line
1While the printer is connected to a telephone line through the port on the back of the printer, plug
an analog telephone into the port of the printer.
2Listen for a dial tone.
If you hear a dial tone, then the printer is properly connected to the telephone line.
If you do not hear a dial tone, then review Step 1 or see the “Fax troubleshooting checklist” on page
46.
Step 3: Set your fax name and fax number
Your user information includes your name or your company name, your fax number (your fax number is
your telephone number, unless you have a dedicated fax telephone line), and the time and date on your
fax machine when a transmission is made. This information appears in the header and footer of the faxes
that you send.
In some countries, you cannot send a fax without this information. Some fax machines also block faxes
without sender information, so make sure that you enter this information in your printer.
1From the printer control panel, navigate to:
> Setup > > Fax Setup > > Dialing and Sending > > Fax Name >
2Enter your name or your company name, and then press .
•To change a character, press the left arrow button.
•To add a space, press the number 0.
3Press the arrow buttons to scroll to Fax Number, and then press .
4Enter your fax number or your telephone number, and then press .
Step 4: Set the printer to receive faxes automatically or
manually
If the printer is connected to a dedicated fax line or sharing the line with an answering machine, then you
can set the printer to receive faxes automatically. If the printer is sharing the line with a telephone
subscribed to voice mail service, then set the printer to receive faxes manually.
1From the printer control panel, navigate to:
> Setup > > Fax Setup > > Ringing and Answering > > Auto Answer >
2Press the arrow buttons to scroll to the setting you want, and then press .
Setting up the printer to fax 37
Step 5: Set the number of rings
If you set Auto Answer to On in Step 4, then do the following. If you set Auto Answer to Off, then proceed
to Step 6.
If you subscribe to Distinctive Ring
Setting the correct ring is important if you subscribe to the Distinctive Ring Pattern Detection (DPRD)
feature offered by telephone companies. This feature allows you to have multiple telephone numbers on
one telephone line. Each telephone number has a designated ring pattern (All Rings, Single Ring Only,
Double Ring Only, Triple Ring Only, Single or Double Rings Only, Single or Triple Rings Only, Double or
Triple Rings Only). The different ring patterns let you know which telephone number was dialed and which
device you should use to answer the call.
Assign one of your telephone numbers to the printer as the fax number, and then set the printer to answer
the ring pattern of that number. If the pattern is set incorrectly, then the printer rings, but it never receives
the fax.
1From the printer control panel, navigate to:
> Setup > > Fax Setup > > Ringing and Answering > > Ring Pattern >
2Press the arrow buttons to scroll to the ring pattern you want, and then press .
If you do not subscribe to Distinctive Ring
If the printer is sharing the line with other devices, then set the printer to pick up on the greater number
of rings. If the printer is connected to a dedicated fax line, then you can choose any number of rings that
you want.
1From the printer control panel, navigate to:
> Setup > > Fax Setup > > Ringing and Answering > > Pick Up On >
2Select the number of rings that you want, and then save the setting.
Step 6: Create a contact list
Using the printer control panel
1From the printer control panel, navigate to:
Touch‑screen models Arrow‑button models
> Address Book > Setup > > Fax Setup > > Address Book >
2Use the menus to add a contact or a fax group. You can add up to 89 contacts and 10 fax groups.
•To change a character, press the left arrow button.
•To add a space, press the number 0.
Note: In some models, entries 1–89 are for individual contacts and entries 90–99 are for fax groups.
Enter the entry number before entering the contact name and fax number of the contact.
Using the fax software
If you are connecting the printer to a computer, then you can also create a contact list using the fax
software.
For Windows users
1Click or Start.
2Click All Programs or Programs, and then select the printer program folder from the list.
3Navigate to:
Printer Home > select your printer > Fax > Edit contact list
The Contacts tab of the Printer Setup Utility opens.
For Macintosh users
1From the Finder, navigate to:
Applications > select your printer folder
2Double‑click Printer Settings.
3Click the Contacts tab.
•To add contacts, click the Individuals tab.
•To add fax groups, click the Groups tab.
For more information on the fax software, click Help or
?
.
Setting up the printer to fax 38
Faxing
CAUTION—SHOCK HAZARD: Do not use the fax feature during a lightning storm. Do not set up
this product or make any electrical or cabling connections, such as the fax feature, power cord, or
telephone, during a lightning storm.
Sending faxes
Tips for sending faxes
•Make sure the printer is on and connected to a working telephone, DSL, or VoIP line. The line is working
if you hear a dial tone.
•Make sure the paper exit tray is fully extended and the tray extension is flipped out.
•Depending on your printer model, use the ADF when scanning two‑sided (duplex) pages.
•To easily retrieve a document after copying or scanning, lift the ADF input tray.
•When using the ADF, adjust the paper guide on the ADF to the width of the original document.
•When using the scanner glass, close the scanner cover, if possible, to avoid dark edges on the scanned
image.
•Do not load postcards, photos, small items, transparencies, photo paper, or thin media (such as
magazine clippings) into the ADF. Place these items on the scanner glass.
•When the document to be faxed is in place with the settings you want, press to send the fax.
Sending faxes using the printer control panel
1From the printer control panel, navigate to:
> Fax
2Enter a fax number, or press Address Book to select a number from the Speed Dial or Group Dial list.
3If you want to send a fax to a single recipient, then press .
If you want to send a fax to a group of numbers (broadcast fax), then press the left or right arrow
button to enter another number, and then press . Repeat this step to add more numbers.
4Press the Color/Black button to select a color or black‑and‑white fax.
5Press to start the fax job.
Warning—Potential Damage: Do not touch the cables or the and ports while actively sending a
fax.
Tip:
•You can send a broadcast fax to up to 30 recipients.
Sending faxes using the computer
For Windows users
1With a document open, click File > Print.
2Make sure the appropriate printer is selected, and then click Properties, Preferences, Options, or
Setup.
3Click the Fax tab, and then make sure Enable Fax is selected.
4Enter the recipient fax number or numbers in the “Fax number(s)” field.
You can enter fax numbers manually or by using the Phone Book feature.
5If necessary, enter a prefix in the Dialing Prefix dialog.
6Select the appropriate paper size and page orientation.
7Select Include Cover Page with Fax, and enter the appropriate information if you want to include a
cover page with the fax.
8Click OK.
For Macintosh users
1With a document open, choose File > Print.
2From the Printer pop‑up menu, select the fax version of your printer.
Note: In order to see the fax options on the Print dialog, you must use the fax driver for your
printer. If the fax version of the printer is not on the list, then choose Add a printer, and then
choose the fax version of the printer.
3Enter the name and number of the recipient.
4Click Fax.
Receiving faxes
Tips for receiving faxes
When receiving faxes:
•Make sure that the printer is on and connected to a working telephone, DSL, or VoIP line. The line is
working if you hear a dial tone.
•If you set the printer to receive faxes manually (Auto Answer Off), then make sure that the ringer
volume is not set to Off.
•If you have set the printer to receive faxes automatically (Auto Answer On), then load paper in the
printer.
Faxing 39
Receiving faxes automatically
1Make sure that Auto Answer is on:
From the printer control panel, navigate to:
> Setup > > Fax Setup > > Ringing and Answering > > Auto Answer > > On >
2Set the number of rings before the printer picks up incoming faxes:
aPress the arrow buttons to scroll to Pick Up On, and then press .
bPress the arrow buttons to scroll to the number of rings that you want, and then press to save
the setting.
When the number of rings you set is detected, the printer automatically receives the incoming fax.
Warning—Potential Damage: Do not touch the cables or the and ports while actively receiving
a fax.
Tips:
•If the printer is sharing the line with other analog devices (telephone, answering machine), then set
the printer to pick up calls two rings after the answering machine. For example, if the answering
machine picks up calls after four rings, then set the printer to pick up after six rings. This way, the
answering machine picks up calls first and your voice calls are received. If the call is a fax, then the
printer detects the fax signal on the line and takes over the call. If the printer is on a dedicated fax line,
then you may set the printer to pick up on any number of rings.
•If you have multiple numbers on a single line, or if you subscribe to a distinctive ring service provided
by your telephone company, then make sure that you set the correct ring pattern for the printer.
Otherwise, the printer will not receive faxes even if you have set it to receive faxes automatically.
Receiving faxes manually
1Turn off Auto Answer:
From the printer control panel, navigate to:
> Setup > > Fax Setup > > Ringing and Answering > > Auto Answer > > Off >
2When the telephone rings and you hear fax tones when you pick up the handset, press on the
printer or *9* on the telephone attached to the printer.
Warning—Potential Damage: Do not touch the cables or the and ports while actively receiving
a fax.
Tips:
•The default code for answering faxes manually is *9*, but for increased security, you can change it to
a number that only you know. You can enter up to 7 characters for your code. The valid characters are
the digits 0–9 and the characters # and *.
•Make sure that the telephone is plugged into the port on the back of the printer and that the
printer is connected to the wall jack through the port.
Faxing 40

Wireless networking
Information you will need to set up the printer on a
wireless network
To set up the printer for wireless printing, you need to know:
•The name of your wireless network, which is also known as the SSID (Service Set Identifier)
•If encryption was used to secure your network
•The security key (either a WEP key or WPA/WPA2 passphrase)
To find the WPA/WPA2 passphrase for the wireless network, see the documentation that came with
the access point, see the Web page associated with the access point, or consult your system support
person.
If your access point is using WEP security, then the WEP key should be:
•Exactly 10 or 26 hexadecimal characters
or
•Exactly 5 or 13 ASCII characters
If your access point is using WPA or WPA2 security, then the WPA/WPA2 passphrase should be:
•Exactly 64 hexadecimal characters
or
•From 8 to 63 ASCII characters
Notes:
•Hexadecimal characters are A–F, a–f, and 0–9.
•ASCII characters are letters, numbers, and symbols found on a keyboard. ASCII characters in a
WPA/WPA2 passphrase are case‑sensitive.
If your wireless network is not using security, then you will not have a security key.
Note: If you do not know the SSID of the network that your computer is connected to, then launch the
wireless utility of the computer network adapter and look for the network name. If you cannot find the
SSID or the security information for your network, then see the documentation that came with the
access point, or contact your system support person.
Installing the printer on a wireless network
Before you install the printer on a wireless network, make sure that:
•Your wireless network is set up and working properly.
•The computer you are using is connected to the same wireless network where you want to set up the
printer.
For Windows users
1Close all open software programs.
2Insert the installation software CD.
If the installation dialog does not appear after a minute, then launch the CD manually:
aClick , or click Start and then click Run.
bIn the Start Search or Run box, type D:\setup.exe, where D is the letter of your CD or DVD
drive.
cPress Enter, or click OK.
3Follow the instructions on the computer screen.
Note: Select Wireless connection when prompted to select a connection type.
For Macintosh users
1Close all open applications.
2Insert the installation software CD.
If the installation dialog does not appear after a minute, then click the CD icon on the desktop.
3Double-click the software installer package, and then follow the instructions on the computer screen.
Note: Select Wireless connection when prompted to select a connection type.
What is Wi‑Fi Protected Setup?
Wi
‑
Fi Protected Setup (WPS) is a simple and secure configuration that allows you to establish a wireless
home network and enable network security without requiring prior knowledge of Wi‑Fi technology. It is
no longer necessary to configure the network name (SSID) and WEP key or WPA passphrase for network
devices.
Note: WPS supports only networks that communicate through access points (wireless routers).
The printer supports the following methods in connecting to a wireless network:
•Personal Identification Number (PIN)—A PIN on the printer is entered into the wireless settings of the
access point.
•Push Button Configuration (PBC)—Buttons on both the printer and the access point are pushed within
a given period of time.
Look for any of these identifier marks to check if your access point is WPS certified:
Wireless networking 41

You can find these WPS logos on the side, back, or top of your access point.
For more information on accessing the wireless settings and determining the WPS capability of your access
point, see the documentation that came with the access point or contact your system support person.
Configuring Wi‑Fi Protected Setup manually
Note: Make sure your access point (wireless router) is Wi‑Fi Protected Setup (WPS) certified. For more
information, see the User’s Guide.
If your printer or device has not yet been configured for wireless connection and you want to configure
it using WPS, then push the WPS button on the wireless router. Wait for the printer control panel to display
a message to begin WPS configuration. There might be a short delay before the message appears. If nothing
happens after 30 seconds, then do one of the following:
USE THE PUSH BUTTON CONFIGURATION (PBC) METHOD
1From the printer control panel, navigate to:
> Setup > > Network Setup > > Wireless 802.11b/g/n > > Network Connection
Setup > > Wireless > > Wi‑Fi Protected Setup > > WPS PBC Mode >
2Follow the instructions on the printer display.
USE THE PERSONAL IDENTIFICATION NUMBER (PIN) METHOD
1From the printer control panel, navigate to:
> Setup > > Network Setup > > Wireless 802.11b/g/n > > Network Connection
Setup > > Wireless > > Wi‑Fi Protected Setup > > WPS PIN Mode >
2Follow the instructions on the printer display.
Wireless networking 42

Troubleshooting
Before you troubleshoot
Use this checklist to solve most printer problems:
•Make sure the power cord is plugged into the printer and into a properly grounded, working electrical
outlet.
•Make sure the printer is turned on.
•Make sure the printer is securely connected to the computer, print server, or network access point.
•Check the printer for error messages, and resolve any errors.
•Check for paper jam messages, and clear any jams.
•Check the ink cartridges, and install new cartridges if necessary.
•Turn the printer off, wait about 10 seconds, and then turn the printer back on.
Note: Make sure the printer is not in Sleep mode. Press and hold for three seconds to turn off
the printer.
If Troubleshooting does not solve your problem
Visit our Web site at http://support.lexmark.com to find the following:
•Knowledgebase articles with the latest information and troubleshooting for your printer
•Live online technical support
•Contact numbers for telephone technical support
Setup troubleshooting
•“Incorrect language appears on the display” on page 43
•“Software did not install” on page 43
•“Print job does not print or is missing pages” on page 44
•“Printer is printing blank pages” on page 44
•“Printer is busy or does not respond” on page 45
•“Cannot delete documents from the print queue” on page 45
•“Cannot print through USB” on page 45
Incorrect language appears on the display
If the "Before you troubleshoot" checklist does not solve the problem, then try one or more of the
following:
C
HANGE
THE
LANGUAGE
USING
THE
PRINTER
MENUS
1From the printer control panel, navigate to:
> Setup > > Device Setup > > Language >
2Press the up or down arrow button to scroll to the language you want, and then press .
3To confirm the setting, press the left or right arrow button to scroll to Yes, and then press .
Installation screen did not appear during installation
If the "Before you troubleshoot" checklist does not solve the problem, then try the following:
L
AUNCH
THE
PRINTER
CD
MANUALLY
For Windows users
1Click , or click Start and then click Run.
2In the Start Search or Run box, type D:\setup.exe, where D is the letter of your CD or DVD
drive.
3Press Enter, or click OK.
4Click Install, and then follow the instructions on the computer screen.
For Macintosh users
1From the Finder desktop, click the CD icon.
2Double-click the software installer package, and then follow the instructions on the computer
screen.
Software did not install
If you encountered problems while installing, or if your printer does not appear in the list in the printers
folder or as a printer option when sending a print job, then try uninstalling and reinstalling the software.
Before you reinstall the software, do the following:
M
AKE
SURE
THAT
YOUR
COMPUTER
MEETS
THE
MINIMUM
SYSTEM
REQUIREMENTS
T
EMPORARILY
DISABLE
SECURITY
PROGRAMS
IN
W
INDOWS
BEFORE
INSTALLING
THE
SOFTWARE
Troubleshooting 43

C
HECK
THE
USB
CONNECTION
1Check the USB cable for any obvious damage. If the cable is damaged, then use a new one.
2Firmly plug the square end of the USB cable into the back of the printer.
3Firmly plug the rectangular end of the USB cable into the USB port of the computer.
The USB port is marked with .
Note: If you continue to have problems, then try another USB port on the computer. You may have
connected to a defective port.
R
ECONNECT
THE
PRINTER
POWER
SUPPLY
1Turn off the printer.
Note: Make sure the printer is not in Sleep mode. Press and hold for three seconds to turn off
the printer.
2Unplug the power cord from the wall outlet, and then pull out the power cord from the power
supply.
3After one minute, reconnect the power cord into the power supply, and then plug the power cord
into the wall outlet.
4Turn on the printer.
Print job does not print or is missing pages
If the "Before you troubleshoot" checklist does not solve the problem, then try one or more of the
following:
M
AKE
SURE
THE
INK
CARTRIDGES
ARE
INSERTED
CORRECTLY
1Turn the printer on, and then open the printer.
2Make sure the cartridges are inserted correctly.
The cartridges should click firmly into the matching color slot of the printhead.
3Close the printer.
S
ELECT
YOUR
PRINTER
FROM
THE
P
RINT
DIALOG
BEFORE
SENDING
THE
PRINT
JOB
Note: This solution applies to Macintosh users only.
1With a document open, choose File > Print.
2From the printer pop-up menu, choose your printer, and then click Print.
If your printer does not appear in the Printer list, then choose Add Printer. From the list of printers
in the Default tab, select your printer, and then click Add.
If your printer does not appear in the list, then try either of the following:
•For a USB-connected printer, remove and then reconnect the USB cable.
•For a printer that is wirelessly connected, see the Wireless troubleshooting section.
M
AKE
SURE
THE
PRINT
JOB
IS
NOT
PAUSED
M
AKE
SURE
YOUR
PRINTER
IS
SET
AS
THE
DEFAULT
PRINTER
R
ECONNECT
THE
PRINTER
POWER
SUPPLY
1Turn off the printer.
Note: Make sure the printer is not in Sleep mode. Press and hold for three seconds to turn off
the printer.
2Unplug the power cord from the wall outlet, and then pull out the power cord from the power
supply.
3After one minute, reconnect the power cord into the power supply, and then plug the power cord
into the wall outlet.
4Turn on the printer.
R
EMOVE
AND
RECONNECT
THE
USB
CABLE
CONNECTED
TO
YOUR
PRINTER
C
HECK
THE
USB
CONNECTION
1Check the USB cable for any obvious damage. If the cable is damaged, then use a new one.
2Firmly plug the square end of the USB cable into the back of the printer.
3Firmly plug the rectangular end of the USB cable into the USB port of the computer.
The USB port is marked with .
Note: If you continue to have problems, then try another USB port on the computer. You may have
connected to a defective port.
R
EMOVE
AND
REINSTALL
THE
PRINTER
SOFTWARE
Printer is printing blank pages
Blank pages may be caused by improperly installed ink cartridges.
R
EINSTALL
THE
INK
CARTRIDGES
AND
DEEP
CLEAN
AND
ALIGN
THE
PRINTHEAD
1Reinstall the ink cartridges, see “Replacing ink cartridges” on page 16 for more information.
Troubleshooting 44

If the cartridges do not seem to fit, then make sure the printhead is properly seated, and then try
installing the cartridges again.
2Load plain, unmarked paper.
3From the printer control panel, navigate to:
> Setup > > Maintenance >
4Press the up or down arrow button to scroll to Deep Clean Printhead, and then press .
A cleaning page prints.
5Load plain, unmarked paper.
6From the Maintenance menu screen, press the up or down arrow button to scroll to Align
Printer, and then press .
An alignment page prints.
Note: Do not remove the alignment page until printing is finished.
Printer is busy or does not respond
If the "Before you troubleshoot" checklist does not solve the problem, then try one or more of the
following:
M
AKE
SURE
THE
PRINTER
IS
NOT
IN
S
LEEP
MODE
If the power light is blinking on and off slowly, then the printer is in Sleep mode. Press to wake up
the printer.
If the printer will not come out of Sleep mode, then reset the power:
1Unplug the power cord from the wall outlet, and then wait 10 seconds.
2Insert the power cord into the wall outlet, and then turn on the printer.
If this problem persists, then check our Web site for updates for your printer software or firmware.
R
ECONNECT
THE
PRINTER
POWER
SUPPLY
1Turn off the printer.
Note: Make sure the printer is not in Sleep mode. Press and hold for three seconds to turn off
the printer.
2Unplug the power cord from the wall outlet, and then pull out the power cord from the power
supply.
3After one minute, reconnect the power cord into the power supply, and then plug the power cord
into the wall outlet.
4Turn on the printer.
Cannot delete documents from the print queue
If you have jobs stuck in the print queue and cannot delete them to get other jobs to print, then the
computer and printer may not be communicating.
R
ESTART
THE
COMPUTER
AND
TRY
AGAIN
R
EMOVE
AND
RECONNECT
THE
USB
CABLE
CONNECTED
TO
YOUR
PRINTER
Cannot print through USB
If the "Before you troubleshoot" checklist does not solve the problem, then try one or more of the
following:
C
HECK
THE
USB
CONNECTION
1Check the USB cable for any obvious damage. If the cable is damaged, then use a new one.
2Firmly plug the square end of the USB cable into the back of the printer.
3Firmly plug the rectangular end of the USB cable into the USB port of the computer.
The USB port is marked with .
Note: If you continue to have problems, then try another USB port on the computer. You may have
connected to a defective port.
M
AKE
SURE
THE
USB
PORT
IS
ENABLED
IN
W
INDOWS
1Click , or click Start and then click Run.
2In the Start Search or Run box, type devmgmt.msc.
3Press Enter, or click OK.
The Device Manager opens.
4Click the plus sign (+) beside Universal Serial Bus controllers.
If USB Host Controller and USB Root Hub are listed, then the USB port is enabled.
For more information, see the computer documentation.
R
EMOVE
AND
REINSTALL
THE
PRINTER
SOFTWARE
Fax troubleshooting
•“Fax troubleshooting checklist” on page 46
•“Cannot send faxes” on page 46
Troubleshooting 45
•“Cannot receive faxes” on page 47
•“Cannot run the fax software” on page 47
Fax troubleshooting checklist
If you encounter problems sending and receiving faxes, then check the connection first:
1Check for a dial tone on the telephone line by plugging an analog telephone into the wall jack, DSL
filter, VoIP device, or cable modem where you connected the printer. Make sure you plug the
telephone into the same port.
If you do not hear a dial tone, then contact your line provider.
2While the printer is connected to the telephone line, check for a dial tone by plugging an analog
telephone into the port of the printer.
If you do not hear a dial tone, then use the checklist below. Listen for a dial tone after checking each
item.
If you hear a dial tone but still have problems sending and receiving faxes, then see the other topics
in this section.
Connection checklist
•Make sure that the printer and other devices on the line (if applicable) are set up and configured
correctly according to your setup scenario.
•Make sure that the cables are connected to the correct ports.
•Make sure that the cables are securely plugged in.
Check the cable connections for the following hardware, if applicable:
Power supply Answering machine Cable modem Splitter
Telephone VoIP adapter DSL filter RJ‑11 adapter
•If the printer is connected to a Digital Subscriber Line, then make sure you are using a DSL filter for
the printer.
•If the printer is connected to a VoIP adapter or cable modem, then make sure that the printer is plugged
into the first phone port.
•If you are using a splitter, then make sure that you are using a phone splitter. Do not use a line splitter.
Cannot send faxes
If the “Fax troubleshooting checklist” does not solve the problem, then try one or more of the following:
M
AKE
SURE
THAT
YOU
HAVE
REGISTERED
YOUR
USER
INFORMATION
IN
THE
PRINTER
If you did not enter your user information during initial setup, then enter your fax name and fax number.
In some countries, you cannot send a fax without entering your fax name or company name. Some fax
machines also block unknown faxes or faxes without sender information.
D
ECREASE
THE
TRANSMISSION
SPEED
OF
THE
FAX
MODEM
The modem of the printer can transmit data at 33,600 bps. This is the maximum speed at which the
printer can send and receive faxes. It is not necessary, however, to set the modem to its fastest
transmission capability. The speed of the modem of the receiving fax machine must match or be greater
than the speed at which you are sending your fax. Otherwise, your fax will not be received.
1From the printer control panel, navigate to:
> Setup > > Fax Setup > > Dialing and Sending > > Max Send Speed >
2Select a sending speed, and then press .
E
NABLE
ERROR
CORRECTION
Errors and blurs may appear in the faxed document if there is too much noise on the line. This option
enables the printer to transmit the bad blocks of data again and correct the errors. When a fax has too
many errors, the fax may be rejected by the receiving fax machine.
1From the printer control panel, navigate to:
> Setup > > Fax Setup > > Dialing and Sending > > Error Correction >
2Check to see if error correction is set to On.
If it is not set to On, then press the arrow buttons to select On, and then press .
E
NABLE
AUTOMATIC
FAX
CONVERSION
If the receiving fax machine does not support color fax, then this option automatically converts the
outgoing color fax to black and white. It also automatically reduces the resolution of the fax to a
resolution that the receiving machine can support.
1From the printer control panel, navigate to:
> Setup > > Fax Setup > > Dialing and Sending > > Auto Fax Convert >
2Check to see if automatic fax conversion is set to On.
If it is not set to On, then press the arrow buttons to select On, and then press .
M
AKE
SURE
THAT
THE
D
IAL
P
REFIX
SETTING
IS
CORRECT
The dialing prefix is the number or series of numbers that you press before you can dial the actual fax
number or telephone number. If the printer is in an office setting or in a private branch exchange, this
can be a specific number that you need to press so you can make a call outside the office.
Make sure that the dial prefix entered in the printer is correct for your network.
1From the printer control panel, navigate to:
> Setup > > Fax Setup > > Dialing and Sending > > Dial Prefix >
2Press the arrow buttons to create or modify the prefix.
Troubleshooting 46

3If the prefix is not correct, enter the correct prefix, and then press .
Cannot receive faxes
If the “Fax troubleshooting checklist” does not solve the problem, then try one or more of the following:
M
AKE
SURE
THAT
YOU
HAVE
CONFIGURED
THE
CORRECT
SETTINGS
FOR
YOUR
SETUP
The fax settings depend on whether the printer is connected to its own fax line or shares the line with
other devices.
If the printer is sharing the telephone line with an answering machine, then make sure that the following
are set:
•Auto Answer is On.
•The printer picks up on a greater number of rings than the answering machine.
•The printer picks up on the correct distinctive ring (if you subscribe to a distinctive ring service).
If the printer is sharing the telephone line with a telephone subscribed to voice mail, then make sure
that the following are set:
•Auto Answer is Off (if you have only one number on the telephone line).
•The printer picks up on the correct distinctive ring (if you subscribe to a distinctive ring service).
M
AKE
SURE
THAT
THE
PRINTER
IS
CONNECTED
TO
AN
ANALOG
PORT
The printer is an analog device. If you are using a PBX system, then make sure that the printer is
connected to an analog port on the PBX. You may need a digital line converter that converts digital
signals into analog signals.
M
AKE
SURE
THAT
THE
PRINTER
MEMORY
IS
NOT
FULL
The printer saves an incoming fax to the printer memory before it prints the fax. If the printer runs out
of ink or runs out of paper while receiving the fax, then the printer saves the fax so you can print it
later. However, if the printer memory is full, then the printer may not be able to receive more incoming
faxes. An error message appears on the display when the printer memory is full. Resolve the error to
free up space in the printer memory.
M
AKE
SURE
THAT
F
AX
F
ORWARDING
IS
DISABLED
1From the printer control panel, navigate to:
> Setup > > Fax Setup > > Ringing and Answering > > Fax Forward >
2Press the arrow buttons to scroll to Off, and then press .
I
NCREASE
THE
RINGER
VOLUME
If you set the printer to receive faxes manually (Auto Answer Off), then increase the ringer volume.
M
AKE
SURE
THAT
YOU
HAVE
THE
CORRECT
MANUAL
ANSWER
CODE
If you set the printer to receive faxes manually (Auto Answer Off), then you need to press the correct
code when a fax comes in so that the printer can receive it.
1From the printer control panel, navigate to:
> Setup > > Fax Setup > > Ringing and Answering > > Manual Pickup Code >
2Copy the manual answer code that appears on the display.
Note: To increase the security, you can change your manual pickup code to a number that only you
know. You can enter up to 7 characters for your code. The valid characters are the digits 0–9 and the
characters # and *.
Cannot run the fax software
The printer must be connected to a telephone, DSL, VoIP, or cable service before you can configure the
fax settings in the fax software.
M
AKE
SURE
A
FAX
DRIVER
IS
INSTALLED
The fax option is available for use only with the PostScript driver or the Universal Fax Driver. For
information on installing these drivers, see the Software and Documentation CD.
M
AKE
SURE
THE
PRINTER
IS
CONNECTED
TO
A
TELEPHONE
LINE
You need to connect the printer to your telephone line (through a standard wall jack, a DSL filter, a
VoIP adapter, or a cable modem) before you can open the fax software and configure the fax settings.
Wireless network troubleshooting
If you are having trouble setting up your printer on a network, print a network setup page, and then see
the User's Guide available on the installation software CD.
Also, make sure to check the network indicator lights to verify the connection status of the printer. For
more information on the location of the network indicator lights, see“Using the printer control panel” on
page 13.
Wireless troubleshooting checklist
Before beginning to troubleshoot the wireless printer, verify the following:
•The printer, the computer, and the access point (wireless router) are all plugged in and turned on.
•The wireless network is working properly.
Try accessing other computers on your wireless network.
If your network has Internet access, then try connecting to the Internet over a wireless connection.
•Your SSID is correct.
Troubleshooting 47

Print a network setup page to verify the SSID the printer is using.
If you are not sure if your SSID is correct, then run the wireless setup again.
•Your WEP key or WPA passphrase is correct (if your network is secure).
Log on to the access point and check the security settings.
A security key is like a password. All devices on the same wireless network using WEP, WPA, or WPA2
share the same security key.
If you are not sure if your security information is correct, then run the wireless setup again.
•The printer and the computer are within the range of the wireless network.
For most networks, the printer and the computer should be within 100 feet (30 meters) of the access
point (wireless router).
•The Wi‑Fi indicator is green and successfully connected.
•The printer driver is installed on the computer from which you are performing a task.
•The correct printer port is selected.
•The computer and printer are both connected to the same wireless network.
•The printer is located away from obstacles or electronic devices that could interfere with the wireless
signal.
Make sure the printer and access point are not separated by poles, walls, or support columns
containing metal or concrete.
Many devices can interfere with the wireless signal, including baby monitors, motors, cordless phones,
security system cameras, other wireless networks, and some Bluetooth devices.
Printing a network setup page
A network setup page lists the configuration settings of the printer, including the IP address and MAC
address of the printer.
1Load plain paper.
2From the printer control panel, navigate to:
> Setup > > Network Setup > > Print Network Setup Page >
Locating IP addresses
For Windows users
1Click , or click Start and then click Run.
2In the Start Search or Run box, type cmd.
3Press Enter, or click OK.
The Command Prompt window opens.
4Type ipconfig, and then press Enter.
The IP address appears as four sets of numbers separated by periods, such as 192.168.0.100.
For Macintosh users
1From the Apple menu, choose About This Mac.
2Click More Info.
3From the Contents pane, choose Network.
4If you are connected over a wireless network, choose AirPort from the Active Services list.
Locating the printer IP address
•You can locate the printer IP address by viewing the printer network setup page. See the User's
Guide on the software installation CD for more information on printing a network setup page.
Cannot print over wireless network
If you encountered problems while installing, or if your printer does not appear in the printers folder or
as a printer option when sending a print job, then try uninstalling and reinstalling the software.
Before you reinstall the software, check the troubleshooting checklist, and then do the following:
T
URN
THE
ACCESS
POINT
(
WIRELESS
ROUTER
)
OFF
AND
THEN
BACK
ON
Wait one minute for the printer and computer to reestablish the connection. This can sometimes
refresh network connections and resolve connectivity issues.
D
ISCONNECT
FROM
VPN
SESSION
When you are connected to another network through a VPN connection, you will not be able to access
the printer over your wireless network. End your VPN session, and then try printing again.
M
AKE
SURE
D
EMO
M
ODE
IS
TURNED
OFF
Select printer features are not available when Demo Mode is turned on.
From the printer control panel, navigate to:
> Setup > > Demo Mode > > Off >
C
HECK
YOUR
WEP
KEY
OR
WPA
PASSPHRASE
If your access point is using WEP security, then the WEP key should be:
•Exactly 10 or 26 hexadecimal characters. Hexadecimal characters are A–F, a–f, and 0–9.
or
•Exactly 5 or 13 ASCII characters. ASCII characters are letters, numbers, and symbols found on a
keyboard. ASCII characters in a WEP key are case‑sensitive.
If your access point is using WPA or WPA2 security, then the WPA passphrase should be:
•Exactly 64 hexadecimal characters. Hexadecimal characters are A–F, a–f, and 0–9.
or
Troubleshooting 48

•From 8 to 63 ASCII characters. ASCII characters are letters, numbers, and symbols found on a
keyboard. ASCII characters in a WPA passphrase are case‑sensitive.
Note: If you do not know this information, then see the documentation that came with the access
point, or contact your system support person.
C
HECK
IF
YOUR
ACCESS
POINT
HAS
AN
ASSOCIATION
/
REGISTRATION
BUTTON
Wireless broadband boxes in Europe, the Middle East, and Africa such as LiveBox, AliceBox, N9UF Box,
FreeBox, or Club Internet may require you to press an association/registration button when adding the
printer to your wireless network.
If you are using one of these boxes and need more information, then see the documentation that came
with your box, or contact your Internet Service Provider (ISP).
M
OVE
YOUR
ACCESS
POINT
AWAY
FROM
OTHER
ELECTRONIC
DEVICES
There may be temporary interference from electronic devices such as microwave ovens or other
appliances, cordless phones, baby monitors, and security system cameras. Make sure your access point
is not positioned too closely to these devices.
M
OVE
THE
COMPUTER
AND
/
OR
PRINTER
CLOSER
TO
THE
ACCESS
POINT
The range of your wireless network depends on many factors, including the abilities of your access
point and network adapters. If you are having trouble printing, then try placing the computer and
printer no more than 100 feet apart.
C
HECK
THE
WIRELESS
SIGNAL
QUALITY
Print a network setup page and check the signal quality. If the signal quality is listed as good or excellent,
then another factor is causing the problem.
C
HECK
YOUR
ADVANCED
SECURITY
SETTINGS
•If you are using MAC (Media Access Control) address filtering to limit access to your wireless
network, then you must add the printer MAC address to the list of addresses allowed to connect
to the access point.
•If you set the access point to issue a limited number of IP addresses, then you must change this so
that the printer can be added.
Note: If you do not know how to make these changes, then see the documentation that came with
the access point, or contact the person who set up your wireless network.
M
AKE
SURE
YOUR
COMPUTER
IS
CONNECTED
TO
YOUR
ACCESS
POINT
•See if you have access to the Internet by opening your Web browser and accessing any site.
•If there are other computers or resources on your wireless network, then check to see if you can
access them from your computer.
M
AKE
SURE
THAT
YOUR
COMPUTER
AND
PRINTER
ARE
CONNECTED
TO
THE
SAME
WIRELESS
NETWORK
If the printer is not on the same wireless network as the computer, then you will not be able to print
wirelessly. The SSID of the printer must match the SSID of the computer, if the computer is already
connected to the wireless network.
For Windows users
1Obtain the SSID of the network that the computer is connected to.
aType the IP address of your access point into the address field of your Web browser.
If you do not know the IP address of the access point:
1Click , or click Start and then click Run.
2In the Start Search or Run box, type cmd.
3Press Enter or click OK.
4Type ipconfig, and then press Enter. Check the Wireless Network Connection section:
•The “Default Gateway” entry is typically the access point .
•The IP address appears as four sets of numbers separated by periods, such as
192.168.2.134.
bType the user name and password of the access point when prompted.
cClick OK.
dIn the Wireless settings section, look for the SSID.
eWrite down the SSID.
Note: Make sure you copy it exactly, including any capital letters.
2Obtain the SSID of the network that the printer is connected to:
aFrom the printer, print a network setup page.
bIn the Wireless section, look for SSID.
3Compare the SSID of the computer and SSID of the printer.
If the SSIDs are the same, then the computer and the printer are connected to the same wireless
network.
If the SSIDs are not the same, then run the utility again to set up the printer on the wireless network
used by the computer.
For Macintosh users with an AirPort base station
In Mac OS X version 10.5 or later
1From the Apple menu, navigate to:
System Preferences > Network > AirPort
The SSID of the network that the computer is connected to is displayed in the Network Name menu.
2Write down the SSID.
Troubleshooting 49

In Mac OS X version 10.4 or earlier
1From the Finder, navigate to:
Applications > Internet Connect > AirPort
The SSID of the network that the computer is connected to is displayed in the Network menu.
2Write down the SSID.
For Macintosh users with an access point
1Type the IP address of the access point in the address field of your Web browser, and then continue
to step 2.
If you do not know the IP address of the access point, then do the following:
aFrom the Apple menu, navigate to:
System Preferences > Network > AirPort
bClick Advanced or Configure.
cClick TCP/IP.
The Router entry is typically the access point.
2Type your user name and password when prompted, and then click OK.
3In the Wireless settings section, look for the SSID.
4Write down the SSID, security type, and the WEP key/WPA passphrase (if shown).
Notes:
•Make sure you copy the network information down exactly, including any capital letters.
•Store the SSID and the WEP key or WPA passphrase in a safe place for future reference.
M
AKE
SURE
YOUR
OS
IS
COMPATIBLE
WITH
WIRELESS
PRINTING
THROUGH
A
IR
P
ORT
The printer supports wireless printing only through AirPort base stations for Mac OS X version 10.5 or
later.
“Communication not available” message appears when printing
wirelessly
Try one or more of the following:
M
AKE
SURE
YOUR
COMPUTER
AND
PRINTER
HAVE
VALID
IP
ADDRESSES
FOR
THE
NETWORK
If you are using a laptop and have power saving settings enabled, then you may see the ”Communication
not available” message on your computer screen when you attempt to print wirelessly. This can occur
if the laptop hard drive has powered down.
If you see this message, then wait a few seconds and then try to print again. The laptop and printer
require a few seconds to power up again and reattach to the wireless network.
If you see this message again after you have waited long enough for the printer and the laptop to attach
to the network, then there may be a problem with your wireless network.
Make sure that the laptop and printer have both received IP addresses:
For Windows users
1Click , or click Start and then click Run.
2In the Start Search or Run box, type cmd.
3Press Enter, or click OK.
4Type ipconfig, and then press Enter.
The IP address appears as four sets of numbers separated by periods, such as 192.168.0.100.
For Macintosh users
1From the Apple menu, navigate to:
About This Mac > More Info
2From the Contents pane, choose Network.
3If you are connected over a wireless network, then choose AirPort from the Active Services list.
The Router entry is typically the access point.
Locating the printer IP address
•From the printer, print a network setup page.
In the TCP/IP section, look for Address.
•View the printer settings.
From the printer control panel, navigate to:
> Setup > > Network Setup > > Wireless 802.11 b/g/n > > Network Connection
Setup > > TCP/IP > > IP Address >
If the printer or the laptop does not have an IP address, or if either has an address of 169.254.x.y (where
x and y are any two numbers between 0 and 255), then do the following:
1Turn off the device that does not have a valid IP address (the laptop, the printer, or both).
2Turn on the device, and then check the IP addresses again.
If the printer or the laptop still does not receive a valid IP address, then there is a problem with your
wireless network. Try the following:
•Make sure your access point (wireless router) is turned on and is working.
•Remove any objects that could be blocking the signal.
•Temporarily turn off any unnecessary wireless devices on your network and pause any
network‑intensive activities, like large file transfers or network games. If the network is too busy,
then it is possible that the printer is not receiving the IP address within the allowed time.
Troubleshooting 50

•Make sure your DHCP server, which may also be your wireless router, is working and is configured
to assign IP addresses. If you are not sure how to do this, then refer to the manual that came with
your wireless router.
If the printer and computer have valid IP addresses and the network is operating correctly, then
continue troubleshooting.
M
AKE
SURE
THE
WIRELESS
PORT
IS
SELECTED
Note: This solution applies to Windows users only.
1Click , or click Start and then click Run.
2In the Start Search or Run box, type control printers.
3Press Enter, or click OK.
4Right‑click the printer, and then select Properties or Printer properties from the menu.
5Click the Ports tab, and then locate the selected port.
The selected port has a check mark beside it in the Port column.
6If the Description column of the selected port indicates that it is a USB port, then scroll through the
list and select the port with Printer Port in the Description column. Check the printer model in the
Printer column to make sure you select the right printer port.
7Click OK, and then try to print again.
M
AKE
SURE
BIDIRECTIONAL
COMMUNICATION
IS
ENABLED
Note: This solution applies to Windows users only.
1Click , or click Start and then click Run.
2In the Start Search or Run box, type control printers.
3Press Enter, or click OK.
4Right‑click the printer, and then select Properties or Printer properties from the menu.
5Click the Ports tab.
6Click the box next to Enable bidirectional support if it is not already checked.
7Click Apply > OK, and then try to print again.
Troubleshooting 51

Notices
Edition notice
December 2011
The following paragraph does not apply to any country where such provisions are inconsistent with
local law: LEXMARK INTERNATIONAL, INC., PROVIDES THIS PUBLICATION “AS IS” WITHOUT WARRANTY
OF ANY KIND, EITHER EXPRESS OR IMPLIED, INCLUDING, BUT NOT LIMITED TO, THE IMPLIED WARRANTIES
OF MERCHANTABILITY OR FITNESS FOR A PARTICULAR PURPOSE. Some states do not allow disclaimer of
express or implied warranties in certain transactions; therefore, this statement may not apply to you.
This publication could include technical inaccuracies or typographical errors. Changes are periodically
made to the information herein; these changes will be incorporated in later editions. Improvements or
changes in the products or the programs described may be made at any time.
References in this publication to products, programs, or services do not imply that the manufacturer
intends to make these available in all countries in which it operates. Any reference to a product, program,
or service is not intended to state or imply that only that product, program, or service may be used. Any
functionally equivalent product, program, or service that does not infringe any existing intellectual
property right may be used instead. Evaluation and verification of operation in conjunction with other
products, programs, or services, except those expressly designated by the manufacturer, are the user’s
responsibility.
For Lexmark technical support, visit support.lexmark.com.
For information on supplies and downloads, visit www.lexmark.com.
If you don't have access to the Internet, you can contact Lexmark by mail:
Lexmark International, Inc.
Bldg 004-2/CSC
740 New Circle Road NW
Lexington, KY 40550
USA
© 2011 Lexmark International, Inc.
All rights reserved.
UNITED STATES GOVERNMENT RIGHTS
This software and any accompanying documentation provided under this agreement are commercial
computer software and documentation developed exclusively at private expense.
Trademarks
Lexmark and Lexmark with diamond design are trademarks of Lexmark International, Inc., registered in
the United States and/or other countries.
All other trademarks are the property of their respective owners.
Federal Communications Commission (FCC) compliance information
statement
This product complies with the limits for a Class B digital device, pursuant to Part 15 of the FCC Rules.
Operation is subject to the following two conditions:
1this device may not cause harmful interference, and
2this device must accept any interference received, including interference that may cause undesired
operation.
Any questions on this statement should be directed to:
Director of Lexmark Technology & Services
Lexmark International, Inc.
740 West New Circle Road
Lexington, KY 40550
(859) 232-3000
For additional compliance information, see the online documentation.
Federal Communications Commission (FCC) compliance information
statement
This product complies with Part 68 of the FCC Rules. See the product online documentation for additional
compliance information.
Notices 52

Index
A
Address Book 38
ADF output tray
location 12
ADF paper guide
location 12
ADF tray
location 12
aligning the printhead 18
answering machine
setting up 30
Automatic Document Feeder (ADF)
location 12
B
bidirectional communication
enabling 50
broadcast fax, sending
immediately 39
buttons
printer control panel 13
C
Caller ID
setting 37
canceling
copy job 26
e‑mail 29
print job 23
scan job 28
cannot delete documents from print queue 45
cannot print over wireless network 48
cannot print through USB 45
cannot receive faxes 47
cannot run fax software 47
cannot send faxes 46
cartridges, ink
ordering 16
checking an unresponsive printer 43
checking the dial tone 37
checklist
before you troubleshoot 43
fax troubleshooting 46
cleaning printhead nozzles 18
Communication not available
message 50
configuring Wi‑Fi Protected Setup
PBC, Push Button Configuration method 42
PIN, Personal Identification Number method 42
conserving energy, ink, and paper 5
contact list
creating 38
copies
making 25
copy job
canceling 26
copying 25
on both sides of the paper 25
tips 25
D
dial tone
checking 37
Digital Subscriber Line (DSL)
fax setup 32
digital telephone service
fax setup 33
distinctive ring
setting 38
documents
faxing using the computer 39
faxing using the control panel 39
printing 22
scanning using the touch screen 27
DSL filter 32
duplex
copying, automatic 25
printing, automatic 22
duplex unit
location 13
E
emission notices 52
energy
conserving 5
Ethernet port
location 13
EXT port
location 13
e‑mail
canceling 29
e‑mail function
setting up 29
e‑mailing
scanned documents 27
setting up e‑mail function 29
tips 29
F
fax setup
country‑ or region‑specific 34
digital telephone service 33
DSL connection 32
standard telephone line connection 30
VoIP 32
fax troubleshooting
cannot receive faxes 47
cannot run fax software 47
cannot send faxes 46
fax troubleshooting checklist 46
faxing
Auto Answer setting 37
receiving automatically 40
receiving manually 40
sending a broadcast fax immediately 39
sending using the control panel 39
setting sender information 37
tips, receiving 39
tips, sending 39
using the computer 39
using the control panel 39
faxing tips
receiving faxes automatically 40
FCC notices 52
features, printer 6
file types
supported 14
finding
information 5
publications 5
Web site 5
finding IP address of computer (Mac) 48
flash drive
inserting 15
printing documents from 23
scanning to 27
G
Group List 38
I
incorrect language appears on display 43
information
finding 5
information needed for setting up printer on
wireless network 41
ink
conserving 5
ink cartridge access area
location 13
ink cartridges
installing 16
ordering 16
removing 16
replacing 16
inserting a flash drive 15
installation screen did not appear
automatically 43
installing printer
on wireless network (Macintosh) 41
on wireless network (Windows) 41
installing printer software 19
J
jam clearance cover
location 12
L
language
changing 43
LexPrint 24
line filter 32
LINE port
location 13
M
Macintosh
installing printer on wireless network 41
Macintosh printer software
using 20
memory card
scanning to 27
minimum system requirements 19
models, printer 6
N
network setup page
printing 48
Index 53

networking
finding IP address of computer 48
finding IP address of computer (Mac) 48
finding IP address of printer 48
IP addresses 48
notices 2, 52
O
ordering ink cartridges 16
P
page does not print 44
paper
conserving 5
paper exit tray
location 12
paper stop
location 12
paper tray
location 12
PDF
creating from scan 28
Personal Identification Number method
using 42
phone book 38
phone plug 34
phone splitter 32
photos
printing from a flash drive 23
PictBridge and USB port
location 12
power supply port
location 13
Print dialog
launching 20
print job
canceling 23
print troubleshooting
cannot delete documents from print queue 45
printer
features 6
models 6
setting up 6
printer control panel
buttons 13
location 12
using 13
printer does not respond 45
printer features 6
printer models 6
printer parts
diagram 12
printer printing blank pages 44
printer problems, basic solutions 43
printer software
installing 19
printers
supported 24
printhead
aligning 18
printhead access area
location 13
printhead nozzles
cleaning 18
printing
documents 22
documents from a flash drive 23
network setup page 48
on both sides of the paper 22
photos from a flash drive 23
two‑sided 22
publications
finding 5
Push Button Configuration method
using 42
R
receiving faxes
Auto Answer setting 37, 40
automatically 40
manually 40
tips 40
recycling 5
replacing ink cartridges 16
RJ‑11 adapter 34
S
safety information 2, 30
scan job
canceling 28
scanner cover
location 12
scanner glass
location 12
scanner unit
location 13
scanning
creating a PDF from scan 28
documents for e‑mailing 27
tips 27
to a flash drive 27
to a local computer 27
to a memory card 27
using the touch screen 27
selecting the wireless port 50
sender information
registering 37
sending faxes, tips 39
setting
number of rings 38
setting up fax
country‑ or region‑specific 34
digital telephone service 33
DSL connection 32
standard telephone line connection 30
VoIP connection 32
setting up printer 6
on wireless network (Macintosh) 41
on wireless network (Windows) 41
setup troubleshooting
cannot print through USB 45
incorrect language appears on display 43
installation screen did not appear
automatically 43
page does not print 44
printer does not respond 45
printer printing blank pages 44
software did not install 43
software did not install 43
Speed Dial list 38
supported file types 14
supported operating systems 19
supported printers 24
T
technical support 43
telecommunication notices 52
tips for
copying 25
e‑mailing 29
receiving faxes 39
scanning 27
sending faxes 39
Transmit Terminal Identification (TTI)
setting 37
troubleshooting
checking an unresponsive printer 43
contacting technical support 43
fax checklist 46
solving basic printer problems 43
wireless network 47
troubleshooting, fax
cannot receive faxes 47
cannot run fax software 47
cannot send faxes 46
troubleshooting, print
cannot delete documents from print queue 45
troubleshooting, setup
cannot print through USB 45
incorrect language appears on display 43
installation screen did not appear
automatically 43
page does not print 44
printer does not respond 45
printer printing blank pages 44
software did not install 43
troubleshooting, wireless
cannot print over wireless network 48
two‑sided
copying, automatic 25
two‑sided printing 22
U
USB port
location 13
V
voice mail
setting up 30
Voice over Internet Protocol (VoIP)
fax setup 32
VoIP adapter 32
W
Web Links
accessing 20
Web site
finding 5
Windows
installing printer on wireless network 41
Windows software
Abbyy Sprint OCR 19
Phone Book 19
Printer Home 19
Printer Setup Utility 19
Index 54

Printing Preferences 19
Product Update 19
Status Messenger 19
Status Monitor Center 19
Tools for Office 19
Wireless Setup Utility 19
wireless network
information needed for setting up wireless
printing 41
installing printer on (Macintosh) 41
installing printer on (Windows) 41
troubleshooting 47
wireless setup
information needed for 41
wireless troubleshooting
cannot print over wireless network 48
Wi‑Fi Protected Setup
configuring manually 42
using 41
Wi‑Fi Protected Setup logo
identifying 41
Index 55
