Lezyne USA orporated LEZYNE-CS01 CADENCE SPEED FLOW SENSOR User Manual
Lezyne USA, Incorporated CADENCE SPEED FLOW SENSOR
User manual
6
7
8
ZIP TIE
ORING
1
5
2
3
4
4
5mm
5mm
6
1
2
3
5
5
4
4
7
8
6
7
8
6
7
8
ZIP TIE
ORING
1
5
2
3
4
4
5mm
5mm
ZIP TIE
ORING
5mm
5mm
6
1
2
3
5
5
4
4
7
8
1
5
2
3
4
4
ZIP TIE
ORING
5mm
5mm
1
5
2
3
4
4
1
2
4
4
5
3
5
1
2
3
5
5
4
4
7
6
8
6
7
8
1.
2.
3.
4.
5.
Size: W70xH65xD25mm
Weight: 26g (with battery)
Water Resistance: 1m
Battery: CR2032 (3 volts)
Battery Life (approx): 2222 hours
System Compatibility: Bluetooth
2AD4S-LEZYNE-CS01
20084-LEZYNECS01
FCC ID:
IC ID: 2AD4S-LEZYNE-CS01
20084-LEZYNECS01
FCC ID:
IC ID: 2AD4S-LEZYNE-CS01
20084-LEZYNECS01
FCC ID:
IC ID:
2AD4S-LEZYNE-CS01
20084-LEZYNECS01
FCC ID:
IC ID:
1.
2.
3.
4.
5.
1.
2.
3.
Use a coin to open battery cover by
turning counterclockwise.
Replace battery CR2032 and make
sure the sealing o-ring is in the
groove to ensure water resistance.
Press in the cover back and turn the
cover clockwise to CLOSE.
1.
2.
3.
4.
5.
1.
2.
3.
1.
2.
3.
Dimensions : l x h x p : 70 x 65x x25 mm
Poids : 26 g (batterie comprise)
Étanchéité : jusqu'à 1 m
Batterie : CR2032 (3 volts)
Autonomie de la pile (approx) : 2222 heures
Compatibilité du système : Bluetooth
Utilisez une pièce de monnaie pour ouvrir le
couvercle du logement de la batterie en
tournant dans le sens inverse des aiguilles
d'une montre.
Remplacez la batterie de type CR2032 et
assurez-vous que le joint torique d'étanchéité
-----se trouve bien dans la rainure an de
garantir l'étanchéité.
Replacez le couvercle et tournez-le dans le
sens des aiguilles d'une montre pour le
VERROUILLER.
Tamaño: An70xAl65xPr5mm
Peso: 26 g (pila incluida)
Resistencia al agua: 1 m
Pila: CR2032 (3 voltios)
Duración de la pila (aprox.): 2222 horas
Sistemas compatibles: Bluetooth
Abra la tapa de la pila con una
moneda, girándola hacia la izquierda.
Cambie la pila CR2032 y compruebe si
el anillo de sellado está en la ranura
para asegurarse de que es resistente al
agua.
Coloque la tapa y gírela hacia la derecha
para CERRARLA.
Dimensione: L 70 x H 65 x P 25 mm
Peso: 26 g (con batteria)
Resistenza all'acqua: 1 m
Batteria: CR2032 (3 V)
Durata batteria (approssimativa): 2222 ore
Compatibilità del sistema: Bluetooth
6
7
8
1.
2.
3.
4.
5.
1.
2.
3.
Rimuovere il coperchio batteria utilizzando
una moneta e ruotandolo in senso antiorario.
Sostituire la batteria CR2032 e accertarsi
che l'o-ring di tenuta si trovi nella
scanalatura per garantire resistenza
all'acqua.
Premere il coperchio e ruotarlo in senso
ORARIO per CHIUDERE il vano batteria.
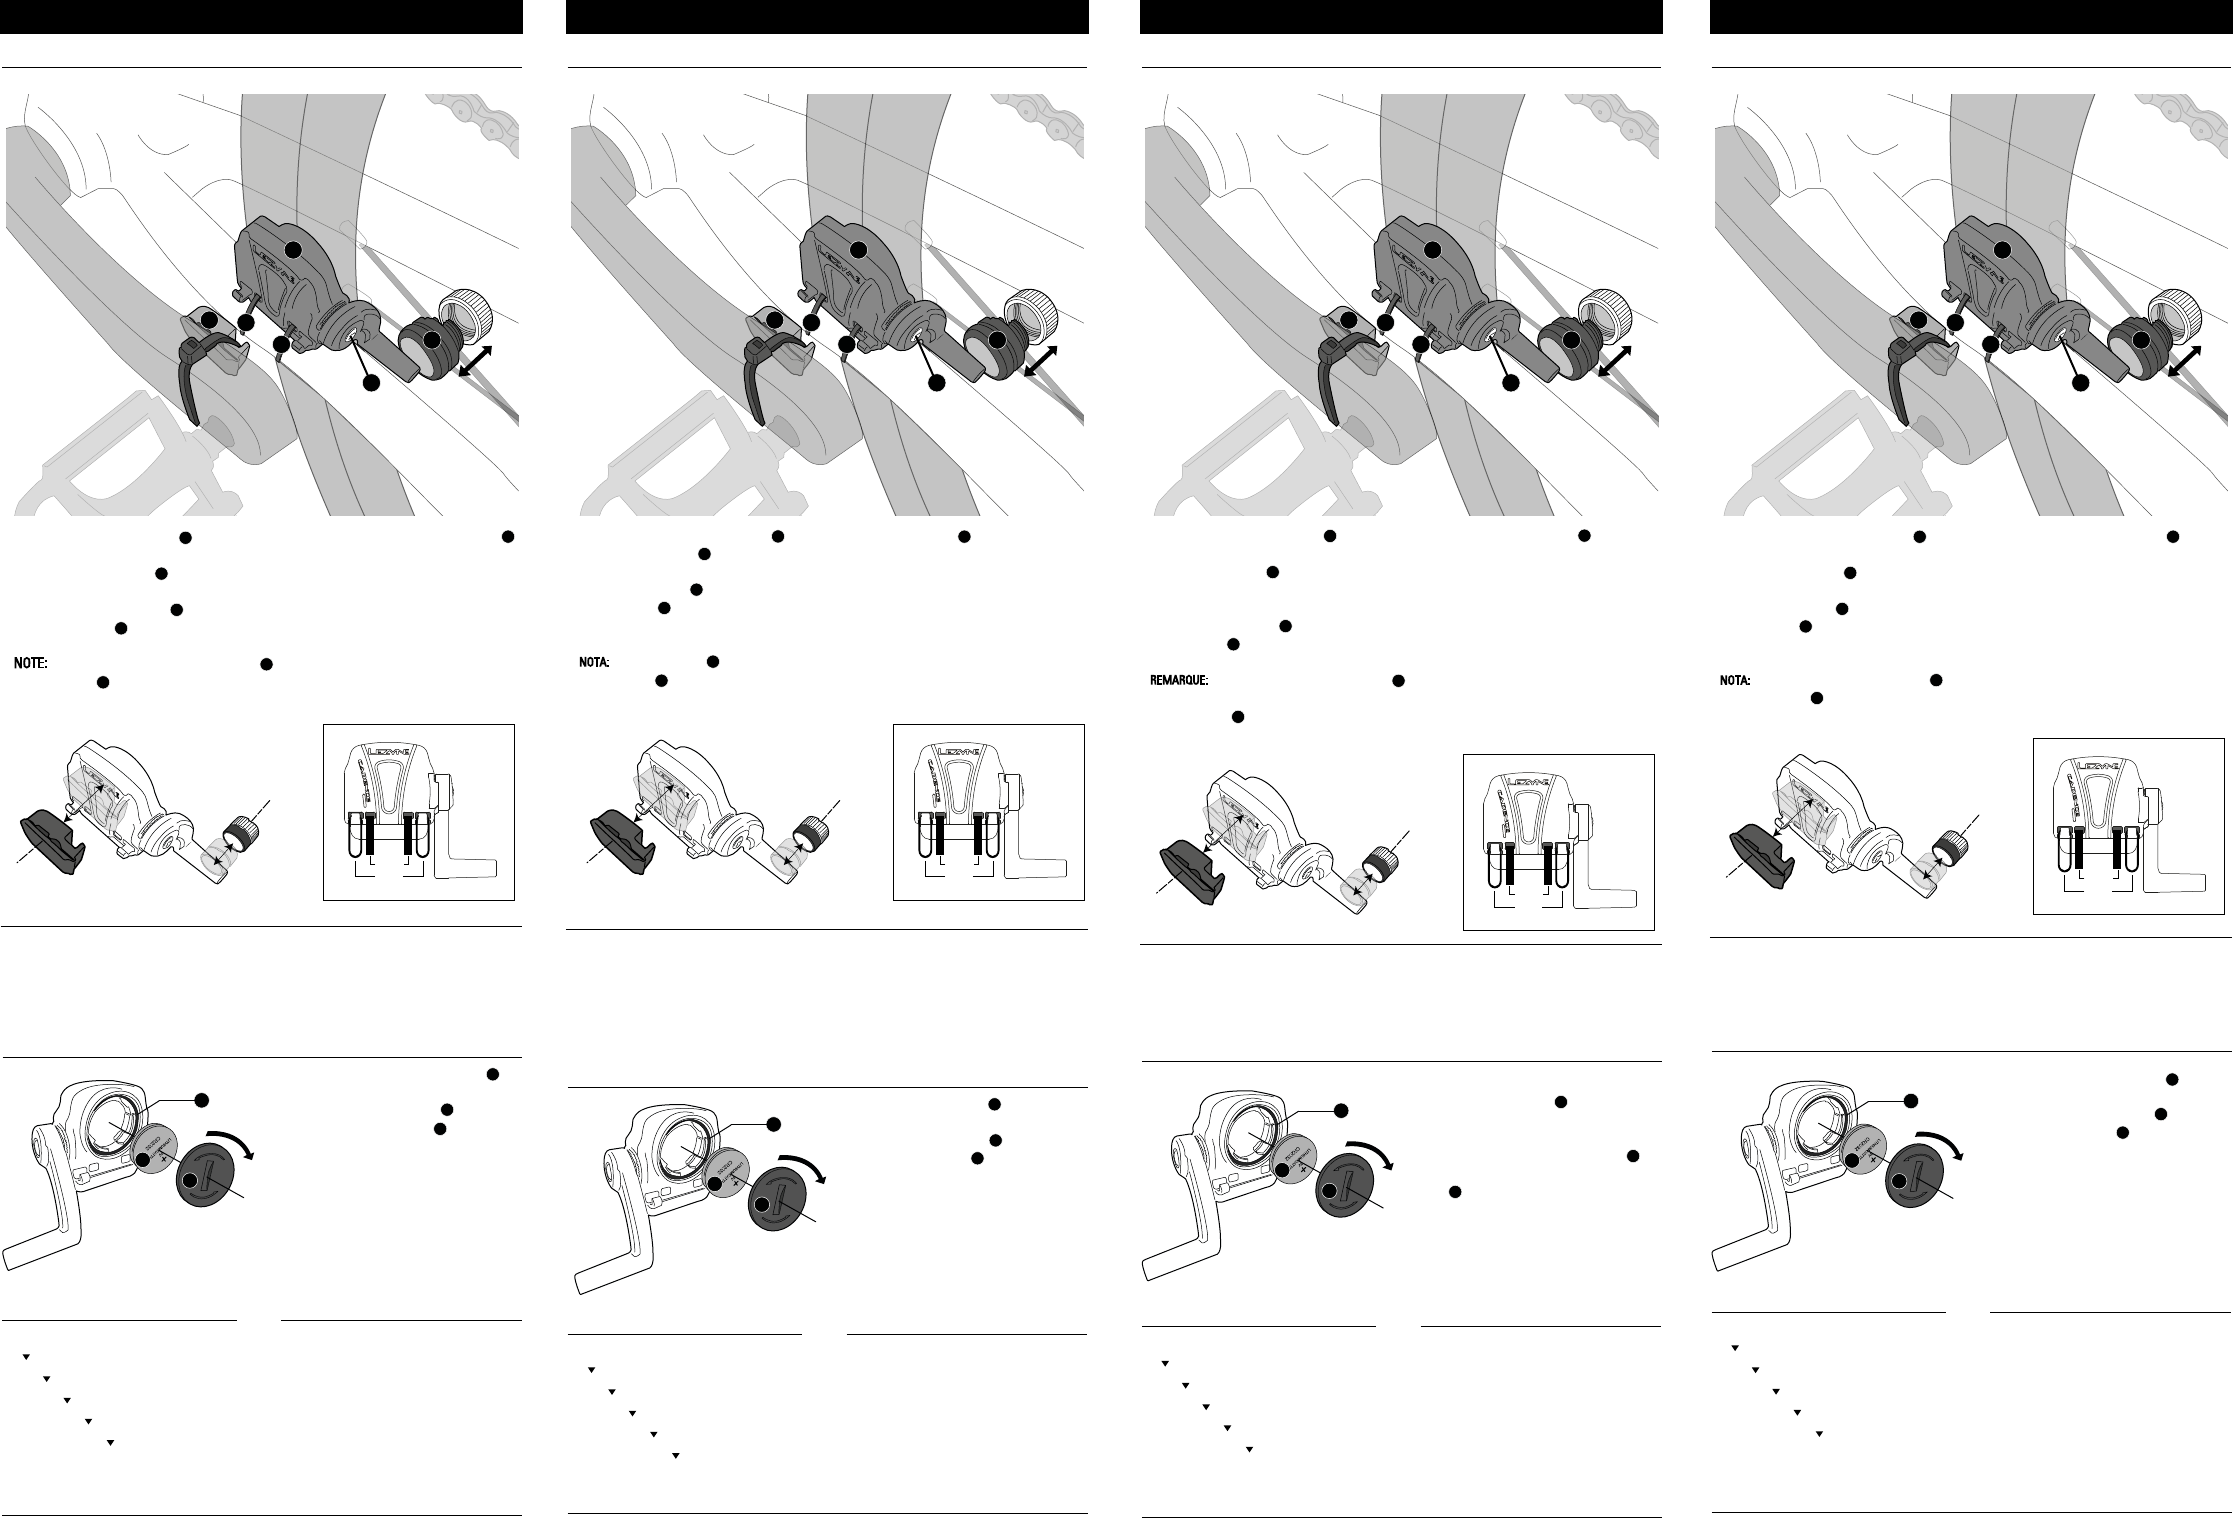
MONTAGGIO DEL SENSORE DI CADENZA
SOSTITUZIONE DELLA BATTERIA
ABBINAMENTO DEL SENSORE CON IL PRODOTTO GPS LEZYNE SPECIFICHE TECNICHE
Entrambi i magneti devono essere allineati ai rispettivi riferimenti.
Inizio rapido
Posizionare il Sensore di cadenza Lezyne sulla forcella posteriore ssandolo con la fascetta o l'o-ring
forniti.
Fissare il magnete pedale al braccio pedivella utilizzando la fascetta fornita e ssandola nella scanalatura
del magnete, quindi allineare il magnete con il logo Lezyne al sensore di cadenza entro uno spazio di 5 mm.
Svitare il magnete ruota , posizionare il raggio nella scanalatura e serrare.
Allentare la vite sul braccio del sensore, regolare la posizione del braccio o inclinare il sensore di cadenza
per allineare il braccio del sensore al magnete ruota entro una distanza di 5 mm, quindi serrare la vite e il
magnete ruota.
NOTA: NON allentare completamente la vite , per prevenire l'esposizione dei li del braccio sensore.
Serrare la fascetta (o utilizzare l'o-ring) sul sensore di cadenza Lezyne.
A questo punto si è pronti per avviare l'abbinamento dei sensori.
Per maggiori informazioni sui prodotti Lezyne, visitare: www.lezyne.com
Maggiori informazioni
GUIDA INTRODUTTIVA
Il sensore di velocità/cadenza Lezyne può essere abbinato a dispositivi GPS Lezyne e alla maggioranza delle
app di tness. Compatibile con smart phone Android & iOS
Per utilizzare il sensore di velocità/cadenza Lezyne, è necessario abbinarlo a prodotti GPS Lezyne. Per
istruzioni, consultare la Guida Utente del proprio dispositivo Lezyne.
MONTAGE DE VOTRE MONITEUR DE CADENCE
COMMENT CHANGER LA BATTERIE
COUPLAGE DU CAPTEUR AVEC LE GPS LEZYNE SPÉCIFICATIONS
Les deux aimants doivent être alignés sur leurs repères respectifs.
Placez le capteur de cadence Lezyne sur le tendeur de chaîne arrière à l'aide du lien zip /du joint
torique fourni.
Fixez l'aimant de pédale au bras de manivelle à l'aide du lien zip, placez le lien zip dans l'encoche de
l'aimant de pédale, et alignez l'aimant de pédale comportant le logo Lezyne sur capteur de cadence avec une
marge de 5 mm.
Dévissez l'aimant de rayon , placez le rayon dans l'encoche et serrez.
Desserrez la vis sur le bras du capteur, ajustez la position du bras ou soulevez le capteur de cadence pour
aligner le bras du capteur avec l'aimant de rayon avec une marge de 5 mm, serrez la vis et l'aimant de rayon.
REMARQUE: Ne détachez PAS complètement la vis pour empêcher l'exposition des câbles du bras du
capteur.
Serrez le lien zip (ou utiliser un joint torique) sur le capteur de cadence Lezyne.
Vous êtes maintenant prêt pour coupler les capteurs.
Pour en savoir plus sur les produits Lezyne, rendez-vous sur: www.lezyne.com
Informations complémentaires
PRISE EN MAIN
Le capteur de vitesse Lezyne peut être couplé avec les équipements GPS et la plupart des applications de
tness. Compatible avec les Smartphones sous Android & iOS.
Pour démarrer votre capteur de vitesse Lezyne, veuillez le coupler avec les équipements GPS Lezyne. Pour
de plus amples instructions, veuillez consulter le mode d'emploi de votre équipement Lezyne.
MOUNT YOUR CADENCE
HOW TO CHANGE BATTERY
PAIR THE SENSOR WITH LEZYNE GPS SPECIFICATION
Lezyne GPS
Main Menu
Sensors
Speed & Candence
Scan BTLE
Spd&Cad
Lezyne GPS
Main Menu
Sensors
Speed & Candence
Scan BTLE
Spd&Cad
Lezyne GPS
Main Menu
Sensors
Speed & Candence
Scan BTLE
Spd&Cad
Lezyne GPS
Main Menu
Sensors
Speed & Candence
Scan BTLE
Spd&Cad
Both magnets must be aligned with their respective indication lines.
72060-A1
English Quick Start
Place Lezyne Cadence Sensor on the rear chainstay by fastening with supplied zip tie
/or Oring.
Attach the Pedal Magnet to the crank arm with zip tie, place zip tie in the Pedal Magnet
groove, and align Pedal Magnet with the Lezyne logo to the Cadence Sensor within 5mm.
Unscrew the Spoke Magnet , place the spoke in the groove and tighten.
Loosen the screw on sensor arm, adjust arm position or tilt Cadence Sensor to align
sensor arm with spoke magnet within 5mm, tighten the screw and Spoke Magnet.
NOTE: DO NOT completely loosen the screw to prevent exposing sensor arm wires.
Tighten zip tie (or use Oring) on the Lezyne Cadence Sensor.
Now you’re ready to start pairing the sensors.
For more information on Lezyne products, visit: www.lezyne.com
MORE INFORMATION
GETTING START
Lezyne Cadence Speed Sensor can be pair with Lezyne GPS devices and most tness apps.
Campatible with Android & iOS smart phones.
To get start with Lezyne Cadence Speed Sensor, please pair it with Lezyne GPS products, for
more instructions, see the user guide of your Lezyne product.
Français démarrage rapide
MONTE LA CADENCIA
CAMBIO DE LA PILA
SINCRONIZACIÓN DEL SENSOR CON UN GPS LEZYNE ESPECIFICACIONES
Los dos imanes deben estar alineados con sus respectivas líneas indicativas.
Guía de Inicio Rápido en Español
Coloque el sensor de la cadencia Lezyne en la vaina apretándolo con la brida o junta tórica incluida.
Acople el imán del pedal al brazo de la biela con la brida, coloque esta en la ranura del imán y alinee el
imán del logo Lezyne con el sensor de cadencia a una distancia no superior a 5 mm.
Aoje el imán del radio , coloque el radio en la ranura y apriete.
Aoje el tornillo del brazo del sensor, ajuste la posición del brazo o el sensor de cadencia para alinear el
brazo del sensor con el imán del radio a una distancia no superior a 5 mm, y a continuación apriete el
tornillo y el imán.
NOTA: NO aoje el tornillo totalmente para evitar que el sensor quede expuesto a los cables del brazo.
Apriete la brida (o use una junta tórica) del sensor de cadencia Lezyne.
A continuación, puede iniciar la sincronización de los sensores.
Para obtener más información sobre los productos Lezyne, visite: www.lezyne.com
Más información
INICIO
El sensor de velocidad de cadencia Lezyne puede sincronizarse con los dispositivos GPS de
Lezyne y la mayoría de las aplicaciones de ejercicios. Compatible con smartphones Android e
iOS.
Para empezar a utilizar el sensor de velocidad de cadencia Lezyne, sincronícelo con los
dispositivos GPS Lezyne. Encontrará más información al respecto en el manual de usuario del
producto Lezyne en cuestión.

サイズ:幅70x高さ65x奥行き25mm
重量:26g(バッテリー込み)
防水性:1m
バッテリー:CR2032(3ボルト)
およそのバッテリー寿命:2222時間
システムの互換性:Bluetooth
6
1
2
3
5
5
4
4
7
8
6
7
8
1.
2.
3.
4.
5.
ZIP TIE
ORING
1
5
2
3
4
4
5mm
5mm
1.
2.
3.
Afmeting: B70xH65xD25mm
Gewicht: 26g (met batterij)
Waterbestendigheid: 1m
Batterij: CR2032 (3 volt)
Levensduur batterij (circa): 2222 uur
Compatibiliteit: Bluetooth
6
1
2
3
5
5
4
4
7
8
6
7
8
1.
2.
3.
4.
5.
ZIP TIE
ORING
1
5
2
3
4
4
5mm
5mm
1.
2.
3.
Größe: W70xH65xD25mm
Gewicht: 26 g (mit Batterie)
Wasserdichtheit: 1 m
Batterie: CR2032 (3 Volt)
Batterielebensdauer (ca.): 2222 Stunden
Systemkompatibilität: Bluetooth
6
1
2
3
5
5
4
4
7
8
6
7
8
1.
2.
3.
4.
5.
ZIP TIE
ORING
1
5
2
3
4
4
5mm
5mm
1.
2.
3.
硬貨でバッテリーカバー を反時計方向に
回して開けてください。
CR2032 バッテリーを交換してください。密
閉用Oリング が溝内にあり、防水できてい
ることを確認してください。
カバーを押し戻し、時計方向に回して閉めてく
ださい。
Open het batterijdeksel met een muntstuk
door linksom te draaien.
Vervang de CR2032-batterij en zorg ervoor
dat de dichtingsring in de groef zit om de
waterbestendigheid te verzekeren.
Druk de achterzijde weer vast en draai het
deksel rechtsom om het te sluiten.
Öffnen Sie das Batteriegehäuse mit einer
Münze, indem Sie diese gegen den
Uhrzeigersinn drehen.
Tauschen Sie die Batterie CR2032 aus.
Achten Sie darauf, dass der Dichtungsring
in der Einkerbung liegt, um die Wasserdich-
theit zu gewährleisten.
Setzen Sie das Gehäuse wieder fest auf und
drehen Sie es zum SCHLIESSEN im
Uhrzeigersinn.
2AD4S-LEZYNE-CS01
20084-LEZYNECS01
FCC ID:
IC ID: 2AD4S-LEZYNE-CS01
20084-LEZYNECS01
FCC ID:
IC ID:
2AD4S-LEZYNE-CS01
20084-LEZYNECS01
FCC ID:
IC ID:
Lezyne USA, 645 Tank Farm Rd., Unit F, San Luis Obispo, California 93401 72060-Y10-CADENCE-QUICK START-R0-A1
ケイデンスセンサーの取り付け
バッテリーの交換方法
センサーとLezyne GPSとのペアリング 仕様
どちらのマグネットも、それぞれの表示線と一直線に並べる必要があります。
ユーザーズマニュアル
Lezyne ケイデンスセンサーを 、付属の結束バンド または0リングで締めることで、リアチェーンステイ
に設置してください。
ペダルマグネットを 、結束バンドでクランクアームに取り付けます。なお、結束バンドは、ペダルマグネッ
トの溝の中で締めてください。次に、ペダルマグネットを、ケイデンスセンサーから5mm以内の位置で、
Lezyneのロゴと一直線に並べてください。
スポークマグネット を緩め、スポークを溝にはめてから締めてください。
センサーアームのネジ を緩めてください。アームの位置を調整するか、ケイデンスセンサーを傾けて、セン
サーアームをスポークマグネットと5mm以内で一直線に並べ、ネジとスポークマグネットを締めてください。
注意: センサーアームの配線が剥き出しにならないよう、ネジ が取れるまで緩めてはいけません。
Lezyne ケイデンスセンサーの結束バンド (またはOリング)を締めてください。
これで、センサーをペアリングする準備が整いました。
Lezyne製品に関して詳しくは、www.lezyne.comをご覧ください。
さらに詳しくは
始めるにあたって
Lezyne ケイデンススピードセンサーは、Lezyne GPS デバイスおよび多くのフィットネスアプリとペアリングさせ
ることができます。Android & iOS搭載スマートフォンに対応しています。
Lezyne ケイデンススピードセンサーを使い始めるには、Lezyne GPS製品とペアリングさせてください。さらに
詳しくは、Lezyne製品の取扱説明書をお読みください。
UW CADENCE MONTEREN
DE BATTERIJ VERWISSELEN
DE SENSOR KOPPELEN MET LEZYNE GPS SPECIFICATIE
Beide magneten moeten uitgelijnd zijn met hun respectieve indicatielijnen.
Nederlandse Snelstartgids
Bevestig de sensor van de Lezyne Cadence op de achterwielvork met behulp van de meegeleverde
kabelbinder en/of O-ring.
Bevestig de pedaalmagneet op de trapstang met een kabelbinder, plaats de kabelbinder in de groef
van de pedaalmagneet en lijn de pedaalmagneet met het Lezyne-logo met een speling van maximaal 5
mm uit ten opzichte van de Cadence-sensor.
Schroef de spaakmagneet los, plaats de spaak in de groef en draai vast.
Draai de schroef op de sensorarm los, regel de armpositie bij of kantel de Cadence-sensor om de
sensorarm met een speling van maximaal 5 mm uit te lijnen ten opzichte van de spaakmagneet, zet de
schroef en de spaakmagneet vast.
OPMERKING: Draai de schroef NIET volledig los om te voorkomen dat de draden van de sensorarm
bloot komen te staan.
Zet de kabelbinder vast (of gebruik een O-ring) op de Lezyne Cadence-sensor.
Nu bent u klaar om de sensoren te koppelen.
Voor meer informatie over Lezyne-producten gaat u naar: www.lezyne.com
Meer informatie
AAN DE SLAG
De Lezyne Cadence-snelheidssensor kan worden gekoppeld met Lezyne GPS-toestellen en de meeste
tness-apps. Compatibel met Android en iOS smartphones.
Om aan de slag te gaan met de Lezyne Cadence-snelheidssensor, koppelt u de sensor met Lezyne
GPS-producten; meer instructies vindt u in gebruikershandleiding van uw Lezyne-product.
TRITTFREQUENZMESSER MONTIEREN
BATTERIE WECHSELN
SENSOR MIT LEZYNE GPS VERBINDEN TECHNISCHE DATEN
Beide Magnete müssen auf ihren jeweiligen Markierungslinien ausgerichtet sein.
Deutsch Schnellstart
Befestigen Sie den Lezyne Trittfrequenz-Messer mit dem beiliegenden Kabelbinder oder mit einem
O-Ring an der hinteren Kettenstrebe.
Befestigen Sie den Pedalmagneten mit einem Kabelbinder an der Tretkurbel. Legen Sie den
Kabelbinder in die Einkerbung des Pedalmagneten und richten Sie den Pedalmagneten mit 5 mm so aus,
dass das Lezyne Logo zum Trittfrequenzmesser zeigt.
Schrauben Sie den Speichermagneten auf. Setzen Sie die Einkerbung auf eine Speiche und schrauben
Sie den Speichermagneten fest.
Lösen Sie die Schraube am Sensoraufnehmer, richten Sie die Aufnehmerposition aus oder neigen Sie
den Trittfrequenzmesser, um ihn mit 5 mm am Speichermagneten auszurichten. Ziehen Sie abschließend
Schraube und Speichermagnet fest.
HINWEIS: Lösen Sie die Schraube NICHT vollständig, um die Drähte des Sensoraufnehmers nicht
freizulegen.
Befestigen Sie den Kabelbinder (oder O-Ring) am Lezyne Trittfrequenzmesser.
Nun können Sie die Sensoren koppeln.
Weitere Informationen zu den Produkten von Lezyne nden Sie unter: www.lezyne.com
Weitere Informationen
ERSTE SCHRITTE
Der Lezyne Trittfrequenzmesser lässt sich mit Lezyne GPS-Geräten und den meisten Fitness-Apps koppeln.
Er ist zudem kompatibel mit Android- und iOS-Smartphones.
Um den Lezyne Trittfrequenzmesser nutzen zu können, koppeln Sie ihn mit Lezyne GPS-Produkten. Weitere
Anweisungen hierzu nden Sie im Benutzerhandbuch Ihres Lezyne Produkts.
Lezyne GPS
Main Menu
Sensors
Speed & Candence
Scan BTLE
Spd&Cad
Lezyne GPS
Main Menu
Sensors
Speed & Candence
Scan BTLE
Spd&Cad
Lezyne GPS
Main Menu
Sensors
Speed & Candence
Scan BTLE
Spd&Cad
FEDERAL COMMUNICATIONS COMMISSION INTERFERENCE STATEMENT
This equipment has been tested and found to comply with the limits for a Class B digital
device, pursuant to part 15 of the FCC Rules. These limits are designed to provide
reasonable protection against harmful interference in a residential installation. This
equipment generates, uses and can radiate radio frequency energy and, if not installed and
used in accordance with the instructions, may cause harmful interference to radio
communications. However, there is no guarantee that interference will not occur in a
particular installation. If this equipment does cause harmful interference to radio or
television reception, which can be determined by turning the equipment off and on, the
user is encouraged to try to correct the interference by one or more of the following
measures:
-Reorient or relocate the receiving antenna.
-Increase the separation between the equipment and receiver.
-Connect the equipment into an outlet on a circuit different from that to which the receiver
is connected.
-Consult the dealer or an experienced radio/ TV technician for help.
CAUTION:
Any changes or modications not expressly approved by the grantee of this device could
void the user's authority to operate the equipment.
This device complies with Part 15 of the FCC Rules. Operation is subject to the following
two conditions: (1) this device may not cause harmful interference, and (2) this device must
accept any interference received, including interference that may cause undesired
operation.
RF exposure warning
This equipment must be installed and operated in accordance with provided instructions
and the antenna(s) used for this transmitter must be installed to provide a separation
distance of at least 20 cm from all persons and must not be co-located or operating in
conjunction with any other antenna or transmitter. End-users and installers must be provide
with antenna installation instructions and transmitter operating conditions for satisfying RF
exposure compliance.
Canada, Industry Canada (IC) Notices
This device complies with Canada licence-exempt RSS standard(s).
Operation is subject to the following two conditions: (1) this device may not cause
interference, and (2) this device must accept any interference, including interference that
may cause undesired operation of the device.
Canada, avis d'Industry Canada (IC)
Cet appareil est conforme avec Industrie Canada exemptes de licence RSS standard(s).
Son fonctionnement est soumis aux deux conditions suivantes : (1) cet appareil ne doit pas
causer d'interférence et (2) cet appareil doit accepter toute interférence, notamment les
interférences qui peuvent affecter son fonctionnement.
Radio Frequency (RF) Exposure Information
The radiated output power of the Wireless Device is below the Industry Canada (IC) radio
frequency exposure limits. The Wireless Device should be used in such a manner such that
the potential for human contact during normal operation is minimized.
This device has also been evaluated and shown compliant with the IC RF Exposure limits
under mobile exposure conditions. (antennas are greater than 20cm from a person's body).
Informations concernant l'exposition aux fréquences radio (RF)
La puissance de sortie émise par l’appareil de sans l est inférieure à la limite d'exposition
aux fréquences radio d'Industry Canada (IC). Utilisez l’appareil de sans l de façon à
minimiser les contacts humains lors du fonctionnement normal.
Ce périphérique a également été évalué et démontré conforme aux limites d'exposition aux
RF d'IC dans des conditions d'exposition à des appareils mobiles (antennes sont
supérieures à 20 cm à partir du corps d'une personne).