LifePrint LP001 Lifeprint Photo Printer User Manual manual LP 160816 2
LifePrint Products Inc. Lifeprint Photo Printer manual LP 160816 2
User Manual
55
50
45
40
35
30
CHECK
DRAWN DESIGN
NO CODE
DWG NO
UNIT m/m
Q'TY
NAME
DATE
APPRO
TOL
SCALE
MATERIAL
+
-
TREATMENT MODEL REMARK
10
25
20
15
5
510 15 20 25 30
NO
2
D
3
A
N
E
M1
35 40 45 50 55 60 65
DATE C
B
A
50
~500
~
~150
15
~
~5
+0.50
0.30
+
0.10
+
0.55
0.90
-
+
-
-
+
0.18
-
+
-
-0.30
+
-
+
-
0.90
-
+1.50
0.20
0.10
-
+
-
+
0.07
-
-
+
0.05
+
-
+
-
0.35
+0.25
CONTENT
70 75
SIGN
A1
SIZE
DS Global. co., ltd.
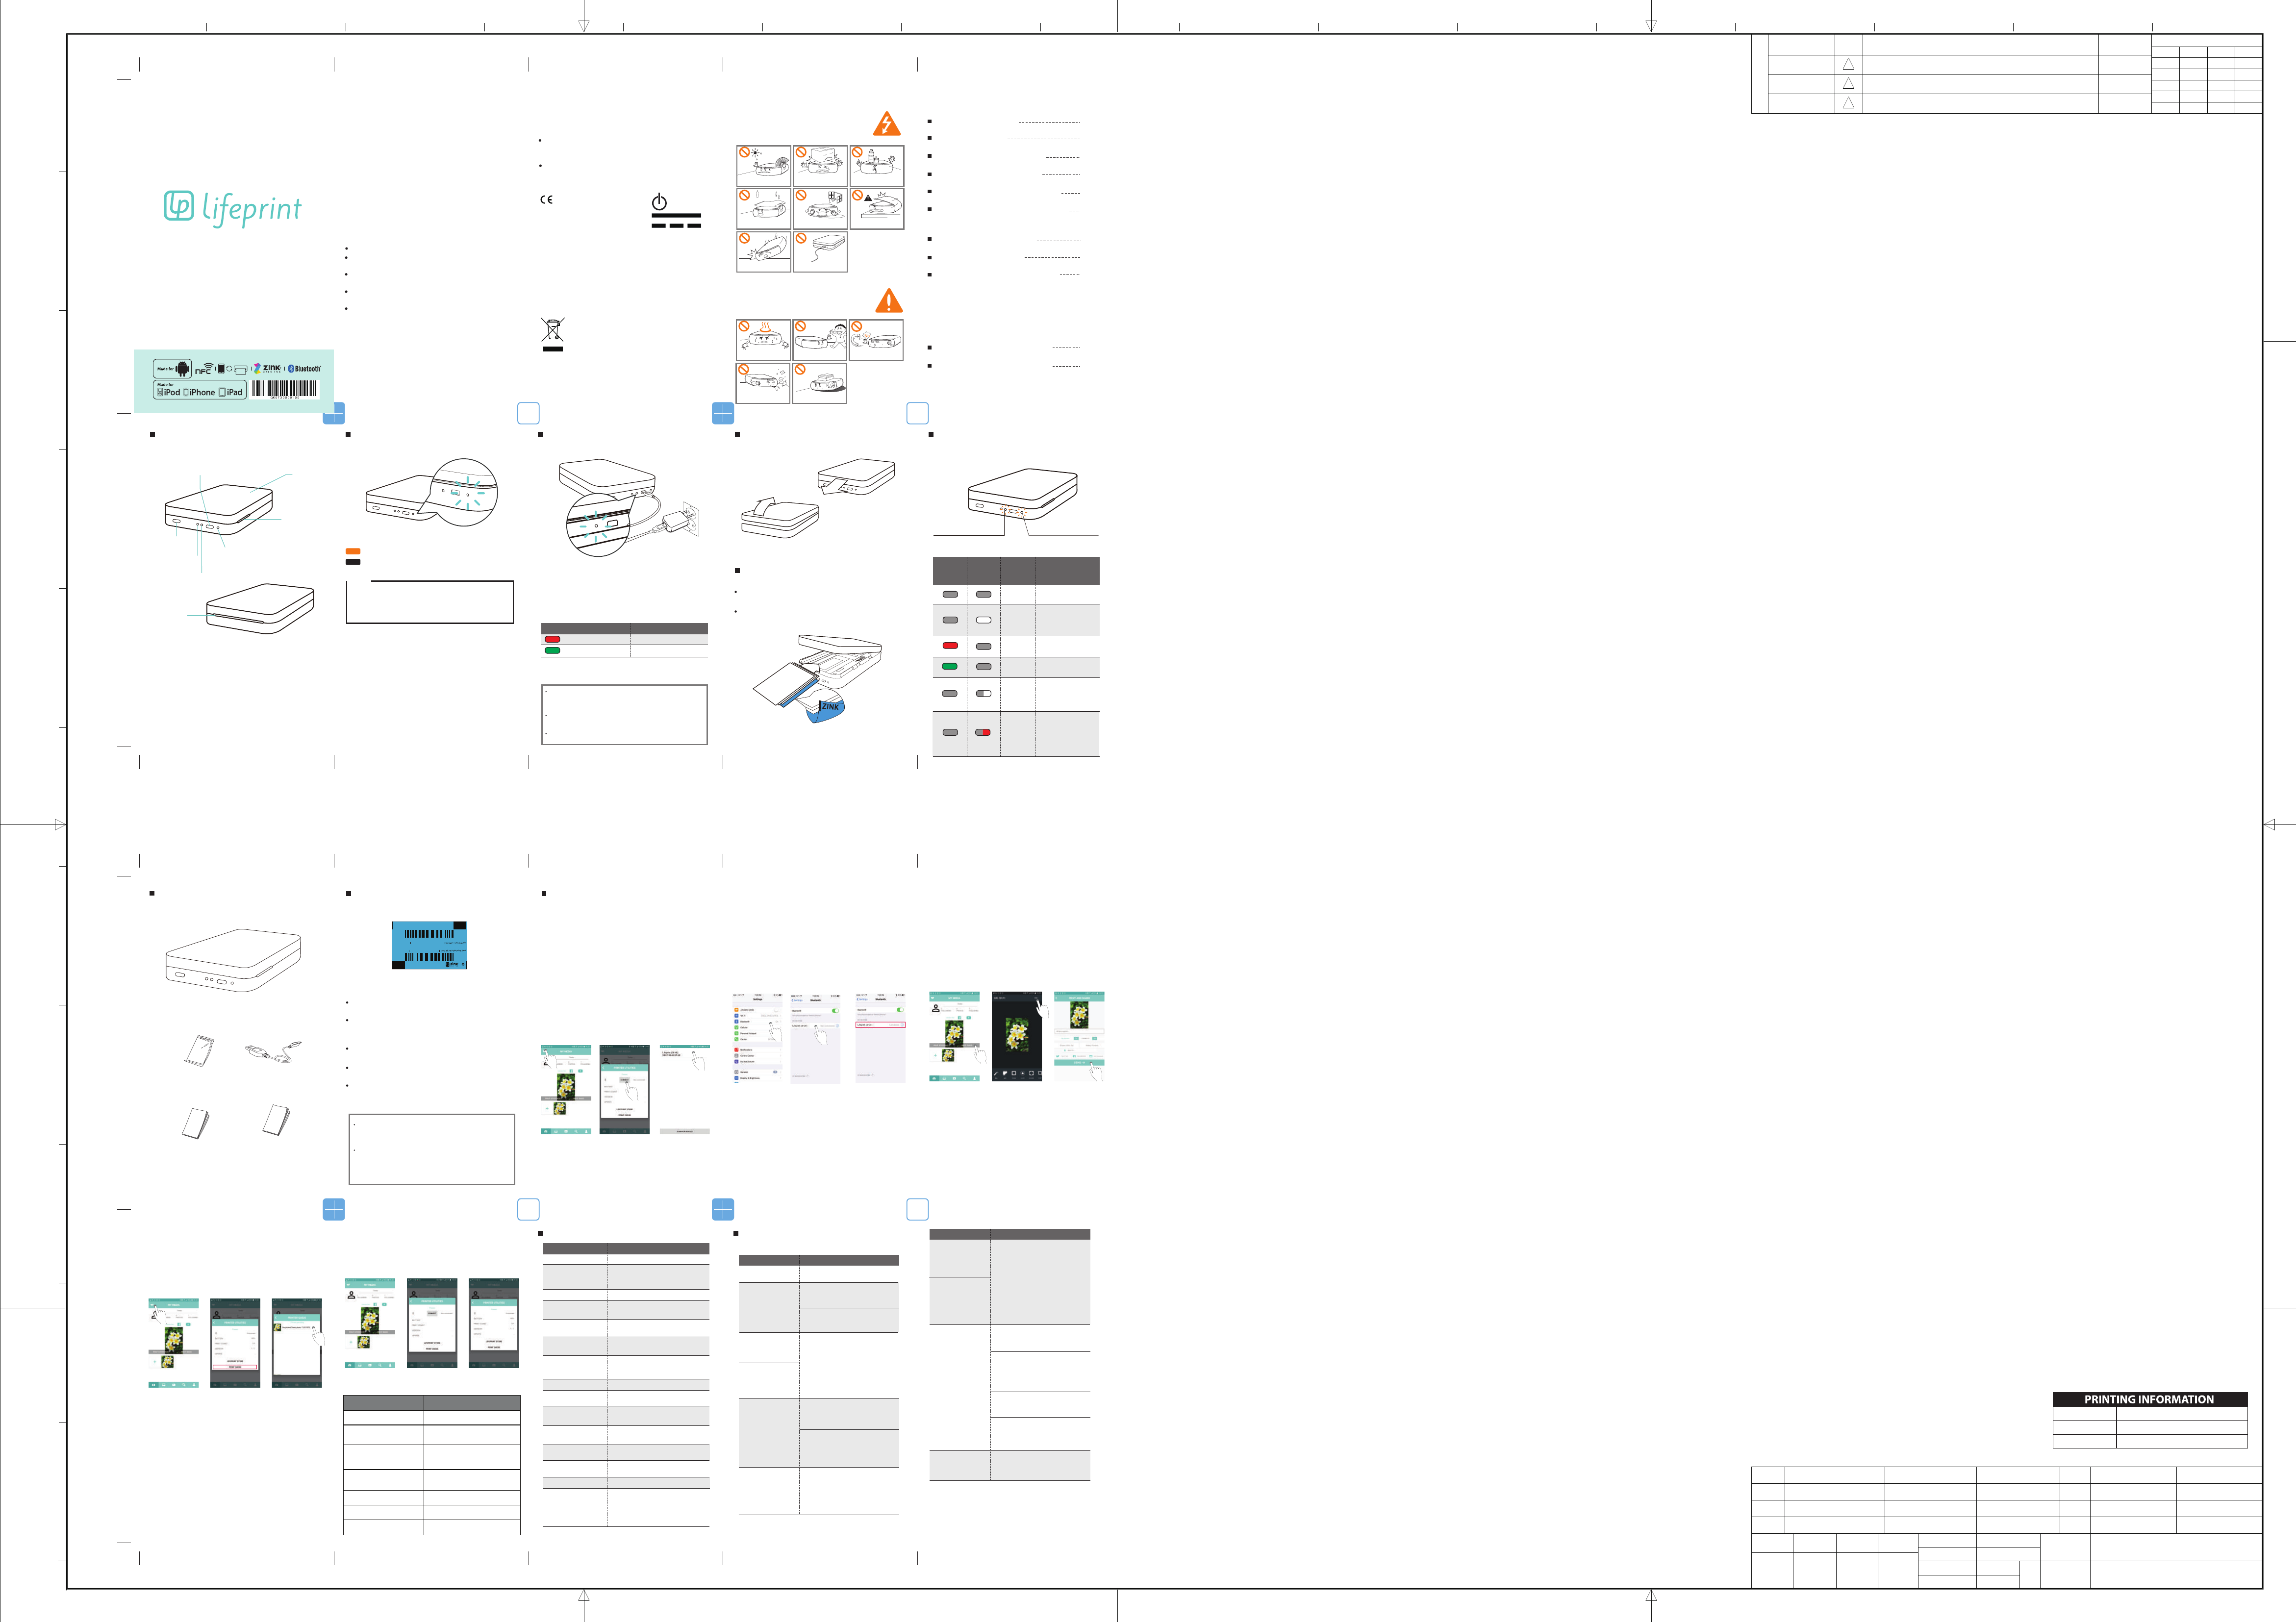
Description of LED Status
Indicators
DetailsCharging
status
indicator
Operating
status
indicator
Current
status
Off Turn on the power
to print.
Standby/
On
Wait for print
command. Turn off
automatically after
the set time.
Charging in
progress
The battery is
being charged.
The battery is fully
charged.
Charging in
completed
Operating/
Flashing
No paper, paper jam,
cancel operation,
cover open, low
battery, image not
supported, update
failure, etc.
Power off, image
transmission, image
processing, printing,
cooling standby
Error/
Flashing
Charge indicator LED Status indicator LED
MATERIAL
PROCESS
CMYK
COLOR
Offset Printing
6
2
78
43
9
11
16 17
12 1314
18 19
MANUAL USER (Japan)
GK07X0000100
2016.08.08
User’s manual
症状
Safety Precautions
Reorient or relocate the receiving antenna.
Increase the separation between the equipment and
receiver.
Connect the equipment into an outlet on a circuit
different from that to which the receiver is connected.
Consult the dealer or an experienced radio, TV
technical for help.
Only shielded interface cable should be used.
This equipment has been tested and found to comply
with the limits for a Class B digital device, pursuant to
Part 15 of the FCC Rules. These limits are designed to
provide reasonable protection against harmful
interference in a residential installation.
This equipment generate, uses and can radiate radio
frequency energy and, if not installed and used in
accordance with the instructions, may cause harmful
interference to radio communications. However, there is
no guarantee that interference will not occur in a
particular installation.
If this equipment does cause harmful interference to
radio or television reception which can be determined
by turning the equipment off and on, the user is
encouraged to try to correct the interference by one or
more of the following measures.
Finally, any changes or modifications to the equipment
by the user not expressly approved by the grantee or
manufacturer could void the users authority to operate
such equipment.
This device complies with Part 15 of the FCC Rules.
Operation is subject to the following two conditions:
(1) this device may not cause harmful interference, and
(2) this device must accept any interference received,
including interference that may cause undesired
operation of this device.
Safety Precautions
Keep out of direct sunlight and away
from a heat source.
Do not place heavy objects on the
product.
Do not place containers of liquid
on the product.
Do not spray water directly onto the
product when cleaning.
Do not place the product in very low
temperatures.
Do not attempt to disassemble, repair
and remodel it for yourself.
Do not drop or give it impact. Comply with rated (5V1A) voltage
and current.
A violation of labeling regulations can
cause serious injury or death
WARNING
Any changes or modifications in construction of this
device which are not expressly approved by the party
responsible for compliance could void the user's
authority to operate the equipment.
Changes and modifications not expressly approved by
the party responsible for compliance could void the
user's authority to operate the equipment.
CAUTION
CE WARNING
ETSI EN 300 328 V1.9.1
ETSI EN 301 489-1 V1.9.2
ETSI EN 301 489-17 V2.2.1
EN 60950-1:2006+A11: 2009+A1:2010+A12:2011+A2:2013
FCC ID : 2AJH8LP001
EN Test Regulations
2200
1 Avoid contact with leaking or a damaged battery.
2 Do not short battery teminals.
3 Adult supervision is recommended when product is
used by young children.
4 Avoid areas of excessive heat or moisture.
5 Do not disassemble the battery.
This product contains electrical or electronic
materials. The presence of these materials
may. if not disposed of properly, have
potential adverse effects on the environment
and human health.
Presence of this label on the product means it should
not be disposed of as unsorted waste and must be
collected separately. As a consumer, you are responsible
for ensuring that this product is disposed of properly.
BATTERY WARNINGS
It is desirable that it be installed and operated with at
least 20cm or more between the radiator and person’s
body(excluding extremities:hand,wrists,feet, and ankles)
Product specifications
Type
Size
Paper size 50 x 76 (mm)
Type of supported
image file/size
PNG(2550x3300)JPEG(baseline)
Within a maximum of 10M Byte
Progressive JPEG not supported
Paper used ZINK Paper (for Pomini only)
Paper storage
conditions
Temperature : 20 ~ 25°C
Humidity : 40 ~ 55% RH
Product operating
conditions
Temperature : 5 ~ 40°C
Humidity : Less than 70% (35°C)
Optimal print
conditions
Temperature : 15 ~ 32°C
Humidity : Less than 70%(32°C)
LED display Power on/Standby/
Communication/Charge/Error/
Print/Update
Communication Bluetooth 4.0
External connection
terminal Micro USB port (charging only)
USB power supply Rated DC 5V / 1.0A
adapter (optional)
Normal operating
voltage
Built-in battery 500mAh lithium ion
(rechargeable)
DC 8V
※ Product design and specifications are subject to
change without notice.
Android : 4.0 or higher
iOS : 5.1 or higher
(Support may not be provided
depending on the user’s Smart
phone version and environment.)
Support App
version
Proper image
resolution More than 1280 x 2448 pixel
Weight 186g
Items to check before
reporting a malfunction
The power does
not turn on.
Check to see if the battery is
charged.
Problems Checklist
Bluetooth
connection is not
established.
Reboot the Bluetooth of the
phone, or connect directly from
the Settings menu.
Try connecting in about 5
minutes after turning on the
power to the device.
Printing paper
seems to be
jammed.
Stopped during
printing operation.
The paper is automatically
ejected if you turn on the power
after turning it off. Print it after
printing out the Smart Sheet 2
to 3 times.
The printing paper should be
stored in an environment with
low temperature/humidity.
Do not fold or crumble the paper.
The power turns
off automatically
after a certain
period of time.
Check the Auto Time Off value
within “Settings” -> “see more”
of the App.(None, 3 minutes,
5 minutes, 10 minutes)
The operating status LED
flickering Red indicates there is
no power remaining on the
battery. In this case, charge the
battery with a dedicated adapter.
The printed photo
shows a line.
A slash mark
appears in the
middle of the
photo.
Print it again after printing out
the Smart Sheet 2 to 3 times.
(A line may appear in case
an impact is applied to the printer
during the printing operation.)
Problems Checklist
White LED flashes
and printed paper
does not come out.
This device requires the proper
temperature of (15~32°C) to
facilitate smooth printing
operation. Thus, a greater
warm-up time is required in
temperatures that are lower
than ideal, and cooling times
are greater when the temperature
is higher than ideal. Please wait
a moment to reach the proper
temperature.
Printed paper
comes out too late.
The printed image
quality differs
greatly from the
original image
quality.
The image quality is somewhat
degraded when editing the image
using Pomini App’s Edit menu.
Print it again after printing out the
Smart Sheet 2 to 3 times.
The Smart Sheet within the same
pack with printing paper should
be used.
Check to see if the image has the
proper resolution (1280x2448) or
higher.
The printed image quality cannot
be guaranteed in case you use
printing paper of other companies.
Use the original printing paper.
Turn on the power after pressing
the Reset Hole with a pointed
object.
The above methods
do not resolve the
problems.
Do not place the product in a hot or
humid place.
Keep out of the reach of children. Keep away from magnetic interference.
Do not place the product in a place
with humidity, dust and soot.
Wipe it with a dry cloth when cleaning.
NOTICE
A violation of labeling regulations
causes minor injury or damage to the
product
Direct Current
STAND-BY
Components check
Print
Zink photo paper
Manual
USB Cable
Rerulator sheet
Charging the battery
This device has a built-in battery.
Make sure that the battery is charged fully before use.
Average charging time: About 1 hour and 30 minutes
Charging status indicator Description of status
Charging in progress
Charging completed
The use of a non-standard charger can cause
malfunction and exception from the subjects of
warranty service.
Do not give abnormal impacts.
Notice
Checking charging status indicator
There may be the risk of electric shock during
the process of charging, so please use with care.
Cover Open method
Inserting printing paper
Prepare the blue Smart Sheet and white printing paper
after unpacking the photo printing paper pack.
Open the top cover and insert the Smart Sheet and
printing paper as shown in the figure.
Push
Open
Application Connection and
Printing
<APP Connection>
- Android Connection
1. Select the exclusive APP and execute it after turn
on the printer.
2. Select the printing menu on the top of the left
main screen of APP.
3. Press the Connect button.
4. Connect the “Lifeprint (XX:XX)” from the searched
lists.
5. It will be connected with paired printer.
6. Be moved main screen automatically after press the
printing button on the top of the left screen.
7. Press the PRINT QUEUE at the bottom of line.
8. Select the image for printing, the image will be saved
on waiting list after send the image.
- ios Connection
1. Turn on the power of the device.
2. For Bluetooth connection, change the mode to
“Turn on” [Bluetooth] from [Settings] of the device.
3. Connect “Lifeprinter (XX:XX)” in the searched list.
(MAC Address can be checked in the label inside
the device.)
<Printing (both for Android & iOS)>
1. Execute the Lifeprint App.
2. Select the designed photo on main screen.
3. Press the PRINT IMAGE button.
4. Press the completed printing button on the top of the
right screen after edit on Photo-editor mode.
5. Press the SEND button at the bottom of line.
ZINK Smartsheet
®
W888-0134B
Must Load! Barcode facing
www.ZINK.com
装纸时需将此纸放于底部 読み込み時は用紙の1番下に入れてください
バーコードを下にして必ず読み込ませてください !
FROM ZINK IMAGING
Zink Smart Sheet
Features
Provide optimum image quality correction suitable
for each printing paper pack
Remove foreign objects from printer head.
How to use
Eject automatically before printing out the paper
in initial output.
Poor quality and occurrence of horizontal lines can be
improved by repeatedly printing 2 to 3 times.
Recycle until the printing paper of each printing paper
pack is exhausted.
Notice
Optimum image quality cannot be guaranteed
when the Smart Sheet of each printing paper pack
is not used, or the bar code is damaged.
Long-term storage after opening the printing
paper pack can have a bad effect on printing
quality due to a discoloration or distortion of
printing paper.
Function Description
connect Setting with Print
Battery Battery Gauge indication
PRINT COUNT Accumulated total printed
images with using printer
VERSION Firmware Version indication
UPDATE Available or not for Updating
LIFEPRINT STORE Move to STORE
PRINT QUEUE Waiting list for Printing image
<Setting (both for Android & iOS)>
<Description for Setting>
1. Select the Print button on the top of the left screen
on Main
2. Do setting and checking for each functions on Devices
screen.
disconnect connect
Names of parts
Top cover
Micro USB Port (only for charging)
Push the
power button
Reset button
Kesnsington lock
Charging Indicator
Status Indicator
Paper exit
Table of Contents
Names of parts
Power on/off
Charging the battery
Cover Open method
Inserting printing paper
Description of LED Status
Indicators
Components check
Zink Smart Sheet
Application Connection
and Printing
- APP Connection
Android Connection
ios Connection
- Printing (both for Android & iOS)
- Setting (both for Android & iOS)
Power on/off
ON
Press the power button for about 3 to 5 seconds.
OFF
Press the power button for about 2 seconds.
Note
When you turn on the power, the operating status
LED indicator blinks for about 5 seconds.
You can print it out when the blinking ends,
and the LED is turned on white.
6
7
8
9
9
10
11
12
13
18
19
Product specifications
Items to check before
reporting a malfunction