Luminex 5842 12-Bluetooth Ceiling Light User Manual 351 1542
Luminex International Co., Ltd 12-Bluetooth Ceiling Light 351 1542
Luminex >
Users Manual
Important to Know:
1. If you are not familiar with state and local electrical
codes, it is recommended that you consult with a
qualified electrician.
2. This fixture requires a 120 VAC, 60 Hz power
source. Using non-replaceable LED bulb.
3. Mobile device requirements:
IOS 8.x or later.
Android v4.4 or later.
Phone must also have Bluetooth version 4.0 or
later.
Maximum Wattage: 18 W
Working Temperature Range: 14°F ~ 122°F
Features:
1. Energy saving LED fixture.
2. Customize your color temperature from Warm White
to Daylight.
3. Sync multiple units.
4. Set on/off schedule.
5. IOS & Android™ compatible.
ASSEMBLY AND INSTALLATION
INSTRUCTIONS
352-5842
160607
WARNING:
TO AVOID RISK OF ELECTRICAL SHOCK, BE SURE TO SHUT OFF
POWER BEFORE INSTALLING OR SERVICING THIS FIXTURE.
NOTES: 1. Before installing, consult local electrical codes for wiring and grounding requirements.
2. Customer Service: 1-800-887-6326 (weekdays 9 a.m. – 5 p.m. CST)
3. READ AND SAVE THESE INSTRUCTIONS.
Hardware Package (included):
Turn off the power at fuse or circuit box
Mounting Strap (A) Green Grounding
Screw (C) Long Screw(D)
Mounting Screw (B) Wire Nut (E)
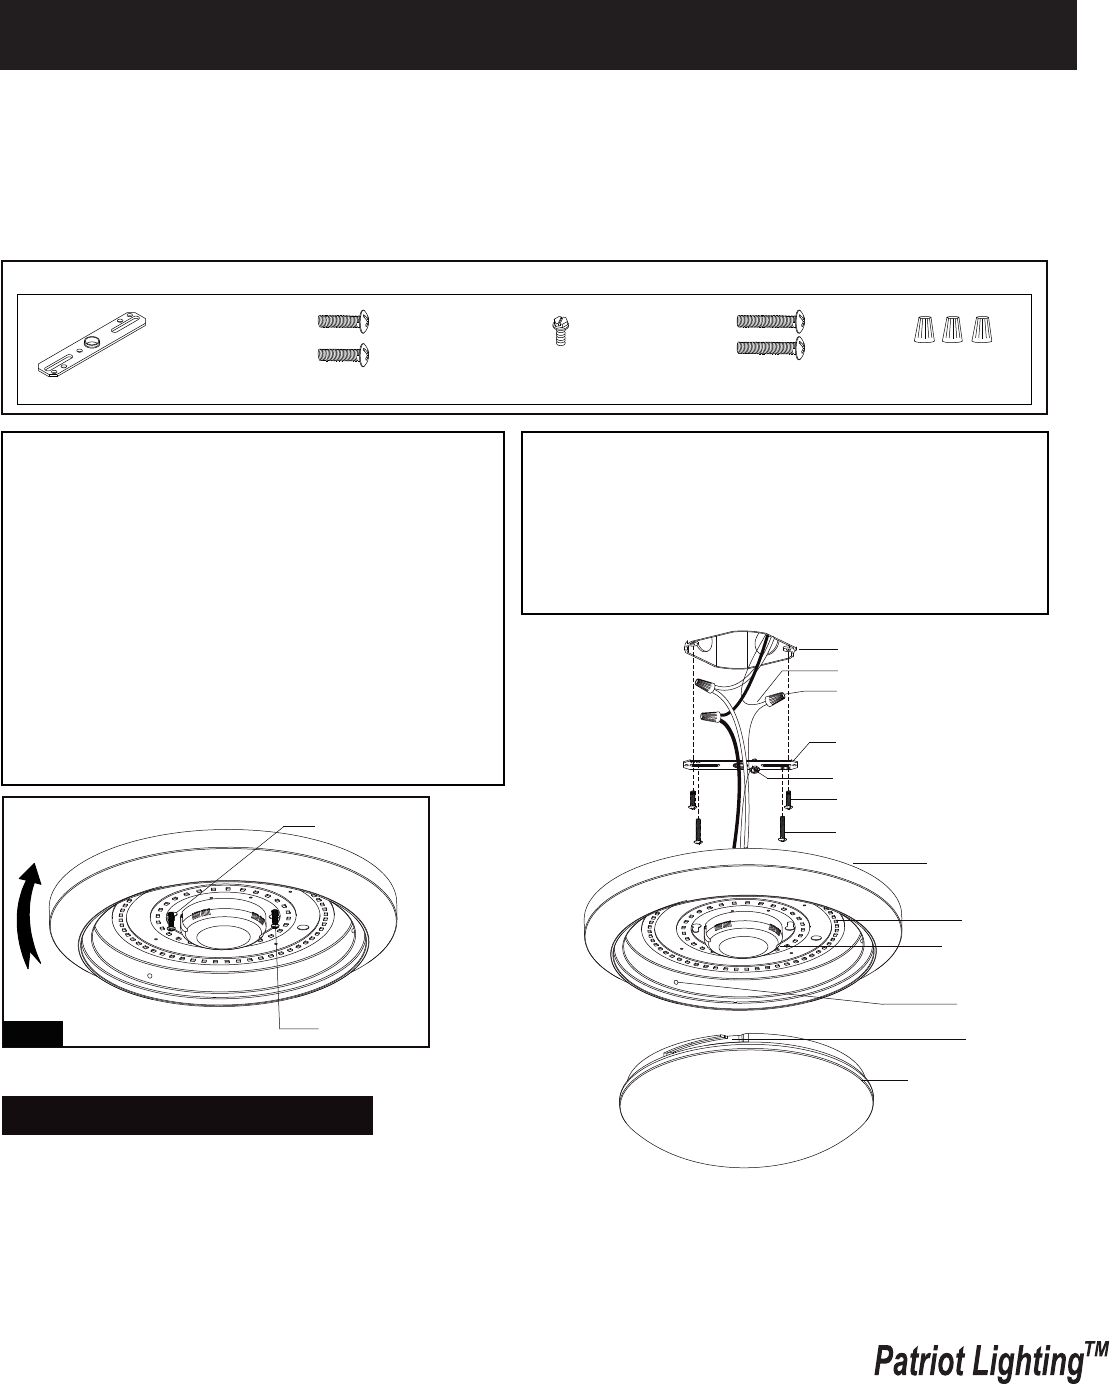
Ceiling Pan
Stud
Driver with Bluetooth
module
Plastic Shade
Long Screw
Key Hole Slot
Slot
LED Module
Fig.1
1. Remove the plastic shade from ceiling pan.
2. Attach the two long screws to the holes on the mounting strap.
Thread them in part way: 2 to 3 turns only.
3. Attach the mounting strap to the outlet box using two mounting screws.
Warning: LED electronics can be damaged by electro static discharge (ESD)shock. Before
installation, discharge yourself by touching a grounded bare metal surface to remove this
hazard. To avoid damage, do not touch the LED module.
Page 1 / 8
Outlet Box
House Grounding Wire
Wire Nut (E)
Long Screw (D)
Mounting Strap (A)
Green Grounding Screw (C)
Mounting Screw (B)
Installtion Steps
The following parts are available for re-order if damaged or missing. Call us toll-free at 1-800-887-6326
The fixture will not light.
Ensure the power supply is on.
Ensure the circuit breaker is in the on
position.
Turn Bluetooth “on” in the device’s
settings.
Turn Bluetooth “on” in the device’s
settings.
Turn Bluetooth “on” in the device’s
settings.
Have existing user turn off Bluetooth
connection.
Re-start Bluetooth and APP.
Ensure your device is within 32 feet
of the narrowest light fixture and
ensure each light is within 32 feet.
Turn on the power to the light.
The power is off.
The circuit breaker is off.
Bluetooth is not turned on.
Bluetooth is not turned on.
Bluetooth is not turned on.
The Power to the light is turned off.
The fixture is occupied by other users.
Connection failure.
Out of connection distance.
Problem Possible Cause Solution
The fixture is not
responding to the APP.
The APP is not turning
on the light fixture.
The APP is not finding
the light fixture.
160607
Turn on the power at fuse or circuit box
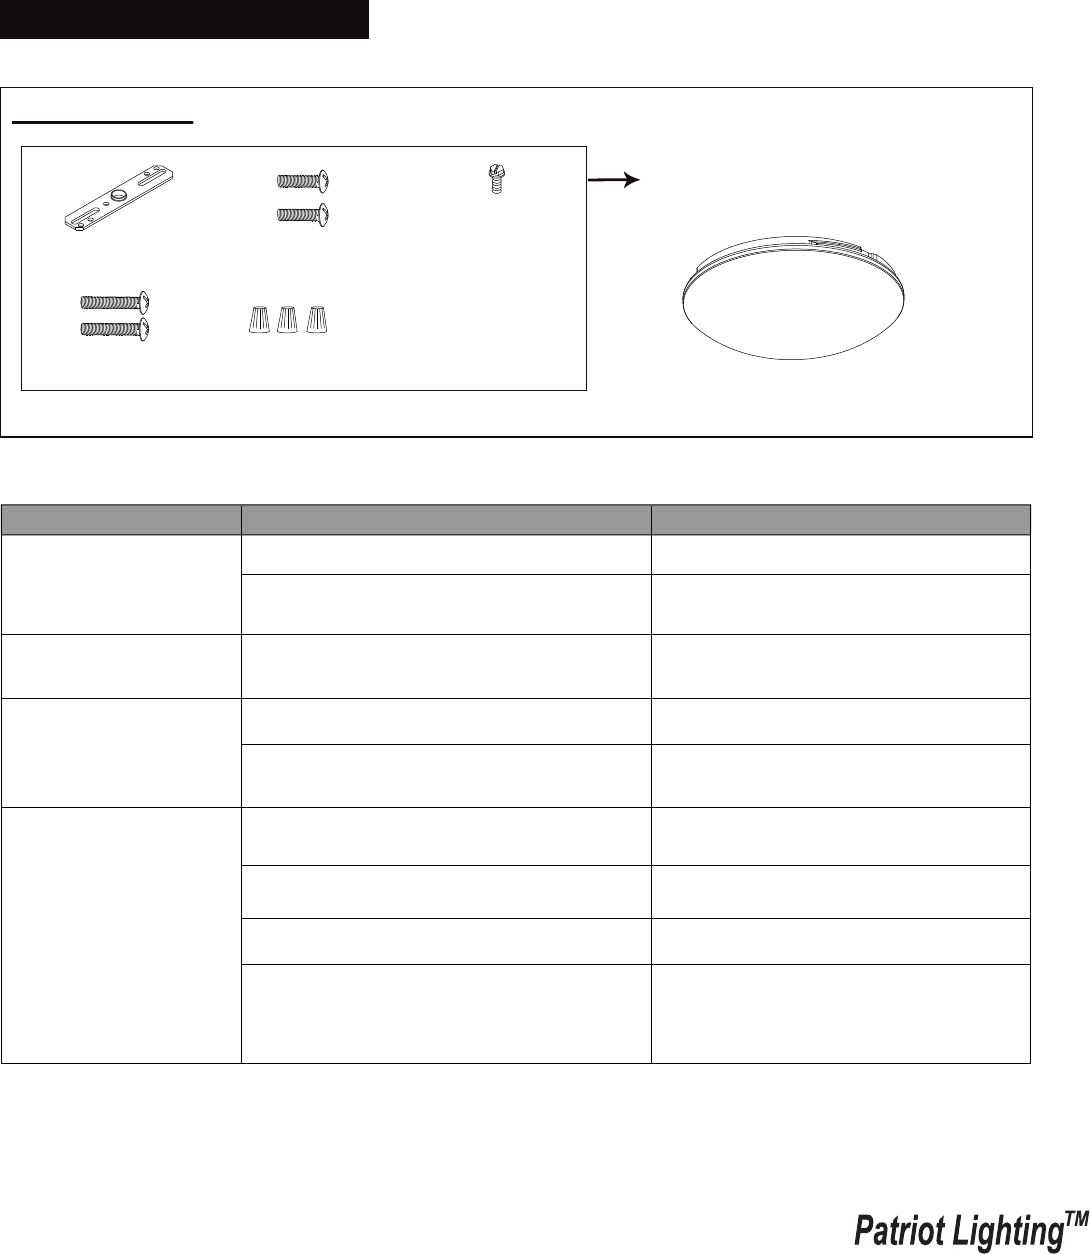
Plastic Shade
9821PS
Page 2 / 8
Spare Parts List:
Assembly Kit
5564MM (1 SET)
Mounting Strap (A) Green Grounding
Screw (C)
Long Screw(D)
Mounting Screw (B)
Wire Nut (E)
4. Pull out the source wires from the outlet box. Make wire connections using wire nuts as follows:
---Connect the hot wire (usually black insulation) from the fixture to the black wire from the power source.
---Connect the neutral wire (usually white insulation) from the fixture to the white wire from the power source.
---Attach the fixture grounding wire (usually green insulation or bare wire) to the mounting strap with the green
grounding screw, and then connect them to the house grounding wire with the wire nut.
Carefully put the wires back into the outlet box.
5. Attach the ceiling pan to the mounting strap by inserting two long screw heads into the key holes. Rotate the ceiling
pan until it is locked into place, and then tighten the long screws to secure it. (See Fig.1)
6. Attach the plastic shade back to the ceiling pan by aligning studs with slots, and turn it clockwise until it is locked in
place.
Troubleshooting

160607
Page 3 / 8
5-Year Limited Warranty:
This Patriot Lighting fixture carries a limited warranty against defects in material or workmanship. If the Patriot Lighting
product fails at any time within five (5) years after the original date of sale due to defects in material or workmanship,
return the product to Menards with the original sales receipt. At its discretion, Patriot Lighting will replace the defective
fixture with the same or similar fixture or issue a refund. This warranty and any implied warranty (including but not limited
to any implied warranty of merchantability or fitness for a particular purpose) does not cover glass globes, light bulbs and
other expendable items. This warranty excludes coverage of finish or color against tarnishing, flaking, and discoloration.
If the original purchaser ceases to own the Patriot Lighting product this warranty and any implied warranty will be void.
This warranty does not cover damage caused by misuse or abuse, including but not limited to improper installation,
improper usage, accident, negligence, unauthorized repair, unauthorized modifications, or unauthorized maintenance of
the fixture. This warranty does not include reimbursement for inconvenience, installation, setup time, returned shipping
charges or defects, losses, labor, injuries to personal property.
This warranty gives the consumer specific legal rights, and the consumer may have other rights which vary from state to
state. The seller’s employees are not qualified to advise on the use of the fixture. Any oral representations made will
not be binding on seller or its employees.
For questions regarding this product, call toll-free at 1-800-887-6326.
FCC Statement
1. This device complies with Part 15 of the FCC Rules. Operation is subject to the following two conditions:
(1) This device may not cause harmful interference.
(2) This device must accept any interference received, including interference that may cause undesired operation.
2. Changes or modifications not expressly approved by the party responsible for compliance could void the user's
authority to operate the equipment.
NOTE: The manufacturer is not responsible for any radio or TV interference caused by unauthorized modifications
to this equipment. Such modifications could void the user’s authority to operate the equipment.
NOTE: This equipment has been tested and found to comply with the limits for a Class B digital device, pursuant to
part 15 of the FCC Rules. These limits are designed to provide reasonable protection against harmful interference
in a residential installation.
This equipment generates uses and can radiate radio frequency energy and, if not installed and used in accordance
with the instructions, may cause harmful interference to radio communications. However, there is no guarantee that
interference will not occur in a particular installation. If this equipment does cause harmful interference to radio or
television reception, which can be determined by turning the equipment off and on, the user is encouraged to try to
correct the interference by one or more of the following measures:
- Reorient or relocate the receiving antenna.
- Increase the separation between the equipment and receiver.
- Connect the equipment into an outlet on a circuit different from that to which the receiver is connected.
- Consult the dealer or an experienced radio/TV technician for help
This equipment complies with FCC radiation exposure limits set forth for an uncontrolled environment. This equipment
should be installed and operated with minimum distance of 20 cm between the radiator and your body.
Setting for single light through mobile device (Take IOS for example as below.
Android will be slightly different).
160607
Page 4 / 8
User Guide
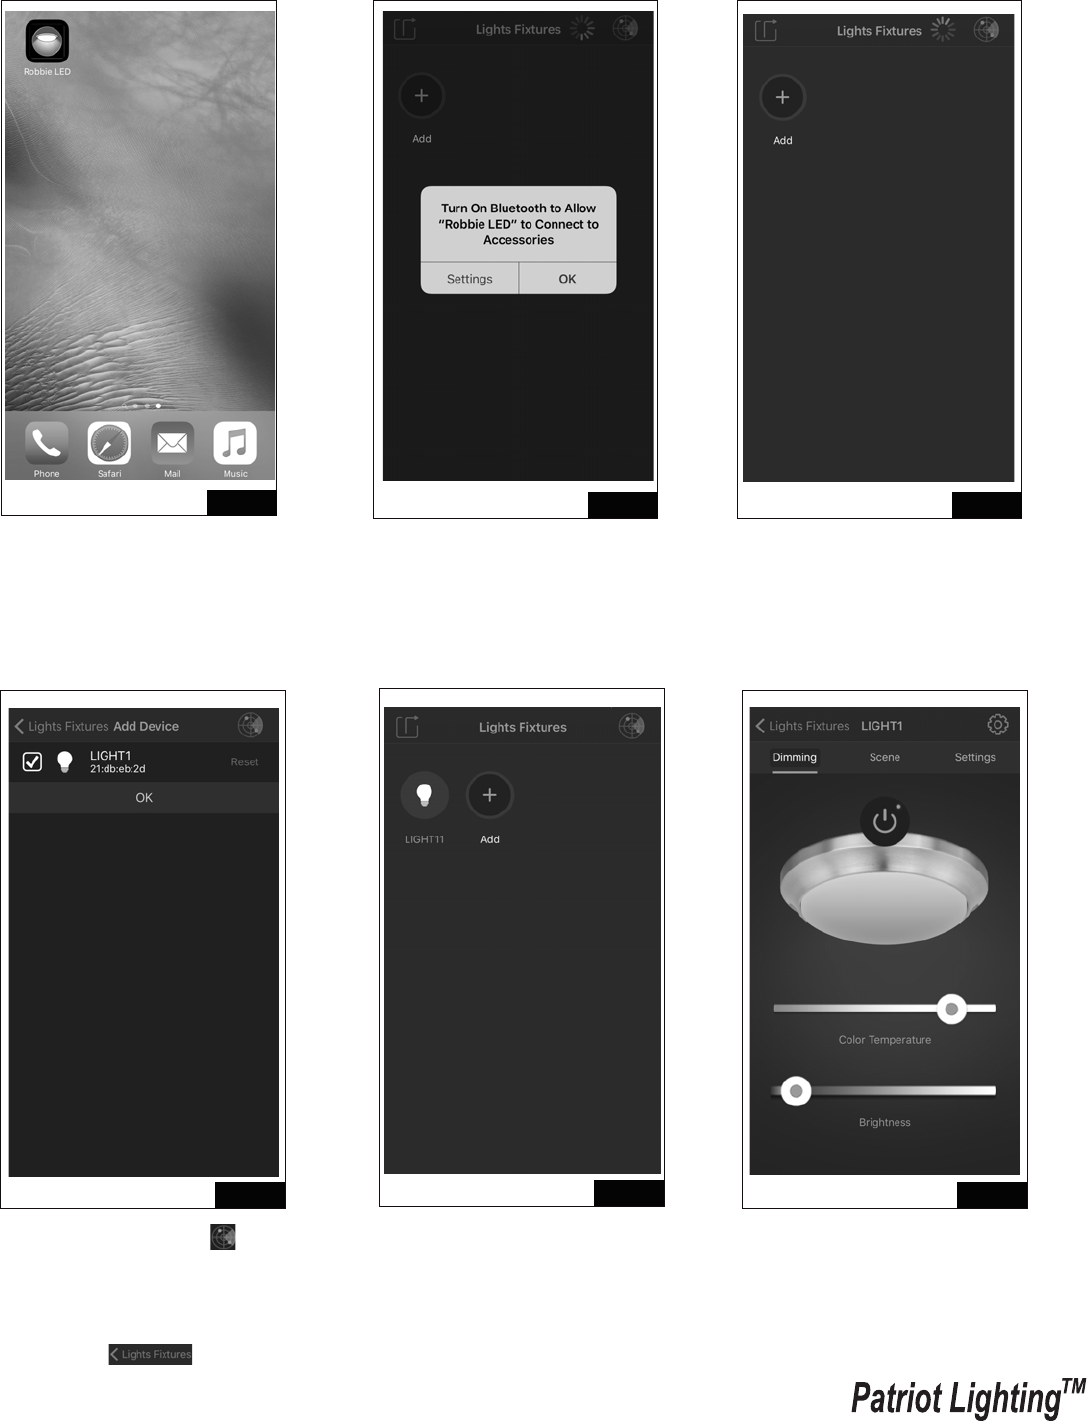
Fig.1 Fig.2
Fig.6
Fig.3
Fig.4 Fig.5
1. Search “Robbie LED” at Apple
store or Android Google Play.
Download the “Robbie LED” APP
onto the device. Start the APP.
2. Turn on Bluetooth to allow
“Robbie LED” to connect to
accessories. Press “Settings”
and turn on Bluetooth.
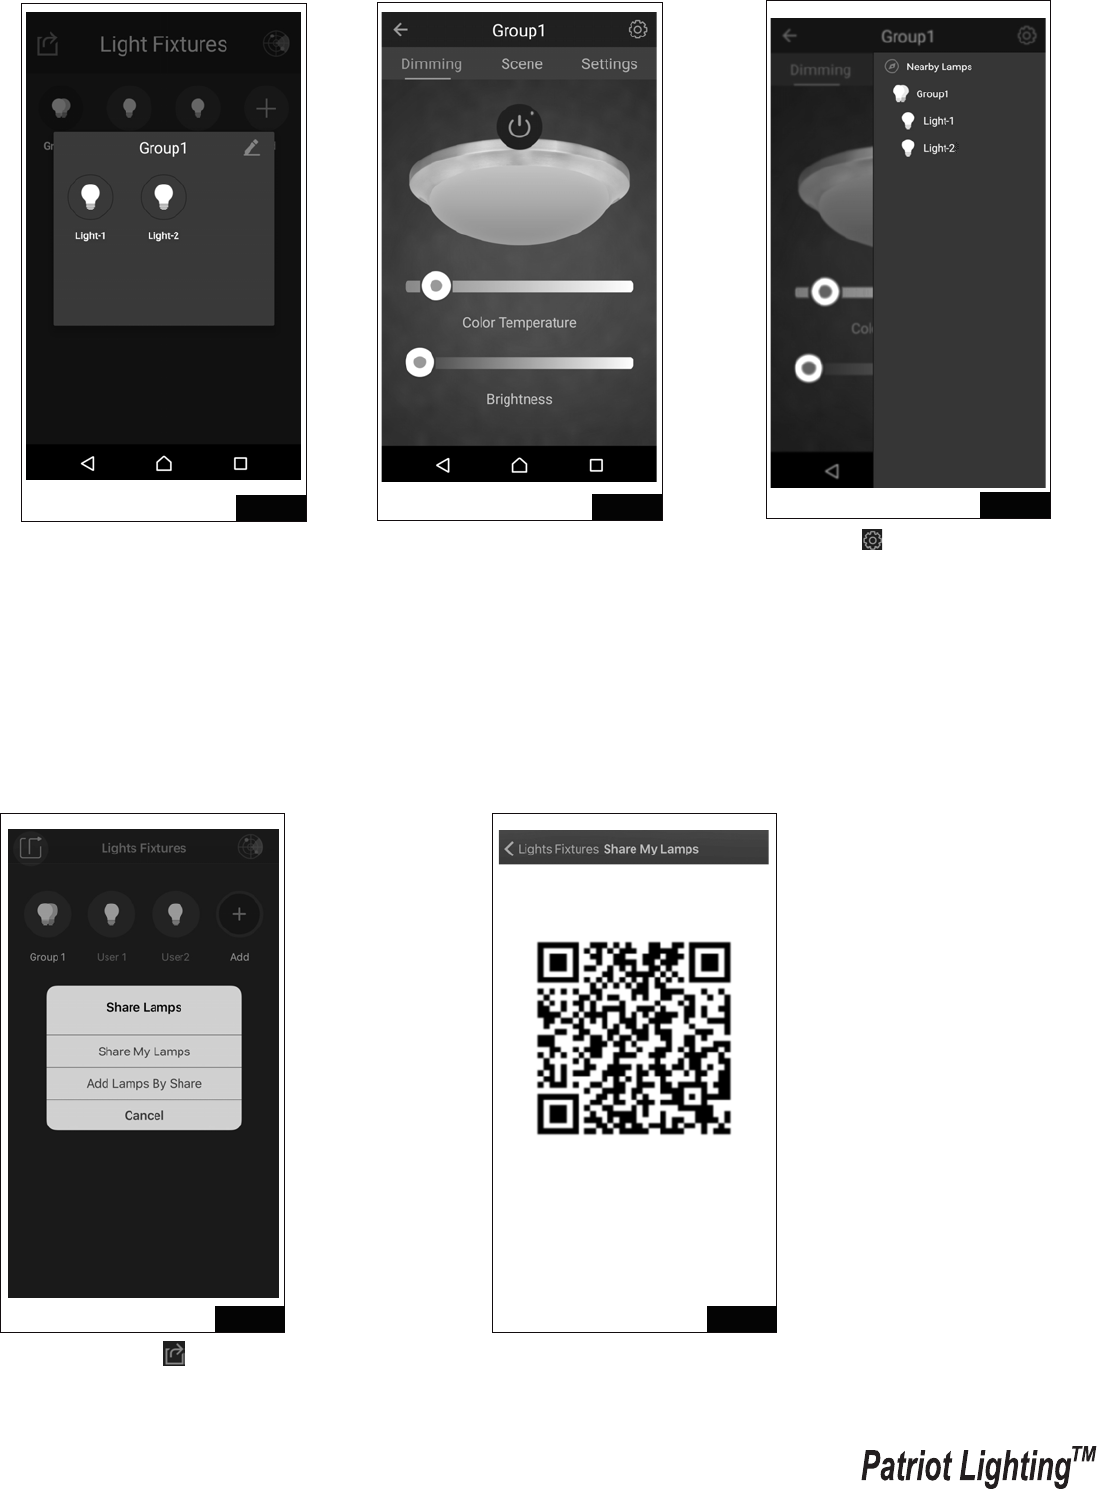
6. Select “Dimming” to control on/
off, color temperature and
brightness.
3. Turn off the power for light
fixture at this time, and then
select the “Add” icon.
4. Select the top right “ ” icon,
then turn on the power of light
fixture. Bluetooth searches the
light which needs be selected.
Select “OK” and then select
top left “ ” icon.
5. Select the Bluetooth device.
Setting for multiple lights through mobile device (Take Android system for
example as below. IOS will be slightly different)
160607
Page 5 / 8
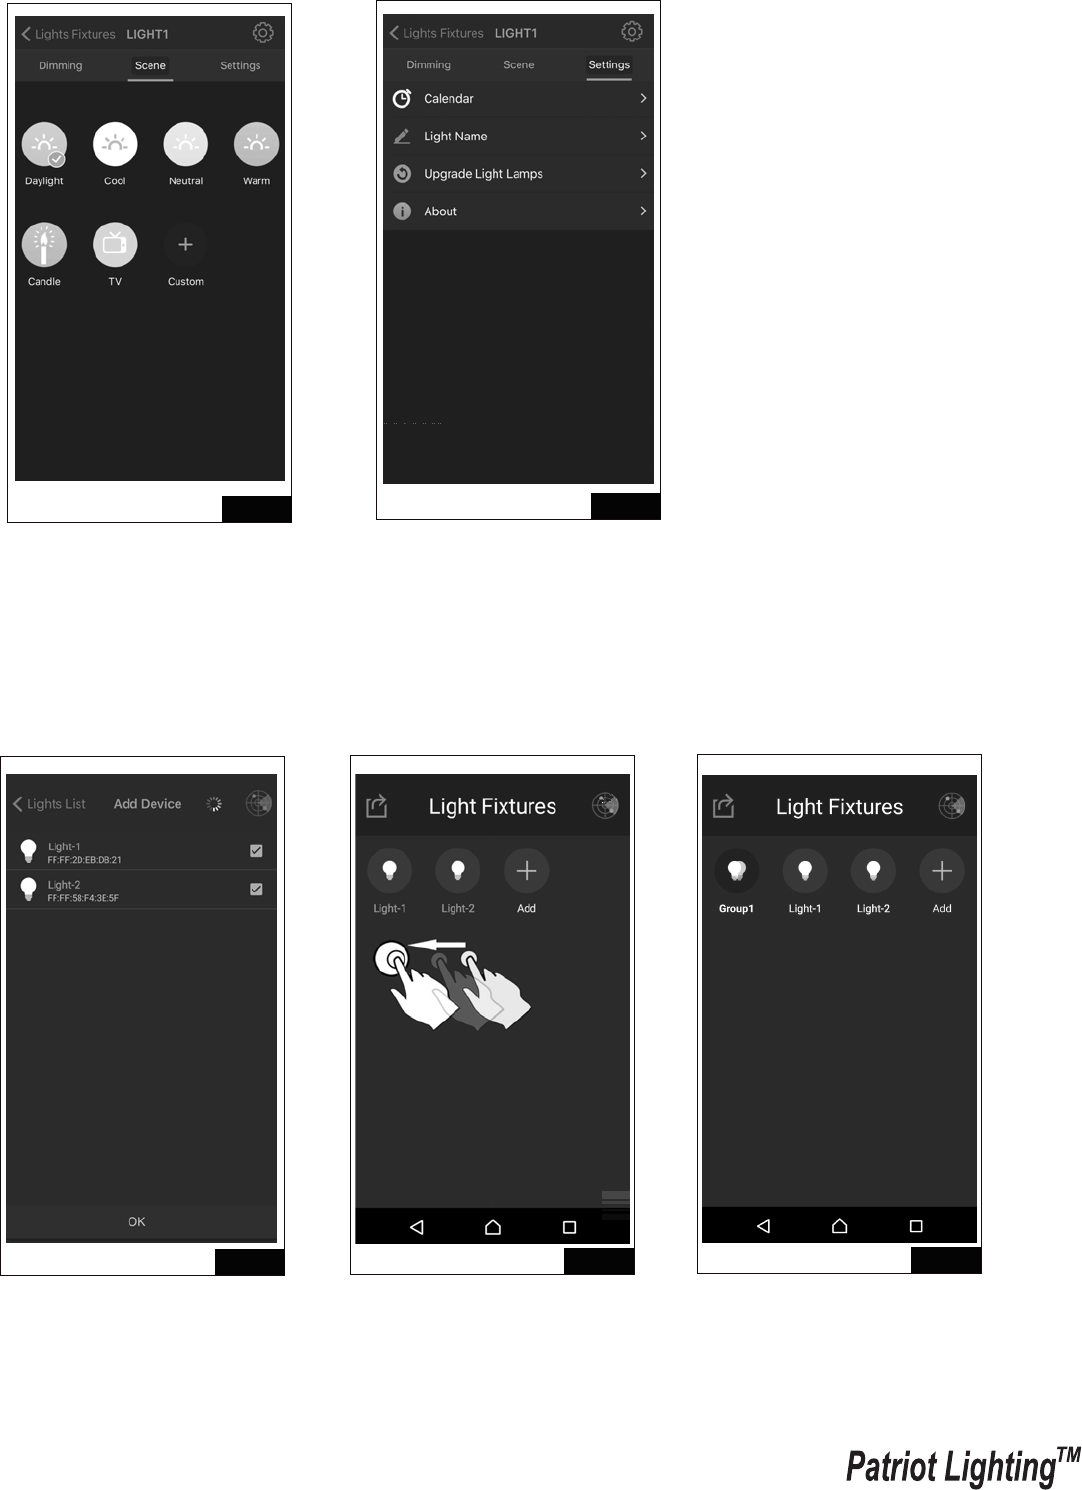
Fig.7
Fig.10 Fig.11
Fig.9
Fig.8
7. Select “Scene” to choose default
scenes or customize your own.
8. Select “Settings” to set on/off schedule,
change the name of the light, and find
the latest APP version to upgrade.
2. Press and hold one light, then
drag to another light to creat
a group. The fixtures grouped
will flash 3 times.
3. The group you have created
is now shown in the list.
1. Select the multiple lights that
have been found, then press
“OK”.
Sharing light fixtures with another user.
User may share or receive existing light fixtures with another user through following
instructions:
A: Share My Lamps
160607
Page 6 / 8
Fig.13 Fig.14
Fig.15 Fig.16
Fig.12
4. Press and hold group light icon
to rename Group.
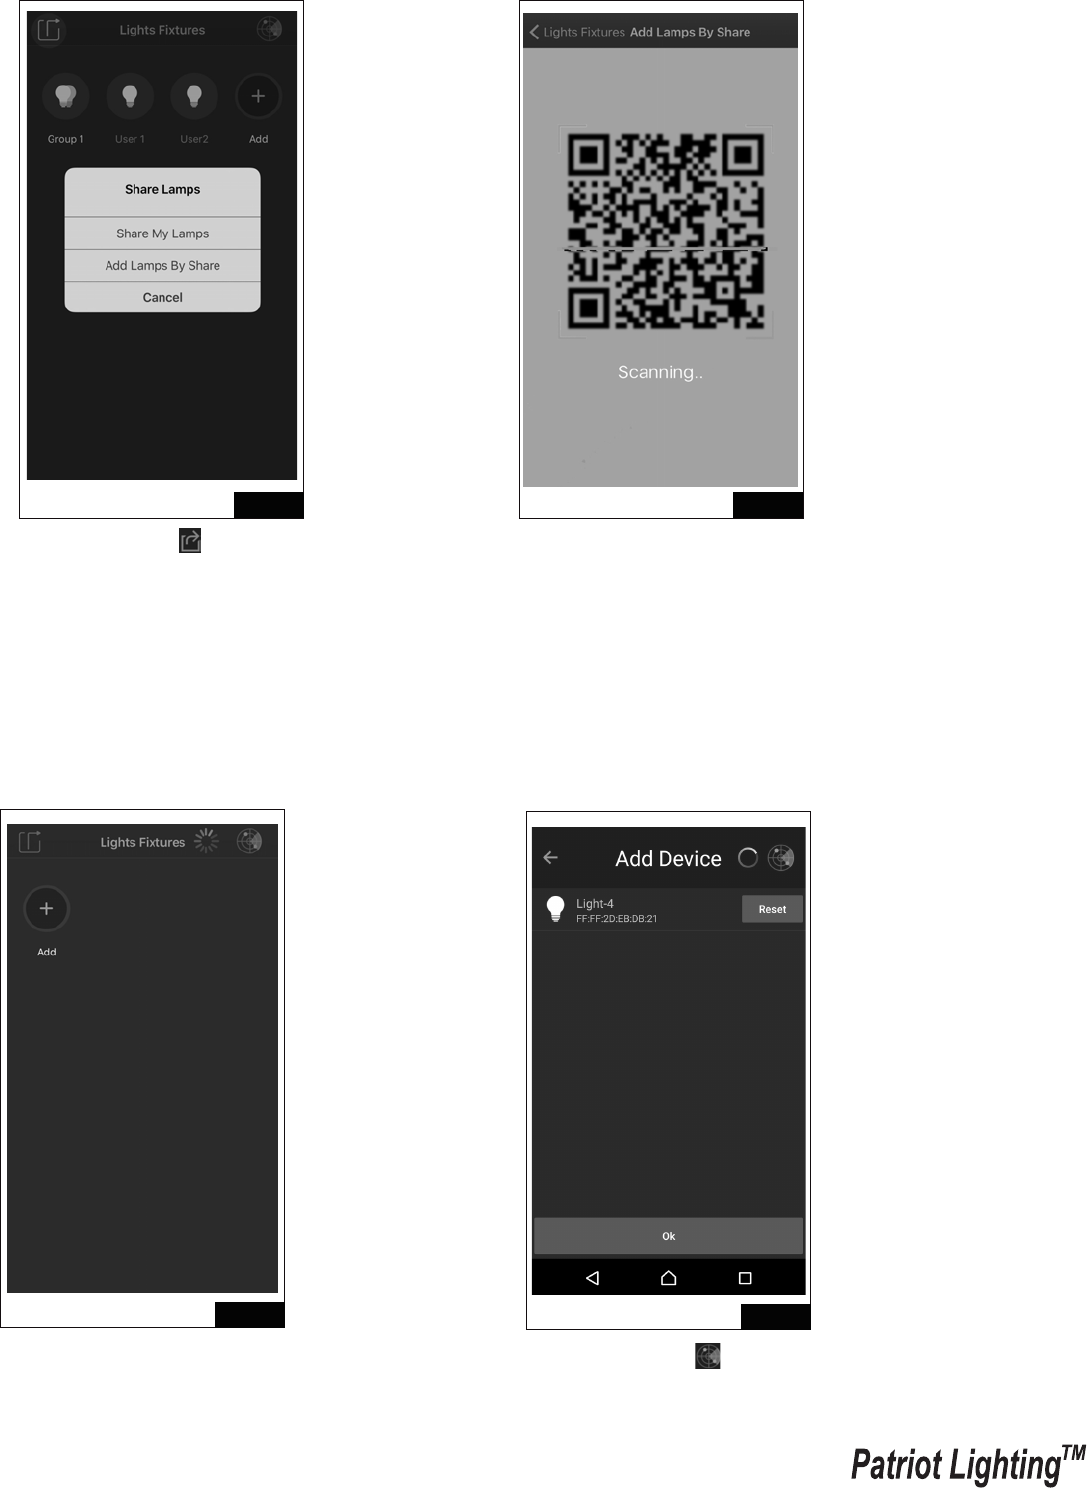
1. Select top left “ ” icon and
select “ Share My Lamps”. 2. QR code will be generated,
allow another user to scan.
5. Select Group1 to control on/off,
color temperature and
brightness. Also scenes and
setting for group lights.
6. Select “ ” icon to change the
setting of single light or Group.
B: Add Lamps by Share
160607
Page 7 / 8
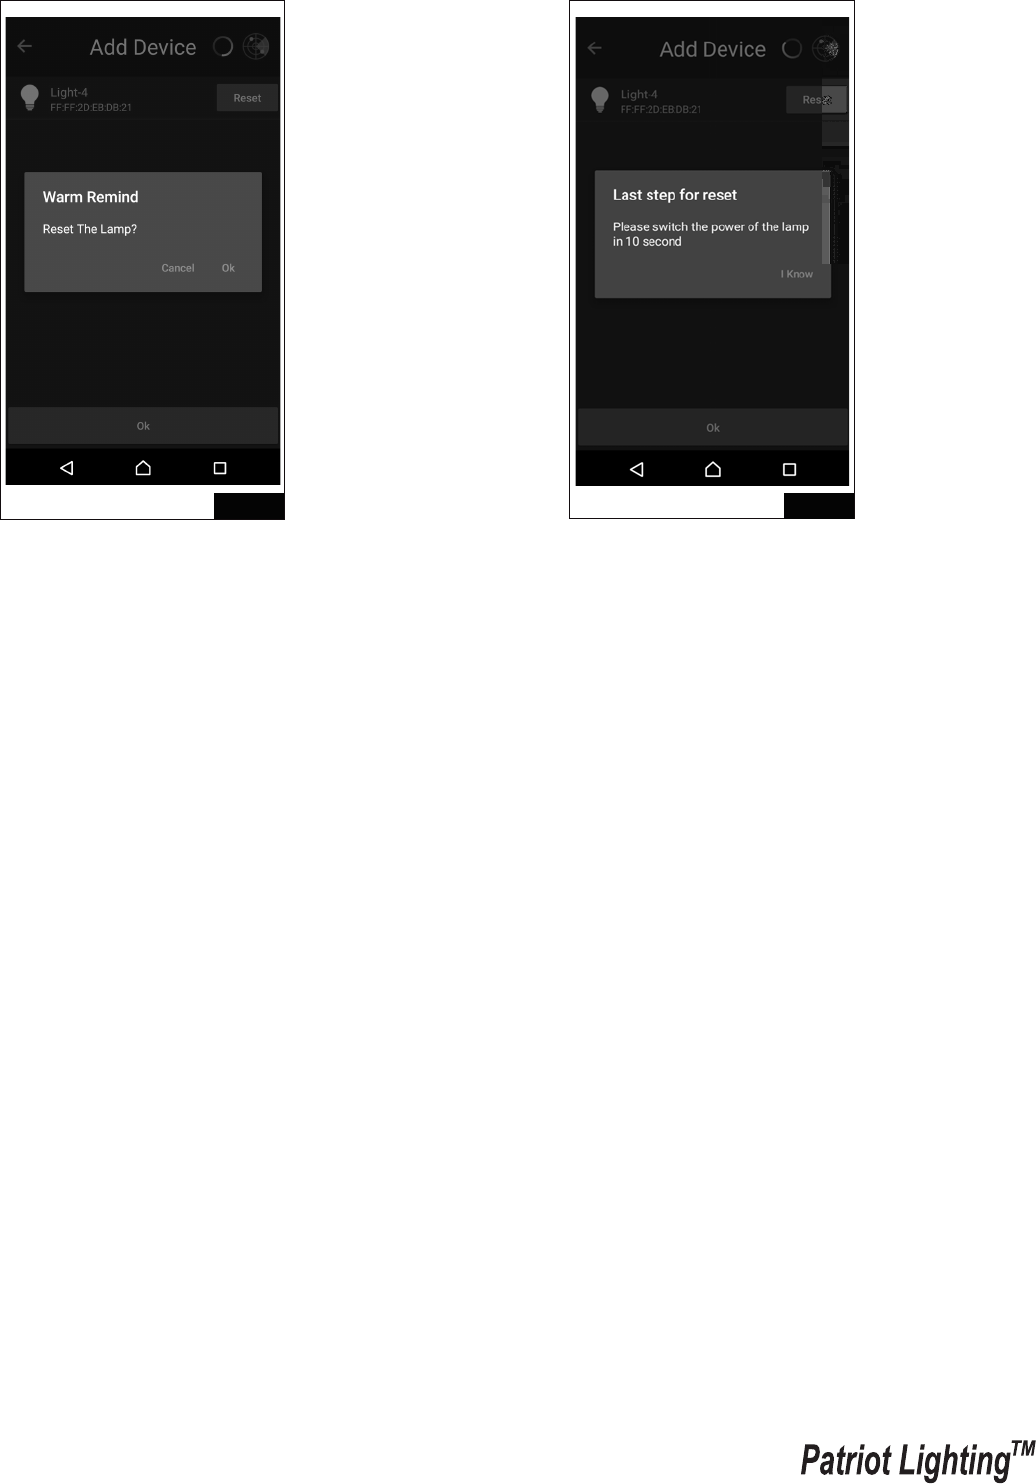
Reset Light Fixture
Fig.17 Fig.18
Fig.20
Fig.19
2. Scan the QR code generated from
another user to gain access of their
light fixtures.
1. Turn off the power of light
fixture then select “Add”
icon.
1. Select top left “ ” icon and
select “Add Lamps By Share”.
2. Select top right “ ” icon, then
turn back on the power of light
fixture.
160607
Page 8 / 8
Fig.21 Fig.22
3. Select the light fixtures you want
to reset by pressing “Reset”, and
press “OK” to proceed.
4. Select “I Know” then turn the
light fixture “OFF” and “ON”
immediately to complete the
reset.