Lutron Electronics 0056 Electronic dimmer with RF communication User Manual
Lutron Electronics Company Inc Electronic dimmer with RF communication
User Manual
Load Specifications
Control Load Type Min.
Load
Max.
Load
SZ-1SD
Incandescent 10 W 150 W
Halogen 10 W 100 W
Compact
fluorescent 10 W 30 W
Important Notes
Install in accordance with all local and
national electrical codes.
Environment: Ambient operating
temperature: 32 to 104 °F (0 to 40 °C),
0 to 90% humidity, non-condensing.
Indoor use only.
Cleaning: To clean, wipe with a clean
damp cloth. DO NOT use any chemical
cleaning solutions.
RF Device Placement: RF dimmers
and switches must be located within 20
feet (6 m) of an RF signal repeater or a
device configured as a repeater.
Stanza RF dimmers or switches cannot
be controlled by the system until they
are addressed and programmed. They
will work as stand-alone controls only.
Range and performance of the Stanza
system are dependent on a variety of
factors, including:
• Distance between system components
• Geometry of the space
• Construction of walls separating
system
• Electrical equipment located near the
system components
• Position of the lamp socket dimmer/
switch.
Lamp requirements: Do not use
dimmer to control table lamps with
touch control or with integral dimmers.
Lamps without integral switches are
recommended; lamps with integral
switches must be set to full on, then the
switch should be disabled or removed.
The lamp socket dimmer/switch may
be installed in any orientation between
vertical and 90° from vertical. When
installed in any orientation other than
vertical, derating is required.
Derating Chart
Orientation Load Type Rating
Vertical
Incandescent 150 W
Halogen 100 W
10 to 90°
from vertical
Incandescent 100 W
Halogen 75 W
1. Find a suitable location for the lamp
socket dimmer/switch. The dimmer/
switch must be within 20 feet (6 m) of
a device congured as a repeater. If
there is a switch on the lamp, make
sure it is in the full on position, and
remove or disable it if possible.
2. Unplug the lamp
cord from the wall
receptacle.
3. Remove
the lamp
harp.
4. Remove
the lamp
bulb, and
screw
the lamp
socket
dimmer/
switch into
the lamp
socket.
Replace the
bulb into
the lamp socket dimmer/switch.
5. Reinstall the lamp harp (rotate it to
clear the lamp socket dimmer/switch
if necessary). If desired, install the
optional harp lock using the provided
hex wrench.
6. Plug the lamp cord
into the wall socket.
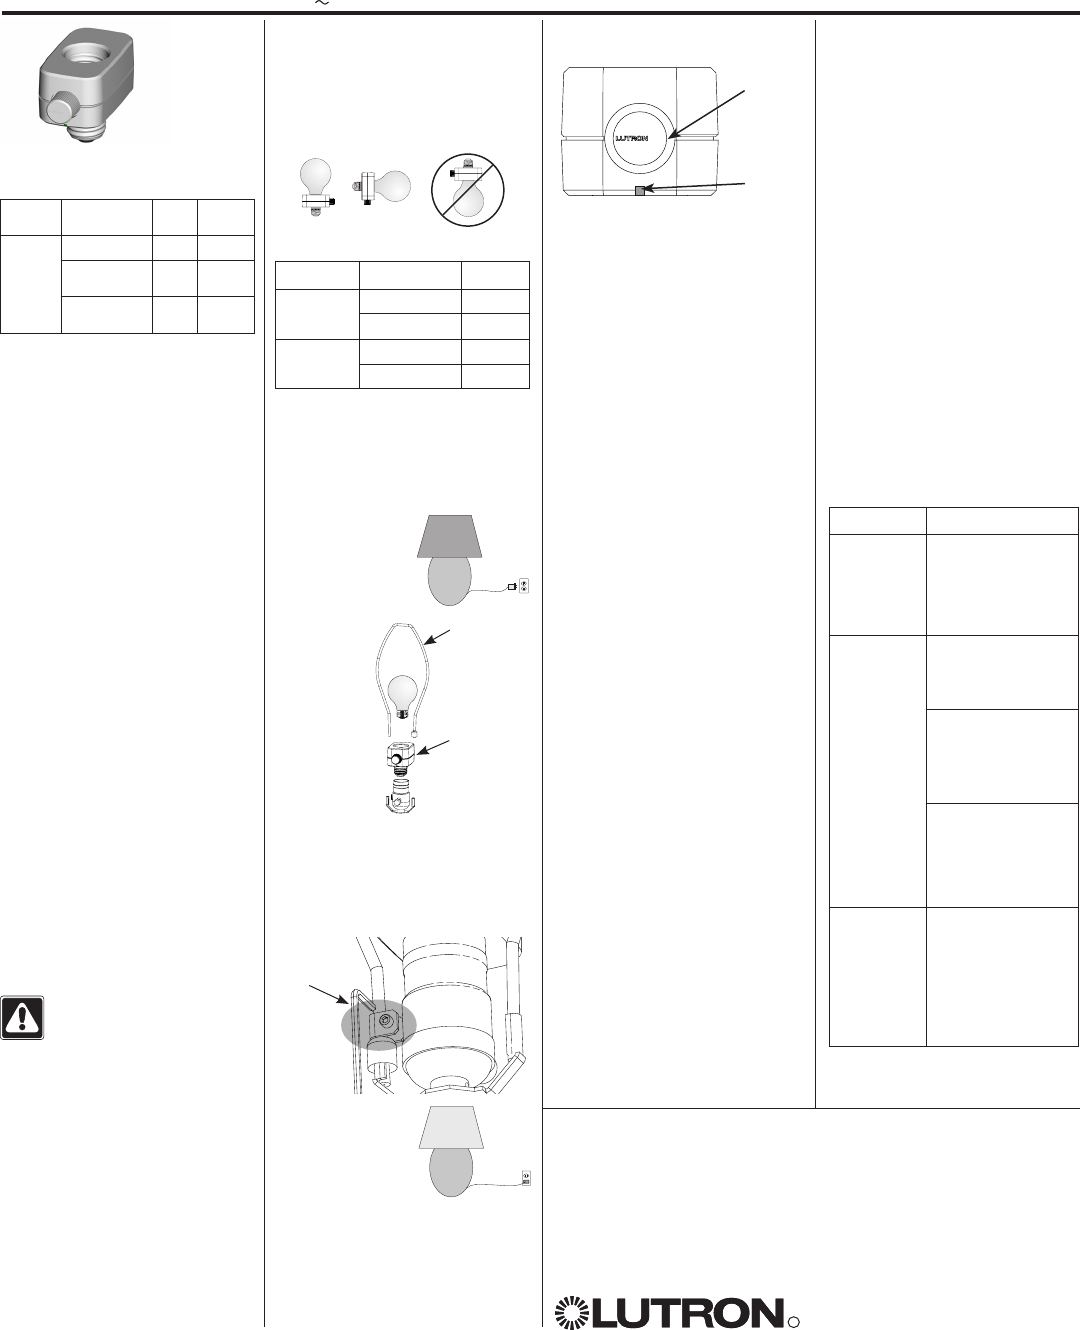
Dimming Knob
• Turn clockwise to turn on and
brighten
• Turn counter-clockwise to dim and
turn off
• Push in to toggle on and off
• Push in and hold to enter program-
ming mode
• Audible sound indicates when high
and low levels are reached
Status Indicator
• Indicates current load status
• Green = load is switched on
• Off = load is switched off
• Amber = device is in programming
mode
• Red = device is experiencing an over-
temperature condition
Operation Notes
• The lamp socket dimmer/switch
should immediately control the bulb
once power is applied.
• When initially installed, the lamp
socket dimmer/switch functions only
as a switch, which allows it to control
non-dimmable compact uorescent
bulbs. To also dim incandescent
loads, it must rst be addressed as
part of a Stanza system.
• The lamp socket dimmer/switch
cannot be controlled over radio
frequency (RF) from a keypad or
contact closure input until it has been
addressed as part of a Stanza system.
Returning the Dimmer/Switch to
Factory Settings
1. Triple-tap the dimming knob quickly
(within 1 second).
2. Press and hold the dimming knob for
5 seconds (until the load ashes).
3. Triple-tap the dimming knob quickly
again.
Notes
• Returning to factory settings will
clear all programming from the lamp
socket dimmer/switch device, and will
prevent it from being controlled over
RF from a keypad or control interface.
• After being returned to factory
defaults, the device will need to be re-
addressed as part of a system.
• The device will revert to switching
operation, so non-dimmed compact
uorescent loads can be controlled.
Incandescent loads then cannot be
controlled until the device has been
re-addressed as part of a system.
Otherwise, damage to the device or
bulb may occur.
Installation Instructions
Please Read Before Installing
Lamp Socket Dimmer/Switch
StanzaTM
StanzaTM Lamp Socket
Dimmer/Switch
SZ-1SD-TP
120 V 50 / 60 Hz
Installation Operation
Remove
lamp harp.
Install lamp
socket.
Tighten harp
lock.
Caution! To avoid risk of elec-
trical shock, do not attempt
to open the lamp socket
dimmer / switch. Unplug the table lamp
before changing the light bulb.
Lutron Electronics Co., Inc.
Made and printed in the U.S.A.
P/N 030-996 Rev. A 6 /08
Technical support: USA, Canada, Caribbean: 1.800.523.9466
Mexico: +1.888.235.2910
Central/South America: +1.610.282.6701
Warranty: 1-year limited warranty standard. 2-year parts and labor warranty, with
8-year pro-rated parts replacement on commissioned systems.
These products may be covered under one or more of the following U.S. patents: 5,248,919;
5,838,226; 5,848,054; 5,905,442; 6,687,487; 6,803,728; and corresponding foreign patents.
U.S. and foreign patents pending. Lutron and the sunburst logo are registered trademarks and
Stanza is a trademark of Lutron Electronics Co., Inc.
© 2008 Lutron Electronics Co., Inc.
R
Dimming
knob
Status
indicator
Troubleshooting Guide
Symptom Cause and Action
Light does
not turn
on, but
the status
indicator is
on.
Light bulb/lamp is
burned out or not
installed.
• Replace or install
lamps.
Light does
not turn on,
and the sta-
tus indicator
is off.
Power is off
• Check the circuit
breaker and make
sure it is on.
Lamp is unplugged
• Check that the
lamp cord is
plugged into the
wall socket.
Lamp has an integral
switch
• Make sure the
lamp’s integral
switch is set to
full on.
Dimmer
does not
dim properly
and/or flick-
ers.
Lamp has an integral
dimmer
• Use a lamp without
a dimmer.
Bulb is not
dimmable
• Replace bulb with
incandescent bulb.
FCC Information
Note: This equipment has been tested and found to comply with
the limits for a Class B digital device pursuant to Part 15 of the
FCC rules. Operation is subject to the following: (1) This device
may not cause harmul interference, and (2) this device must
accept any interference received, incouding interference that
may cause undesired operation.