Lutron Electronics 0063 Electronic Control with RF communication User Manual Stanza Keypad Install English
Lutron Electronics Company Inc Electronic Control with RF communication Stanza Keypad Install English
Contents
- 1. User Manual 1
- 2. User Manual 2
- 3. User Manual
User Manual
Important Notes
Install in accordance with all local and
national electrical codes.
Environment: Ambient operating
temperature: 32 to 104 °F (0 to 40 °C),
0 to 90% humidity, non-condensing.
Indoor use only.
Spacing: If mounting one control above
another, leave at least 4.5 in (114 mm)
vertical space between them.
Faceplates: Use Lutron Stanza
faceplates for best color match and
aesthetic appearance. Do not paint
controls or faceplates.
Cleaning: To clean faceplate or buttons,
wipe with a clean damp cloth. DO NOT
use any chemical cleaning solutions.
Wallboxes: Lutron recommends using
3.5 in (89 mm) deep wallboxes for easier
installation.
RF Device Placement: RF keypads
must be located within 20 feet (6 m)
of an RF signal repeater or a device
configured as a repeater.
Stanza RF keypads cannot control
any device in the system until they are
addressed and programmed. When
powered and unaddressed, they turn
on their button backlights to indicate
proper operation.
Operation
Installation Instructions
Please Read Before Installing
StanzaTM StanzaTM Keypads
SZ-2B, SZ-3B,
SZ-4B, SZ-5B,
SZ-3/1B
120 V 50 / 60 Hz 0.5 W
SZ-3BSZ-2B SZ-4B
SZ-5B SZ-3/1B
Status LEDs
Indicate current
scene selected;
all glow softly
as night lights
when scene is not
selected
If keypad is unpro-
grammed, all LEDs
flutter when any
button is pressed
Keypad Buttons
Buttons are backlit for easy location in
a darkened room.
Returning the Keypad to Factory
Settings
1. Triple-tap a button on the keypad
quickly (within 1 second).
2. Press and hold the same button on
the keypad for 5 seconds (until the
status LEDs ash) .
3. Triple-tap the same button on the
keypad quickly again.
Notes
• Returning to factory settings will
clear all programming from the
keypad, and will prevent any device
from being controlled by the keypad
over RF.
• After being returned to factory
defaults, the device will need to be
re-addressed as part of a system.
Troubleshooting Guide
Symptom Cause and Action
Keypad LEDs do not
light
Power not present
• Circuit breaker OFF or tripped. Perform short circuit check.
Wiring error
• Check wiring to be sure it matches installation instructions
and wiring diagrams.
Lights do not respond
to a button press
Improper programming
• Check programming in the Stanza software.
Out of RF range
• Ensure device is within 20 feet (6 m) of another device
configured as a repeater.
All status LEDs flash
when each keypad
button is pressed
Keypad is not addressed to the system
• Address device as part of a Stanza system.
Lutron Electronics Co., Inc.
Made and printed in the U.S.A.
P/N 030-995 Rev. A 10/14/08
Technical support: USA, Canada, Caribbean: 1.800.523.9466
Mexico: +1.888.235.2910
Central/South America: +1.610.282.6701
Warranty: 1-year limited warranty standard. 2-year parts and labor warranty, with
8-year pro-rated parts replacement on systems that include factory startup.
These products may be covered under one or more of the following U.S. patents: 5,248,919;
5,637,930; 5,838,226; 5,848,054; 5,905,442; 6,687,487; 6,803,728; and corresponding foreign
patents. U.S. and foreign patents pending. Lutron and the sunburst logo are registered
trademarks and Stanza is a trademark of Lutron Electronics Co., Inc.
© 2008 Lutron Electronics Co., Inc.
R
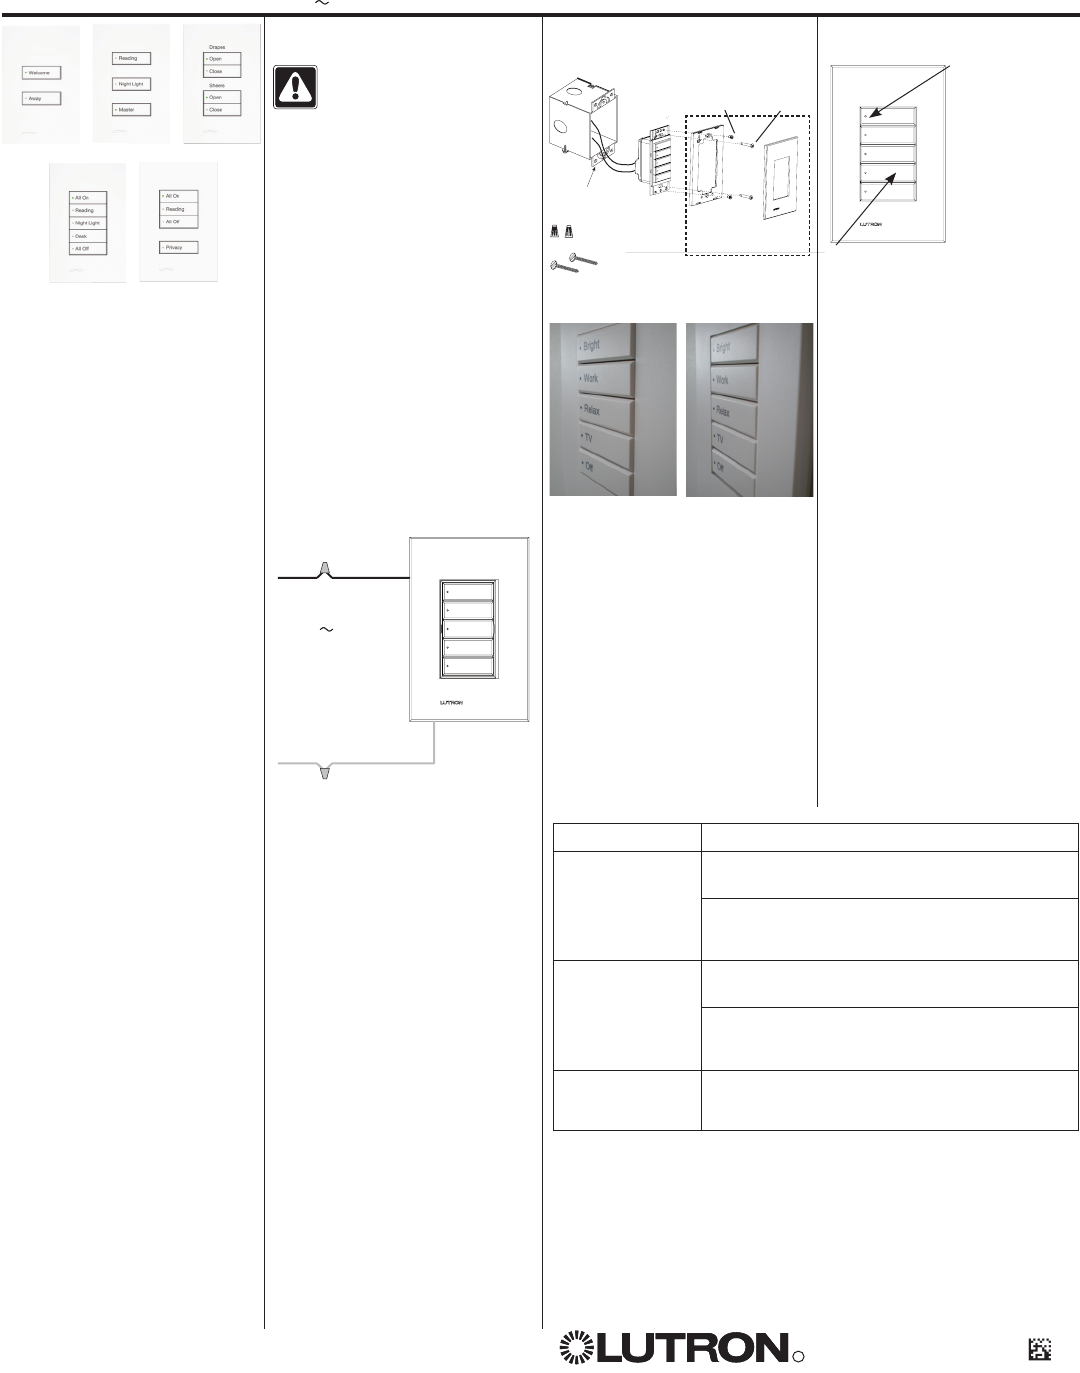
Mounting Diagram
Control
mounting
screws
Wallbox Control
Included:
Wire Connectors (2)
Mounting Screws (2)
Faceplate
adapter
mounting
screws
Faceplate/adapter purchased
separately.
FCC Information
Note: This equipment has been tested and found to
comply with the limits for a Class B digital device,
pursuant to Part 15 of the FCC rules. These limits are
designed to provide reasonable protection against
harmful interference in a residential and commercial
installation. This equipment generates, uses and can
radiate radio frequency energy and, if not installed and
used in accordance with the instructions, may cause
harmful interference to radio or television reception.
However, there is no guarantee that interference will
not occur in a particular installation. If this equipment
does cause harmful interference to radio or television
reception, which can be determined by turning the
equipment off and on, the user is encouraged to try to
correct the interference by one or more of the
following measures:
• Reorient or relocate the receiving antenna.
• Increase the seperation between the equipment and
receiver.
• Connect the equipment into an outlet on a circuit
different from that to which the receiver is
connected.
• Consult the dealer or an experienced radio/TV
technician for help.
FCC Information
Changes or modifications not expressly approved by Lutron Electronics Co. could void the user’s authority to
operate this equipment.
NOTE: This equipment has been tested and found to comply with the limits for a Class B digital device, pursuant
to Part 15 of the FCC rules. Operation is subject to the following: (1) This device may not cause harmul interfer-
ence, and (2) this device must accept any interference received, including interference that may cause undesired
operation.
Installation
WARNING! Wiring with power
ON may result in personal injury
or death. Locate and remove fuse
or lock circuit breaker in the OFF
position before proceeding.
1. Turn power OFF at fusebox or circuit
breaker.
2. Prepare wires. When making wire
connections, follow the recommended
strip lengths and combinations for the
supplied wire connector.
Note: Wire connectors provided are
suitable for copper wire only.
Wire Connector:
• Strip insulation 3/8 in (9.5 mm) for
14 AWG (1.5 mm2) wire.
• Strip insulation 1/2 in (12.7 mm) for
16 or 18 AWG (1.0 or 0.75 mm2) wire.
3. Wire controls as follows:
a. Connect the black control wire to
the Hot/Live wire coming from the
distribution panel.
b. Connect the white control wire to
the Neutral wire coming from the
distribution panel.
c. Twist wire connector tight.
4. Push all wires back into the wallbox
and loosely fasten the control to the
wallbox using the control mounting
screws provided. Do not pinch the
wires.
5. Attach Lutron Stanza faceplate
adapter and faceplate. See Mounting
Diagram.
a. Install faceplate adapter onto front
of control(s).
b. Tighten control mounting screws
until faceplate adapter is flush to
wall (do not over-tighten).
c. Snap faceplate onto faceplate
adapter, and verify that control
is aligned properly and keypad
buttons protrude in front of the
faceplate.
d. If control(s) is (are) misaligned
or buttons are flush with the
faceplate, loosen mounting screws
appropriately.
6. Restore power. Check for correct
local operation (see Operation).
Keypad will not control a remote
device until it is addressed.
Black
White
Hot/
Live
Neutral
120 V
50 / 60 Hz
Correct:
Keypad protrudes from
faceplate.
Incorrect:
Keypad is flush with
faceplate. Loosen control
mounting screws.