Lutron Electronics 0116 Wireless Fixture Sensor User Manual UserManual
Lutron Electronics Company Inc Wireless Fixture Sensor UserManual
UserManual
Lutron Electronics Co., Inc. 7200 Suter Road
Coopersburg, PA 18036-1299 USA
Release Wires from Connectors
Press connector buttons while pushing the wires slightly inward. Pull wires outward to release the wires from the
connectors. Do NOT pull out the wires without using the connector buttons, as damage to the product
can occur.
Packaging
Fixture packaging must protect the installed wireless fixture control so that it does not get damaged in shipping.
Customer Assistance | 1.844.LUTRON1 USA, Canada, and the Caribbean | +44.(0)20.7702.0657 Europe | +1.610.282.3800 Others | www.lutron.com
Part of the Vive Family
Clear Connect Wireless Fixture
Controllers
Required Components
For each fixture, you will need:
Clear Connect Wireless Fixture
Controller (with Occupancy Sensor)
(DFCSJ-OEM-OCC)
Clear Connect Wireless Fixture
Controller (RF Only)
(DFCSJ-OEM-RF)
Start Here
English
Important Notes:
• Forinstallationbyaqualiedxturemanufacturer.
• Usecopperconductorsonly.
• Checktoseethatthedevicetypeandratingissuitablefortheapplication.
•DO NOTinstallifproducthasanyvisibledamage.
• Ifmoistureorcondensationisevident,allowtheproducttodrycompletely
before installation.
• Operatebetween32°Fand131°F(0°Cand55°C),ambient.
• 0%to90%humidity,non-condensing.
• Forindooruseonly.
• Sensorshouldbemountedtoxtureinorientationthatmakesitparallelto
theoorwhenxtureisinstalledinceiling.
DFCSJ-OEM-OCC Clear Connect Wireless
Fixture Controller (with Occupancy Sensor)
DFCSJ-OEM-RF Clear Connect
Wireless Fixture Controller (RF Only)
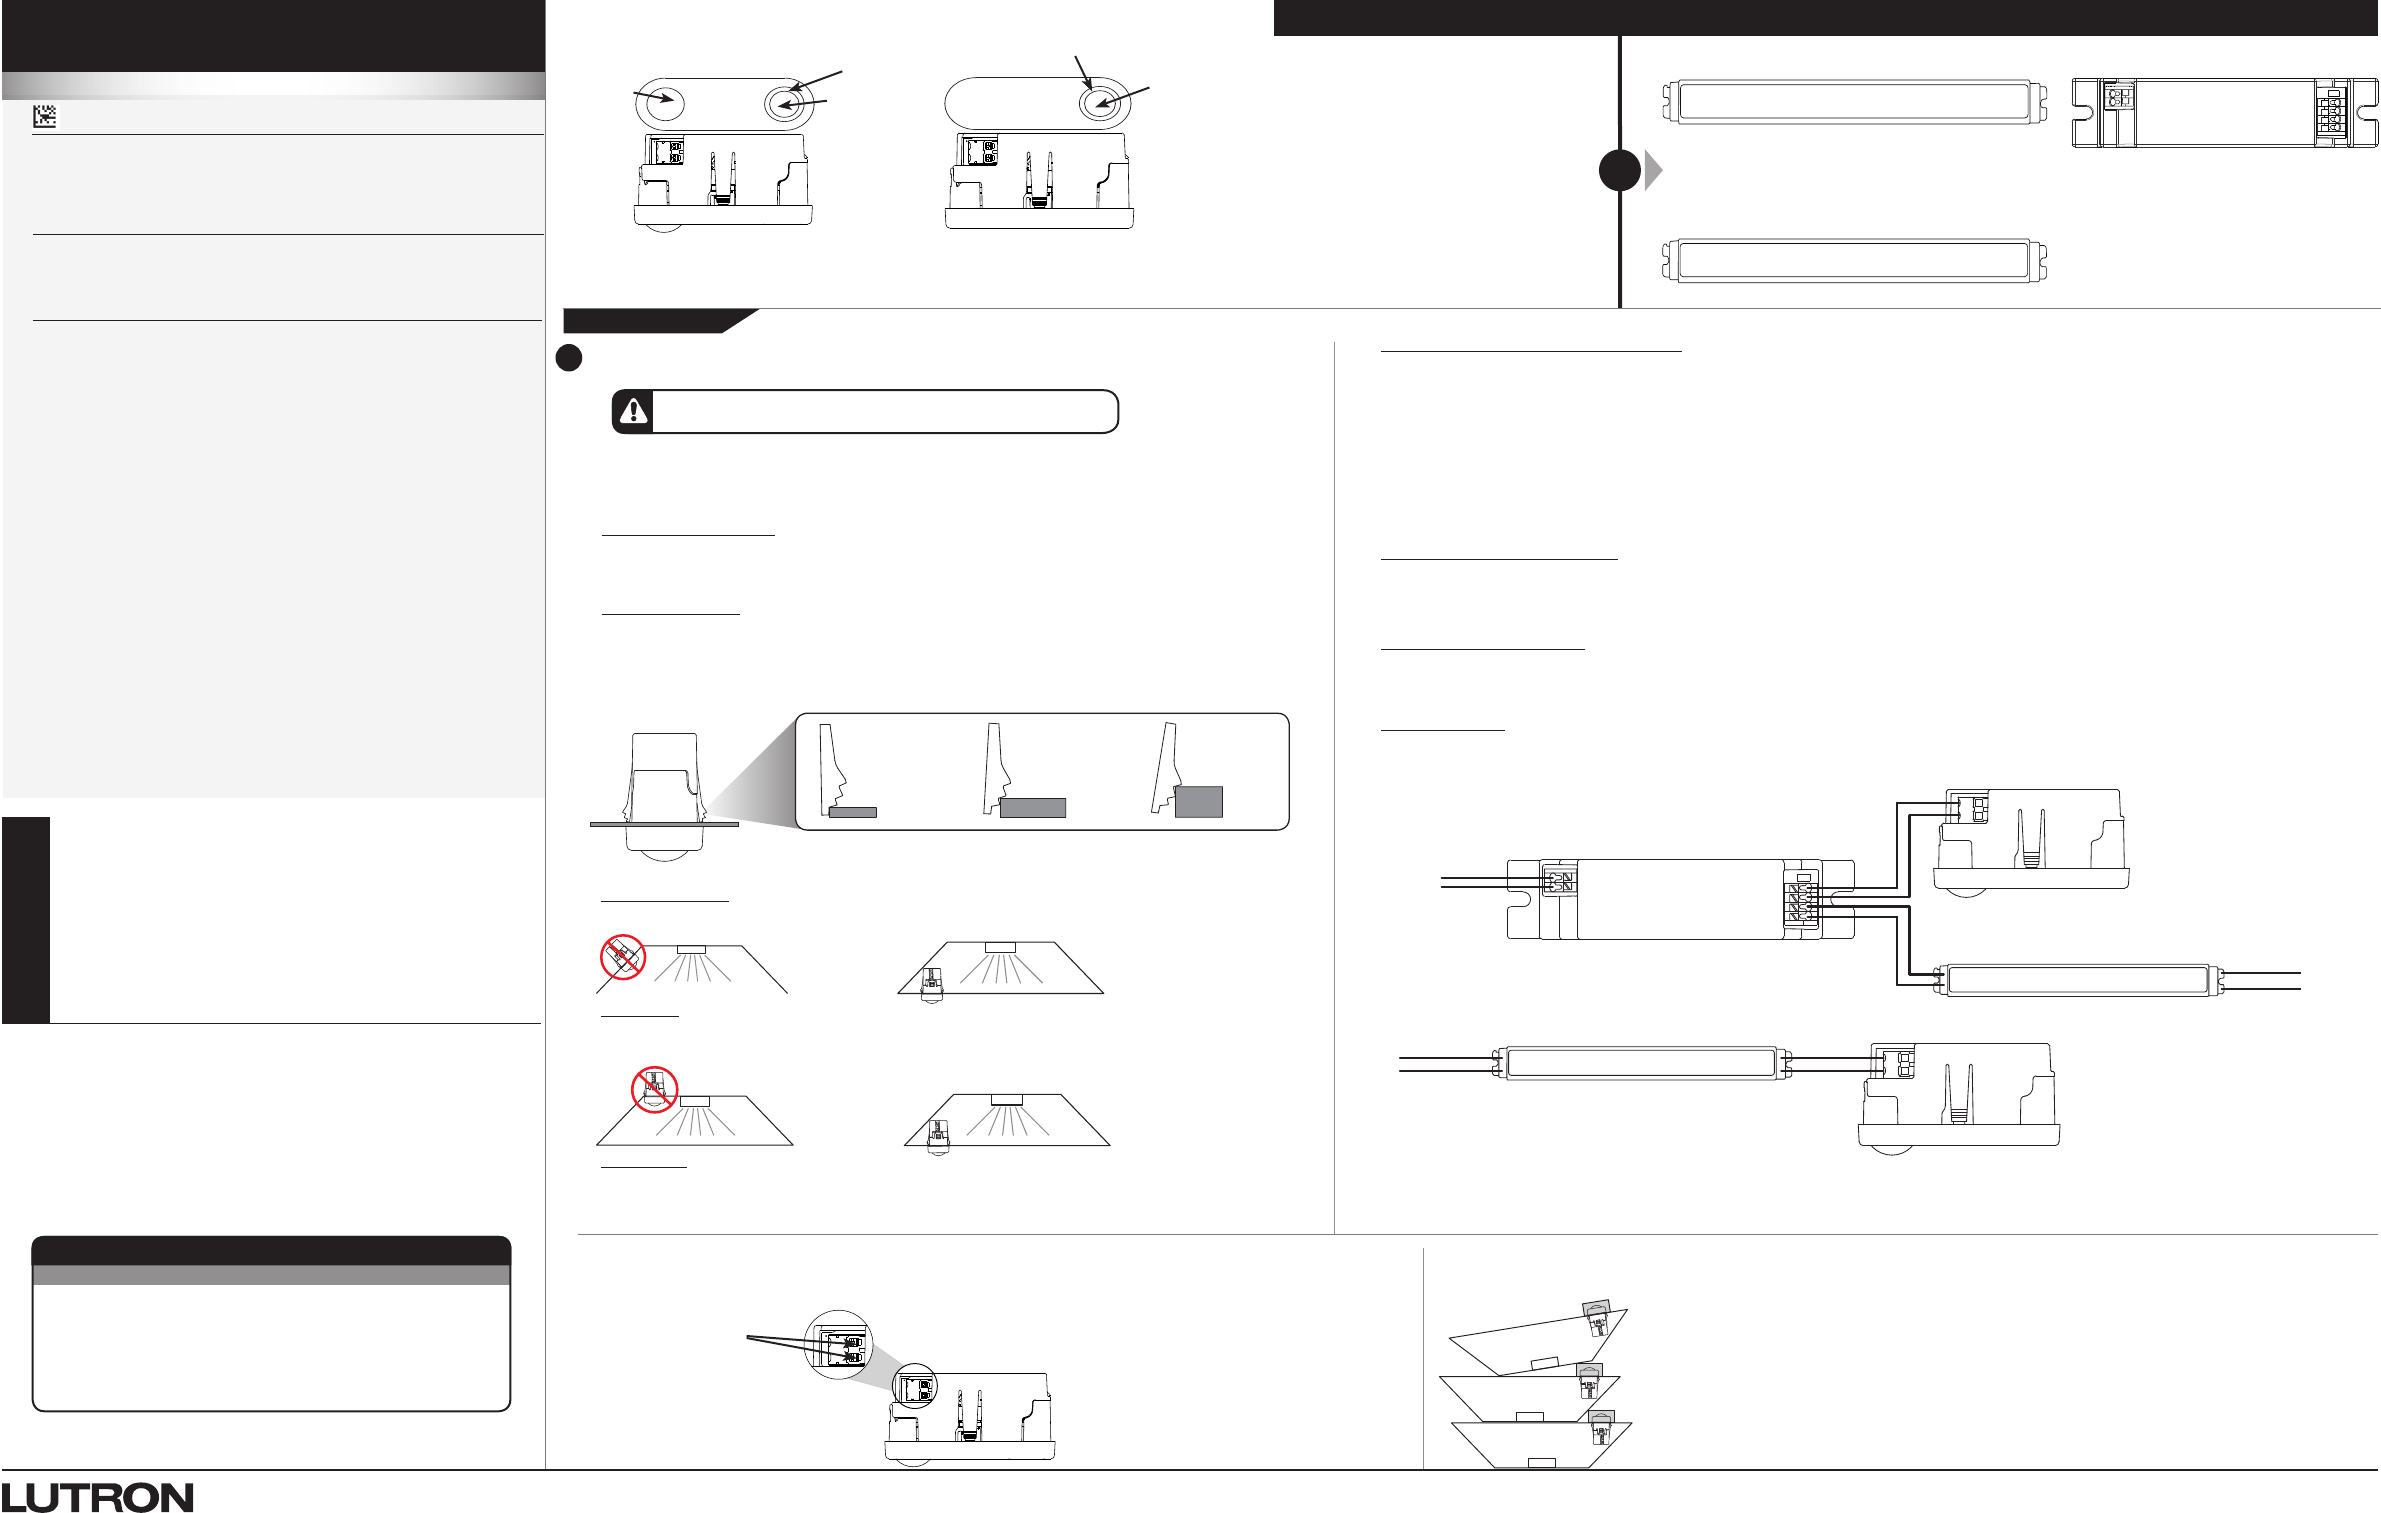
InstallClearConnectWirelessFixtureController
• Ensureknockoutandadjacentsurfacesarefreefromburrs,oil,chemicals,debris,etc.
• DonotpushonthePIRlensorbuttontoinstallthewirelessfixturecontrol.Pushonthecenterofthe
wireless fixture control.
Connector(poke-instyle)
• 18to22AWG(0.75to0.3mm2)solidcopperwire
• Wirestriplength:0.31in(8mm)
Mounting Thickness
Snapsenablemountingtothefollowingmaterialthicknessranges:
• 0.04in(1mm)orless
• 0.041to0.08in(1.1to2mm)
• 0.081to0.13in(2.1to3.3mm)
WARNING! Shock Hazard. May result in serious injury or death.
Turn off power at circuit breaker before installing the unit.
Formoreinformation,see
www.lutron.com/TechnicalDocumentLibrary/3691039.pdf
Please read before installing.
+
One Fixture Control At least one EcoSystem driver + Wireless Sensor Interface (PS-OEM-2W-UNV)
Or
At least one driver with self-powered DALI link
1
9.5–20.5 V-
80-250 mA
041600
Rev. A
03/2017
*
For set-up, programming, and
troubleshooting with a Vive system,
please refer to the installation
instructions included with the Vive hub
or at www.lutron.com
Clear Connect Wireless Fixture Controllers
UL2043PlenumRated
Controlsupto4ballastsordrivers(IEC60929AnnexE.2requireseachballastor
drivertolimitthesink/sourcecurrentdrawto2.0mAmaximum).
DefaultFunctionality
Fixture Controls
Auto On level: DFCSJ-OEM-OCC only
(notapplicableforDFCSJ-OEM-VAC orDFCSJ-OEM-RF)
Varieswithambientlightlevelwhenoccupancyistriggered
(e.g.,100%foradarkroom,10%forabrightroom).
Timeout period:15minutes
Connector buttons
0.04in(1mm)
or less
0.041to0.08in
(1.1to2mm)
0.081to0.13in
(2.1to3.3mm)
DaylightingSensor
Donotinstallindirectviewofthelightsourceorreflectingsurface.
PIRSensor
• Installinalocationthatallowsthesensortohaveanunobstructedviewofthearea.
• Installawayfromradiatedheatgivenoffbythelightsource.
Temperature
Thewirelessfixturecontrolisratedfor55°C(131°F)maximum.Productmustbeinstalledinanarea
thatwillnotallowittoexceedthisrating.Keepawayfromheatgeneratingdevices(e.g.,drivers)and
verifyduringthefixturedesignprocess.
WiringBestPractices(forRFconsideration)
• Keepallthefixturewiringtotheminimumlengthneededtoachievetheconnectionsinanorganizedmanner.Avoidunnecessaryslackinthe
wires.
• Ifthedriverisprovidedwithagroundterminal,thisterminalmustbeelectricallyconnectedtothegroundedfixturemetalusingagroundwire
thatisnolongerthan2in(51mm).
• Mechanically affix all the wires to the fixture wall so that they are kept as close possible to the grounded fixture metal.
• Ensurethatthedriverwiringisasfaraspossiblefromthewiringimmediatelyconnectedtothewirelessfixturecontrol
• EnsurethatthewirelessfixturecontrolismountedawayfromtheLEDstripstominimizethecouplingoftheRFradiationfromtheLEDstrips
into the wireless fixture control.
• Formoreinformation,seewww.lutron.com/TechnicalDocumentLibrary/048620.pdf
Wirelessfixturecontroller(RFonly)
•TheWirelessfixturecontroller(RFonly)(DFCSJ-OEM-RF)canbeinstalledonthebackofthefixture,assumingmetaltilesarenotbeingused.
• TheWirelessfixturecontroller(RFonly)willberatedforuseinplenumareas.
• Donotfullyenclosewithinthemetalfixture.
MountingtoCurvedSurfaces
Mountingdirectlytoacurvedsurfaceisnotrecommended.Anadaptor(custommanufacturedbytheOEM)mayberequiredtoensurethat
thedeviceisseatedproperly.
Remote Mounting
The wireless fixture control is intended for troffer and linear fixtures and is not intended to be ceiling mounted.
WiringDiagrams
120–277V~
120–277V~
Wireless sensor interface
EcoSystem/DALIdriver
Driverwithself-poweredDALIlink
EcoSystemdriver
Driverwithself-poweredDALIlink
Clear Connect Wireless
Fixture Controller
Clear Connect Wireless
Fixture Controller
Button
Button
PIRlens
Daylight
sensor lens
Daylight
sensor lens
OR
FCC information and IC information
Thisdevicecomplieswithpart15oftheFCCRulesandIndustryCanada
license-exemptRSSstandard(s).Operationissubjecttothefollowing
twoconditions:(1)Thisdevicemaynotcauseinterference,and(2)this
devicemustacceptanyinterference,includinginterferencethatmay
causeundesiredoperation.Modicationsnotexpresslyapprovedby
LutronElectronicsCo.,Inc.couldvoidtheuser’sauthoritytooperatethis
equipment.
NOTE: This equipment has been tested and found to comply with the
limitsforaClassBdigitaldevice,pursuanttopart15oftheFCCRules.
Theselimitsaredesignedtoprovidereasonableprotectionagainst
harmfulinterferenceinaresidentialinstallation.Thisequipmentgenerates,
usesandcanradiateradiofrequencyenergyand,ifnotinstalledandused
inaccordancewiththeinstructions,maycauseharmfulinterferenceto
radiocommunications.However,thereisnoguaranteethatinterference
willnotoccurinaparticularinstallation.Ifthisequipmentdoescause
harmfulinterferencetoradioortelevisionreception,whichcanbe
determinedbyturningtheequipmentoffandon,theuserisencouraged
to try to correct the interference by one or more of the following
measures:
• Re-orientorrelocatethereceivingantenna.
• Increasetheseparationbetweentheequipmentandreceiver.
• Connecttheequipmentintoanoutletonacircuitdifferentfromthatto
whichthereceiverisconnected.
Clear Connect Wireless Fixture Controllers with
Ecosystem or DALI Driver
Wireless Fixture Control with Driver with
Self-powered DALI Link
N
LS+
S-
E+
E1
E-
E2
Wireless sensor interface
120–277V~
ALL PROGRAMMING IS OPTIONAL
Programming is not required for default functionality
ResetFactoryDefaults
Note:Insomeinstances,itmaybenecessarytoresetthe
xturecontrollersandconnecteddevicesbacktofactory
defaultsettings.Beforebeginning,makesurethatall
devicesareconnectedandpowered.
A
Rapidly tap the button on the xture controller three times
andholdonthefourthuntiltheLEDbeginstoashslowly;
release button.
B
Within1secondofreleasingthebutton,againrapidly
tapthebuttonthreetimesandtheLEDswillashrapidly
indicating that the unit has been reset to factory defaults.
Note:Anyassociationsorprogrammingpreviouslysetup
with the xture control will be erased and will need to be
re-programmed.
Clear Connect Wireless Fixture
Controllers
Part of the Vive Family
Limited Warranty:
http://www.lutron.com/TechnicalDocumentLibrary/369-119_Wallbox_Warranty.pdf
Troubleshooting
* www.lutron.com
Symptom Solution
Sensordoesnotrespond
to motion.
• Sensorrequires2-minutewarmupperiodfrompowerresetbeforesensingcircuitisactive.
Defaulttimeoutis15minutes.
Lightsdonotdimorturn
ONasexpected.
• Ensurethatcontrollinesarewiredproperly
Lightsareunstableat
low-end.
• Adjustlow-endtrim.RefertoVivedocumentationonwww.lutron.com.
Customer Assistance | 1.844.LUTRON1 USA, Canada, and the Caribbean | +44.(0)20.7702.0657 Europe | +1.610.282.3800 Others | www.lutron.com
Lutron Electronics Co., Inc.
7200 Suter Road
Coopersburg, PA 18036-1299 USA
Lutron,Pico,PowPak,EcoSystem,andEnergiTriPakaretrademarksofLutronElectronicsCo.,Inc.registeredintheU.S.andothercountries.RadioPowrSavrandVivearetrademarksofLutronElectronicsCo.,Inc.
NECisaregisteredtrademarkoftheNationalFireProtectionAssociation,Quincy,Massachusetts.
©2017LutronElectronicsCo.,Inc.
*
For set-up, programming, and troubleshooting with a
Vive system, please refer to the installation instructions
included with the Vive hub or at
www.lutron.com
Recommended end-of-line test
1. Providepowertoxture.
2. Fixturewillgotothedriver’ssavedlevel.
3. Pressthebuttontotoggletheloadstate.LightwillfadetoON
(orOFF)over1second.GreenLEDwillstaylitfor2secondsafter
releasing the button.
4. Toggletheloadagain(ifnecessary)toensurethelightsareon.
ThiswillmakesurethelightsturnONwhenpowerisappliedthe
nexttime(atjobsite).
5. Removepower.
If testing occupancy sensor functionality:
1. Applypowertoxture.
2. Pressbutton(ifnecessary)toturnlightsoff.
3. Waitfor2minutesforsensoroccupancycircuittobecomeactive
4. Providemotioninfrontofsensor-lightswillturnON.
5. Lightswillnottunoffautomaticallyfor15minutesafterlast
motion detection.
If testing daylight sensor functionality:
1. Applypowertoxture.Fixtureshouldturnontofull(highend).If
not,pressbuttononsensor.
2. Shinelightsource(ashlight)directlyintodaylightlens.Fixture
lightwilldimdownover1minute(holdashlightsteadilyinplace).
3. Coverdaylightlens/buttonwithopaquematerial.Fixturelightwill
dimupover1minute(holdopaquematerialsteadilyinplace)