MEILOON 480200 DLP Projector User Manual DHT100 UserMan
MEILOON INDUSTRIAL CO., LTD. DLP Projector DHT100 UserMan
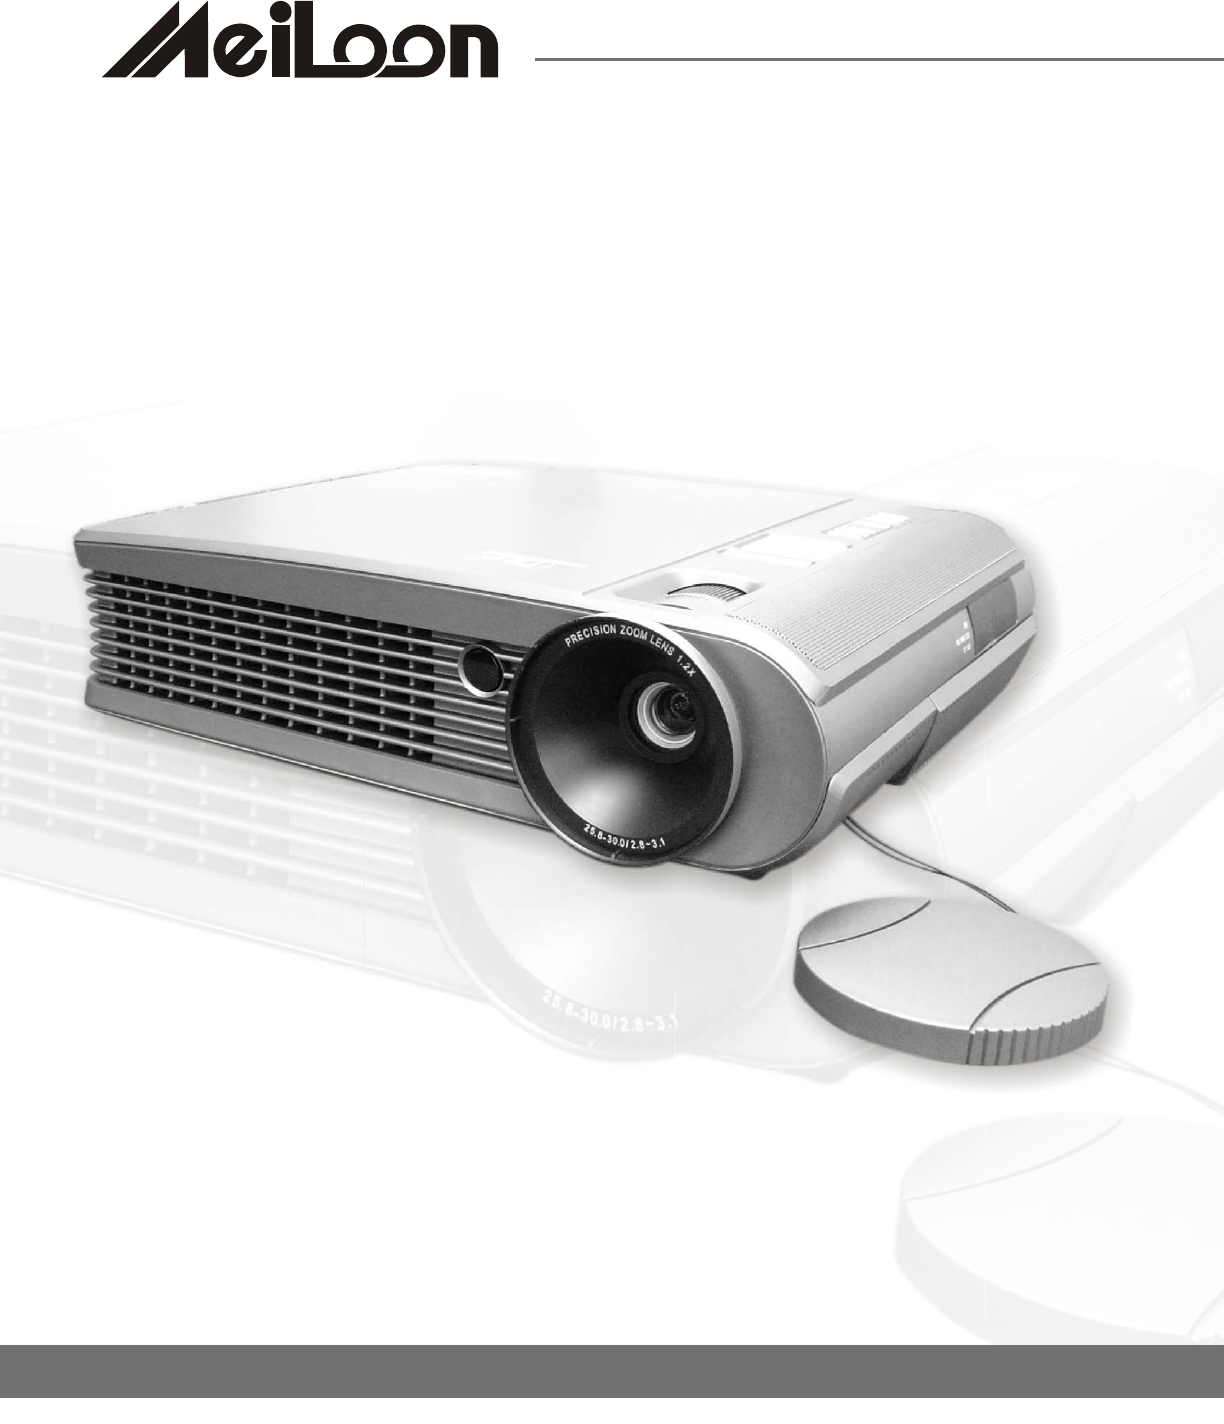
MEILOON >
Contents
- 1. User Manual 1
- 2. User Manual 2
User Manual 2
2
0
INSTALLATION
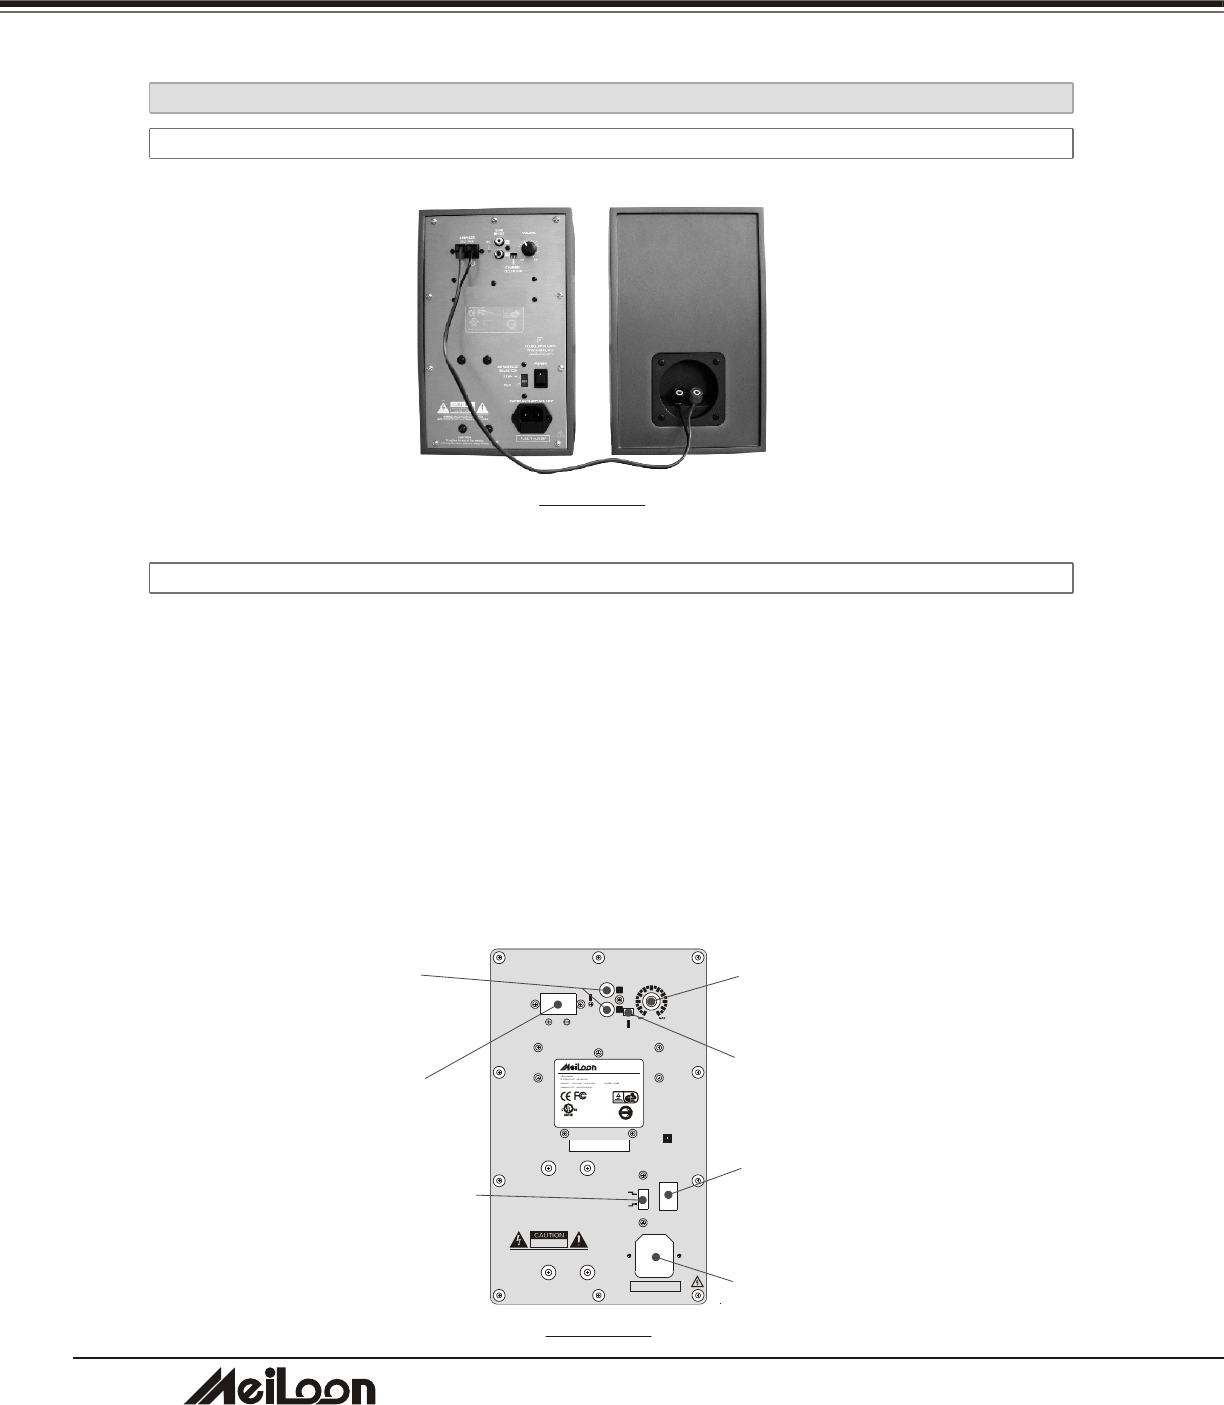
2-3-4 OPERATING THE WIRELESS SPEAKER
2-3-4-1 CONNECTING THE SPEAKERS
DRAWING 29
2-3-4-2 OPERATING THE SPEAKERS
A. Make sure the AC voltage selector (115V or 230V) is selected for your local voltage
(Factory preset is on 230V).
B. Connect the power cord into a wall outlet.
C. Turn on the power switch on the rear panel of the speaker.
D. Make sure the wireless channel of the speaker that is selected is the same as the
wireless channel of the transmitter that is selected in the projector. (Please check
the OSD, it will be described in the section of "3-2-2-4 Audio")
E. Adjust the volume with volume knob on the rear panel of the speaker.
DRAWING 30
VOLUME
SPEAKER
OUTPUT
AC VOLTAGE
SELECTOR
230V~
115 V~
POWER
DOUBLE INSULATION
When servicing only
use identical parts
CAUTION
To reduce the risk of fire, replace
with only the same type and rating of fuse.
LINE
INPUT
L
R
P. L .
RISK OF ELECTRIC SHOCK
DO NOT OPEN
~
WARNING: SHOCK HAZARD-DO NOT OPEN
AVIS : RISQUEDE CHOC ELECTRIQUE-NE PAS OUVRIR.
FUSE: T 1A L/250V
POWER CONSUMPTION: 100W
CHANNEL
SELECTOR
Bar-code
(45x13mm)
AUDIO SYSTEM
86AC
E241996
EIKI INDUSTRIAL CO., LTD.
MADE IN CHINA
R33803
Meiloon
W24025
FCC ID:RRT480200
Volume Knob
Channel Selector
Signal Output
Signal Input
Power Switch
AC Power Inlet
AC Voltage Selector
DHT100/200
DHT100/200
2
1
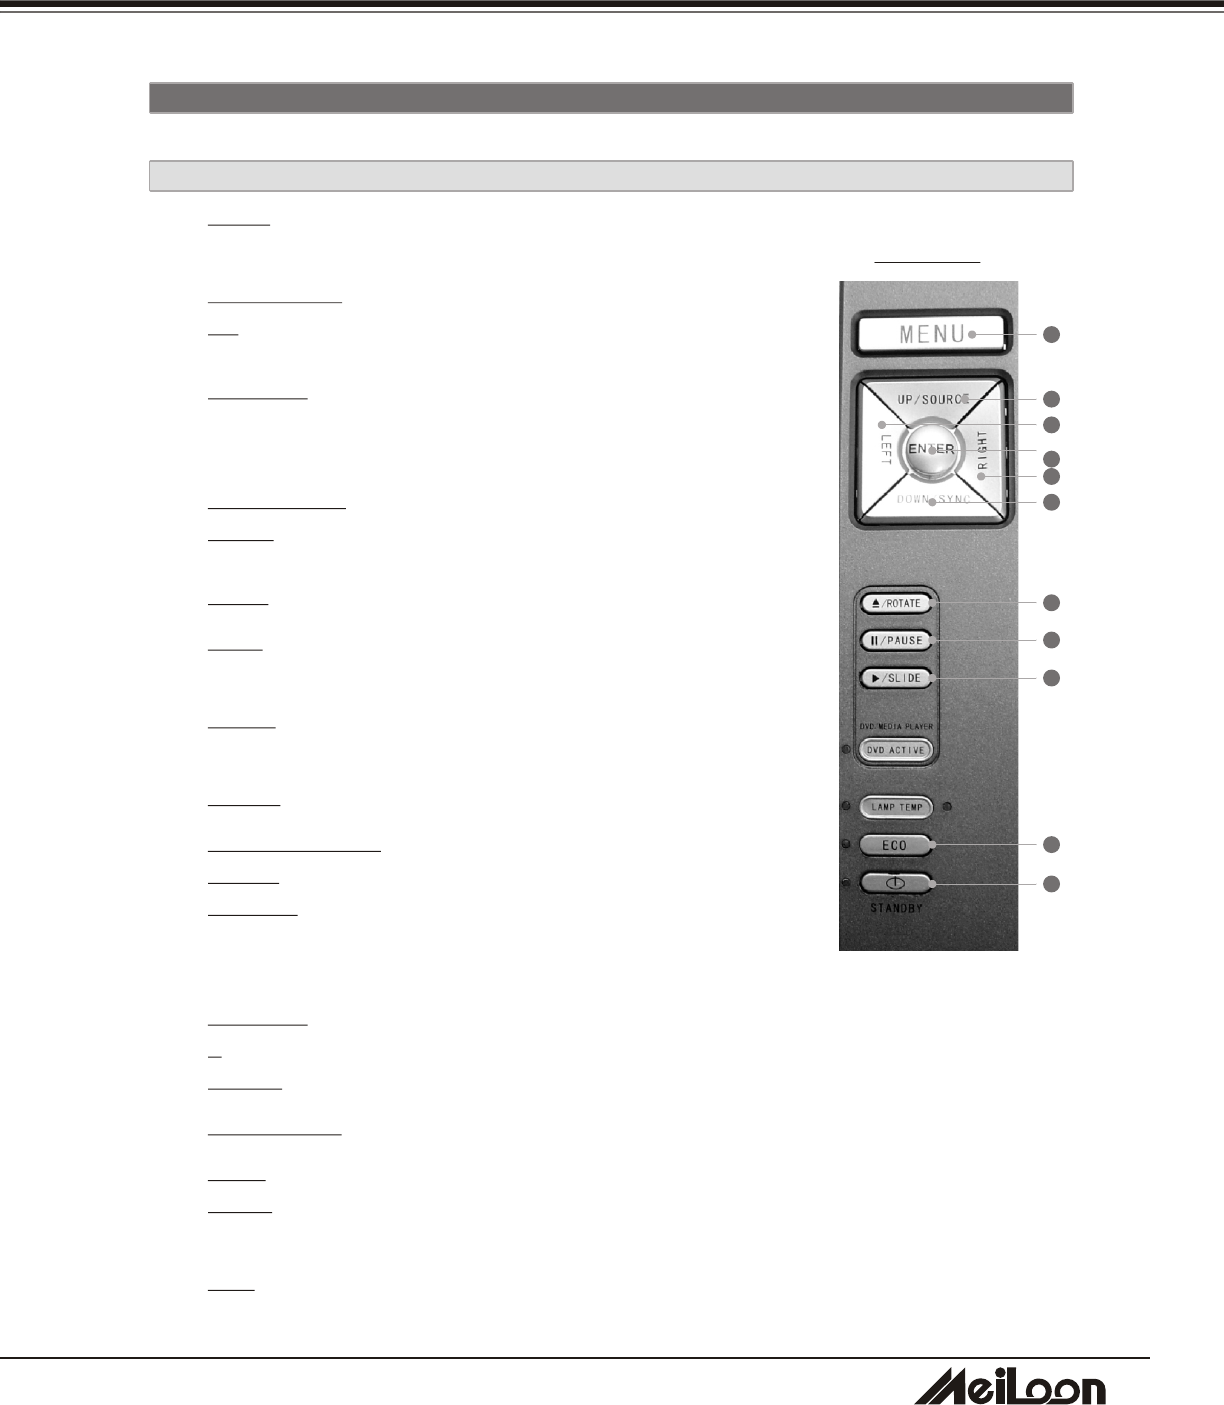
1. MENU: Press once to display the OSD.Press again to exit the
OSD.
2. UP/SOURCE: This button is dual function.
UP: Cursor function or make an adjustment based on your
selection of a function.
SOURCE: Selects "Composite Video", "S-Video",
"Component-I Video (YCbCr)", "Analog YPbPr", "DVD
Player", "Media player", "Computer", "TV" sources.
3. DOWN/SYNC: This button is dual function.
DOWN: Cursor function or make an adjustment based on
your selection of a function.
SYNC: Optimizes the signal from PC
4. LEFT: Cursor function or make an adjustment based on your
selection of a function.
5. RIGHT: Cursor function or make an adjustment based on
your selection of a function.
6. ENTER: Confirms your selection item.
7. EJECT/ROTATE: This button is dual function.
EJECT: Eject a DVD
ROTATE: Rotates the photo 90 degrees clockwise on screen,
but this function can't be accessed when Slideshow is
playing.
8. II/PAUSE: This button is dual function.
II: Pauses when playing the DVD disc.
PAUSE: Pauses when playing photos.
9. PLAY/SLIDE: This button is dual function.
PLAY: Plays a DVD.
SLIDE: Displays the photos on your memory card as a slide show, with (MP3)
music if available on your memory card.
10. ECO: Using the projector in this mode will save lamp life and reduce fan noise. You
can use this mode for watching video in a room with reduced ambient lighting.
3.
Control Panel and Remote Control
3-1 CONTRO PANELL AND REMOTE CONTROL
3-1-1 USING THE CONTROL PANEL
You can control the projector's functions through the Control Panel and Remote Control.
DRAWING 31
1
2
3
4
5
6
7
8
9
10
11
DHT100/200
DHT100/200
2
2
DHT100/200
DHT100/200
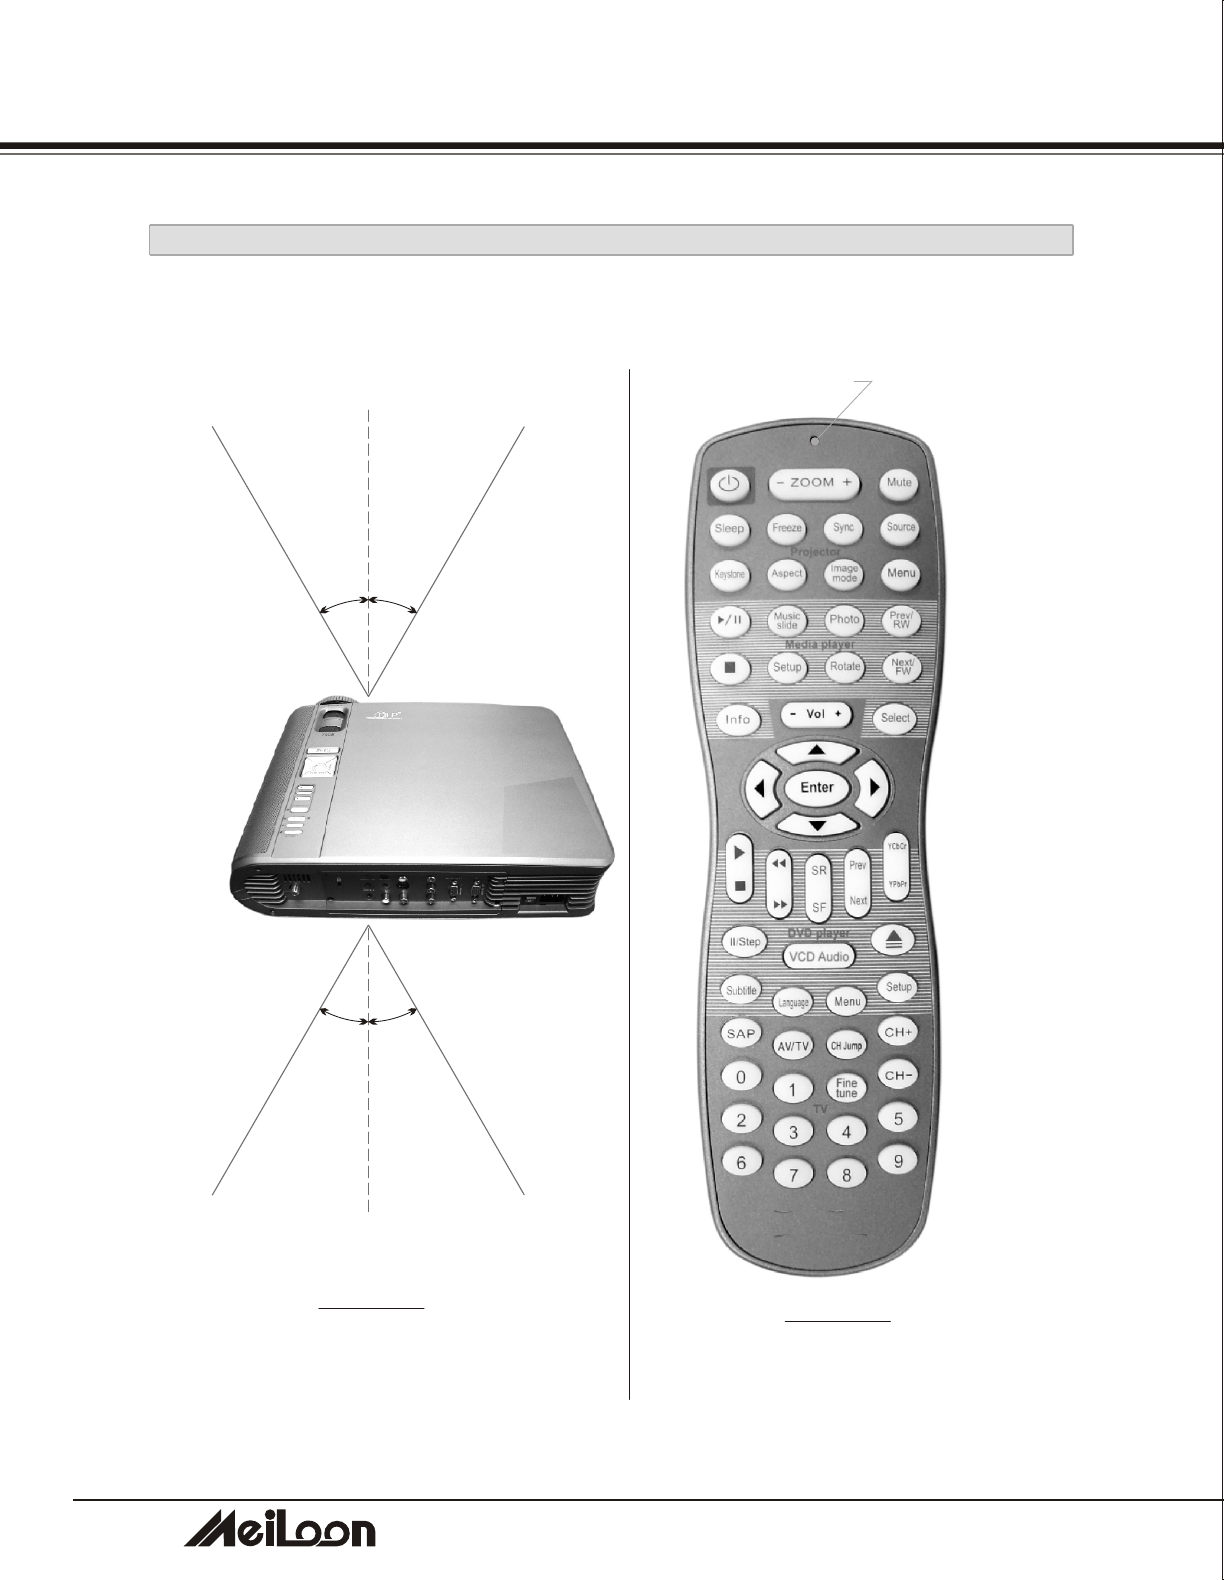
3-1-2 USING THE REMOTE CONTROL
10m
O
30
O
30
10m
O
30
O
30
LED indicator
USER CONTROLS
Section A
Section B
Section C
Section D
Section E
DRAWING 32 DRAWING 33

2
3
DHT100/200
DHT100/200
1. POWER: Powers On/Off the projector
2. ZOOM-: Reduces the image size (For projecto r use)
3. ZOOM+: Increases the image size (For projector use)
4. MUTE: Mutes the audio output. Press once for Mute on ,press again for mute off.
5. SLEEP: Turns off the projector after a period. (So the time you need---0ff, 15min, 30min, 45min,
60min)
6. FREEZE: Freezes the image.
7. SYNC: Optimizes the signal from PC
8. SOURCE: Selects "Composite Video", "S-Video", "Component-I Video (YCbCr)", "Analog
YPbPr", "DVD Player", "Media player", "Computer", "TV" sources.
9. KEYSTONE: Adjusts image distortion caused by tilting the projector (+/- 12 degree)
10. ASPECT: Selects the aspect ratio.(4:3,16:9,1:1)
11. IMAGE MODE: Three modes can be selected. (Theater/Computer, Standard, User)
12. MENU: Displays the MENU of your playing device. Press once to display, twice to disappear.
There are five sections on the Remote Control as described below.
LED indicator: The LED will light when the Remote Control is functioning. If not, please check
your batteries.
Section A: BLUE characters, for PROJECTOR use
Section B: RED characters, for MEDIA PLAYER use
13. PLAY and PAUSE:
PLAY: Plays program
PAUSE: Pauses the program.
When playing slideshow with music, press once to pause the slideshow, press again to pause the
MP3 music.
14. MUSIC SLIDE: Plays slideshow with music
15. PHOTO: Plays the photos
16. PREV/RW
PREV: Selects the previous photo
RW: Rewinds the program
17. STOP: Stops the program
18. SETUP: Enters the OSD of the Media player. (If you are playing a program, please stop it first).
19. ROTATE: Rotates the photo (This function can't be executed when playing a slideshow)
20. NEXT and FW:
NEXT: Selects the previous photo
FW: Forward the program
21. INFORMATION : Shows the information (resolution) of the displaying photo.
22. SELECT: a. Selects the card you want when different cards are inserted simultaneously.
b. Return to start-up screen.
USER CONTROLS
2
4
DHT100/200
DHT100/200
Section C: BLACK Characters, for ANY SOURCE use
These are "Common Keys". They can be used with any source.
23. VOL -: Decreases the volume of either the internal speaker or the external speaker.
24. VOL +: Increases the volume of either the internal speaker or the external speaker.
25. UP: Moves up when selecting item.
26. LEFT: Moves left when selecting item.
27. RIGHT: Moves right when selecting item.
28. DOWN: Moves down when selecting item.
29. ENTER: Confirms your selection.
30. PLAY: Plays the program.
31. STOP: Stops the program.
32. FF: Fast-forwards the program.
33. FR: Fast-rewinds the program.
34. SF: Slow-forwards the program.
35. SR: Slow-rewinds the program.
36. NEXT: Selects the next song or chapter.
37. PREV: Selects the previous song or chapter.
38. YCbCr : This key can't be used on this model.
39. YPbPr: This key can't be used on this model.
40. PAUSE/STEP:
PAUSE: Pauses the program.
STEP: Plays the disc step by step.
41. VCD AUDIO: Selects a VCD language. (if the VCD is recorded in two languages) This function
can't work while playing a DVD.
42. EJECT: Ejects the disc from the DVD player.
43. SUBTITLE: Selects the language of the subtitle.
44. LANGUAGE: Selects the language of the dub. (If the disc is recorded with multi-language)
45. MENU: Enters the menu of the DVD disc.
46. SETUP: Stops the program, press this button to enter the OSD of the DVD player, and then set
the function you need.
47. SAP: Second audio program.
48. AV/TV: Changes the mode between AV and TV
49. CH JUMP: Channel jump.
50. CH +: Next channel
51. CH -: Previous channel
52. Fine tune: Fine tune the TV signal
53. 0-9 KEYS: Selects the TV channel.
Section D: GREEN characters, for DVD PLAYER use
Section E: BROWN characters, for TV TUNER use
USER CONTROLS
2
5
DHT100/200
DHT100/200
USER CONTROLS
3-2 ON-SCREEN DISPLAY MENUS
3-2-1 HOW TO OPERATE
1. To Open the ON-Screen Display (OSD) menu, press the "Menu" button on the
Remote Control or Control Panel .
2. When the OSD is displayed, use "Cursor" buttons on the Control Panel or on the
Remote Control to choose the item you need.
3. Press the "Menu" button again to exit.
3-2-2 PROJECTOR'S OSD
IMAGE
DISPLAY
AUDIO
SYSTEM
LANGUAGE
TV
COMPUTER IMAGE
Brightness
Contrast
Frequency
Tracking
Hor. Position
Ver. Position
Image Mode
VIDEO IMAGE
Brightness
Contrast
Color Satur.
Sharpness
Tint
Image Mode
DISPLAY
Aspect Ratio
Zoom
Keystone
Color Temperature
AUDIO
Volume
Treble
Bass
Mute
Int/Ext Speaker
Wireless Channel set
SYSTEM
OSD Location
Projection
Lamp Hours
Lamp Reset
Int/Ext Speaker
Auto Source
Factory Reset
LANGUAGE
English
Deutsch
Francais
Espanol
繁體中文
簡體中文
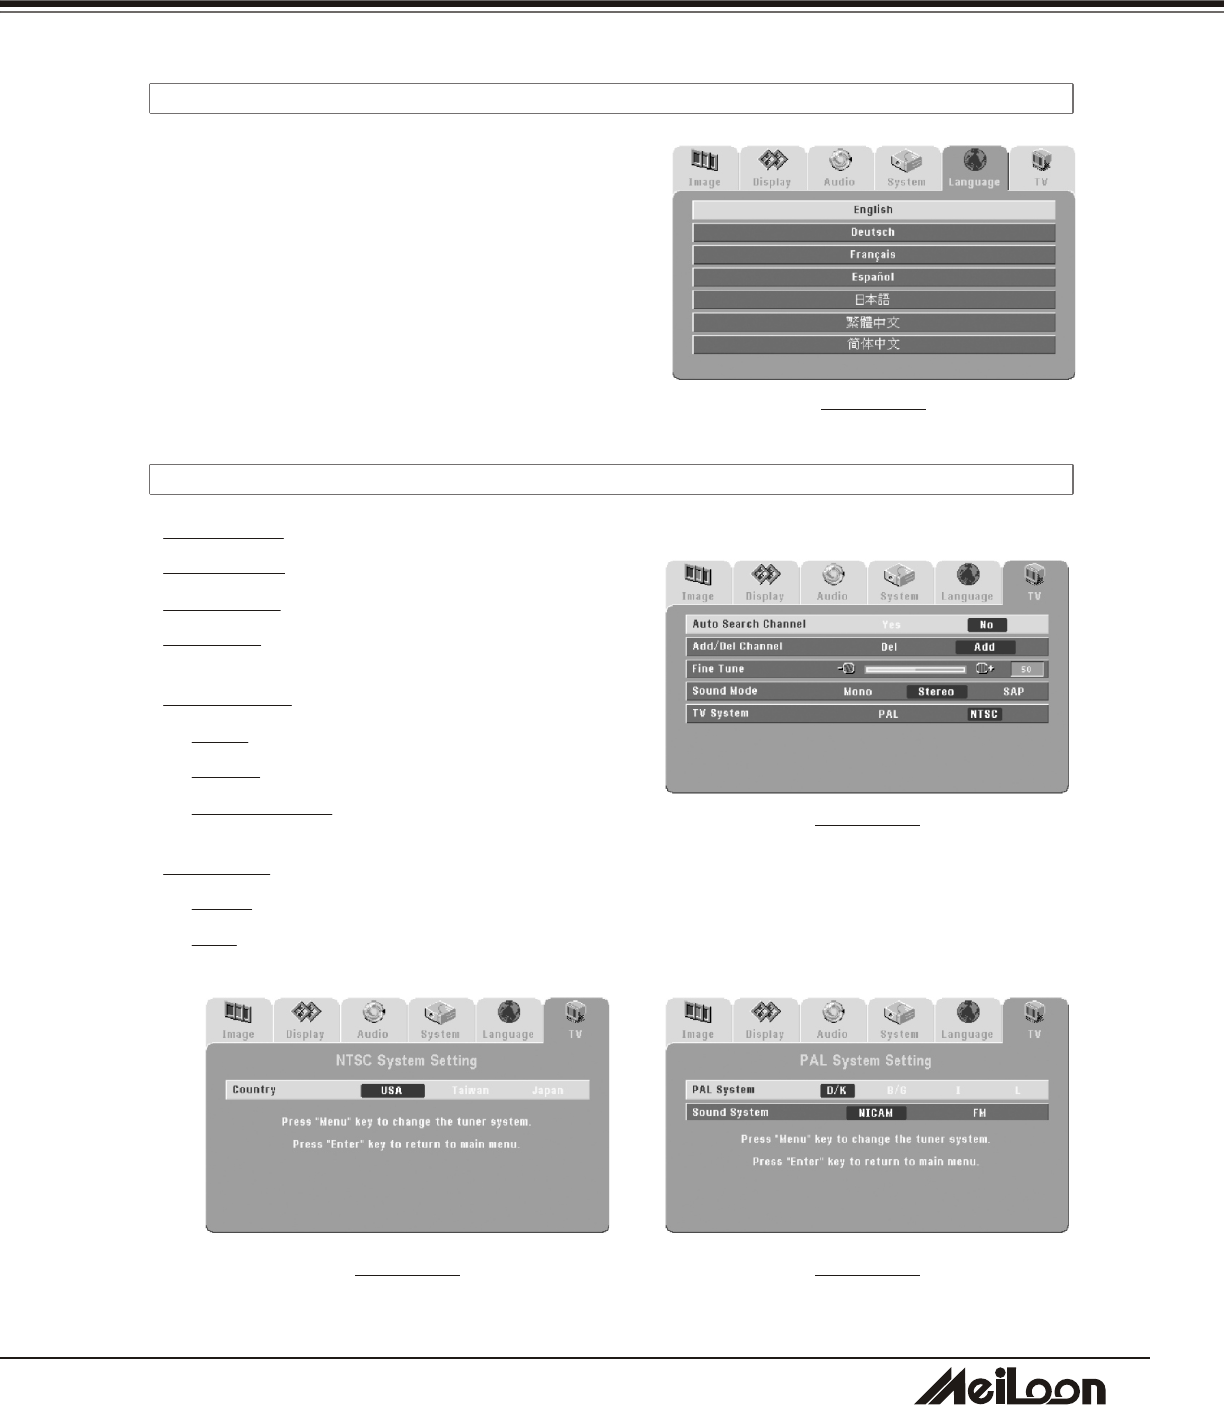
TV
Auto Search Channel
Add/Del Channel
Fine Tune
Volume Mode
TV System
High Brightness
Gamma
High Brightness
Gamma
NTSC sys. setting
PAL sys. setting
Red Color
Temperature
Green Color
Temperature
Blue Color
Temperature
Wireless Channel
setting
2
6
USER CONTROLS
3-2-2-1 MAIN MENU
DRAWING 34
Press the “Enter" button to enter the submenu,
press it again to return to the main menu.
Main Menu includes:
Image
Display
Audio
System
Language
TV
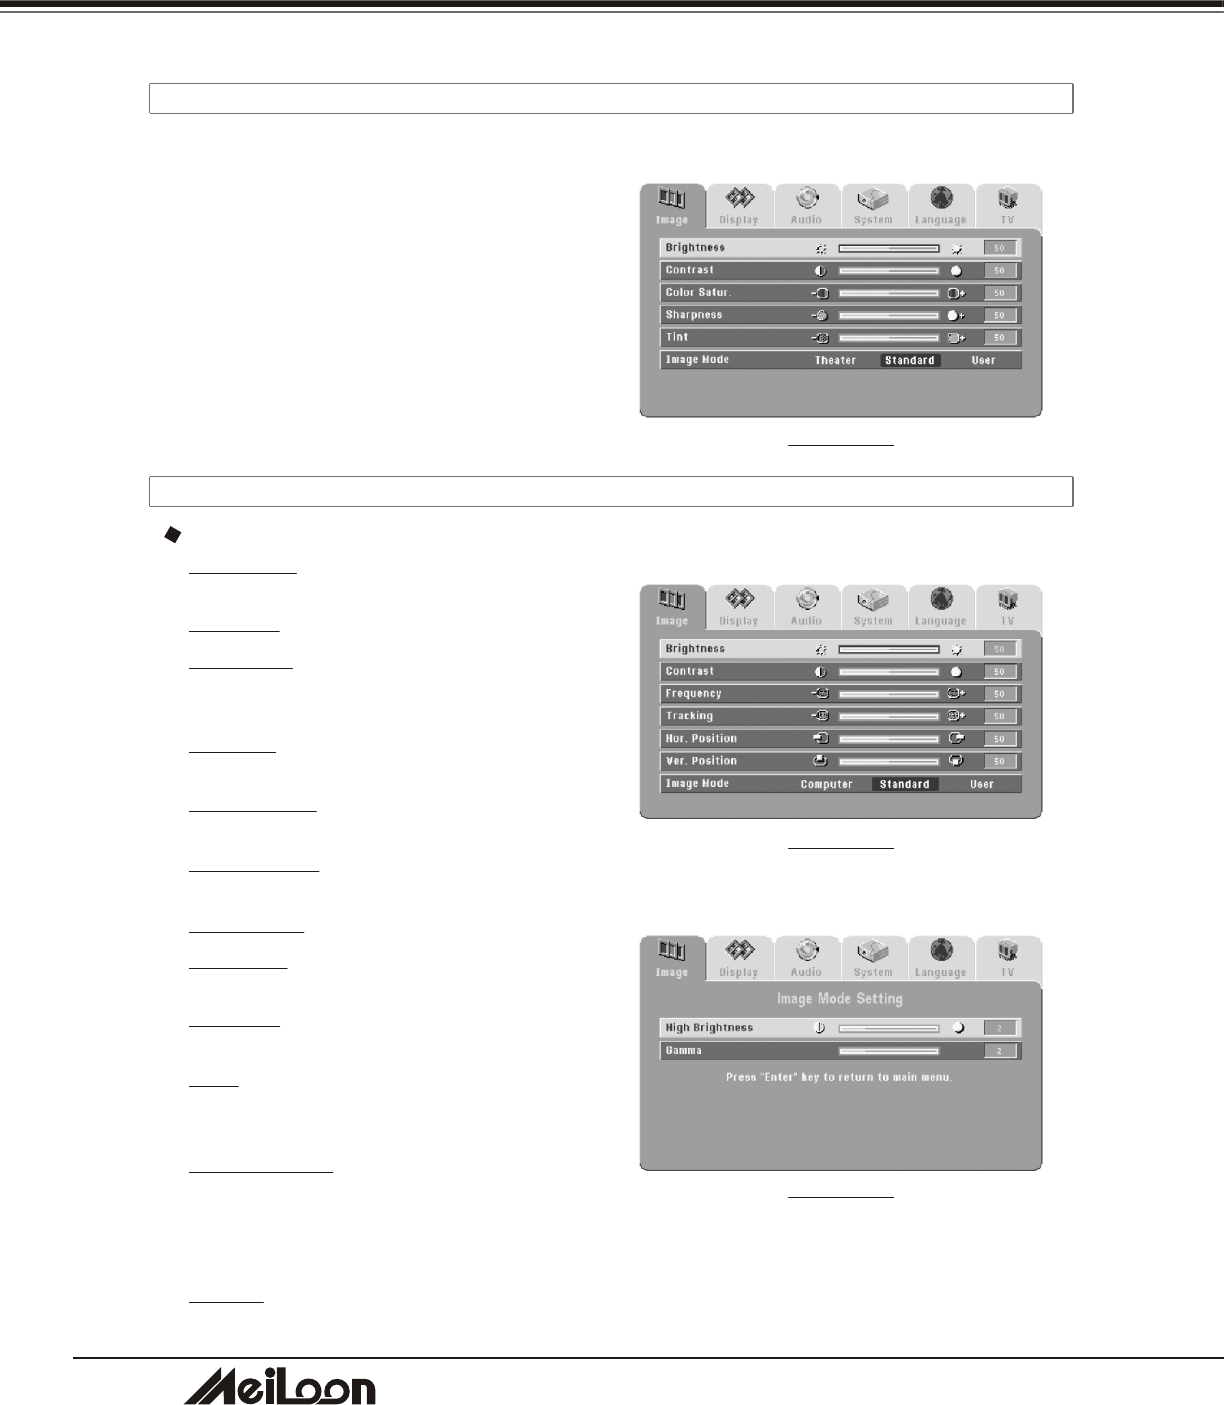
3-2-2-2 IMAGE
Computer Image
Brightness: Adjusts the brightness of the
image.
Contrast: Adjusts the contrast of the image
Frequency: Adjusts the frequency to match
the frequency of your computer's graphic
card.
Tracking: Synchronizes the signal timing with
your computer's graphic card.
Hor. Position: Moves the image's horizontal
position.
Ver. Position: Moves the image's vertical
position.
Image Mode: Choose a mode
Computer: This mode is good for computer
signals.
Standard: This mode is good for movie
pictures.
User: This mode allows you to adjust High
Brightness and/or Gamma. Press the "Right"
button to enter the submenu.
High Brightness: Sets the white peaking level
of the DMD chip. If you prefer a stronger
image, press the "Right" button to increase
the value. If you want a more natural image,
press the" Left" button to decrease the value.
Gamma: Adjusts the Gamma (mid-tone
brightness) curve.
DRAWING 35
DRAWING 36
DHT100/200
DHT100/200
2
7
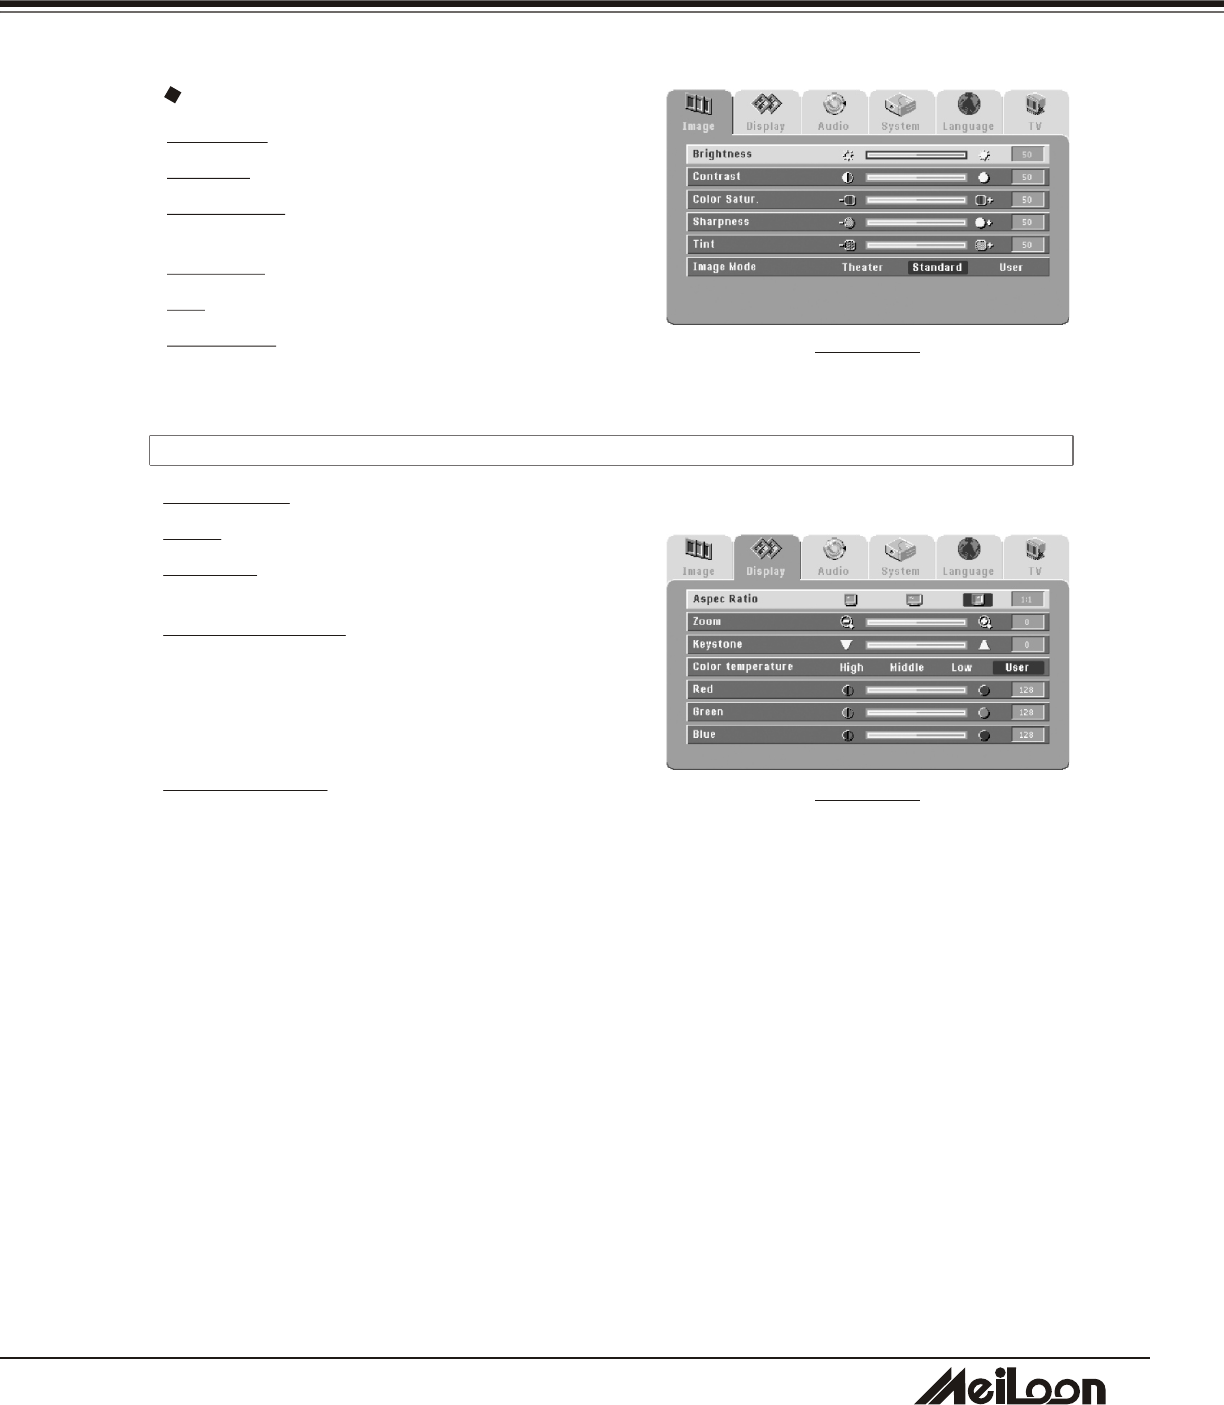
USER CONTROLS
Brightness: Adjusts the brightness of the image.
Contrast: Adjusts the contrast of the image
Color Satur. : Adjusts color saturation of the
image.
Sharpness: Adjusts the sharpness of the image.
Tint: Adjusts the color balance of red and green .
Image Mode: See "Image Mode" in the "Computer
Image" section.
Aspect Ratio: Selects your desired aspect ratio.
Zoom: Increases or reduces the size of the image.
Keystone: Adjusts image distortion caused by tilting
the projection.
Color Temperature: Adjusts the color temperature
of the image. A higher color temperature looks
colder. A lower color temperature looks warmer.
When the color temperature is set to User mode,
press "Down" button to select Red, Green, or Blue
adjustment.
Red, Green, Blue: Increases or decreases the value
to find the desired color temperature.
3-2-2-3 DISPLAY
Video Image
DRAWING 37
DRAWING 38
DHT100/200
DHT100/200
2
8
USER CONTROLS
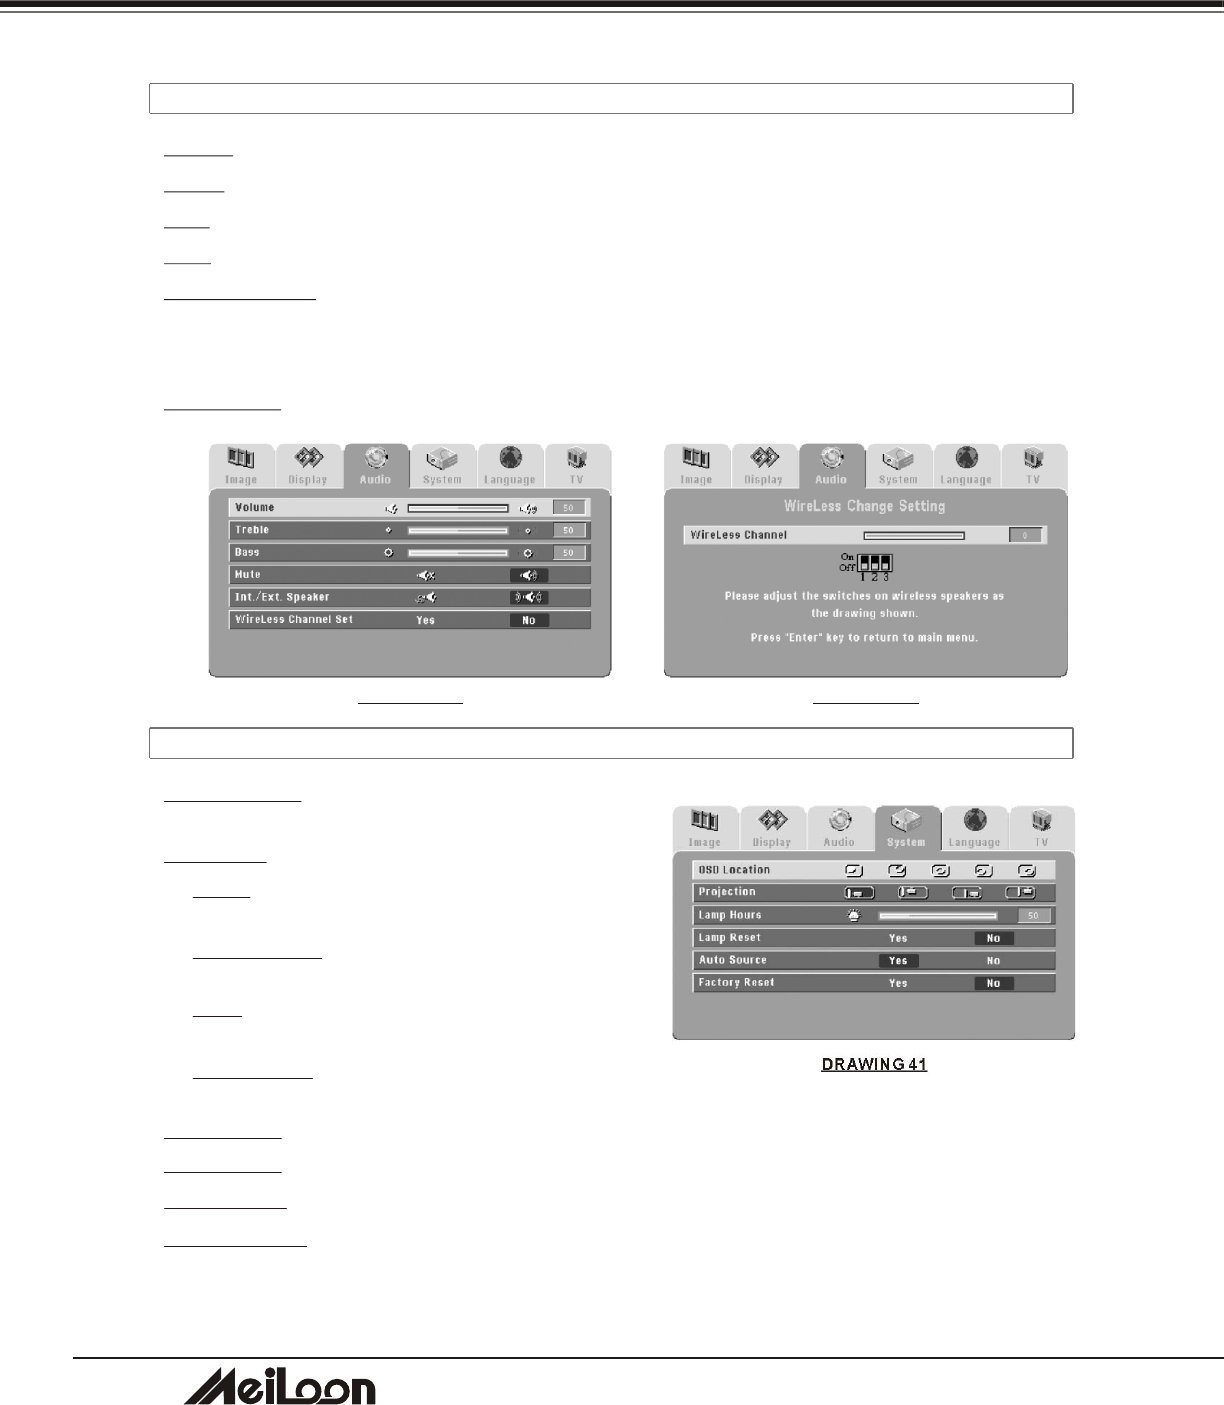
3-2-2-5 SYSTEM
OSD Location:Chooses the OSD location on the
display screen.
Projection: Selects the projector's orientation.
Front: The factory default setting. For "tabletop"
projection.
Front Ceiling: Inverts the image. For "ceiling
mounted" projection.
Rear: Reverses the image. For "tabletop"rear
projection
Rear Ceiling: Reverses and inverts the image. For
"ceiling mounted" rear projection.
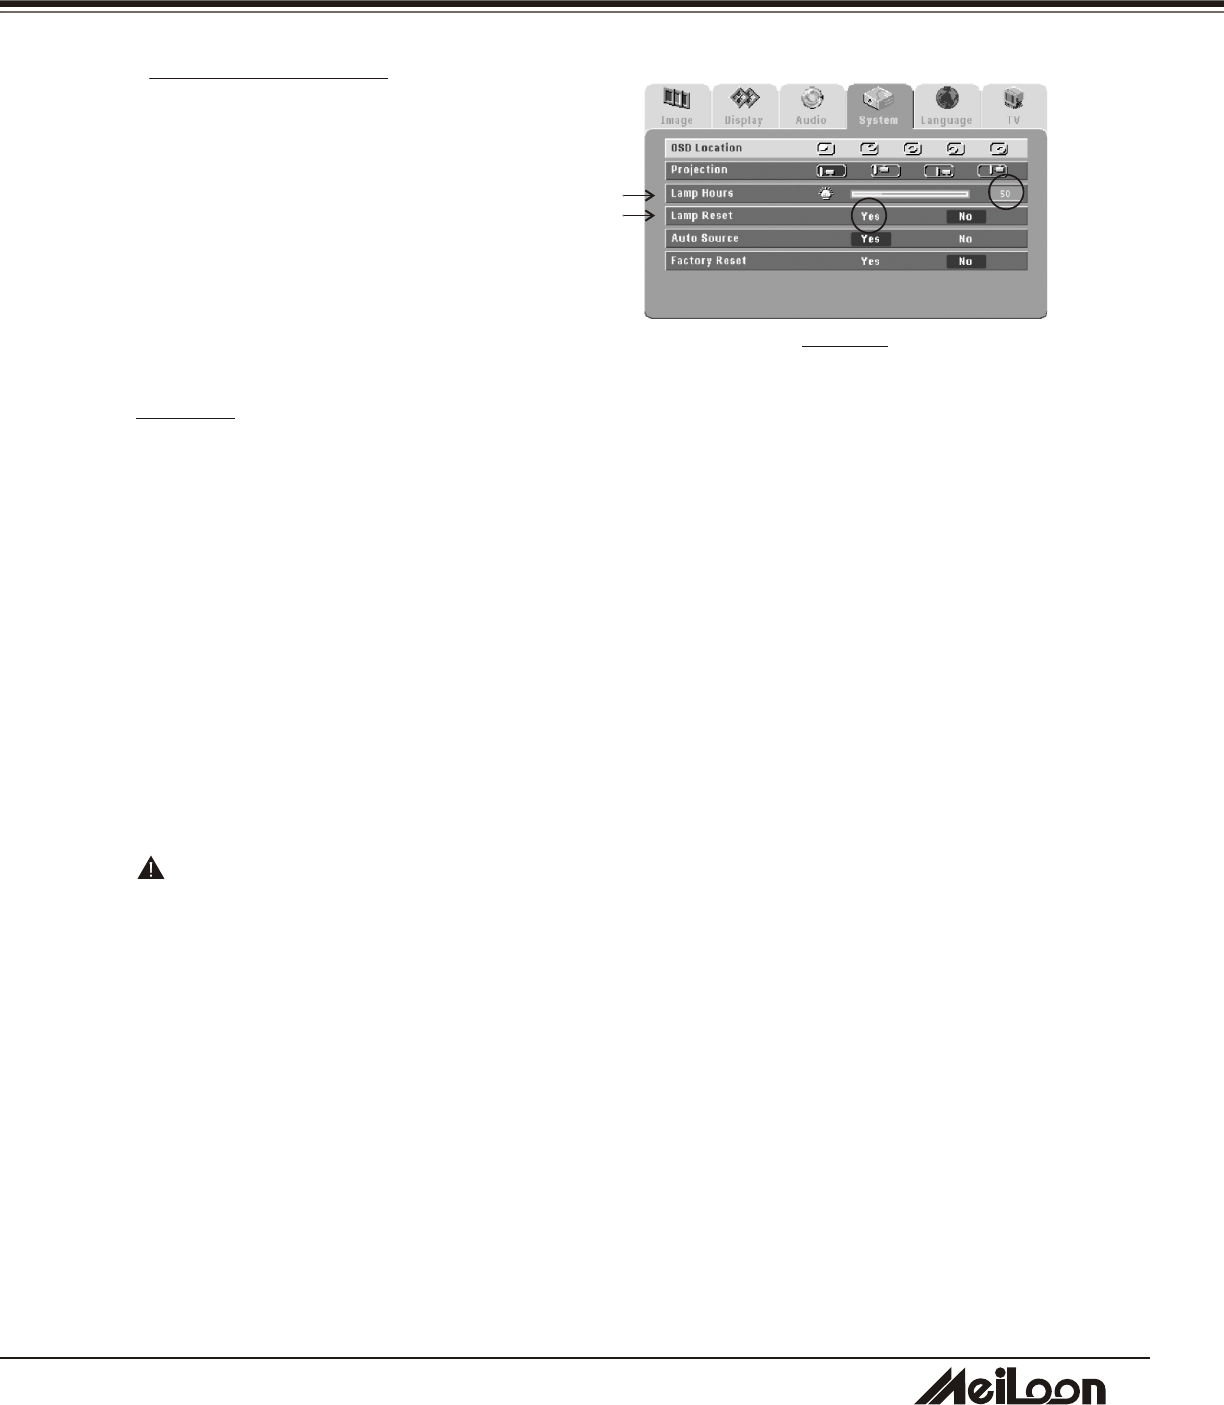
Lamp Hours: Displays the cumulative lamp operation time.
Lamp Reset: Resets the lamp operation time after changing lamps..
Auto Source: Detects the input source automatically.
Factory Reset: Resets all items in all menus to their default settings.
DRAWING 41
Volume: Adjusts the volume of the internal or wireless speaker.
Treble: Adjusts the treble audio of the internal or wireless speaker
Bass: Adjusts the Bass audio of the internal or wireless speaker.
Mute: Mutes the internal or wireless speaker.
Int/Ext Speaker: Selects the internal or wireless speaker. If you select wireless speaker, press
the "Down" button to get the wireless channel selection. Set the wireless speaker channel to
match the wireless speaker channel set on the projector. Press the "Enter" button to return to
the main menu.
Wireless CH.: Sets the wireless channel.
3-2-2-4 AUDIO
DRAWING 39 DRAWING 40
DHT100/200
DHT100/200
2
9
3-2-2-6 LANGUAGE
Selects the Language you need.
DRAWING 42
USER CONTROLS
3-2-2-7 TV
Auto Search: Searches channels automatically.
Add Channel: Adds the channel you need.
Del Channel: Deletes the channel you don't need.
Fine Tune: Mutes the internal speaker of projector
or wireless speaker.
Volume Mode:
Mono: Outputs the mono sound.
Stereo: Outputs the stereo sound.
Sub-Language: Changes the main language to the
sub-language.
TV System: Selects the NTSC or PAL system.
NTSC: Selects Country.
PAL: Selects region and volume system
DRAWING 43
DRAWING 45DRAWING 44
DHT100/200
DHT100/200
3
0
USER CONTROLS
3-2-3 MEDIA PLAYER'S OSD
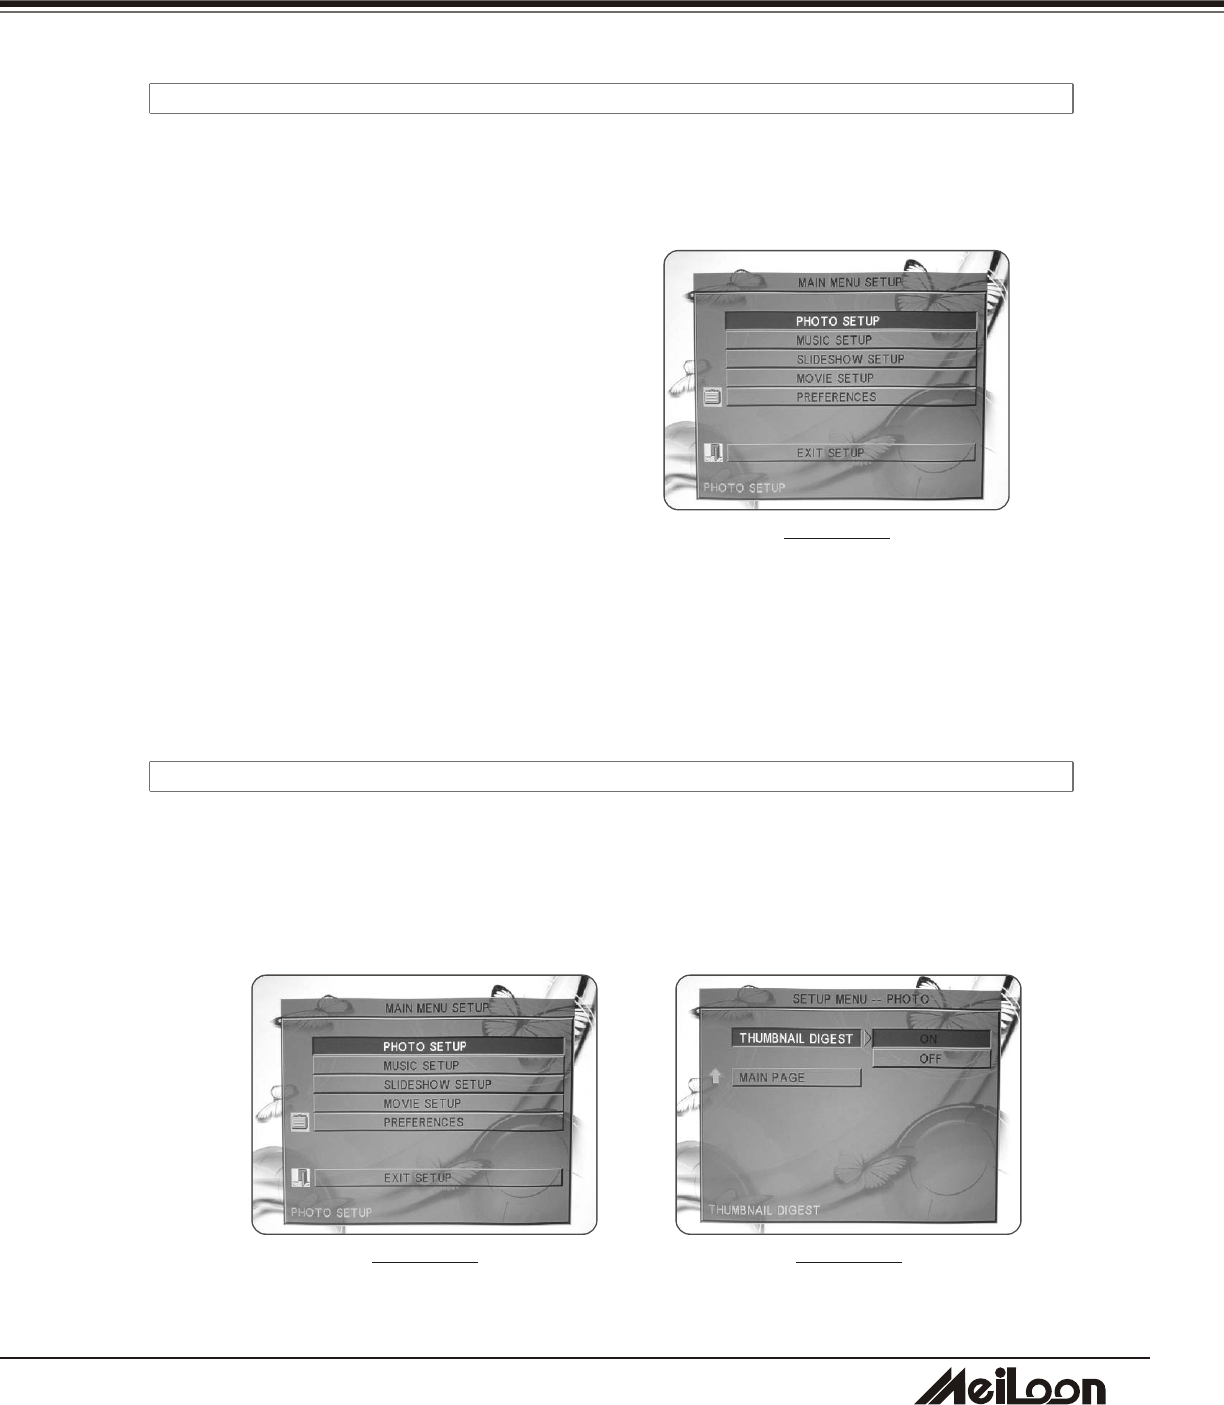
PHOTO SETUP
MUSIC SETUP
SLIDESHOW SETUP
MOVIE SETUP
PREFERENCE
Press the "Setup"(red) button on the Remote Control to enter the Media Player's OSD.
PHOTO SETUP
Thumbnail digest
MUSIC SETUP
Repeat mode
SLIDESHOW SETUP
Slideshow mode
Folder repeat
Interval time
Transition
Auto start
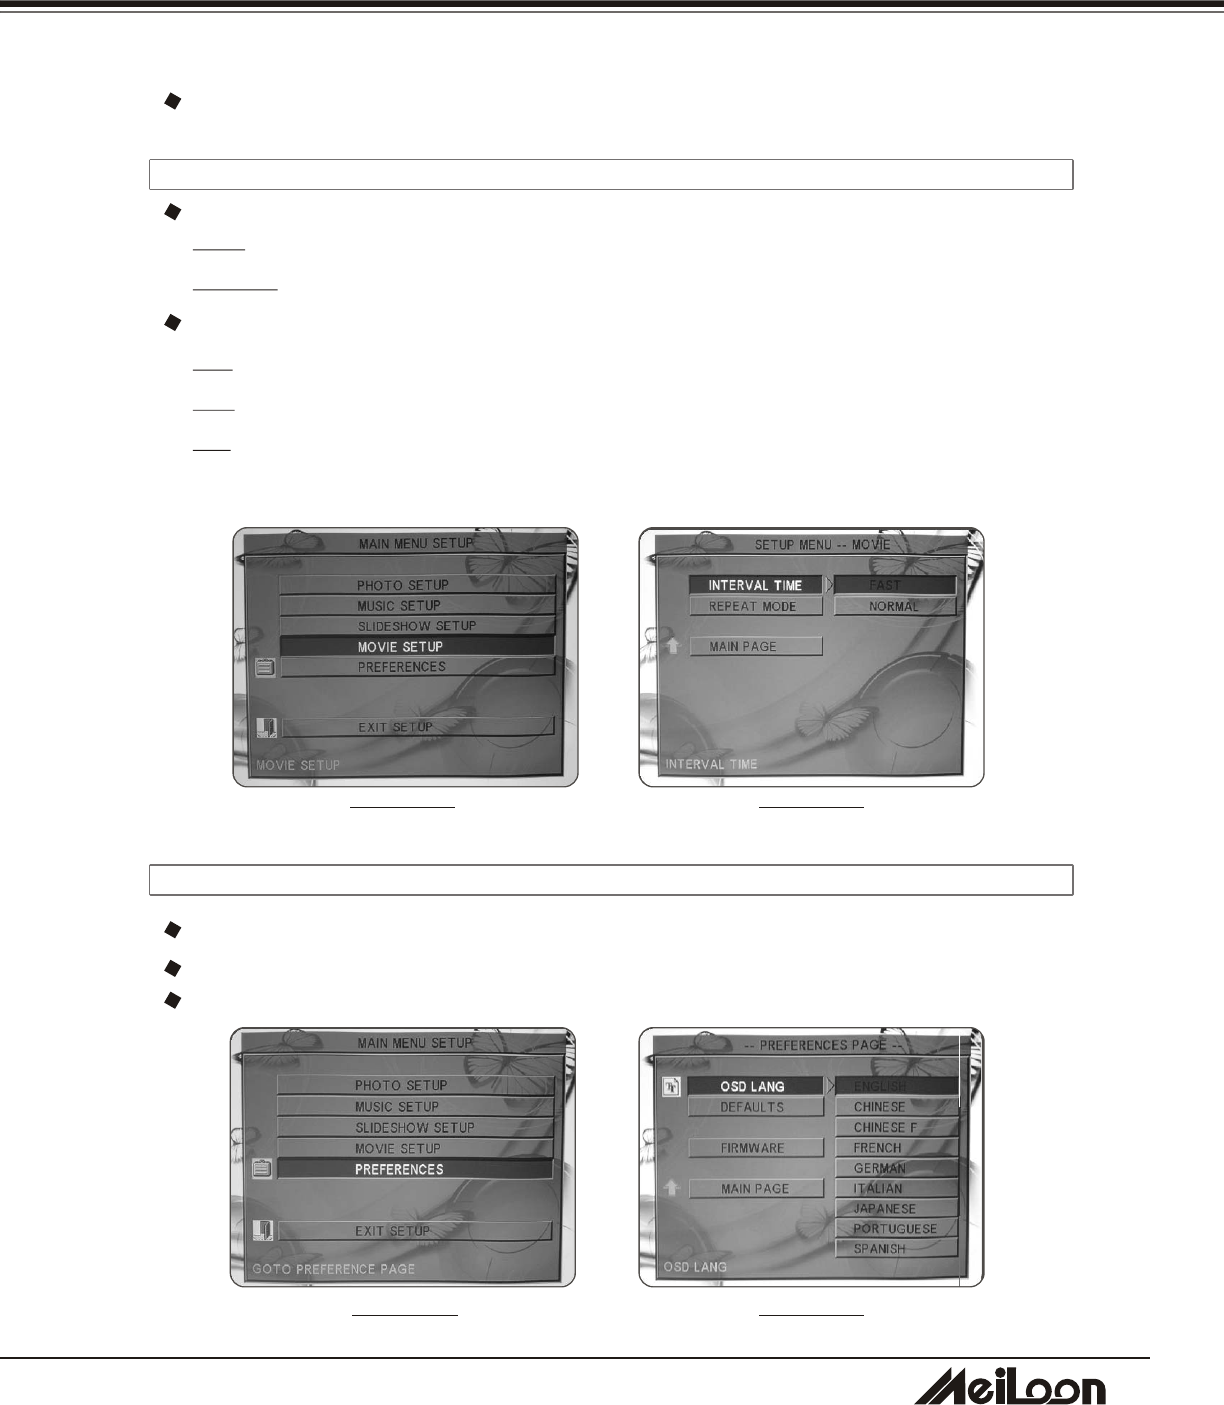
MOVIE SETUP
Interval time
Repeat mode
PREFERENCE
OSD Language
Defaults
Firmware
On, Off
One, All, Off
Auto, Manual
One, All, Off
One, Three, Five, Ten seconds
Full Screen
TOP -> BOTTOM
BOTTOM -> TOP
TB -> CENTER
CENTER -> TB
BLIND: T -> B
LEFT -> RIGHT
RIGHT -> LEFT
L/R -> CENTER
On, Off
Fast, Normal
Off, One, All
English
Chinese
Chinese F
French
German
Japanese
Spanish
Reset
Edition
Update
DHT100/200
DHT100/200
3
1
USER CONTROLS
3-2-3-1 MAIN MENU
DRAWING 46
1. Press "Setup" button to show the main menu
on screen
2. Press "Up" / "Down" button to select the
item.
3. Press "Enter" button to enter the sub-menu.
4. Press "Right" button to set the function.
5. Press "Enter" button to confirm the setting
6. Press "Left" button to return the function
item.
7. Select "EXIT SETUP" to exit the setup main.
Main Menu includes:
PHOTO SETUP
MUSIC SETUP
SLIDESHOW SETUP
MOVIE SETUP
PREFERENCES
The Menu can only be accessed from the Remote Control.
3-2-3-2 PHOTO SETUP
Digital cameras automatically store a thumbnail of each picture taken. These thumbnails load
faster and allow you to browse photos more easily.
The Media Player can detect and display these thumbnails. The PHOTO SETUP function lets
you turn the THUMBNAIL DIGEST on or off. If you select on, you can view your photos more
quickly.
DRAWING 47
Submenu
DRAWING 48
DHT100/200
DHT100/200

3
2
USER CONTROLS
3-2-3-3 MUSIC SETUP
Submenu
ONE—Repeats the selected song.
ALL—Repeats all the songs in the memory card.
OFF—Does not repeat any songs.
Repeat Mode
3-2-3-4 SLIDESHOW SETUP
DISPLAY MODE —Set to cause the slideshow to
start automatically.
REPEAT MODE —Set to cause all photos in a folder
to display consecutively and continuously (in a loop).
INTERVAL TIME —Set the show time of each photo.
(One, Three, Five, or Ten sec).
TRANSITION —Set the transition mode between
slides.
FULL SCREEN —Image appears full screen
TOP -> BOTTOM —Image rolls in from top to bottom
BOTTOM -> TOP —Image rolls in from bottom to top
TB -> CENTER —Image rolls in from top and bottom
to center
CENTER -> TB —Image rolls from center to top and
bottom
BLIND: T -> B—Image rolls in blinds from top to
bottom
LEFT -> RIGHT—Image rolls in from left to right
RIGHT -> LEFT—Image rolls in from right to left
L/R -> CENTER—Image rolls in from left and right to
center
Submenu
DRAWING 49 DRAWING 50
DRAWING 51
DRAWING 52
DHT100/200
DHT100/200
3
3
USER CONTROLS
3-2-3-5 MOVIE SETUP
FAST: A short preview of movie plays in Thumbnail view.
NORMAL: The whole movie plays in Thumbnail view.
REPEAT MODE
OFF: REPEAT MODE is turned off.
ONE: Plays the selected movie continuously (loop).
ALL: Plays all movies on the memory card continuously(loop).
INTERVAL TIME
3-2-3-6 PREFERENCE
OSD LANG: Selects the OSD language.
DEFAULTS: Returns to the default value.
FIRMWARE: Updates the firmware. (For service person use only)
Submenu
DRAWING 53
DRAWING 55 DRAWING 56
DRAWING 54
AUTO START —When turned on, any media in the memory card plays automatically when the
card is inserted.
DHT100/200
DHT100/200
3
4
USER CONTROLS
3-2-4 DVD PLAYER'S OSD
LANGUAGE
VIDEO
AUDIO 1
AUDIO 2
Press the "Setup"(green) button on the Remote Control to enter the DVD player's OSD.
LANGUAGE
OSD Menu
Subtitle
Audio
DVD menu
VIDEO
TV Shape
TV System
AUDIO
AC3
DTS
MP3/WMA
Others
MORE AUDIO
Prologic
Subwoofer
Factory Set
English, 簡體中文,繁體中文, Francais
日本語, Deutsch, Spanish
English, 簡體中文,繁體中文, Francais
日本語, Auto, Off
English, Chinese S, Chinese T, Francais
Japanese, German, Spanish
English, Chinese S, Chinese T, Francais
Japanese, German, Spanish
4:3, 16:9
NTSC, PAL, PAL60, AUTO
Analog Out - 2 Channels, 6 Channels
Digital Out - PCM, RAW, OFF
Analog Out - 2 Channels, 6 Channels
Digital Out - PCM, RAW, OFF
Analog Out - 2 Channels, 6 Channels
Digital Out - PCM, RAW, OFF
Analog Out - 2 Channels, 6 Channels
Digital Out - PCM, RAW, OFF
Auto, On, Off
On, Off
On, Off
DHT100/200
DHT100/200
3
5
USER CONTROLS
3-2-4-1 MAIN MENU
The Menu can only be accessed from the Remote
Control.
1. Press "Setup" button to show the main menu on
screen
2. Press "Right" or "Left" button to select the item
you want.
3. Press "Enter" button to enter the sub-menu.
4. Press "Up" button to return the main menu
5. Press "Setup" button to exit the menu
3-2-4-2 LANGUAGE
DRAWING 58
DRAWING 57
DHT100/200
DHT100/200
㪪㪼㫃㪼㪺㫋㫊㩷㫋㪿㪼㩷㪣㪸㫅㪾㫌㪸㪾㪼㩷㫆㪽㩷㪦㪪㪛㩷㪤㪼㫅㫌㪅
㩿㪜㫅㪾㫃㫀㫊㪿㪃㩷◲㜚ਛᢥ㪃 ❥㜚ਛᢥ㪃 㪝㫉㪸㫅㪺㪸㫀㫊㪃㩷ᣣᧄ⺆㪃 㪛㪼㫌㫋㫊㪺㪿㪃㩷
㪪㫇㪸㫅㫀㫊㪿㪀
㪪㫌㪹㫋㫀㫋㫃㪼
㪪㪼㫃㪼㪺㫋㫊㩷㫋㪿㪼㩷㪣㪸㫅㪾㫌㪸㪾㪼㩷㫆㪽㩷㫊㫌㪹㫋㫀㫋㫃㪼㪅
㩿㪜㫅㪾㫃㫀㫊㪿㪃㩷◲㜚ਛᢥ㪃㩷❥㜚ਛᢥ㪃㩷㪝㫉㪸㫅㪺㪸㫀㫊㪃㩷ᣣᧄ⺆㪃㩷㪘㫌㫋㫆㪃㩷㪦㪽㪽㪀
㪘㫌㪻㫀㫆
㪪㪼㫃㪼㪺㫋㫊㩷㫋㪿㪼㩷㪣㪸㫅㪾㫌㪸㪾㪼㩷㫆㪽㩷㪻㫌㪹㪅
㩿㪜㫅㪾㫃㫀㫊㪿㪃㩷◲㜚ਛᢥ㪃㩷❥㜚ਛᢥ㪃㩷㪝㫉㪸㫅㪺㪸㫀㫊㪃㩷ᣣᧄ⺆㪃㩷㪛㪼㫌㫋㫊㪺㪿㪃㩷
㪪㫇㪸㫅㫀㫊㪿㪀
㪛㪭㪛㩷㪤㪼㫅㫌
㪪㪼㫃㪼㪺㫋㫊㩷㫋㪿㪼㩷㪣㪸㫅㪾㫌㪸㪾㪼㩷㫆㪽㩷㪛㪭㪛㩷㪤㪼㫅㫌㪅
㩿㪜㫅㪾㫃㫀㫊㪿㪃㩷◲㜚ਛᢥ㪃㩷❥㜚ਛᢥ㪃㩷㪝㫉㪸㫅㪺㪸㫀㫊㪃㩷ᣣᧄ⺆㪃㩷㪛㪼㫌㫋㫊㪺㪿㪃㩷
㪪㫇㪸㫅㫀㫊㪿㪀
3
6
3-2-4-3 VIDEO
TV Shape
There are two aspect ratios to choose from:
4:3: The image will be displayed in 4:3 aspect.
16:9: The image will be displayed in 16:9 wide screen.
TV System
Selects system you need.
USER CONTROLS
3-2-4-4 AUDIO 1
AC3, DTS, MP3/WMA, Others:
Analog Out:Selects the channels you need (2 or 6
channels)
Digital Out: PCM, RAW, OFF
RAW: Digital output
PCM: Analog output
Please set 2 channels and PCM when playing wireless
stereo speaker.
DRAWING 59
DRAWING 60
DHT100/200
DHT100/200
3
7
3-2-4-5 AUDIO 2
USER CONTROLS
Prologic:
Auto: Default setting. The DVD player will automatically
change the output from 2 channels to 6 channels.
On: Sets the function always on.
Off: Sets the function off.
Subwoofer:
On: Sets the subwoofer on.
Off: Sets the subwoofer off.
Factory Set:
On: Restores the default setting.
Off: Keeps the user's setting.
DRAWING 61
DHT100/200
DHT100/200

3
8
DHT100/200
DHT100/200
4.
APPENDICES
4-1 TROUBLESHOOTING
1. No Images appears
Check the power cable connection at the power inlet of the projector and at the
wall outlet.
Confirm that the main power switch at the rear of the projector is in the on
position.
Check the Standby/on button indicator. (Section 3-1)
Confirm that the lens cap has been removed.
Make sure the source device is properly connected to the projector, and is
outputing a signal.
Press "Source" button on either the projector or the Remote Control to ensure
that correct source is selected.
2. Image is blurred
Ensure the distance between the projector and the screen is within the focus
range of the lens. (Section 2-2)
Adjust the focus ring.
3. Image is too dark
Adjust the contrast or brightness in the image menu of projector properly.
Adjust the brightness in the setup menu of DVD player.
Has the lamp reached the end of its life? If so replace the lamp.
4. Computer Image is unstable or the projector isn't projecting the whole image.
Press "SYNC" button either on the projector or the Remote Control to
synchronize the computer output signal.
Use "Image" menu to adjust the tracking or frequency.
Verify that the computer's output resolution to the projector is less than or
equal to 1024 x 768.
5. Image is stretched when displaying 16:9 DVD.
Adjust the "Aspect Ratio" in the OSD of projector.
Adjust the "TV Shape" in the OSD of DVD player.

3
9
DHT100/200
DHT100/200
6. No sound
Make sure the Mute option in Audio menu is off.
Make sure the Audio menu in DVD player's OSD is set properly.
Make sure the Internal/External speaker option in audio menu is set as required.
Make sure the channel of wireless transmitter selected in projector is the same
as the channel of wireless receiver selected in the wireless speaker.
7. Wireless speaker noisy
Change the channels on the projector and wireless speaker simultaneously.
There are 8 channels selectable.(refer to the Section 3-2-2-4)
8. Remote control does not work
Install new batteries.
Make sure there are no obstacles between you and the projector's receivers.
Make sure you are attempting to operate it within its usable range.
9. Can't read the memory card
Make sure the Media Player's LED indicator (beside the card slot) is lighting..
Check the compatibility of memory card (refer to section 2-3-2)
Re-insert the memory card.
10. Can't play DVD
Make sure the DVD player's LED indicator (on the control panel of the projector)
is lighting
Confirm that the disc is an original edition.
Eject the disc and play again.
11. The disc can't play or is automatically ejected after loading
Make sure the disc is free from dirt and dust and is not damaged.
Make sure the disc is loaded with the label side face-up and aligned properly in
the disc tray guide.
Make sure the disc format is compatible with the DVD player of the projector.
Please refer to the specification.
12. The color of Image is not correct
Please reset all settings.
APPENDICES
4
0
DHT100/200
DHT100/200
APPENDICES
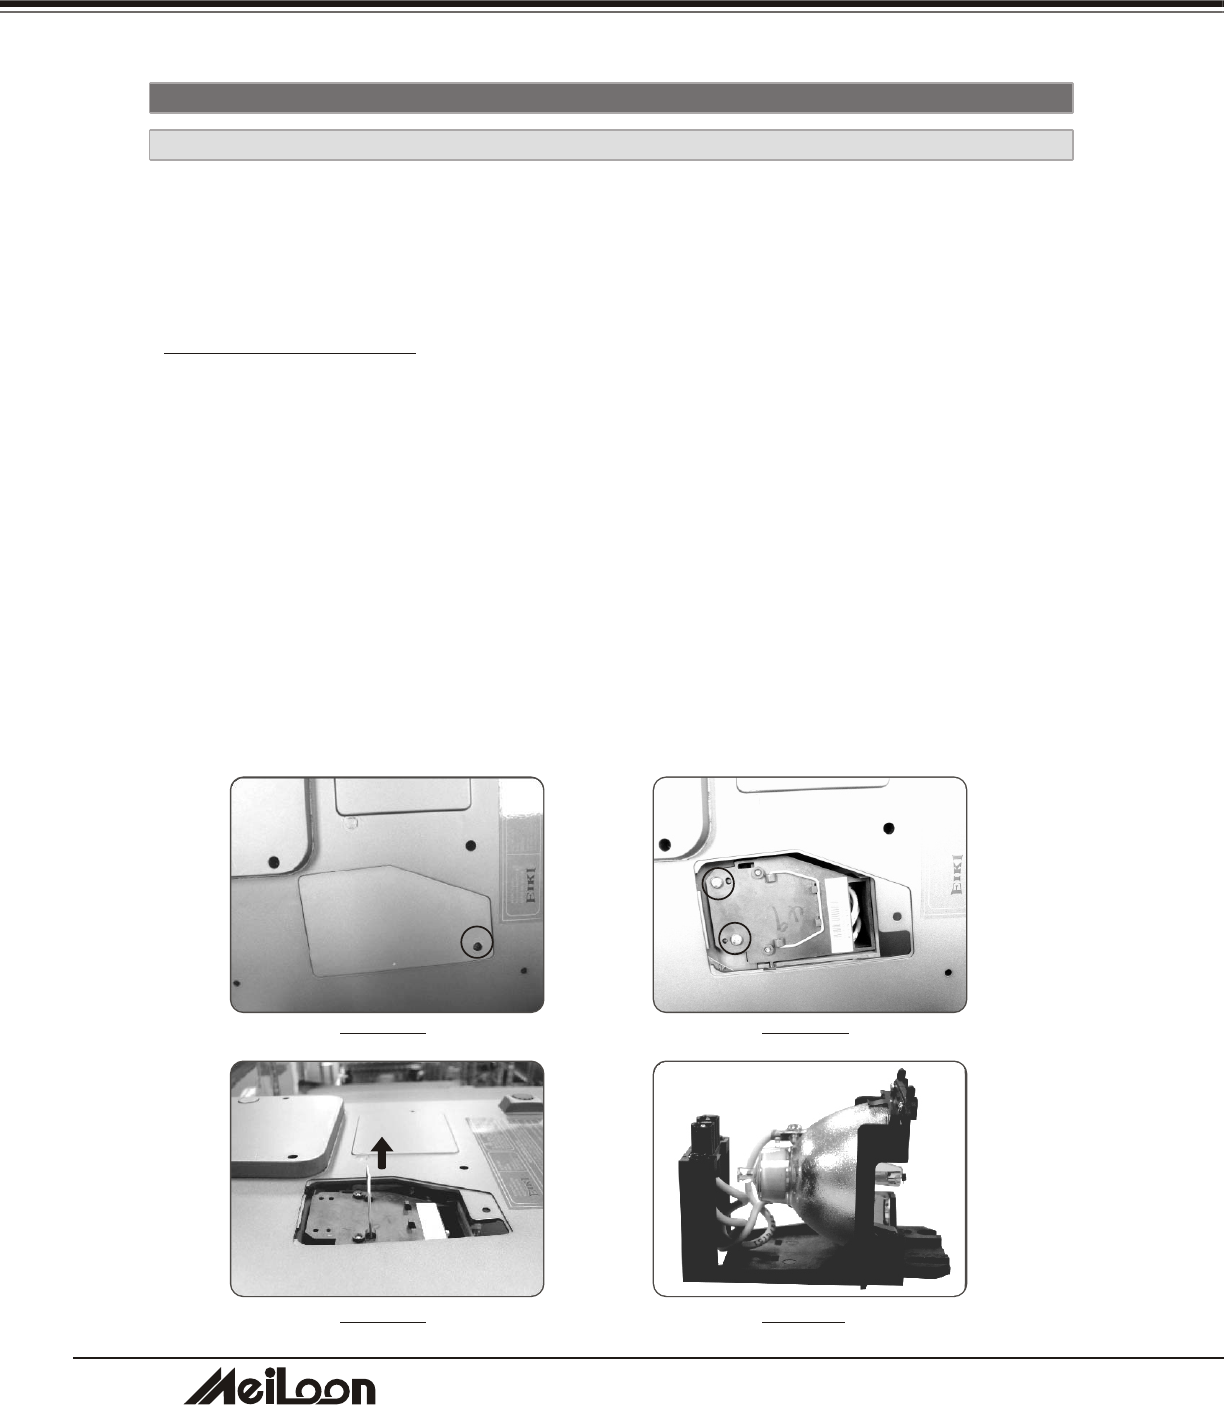
4-2-1 REPLACING THE LAMP
4-2 MAINTENANCE
When the lamp's total working time accumulates to over 1850 hours, the on-screen
display (OSD) will deliver a message recommending that you replace the lamp. Please
contact a service center to replace the lamp as soon as possible, or refer to the
following instructions to replace it yourself.
TO REPLACE THE LAMP
1. Turn off the projector by pressing the "Power" button
2. Allow the projector to cool down for at least one hour.
3. Switch off the power and disconnect the power cord.
4. Loosen the screw on the lamp cover and remove the lamp cover. (Drawing 62)
5. Loosen two screws on the lamp module (Drawing 63) remove the lamp module by
pulling on the handle (Drawing 64)
6. Insert a new lamp module (Drawing 65) into the socket: make sure it is in position.
7. Reverse steps 4 and 5
8. Ensure that the lamp cover is securely attached and flush with the bottom of the unit.
The unit will not operate with the cover incorrectly installed.
9. Reset the lamp timer
DRAWING 63DRAWING 62
DRAWING65DRAWING 64
4
1
DHT100/200
DHT100/200
CAUTION
* Do not touch the lamp immediately after it has been used: it will be extremely hot.
Allow the fan to finish its cooling process, then turn the projector off, and disconnect
the power cord. Then allow at least one hour for the lamp to cool down before handling.
* Do not remove any screws other than the lamp cover screw and the lamp housing
screws. Removing other screws could result in electric shock.
* Although the mercury content of the lamp is minuscule, spent lamps should be
treated as hazardous waste. Consult federal, state/provincial or local regulations for
proper disposal.
APPENDICES
To reset the lamp timer
1. Press the Menu button on control panel
or remote controller.
2. Go into the system menu and move the
cursor to the lamp reset item.
3. Select "Yes" to execute the lamp reset
and the lamp hours will reset to 0 hour.
Important
Continuing to use the lamp after the replace the lamp message has been displayed on
the screen may result in the lamp exploding. If this occurs, pieces of glass may scatter
inside the projector, and out into the room. If this occurs, do not touch them, as the
pieces of glass may cause injury. The bulb contains a small amount of mercury:
ventilate the area well. Contact your dealer for servicing: do not attempt to service the
projector yourself.
DRAWING 66
4
2
DHT100/200
DHT100/200
APPENDICES
4-2-2 CLEANING THE PROJECTOR
Cleaning the cabinet
Wipe lightly with a soft, dry cloth. If the cabinet is very dirty, clean it with a soft,
dampened cloth using mild commercial cleaner and finish with a dry cloth. Do not use
liquid or aerosol cleaners.
Cleaning the lens
Clean the lens carefully by using a blower or lens paper to prevent creating any
scratches on lens.
4
3
DHT100/200
DHT100/200
4-3 SPECIFICATION
APPENDICES
NTSC/PAL/SECAM/NTSC4.43
SXGA (Compression) /XGA/SVGA/VGA/Mac
Adjustable from 35” to 300”
1.5m – 10m
1800 ANSI lumens
2000 : 1
Single 0.7” DDR XGA DMD
4 segmentations
786,432 (1024 x 768)
480 TV Lines (S-Video)
F2.8~ 3.1, f = 25.8 ~ 30 mm, Zoom ratio: 1.2:1
10 : 0
250 W, Lamp life: 2000 hours (Normal mode) / 3500 hours (Eco mode)
Max. X32 for XGA mode
+/- 12 degrees (Vertical)
Left/Right and Top/Bottom
Up to 15 degrees / 45 degrees up and down
Automatic frequency control
H sync. 15kHz~82kHz, V sync. 50Hz~85Hz
5°C to +35°C
32dBA
Dsub 15 x1
Component (HDTV, EDTV) input: RCA Jack x3, RCA x1 (Composite),
Mini DIN 4-pin x1, RCA x2 (R, L-mono)
3.5mm mini Jack x 1: Audio Out
3.5mm mini Jack x 3: Audio 5.1 channel output
2W x 1
Stereo 25W x 2
Dimension (WxDxH): 170x180x270 mm(6.7" x 7.1" x 10.6")
Weight: 8.35 Kg
100 - 240V, 50 - 60Hz
330W
374 x 290 x 92mm (14.7" x 11.4" x 3.6")
4.5 kg (10 lb)
1. EMC - FCC Class B, CE Class B, CCC
2. Safety - cUL, TUV, CB
Power cord
VGA Cable
Audio Cable
Mac Adapter
Remote Control
Soft Carry Bag for projector
25W x 2 Wireless speakers
TV tuner
Deluxe speaker
Satellite speaker
Soft Carry Case for Wireless Speakers
Color system
Computer compatibility
Screen size (diagonal)
Throw distance
Brightness
Contrast ratio
DMD panel
Color wheel
Number of pixels
Horizontal resolution
Projection lens
Lens shift (U/D ratio)
Projection lamp
Digital Zoom
Digital Keystone
Picture Reverse Scan
Front Elevation /
Maximum tilt angle
Scanning frequency
Operating temperature
Fan noise
Computer Input
Computer Output Dsub 15 x1
Video
Audio Out
Built-in Speaker
Wireless Speaker
Power Supply
Power consumption
Dimensions (WxDxH)
Net weight
Regulations
Standard Accessories
Optional Accessories
ALL-IN-ONE PROJECTOR
MODEL DHT100/200
OWNER'S MANUAL
Meiloon Industrial Co., Ltd.
