Mandolyn Electronic Technology WS Weather Station Receiver User Manual IM WS2211 English UPM Rev1
Mandolyn Electronic Technology Inc. Weather Station Receiver IM WS2211 English UPM Rev1
Contents
- 1. User Manual WS1233U
- 2. User Manual WS2211
- 3. User Manual WS2300U
User Manual WS2211
WIRELESS THERMOSTATION
INSTRUCTIONS FOR USE
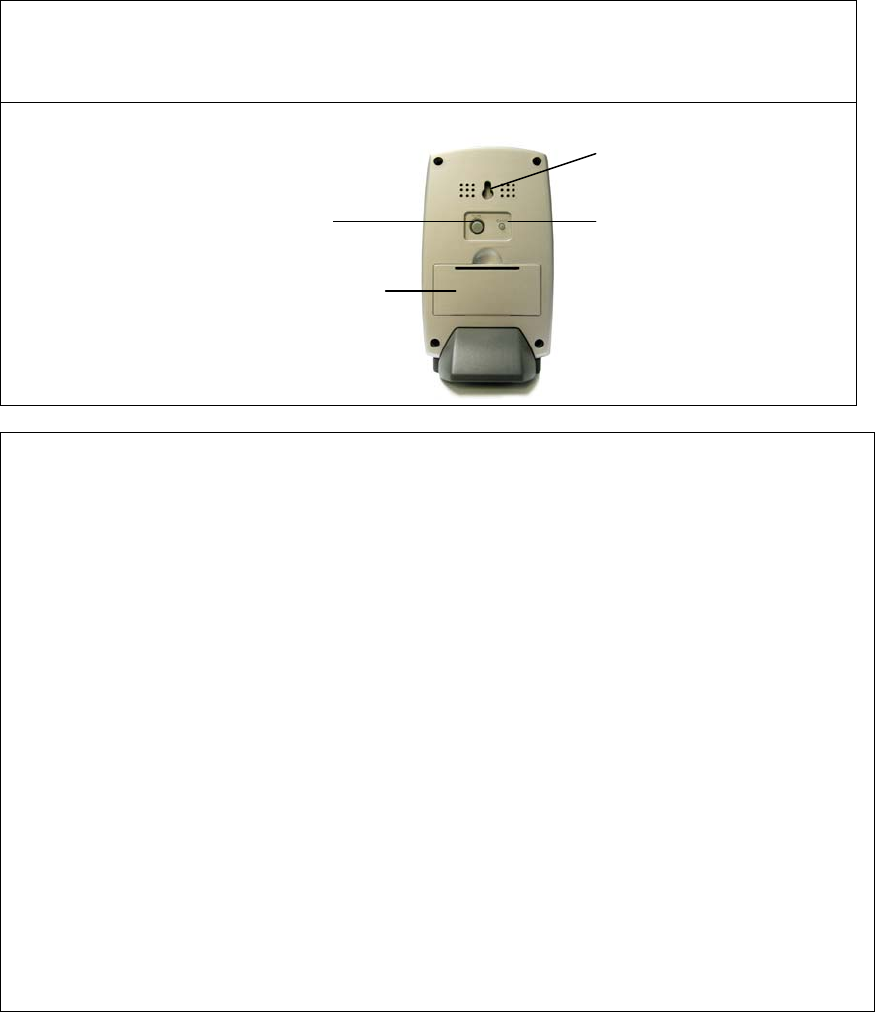
View from the back of the base unit
SAFETY INSTRUCTIONS
Warning
Batteries are extremely dangerous when swallowed.
Therefore keep batteries and devices out of the reach of small children. If a battery has been
swallowed seek immediate medical advice. The cells supplied must not be recharged, reactivated
by any other means, is-mantled, exposed to an open flame, or short-circuited.
-Although the thermometer sender is weather-proof, please be sure that it is not placed where it
will be exposed to rainfall and direct sunlight.
-Do not use abrasive or caustic cleaning agents to clean the base station or sensors. Doing this may
damage the surface or lead to corrosion of electronic parts.
-Furniture today is often coated with a wide range of varnishes and plastics and is treated with
various substances. Therefore, it cannot be fully ruled out that some of these substances contain
components that can damage or soften the rubber feet. If necessary, put the base station on
something that will not slip.
- If a sensor is exposed to very low temperatures for an extended period of time, the batteries may
lose power, which may cause the transmission range to be limited. Higher temperatures also reduce
battery performance.
Wall-mounting notch
°C/°F button Reset button
Battery
compartment

USING THE THERMOMETER FOR THE FIRST TIME
! Set up the sensor for use first so that the base station can receive a signal immediately.
Using the sensor for the first time
1.Remove the sensor from its holder by gently lifting the holder up and carefully pushing it back.
2.Unscrew the battery compartment screw and lift off the cover.
3.Insert two of the batteries included with purchase. Ensure correct polarity +/-as shown in the
compartment.
4.Replace the cover and tighten the screw.
Using the base station for the first time
1.Open the battery compartment on the rear of the base station.
2.Insert two of the batteries included with purchase. Ensure correct polarity +/-as shown in the
compartment.
3.Close the battery cover.
After inserting the batteries, the current room temperature is displayed.
The base station now tries to pick up signals from sensors for 3 minutes.
If no signal is detected, bars are shown on the display.
As soon as the base station has detected a sensor signal, one beep tone is emitted. The base station
display then shows the temperature value received from the sensor.
If reception is lost before the time can be set, then place the base station, which has better
reception, such as, near a window. Press the R button on the rear of the base station. This will
restart the search for signals from sensors.
BASIC THERMOMETER SETTINGS
You can make the following settings on your thermometer:
~ Display temperature in Celsius (°C) or Fahrenheit (°F)
~ Setting the time
~ Date
~ Language for displaying day of the week:
D=German
E=English
F=French
I=Italian
S= Spanish
Selecting Centigrade or Fahrenheit scales
To have the temperature displayed in Centigrade or Fahrenheit, press the °C/°F button on the rear
of the base station.

Clock Setting
• Hold “Snooze/Mode” key to go into Clock Setting Mode;
• Press “Hour” key to increment hour digit and “Min” key to increment min digit; Press
“Remote/AM/PM” key to clear second digit
• Press “Year/Alarm” key at clock display mode, the second digit will toggle between
second display and weekday language display;
• Press “Remote/AM/PM” key to clear second digit if showing second digit; or, to
change the language display by pressing “Remote/PM/AM” key. The sequence is E –
D – F – I – S (English, German, French, Italy, Spanish )
• Press “Snooze/Mode” key to cease the setting and back to clock display
• Press “Remote/AM/PM” at clock display mode to change between 12/24 hr display
Date setting
• Press “Snooze/Mode” key twice more after Clock mode can reach Date, Month and
Year setting
• Display method is Date – Month – Year
• Press “Hour” key to increment Month digit and “Min” key to increment Date digit and
“Year/Alarm” to increment Year digit.
• Weekday will change according to the setting of date, month and year
TIPS: Clock display modes HH:MM:SS or HH:MM + Weekday by pressing “Year/Alarm”
key
INSTALLATION OR WALL-MOUNTING
The base station
Choose a location for placing the base station, which is not exposed to sunlight.
Before final mounting of the base station, check if the unit is picking up a signal which is not being
impaired by parts of the building. If the signal is poor, choose a different place for mounting the
base station.
The notch on the back of the station allows you to mount the unit on the wall.
Place the base station on the stand supplied with the unit.
Sensor
Select a location for placement of the sensor, which is not exposed to direct sunlight or rain.
You may mount the sensor on a wall-mount unit or place it on a tabletop holder.
To set up the sensor, fold out the stand on the back of the holder.
Range
- Place the sensor within a radius of up to 30 m of the base station.
The reception range depends on the physical properties of the building where the base station is
used. Steel-reinforce walls, for example, reduce the reception range.
- Do not place it near the floor or ceiling, as this reduces the transmission range.
- At very low temperatures below freezing, the battery output may drop considerably and thus the
transmitting range may be temporarily reduced.
- Please bear in mind that the actual range of the sensors depends on the materials used in
constructing the building as well as where they are placed.
- Consider testing different locations.

MINIMUM AND MAXIMUM TEMPERATURES
The base station saves measured minimum and maximum temperatures from each sensor and also
the room temperature reading since initial use or since the temperature was last erased.
Call-up data
Press the HOUR/MAX button once to display the saved maximum temperatures of the currently
displayed sensor at the base station. MAX is displayed to the left of the temperature. To display the
saved minimum temperature, press the MINUTE/MIN button. MIN is displayed to the left of the
temperature.
To display the current temperatures again, press the HOUR/MAX button once more or press
MINUTE/MIN.
Clear data
To clear the saved minimum and maximum temperatures, press and hold the HOUR/MAX button
or the MINUTE/MIN button for approx.3 seconds. You will hear a beep tone and the values are
deleted.
DISPLAYS
Each time you press the SNOOZE/MODE button, this switches from one display mode to the next
in the order described.
Mode 1:
1. Outside temperature
2. Hours, minutes, weekday in selected language (local time) (By pressing YEAR/ALARM button
3. Room temperature
Mode 2:
1.Outside temperature
2.Alarm: hour, minute (based on local time)
3.Room temperature
Mode 3:
1.Outside temperature
2. Day, Month, Year
3. Room temperature
ALARM FUNCTIONS
Setting alarm times
1.To enter the Alarm mode press the SNOOZE/MODE button once from Clock mode, the symbol
for Alarm is shown at the display.
2.Press the HOUR/MAX button to set hours.
3.Press the MINUTE/MIN button to set minutes.
4. Press the REMOTE/AM/PM button to toggle between AM and PM.
5.To activate the alarm, press the YEAR/ALARM button of the base station. You will hear a beep
tone and ON is displayed on the display next to Alarm.
6.Press the SNOOZE/MODE button to save your setting, and a bell-shape icon will show at clock
display to indicate the alarm is set.
Turning off the alarm signal
If Alarm have been activated the alarm signal will go off at the time set.
-Press any button to shut off the alarm signal. The alarm will go off again the next time the alarm
time is reached.
-Pressing the SNOOZE/MODE button will program the alarm to go off about 5 minute later.
-If no button is pressed to shut the alarm off, the alarm will continue to sound for about two
minutes.
Turn off the alarm feature
1.To turn off Alarm setting, press the SNOOZE/MODE button twice from Clock mode until the
symbol for Alarm is shown at the bottom of the display.
2.Press the YEAR/ALARM button. The ON displayed next to Alarm goes out.
Manually registering a senor
If contact with the sensor and base station is not established automatically, register the sensor with
the base station manually
• Press the REMOTE button and hold for 3 seconds. The “symbol” starts to flash and the
base station confirms your setting by sounding an audible tone.
• As soon as the base station has detected a sensor signal, one beep tone is emitted. The base
station display then shows the temperature value received from the sensor.
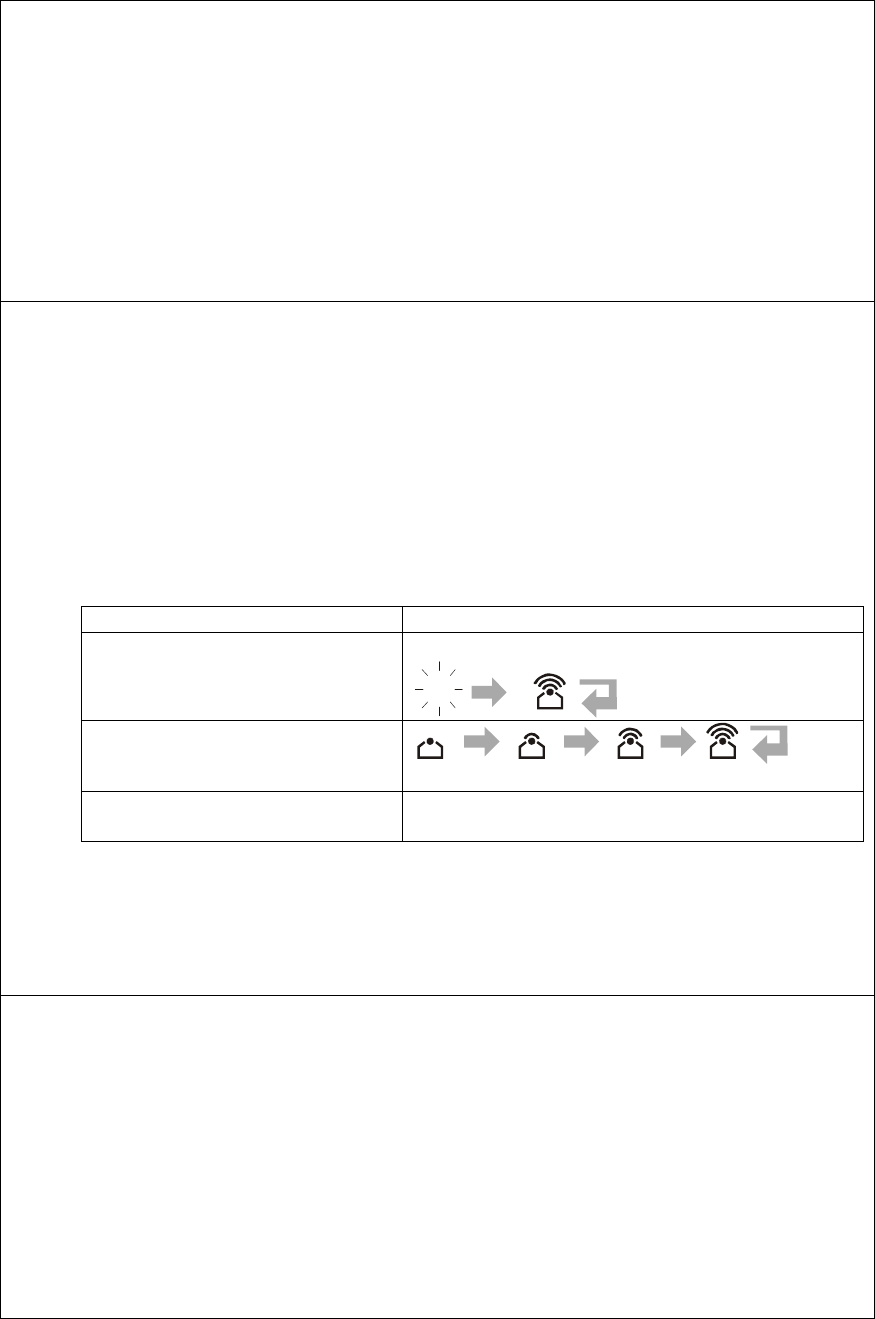
• There are 3 synchronization stages: Receiving, Synchronized and Lost signal
stage. Different symbols represent different stages as follows:
Stages Symbols
Receiving
Synchronized
Lost signals No symbol shown, and the temperature data
of remote channel will be flashing
• It is recommended to place the transmitter and receiver together during
synchronization process. If the red indicator of transmitter flashes and the data is
shown onto the receiver, this process is considered to be successful; otherwise, it
is recommended to repeat this process.
CHANGING THE BATTERIES
If the battery symbol is displayed next to the Clock display, then the base station batteries have run
dry.
If the battery symbol is displayed next to the temperature display for a sensor, then the sensor
batteries have run dry.
We recommend using alkaline batteries. You will need two AAA batteries (LR03) for the base
station.
Batteries must be properly disposed of. For this purpose all shops selling batteries provide battery
collection boxes on their premises. Used batteries can also be disposed of at public waste collection
facilities.
Changing the batteries in the base station will cause all settings to be erased.
After changing the batteries on the base station, it will find existing sensors automatically.

After changing the batteries in a sensor, you must register sensor at the base station again as
described in chapter “Manually registering a senor ”.
CARE AND MAINTENANCE
Protect the base station and sensor from dust, impacts, extreme temperatures and direct sunlight. If
needed, wipe it with a dry cloth.
Do not expose the base station to any moisture.
The sensor is protected against humidity. If you want to mount it outdoors, look for a protected
place that is not directly exposed to sunlight or rain.
TROUBLESHOOTING
5The sensor signal is not being received
-Are the station and sensor batteries working properly?
If the sensor is exposed to temperatures below freezing for longer periods of time, this may affect
battery performance and the range of reception. At higher temperatures, the original battery output
is retrieved.
-Has the sensor been set up within the 30 m perimeter for reception?
Note that the actual range of the sensors depends on the materials used for the building as well as
the relevant position. Consider testing different locations.
-Is the station too close to a television set or computer monitor?
Try changing the location of the station.
-Other devices employing radio transmission such as garage door openers, alarm systems or
wireless headphones may temporarily cause reception to be poor. However, reception of the
temperature signals is resumed once the disturbance is over.
-Have you changed the batteries in the sensor?
You have to register the sensor with the base station again.
5The temperature shown by the base station does not match the sensor temperature
There is a different radio transmitter nearby. Perhaps your neighbour owns a similar device.
Change the house code setting to ensure that only the signals from those sensors you have set up
are displayed.
1. Open the battery compartment of the sensor.
2. Press the House Code button in order to change the transmitter house code, and it can
distinguish with other transmitter. It is highly recommended if interference is experienced.
3. Select a house code from 1 to 15 by pressing the House Code button from 1 to 15 times
respectively, and LED will flash according to indicate number you press and your selection. Then
the signals based on the new house code will send and the LED indicator flashes after 20 seconds
later without further modification made.
TECHNICAL SPECIFICATIONS
Power supply for base station: 2 x 1.5 V batteries AAA
Base station measurement range: -9.9 °C to +55 °C
Measures to: 0.1 °C
Transmission frequency: 433.92 MHz
Range: maximum of 30 m

Time display format: 24 hr
Weekday display: 5 languages (German, English, French, Italian, Spanish)
We reserve the right to make technical and design changes when improving the product.
FCC Statement
The statement required by 15.105 is as follows:
This equipment has been tested and found to comply with the limits for a Class B digital
device, pursuant to Part 15 of the FCC Rules. These limits are designed to provide reasonable
protection against harmful interference in a residential installation. This equipment generates,
uses and can radiate radio frequency energy and, if not installed and used in accordance with
the instructions, may cause harmful interference to radio communications. However, there is
no guarantee that interference will not occur in a particular installation. If this equipment does
cause harmful interference to radio or television reception, which can be determined by
turning the equipment off and on, the user is encouraged to try to correct the interference by
one or more of the following measures:
- Reorient or relocate the receiving antenna.
- Increase the separation between the equipment and receiver.
- Connect the equipment into an outlet on a circuit different from that to which the receiver is
connected.
- Consult the dealer or an experienced radio/TV technician for help.
Statement required by 15.19 and RSS210
This device complies with Part 15 of the FCC Rules and with RSS-210 of Industry
Canada.
Operation is subject to the following two conditions:
(1) this device may not cause harmful interference, and
(2) this device must accept any interference received, including interference that
may cause undesired operation.
Manual Requirements according 15.21
NOTICE:
Changes or modifications made to this equipment not expressly approved by UPM may
void the FCC authorization to operate this equipment.
ICES - 003
The statement required by ICES - 003 is as follows:
NOTICE:
This Class B digital apparatus complies with Canadian ICES-003.
Cet appareil numérique de la classe [*] est conforme à la norme NMB-003 du Canada.