Maxon CIC MX-C99 GSM/GPRS Handset User Manual mx c99en 0428
Maxon CIC Corp. GSM/GPRS Handset mx c99en 0428
UserManual.wiki
>
Maxon CIC
>
MX-C99 User Manual
>
Manual part 1
Contents
1.
Manual part 1
2.
Manual part 2
3.
Warnings
Manual part 1
Navigation menu
Upload a User Manual
Namespaces
Wiki Guide
HTML
PDF
Info
Views
User Manual
Discussion / Help
Navigation
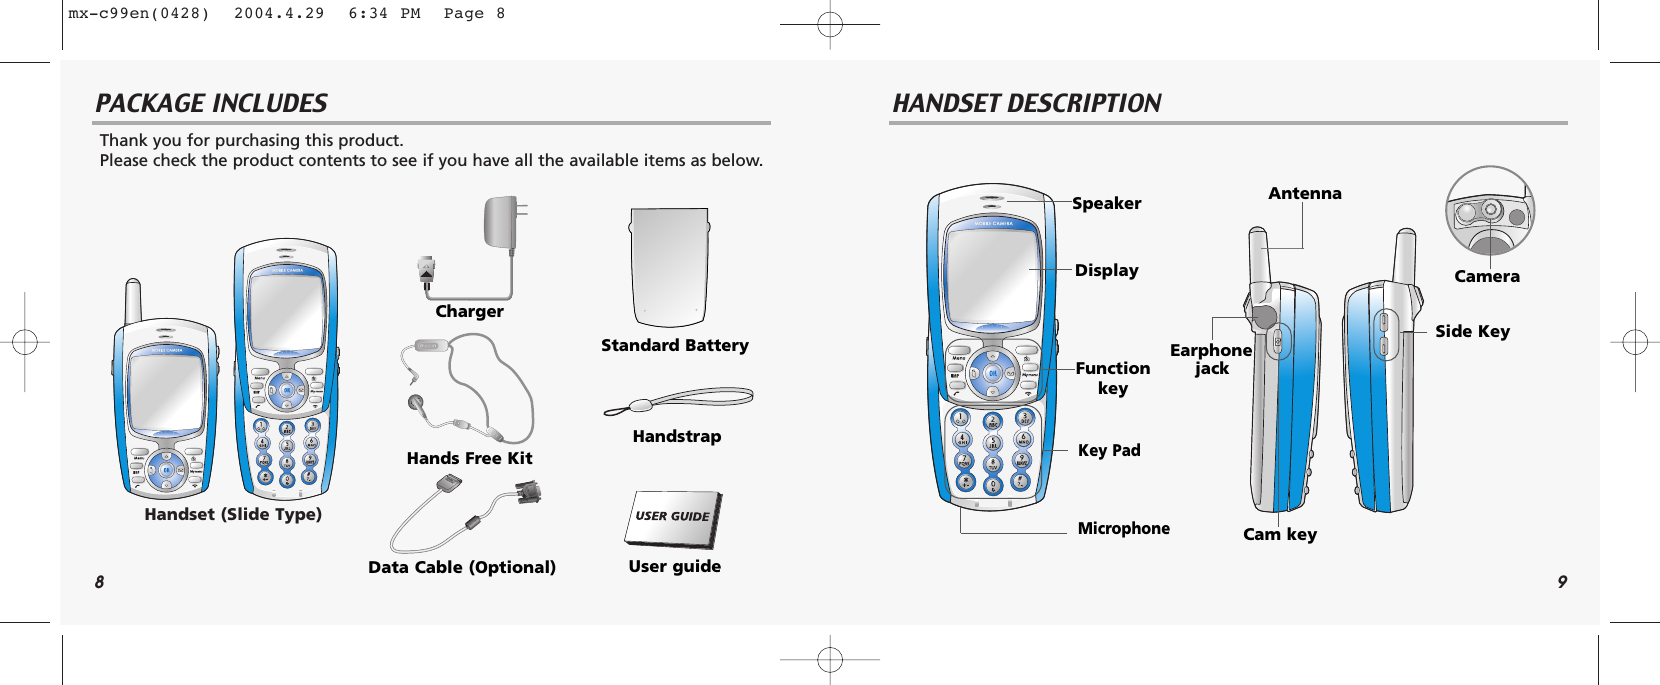
![10 11MAIN DISPLAY FUNCTION KEYSMain DisplayIcon display – Shows thecurrent status of phone.Graphic display – Showsphone numbers, text lines,animations, pictures.Function display – Showseach function of [soft1] and[soft2] to help browse throughmain menu.[Soft1] – To place a call or redial a number. Send/Redial Key. [Soft2] – To turn on and off the phone. To end of call.Menu Key – To browse the main menu and view options.Camera Key – To move directly to camera menu. Back and Clear keyWAPKey – To move directly to WAP menu. My Menu Key – To move directly to one of menu.4-Direction navigation key– To browse the Messages, Phonebook menu, Dial list, and Look up menu.OK Key – To select an option.Keypad Keys – To enter letters and numbers*Key –To place an international call (+). –To turn the silent mode (Vibration) on or off.# Key – Special character key. Turns T9 text dictionary on or off.Side key – Volume and Keypad level control key.Side cam key – To move directly to camera menu.(Refer to p.91)IconsSignal Strength – The number of bars shows signal strength.Battery – Current batterycharging level.Alarm –Appears when analarm is set.Call forwarding – Appearswhen call forwarding is set.Manner mode – Appears whenmanner is set as a ring mode.GPRS Signal – The phoneenters a GPRS service area.Tasks –Appears when an task is set.Vibration Only – Appears whenan vibration only is selected.mx-c99en(0428) 2004.4.29 6:34 PM Page 10](https://usermanual.wiki/Maxon-CIC/MX-C99.Manual-part-1/User-Guide-420452-Page-6.png)

![24BASIC FUNCTIONS BASIC FUNCTIONSRECEIVING CALLS1.The phone ringsTo reject or terminate a call press the .2.Slide up the phone cover and answer the phone.• Slide open Set: To answer the phone, slide the phone up.(Refer to page 87)INTERNATIONAL CALLS, CALL TO AN EXTENSION, EMERGENCY CALLTo make a domestic call, simply enter the desired number and press or key. Acalling or busy tone will sound. To end the call, press .Some countries (e.g. USA) use area codes. In this case you must enter an area code before the a phonenumber (no space between them).1.To make an international call, press until + is displayed. Then enter country code, area code if necessary and finally phone number. (no spaces allowed)2.To make a call to an extension line you may have to go through an automated switchboard. To do so: - Enter a phone number.- Press once.- Enter the extension number. Press .- The call will automatically be routed to the extension line.3.You are able to make emergency calls at all times, even without a SIM card installed. You will be prompted to confirm your call. (To avoid faulty calls)Emergency call number : 112Caller ID FunctionYou can view caller ID.If you send a call, the called number will be stored in the Dial list. To retrieve a number, press to open the list, scroll to anappropriate number and press to place a call.With ear-microphone in use, press and hold [send/end] on the ear-microphone to receive or end a call.25mx-c99en(0428) 2004.4.29 6:34 PM Page 24](https://usermanual.wiki/Maxon-CIC/MX-C99.Manual-part-1/User-Guide-420452-Page-13.png)
![28ENTERING LETTERS AND NUMBERS29CHAPTER 3Menu•Message•Internet•Organizer•Games•My phone•Settings•CameraKEY FEATURESIn English input mode, the following keys help enter letters, numbers and symbols.Press [Soft1] to select an options : ABC, 123, Symbols, T9 language.Press [Soft2] to clear a digit.Press [Navigation key] to move a cursor.Press [*] to select letter case (English mode only), or Press and hold it to change to symbol mode.SpacePress and hold it to change to mode : ABC, 123, T9 language.Press [#] to enter # . , ; : ” ’? !mx-c99en(0428) 2004.4.29 6:34 PM Page 28](https://usermanual.wiki/Maxon-CIC/MX-C99.Manual-part-1/User-Guide-420452-Page-15.png)
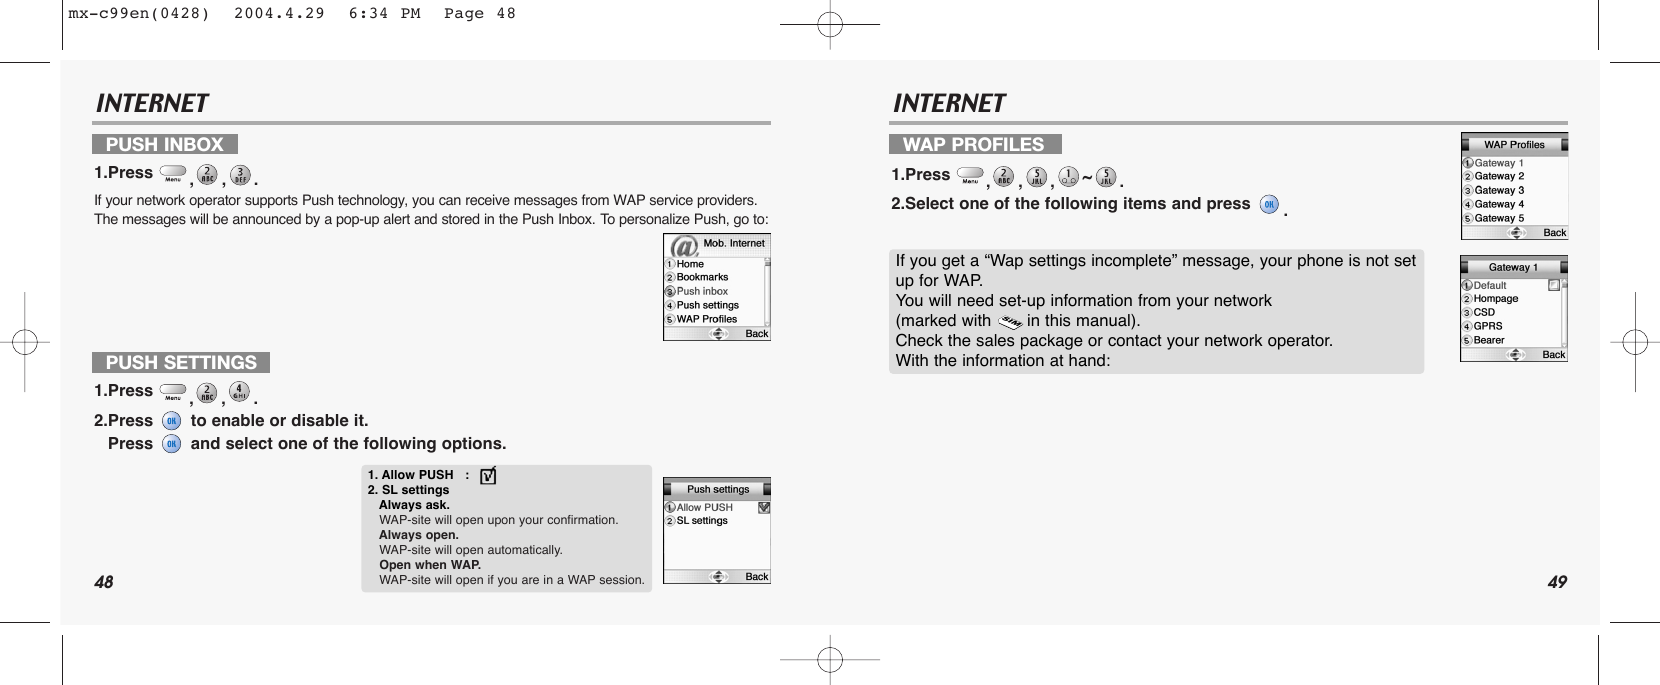
![50 51INTERNET INTERNETDEFAULT1.Press to select “Default”.HOMEPAGE1.Press to select “Homepage”.CSD1.Press to select “CSD”.In each item, you are to enter data or select an option.GPRS1.Press to select “GPRS”.In each item, you are to enter data.Make up ‘Default ’ to make this your Home. You can configure five different gateways, but only one of them can be “Home”. -Enter a url and press [ ] to save it. Homepage (e.g.:http://wap.aol.com)User namePasswordDial-up numberIP addressData type (Analog / ISDN)Data speed (9600 / 14400)Idle Timeout (1minute / 2 / 3 / 4 / 5 ) User name Password APN (Access Point Name)IP address (The IP Address is a 12 digit code. When typing it, enter 0 for “blank” spaces.)mx-c99en(0428) 2004.4.29 6:34 PM Page 50](https://usermanual.wiki/Maxon-CIC/MX-C99.Manual-part-1/User-Guide-420452-Page-26.png)
![54 55INTERNET ORGANIZERThe Organizer is a practical tool that will help you to keep track of your appointments and alertyou of meetings, celebrations, events etc.DAY VIEW1.Press to select “Day View”.2.Use and to select a schedule and press to view it.EMPTY CACHE1.Press ,,. To provide quick access to your favorite web sites, information is stored in the phones cache memory. It is recommended that you empty your cache memory regularlyto avoid congestion.CALENDARTo set and view appointments.1.Press ,,. In Day view, you can check appointments for the day. You can scroll through the entries and use [ ] to view an appointment. Press [ ] to add an appointment and edit or delete it.Press to select “Option”.Month : To move to ‘Month vview’.New : To add an appointment.You are to select one of the following categories. (Meeting/ Birthday / Memo)Delete : To delete a selected appointment.View : To display a selected appointment.mx-c99en(0428) 2004.4.29 6:34 PM Page 54](https://usermanual.wiki/Maxon-CIC/MX-C99.Manual-part-1/User-Guide-420452-Page-28.png)
![56 57ORGANIZER ORGANIZERMONTH VIEW1.Press to select “Month View”.2.Use to select a date and press to view appointments on the particular date.3.Select an appointment and press to do the following options. NEW1.Press to select “New”.- A calendar is displayed with appointments. the date with an appointment is shown in green color, while a selected date is in violet.- The wallpaper for calendar changes as a new season is selected.Press to select “Option”.Day view : To move to ‘Day view’New : To add a new appointment. Press to select “Option”.New : To add an appointment.You are to select one of the following categories. (Meeting/ Birthday / Memo).Delete : To delete a selected appointmentView : To display a selected appointment.In ‘New’ you can enter a new appointment. Define it as a Meeting, Birthday or a Memo.Select one and enter the relevant information in the text editor. Use [ ] to scroll through the entry fields:ቢ.Subject To enter a title for an appointment.ባ.Start and End date, ቤ.Start and End time. To set a date and a time to start or end an appointmentብ.Reminder timeTo set a reminder to give you an alert to appointment. mx-c99en(0428) 2004.4.29 6:34 PM Page 56](https://usermanual.wiki/Maxon-CIC/MX-C99.Manual-part-1/User-Guide-420452-Page-29.png)
![60 61ORGANIZER ORGANIZERALARM 1,2,31.Press ,, to select “Alarm 1, 2, 3”.2.Press to mark up ‘Alarm on’ to enable the alarm.3.Enter a time, select alarm type and sound.SELECT ALL1.Press to select “Select All”.CANCEL ALL1.Press to select “Cancel All”.Enter a figure and press a +, -, *, / as a assigned in navigation keys.Enter another figure, then press .The result will be show on the bottom line.ExampleEnter 200 and press . Enter 25 then press . The result 225 will be show in bottom line.If you want to continue the calculation, do not select =, but press then repeat the above procedure.To finish the calculation, select .ALARM1.Press ,,. CALCULATORTo use the calculator.1.Press ,,. Press to select “Option”.Delete allDeleteTime - Set a alarm time.Alarm type - Everyday, Workday, Defineself.Sound - Alarm1~5.Select a alarm 1~3.Press [ ] to clear a digit or press and hold [ ] to clear all inputs.mx-c99en(0428) 2004.4.29 6:34 PM Page 60](https://usermanual.wiki/Maxon-CIC/MX-C99.Manual-part-1/User-Guide-420452-Page-31.png)
![66 67MYPHONE MYPHONE INCOMING CALL1.Press to select “Incoming Call”.SMS ATTENTION1.Press to select “SMS Attention”.KEYPAD TYPE1.Press to select “Keypad Type”.2.Select one of the available keypad tone type and press to save it.AUDIO1.Press ,,. Alert Tune - Select one among 10bells, 30melodies and some downloaded melodies.Alert Type - Select one of the available options .(1.Tone only / 2.Tone+Vib / 3.Tone after Vib / 4.Vibration Only)Volume - Volume can be controlled in 7 levels through [ ] and [ ]Alert Tune - 10 different SMS alert tunes.Alert Type - Select one of the available options. (1.Tone only / 2. Tone +Vib / 3.Vibration Only)Volume - Volume can be controlled in 7 levels through [ ] and [ ].Duration - A function to set the alarm that notices unread messages.(1.Once / 2.Periodic)mx-c99en(0428) 2004.4.29 6:34 PM Page 66](https://usermanual.wiki/Maxon-CIC/MX-C99.Manual-part-1/User-Guide-420452-Page-34.png)