Medtronic MiniMed 1510 620G/630G/640G/670G Insulin Delivery Pump User Manual 2
Medtronic MiniMed, Inc. 620G/630G/640G/670G Insulin Delivery Pump Users Manual 2
Contents
- 1. Users manual
- 2. Users Manual 2
- 3. Users Manual 3
- 4. Users Manual 4
- 5. Users Manual 5
Users Manual 2
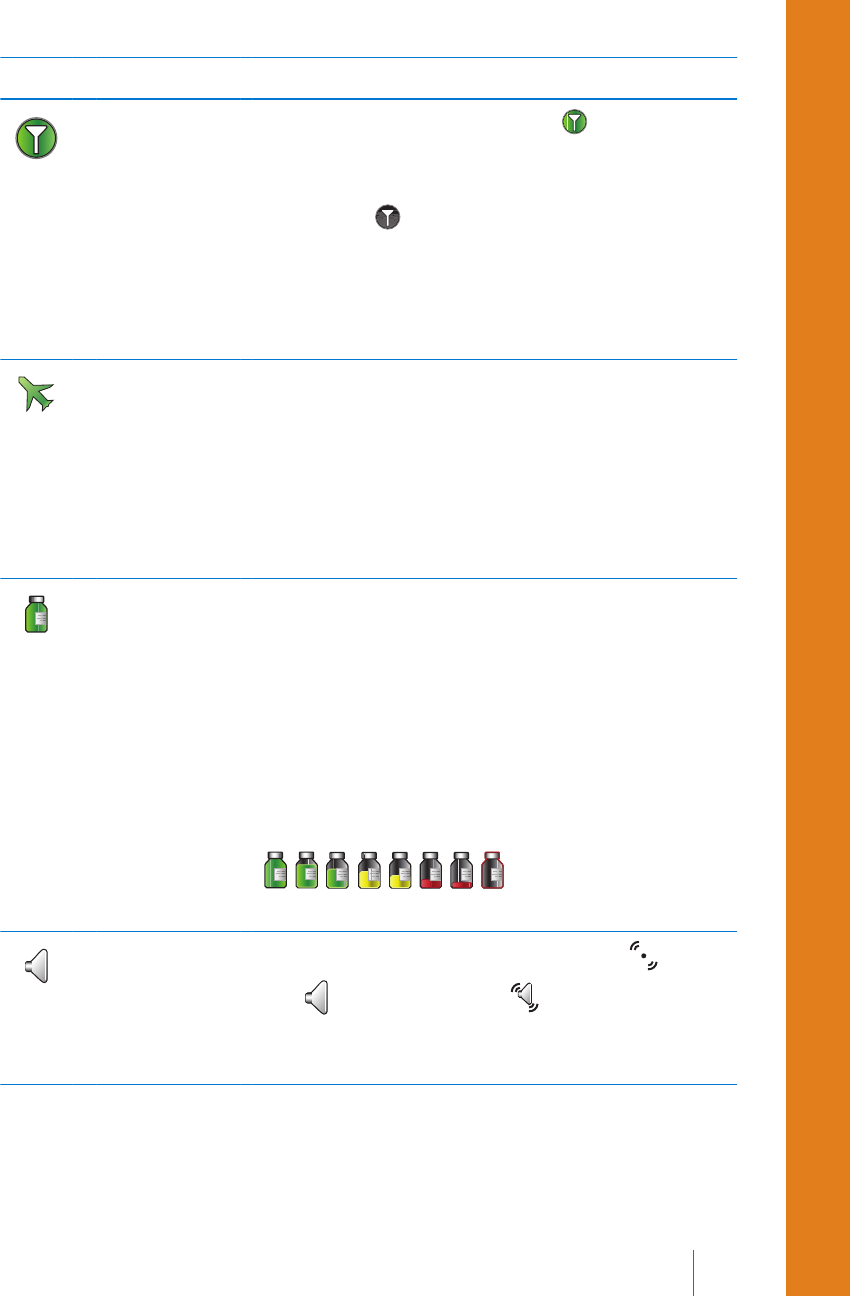
Icon Icon name What it means
Connection The connection icon appears green when the
Sensor feature is on and your transmitter is successfully
communicating with your pump. The connection icon
appears gray when the Sensor feature is turned on,
but the transmitter is not connected or communication
with your pump has been lost. For more information
about the Sensor feature, see Understanding Continuous
Glucose Monitoring (CGM), on page 151.
Airplane Mode Appears in place of the Connection icon if Airplane
Mode is turned on. When Airplane Mode is turned on,
the pump cannot receive wireless communication from
other devices. The pump also cannot send wireless
communication to other devices. For more information
about using Airplane Mode, see Airplane Mode, on
page 137.
Reservoir Shows the approximate amount of insulin left in your
reservoir. The color and the fill level of the icon indicate
the status. When your reservoir is full, the icon is solid
green. As your insulin is used, the icon becomes
emptier, and the color of the icon changes as shown in
the following example. For more information about
your reservoir, see Reservoir and infusion set on
page 93.
Audio The audio mode you are using: vibrate only , audio
only , or vibrate and audio . For more information
about your audio settings, see Audio Options, on
page 138.
■ first steps
First steps 29
MP6025958-022 / A
RELEASED
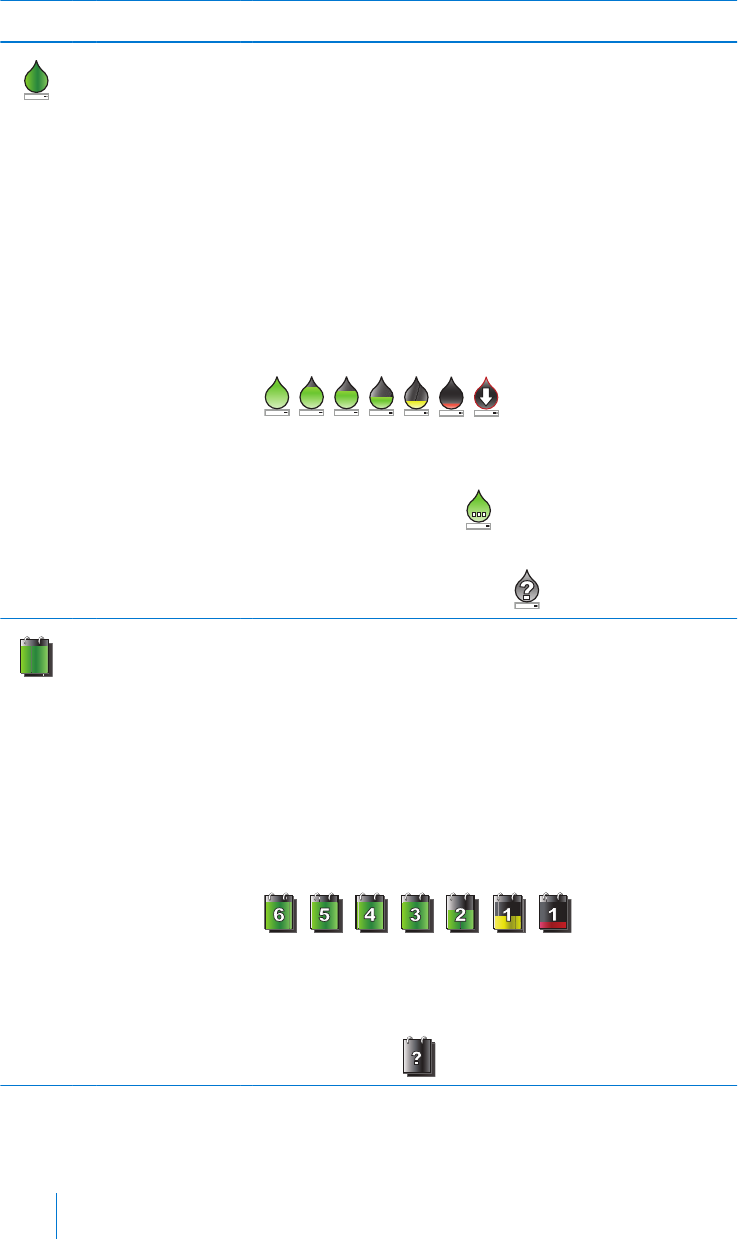
Icon Icon name What it means
Calibration The approximate time left until your next sensor
calibration is due. Appears only when the Sensor
feature is turned on. The color and the fill level of the
icon indicate the status. When your sensor is fully
calibrated, the icon is solid green. As the time for your
next sensor calibration approaches, the icon becomes
emptier, and the color of the icon changes as shown in
the following example. For more information about
calibrating your sensor, see Calibrating your sensor, on
page 183.
When your sensor is initializing, the Calibration icon
appears with three dots . If the time to your next
sensor calibration is unavailable, the Calibration icon
appears with a question mark .
6
Sensor Life The number of days remaining in the life of your
sensor. Appears only when the Sensor feature is turned
on. The color and the fill level of the icon indicate the
status. When you insert a new sensor, the icon is solid
green. As your sensor life is used, the icon becomes
emptier. The icon turns yellow when less than 24 hours
remains in the life of your sensor. It turns red when less
than 12 hours remains in the life of your sensor.
If the number of days remaining in the life of your
sensor is unavailable, the Sensor Life icon appears with
a question mark .
30 Chapter 2
MP6025958-022 / A
RELEASED

Icon Icon name What it means
Block Mode Indicates that the pump is in Block Mode, and that
certain functions are restricted. Caregivers, such as
parents of a young child, can use Block Mode to restrict
access to critical pump settings. For more information
about Block Mode, see Block Mode, on page 139.
Temporary
Network
Connection
Appears while you are temporarily connected to a
remote upload device.
Status screens
The Status screens provide information about your pump, any notifications you
have received, your current settings, and optional sensor. The Status screens are
described in the following table:
Status screen Displays this information
Notifications A list of alarms, alerts, and reminders that have occurred over the past
24 hours. You can display further details about a particular alarm, alert,
or reminder by selecting it from the list. For more information on
alarms and alerts, see the Alarms, alerts, and messages chapter.
Quick Status A summary of status information, including your last bolus, last BG
meter reading, current basal rate, reservoir level, and pump battery
charge level. If you are using a sensor, this screen also displays the
time that your next calibration is due and the SmartGuard™ status.
Pump Provides a detailed view of your pump status, including whether your
pump is in a specific mode, the reservoir status, battery status, the
pump serial number, and other details about your pump.
Sensor The Sensor status screen is available only if your sensor feature is
turned on. The Sensor status screen indicates if any alert silence
options are turned on. It also shows the status of your calibrations,
your sensor life, ISIG, transmitter battery, serial number and version
number of your transmitter, and the SmartGuard status.
■ first steps
First steps 31
MP6025958-022 / A
RELEASED
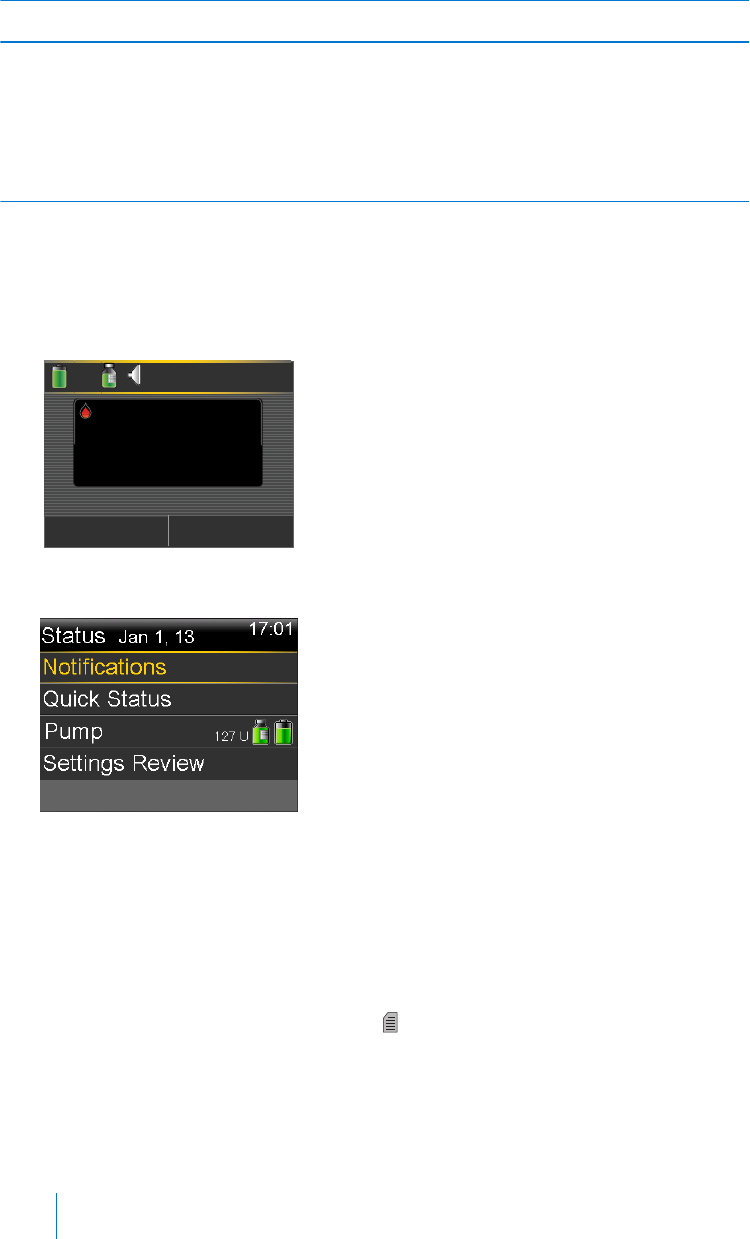
Status screen Displays this information
Settings
Review
The Settings Review screen provides a list of all your pump settings.
The settings are organized by where they appear in the menu for
your pump. For example, your bolus settings appear under the Insulin
Settings section, and your brightness level setting appears under the
Utilities section.
Viewing the Status screens
1. Go to the Home screen.
2. Select the status bar that appears at the top of the Home screen.
17:00
Bolus Basal
110
mg/dL
Active Insulin 1.0 U
BG
The Status screen appears.
3. Select the status screen that you want to view. Refer to the table at the
beginning of this section for a description of the different status screens.
Using the Menu screen
The Menu screen is where you access the various features and functions of your
system. To display the Menu screen, press .
32 Chapter 2
MP6025958-022 / A
RELEASED

The following options are available from the Menu screen:
Select this To do this
Suspend Delivery Stop your current basal and bolus insulin delivery.
Audio Options Set your audio, vibrate, and volume options for the notifications
you receive.
History Access the Summary, Daily History, and Alarm History screens. If
you are using a sensor, you can access the SG Review and ISIG
History screens.
Reservoir &
Tubing
Start the process of changing your reservoir and infusion set.
Insulin Settings Set up and manage your insulin delivery options, including your
Basal and Bolus settings.
Sensor Settings Set up your optional continuous glucose monitoring device
settings.
Event Markers Save information about events, such as exercise, blood glucose
readings, carbs you eat, or injections you take. If you are using a
sensor, the blood glucose readings may be used for calibration.
Reminders Set up reminders to help monitor your system and to help you
manage your diabetes. You can also create reminders for personal
events.
Utilities Set up and manage the features and functions of your system.
■ first steps
First steps 33
MP6025958-022 / A
RELEASED

Scroll bar
The scroll bar is located on the right side of the display, as shown in the following
example. It appears only when there is more information available to view on the
screen. Press or to move up or down the screen.
scroll bar
Power modes
Your pump is designed to conserve battery power when you are not actively using
the pump screens.
In this
mode
Your pump behaves like this
Awake Your pump screen is on. Unless you are actively using another screen, your
Home screen appears.
To wake up your pump from being in power save or sleep mode, press
any button. If your pump has been in sleep mode, the pump is locked. To
unlock your pump, see Unlocking your pump, on page 26.
Power
save
Your pump is fully functional, but the screen goes dark to save power. You
can set how long it takes for your screen to enter power save mode by
changing the Backlight setting. For more information, see Display Options,
on page 141. If any button is pressed while the pump is in Power save
mode, the pump returns to the screen that was last displayed.
34 Chapter 2
MP6025958-022 / A
RELEASED

In this
mode
Your pump behaves like this
Sleep Your pump automatically enters sleep mode about two minutes after your
pump enters power save mode if no buttons are pressed. At this time,
your pump automatically locks. If any button is pressed, your pump returns
to the Home screen.
Note: In some cases, if there is an action you need to take,
your pump returns to the screen last displayed. This
includes startup settings, loading your reservoir, filling your
tubing, filling your cannula, and any screen where you have
an action pending.
To put your pump into sleep mode, press and hold the Menu button
for about two seconds.
If you remove your pump
You may have an occasion when you need or want to remove your pump. If you
have to remove and store your pump, it is recommended that you do the
following:
• Write down a record of your current basal rates and use the Save Settings
feature. See Saving your settings, on page 142 for more information.
• Remove the battery. See Storing your pump, on page 242 for more information.
Remember, your body still needs insulin while your pump is removed.
Consult your healthcare professional to determine an alternate method of
receiving insulin. Disconnecting from your pump for less than one hour may not
require an insulin adjustment. If you remove your pump for more than one hour,
you should take your insulin another way, as prescribed by your healthcare
professional.
■ first steps
First steps 35
MP6025958-022 / A
RELEASED

36 Chapter 2
MP6025958-022 / A
RELEASED

basal
MP6025958-022 / A
RELEASED
MP6025958-022 / A
RELEASED

Basal
Basal insulin is the "background" insulin that you need throughout the day and
night to maintain your target blood glucose values when you are not eating. Your
basal insulin accounts for approximately one half of your daily insulin requirements.
Your pump mimics a pancreas by delivering insulin continuously over 24 hours.
Your basal insulin is delivered according to a basal pattern. Basal patterns and
other basal settings are described in the following sections.
Basal rate
Your basal rate is the specific amount of basal insulin that your pump continuously
delivers each hour. While some people use one basal rate all day, others require
different rates at different times of the day.
Your basal rates are set in one or more basal patterns. Each basal pattern covers
24 hours. For specific information about basal patterns, see Basal patterns, on
page 41.
Basal 39
■ basal
MP6025958-022 / A
RELEASED

Basal insulin settings
Your basal insulin delivery settings are described in the following table.
Setting What it is What it does for you
Basal Pattern A set of one or more
basal rates that cover a
24-hour period.
Determines the amount of insulin you
receive per hour throughout the day
and night. Allows you to vary your basal
rate according to your needs. You can
set up to eight basal patterns. For
details on setting up basal patterns, see
Adding a new basal pattern, on page 42.
For details about starting a basal
pattern, see Changing from one basal
pattern to another, on page 46.
Temp Basal A basal rate that you use
in place of your
scheduled basal rate for
short-term situations.
Allows you to temporarily change your
current basal rate for a duration of time
that you specify. For details about
starting a temp basal rate, see Starting a
Temp Basal rate, on page 48.
Preset Temp A temporary basal rate
that you can define
ahead of time.
Allows you to set and save temporary
basal rates for known short-term
situations, such as when you are sick or
have times of increased or decreased
activity. For details about setting up a
preset temp basal rate, see Preset Temp
basal rates, on page 49. For details
about starting a preset temp basal rate,
see Starting a Preset Temp basal rate, on
page 51.
Max Basal Rate Maximum amount of
basal insulin that your
pump can deliver
per hour.
Provides a safety measure by limiting
the total amount of basal insulin your
pump can deliver per hour. For details
about setting your Max Basal rate, see
Max Basal Rate, on page 41.
40 Chapter 3
MP6025958-022 / A
RELEASED

Max Basal Rate
Max Basal Rate limits the amount of basal insulin that can be delivered per hour,
based on the maximum rate you set. You are unable to set any basal rates, temp
basal rates, or preset temp basal rates that exceed the max basal rate amount. You
can set your max basal rate from 0 to 35 units per hour. Set your max basal rate as
prescribed by your healthcare professional.
Note: If you are setting your max basal rate after you have set up your
basal patterns or preset temp basal rates, you cannot set your max basal
rate lower than any of your existing basal rates. You cannot access this
feature during a bolus delivery.
To set your Max Basal Rate:
1. Go to the Max Basal/Bolus screen.
Menu > Insulin Settings > Max Basal/Bolus
2. Select Max Basal to set the maximum number of basal insulin units that can
be delivered each hour.
Because the Max Basal Rate setting determines your basal insulin limits, a
warning message appears any time you enter the screen to change the value.
To continue setting the value, select Continue.
3. In the Max Basal Rate screen, select Max Basal to set the maximum units per
hour.
4. Select Save.
Basal patterns
Your basal pattern determines the amount of basal insulin you receive throughout
the day and night. Because your basal insulin needs can vary, you can set up to
eight basal patterns. For example, you might use one basal pattern during the
week and a different basal pattern during the weekend.
■ basal
Basal 41
MP6025958-022 / A
RELEASED

A basal pattern is made up of one to 48 basal rates that you set up to cover a full
24-hour period. If you only need one basal rate throughout the day, you set only
one rate for the 24-hour period. If you need the basal rates to change during the
day or night to better match your insulin needs, you can set more than one rate,
each with a separate start and end time.
The following example represents one basal pattern with three basal rates set for
three different time periods.
00:00 6:00 12:00 18:00 24:00
00:00 – 8:00
8:00 – 18:00
18:00 – 24:00
24 Hours
1.000
0.500
U/hr
0.650 U/hr
0.900 U/hr 0.900 U/hr
Your healthcare professional will determine what rates are right for you.
Note: If you have already set up basal patterns and want to switch from
using one basal pattern to another, see Changing from one basal pattern
to another, on page 46.
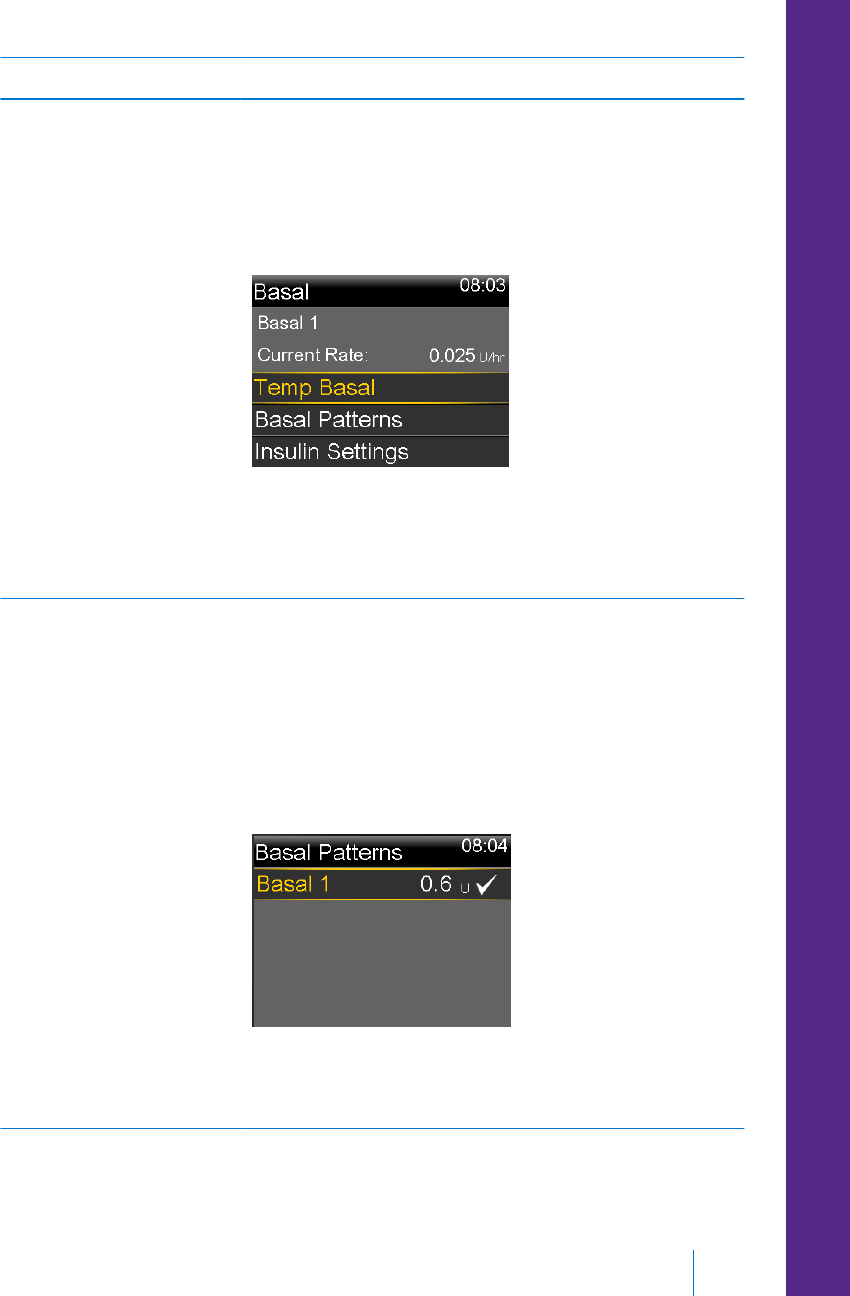
Adding a new basal pattern
This procedure shows you how to add a new basal pattern.
To add a new basal pattern:
1. Go to the Basal Pattern Setup screen.
Menu > Insulin Settings > Basal Pattern Setup
42 Chapter 3
MP6025958-022 / A
RELEASED
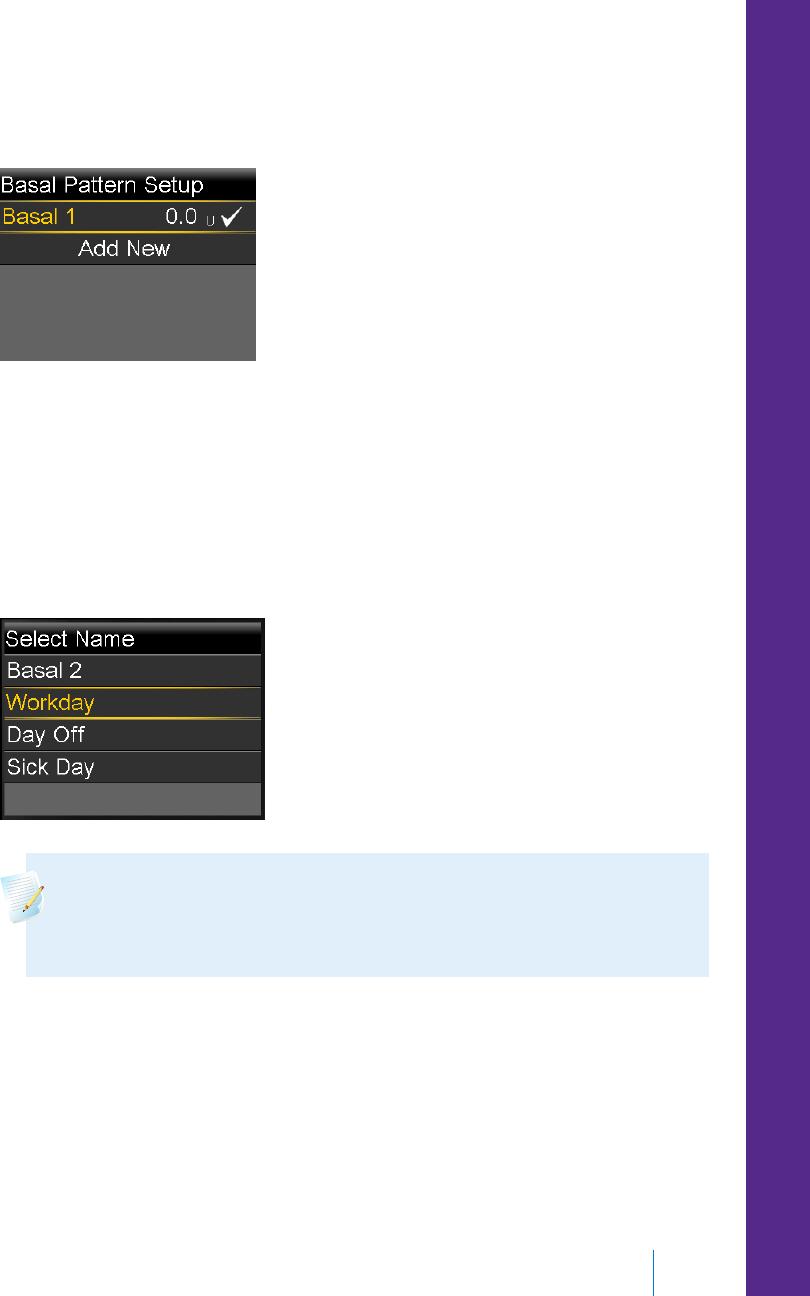
The Basal Pattern Setup screen appears. Your active basal pattern appears
with a check mark and the 24-hour delivery amount, as shown in the
following example.
2. If this is your first time setting up a basal pattern, the unit amount will be 0.0.
Select Basal 1 and proceed to step 5.
If this is not your first time setting up a basal pattern, proceed to the next
step to add a new pattern.
3. To add a new basal pattern, select Add New.
The Select Name screen appears.
Note: The Workday, Day Off, and Sick Day patterns are available so
that you can match a basal pattern name to your insulin needs on
those particular days.
4. Select the basal pattern that you want to set up. An edit screen appears for
the pattern you selected. The following example shows the Edit Workday
screen.
■ basal
Basal 43
MP6025958-022 / A
RELEASED

Caution: Insulin is delivered in units per hour. If you set a basal
rate of 0.025 U/hr for a 30-minute time period, this might result in
no insulin delivered for that 30-minute period.
5. To create one continuous 24-hour basal rate for your basal pattern, continue
with this step. To create more than one basal rate for your new basal pattern,
skip to step 6.
a. Leave End time at 24:00 to set a 24-hour rate. The Start time of the first
time segment is always 00:00.
b. Set your rate in units per hour.
c. Skip to Step 7.
6. To create more than one basal rate for your new basal pattern, enter one
basal rate at a time, as described in the following steps:
a. Set the End time and the Rate for your first basal rate. You set your rates
in 30-minute increments.
If you set the End time to anything other than 24:00, a second basal rate
setting appears.
44 Chapter 3
MP6025958-022 / A
RELEASED
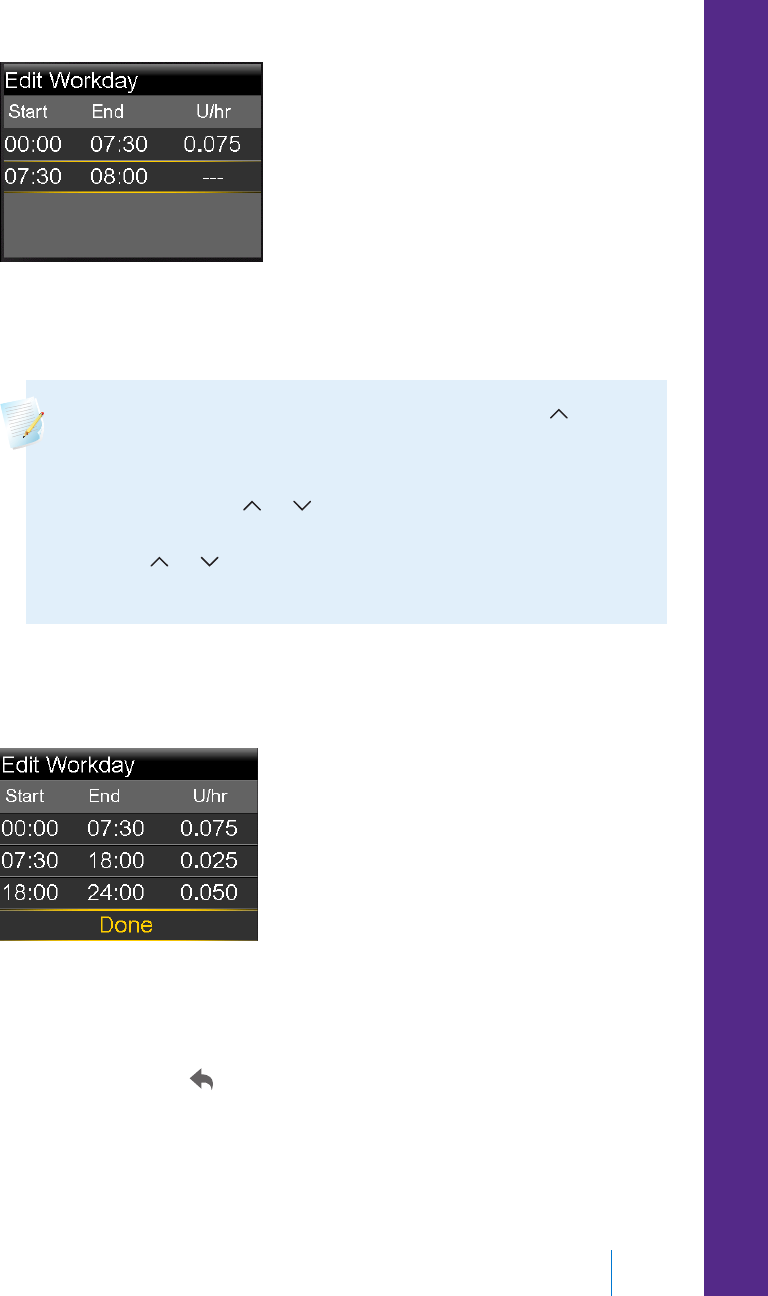
The Start time for the next rate is always the same as the End time of
the previous rate.
Note: If you need to make a change, you can press to scroll
up to the rate you want to change. Adjust the End time or Rate
values as desired.
Note that pressing or when a field is selected (flashing)
adjusts the value of that field. When there is no field selected,
pressing or allows you to scroll up or down the list of
basal rates.
b. Continue setting rates for different time periods as needed. The End time
for your last rate must be 24:00, as shown in the example below.
7. When you finish setting your basal pattern, select Done. (The Done option
appears only when the last End time in your basal pattern is set to 24:00).
A screen appears that allows you to review your basal pattern. If you need to
make any changes, press to return to the previous screen.
8. Select Save.
To activate your basal pattern, see Changing from one basal pattern to another,
on page 46.
■ basal
Basal 45
MP6025958-022 / A
RELEASED

Editing, copying, or deleting a basal pattern
To edit, copy, or delete a basal pattern:
1. Go to the Basal Pattern Setup screen.
Menu > Insulin Settings > Basal Pattern Setup
The Basal Pattern Setup screen displays all of your existing basal patterns.
2. Select the basal pattern you want to edit, copy, or delete.
3. Select Options.
4. Do one of the following:
• Select Edit to adjust the End time or rate values for one or more of the
basal rates in this basal pattern.
• Select Copy to copy the basal rate information from the selected basal
pattern to a new basal pattern. When the Select Name screen appears,
you can select any available name from the list. Use the Edit option to
adjust the new basal pattern as desired.
• Select Delete to delete the selected basal pattern. You cannot delete the
active basal pattern.
Changing from one basal pattern to another
When you change to a new basal pattern, your pump delivers your basal insulin
according to the basal pattern you selected.
To change to a different basal pattern:
1. Go to the Basal Patterns screen.
Home screen > Basal > Basal Patterns
The Basal Patterns screen shows the basal patterns you have set up. The
active basal pattern is indicated with a check mark.
2. Select the basal pattern you want to start.
The Basal screen displays the details for the selected basal pattern.
3. To start this pattern, select Begin.
46 Chapter 3
MP6025958-022 / A
RELEASED

Temporary basal rates
The Temp Basal feature and Preset Temp feature allow you to set temporary basal
rates to manage blood glucose levels during short-term activities or conditions
that require a basal rate different than your current one, such as an illness or a
change in physical activity. You can make an immediate change to your basal
insulin for a set period of time (30 minutes to 24 hours), up to your max basal rate.
About Temp Basal rates
A temp basal rate temporarily overrides all other basal programming. Your
programmed basal pattern resumes after the temp basal rate delivery is completed
or cancelled.
The Temp Basal feature allows you to set and start a temporary basal rate
immediately. The Preset Temp feature allows you to set up a temp basal rate
ahead of time for known situations. You define temp basal rates and preset temp
basal rates using either a percentage of your current basal pattern, or by setting a
specific rate, as described in the following table.
This temp basal type: Works like this:
Percent Delivers a percentage of the basal rates programmed
in your active basal pattern for the duration of the
temp basal rate. The temp basal amount is rounded
down to the next 0.025 units if your basal rate is set at
less than 1 unit per hour, or to the next 0.05 units if
your basal rate is set at more than 1 unit per hour.
Temp basal rates can be set to deliver from 0 to 200%
of your scheduled basal rate. The percent amount you
can use, however, is based on the largest basal rate
scheduled during the temp basal duration, and is
limited by your max basal rate.
Rate Delivers a fixed basal insulin rate in units per hour for
the duration of your temporary basal, limited by your
max basal rate.
To use the Temp Basal feature, see Starting a Temp Basal rate, on page 48. To use
the Preset Temp Basal feature, see Preset Temp basal rates, on page 49.
■ basal
Basal 47
MP6025958-022 / A
RELEASED

Starting a Temp Basal rate
When you start a temp basal rate, your basal delivery changes to the temporary
basal rate for the duration you set. When the duration is complete, your basal
insulin automatically returns to the active basal pattern.
To start a temp basal rate:
1. Go to the Temp Basal screen.
Home screen > Basal > Temp Basal
2. Duration is flashing. Set the Duration for this temp basal rate. The Duration
can be set from 30 minutes to 24 hours, in 15-minute increments.
3. Select Next.
4. The Type defaults to Percent. You can switch between Percent and Rate by
selecting Type.
48 Chapter 3
MP6025958-022 / A
RELEASED

5. Depending on the Type you selected, do one of the following:
• Enter a percentage:
• Enter a basal rate, making sure you do not exceed your max basal rate:
6. If desired, select Review to review your temp basal setting.
7. Select Begin to start the temp basal rate.
Your Temp Basal rate continues for the duration you set. The Basal option on
the Home screen appears as Basal (T) during your temp basal delivery. Your
scheduled basal rate automatically starts again when your Temp Basal rate
finishes.
Note: If you need to cancel your temp basal, select Basal (T) from
the Home screen, then select Cancel Temp Basal.
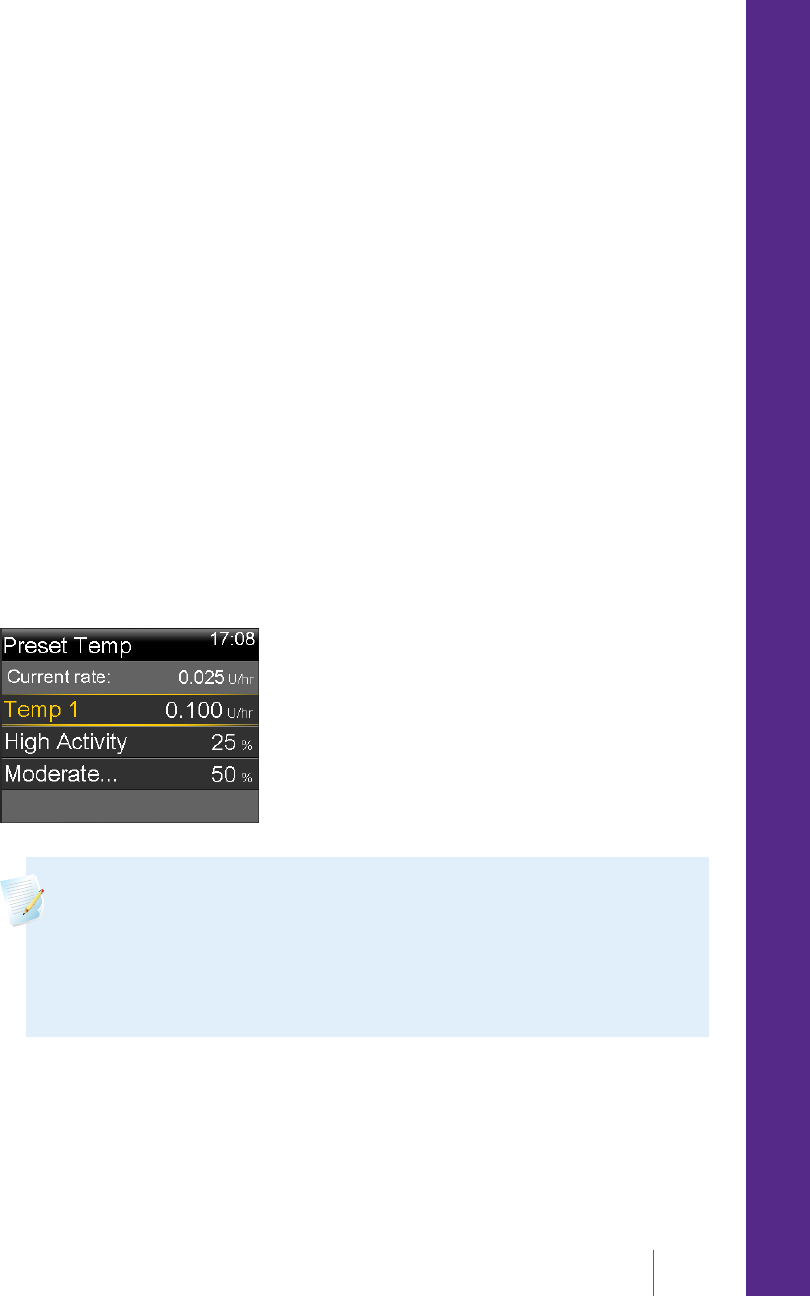
Preset Temp basal rates
The Preset Temp feature allows you to set up basal rates for recurring short-term
situations where you need to temporarily change your basal rate.
■ basal
Basal 49
MP6025958-022 / A
RELEASED

There are four names you can use to match your preset temp basal rate to a
situation: High Activity, Moderate Activity, Low Activity, and Sick. There are also
four additional preset temp rates available to use for other circumstances (Temp 1
through Temp 4).
Setting up and managing Preset Temp basal rates
This section describes how to set up, edit, rename, or delete a preset temp basal
rate. For information on how to start using a preset temp basal rate, see Starting a
Preset Temp basal rate, on page 51.
To set up a preset temp basal rate:
1. Go to the Preset Temp Setup screen.
Menu > Insulin Settings > Preset Temp Setup
2. Select Add New.
3. Select a name for the preset temp basal rate you want to set (Temp 1, High
Activity, Moderate Activity, Low Activity, or Sick).
4. The Type defaults to Percent. You can switch between Percent and Rate by
selecting Type.
5. If you are using Percent, enter the percentage you want to use. If you are
using Rate, enter the rate in units per hour. You cannot exceed your max
basal rate.
6. Set the Duration (from 30 minutes to 24 hours in 15 minute increments) that
you want this preset temp basal to be active.
7. Select Save.
To change, rename, or delete a preset temp basal rate:
1. Go to the Preset Temp Setup screen.
Menu > Insulin Settings > Preset Temp Setup
2. Select the desired preset temp basal.
Note: You cannot select a preset temp basal rate that is currently in
use.
3. Select Options, and then do one of the following:
50 Chapter 3
MP6025958-022 / A
RELEASED
• Select Edit to adjust the Type (Percent or Rate), the Percentage or Rate
amount, and the Duration for this preset temp basal rate.
• Select Rename to assign a different name to this preset temp basal rate.
When the Select Name screen appears, you can select any available name
from the list.
• Select Delete to delete this preset temp basal rate.
Starting a Preset Temp basal rate
You must set up preset temp basal rates before you can use the Preset Temp
feature. For more information, see Preset Temp basal rates, on page 49.
To start a preset temp basal rate:
1. Go to the Preset Temp screen. The Preset Temp option only appears if you
have set up preset temp basal rates.
Home screen > Basal > Preset Temp
The Preset Temp screen displays the preset temp basal rates you have set up,
along with their percentage or rate amounts.
Note: Depending on your active basal pattern, it is possible for a
percentage preset temp basal rate to exceed your max basal limit.
Because you cannot use a preset temp basal rate that exceeds your
max basal limit, these rates appear in the list, but are not available
for use.
■ basal
Basal 51
MP6025958-022 / A
RELEASED

2. Select the preset temp basal rate that you want to use, and then select
Begin.
Your preset temp basal rate continues for the duration you set. The Basal
option on the Home screen appears as Basal (T) during your preset temp
basal delivery. Your scheduled basal rate automatically starts again when your
preset temp basal rate finishes.
Canceling a Temp Basal or Preset Temp basal rate
You can cancel a temp basal or preset temp basal rate at any time. When you do
so, your scheduled basal pattern automatically starts again.
To cancel a temp basal rate:
1. Go to the Basal screen.
Home screen > Basal (T)
The Temp Basal screen displays the name (Preset Temp only), current basal
rate, the set duration, and the remaining time.
2. Select Cancel Temp Basal.
Viewing your basal information
The following table describes how you can view your basal rates and patterns.
52 Chapter 3
MP6025958-022 / A
RELEASED
To do this: Do this:
View your current basal
rate
Go to the Basal screen:
Home screen > Basal
The active basal pattern and current basal rate appear at
the top of the Basal screen.
You can also view your current basal rate by selecting the
Status Bar at the top of the Home screen, and then
selecting Quick Status.
View your basal patterns Go to the Basal Patterns screen:
Home screen > Basal > Basal Patterns
The Basal Patterns screen shows the basal patterns you
have set up, and the 24-hour insulin total for each basal
pattern. A check mark appears next to the active basal
pattern.
To see the individual basal rates, select the desired basal
pattern.
■ basal
Basal 53
MP6025958-022 / A
RELEASED

Stopping and resuming your insulin delivery
Use Suspend Delivery if you need to stop all active basal and bolus insulin
deliveries. When you suspend your insulin delivery, your pump beeps and vibrates
periodically to remind you that insulin is not being delivered.
When you are ready to continue your basal insulin delivery, use the Resume
feature. When you use the Resume feature, your pump starts your programmed
basal pattern, but does not start any previously programmed bolus deliveries.
Note: If you want to stop a bolus delivery only, without stopping your
basal delivery, see Stopping a bolus delivery, on page 88.
WARNING: A bolus delivery or fill cannula that was suspended
does not restart when you resume. To avoid a high BG and
ketoacidosis, always check the pump's Daily History after you
resume insulin delivery to determine the amount that was
delivered. If needed, program a new bolus or fill cannula delivery.
Caution: When using Audio or Vibrate, it is possible that an Audio or
Vibration notification may not occur as expected if the speaker or
vibrator in your pump malfunctions. This is most important when
using the Easy Bolus feature or when your pump is in Manual Suspend
where a missed notification may cause an over or under delivery of
insulin.
Contact the 24 Hour HelpLine or your local representative with any
concerns.
To suspend all insulin delivery:
1. Go to the Suspend Delivery screen.
Menu > Suspend Delivery
2. A confirmation message appears. To suspend your pump and stop all insulin
delivery, select Yes.
The Home screen indicates that your insulin is suspended. Your pump
functions are limited until you resume your insulin delivery.
54 Chapter 3
MP6025958-022 / A
RELEASED

To resume basal insulin delivery:
1. While insulin is suspended, go to the Home screen.
2. Select Resume.
A confirmation message appears.
3. To resume your basal insulin delivery, select Yes. If a Temp Basal was active
when you suspended your pump, it resumes if the time is still within the
duration that you set.
Note: If you still need a bolus delivery that was in progress before
you suspended your delivery, check the Daily History screen for the
actual bolus units delivered and the intended bolus amount. Then
you can set up a new bolus amount as needed. See Daily History, on
page 121 for details about using the Daily History screen.
■ basal
Basal 55
MP6025958-022 / A
RELEASED

56 Chapter 3
MP6025958-022 / A
RELEASED

bolus
MP6025958-022 / A
RELEASED
MP6025958-022 / A
RELEASED

Bolus
A bolus is the amount of insulin taken to cover an expected rise in blood glucose,
typically when you eat a meal or snack. You can also use a bolus to correct a high
blood glucose reading.
About bolus deliveries
There are different types of bolus deliveries you can use, depending on your
insulin needs at the time. There are also different ways you can deliver a bolus.
Discuss these options with your healthcare professional to determine what is best
for you.
Bolus types
The following table provides general information about the available bolus types.
Type How it works When to use it
Normal Provides a single
immediate dose of
insulin.
This is the typical bolus type you use to
cover your food intake, or to correct a high
BG meter reading.
For details about using the Normal bolus
feature, see Normal bolus, on page 73.
Bolus 59
■ bolus
MP6025958-022 / A
RELEASED

Type How it works When to use it
Square
Wave™
Delivers a single bolus
evenly over an extended
period of time
(30 minutes to 8 hours).
You might use a Square Wave bolus:
• If you have delayed food digestion due to
gastroparesis or meals high in fat.
• When snacking over an extended period of
time.
• If a Normal bolus drops your blood glucose
too rapidly.
For details about using the Square Wave
bolus feature, see Square Wave bolus, on
page 76.
Dual
Wave™
Delivers a combination
of an immediate Normal
bolus followed by a
Square Wave bolus.
You might use a Dual Wave bolus:
• When you eat meals that are both high in
carbs and fat which may delay digestion.
• When your meal bolus is combined with a
correction bolus for an elevated blood
glucose.
For details about using a Dual Wave bolus,
see Dual Wave bolus, on page 79.
Bolus type example
The following example shows how the different bolus types work.
Hours
Hours
0 1 2 3
Hours
Units of insulin
Normal (N) bolus
0 1 2 3 0 1 2 3
Bolus
over time
Bolus
now
Bolus
now
Square Wave (S) bolus Dual Wave (D) bolus
Bolus
over time
60 Chapter 4
MP6025958-022 / A
RELEASED

Bolus delivery options
The following table describes the different ways you can deliver a bolus.
Delivery
method
Type of bolus available How it works
Bolus Wizard Normal bolus, Square
Wave bolus, Dual Wave
bolus
You enter your BG meter reading and
your carbs you plan to eat, and then the
Bolus Wizard calculates an estimated
bolus amount based on your individual
settings.
For details about using the Bolus Wizard
feature, see Bolus Wizard, on page 65.
To deliver a:
• Normal bolus using Bolus Wizard, see
page 73.
• Square Wave bolus using Bolus Wizard,
see page 77.
• Dual Wave bolus using Bolus Wizard,
see page 79.
Manual Normal bolus, Square
Wave bolus, Dual Wave
bolus
You do your own calculation and
manually enter your bolus amount.
To deliver a:
• Normal bolus, see page 75
• Square Wave bolus, see page 78
• Dual Wave bolus, see page 81
Preset Bolus Normal bolus, Square
Wave bolus, Dual Wave
bolus
You select from specific bolus settings
that you define ahead of time for
recurring situations.
For details about using the Preset Bolus
feature, see Preset Bolus, on page 85.
■ bolus
Bolus 61
MP6025958-022 / A
RELEASED

Delivery
method
Type of bolus available How it works
Easy Bolus™ Normal bolus After the Easy Bolus feature is set up,
you can deliver a Normal bolus by using
the button when the pump is in
sleep mode.
For details about using the Easy Bolus
feature, see Easy Bolus, on page 82.
Remote Bolus
from your
compatible
Bayer meter
Normal bolus or any
Preset Bolus set up on
your pump.
For information on using the Remote
Bolus feature on your compatible Bayer
meter, see the user guide that came
with your compatible Bayer meter.
For information on turning on the
Remote Bolus feature on your pump,
see Setting up Remote Bolus , on
page 112.
Bolus settings
The following table describes some bolus settings that may need to be changed
before you use your bolus options. Consult with your healthcare professional for
the settings that are right for you.
Note: There are additional settings required if you want to use the Bolus
Wizard. These are described in the section, Bolus Wizard, on page 65.
Setting What it is What it does for you
Max Bolus Maximum amount of
bolus insulin (in units)
your pump can deliver
in a single bolus.
Provides a safety measure by limiting
the total amount of bolus insulin you
can program for a single bolus delivery.
For details about setting the max bolus
amount, see Max Bolus, on page 63.
62 Chapter 4
MP6025958-022 / A
RELEASED

Setting What it is What it does for you
Bolus Increment The amount of insulin
(in units) that is
increased or decreased
with each button press
when adjusting your
bolus amount. The Bolus
Wizard will also use the
increment to display the
bolus total and
adjustment amounts.
This setting does not
apply to Easy Bolus.
Allows you to set your increment value
according to your typical bolus amounts.
For details about setting the bolus
increment, see Bolus Increment, on
page 64.
Bolus Speed The speed that your
pump delivers your
bolus insulin.
Allows you to set your bolus insulin
delivery speed to Standard or Quick.
For details about setting your bolus
speed, see Bolus Speed, on page 64.
Max Bolus
Max Bolus limits the amount of insulin that can be delivered in a single bolus. Your
pump prevents single bolus insulin deliveries that exceed the max bolus you set.
You can set your max bolus from 0 to 75 units. Set your max bolus as prescribed
by your healthcare professional.
If you are setting your max bolus after you have set up your Preset Bolus deliveries,
you cannot set your max bolus lower than any of your Preset Bolus amounts.
To set your max bolus:
1. Go to the Max Basal/Bolus screen.
Menu > Insulin Settings > Max Basal/Bolus
2. Select Max Bolus.
3. Because the Max Bolus setting determines your bolus insulin limit, a warning
message appears any time you go to the screen to change the value. To
continue to the Max Bolus screen, select Continue.
■ bolus
Bolus 63
MP6025958-022 / A
RELEASED

4. Select Max Bolus, and then set the maximum number of insulin units your
pump can deliver in one bolus.
5. Select Save.
Bolus Increment
The Bolus Increment setting determines the number of units that are increased or
decreased with each button press when you adjust your bolus delivery amount in
the Bolus Wizard, Manual Bolus, and Preset Bolus screens. Depending on your
typical bolus amount, you can set your increment to 0.1 units, 0.05 units, or
0.025 units.
Note: Easy Bolus uses a setting called Step Size to determine the
number of insulin units for each button press. See Setting up Easy Bolus,
on page 83 for more information.
To set your Bolus Increment:
1. Go to the Bolus Increment screen.
Menu > Insulin Settings > Bolus Increment
2. Select Increment to set your desired increment value.
3. Select Save.
Bolus Speed
Bolus Speed sets the rate at which your pump delivers bolus insulin. You can set a
Standard rate (1.5 units per minute), or a Quick rate (15 units per minute).
To set your Bolus Speed:
1. Go to the Bolus Speed screen.
Menu > Insulin Settings > Bolus Speed
2. Select Standard or Quick.
3. Select Save.
64 Chapter 4
MP6025958-022 / A
RELEASED

Bolus Wizard
The Bolus Wizard is a feature that uses your individual Bolus Wizard settings to
calculate an estimated bolus amount based on the BG values and carbs that you
enter. Work with your healthcare professional to define your personal settings,
which include your carb or exchange ratio, insulin sensitivity, BG target range, and
active insulin time.
Note: If you do not know how to count carbs, consult with your
healthcare professional before using the Bolus Wizard.
After you set up the Bolus Wizard, you can use it to calculate and deliver a food
bolus, a correction bolus, or a food plus correction bolus using a Normal bolus (see
page 73), Square Wave bolus (see page 77), or Dual Wave bolus (see page 79).
The following sections describe how to set up the Bolus Wizard. Bolus delivery
instructions are provided in the individual sections for each bolus type.
Understanding your Bolus Wizard settings
Your pump guides you through entering the following settings when you first turn
on the Bolus Wizard feature. Get your prescribed settings from your healthcare
professional, and always consult your healthcare professional before changing your
settings. The setup procedure begins on page 66.
Setting What it does
Carb Ratio
Exchange Ratio
Used for food bolus calculations.
•If you count carbs: the number of carb grams that are
covered by 1 unit of insulin.
•If you count exchanges: the number of insulin units that
are needed to cover 1 carb exchange.
Insulin Sensitivity
Factor
Used to calculate correction bolus amounts.
Your insulin sensitivity factor is the amount that blood
glucose is reduced by one unit of insulin.
■ bolus
Bolus 65
MP6025958-022 / A
RELEASED

Setting What it does
BG Target The Bolus Wizard calculates your estimated bolus based
on your BG target range. The high and low values you set
are the values to which your blood glucose is corrected.
To use a single target value rather than a range, set the
same value for High and Low.
If your BG value is above the high target value, a
correction dose is calculated. If your BG value is below
the low target value, a negative correction is calculated
and subtracted from your food bolus.
Active Insulin Time Active insulin is the bolus insulin that has been delivered
by the pump and is still working to lower your blood
glucose levels. Active insulin time is the length of time
that bolus insulin is tracked as active insulin.
Work with your healthcare professional to get the active
insulin time that best represents the insulin type you use
and your physiological insulin absorption rate.
For more information about how the Bolus Wizard uses
your active insulin amount, see About active insulin, on
page 71.
Setting up the Bolus Wizard feature
Before you can use the Bolus Wizard to calculate a bolus, you must turn on this
feature and enter your Bolus Wizard settings.
To set up the Bolus Wizard feature:
1. Go to the Bolus Wizard Setup screen.
Menu > Insulin Settings > Bolus Wizard Setup
The Bolus Wizard Setup screen appears with the Bolus Wizard turned off.
66 Chapter 4
MP6025958-022 / A
RELEASED
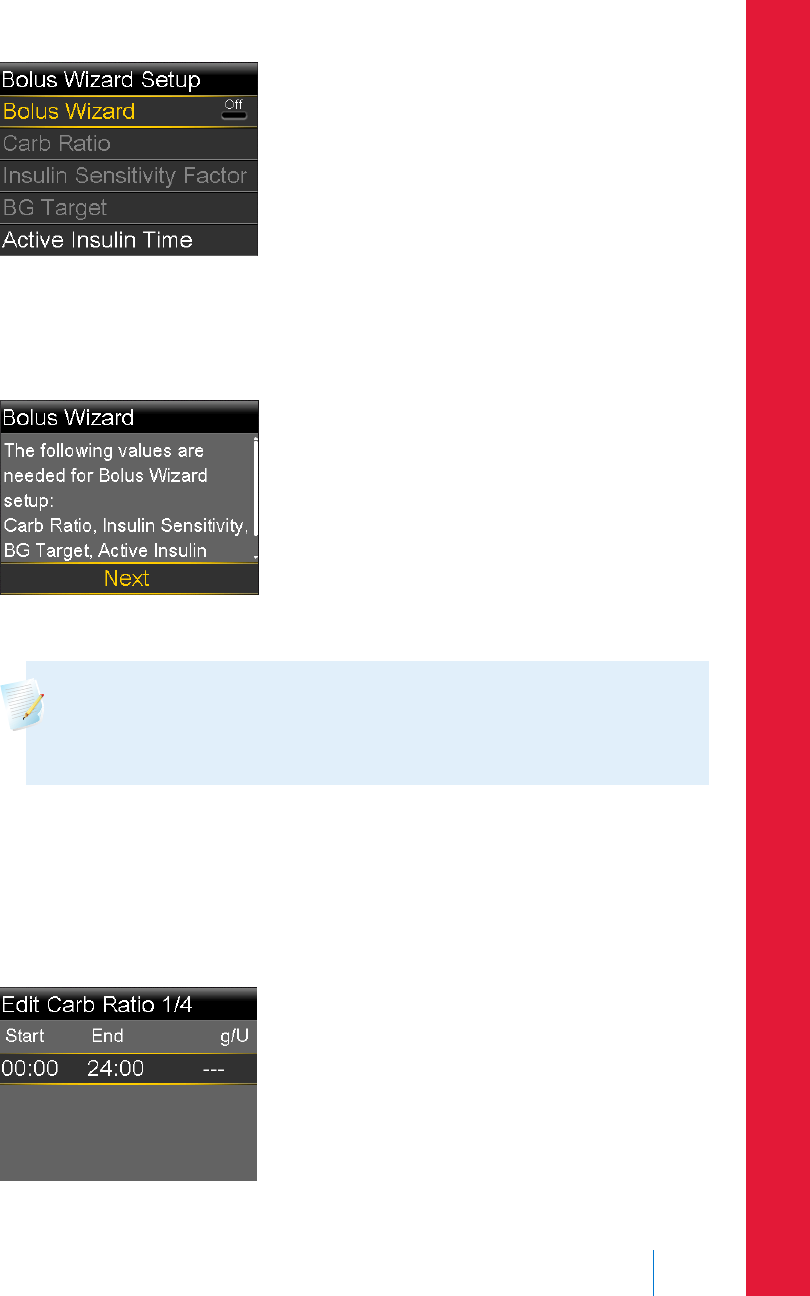
2. Select Bolus Wizard to turn on the feature.
If this is the first time you have turned on the Bolus Wizard feature, your
pump displays information about the settings you need to enter.
Make sure you have the values you need, and then select Next to continue.
Note: As you enter your personal settings, your pump displays
information about each setting. Click Next to continue when you
have read each explanation.
3. When the Edit Carb Ratio screen appears, enter your carb ratio. If you are
setting a carb ratio, set the grams per unit (g/U). If you are setting an
exchange ratio, set the units per exchange (U/exch). You can set up to eight
carb ratios using different time segments. The time segments must cover a
24-hour period.
■ bolus
Bolus 67
MP6025958-022 / A
RELEASED
Note: Your pump uses grams as the default carb unit. If you would
like to change your carb unit to exchanges, see Carb Unit, on
page 140.
If your ratio value is outside the range of 5 to 50 grams per unit or 0.3 to
3 units per exchange, a message appears asking you to confirm your setting.
4. When the Edit Sensitivity screen appears, enter your insulin sensitivity factor.
You can set up to eight different sensitivity factors using different time
segments. The time segments must cover a 24-hour period.
If the value you enter is outside the range of 20 to 100 mg/dL, a message
appears asking you to confirm your setting.
5. When the Edit BG Target screen appears, enter your Bolus Wizard BG target
range. You can set up to eight different BG target ranges using different time
segments. The time segments must cover a 24-hour period.
If your BG target is outside the range of 90 to 140 mg/dL, a message appears
asking you to confirm your setting.
6. When the Active Insulin Time screen appears, enter your active insulin time
value.
68 Chapter 4
MP6025958-022 / A
RELEASED

7. Select Save.
A message appears letting you know the Bolus Wizard setup is complete.
You can now use the Bolus Wizard to calculate a bolus.
Changing your Bolus Wizard settings
This section shows you how to make changes to your personal settings after you
initially set up the Bolus Wizard. These settings are available only if the Bolus
Wizard is turned on.
Changing your carb or exchange ratio
You can change either your carb ratio or exchange ratio setting, depending on
whether you use grams or exchanges as your carb unit. The carb ratio and
exchange ratio settings are available only if the Bolus Wizard is turned on.
Note: Your pump uses grams as the default carb unit. If you would like
to change your carb unit to exchanges, see Carb Unit, on page 140.
To change your carb or exchange ratio:
1. Go to the Carb Ratio screen or the Exchange Ratio screen, depending on the
carb units you use.
Menu > Insulin Settings > Bolus Wizard Setup > Carb Ratio
or
Menu > Insulin Settings > Bolus Wizard Setup > Exchange Ratio
2. Select Edit.
■ bolus
Bolus 69
MP6025958-022 / A
RELEASED

3. Select the carb or exchange ratio to adjust the Start time, the End time, and
the ratio. You can set up to eight different carb or exchange ratios using
different time segments. The time segments must cover a 24-hour period.
If you set a value outside the typical range of 5 to 50 grams per unit or 0.3 to
3 units per exchange, a message appears asking you to confirm your setting.
4. When you have made your changes, select Save.
Changing your insulin sensitivity factor
The Insulin Sensitivity Factor option is only available if the Bolus Wizard feature is
turned on.
To change your insulin sensitivity factor:
1. Go to the Sensitivity screen.
Menu > Insulin Settings > Bolus Wizard Setup > Insulin Sensitivity Factor
2. Select Edit.
3. Select the sensitivity factor to adjust the Start time, the End time, and the
Sensitivity amount. You can set up to eight different sensitivity amounts using
different time segments. The time segments must cover a 24-hour period.
If you set a value that is outside the typical range of 20 to 100 mg/dL per
unit, a message appears asking you to confirm your setting.
4. When you have made your changes, select Save.
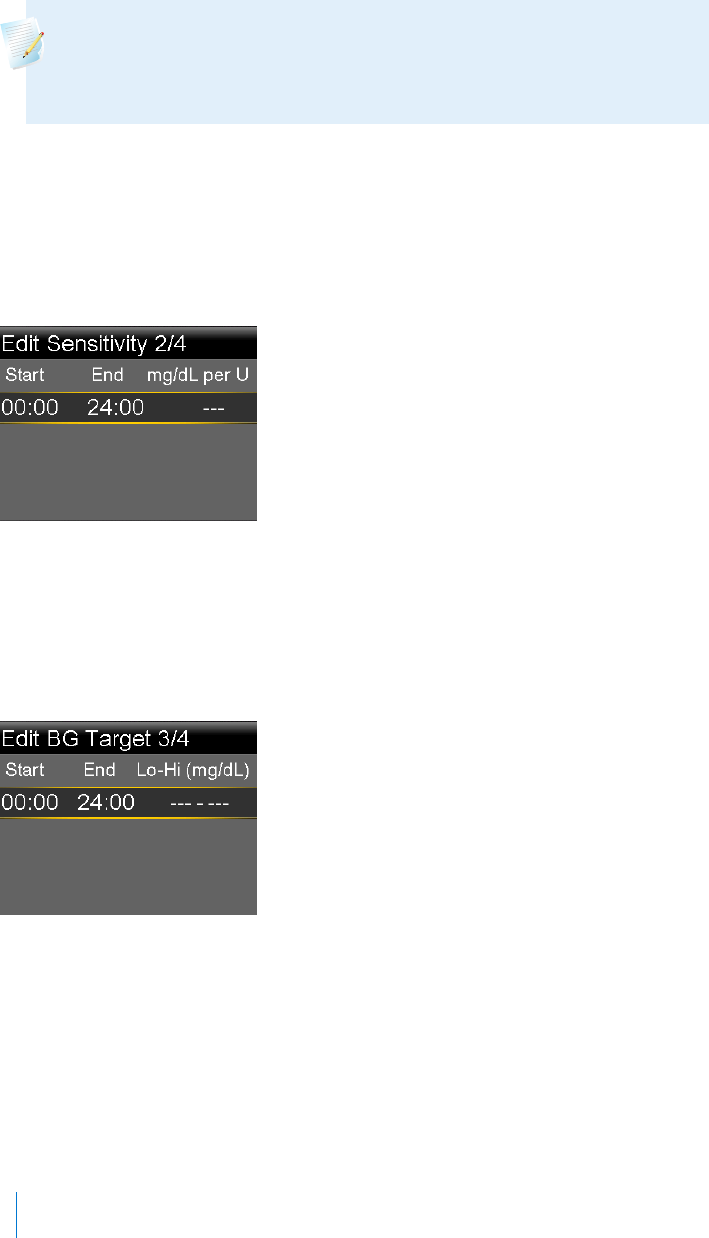
Changing your Bolus Wizard BG target
Your target range can be from 60 to 250 mg/dL. The Bolus Wizard BG Target
option is only available if the Bolus Wizard feature is turned on.
To change your Bolus Wizard BG target range:
1. Go to the BG Target screen.
Menu > Insulin Settings > Bolus Wizard Setup > BG Target
2. Select Edit.
3. Select the BG target to adjust the Start time, the End time, and the Lo (low)
and Hi (high) BG Target values. Your high value cannot be less than your low
value. You can set up to eight different values using different time segments.
The time segments must cover a 24-hour period.
70 Chapter 4
MP6025958-022 / A
RELEASED

If your BG target is outside the typical range of 90 to 140 mg/dL, a message
appears asking you to confirm your setting.
4. When you have made your changes, select Save.
Changing your Active Insulin Time
The active insulin time setting lets the pump know which active insulin time to
use in calculating the amount of active insulin to subtract before estimating a
bolus. Your healthcare professional will prescribe the active insulin time that is best
for you.
To change your active insulin time:
1. Go to the Active Insulin Time screen.
Menu > Insulin Settings > Bolus Wizard Setup > Active Insulin Time
2. Select Duration, then adjust your active insulin time (in hours), using 15-
minute increments.
3. Select Save.
Turning off the Bolus Wizard feature
You can turn off the Bolus Wizard feature at any time. Your Bolus Wizard settings
remain in your pump. When the Bolus Wizard is turned off, the Bolus Wizard
option does not appear in the Bolus Menu, and you cannot edit your Carb Ratio,
Insulin Sensitivity Factor, or BG Target settings from the Bolus Wizard Setup screen.
To turn off the Bolus Wizard feature:
1. Go to the Bolus Wizard Setup screen.
Menu > Insulin Settings > Bolus Wizard Setup
2. Select Bolus Wizard to turn the feature off.
About active insulin
Active insulin is the bolus insulin that has already been delivered to your body,
and is still working to lower your blood glucose levels. The pump considers your
active insulin time setting in determining if any active insulin is still in your body
from prior boluses. This may help prevent hypoglycemia caused by over-correcting
for high blood glucose.
■ bolus
Bolus 71
MP6025958-022 / A
RELEASED

Your current active insulin amount displays on the Home screen, and includes only
the bolus insulin you have already received.
When you are using the Bolus Wizard, the Bolus Wizard calculator uses your
current active insulin value to determine if there is an active insulin adjustment
needed. The active insulin adjustment calculation considers both the bolus insulin
that has already been delivered (the amount shown on the Home screen), as well
as any insulin that is going to be delivered by an active Square Wave bolus.
WARNING: Do not use the Bolus Wizard to calculate a bolus for a
period of time after giving a manual injection of insulin by syringe
or pen. Manual injections are not accounted for in the active insulin
amount. Therefore, the Bolus Wizard could prompt you to deliver
more insulin than needed. Too much insulin may cause
hypoglycemia. Consult with your healthcare professional for how
long you need to wait after a manual injection of insulin before you
can rely on the active insulin calculation of your Bolus Wizard.
Bolus Wizard warnings
When you use the Bolus Wizard, there may be times when you see one of the
following:
Warning: What it means: What to do:
High BG Your BG meter reading is above
250 mg/dL.
• Check for an occlusion.
• Check ketones.
• Consider an insulin injection.
• Monitor your BG.
Low BG Your BG meter reading is below
70 mg/dL.
Treat your low BG. Do not give
yourself a bolus until your BG
returns to normal.
72 Chapter 4
MP6025958-022 / A
RELEASED

Warning: What it means: What to do:
Max Bolus
Exceeded
The bolus amount entered
exceeds your Max Bolus setting.
Check the bolus amount. Select
No to cancel, or Yes to
continue. If you select Yes, the
bolus amount that you entered
is reduced to your max bolus
limit.
Normal bolus
A Normal bolus provides a single immediate dose of insulin. You use a Normal
bolus to cover your food intake or to correct a high BG meter reading.
You cannot access the Reservoir & Tubing, Insulin Settings, or Sensor Settings
menu options during a Normal bolus delivery.
Note: Your pump allows you to deliver a Normal bolus while a Square
Wave bolus or the Square portion of a Dual Wave bolus is being
delivered.
Delivering a Normal bolus with the Bolus Wizard
To deliver a Normal bolus using the Bolus Wizard:
1. For a correction bolus or a food bolus with a correction, use your BG meter to
check your blood glucose. For a food bolus only, skip this step.
2. Go to the Bolus Wizard screen.
Home screen > Bolus > Bolus Wizard
The Bolus Wizard screen shows your current BG meter reading (if applicable)
and any insulin that is still active from previous boluses. For more information
about active insulin, see About active insulin, on page 71. For more information,
see About your compatible Bayer meter, on page 111.
Note: Be aware that if you already have the Bolus Wizard open prior
to wirelessly sending your BG meter reading to your pump, you
must close the Bolus Wizard and open it again, in order for that
reading to appear.
■ bolus
Bolus 73
MP6025958-022 / A
RELEASED

3. If you are not using a wirelessly connected compatible Bayer meter, you can
select BG to manually enter your BG meter reading.
Note: If you choose not to enter a BG value, three dashes appear
on the screen in place of the BG value.
4. For a food bolus, select Carbs to enter the carb count of your meal. For a
correction bolus where no food was eaten, leave the Carbs value at 0.
5. Your calculated bolus appears in the Bolus field.
If you want to change the bolus amount, select Bolus and make any desired
adjustment. If you change your bolus amount, the word “Modified” appears
next to the new bolus amount.
6. Select Next to review your bolus information.
Your bolus amount appears.
Note: If you modified your bolus amount in the previous step,
Bolus Calculated displays your original bolus amount, Modification
displays the amount you added or subtracted from your bolus, and
Bolus displays the actual bolus amount.
74 Chapter 4
MP6025958-022 / A
RELEASED

7. Select Deliver Bolus to start your bolus.
Your pump beeps or vibrates and displays a message when your bolus starts.
The Home screen shows your bolus amount as it is being delivered. Your
pump beeps or vibrates when your bolus is complete.
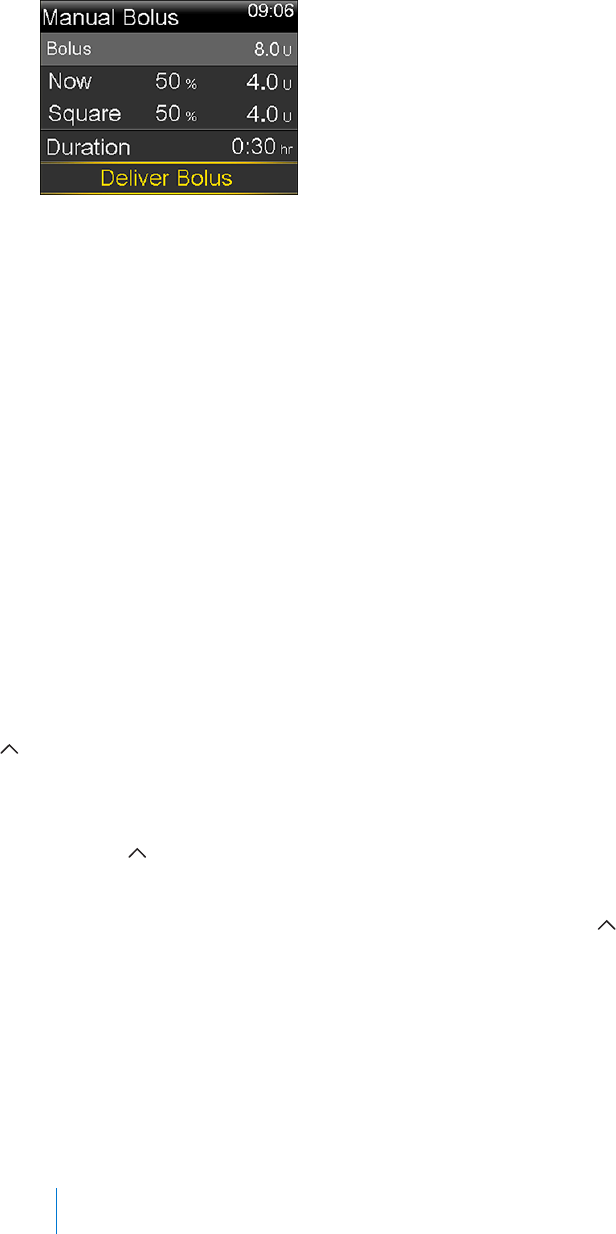
Delivering a Normal bolus using Manual Bolus
The following section describes how to deliver a Normal bolus using the Manual
Bolus feature.
To deliver a Normal bolus using Manual Bolus:
1. Go to the Manual Bolus screen.
Home screen > Bolus > Manual Bolus
Note: If the Bolus Wizard is turned off, the Manual Bolus screen
appears when you select Bolus.
The Manual Bolus screen shows your current BG value (if applicable) and any
insulin that is still active from previous boluses. For more information about
active insulin, see About active insulin, on page 71.
2. Select Bolus to set your bolus delivery amount (in units).
3. Select Deliver Bolus to start your bolus.
■ bolus
Bolus 75
MP6025958-022 / A
RELEASED

Your pump beeps or vibrates and displays a message when your bolus starts.
The Home screen shows your bolus amount as it is being delivered. Your
pump beeps or vibrates when your bolus is complete.
Square Wave bolus
A Square Wave bolus delivers a bolus evenly over a period of time (30 minutes to
8 hours).
When using the Bolus Wizard, a Square Wave bolus is available only when giving a
food bolus without a correction for an elevated BG. A Square Wave bolus is not
available for a correction bolus alone, or a correction bolus with food bolus.
A Square Wave bolus can be useful in these situations:
• If you have delayed food digestion due to gastroparesis or meals high in fat.
• When you are snacking over an extended period of time.
•If a Normal bolus drops your blood glucose too rapidly.
Since the Square Wave bolus extends delivery over a period of time, the insulin is
more likely to be available as you need it.
Note: You cannot perform these functions during a Square Wave bolus
delivery:
• Change the Max Bolus or the Active Insulin Time settings.
• Turn off or deliver Dual Wave or Square Wave boluses.
• Turn the Bolus Wizard feature on or off.
•Fill the cannula.
•Rewind your pump.
• Run a self-test.
• Access the Manage Settings menu.
All other functions are available during the Square Wave bolus.
Turning on or off Square Wave bolus
The Square Wave bolus delivery option is available only after you turn on the
Square Wave feature.
76 Chapter 4
MP6025958-022 / A
RELEASED

To turn on or turn off the Square Wave feature:
1. Go to the Dual/Square screen.
Menu > Insulin Settings > Dual/Square Wave
2. Select Square Wave to turn the feature on or off.
3. Select Save.
Delivering a Square Wave bolus with the Bolus Wizard
The Square Wave option is available in the Bolus Wizard only after you turn on the
Square Wave feature. Also, you must have entered a Carbs value.
To deliver a Square Wave bolus with the Bolus Wizard:
1. Go to the Bolus Wizard screen.
Home screen > Bolus > Bolus Wizard
The Bolus Wizard screen shows your current BG meter reading (if applicable)
and any insulin that is still active from previous boluses. For more information
about active insulin, see About active insulin, on page 71. For more information,
see About your compatible Bayer meter, on page 111.
Note: Be aware that if you already have the Bolus Wizard open prior
to wirelessly sending your BG meter reading to your pump, you
must close the Bolus Wizard and open it again, in order for that
reading to appear.
2. If you are not using a wirelessly connected compatible Bayer meter, you can
select BG to manually enter your BG meter reading.
Note: If you choose not to enter a BG meter reading, three dashes
appear on the screen instead.
3. Select Carbs to enter the amount of carbs in your food.
■ bolus
Bolus 77
MP6025958-022 / A
RELEASED

4. Review your calculated bolus amount in the Bolus field. If you want to
change the bolus amount, select Bolus and make your desired change.
Remember, if there is a correction bolus amount calculated, you are not able
to give a Square Wave bolus.
Note: If you change your bolus amount, the word “Modified”
appears next to the new bolus amount.
5. Select Next to review your bolus information.
6. Select Square.
The Bolus Wizard screen appears with your bolus amounts.
7. To change the time period over which your bolus is delivered, select
Duration to adjust the time. The duration can be from 30 minutes to 8 hours,
in 15 minute increments.
8. Select Deliver Bolus to start your bolus.
During a Square Wave bolus delivery, the Bolus button on your Home screen
appears as Bolus (S). You can select Bolus (S) to stop the bolus, to see details
on the insulin that has been delivered, or to access the Bolus menu. The
Bolus menu provides access to the Bolus Wizard, Manual Bolus, Preset Bolus,
and Insulin Settings options.
Delivering a Square Wave bolus using Manual Bolus
The Square Wave option is available in the Manual Bolus screen only after you turn
on the Square Wave feature.
To deliver a Square Wave bolus manually:
1. Go to the Manual Bolus screen.
Home screen > Bolus > Manual Bolus
2. Set your bolus delivery amount (in units), and then select Next.
3. Select Square.
4. Select Duration and set the amount of time over which you want your
Square Wave bolus to be delivered. The duration can be from 30 minutes to
8 hours, and is set in 15-minute increments.
78 Chapter 4
MP6025958-022 / A
RELEASED

5. Select Deliver Bolus to start your bolus.
During a Square Wave delivery, the Bolus button on your Home screen
appears as Bolus (S). You can select Bolus (S) to stop the bolus, to see details
on the insulin that has been delivered, or to access the Bolus menu. The
Bolus menu provides access to the Bolus Wizard, Manual Bolus, Preset Bolus,
and Insulin Settings options.
Dual Wave bolus
The Dual Wave bolus feature meets both immediate and extended insulin needs
by delivering a combination of an immediate Normal bolus followed by a Square
Wave bolus.
A Dual Wave bolus can be useful in these situations:
• When you need to correct elevated blood glucose before a meal, and you
also need a delayed bolus for food that is absorbed slowly.
• When you eat meals with mixed nutrients, such as carbs, fats and proteins,
that are absorbed at different rates.
Turning on or off Dual Wave bolus
The Dual Wave bolus delivery option is available only after you turn on the Dual
Wave feature.
To turn on or turn off the Dual Wave feature:
1. Go to the Dual/Square screen.
Menu > Insulin Settings > Dual/Square Wave
2. Select Dual Wave to turn the feature on or off.
3. Select Save.
Delivering a Dual Wave bolus with the Bolus Wizard
The Dual Wave option is available in the Bolus Wizard only after you turn on the
Dual Wave feature.
To deliver a Dual Wave bolus with the Bolus Wizard:
1. For a correction bolus or a food bolus with a correction, use your BG meter to
check your blood glucose. For a food bolus only, skip this step.
■ bolus
Bolus 79
MP6025958-022 / A
RELEASED

2. Go to the Bolus Wizard screen.
Home screen > Bolus > Bolus Wizard
The Bolus Wizard screen shows your current BG meter reading (if applicable)
and any insulin that is still active from previous boluses. For more information
about active insulin, see About active insulin, on page 71. For more information,
see About your compatible Bayer meter, on page 111.
Note: Be aware that if you already have the Bolus Wizard open prior
to wirelessly sending your BG meter reading to your pump, you
must close the Bolus Wizard and open it again, in order for that
reading to appear.
3. If you are not using a wirelessly connected compatible Bayer meter, you can
select BG to manually enter your BG meter reading.
Note: If you choose not to enter a BG value, three dashes appear
on the screen in place of the BG value.
4. For a food bolus, select Carbs to enter the carb count of your meal. For a
correction bolus where no food was eaten, leave the Carbs value as 0.
5. Review your calculated Bolus amount. If you want to change the amount,
select Bolus and make your desired change.
Note: If you change your bolus amount, the word “Modified”
appears next to the new bolus amount.
6. Select Next to review your bolus information.
7. Select Dual.
The Bolus Wizard screen appears, with the food amount split evenly between
the Now and Square portions.
8. If you need to change the amounts, select the area of the screen with the
Now value and adjust the Now amount.
80 Chapter 4
MP6025958-022 / A
RELEASED

When you adjust the Now amount, the Square amount adjusts automatically.
9. Adjust the Duration over which you want the Square Wave portion to be
delivered. The duration can be from 30 minutes to 8 hours.
10. Select Deliver Bolus to start your bolus.
During a Dual Wave delivery, the Home screen shows the progress of the
Now portion of your delivery. When the Now portion is complete, the Bolus
button on your Home screen appears as Bolus (D). You can select Bolus (D)
to stop the bolus, to see details on the amount of bolus insulin delivered, or
to access the Bolus menu. The Bolus menu provides access to the Bolus
Wizard, Manual Bolus, Preset Bolus, and Insulin Settings options.
Delivering a Dual Wave Bolus using Manual Bolus
The Dual Wave option is available in the Manual Bolus screen only after you turn
on the Dual Wave feature.
To deliver a Dual Wave bolus using Manual Bolus:
1. Go to the Manual Bolus screen.
Home screen > Bolus > Manual Bolus
The Manual Bolus screen appears.
2. Set your bolus delivery amount (in units), and then select Next.
3. Select Dual.
The Manual Bolus screen appears, with the Now and Square portions split
evenly.
■ bolus
Bolus 81
MP6025958-022 / A
RELEASED
4. If you need to change the amounts, select the area of the screen with the
Now value and adjust the Now amount. When you adjust the Now amount,
the Square amount adjusts automatically.
5. Adjust the Duration over which you want the Square Wave portion to be
delivered. The duration can be from 30 minutes to 8 hours.
6. Select Deliver Bolus to start your bolus.
During a Dual Wave delivery, the Home screen shows the progress of the
Now portion of your delivery. When the Now portion is complete, the Bolus
button on your Home screen appears as Bolus (D). You can select Bolus (D)
to stop the bolus, to see details on the amount of bolus insulin delivered, or
to access the Bolus menu. The Bolus menu provides access to the Bolus
Wizard, Manual Bolus, Preset Bolus, and Insulin Settings options.
Easy Bolus
The Easy Bolus feature allows you to quickly deliver a Normal bolus using only the
button. Your pump must be in sleep mode to use the Easy Bolus feature.
Before using Easy Bolus, you must turn on the feature and set the step size. The
step size determines the number of units the bolus amount increases each time
you press the button. Your Easy Bolus delivery is limited to 20 steps or your max
bolus limit, whichever comes first.
To help you count your Easy Bolus steps, each time you press the button, your
pump makes a different tone. There are five different tones that repeat if you use
more than five steps.
82 Chapter 4
MP6025958-022 / A
RELEASED

Understanding Easy Bolus step sizes
When setting up Easy Bolus, you can set the step size from 0.1 to 2.0 units. Your
step size cannot be higher than your max bolus. Set the step size to a number
that is convenient to use and easy to multiply.
The following example shows how your bolus amount is increased with each step,
or each press of the button when using the Easy Bolus feature to deliver a
bolus. In this example, the step size is 0.5 units. For a delivery of 2.0 units, you
would need four steps, or press the button four times when using the Easy
Bolus feature.
1 step = 0.5 units
2 steps = 1.0 units
3 steps = 1.5 units
4 steps = 2.0 units
Total number units
Total number steps = 4
Total number button presses = 4
0 0.5 1.0 1.5 2
Setting up Easy Bolus
The Easy Bolus option is available only after you turn on the feature.
To set up Easy Bolus:
1. Go to the Easy Bolus screen.
Menu > Insulin Settings > Easy Bolus
2. Select Easy Bolus to turn on the feature.
3. Set the Step Size amount (in units). You can set the step size from 0.1 to 2.0
units. Your step size cannot be higher than your max bolus.
4. Select Save.
■ bolus
Bolus 83
MP6025958-022 / A
RELEASED

Delivering a bolus using Easy Bolus
Initially you should use the Easy Bolus feature while looking at the pump screen as
you count the tones or vibrations.
Caution: Always check your pump if you hear any unanticipated
beeps or vibrations.
Caution: When using Audio or Vibrate, it is possible that an Audio or
Vibration notification may not occur as expected if the speaker or
vibrator in your pump malfunctions. This is most important when
using the Easy Bolus feature or when your pump is in Manual Suspend
where a missed notification may cause an over or under delivery of
insulin.
Contact the 24 Hour HelpLine or your local representative with any
concerns.
To use the Easy Bolus feature, you need to put your pump into sleep mode by
pressing and holding the Menu button for about two seconds.
To deliver a bolus using Easy Bolus:
1. While your pump screen is in sleep mode, press and hold for about one
second. After your pump beeps or vibrates, release . You can now start
programming your Easy Bolus.
Note: If your pump does not respond when you press , it may
not be in sleep mode, even if the screen is dark.
2. Press the number of times needed to set your bolus amount.
Each time you press , your pump sounds a tone or vibrates, and your bolus
amount increases by the number of units set for the step size.
Note: You cannot use to select the Easy Bolus values. Pressing
cancels the Easy Bolus.
84 Chapter 4
MP6025958-022 / A
RELEASED

3. When you have reached the desired bolus amount, press and hold to
confirm the amount. You should hear a confirmation tone or feel a vibration
for each button press. Count to ensure the amount is correct. If the amount is
not correct, press and hold until you hear a tone, and then start again from
step 1.
4. When the bolus amount is confirmed, press and hold for about one
second to deliver your bolus. Your pump beeps or vibrates. Your bolus starts
immediately after the confirmation.
Note: If you do not start your bolus within 10 seconds, your Easy
Bolus is cancelled, and you receive a message letting you know that
your bolus was not delivered.
Preset Bolus
The Preset Bolus feature allows you to set up in advance bolus deliveries you
expect to use frequently. There are four Preset Bolus names that allow you to
match a bolus to a meal with a known carb content: Breakfast, Lunch, Dinner and
Snack. There are four additional Preset Bolus names that can be set for other
circumstances (Bolus 1 through Bolus 4).
Note: To set up a Dual Wave bolus or Square Wave bolus, the Dual
Wave or Square Wave feature must be turned on.
Setting up and managing Preset Bolus deliveries
To set up Preset Bolus amounts:
1. Go to the Preset Bolus Setup screen.
Menu > Insulin Settings > Preset Bolus Setup
The Preset Bolus Setup screen appears, showing any existing Preset Bolus
settings.
2. Select Add New.
The Select Name screen appears with the available Preset Bolus names.
3. Select the Preset Bolus you want to set.
■ bolus
Bolus 85
MP6025958-022 / A
RELEASED