Medtronic MiniMed 1510 620G/630G/640G/670G Insulin Delivery Pump User Manual 4
Medtronic MiniMed, Inc. 620G/630G/640G/670G Insulin Delivery Pump Users Manual 4
Contents
- 1. Users manual
- 2. Users Manual 2
- 3. Users Manual 3
- 4. Users Manual 4
- 5. Users Manual 5
Users Manual 4

To clear all your settings:
1. Make sure the pump is not connected to your body.
2. Go to the Manage Settings screen.
Menu > Utilities > Manage Settings
3. Simultaneously press and hold and until the Manage Settings menu
appears.
4. Select Clear All Settings.
A confirmation screen appears asking if you want to clear all your settings.
5. To continue clearing your settings, select Yes. If you do not want to clear
your settings, select No.
If you clear your settings, your pump displays the Welcome screen and
continues to the Startup Wizard. For more details on entering your startup
settings, see Entering your startup settings, on page 24.
Clearing your active insulin
Use this feature when you are ready to use your pump with insulin for the first
time. This feature clears any active insulin values that your pump has tracked, and
sets the active insulin value to zero. If you have practiced delivering a bolus with
your pump prior to using your pump with insulin, you must clear the active
insulin. This ensures that the Bolus Wizard has an accurate active insulin amount
for bolus calculations.
You can clear your active insulin only once. After you clear your active insulin, the
feature is no longer available.
1. Go to the Manage Settings screen.
Menu > Utilities > Manage Settings
2. Simultaneously press and hold and until the Manage Settings menu
appears.
The Manage Settings screen appears. If you have never cleared your active
insulin, the Clear Active Insulin option appears.
144 Chapter 9
MP6025958-022 / A
RELEASED

Manage Settings
Save Settings
Restore Settings
Clear All Settings
Clear Active Insulin
Settings History
Note: If the Clear Active Insulin selection does not appear on the
Manage Settings screen, it means that you have already cleared your
active insulin on the pump.
3. Select Clear Active Insulin.
A confirmation screen appears asking if you want to continue.
4. Select Clear to clear your active insulin value from your pump. If you do not
want to clear your active insulin at this time, select Cancel.
A message appears confirming that your active insulin value is cleared.
Viewing your pump setting history
The Settings History shows you a history of activities you have performed in the
Manage Settings area, such as saving, restoring, or clearing your settings.
1. Go to the Manage Settings screen.
Menu > Utilities > Manage Settings
2. Simultaneously press and hold and until the Manage Settings menu
appears.
3. Select Settings History.
The Settings History screen appears.
Self Test
Self Test is a safety utility that allows you to check if your pump is operating
properly. This self-diagnostic feature can be used for maintenance or to check that
your pump is operating properly. Self Test is additional to the routine tests that run
independently while the pump operates.
■ general settings
General settings 145
MP6025958-022 / A
RELEASED

WARNING: Your insulin is suspended for up to two minutes while
your pump runs the self test.
Self Test includes the following tests:
Test Description
Display Turns on the display for up to 30 seconds.
Notification light Turns on the notification light for three seconds and then turns it
off.
Vibration Generates two vibration cycles.
Tone Generates an alert tone, an Easy Bolus (step 1) tone, and an alarm
tone.
The pump will run through a series of tests as listed in the previous table. Self Test
requires you to observe the pump during the test.
To run the Self Test:
1. Go to the Self Test screen.
Menu > Utilities > Self Test
A message indicates that the Self Test is in progress.
Self Test takes up to two minutes to complete. During that time, the display
briefly turns white, the notification light blinks, the pump vibrates, and the
pump beeps.
2. If Self Test does not detect a problem, the display returns to the Utilities
screen.
If Self Test detects a problem, a message appears with more information
about the problem. If Self Test displays an error message or you observe the
pump not behaving as indicated during the test, contact the 24 Hour
HelpLine or your local representative.
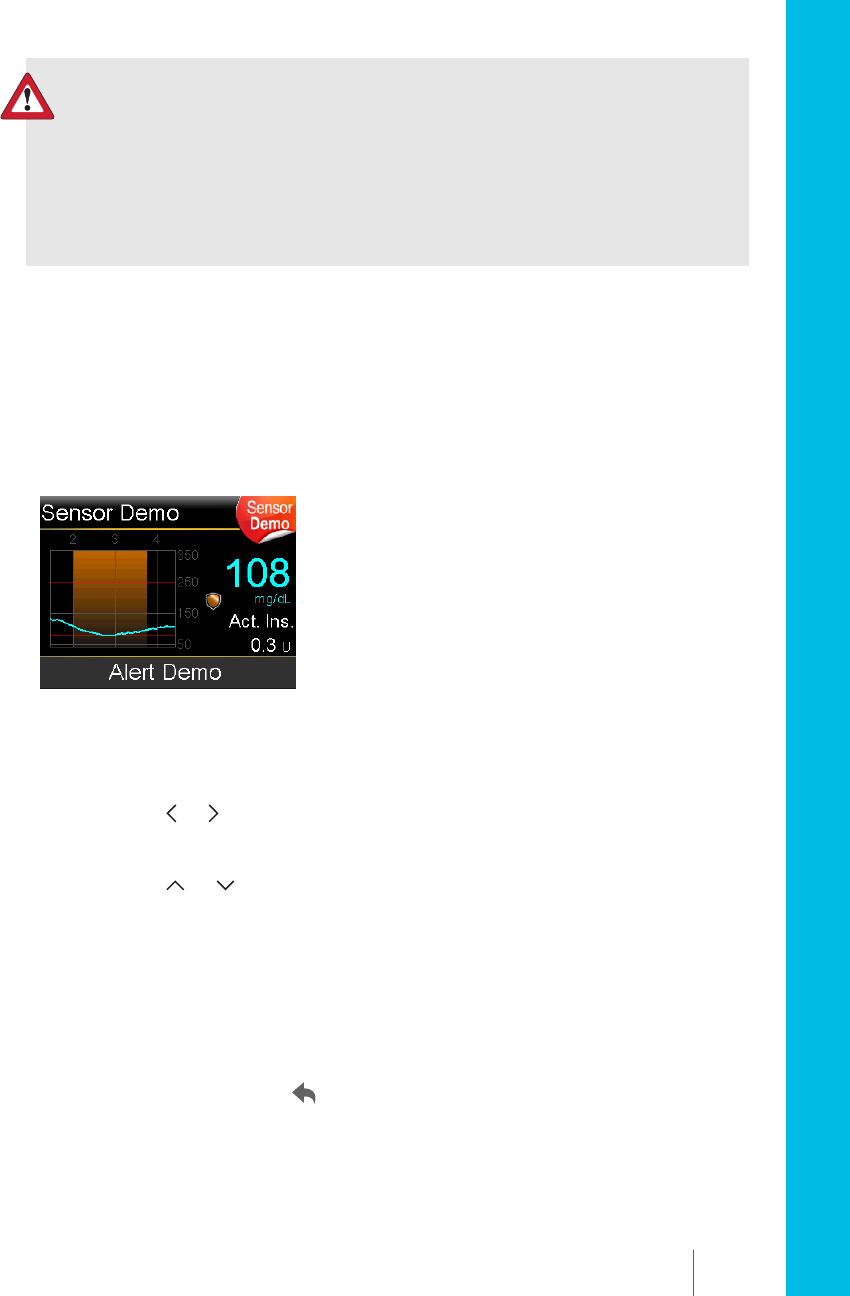
Sensor Demo
Sensor Demo lets you see what the Home screen would look like if you were
using the optional Continuous Glucose Monitoring (CGM) feature. For more
information about sensor graphs, please see The sensor graph, on page 191.
146 Chapter 9
MP6025958-022 / A
RELEASED
WARNING: Do not use Sensor Demo to make any decisions related
to your therapy. Information seen in the Sensor Demo is not real
data. It is an example of the type of information you can access
when using the sensor feature. Making treatment decisions based
on data that is not real can lead to low or high blood glucose
conditions.
To view the sensor graphs:
1. Go to the Sensor Demo screen.
Menu > Utilities > Sensor Demo
A screen appears as an example of what your Home screen looks like when
you are using the optional CGM feature.
2. Press Select to access the sensor graph examples.
3. From the sensor screen examples you can:
•Press the or buttons to move the cursor across the graph. Examples
of sensor data appear for the different time periods.
•Press the or buttons to view graphs that cover different time
periods. You can view 3-hour, 6-hour, 12-hour, and 24-hour graphs.
Sensor Demo simulates a sensor glucose graph, showing an example of the
general trend of glucose as it rises and falls over time. The top of the graph
indicates the time of day, while the side bar shows the sensor glucose (SG)
reading markers.
4. To exit Sensor Demo, press .
To see and hear examples of sensor-related alerts:
1. Go to the Sensor Demo screen.
■ general settings
General settings 147
MP6025958-022 / A
RELEASED

Menu > Utilities > Sensor Demo
2. Select Alert Demo.
3. To see and hear sensor-related alerts, select any of the listed alerts.
4. To exit an alert example, press , then select OK to clear the alert. To exit
Sensor Demo, press .
Time and date
Make sure the time and date are always set correctly on your pump. This is
necessary to ensure the correct basal insulin delivery and to keep an accurate
record of pump functions. You may need to change the time or the date if you
travel to a different time zone or practice daylight saving time. After the time and
date are changed, the pump adjusts all settings automatically.
To change the time and the date:
1. Go to the Time & Date screen.
Menu > Utilities > Time & Date
2. Select and change the Time, Time Format, or Date as necessary. If you are
using a 12-hour clock, be sure to specify AM or PM.
3. Select Save.
148 Chapter 9
MP6025958-022 / A
RELEASED

setting up continuous glucose monitoring
MP6025958-022 / A
RELEASED
MP6025958-022 / A
RELEASED

Setting up Continuous Glucose
Monitoring
This chapter explains how to wirelessly connect your pump and transmitter, and
how to enter your sensor settings and set up continuous glucose monitoring
(CGM) on your pump. You will need the following:
• MiniMed 640G insulin pump
• Sensor glucose settings (provided by your healthcare professional)
• Enlite sensor
• Guardian 2 Link transmitter kit
WARNING: Do not make therapy treatment decisions based on
sensor glucose values because sensor glucose and blood glucose
values may differ. If your sensor glucose reading is low or high, or if
you feel symptoms of low or high glucose, confirm your blood
glucose with your BG meter prior to making therapy decisions to
avoid severe low or high glucose conditions.
Understanding Continuous Glucose Monitoring (CGM)
The Sensor feature on the pump lets you integrate and use continuous glucose
monitoring (CGM). CGM is a sensor glucose monitoring tool that uses a glucose
sensor that is placed below your skin to continuously measure the amount of
glucose in your interstitial fluid. CGM helps you better manage your diabetes by:
• Recording your glucose values throughout the day and night
Setting up Continuous Glucose Monitoring 151
■ setting up continuous glucose monitoring
MP6025958-022 / A
RELEASED

• Showing the effects that your diet, exercise, and medication can have on your
glucose levels
• Giving you additional tools to help you prevent high and low glucose levels
To learn more about the accuracy of sensor glucose (SG) readings versus blood
glucose (BG) meter readings, see Enlite™ Sensor Performance for the MiniMed™ 640G
Insulin Pump.
SmartGuard
SmartGuard is a feature that can automatically stop and resume insulin delivery
based on your sensor glucose values and low limit. Your low limit should be set
based on recommendations from your healthcare professional. When a
SmartGuard suspend by sensor event occurs, basal insulin delivery automatically
resumes if your sensor glucose values are rising and have met the specified criteria,
or if the maximum suspend time of two hours is reached.
The following table shows the different SmartGuard settings you can use and
where to find out more information.
To learn more about: Go to this section:
How to use SmartGuard to automatically suspend
your insulin delivery before you reach your low
limit.
Suspend before low, on page 158.
How to use SmartGuard to automatically suspend
your insulin delivery when you reach your low limit.
Suspend on low, on page 161.
How SmartGuard automatically resumes your basal
insulin delivery after a suspend by sensor event.
Automatically resuming basal
delivery after a SmartGuard
suspend by sensor event, on
page 163.
To set up SmartGuard suspend by sensor settings, see Setting up the Low Settings,
on page 171.
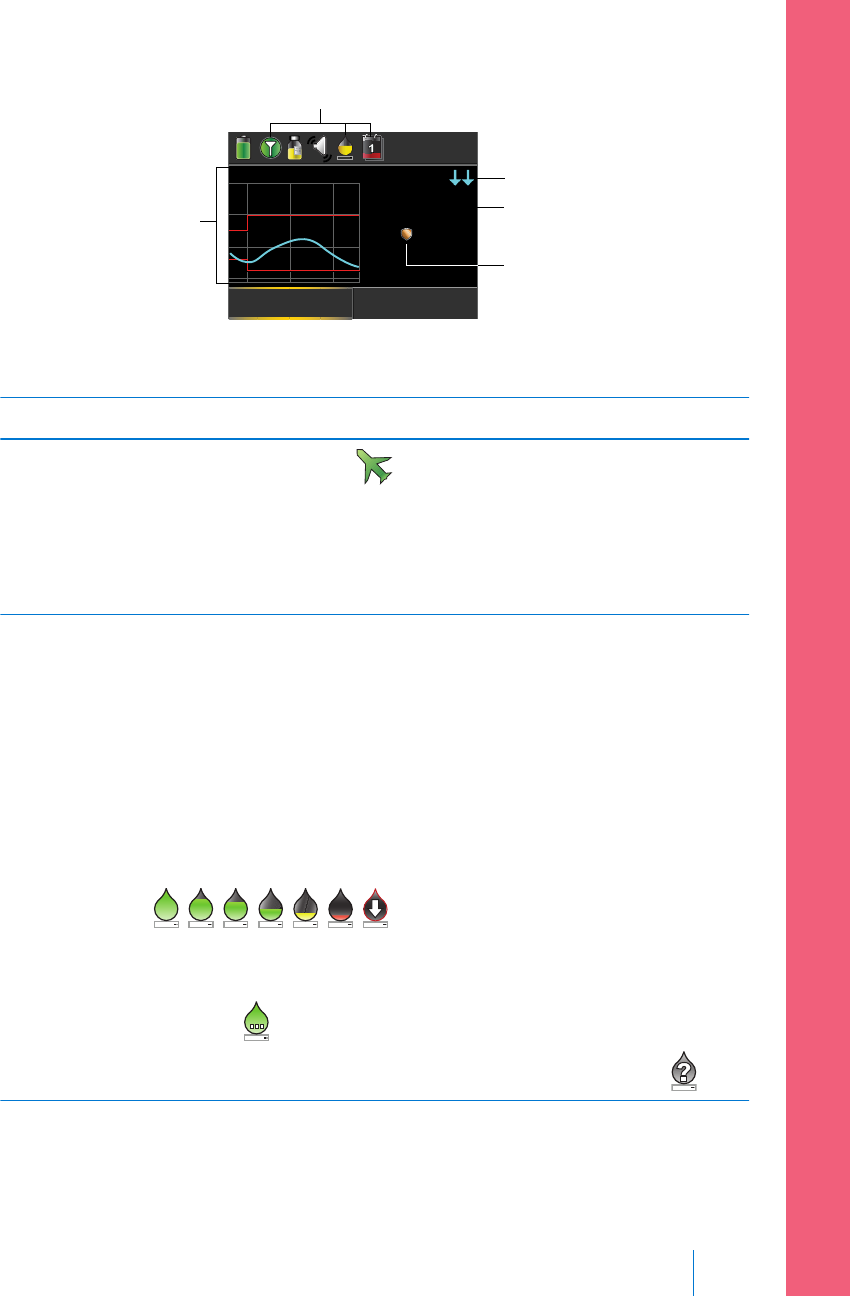
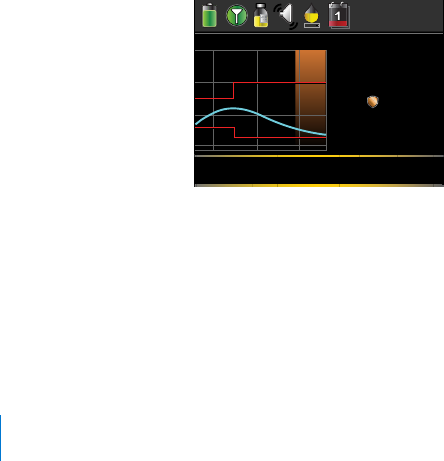
Home screen with CGM
When you turn on the Sensor feature, the Home screen on your pump changes to
display a real-time graph that shows your sensor glucose (SG) information. For
more information, see Turning on the Sensor feature, on page 167.
152 Chapter 10
MP6025958-022 / A
RELEASED
U
16:00
Bolus Basal
99
mg/dL
Act Ins.
10 11 12
350
250
150
50
0.10
SG reading
SmartGuard
suspend by
sensor icon
trend arrows
sensor graph
sensor status icons
The following items appear on your Home screen with CGM:
Item Description
Airplane
Mode icon
The Airplane Mode icon appears in place of the Connection icon
if Airplane Mode is turned on. When Airplane Mode is turned on, the
pump cannot receive wireless communication from other devices. For
more information about using Airplane Mode, see Airplane Mode, on
page 137.
Calibration
icon
The approximate time left until your next sensor calibration is due. The
calibration icon appears only when the Sensor feature is turned on.
The color and the fill level of the icon indicate the status. When your
sensor is fully calibrated, the icon is solid green. As the time for your
next sensor calibration approaches, the icon becomes emptier, and
the color of the icon changes as shown in the following example. For
more information about calibrating your sensor, see Calibrating your
sensor, on page 183.
When your sensor is initializing, the Calibration icon appears with
three dots . If the time to your next sensor calibration is
unavailable, the Calibration icon appears with a question mark .
■ setting up continuous glucose monitoring
Setting up Continuous Glucose Monitoring 153
MP6025958-022 / A
RELEASED
Item Description
Connection
icon
The connection icon appears green when the Sensor feature is on
and your transmitter is successfully communicating with your pump.
The connection icon appears gray when the Sensor feature is
turned on, but the transmitter is not connected or communication
with your pump has been lost. For more information about the Sensor
feature, see Understanding Continuous Glucose Monitoring (CGM), on
page 151.
Sensor graph Displays your SG readings over a period of 3 hours. The red lines
represent your high and low SG limits. The blue line represents your
SG trends during the specified period. For more information, see The
sensor graph, on page 191.
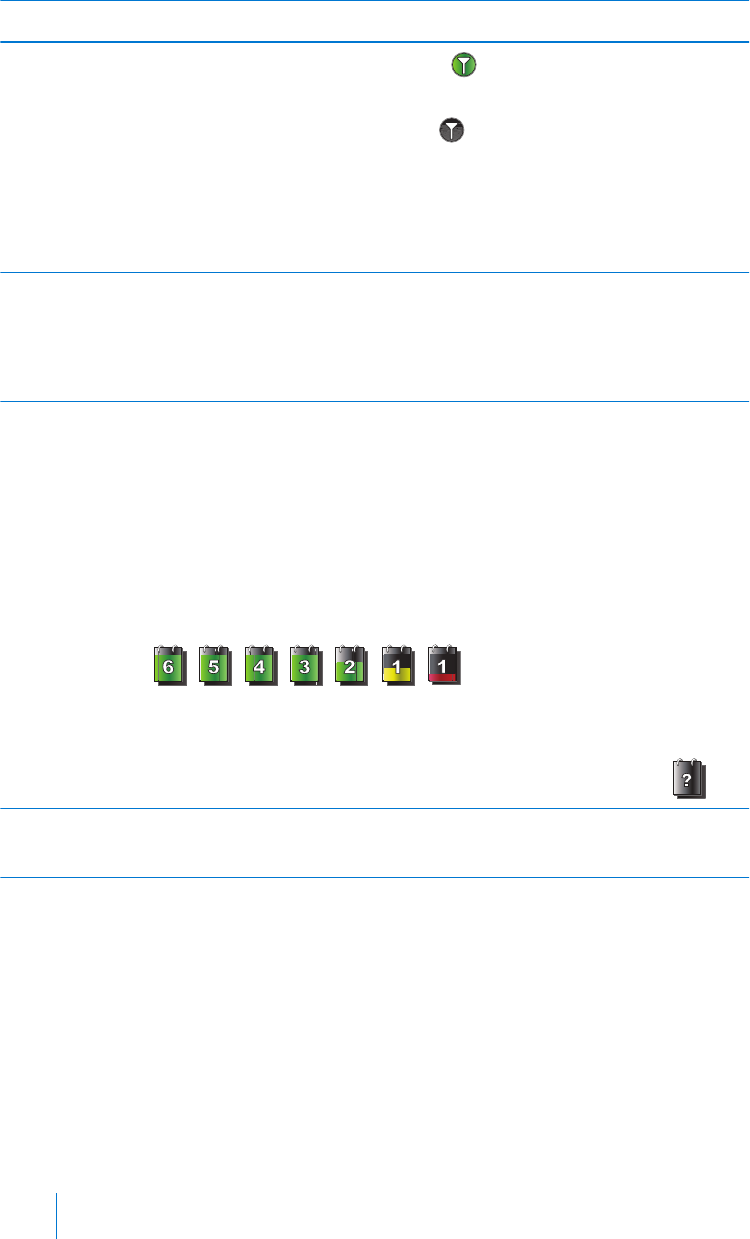
Sensor Life
icon
The number of days remaining in the life of your sensor. The sensor
life icon appears only when the Sensor feature is turned on. The color
and the fill level of the icon indicate the status. When you insert a
new sensor, the icon is solid green. As your sensor life is used, the
icon becomes emptier. The icon turns yellow when less than 24 hours
remains in the life of your sensor. It turns red when less than 12 hours
remains in the life of your sensor.
If the number of days remaining in the life of your sensor is
unavailable, the Sensor Life icon appears with a question mark .
SG reading Shows your current SG reading which is sent wirelessly to your pump
by the transmitter.
154 Chapter 10
MP6025958-022 / A
RELEASED

Item Description
SmartGuard
suspend by
sensor icon
The SmartGuard suspend by sensor icon appears only when either the
Suspend before low or Suspend on low feature is set to on. For details
on the SmartGuard feature, see SmartGuard, on page 152.
The SmartGuard suspend by sensor icon indicates the current status of
the suspend features, as follows:
•The icon is solid gold when either the Suspend on low or
Suspend before low is turned on and ready.
• The gold icon flashes if your insulin delivery is currently suspended
due to a Suspend on low or Suspend before low event.
•The icon appears gray with a line through it when neither
suspend feature is available. The suspend features might be
unavailable due to a recent suspend or because there are no SG
values available. It might also be unavailable because the pump is
not currently delivering insulin.
Trend arrows Shows the rate at which the most recent sensor glucose level is rising
or falling. For more information about trend arrows, see Identifying
rapid changes in sensor glucose, on page 192.
Note: Several items appear on both your Home screen without CGM and
your Home screen with CGM. For more information, see Home screen, on
page 26, and Status bar, on page 28.
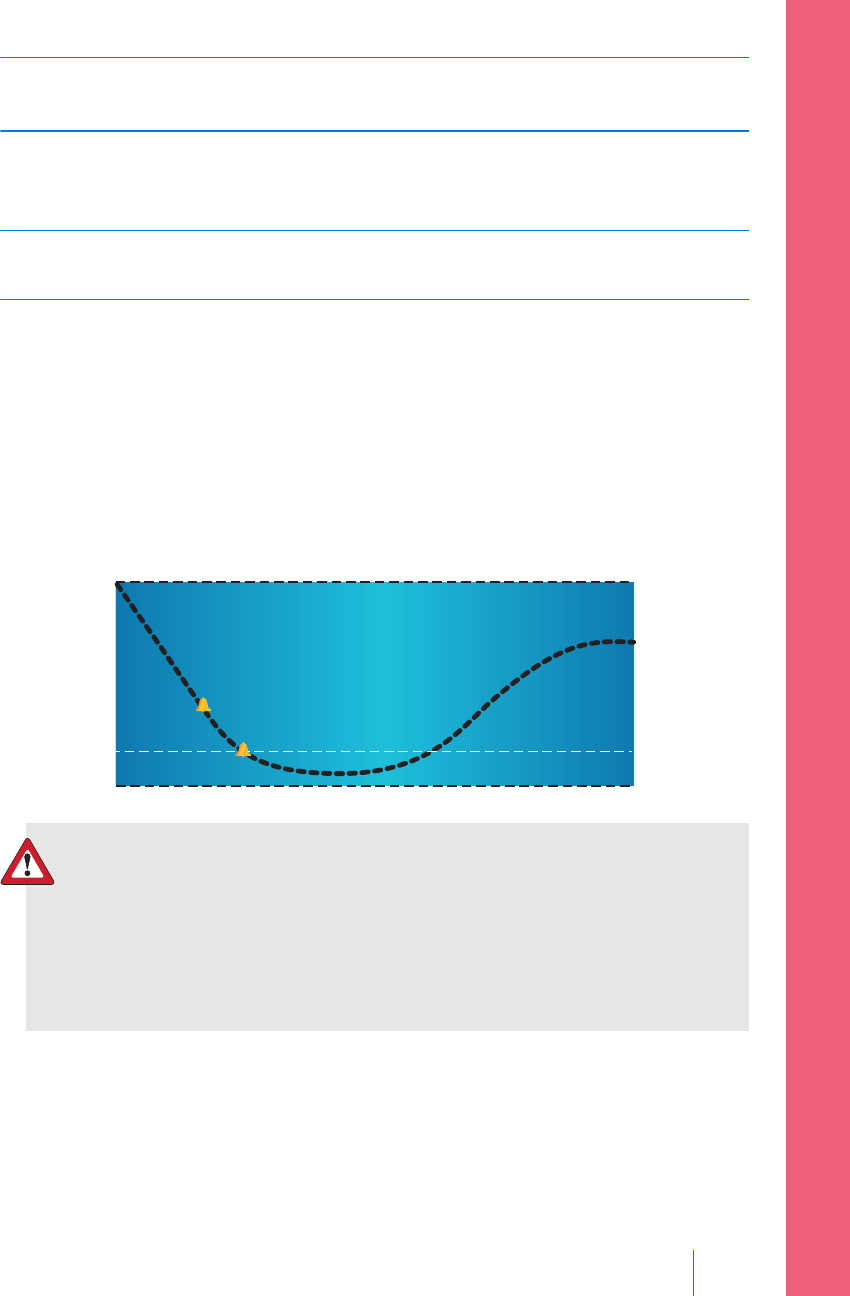
Understanding glucose settings
There are several types of glucose alerts you can set to notify you if your glucose
values are changing at a particular rate, or if they are approaching or have reached
a specified low or high limit. You can also set your pump to automatically suspend
insulin delivery before or when you reach your low limit.
The following graph shows the different high and low glucose alerts you can use.
■ setting up continuous glucose monitoring
Setting up Continuous Glucose Monitoring 155
MP6025958-022 / A
RELEASED
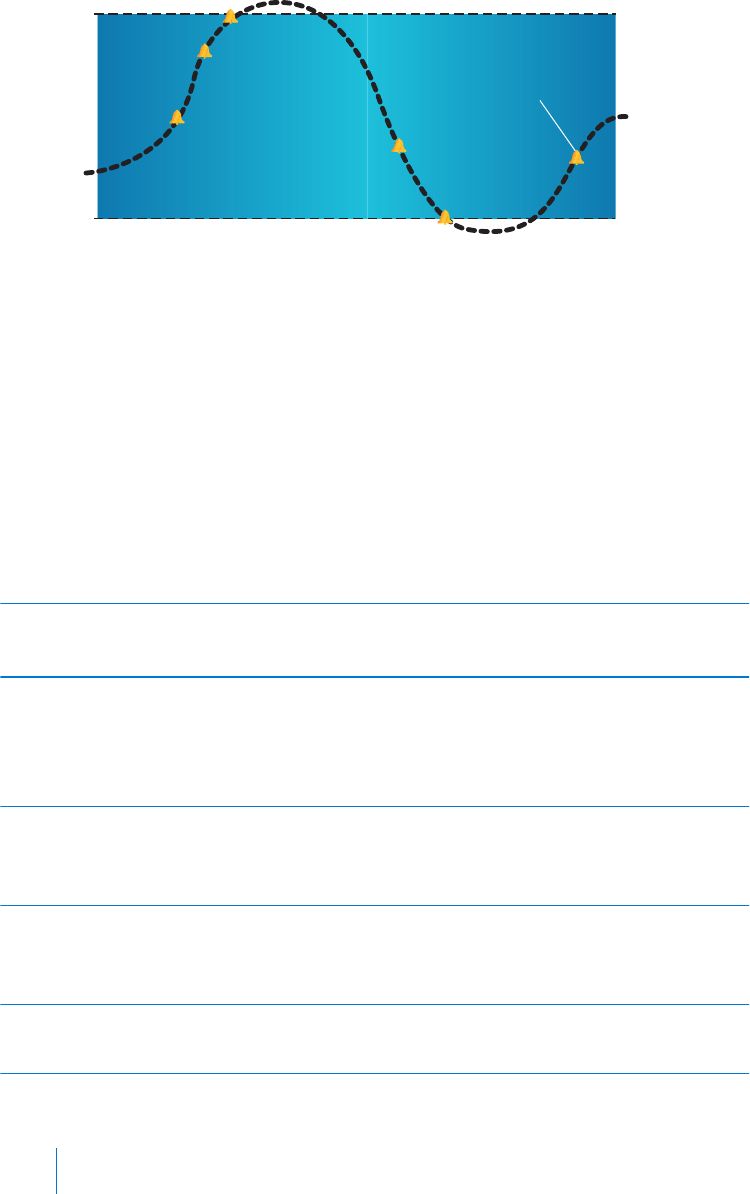
High
Limit
Low
Limit
Alert before high
Rise Alert
Alert before low
Alert on low
Sensor
Glucose
Alert on high
Suspend before low
Suspend on low
Resume basal alert
The high alerts are described in the High settings section on page 156. For details
on low alerts and suspend options, see Low settings, on page 157.
High settings
These settings alert you if your sensor glucose:
• is rising rapidly (Rise Alert)
• is approaching your high limit (Alert before high)
• has reached your high limit (Alert on high)
The following table describes the High Settings.
High glucose
setting
Description
High limit Your high limit is the value on which your other high settings are
based. Your high limit can be set from 100 mg/dL to 400 mg/dL. You
can set up to eight high limits for different time segments throughout
the day or night.
Alert before
high
When Alert before high is on, you will receive an alert any time the
sensor glucose is predicted to reach the high limit. This makes you
aware of potential highs before they occur.
Time before
high
Time before high is only available when using Alert before high. Time
before high determines when you will receive an Alert before high.
You can set a time between 5 and 30 minutes.
Alert on high When Alert on high is on, your system alerts you when your SG
reading reaches or exceeds your High Limit.
156 Chapter 10
MP6025958-022 / A
RELEASED
High glucose
setting
Description
Rise Alert The Rise Alert notifies you when your glucose is rising rapidly. This
alert helps you understand how much your glucose levels are affected
by meals or, for example, when forgetting to give a bolus.
Rise Limit The Rise Limit determines when you will receive a Rise Alert. Rise Limit
is only available when using Rise Alert.
To set up your high settings, see Setting up the High Settings, on page 167.
Low settings
The low settings allow you to be alerted and/or have insulin delivery suspended
when you are either approaching or have reached your low limit. This is done by
using alerts and the SmartGuard feature described on page 152.
The following graph shows the different low settings you can use:
Low Limit
Alert before low
Alert on low
Suspend before low
Suspend on low
WARNING: SmartGuard suspend by sensor features are not
intended to be a treatment for low blood glucose. Having insulin
suspended when glucose is low may not bring your blood glucose
back to your target range for several hours. Always confirm your
blood glucose readings with your BG meter and treat according to
the recommendations of your healthcare professional.
The following sections describe the SmartGuard feature and the low settings. For
details on setting up SmartGuard and your low settings, see Setting up the Low
Settings, on page 171.
■ setting up continuous glucose monitoring
Setting up Continuous Glucose Monitoring 157
MP6025958-022 / A
RELEASED

Low limit
The low limit is the value on which the other low settings are based. The low limit
can be set from 50 mg/dL to 90 mg/dL. You can set up to eight low limits for
different periods of the day or night.
Suspend before low
The Suspend before low feature stops insulin delivery when your sensor glucose
values are approaching your low limit. This feature is intended to suspend insulin
delivery to minimize the amount of time spent low.
The default setting for the Suspend before low feature is off. Consult your
healthcare professional for the Suspend before low setting that is best for you.
If you turn on Suspend before low, then Alert on low is automatically turned on.
You also have the option to turn on Alert before low.
•If Alert before low is on, your pump alerts you when insulin delivery is
suspended. For details, see Alert before low, on page 160.
• If Alert before low is off, then Suspend before low appears on the screen, but
the pump will not beep or vibrate when insulin delivery is suspended.
WARNING: The Suspend before low feature uses the sensor glucose
value, not your blood glucose value to automatically suspend
insulin delivery. Your pump automatically suspends insulin delivery
when your sensor glucose is approaching the low limit. However
your blood glucose reading may be higher than the sensor glucose
value. This could result in hyperglycemia. Likewise, your pump may
not suspend insulin delivery because your sensor glucose is not
approaching the low limit. However, your blood glucose may be
lower than the sensor glucose value. This could result in
hypoglycemia. Always check your blood glucose and treat as
appropriate.
Suspend before low conditions
When a Suspend before low event occurs, all insulin delivery is suspended. For a
Suspend before low event to occur, both of these must happen:
• Your SG value is at or within 70 mg/dL above your low limit.
158 Chapter 10
MP6025958-022 / A
RELEASED

• Your SG is predicted to reach or fall below a level that is 20 mg/dL above
your low limit within approximately 30 minutes.
Responding to a Suspend before low event
When you clear the Suspend before low alert, the SmartGuard suspend by sensor
icon flashes and "Suspended before low" appears on your Home screen. If your
SG reaches your low limit, an Alert on low occurs.
When a Suspend before low event occurs, insulin delivery will remain suspended
for at least 30 minutes, unless you manually resume your basal delivery. For details,
see Manually resuming basal delivery during a suspend by sensor event, on page 174.
After the minimum 30-minute suspend time, basal insulin delivery will
automatically resume if the following conditions are met:
• Your SG is at least 20 mg/dL above your low limit.
• Your SG is estimated to be more than 40 mg/dL above your low limit within
30 minutes.
Your basal insulin delivery will be suspended for a maximum of two hours, unless
these criteria are met during the suspend or unless you manually resume your
basal insulin. For details, see Manually resuming basal delivery during a suspend by
sensor event, on page 174.
If you do not respond to the Suspend before low alert, your pump resumes insulin
delivery after two hours and displays a Basal delivery resumed alert.
When Suspend before low is unavailable
After a Suspend before low event occurs, there is a period of time when the
Suspend before low functionality is unavailable. This time will vary depending on
whether or not you respond to the Suspend before low event. You can manually
suspend your insulin delivery at any time. For details, see Stopping and resuming
your insulin delivery, on page 54.
Note: The maximum amount of time the Suspend before low feature
will be unavailable is four hours.
When the SmartGuard suspend by sensor features are unavailable, the SmartGuard
suspend by sensor icon on the Home screen appears gray .
■ setting up continuous glucose monitoring
Setting up Continuous Glucose Monitoring 159
MP6025958-022 / A
RELEASED

When a Suspend before low event occurs and you respond within two hours
and:
• Stay suspended for the two hour maximum suspend time, the SmartGuard
suspend by sensor features will be unavailable for 30 minutes after your basal
insulin delivery resumes.
• Your insulin automatically resumes due to your rising SG levels, the
SmartGuard suspend by sensor features will be unavailable for 30 minutes
after your basal insulin delivery resumes.
• Manually resume your basal insulin delivery, the SmartGuard suspend by
sensor features will be unavailable for 30 minutes after your basal insulin
delivery resumes.
If your pump has been suspended for two hours and you have not responded,
basal insulin delivery automatically resumes.
If you respond within 30 minutes of basal insulin delivery being resumed, the
SmartGuard suspend by sensor features will be unavailable for a total of 30
minutes. For example:
• If you respond 10 minutes after your basal insulin delivery resumes, the
SmartGuard suspend by sensor features will be unavailable for an additional
20 minutes.
• If you respond 20 minutes after your basal insulin delivery resumes, the
SmartGuard suspend by sensor features will be unavailable for an additional
10 minutes.
If you respond 30 minutes to four hours after your basal insulin delivery resumes,
the SmartGuard suspend by sensor features will be available immediately.
If you do not respond, the SmartGuard suspend by sensor features will be
unavailable for four hours after basal delivery resumes.
Alert before low
When Alert before low is on, you will receive an alert when you are approaching
your low limit. This makes you aware of potential lows before they occur.
The Alert before low feature can be used with the Suspend before low and
Suspend on low features. The Alert before low feature works as follows:
160 Chapter 10
MP6025958-022 / A
RELEASED

• if Alert before low is on, and both suspend by sensor features are off, you
receive the Alert before low 30 minutes before you reach your low limit.
• If Suspend on low is on, and Alert before low is on, you receive an Alert
before low 30 minutes before you reach your low limit.
• If Suspend before low is on, and Alert before low is on, you receive a Suspend
before low alert when insulin delivery is suspended. For details, see Suspend
before low, on page 158.
You can also choose to have the Alert before low off.
Suspend on low
The Suspend on low feature stops insulin delivery when your sensor glucose value
reaches or falls below the low limit that you set. When a Suspend on low event
occurs, all insulin delivery is suspended. This feature is used for situations when
you cannot respond to a low glucose condition. It is intended to suspend insulin
delivery and minimize the amount of time spent low.
The default setting for the Suspend on low feature is off. Consult your healthcare
professional for the Suspend on low setting that is best for you.
If you turn on Suspend on low, then Alert on low is turned on automatically. For
more information, see Alert on low, on page 163.
WARNING: The Suspend on low feature uses the sensor glucose
value, not your blood glucose value, to automatically suspend your
pump. Your pump may automatically suspend when your sensor
glucose is at or below the low limit, while your blood glucose is
above that limit. This could result in hyperglycemia. Likewise, your
pump may not suspend even though your blood glucose is at or
below the low limit. This could result in hypoglycemia. Always
check your blood glucose and treat as appropriate.
Responding to a Suspend on low event
When you clear the Suspend on low alarm, the SmartGuard suspend by sensor
icon flashes and "Suspended on low" appears on your Home screen.
When a Suspend on low event occurs, the pump alerts you.
■ setting up continuous glucose monitoring
Setting up Continuous Glucose Monitoring 161
MP6025958-022 / A
RELEASED

When a Suspend on low event occurs, insulin delivery remains suspended for at
least 30 minutes, unless you manually resume your basal delivery. For details, see
Manually resuming basal delivery during a suspend by sensor event, on page 174. After
the minimum 30-minute suspend time, basal insulin delivery will automatically
resume if the following conditions are met:
• Your SG is at least 20 mg/dL above your low limit.
• Your SG is estimated to be more than 40 mg/dL above your low limit within
30 minutes.
Your basal insulin delivery will be suspended for a maximum of two hours, unless
these criteria are met during the suspend or unless you manually resume your
basal insulin. For details, see Manually resuming basal delivery during a suspend by
sensor event, on page 174.
If you do not respond to the Suspend on low alarm, your pump resumes insulin
delivery after two hours and continues to display an emergency message.
When Suspend on low is unavailable
After a Suspend on low event occurs, there is a period of time when the suspend
functionality is unavailable. This time will vary depending on whether or not you
respond to the Suspend on low event. You can manually suspend insulin delivery
at any time. For details, see Stopping and resuming your insulin delivery, on page 54.
Note: The maximum amount of time the Suspend on low feature will be
unavailable is four hours.
When the SmartGuard suspend by sensor features are unavailable, the SmartGuard
suspend by sensor icon on the Home screen appears gray .
When a Suspend on low event occurs and you respond within two hours and
• Stay suspended for the two hour maximum suspend time, the SmartGuard
suspend by sensor features will be unavailable for 30 minutes after your basal
insulin delivery resumes.
• Your insulin automatically resumes due to your rising SG levels, the
SmartGuard suspend by sensor features will be unavailable for 30 minutes
after your basal insulin delivery resumes.
162 Chapter 10
MP6025958-022 / A
RELEASED

• Manually resume your basal insulin delivery, the SmartGuard suspend by
sensor features will be unavailable for 30 minutes after your basal insulin
delivery resumes.
If your pump has been suspended for two hours and you have not responded,
basal insulin delivery automatically resumes.
If you respond within 30 minutes of basal insulin delivery being resumed, the
SmartGuard suspend by sensor features will be unavailable for a total of 30
minutes. For example:
• If you respond 10 minutes after your basal insulin delivery resumes, the
SmartGuard suspend by sensor features will be unavailable for an additional
20 minutes.
• If you respond 20 minutes after your basal insulin delivery resumes, the
SmartGuard suspend by sensor features will be unavailable for an additional
10 minutes.
If you respond 30 minutes to four hours after your basal insulin delivery resumes,
the SmartGuard suspend by sensor features will be available immediately.
If you do not respond, the SmartGuard suspend by sensor features will be
unavailable for four hours after basal delivery resumes.
Alert on low
The Alert on low feature is automatically turned on when either the Suspend
before low feature or the Suspend on low feature is turned on.
When Alert on low is set to on, you receive an alert when your SG reading reaches
or falls below your low limit. If your pump is suspended and you have not
responded, an emergency message appears.
Automatically resuming basal delivery after a SmartGuard suspend by sensor
event
In addition to suspending insulin delivery, the pump can also automatically resume
delivery of basal insulin. If insulin has been suspended by either the Suspend
before low or the Suspend on low feature, insulin delivery will automatically be
resumed if either of the following conditions are met:
■ setting up continuous glucose monitoring
Setting up Continuous Glucose Monitoring 163
MP6025958-022 / A
RELEASED

• if insulin has been suspended for a minimum of 30 minutes and SG values are
at least 20 mg/dL above the low limit and expected to be more than 40
mg/dL above the low limit in 30 minutes.
• after a maximum of two hours.
Resume basal alert
When the Resume basal alert is on, you will be alerted when insulin is
automatically resumed. If the Resume basal alert is off, basal insulin resumes, but
you do not receive an alert. However, you will get a message indicating that the
basal has automatically resumed.
If basal resumes after the maximum suspend time of two hours, you will be alerted
even if the Resume basal alert is set to off. It is important that you check your BG
and ensure your glucose is at a safe level.
For details on setting up the Resume basal alert, see Setting up the Low Settings, on
page 171.
SmartGuard suspend by sensor examples
The following examples describe several scenarios that illustrate different types of
suspend events, user actions in response to these events, and what happens to
insulin delivery in each case.
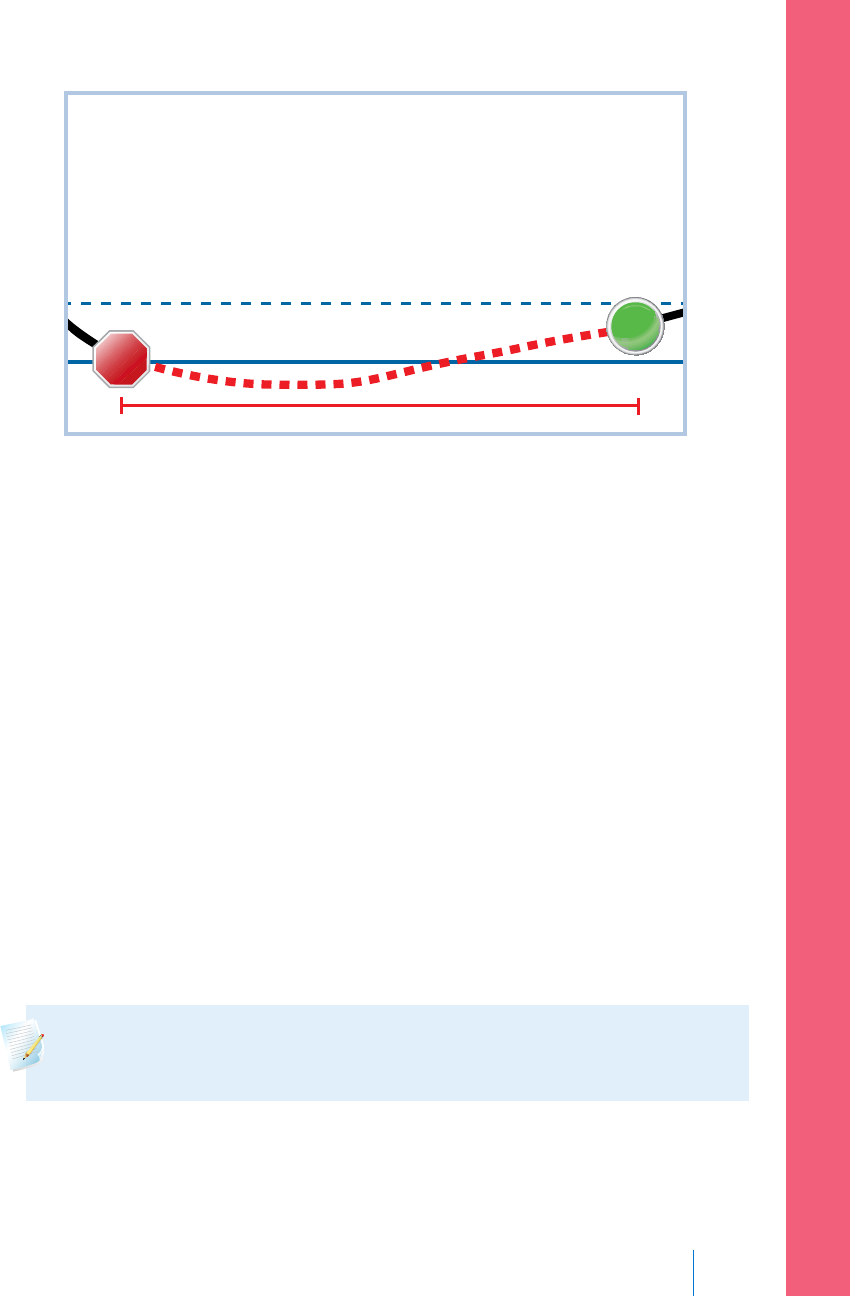
Example 1: Suspend before low, non-responsive, auto resume basal
(trending upwards)
Sarah has been experiencing low sensor glucose values. Her healthcare
professional has recommended she use the Suspend before low feature. While at a
concert, Sarah’s sensor glucose values are approaching her low limit. Her pump
recognizes that her glucose will be at or within 20 mg/dL above her low limit
within 30 minutes and suspends her insulin. Sarah has her Alert before low set to
off so that she is not alerted when this occurs.
164 Chapter 10
MP6025958-022 / A
RELEASED

Low Limit
20 above Low Limit
70 above Low Limit
30 min
STOP
An hour later, her sensor glucose values are 21 mg/dL above her low limit. Her
pump estimates her sensor glucose values will be 45 mg/dL above her low limit
within 30 minutes. Her pump automatically resumes her basal insulin delivery.
When the concert ends, Sarah sees that her pump automatically suspended and
resumed her insulin delivery and a potential low was avoided. She clears the
messages by selecting OK.
Example 2: Suspend before low, responsive, manually resume basal
Kate decides to meet her friends at the mall. While shopping, she gets a Suspend
before low alert. This indicates that her sensor glucose values are approaching the
low limit she has set. She clears the alert and sees that her insulin has been
suspended. Kate checks her BG to confirm. Based on her healthcare professional's
recommendation, Kate stops for a snack to help avoid hypoglycemia. Knowing the
carbohydrate will make her glucose rise, Kate manually resumes her basal insulin
delivery by selecting Suspended before low from the Home screen and choosing
Resume basal.
Kate knows that after she has manually resumed her basal insulin delivery, the
suspend functions will be unavailable for 30 minutes. However, she will be alerted
if she reaches her low limit.
■ setting up continuous glucose monitoring
Setting up Continuous Glucose Monitoring 165
MP6025958-022 / A
RELEASED

Example 3: Suspend before low, responsive, stays suspended
Doug has just finished his evening jog on the beach. As he is walking home, he
receives a Suspend before low alert. He sees that his pump has automatically
suspended his insulin delivery. Doug clears the alert by selecting OK on his pump.
He knows that his pump is now suspended and insulin delivery has been stopped.
He checks his BG to confirm and keeps his insulin suspended.
A while later, Doug receives another alert. He looks at his pump and sees that he
has received an Alert on low. His SG has reached his low limit. He clears the alert
and checks his BG to confirm. He eats carbohydrates to treat the low glucose as
instructed by his healthcare professional.
Doug keeps his insulin suspended as directed by his healthcare professional. He
knows that once his SG is above his low limit and trending upward, or reaches the
maximum suspend time of two hours, basal insulin delivery will automatically
resume.
Example 4: Suspend on low, response after basal delivery resumes
Michael is on his college hockey team. He played in a hockey tournament all day
and is so exhausted that he falls asleep watching television. His sensor glucose
value begins to drop. When his sensor glucose value reaches his low limit, the
pump begins to alarm. It automatically suspends all insulin delivery. Michael does
not respond to the alarm. After ten minutes, his pump begins to siren and displays
the emergency message.
About three hours later, Michael’s roommate comes home. He hears the pump
sirening and wakes up Michael. Michael clears any messages by selecting OK. He
sees that his basal insulin was suspended for the two hour maximum and had
automatically been resumed. He checks his blood sugar and sees that it is within
the target range.
166 Chapter 10
MP6025958-022 / A
RELEASED
Low Limit
20 above Low Limit
2 hours
STOP
START
Since Michael has responded to his alert, the pump will suspend insulin delivery
and alarm again if his sensor value reaches or falls below his low limit again.
Turning on the Sensor feature
You must turn on the Sensor feature before you can set up your glucose alerts
and start monitoring your sensor glucose.
To turn on the Sensor feature:
1. Go to the Sensor Settings screen.
Menu > Sensor Settings
2. Select Sensor to turn on the sensor feature. The sensor settings become
accessible.
Setting up the High Settings
The steps below guide you through setting up your high settings. For details on
your high settings, see High settings, on page 156.
Note: When you enter your settings, you first define the time segment,
and then select the high settings you want on during that time segment.
To set up the High Settings:
1. Go to the High Settings screen.
■ setting up continuous glucose monitoring
Setting up Continuous Glucose Monitoring 167
MP6025958-022 / A
RELEASED
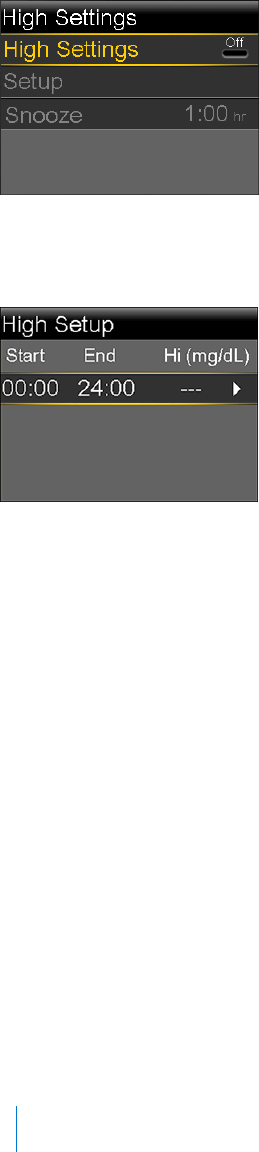
Menu > Sensor Settings > High Settings
The High Settings screen appears.
2. Select High Settings to turn on the feature.
The High Setup screen appears.
3. Select the time segment. The End time starts flashing.
The Start time of the first time segment is always 00:00. You can set up to
eight time segments, each with a different high limit. If you set more than
one time segment, the time segments must cover a 24-hour period.
4. Set the End time.
5. Set your Hi limit. You can enter a value from 100 to 400 mg/dL, in increments
of 5 mg/dL.
6. Select the arrow to the right of the End time to select the high settings for
this time segment.
A screen appears showing the high alerts for the selected time segment.
168 Chapter 10
MP6025958-022 / A
RELEASED
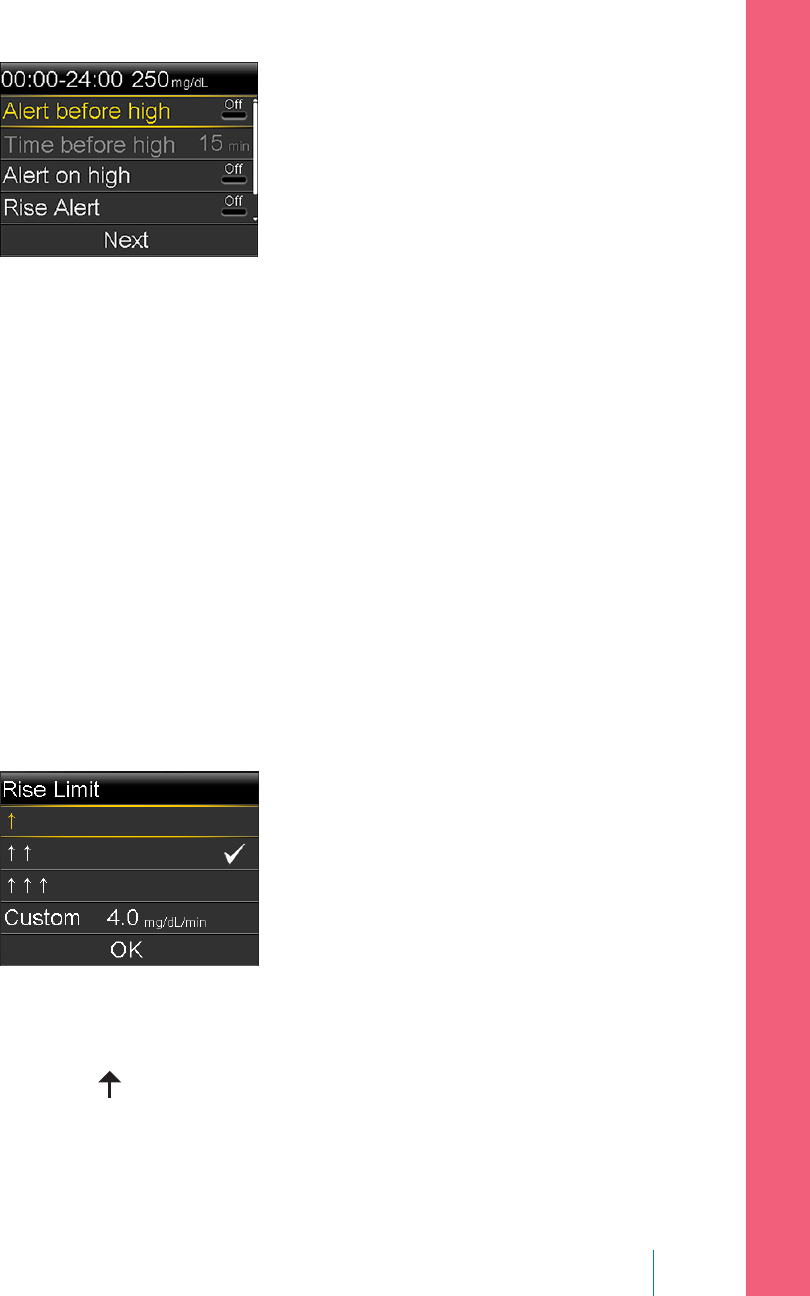
7. Set the following alerts as desired:
a. Select Alert before high if you want to receive an alert before you reach
your high limit.
b. If you turned on Alert before high, enter the Time before high to set
how soon you want to be alerted before reaching your high limit. You
can enter a value from 5 to 30 minutes.
c. Select Alert on high if you want an alert when you reach your high limit.
d. Select Rise Alert if you want to receive an alert when your SG is rising
quickly.
Skip to step 11 if you do not select Rise Alert.
8. If you turned on the Rise Alert, you need to set the Rise Limit. Scroll down
and select Rise Limit to access this option.
The Rise Limit screen appears.
9. Select the arrow option (one, two, or three arrows) that corresponds to the
rise rate you want to use. To use a custom rate, skip to the next step.
•Select for an alert when your SG has been rising at a rate of 1 mg/dL
per minute or more.
■ setting up continuous glucose monitoring
Setting up Continuous Glucose Monitoring 169
MP6025958-022 / A
RELEASED

•Select for an alert when your SG has been rising at a rate of
2 mg/dL per minute or more.
•Select for an alert when your SG has been rising at a rate of
3 mg/dL per minute or more.
Select OK, and skip to step 11.
Note: These arrows appear on your Home screen to let you know
the rate at which your SG has been rising.
10. To enter a custom rise limit, do the following:
a. Select Custom. The Custom Limit screen appears.
b. Select Rise Limit and set a rise rate from 1 to 5 mg/dL/min. You set the
rate in 0.1 mg/dL/min increments.
c. Select OK to return to the Rise Limit screen and then select OK again to
confirm your settings.
11. When you have set all the high settings for the selected time segment, select
Next to continue.
12. If you entered an End time of anything other than 00:00, another time
segment appears. When you are finished entering high settings, select Done.
13. Review your settings, and select Save.
To change your High Settings:
1. Go to the High Settings screen.
Menu > Sensor Settings > High Settings
The High Settings screen appears.
2. Select Setup.
3. Select Edit.
4. Select and, if needed, adjust the time segment you would like to change.
5. Select any alert setting to turn it on or off or to adjust the setting.
6. Select Next.
7. Select Done.
170 Chapter 10
MP6025958-022 / A
RELEASED

8. Review your settings, and select Save.
High Snooze
High Snooze is available once you have set your High Settings. High Snooze allows
you to set the amount of time that you want to wait before you are reminded that
an alert condition still exists. After a high alert is received and cleared, you will be
alerted again only if the high alert condition still exists after the snooze time you
have set.
Setting the High Snooze:
1. Go to the High Settings screen.
Menu > Sensor Settings > High Settings
The High Settings screen appears.
2. Select Snooze and enter a value from 5 minutes to 3 hours, in 5 minute
increments.
Setting up the Low Settings
The steps below guide you through setting up the Low Settings. For details on the
Low Settings, see Low settings, on page 157.
Note: When you enter your settings, you first define the time segment,
and then select the low settings you want on during that time segment.
To set up the Low Settings:
1. Go to the Low Settings screen.
Menu > Sensor Settings > Low Settings
The Low Settings screen appears.
■ setting up continuous glucose monitoring
Setting up Continuous Glucose Monitoring 171
MP6025958-022 / A
RELEASED
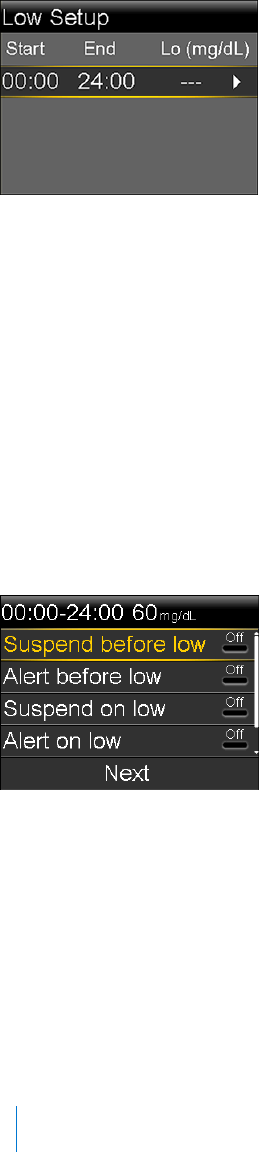
2. Select Low Settings to turn on the feature.
The Low Setup screen appears.
3. Select the time segment. The End time starts flashing.
The Start time of the first time segment is always 00:00. You can set up to
eight time segments, each with a different low limit. If you set more than one
time segment, the time segments must cover a 24-hour period.
4. Set the End time.
5. Set your low limit. You can enter a value from 50 to 90 mg/dL, in increments
of 5 mg/dL.
6. Select the arrow to the right of the End time to select the low settings for
this time segment.
A screen appears showing the available settings for the selected time period.
7. Set the following as desired:
a. Select Suspend before low to have insulin suspended before you reach
your low limit. The Alert on low alert is automatically turned on and
cannot be turned off.
b. Select Alert before low to receive an alert before you reach your low
limit. If Suspend before low is also on, you are alerted when insulin is
suspended.
172 Chapter 10
MP6025958-022 / A
RELEASED

c. Select Suspend on low to have insulin suspended when you reach or fall
below your low limit. The Alert on low alert is automatically turned on
and cannot be turned off.
d. Select Alert on low if you want to receive an alert when your SG reaches
or falls below your low limit. If either suspend feature is on, this will
already be on.
e. Select Resume basal alert if you want an alert when basal insulin
delivery is resumed based on SG values during a suspend by sensor
event. If you do not turn on the alert, the Basal delivery resumed
message will still appear on the pump, but you will not be alerted.
Note: When setting your low alerts:
• If you turn on the Suspend before low or the
Suspend on low feature, then the Alert on low
feature is turned on automatically.
• Only one suspend by sensor feature can be used
during each time segment. You cannot use both
the Suspend before low and the Suspend on low
features in the same time segment.
8. If you entered an End time of anything other than 00:00, another time
segment appears.
When you are done entering your low settings, select Done.
9. Review your settings, and select Save.
To make changes to your Low Settings:
1. Go to the Low Settings screen.
Menu > Sensor Settings > Low Settings
The Low Settings screen appears.
2. Select Setup.
3. Select Edit.
4. Select, and if needed, adjust the time segment you would like to change.
■ setting up continuous glucose monitoring
Setting up Continuous Glucose Monitoring 173
MP6025958-022 / A
RELEASED
5. Select any alert setting to turn it on or off or to adjust the setting.
6. Select Next.
7. Select Done.
8. Review your settings, and select Save.
Low Snooze
Low Snooze is available once you have set your Low Settings. Low Snooze allows
you to set the amount of time that you want to wait before you are reminded that
an alert condition still exists. After a low alert is received and cleared, you will be
alerted again only if the low alert condition still exists after the snooze time you
have set.
Setting the Low Snooze:
1. Go to the Low Settings screen.
Menu > Sensor Settings > Low Settings
The Low Settings screen appears.
2. Select Snooze and enter a time between 5 minutes and 1 hour.
Manually resuming basal delivery during a suspend by sensor event
When your pump suspends insulin due to a Suspend before low or Suspend on
low event, the bottom of your Home screen displays either Suspended before low
or Suspended on low depending on which is active.
U
10:00
Suspended before low
99
mg/dL
Act Ins.
10 11 12
350
250
150
50
0.1
If you do not want to wait for your pump to automatically resume your basal
insulin, you can follow the procedure below to manually resume your basal
delivery.
To manually resume basal delivery:
174 Chapter 10
MP6025958-022 / A
RELEASED

1. From the Home screen, select Suspended before low or Suspended on low.
The SmartGuard screen appears.
2. Select Resume Basal.
3. Select Yes to resume basal delivery.
Wirelessly connecting your pump and transmitter using
Auto Connect
Before you can start using your sensor, you must first wirelessly connect your
pump to your transmitter so they can begin communicating with each other.
The Auto Connect process locates your transmitter without having to enter the
serial number of the transmitter into your pump manually.
Note the following before trying to connect your pump and transmitter:
• You can connect only one transmitter to your pump. If you already have a
transmitter connected to your pump, you must delete it before continuing.
For instructions on deleting a transmitter from your pump, see Deleting the
transmitter from your pump, on page 181.
• Ensure that you are not close to other Medtronic devices that are in search
mode before using Auto Connect. (For example, if another household
member is connecting a BG meter or transmitter to his or her insulin pump.) If
you know multiple people are connecting devices, such as in a training class,
use the Manual Connect process on page 178.
Connecting your pump and transmitter using Auto Connect:
1. Attach your transmitter to the charger and make sure the transmitter is fully
charged. Keep your transmitter attached to the charger.
charger
transmitter
■ setting up continuous glucose monitoring
Setting up Continuous Glucose Monitoring 175
MP6025958-022 / A
RELEASED
Note: Both lights on the charger are off when the transmitter is fully
charged. For more information, see your transmitter user guide.
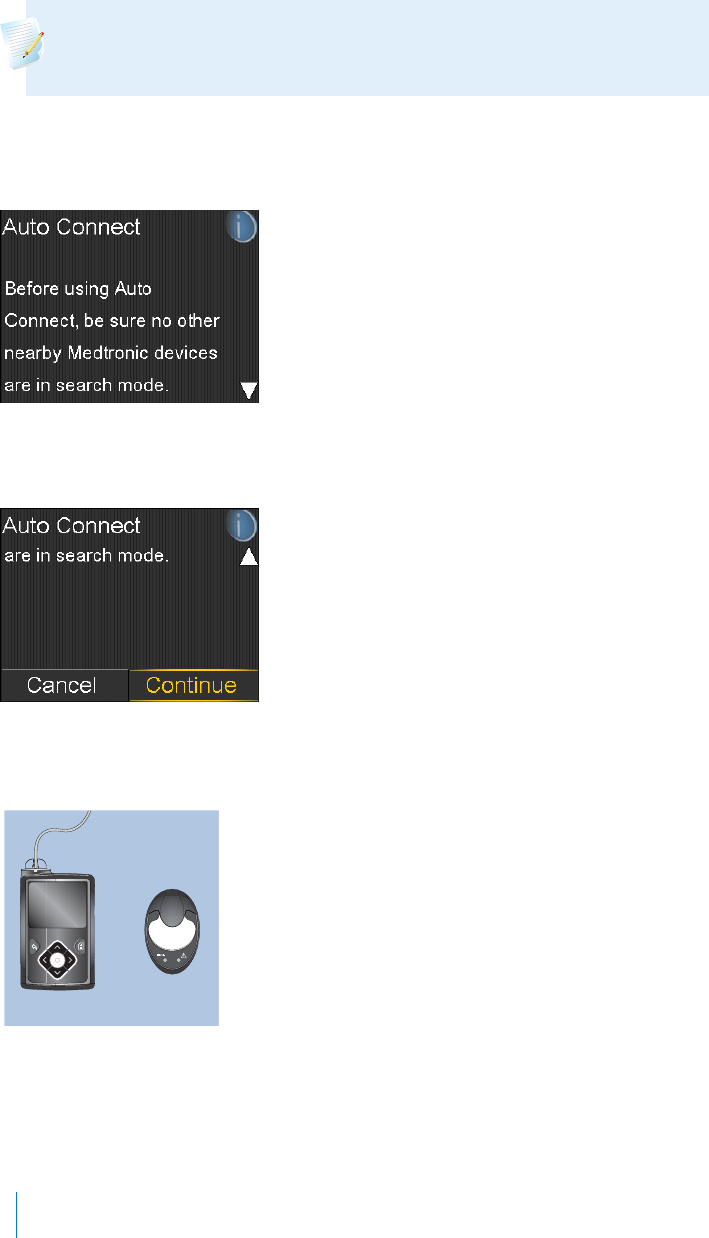
2. Go to the Auto Connect screen.
Menu > Utilities > Device Options > Connect Device > Auto Connect
3. Make sure there are no other devices in search mode nearby, scroll down to
the bottom of the Auto Connect screen, and select Continue.
The New Device screen appears.
4. Place the transmitter (still attached to the charger) next to the pump.
5. Select Search on your pump and immediately remove the transmitter from
the charger.
176 Chapter 10
MP6025958-022 / A
RELEASED
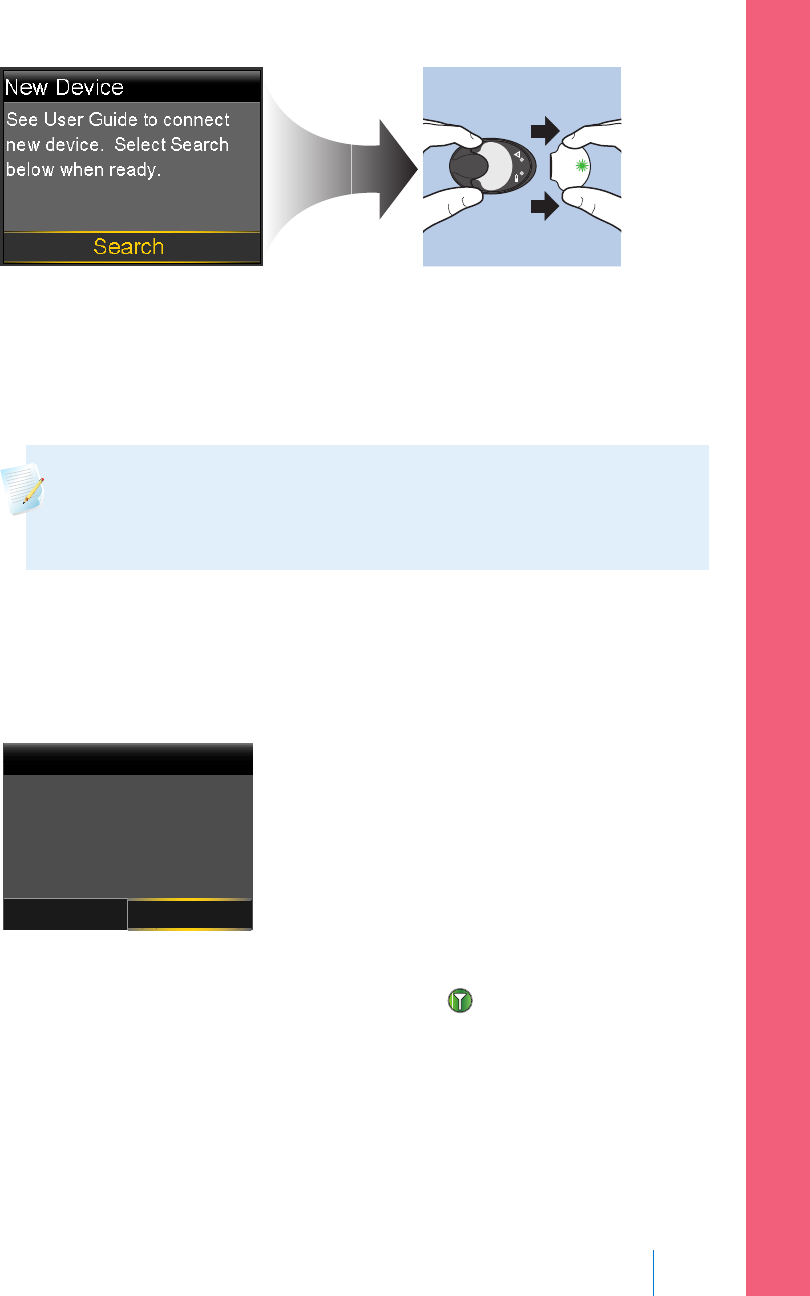
The following happens when you start the search process:
• On your pump, a message appears to let you know your pump is
searching.
• On your transmitter, a green light flashes briefly and then turns off.
Note: The search process can take up to two minutes. You cannot
access your pump screens or suspend your pump during the search
process.
When your pump finds the transmitter, the Confirm Device SN screen
appears.
6. Ensure the transmitter serial number on your pump screen matches the serial
number on the back of your transmitter and then select Confirm.
New Device
Confirm
Cancel
Confirm Device SN
SN: GT6004343M
If the connection is successful, your pump displays a success message. If the
Sensor feature is turned on, the Connection icon appears on the status
bar.
If your pump does not find your transmitter, see the following procedure, If
your pump does not find your transmitter. If your pump finds multiple devices,
skip to the steps on page 178.
■ setting up continuous glucose monitoring
Setting up Continuous Glucose Monitoring 177
MP6025958-022 / A
RELEASED

If your pump does not find your transmitter:
1. Place the transmitter back on the charger and make sure your transmitter is
fully charged before continuing.
2. Place your pump and transmitter within an arm's length of each other.
3. Select Retry on your pump and immediately remove the transmitter from the
charger to start the search process.
4. If the search is unsuccessful the second time, select Cancel when the No
Devices Found message appears and then follow the instructions in Wirelessly
connecting your pump and transmitter using Manual Connect, on page 178.
If your pump found multiple devices:
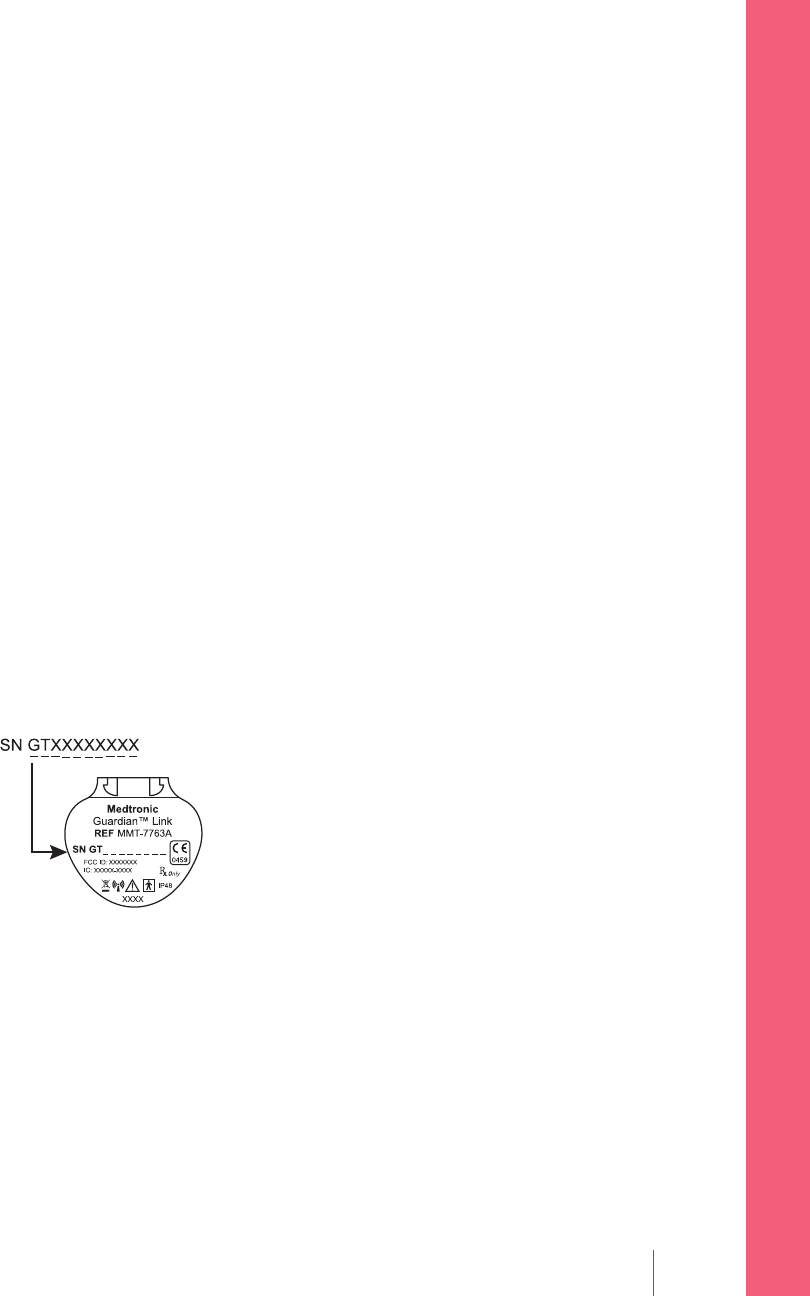
1. Write down the serial number for your transmitter. The serial number can be
found on the back of your transmitter.
2. Place the transmitter back on the charger and make sure your transmitter is
fully charged before continuing.
3. Select Next from the Multiple Devices Found message to display the Enter
Device SN screen.
4. Manually enter your device serial number by following the instructions,
starting with step 4 in Wirelessly connecting your pump and transmitter using
Manual Connect, on page 178.
Wirelessly connecting your pump and transmitter using
Manual Connect
The Manual Connect process requires you to enter the serial number of the
transmitter into your pump. Use this process if you are unsuccessful using the
Auto Connect process, or when multiple people in close range are connecting
their pumps with other devices, such as a group training session.
Note: You can connect only one transmitter to your pump. If you already
have a transmitter connected to your pump, you must delete it before
continuing. For instructions on deleting a transmitter from your pump,
see Deleting the transmitter from your pump, on page 181.
178 Chapter 10
MP6025958-022 / A
RELEASED
Connecting your pump and transmitter using Manual Connect:
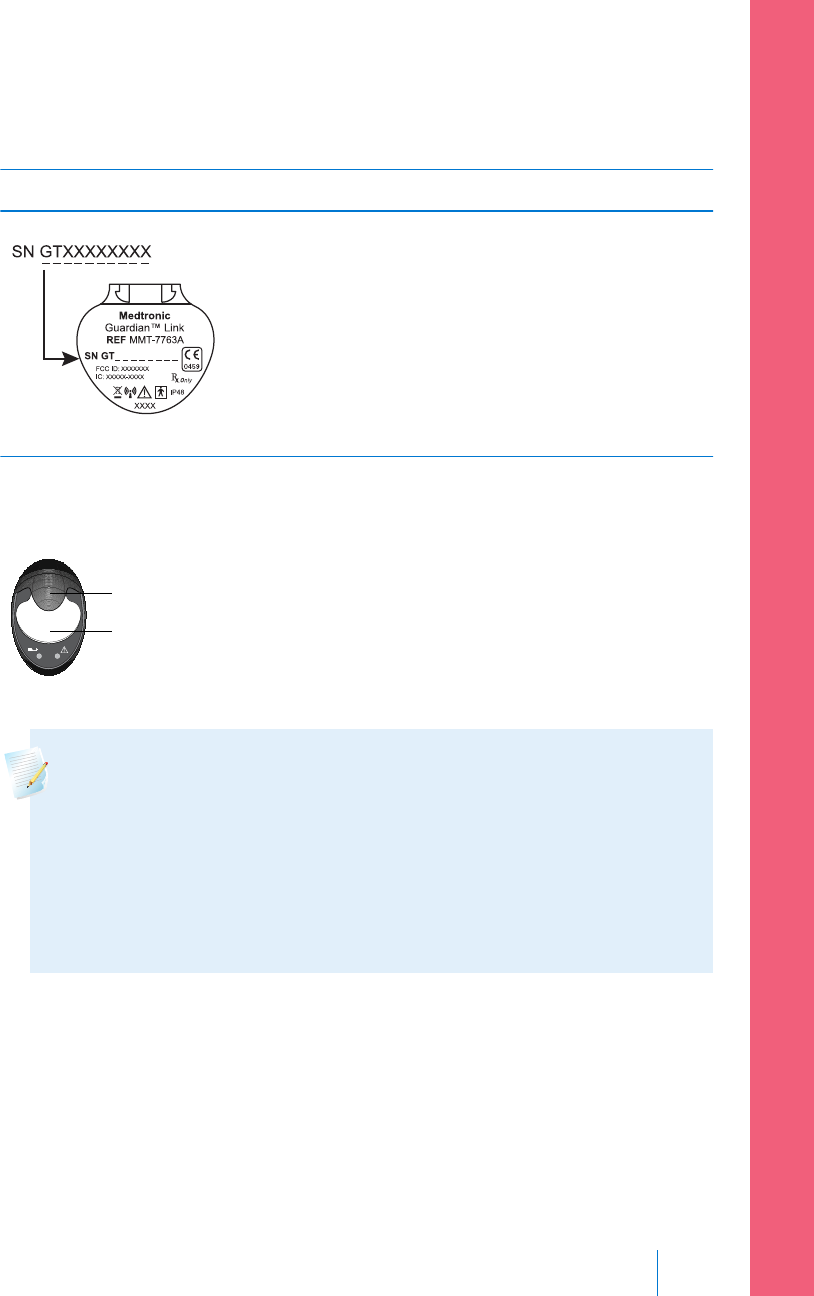
1. You need the serial number for your transmitter during the connection
process. Write down the serial number in the following space provided.
Find your serial number here: Write it here:
Write your serial number here, include any
letters:
SN GT __ __ __ __ __ __ __ __
2. Attach your transmitter to the charger, and make sure the transmitter is fully
charged. Keep your transmitter attached to the charger.
charger
transmitter
Note: Both lights on the charger are off when the transmitter is fully
charged. For more information, see your transmitter user guide.
If you remove the transmitter from the charger to write down the
serial number, the green charger light may start flashing when you
attach the transmitter to the charger again. You can continue the
connection process without waiting for the charger light to stop
flashing.
3. On the pump, go to the Enter Device SN screen.
Menu > Utilities > Device Options > Connect Device > Manual Connect
■ setting up continuous glucose monitoring
Setting up Continuous Glucose Monitoring 179
MP6025958-022 / A
RELEASED
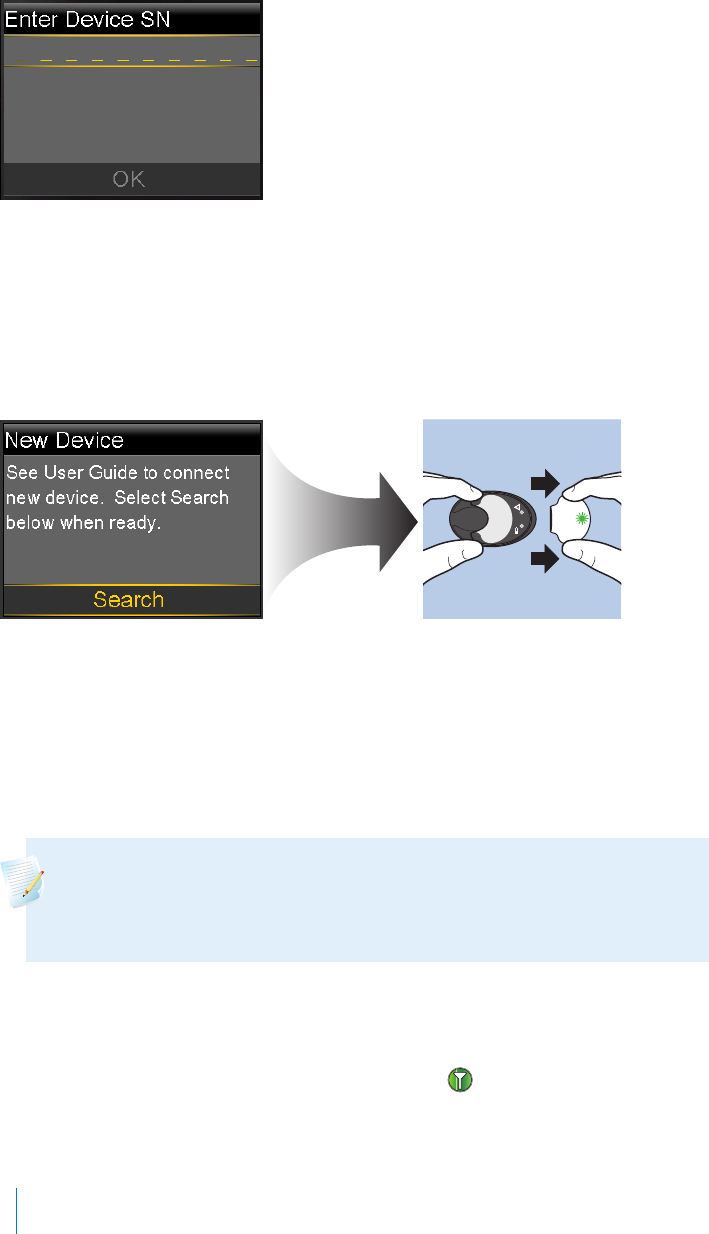
4. Use the pump navigation buttons to enter the serial number of the
transmitter and select OK.
The New Device screen appears.
5. Select Search on your pump and immediately remove the transmitter from
the charger.
The following happens when you start the search process:
• On your pump, a message appears to let you know your pump is
searching.
• On your transmitter, a green light flashes briefly and then turns off.
Note: The search process can take up to two minutes. You cannot
access your pump screens or suspend your pump during the search
process.
6. Place the transmitter next to the pump.
If the connection is successful, your pump displays a success message. If the
Sensor feature is turned on, the Connection icon appears on the status
bar.
180 Chapter 10
MP6025958-022 / A
RELEASED
If your pump does not connect to your transmitter:
1. If your pump does not connect to the transmitter, do one of the following:
• Select Retry to return to the Enter Device SN screen on your pump, and
then return to step 4 of the procedure above and follow the instructions
to search again.
• Select Cancel to return to the Connect Device screen, where you can
search again using Manual Connect or Auto Connect.
2. If you have tried to connect multiple times without success, see My pump
cannot find the sensor signal, on page 234.
Deleting the transmitter from your pump
Follow this procedure to delete the transmitter from your pump. Use this process
when you are replacing your transmitter.
To delete your transmitter from your pump:
1. Go to the Manage Devices screen.
Menu > Utilities > Device Options > Manage Devices
2. Identify and select your transmitter by the serial number. The serial number
can be found on the back of the transmitter.
3. Select Delete.
4. A screen appears confirming that you would like to delete the device. Select
Yes to confirm or No to cancel.
Inserting the sensor
Always refer to the serter user guide for instructions on how to insert the sensor.
■ setting up continuous glucose monitoring
Setting up Continuous Glucose Monitoring 181
MP6025958-022 / A
RELEASED

Connecting the transmitter to the sensor
Always refer to your transmitter user guide for instructions on connecting the
transmitter to the sensor.
Starting the sensor
After you insert your sensor and connect your sensor and transmitter, your pump
starts communicating with the transmitter. The pump notifies you when the
sensor is ready to use.
To start a new sensor using the Start New Sensor message:
1. Select Start New Sensor when it appears on the pump screen.
The "Sensor warm-up started" message appears.
2. Select OK.
"Warm up..." appears on the Home screen until the sensor is ready for first
calibration.
Note: If you do not see the Start New Sensor option, then follow
the procedure for manual connection described below.
To start a new sensor using manual connect:
1. Go to the Sensor Connections screen.
Menu > Sensor Settings > Sensor Connections
2. Select Start New Sensor.
The Start New Sensor screen appears.
3. If you have not done so already, connect the transmitter to your sensor. For
details about connecting your transmitter and sensor, see your transmitter
user guide.
Your pump searches for your transmitter signal. It can take up to six minutes
for your pump and transmitter to start communicating.
4. Select OK.
5. The Sensor warm-up started message appears on the screen. Select OK.
182 Chapter 10
MP6025958-022 / A
RELEASED

"Warm up..." appears on the Home screen until the sensor is ready for first
calibration. Your pump begins displaying SG data up to 15 minutes after you
successfully calibrate your sensor. For details about calibration, see Calibrating
your sensor, on page 183.
If you receive a message that your pump cannot find the sensor signal,
continue to the next section.
If your pump cannot find the sensor signal:
1. If your pump cannot find the sensor signal, follow the instructions on your
pump screen. Your pump guides you through the following steps:
a. Disconnect and reconnect the transmitter from the sensor. Pay attention
to the transmitter, and notice if the transmitter light blinks when
connected to the sensor. If the transmitter light does not blink, you need
to charge your transmitter.
b. Move your pump closer to your transmitter. It can take up to 15 minutes
for your pump to find the sensor signal.
c. If your pump is still unable to find the sensor signal, make sure you are
away from any electronic devices that might cause interference.
2. If you have gone through all of the troubleshooting on your pump screen
and your pump still cannot find the sensor signal, contact your local help line
or representative for assistance.
Calibrating your sensor
Calibration is the process of entering a BG meter reading to calculate sensor
glucose values. You must calibrate your sensor regularly to ensure you continue to
receive sensor glucose data. For details, see Guidelines for calibrating, on page 186.
Within two hours after you use your pump to start the sensor, your pump displays
a Calibrate now alert to let you know that a calibration is due. This BG meter
reading is the first calibration for your sensor. It takes up to 15 minutes after
calibration to see the first sensor glucose reading on your Home screen. You enter
your second calibration within six hours after your first calibration.
■ setting up continuous glucose monitoring
Setting up Continuous Glucose Monitoring 183
MP6025958-022 / A
RELEASED

After you have entered your first two calibrations, you must calibrate your sensor
again within 12 hours. If you do not enter a BG meter reading within 12 hours,
your pump displays the Calibrate now alert and stops calculating sensor glucose
values until a calibration BG is successfully entered. The sensor must be calibrated
at a minimum of every 12 hours throughout the life of the sensor.
If you are using a compatible Bayer meter, you can set up your pump to calibrate
automatically with each valid BG meter reading. For more details, see Setting up
Auto Calibration, on page 184.
Note: Sensor calibration is successful only if your BG entry is in the range
of 40 to 400 mg/dL. Remember to calibrate three to four times
throughout the day for optimal results.
To calibrate your sensor:
1. Take a BG meter reading.
2. Go to the Calibrate Sensor screen.
Menu > Sensor Settings > Calibrate Sensor
3. Select BG and enter the value.
4. Select Calibrate.
You can set up a reminder to notify you when your next calibration is due.
For more information, see Calibration reminders, on page 133.
Setting up Auto Calibration
The Auto Calibration feature determines how to calibrate the pump when using a
wirelessly linked compatible Bayer meter. When the Auto Calibration feature is
turned on, the pump uses any BG value in the range of 40 to 400 mg/dL for
calibration. When this feature is turned off, the pump asks you every time if you
want to use the compatible Bayer meter for calibration.
To turn on Auto Calibration:
1. Go to the Auto Calibration screen.
Menu > Sensor Settings > Auto Calibration
2. Select Auto Calibration to turn on the feature.
184 Chapter 10
MP6025958-022 / A
RELEASED

3. Select Save.
Note: If you decide not to use the Auto Calibration in the future,
select Auto Calibration to turn off the feature.
Where to enter your calibration BG meter reading
There are several screens on the pump where you can enter a BG meter reading
for calibration. These screens are described in the following table. These options
are available only if you are using a sensor, and your transmitter is wirelessly
connected with your pump.
Note: If you are using a compatible Bayer meter and want to calibrate
using every valid BG meter reading sent to your pump, you can use the
Auto Calibration feature. For details about Auto Calibration, see Setting up
Auto Calibration, on page 184.
Pump screen How to enter your calibration BG
Home screen
When the calibration option is available,
you can access the Calibrate Sensor
screen. First highlight the sensor graph on
the Home screen. Then press and hold the
button to access the calibration screen.
Enter a BG meter reading specifically for
calibration.
Calibrate Sensor screen
Menu > Sensor Settings > Calibrate
Sensor
Enter a BG meter reading specifically for
calibration.
BG Meter screen
The BG Meter screen appears
automatically when your compatible Bayer
meter sends a BG meter readings to your
pump.
Select the Calibrate Sensor option to
calibrate your sensor with the current BG
meter readings.
■ setting up continuous glucose monitoring
Setting up Continuous Glucose Monitoring 185
MP6025958-022 / A
RELEASED

Pump screen How to enter your calibration BG
BG screen in Event Markers
Menu > Event Markers > BG
When you enter a BG meter reading in
Event Markers, the Event Markers screen
has an option to use the BG value for
calibration.
BG field in the Bolus Wizard screen
Home screen > Bolus > Bolus Wizard
When you enter a BG meter reading to
deliver a bolus using the Bolus Wizard,
the Bolus Wizard gives you the option to
use the BG value for calibration after the
bolus is delivered.
When to calibrate
The following table describes when to calibrate your sensor.
Calibrate Description
After warm-up is
complete.
Do your first sensor calibration.
Your pump displays a Calibrate now alert within two hours
after starting a new sensor. Your first sensor glucose reading
appears about 5 to 15 minutes after you calibrate.
Six hours after your
first calibration.
Do your second sensor calibration.
Six hours after you calibrate for the first time, a Calibrate now
alert appears, and your pump stops calculating your SG values.
It takes about 5 to 15 minutes after you calibrate to receive SG
values again.
Within 12 hours after
your second
calibration and at
least every 12 hours
thereafter.
After you do your second calibration, you need to calibrate at
least every 12 hours.
If you do not calibrate for more than 12 hours, a Calibrate now
alert appears. It takes about 5 to 15 minutes after you calibrate
to receive SG values again.
Guidelines for calibrating
Follow these guidelines for best sensor calibration results:
• Calibrate three to four times spread out throughout the day to improve
accuracy. For details, see When to calibrate, on page 186.
186 Chapter 10
MP6025958-022 / A
RELEASED

• You can calibrate anytime. However, calibrating with two or three down trend
arrows may temporarily decrease accuracy until the next calibration. For an
example of trend arrows on the Home screen, see Home screen with CGM, on
page 152.
• If you are not using a compatible Bayer meter, enter your BG meter reading
into the pump immediately after testing your BG. Your BG meter reading is
only valid for 12 minutes, do not wait to enter it later.
• Always use clean, dry fingers when you test your blood glucose levels.
• Use only your fingertips when obtaining blood samples for calibration.
Note: If your BG meter readings are significantly different than your
sensor glucose readings, you need to wash your hands and calibrate
again.
Disconnecting the transmitter from the sensor
Always refer to your transmitter user guide for instructions on disconnecting the
transmitter from the sensor.
Removing the sensor
Always refer to the sensor user guide for instructions on how to remove the
sensor.
Turning off Sensor Settings
You can turn off Sensor Settings at any time. If you disconnect the transmitter
from the sensor, turn off the Sensor Settings to avoid getting a sensor alert. Your
sensor settings remain in your pump. You cannot make changes to the settings
until you turn on the Sensor Settings again.
To turn off Sensor Settings:
1. Go to the Sensor Settings screen.
Menu > Sensor Settings
2. Select Sensor.
3. Select Yes to turn off the sensor feature.
■ setting up continuous glucose monitoring
Setting up Continuous Glucose Monitoring 187
MP6025958-022 / A
RELEASED

188 Chapter 10
MP6025958-022 / A
RELEASED

using continuous glucose monitoring
MP6025958-022 / A
RELEASED
MP6025958-022 / A
RELEASED
Using continuous glucose
monitoring
This chapter provides information on how to use CGM on your pump and view
your sensor glucose data. This information helps you identify sensor glucose
trends, including being notified if your sensor glucose is falling or rising rapidly.
You can also view historical sensor glucose readings in a graph format. Information
is also included on how to silence your glucose alerts.
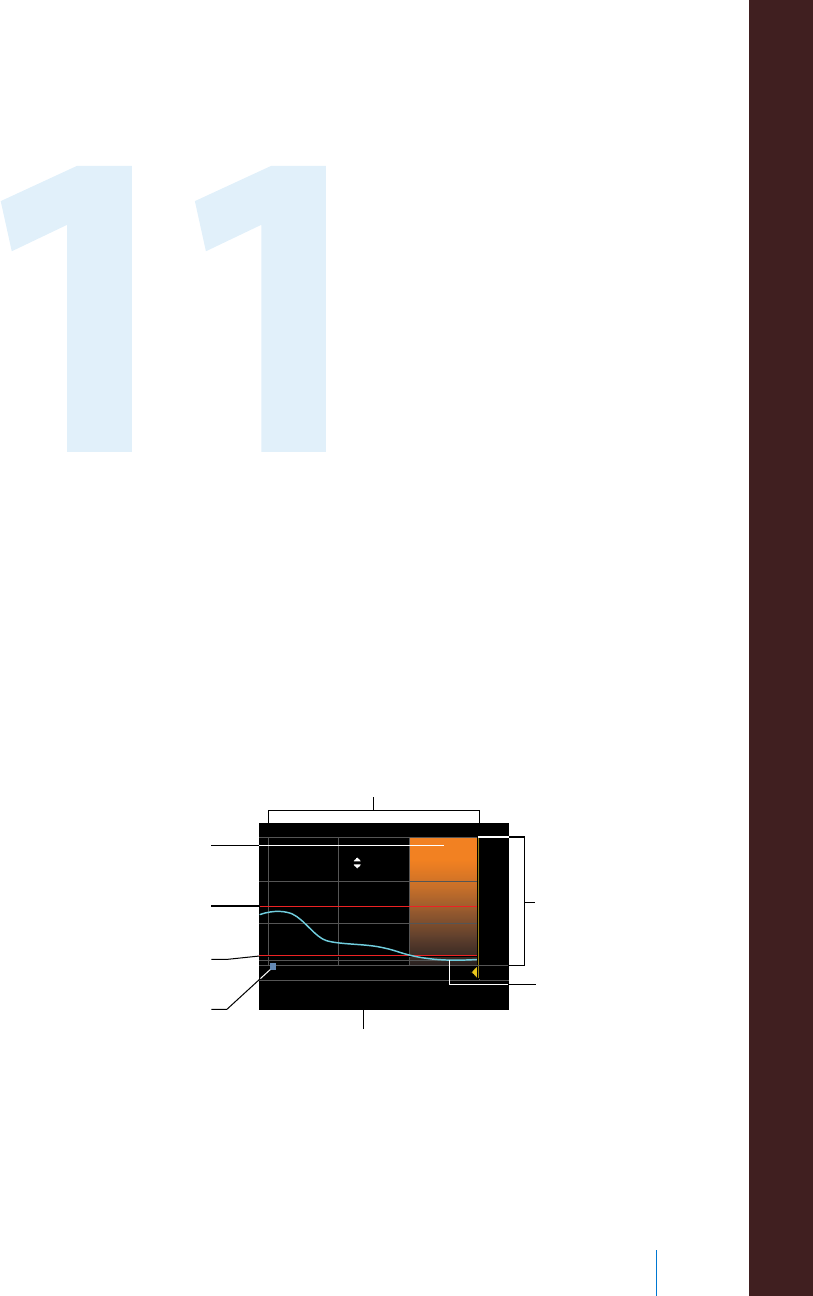
The sensor graph
The sensor graph displays your current sensor glucose (SG) reading that is
wirelessly sent to your pump by the transmitter.
67 8
350
250
150
50
mg/dL
60 mg/dL, 09:00
3 hr
9
SG values
high limit
SmartGuard
suspend by sensor
time
low limit
bolus marker
continuous
SG reading
selected
reading or event
The sensor graph includes the following information:
• The most recent sensor glucose reading
Using continuous glucose monitoring 191
■ using continuous glucose monitoring
MP6025958-022 / A
RELEASED
• Historical sensor glucose readings for the last 3-hour, 6-hour, 12-hour, or
24-hour periods
• Your high and low glucose alert limit
• The bolus deliveries you have given during the time period shown on the
graph
• Any suspend events that have occurred
If an SG reading does not appear on the graph, some possible reasons for this
include:
• An error condition or a sensor-related alert is occurring.
• A new sensor that you just inserted is still initializing.
• A new sensor that just initialized is still calibrating.
• An existing sensor that you have recently reconnected is not ready.
• More than six hours have passed since the initial sensor calibration.
• More than 12 hours have passed since the last sensor calibration.
To view the sensor graph:
1. Select the graph area of the Home screen.
A full-screen view of the 3-hour graph appears.
2. Select to navigate to the 6-hour, 12-hour, and 24-hour graphs.
3. Select to view SG readings and event details.
4. To exit the full-screen view, press .
Identifying rapid changes in sensor glucose
When you use a sensor, trend arrows appear on the Home screen if your SG has
been rising or falling faster than a certain per-minute rate. The number of arrows
that appear tell you how quickly your SG has been changing.
The following table shows the trend arrows and their corresponding rates.
SG has been rising at a rate of 1 mg/dL per minute or more, but less than
2 mg/dL per minute.
SG has been falling at a rate of 1 mg/dL per minute or more, but less than
2 mg/dL per minute.
192 Chapter 11
MP6025958-022 / A
RELEASED
SG has been rising at a rate of 2 mg/dL per minute or more, but less than
3 mg/dL per minute.
SG has been falling at a rate of 2 mg/dL per minute or more, but less than
3 mg/dL per minute.
SG has been rising at a rate of 3 mg/dL per minute or more.
SG has been falling at a rate of 3 mg/dL per minute or more.
Silencing Glucose Alerts
The Alert Silence feature allows you to make sensor glucose alerts silent for a set
period of time. This is useful in situations where you do not want to disturb others,
such as when you are in a business meeting or in a movie theater. When using
this feature, your system still records the time and glucose value for any alerts that
occur. You can view this information in the Alarm History screen. See Alarm History,
on page 122 for details.
If a glucose alert occurs when you are using the Alert Silence feature, the
notification light begins to flash and the Sensor alert occurred message appears
letting you know an alert was silenced, but there is no vibration or beep. If you
have not cleared the alert by the end of the preset alert silence duration, your
pump begins to beep or vibrate periodically until the alert is cleared.
The following table describes the glucose alerts that are silenced with each option.
This Alert
Silence setting
Silences these alerts
High Alerts Only Alert on high, Alert before high, and Rise Alert
High & Low
Alerts
Alert on high, Alert before high, Rise Alert, Alert on low, Alert
before low, Suspend before low, and Resume Basal Alert
■ using continuous glucose monitoring
Using continuous glucose monitoring 193
MP6025958-022 / A
RELEASED
This Alert
Silence setting
Silences these alerts
All Sensor Alerts All of the alerts listed previously for High & Low Alerts, plus the
following:
• All calibration alerts, reminders, or error messages
• All alerts relating to sensor insertion, including alerts about
sensor warm-up, changing your sensor, sensor expiration, sensor
errors, connection issues, and so on
• All alerts related to your transmitter, including all alerts about
your transmitter battery and all connection issues
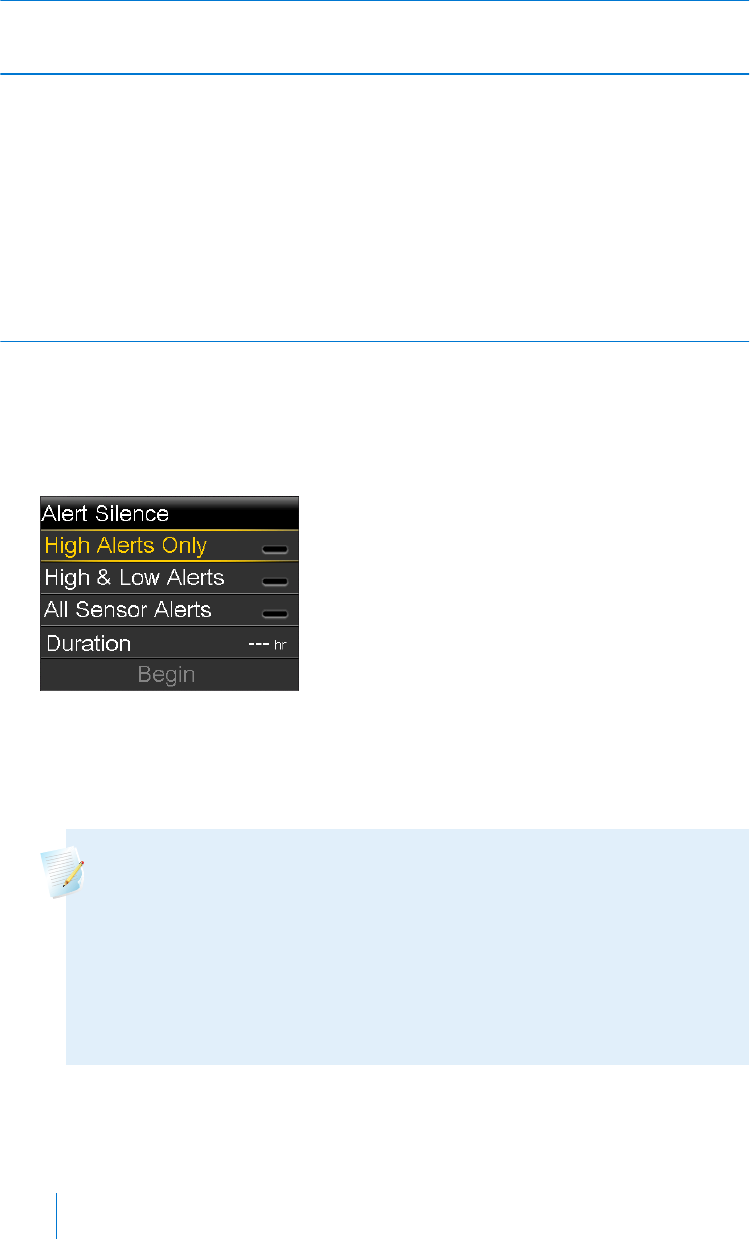
To silence Glucose alerts:
1. Go to the Alert Silence screen.
Menu > Sensor Settings > Alert Silence
2. Select High Alerts Only, High & Low Alerts, or All Sensor Alerts to set the
alerts you want silenced. Refer to the previous table for details about the
alerts silenced with each selection.
Note: If you select All Sensor Alerts, you will not receive any alerts
related to your sensor glucose readings, your sensor, calibration
requirements, or your transmitter. If a glucose alert occurs, the
notification light flashes and a message appears on your pump to let
you know a silenced alert occurred, but there is no vibration or
beep. You can view the specific alert in Alarm History. For more
information, see Alarm History, on page 122.
194 Chapter 11
MP6025958-022 / A
RELEASED
3. Set the Duration time (from 30 minutes to 24 hours) for which the alerts will
be silenced, and then select OK.
4. Select Begin. The Alert Silence settings immediately take effect and you are
returned to the Sensor Settings screen.
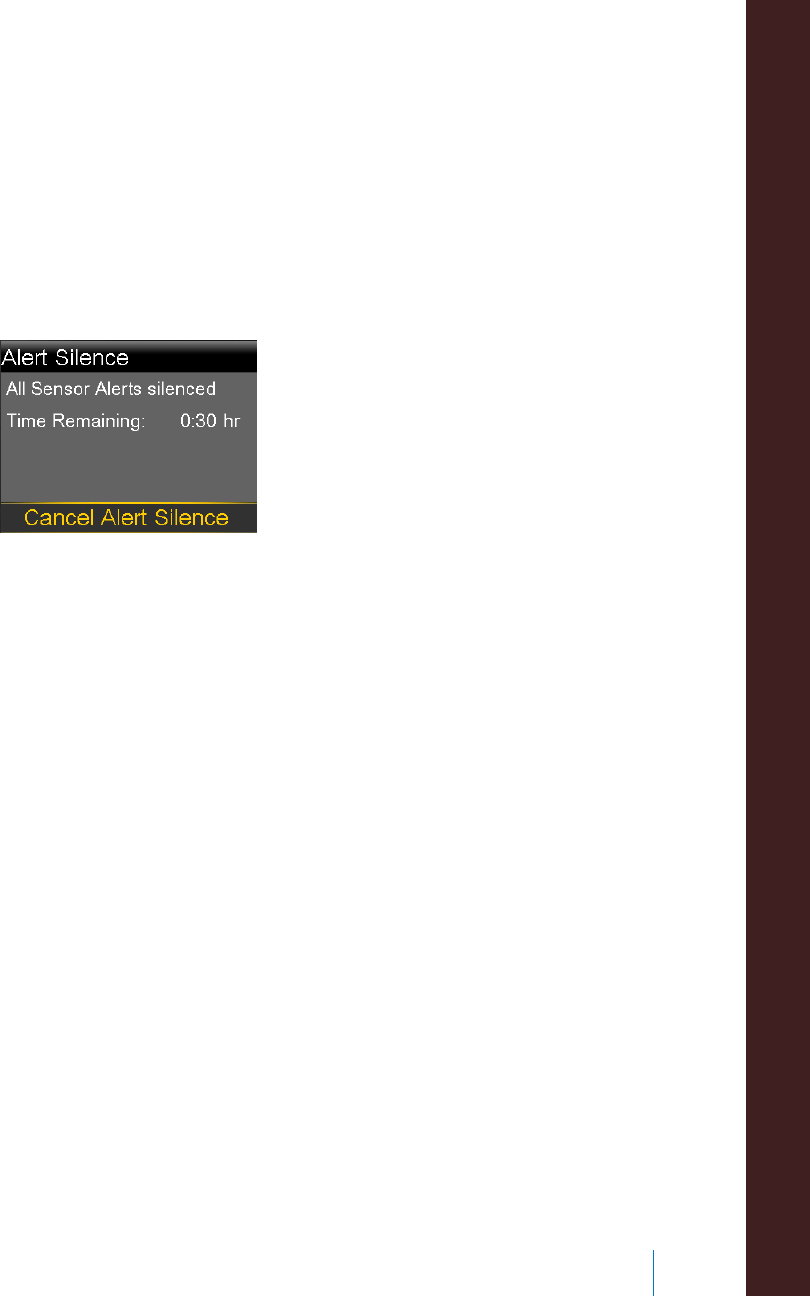
To cancel Alert Silence:
1. Go to the Alert Silence screen.
Menu > Sensor Settings > Alert Silence
2. Select Cancel Alert Silence.
■ using continuous glucose monitoring
Using continuous glucose monitoring 195
MP6025958-022 / A
RELEASED

196 Chapter 11
MP6025958-022 / A
RELEASED

alarms, alerts, and messages
MP6025958-022 / A
RELEASED
MP6025958-022 / A
RELEASED

Alarms, alerts, and messages
This chapter describes the general behavior of the most common and the most
serious notifications and how to resolve them.
About alarms, alerts, and messages
Your pump has a sophisticated safety network. If this safety network detects
anything unusual, it conveys this information in the form of notifications.
Notifications include alarms, alerts, and messages.
Note: When you receive a notification while your pump is locked, you
will be able to clear the alarm, alert, or message without having to unlock
your pump. After you clear the notification, you will be redirected to the
Home screen. You must unlock your pump before navigating away from
the Home screen. For more information, see Unlocking your pump, on
page 26.
When you have received more than one notification and there are multiple
messages to view, a small white flap appears on the notification icon in the upper-
right corner of the screen . When you clear the first notification, the next
notification becomes visible.
A white triangle in the lower-right corner means you must press to continue.
Alarms, alerts, and messages 199
■ alarms, alerts, and messages
MP6025958-022 / A
RELEASED