Medtronic MiniMed 1510 620G/630G/640G/670G Insulin Delivery Pump User Manual 5
Medtronic MiniMed, Inc. 620G/630G/640G/670G Insulin Delivery Pump Users Manual 5
Contents
- 1. Users manual
- 2. Users Manual 2
- 3. Users Manual 3
- 4. Users Manual 4
- 5. Users Manual 5
Users Manual 5
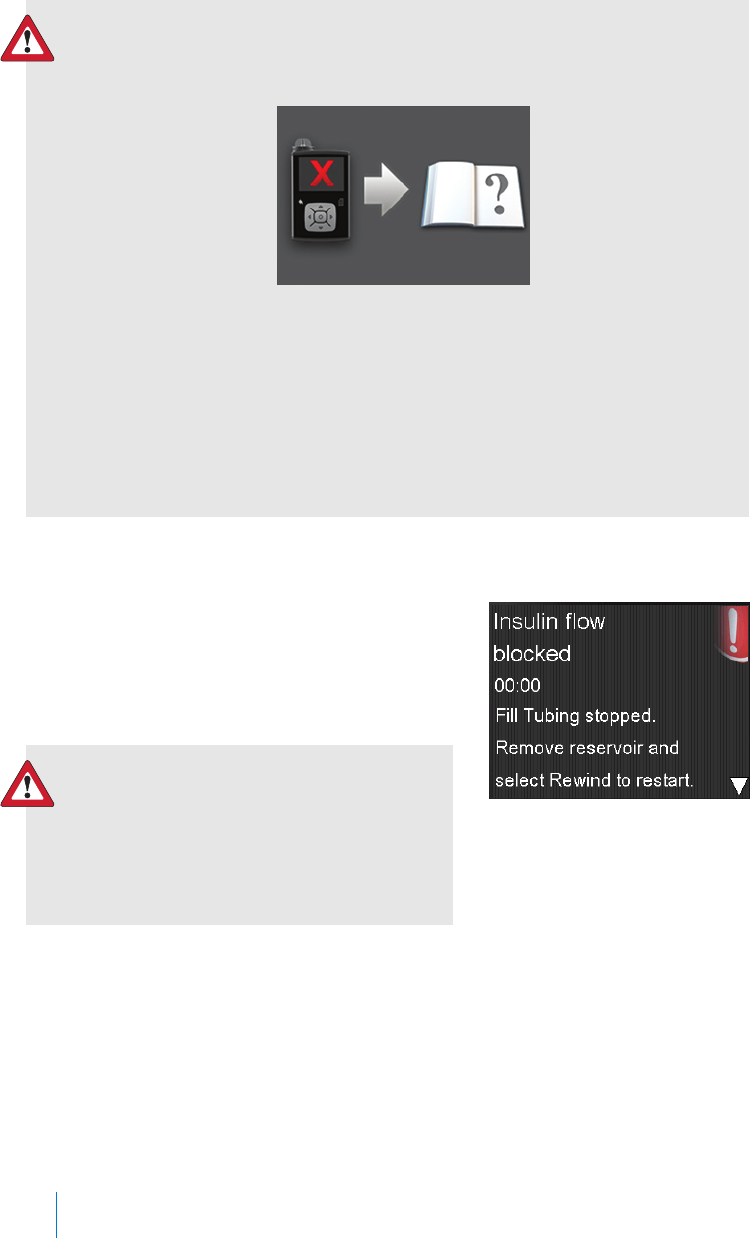
WARNING: If you receive a critical error on your pump, the
following screen displays and the pump sirens.
Immediately disconnect from your insulin pump and discontinue
use. Contact your local representative for assistance.
Remember, your body still needs insulin while your pump is
removed. It is important that you consult your healthcare
professional to determine an alternate method of receiving insulin
while your pump is removed.
Alarms
An alarm warns you that the pump detected
something that prevents insulin from being
delivered. It is important that you respond to an
alarm.
WARNING: Do not ignore your pump
when it has an alarm because all
insulin delivery is stopped, which may
lead to high blood glucose and
ketoacidosis.
When an alarm occurs:
Display: The pump displays a notification with a red icon and instructions.
Notification light: The red notification light blinks twice, followed by a pause, in a
continuous repeating pattern. The notification light is shown in Using the buttons,
on page 20.
200 Chapter 12
MP6025958-022 / A
RELEASED

Audio: Depending on your Audio Options settings, the pump emits an alarm tone,
a continuous three-pulse-and-pause vibration pattern, or both the alarm tone and
vibration.
You must resolve the underlying problem that triggered the alarm. In most cases,
you clear an alarm by pressing and then you make a selection. In some cases,
however, clearing the alarm does not fix the underlying problem. The alarm
repeats until the underlying problem is fixed.
If you do not respond to an alarm, after ten minutes the alarm tone escalates to a
loud emergency siren. For more information, see Alarm and alert escalation, on
page 247.
Alerts
An alert makes you aware of a situation that may
require your attention. An alert is less serious than
an alarm.
When an alert occurs:
Display: The pump displays a notification with a
yellow icon and instructions.
Notification light: The red notification light on your pump blinks once, followed
by a pause, then blinks once again in a continuous repeating pattern. The
notification light is shown in Using the buttons, on page 20.
Audio: Depending on your Audio Options settings, the pump either beeps or
vibrates in a continuous three-pulse-and-pause pattern, or does both.
To clear an alert, press and then make a selection. If you do not respond to an
alert, the pump beeps every five minutes or every fifteen minutes, depending on
the alert. Some alerts will also escalate to a loud emergency siren after ten
minutes. For more information, see Alarm and alert escalation, on page 247.
Note: If an alert occurs when you are in a screen other than the Home
screen, the alert message may appear after you return to the Home
screen.
■ alarms, alerts, and messages
Alarms, alerts, and messages 201
MP6025958-022 / A
RELEASED
Messages
A message informs you about the status of your
pump or if you need to make a decision.
When a message occurs:
Display: The pump displays a notification with a
blue icon and instructions.
Notification light: Does not illuminate or blink.
Audio: Depending on the message, the pump emits a message tone, an alert
tone, or no tone. Depending on your Audio Options settings, you may hear a tone,
feel a one-pulse-only vibration, or hear a tone and feel a vibration.
You clear the message by pressing and make a selection.
Pump alarms, alerts, and messages
The following table lists the most common or serious alarms, alerts, and messages
related to your pump. The table also explains the meaning, consequences, and the
reasons why these notifications appear, and provides steps for problem resolution.
Title and text Explanation Next steps
Active Insulin cleared
Any Active Insulin amount
has been cleared.
An alarm has
cleared your active
insulin amount.
Your active insulin
amount is now at
0 units.
• Select OK to clear the alarm.
• The active insulin tracked prior to
pump restart is not included in
new Bolus Wizard calculations.
Consult your healthcare
professional for how long you
need to wait after active insulin is
cleared before you can rely on
the active insulin calculation of
your Bolus Wizard
• You can check Daily History for
the time and amount of your last
bolus. For more information, see
Daily History, on page 121.
202 Chapter 12
MP6025958-022 / A
RELEASED

Title and text Explanation Next steps
Auto Suspend
Insulin delivery
suspended. No buttons
pressed within time set in
Auto Suspend.
You have not
pressed any buttons
during the time
specified in the
Auto Suspend
settings.
• To clear the alarm and resume
basal insulin delivery, select
Resume Basal.
• Check your BG and treat as
necessary.
Battery failed
Insert a new AA battery.
The pump battery
does not have
enough power.
• Select OK to clear the alarm.
• Remove the old battery and
insert a new AA battery.
For details, see About batteries, on
page 21.
Battery not compatible.
See User Guide.
The battery that you
inserted into the
pump is not
compatible.
• To clear the alarm, remove the
incompatible battery.
• Insert a new AA battery. For
compatible battery types, see
About batteries, on page 21.
Bolus not delivered.
Bolus entry timed out
before delivery. If bolus
intended, enter values
again.
Bolus values
entered, but bolus
was not delivered
within 30 seconds.
• Select OK to clear the alert.
• If bolus delivery was intended,
check your BG, re-enter bolus
values and deliver bolus.
Bolus stopped
Cannot resume bolus or
cannula fill. XX.XXX of
YY.YYY U delivered.
ZZ.ZZZ U not delivered. If
needed, enter values
again.
The battery power
was exhausted
while a bolus or Fill
Cannula was in
progress.
• Note the amount of insulin not
delivered.
• Replace the AA battery.
• Select OK to clear the alarm.
• Deliver the remaining bolus
amount if needed.
■ alarms, alerts, and messages
Alarms, alerts, and messages 203
MP6025958-022 / A
RELEASED

Title and text Explanation Next steps
Cannot connect device
This device is
incompatible with your
pump. See User Guide.
• You may be trying
to connect a
device that is not
compatible with
your pump.
• You are trying to
connect a
transmitter to your
pump but another
transmitter is
already wirelessly
connected to your
pump.
• Select OK to clear the alert.
• Check the list of devices that are
compatible with your pump in
Optional devices, on page 14.
• If you are replacing your
transmitter, make sure that you
first delete the old transmitter
from your pump before you try
to connect your new transmitter.
Only one transmitter can be
connected to your pump. For
details, see Deleting the
transmitter from your pump, on
page 181.
Check settings
Startup Wizard settings
complete. Check and set
up your other settings.
Some settings have
been cleared or
reverted to factory
default values.
• Select OK to clear the alert.
• Review any settings that you
have not already set in Startup
Wizard and re-enter the values, if
necessary.
Critical pump error
Delivery stopped. Pump
not working properly.
Stop using pump.
Remove infusion set from
body. Consider other
insulin treatment. See
User Guide.
Your pump has
encountered a
critical error.
The pump is not able to deliver
insulin. Remove your infusion set
and stop using your pump.
• Consider another form of insulin
delivery.
• Check your BG, and treat as
necessary.
• Write down the error code that
appears on the alarm screen.
• Call your local representative for
assistance with your pump.
204 Chapter 12
MP6025958-022 / A
RELEASED

Title and text Explanation Next steps
Delivery limit exceeded
Delivery stopped. Check
BG. See User Guide for
more information.
You have attempted
to deliver more
insulin than
expected based on
your Max Bolus and
Max Basal settings.
• Check your BG.
• Select Resume Basal.
• Check Bolus History and
reevaluate your need for insulin.
• Continue to monitor your BG.
Fill Cannula?
Select Fill to fill cannula
or select Done if not
needed.
You had the Fill
Cannula screen
displayed for
15 minutes.
• To proceed and fill the cannula,
select Fill.
• If you do not need to fill the
cannula, select Done to skip this
process.
Insert battery
Delivery stopped. Insert a
new battery now.
The battery was
removed from the
pump.
• Insert a new AA battery.
• The alarm clears when you insert
a new battery.
• The pump powers off after
10 minutes unless you insert a
new battery.
■ alarms, alerts, and messages
Alarms, alerts, and messages 205
MP6025958-022 / A
RELEASED

Title and text Explanation Next steps
Insulin flow blocked
Check BG. Consider
injection and testing
ketones. Change reservoir
and infusion set.
Your pump has
detected that the
basal or bolus
insulin flow was
blocked.
• Check your blood glucose.
Consider checking ketones and
take an injection if needed.
• Remove your infusion set and
reservoir.
• Select Rewind to start the new
reservoir process using a new
infusion set and reservoir.
If a bolus delivery was in progress
when the alarm occurred:
• Check the Daily History screen for
the amount of bolus already
delivered before the pump
alarmed.
• Consider delivering remaining
bolus, if the bolus insulin was not
included in an insulin injection.
206 Chapter 12
MP6025958-022 / A
RELEASED

Title and text Explanation Next steps
Insulin flow blocked
Check BG. Consider
injection and testing
ketones. Estimated 0 U
insulin in reservoir.
Change reservoir and
infusion set.
Your pump has
detected that the
insulin flow was
blocked and there is
no insulin in the
reservoir.
• Check your blood glucose.
Consider checking ketones and
take an injection if needed.
• Remove your infusion set and
reservoir.
• Select Rewind to start the new
reservoir process using a new
infusion set and reservoir.
If a bolus delivery was in progress
when the alarm occurred:
• Check the Daily History screen for
the amount of bolus already
delivered before the pump
alarmed.
• Consider delivering remaining
bolus, if the bolus insulin was not
included in an insulin injection.
■ alarms, alerts, and messages
Alarms, alerts, and messages 207
MP6025958-022 / A
RELEASED

Title and text Explanation Next steps
Insulin flow blocked
Fill Cannula stopped.
Remove infusion set from
body. Change reservoir
and infusion set.
Your pump has
detected the insulin
flow was blocked
while filling the
cannula.
• Check your blood glucose.
Consider checking ketones and
take an injection if needed.
• Remove your infusion set and
reservoir.
• Select Rewind to start the new
reservoir process using a new
infusion set and reservoir.
If a fill cannula was in progress
when the alarm occurred:
• Check the Daily History screen for
the amount of bolus already
delivered before the pump
alarmed.
• Consider delivering remaining
bolus, if the bolus insulin was not
included in an insulin injection.
208 Chapter 12
MP6025958-022 / A
RELEASED

Title and text Explanation Next steps
Insulin flow blocked
Fill Tubing stopped.
Remove reservoir and
select Rewind to restart.
Your pump has
detected the insulin
flow was blocked
while filling the
tubing. Possible
connection issue
between the tubing
and reservoir.
• Remove the reservoir and select
Rewind to restart the fill tubing
process.
• Disconnect tubing from reservoir.
• Be sure tubing is not crimped or
bent.
•Continue following the steps
displayed on the pump using the
same infusion set and reservoir.
• If this alarm occurs again, use a
new infusion set.
If a fill tubing delivery was in
progress when the alarm occurred:
• Check the Daily History screen for
the amount of bolus already
delivered before the pump
alarmed.
• Consider delivering remaining
bolus, if the bolus insulin was not
included in an insulin injection.
Loading incomplete
Remove reservoir and
select Rewind to restart
loading.
You pressed
after loading began.
• Remove the reservoir to start
again.
• Select Rewind and follow the on-
screen instructions.
Low battery Pump
Replace battery soon.
The battery in the
pump is low on
power.
• Select OK to clear the alert.
• Replace the AA battery as soon
as possible. Otherwise, insulin
delivery stops, and the Replace
Battery Now alarm occurs.
•If the pump is delivering a bolus
or filling the cannula, wait until
delivery is complete to replace
battery.
■ alarms, alerts, and messages
Alarms, alerts, and messages 209
MP6025958-022 / A
RELEASED

Title and text Explanation Next steps
Low reservoir
XX hours remaining.
Change reservoir.
or:
XX units remaining.
Change reservoir.
Your reservoir is low
on insulin,
according to the
number of hours or
units set in the Low
Reservoir Reminder.
• Select OK to clear the alert.
• Change the reservoir soon.
• If you do not change the
reservoir after you receive this
alert, you will receive a second
Low reservoir alert when the
insulin level reaches half of your
original alert amount. For more
details, see Low Reservoir
reminder, on page 132.
Manage settings error
Delivery stopped. Backup
settings cleared from
Manage Settings. Current
settings are working
properly. Select OK to
restart. See User Guide.
A pump error has
occurred, and you
need to restart your
pump. Your backup
settings have been
lost, but your
current settings are
unchanged.
• Select OK to restart your pump.
Your current settings are
unchanged. Only your backup
settings are lost.
• When the pump restarts, follow
instructions on the pump display.
•If the pump was delivering a
bolus or filling the cannula, check
Daily History and evaluate your
need for insulin.
• Consider saving your current
settings. For details, see Saving
your settings, on page 142.
Max Fill reached
3X.X U. Did you see drops
at the end of tubing?
You have exceeded
the number of units
expected to fill the
tubing. By now,
insulin should be at
the end of the
tubing.
• If you see drops at the end of
the tubing, select Yes.
• If you do not see drops, select
No.
• Follow instructions displayed on
the pump.
210 Chapter 12
MP6025958-022 / A
RELEASED

Title and text Explanation Next steps
Max Fill reached
4X.X U. Remove reservoir
and select Rewind to
restart New Reservoir
procedure.
You have exceeded
the number of units
expected to fill the
tubing. By now,
insulin should be at
the end of the
tubing.
• Remove the reservoir.
• Check if you still have insulin in
the reservoir. If you do, you can
continue using the same
reservoir.
• Select Rewind to restart the new
reservoir procedure.
No reservoir detected
Rewind before loading
reservoir.
There is no reservoir
in the pump or the
reservoir is not
properly locked into
place.
• Select Rewind.
• Ensure that your reservoir is filled
with insulin.
• When prompted, ensure that
your reservoir is inserted and
properly locked into place.
Power error detected
Delivery stopped. Record
your settings by
uploading to CareLink or
write your settings on
paper. See User Guide.
The internal power
source in your
pump is unable to
charge. Your pump
is operating on the
AA battery only.
• Select OK to clear the alert.
• Check your BG and treat as
necessary.
• Record your settings as soon as
possible because your AA battery
may not last long.
• Call your local representative for
assistance with your pump.
Power loss
AA battery was removed
for more than 10 min or
power was lost. Select OK
to re-enter time and date.
Your pump battery
has been out for
more than
ten minutes, and
your pump has lost
power. You must
reset your time and
date.
• Select OK to go to the Time &
Date screen.
• Enter the current time, time
format, and date.
■ alarms, alerts, and messages
Alarms, alerts, and messages 211
MP6025958-022 / A
RELEASED

Title and text Explanation Next steps
Pump error
Delivery stopped. Current
settings cleared. Pump
restart needed. Select OK
to restart and then re-
enter your settings. See
User Guide.
Your pump
encountered an
error and will
restart. Your pump
settings will return
to factory default
values.
• When the pump restarts, follow
instructions on the pump display.
• After restart, check settings and
re-enter values as needed.
• If you recently saved backup
settings in Manage Settings, use
Restore Settings.
•If the pump was delivering a
bolus or filling the cannula, check
Daily History and reevaluate your
need for insulin.
• If this alarm recurs frequently,
write down the error code
displayed on the alarm screen
(you can also find it in your
Alarm History) and contact your
local representative for assistance
with your pump.
Pump error
Delivery stopped. Settings
unchanged. Pump restart
needed. Select OK to
restart. See User Guide.
A pump error has
occurred, you need
to restart your
pump.
• Select OK to restart your pump.
•If the pump was delivering a
bolus or filling the cannula, check
Daily History and reevaluate your
need for insulin.
• If this alarm recurs frequently,
write down the error code
displayed on the alarm screen
(you can also find it in your
Alarm History) and contact your
local representative for assistance
with your pump.
212 Chapter 12
MP6025958-022 / A
RELEASED

Title and text Explanation Next steps
Pump error
Delivery stopped. Settings
unchanged. Select OK to
continue. See User Guide.
Your pump
encountered an
error but a restart is
not necessary. The
issue is resolved.
Your settings are
not changed.
• Select OK to resume basal
delivery.
•If the pump was delivering a
bolus or filling the cannula, check
Daily History and reevaluate your
need for insulin.
• If this alarm recurs frequently,
write down the error code
displayed on the alarm screen
(you can also find it in your
Alarm History) and contact your
local representative for assistance
with your pump.
Pump restarted
Delivery stopped. Settings
unchanged. Select OK to
continue. See User Guide.
Your pump has
encountered a
problem and has
restarted. Your
settings have not
been changed.
• Select OK to continue.
•If the pump was delivering a
bolus or filling the cannula, check
Daily History and re-evaluate your
need for insulin.
• If this alarm recurs frequently,
write down the error code
displayed on the alarm screen
(you can also find it in your
Alarm History) and contact your
local representative for assistance
with your pump.
Replace battery
Battery life less than 30
minutes. To ensure insulin
delivery, replace battery
now.
Battery life is low
and will be
exhausted within 30
minutes.
• Select OK to clear the alert.
• Replace the AA battery.
■ alarms, alerts, and messages
Alarms, alerts, and messages 213
MP6025958-022 / A
RELEASED

Title and text Explanation Next steps
Replace battery now
Delivery stopped. Battery
must be replaced to
resume delivery.
Insulin delivery has
stopped due to low
power. Battery was
not replaced after
the Low battery
Pump alert.
Replace the battery immediately to
resume insulin delivery. For details,
see Removing the battery, on
page 23.
Reservoir estimate at 0 U
To ensure insulin delivery,
change reservoir.
Your reservoir level
is estimated at
0 units.
• Select OK to clear the alert.
• Change the reservoir now.
Resume bolus?
XXX of YYY U delivered.
Resume delivery of
ZZZ U?
A normal bolus
delivery has been
interrupted because
the pump battery
was removed. If it is
within 10 minutes
since this
interruption, you
can resume this
bolus.
• Check the message to see how
much of the bolus was actually
delivered.
• To cancel remaining amount of
bolus, select Cancel.
• To resume remaining amount of
bolus, select Resume.
Resume Dual bolus?
XX of YY U delivered.
Resume delivery of ZZ U
for XX:XX hr?
The Square portion
of Dual Bolus
delivery has been
interrupted. If it is
within 10 minutes
since this
interruption, you
can resume this
bolus.
• Check the message to see how
much of the Dual Wave bolus
was actually delivered.
• To cancel remaining amount of
bolus, select Cancel.
• To resume remaining amount of
bolus, select Resume.
214 Chapter 12
MP6025958-022 / A
RELEASED

Title and text Explanation Next steps
Resume Dual bolus?
XX of YY U delivered.
Resume delivery of ZZ U
now, and AA U Square for
XX:XX hr?
The Now portion of
a Dual Wave bolus
delivery has been
interrupted because
the pump battery
was removed. If it is
within 10 minutes
since this
interruption, you
can resume this
bolus.
• Check the message to see how
much of the Dual Wave bolus
was actually delivered.
• To cancel remaining amount of
bolus, select Cancel.
• To resume remaining amount of
bolus, select Resume.
Resume Square bolus?
XX of YY U delivered for
XX:XX hr. Resume delivery
of ZZ U for XX:XX hr?
The Square Wave
bolus delivery was
interrupted. If it is
within 10 minutes
since this
interruption, you
can resume this
bolus.
• Check the message to see how
much of the Square Wave bolus
was actually delivered.
• To cancel remaining amount of
bolus, select Cancel.
• To resume remaining amount of
bolus, select Resume.
Stuck button
Button pressed for more
than 3 minutes
The pump has
detected that a
button has been
pressed for an
unusually long time.
• Select OK to clear the alarm.
• If this alarm occurs again, contact
your local representative for
assistance with your pump.
If you are unable to clear the
alarm:
• Consider another form of insulin,
because your pump is not
delivering insulin.
• Check your BG and treat as
necessary.
• Contact your local representative
for assistance with your pump.
■ alarms, alerts, and messages
Alarms, alerts, and messages 215
MP6025958-022 / A
RELEASED

Title and text Explanation Next steps
Wrong key pressed
Try again
Wrong button
selected while
unlocking the
pump.
• Select OK to clear the alert.
• Try to unlock the pump. Select
the highlighted key when
prompted.
For more information, see
Unlocking your pump, on page 26.
CGM (sensor) alarms, alerts, and messages
The following table lists the most common or serious alarms, alerts, and messages
related to your sensor glucose readings, as well as the status of your transmitter
and sensor. The table also explains the meaning, consequences, and the reasons
why these notifications appear, and provides steps for problem resolution.
Title and text Explanation Next steps
Alert before high
Sensor glucose
approaching High Limit.
Check BG.
Your SG value is
approaching your
specified high limit.
• Select OK to clear the alert.
• Check your BG.
• Follow instructions from your
healthcare professional and
continue to monitor your BG.
Alert before low
Sensor glucose
approaching Low Limit.
Check BG.
Your SG value is
approaching your
specified low limit.
• Select OK to clear the alert.
• Check your BG.
• Follow instructions from your
healthcare professional and
continue to monitor your BG.
Alert on high XXX mg/dL
High sensor glucose.
Check BG.
Your SG value is at
or above your
specified high limit.
• Select OK to clear the alert.
• Check your BG.
• Follow instructions from your
healthcare professional and
continue to monitor your BG.
216 Chapter 12
MP6025958-022 / A
RELEASED

Title and text Explanation Next steps
Alert on low XXX mg/dL
Low sensor glucose.
Check BG.
Your SG value is at
or below your
specified low limit.
• Select OK to clear the alert.
• Check your BG.
• Follow instructions from your
healthcare professional and
continue to monitor your BG.
Alert on low XXX mg/dL
Low sensor glucose.
Insulin delivery suspended
since XX:XX. Check BG.
Your SG value is at
or below your
specified low limit,
and the pump has
suspended insulin
delivery due to a
Suspend on low or
Suspend before low
event.
• Select OK to clear the alert.
• Check your BG.
• Follow instructions from your
healthcare professional and
continue to monitor your BG.
Basal delivery resumed
Basal delivery resumed at
XX:XX after suspend by
sensor. Check BG.
Your pump is
resuming basal
insulin delivery after
a Suspend on low
or Suspend before
low event occurred.
• Select OK to clear the alert.
• Check your BG.
• Follow instructions from your
healthcare professional and
continue to monitor your BG.
Basal delivery resumed
Low settings change
caused basal to be
resumed at XX:XX. Check
BG.
Your pump is
resuming basal
insulin delivery after
a Suspend before
low or a Suspend
on low event
occurred, because
you have turned off
the Suspend before
low or the Suspend
on low feature.
• Select OK to clear the alert.
• Check your BG.
• Follow instructions from your
healthcare professional and
continue to monitor your BG.
■ alarms, alerts, and messages
Alarms, alerts, and messages 217
MP6025958-022 / A
RELEASED

Title and text Explanation Next steps
Basal delivery resumed
Maximum 2 hour suspend
time reached. Check BG.
Your pump is
resuming basal
insulin delivery two
hours after a
Suspend before low
or Suspend on low
event occurred.
• Select OK to clear the alert.
• Check your BG.
• Follow instructions from your
healthcare professional and
continue to monitor your BG.
Basal delivery resumed
Maximum 2 hour suspend
time reached. SG is still
under Low limit. Check
BG.
Your pump is
resuming basal
insulin delivery two
hours after a
Suspend before low
or Suspend on low
event occurred.
• Your pump has resumed basal
insulin delivery; however, your SG
value is still at or below your low
limit.
• Select OK to clear the alert.
• Check your BG.
• Follow instructions from your
healthcare professional and
continue to monitor your BG.
BG not received
Place pump close to
transmitter. Select OK to
resend BG to transmitter.
The transmitter was
unable to receive
the calibration BG
meter readings from
the pump.
• Move your pump and transmitter
closer together.
• Select OK. Your pump tries again
to send your BG to your
transmitter for sensor calibration.
218 Chapter 12
MP6025958-022 / A
RELEASED

Title and text Explanation Next steps
Calibrate now
Check BG and calibrate
sensor.
A BG meter reading
is needed
immediately to
calibrate your
sensor so that you
can continue
receiving sensor
glucose readings.
• Take a BG meter reading and
enter for calibration. After you
receive a Calibrate now alert, it
takes up to 15 minutes after you
calibrate for your pump to
receive SG values. For details, see
Calibrating your sensor, on
page 183.
• If you are unable to calibrate
now, you can use the Snooze
feature. Set the desired time, and
select Snooze. If you do not
calibrate before the Snooze time
is up, the Calibrate Now alert
occurs again.
Calibration not accepted
Recheck BG and calibrate
sensor.
Your system was
unable to use the
BG meter readings
you entered to
calibrate your
sensor.
• Wash and dry hands thoroughly.
See Guidelines for calibrating, on
page 186.
• Enter a new BG meter reading for
calibration as instructed in
Calibrating your sensor, on
page 183. If you receive a
Calibration not accepted alert on
your second calibration, a
Change sensor alert occurs.
• Call your local representative if
you have questions.
■ alarms, alerts, and messages
Alarms, alerts, and messages 219
MP6025958-022 / A
RELEASED

Title and text Explanation Next steps
Cannot find sensor
signal
Disconnect and reconnect
transmitter, then select
OK. Notice if transmitter
light blinks.
The pump has not
received a signal
from the
transmitter.
• Disconnect and reconnect your
transmitter and sensor.
• See if the light on your
transmitter blinks when
connected to the sensor. You
may need this information for
troubleshooting later.
• Select OK. Your pump searches
for your sensor. If your pump
receives a signal from your
sensor, you do not need to do
anything else. If your pump does
not receive a signal from the
sensor, another message appears
to let you know.
Change sensor
Insert new sensor and
Start New Sensor.
You selected No in
the Check sensor
insertion message,
indicating that your
sensor is not fully
inserted.
• Select OK to clear the alert.
• Change your sensor. For details,
see your sensor user guide.
• After you change your sensor,
refer to Starting the sensor, on
page 182.
Change sensor
Second calibration not
accepted. Insert new
sensor.
This alert occurs
when you receive
two Calibration not
accepted errors in a
row.
• Select OK to clear the alert.
• Change your sensor. For details,
see your sensor user guide.
Change sensor
Sensor not working
properly. Insert new
sensor.
Sensor signal is no
longer reliable.
• Select OK to clear the alert.
• Change your sensor. For details,
see your sensor user guide.
220 Chapter 12
MP6025958-022 / A
RELEASED

Title and text Explanation Next steps
Check connection
Ensure transmitter and
sensor connection is
secure, then select OK.
The pump fails to
detect the
transmitter and is
unable to receive
sensor signal.
• Select OK to clear the alert.
• If your sensor is fully inserted,
select Yes. If your sensor is not
fully inserted, select No.
• If your sensor was not fully
inserted, insert a new sensor.
• If you still cannot connect your
sensor, see My pump cannot find
the sensor signal, on page 234.
Lost sensor signal
Move Pump closer to
transmitter. May take
15 minutes to find signal.
Transmitter signal
has not been
received for
30 minutes during
or after initialization.
• Move your pump closer to your
transmitter. It can take up to
15 minutes for your pump to
start communicating with your
transmitter.
• Select OK to clear the alert.
Low battery transmitter
Recharge transmitter
within 24 hours.
The battery in the
transmitter needs to
be recharged within
24 hours.
• Select OK to clear the alert.
• Recharge your transmitter as
soon as possible.
Medical device
CALL FOR EMERGENCY
ASSISTANCE. I have
diabetes.
Your pump is
suspended due to
low SG, and you
have not responded
to the alarm within
10 minutes.
• Select Dismiss.
• Immediately call for emergency
assistance.
■ alarms, alerts, and messages
Alarms, alerts, and messages 221
MP6025958-022 / A
RELEASED

Title and text Explanation Next steps
No calibration occurred
Confirm sensor signal.
Calibrate by XX:XX.
The transmitter was
unable to receive
the calibration BG
meter readings from
the pump.
• Select OK to clear the alert.
• Check the status bar on your
pump to ensure that your pump
has a signal from your sensor. If
there is no sensor signal, see My
pump cannot find the sensor
signal, on page 234.
• Calibrate again by the time
shown on the pump screen to
ensure you continue SG
monitoring.
No calibration occurred
Confirm sensor signal.
Check BG again to
calibrate sensor.
The transmitter was
unable to receive
the required
calibration BG from
the pump.
Calibration is
required by the
system for SG
values to resume.
"Calibration
required" appears
on your sensor
graph.
• Select OK to clear the alert.
• Take another BG meter reading
and calibrate again.
Possible signal
interference
Move away from
electronic devices. May
take 15 minutes to find
signal.
There may be
interference from
another electronic
device that is
affecting the
communication
between your
pump and
transmitter.
• Move away from other electronic
devices. It can take up to
15 minutes for your pump to
start communicating with your
transmitter.
• Select OK to clear the alert.
222 Chapter 12
MP6025958-022 / A
RELEASED

Title and text Explanation Next steps
Rise Alert
Sensor glucose rising
rapidly.
Your SG value has
been rising as fast
or faster than your
preset Rise Alert
Limit.
• Select OK to clear the alert.
• Monitor trend and glucose level.
• Follow instructions from your
healthcare professional.
Sensor alert occurred
Check Alarm History for
silenced alerts.
Sensor alert
occurred when Alert
Silence is on.
• Select OK to clear the alert.
• Check the Alarm History screen
to see which alerts were silenced.
For more information about
accessing the Alarm History
screen, see Alarm History, on
page 122.
• Select the alert to open the
Alarm Detail screen.
• Take action based on the
selected alert.
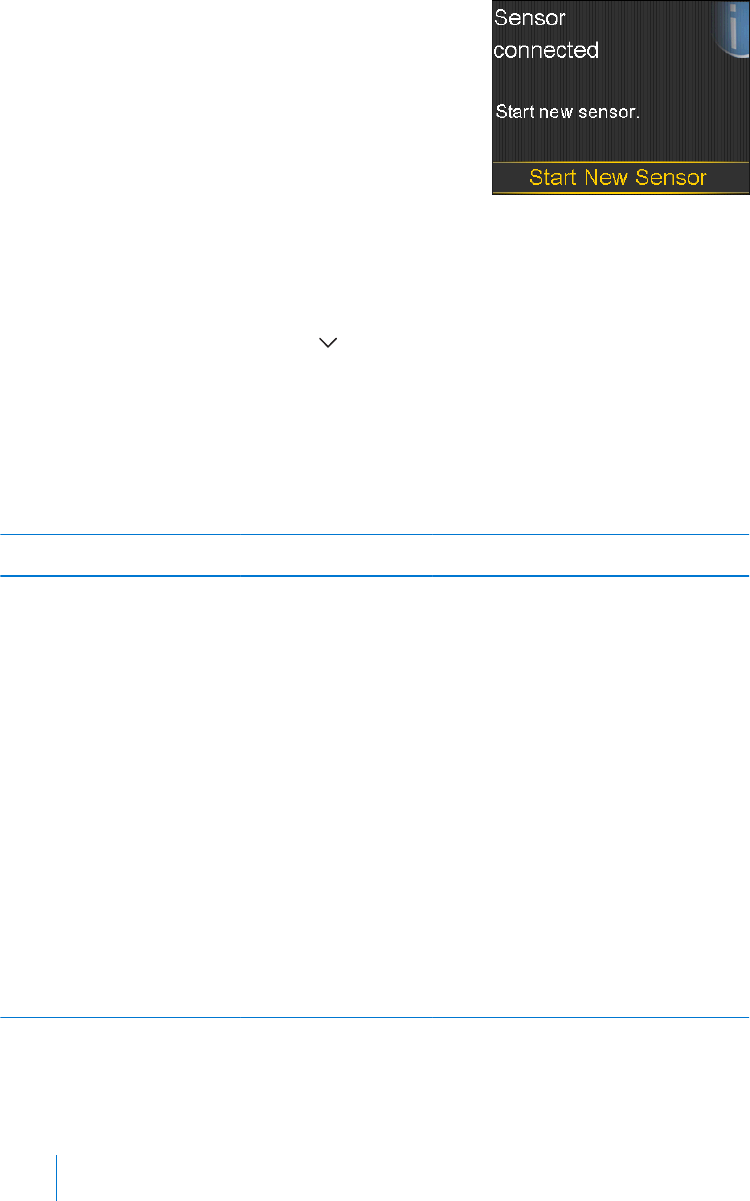
Sensor connected
If new sensor, select Start
New. If not, select
Reconnect.
The transmitter has
detected that you
have connected a
sensor. The pump
needs to know if
this is a new sensor
or if you have
reconnected your
old sensor.
• If you have connected a new
sensor, select Start New Sensor.
• If you have reconnected a sensor
you have been using, select
Reconnect Sensor.
• In either case, a "warm-up"
messages appears on your Home
screen, and you are prompted to
calibrate your sensor. Your pump
starts receiving your SG values
again after the two-hour
initialization is complete.
Sensor expired
Insert new sensor.
The sensor has
been used for
6 days (144 hours).
It has reached the
end of its useful life.
Change your sensor. For details,
see your sensor user guide.
■ alarms, alerts, and messages
Alarms, alerts, and messages 223
MP6025958-022 / A
RELEASED

Title and text Explanation Next steps
Sensor signal not found
Did transmitter light blink
when connected to
sensor?
The pump has still
not received a
signal from the
transmitter.
When you reconnected the
transmitter to the sensor, did you
see a blinking green light on the
transmitter?
• Select Yes or No and follow the
instructions on the screen.
Sensor signal not found
See User Guide.
After multiple
attempts, the pump
failed to detect the
transmitter and is
unable to receive
sensor signal.
• Select OK to clear the alert.
• Repeat the connection process.
Remove the transmitter from the
sensor for about ten seconds,
and then reconnect it to the
sensor.
• It can take up to 15 minutes for
your pump to find the sensor
signal.
• Move your pump closer to your
transmitter to improve reception.
• Make sure you are away from
any electronic devices that might
cause interference, such as
cellular phones and other
wireless devices.
• If your pump still cannot find the
sensor signal, call your local
representative for assistance.
SG value not available
If problem continues, see
User Guide.
The sensor signals
are either too high
or too low.
• Select OK to clear the alert.
• You do not need to change the
sensor. If the alert persists, test
your transmitter with the tester.
Refer to your transmitter user
guide for instructions on testing
the transmitter.
224 Chapter 12
MP6025958-022 / A
RELEASED

Title and text Explanation Next steps
Suspend before low
Delivery stopped. Sensor
glucose approaching Low
Limit. Check BG.
Your SG value is
falling. Insulin
delivery is
suspended
according to your
Suspend before low
setting and your SG
is approaching your
specified low limit.
• Select OK to clear the alert.
• Check your BG. If necessary, treat
your BG as directed by your
healthcare professional.
Suspend on low
Delivery stopped. Sensor
glucose XXX mg/dL.
Check BG.
Your SG value is at
or below the low
limit you specified.
• Select OK to clear the alert.
• Check your BG. If necessary, treat
your BG as directed by your
healthcare professional.
Transmitter battery
depleted
Recharge transmitter now.
The battery in the
transmitter needs to
be recharged. SG
values are not
recorded or
transmitted until
you recharge
transmitter.
• Select OK to clear the alert.
• Recharge your transmitter.
CareLink alert and message
The following table lists the most common or serious alarms, alerts, and messages
related to CareLink. The table also explains the meaning, consequences, and the
reasons why these notifications appear, and provides steps for problem resolution.
■ alarms, alerts, and messages
Alarms, alerts, and messages 225
MP6025958-022 / A
RELEASED

Title and text Explanation Next steps
Connect Device?
Device with SN
<XXXXXXXXXX> is trying
to connect to your pump.
Allow connection?
The CareLink USB
software is
attempting to
connect to your
pump in
preparation for data
download.
• Select Yes to allow connection,
only if you are expecting or
performing a data download.
• Select No to deny connection.
If no selection is made, the
screen will timeout after 30
seconds and will automatically
reject the request.
Download slow
Insulin delivery not
affected. CareLink
download may take
longer than usual. Select
OK to continue. See User
Guide.
The download of
pump data is taking
longer than
expected. Data will
not be affected.
• Select OK to clear the alert.
• Wait for the data to finish
downloading.
• If problem still persists or if there
is no progress in download, call
your local representative for
assistance.
226 Chapter 12
MP6025958-022 / A
RELEASED

troubleshooting
MP6025958-022 / A
RELEASED
MP6025958-022 / A
RELEASED
Troubleshooting
This chapter contains procedures and information to help you understand and
address conditions that might occur with your pump.
For a list of alarms, alerts, and messages that may appear on your pump, see Pump
alarms, alerts, and messages, on page 202.
Troubleshooting pump issues
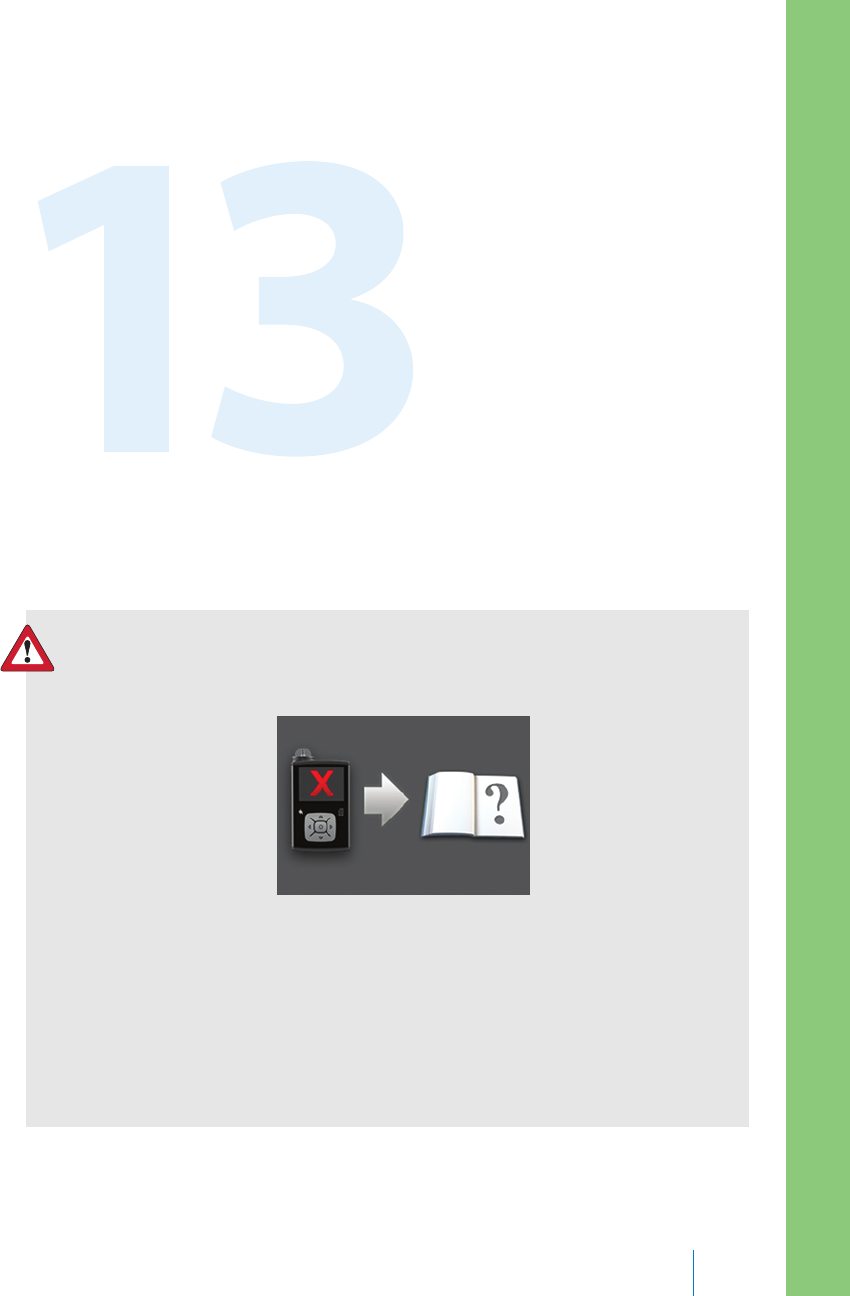
WARNING: If you receive a critical error on your pump, the
following screen displays and the pump sirens.
Immediately disconnect from your insulin pump and discontinue
use. Contact your local representative for assistance.
Remember, your body still needs insulin while your pump is
removed. It is important that you consult your healthcare
professional to determine an alternate method of receiving insulin
while your pump is removed.
Troubleshooting 229
■ troubleshooting
MP6025958-022 / A
RELEASED

What is a Check Settings alarm?
This alarm occurs when a condition causes your pump to reset to factory settings.
You see this alarm after your pump guides you through re-entering the Startup
Wizard settings.
The Check Settings alarm is letting you know that other settings may have been
cleared or reverted to factory default values. Review any settings that you have not
already set in Startup Wizard and re-enter the values, if necessary.
My pump is asking me to rewind
WARNING: Make sure the infusion set is disconnected from your
body before you rewind your pump or fill the infusion set tubing.
Never insert the reservoir into the pump while the tubing is
connected to your body. Doing so could result in an accidental
infusion of insulin, which may cause low BG.
You always rewind your pump when changing the reservoir. Rewinding returns the
piston in the reservoir compartment to its starting position. It is normal for your
pump to ask you to rewind anytime you must remove and replace the reservoir,
such as when resolving an Insulin Flow Blocked alarm or addressing a problem
loading the reservoir.
I dropped my pump
Caution: If your pump has been dropped or you suspect your pump
is damaged, carefully inspect your pump to ensure there are no cracks
before exposing your pump to water.
Do the following:
1. Check that all connections are still tightly in place.
2. Check the display, button area, and pump case for cracks or damage.
3. Check the infusion set, including the tubing connector and tubing for cracks
or damage.
4. Review the status screen, basal rates and other pump settings.
5. Perform the Self Test procedure by going to:
230 Chapter 13
MP6025958-022 / A
RELEASED

Menu > Utilities > Self Test
For details, see Self Test, on page 145.
6. If the Self Test does not complete successfully, or if you are concerned about
your pump, call your local representative for assistance and check your BG.
I cannot get to the Manage Settings screen
If you go to Menu > Utilities > Manage Settings, a message appears telling you
that the feature is not normally accessible and to consult your user guide. To
access the Manage Settings screen:
1. Menu > Utilities > Manage Settings
2. Simultaneously press and hold and for about two seconds. The Manage
Settings screen appears. For more information, see Managing your pump
settings , on page 142.
My pump display times out too quickly
Your pump display times out after 15 seconds by default in order to conserve
battery power. You can increase this setting up to three minutes. Go to Menu >
Utilities > Display Options, and then adjust the Backlight setting as desired. For
more information, see Display Options, on page 141.
Note: Be aware that using a longer Backlight time causes your pump to
use more battery power. When your pump battery is low, the timeout for
the backlight on your pump screen is automatically reduced.
Where is my pump status screen?
1. To go to the Status screen, highlight and select the status bar at the top of
your Home screen.
■ troubleshooting
Troubleshooting 231
MP6025958-022 / A
RELEASED

17:00
Bolus Basal
110
mg/dL
Active Insulin
1.0
U
BG
The Status screen appears.
2. From the Status screen, you can select the type of status information you
want to view. For example, to see a quick status of your pump and recent
insulin deliveries, go to Quick Status. For details, see Status screens, on page 31.
My pump is asking me to enter my settings
Certain pump errors can clear your settings and return them to their factory
default values. This also happens if you intentionally clear your settings. Do not
clear your settings unless directed to do so by your healthcare professional.
If you have saved your settings using the Save Settings option, you can restore
them using the Restore Settings option. If you restore your settings, ensure the
restored settings match the settings prescribed most recently by your healthcare
professional.
The Startup Wizard appears automatically when your pump restarts. The wizard
guides you through entering the following information. Be sure to have these
values ready when you begin.
• Time format, time, and date
•Carb unit
•Active Insulin Time
232 Chapter 13
MP6025958-022 / A
RELEASED

• Basal patterns
After you enter your pump settings, you have the option of entering the following
Bolus Wizard settings:
• Carb ratio or Exchange ratio
• Insulin sensitivity factor
•BG target
To enter your pump settings:
1. Begin entering your settings by selecting your language. Click Next to go to
each new screen.
2. When the Select Time Format screen appears, select a 12-hour or a 24-hour
time format.
3. When the Enter Time screen appears, adjust the setting to the current time. If
you are using a 12-hour clock, be sure to specify AM or PM.
4. When the Enter Date screen appears, adjust the Year, Month and Day to the
current date.
5. When the Select Carb Unit screen appears, select Grams or Exchanges as the
unit your pump uses to display carbohydrate information.
6. When the Active Insulin Time screen appears, enter the Duration.
For details, see About active insulin, on page 71.
7. Enter your first basal rate by entering the End time and the Rate. You can
enter more basal patterns after you complete the startup wizard.
For details, see Adding a new basal pattern, on page 42.
After you complete your basal pattern, a screen appears to allow you to
review your basal information.
8. When the message appears asking if you want to setup the Bolus Wizard
settings, do one of the following:
• Select Yes to continue entering your settings, then continue to the next
section.
• Select No if you do not want to enter your Bolus Wizard settings. A
message appears letting you know that your settings are complete. Select
OK to continue using your pump.
■ troubleshooting
Troubleshooting 233
MP6025958-022 / A
RELEASED

To enter your Bolus Wizard settings:
1. When your pump shows a list of settings for the Bolus Wizard, make sure you
have the values you need before continuing.
2. Depending on the Carb Unit you set earlier, either the Carb Ratio or the Exch
Ratio screen appears. Enter your carb ratio or exchange ratio by entering the
End time and the Rate. You can adjust your carb or exchange ratio at any
time.
For details, see Changing your carb or exchange ratio, on page 69.
3. When the Edit Sensitivity screen appears, enter your insulin sensitivity factor
by entering the End time and the mg/dL per unit. You can adjust your insulin
sensitivity factor at any time.
For details about entering insulin sensitivity factors, including how to set
multiple time periods, see Changing your insulin sensitivity factor, on page 70.
4. When the BG Target screen appears, enter your BG Target range by entering
the End time and your Lo (low) and Hi (high) limits. You can adjust your BG
Target ranges at any time.
For details, see Changing your Bolus Wizard BG target, on page 70.
A message appears confirming that your setup is complete.
5. Select Next to display the Home screen, and continue using your pump.
Troubleshooting sensor issues
My pump cannot find the sensor signal
If your pump cannot find the sensor signal after you connect your sensor and
transmitter, follow the instructions on the pump screen to troubleshoot the issue
as described below.
If your pump finds the sensor signal at any time during troubleshooting, your
pump beeps or vibrates, and "Warm up" appears on your sensor graph. It can take
up to two hours for your sensor to warm up.
234 Chapter 13
MP6025958-022 / A
RELEASED

Note: If you are using Alert Silence and currently have all sensor alerts
silenced, your pump does not display the troubleshooting screens. Any
glucose alerts you received are displayed in the Alarm History screen.
1. Make sure your setup meets the following requirements:
• Your transmitter is fully charged.
If both lights on the charger are off, your transmitter is fully charged. For
details, see your transmitter user guide.
• You have only one transmitter connected to your pump.
Delete the current transmitter that is connected to your pump before
continuing. For details, see Deleting the transmitter from your pump, on
page 181.
• Your transmitter is placed next to your pump.
• Your transmitter is reconnected to the pump, if your pump has been
recently reset. For details, see Wirelessly connecting your pump and
transmitter using Auto Connect, on page 175.
• The Airplane Mode is turned off on your pump.
• You have applied the tape correctly, as instructed in the sensor user
guide.
2. Disconnect the transmitter from the sensor for at least 10 seconds.
3. While the light on the transmitter is blinking, reconnect the transmitter with
the sensor to restart communication and select OK on the pump to
acknowledge the alert.
4. Depending on whether the light blinked when you connected the transmitter
to the sensor, select Yes or No on your pump and do one of the following:
■ troubleshooting
Troubleshooting 235
MP6025958-022 / A
RELEASED

• If the transmitter light did not blink, you need to charge your transmitter.
When your transmitter is charged, start your sensor. For details, see
Starting the sensor, on page 182.
• If your transmitter light blinked, but you still have no sensor signal,
continue to the next step.
5. Move your pump closer to your transmitter and select OK. It can take up to
15 minutes for your pump to find the sensor signal.
6. If your pump still cannot find the sensor signal, make sure you are away from
any electronic devices that might cause interference, such as cellular phones
and other wireless devices, and select OK.
7. If you have gone through all the troubleshooting steps on your pump screen,
and your pump still cannot find the sensor signal, or if your sensor graph
displays "Sensor signal not found. See User Guide," call your local
representative for assistance.
Calibration not accepted
Calibration not accepted alert occurs when one of the following happens:
• System was unable to use the BG meter readings you entered to calibrate
your sensor.
• System rejects two calibrations in a row from the same sensor.
• The transmitter was unable to receive the calibration BG meter readings from
the pump due to failed sensor signal.
For details on when and how to calibrate your sensor, see Calibrating your sensor,
on page 183.
Why does the SmartGuard suspend by sensor icon on my Home screen
appear gray?
The SmartGuard suspend by sensor icon appears gray on the Home screen
when either the Suspend on low or Suspend before low feature is unavailable. The
suspend features may be unavailable due to the following conditions:
• A suspend event has occurred recently.
236 Chapter 13
MP6025958-022 / A
RELEASED

After a Suspend before low or Suspend on low event occurs, there is a period
of time when the suspend functionality is unavailable. This time will vary
depending on whether or not you respond to the suspend event. Typically,
the suspend features will be unavailable for 30 minutes after your basal insulin
delivery is resumed. For details, see When Suspend before low is unavailable, on
page 159 or When Suspend on low is unavailable, on page 162.
• No SG values are available.
SG values may be unavailable because:
• Your pump is in Airplane Mode.
For more information, see Airplane Mode, on page 137.
• Sensor calibration is required.
For details on when and how to calibrate your sensor, see Calibrating your
sensor, on page 183.
• Your pump has lost connection to the sensor.
Move your pump closer to the sensor. For more details, see My pump
cannot find the sensor signal, on page 234.
• The sensor glucose value received was outside the expected range and
was not displayed.
Select OK to clear the alert. If the issue continues, you may need to
replace the sensor.
If the issue persists, call your local representative for assistance.
■ troubleshooting
Troubleshooting 237
MP6025958-022 / A
RELEASED

238 Chapter 13
MP6025958-022 / A
RELEASED

maintenance
MP6025958-022 / A
RELEASED
MP6025958-022 / A
RELEASED

Maintenance
Read your warranty statement included with your pump for information about
what is covered during your warranty period.
Cleaning your pump
Caution: Never use organic solvents, such as lighter fluid, nail polish
remover, or paint thinner to clean your pump. Never use lubricants
with your pump. When cleaning your pump, be sure to keep the
reservoir compartment dry and away from moisture.
Make sure you have the following supplies ready for cleaning your pump: three or
four small, clean, soft cloths, a mixture of water with a mild detergent, clean water,
70% alcohol, and a few clean cotton tips and cotton balls.
To clean your pump:
1. Dampen a cloth with water mixed with a mild detergent.
2. Using the cloth, wipe the outside of the pump.
3. Dampen a clean cloth with water and wipe to remove any detergent residue.
4. Dry with a clean cloth.
5. Wipe your pump with a 70% alcohol wipe for disinfection.
6. Using a dry clean cotton tip, remove any battery residue from the battery cap.
7. Using a dry clean cloth, remove any battery residue from the battery
compartment opening.
Maintenance 241
■ maintenance
MP6025958-022 / A
RELEASED
Cleaning your transmitter
Always refer to your transmitter user guide for instructions on cleaning the
transmitter.
Storing your pump
Storage mode allows you to safely place your pump in storage while not in use.
Note: If you place your pump in storage mode, it is important to insert a
new AA battery for 8 to 12 hours every six months to recharge the
internal power source.
WARNING: Active insulin is now cleared. Any active insulin tracked
prior to the pump entering storage mode is not included in any
new Bolus Wizard calculations.
Placing your pump in storage mode:
1. Remove the AA battery from the pump. For details, see Removing the battery,
on page 23.
Note: When you remove the battery, your pump issues an Insert
Battery alarm for 10 minutes or until you place your pump into
storage mode.
2. Press and hold until your screen turns off.
Caution: Store your pump at room temperature. While in
storage, the pump should never be exposed to temperatures
above 35°C (95°F).
Waking your pump from storage mode
1. Insert a new AA battery into your pump. For details, see Inserting the battery,
on page 22.
242 Chapter 14
MP6025958-022 / A
RELEASED

A Pump Error message appears.
2. Select OK.
Your pump displays a Power Loss alarm.
3. Select OK.
The Time & Date screen appears.
4. Enter the current Time, Time Format and Date.
5. Select Save.
Your pump displays an Active Insulin Cleared alert.
6. Select OK.
Make sure that all of your settings, such as basal rate, are set as desired. If you
need to, reapply your last saved settings by using the Restore Settings option
as instructed in Restoring your settings, on page 143.
Storing your transmitter
Always refer to your transmitter user guide for instructions on storing your
transmitter.
■ maintenance
Maintenance 243
MP6025958-022 / A
RELEASED

244 Chapter 14
MP6025958-022 / A
RELEASED

product specifications and safety information
MP6025958-022 / A
RELEASED
MP6025958-022 / A
RELEASED

Product specifications and safety
information
This chapter provides detailed product specifications and safety information.
Product specifications
This section provides detailed information on product specifications.
Alarm and alert escalation
The following alerts may escalate to a siren:
• Alert before high • Check connection
• Alert before low • Lost sensor signal
• Alert on high • No calibration occurred
• Alert on low • Possible signal interference
• Basal delivery resumed • Rise Alert
• BG not received • Sensor expired
• Calibration not accepted • Sensor signal not found
• Calibrate now • SG value not available
• Cannot find sensor signal • Suspend before low (only if Alert before low is on)
• Change sensor • Transmitter battery depleted
Product specifications and safety information 247
■ product specifications and safety information
MP6025958-022 / A
RELEASED

Minutes from
alarm or
alert
Audio Audio and
vibration
Vibration
0 Audio Audio and vibrate Vibrate
1 Audio Audio and vibrate Vibrate
2 Audio Audio and vibrate Vibrate
3 Audio Audio and vibrate Vibrate
4 Audio Audio and vibrate Vibrate
5 Audio Audio and vibrate Vibrate
6 Audio and vibrate Audio and vibrate Audio and vibrate
7 Audio and vibrate Audio and vibrate Audio and vibrate
8 Audio and vibrate Audio and vibrate Audio and vibrate
9 Audio and vibrate Audio and vibrate Audio and vibrate
10 Siren and vibrate Siren and vibrate Siren and vibrate
Note: The Medical device alarm sirens immediately.
Altitude range
• Pump operating range is from 70.33 kPa (10.2 psiA) to 106.18 kPa (15.4 psiA)
• Storage range is from 49.64 kPa (7.2 psiA) to 106.18 kPa (15.4 psiA)
Audio frequency
The following table lists the various audible tones and their corresponding
frequencies:
Tone name Frequency tolerance (+/- 1%)
Alarm 1655 Hz followed by 3310 Hz
Alternate Alarm 1850 Hz
Siren (escalated alarm) 1655 Hz, followed by 3310 Hz
Alert 934 Hz
248 Chapter 15
MP6025958-022 / A
RELEASED

Tone name Frequency tolerance (+/- 1%)
High Sensor Glucose 1312 Hz, followed by 1410 Hz, 1500 Hz, 1619 Hz,
1722 Hz
Low SG 1722 Hz, 1619 Hz, 1500 Hz, 1410 Hz, 1312 Hz
Lost SG 1485 Hz, followed by 1395 Hz, 1320 Hz, 1395 Hz
Message tone 1655 Hz
Reminder tone 934 Hz
Fill tubing tone 1850 Hz
Bolus delivery cancellation tone 1485 Hz, followed by 1655 Hz and 1485 Hz
Loading complete tone 934 Hz
Reservoir loading in progress
tone
1850 Hz
Easy Bolus activation 1045 Hz
Easy Bolus step 1 increment 1175 Hz
Easy Bolus step 2 increment 1320 Hz
Easy Bolus step 3 increment 1395 Hz
Easy Bolus step 4 increment 1570 Hz
Easy Bolus step 5 increment 1760 Hz
Backlight
Type LED (Light-emitting Diode)
Time out 15 seconds (default), 30 seconds, one minute,
three minutes
Time out when battery is low 15 seconds (default), 30 seconds
Basal delivery
Delivery rate range 0 to 35 units per hour or the Max Basal Rate
amount, whichever is lower.
Max Basal Rate default 2 units per hour
■ product specifications and safety information
Product specifications and safety information 249
MP6025958-022 / A
RELEASED

Basal patterns Maximum of 8 patterns. Each pattern covers a
24 hour period and can have up to 48 rates. Rates
are set in 30 minute increments.
Basal pattern names Fixed names: Basal 1, Basal 2, Basal 3, Basal 4, Basal 5,
Workday, Day Off, Sick Day
Increments • 0.025 units per hour for basal amounts in the
range 0 to 0.975 units
• 0.05 units per hour for basal amounts in the range
1 to 9.95 units
• 0.1 units per hour for basal amounts of 10 to
35 units
BG Target
Maximum targets 8
Range 60 to 250 mg/dL
Default value for High BG
targets and Low BG targets
None
BG meter value
The most recent BG value received from the meter. If you are using a compatible
Bayer meter, this value appears on the Home screen when the Sensor feature is
off. This value also appears in the Bolus Wizard screen when setting up a bolus.
Expiration 12 minutes
Range 20 to 600 mg/dL
Bolus delivery
Bolus Speed options • Standard: 1.5 units/minute
• Quick: 15 units/minute
Bolus programming increments • 0.025 units
•0.05 units
•0.1 units
250 Chapter 15
MP6025958-022 / A
RELEASED

Fluid delivered/stroke • 0.25 μL (microliter) for 0.025 unit pump stroke
• 0.5 μL for 0.05 unit pump stroke
• 2.0 μL for 0.2 unit pump stroke
Bolus Wizard feature default settings
Item Default Limits Increments
Carb units grams - -
Insulin to carb (or
exchange) ratio
None 1–200 g/u
(0.075–15.0
u/exch)
0.1 g/u for 1–9.9 g/u;
1 g/u for ratios of 10 g/u to
200 g/u
(0.001 u/exch for
0.075–0.099 u/exch
0.01 u/exch for 0.10–9.99 u/exch;
0.1 u/exch for 10–15 u/exch)
Insulin Sensitivity
Factor
None 5–400 mg/dL 1 mg/dL
BG Target None 60–250 mg/dL 1 mg/dL
Active Insulin
Time
6 hours 2 to 8 hours 15 minutes
Bolus Wizard feature specifications
There are four different formulas the Bolus Wizard feature uses to estimate a bolus,
depending on your current BG. The following formulas apply only when the carb
units are in grams.
1. If your current BG is greater than your High BG Target, the Bolus Wizard
feature subtracts active insulin from the BG correction estimate, then adds this
to the food estimate to get the total bolus estimate. However, if the result of
subtracting active insulin from BG correction estimate is a negative number
(less than zero), the total bolus estimate is based only on the food estimate.
■ product specifications and safety information
Product specifications and safety information 251
MP6025958-022 / A
RELEASED

(food estimate)
where:
=
(correction estimate)
total bolus
estimate
A = food (grams)
B = carb ratio
C = current BG
D = High BG Target
E = insulin sensitivity
- active insulin
+
A
B
C - D
E
Food estimate:
Carb grams ÷ Carb ratio = Units of insulin
Correction estimate:
(Current BG - High BG Target) ÷ Insulin sensitivity - Active insulin = Units of
insulin
Total bolus estimate:
Food estimate + Correction estimate = Units of insulin
2. If your current BG is less than your Low BG Target, the Bolus Wizard feature
adds the BG correction estimate to the food estimate to get the total bolus
estimate.
(food estimate)
where:
=
(correction estimate)
total bolus
estimate
A = food (grams)
B = carb ratio
C = current BG
D = Low BG Target
E = insulin sensitivity
+
A
B
C - D
E
Food estimate:
Carb grams ÷ Carb ratio = Units of insulin
Correction estimate:
(Current BG - Low BG Target) ÷ Insulin sensitivity = Units of insulin
Total bolus estimate:
252 Chapter 15
MP6025958-022 / A
RELEASED

Food estimate + Correction estimate = Units of insulin
3. If your current BG is between or equal to your High or Low BG Target, the
total bolus estimate is based only on the food estimate.
(food estimate)
=
total bolus
estimate carb ratio
food (grams)
Food estimate:
Carb grams ÷ Carb ratio = Units of insulin
Note: When the current BG is below the Low BG Target, an active
insulin amount is not considered in the Bolus Wizard feature
calculations.
Total bolus estimate = Food estimate
4. If you do not enter a BG, the total bolus estimate is based only on the food
estimate.
Following are some notes about using the Bolus Wizard:
• If a Dual Wave bolus is less than the estimate due to the Max Bolus limit or a
change that you make, the Square portion is reduced first.
• Based on the Active Insulin Time setting you choose, your pump keeps track
of how much insulin is still active in your body. This is shown as Active Insulin
or Act. Ins. on the Home screen, Bolus screen, Manual Bolus screen, Preset
Bolus, and Daily History screens. This prevents stacking of insulin, and lowers
the chances of hypoglycemia.
• The Bolus Wizard feature may utilize your current BG measurement,
carbohydrate consumption, and active insulin to calculate your estimated
bolus.
•Active Insulin Curve
■ product specifications and safety information
Product specifications and safety information 253
MP6025958-022 / A
RELEASED
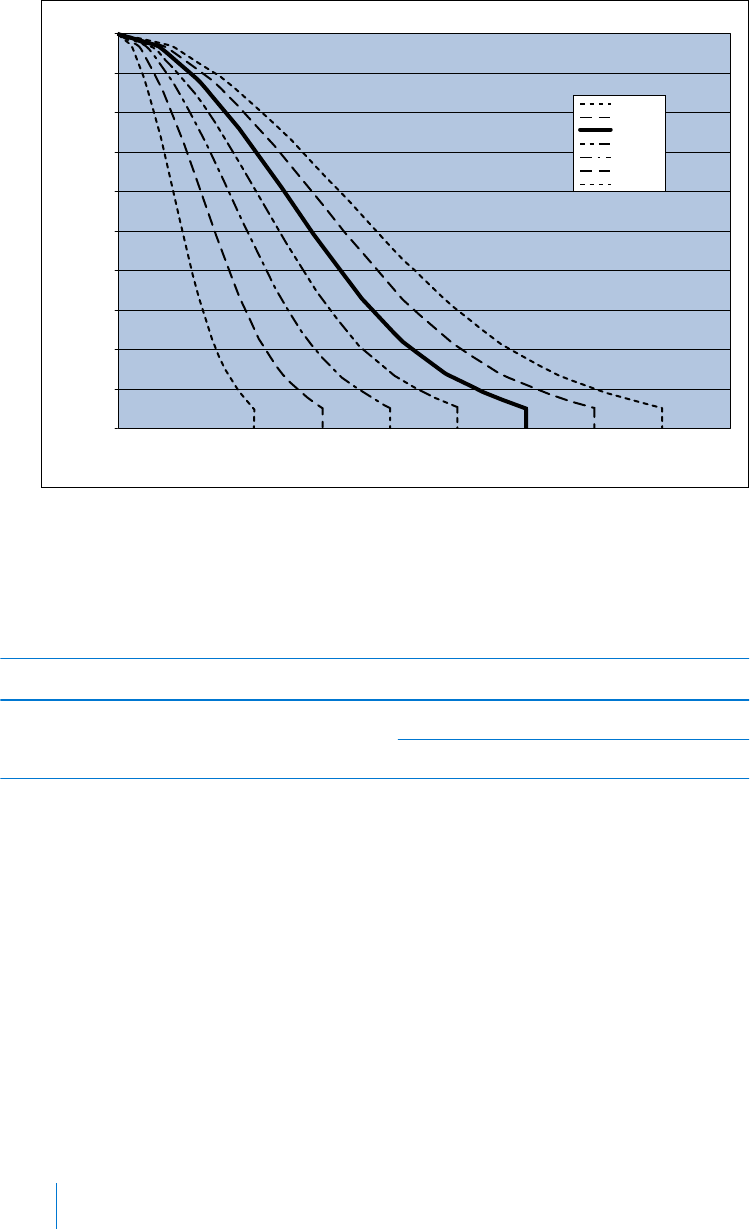
% Insulin Remaining
Time (hours)
Active Insulin Curve
100%
90%
80%
70%
60%
50%
40%
30%
20%
10%
0%
01 2 3456 978
8 Hour
7 Hour
6 Hour
5 Hour
4 Hour
3 Hour
2 Hour
Graph adapted from Mudaliar and colleagues, Diabetes Care, Volume 22,
Number 9, Sept. 1999, page 1501.
Carb ratios
Maximum ratio settings Range
8
1 to 200 grams/unit
0.075 to 15 units/exch
Delivery accuracy
• Delivery accuracy: ±5%.
• All Normal boluses are delivered within 50 minutes ±3 seconds at Standard
rate (75 units, at 1.5 units per minute), and within 5 minutes ±3 seconds at
Quick rate (75 units, at 15 units per minute).
• The maximum infusion pressure generated and the occlusion threshold
pressure is 86.12 kPa (12.49 psi). The bolus volume generated is 0.01225 mL.
• The following is a representative delivery accuracy curve.
254 Chapter 15
MP6025958-022 / A
RELEASED
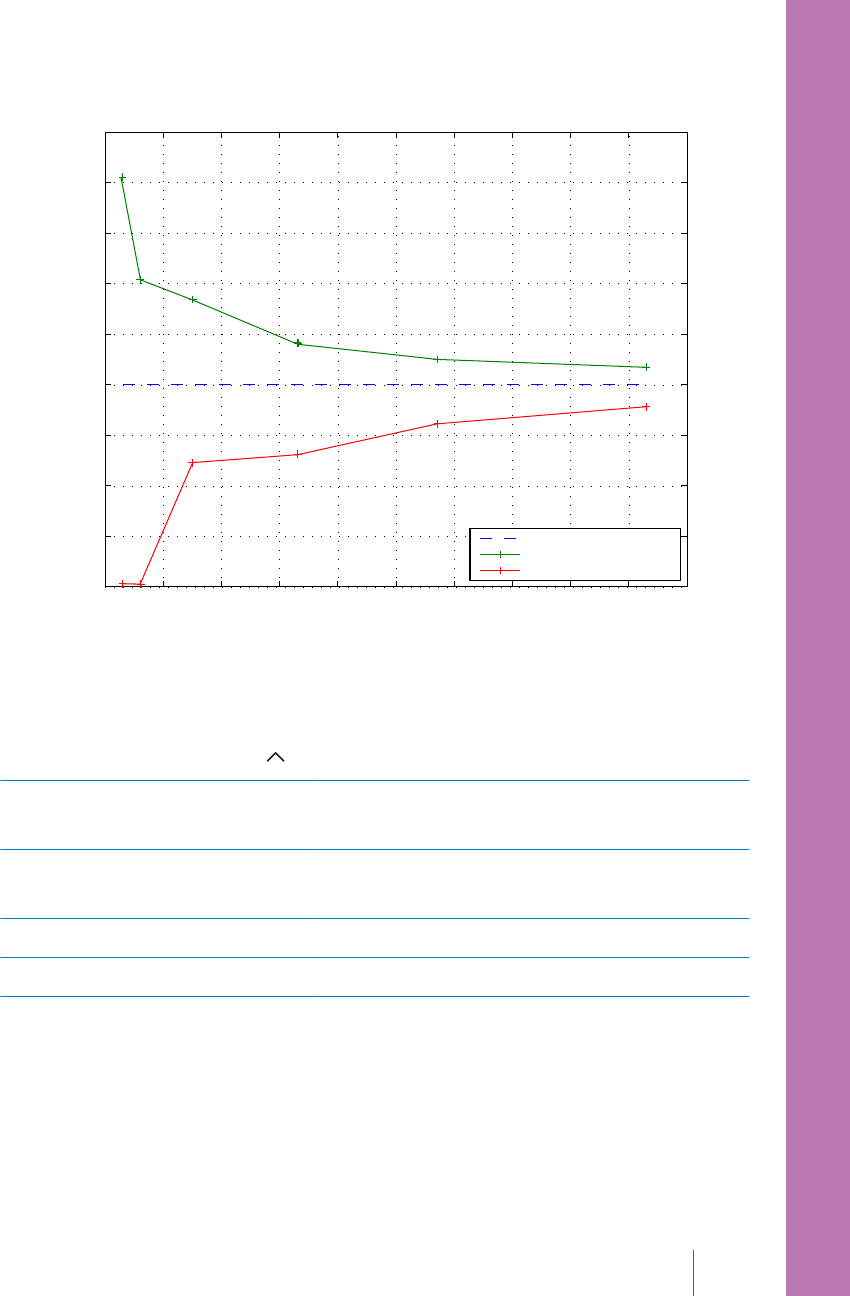
010 20 30 40 50 60 70 80 90 100
−20
−15
−10
−5
0
5
10
15
20
25
Trumpet Curve for MMT−1511/1512
Observation Window [Minutes]
Percent Error [%]
Overall Error
Maximum Error
Minimum Error
Easy Bolus
Allows user to set up and deliver a Normal Bolus when the pump is in Sleep
Mode. This is done using the and with the help of audio and vibration cues.
Audio mode range 0 to 20 increments or Max Bolus limit, whichever
comes first
Vibrate mode range 0 to 20 increments or Max Bolus limit, whichever
comes first
Default step size 0.1 unit
Adjustable step size 0.1 to 2 units per increment up to Max Bolus limit
Environmental conditions
• Pump operating temperature range is from 5°C (41°F) to 40°C (104°F).
• Air pressure range is from 10.2 psi to 15.4 psi (700 hPa to 1060 hPa).
■ product specifications and safety information
Product specifications and safety information 255
MP6025958-022 / A
RELEASED

• Operating humidity range of the case: 20% to 90%.
This requirement exceeds IEC 60601-1, subclause 7.9.3.1 (30% to 75%).
Filling the infusion set and cannula
• The cannula can be filled from 0.025 units to 5.1 units, in increments of
0.025 units.
• The standard fill rate is 1.5 units per minute.
The quick fill rate is 15 units per minute.
• When filling the tubing, a warning occurs at 30 units, and thereafter at every
10 units.
• Insulin used to fill the infusion set is recorded in the Daily History.
Infusion pressure
The maximum infusion pressure and occlusion pressure is 86.12 kPa (12.49 psi).
Insulin delivery default settings
Bolus settings
Item Default setting Limits Increments
Bolus Wizard
feature:
Off - -
Easy bolus: Off - -
Easy bolus step
size:
0.1 U 0.1 U to 2 U -
Bolus increment: 0.10 U 0.025 U
0.05 U
0.10 U
-
Dual/Square
bolus:
Off - -
Max bolus: 10 U 0 to 75 U (per
single bolus)
-
Bolus BG Check
Reminder:
Off 0:00 to 5:00 0:30
256 Chapter 15
MP6025958-022 / A
RELEASED

Basal settings
Item Default setting Limits Increments
Max Basal Rate 2 U/h 0–35 U/h 0.025 U for
0.025–0.975 U/h
0.05 U for 1.00–9.95 U/h
0.1 U for rates of 10.0 U/h
or more
Basal Rate 0.000 U/h 0.000 U/h to Max
Basal Rate setting
0.025 U for
0.025–0.975 U/h
0.05 U for 1.00–9.95 U/h
0.1 U for rates of 10.0 U/h
or more
Temp Basal Type Percent Percent, Rate N/A
Temp Basal
Percent
100% 0-200% 5%
Temp Basal Rate Current basal
rate
0.0 U/hr to Max
Basal Rate
0.025 U for
0.025–0.975 U/h
0.05 U for 1.00–9.95 U/h
0.1 U for rates of 10.0 U/h
or more
Insulin sensitivity factor
Maximum settings 8
Default None. Insulin sensitivity is set during Startup of the Bolus
Wizard.
Range 5 to 400 mg/dL/unit
Low Reservoir reminder
The values are based on displayed amount, not actual amount.
■ product specifications and safety information
Product specifications and safety information 257
MP6025958-022 / A
RELEASED

Alert
type
Alert range Increment Default
value
Time First reminder occurs at 2 to 24 hours. Second
reminder occurs one hour before empty. The
second reminder is automatic and cannot be
changed by the user.
30 min 8 hours
Units First reminder occurs at 5 to 50 units. Second
reminder occurs at 50 percent of the
remaining specified amount. The second
reminder is automatic and cannot be changed
by the user.
1 unit 20 units
Max Bolus
Range 0 to 75 units
Default 10 units
Normal bolus
Range is 0.025 to 75 units of insulin, and limited by the Max Bolus setting.
Occlusion detection
When occlusion is detected, the Insulin flow blocked alarm occurs. The occlusion
alarm is triggered by an average of 2.23 units of missed insulin (standard bolus) or
1.97 units of missed insulin (quick bolus). The MiniMed pump is intended for use
with U100 insulin. This table shows occlusion detection for four different situations
when using U100 insulin.
Rate Minimum time
before alarm
Average time
before alarm
Maximum time
before alarm
bolus delivery (10 units at
standard speed)
71 seconds 95 seconds 136 seconds
bolus delivery (10 units at
quick speed)
9 seconds 10 seconds 14 seconds
basal delivery (1.0 u/h) 2.00 hours 2.50 hours 3.80 hours
basal delivery (0.025 u/h) 123.38 hours 142.03 hours 178.33 hours
258 Chapter 15
MP6025958-022 / A
RELEASED

Percent temp basal
The default value is 100 percent of basal programming.
Range 0 to 200%
Default 100% of basal programming
Increment 5%
Program safety checks
A single fault condition will cause the pump to suspend insulin delivery. Maximum
infusion with a single fault condition is 0.2 units.
Pump dimensions
The MMT-1512 pump dimensions in inches are approximately
2.1 width x 3.34 length x 0.96 depth.
The MMT-1512 pump dimensions in centimeters are approximately 5.3 width x 8.5
length x 2.44 depth.
The MMT-1712 pump dimensions in inches are approximately
2.1 width x 3.78 length x 0.96 depth.
The MMT-1712 pump dimensions in centimeters are approximately 5.3 width x 9.6
length x 2.44 depth.
Pump memory
User settings and pump history are stored in non-volatile memory which will retain
data. The memory size will hold 90 days of pump history before it becomes full
and has to be written over. This means that at any time the user can review a
maximum of 90 days of history.
Pump weight
The mass of the MiniMed 640G insulin pump (MMT-1512) is approximately 91.9
grams.
The mass of the MiniMed 640G insulin pump (MMT-1712) is approximately 95.7
grams.
■ product specifications and safety information
Product specifications and safety information 259
MP6025958-022 / A
RELEASED

Sensor default settings
High sensor settings
Item Default
setting
Limits Increments
High SG alert
limit
250 mg/dL 100 to 400 mg/dL 5 mg/dL
Alert before high Off - -
Alert on high Off - -
Time before high 15 minutes 5 to 30 minutes 5 minutes
Rise Alert Off - -
Rise Limit Two up
arrows
• 1up arrow
(1 mg/dL/min)
• 2 up arrows
(2 mg/dL/min)
• 3 up arrows
(3 mg/dL/min)
•Custom limit
(1.0 to 5.0 mg/dL/min)
High Snooze 1 hour 5 minutes to 3 hours 5 minutes
Low sensor settings
Item Default
setting
Limits Increments
Low SG alert
limit
60 mg/dL 50 to 90 mg/dL 5 mg/dL
Suspend before
low
Off - -
Suspend on low Off - -
Alert before low Off - -
Alert on low Off - -
Low Snooze 20 minutes 5 minutes to 1 hour 5 minutes
260 Chapter 15
MP6025958-022 / A
RELEASED

Low sensor settings
Item Default
setting
Limits Increments
Resume basal
alert
Off - -
■ product specifications and safety information
Product specifications and safety information 261
MP6025958-022 / A
RELEASED

Guidance and manufacturer's declaration
Guidance and Manufacturer's Declaration - Electromagnetic Emissions
The MiniMed 640G insulin pump is intended for use in the electromagnetic
environment specified below. The customer or the user of the MiniMed insulin
pump should make sure that it is used in such an environment.
Emissions Test Compliance Electromagnetic Environment -
Guidance
RF emissions
Test: 47 CFR Part 15,
Subpart C Section
15.247(a)(2)/RSS-210
FHSS– DAOO-705,
DTS-KDB 558074,
ANSI C63.4, RSS-Gen,
FCC Part 15 Section
15.109, Class B/ANSI
c63.4 (2009)
•6 dB and 99%
Bandwidths: Pass
•Maximum Output
Power: Pass
• TX Spurious
Emissions: Pass
• Power Spectral
Density: Pass
The MiniMed insulin pump must emit
electromagnetic energy in order to
perform its intended function. Nearby
electronic equipment may be
affected.
RF emissions
EN55011 (2009)+A1
Class B The MiniMed insulin pump is suitable
for use in all establishments,
including domestic and those directly
connected to the public low-voltage
power supply network that supplies
buildings used for domestic purposes.
RTCA DO 160G (2010)
20.5 and 21.5
Complies
ARIB STD-T66 Complies
262 Chapter 15
MP6025958-022 / A
RELEASED

Guidance and Manufacturer's Declaration - Electromagnetic Immunity
The MiniMed 640G insulin pump is intended for use in the electromagnetic
environment specified below. The customer or the user of the MiniMed insulin
pump should assure that it is used in such an environment.
Immunity Test IEC 60601 Test
Level
Compliance
Level
Electromagnetic
Environment -
Guidance
Electrostatic discharge
(ESD)
IEC 61000-4-2
±8 kV contact
±15 kV air
±30 kV air
(<5% relative
humidity)
For use in a typical
domestic, commercial,
or hospital
environment.
Electrical fast transient/
burst
±2 kV for power
supply lines
Not applicable Requirement does not
apply to this battery
powered device.
IEC 61000-4-4 ±1 kV for input/
output lines
Surge
IEC 61000-4-5
±1 kV line(s) to
line(s)
±2 kV line(s) to
earth
Not applicable Requirement does not
apply to this battery
powered device.
Voltage dips, short
interruptions and
voltage variations on
power supply lines
IEC 61000-4-11
<5% UT
(>95% dip in UT
) for 0.5 cycle
Not applicable Requirement does not
apply to this battery
powered device.
Power frequency
(50/60 Hz) magnetic
field
IEC 61000-4-8
400 A/m
(continuous
field at 60
seconds)
4000 A/m (short
duration at 3
seconds)
400 A/m
4000 A/m
Power frequency
magnetic fields should
be at levels
characteristic of a
typical location in a
typical commercial or
hospital environment.
Note: UT is the a.c. mains voltage prior to application of the test level.
■ product specifications and safety information
Product specifications and safety information 263
MP6025958-022 / A
RELEASED

Guidance and Manufacturer's Declaration - Electromagnetic Immunity
The MiniMed 640G insulin pump is intended for use in the electromagnetic
environment specified below. The customer or user of the MiniMed insulin pump
should assure that it is used in such an electromagnetic environment.
Immunity
Test
IEC 60601
Level
Compliance
Level
Electromagnetic Environment
Guidance
Portable and mobile RF
communications equipment should
be used no closer to any part of the
MiniMed insulin pump, including
cables, than the recommended
separation distance calculated from
the equation applicable to the
frequency of the transmitter.
264 Chapter 15
MP6025958-022 / A
RELEASED

Guidance and Manufacturer's Declaration - Electromagnetic Immunity
The MiniMed 640G insulin pump is intended for use in the electromagnetic
environment specified below. The customer or user of the MiniMed insulin pump
should assure that it is used in such an electromagnetic environment.
Radiated RF
IEC 61000-4-3
10 V/m
80 MHz to
800 MHz
10 V/m
800 MHz to
2.5 GHz
10 V/m
80 MHz to
800 MHz
10 V/m
800 MHz to 6
GHz
Recommended separation distance
d = [12/E
1
]P
80 MHz to 800 MHz
d = [23/E
1
]P
800 MHz to 6 GHz
Where P is the maximum output
power rating of the transmitter in
watts (W) according to the
transmitter manufacturer and d is the
recommended separation distance in
meters (m).
Field strengths from fixed RF
transmitters, as determined by an
electromagnetic site surveya, should
be less than the compliance level in
each frequency rangeb.
Interference may occur in the vicinity
of equipment marked with the
following symbol:
Note: At 80 MHz and 800 MHz, the higher frequency range applies.
Note: These guidelines may not apply in all situations. Electromagnetic propagation is
affected by absorption, and reflection from structures, objects and people.
Note: The table is per IEC (EN) 60601-1-2 Edition 3.
■ product specifications and safety information
Product specifications and safety information 265
MP6025958-022 / A
RELEASED

Guidance and Manufacturer's Declaration - Electromagnetic Immunity
The MiniMed 640G insulin pump is intended for use in the electromagnetic
environment specified below. The customer or user of the MiniMed insulin pump
should assure that it is used in such an electromagnetic environment.
aField strengths from fixed transmitters, such as base stations for radio (cellular/
cordless) telephones and land mobile radios, amateur radio, AM and FM radio
broadcasts and TV broadcast cannot be predicted theoretically with accuracy. To assess
the electromagnetic environment due to fixed RF transmitters, an electromagnetic site
survey should be considered. If the measured field strength in the location in which
the MiniMed insulin pump is used exceeds the applicable RF compliance level above,
the insulin pump should be observed to verify normal operation. If abnormal
performance is observed, additional measures may be necessary, such as re-orienting or
relocating the MiniMed insulin pump.
bOver the frequency range 150 kHz to 80 MHz, field strengths should be less than 10
V/m.
266 Chapter 15
MP6025958-022 / A
RELEASED

Recommended separation distances between the MiniMed 640G insulin
pump and common household radio transmitters
Household RF
Transmitter
Frequency Recommended
Separation
Distance (meter)
Recommended
Separation
Distance (inch)
Telephones
Cordless Household 2.4 GHz 0.3 12
Cordless Household 5.8 GHz 0.3 12
TDMA-50 Hz (cell phone) 1.9 GHz 0.3 12
TDMA-50 Hz (cell phone) 800 MHz 0.3 12
PCS (cell phone) 1.9 MHz 0.3 12
DCS (cell phone) 1.8 MHz 0.3 12
GSM (cell phone) 900 MHz 0.3 12
GSM (cell phone) 850 MHz 0.3 12
CDMA (cell phone) 800 MHz 0.3 12
Analog (cell phone) 824 MHz 0.3 12
CDMA (cell phone) 1.9 MHz 0.3 12
WiFi Networks
802.11b 2.4 GHz 1 39.5
802.11g 2.4 GHz 1 39.5
802.11n 2.4 GHz 1 39.5
Bluetooth 500 kb/s 2.4 GHz 0.1 3.93
ZigBee 250 kb/s 2.4 GHz 0.1 3.93
■ product specifications and safety information
Product specifications and safety information 267
MP6025958-022 / A
RELEASED

Recommended separation distances between portable and mobile RF
communications equipment and the MiniMed 640G insulin pump
The insulin pump is intended for use in an electromagnetic environment in which
radiated RF disturbances are controlled. The customer or user of the MiniMed
insulin pump can help prevent electromagnetic interference by maintaining a
minimum distance between portable and mobile RF communications equipment
(transmitters) and the MiniMed insulin pump as recommended below, according to
the maximum output power of the communications equipment.
Rated maximum output
power of transmitter (W)
Separation distance according to the frequency of
transmitter (m)
80 MHz to 800 MHz
d=1.2 P
800 MHz to 6 GHz
d=2.3 P
0.01 0.12 0.23
0.1 0.38 0.73
11.22.3
10 3.8 7.3
100 12 23
For transmitters rated at a maximum output power not listed above, the recommended
separation distance d in meters (m) can be estimated using the equation applicable to
the frequency of the transmitter, where p is the maximum output power rating of the
transmitter in watts (W) according to the transmitter manufacturer.
Note: At 80 MHz and 800 MHz, the separation distance for the higher frequency range
applies.
Note: These guidelines may not apply in all situations. Electromagnetic propagation is
affected by absorption and reflection from structures, objects and people.
Wireless communication
Quality of service
The CGM transmitter and MiniMed insulin pump are associated as part of an
802.15.4 network for which the pump functions as the coordinator and the CGM
transmitter as an end node. In an adverse RF environment the MMT-1512/1712
pump will assess channel changing needs based on "noise" levels detected during
268 Chapter 15
MP6025958-022 / A
RELEASED

an energy scan. The pump will perform the energy scan if after 10 minutes no
CGM transmitter signal has been received. If the channel change occurs the pump
will send beacons on the new channel.
The CGM transmitter will initiate a channel search when beacon detection fails on
the associated channel. The search will be conducted across all five channels.
When the beacon is located the transmitter will rejoin on the identified channel.
Upon re-association any missed packets (up to 10 hours) will be transmitted from
the CGM transmitter to the pump.
In normal operation the CGM transmitter will transmit a packet every 5 minutes
and retransmit the packet if the data is corrupted or missed.
Radio frequency (RF) communications specifications
Utilizes the IEEE 802.15.4 protocol with the proprietary data format.
Pump frequency 2.4 GHz; proprietary Medtronic protocol; range up to
1.8 meters (6 feet).
Maximum output
power (EIRP)
-1.59 dBm
Operating frequencies 2420 MHz, 2435 MHz, 2450 MHz, 2465 MHz, 2480 MHz
Bandwidth 5 MHz which is allocated channel bandwidth per the IEEE
protocol
Data security
The MiniMed 640G insulin pump is designed to only accept radio frequency (RF)
communications from recognized and linked devices (you must program your
pump to accept information from a specific device).
The MiniMed 640G system ensures data security via proprietary means and ensures
data integrity using error checking processes, such as cyclic redundancy checks.
■ product specifications and safety information
Product specifications and safety information 269
MP6025958-022 / A
RELEASED
Icon table
Follow instructions for use
Manufacturer
Date of manufacture (year - month)
Use by (year - month)
Catalogue number
Device serial number
Storage temperature range
Storage humidity range
Magnetic Resonance (MR) unsafe
Type BF equipment (protection from electrical shock)
Radio communication
Pump: Protected against the effects of continuous immersion in water (12
feet or 3.6 meters for 24 hours).
Signifies compliance with Australian EMC, EME and Radio communications
requirements
Signifies compliance with Industry Canada EMC and Radio communications
requirements
This symbol means that the device fully complies with MDD 93/42/EEC (NB
0459) and R&TTE Directive 1999/5/EC.
270 Chapter 15
MP6025958-022 / A
RELEASED

appendix a: end user software license agreement
MP6025958-022 / A
RELEASED
MP6025958-022 / A
RELEASED

End user software license
agreement
End user software license agreement
NOTICE TO USER: Certain portions of software contained in this product may be
covered by the GNU General Public License, Version 2 or Version 3 (“Open Source”),
which can be obtained through the GNU web site at www.gnu.org/copyleft/
gpl.html. The source code for any Open Source can be obtained, for a nominal fee
to cover the cost of shipping and media, by contacting Medtronic MiniMed, Inc.,
Director of Software Development, 18000 Devonshire Street, Northridge, CA
91325-1219, USA, tel: +1-866-948-6633.
End user software license agreement 273
■ appendix a: end user software license agreement
MP6025958-022 / A
RELEASED

274 Appendix A
MP6025958-022 / A
RELEASED

glossary
MP6025958-022 / A
RELEASED
MP6025958-022 / A
RELEASED

Glossary
active insulin Bolus insulin that has been delivered by the pump and is
still working to lower your blood glucose levels.
active insulin adjustment The amount of insulin that is subtracted from your BG
correction bolus to account for the active insulin that is
tracked by the Bolus Wizard.
Active Insulin Time A Bolus Wizard setting that lets you set the length of
time that bolus insulin is tracked as active insulin.
Activity Guard An attachment that can be used to ensure that the
reservoir stays secure during activity, or when the pump
is worn by a child.
Airplane Mode A feature that temporarily stops your device from
communicating wirelessly.
alarm An audible beep or vibration with a message to inform
you that the pump is no longer delivering insulin. Alarms
require immediate action.
Alarm History A feature that stores information about recent alarms
and alerts.
alert An audible beep or vibration with a message to inform
you of a situation that may require your attention.
Alert before low An alert that occurs when you are approaching your low
sensor glucose value.
Alert Limits The values that you set to determine when low and high
glucose alerts are triggered.
Glossary 277
■ glossary
MP6025958-022 / A
RELEASED

Alert on low An alert that occurs when your sensor glucose value
reaches or falls below your low limit.
Auto Suspend An alarm that you set to suspend insulin delivery and
trigger an alarm if no buttons are pressed for a specified
period of time. Clearing the alarm resumes insulin
delivery.
Awake mode A state in which the pump screen is on. Unless you are
actively using another screen, your Home screen appears.
basal insulin Insulin that is continuously delivered by the pump to
meet your individual insulin needs between meals and
during sleep.
basal pattern A set of one or more basal rates that covers a 24-hour
period.
basal rate The amount of continuous basal insulin that you
program your pump to automatically deliver per hour.
BG Abbreviation for blood glucose. See blood glucose.
BG Targets The high and low values to which your blood glucose is
corrected when using the Bolus Wizard.
Block Mode A feature that restricts the ability to change all settings.
You can still perform certain functions, such as
suspending insulin delivery, reviewing history, testing
your pump, or clearing alarms and alerts.
blood glucose (BG) Refers to glucose (sugar) that is present in the blood,
commonly measured by a blood glucose meter.
blood glucose meter A device that measures glucose levels in the blood.
Bolus BG Check reminder A reminder that you set just after you program a bolus.
The reminder notifies you to check your blood glucose
when the time period that you specified has passed.
bolus insulin Insulin used to cover an expected rise in glucose levels
from carbohydrates, or to lower a high blood glucose
value down to your target range.
Bolus Speed A feature that lets you choose the speed at which your
device delivers bolus insulin.
278 Glossary
MP6025958-022 / A
RELEASED

Bolus Wizard A feature that uses your individual Bolus Wizard settings
to calculate an estimated bolus amount based on the BG
values and carbs that you enter. These settings include
Carb Ratio, Insulin Sensitivity Factor, BG Target Range,
and Active Insulin Time.
calibrate The process of using a meter blood glucose reading to
calculate sensor glucose values.
Calibration reminder A reminder you can set to let you know when your next
calibration is due.
cannula Short, thin, and flexible tube placed in the tissue below
the skin. Insulin is delivered through the cannula into the
body.
carb ratio The number of grams of carbohydrates covered by one
unit of insulin. The carb ratio is used to calculate bolus
amounts.
carb unit The unit of measure for carbohydrates, either grams (g)
or exchanges (exch).
CGM Abbreviation for continuous glucose monitoring. See
continuous glucose monitoring.
continuous glucose
monitoring (CGM)
A monitoring tool that uses a glucose sensor placed
below the skin to continuously measure the amount of
glucose in your interstitial fluid.
correction bolus Insulin used to lower a high blood glucose value down
to your target range.
Daily History A feature that displays the actions that you performed
using your device.
Dual Wave™ Bolus A type of bolus that provides a dose of insulin delivered
as a combination of a Normal Bolus followed by a
Square Wave Bolus.
Easy Bolus™ A feature that lets you deliver a Normal Bolus in preset
increments using only audio or vibrate confirmation.
Event Marker A feature that allows you to record events, such as blood
glucose readings, injections, carbohydrates, and exercise.
■glossary
Glossary 279
MP6025958-022 / A
RELEASED

exchange ratio The number of insulin units that are needed to cover
1 carbohydrate exchange. The exchange ratio is based
on your individual needs and is used to calculate bolus
amounts.
food bolus A dose of insulin you give to cover an expected rise in
glucose levels from carbohydrates.
High limit The value you set to determine when the pump will
alert you of a high sensor glucose condition.
infusion set Tubing that connects to the reservoir on one end, and
has a needle or cannula on the other end, that you
insert into your body. Insulin travels from the pump
through the infusion set into your body.
infusion site The location on the body where the infusion set is
inserted.
insulin sensitivity factor The amount that blood glucose is reduced by one unit
of insulin. The insulin sensitivity factor is used to
calculate correction bolus amounts.
interstitial fluid The fluid that surrounds the cells in the body.
ISIG The signal created by the sensor that is used to calculate
your sensor glucose value. Typically used by Medtronic
technical support representatives when troubleshooting.
lock A pump feature that prevents accidental button presses.
Low limit The value you set to determine when the pump will
alert of a low sensor glucose condition, and also used for
determining if insulin delivery should be suspended.
Manual Bolus A feature that allows you to enter and deliver a dose of
insulin in the amount that you have determined is
necessary.
Max Basal Rate A feature that allows you to set the maximum amount
of basal insulin that can be delivered per hour.
Max Bolus A feature that allows you to set the maximum bolus
amount that can be delivered in one dose.
meter A term for any blood glucose meter.
280 Glossary
MP6025958-022 / A
RELEASED

Missed Meal Bolus
reminder
A reminder that a bolus was not delivered during time
periods that you specify, often set around your meal
times.
Normal Bolus A type of bolus that provides an entire dose of insulin
immediately.
notifications All notifications are designed to get your attention and
convey different types of information. They include
alarms, alerts, reminders, and messages.
occlusion A blockage or crimp of the cannula or tubing that
prevents proper insulin flow.
piston The part of the insulin pump that engages the reservoir
and moves insulin through the tubing.
Power save mode A state in which your pump is fully functional, but the
screen goes dark to save power. You can set how long it
takes for your screen to enter power save mode by
changing the Backlight setting.
Preset Bolus A feature that allows you to set up and save a bolus for
specific meals or snacks that you frequently eat or drink.
Preset Temp Basal A feature that allows you to set up and save temporary
basal rates for repeated use.
Rate alert An alert that notifies you if your sensor glucose value has
been rising or falling faster than the Rise Limit or Fall
Limit that you have set.
reminder A type of notification that you can set to help you
remember to do something.
reservoir The small container that you fill with insulin and insert
into your delivery device.
Resume basal alert An alert that can be set to occur when your pump has
automatically resumed basal insulin delivery after a
Suspend before low or Suspend on low event because
your sensor glucose values have met the necessary
criteria. This alert will always occur if basal insulin delivery
has resumed because the two hour maximum suspend
time has elapsed.
■glossary
Glossary 281
MP6025958-022 / A
RELEASED

Rewind A feature used when changing a reservoir. It returns the
piston to its starting position and allows a new reservoir
to be placed into the pump.
sensitivity See insulin sensitivity factor.
sensor (glucose sensor) The small part of the continuous glucose monitoring
system that you insert just below your skin to measure
glucose levels in your interstitial fluid.
sensor glucose (SG) Refers to glucose (sugar) that is present in the interstitial
fluid and is measured by a glucose sensor.
Set Change reminder A reminder that you can set to change your infusion set.
SG Abbreviation for sensor glucose. See sensor glucose.
Sleep mode A state in which your pump is fully functional, but the
screen is dark. Your pump automatically enters sleep
mode when you have not pressed any buttons for about
two minutes.
SmartGuard™ A feature that can automatically stop and resume insulin
delivery based on your sensor glucose values and low
limit.
Square Wave™ Bolus A bolus delivered evenly over a specified time period.
Suspend before low A feature that suspends insulin delivery when the sensor
predicts sensor glucose value is approaching your low
limit.
Suspend Delivery This feature stops all insulin delivery until you resume it.
Only the basal insulin restarts when delivery is resumed.
Suspend on low A feature that suspends insulin delivery when your
sensor glucose value reaches or falls below your low
limit.
Temp Basal Rate
(temporary basal rate)
A feature that allows you to temporarily increase or
decrease your current basal rate for a duration of time
that you specify.
transfer guard The plastic piece that comes attached to the reservoir. It
is used to connect the reservoir to the insulin vial while
filling the reservoir with insulin.
282 Glossary
MP6025958-022 / A
RELEASED

transmitter A device that connects to a glucose sensor. The
transmitter collects data measured by the sensor and
wirelessly sends this data to monitoring devices.
■glossary
Glossary 283
MP6025958-022 / A
RELEASED

284 Glossary
MP6025958-022 / A
RELEASED

index
MP6025958-022 / A
RELEASED
MP6025958-022 / A
RELEASED

Index
A
accessories 15
active insulin
about 71
adjustment 71
clearing settings 144
Home screen 26
injection warning 71
viewing amount 27
Active Insulin cleared alert 202
Active Insulin Time
about 66
changing 71
Airplane Mode
setting up 138
status bar 29
using 137
Alarm History 122
alarms
about 199
audio options 201
Auto Suspend 203
Battery failed 203
Battery not compatible 203
Bolus not delivered 203
Bolus stopped 203
CGM 216
Critical pump error 204
Delivery limit exceeded 205
emergency siren 201
Fill Cannula? 205
Insert battery 205
Insulin flow blocked 206, 207, 208, 209
Loading incomplete 209
Manage Settings error 210
Max Fill reached 210, 211
No reservoir detected 211
notification light 200
overview 200
pump 202, 225
Pump error 212, 213
Pump restarted 213
red icon 200
Replace battery 213
Replace battery now 214
sensor 216
siren 201
Stuck button 215
Alert before high SG setting 156
Alert before low
about 160
summary screen 120
Alert on high SG setting 156
Alert on low
about 163
summary screen 120
Alert Silence 193
alerts
about 199
Active Insulin cleared 202
audio options 201
BG not received 218
Calibrate now 219
Calibration not accepted 219
Cannot connect device 204
Index 287
■ index
MP6025958-022 / A
RELEASED

Cannot find sensor signal 220
CGM 216
Change sensor 220
Check connection 221
Check settings 204
Download slow 226
Lost sensor signal 221
Low battery Pump 209
Low battery transmitter 221
Low reservoir 210
No calibration occurred 222
notification light 201
overview 201
Possible signal interference 222
pump 202, 225
Reservoir estimate 214
Rise alert 223
sensor 216
Sensor alert occurred 223
Sensor expired 223
Sensor signal not found 224
SG value not available 224
silencing 193
Transmitter battery depleted 225
yellow icon 201
areas, for inserting infusion set 103
arrows, trend 192
audio
options 33
settings 138
silencing 193
vibrate 29
auto connect 175
Auto Suspend alarm 203
awake mode 34
B
backlight
battery use 21
setting up 141
basal
about 39
current delivery 52
daily delivery amount 118
delivery 39
history 117, 118
Home screen 26
Max Basal Rate 41
patterns 41
Preset Temp basal rate 49
rate 39
settings 40
summary 117
Temp Basal 47
basal patterns
about 42
adding 46
changing 46
deleting 46
example 42
battery
about 21
alarm 203, 205, 213, 214
alert 209
belt clip 23
compartment location 19
disposal 23
inserting 22
removing 23
replacing 22
status bar icon 28
types 21
Battery failed alarm 203
Battery not compatible alarm 203
belt clip
part number 15
remove battery cap 23
BG
Home Screen 26
sensor calibration 185
BG meter readings
average 119
manual high 120
manual low 120
meter high 120
meter low 119
summary 119
288 Index
MP6025958-022 / A
RELEASED

BG not received alert 218
BG target
Bolus Wizard 66
setting up 70
Block Mode
status bar 31
using 139
blood glucose
Home screen 26
sensor calibration 185
bolus
about 59
daily delivery amount 118
delivery speed 63
history 117, 118
increment setting 63, 64
Max bolus 62
reminders 131
setting delivery speed 63
settings 62
summary 117, 118
types 59
Bolus BG Check reminder, about 130
bolus deliveries
about 59
Bolus Wizard 61, 65
delivery rate 63
Dual Wave 79
Easy Bolus 62, 82
Manual Bolus 61, 75
Max Bolus setting 62
Normal bolus 73, 75
options 61
Preset Bolus 61, 85
resume message 214, 215
Square Wave 76
stopping 88
types 59
Bolus not delivered alarm 203
Bolus stopped alarm 203
bolus types
DualWave 60
examples 60
Normal 59
Square Wave 60
Bolus Wizard
Active Insulin Time 66
BG target 66
Carb ratio 65
Dual Wave 79
Exchange ratio 65
High BG warning 72
injection warning 71
Insulin Sensitivity Factor 65
Low BG warning 72
Max Bolus Exceeded warning 73
Normal bolus 73
Square Wave 77
warnings 72
C
calibrate
error 220, 221
sensor 183
when to 186
Calibrate now alert 219
calibration
guidelines 186
icon 30
Calibration not accepted alert 219
Calibration reminder 133
Cannot connect device alert 204
Cannot find sensor signal alert 220
cannula alarm 205
carb ratio 69
Carb Units 140
CareLink Personal Software 124
Change sensor alert 220
Check connection alert 221
Check settings alert 204
cleaning
pump 241
transmitter 242
■index
Index 289
MP6025958-022 / A
RELEASED

clearing
active insulin 144
pump settings 143
Connect Device message 226
connecting pump, transmitter
automatically 175
manually 178
connection, failure 178
Consumable
infusion set 13
reservoir 13
continuous glucose monitoring
about 151
airplane mode 137
alarms 216
alerts 216
calibrating sensor 183
connecting pump, transmitter 175
examples 164
High Settings 156
home screen 152
Low Settings 157
messages 216
sensor feature, turning on 167
sensor glucose reading 191
sensor graph 191
settings 155
correction estimate 251, 252
Critical pump error 204
D
Daily History 121
date
changing 148
Startup Wizard 24
delivery
stop bolus 33
suspend all 33
Delivery limit exceeded alarm 205
Download slow alert 226
Dual Wave 60
about 79
Bolus Wizard 79
example 60
Manual bolus 81
resume message 214, 215
setting up 79
E
Easy bolus
about 82
Manual bolus 84
setting up 83
step size 83
electromagnetic emissions 262
Electromagnetic environment 267, 268
electromagnetic immunity 263
emergency
kit 4
siren 201
emergency kit 4
emissions 262
event markers
about 124
blood glucose 125
exercise 125
food 125
injection 125
setting up 124
exchange ratio 69
F
Fill Cannula? alarm 205
food estimate 251, 252, 253
G
glucose alerts, silencing 193
graph, sensor 191
H
High BG, Bolus Wizard warning 72
High Limit SG setting 156
High Settings
about 156
entering 167
290 Index
MP6025958-022 / A
RELEASED

history
about 117
menu 33
pump settings, viewing 145
summary 117
Home Screen
about 26
active insulin amount 26
basal delivery 26
blood glucose reading 26
bolus delivery 26
CGM, with 152
display 21
sensor glucose 152
sensor glucose reading 152
sensor graph 152
sensor status icons 152
status bar 26
time 26
trend arrows 152
I
icons
Home Screen 28
sensor status 152
SmartGuard 155, 159, 162
suspend by sensor 155
infusion set
about 93
best insertion sites 103
disconnect Quick-set 107
fill cannula alarm 205
fill tubing 101
inserting 103
reconnect Quick-set 107
reservoir alarm 209
reservoir and tubing 33
reservoir removal 93
rotating sites 104
setting up 93
type 13
Insert battery alarm 205
inserting
infusion set 103
reservoir 99
sensor 181
insulin
basal 39
basal patterns 41
bolus 59
flow blocked alarm 206, 207, 208, 209
icon 29
Max Fill reached alarm 210, 211
settings 33
insulin delivery
Block Mode 139
resuming 54, 163, 174
stopping 54, 88
suspending 54, 139, 158, 161
Insulin flow blocked
alarm 206, 207, 208, 209
Insulin Sensitivity Factor
about 65
setting up 70
ISIG
view 124
L
language
changing 141
starting 24
light, red 200
Loading incomplete alarm 209
Lost sensor signal alert 221
Low battery Pump alert 209
Low battery transmitter alert 221
Low BG, Bolus Wizard warning 72
Low limit 158
Low Reservoir
alert 132, 210
reminder 132
Low Settings
about 157
entering 171
examples 164
■index
Index 291
MP6025958-022 / A
RELEASED

M
maintenance 241
Manage Settings error alarm 210
managing, pump settings 142
Manual bolus
Dual Wave 81
Easy bolus 84
Normal bolus 75
Square Wave 78
Max Basal
alarm 205
rate 40
Max Basal Rate
setting 41
Max Bolus
alarm 205
exceeded 73
setting 62
warning 63
Max Fill reached alarm 210, 211
Menu screen
about 32
accessing 32
audio options 33
display 21
event markers 33
history 33
insulin settings 33
reminders 33
reservoir and tubing 33
sensor settings 33
suspend delivery 33
utilities 33
messages
about 199
audio options 202
blue icon 202
CGM 216
Connect Device 226
continuous glucose monitoring 216
overview 202
pump 202, 225
Resume bolus 214
Resume Dual bolus 214, 215
Resume Square bolus 215
sensor 216
Sensor connected 223
Missed Meal Bolus reminder 131
modes
Block 139
power 34
mute alerts 193
N
No calibration occurred alert 222
No reservoir detected alarm 211
Normal bolus
about 73
Bolus Wizard 73
delivery 73
example 60
Manual bolus 75
resume message 214
notification light 200, 201
notifications 31
O
ordering supplies 15
P
patterns, basal
about 42
adding 46
changing 46
copying 46
deleting 46
example 42
personal reminder 129
Possible signal interference alert 222
power save mode 34
Preset Bolus
about 85
changing 86
deleting 86
delivering 87
292 Index
MP6025958-022 / A
RELEASED

Dual Wave 85
renaming 86
setting up 85
Square Wave 85
Preset Temp Basal rate
about 40
starting 51
Preset Temp basal rate
about 49
editing 50
managing 49
setting up 49
previous screen 21
pump
alarms 202, 225
alerts 202, 225
buttons 20
cleaning 241
connecting, transmitter 175, 178
connection status 29
deleting, transmitter 181
messages 202, 225
navigation 24
notification light 20
overview 19
parts illustration 19
rewinding 94
settings 232
storing 242
unlocking 26
Pump error alarm 212, 213
Pump restarted alarm 213
pump settings
clearing 143
managing 142
restoring 143
saving 142
specifications 247
viewing history 145
Q
quick status 31
Quick-set infusion set
disconnecting 107
reconnecting 108
R
rate, basal
about 39
Preset Temp 40
Temp 40, 47
rate of change arrows 152
red light 200, 201
reminders
about 129
Bolus BG Check 130
Calibration 133
Low Reservoir 132
Menu screen 33
Missed Meal Bolus 131
Personal 129
Set Change 133
remote bolus 62, 112
Replace battery alarm 213, 214
reservoir
about 93
compartment image 19
inserting 99
Loading incomplete alarm 209
Low Reservoir alert 210
Max Fill reached alarm 210, 211
Menu screen 33
No reservoir detected alarm 211
ordering 15
plunger rod 97
removal 93
Reservoir estimate at 0 U 214
setting up 93
transfer guard 97
type 13
Reservoir estimate alert 214
restoring, pump settings 143
Resume basal alert 163, 164
Resume bolus message 214
Resume Dual bolus message 214, 215
■index
Index 293
MP6025958-022 / A
RELEASED

Resume Square bolus message 215
resuming suspended delivery 54, 163, 174
return to previous screen 21
RF communications 267, 268
Rise Alert
responding to 223
SG setting 157
summary screen 120
Rise Limit SG setting 157
S
saving
power 34
pump settings 142
screen
Active Insulin Time 71
Airplane Mode 138
Alarm History 122
Audio Options 139
Auto Suspend 139
Basal Pattern Setup 46
BG Check 130
BG Target 70
Block Mode 140
Bolus Increment 64
Bolus Speed 64
Bolus Wizard Setup 66, 71
Carb Ratio 69
Carb Unit 140
Display Options 141
Dual/Square Wave 77
Easy Bolus 83
Enter Date Screen 25
Enter Time 25
Event Markers 124
Exchange Ratio 69
Fill Cannula 106
Fill Tubing 102
Home Screen 26, 152
Language 24, 141
Low Reservoir 133
Manual bolus 75
Max Bolus 63
Missed Meal Bolus 131
New Reservoir 95
Personal reminder 129
Preset Bolus Setup 86
Preset Temp Setup 50
Select Time Format 24
Self Test 146
Sensitivity 70
Sensor Demo 147
Sensor Glucose Review 122
Sensor Settings 167
Set Change 133
Summary 117
Suspend Delivery 54
Temp Basal 48
Time and Date 148
Welcome screen 24
scroll bar 21, 34
select 21
sensor
airplane mode 137
alarms 216
alerts 216
BG not received alert 218
calibrating 183, 186
calibration alert 219
calibration icon 30
connecting, transmitter 182
disconnecting, transmitter 187
expired alert 223
feature, turning off 187
feature, turning on 167
graph 152
inserting 181
life icon 30
messages 216
pair 175, 178
removing 187
settings 33, 167
signal alert 220
starting 182
status icons 152
294 Index
MP6025958-022 / A
RELEASED

summary 120
trend arrows 152
wireless connection 175, 178
Sensor alert occurred
responding to 223
Sensor connected message 223
Sensor Demo 146
Sensor expired alert 223
sensor glucose
arrows 192
graph 191
high settings 156
history 191
low settings 157
review 122
rise alert 223
sensor alert occurred 223
sensor graph
about 191
trend arrows 192
Sensor signal not found alert 224
serial number, pump 12
Set Change reminder 133
settings
basal 40
bolus 62
Bolus Wizard 65
CGM 155
low SG 157
product specifications 247
startup 24
troubleshooting 229
SG average 120
SG Std. Dev. 120
SG value not available alert 224
silencing alerts 193
siren 201
sleep mode 35
SmartGuard
about 152
icon 155, 159, 162
summary 121
Square Wave 60
about 76
Bolus Wizard 77
example 60
Manual bolus 78
resume message 214, 215
setting up 76
starting
sensor 182
Startup Wizard
about 24
re-entering settings 232
using 24
status bar
about 28
Airplane Mode 29
audio mode 29
battery 28
Block Mode 31
CGM, with 152
CGM, without 26
Connection icon 29
icons 28
insulin amount 29
sensor calibration 30
sensor life 30
time 26
status screens
about 31
notifications 31
pump 31
quick status 31
sensor 31
settings review 32
stopping
bolus 88
insulin delivery 54
storage mode 242
Stuck button alarm 215
summary screen
about 117
basal 118
BG meter readings 119
bolus 118
■index
Index 295
MP6025958-022 / A
RELEASED

overview 118
total carbs 118
total daily dose 118
viewing 117
supplies, ordering 15
Suspend before low
about 158
examples 164, 165, 166
unavailable 159
suspend by sensor
icon 155
Suspend on low
about 161
examples 166
unavailable 162
suspended delivery, resuming
automatically 163
manually 54, 174
suspending insulin delivery 54, 139, 158, 161
T
temp basal rate
about 47
percent 47
preset 40
rate 47
starting 48
types 47
Time before high SG setting 156
time, current changing 148
transmitter
communication 29
connecting, pump 175, 178
deleting, from pump 181
signal alert 220
Transmitter battery depleted alert 225
trend arrows 192
troubleshooting 229
tubing
filling 101
image 19
Max Fill reached alarm 210, 211
U
unavailable
Suspend before low 159
Suspend on low 162
unlocking 26
utilities 33
V
viewing history, pump settings 145
W
wireless connection
automatic 175
failure 178
manual 178
296 Index
MP6025958-022 / A
RELEASED

■index
Index 297
MP6025958-022 / A
RELEASED

298 Index
MP6025958-022 / A
RELEASED
MP6025958-022 / A
RELEASED
6025958-022_a
MP6025958-022 / A
RELEASED

MP6025958-022 / A
RELEASED