Mercury Networks QUANTUM6636 6x6 MIMO WiMAX Base Station User Manual PureWave Quantum 6600 User Guide v2 1
Mercury Networks, LLC 6x6 MIMO WiMAX Base Station PureWave Quantum 6600 User Guide v2 1
Contents
Part 2 updated user guide RevE
PureWave Quantum 6600 User Guide v2.1
Page 51
3.4.2.4 Tools Users
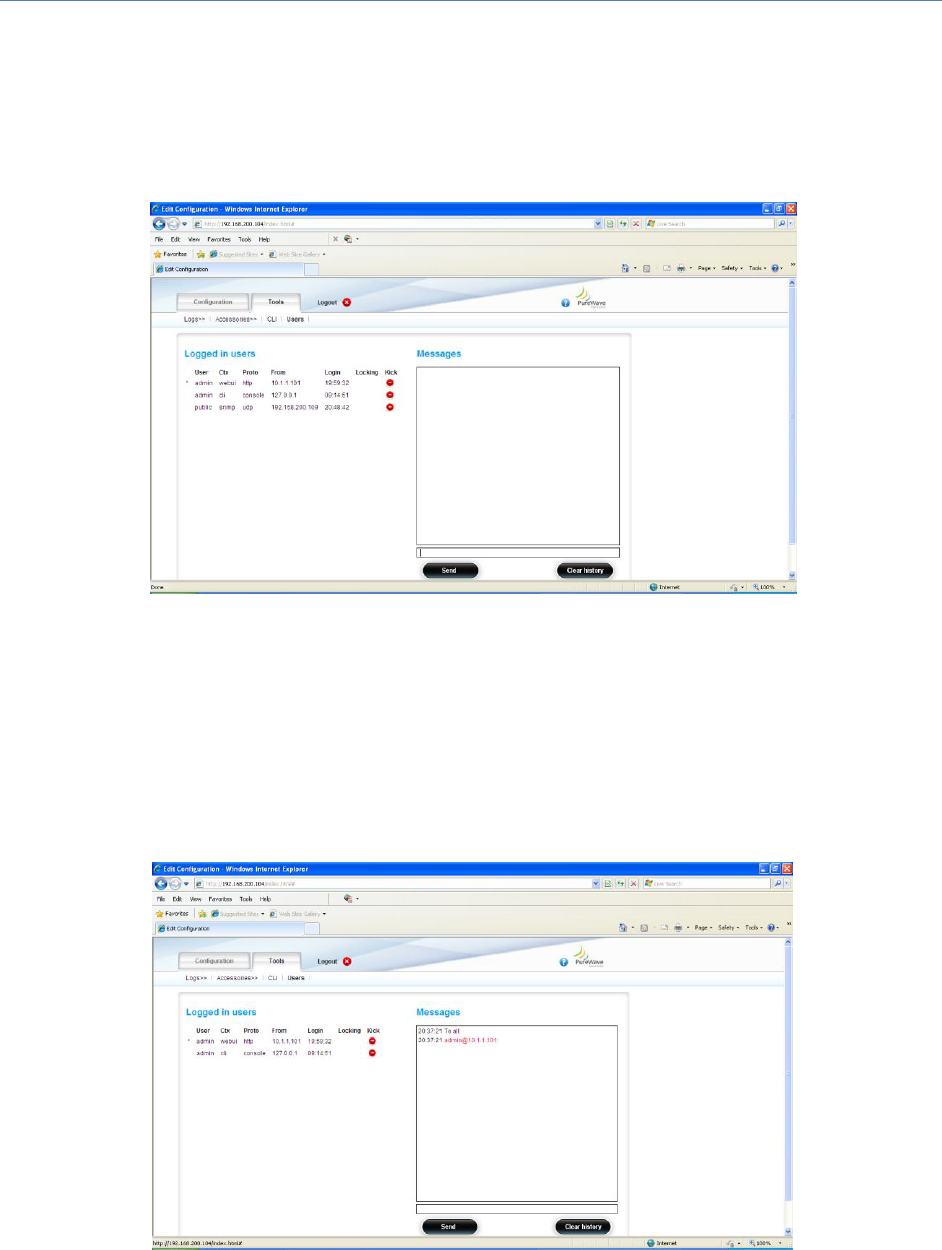
At the Main Web GUI Interface Screen, select the Tools Tab and then Users. The User is presented with
a screen that indicates the Users that are currently logged in to the Base Station and an instant
messaging section to communicate with these Users (figure 37).
Figure 37: The Tools Tab Users Connected to Base Station
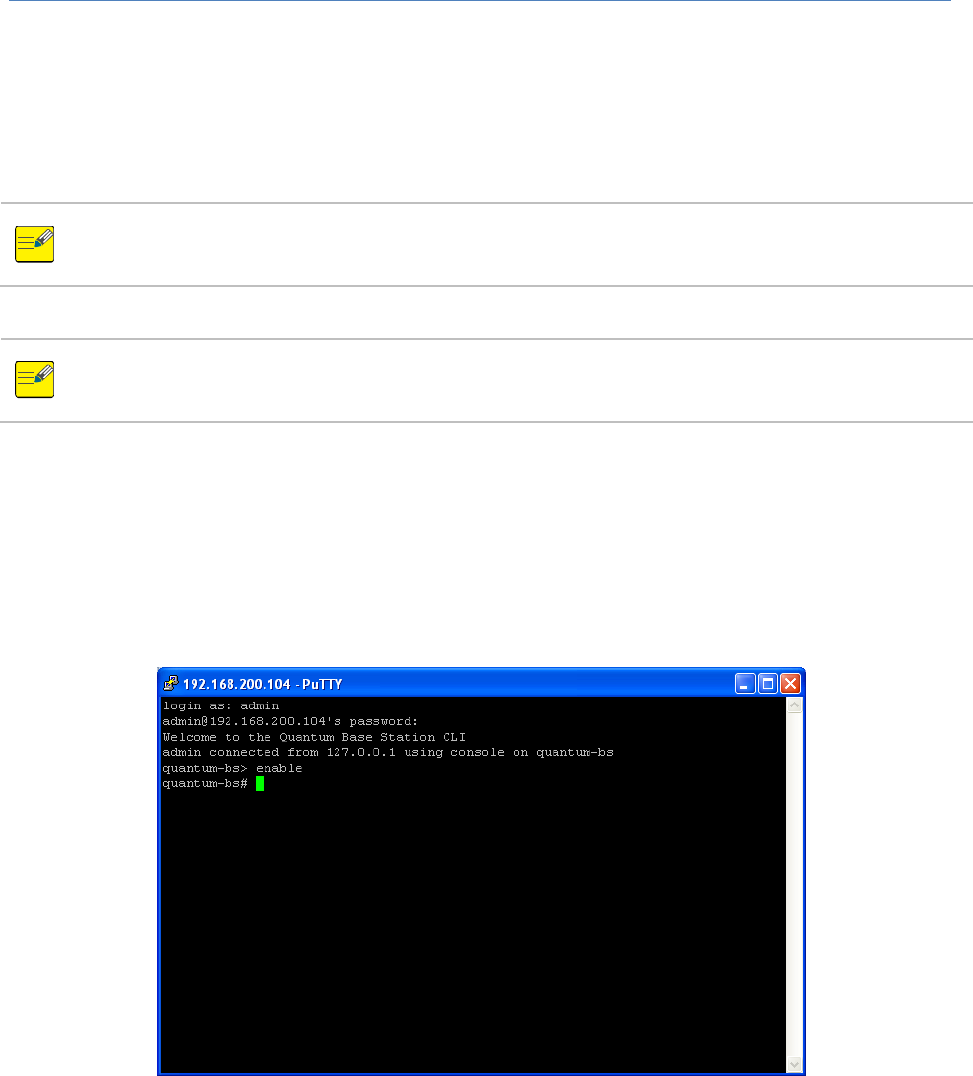
The User can also physically disconnect or "kick" off the User. The User simply has to select the Kick
command option. A message board is provided to enable instant messages to be sent to the Users that
are currently connected to the Base Station. The User simply has to enter the relevant message in the
text box and then press Send. There is also the option to Clear history if required (refer to figure 38).
Figure 38: The Tools Tab Users Instant Messaging

PureWave Quantum 6600 User Guide v2.1
Page 52
3.5 Base Station Initial Configuration
3.5.1 System Architecture and Terminology
In this section we will configure the minimal set of parameters that must be appropriately set prior to
deployment. It is important to first clarify some terminology related to the system architectural model.
In typical terminology, a Base Station is comprised of one or more co-located sectors. Each PureWave
Quantum 6000 Base Station can be deployed either by itself, as a single-sector Base station, or as one
sector in a multi-sectored Base station. In either case, each PureWave Quantum 6000 must be fully
configured and provisioned in its entirety, as if it was a standalone Base Station.
The various Web Interface configuration parameters are organized into a hierarchical tree, and that
some parameters are labeled as “Base Station” level and some “sector” level. Since the Quantum 6000
Base Station is really both a sector and a Base station, the differentiation is for organizational purposes,
as well as compatibility with future multi-sector functionality or products.
Additionally, a Base Station must be connected to subscriber devices on the air-interface side and to a
Core Network on the backhaul side. As discussed previously, PureWave Quantum 6000 Base Stations
can flexibly support a variety of core network configurations, ranging from a simple router (“Standalone
Mode”) to a full ASN-GW. It also has a built-in Radius client for connection to an external AAA server
when in Standalone Mode.
3.5.2 Base Station Management Interface and Access Parameters
Table 10 lists the minimum set of management interface parameters that must be set prior to
deployment. These parameters govern how an operator, administrator, or management system
interfaces with and gains access to the Base Station. Before proceeding, please gather the information
listed in the table. Factory default values are provided here as they are required for initial access.
Parameter
Description
Factory Default
Mgmt IP Address
IP address used for all external mgmt
interfaces (CLI / Web / SNMP).
192.168.1.10
Mgmt IP Netmask
Mgmt interface IP netmask
255.255.255.0
Mgmt Default Gateway
Mgmt interface default gateway
192.168.1.254
Hostname
String name assigned to the Base Station.
quantum-bs
admin User Password
Unique password for default admin
admin123
Table 10: Base Station Management Interface and Access Parameters
PureWave Quantum 6600 User Guide v2.1
Page 53
To perform the initial configuration of the Base Station, it is recommended to configure the
Management Interface Parameters via accessing through the Base Station Console Port. To complete
this section you will need the data in Table 10.
If the management IP settings are "unknown" then the Base Station can only be accessed via
its Console port (refer to section 3.3.1). Once the Base Station has been accessed, its
management IP settings can be reset using the procedure detailed in section 3.4.
Even though the CLI may be accessed through the Ethernet ports, it is not the recommended
method of changing the management interface parameters, as connectivity with the port will
be lost immediately upon changing them.
Log into the CLI (Section 3.3) and execute the commands as indicated to configure the Base Station
access parameters. Text in brackets <…> should be replaced with your configuration data to replace the
default values from the table above.
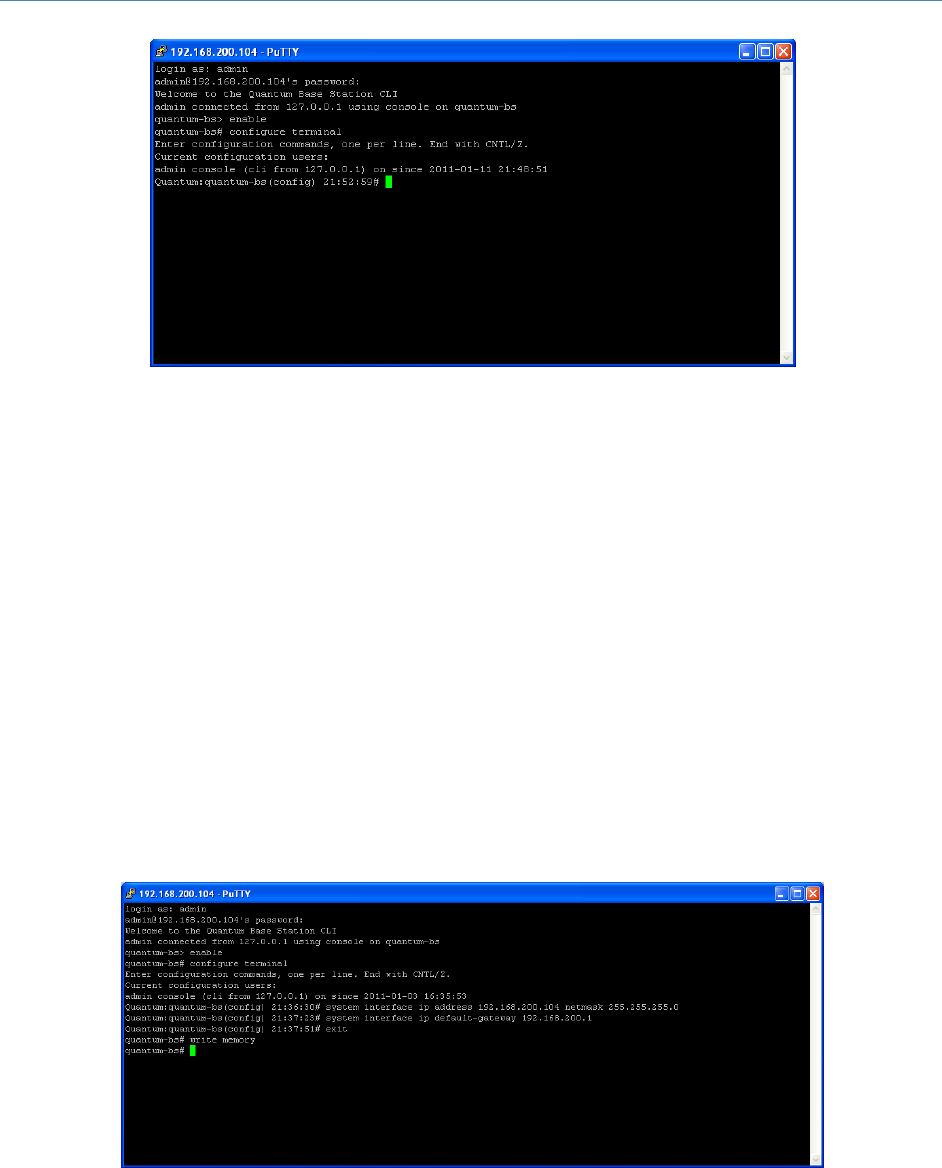
(1) At the quantum-bs> prompt, type enable. This will drop the User into the enable mode and the
prompt will change from > to # (refer to figure 39).
Figure 39: Initial Connection to CLI
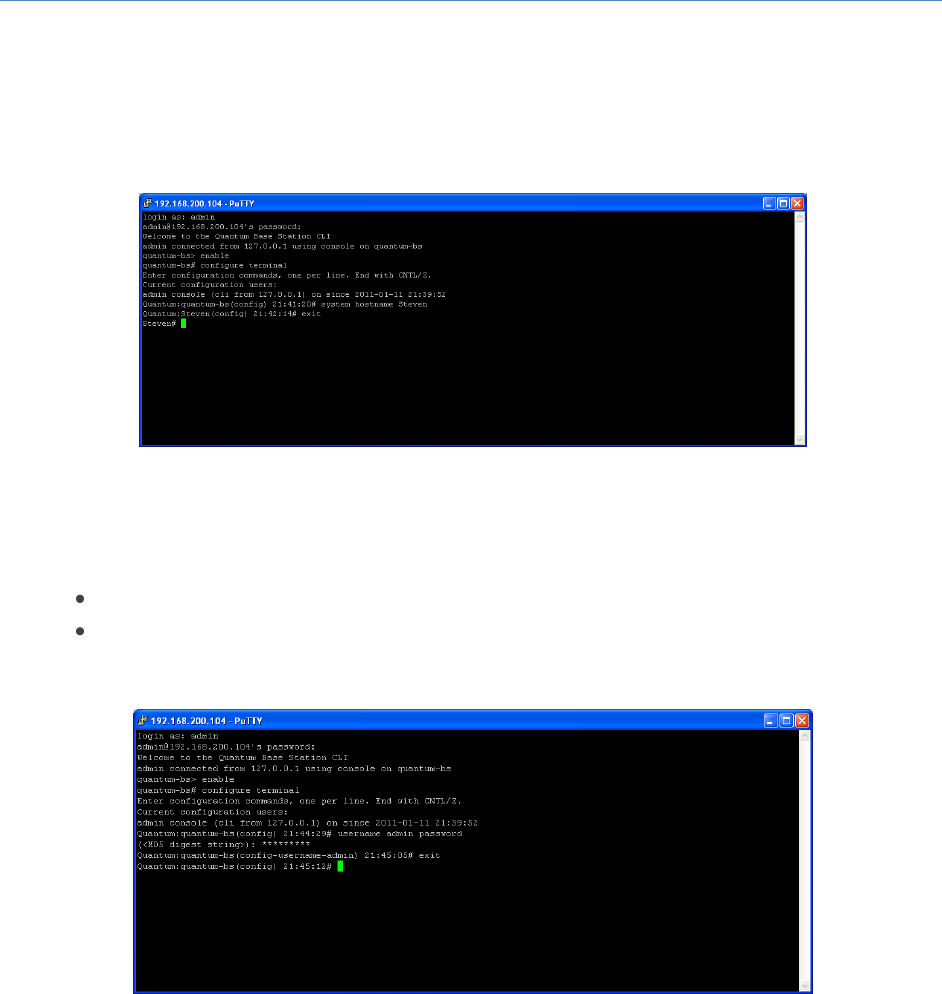
(2) At the quantum-bs# prompt type configure terminal. The prompt will now indicate that the
User is now in config mode and it will display the current Base Station time (figure 40).
PureWave Quantum 6600 User Guide v2.1
Page 54
Figure 40: Base Station CLI Time
(3) To set the Management IP address, at the Quantum:quantum-bs(config) prompt type
system interface ip address <Mgmt IP Address> netmask <Mgmt IP Netmask> e.g.
system interface ip address 192.168.200.104 netmask 255.255.255.0
(4) To set the default Gateway at the Quantum:quantum-bs(config) prompt type
system interface ip default-gateway <Mgmt Default Gateway> e.g.
system interface ip default-gateway 192.168.200.1
(5) To exit, at the Quantum:quantum-bs(config) prompt type exit
(6) The changes must be written to memory. At the quantum-bs# prompt type write memory (refer
to figure 41).
Figure 41: Base Station CLI Initial Configuration
(7) The IP address change to the Base station is immediate and does not require a reboot.
PureWave Quantum 6600 User Guide v2.1
Page 55
(8) Another useful command is the ability to change the default Quantum prompt. When the User is
in the config mode, type system hostname <Hostname> (refer to Figure 42). The change must
be written to memory and the Base Station has to be rebooted.
Figure 42: Base Station CLI Hostname Change
(9) To change the username admin password, when the User is in the config mode, type
username admin password
Password <new admin User Password>
The change must be written to memory (Figure 43).
Figure 43: Base Station CLI Username Password Change
3.5.3 Base Station Configuration Parameters
There are a number of key parameters that must be configured, as a minimum, prior to deployment and
operation of the Base Station. Table 11 is a list of these parameters. In addition to these key parameters,
there are a number of other parameters that can be configured on the Base Station. Such parameters
can be left in their default configuration for "nominal" Base Station operation but there is the option to
PureWave Quantum 6600 User Guide v2.1
Page 56
change based upon specific operating conditions. All parameters will be described in the following
sections.
One point to make, is that in the context of the PureWave Quantum 6600, as this is a single sector Base
Station, the terms “Sector” and “Base Station” are effectively synonymous. This fact is represented
within the Web GUI Interface by the use of the number 1 at the appropriate menu option. The number 1
stands for Sector 1.
The key Base Station parameters that must be configured are:
Configuration Item
Description
Base Station Mode
Standalone Local Mode(default) or ASN Gateway Mode
ASN Gateway IP Address
IP Address of the ASN-GW (ASN-GW Mode only)
Base Station Radius IP Address
IP Address of the Radius Server (Standalone Mode only)
Base Station Radius Port
Radius Server Port (Standalone Mode only)
Base Station Radius Secret
Radius string secret (Standalone Mode only)
Sector IP address
IP Address of the sector’s datapath interface
Sector IP Netmask
Netmask of the sector’s datapath interface
Sector Default Gateway
Default gateway of the sector’s datapath interface
Sector BS-ID
Base Station ID of the sector
Sector CS Type
Convergence sub-layer type of the sector: Ethernet CS
(default) or IPv4 CS
Sector Radio Center Frequency
Center frequency in kHz
Sector Channel Bandwidth
5 MHz, 7MHz, or 10 MHz (default)
Sector Radio Power Output
Preamble power output value per antenna (includes 3 dB
preamble). Default : 36 dBm.
Sector Radio Antenna Gain
Antenna gain (dBi)
Sector Radio Cable Loss
Estimated external cable loss (dB)
Sector Antenna TX Mode
MIMO-A (default) or MIMO-AB
Sector DL:UL Frame Ratio
26:21, 29:18, 32:15, 35:12 (default) in 5MHz and 10MHz
23:9, 21:12, 17:15 in 7MHz
Sector Antenna TX Mode
MIMO-A (default) or MIMO-AB
Table 11: Base Station Sector Configuration Data
The Web GUI Interface will be used to configure the parameters that are required in Table 11. The
starting point for all configurations is the Main Web GUI Interface Screen. The relevant parameters are
distributed across a number of different menu options and hence screens and windows. Each of these
options will be discussed in detail.
PureWave Quantum 6600 User Guide v2.1
Page 57
After making the various configuration changes, the User will need to "Commit" and "Save"
the changes.
3.5.3.1 Sector, General Settings
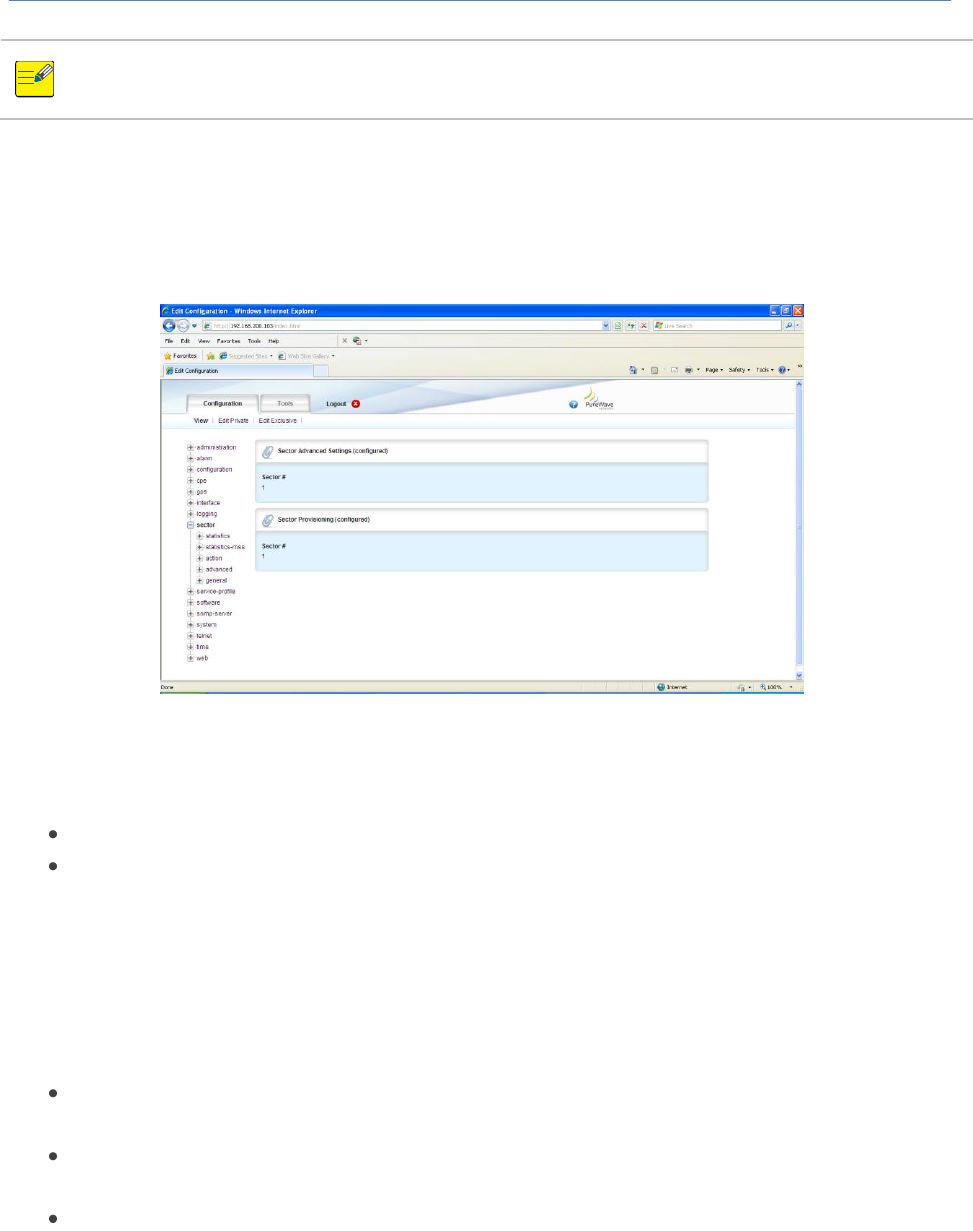
At the Main Web GUI Interface Screen select the Configuration Tab, select sector Main Menu Option
and then general Main Menu Sub-Element. This will display the Sector Settings window (Figure 44).
Figure 44: Sector Settings
There are two basic groups to this Sector option. These are:
Sector Advanced Settings (configured)
Sector Provisioning (configured)
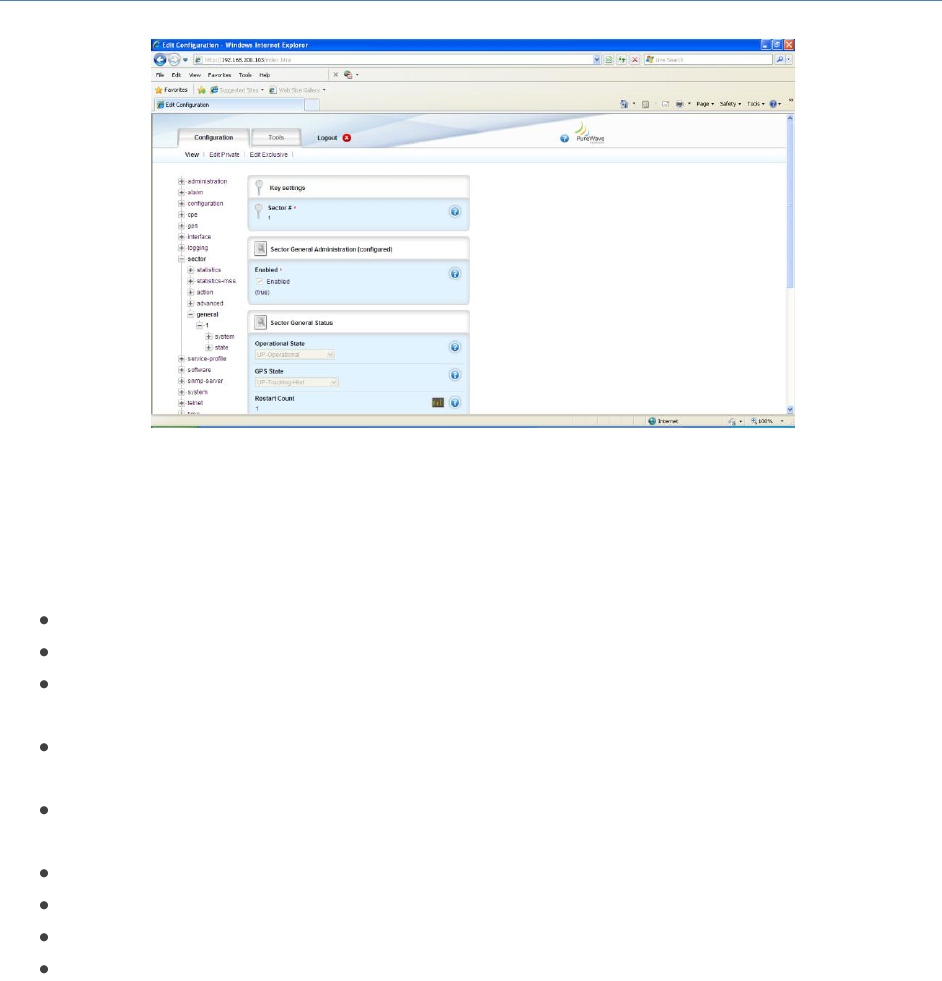
The User now has to navigate to the next level, therefore at the Main Web GUI Interface Screen select
the Configuration Tab, select sector Main Menu Option, general Main Menu Sub-Element and then 1,
this will display the key settings window. There are three distinct groups to this window (refer to Figure
45).
Key Settings. This indicates the relevant sector, which as has been described in number 1. This is
not a configurable parameter.
Sector General Administration (configured). This is an indication whether the sector has been
enabled to effect general administration. This can be configured.
Sector General Status. This indicates the current status of the following parameters. These
parameters are non-configurable:
PureWave Quantum 6600 User Guide v2.1
Page 58
Figure 45: Sector General Options
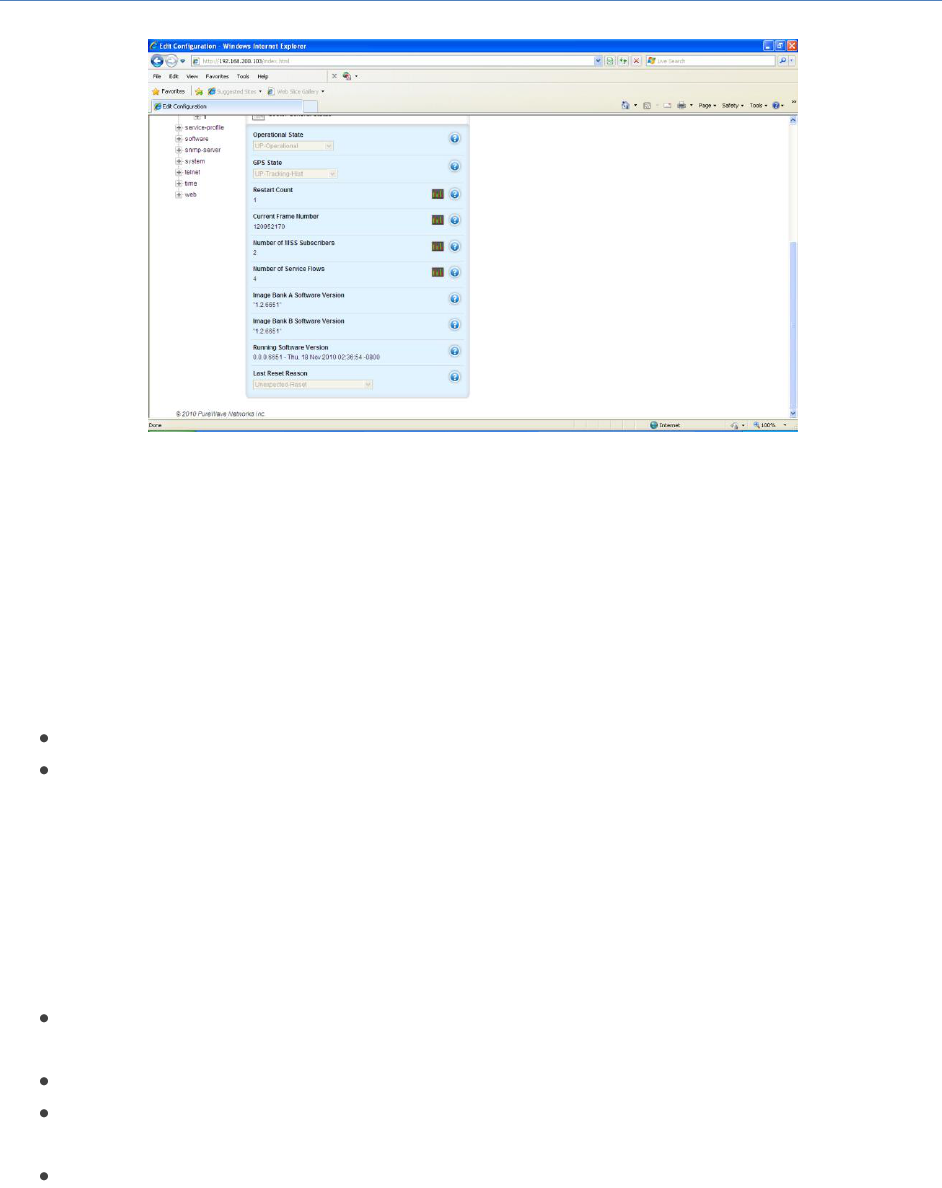
The Key Settings are defined by the following parameters (refer to Figure 46):
Operational State. This indicates if the Base Station is operational
GPS State. This indicates the status of the Base Station GPS.
Restart Count. This is a cumulative count of the number of sector restarts since the Base Station
was power cycled.
Number of MSS Subscribers. This is a count of the current Subscribers that are connected to the
sector.
Number of Service Flows. This is a count of the total number of Subscriber service flows that are
currently configured.
Image Bank A Software Version. The software that has been loaded into Bank A.
Image Bank B Software Version. The software that has been loaded into Bank B.
Running Software Version. This is the current operating version of software.
Last Reset Reason. This provides a reason for the last sector reset.
PureWave Quantum 6600 User Guide v2.1
Page 59
Figure 46: Sector General Configuration Parameters
At the Main Web GUI Interface Screen select the Configuration Tab, select sector Main Menu Option,
general Main Menu Sub-Element, 1 and then system. This will display the currently configured Sector
General Provisioning window. There are a further two sub-elements to this window but only one is
displayed.
These sub-elements are:
system. This option enables the User to configure the parameters.
state. This is a duplication of the windows and parameters that are contained within the system
options. These are "read-only" screens and provide an indication as the current state or status
of the system parameters.
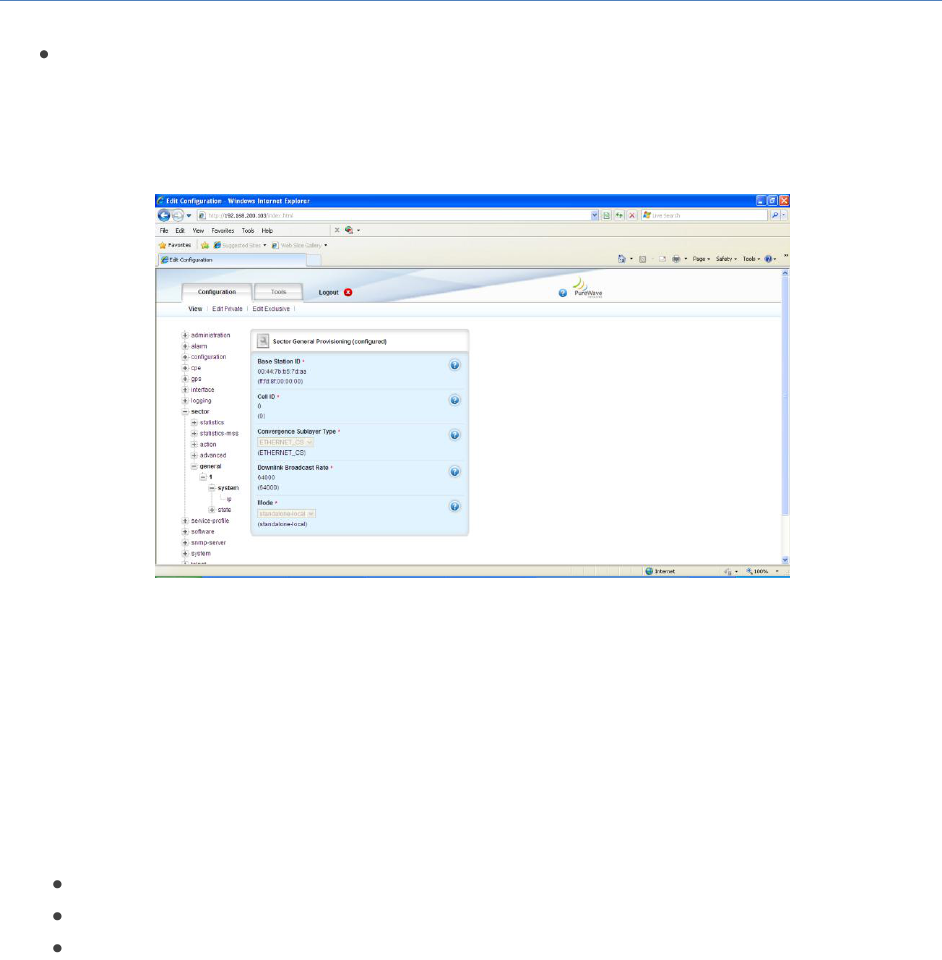
The status of the following parameters are displayed and the User is free to configure as required (refer
to Figure 47). To edit and configure then the User must enter the Edit Mode (select Edit
Private/Exclusive):
Base Station ID. This is the unique identifier that specifically indentifies the Base Station to the
Subscribers. It is not recommended that this is changed.
Cell ID. This is a numeric identifier that the User will define to a cell (acceptable range is 0 to 31).
Convergence Sublayer Type. This is the convergence sublayer type that is globally set for the
sector. The available options are ETHERNET_CS and IPv4_CS. The default is ETHERNET_CS.
Downlink Broadcast Rate. This is a User defined parameter that specifies the maximum
reserved Downlink (DL) rate for the purposes of IP broadcast traffic. This rate can be set up to
1Mbps and once set it is reserved and as such it is not available for Data Traffic. The default is
64000.
PureWave Quantum 6600 User Guide v2.1
Page 60
Mode. This is the Base Station Mode and the available options are standalone-local (this is
selected when the Base Station is used in a standalone mode and it is not connected to an ASN
Gateway) the and asn-gateway (selected when the Base Station is connected to an ASN
Gateway).
Figure 47: Sector General Provisioning Parameters
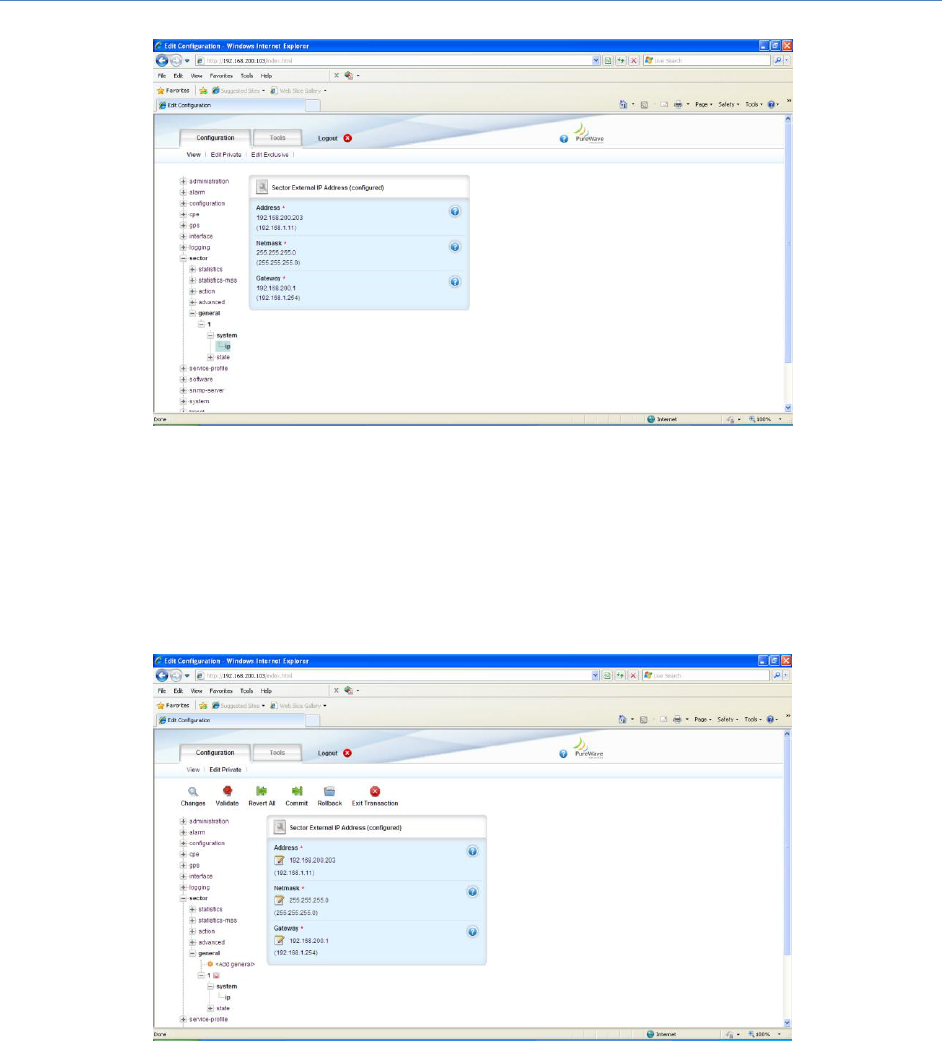
At the Main Web GUI Interface Screen select the Configuration Tab, select sector Main Menu Option,
general Main Menu Sub-Element, 1, system and then ip and this will display the current configuration of
the Sector External IP Address (refer to Figure 48). This is the Management IP Address through which
the User is able to communicate to the Base Station. The Management IP parameters that the User can
configure are:
Address. This is the IP address
Netmask. This is the netmask associated with the IP address
Gateway. This is the defined gateway.
PureWave Quantum 6600 User Guide v2.1
Page 61
Figure 48: Sector External IP Address
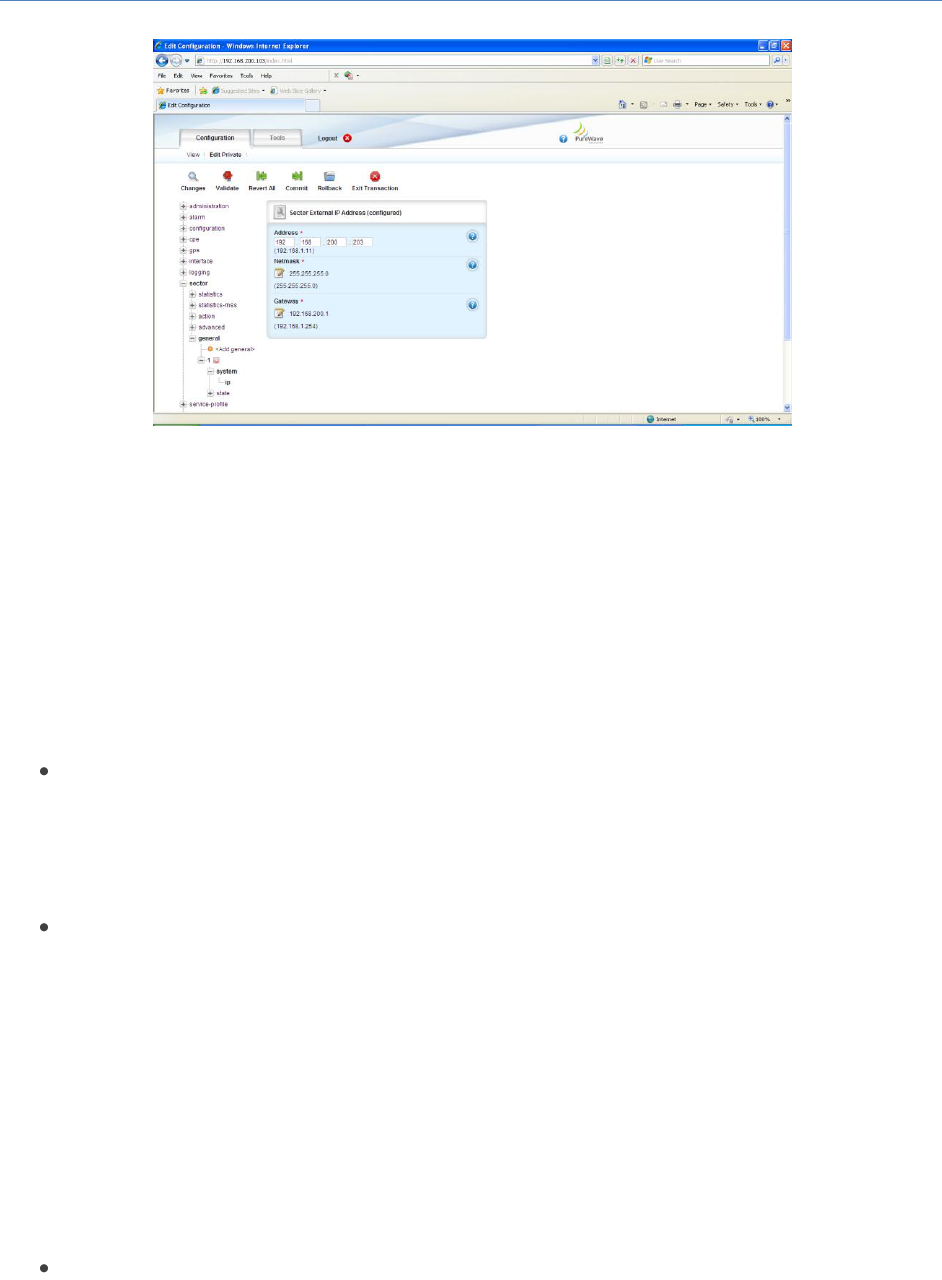
To edit the parameter, the User must enter the Edit Mode (select Edit Private or Edit Exclusive). Once in
the Edit Mode the User simply has to select the notepad icon and this will provide an option to edit the
IP address (refer to Figure 49 and Figure 50).
Figure 49: Sector External IP Address Configuration
PureWave Quantum 6600 User Guide v2.1
Page 62
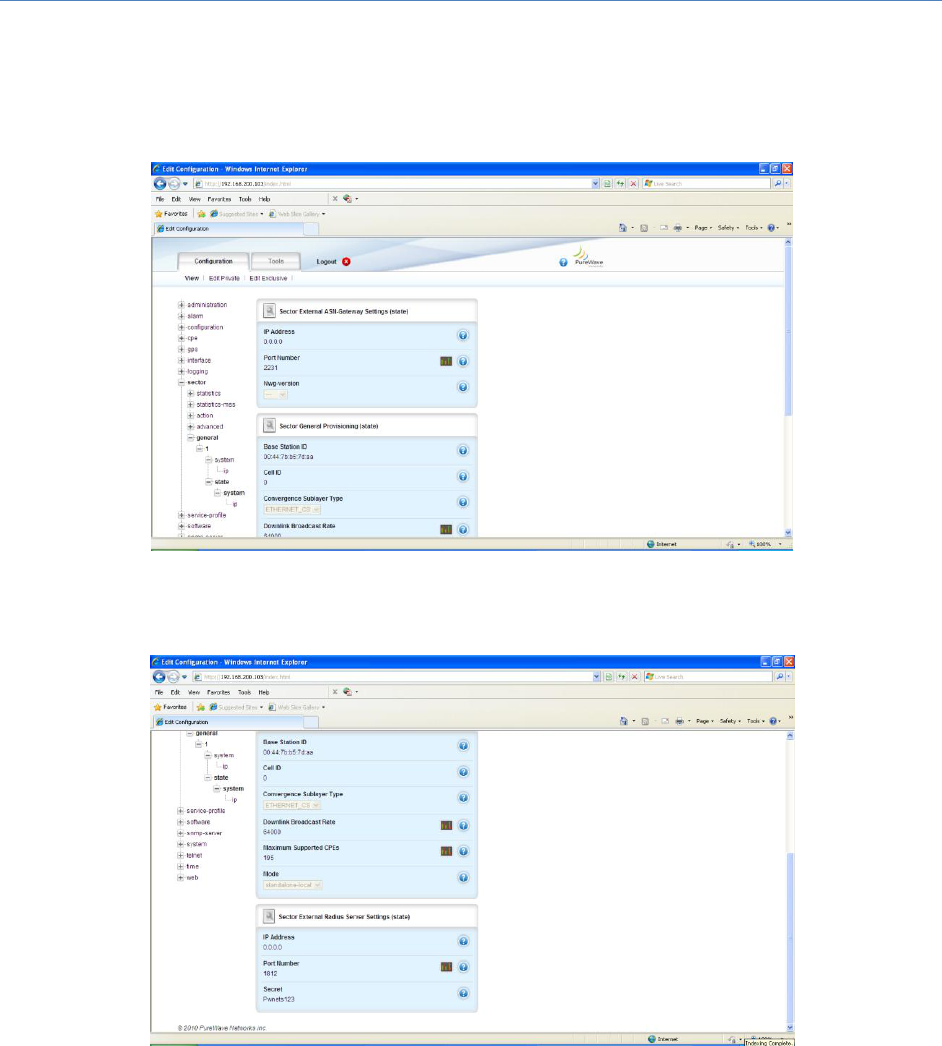
Figure 50: Sector External IP Address Changed
At the Main Web GUI Interface Screen select the Configuration Tab, select sector Main Menu Option,
general Main Menu Sub-Element, 1, state and then system. This provides another view that will display
the current configuration of the Sector. Even if the User enters the Edit Mode (select Edit Private or Edit
Exclusive), no parameters are made available for editing. The options to configure these parameters are
contained under the system and then base station options.
There are three distinct groups to this window (refer to Figure 51 and Figure 52).
Sector External ASN-Gateway. This contains the parameters:
o IP Address. This is the IP Address of the external ASN Gateway.
o Port Number. This is the IP port number that is used to communicate with the ASN
Gateway.
o Nwg-version. This is the current firmware version of the ASN Gateway.
Sector General Provisioning
o Base Station ID. This is the unique identifier that specifically indentifies the Base Station
to the Subscribers.
o Cell ID. This is a numeric identifier that the User will define to a cell.
o Convergence Sublayer Type. This is the convergence sublayer type that is globally set
for the sector.
o Downlink Broadcast Rate. This is the maximum reserved Downlink (DL) rate for the
purposes of IP broadcast traffic.
o Maximum Supported CPEs. This specifies the maximum number of Subscriber CPEs
(200) that can be connected to the Base Station.
o Mode. This specifies whether the Base Station Mode is connected to an ASN Gateway.
Sector External Radius Server Settings
o IP Address. This is the IP Address of the external radius server.
PureWave Quantum 6600 User Guide v2.1
Page 63
o Port Number. This is the IP port number that is used to communicate with the external
radius server for authentication purposes.
o Secret. This is the radius shared secret between the radius server and the Base Station.
Figure 51: Sector External ASN Gateway Settings
Figure 52: Sector External Radius Server Settings
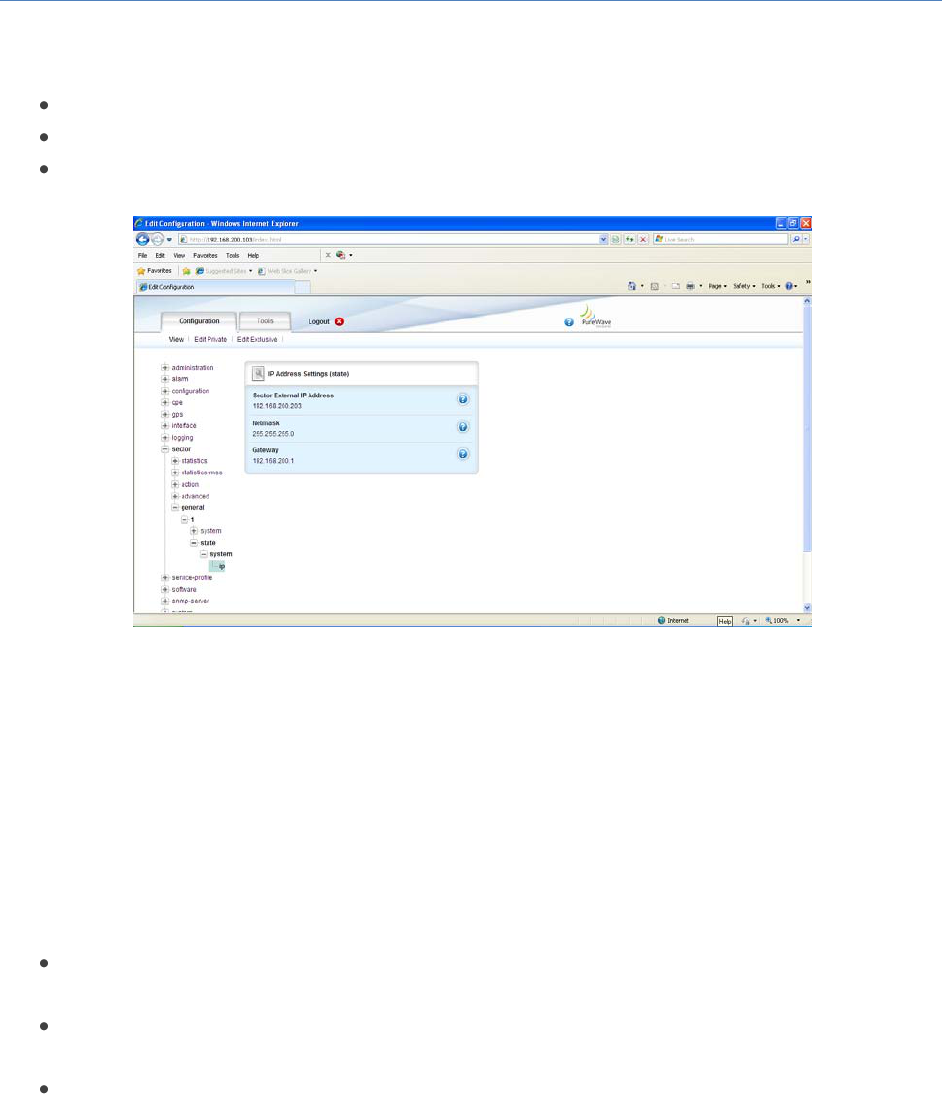
At the Main Web GUI Interface Screen select the Configuration Tab, select sector Main Menu Option,
general Main Menu Sub-Element, 1, state, system and then ip. This provides another view that will
display the current Management IP configuration of the Sector. Even if the User enters the Edit Mode
(select Edit Private or Edit Exclusive), no parameters are made available for editing.
PureWave Quantum 6600 User Guide v2.1
Page 64
There following information is displayed in Figure 53.
Sector External IP Address.
Netmask.
Gateway.
Figure 53: Sector External Radius Server Settings
3.5.3.2 Sector, Advanced Settings
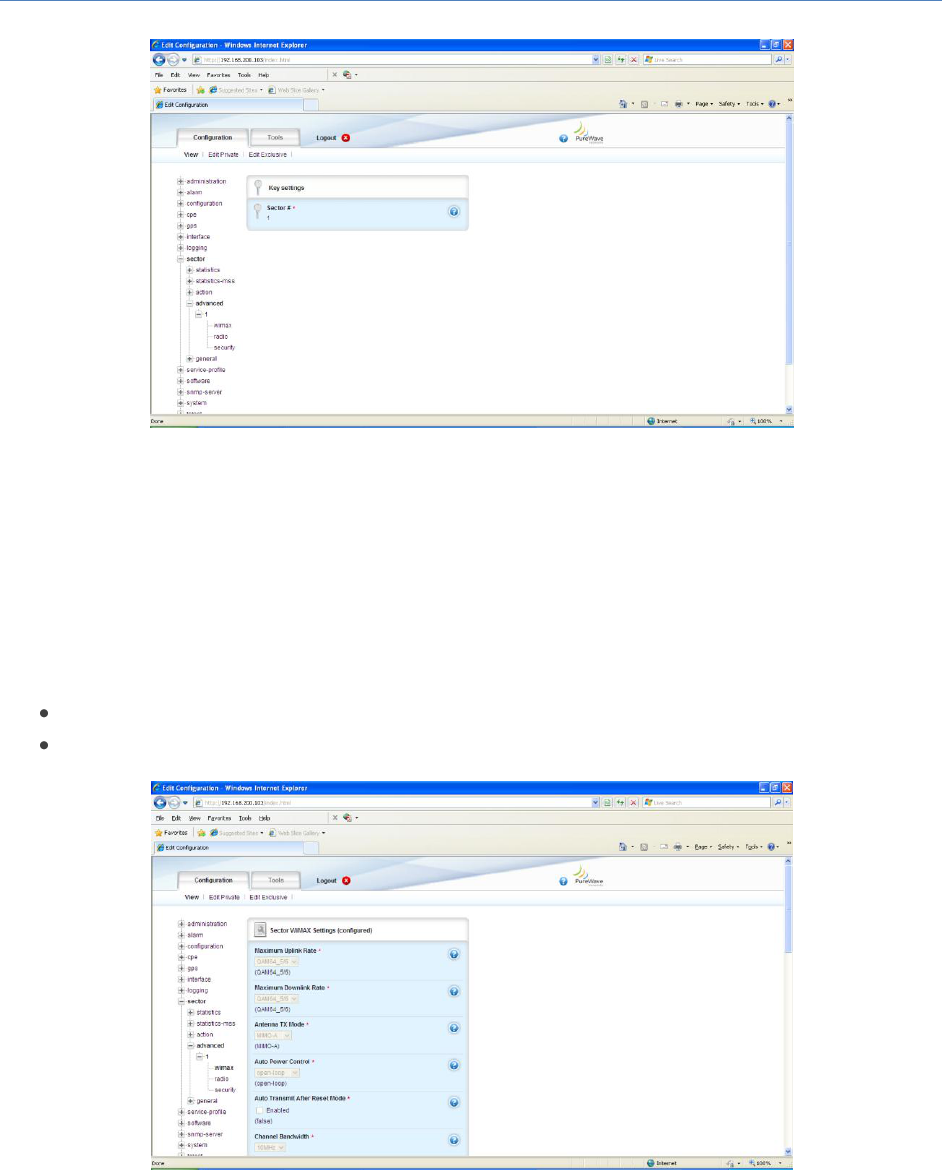
At Main Web GUI Interface Screen select the Configuration Tab, select sector Main Menu Option,
advanced Main Menu Sub-Element and then 1, this will display the key settings window. There are two
further sub-elements to this window but the information is only displayed when the actual element is
selected. These further sub-elements are (refer to Figure 54):
wimax. These are the parameters that can be configured as defined by the WiMAX 802.16e
specification.
radio. These are the parameters that can be configured as part of the specific Base Station radio
transmission configuration.
security
PureWave Quantum 6600 User Guide v2.1
Page 65
Figure 54: Sector Advanced Settings
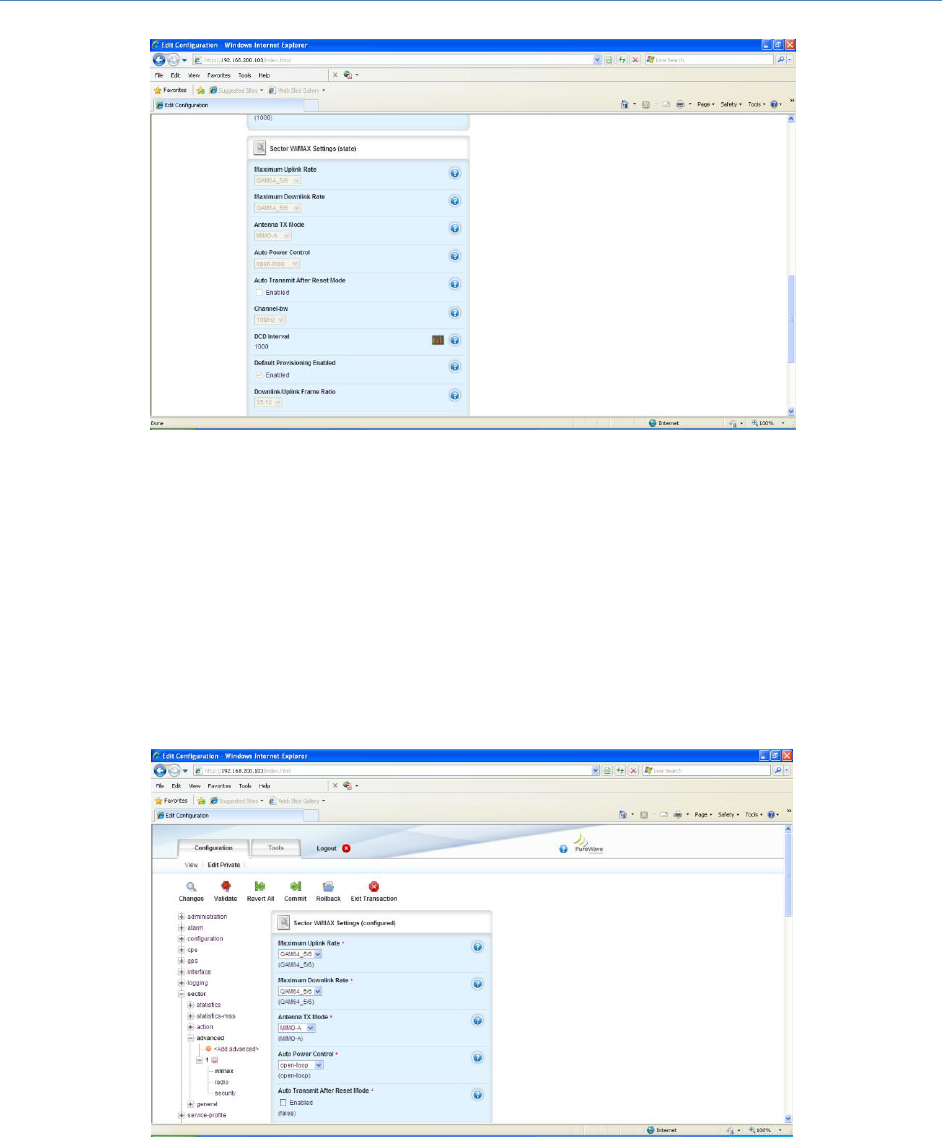
To view the Sector WIMAX Settings, at the Main Web GUI Interface Screen select the Configuration Tab,
select sector Main Menu Option, advanced Main Menu Sub-Element, 1, and then wimax. The display is
split into two main sections. These sections do not fit onto one screen and therefore the User has to
scroll down to view etc (refer to Figure 55 and Figure 56).
Sector WIMAX Settings (configured). These are the parameters that the User can Edit.
Sector WIMAX Settings (state). These are the current configurations values of the parameters.
Figure 55: Sector Configured WIMAX Settings
PureWave Quantum 6600 User Guide v2.1
Page 66
Figure 56: Sector State WIMAX Settings
If the User wants to configure any of the WiMAX parameters then they must enter the Edit Mode (select
Edit Private or Edit Exclusive) and edit as necessary. The methods to Edit the parameters will be offered
via a drop down menu of choices, enabling of a check box or editing of a notepad icon.
After making the various configuration changes, the User will need to "Commit" and "Save" the
changes.
Figure 57: Sector WIMAX Settings Configuration

PureWave Quantum 6600 User Guide v2.1
Page 67
The Sector WIMAX Settings parameters that the User can configure are defined below:
Maximum Uplink Rate. This parameter provides the means to globally fix the maximum
modulation rate in the Uplink direction (defined as Subscriber to Base Station). If the User wants
to dynamically adapt the rate to the maximum then the default value of QAM64_5/6 can be left
unchanged. Refer to Appendix A for an explanation of how the maximum modulation rate,
defined as MCS Rate, effectively caps the system data throughput. If the User wants to
physically cap the rate and hence cap the throughput, they are free to select from the following
MCS rates:
o QAM64_5/6
o QAM64_3/4
o QAM64_2/3
o QAM64_1/2
o QAM16_3/4
o QAM16_1/2
o QPSK_3/4
o QPSK_1/2
Maximum Downlink Rate. This parameter provides the means to globally fix the maximum
modulation rate in the Downlink direction (defined as Base Station to Subscriber). The default is
QAM64_5/6 and the same options as maximum uplink rate parameter are available.
Antenna TX Mode. This the option to define the Smart Antenna Capabilities that were described
in section 2.3.2.3. The default setting is MIMO-A and the available options are:
o MIMO-AB
o MIMO-A
Auto Power Control. The transmit power of a Subscriber is controlled via automatic algorithms
in the Base Station. This control of the transmit power ensures optimum performance. The
default is open-loop and the available options are:
o open-loop. In the case of an open loop algorithm, the Base Station sends a signal to the
Subscriber of the required settings and the Subscriber controls its transmit power
dynamically.
o closed-loop. In the case of closed loop, the Base Station controls the Subscriber transmit
power settings with a full measurements loop.
Auto Transmit After Reset Mode. When this is enabled the Base Station will automatically start
transmitting upon a power cycle. If this is disabled, then the User will have to manually start the
transmission.
Channel Bandwidth. This is the current channel bandwidth of the radio transmission. The
default is 10MHz and the options are:
o 10MHz
o 7 MHz
o 5MHz
DCD Interval. This is the WiMAX 802.16e DCD Interval value and it is to be defined in
milliseconds. The default is 1000 (1 second) and the available range is 15 up to 10000.
Default Provisioning Enabled. The User has the choice to enable or disable this feature. If this is
enabled, then the Quality of Service (QoS) profile for the CPE will be the Default QoS that has
been provisioned. This is defined as QoS profile “1”. If this is disabled then the QoS profile will
be that as defined for the particular CPE.

PureWave Quantum 6600 User Guide v2.1
Page 68
Downlink/Uplink Frame Ratio. This is the ratio of downlink to uplink MAP symbols, refer to
Appendix A and how this affects data throughput. The default option is 35:12 and the available
options are:
o 26:21
o 29:18
o 32:15
o 35:12
Maximum Distance. This is the maximum distance, defined in km, that a Base Station can
transmit to a CPE. The default is set to 11 and the User can select in the range 1 to 24.
Noise and Interference Settings. The default is 35. NI is defined as per the IEEE 802.16-e as the
noise per tone in 0.5 db steps above the -150 dBm, where 0 is -150dbm and 35 is -132.5dbm per
tone.
UCD Interval. This is WiMAX 802.16e UCD Interval value and it is to be defined in milliseconds.
Interval defined in milliseconds. The default is 1000 (1 second) and the available range is 15 up
to 10000.
DL ECINR Report Support – Specifies the mode of CINR reporting to be provided from the
CPEs. Disabling ECINR reporting should be done only in case of older CPE revisions that do not
support ECINR reporting.
5MHz Large Map Support – Available and applicable only in case of 5MHz channel bandwidth
setting.
Auto Noise Level Adjustment Support – Enables the automatic dynamic adjustment of NI and
internal settings with respect to the measured noise level on the channel. The Noise
measurement values can be seen in the radio tab.
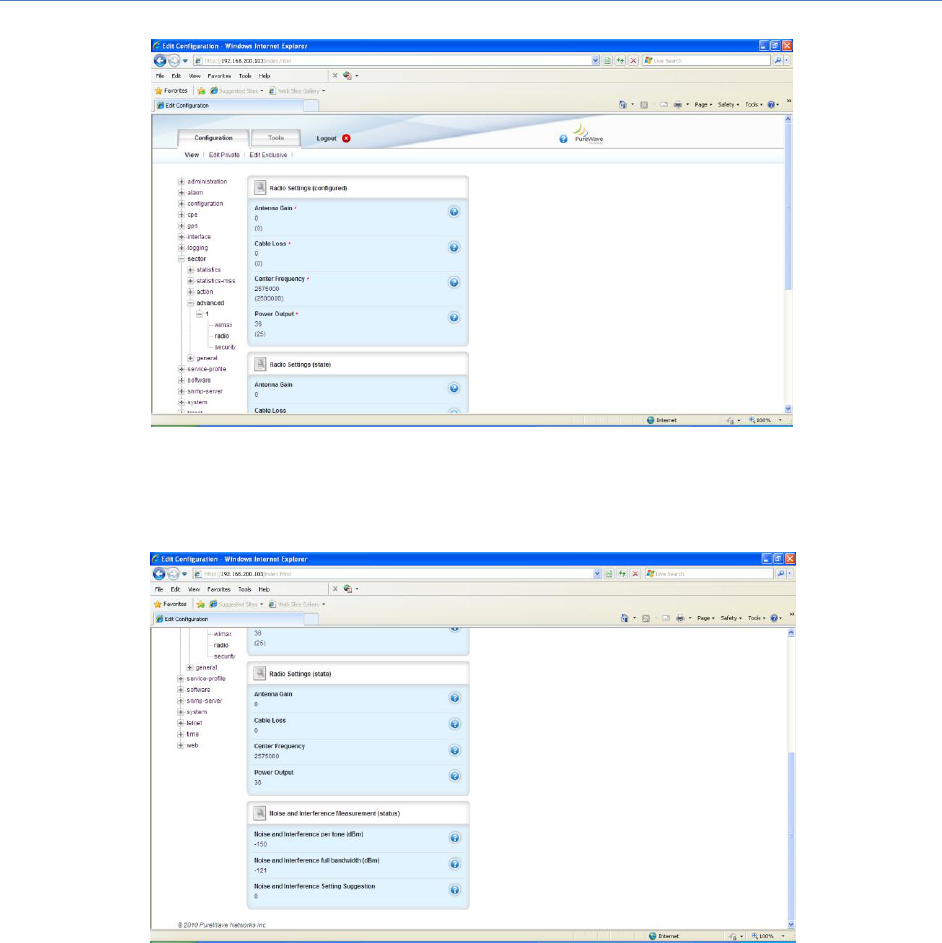
To view the Radio Settings, at the Main Web GUI Interface Screen select the Configuration Tab, select
sector Main Menu Option, advanced Main Menu Sub-Element, 1, and then radio. The display is split into
three main grouping sections. These sections do not fit onto one screen and therefore the User has to
scroll down to view etc (refer to Figure 58 and Figure 59).
Radio Settings (configured). These are the parameters that the User can Edit.
Radio Settings (state). These are the current configurations values of the parameters.
Noise and Interference Measurements (status). These are the current configurations values of
the parameters. The Noise level is represented in 3 different measurement units.
PureWave Quantum 6600 User Guide v2.1
Page 69
Figure 58: Sector Radio Configured Settings
Figure 59: Sector Radio State Settings
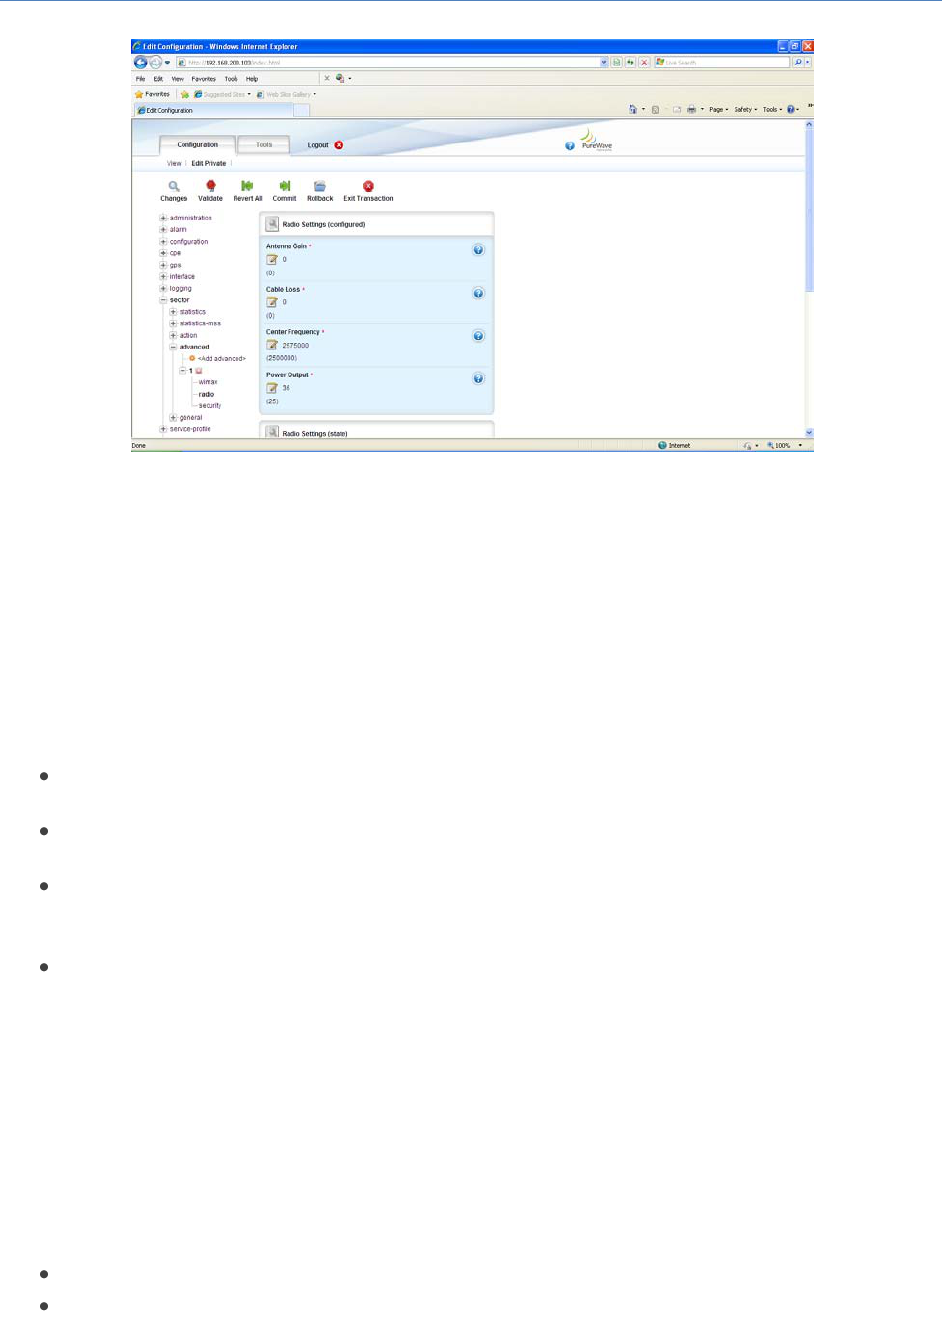
If the User wants to configure any of the Radio parameters then they must enter the Edit Mode (select
Edit Private or Edit Exclusive) and edit as necessary. The methods to Edit the parameters will be offered
via editing of a notepad icon (refer to Figure 60).
PureWave Quantum 6600 User Guide v2.1
Page 70
Figure 60: Sector Radio Settings Configuration
After making the various configuration changes, the User will need to "Commit" and "Save" the
changes.
The Radio Settings parameters that the User can configure are defined below:
Antenna Gain. This is the gain (in dB) for the Antenna that the Base Station is connected to. The
default setting is 0 but the User is free to enter any value.
Cable Loss. This is a loss of the cable (in dB’s) from the Base Station to the Antenna. The default
setting is 0 but the User is free to enter any value.
Center Frequency. This is the center frequency of the Base Station and it must match with what
is configured on the Subscribers. The default setting is relative to the frequency range of
operation of the Base Station. To re-configure, the center frequency has to be input in KHz.
Power Output. This is the radio output power in dBm. The default setting is relative to the
frequency range of operation of the Base Station. The User must ensure that the maximum
output power is defined as described in section 2.3.2.2 "Computing EIRP Power".
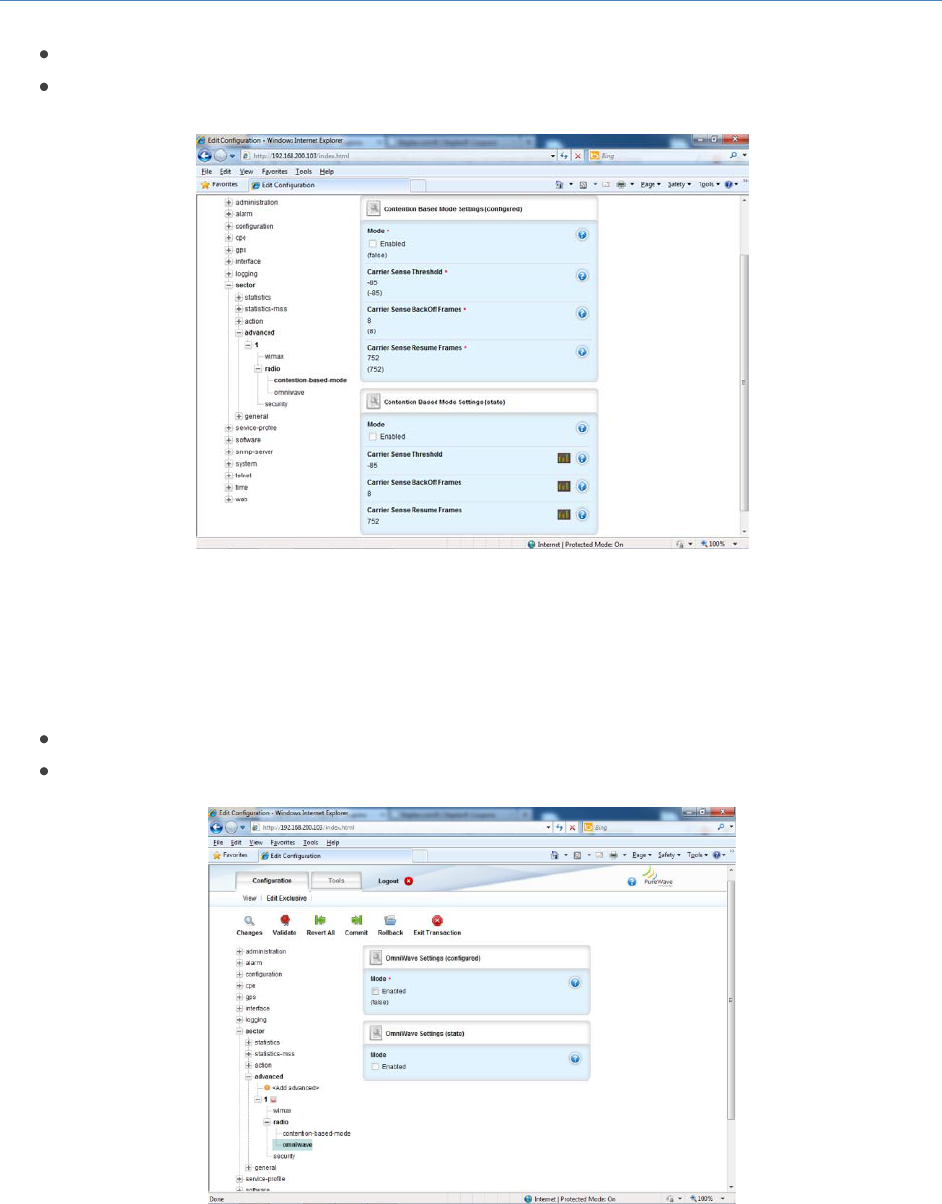
Contention Based Mode may be enabled on the Radios to support the upper 25 MHz of the 3.65 GHz US
ISM band. To utilize Wimax Contention Based Mode, at the Main Web GUI Interface Screen select the
Configuration Tab, select sector Main Menu Option, advanced Main Menu Sub-Element, 1, and then
radio and contention-based mode. The display is split into two grouping sections. These sections do not
fit onto one screen and therefore the User has to scroll down to view etc (refer to Figure 61).
Mode (enable/disable). Allows the feature to be enabled or disabled
Carrier Sense Threshold. Set to -85.0 dBm
PureWave Quantum 6600 User Guide v2.1
Page 71
Carrier BackOff Frame. Number of frames to wait when a carrier is detected
Carrier Sense Resume Frame. Set to 752
Figure 61 Contention Based Mode
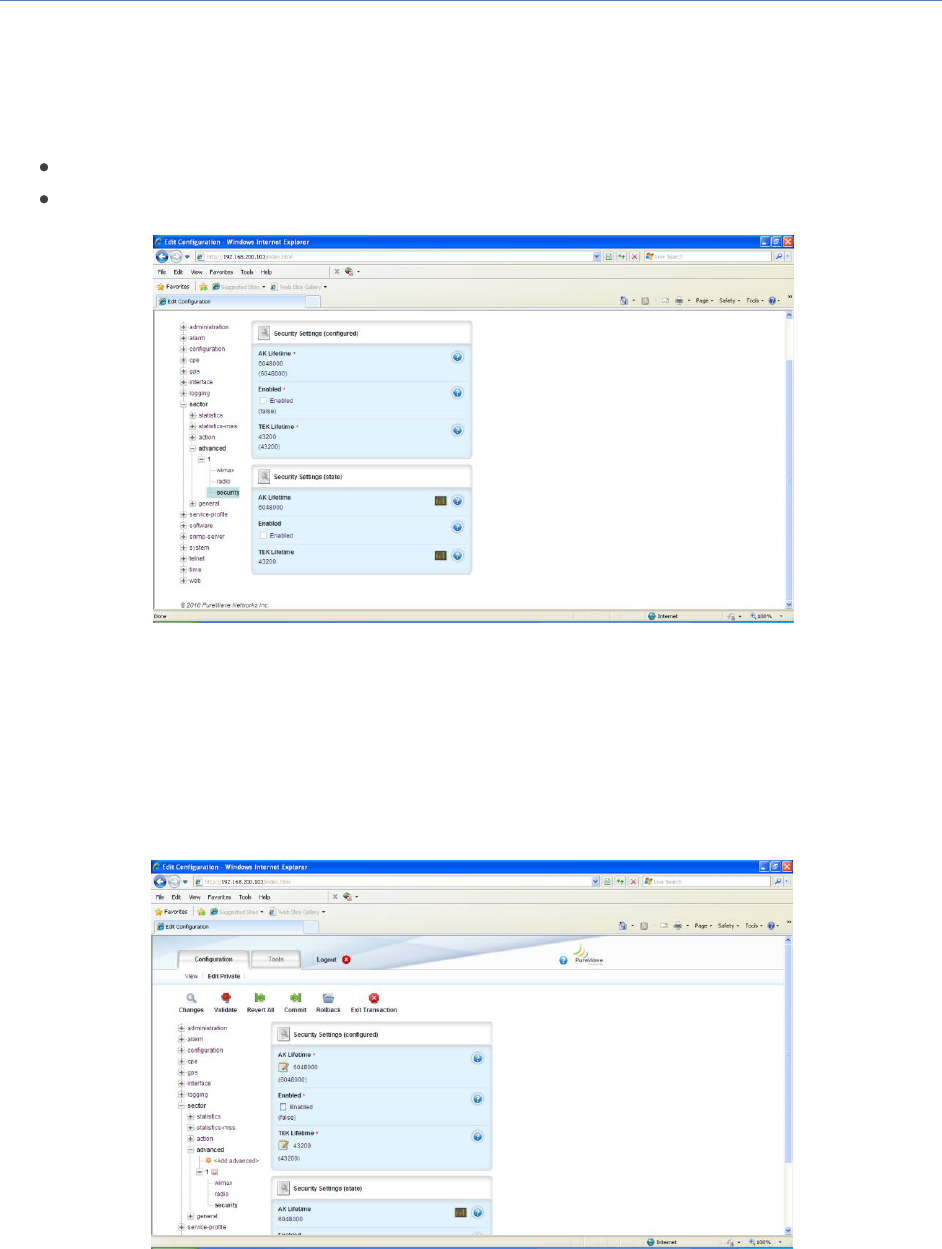
Omniwave may be enabled on the radio level to support a 3x2x2 configuration. To utilize Omniwave, at
the Main Web GUI Interface Screen select the Configuration Tab, select sector Main Menu Option,
advanced Main Menu Sub-Element, 1, and then radio and omniwave.
Mode (enable/disable). Allows the feature to be enabled or disabled
Status. Current configuration (enabled or disabled)
Figure 62 OmniWave Settings
PureWave Quantum 6600 User Guide v2.1
Page 72
To view the Security Settings, at the Main Web GUI Interface Screen select the Configuration Tab, select
sector Main Menu Option, advanced Main Menu Sub-Element, 1, and then security. The display is split
into two main grouping sections (refer to Figure 63).
Security Settings (configured). These are the parameters that the User can Edit.
Security Settings (state). These are the current configurations values of the parameters.
Figure 63: Sector Security Settings
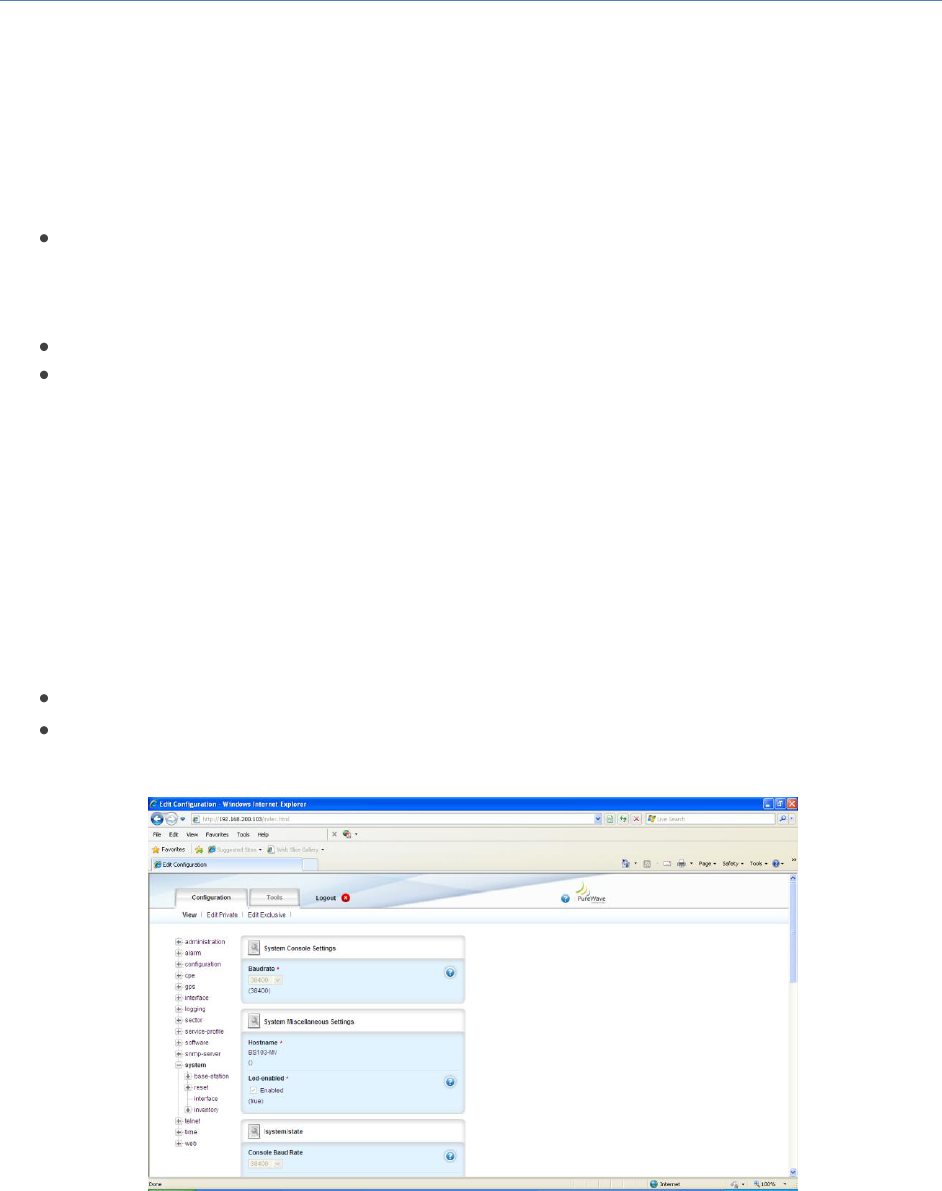
If the User wants to configure any of the Security parameters then they must enter the Edit Mode
(select Edit Private or Edit Exclusive) and edit as necessary. The methods to Edit the parameters will be
offered via an enabling of a check box or editing of a notepad icon (refer to Figure 64).
Figure 64: Sector Security Settings Configuration
PureWave Quantum 6600 User Guide v2.1
Page 73
After making the various configuration changes, the User will need to "Commit" and "Save" the
changes.
The Security Settings parameters that the User can configure are defined below:
AK Lifetime. This stands for Authorization Key lifetime. It is used when authentication and
encryption is enabled. It is periodically re-generated by the Base Station after a request is
received from a Subscriber following expiration of this timeout. The default setting is 6048000
but the User is free to enter any value.
Enabled. This indicates whether the Security Feature has been enabled or not.
TEK Lifetime. This stands for Traffic Encryption Key lifetime. It is used when authentication and
encryption is enabled. It is periodically re-generated by the Base Station after a request is
received from a Subscriber following expiration of this timeout. The default setting is 43200 but
the User is free to enter any value.
3.5.3.3 System Settings
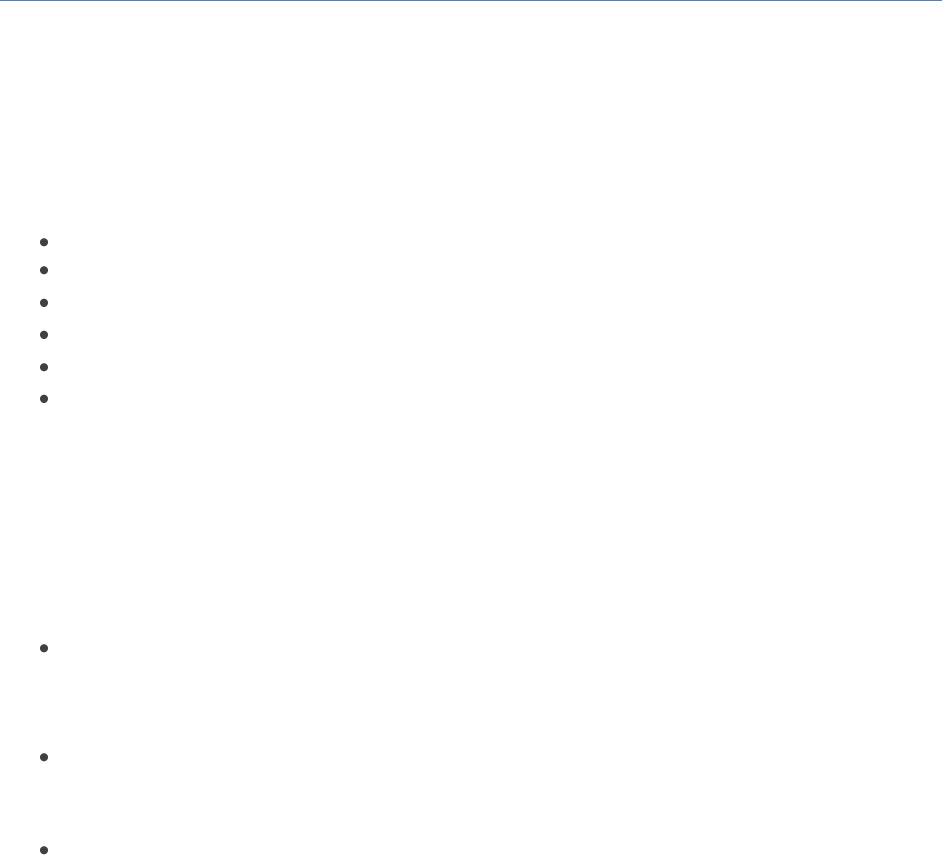
At the Main Web GUI Interface Screen select the Configuration Tab and then select system Main Menu
Option. This will display the System Settings window. The system menu option has three further sub-
elements , these being (refer to Figure 65):
base-station. This details various Base Station parameters.
reset. This is a means for the User to default the Base Station back to its "out of the box" initial
configuration values.
Figure 65: System Settings
PureWave Quantum 6600 User Guide v2.1
Page 74
The System display is split into seven main grouping sections. These sections do not fit onto one screen
and therefore the User has to scroll down to view etc. An indication as to whether there are any User
configurable parameters included in the grouping is provided. If the User wants to configure any of the
parameters then they must enter the Edit Mode (select Edit Private or Edit Exclusive) and edit as
necessary. The methods to Edit the parameters will be offered via a drop down menu of choices, an
enabling of a check box or editing of a notepad icon.
System Console Settings.
System Miscellaneous Settings.
/system/state. This option does not contain any User configurable parameters.
System General Settings.
System Identification Setting. This option does not contain any User configurable parameters.
System Utilization Statistics. This option does not contain any User configurable parameters.
The parameters that the User can configure and the relevant grouping section that they belong are
outlined below. After making the various configuration changes, the User will need to "Commit" and
"Save" the changes.
System Console Settings.
o Baudrate. This is the baud rate that is configured for serial connection via the Base
Station Console Port. The default is 38400 and the available options are 115200, 57600,
38400, 19200 and 9600.
System Miscellaneous Settings.
o Hostname. This is a free format text field for the User to specify a hostname.
o Led-enabled. The User can enable or disable the LED indicators for the Base Station.
System General settings.
o Name. This is a free format text field for the User to specify a name to the Base Station.
o Location. This is a free format text field for the User to specify a location to the Base
Station.
o Contact. This is a free format text field for the User to specify a contact for the Base
Station.
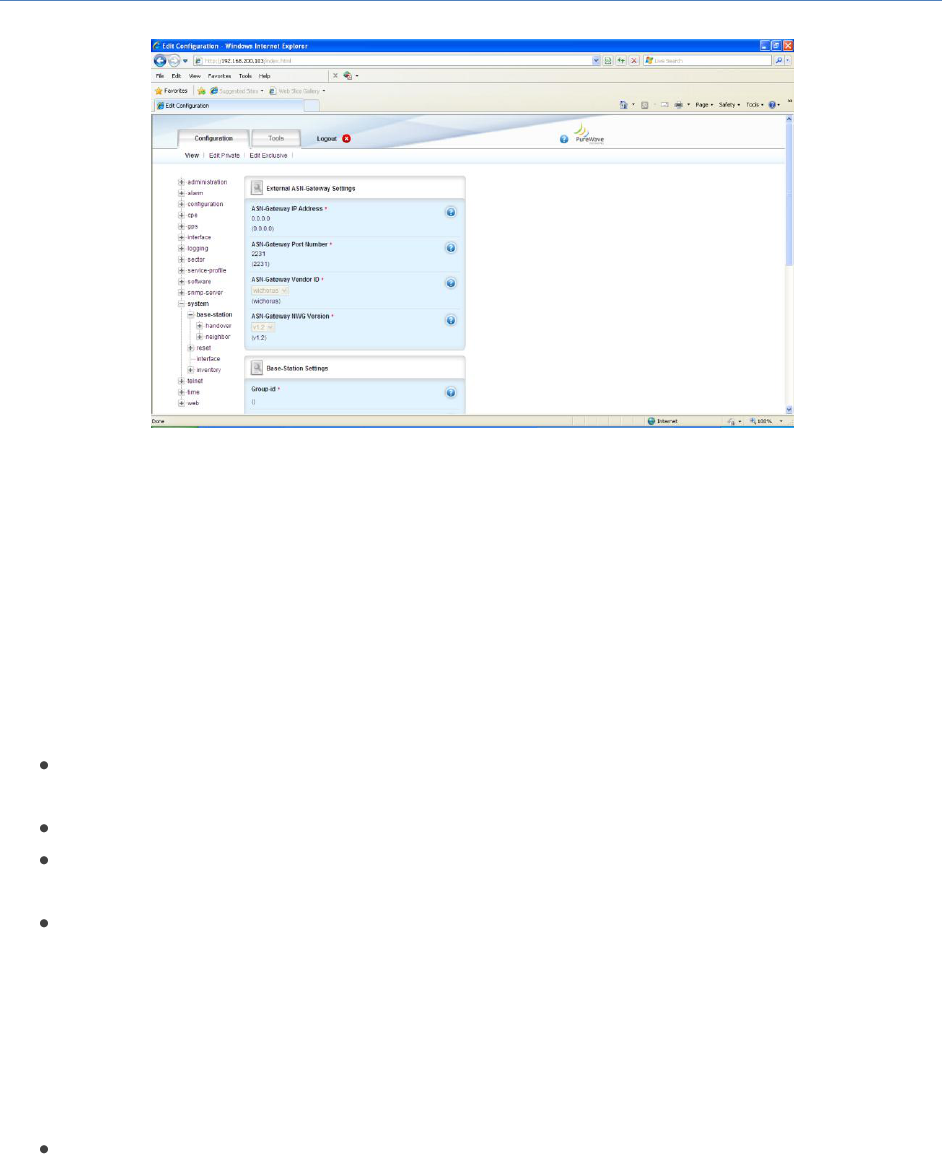
At the Main Web GUI Interface Screen select the Configuration Tab, select system Main Menu Option
and then the base-station Main Menu Sub-Element. This will display the External ASN-Gateway Settings
window (refer to Figure 66).
PureWave Quantum 6600 User Guide v2.1
Page 75
Figure 66: System External ASN Gateway Settings
The System display is split into four main grouping sections. These sections do not fit onto one screen
and therefore the User has to scroll down to view etc. An indication as to whether there are any User
configurable parameters included in the grouping is provided. If the User wants to configure any of the
parameters then they must enter the Edit Mode (select Edit Private or Edit Exclusive) and edit as
necessary. The methods to Edit the parameters will be offered via a drop down menu of choices or
editing of a notepad icon.
External ASN-Gateway Settings. These are the settings for any external ASN Gateway that is
connected to the Base Station.
Base-Station Settings. These are the settings for the Base Station.
External Radius Server Settings. These are the settings for the external Radius Server, if
configured.
/system/base-station/neighbor. These are settings which are broadcasted by the base station
so that the CPE understands which neighboring Base Stations to scan
The parameters that the User can configure and the relevant grouping section that they belong are
outlined below. After making the various configuration changes, the User will need to "Commit" and
"Save" the changes.
External ASN-Gateway Settings.
o ASN-Gateway IP Address. This is the IP address of the ASN Gateway that the Base
Station is connected to. An IP address has to be provided if the Base Station has been
configured to operate in ASN Gateway mode.
o ASN-Gateway Port Number. This is the Port Number that the Base Station use to
communicate with the ASN Gateway.

PureWave Quantum 6600 User Guide v2.1
Page 76
o ASN-Gateway Vendor ID. This User has the option to select and store the vendor of the
ASN Gateway. The current options are Wichorus and Cisco.
o ASN-Gateway NWG Version. This User has the option to select and store the current
firmware version of the ASN Gateway. The current options are v1.2 and v1.3.
Base-Station Settings
o Group-id. This is a free format text field.
o Group-descr. This is a free format text field.
o Mode. This defines the mode of operation for the Base Station. The default option is
standalone-local and the available options are asn-gateway and standalone-local.
External Radius Server Settings
o Radius Server IP Address. If the Base Station has been configured to use an external
Radius Server, then its IP address would be provided here.
o Radius Server Port Number. This is the Port Number that the Base Station use to
communicate with the Radius Server.
o Secret. This is the radius "secret" that is shared between the Base Station and the
Radius Server.
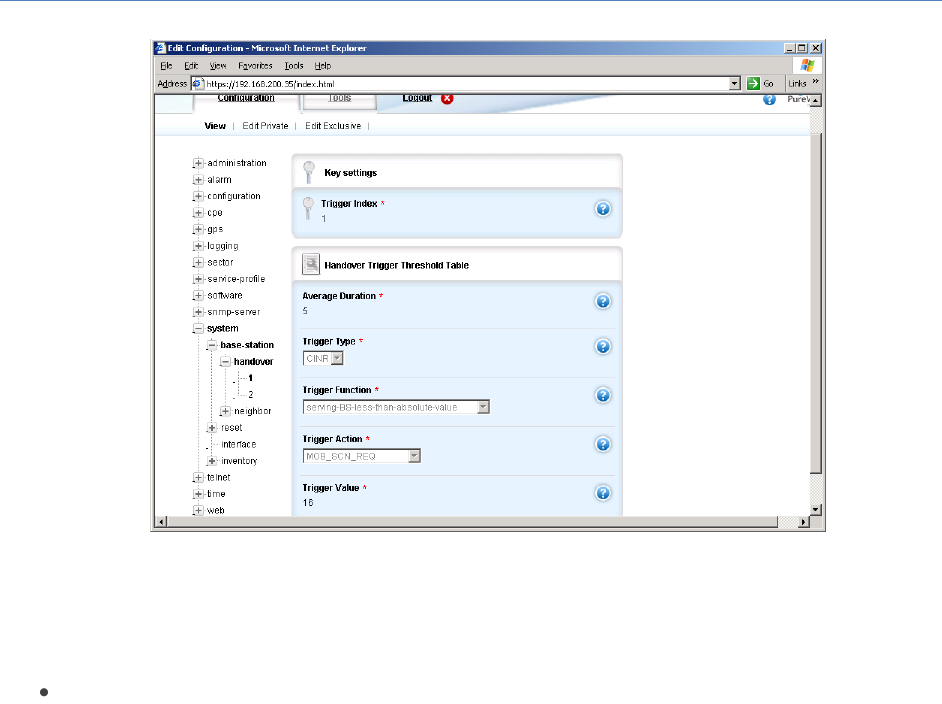
The system, base-station menu option has two further sub-elements, handover and neighbor.
handover. This is where triggers are set for handover operation (see Figure 67). By default,
there are no triggers. For handover operation at least two triggers must be set, one for scanning
and one for handover. This information is incorporated into DCD message sent by the base
station. This may be left unconfigured if no handover is desired. For each trigger following needs
to be configured:
o Trigger Index: A user defined unique number between 1-8.
o Average Duration: Trigger averaging duration is the time measured in number of frames
over which the metric measurements are averaged.
o Trigger Type: This defines trigger metric, CINR or RSSI
o Trigger Function: This parameter specifies the function for the trigger type chosen
earlier. Select one from the dropdown menu.
o Trigger Action: This parameter specifies the action, scanning or handover, to take when
trigger criteria is met. Select from the dropdown menu.
o Trigger Value: This parameter specifies the value for corresponding to the trigger type
and function selected above.
PureWave Quantum 6600 User Guide v2.1
Page 77
Figure 67 System Handover Trigger Setting
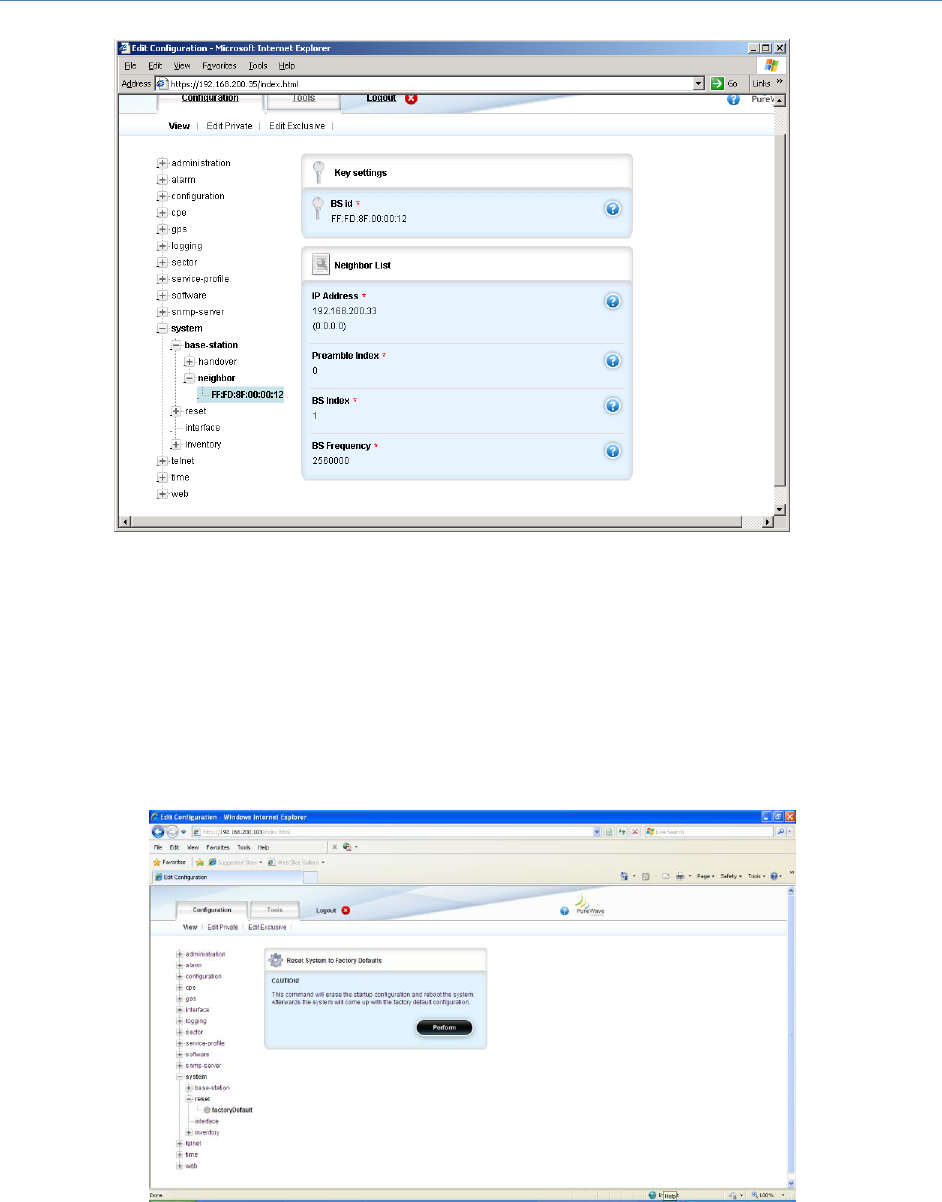
neighbor. This is the place to configure information about neighbor base stations (Figure 68).
This is required for handover operation. This can be left unconfigured if no handover is required.
For each neighbor, following needs to be configured:
a. BS id: This is the BSID of neighbor bs. Use upper case letters only. BSID of the
neighboring base stations should have same operator id as the serving base station., i.e.
the upper 6 bytes should be same.
o IP Address: This is the IP address of the neighbor base station.
o Preamble Index: This is the preamble-index of the neighbor base station.
o BS Index: This is a user defined number in the range of 1-254. The index of 255 has a
special meaning. When this index is set to 255 then the neighbor will be considered as a
non-Purewave base station, and Purewave base station will unconditionally accept the
handover request. No backbone communication will take place.
o BS Frequency: This is the frequency of the neighbor base station in KHz.
PureWave Quantum 6600 User Guide v2.1
Page 78
Figure 68 Neighbor configuration
At the Main Web GUI Interface Screen select the Configuration Tab, select system Main Menu Option,
reset Main Menu Sub-Element and then factory/Default. This provides the User with a reset system to
factory defaults option (refer to Figure 69). The User has to select Perform Command Menu Option to
erase the startup configuration and reboot the system. Afterwards the system will come up with the
factory default configuration.
Figure 69: System Reset to Default Option
PureWave Quantum 6600 User Guide v2.1
Page 79
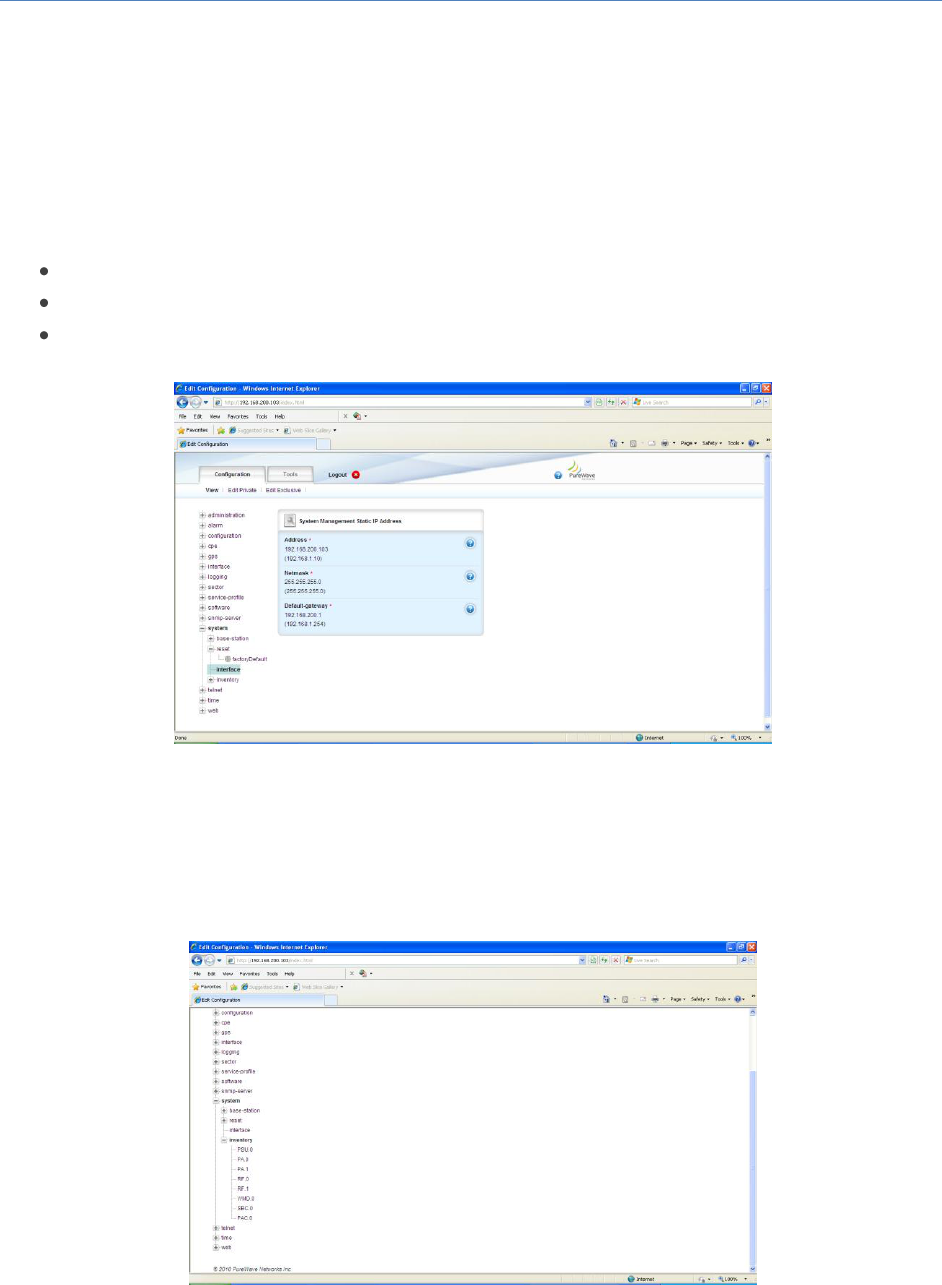
At the Main Web GUI Interface Screen select the Configuration Tab, select system Main Menu Option,
reset Main Menu Sub-Element and then interface. This provides the User with the options to configure
the System Management Static IP Address (refer to Figure 70). If the User wants to configure any of the
parameters then they must enter the Edit Mode (select Edit Private or Edit Exclusive) and edit as
necessary. The methods to Edit the parameters will be offered via editing of a notepad icon.
The parameters to configure for the Base Station Static Management IP Address are:
Address
Netmask
Default Gateway
Figure 70: System Management Static IP Address
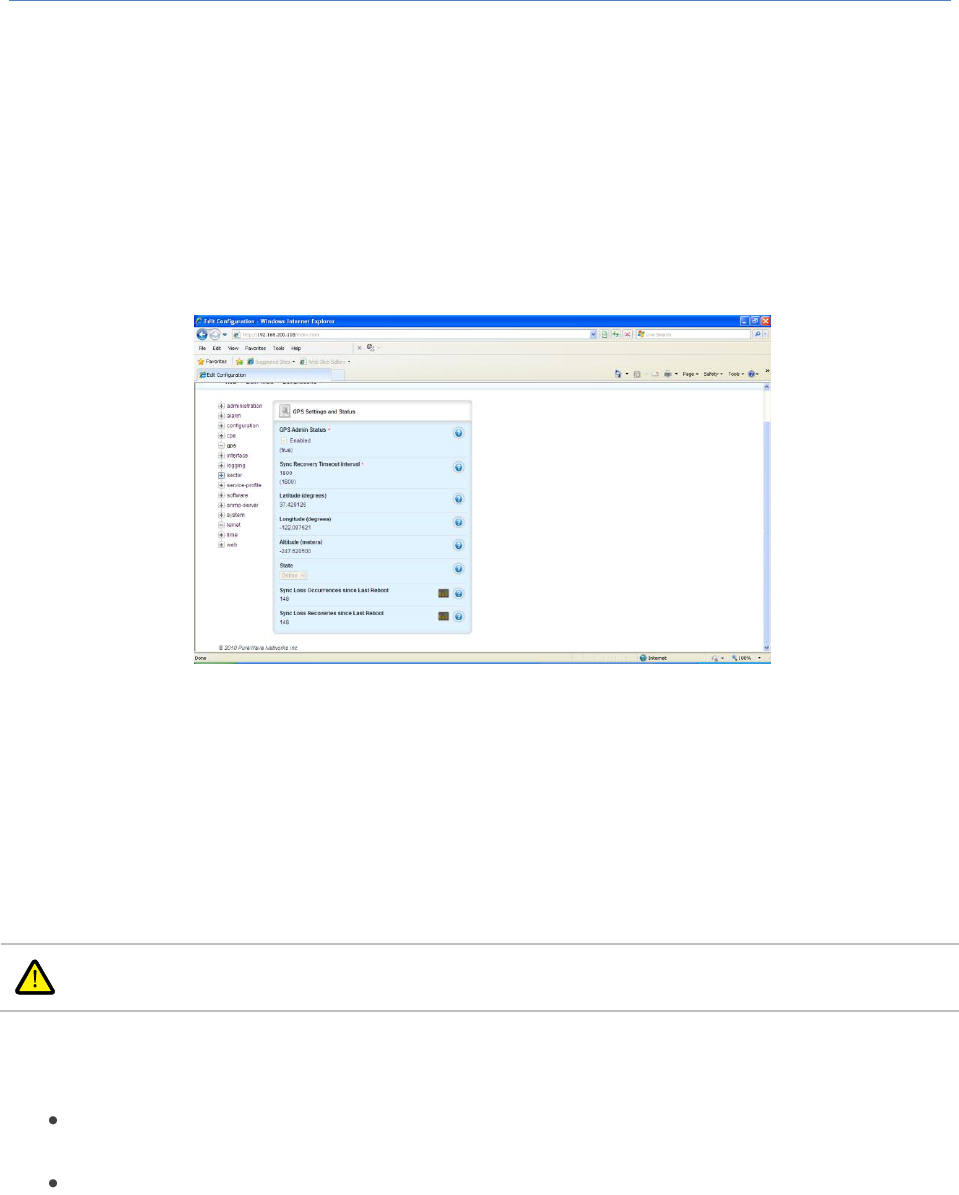
At the Main Web GUI Interface Screen select the Configuration Tab, select system Main Menu Option
and then inventory Main Menu Sub-Element. This will provide the User with an inventory checklist of
the internal hardware modules of the Base Station (refer to Figure 71).
Figure 71: System Base Station Inventory
PureWave Quantum 6600 User Guide v2.1
Page 80
3.5.3.4 GPS Settings
The use of a GPS for air frame synchronization is mandatory if more than one Base Station is installed in
a geographical area where potential radio transmissions could interfere with one another. GPS is
enabled or disabled via the GPS option.
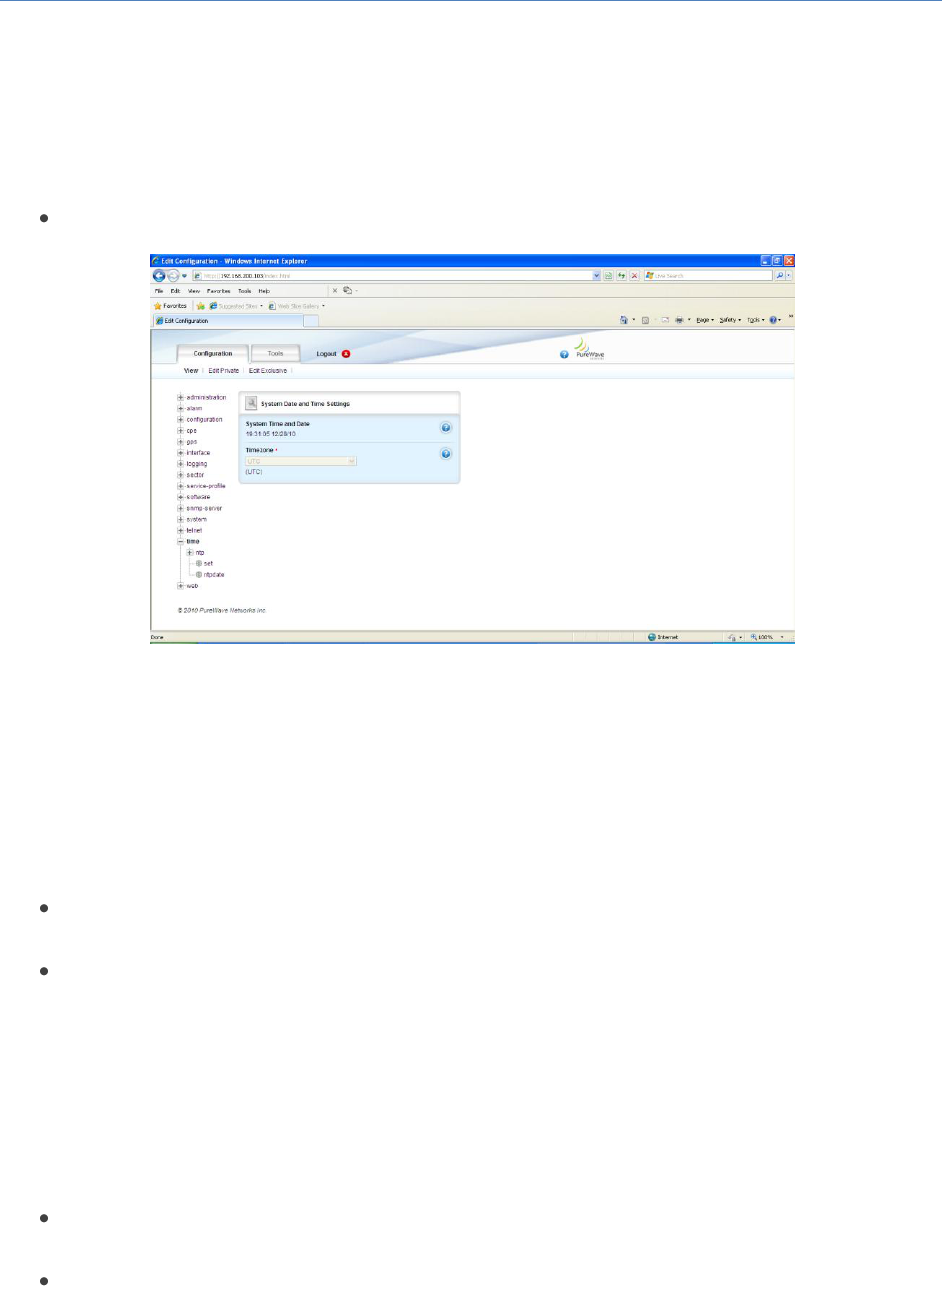
At the Main Web GUI Interface Screen select the Configuration Tab and then select the gps Main Menu
Option. This will display the GPS Settings and Status window (Figure 72). The gps Main Menu Option has
no further sub-elements .
Figure 72: GPS Settings and Status
The GPS Settings display is split into one main group sections. An indication as to whether there are any
User configurable parameters included in the group is provided. If the User wants to configure any of
the parameters then they must enter the Edit Mode (select Edit Private or Edit Exclusive) and edit as
necessary. The methods to Edit the parameters will be offered via an enabling of a check box or editing
of a notepad icon.
A GPS antenna MUST be connected to the base Station before setting GPS Admin Status to
“Enabled”.
The GPS Settings and Status window contains (refer to figure 69):
GPS Admin Status. This is an indication of the GPS Admin Status. The options are enabled and
disabled with disabled as the default.
Sync Recovery Timeout Interval. The Base Station has a Sync Recovery feature, whereby the
Base Station is automatically reset if GPS sync is lost for more than a specified timeout period.
The timeout period (in seconds) is specified via the Sync Recovery Timeout Interval parameter.
The default value is 1800 seconds.

PureWave Quantum 6600 User Guide v2.1
Page 81
Latitude (degrees). This is the latitude location of the GPS receiver. This is not a User
configurable parameter.
Longitude (degrees). This is the longitude location of the GPS receiver. This is not a User
configurable parameter.
Altitude (meters). This is the altitude in meters, above sea level of the GPS receiver. This is not a
User configurable parameter.
State. This is an indication of the state of the GPS receiver. This is not a User configurable
parameter.
Sync Loss Occurrences since Last Reboot. This is a cumulative count of the number of GPS sync
losses since the Base Station was last reset. This is not a User configurable parameter.
Sync Loss Recoveries since Last Reboot. This is a cumulative count of the number of GPS sync
recoveries since the Base Station was last reset. This is not a User configurable parameter.
The GPS will be in one of the states below from startup and until it is operational and providing
synchronization to the base station.
Offline. The 1 PPS from the satellite signal is not detected, so basic synch lock has not occurred.
This can be also seen as there should not be any coordinates if the GPS is “offline”
INIT: GPS state which dictates whether or not the BASE STATION will start transmission if the
GPS is enabled.
o INIT-Initializing
o INIT-Tracking-1-OSO
o INIT-Tracking-2-STO-Init
o INIT-Tracking-3-STO-Start
UP: GPS is operational (up).
o UP-Tracking-Done. Base Station will begin transmission
o UP-Tracking-Hist. Last GPS state indicating a steady state.
o UP-Holdoff
o UP-ReAcquire
o UP-Retrack
DOWN: GPS is not operational (down).
o DOWN-Unreliable
o DOWN-Recovery
3.5.3.5 Time Settings
It is important that the Base Station maintain an accurate date and time so that system logs are aligned
and may be correlated with other network activity and trouble reports. Although the date and time
must be initially set by the user, the Base Station supports the Network Time Protocol (NTP) to maintain
its accuracy. The use of NTP is optional
PureWave Quantum 6600 User Guide v2.1
Page 82
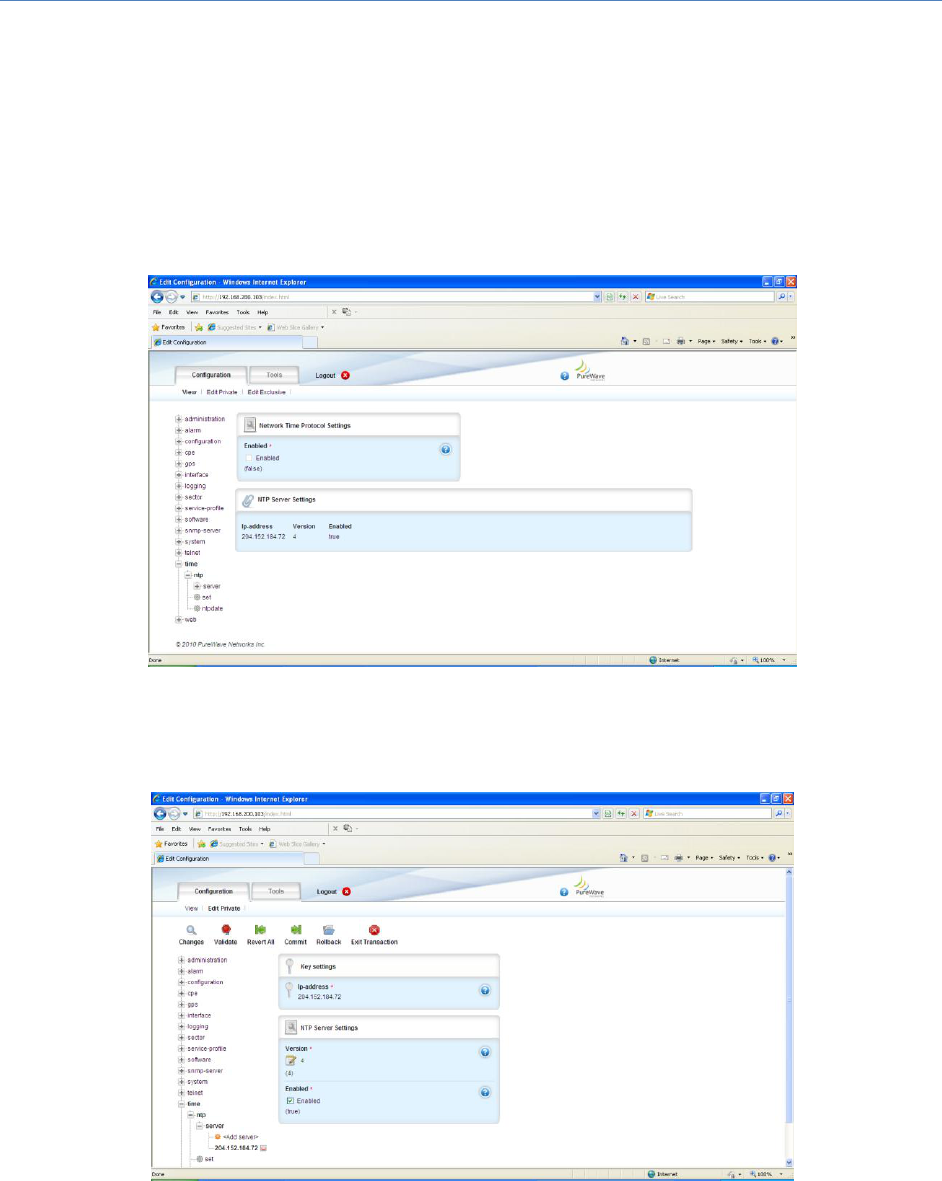
At the Main Web GUI Interface Screen select the Configuration Tab and then select the time Main Menu
Option. This will display the System Date and Time Settings and the display is split into one main group
section (refer to Figure 73). In addition, the time menu option has a single further sub-element.
The further sub element is:
ntp. These are the NTP time settings.
Figure 73: Time Settings
An indication as to whether there are any User configurable parameters included in the group is
provided. If the User wants to configure any of the parameters then they must enter the Edit Mode
(select Edit Private or Edit Exclusive) and edit as necessary. The methods to Edit the parameters will be
offered via drop down menu.
The System Date and Time Settings window contains:
System Time and Date. This is an indication of current date and time. This is not a User
configurable parameter.
Timezone. This is an indication of the timezone. The Use is free to select their respective
timezone and multiple options are available via the dropdown menu.
To view the Network Time Protocol Settings then at the Main Web GUI Interface Screen select the
Configuration Tab, select time Main Menu Option and then ntp Main Menu Sub-Element. The display is
split into two main grouping sections (figure 71).
Network Time Protocol Settings. This is an indication as to whether NTP has been enabled. The
options are enabled and disabled with disabled as the default.
NTP Server Settings. This is an indication of the IP address, the NTP protocol version and
whether the server is enabled of the NTP server. If the User wants to configure the NTP settings
PureWave Quantum 6600 User Guide v2.1
Page 83
then they can edit, delete or add another NTP server. If the User enters the Edit mode for this
parameter, then a further sub element with two more windows appear and the User can edit as
required (refer to figure 72). The User can configure:
o Ip-address. This is the IP Address of the NTP Server.
o Version. This is the protocol version of the NTP Server.
o Enabled. This indicates whether the NTP Server is enabled.
Figure 74: Time NTP Server Settings
Figure 75: Time NTP Server Configuration
PureWave Quantum 6600 User Guide v2.1
Page 84
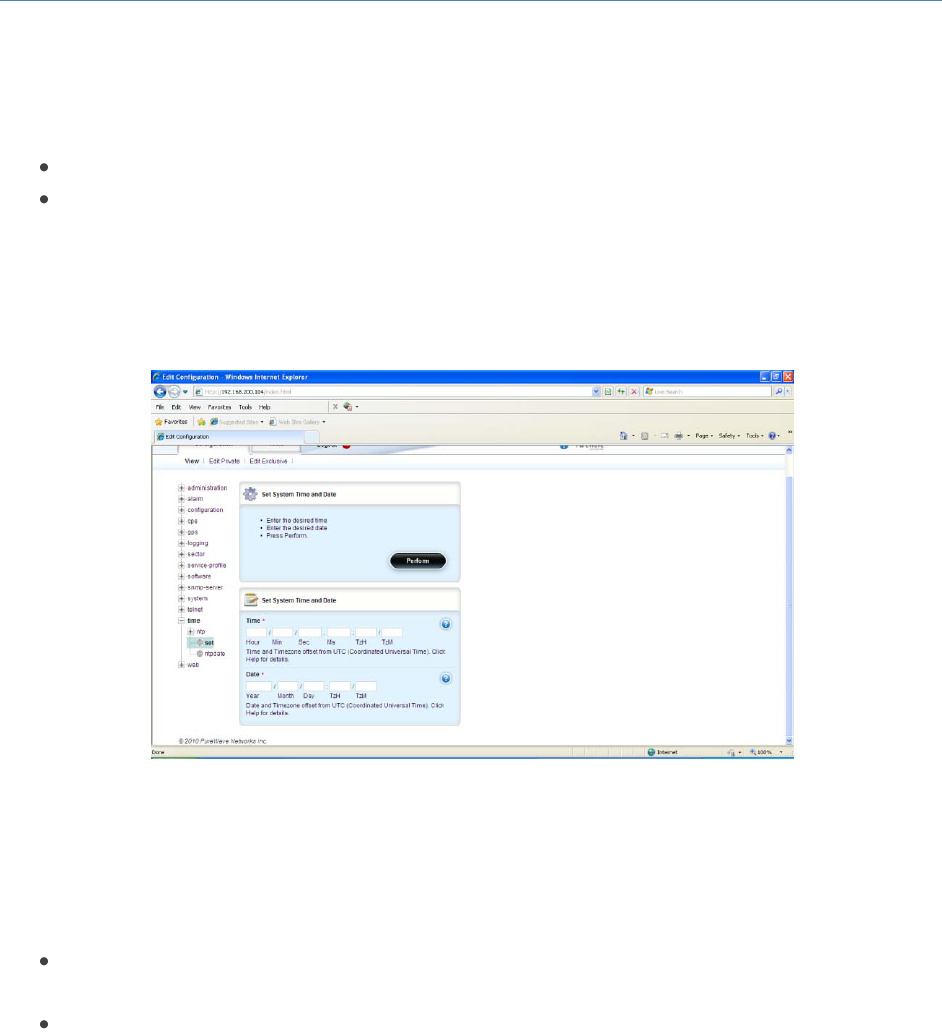
To view the current System Time and Date Settings then at the Main Web GUI Interface Screen select
the Configuration Tab, select time Main Menu Option and then the set Main Menu Sub-Element. The
display is split into two main grouping sections (refer to Figure 76).
Set System Time and Date. This is a text box that contains the Perform Command Menu Option.
Set System Time and Date. The User is free to configure the Time and Date. The dialog time is
specified in 24-hour format and includes milliseconds (“Ms”), which may simply be set to 0. TzH
is the timezone hours offset from Coordinated Universal Time (UTC) and is between -23 and
+23. TzM is the timezone minutes offset from Coordinated Universal Time (UTC) and is between
0 and 59. Once these parameters have been configured, the User must select the Perform
Command Menu Option for the changes to be effected.
Figure 76: Time NTP Server System Set
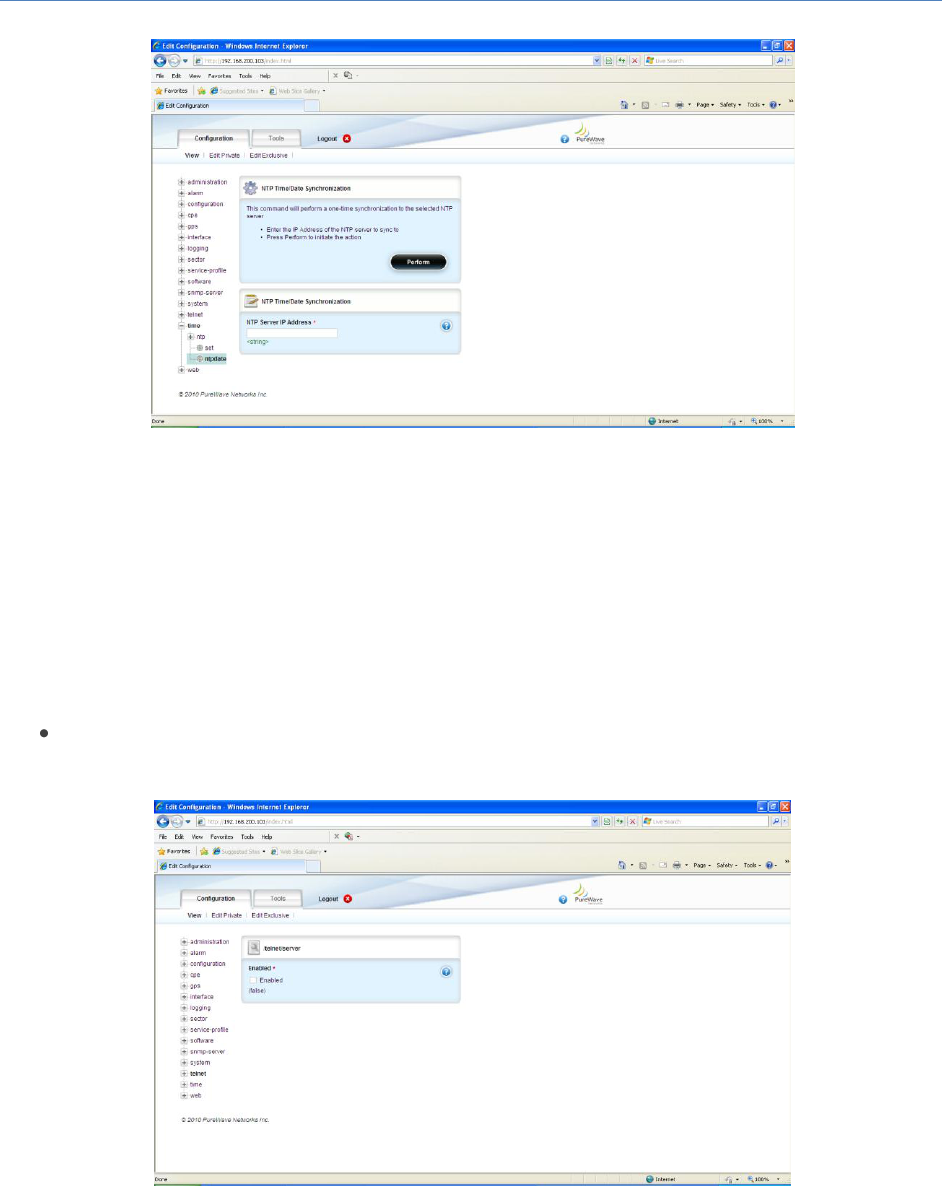
To view the NTP Time/Date Synchronization then at the Main Web GUI Interface Screen select the
Configuration Tab, select time Main Menu Option, then ntp Main Menu Sub-Element and then
ntpdate. The display is split into two main grouping sections (refer to Figure 77).
NTP Time/Date Synchronization. This command will perform a one-time synchronization to the
selected NTP server. To apply the User simply needs to select the Perform command button.
NTP Time/Date Synchronization. The User can configure the NTP Server IP address to perform
the one time synchronization with.
PureWave Quantum 6600 User Guide v2.1
Page 85
Figure 77: Time NTP Server Synchronization Update
3.5.3.6 Telnet Settings
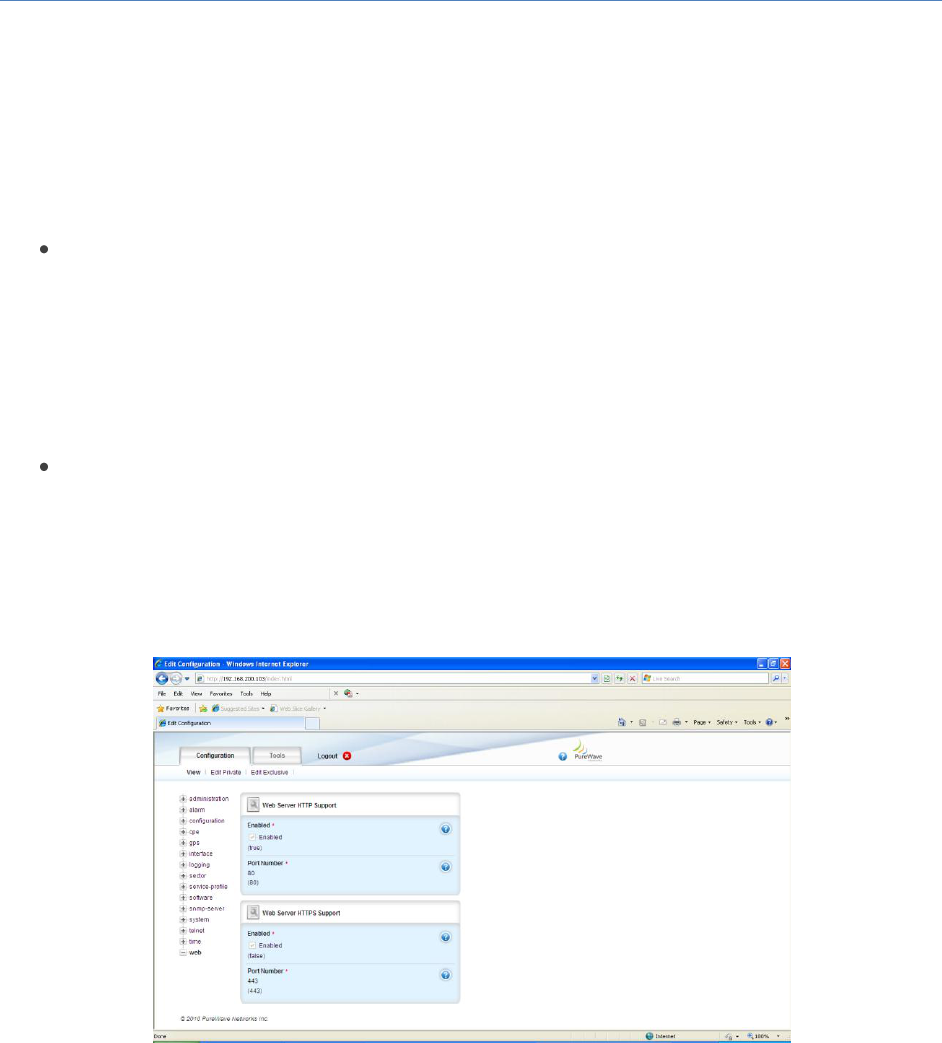
At the Main Web GUI Interface Screen select the Configuration Tab and select the telnet Main Menu
Option. This will display the /telnet/server Settings and the display is split into one main group section
(refer to Figure 78). There are no further sub-element associated with this option.
The /telnet/server settings are:
Enabled. This indicates whether the telnet option has been enabled or not. This is a User
configurable value that is edited via a check box.
Figure 78: Telnet Server Enabled
PureWave Quantum 6600 User Guide v2.1
Page 86
3.5.3.7 Telnet Settings
At the Main Web GUI Interface Screen select the Configuration Tab and select the web Main Menu
Option. This will display the web Settings and the display is split into two main grouping sections (refer
to Figure 79). There are no further sub-element associated with this option. The main grouping sections
are:
Web Server HTTP Support. This indicates the Base Station HTTP options. The configuration
options are:
o Enabled. This indicates whether the HTTP Support option has been enabled or not. This
is a User configurable value that is edited via a check box. The default configuration is
disabled.
o Port Number. This is the port number for HTTP Support. This is a User configurable
value that is edited via a notepad icon.
Web Server HTTPS Support. This indicates the Base Station HTTP options. The configuration
options are:
o Enabled. This indicates whether the HTTPS Support option has been enabled or not. This
is a User configurable value that is edited via a check box. The default option is enabled.
o Port Number. This is the port number for HTTPS Support. This is a User configurable
value that is edited via a notepad icon.
Figure 79: Web Server HTTP Support
3.5.3.8 Configuration Settings
All the Base Station configuration parameters are contained and stored local on the Base Station in flash
memory, via a number of configuration files. The User has the complete control to perform a variety of
functions such as copy, move, delete and restore etc on these files. This presents a User with an option,

PureWave Quantum 6600 User Guide v2.1
Page 87
in the event that they would like to re-configure a Base Station or the Subscriber CPE profiles they can
copy and export a configuration file which can then easily be edited and downloaded back onto the Base
Station. This is an alternative approach to the screen by screen configuration method that is detailed in
this User Guide.
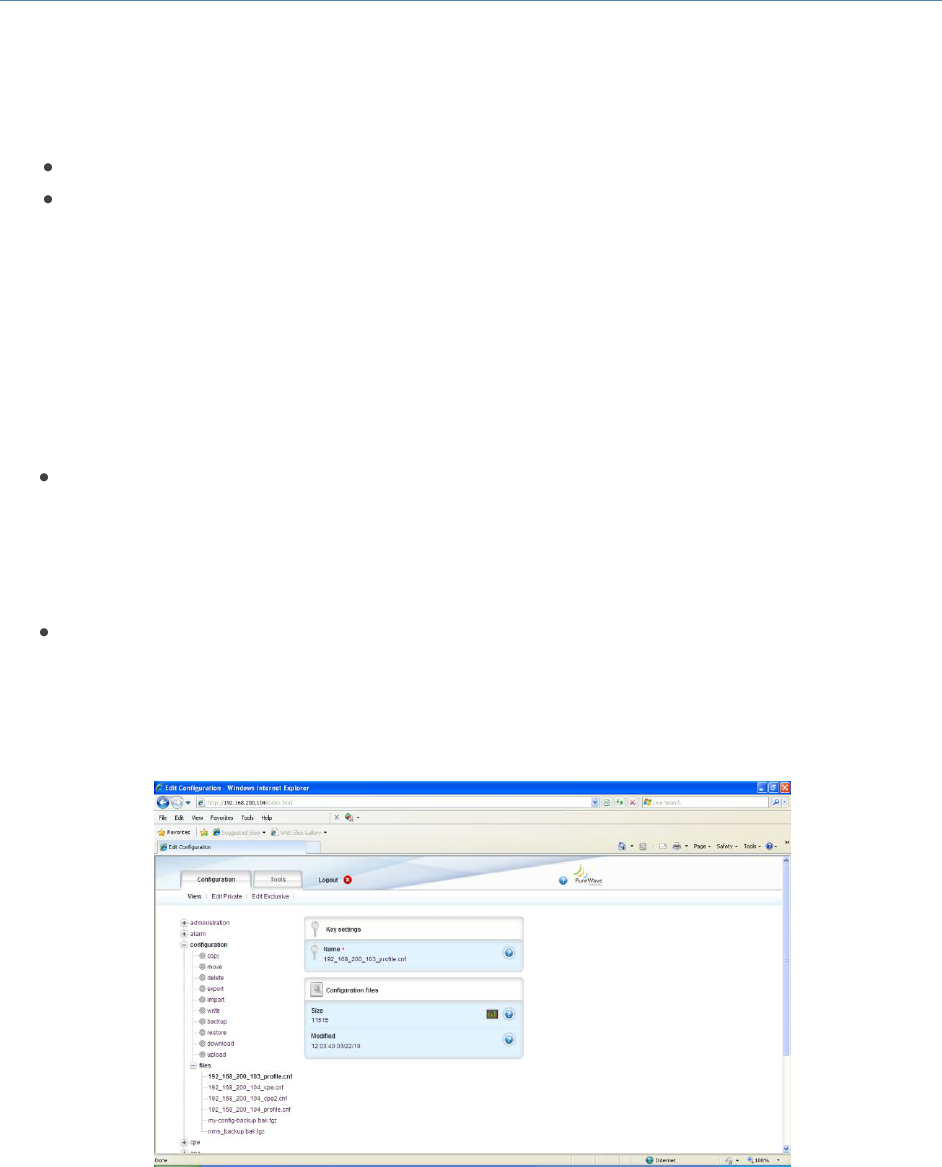
At the Main Web GUI Interface Screen select the Configuration Tab and select the configuration Main
Menu Option. This will display the configuration Settings and the display is split into two main grouping
sections (refer to figure 77). There are ten Main Menu Sub-Elements associated with the configuration
Main Menu Option. The main grouping sections are:
Configuration File Operation Status. This indicates the Configuration File operation status when
the User is downloading or uploading a configuration file. The parameters that are displayed are
as follows.
o State. This indicates execution state of the configuration command. It is not a
configurable parameter and simply states the current status, for example Idle.
o Download Progress. This provides an indication of the completion percentage of the
configuration file that is being downloaded. This is not a configurable parameter.
o Upload Progress. This provides an indication of the completion percentage of the
configuration file that is being uploaded. This is not a configurable parameter.
Configuration Files. This is a list of the configuration files on the Base Station. There is no
configurable parameters for these files and the information that is presented for each file is:
o Name.
o Size. The size of the file is in bytes.
o Modified. This is the date and time that the file was last modified.
The ten Main Menu Sub-Elements are essentially the actions that can be performed on a configuration
file. The User is not required to be in Edit Mode to perform any of these actions, the action is presented
to them directly at each Main Menu Sub-Element option. These are:
copy
move
delete
export
import
write
backup
restore
download
upload
files
PureWave Quantum 6600 User Guide v2.1
Page 88
The Main Menu Sub-Elements will be examined in detail. The same display elements are presented
when the User navigates to each of these 10 Main Menu Sub-Elements. The display is split into two main
grouping sections (refer to Figure 80).
The top grouping section provides a description and instructions of the action.
The bottom grouping section provides the mechanism to perform the action.
Another common theme throughout the Main Menu Sub-Element is the ability to select a configuration
file for an action. The relevant files are presented to the User via a drop down menu or the files are
listed under the files Main Menu Sub-Element option. To view the files then at the Main Web GUI
Interface Screen select the Configuration Tab and select the files Main Menu Option. This will display all
the relevant files.
The explanation for each file is:
.cnf (configuration) files are created by the export command and can only be read by the import
command. The data in the file is saved as a series of CLI commands. This file is in ASCII format
and can be edited within a text editor.
o profile.cnf file is the Base Station configuration file.
o cpe.cnf is the Subscriber CPE configuration file.
The backup.bak.tgz is the non-editable database backup configuration stored in a compressed
format. This file is created with the backup command and can only be read by the restore
command.
Figure 80: Configuration Settings
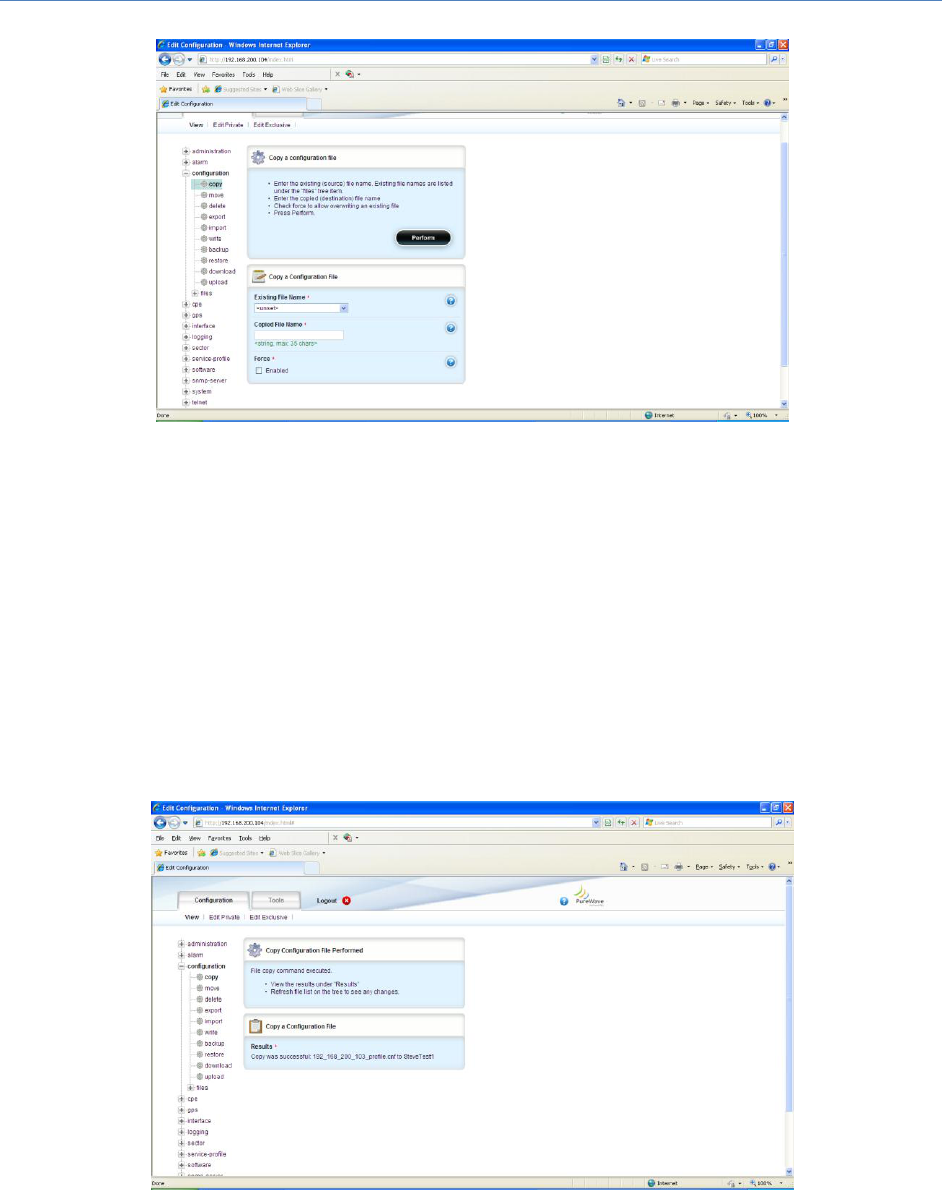
At the Main Web GUI Interface Screen select the Configuration Tab, then configuration Main Menu
Option and then the copy Main Menu Sub-Element. This will display window to copy a configuration file.
PureWave Quantum 6600 User Guide v2.1
Page 89
Figure 81: Configuration Copy Settings
The procedure to copy a file is (refer to Figure 81):
(1) Select the file to be copied from the drop down menu of the Existing File Name field.
(2) Enter the copied file name in the Copied File Name field.
(3) Enable the Force field if the User wants to overwrite an existing file on the Base Station.
(4) The User must then press the Perform Command Menu Option.
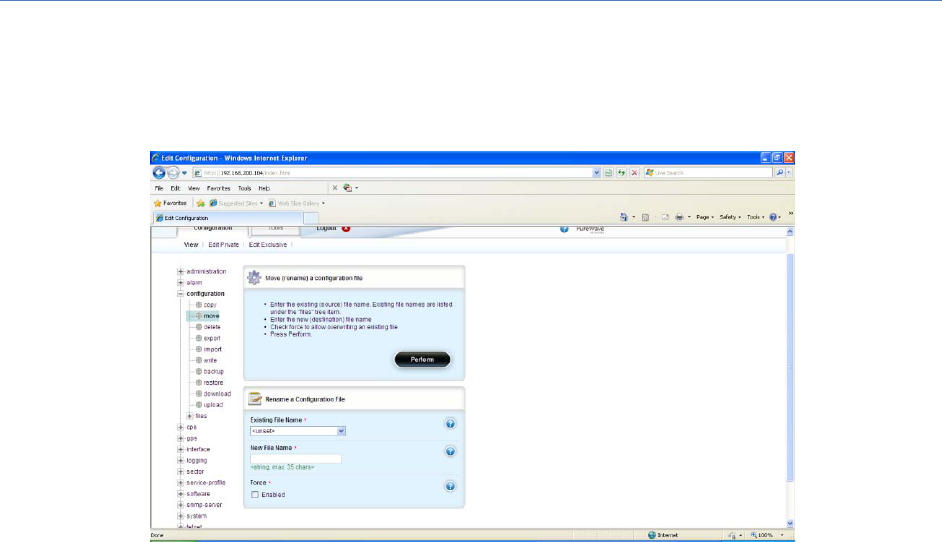
(5) The relevant file will now be copied and the results of this action will be displayed (Figure 82).
Figure 82: Configuration Copy Successful
PureWave Quantum 6600 User Guide v2.1
Page 90
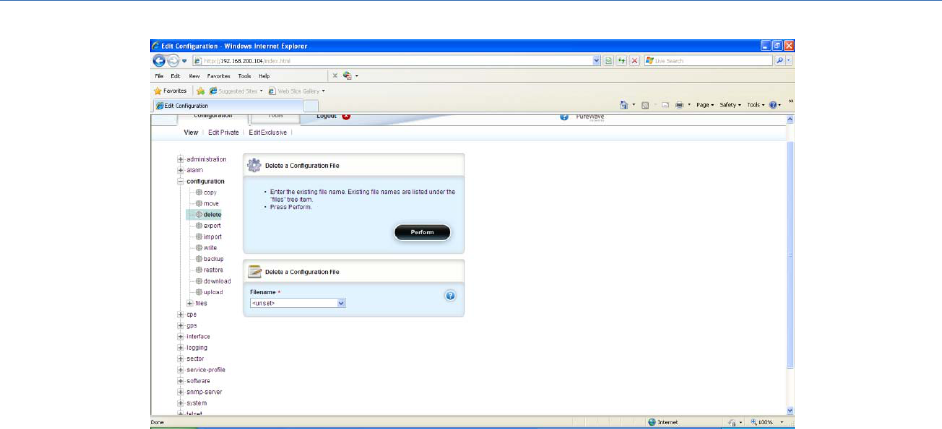
At the Main Web GUI Interface Screen select the Configuration Tab, then configuration Main Menu
Option and then the move Main Menu Sub-Element. This will display window to move or rename a
configuration file (Figure 83).
Figure 83: Configuration Move Settings
The procedure to rename a file is:
(1) Select the file to be renamed from the drop down menu of the Existing File Name field.
(2) Enter the new file name in the New File Name field.
(3) The User must then press the Perform Command Menu Option.
(4) The relevant file will now be renamed and the results of this action will be displayed.
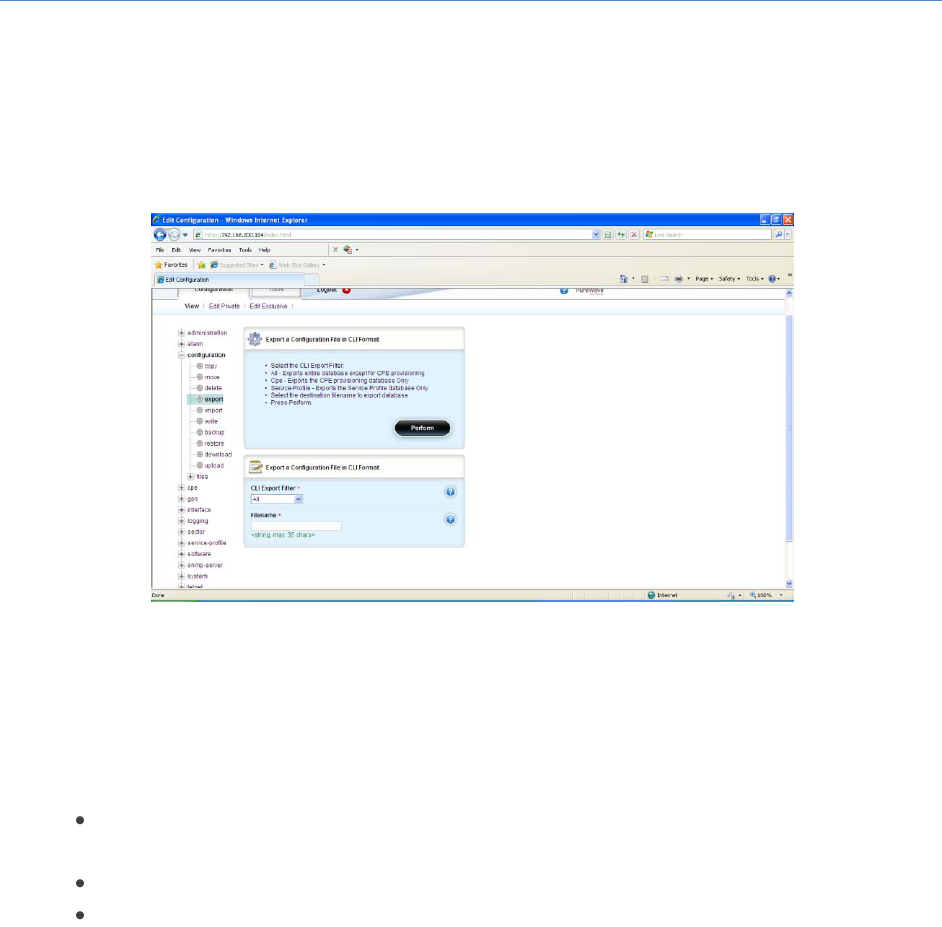
At the Main Web GUI Interface Screen select the Configuration Tab, then configuration Main Menu
Option and then the delete Main Menu Sub-Element. This will display window to delete a configuration
file (refer to Figure 84).
PureWave Quantum 6600 User Guide v2.1
Page 91
Figure 84: Configuration Delete Settings
The procedure to delete a file is:
(1) Select the file to be renamed from the drop down menu of the Filename field.
(2) The User must then press the Perform Command Menu Option. A prompt box will now appear
and the User is requested to confirm "Do you really want to delete the file?".
(3) The relevant file will now be renamed and the results of this action will be displayed.
PureWave Quantum 6600 User Guide v2.1
Page 92
At the Main Web GUI Interface Screen select the Configuration Tab, then configuration Main Menu
Option and then the export Main Menu Sub-Element. This will display window to export a configuration
file (refer to Figure 85). The export option creates an ASCII file that can be physically edited by the User.
The file will be stored in flash on the Base Station and the User will have to upload it off the Base
Station.
Figure 85: Configuration Export Settings
The procedure to export a file is:
(1) Select the CLI export filter from the drop down menu of the CLI Export Filter. The options are:
All. This will export the entire configuration database except for Subscriber CPE
provisioning.
CPE. This will export the Subscriber CPE provisioning database only.
Service-Profile. This will export the Service Profile database only.
(2) Enter the destination filename to export the database in the Filename field.
(3) The User must then press the Perform Command Menu Option.
(4) The relevant file will now be renamed and the results of this action will be displayed.
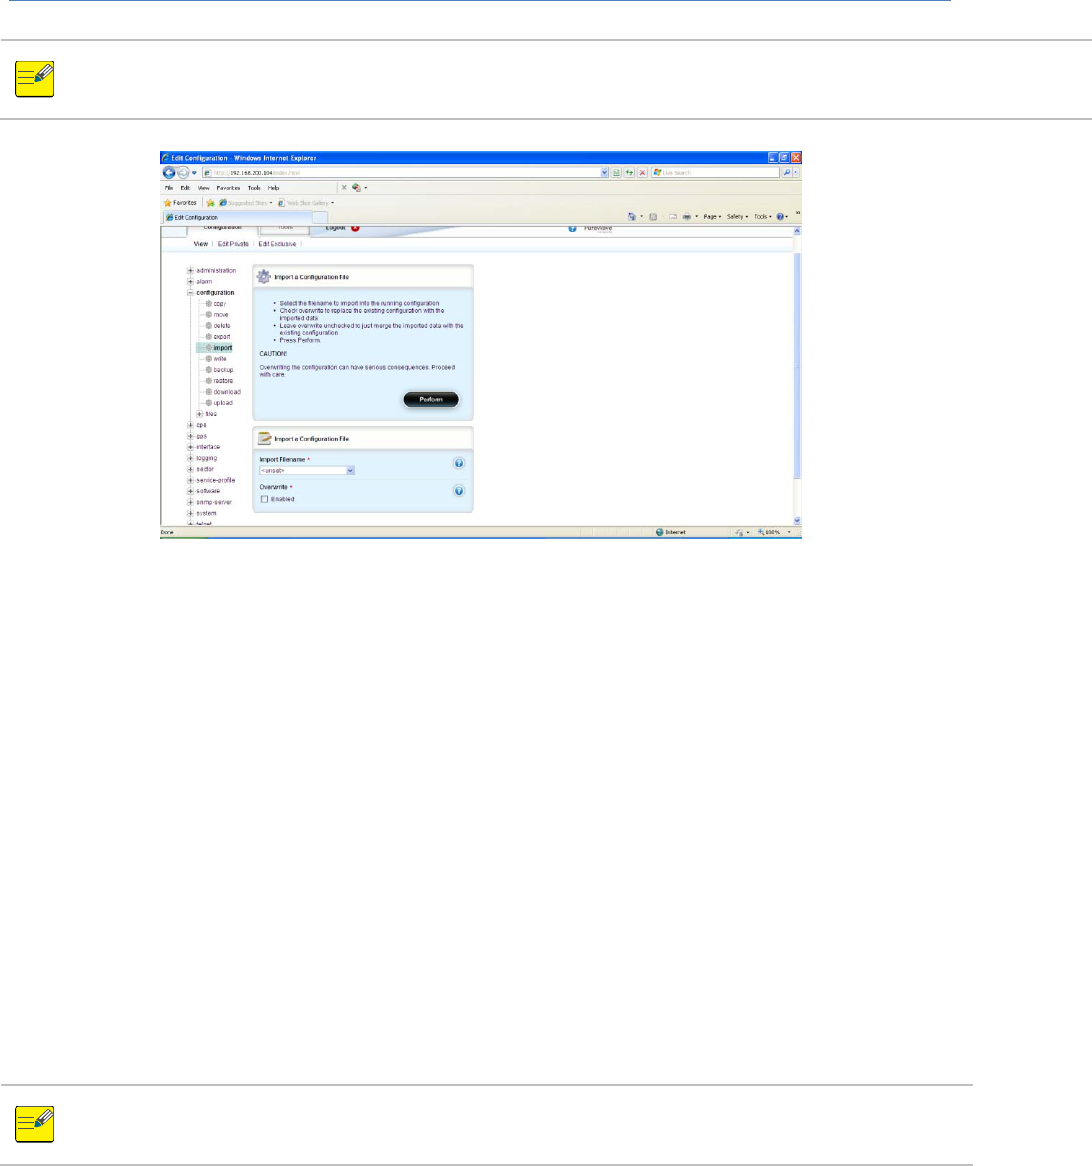
At the Main Web GUI Interface Screen select the Configuration Tab, then configuration Main Menu
Option and then the import Main Menu Sub-Element. This will display window to import a configuration
file (refer to Figure 86). The import option will import a configuration into the running configuration.
PureWave Quantum 6600 User Guide v2.1
Page 93
Overwriting the configuration file can have serious consequences. The User must proceed
with care.
Figure 86: Configuration Import Settings
The procedure to import a file to the Base Station:
(1) Select the filename to import into the running configuration from the drop down menu of the
Import Filename.
(2) If the User enables the Overwrite field, then this will replace the existing CPE configuration data
with the imported data. This will only work with files created with the export CPE option. Trying
to load other files with the overwrite option set will result in an error message.
(3) If the User does not enable the Overwrite field, then the imported data will be merged with the
existing configuration.
(4) The User must then press the Perform Command Menu Option.
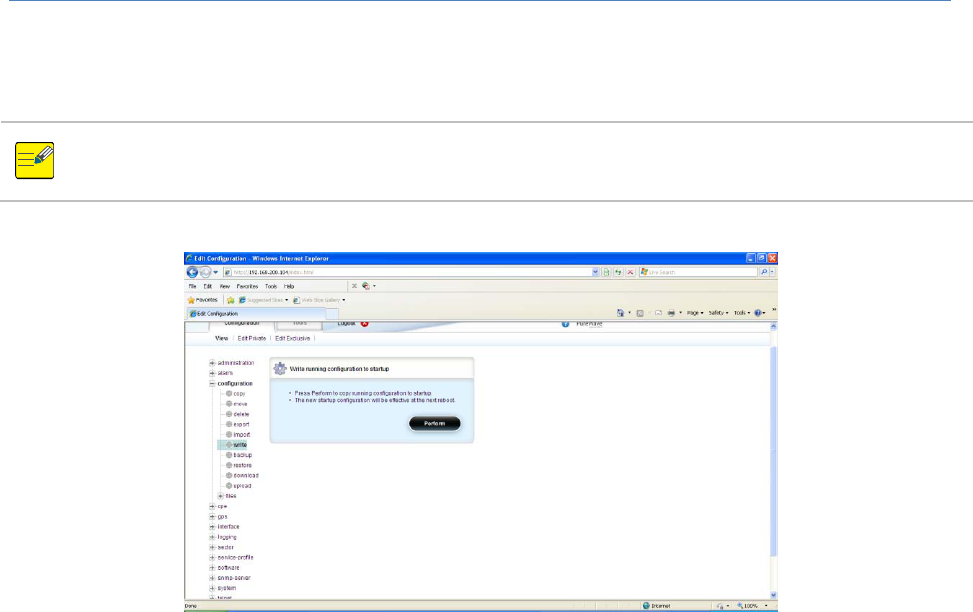
At the Main Web GUI Interface Screen select the Configuration Tab, then configuration Main Menu
Option and then the write Main Menu Sub-Element. This will display window to write a configuration
The Import command can take several minutes to complete. Please wait until this process is
completed before going on to make any other configuration changes.
PureWave Quantum 6600 User Guide v2.1
Page 94
file (refer to Figure 87). The write procedure will copy the running configuration to startup. The new
startup configuration will be effective at the next reboot of the Base Station.
Please note that changes will not be persistent and survive a restart unless the write
command is issued after the changes are made.
Figure 87: Configuration Write Settings
The procedure to write the configuration is:
(1) The User must then press the Perform Command Menu Option. A prompt box will now appear
and the User is requested to confirm "Do you really want to write the file?".
(2) The relevant configuration will now be written and the results of this action will be displayed.
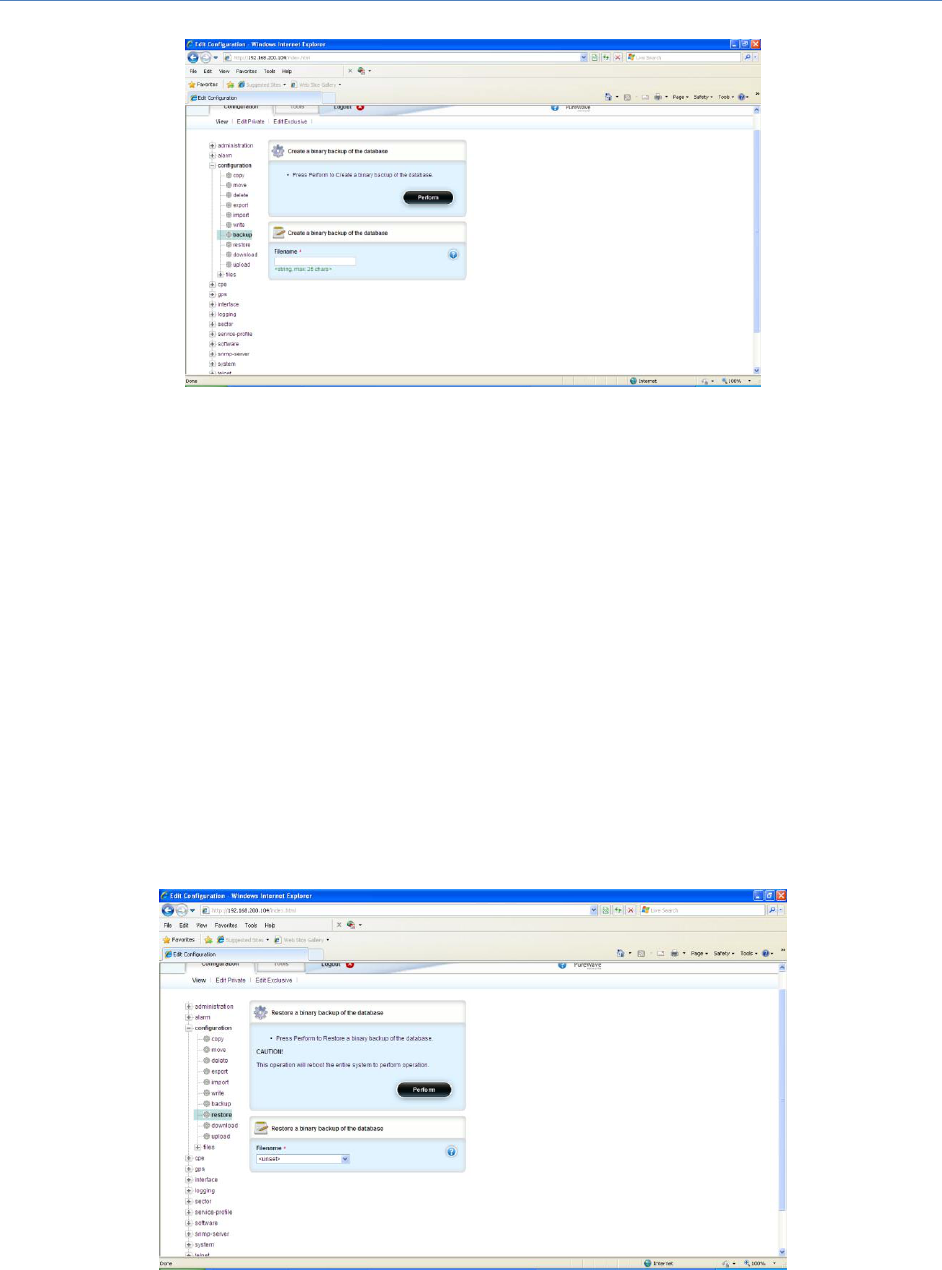
At the Main Web GUI Interface Screen select the Configuration Tab, then configuration Main Menu
Option and then the backup Main Menu Sub-Element. This will display window to backup a
configuration file (refer to Figure 88). The backup procedure will create a binary backup of the entire
database which is compressed into a tar.gz file. This is effectively the essence of the Base Station but it
cannot be edited by the User.
PureWave Quantum 6600 User Guide v2.1
Page 95
Figure 88: Configuration Backup Settings
The procedure to backup a database is:
(1) Select the filename to create a binary backup of the database in the Filename field.
(2) The User must then press the Perform Command Menu Option. A prompt box will now appear
and the User is requested to confirm "Do you really want to delete the file?".
(3) The relevant file will now be renamed and the results of this action will be displayed.
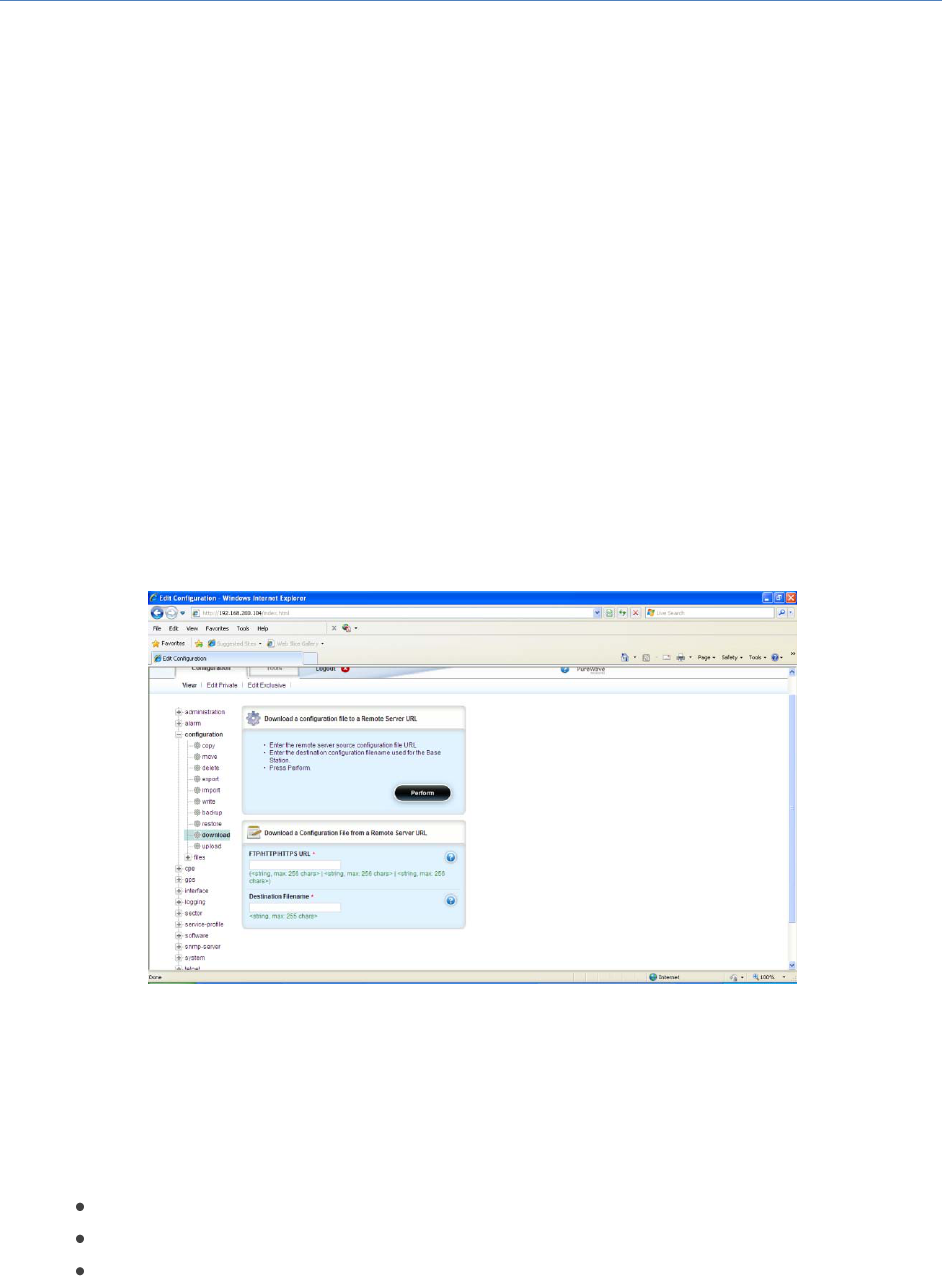
At the Main Web GUI Interface Screen select the Configuration Tab, then configuration Main Menu
Option and then the restore Main Menu Sub-Element. This will display window to restore a
configuration file (refer to Figure 89). The procedure will restore a binary backup of the entire database.
This procedure will affect a reboot of the Base Station.
Figure 89: Configuration Restore Settings
PureWave Quantum 6600 User Guide v2.1
Page 96
The procedure to restore a database is:
(1) Select the filename to restore a binary backup of the database in the Filename field.
(2) The User must then press the Perform Command Menu Option. A prompt box will now appear
and the User is requested to confirm "Do you really want to delete the file?".
(3) The relevant file will now be renamed and the results of this action will be displayed.
At the Main Web GUI Interface Screen select the Configuration Tab, then configuration Main Menu
Option and then the download Main Menu Sub-element. This will display window to download a
configuration file to a remote server (refer to Figure 90). Prior to downloading the file, the User must
ensure that an FTP Server has been configured and is running. There are a number of free commercially
available FTP Servers that can be used. A key step in the process is to ensure that the URL for the file is
set to be the FTP Home directory. For the purposes of upload and download, think of the Base Station as
client in relation to the FTP as the server. The download process will therefore download from the
Server to the Base Station.
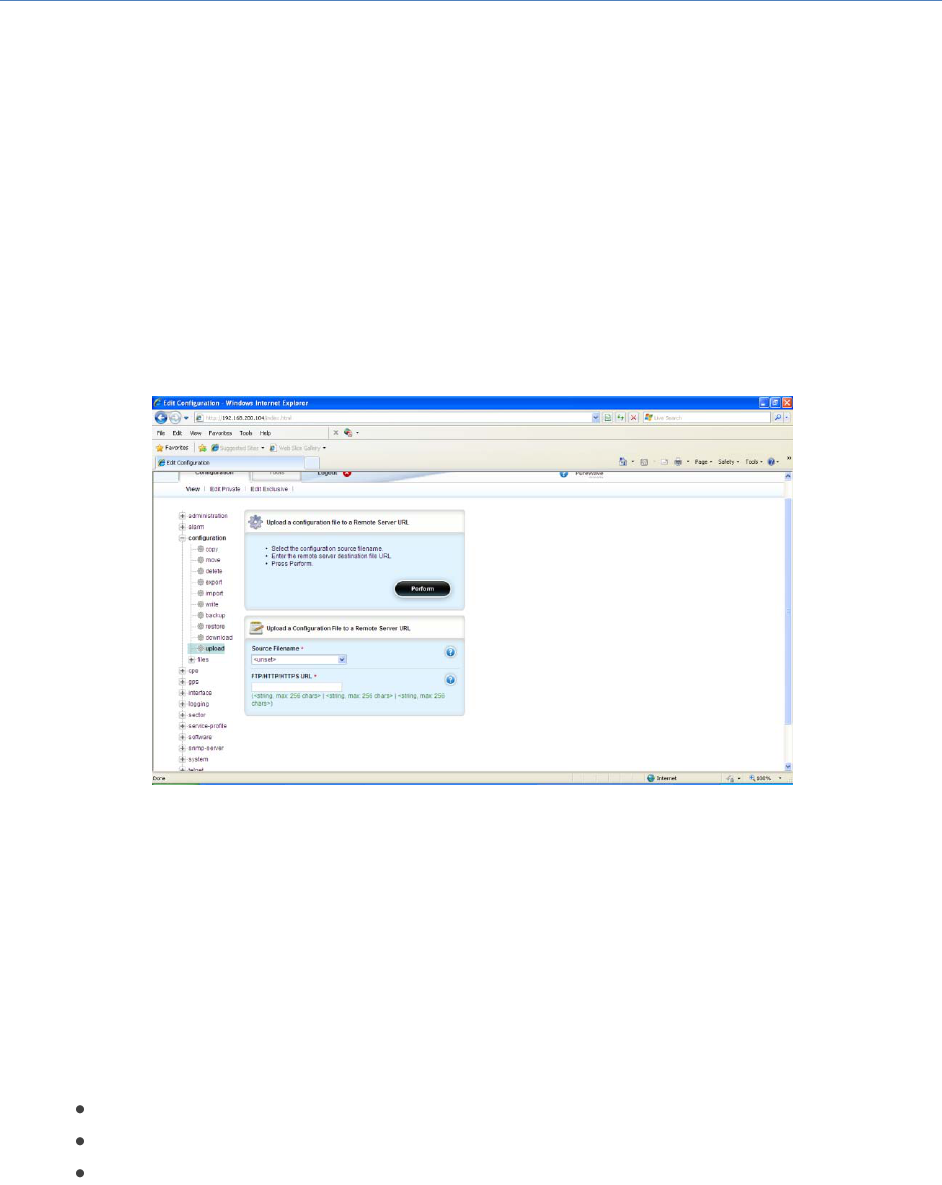
Figure 90: Configuration Download Settings
The procedure to download a file from a remote server is:
(1) Enter the remote server source configuration URL in the FTP/HTTP/HTTPS URL field. Acceptable
examples are:
ftp://192.168.10.1/filename
http://my.host-name.com/dir/filename
ftp://username:password@noc.big_co.com:2323/dir/filename
PureWave Quantum 6600 User Guide v2.1
Page 97
(2) Enter the destination configuration used filename used for the Base Station is the Destination
Filename field.
(3) The User must then press the Perform Command Menu Option. A prompt box will now appear
and the User is requested to confirm "Do you want to download the file?".
(4) The relevant file will now be downloaded and the results of this action will be displayed.
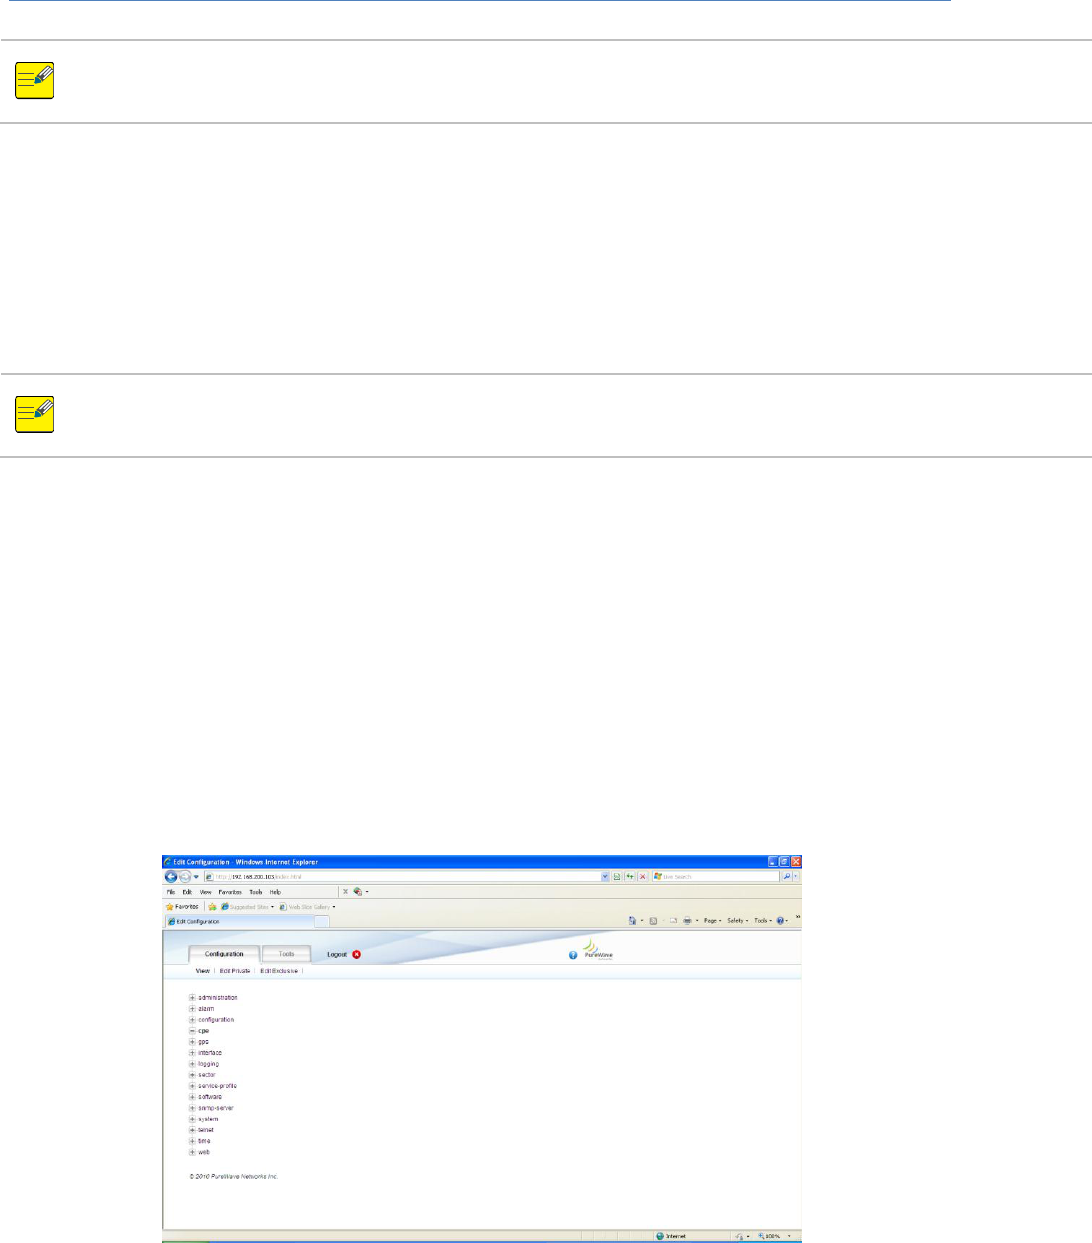
At the Main Web GUI Interface Screen select the Configuration Tab, then configuration Main Menu
Option and then the upload Main Menu Sub-Element. This will display window to upload a configuration
file to a remote server (refer to Figure 91). Prior to uploading the file, the User must ensure that a FTP
Server has been configured and is running.
Figure 91: Configuration Upload Settings
The procedure to upload a file to a remote server is:
(1) Enter the configuration source filename in the Source Filename field.
(2) Enter the remote server destination file URL in the FTP/HTTP/HTTPS URL field. Acceptable
examples are:
ftp://192.168.10.1/filename
http://my.host-name.com/dir/filename
ftp://username:password@noc.big_co.com:2323/dir/filename
(3) The User must then press the Perform Command Menu Option. A prompt box will now appear
and the User is requested to confirm "Do you want to upload the file?".
(4) The relevant file will now be uploaded and the results of this action will be displayed.
PureWave Quantum 6600 User Guide v2.1
Page 98
To ensure that the User has a stored backup of the running configuration file, then the User
would export and then upload the relevant files. To restore a previously stored file from its
remote location, then the User would download and then import.
3.5.4 Connecting a Subscriber Station
The procedures for provisioning each make and model of Subscriber CPE device vary and hence are
beyond the scope of this document. However, PureWave have prepared general documentation that
details recommend procedures to configure specific Subscriber units. Please refer to this documentation
for further details.
When a Subscriber CPE is powered on and configured for an appropriate Base Station, if that
Base Station is configured for auto-provisioning, the Subscriber CPE will automatically connect
to the Base Station and it will be assigned the default Client Profile (Client Profile 1).
The User however has the complete flexibility to pre-configure the Subscriber CPE and has the capability
to assign it to a specific Client Profile.
The procedure to configure a Subscriber CPE is:
(1) For the particular Subscriber CPE that you wish to provision please record the Subscriber MAC
address. This is written on the CPE label.
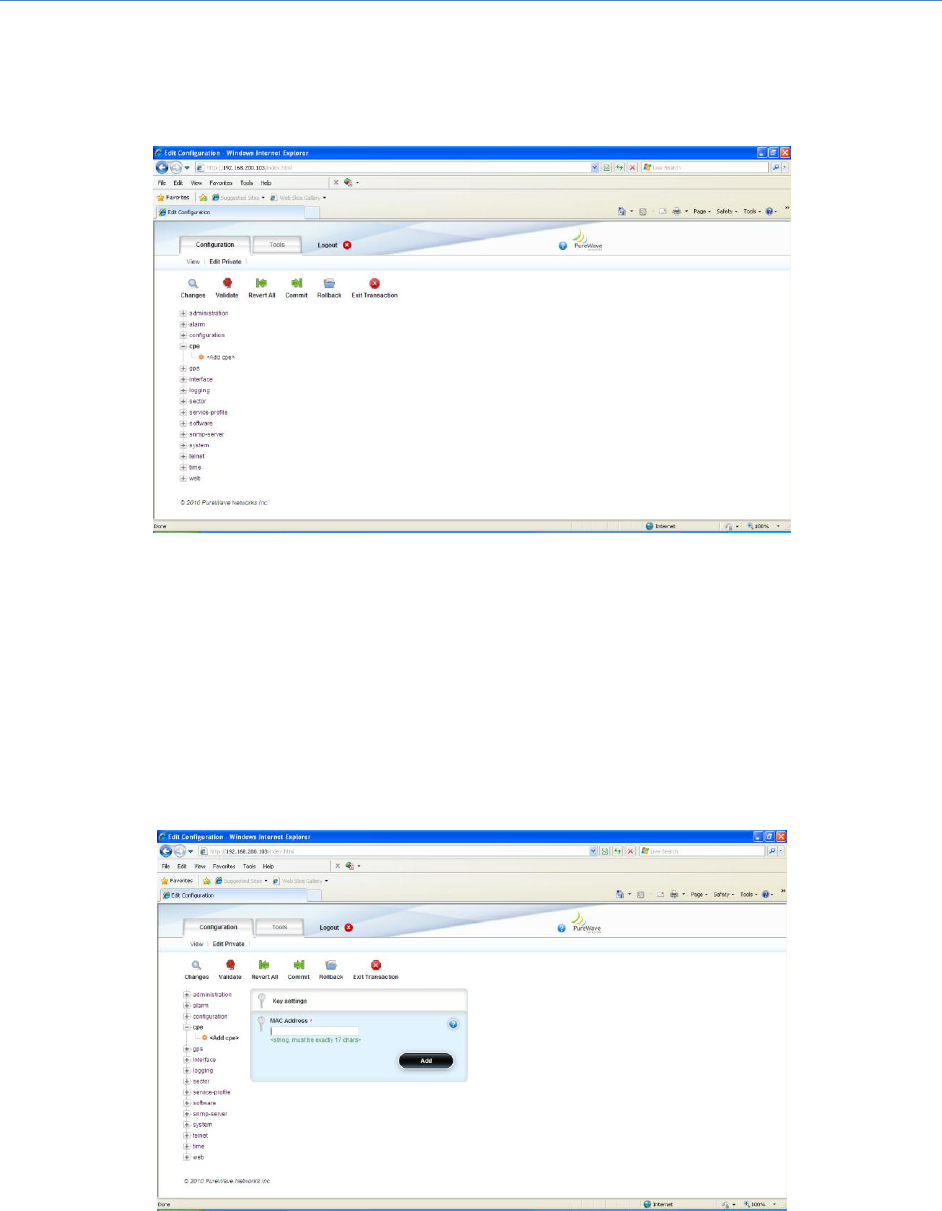
(2) At the Main Web GUI Interface Screen select the Configuration Tab and then the cpe Main
Menu Option. This will display a list of all Subscriber CPEs that have been specifically configured
on the Base Station (refer to Figure 92). If there are none listed then none have been
configured.
Figure 92: CPE Main Menu Option
PureWave Quantum 6600 User Guide v2.1
Page 99
(3) The User now has to enter the Edit Mode (select Edit Private or Edit Exclusive). The <Add cpe>
option will appear (refer to Figure 93).
Figure 93: Add Subscriber CPE Option
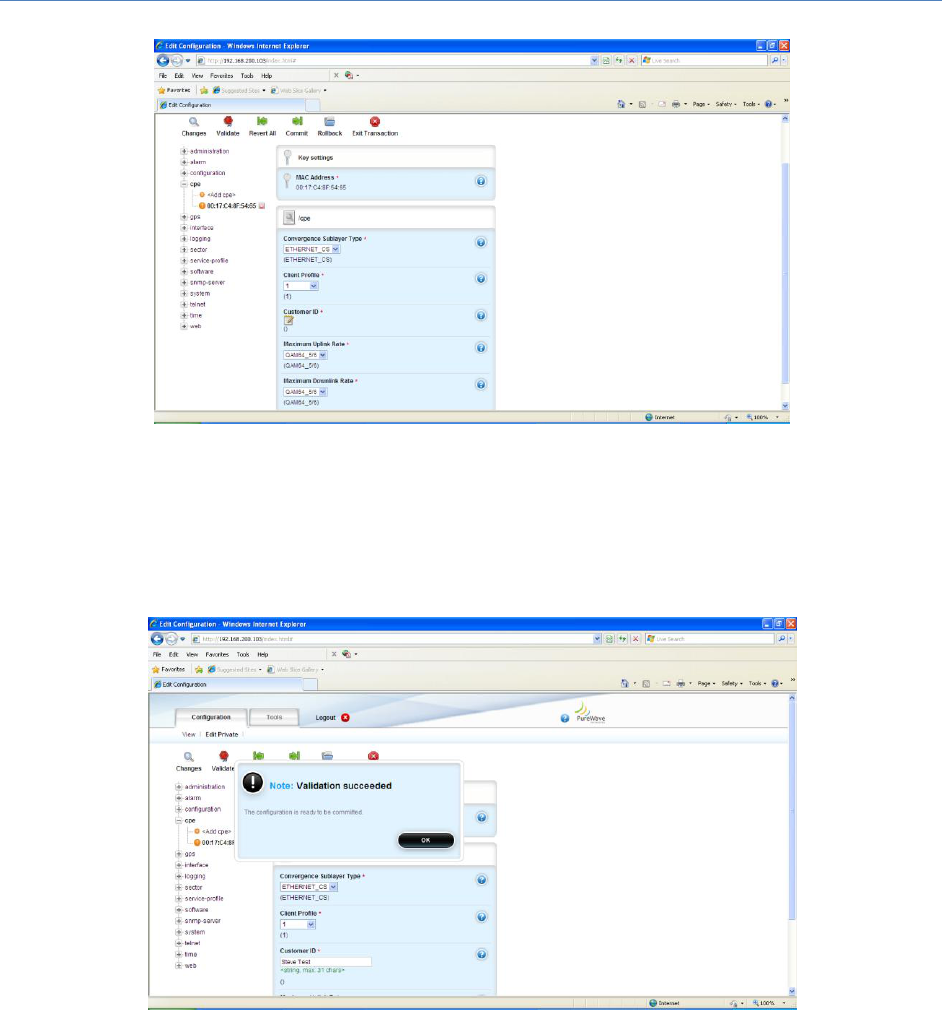
(4) The User must select the <Add cpe> option. A Key Settings window will appear. The User is
prompted to enter the Subscriber CPE MAC Address. The MAC Address must be entered in
Upper Case letters only and using a colon (:) to separate the digits, e.g. 00:17:C4:8F:9B:34. If the
User selects the “?” Command Menu Option within the window then a reminder prompt will be
displayed. Once the MAC Address has been entered the User must select the Add command
button (refer to Figure 94).
Figure 94: Add Subscriber CPE MAC Address

PureWave Quantum 6600 User Guide v2.1
Page 100
(5) The User will now be presented with the Subscriber configuration options. The options to select
are (refer to Figure 95):
Convergence Sublayer Type. The User can select from a drop down menu. The default
option is Ethernet_CS and the available options are:
o IPV4_CS
o ETHERNET_CS . This is the default setting, the Base Station operates in Standalone
mode.
Client Profile. This profile can be selected from a drop down menu. The User can select
<unset> or from one of the user configured profiles (1 through 8).
IP Address. Applicable/Visible only when the CPE is configured for IPV4_CS Convergence
Sublayer mode and the base station operated in Stand Alone mode. 0.0.0.0 value (default)
means that the CPE will obtain its IP address through DHCP Server. When changed from the
defaults value a static IP address is used for the Provisioning. The CPE device must be
configured with the same IP address.
IP Netmask. Applicable/Visible only when the CPE is configured for IPV4_CS Convergence
Sublayer mode and the base station operated in Stand Alone mode. Defines the Subnet
Mask. Currently only a single IP Address is possible, thus the default value of
255.255.255.25.255 should not be changed!
Customer ID. This is a free format text field that enables the User to uniquely define a
Subscriber. This is edited by selecting the notepad icon.
Maximum Uplink Rate. The User can select the maximum uplink modulation rate. This will
effectively provide a cap on the maximum data traffic rate. This direction is defined as the
Subscriber to Base Station. This is selected via the drop down menu and the options are:
o QAM64 5/6
o QAM64 3/4
o QAM64 2/3
o QAM64 1/2
o QAM16 3/4
o QAM16 1/2
o QPSK 3/4
o QPSK 1/2
Maximum Downlink Rate. The User can select the maximum downlink modulation rate.
This will effectively provide a cap on the maximum data traffic rate. This direction is defined
as the Base Station to Subscriber. This is selected via the drop down menu and the options
are:
o QAM64 5/6
o QAM64 3/4
o QAM64 2/3
o QAM64 1/2
o QAM16 3/4
o QAM16 1/2
o QPSK 3/4
o QPSK 1/2
PureWave Quantum 6600 User Guide v2.1
Page 101
Figure 95: Add Subscriber CPE Settings
(6) Once the Subscriber options have been selected, the User can then Validate the changes. The
User simply selects the Validate command button. A window indicating whether the Validation
is successful or not will appear (refer to Figure 96). If successful then the User has to select the
OK command button.
Figure 96: Add Subscriber CPE Validation
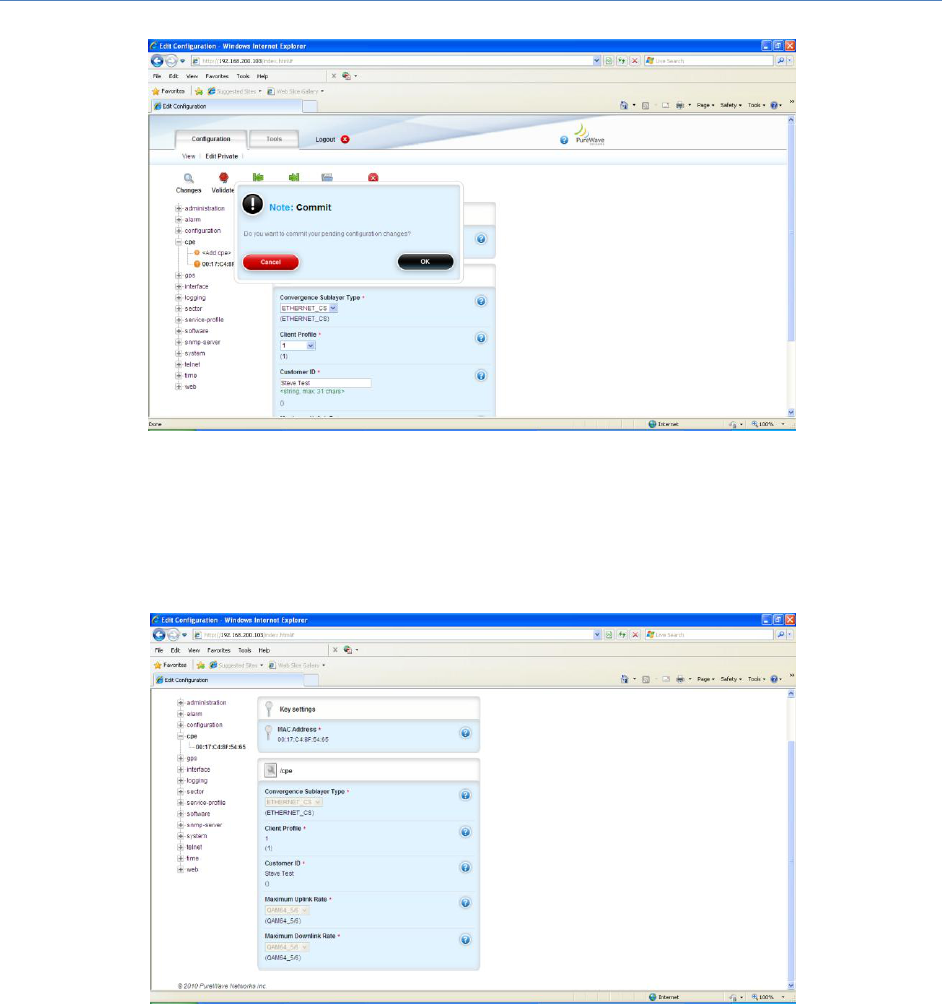
(7) After performing the Validation, the final step is to execute the Commit procedure. The User
simply has to select the Commit command button. A window prompting the User to commit the
changes will appear. To effect the commit the User has to select the OK command button (refer
to Figure 97). A further window indicating that the commit changes succeeded will appear.
PureWave Quantum 6600 User Guide v2.1
Page 102
Figure 97: Add Subscriber CPE Commit
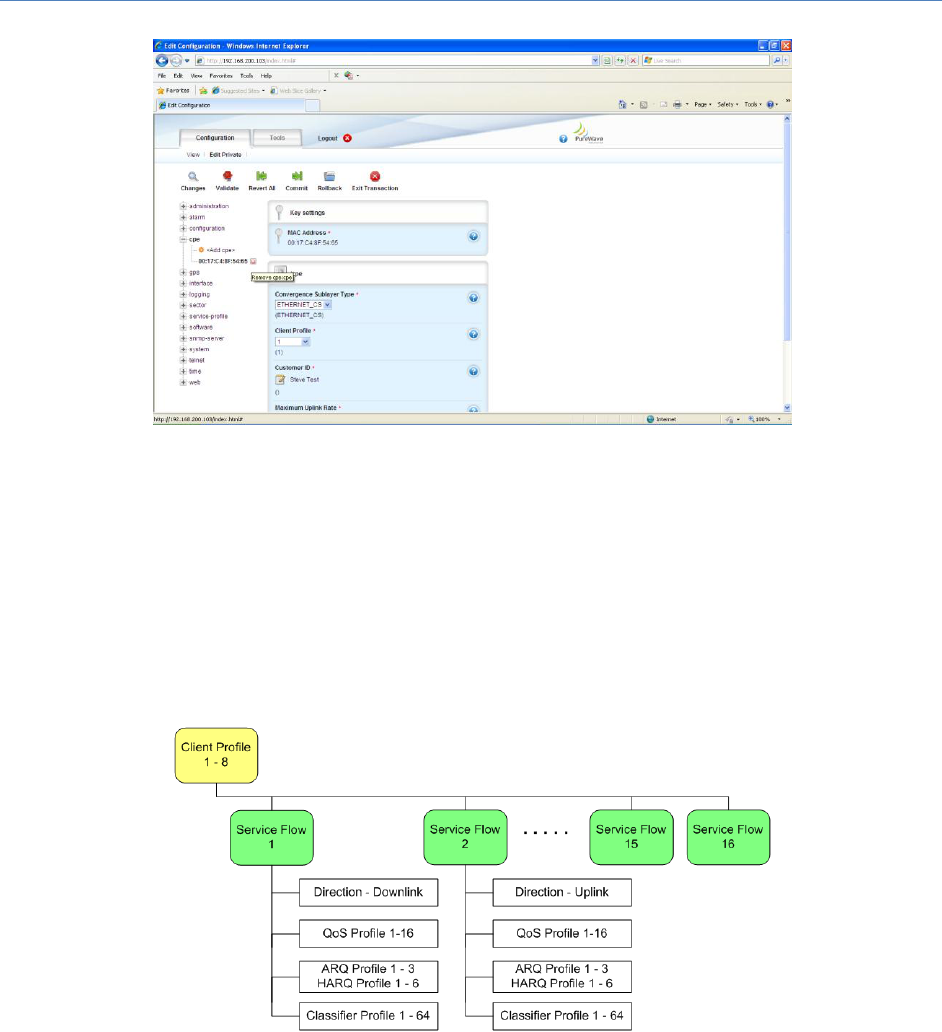
(8) The Subscriber configuration details will now be displayed.
Figure 98: Subscriber CPE Configured Settings
(9) If the User wants to delete a previously configured Subscriber, then the option to delete is
available. When the User is in the Edit Mode, there is a red cross box positioned next to the end
of the Subscriber MAC Address listing. If the User positions the cursor over the box then the
message Remove cpe:cpe appears (refer to Figure 99). The User simply selects this box. The
User must then commit the changes.
PureWave Quantum 6600 User Guide v2.1
Page 103
Figure 99: Subscriber CPE Delete
3.5.5 Subscriber CPE Client Profiles
The process to create a QoS (Quality of Service) Client Profile on the Subscriber CPE is relatively
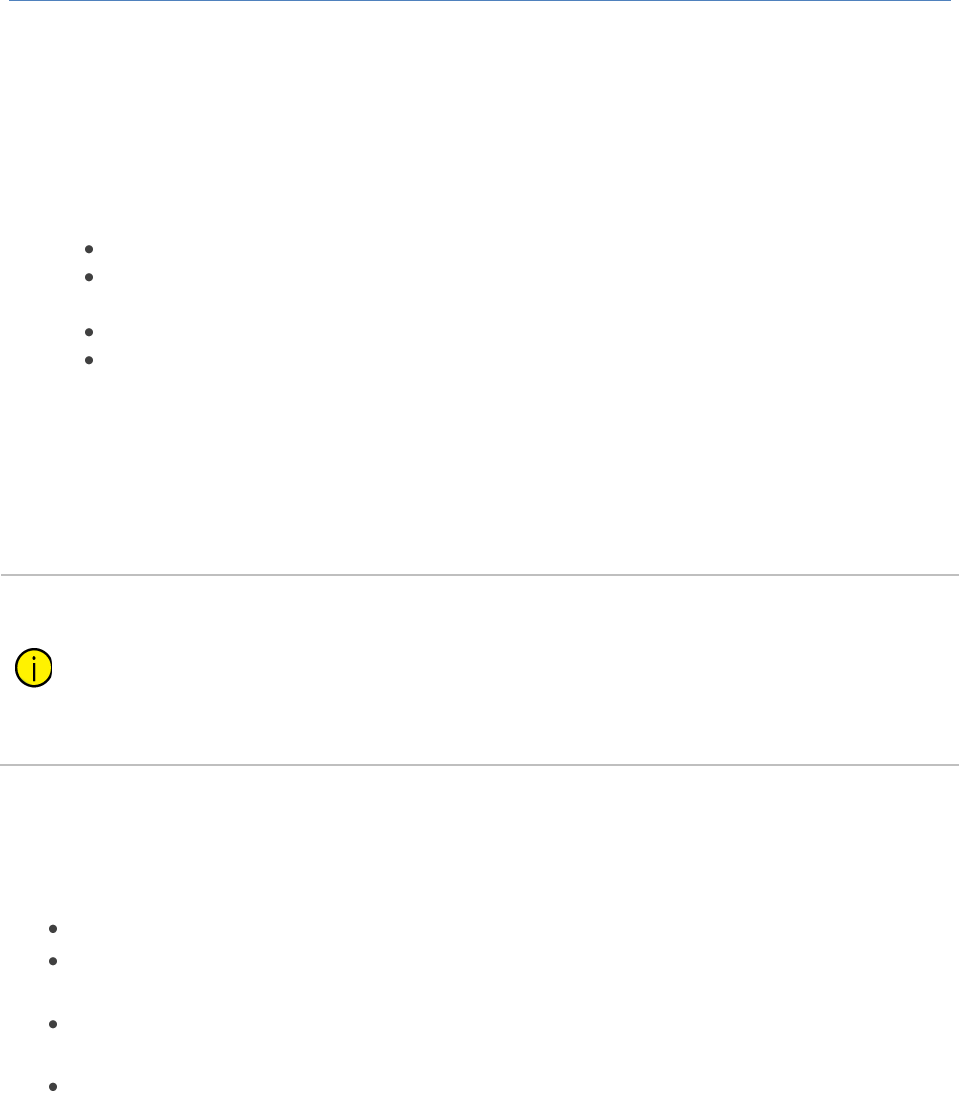
straightforward. The basic concept flow diagram is detailed in Figure 100.
Figure 100: Subscriber CPE Provisioning Flow Concepts
The Service Profile system through the use of Client Profiles, create multiple data connections that suit
the need of the Operator or Service Level Agreements. The Client Profile is the top level in a complex
hierarchy that provides a large degree of flexibility in service offerings.
PureWave Quantum 6600 User Guide v2.1
Page 104
Client Profiles are assigned to individual Subscriber CPE’s and within each client profile there is the
ability to throttle throughput, and organize types of traffic into specific connection types. The use of
ARQ/HARQ is also contained within this system.
The Subscriber CPE Client Profile contains a Service Flow for both the uplink and the downlink directions.
The Service Flow is created from the following components:
The direction of flow of traffic
The specific Quality of Service (QoS) type, e.g. Best Effort (BE) or Unsolicited Grant Service
(UGS) etc that is to be applied.
ARQ and/or HARQ definitions. These are the error recovery mechanisms.
Packet Classifiers. This will classify on a packet by packet basis depending on the defined
classification criteria. For example, the conditions under which the packet is to be
transported and/or which Service flow it is to be assigned.
A Client Profile is a set a Service Flows that correspond to a specific Service Level Agreement assigned
to a customer. Each Client Profile supports up to 16 service flows and each service flow is uni-
directional. A set of service flows includes an Uplink and a Downlink direction.
Tip
When designing Client Profiles, it is important to understand how the
throughout rating mechanism works. In the event of contradicting parameters
being set, the system will allocate to a Subscriber CPE the lower of the
parameters. For example, assume a conflict between the Client Profile setting
the maximum uplink rate of 2Mbps and the QoS Profile setting the maximum
sustained rate to 1Mbps. In this example, the system will limit the uplink rate to
1Mbps.
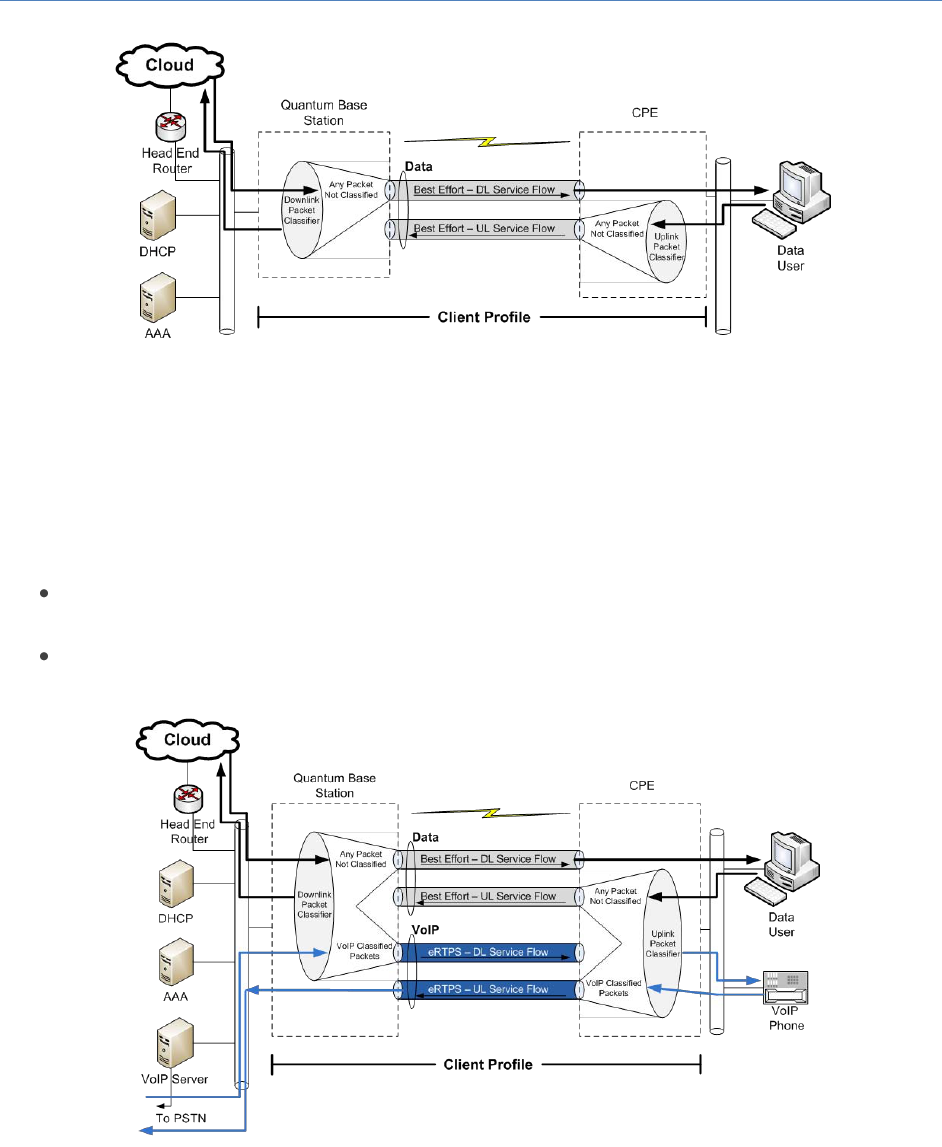
Figure 101 demonstrates a typical "Best Effort" type of Client Profile. Consider a packet that is flowing in
the downlink direction (i.e. Base Station to Subscriber CPE). The same concept applies in the uplink
direction.
A packet flow from the network and into the Base Station. It is destined for the Subscriber CPE.
The packet is then processed by the Classifiers rules that have been defined. In this example
these are the Downlink Packet Classifier.
If the packet is subject to the Classifier rule then it is processed and classified as defined by that
rule. Packets that are not subject to the rule are then identified as a Non Classified Packet.
The Non Classified Packets are then passed out of the Base Station and are now subject to the
relevant Service Flow definitions. In this example this would be Best Effort.
PureWave Quantum 6600 User Guide v2.1
Page 105
Figure 101: Typical Best Effort Client Profile
Figure 99 demonstrates a more complex but still typical "Voice and Data" type of application.
In this example these is a VoIP Packet Classifier defined. This has been associated to an eRTPS
Service Flow. Non Classifier packets have been set to a Best Effort Service Flow.
Any packet that enters from the Network will be tested against the Classifier rules. A VoIP
packet will therefore be transmitted downlink via eRTPS and everything else via Best Effort.
Figure 102: Typical Voice and Data Client Profile
PureWave Quantum 6600 User Guide v2.1
Page 106
By default the Base Station is pre-configured with a number of profiles for Classifier,
HARQ, ARQ, QoS and Client. The User has the complete freedom and flexibility to use
these pre-defined profiles or they can edit accordingly.
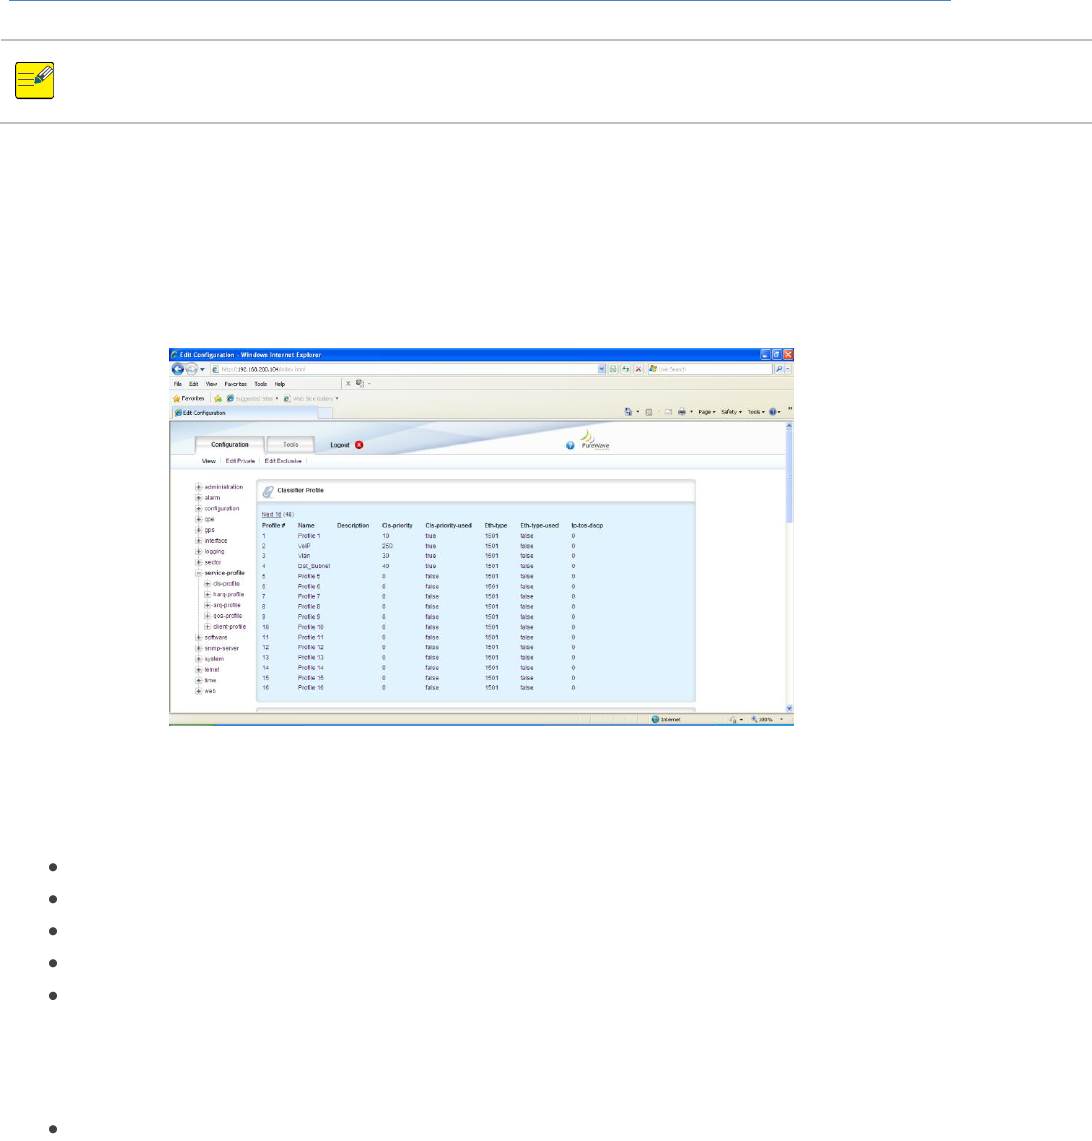
At Main Web GUI Interface Screen select the Configuration Tab and then the service-profile Main Menu
Option. This window details the information for the service profile Main Menu Option. There are five
Main Menu Sub-Elements and window is split into five main grouping sections (refer to Figure 103). The
five main grouping sections provide a summary of the information that can be obtained by selecting and
navigating down into the Main Menu Sub-Element level.
Figure 103: Service Profile Menu Option
The Main Menu Sub-Elements are:
cls-profile. These are the Classifier profiles.
harq-profile. These are the Hybrid ARQ (automatic recovery) profiles.
arq-profile. These are the ARQ profiles.
qos-profile. These are the Quality of Service profiles.
client-profile. These are the Client profiles.
This just provides an indication of the information that is displayed. A description of the variables will be
provided when the Main Menu Sub-Elements are described. The five main grouping sections are:
Classifier Profiler. The User can define up to 64 Classifier profiles. A list of profiles (up to 16 at a
time) and the following information is displayed for each Classifier:
o Profile #
o Name
o Description
o Cls-priority
o Cls-priority-used

PureWave Quantum 6600 User Guide v2.1
Page 107
o Eth-type
o Eth-type-used
o Ip-tos-dscp
Hybrid ARQ Profile. The User can define up to 8 profiles and the following information is
displayed for each profile:
o Profile #
o Name
o Description
o Enable
o Channel-mapping
o Num-retries
o Pdu-sn-support
ARQ Profile. The User can define up to 3 profiles and the following information is displayed for
each profile:
o Profile #
o Name
o Description
o Enable
o Deliver-in-order
o Window-size
o Timeout-tx-delay
o Timeout-rx-delay
QoS Profile. The User can define up to 16 profiles and the following information is displayed for
each QoS profile:
o Profile #
o Name
o Max-sustained-traffic-rate
o Max-latency
o Data-delivery-service
o Traffic-priority
o Max-traffic-burst
Client Profile. The User can define up to 8 profiles and the following information is displayed for
each Client profile:
o Profile #
o Description
o Max-dl-rate
o Max-pps
o Max-ul-rate
o Min-dl-reserved-rate
o Min-ul-reserved-rate
PureWave Quantum 6600 User Guide v2.1
Page 108
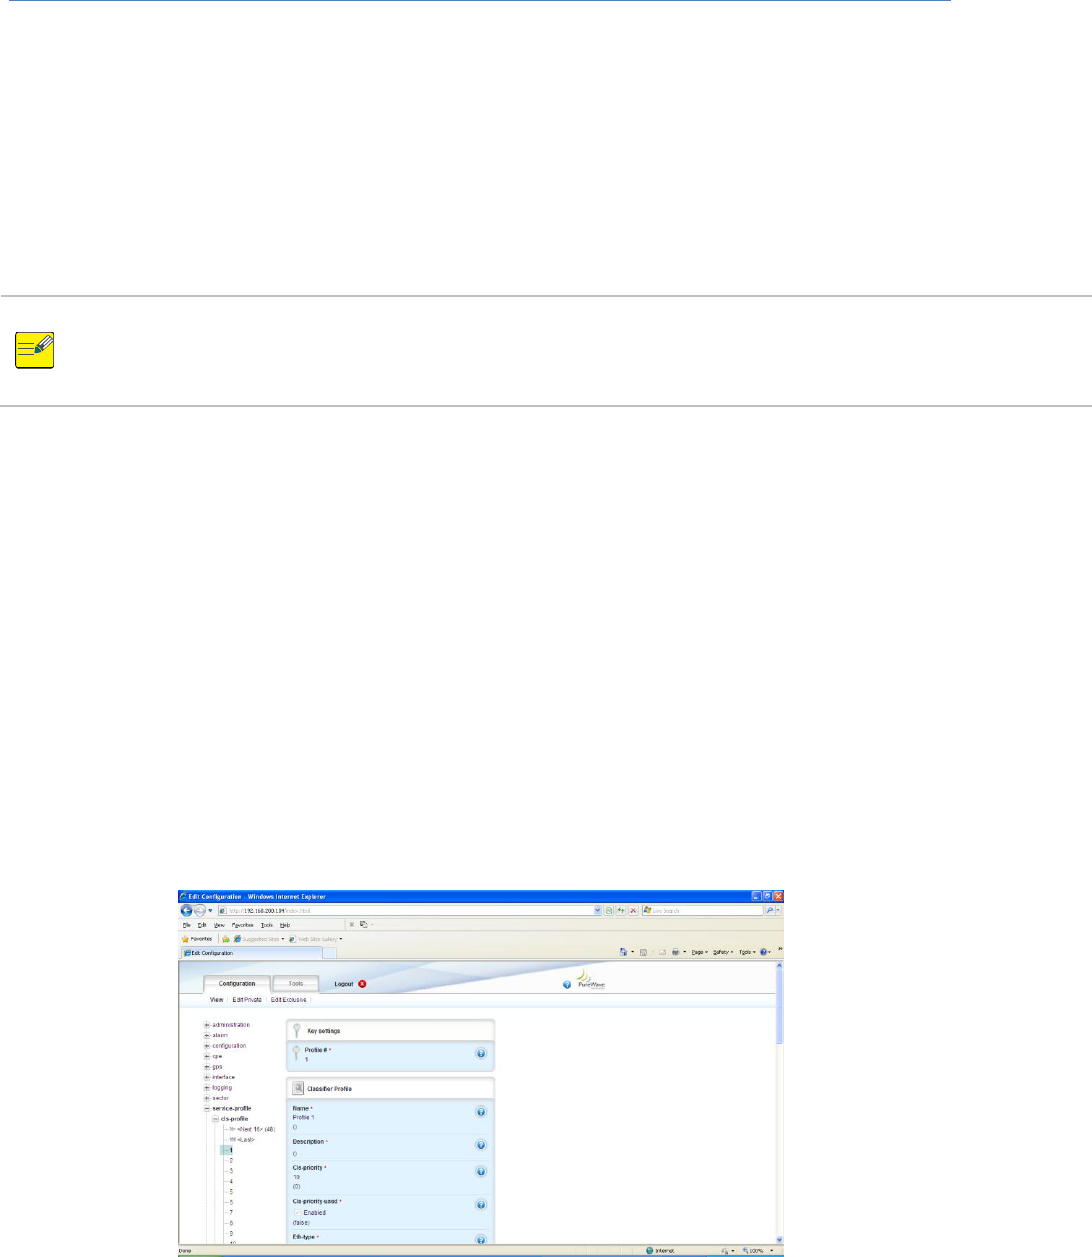
At Main Web GUI Interface Screen select the Configuration Tab and then the service-profile Main Menu
Option. If the User now enters the Edit Mode, then they can either Edit or Delete any of all the profiles
that have been configured as a default. If the User decides to Edit any of these profiles then they are
immediately navigated to the relevant Main Menu Sub-Element level.
The information that is presented at the service-profile Main Menu Option level is simply a summary of
what is actually available for each of the profiles. The User can navigate to the respective Main Menu
Sub-Element level for full viewing and configuration capabilities.
If the User wants to configure any of the parameters then they must enter the Edit Mode
(select Edit Private or Edit Exclusive) and edit as necessary. The methods to Edit the
parameters will be offered via a drop down menu of choices, an enabling of a check box or
editing of a notepad icon.
These Profiles will now be described in detail.
3.5.5.1 Classifier Profile
This profile will classify on a packet by packet basis depending on the defined classification criteria. For
example, the conditions under which the packet is to be transported and/or which Service flow it is to
be assigned.
At Main Web GUI Interface Screen select the Configuration Tab, then the service-profile Main menu
Option and then the cls-profile Main Menu Sub-Element. This User is presented with all the 64 pre-
configured default profiles. These are displayed 16 at a time. To physically view all the profile
configuration parameters then the User must actually select a profile and two main grouping sections
are presented (refer to Figure 104).
Figure 104: Service Profile Classifier Profile

PureWave Quantum 6600 User Guide v2.1
Page 109
The main grouping sections are:
Key settings. This simply displays:
o Profile #
Classifier Profile. This displays all that the available configuration parameters. These are:
o Name. This is the profile name and it is a text field
o Description. This is the profile description and it is a text field.
o Cls-priority. This User can assign a priority to the classifier. The priority is assigned as a
number in the range 0 to 255. The default priority is 0 (no priority).
o Cls-priority-used. This is a check box to enable/disable the priority rule.
o Eth-type. This is the Ethernet Type. This is assigned as a number in the range 1501 to
65535. This represents the value in decimal format.
o Eth-type-used. This is a check box to enable/disable the Ethernet Type rule.
o Ip-tos-dscp. This is the IP TOS Descriptor. This is assigned as a number in the range 0
(default) to 63.
o Ip-tos-dscp-used. This is a check box to enable/disable the IP TOS Descriptor rule.
o Ip-protocol. This is the IP Protocol. This is assigned as a number in the range 0 (default)
to 255.
o Ip-protocol-used. This is a check box to enable/disable the IP Protocol rule.
o Dest-ip-addr-prfx. This is the IP Destination Address and Prefix (mask length).
Configuration examples are 192.0.0.0/2, 192.168.0.0/3, 192.1468.254.0/23 and
192.168.1.1/32.
o Dest-ip-addr-used. This is a check box to enable/disable the IP Destination Address rule.
o Src-ip-addr-prfx. This is the IP Source Address and Prefix (mask length). Configuration
examples are 192.0.0.0/2, 192.168.0.0/3, 192.1468.254.0/23 and 192.168.1.1/32.
o src-ip-addr-used. This is a check box to enable/disable the IP Source Address rule.
o Dest-port-start. This is the Destination Port Low Limit. This is assigned as a number in
the range 0 (default) to 65535.
o Dest-port-end. This is the Destination Port High Limit. This is assigned as a number in
the range 0 (default) to 65535.
o Dest-ip-port-used. This is a check box to enable/disable the Destination Port rule.
o Src-port-start. This is the Source Port Low Limit. This is assigned as a number in the
range 0 (default) to 65535.
o Src-port-end. This is the Source Port High Limit. This is assigned as a number in the
range 0 (default) to 65535.
o Src-ip-port-used. This is a check box to enable/disable the Source Port rule.
o Vlan-id. This is the VLAN ID Tag. This is assigned as a number in the range 0 (default) to
4095.
o Vlan-id-used. This is a check box to enable/disable the VLAN ID rule.
o Vlan-user-priority-low. This is the VLAN User Priority Low Byte. This is assigned as a
number in the range 0 (default) to 7.
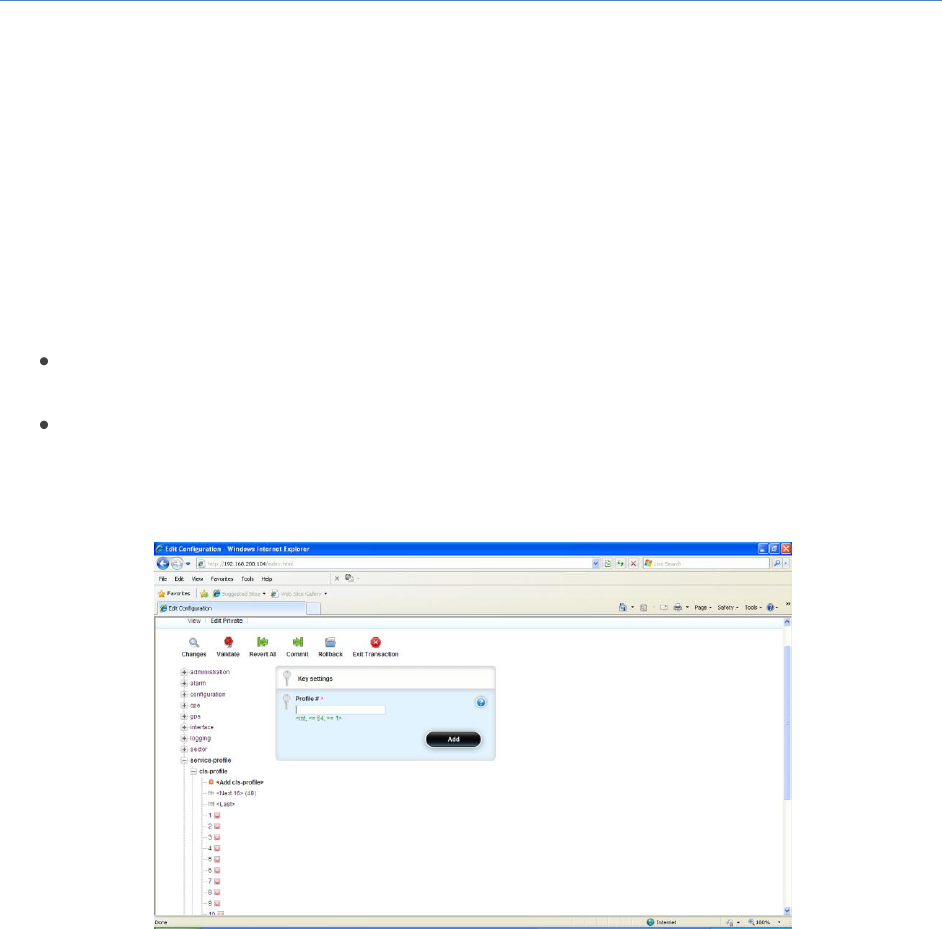
PureWave Quantum 6600 User Guide v2.1
Page 110
o Vlan-user-priority-high. This is the VLAN User Priority High Byte. This is assigned as a
number in the range 0 (default) to 7.
o Vlan-user-priority-used. This is a check box to enable/disable the VLAN User Priority
rule.
The System is pre-configured with 64 default profiles. If the User wants to add any of their own
configurations, they must delete a profile before they can add and configure a new one.
When in Edit mode, the User is presented with (refer to Figure 105):
<Add cls-profile>. If the User selects this option and there is available profile to be added then
they can simply add and then they will be dropped directly into the configuration window.
A List of all the profiles with a red box beside each profile. If the User navigates to the red icon
then this will present the User with the ability to delete the profile.
Figure 105: Service Profile Classifier Profile Edit Capability
3.5.5.2 HARQ Profile
At Main Web GUI Interface Screen select the Configuration Tab, then the service-profile Main Menu
option and then the harq-profile Main Menu Sub-Element. This User is presented with all the 6 pre-
configured default profiles. To physically view all the profile configuration parameters then the User
must actually select a profile and two main grouping sections are presented (refer to Figure 106).