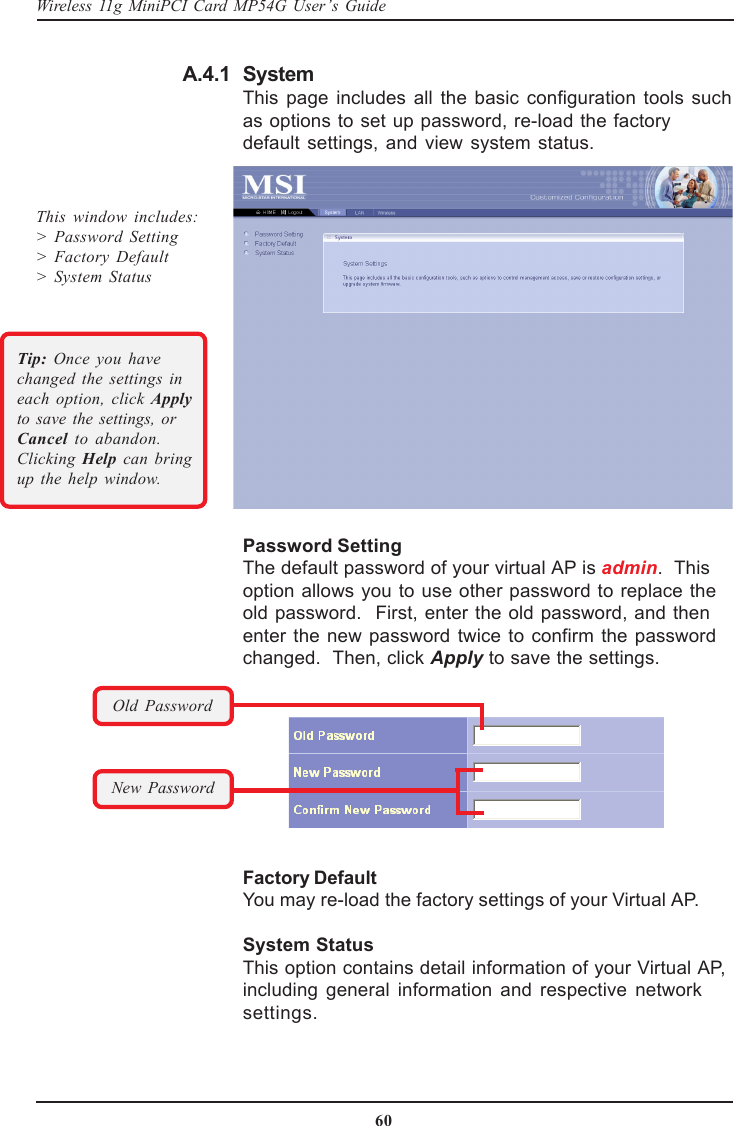
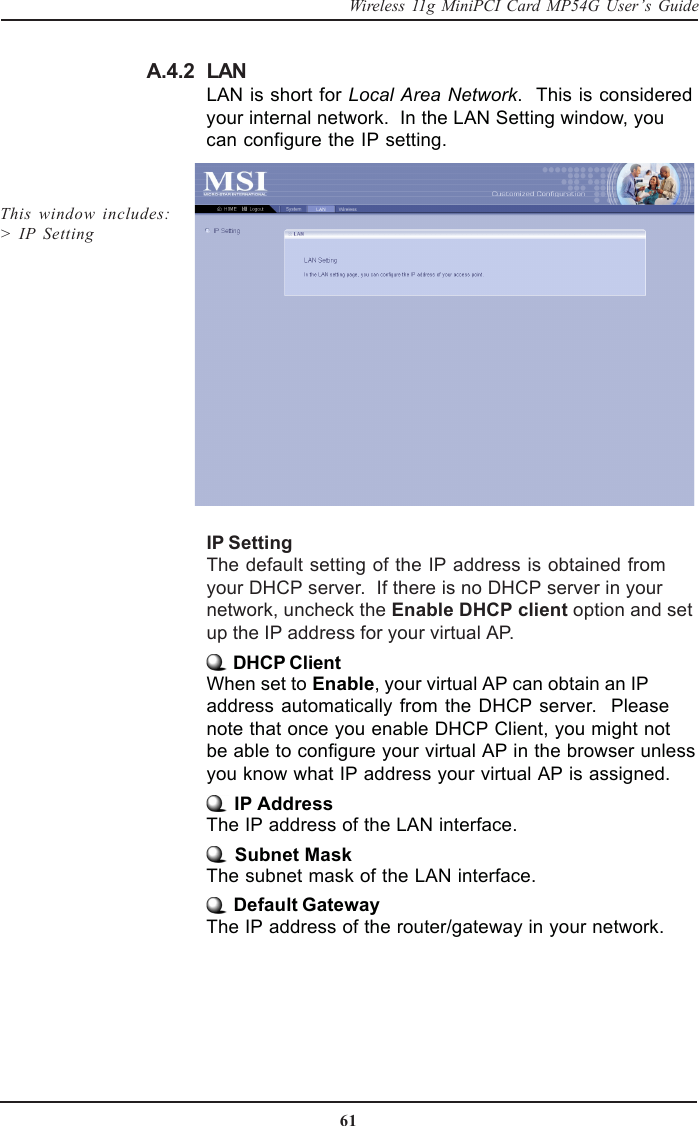
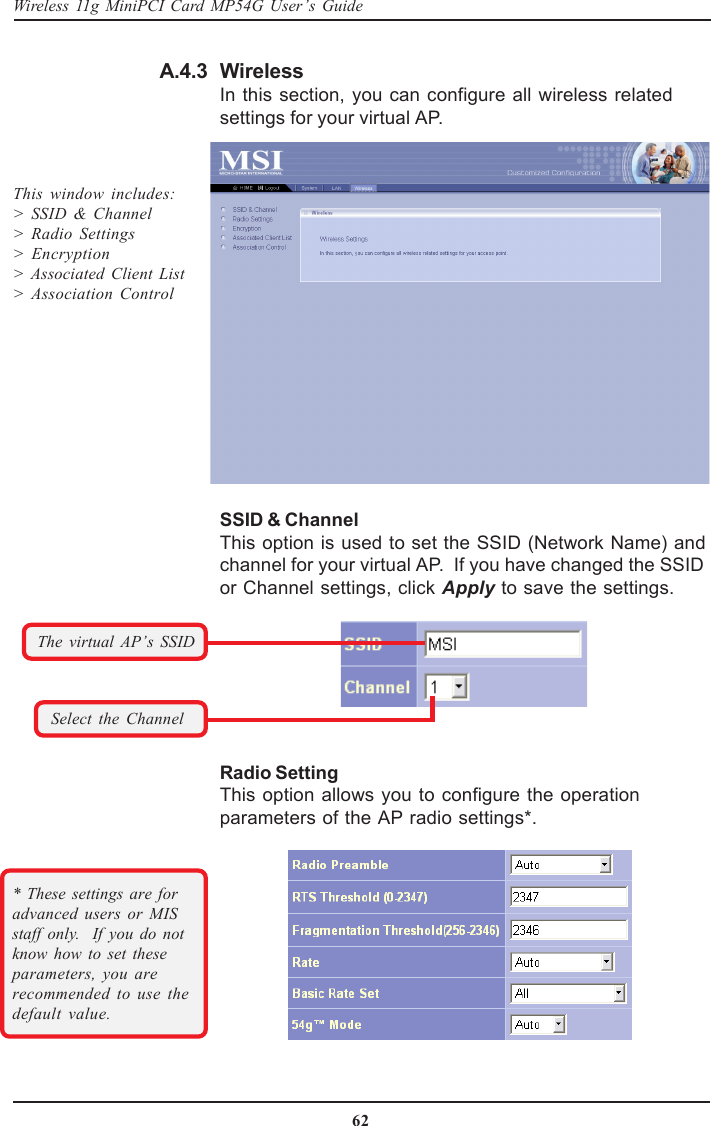
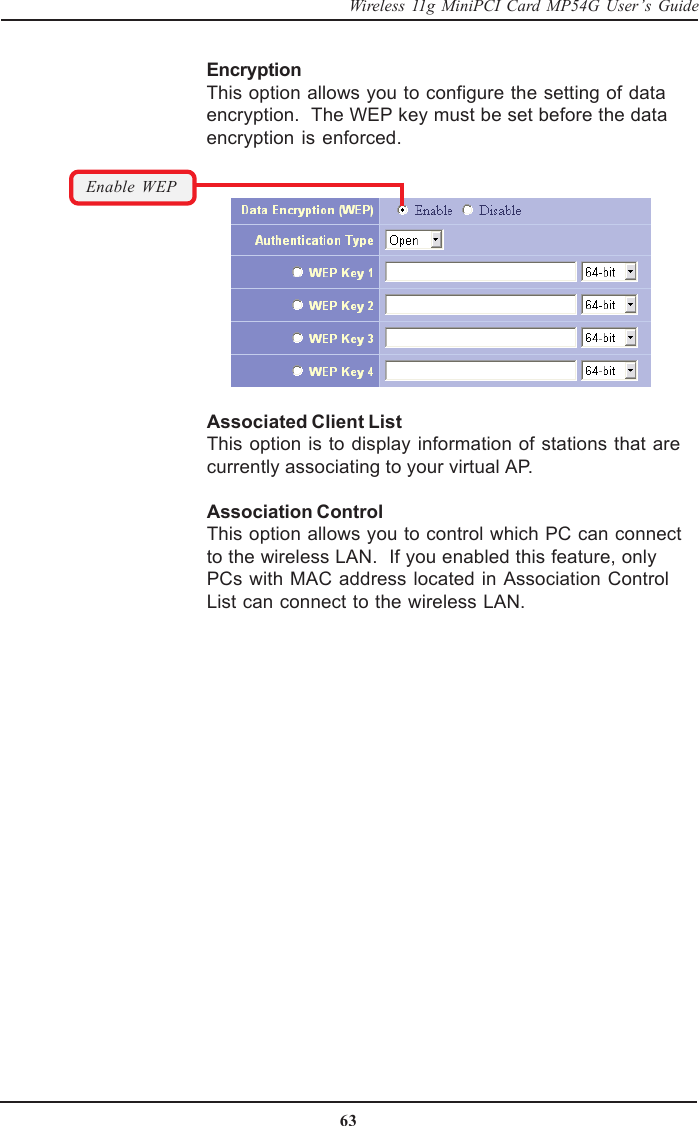
Micro Star MS6820 Wireless 11g MiniPCI Card User Manual 6823 TOC
Micro Star International Co Ltd Wireless 11g MiniPCI Card 6823 TOC
UserManual.wiki
>
Micro Star
>
MS6820 User Manual
>
USERS MANUAL 4
Contents
1.
users manual 1
2.
users manual 2
3.
users manual 3
4.
users manual 4
5.
USERS MANUAL 1
6.
USERS MANUAL 2
7.
USERS MANUAL 3
8.
USERS MANUAL 4
USERS MANUAL 4
Navigation menu
Upload a User Manual
Namespaces
Wiki Guide
HTML
PDF
Info
Views
User Manual
Discussion / Help
Navigation

![32Wireless 11g MiniPCI Card MP54G User’s Guide 4. Go to Start -> Run and enter cmd in the Openbox; then, click OK, and a DOS prompt windowwill appear. 5. Type net bridge show adapter and press[Enter]. 6. Type netsh bridge set adapter Xforcecompatmode=enable, where X is yourethernet identifier, and press [Enter]. 7. Type netsh bridge set adapter Yforcecompatmode=enable, where Y is yourwireless identifier, and press [Enter].ClickEnter cmdin the box](https://usermanual.wiki/Micro-Star/MS6820.USERS-MANUAL-4/User-Guide-395183-Page-6.png)
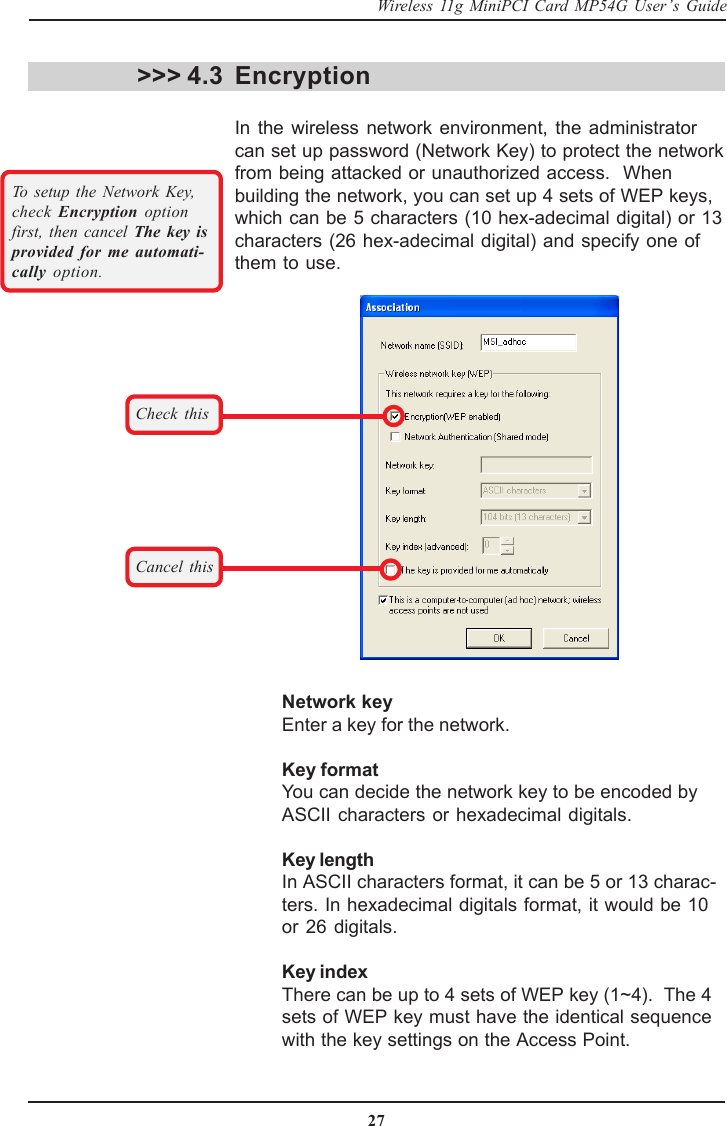
![34Wireless 11g MiniPCI Card MP54G User’s Guide 9. Enter a name for this new network in the Net-work name (SSID), and check the "This is acomputer-to-computer [ad hoc] network;wireless access points are not used" option.In this case, this computer will function as anaccess point, while other computers can usethis network name (which is "aaa " in the picturebelow) to access. Once they connect successfully, they could access the ethernet LAN viaNetwork Neighborhood.Enter SSIDCheck thisPlease also refer toWindows XP help filefor more information.](https://usermanual.wiki/Micro-Star/MS6820.USERS-MANUAL-4/User-Guide-395183-Page-8.png)
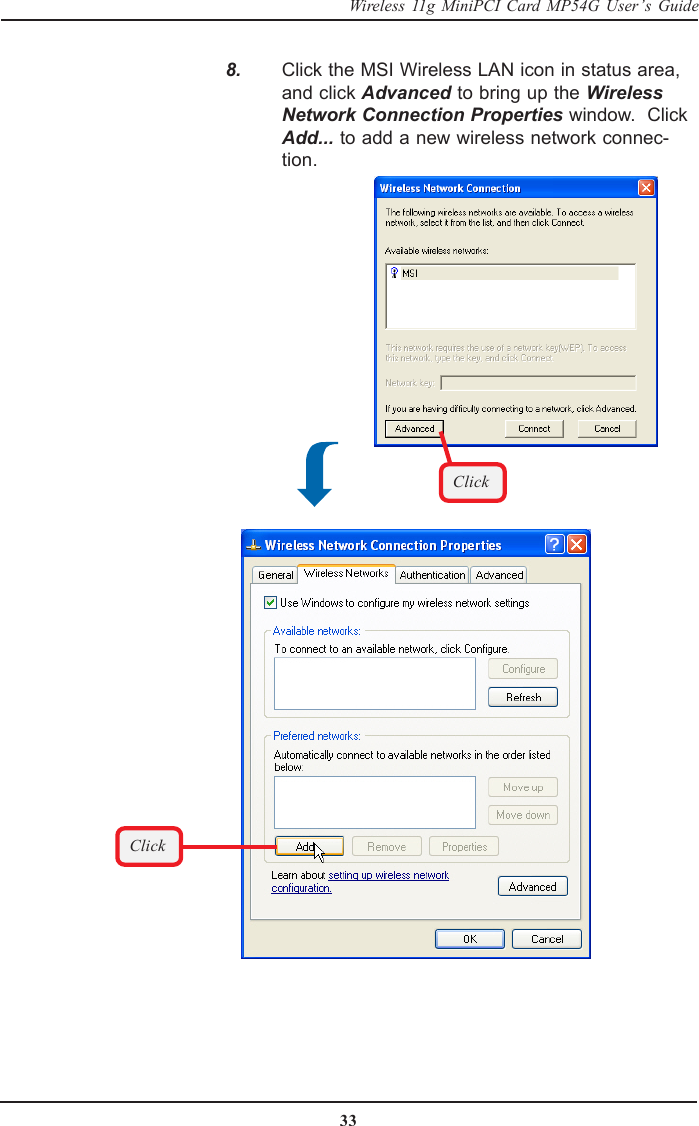
![43Wireless 11g MiniPCI Card MP54G User’s Guide 4. When the Wireless Network ConnectionProperties window appears, choose Generaltab and select Internet Protocol [TCP/IP], andclick Properties to bring up the Internet Proto-col [TCP/IP] Properties window.Select thisClickUnder Windows 2000/XP 1. Click Start and choose Control Panel to openthe Control Panel window. 2. Double-click the Network Connection icon toopen the Network Connection window. 3. Right-click the MSI 6820 miniPCI WirelessNetwork Adapter icon and click Propertiesfrom the shortcut menu.Click](https://usermanual.wiki/Micro-Star/MS6820.USERS-MANUAL-4/User-Guide-395183-Page-17.png)
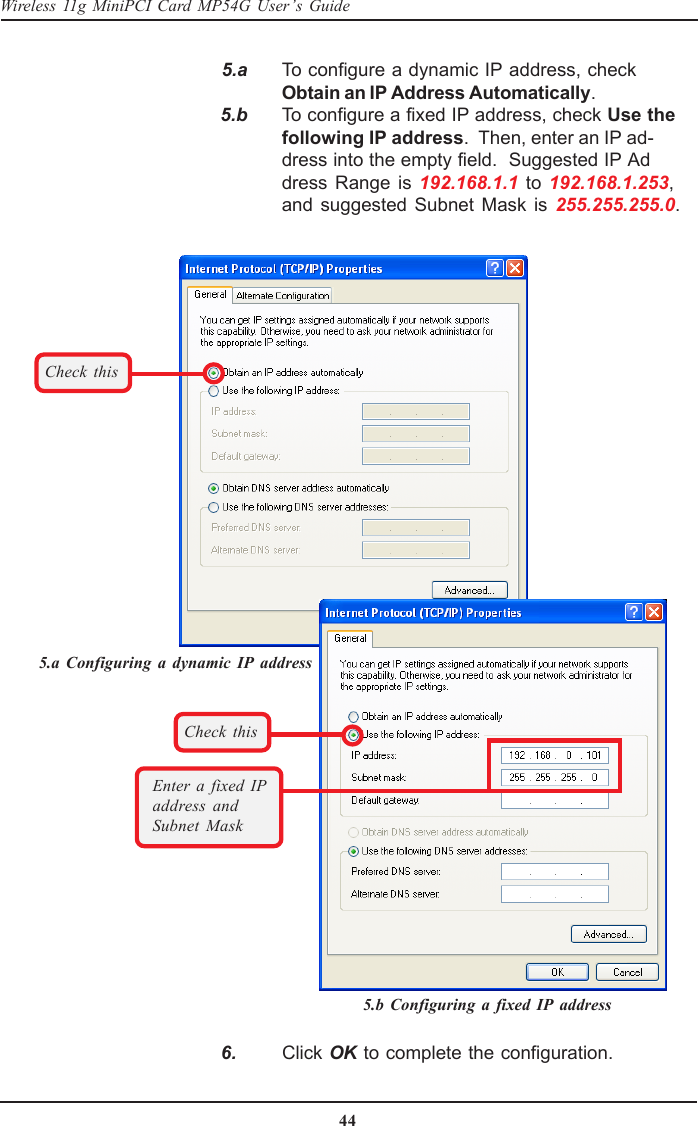
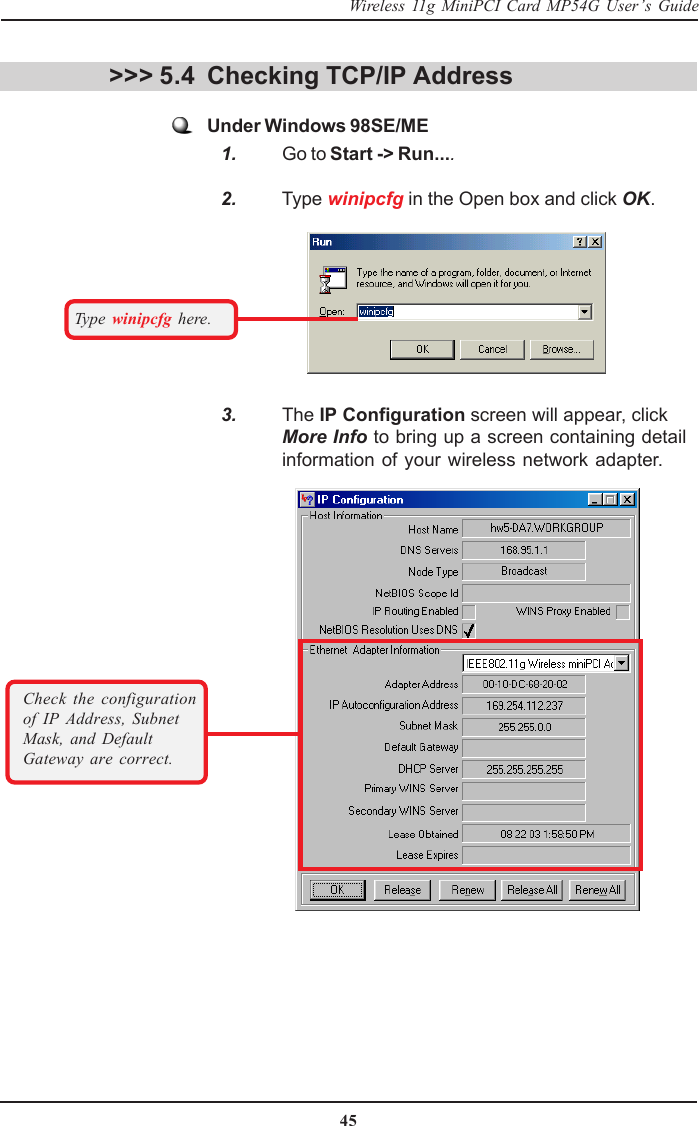
![46Wireless 11g MiniPCI Card MP54G User’s GuideUnder Windows 2000/XP 1. Go to Start -> Run.... 2. Type cmd in the Open box and click OK. 3. A DOS prompt window appears. Type ipconfig/all and press [Enter] to display IP information.Type cmd here.Check the configurationof IP Address, SubnetMask, and DefaultGateway are correct.](https://usermanual.wiki/Micro-Star/MS6820.USERS-MANUAL-4/User-Guide-395183-Page-20.png)
![47Wireless 11g MiniPCI Card MP54G User’s GuideChecking Connection by Pinging 1. Go to Start -> Run.... 2. Type command (Windows 98SE/ME) or cmd(Windows 2000/XP) in the Open box and clickOK. 3. A DOS prompt window appears. Type pingwww.msi.com.tw (or any URL address), whichis the IP address of the Gateway in this case,and press [Enter].>>> 5.5You will get reply if thepinging is successful.](https://usermanual.wiki/Micro-Star/MS6820.USERS-MANUAL-4/User-Guide-395183-Page-21.png)