Microsoft 1804 802.11n 1T2R wireless radio User Manual 2
Microsoft Corporation 802.11n 1T2R wireless radio 2
Contents
User manual 2
Notebook PC E-Manual
51
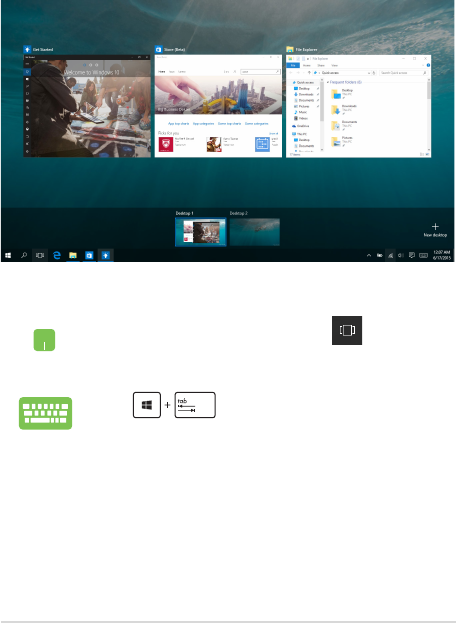
Task view
Quickly switch between opened apps and programs using the task view
feature, you can also use task view to switch between desktops.
Launching task view
Position your mouse pointer over the icon on the
taskbar and click it.
Press on your keyboard.
52
Notebook PC E-Manual
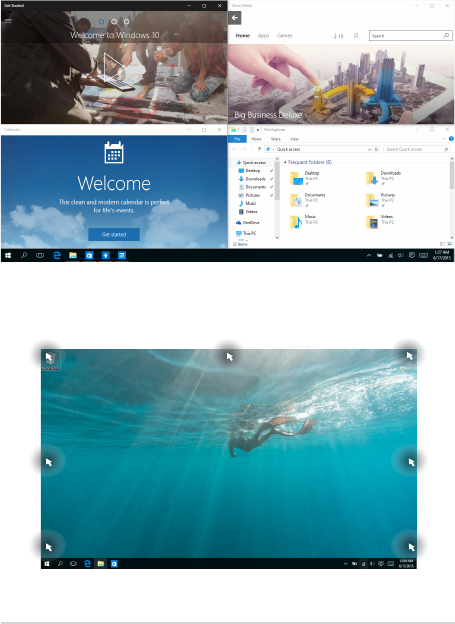
Snap feature
The Snap feature displays apps side-by-side, allowing you to work or
switch between apps.
Snap hotspots
You can drag and drop apps to these hotspots to snap them into place.

Notebook PC E-Manual
53
Using Snap
1. Launch the app you wish to snap.
2. Drag the title bar of your app and drop the app to
the edge of the screen to snap.
3. Launch another app and repeat the above steps to
snap another app.
1. Launch the app you wish to snap.
2. Press and hold the key, then use the arrow
keys to snap the app.
3. Launch another app and repeat the above steps to
snap another app.
54
Notebook PC E-Manual
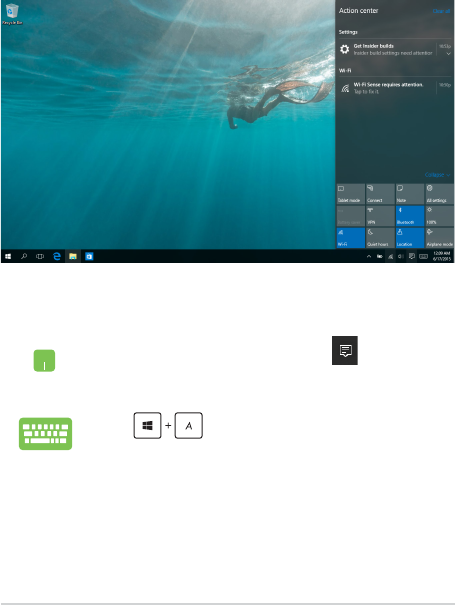
Action Center
Action Center consolidates notications from apps and presents a single
place where you can interact with them. It also has a really useful Quick
Actions section at the bottom.
Launching Action Center
Position your mouse pointer over the icon on the
taskbar and click it.
Press on your keyboard.
Notebook PC E-Manual
55
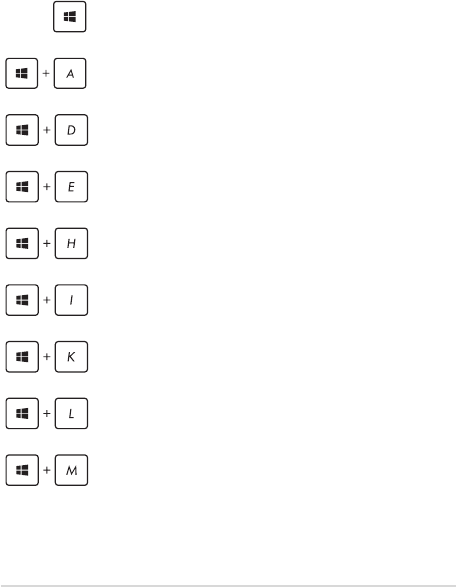
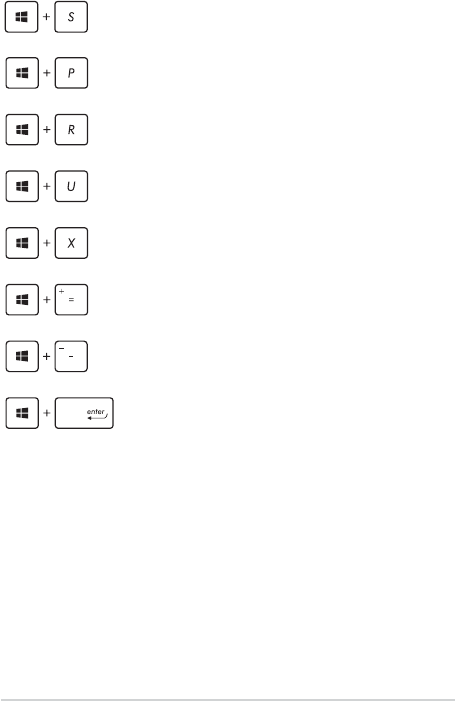
Other keyboard shortcuts
Using the keyboard, you can also use the following shortcuts to help
you launch applications and navigate Windows® 10.
\
Launches Start menu
Launches Action Center
Launches the desktop
Launches the File Explorer
Opens the Share panel
Launches Settings
Launches Connect panel
Activates the Lock screen
Minimizes all currently active windows
56
Notebook PC E-Manual
Launches Search
Launches Project panel
Opens the Run window
Opens Ease of Access Center
Opens the context menu of the Start button
Launches the magnier icon and zooms in
your screen
Zooms out your screen
Opens Narrator Settings
Notebook PC E-Manual
57
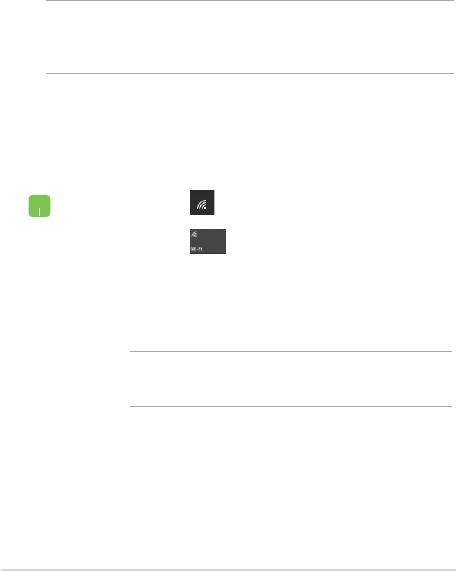
Connecting to wireless networks
Wi-Fi
Access emails, surf the Internet, and share applications via social
networking sites using your Notebook PC’s Wi-Fi connection.
IMPORTANT! Airplane mode disables this feature. Ensure that Airplane
mode is turned o before enabling the Wi-Fi connection of your
Notebook PC.
Connecting Wi-Fi
Connect your Notebook PC to a Wi-Fi network by using the following
steps:
1. Select the icon from the taskbar.
2. Select the icon to enable Wi-Fi.
3. Select an access point from the list of available Wi-Fi
connections.
4. Select Connect to start the network connection.
NOTE: You may be prompted to enter a security key to
activate the Wi-Fi connection.

58
Notebook PC E-Manual
1. Launch Settings from the Start menu.
2. Select Devices, then select Bluetooth to search for
Bluetooth-enabled devices.
3. Select a device from the list. Compare the passcode
on your Notebook PC with the passcode sent to
your chosen device. If they are the same, select
Yes to successfully pair your Notebook PC with the
device.
NOTE: For some Bluetooth-enabled devices, you may be
prompted to key in the passcode of your Notebook PC.
Bluetooth
Use Bluetooth to facilitate wireless data transfers with other Bluetooth-
enabled devices.
IMPORTANT! Airplane mode disables this feature. Ensure that Airplane
mode is turned o before enabling the Bluetooth connection of your
Notebook PC.
Pairing with other Bluetooth-enabled devices
You need to pair your Notebook PC with other Bluetooth-enabled
devices to enable data transfers. Connect your devices by using the
following steps:
Notebook PC E-Manual
59
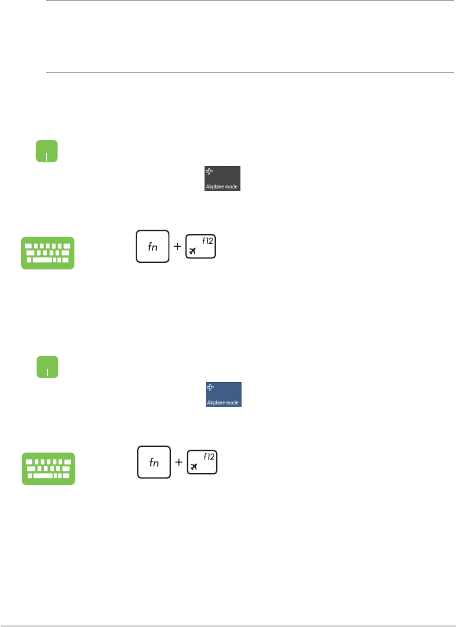
Airplane mode
Airplane mode disables wireless communication, allowing you to use
your Notebook PC safely while in-ight.
Turning Airplane mode o
1. Launch Action Center from the taskbar.
2. Select the icon to disable Airplane mode.
Press .
Turning Airplane mode on
1. Launch Action Center from the taskbar.
2. Select the icon to enable Airplane mode.
Press .
NOTE: Contact your airline provider to learn about related in-ight
services that can be used and restrictions that must be followed when
using your Notebook PC in-ight.

60
Notebook PC E-Manual
Connecting to wired networks
You can also connect to wired networks, such as local area networks
and broadband Internet connection, using your Notebook PC’s LAN
port.
NOTE: Contact your Internet Service Provider (ISP) for details or
your network administrator for assistance in setting up your Internet
connection.
To congure your settings, refer to the following procedures.
IMPORTANT! Ensure that a network cable is connected between your
Notebook PC’s LAN port and a local area network before performing the
following actions.
Conguring a dynamic IP/PPPoE network
connection
1. Launch Settings.
2. Select Network & Internet.
3. Select Ethernet > Network and Sharing Center.
4. Select your LAN then select Properties.
5. Select Internet Protocol Version 4(TCP/IPv4) then
select Properties.
6. Select Obtain an IP address automatically then
select OK.
NOTE: Proceed to the next steps if you are using PPPoE connection.

Notebook PC E-Manual
61
7. Return to the Network and Sharing Center
window then select Set up a new connection or
network.
8. Select Connect to the Internet then select Next.
9. Select Broadband (PPPoE).
10. Type your User name, Password, and Connection
name then select Connect.
11. Select Close to nish the conguration.
12. Select on the taskbar then select the
connection you just created.
13. Type your user name and password then select
Connect to start connecting to the Internet.
Conguring a static IP network connection
1. Repeat steps 1 to 5 under Conguring a dynamic
IP/PPPoE network connection.
2 Select Use the following IP address.
3. Type the IP address, Subnet mask and Default
gateway from your service provider.
4. If needed, you can also type the preferred DNS
server address and alternate DNS server address
then select OK.

62
Notebook PC E-Manual
Turning your Notebook PC off
You can turn o your Notebook PC by doing either of the following
procedures:
• LaunchtheStartmenu,thenselect >
Shut down to do a normal shutdown.
• Fromthelog-inscreen,select > Shut down.
• Press to launch Shut down
Windows. Select Shut down from the drop-down
list then select OK.
• IfyourNotebookPCisunresponsive,press
and hold the power button for at least four (4)
seconds until your Notebook PC turns o.

Notebook PC E-Manual
63
Putting your Notebook PC to sleep
To put your Notebook PC to Sleep mode:
• LaunchtheStartmenu,thenselect >
Sleep to put your Notebook PC to sleep.
• Fromthelog-inscreen,select > Sleep.
Press to launch Shut Down Windows.
Select Sleep from the drop-down list then select OK.
NOTE: You can also put your Notebook PC to Sleep mode by pressing the
power button once.

64
Notebook PC E-Manual
Using Xbox One Wireless Controller
Your Notebook PC oers built-in support for Xbox Wireless, which
allows you to connect an Xbox One Wireless Controller and enable the
same gaming experience on Xbox One. For more details, please go to
https://support.xbox.com/en-US/xbox-one/accessories/using-xbox-
one-wireless-controllers-on-pc-info.

Notebook PC E-Manual
65
Chapter 4:
Power-On Self-Test (POST)

66
Notebook PC E-Manual
The Power-On Self-Test (POST)
The POST (Power-On Self-Test) is a series of software-controlled
diagnostic tests that run when you turn on or restart your Notebook PC.
The software that controls the POST is installed as a permanent part of
the Notebook PC’s architecture.
Using POST to access BIOS and Troubleshoot
During POST, you can access the BIOS settings or run troubleshooting
options using the function keys of your Notebook PC. You may refer to
the following information for more details.
BIOS
The BIOS (Basic Input and Output System) stores system hardware
settings that are needed for system startup in the Notebook PC.
The default BIOS settings apply to most conditions of your Notebook
PC. Do not change the default BIOS settings except in the following
circumstances:
• Anerrormessageappearsonscreenduringsystembootupand
requests you to run the BIOS Setup.
• Youhaveinstalledanewsystemcomponentthatrequiresfurther
BIOS settings or updates.
WARNING! Using inappropriate BIOS settings may result to system
instability or boot failure. We strongly recommend that you change the
BIOS settings only with the help of a trained service personnel.
Accessing BIOS
Enter the BIOS settings by using any of the following methods:
Notebook PC E-Manual
67
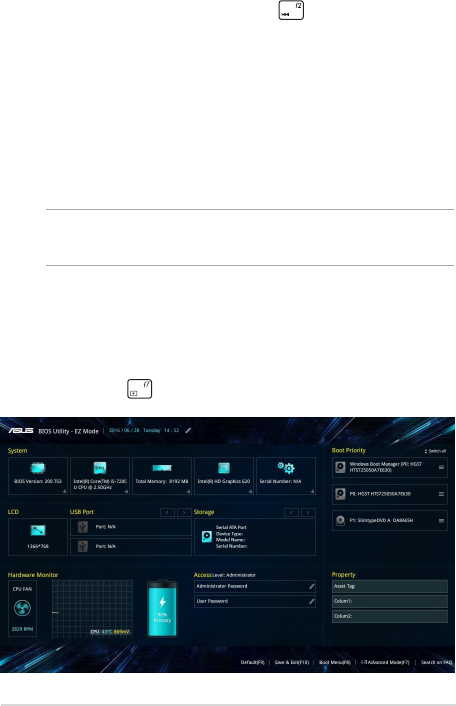
BIOS Settings
NOTE: The BIOS screens in this section are for reference only. The actual
screens may dier by model and territory.
EZ Mode
This menu appears when you enter the BIOS setup program and
provides you an overview of the basic system information. To access
the Advanced Mode for the advanced BIOS settings, select Advanced
Mode (F7) or press .
• RestartyourNotebookPCthenpress during POST.
• LaunchtheStartmenu,andchooseSettings > Update &
security > Recovery, then select Restart now under Advanced
startup. When you enter the Advanced startup screen, select
Troubleshoot > Advanced options > UEFI Firmware Settings >
Restart.
68
Notebook PC E-Manual
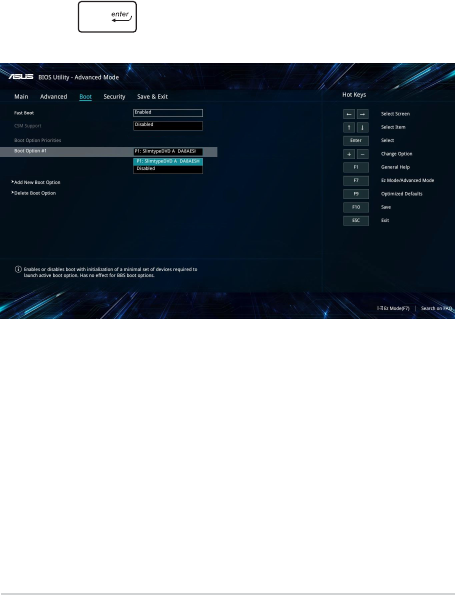
Boot
This menu allows you to set your boot option priorities. You may refer to
the following procedures when setting your boot priority.
1. On the Boot screen, select Boot Option #1.
2. Press and select a device as the Boot Option #1.
Notebook PC E-Manual
69
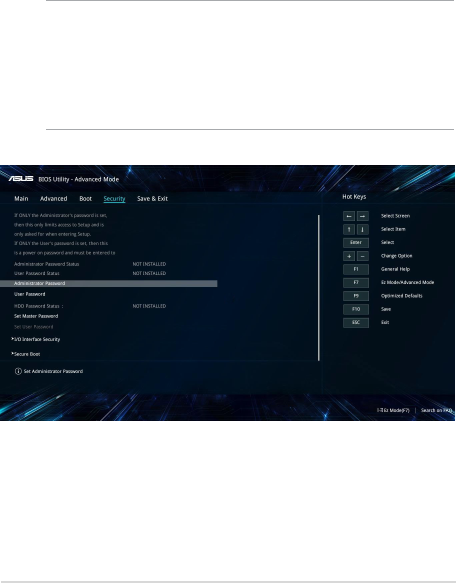
Security
This menu allows you to set up the administrator and user password
of your Notebook PC. It also allows you to control the access to your
Notebook PC’s hard disk drive, input/output (I/O) interface, and USB
interface.
NOTE:
• IfyouinstallaUser Password, you will be prompted to input this
before entering the operating system.
• IfyouinstallanAdministrator Password, you will be prompted to
input this before entering BIOS.
70
Notebook PC E-Manual
To set the password:
1. On the Security screen, select Administrator Password or User
Password.
2. Type in a password then press .
3. Re-type to conrm the password then select OK.
To clear the password:
1. On the Security screen, select Administrator Password or User
Password.
2. Type in the current password then press .
3. Leave other elds blank then select OK to continue.
4. Select OK to clear the old password.
NOTE: A keyboard is required to type in the password.
Notebook PC E-Manual
71
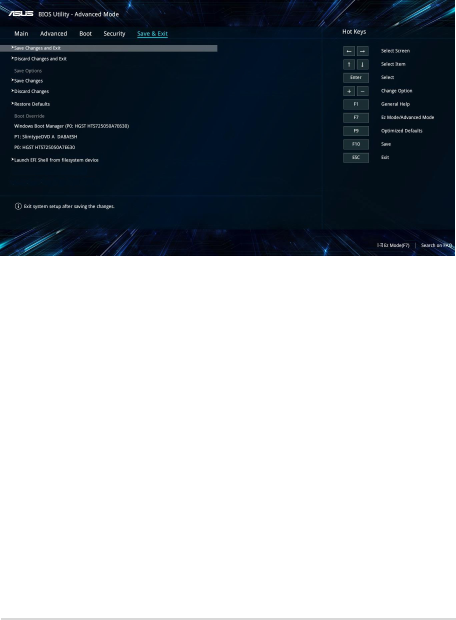
Save & Exit
To keep your conguration settings, select Save Changes and Exit
before exiting the BIOS.
72
Notebook PC E-Manual
To update the BIOS:
1. Verify the Notebook PC’s exact model then download the latest
BIOS le for your model from the ASUS website.
2. Save a copy of the downloaded BIOS le to a ash disk drive.
3. Connect your ash disk drive to your Notebook PC.
4. Restart your Notebook PC then access the BIOS settings.
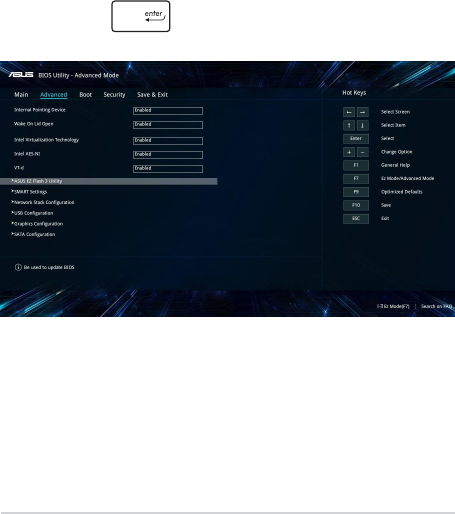
5. From the BIOS menu, select Advanced > ASUS EZ Flash 3 Utility,
then press .
Notebook PC E-Manual
73
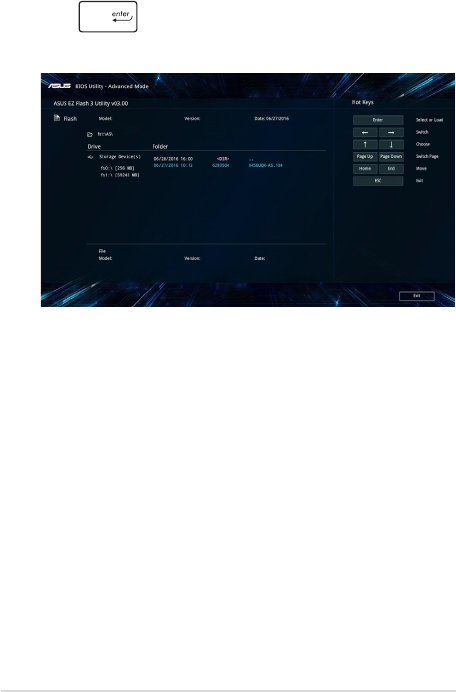
6. Locate your downloaded BIOS le in the ash disk drive then
press . Follow the onscreen instructions to complete the
update.
7. After the BIOS update process, select Save & Exit > Restore
Defaults to restore the system to its default settings.

74
Notebook PC E-Manual
Recovering your system
Using recovery options on your Notebook PC allows you to restore the
system to its original state or simply refresh its settings to help improve
performance.
IMPORTANT!
• Backup all your data les before doing any recovery option on your
Notebook PC.
• Note down important customized settings such as network settings,
user names, and passwords to avoid data loss.
• Ensure that your Notebook PC is plugged in to a power source before
resetting your system.
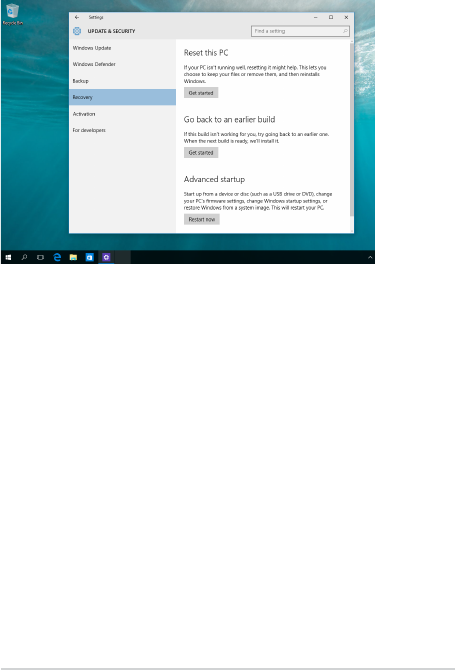
Windows® 10 allows you to do any of the following recovery options:
• Keepmyles- This option allows you refresh your Notebook
PC without aecting personal les (photos, music, videos,
documents).
Using this option, you can restore your Notebook PC to its default
settings and delete other installed apps.
• Removeeverything- This option resets your Notebook PC to
its factory settings. You must backup your data before doing this
option.
Notebook PC E-Manual
75
• Gobacktoanearlierbuild- This option allows you to go back
to an earlier build. Use this option if this build is not working for
you.
• Advancedstartup- Using this option allows you to perform
other advanced recovery options on your Notebook PC such as:
- Using a USB drive, network connection or Windows recovery
DVD to startup your Notebook PC.
- Using Troubleshoot to enable any of these advanced
recovery options: System Restore, System Image Recovery,
Startup Repair, Command Prompt, UEFI Firmware Settings,
and Startup Settings.
Performing a recovery option
Refer to the following steps if you want to access and use any of the
available recovery options for your Notebook PC.
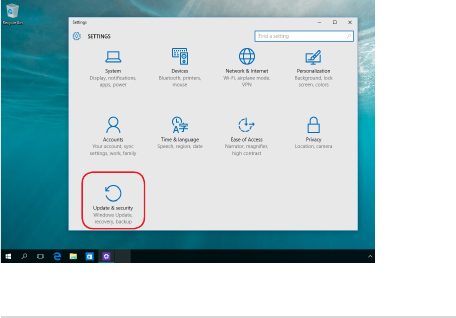
1. Launch Settings and select Update and security.
76
Notebook PC E-Manual
2. Under the Update and security option, select Recovery then
select the recovery option you would like to perform.

Notebook PC E-Manual
77
Chapter 5:
Upgrading your Notebook PC
78
Notebook PC E-Manual
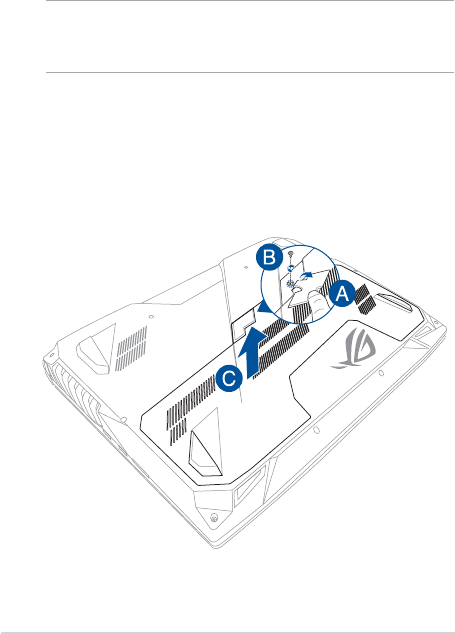
Removing the compartment cover
A. Pull the rubber cover to expose the screw underneath.
IMPORTANT! The rubber cover is designed to be attached to the
Notebook PC’s compartment cover. DO NOT force to detach it or
completely remove it from the compartment cover.
B. Remove the screw from the Notebook PC’s compartment cover.
C. Pull out the compartment cover and remove it completely from
your Notebook PC.
Notebook PC E-Manual
79
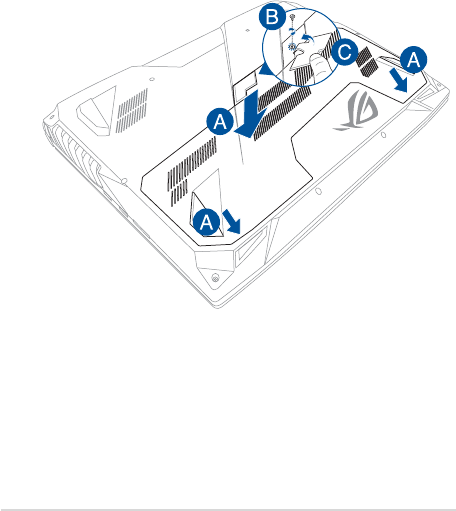
To reattach the compartment cover:
A. Align and reattach the cover of the compartment.
B. Secure the cover using the screw you removed earlier.
C. Put the rubber cover in place.

80
Notebook PC E-Manual
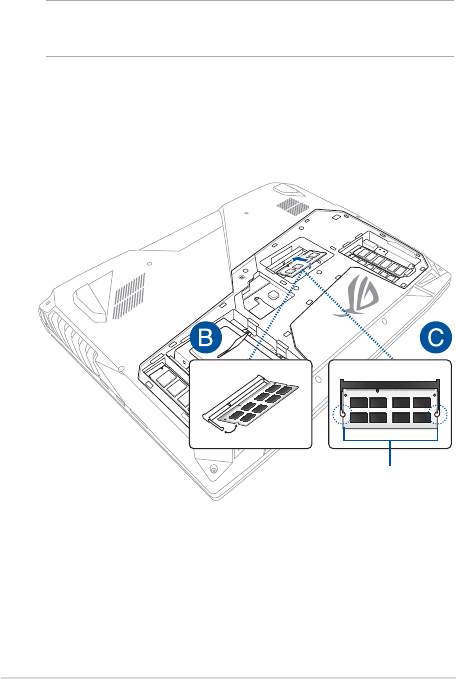
Installing a RAM module
Upgrade the memory capacity of your Notebook PC by installing
a RAM (Random Access Memory) module in the memory module
compartment. The following steps show you how to install a RAM
module into your Notebook PC:
WARNING! Disconnect all the connected peripherals, any telephone or
telecommunication lines and power connector (such as external power
supply, battery pack, etc.) before removing the compartment cover.
IMPORTANT! Visit an authorized service center or retailer for information
on RAM module upgrades for your Notebook PC. Purchase RAM modules
from authorized retailers of this Notebook PC to ensure maximum
compatibility and reliability.
NOTE:
• The appearance of your Notebook PC’s bottom side and RAM module
may vary per model but the RAM module installation remains the
same.
• It is recommended that you install the RAM module under
professional supervision. You may also visit an authorized service
center for further assistance.
Notebook PC E-Manual
81
A. Remove the compartment cover.
NOTE: For more details, refer to the Removing the compartment cover
section in this manual.
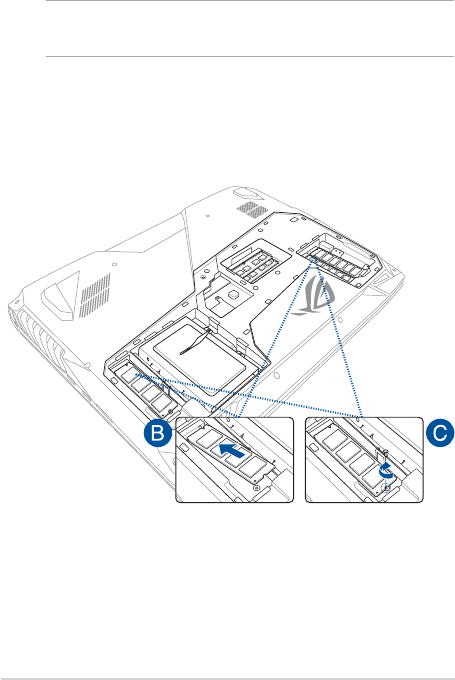
B. Align and insert the RAM module into the RAM module slot.
C. Push down the RAM module until it clicks in place.
30° angle
notches

82
Notebook PC E-Manual
Installing the Hard Disk Drive
Refer to the following steps if you need to install a new HDD (Hard Disk
Drive) of your Notebook PC:
IMPORTANT! Purchase an HDD from authorized retailers of this Notebook
PC to ensure maximum compatibility and reliability.
WARNING! Disconnect all the connected peripherals, any telephone or
telecommunication lines and power connector (such as external power
supply, battery pack, etc.) before removing the compartment cover.
NOTE:
• The appearance of your Notebook PC’s bottom side and HDD may
vary per model but the HDD installation remains the same.
• It is recommended that you replace the HDD under professional
supervision. You may also visit an authorized service center for
further assistance.
Notebook PC E-Manual
83
A. Remove the compartment cover.
NOTE: For more details, refer to the Removing the compartment cover
section in this manual.
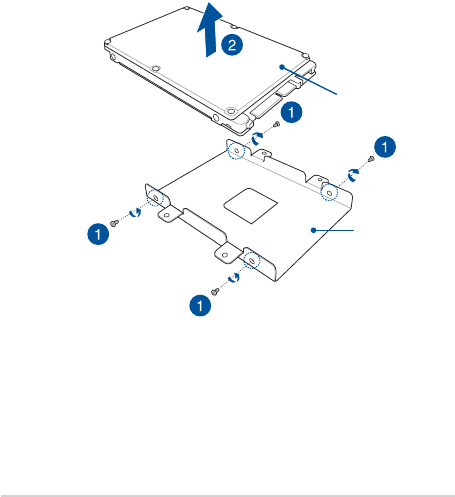
B. Remove the screws securing the HDD bay to the compartment.
C. (Optional) If an HDD is currently installed in your Notebook PC,
disconnect the HDD bay from the HDD port as shown in the
illustration below.
HDD bay
84
Notebook PC E-Manual
D. (Optional) If an HDD is currently attached to the HDD bay, refer to
the following steps on how to remove the old HDD:
1. Remove all the screws on the sides of the HDD bay.
2. Remove the HDD bay from the old HDD, then place the old
HDD on a at dry surface with its PCB (Printed Circuit Board)
facing up, as shown in the illustration below.
HDD bay
old HDD
Notebook PC E-Manual
85
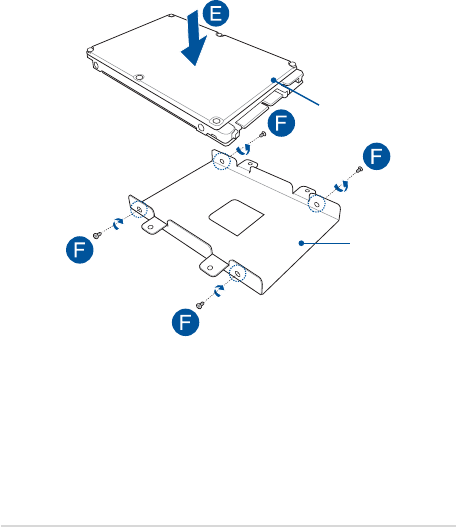
E. Place the new HDD within the HDD bay as shown below. Ensure
that the port connectors of your HDD are not obstructed by any
part of the HDD bay.
F. Reattach and secure the HDD with the screws you removed
earlier.
new HDD
HDD bay
86
Notebook PC E-Manual
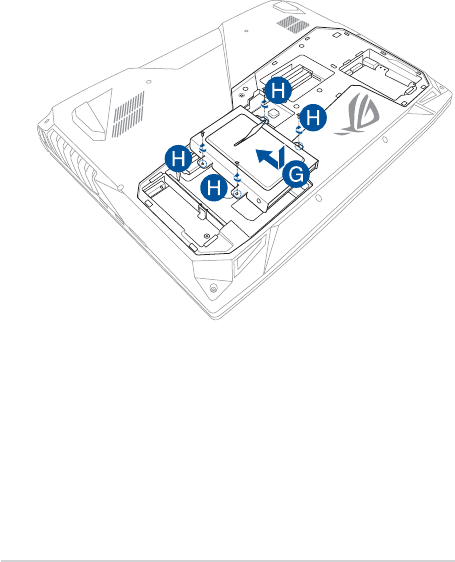
G. Replace the HDD bay back in the compartment with the HDD
connector aligned with the Notebook PC’s HDD port. Push the
HDD bay until it connects with the Notebook PC.
H. Secure the HDD bay with the screws you removed earlier.

Notebook PC E-Manual
87
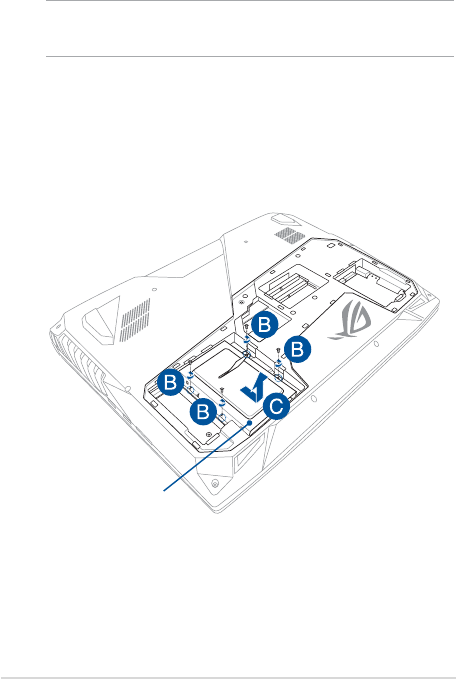
Installing an M.2 card
Refer to the following steps when installing a compatible M.2 card in
your Notebook PC:
IMPORTANT! Purchase your M.2 card from authorized retailers of this
Notebook PC to ensure maximum compatibility and reliability.
WARNING! Disconnect all the connected peripherals, any telephone or
telecommunication lines and power connector (such as external power
supply, battery pack, etc.) before removing the compartment cover.
NOTE:
• The appearance of your Notebook PC’s bottom side and M.2 card
may vary per model but the module installation remains the same.
• ItisrecommendedthatyouinstalltheM.2cardunderprofessional
supervision. You may also visit an authorized service center for
further assistance.
• TheM.22280slotsdonotsupportM.2SATASSD.
88
Notebook PC E-Manual
A. Remove the compartment cover.
NOTE: For more details, refer to the Removing the compartment cover
section in this manual.
B. Align and insert the M.2 card into its card module slot.
C. Secure the M.2 card in place using the bundled screw.

Notebook PC E-Manual
89
Tips and FAQs

90
Notebook PC E-Manual
Useful tips for your Notebook PC
To help you maximize the use of your Notebook PC, maintain its system
performance, and ensure all your data are kept secured, here are some
useful tips that you can follow:
• UpdateWindows®periodicallytoensurethatyourapplications
have the latest security settings.
• Useananti-virussoftwaretoprotectyourdataandkeepthis
updated too.
• Unlessabsolutelynecessary,refrainfromusingforceshutdownto
turn o your Notebook PC.
• Alwaysbackupyourdataandmakeitapointtocreateabackup
data in an external storage drive.
• RefrainfromusingtheNotebookPCatextremelyhigh
temperatures. If you are not going to use your Notebook PC for a
long period of time (at least a month), we recommend that you
take out the battery if the battery is removable.
• Disconnectallexternaldevicesandensureyouhavethefollowing
items prior to resetting your Notebook PC:
- Product key for your operating systems and other installed
applications
- Backup data
- Log in ID and password
- Internet connection information

Notebook PC E-Manual
91
Hardware FAQs
1. A black dot, or sometimes a colored dot, appears onscreen
when I turn on the Notebook PC. What should I do?
Although these dots normally appear onscreen, they will not
aect your system. If the incident continues and subsequently
aects system performance, consult an authorized ASUS service
center.
2. My display panel has an uneven color and brightness. How
can I x this?
The color and brightness of your display panel may be aected
by the angle and current position of your Notebook PC. The
brightness and color tone of your Notebook PC may also vary per
model. You may use the function keys or the display settings in
your operating system to adjust the appearance of your display
panel.
3. How can I maximize my Notebook PC ‘s battery life?
You can try doing any of the following suggestions:
• Usethefunctionkeystoadjustthedisplaybrightness.
• IfyouarenotusinganyWi-Ficonnection,switchyour
system into Airplane mode.
• DisconnectunusedUSBdevices.
• Closeunusedapplications,especiallythosethattakeuptoo
much system memory.

92
Notebook PC E-Manual
4. My battery charge indicator does not light up. What’s wrong?
• Checkwhetherthepoweradapterorbatterypackis
attached correctly. You may also disconnect the power
adapter or battery pack, wait for a minute, then reconnect
them again to the power outlet and Notebook PC.
• Iftheproblemstillexists,contactyourlocalASUSservice
center for assistance.
5. Why is my touchpad not working?
Press to enable your touchpad.
6. When I play audio and video les, why can’t I hear any sound
from my Notebook PC’s audio speakers?
You can try doing any of the following suggestions:
• Press to turn up the speaker volume.
• Checkifyourspeakersweresettomute.
• CheckifaheadphonejackisconnectedtoyourNotebook
PC and remove it.
7. What should I do if my Notebook PC’s power adapter gets lost
or my battery stops working?
Contact your local ASUS service center for assistance.

Notebook PC E-Manual
93
8. My Notebook PC cannot do keystrokes correctly because my
cursor keeps on moving. What should I do?
Make sure that nothing accidentally touches or presses on your
touchpad while you type on the keyboard. You can also disable
your touchpad by pressing .
9. Instead of showing letters, pressing the “U”, “I”, and “O” keys
on my keyboard displays numbers. How can I change this?
Press the key or (on selected models) on your
Notebook PC to turn o this feature and use the said keys for
inputting letters.
10. I overclocked the system and now my screen freezes. What
should I do?
Press and hold the power button for twenty (20) seconds and
release. Your Notebook PC will re-boot and load the default ratio
settings automatically.
11. I have disabled sleep mode, but why does my Notebook PC
still go into sleep mode when I close the lid?
Closing the lid when the system is under high load forces your
Notebook PC to go into sleep mode to prevent overheating.

94
Notebook PC E-Manual
Software FAQs
1. When I turn on my Notebook PC, the power indicator lights
up but nothing appears on my screen. What can I do to x
this?
You can try doing any of the following suggestions:
• ForceshutdownyourNotebookPCbypressingthepower
button for at least four (4) seconds. Check if the power
adapter and battery pack are inserted correctly then turn on
your Notebook PC.
• Iftheproblemstillexists,contactyourlocalASUSservice
center for assistance.
2. What should I do when my screen displays this message:
“Remove disks or other media. Press any key to restart.”?
You can try doing any of the following suggestions:
• RemoveallconnectedUSBdevicesthenrestartyour
Notebook PC.
• Removeanyopticaldiscsthatareleftinsidetheopticaldrive
then restart.
• Iftheproblemstillexists,yourNotebookPCmighthavea
memory storage problem. Contact your local ASUS service
center for assistance.
3. My Notebook PC boots slower than usual and my operating
system lags. How can I x this?
Delete the applications you recently installed or were not
included with your operating system package then restart your
system.

Notebook PC E-Manual
95
4. My Notebook PC does not boot up. How can I x this?
You can try doing any of the following suggestions:
• RemoveallconnecteddevicestoyourNotebookPCthen
restart your system.
• Iftheproblemstillexists,contactyourlocalASUSservice
center for assistance.
5. Why can’t my Notebook PC wake up from sleep mode?
• Youneedtopressthepowerbuttontoresumeyourlast
working state.
• Yoursystemmighthavecompletelyusedupitsbattery
power. Connect the power adapter to your Notebook PC
and connect to a power outlet then press the power button.

96
Notebook PC E-Manual

Notebook PC E-Manual
97
Appendices

98
Notebook PC E-Manual
Overview
On 4th August 1998 the European Council Decision regarding the CTR 21 has
been published in the Ocial Journal of the EC. The CTR 21 applies to all non
voice terminal equipment with DTMF-dialling which is intended to be connected
to the analogue PSTN (Public Switched Telephone Network).
CTR 21 (Common Technical Regulation) for the attachment requirements for
connection to the analogue public switched telephone networks of terminal
equipment (excluding terminal equipment supporting the voice telephony
justied case service) in which network addressing, if provided, is by means of
dual tone multi-frequency signalling.
Network Compatibility Declaration
Statement to be made by the manufacturer to the Notied Body and the vendor:
“This declaration will indicate the networks with which the equipment is designed
to work and any notied networks with which the equipment may have inter-
working diculties.”
Statement to be made by the manufacturer to the user: “This declaration will
indicate the networks with which the equipment is designed to work and any
notied networks with which the equipment may have inter-working diculties.
The manufacturer shall also associate a statement to make it clear where network
compatibility is dependent on physical and software switch settings. It will also
advise the user to contact the vendor if it is desired to use the equipment on
another network.”
Up to now the Notied Body of CETECOM issued several pan-European approvals
using CTR 21. The results are Europe’s rst modems which do not require
regulatory approvals in each individual European country.
Non-Voice Equipment
Answering machines and loud-speaking telephones can be eligible as well as
modems, fax machines, auto-dialers and alarm systems. Equipment in which the
end-to-end quality of speech is controlled by regulations (e.g. handset telephones
and in some countries also cordless telephones) is excluded.

Notebook PC E-Manual
99
This table shows the countries currently under the CTR21
standard.
Country Applied More Testing
Austria
1
Yes No
Belgium Yes No
Czech Republic No Not Applicable
Denmark
1
Yes Yes
Finland Yes No
France Yes No
Germany Yes No
Greece Yes No
Hungary No Not Applicable
Iceland Yes No
Ireland Yes No
Italy Still Pending Still Pending
Israel No No
Lichtenstein Yes No
Luxemburg Yes No
The Netherlands
1
Yes Yes
Norway Yes No
Poland No Not Applicable
Portugal No Not Applicable
Spain No Not Applicable
Sweden Yes No
Switzerland Yes No
United Kingdom Yes No

100
Notebook PC E-Manual
This information was copied from CETECOM and is supplied without liability. For
updates to this table, you may visit:
http://www.cetecom.de/technologies/ctr_21.html
1 National requirements will apply only if the equipment may use pulse dialling
(manufacturers may state in the user guide that the equipment is only intended to
support DTMF signalling, which would make any additional testing superuous).
In The Netherlands additional testing is required for series connection and caller
ID facilities.
Federal Communications Commission
Interference Statement
This device complies with FCC Rules Part 15. Operation is subject to the following
two conditions:
• Thisdevicemaynotcauseharmfulinterference.
• Thisdevicemustacceptanyinterferencereceived,includinginterference
that may cause undesired operation.
This equipment has been tested and found to comply with the limits for a class
B digital device, pursuant to Part 15 of the Federal Communications Commission
(FCC) rules. These limits are designed to provide reasonable protection against
harmful interference in a residential installation. This equipment generates,
uses, and can radiate radio frequency energy and, if not installed and used
in accordance with the instructions, may cause harmful interference to radio
communications. However, there is no guarantee that interference will not occur
in a particular installation. If this equipment does cause harmful interference to
radio or television reception, which can be determined by turning the equipment
o and on, the user is encouraged to try to correct the interference by one or
more of the following measures:
• Reorientorrelocatethereceivingantenna.
• Increasetheseparationbetweentheequipmentandreceiver.

Notebook PC E-Manual
101
• Connecttheequipmentintoanoutletonacircuitdierentfromthatto
which the receiver is connected.
• Consultthedealeroranexperiencedradio/TVtechnicianforhelp.
WARNING! The use of a shielded-type power cord is required in order to meet
FCC emission limits and to prevent interference to the nearby radio and television
reception. It is essential that only the supplied power cord be used. Use only shielded
cables to connect I/O devices to this equipment. You are cautioned that changes or
modications not expressly approved by the party responsible for compliance could
void your authority to operate the equipment.
(Reprinted from the Code of Federal Regulations #47, part 15.193, 1993.
Washington DC: Oce of the Federal Register, National Archives and Records
Administration, U.S. Government Printing Oce.)
FCC Radio Frequency (RF) Exposure Caution
Statement
WARNING! Any changes or modications not expressly approved by the party
responsible for compliance could void the user’s authority to operate this equipment.
“The manufacture declares that this device is limited to Channels 1 through 11 in the
2.4GHz frequency by specied rmware controlled in the USA.”
This equipment complies with FCC radiation exposure limits set forth for an
uncontrolled environment. To maintain compliance with FCC RF exposure
compliance requirements, please avoid direct contact to the transmitting antenna
during transmitting. End users must follow the specic operating instructions for
satisfying RF exposure compliance.

102
Notebook PC E-Manual
Radiation Exposure Statement
This device meets the government’s requirements for exposure to radio waves.
This device is designed and manufactured not to exceed the emission limits for
exposure to radio frequency (RF) energy set by the Federal Communications
Commission of the U.S. Government. The exposure standard for wireless device
employs a unit of measurement known as the Specic Absorption Rate, or SAR.
The SAR limit set by the FCC is 1.6W/kg.
*Tests for SAR are conducted using standard operating positions accepted by the
FCC with the device transmitting at its highest certied power level in all tested
frequency bands.

Notebook PC E-Manual
103
Compliance Statement of Innovation, Science
and Economic Development Canada (ISED)
This device complies with Innovation, Science and Economic Development
Canada licence exempt RSS standard(s). Operation is subject to the following
two conditions: (1) this device may not cause interference, and (2) this device
must accept any interference, including interference that may cause undesired
operation of the device.
Operation in the band 5150–5250 MHz is only for indoor use to reduce the
potential for harmful interference to co-channel mobile satellite systems.
CAN ICES-3(B)/NMB-3(B)
Déclaration de conformité de Innovation,
Sciences et Développement économique Canada
(ISED)
Le présent appareil est conforme aux CNR d’Innovation, Sciences et Développement
économique Canada applicables aux appareils radio exempts de licence.
L’exploitation est autorisée aux deux conditions suivantes: (1) l’appareil ne doit pas
produire de brouillage, et (2) l’utilisateur de l’appareil doit accepter tout brouillage
radioélectrique subi, même si le brouillage est susceptible d’en compromettre le
fonctionnement.
La bande 5150–5250 MHz est réservée uniquement pour une utilisation à l’intérieur
an de réduire les risques de brouillage préjudiciable aux systèmes de satellites
mobiles utilisant les mêmes canaux.
CAN ICES-3(B)/NMB-3(B)

104
Notebook PC E-Manual
Radiation Exposure Statement
The product comply with the Canada portable RF exposure limit set forth for an
uncontrolled environment and are safe for intended operation as described in this
manual. The further RF exposure reduction can be achieved if the product can be
kept as far as possible from the user body or set the device to lower output power
if such function is available.
This device has been tested for compliance with IC SAR values at a typical
operating near the body. To ensure that RF exposure levels below the levels tested,
use accessories with this equipment to maintain a minimum separation distance
of 0 cm between the body of the user and the device. These accessories should
not contain metallic components. It is possible that the accessories used close to
the body that do not meet these requirements are not consistent with the SAR
limits and it is advisable to avoid using them.
Déclaration d’exposition aux radiations
Le produit est conforme aux limites d’exposition pour les appareils portables RF
pour les Etats-Unis et le Canada établies pour un environnement non contrôlé.
Le produit est sûr pour un fonctionnement tel que décrit dans ce manuel. La
réduction aux expositions RF peut être augmentée si l’appareil peut être conservé
aussi loin que possible du corps de l’utilisateur ou que le dispositif est réglé sur la
puissance de sortie la plus faible si une telle fonction est disponible.
Ce dispositif a été testé pour la conformité avec les valeurs SAR à un
fonctionnement typique près du corps . Pour assurer que les niveaux d’exposition
aux radiofréquences en deçà des niveaux testés , utiliser des accessoires avec cet
équipement pour maintenir une distance de séparation minimale de 0 cm entre
le corps de l’utilisateur et l’appareil. Ces accessoires ne doivent pas contenir des
composants métalliques . Il est possible que les accessoires utilisés près du corps
qui ne répondent pas à ces exigences ne sont pas compatibles avec les limites SAR
et il est conseillé d’éviter de les utiliser.

Notebook PC E-Manual
105
Caution
(i) the device for operation in the band 5150-5250 MHz is only for indoor use
to reduce the potential for harmful interference to co-channel mobile satellite
systems;
(ii) the maximum antenna gain permitted for devices in the bands 5250-5350 MHz
and 5470-5725 MHz shall comply with the e.i.r.p. limit; and
(iii) the maximum antenna gain permitted for devices in the band 5725-5825 MHz
shall comply with the e.i.r.p. limits specied for point-to-point and non point-to-
point operation as appropriate.
(iv) Users should also be advised that high-power radars are allocated as primary
users (i.e. priority users) of the bands 5250-5350 MHz and 5650-5850 MHz and that
these radars could cause interference and/or damage to LE-LAN devices.
Avertissement
Le guide d’utilisation des dispositifs pour réseaux locaux doit inclure des
instructions précises sur les restrictions susmentionnées, notamment:
(i) Les dispositifs fonctionnant dans la bande 5150-5250 MHz sont réservés
uniquement à une utilisation en intérieur an de réduire les risques d’interférence
préjudiciables aux systèmes de satellites mobiles utilisant les mêmes canaux;
(ii) Le gain maximal d’antenne permis pour les dispositifs utilisant les bandes
5250-5350 MHz et 5470-5725 MHz doit être conforme à la limite de P.I.R.E; et
(iii) Le gain maximal d’antenne permis (pour les dispositifs utilisant la bande 5725-
5825 MHz) doit être conforme à la limite de P.I.R.E spéciée pour l’exploitation
point à point et non point à point, selon le cas.
(iv) De plus, les utilisateurs devraient aussi être avisés que les utilisateurs de
radars de haute puissance sont désignés utilisateurs principaux (c.-à-d., qu’ils ont
la priorité) pour les bandes 5250-5350 MHz et 5650-5850 MHz et que ces radars
pourraient créer des interférences et/ou des dommages aux dispositifs LAN-EL.

106
Notebook PC E-Manual
Wireless Operation Channel for Dierent
Domains
N. America 2.412-2.462 GHz Ch01 through CH11
Japan 2.412-2.484 GHz Ch01 through Ch14
Europe ETSI 2.412-2.472 GHz Ch01 through Ch13
Power Safety Requirement
Products with electrical current ratings up to 6A and weighing more than 3Kg
must use approved power cords greater than or equal to: H05VV-F, 3G, 0.75mm
2
or
H05VV-F, 2G, 0.75mm
2
.
TV Notices
Note to CATV System Installer—Cable distribution system should be grounded
(earthed) in accordance with ANSI/NFPA 70, the National Electrical Code (NEC),
in particular Section 820.93, Grounding of Outer Conductive Shield of a Coaxial
Cable – installation should include bonding the screen of the coaxial cable to the
earth at the building entrance.
REACH
Complying with the REACH (Registration, Evaluation, Authorization, and
Restriction of Chemicals) regulatory framework, we publish the chemical
substances in our products at ASUS REACH website at http://csr.asus.com/english/
REACH.htm.

Notebook PC E-Manual
107
UL Safety Notices
Required for UL 1459 covering telecommunications (telephone) equipment
intended to be electrically connected to a telecommunication network that has an
operating voltage to ground that does not exceed 200V peak, 300V peak-to-peak,
and 105V rms, and installed or used in accordance with the National Electrical
Code (NFPA 70).
When using the Notebook PC modem, basic safety precautions should always be
followed to reduce the risk of re, electric shock, and injury to persons, including
the following:
• DONOTusetheNotebookPCnearwater,forexample,nearabathtub,
wash bowl, kitchen sink or laundry tub, in a wet basement or near a
swimming pool.
• DONOTusetheNotebookPCduringanelectricalstorm.Theremaybea
remote risk of electric shock from lightning.
• DONOTusetheNotebookPCinthevicinityofagasleak.
Required for UL 1642 covering primary (non-rechargeable) and secondary
(rechargeable) lithium batteries for use as power sources in products. These
batteries contain metallic lithium, or a lithium alloy, or a lithium ion, and may
consist of a single electrochemical cell or two or more cells connected in series,
parallel, or both, that convert chemical energy into electrical energy by an
irreversible or reversible chemical reaction.
• DONOTdisposetheNotebookPCbatterypackinare,astheymay
explode. Check with local codes for possible special disposal instructions
to reduce the risk of injury to persons due to re or explosion.
• DONOTusepoweradaptersorbatteriesfromotherdevicestoreduce
the risk of injury to persons due to re or explosion. Use only UL certied
power adapters or batteries supplied by the manufacturer or authorized
retailers.

108
Notebook PC E-Manual
Macrovision Corporation Product Notice
This product incorporates copyright protection technology that is protected by
method claims of certain U.S.A. patents and other intellectual property rights
owned by Macrovision Corporation and other rights owners. Use of this copyright
protection technology must be authorized by Macrovision Corporation, and
is intended for home and other limited viewing uses only
unless otherwise
authorized by Macrovision Corporation
. Reverse engineering or disassembly is
prohibited.
Prevention of Hearing Loss
To prevent possible hearing damage, do not listen at high volume
levels for long periods.
Coating Notice
IMPORTANT! To provide electrical insulation and maintain electrical safety, a coating
is applied to insulate the device except on the areas where the I/O ports are located.
Notebook PC E-Manual
109
Nordic Lithium Cautions (for lithium-ion
batteries)
CAUTION! Danger of explosion if battery is incorrectly replaced. Replace only with
the same or equivalent type recommended by the manufacturer. Dispose of used
batteries according to the manufacturer’s instructions. (English)
ATTENZIONE! Rischio di esplosione della batteria se sostituita in modo errato.
Sostituire la batteria con un una di tipo uguale o equivalente consigliata dalla
fabbrica. Non disperdere le batterie nell’ambiente. (Italian)
VORSICHT! Explosionsgefahr bei unsachgemäßen Austausch der Batterie. Ersatz
nur durch denselben oder einem vom Hersteller empfohlenem ähnlichen Typ.
Entsorgung gebrauchter Batterien nach Angaben des Herstellers. (German)
ADVARSELI! Lithiumbatteri - Eksplosionsfare ved fejlagtig håndtering. Udskiftning
må kun ske med batteri af samme fabrikat og type. Levér det brugte batteri
tilbage til leverandøren. (Danish)
VARNING! Explosionsfara vid felaktigt batteribyte. Använd samma batterityp eller
en ekvivalent typ som rekommenderas av apparattillverkaren. Kassera använt
batteri enligt fabrikantens instruktion. (Swedish)
VAROITUS! Paristo voi räjähtää, jos se on virheellisesti asennettu. Vaihda paristo
ainoastaan laitevalmistajan sousittelemaan tyyppiin. Hävitä käytetty paristo
valmistagan ohjeiden mukaisesti. (Finnish)
ATTENTION! Il y a danger d’explosion s’il y a remplacement incorrect de la
batterie. Remplacer uniquement avec une batterie du mêre type ou d’un type
équivalent recommandé par le constructeur. Mettre au rebut les batteries usagées
conformément aux instructions du fabricant. (French)
ADVARSEL! Eksplosjonsfare ved feilaktig skifte av batteri. Benytt samme
batteritype eller en tilsvarende type anbefalt av apparatfabrikanten. Brukte
batterier kasseres i henhold til fabrikantens instruksjoner. (Norwegian)
(Japanese)
ВНИМАНИЕ! При замене аккумулятора на аккумулятор иного типа возможно
его возгорание. Утилизируйте аккумулятор в соответствии с инструкциями
производителя. (Russian)
110
Notebook PC E-Manual
CTR 21 Approval (for Notebook PC with built-in
Modem)
Danish
Dutch
English
Finnish
French
Notebook PC E-Manual
111
German
Greek
Italian
Portuguese
Spanish
Swedish

112
Notebook PC E-Manual
ENERGY STAR complied product
ENERGY STAR is a joint program of the U.S. Environmental
Protection Agency and the U.S. Department of Energy helping
us all save money and protect the environment through energy
ecient products and practices.
All ASUS products with the ENERGY STAR logo comply with the ENERGY STAR
standard, and the power management feature is enabled by default. The
monitor and computer are automatically set to sleep after 10 and 30 minutes
of user inactivity. To wake your computer, click the mouse or press any key on
the keyboard. Please visit http://www.energystar.gov/powermanagement for
detail information on power management and its benets to the environment.
In addition, please visit http://www.energystar.gov for detail information on the
ENERGY STAR joint program.
NOTE: Energy Star is NOT supported on FreeDOS and Linux-based operating systems.
Global Environmental Regulation Compliance
and Declaration
ASUS follows the green design concept to design and manufacture our products,
and makes sure that each stage of the product life cycle of ASUS product is in line
with global environmental regulations. In addition, ASUS disclose the relevant
information based on regulation requirements.
Please refer to http://csr.asus.com/english/Compliance.htm for information
disclosure based on regulation requirements ASUS is complied with:
Japan JIS-C-0950 Material Declarations
EU REACH SVHC
Korea RoHS
Notebook PC E-Manual
113
For US and Canada customers, you can call 1-800-822-8837
(toll-free) for recycling information of your ASUS products’
rechargeable batteries.
Rechargeable Battery Recycling Service in
North America
ASUS Recycling/Takeback Services
ASUS recycling and takeback programs come from our commitment to the
highest standards for protecting our environment. We believe in providing
solutions for you to be able to responsibly recycle our products, batteries, other
components as well as the packaging materials. Please go to http://csr.asus.com/
english/Takeback.htm for detailed recycling information in dierent regions.
Regional notice for Singapore
This ASUS product complies with IMDA Standards.
Complies with
IMDA Standards
DB103778
Regional notice for California
WARNING
Cancer and Reproductive Harm -
www.P65Warnings.ca.gov

114
Notebook PC E-Manual
Regional notice for India
This product complies with the “India E-Waste (Management) Rules, 2016” and
prohibits use of lead, mercury, hexavalent chromium, polybrominated biphenyls
(PBBs) and polybrominated diphenyl ethers (PBDEs) in concentrations exceeding
0.1% by weight in homogenous materials and 0.01% by weight in homogenous
materials for cadmium, except for the exemptions listed in Schedule II of the Rule.
Notices for removable batteries
• Riskofexplosionifbatteryisreplacedbyanincorrecttype.
• Thebatteryanditscomponentmustberecycledordisposedofproperly.
Avis concernant les batteries remplaçables
• Labatteriedel’appareilpeutprésenterunrisqued’incendieoudebrûlure
si celle-ci est retirée ou désassemblée.
• Labatterieetsescomposantsdoiventêtrerecyclésdefaçonappropriée.
Simplied EU Declaration of Conformity
ASUSTek Computer Inc. hereby declares that this device is in compliance with the
essential requirements and other relevant provisions of Directive 2014/53/EU. Full
text of EU declaration of conformity is available at
https://www.asus.com/support/.
The WiFi operating in the band 5150-5350 MHz shall be restricted to indoor use
for countries listed in the table below:
AT BE BG CZ DK EE FR
DE IS IE IT EL ES CY
LV LI LT LU HU MT NL
NO PL PT RO SI SK TR
FI SE CH UK HR