Microsoft NHL-12 GSM 850/1800/1900 Cellular Telephone w/Bluetooth User Manual Manual a
Microsoft Mobile Oy GSM 850/1800/1900 Cellular Telephone w/Bluetooth Manual a
UserManual.wiki
>
Microsoft
>
NHL-12 User Manual
>
Manual a
Contents
1.
Manual a
2.
Manual b
3.
Manual 1
4.
Manual 2
Manual a
Navigation menu
Upload a User Manual
Namespaces
Wiki Guide
HTML
PDF
Info
Views
User Manual
Discussion / Help
Navigation
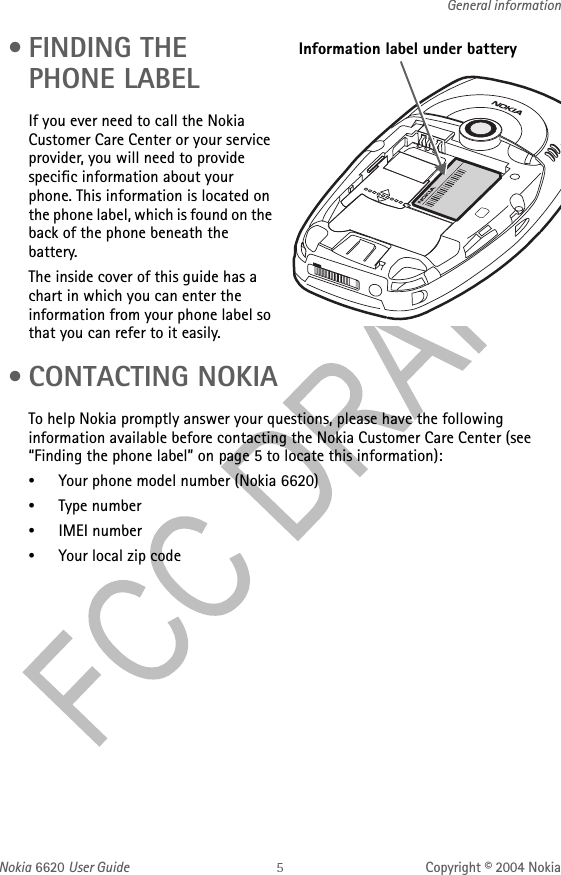
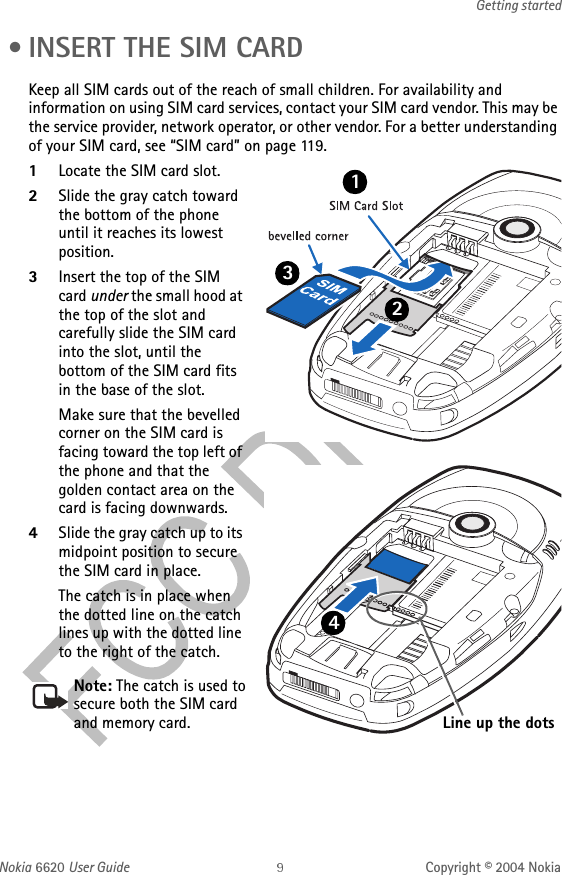
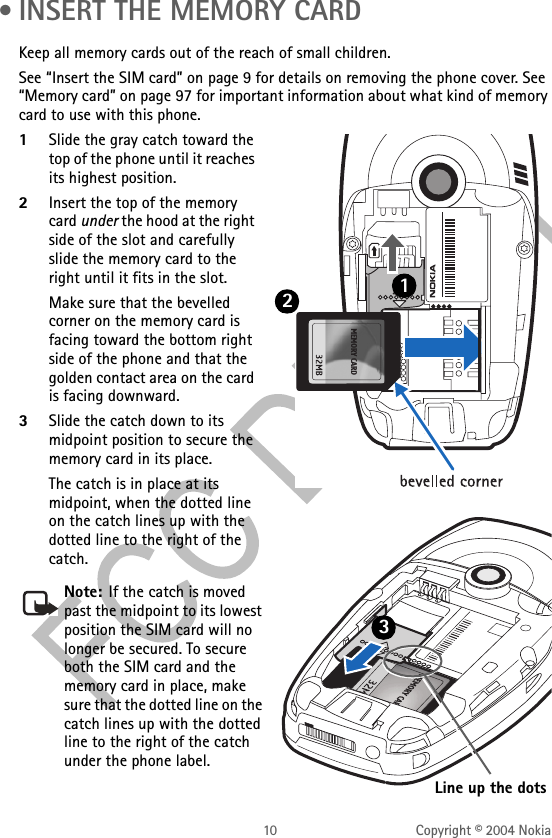
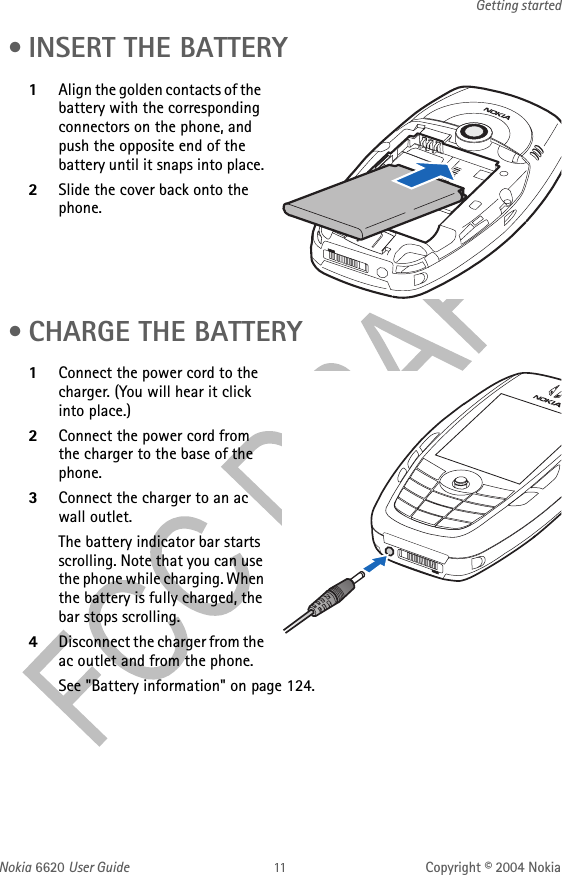
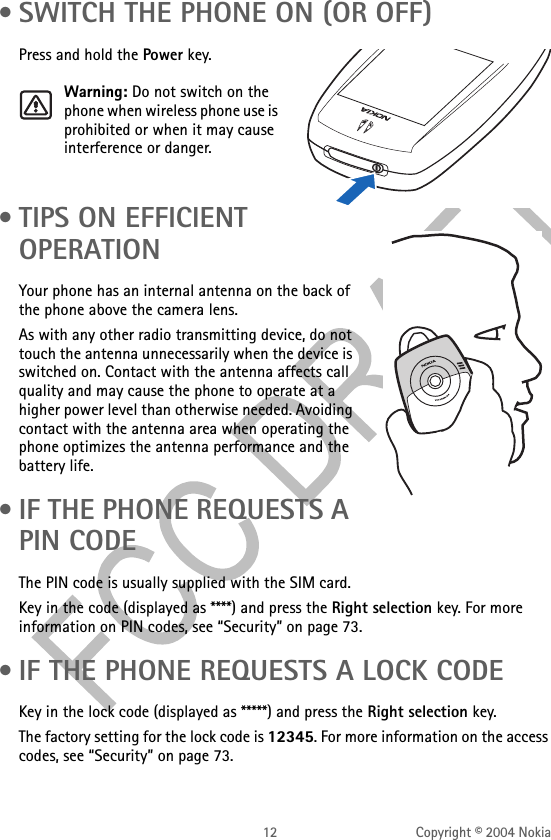
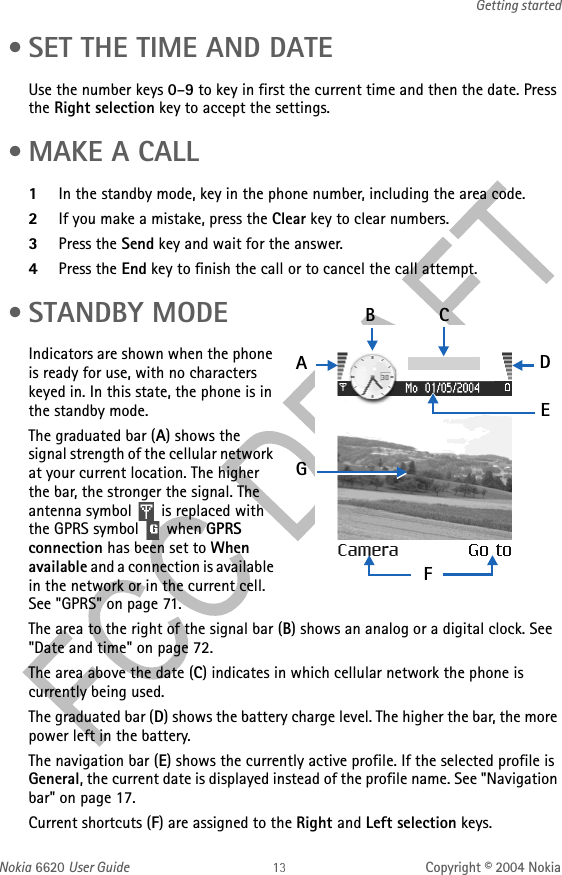
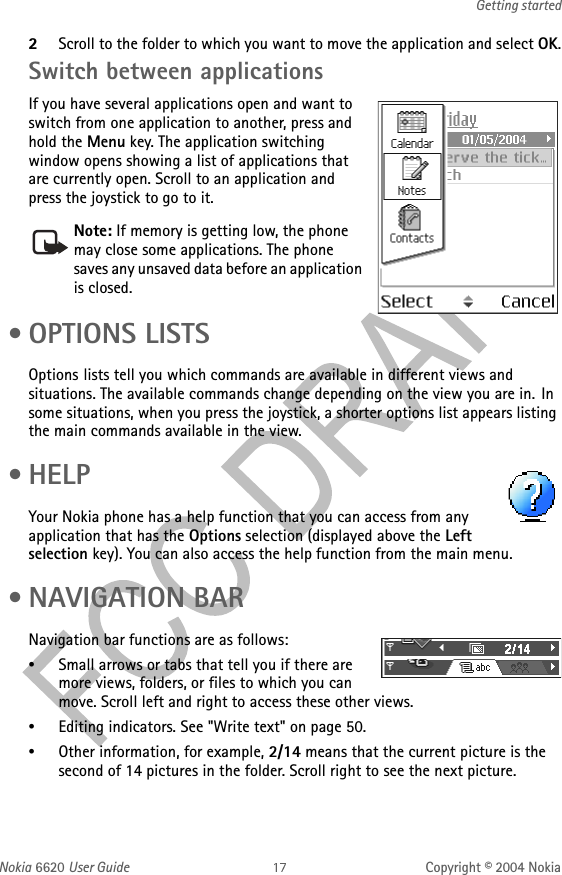
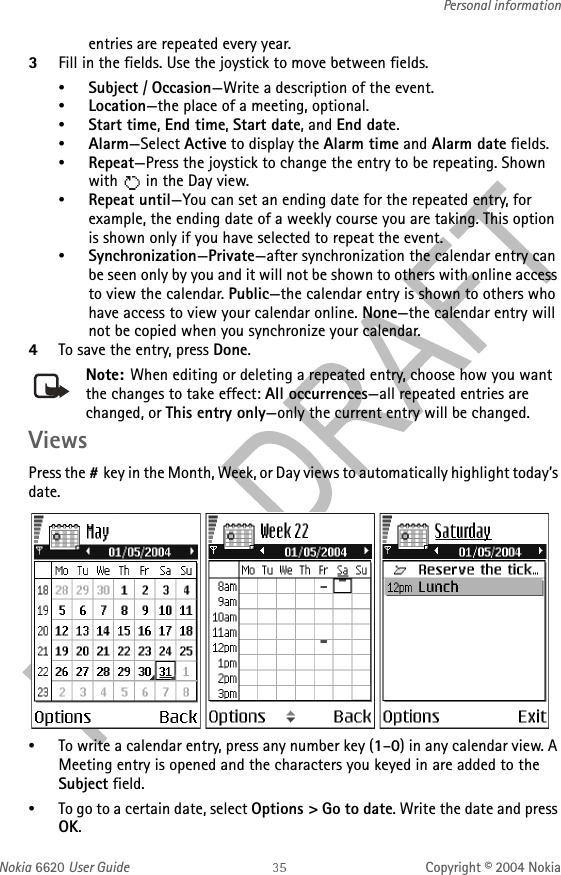
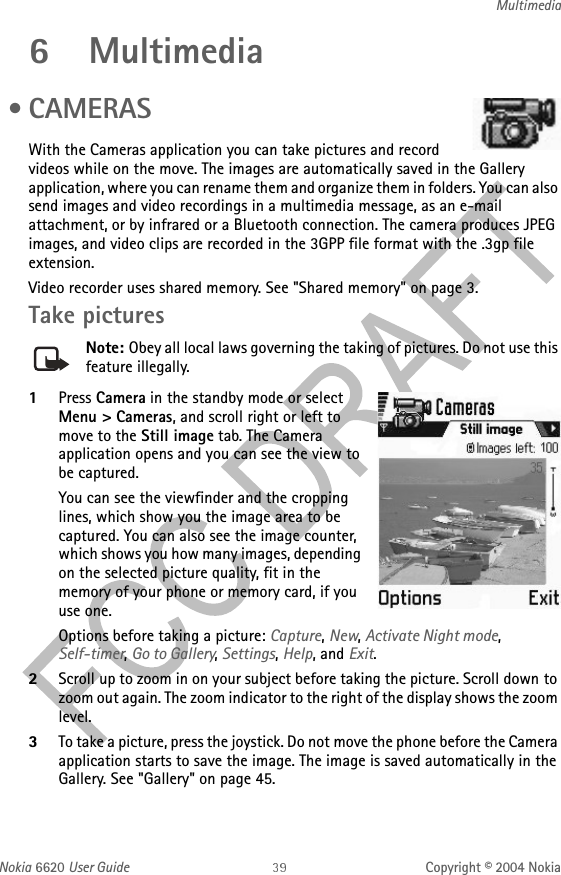
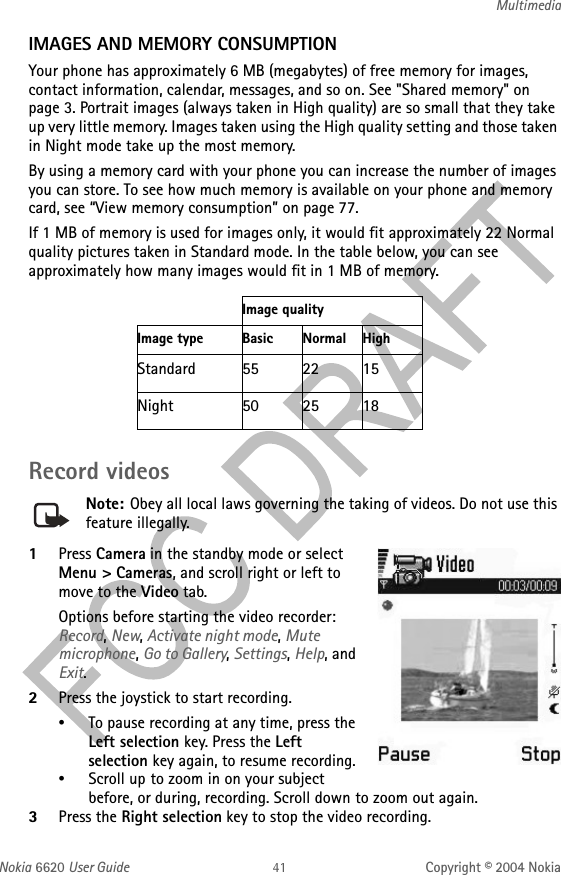
![[ vii ]Nokia 6620 phone at a glance . . . . . . . . . . . . . . . . . vQuick guide. . . . . . . . . . . . . . . . . . . . . . . . . . . . . . . . vi1FOR YOUR SAFETY . . . . . . . . . . . . . . . . . . . . . . . . . . 1Network services. . . . . . . . . . . . . . . . . . . . . . . . . . . . . . . . . . . . . . . 2Shared memory. . . . . . . . . . . . . . . . . . . . . . . . . . . . . . . . . . . . . . . . 32General information . . . . . . . . . . . . . . . . . . . . . . . . . 4Register your phone . . . . . . . . . . . . . . . . . . . . . . . . . . . . . . . . . . . . 4E-Newsletters . . . . . . . . . . . . . . . . . . . . . . . . . . . . . . . . . . . . . . . . . 4Follow graphic clues. . . . . . . . . . . . . . . . . . . . . . . . . . . . . . . . . . . . 4Finding the phone label . . . . . . . . . . . . . . . . . . . . . . . . . . . . . . . . . 5Contacting Nokia . . . . . . . . . . . . . . . . . . . . . . . . . . . . . . . . . . . . . . 5Accessibility solutions . . . . . . . . . . . . . . . . . . . . . . . . . . . . . . . . . . 63Getting started . . . . . . . . . . . . . . . . . . . . . . . . . . . . . 7Remove the back cover . . . . . . . . . . . . . . . . . . . . . . . . . . . . . . . . . 8Insert the SIM card. . . . . . . . . . . . . . . . . . . . . . . . . . . . . . . . . . . . . 9Insert the memory card . . . . . . . . . . . . . . . . . . . . . . . . . . . . . . . . 10Insert the battery . . . . . . . . . . . . . . . . . . . . . . . . . . . . . . . . . . . . . 11Charge the battery . . . . . . . . . . . . . . . . . . . . . . . . . . . . . . . . . . . . 11Switch the phone on (or off) . . . . . . . . . . . . . . . . . . . . . . . . . . . . 12Tips on efficient operation. . . . . . . . . . . . . . . . . . . . . . . . . . . . . . 12If the phone requests a PIN code . . . . . . . . . . . . . . . . . . . . . . . . 12If the phone requests a lock code . . . . . . . . . . . . . . . . . . . . . . . . 12Set the time and date. . . . . . . . . . . . . . . . . . . . . . . . . . . . . . . . . . 13Make a call . . . . . . . . . . . . . . . . . . . . . . . . . . . . . . . . . . . . . . . . . . 13Standby mode . . . . . . . . . . . . . . . . . . . . . . . . . . . . . . . . . . . . . . . . 13](https://usermanual.wiki/Microsoft/NHL-12.Manual-a/User-Guide-410415-Page-8.png)
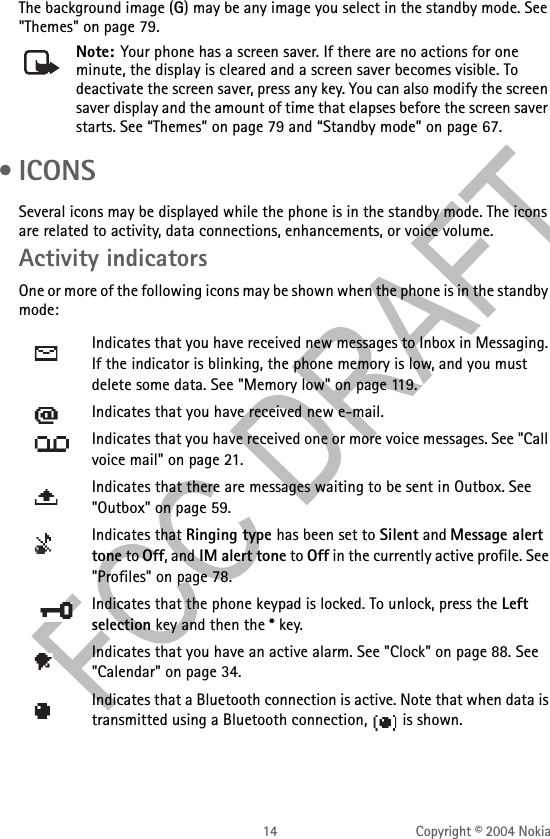
![[ viii ]Icons . . . . . . . . . . . . . . . . . . . . . . . . . . . . . . . . . . . . . . . . . . . . . . . 14Menu . . . . . . . . . . . . . . . . . . . . . . . . . . . . . . . . . . . . . . . . . . . . . . . 16Options lists . . . . . . . . . . . . . . . . . . . . . . . . . . . . . . . . . . . . . . . . . 17Help . . . . . . . . . . . . . . . . . . . . . . . . . . . . . . . . . . . . . . . . . . . . . . . . 17Navigation bar . . . . . . . . . . . . . . . . . . . . . . . . . . . . . . . . . . . . . . . 17Actions common to all applications . . . . . . . . . . . . . . . . . . . . . . 18Search for items . . . . . . . . . . . . . . . . . . . . . . . . . . . . . . . . . . . . . . 19Volume control . . . . . . . . . . . . . . . . . . . . . . . . . . . . . . . . . . . . . . . 19Keyguard . . . . . . . . . . . . . . . . . . . . . . . . . . . . . . . . . . . . . . . . . . . . 204Your phone. . . . . . . . . . . . . . . . . . . . . . . . . . . . . . . 21Make a call . . . . . . . . . . . . . . . . . . . . . . . . . . . . . . . . . . . . . . . . . . 21Answer a call. . . . . . . . . . . . . . . . . . . . . . . . . . . . . . . . . . . . . . . . . 23Call log . . . . . . . . . . . . . . . . . . . . . . . . . . . . . . . . . . . . . . . . . . . . . 245Personal information . . . . . . . . . . . . . . . . . . . . . . . 28Contacts . . . . . . . . . . . . . . . . . . . . . . . . . . . . . . . . . . . . . . . . . . . . 28Presence (network service) . . . . . . . . . . . . . . . . . . . . . . . . . . . . . 32Calendar . . . . . . . . . . . . . . . . . . . . . . . . . . . . . . . . . . . . . . . . . . . . 34To-do . . . . . . . . . . . . . . . . . . . . . . . . . . . . . . . . . . . . . . . . . . . . . . . 37Import data from compatible Nokia phones . . . . . . . . . . . . . . . 386Multimedia. . . . . . . . . . . . . . . . . . . . . . . . . . . . . . . 39Cameras. . . . . . . . . . . . . . . . . . . . . . . . . . . . . . . . . . . . . . . . . . . . . 39View images . . . . . . . . . . . . . . . . . . . . . . . . . . . . . . . . . . . . . . . . . 42RealOne Player™ . . . . . . . . . . . . . . . . . . . . . . . . . . . . . . . . . . . . . . 43Gallery . . . . . . . . . . . . . . . . . . . . . . . . . . . . . . . . . . . . . . . . . . . . . . 457Messaging . . . . . . . . . . . . . . . . . . . . . . . . . . . . . . . 49](https://usermanual.wiki/Microsoft/NHL-12.Manual-a/User-Guide-410415-Page-9.png)
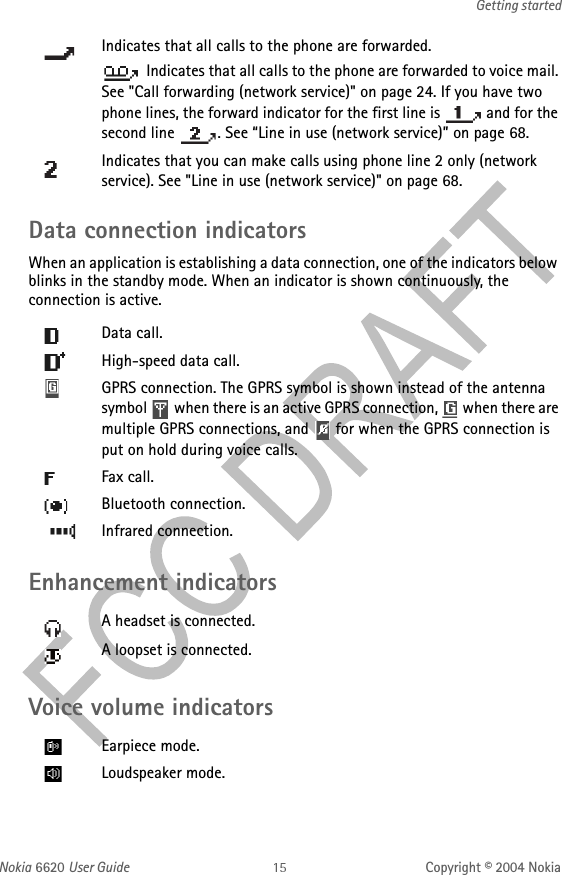
![[ ix ]Write text . . . . . . . . . . . . . . . . . . . . . . . . . . . . . . . . . . . . . . . . . . . 50Write and send messages. . . . . . . . . . . . . . . . . . . . . . . . . . . . . . . 53View a multimedia presentation . . . . . . . . . . . . . . . . . . . . . . . . . 55Inbox—receiving messages. . . . . . . . . . . . . . . . . . . . . . . . . . . . . . 55My folders . . . . . . . . . . . . . . . . . . . . . . . . . . . . . . . . . . . . . . . . . . 57Remote mailbox (network service) . . . . . . . . . . . . . . . . . . . . . . . 57Outbox . . . . . . . . . . . . . . . . . . . . . . . . . . . . . . . . . . . . . . . . . . . . . . 59View messages on a SIM card . . . . . . . . . . . . . . . . . . . . . . . . . . . 60Cell broadcast (network service) . . . . . . . . . . . . . . . . . . . . . . . . . 60Service command editor. . . . . . . . . . . . . . . . . . . . . . . . . . . . . . . . 61settings . . . . . . . . . . . . . . . . . . . . . . . . . . . . . . . . . . . . . . . . . . . . . 618Tools . . . . . . . . . . . . . . . . . . . . . . . . . . . . . . . . . . . . 66Settings . . . . . . . . . . . . . . . . . . . . . . . . . . . . . . . . . . . . . . . . . . . . . 66File manager . . . . . . . . . . . . . . . . . . . . . . . . . . . . . . . . . . . . . . . . . 769Personalization . . . . . . . . . . . . . . . . . . . . . . . . . . . . 78Profiles. . . . . . . . . . . . . . . . . . . . . . . . . . . . . . . . . . . . . . . . . . . . . . 78Themes. . . . . . . . . . . . . . . . . . . . . . . . . . . . . . . . . . . . . . . . . . . . . . 79Go to . . . . . . . . . . . . . . . . . . . . . . . . . . . . . . . . . . . . . . . . . . . . . . . 8110 Extras . . . . . . . . . . . . . . . . . . . . . . . . . . . . . . . . . . . 83Wallet . . . . . . . . . . . . . . . . . . . . . . . . . . . . . . . . . . . . . . . . . . . . . . 83Calculator . . . . . . . . . . . . . . . . . . . . . . . . . . . . . . . . . . . . . . . . . . . 86Converter. . . . . . . . . . . . . . . . . . . . . . . . . . . . . . . . . . . . . . . . . . . . 86Notes . . . . . . . . . . . . . . . . . . . . . . . . . . . . . . . . . . . . . . . . . . . . . . . 88Clock . . . . . . . . . . . . . . . . . . . . . . . . . . . . . . . . . . . . . . . . . . . . . . . 88Recorder . . . . . . . . . . . . . . . . . . . . . . . . . . . . . . . . . . . . . . . . . . . . 89Voice commands. . . . . . . . . . . . . . . . . . . . . . . . . . . . . . . . . . . . . . 89](https://usermanual.wiki/Microsoft/NHL-12.Manual-a/User-Guide-410415-Page-10.png)
![[ x ]Instant messaging (IM) (network service) . . . . . . . . . . . . . . . . . 91Memory card. . . . . . . . . . . . . . . . . . . . . . . . . . . . . . . . . . . . . . . . . 9711 Web Browser and Applications . . . . . . . . . . . . . . . . 99Web (Mobile browser) . . . . . . . . . . . . . . . . . . . . . . . . . . . . . . . . . 99Configuration manager . . . . . . . . . . . . . . . . . . . . . . . . . . . . . . . 105Application manager . . . . . . . . . . . . . . . . . . . . . . . . . . . . . . . . . 10612 Connectivity . . . . . . . . . . . . . . . . . . . . . . . . . . . . . 110Bluetooth connection. . . . . . . . . . . . . . . . . . . . . . . . . . . . . . . . . 110Infrared connection . . . . . . . . . . . . . . . . . . . . . . . . . . . . . . . . . . 113USB connection . . . . . . . . . . . . . . . . . . . . . . . . . . . . . . . . . . . . . 115Connection manager . . . . . . . . . . . . . . . . . . . . . . . . . . . . . . . . . 115Connect your phone to a compatible computer . . . . . . . . . . . 116Sync—remote synchronization. . . . . . . . . . . . . . . . . . . . . . . . . . 11713 Troubleshooting . . . . . . . . . . . . . . . . . . . . . . . . . . 119SIM card . . . . . . . . . . . . . . . . . . . . . . . . . . . . . . . . . . . . . . . . . . . 119Memory low . . . . . . . . . . . . . . . . . . . . . . . . . . . . . . . . . . . . . . . . 119Different ways to store data . . . . . . . . . . . . . . . . . . . . . . . . . . . 120Q&A . . . . . . . . . . . . . . . . . . . . . . . . . . . . . . . . . . . . . . . . . . . . . . . 12014 Reference information . . . . . . . . . . . . . . . . . . . . . 124Battery information . . . . . . . . . . . . . . . . . . . . . . . . . . . . . . . . . . 124Enhancements. . . . . . . . . . . . . . . . . . . . . . . . . . . . . . . . . . . . . . . 124Enhancements, Batteries, and Chargers . . . . . . . . . . . . . . . . . . 125Care and maintenance . . . . . . . . . . . . . . . . . . . . . . . . . . . . . . . . 128Additional safety information . . . . . . . . . . . . . . . . . . . . . . . . . . 128Emergency calls . . . . . . . . . . . . . . . . . . . . . . . . . . . . . . . . . . . . . 130](https://usermanual.wiki/Microsoft/NHL-12.Manual-a/User-Guide-410415-Page-11.png)
![[ xi ]Certification Information (SAR). . . . . . . . . . . . . . . . . . . . . . . . . 131Nokia 6620 technical information . . . . . . . . . . . . . . . . . . . . . . 133Message from the CTIA . . . . . . . . . . . . . . . . . . . . . 139Message from the FDA . . . . . . . . . . . . . . . . . . . . . 143Index. . . . . . . . . . . . . . . . . . . . . . . . . . . . . . . . . . . 149](https://usermanual.wiki/Microsoft/NHL-12.Manual-a/User-Guide-410415-Page-12.png)
![[ xii ]](https://usermanual.wiki/Microsoft/NHL-12.Manual-a/User-Guide-410415-Page-13.png)