Microsoft NHL-12 GSM 850/1800/1900 Cellular Telephone w/Bluetooth User Manual Manual b

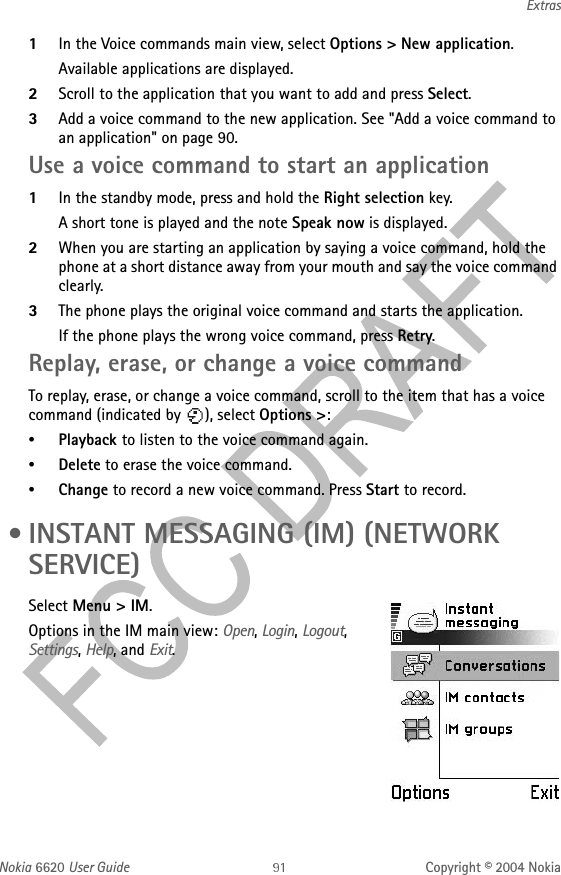
Microsoft Mobile Oy GSM 850/1800/1900 Cellular Telephone w/Bluetooth Manual b

Contents

Manual b

Nokia 6620 User Guide Copyright © 2004 NokiaToolsNetworkOPERATOR SELECTIONChoose Automatic to set the phone to automatically search for and select one of the cellular networks available in your area.Or, choose Manual if you want to select the desired network manually from a list of networks. If the connection to the manually selected network is lost, the phone will sound an error tone and ask you to select a network again. The selected network must have a roaming agreement with your home network, that is, the operator whose SIM card is in your phone.CELL INFO DISPLAYSelect On to set the phone to indicate when it is used in a cellular network based on Micro Cellular Network (MCN) technology and to activate cell info reception.EnhancementScroll to an enhancement folder and open the settings:•Select Default profile to select the profile you want to be activated each time when you connect a certain enhancement to your phone. See "Change the profile" on page 78. •Select Automatic answer to set the phone to answer an incoming call automatically after five seconds time. If the Incoming call alert is set to Beep once or Silent, automatic answer cannot be used, and you must answer the phone manually.•If you are using an enhancement such as a loopset, headset, or TTY adapter, you must activate it separately by selecting Menu > Tools > Settings > Enhancement > Enhancement in use > Headset, Loopset, or TTY. If you have activated a loopset, the headset will use the same settings as the loopset.See also “Enhancement indicators” on page 15.SecurityPHONE AND SIMIf your phone requests a security code, refer to the following explanations to determine what you should enter:•PIN code (4 to 8 digits)—The PIN (Personal Identification Number) code protects your SIM card against unauthorized use. The PIN code is usually supplied with the SIM card.After three consecutive incorrect PIN code entries, the PIN code is blocked. If the PIN code is blocked, you need to unblock the PIN code before you can use
74 Copyright © 2004 Nokiathe SIM card again. See also the information below about the PUK code.•PIN2 code (4 to 8 digits)—The PIN2 code is supplied with some SIM cards and is required to access some functions, such as fixed dialing numbers (FDN).•Lock code (5 digits)—The lock code can be used to lock the phone and keypad to avoid unauthorized use. Note: The factory setting for the lock code is 12345. To avoid unauthorized use of your phone, change the lock code. Keep the new code secret and in a safe place separate from your phone.•PUK and PUK2 codes (8 digits)—The PUK (Personal Unblocking Key) code is required to change a blocked PIN code. The PUK2 code is required to change a blocked PIN2 code. If the codes are not supplied with the SIM card, contact the operator whose SIM card is in your phone for the codes.You can change the following codes: lock code, PIN code, and PIN2 code. These codes can only include the numbers from 0 to 9. Note: Avoid using access codes similar to emergency numbers, such as 911, to prevent accidental dialing of the emergency number.PIN code request—When the PIN code request is active, the code is requested each time the phone is switched on. Note that deactivating the PIN code request may not be allowed by some SIM cards.PIN code / PIN2 code / Lock code—Open this setting if you want to change the code.Autolock period—You can set an autolock period, a time-out after which the phone is automatically locked and can be used only if the correct lock code is entered. Key in a number for the time-out in minutes or select None to turn off the autolock period.To unlock the phone, key in the lock code.Note: When the phone is locked, calls may be possible to the emergency number programmed into your phone (e.g. 911 or other official emergency number).Lock if SIM changed—Select Yes if you want the phone to ask for the lock code when an unknown, new SIM card is inserted into your phone. The phone maintains a list of SIM cards that are recognized as the owner’s cards.Fixed dialing—You can restrict your outgoing calls to selected phone numbers, if supported by your SIM card. You need the PIN2 code for this function. When this function is active, you can only call those phone numbers that are included in the fixed dialing list or which begin with the same digit(s) as a phone number on the list.Press the joystick to set Fixed dialing on.
Nokia 6620 User Guide Copyright © 2004 NokiaToolsOptions in the Fixed dialing view: Open, Call, Activ. fixed dialing/Deact. fixed dialing, New contact, Edit, Delete, Add to Contacts, Add from Contacts, Find, Mark/Unmark, Help, and Exit.Note: When fixed dialing is activated, calls still may be possible to the official emergency number programmed into your phone.To add new numbers to the Fixed dialing list, select Options > New contact or Add from Contacts. Closed user group (network service)—You can specify a group of people whom you can call and who can call you. For more information, contact your network operator or service provider. Select Default to activate the default group agreed on with the network operator, On if you want to use another group (you need to know the group index number), or Off.Note: When calls are limited to closed user groups, calls still may be possible to the official emergency number programmed into your phone.Confirm SIM services (network service)—Sets the phone to display confirmation messages when you are using a SIM card service.Restore server—To reset your connection settings allowing you to receive new settings from your service provider.CERTIF. (CERTIFICATE) MANAGEMENTOptions in the certificate management main view: Certificate details, Delete, Trust settings, Mark/Unmark, Help, and Exit.In the Certif. management main view, you can see a list of authority certificates that have been stored in your phone. Scroll right to see a list of personal certificates, if available.Authority certificates are used by some browser services, such as banking services, for checking signatures or server certificates or other authority certificates.Server certificates are used to improve security in the connection between the phone and the gateway. The phone receives the server certificate from the service provider before the connection is established, and its validity is checked using the authority certificates saved in the phone. Server certificates are not saved.Server certificates may be needed, for example, when you:•Want to connect to an online bank or another site or remote server for actions that involve transferring confidential information.•Want to decrease the risk of viruses or other malicious software and be sure of the authenticity of software when downloading and installing software.
76 Copyright © 2004 NokiaImportant: Even if the use of certificates makes the risks involved in remote connections and software installation considerably smaller, they must be used correctly in order to benefit from increased security. The existence of a certificate does not offer any protection by itself; the certificate manager must contain correct, authentic, or trusted certificates for increased security to be available.Important: Certificates have a restricted lifetime. If Expired certificate or Certificate not valid yet is shown even if the certificate should be valid, check that the current date and time in your phone are correct.CHANGE THE TRUST SETTINGS OF AN AUTHORITY CERTIFICATEScroll to an authority certificate and select Options > Trust settings. Depending on the certificate, a list of the applications that can use the selected certificate is shown. For example:•Application manager / Yes—The certificate is able to certify the origin of new software.•Internet / Yes—The certificate is able to certify e-mail and imaging servers.Important: Before changing these settings, you must make sure that you really trust the owner of the certificate and that the certificate really belongs to the listed owner. •FILE MANAGERSelect Menu > Tools > File Mngr.Options in the File manager main view: Open, Send, Delete, Move to folder, Copy to folder, New folder, Mark/Unmark, Rename, Find, Receive via infrared, View details, Memory details, Help, and Exit.In File manager you can browse, open, and manage files and folders in the phone memory or on the memory card, if you use one.Open File manager to see a list of the folders in the phone memory. Scroll right to see the folders on the memory card, if you use one.You can browse, open, and create folders, mark, copy and move items to folders. See "Actions common to all applications" on page 18.
Nokia 6620 User Guide Copyright © 2004 NokiaToolsView memory consumptionIf you have a memory card installed on your phone, you will have a choice of two memory views, one for the phone memory and one for the memory card. Scroll right or left to move from one memory tab to another.To check memory consumption of the current memory select Options >Memory details.The phone calculates the approximate amount of free memory for storing data and installing new applications.In the memory views, you can view the memory consumption of the different data groups: Calendar, Contacts, Documents, Messages, Images, Sound files, Video clips, Applications, Mem. in use, and Free memory.Note: If the phone memory is getting low, remove some files, or move them to the memory card. See "Troubleshooting" on page 119.
78 Copyright © 2004 Nokia9Personalization •PROFILESSelect Menu > Profiles.In Profiles, you can adjust and customize the phone tones for different events, environments, or caller groups. You can see the currently selected profile at the top of the display in the standby mode. If the General profile is in use, only the current date is shown.Options in the Profiles main view: Activate, Personalize, Create new, Delete profile, Tone download, Help, and Exit.Change the profile1Select Menu > Profiles. A list of profiles opens.2In the Profiles list, scroll to a profile and select Options > Activate.Shortcut: To change the profile in the standby mode, press the Power key briefly, scroll to the profile you want to activate, and press OK.Offline profileOffline profile lets you use features on the phone without connecting to the GSM wireless network.Important: In Offline profile you cannot make any calls, including emergency calls, or use other features that require network coverage.When you activate the Offline profile GSM is turned off, as indicated by the   icon in the signal strength indicator. All GSM wireless phone signals to and from the phone are prevented. Note: In areas where mobile phone use is prohibited, use of a Bluetooth connection may also be prohibited. Therefore, consult the relevant authorities before using a Bluetooth connection.
Nokia 6620 User Guide Copyright © 2004 NokiaPersonalizationCustomize profiles1To modify a profile, scroll to the profile in the Profiles list and select Options > Personalize. A list of profile settings opens.2Scroll to the setting you want to change and press the joystick to open the choices:•Ringing tone—Sets the ringing tone for voice calls, choose a ringing tone from the list. Press any key to stop the sound. If a memory card is used, tones stored on it have the   icon next to the tone name. Ringing tones use shared memory. See "Shared memory" on page 3.  You can also change ringing tones in Contacts. See "Add a ringing tone for a contact card or group" on page 29. •Ringing type—When Ascending is selected, the ringing volume starts from level one and increases level by level to the set volume level.•Ringing volume—Sets the volume level for the ringing and message alert tones.•Message alert tone—Sets the tone for messages.•IM alert tone—Sets the tone for instant messages.•Vibrating alert—Sets the phone to vibrate at incoming voice calls and messages.•Keypad tones—Sets the volume level for keypad tones.•Warning tones—Instructs the phone to sound a warning tone, for example, when the battery is running out of power.•Alert for—Sets the phone to ring only upon calls from phone numbers that belong to a selected contact group. Phone calls coming from people outside the selected group will have a silent alert. You can select All calls, or you can select items from a list of contact groups, if you have created them. See "Creating contact groups" on page 32. •Profile name—You can rename a profile and give it any name you want. The General and Offline profiles cannot be renamed. • THEMESSelect Menu > Themes.
80 Copyright © 2004 NokiaYou can change the look of your phone display by activating a theme. A theme can include the idle screen wallpaper, color palette, screen saver, and icons and background image in ’Go to’. Edit a theme for more detailed personalization.When you open Themes you will see a list of the available themes. The currently active theme is indicated by a check mark. Scroll right to see the themes on the memory card, if you use one.To preview a theme, scroll to the theme and select Options > Preview. Press the Left selection key to activate the theme. You can activate the theme without previewing it by selecting Options > Apply from the main view.Options in the Themes main view: Preview, Apply, Edit, Copy to mem. card, Copy to phone mem., Theme downloads, Delete, Help, and Exit.Edit themesTo personalize themes further, you can group together elements from other themes or images from the Gallery: 1Scroll to a theme, select Options > Edit.2Scroll to the following items, and select Options > Change to modify them:•Wallpaper to choose an image to use as a background image in the standby mode. You can select an image from one of the available themes or from the Gallery, where your own images are saved.•Color palette to change the color used on the display.•Screen savers to select what is shown on the screen saver bar: the time and date or text you have written yourself. The location and background color of the screen saver bar changes in one minute intervals. Also, the screen saver changes to indicate the number of new messages or missed calls. You can set the time that elapses before the screen saver is activated. See "Standby mode" on page 67. •Icons to select a different icon set from any one of the themes.Note: All pre-installed themes have the same icon set.
Nokia 6620 User Guide Copyright © 2004 NokiaPersonalization•Image in ‘Go to’ to choose an image to use as a background image in ‘Go to’. You can select an image from one of the available themes or from the Gallery, where your own images are saved.3Select Options > Set to select the current setting. You can also preview the selected item by selecting Options > Preview. Note that you cannot preview all elements.Restore themesTo restore the currently selected theme back to its original settings, select Options > Restore orig. theme when editing a theme. •GO TOPress Go to (Right selection key) in the standby mode or select Menu > Go to.Use ’Go to’ for storing shortcuts, links to your favorite photos, video clips, notes, Recorder sound files, browser bookmarks, and saved browser pages.Options in the ’Go to’ main view: Open, Edit shortcut name, Shortcut icon, Delete shortcut, Move, List view / Grid view, Help, and Exit.The default shortcuts:Shortcuts can be added only from pre-installed applications and functions. Not all applications have this functionality. 1Open the application and scroll to the item that you want to add as a shortcut to ’Go to’.2Select Options > Add to ’Go to’ and press OK.Note: A shortcut in ’Go to’ is automatically updated if you move the item to which it is pointing, for example, from one folder to another.opens the Notes editoropens the Calendar to the current dateopens the Messaging Inbox
82 Copyright © 2004 NokiaHints on using shortcuts:•To open a shortcut, scroll to the icon and press the joystick. The file is opened in the corresponding application.•To delete a shortcut, scroll to the shortcut you want to remove and select Options > Delete shortcut. Removing a shortcut does not affect the file to which it refers.•To change the shortcut name, select Options > Edit shortcut name. Write the new name. This change affects only the shortcut, not the file or item to which the shortcut refers.
Nokia 6620 User Guide Copyright © 2004 NokiaExtras10 Extras • WALLET Select Menu > Extras > Wallet.Wallet provides you with a storage area for your personal information, such as credit and debit card numbers, addresses, and other useful data (for example, user names and passwords).The information stored in the wallet can be easily retrieved while browsing to automatically fill in online forms on browser pages, for example, when the service asks for credit card details. Data in the wallet is encrypted and protected with a wallet code that you define.You can group wallet data into profiles that can be accessed, for example, for making purchases online.Because of the nature of the wallet, it will automatically close after 5 minutes. Enter the wallet code to regain access to the contents. You can change this automatic time-out period, if required. See "Wallet settings" on page 85. Options in the wallet main view: Open, Settings, Help, and Exit.Enter the wallet codeEach time you open the wallet you will be prompted for a wallet code.When you open the wallet for the first time, you must create your own access code:1Enter a code of your choice (4–10 alphanumeric characters) and press OK.You will be prompted to verify the code.2Enter the same code and press OK.Do not give your wallet code to anyone else.Note: If you enter the wallet code incorrectly on three consecutive attempts, the wallet application is blocked for five minutes. The block time increases if further incorrect wallet codes are entered.Important: If you forget your wallet code, you will have to reset the code, and you will lose all information stored in the wallet. See "Reset the wallet and wallet code" on page 86.
84 Copyright © 2004 NokiaStore personal card detailsOptions when viewing or editing card details: Delete, Help, and Exit.1Select the Cards category from the main wallet menu.2Select a type of card from the list:•Payment cards—Credit and debit cards.•Loyalty cards—Membership and store cards.•Online acc. cards—Personal user names and passwords to online services.•Address cards—Basic contact details for home/office.•User info cards—Customized personal preferences for online services.3Select Options > Create new. An empty form opens. 4Fill in the fields and press Done.You can also receive card information directly to the phone from a card issuer or service provider (if they offer this service). You will be notified to which category the card belongs. Save or discard the card. You can view and rename a saved card, but you cannot edit it.You can open, edit, or delete the fields in the card. Any changes will be saved upon exiting.Create personal notesPersonal notes are a means of storing sensitive information, for example, a bank account number. You can access the data in a personal note from the browser. You can also send a note as a message.1Select the Personal notes category from the main wallet menu.2Select Options > Create new. An empty note opens. 3Press any key from 1 to 0 to start writing. Press the Clear key to clear characters. Press Done to save.Create a wallet profileOnce you have stored your personal details, you can combine them together into a wallet profile. Use a wallet profile to retrieve wallet data from different cards and categories to the browser.1Select the Wallet profiles category from the main wallet menu.2Select Options > Create new. A new wallet profile form opens. 3Fill in the fields as indicated below and press Done.Some of the fields must contain data selected from the wallet. You must save the data under the relevant category before creating a wallet profile or else the profile cannot be created.
Nokia 6620 User Guide Copyright © 2004 NokiaExtras•Profile name—Choose and enter a name for the profile.•Payment card—Select a card from the Payment card category.•Loyalty card—Select a card from the Loyalty card category.•Online access card—Select a card from the Online acc. card category.•Shipping address—Select an address from the Address card category.•Billing address—By default this is the same as the Shipping address. If you require a different address, select one from the Address card category.•User info card—Select a card from the User info card category.•Receive e-receipt—Select a destination from the Address card category.•Deliver e-receipt—Select To phone, To e-mail, or To pho. & e-mail.•Phone ID sending—Set to On or Off. Defines whether or not your unique phone identification is sent with the wallet profile (for future development dependent on RFID-based ticketing).Retrieve information from wallet to your browserWhen using online mobile services supporting the wallet functionality, you can upload the data stored in your wallet to automatically enter your details into an online form. For example, by uploading your payment card details, you do not need to key in the card number and expiration date each time you need them (depending on the content being browsed). Also, you can retrieve your user name and password stored as an access card when connecting to a mobile service that requires authentication. See "Purchase an item" on page 103. View ticket detailsYou can receive notifications of tickets purchased online with the browser. Received notifications are stored in the wallet. To view the notifications:1Select the Tickets category from the main wallet menu.2Select Options > View.Options in the Tickets main view: View, Delete, Rename, Mark / Unmark, Help, and Exit.Note: None of the fields within the notification can be modified.Wallet settingsSelect Options > Settings from the main wallet menu to modify the following items: •Wallet code—Change your wallet code. You will be prompted to enter the current code, create a new code, and verify the new code.•Phone ID—Set the phone ID code, type, and sending options (for future development dependent on RFID-based ticketing).
86 Copyright © 2004 Nokia•Automatic close—Change the automatic time-out period (1–60 minutes). After the time-out period has elapsed, the wallet code must be re-entered to gain access to the contents.Reset the wallet and wallet codeImportant: This operation erases all contents of the wallet. To reset both the contents of the wallet and the wallet code:1Key in *#7370925538# in the standby mode.2Enter the phone lock code, and press OK. See "Security" on page 73. 3You will be asked to confirm the erasing of data. Press OK.When opening the wallet again, you must enter a new wallet code. See "Enter the wallet code" on page 83.  • CALCULATORSelect Menu > Extras > CalculatorOptions in Calculator: Last result, Memory, Clear screen, Help, and Exit.1Enter the first number of your calculation. •To add a decimal, press the # key.•Press the Clear key to erase a mistake in the number.2Scroll to an arithmetic function and press the joystick to select it. 3Enter the second number.4To execute the calculation, scroll to   and press the joystick.•Press and hold the Clear key to clear the result of the previous calculation.•Use   and   to view previous calculations and move in the sheet.Note: This calculator has limited accuracy and is designed for simple calculations. •CONVERTERSelect Menu > Extras > Converter.In Converter, you can convert measures such as Length from one unit to another, for example, Yards to Meters.Note: The Converter has limited accuracy and rounding errors may occur.
Nokia 6620 User Guide Copyright © 2004 NokiaExtrasConvert unitsOptions in Converter: Conversion type, Currency rates (not applicable to other units), Help, and Exit.Note: To make currency conversions, you must first set the exchange rate. See "Set a base currency and exchange rates" on page 87. 1Scroll to the Type field and press the joystick to open a list of measures. 2Scroll to the measure you want to use and press OK.3Scroll to the first Unit field and press the joystick to open a list of available units. 4Select the unit from which you want to convert and press OK.5Scroll to the next Unit field and select the unit to which you want to convert.6Scroll to the first Amount field and key in the value you want to convert.Press the # key to add a decimal and press the * key to insert the +, - (for temperature), and E (exponent) symbols.The other Amount field changes automatically to show the converted value.Note: The conversion order changes if you write a value in the second Amount field. The result is shown in the first Amount field.Set a base currency and exchange ratesBefore you can make currency conversions, you need to choose a base currency (usually your domestic currency) and add exchange rates.Note: The rate of the base currency is always 1. The base currency determines the conversion rates of the other currencies.1Select Currency as the measure type and select Options > Currency rates. A list of currencies opens and you can see the current base currency at the top.2To change the base currency, scroll to the currency (usually your domestic currency), and select Options > Set as base curr..Important: When you change base currency, all previously set exchange rates are reset to zero and you must enter new rates.3Add exchange rates, scroll to the currency, and key in a new rate, that is, how many units of the currency equal one unit of the base currency you have selected. 4After you have inserted all the needed exchange rates, you can make currency conversions. See "Convert units" on page 87.
88 Copyright © 2004 Nokia •NOTESSelect Menu > Extras > Notes.You can link notes to ’Go to’ and send them to other devices. Plain text files (TXT format) you receive can be saved to Notes.Press any key from 1 to 0 to start to write. Press the Clear key to clear letters. Press Done to save. •CLOCKSelect Menu > Extras > Clock.Options in Clock: Set alarm, Reset alarm, Remove alarm, Settings, Help, and Exit.Change clock settingsTo change the time or date, select Options > Settings in Clock. Set an alarm1To set a new alarm, select Options > Set alarm.2Enter the alarm time and press OK. When the alarm is active, the   indicator is shown.To cancel an alarm, select Clock and select Options > Remove alarm.Stop an alarmPress Stop to turn off the alarm. Press any key or Snooze to stop the alarm for five minutes, after which it will resume. You can do this a maximum of five times.If the alarm time is reached while the phone is switched off, the phone switches itself on and starts sounding the alarm tone. If you press Stop, you receive a message asking whether you want to activate the phone for calls. Press No to switch off the phone or Yes to make and receive calls.Note: Do not press Yes when wireless phone use is prohibited or when it may cause interference or danger.Personalize the alarm tone1To personalize the alarm tone, select Options > Settings. 2Select Clock alarm tone.When you scroll through the list of tones, you can stop on a tone to listen to
Nokia 6620 User Guide Copyright © 2004 NokiaExtrasit before you make your selection. 3Press Select to select the current tone. •RECORDERSelect Menu > Extras > Recorder.Options in Recorder: Record sound clip, Delete, Rename sound clip, Send, Go to Gallery, Settings, Add to ’Go to’, Help, and Exit.Note: Obey all local laws governing recording of calls. Do not use this feature illegally. The voice recorder allows you to record telephone conversations and voice memos. If you are recording a telephone conversation, both parties will hear a tone every five seconds during recording.Recorded files are stored in the Gallery. See "Gallery" on page 45. Select Options > Record sound clip and scroll to a function and press the joystick to select it. Use:Note: The recorder cannot be used when a data call or GPRS connection is active. • VOICE COMMANDSSelect Menu > Tools > Voice com..Options in the Voice commands main view: Add voice command, Open, New application, Playback, Change, Delete, Delete all, Help, and Exit.You can use Voice commands to start applications and profiles, and to dial numbers from Contacts, without having to look at your phone display. You record a word, or words, (voice command) and then say this voice command to open an application, activate a profile, or dial a number.Note: You can have only one voice command per item.Any spoken word(s) can be a voice command. to record to fast forwardto pause to fast rewindto stop to play an opened sound file
90 Copyright © 2004 NokiaWhen recording, hold the phone at a short distance away from your mouth. After the starting tone, say clearly the word, or words, you want to record as a voice command.Before using voice commands, note that:•Voice commands are not language dependent. They are dependent on the speaker’s voice.•Voice commands are sensitive to background noise. Record and use them in a quiet environment.•Very short voice commands are not accepted. Use longer words and avoid similarities between different voice commands.Note: You must say the voice command exactly as you said it when you recorded it. This may be difficult in, for example, a noisy environment or during an emergency, so you should not rely solely upon voice commands in all circumstances.Add a voice command to an applicationNote: To add a voice command to a profile, the Profiles folder must be opened and a specific profile selected.1In the Voice commands main view, scroll to the application to which you want to add a voice command, and select Options > Add voice command.The text Press ’Start’, then speak after tone is displayed. 2Press Start to record a voice command. The phone sounds a starting tone and the note Speak now is displayed.3Say the voice command. The phone will stop recording after approximately 5 seconds.4After recording, the phone plays the recorded command and the note Playing voice command is displayed. If you do not want to save the recording, press Quit.5When the voice command has been successfully saved, the note Voice command saved is displayed and a beep sounds. A symbol   can be seen next to the application. ADD AN APPLICATION TO THE LISTYou can assign voice commands to other applications that are not listed in the Voice commands main view.
Nokia 6620 User Guide Copyright © 2004 NokiaExtras1In the Voice commands main view, select Options > New application.Available applications are displayed.2Scroll to the application that you want to add and press Select.3Add a voice command to the new application. See "Add a voice command to an application" on page 90. Use a voice command to start an application1In the standby mode, press and hold the Right selection key. A short tone is played and the note Speak now is displayed.2When you are starting an application by saying a voice command, hold the phone at a short distance away from your mouth and say the voice command clearly. 3The phone plays the original voice command and starts the application.If the phone plays the wrong voice command, press Retry.Replay, erase, or change a voice commandTo replay, erase, or change a voice command, scroll to the item that has a voice command (indicated by  ), select Options >:•Playback to listen to the voice command again.•Delete to erase the voice command.•Change to record a new voice command. Press Start to record. • INSTANT MESSAGING (IM) (NETWORK SERVICE)Select Menu > IM.Options in the IM main view: Open, Login, Logout, Settings, Help, and Exit.
92 Copyright © 2004 NokiaIM allows you to converse with other people using instant messages and join discussion forums (IM groups) with specific topics. Once you have registered with an IM service, you can log in to the service provider’s IM server.This User Guide shows examples of IM icons and their descriptions. The icons and display text may appear differently on your phone, depending on which IM service you use. If you have any questions about the differences in the various IM service providers’ display text and icons, contact your wireless service providerBefore using IMTo access an IM service you need to save the settings for that service. You may receive the settings from the network operator or service provider that offers the service. See "Smart messages" on page 56. You can also key in the settings manually. See "IM servers" on page 96. Connect to an IM server1Go to Menu > IM to connect to an IM server. You can change the default IM server. See "IM servers" on page 96. 2Once the connection has been established, key in your user ID and password and press the joystick, or press Cancel to stay offline. When you are offline, your phone is not connected to the IM server and you cannot send or receive messages. To log in later, select Options > Login.3To log out, select Options > Logout.Note: You obtain the user ID and password from your service provider.Modify your IM settingsSelect Options > Settings > IM settings from the main IM menu screen.•Use screen name—Select Yes to key in a nickname (max. 10 characters).•IM presence—To prevent others from seeing if you are online, select Not active.•Reload user status—To choose how to update information about whether your IM contacts are online or offline. Select Automatically or Manually. When you select Automatically, you must then select the contacts on which you want Note: Check the availability of IM services, pricing, and tariffs with your network operator and/or service provider. Service providers will also give you instructions on how to use their services.
Nokia 6620 User Guide Copyright © 2004 NokiaExtrasto receive automatic status updates.•Block invitations—To block all IM invitations sent to you, select Yes. IM invitations are sent by IM users who want you to join their IM groups.•Message speed—Select the speed at which new messages are displayed.•Login type—To choose whether to log in to a IM server automatically or by entering your user ID and password manually each time you start IM.Join and leaving an IM groupGo to the IM groups view. A list of IM groups that you have saved or are currently joined to is shown. The icon next to a group indicates whether it is:•A group that you have saved and are currently joined to.•A group that you have saved but are not currently joined to.•A group that you are currently joined to but have not saved.Options in the IM groups view: Open, Join group, Create new group, Leave IM group, IM group, Search, Settings, Help, and Exit.To join an IM group: Scroll to a group on the list and press the joystick. To join an IM group not on the list but for which you know the group ID, select Options > Join group. Key in the group ID and press the joystick.To leave the IM group: Select Options > Leave IM group.You can scroll to a group, press Options > IM group and then select: Save as favorite, Remove group, View members to see who are currently joined to the group, IM group info to see the group ID, topic, members, editing rights in the group, and whether sending private messages is allowed in the group, and IM group settings to view and edit the IM group’s settings. See "Edit IM group settings" on page 96. Search for IM groups and usersGo to the IM groups view and select Options > Search > Groups or Users.•You can search for Groups by Group name, Topic, and Members (user ID). For groups that you have found you can select Join and Save group. •You can search for Users by User’s name, User ID, Phone number, and E-mail address. For users that you have found, you can select Add to IM contacts to save the contact, and Add to blocked list to block (or unblock) messages from the contact.When the search result is displayed, you can select Options > New search, More results from the same search, and Previous results to see your previous search result.
94 Copyright © 2004 NokiaChat in an IM groupOnce you have joined an IM group, you can view the messages that are exchanged in the group, and send your own messages.Options while in an IM group chat: Send, Send invitation, Send private message, Reply, Leave IM group, IM group, Record convers./Stop recording, Help, and Exit.•To send a message, write the message and press the joystick.•To send a private message to a member (if allowed in the group), select Options > Send private message, select the recipient, write the message, and press the joystick. •To reply to a private message sent to you, select Options > Reply.To invite IM contacts who are online to join the IM group (if allowed in the group), select Options > Send invitation, select the contacts you want to invite, write the invitation message, and press the joystick.RECORD MESSAGESTo record the messages that are exchanged in an IM group or during an individual conversation, select Options > Record convers.. Key in the name for the message file and press the joystick. To stop recording, select Options > Stop recording.The recorded message files are saved to Notes. See "Notes" on page 88. BLOCK MESSAGESTo prevent receiving messages from certain IM users, select Options > Blocking options and then select:•Add to blocked list—To block messages from the currently selected user.•Add ID to list manually—Key in the user ID of the user and press the joystick.•View blocked list—To see the users whose messages are blocked.•Unblock—Select the user that you want to remove from the blocked list and press the joystick.Start and view individual conversationsGo to the Conversations view for a list of the IM users with whom you have an ongoing conversation.Options in the Conversations view: Open, Add to IM contacts, New conversation, IM group, Blocking options, End conversation, Settings, Help, and Exit.To start a new conversation, select Options > New conversation and then select:•Select recipient—To see a list of your saved IM contacts that are currently online. Scroll to the contact and press the joystick.
Nokia 6620 User Guide Copyright © 2004 NokiaExtras•Enter user ID—Key in the user ID and press the joystick. The user ID is provided by the service provider to those who register to the service.Options while having a conversation: Send, Add to IM contacts, Record convers./Stop recording, Blocking options, End conversation, Settings, Help, and ExitTo view an ongoing conversation, scroll to the user and press the joystick. To continue the conversation, write your message and press the joystick. To return to the conversations list without closing the conversation, press Back.To close the conversation, select Options > End conversation.Icon:  next to a user indicates that you have received a new message from that user.Note: Ongoing conversations are automatically closed when you exit IM.To save a user to your IM contacts, scroll to the user and select Options > Add to IM contacts.To send automatic replies to incoming messages, select Options > Set auto reply on. Key in the text and press Done. You can view received messages normally.IM contactsGo to the IM contacts view to see a list of your saved IM contacts.   is shown next to contacts that are currently online, and   for contacts that are offline.Options in the IM contacts view: Open, View conversation, Switch tracking on, Belongs to groups, New IM contact, Edit, Delete, Reload user status, Blocking options, Search, Settings, Help, and Exit.To create a new contact, select Options > New IM contact. Fill in the Nickname, Name, and User ID fields and press Done.You can scroll to a contact and press the joystick to view contact details. Press Options and select:•Edit—To edit the contact’s details.•View conversation—To start a new conversation or continue an ongoing conversation with the contact.•Switch tracking on—To be notified every time the IM contact goes online or offline. •Belongs to groups—To see which groups the IM contact has joined.•Reload user status—To update information about whether the contact is online or offline. This option is not available if you have set the Reload user status to Automatically in IM settings.
96 Copyright © 2004 NokiaEdit IM group settingsYou can edit the settings for an IM group if you have created the group or if the creator of the group has given you editing rights. Go to the IM groups view, scroll to the desired group and select Options > IM group > IM group settings. CREATE A NEW IM GROUPGo to the IM groups view and select Options > Create new group. Key in the settings for the group:•Group name, Group topic, and a Welcome note that the participants see when they join the group.•Group ID is created automatically and cannot be changed.•Group size is the maximum number of members allowed to join the group.•Allow search defines whether others can find the IM group by searching.•Editing rights designates which contacts have permission to invite other contacts to join the group. Select the IM group members to whom you want to give editing rights.•Group members - See "Restrict access to an IM group" on page 96. •Allow private msgs. - To allow or prevent private messaging between members.RESTRICT ACCESS TO AN IM GROUPYou can make an IM group closed by creating a Group members list. Only the users on the list are allowed to join the group. Go to the IM groups view, scroll to the group and select Options > IM group > IM group settings > Group members > Selected only.•To add a user to the list, select Add and IM contact or Enter user ID.•To remove a user from the list, scroll to the user and select Remove.•To clear the list and allow all IM users to join the group again, select Remove all. IM serversSelect Options > Settings > Server settings. You may receive the settings as a smart message from the service provider that offers the IM service.•To change the IM server you wish to connect to, select Server in use.•To add a new server to your list of IM servers, select IM servers > Options > Create new server. Key in or select the settings: Server name and Access point in use to connect to the server, URL address of the IM server, your User ID, and login Password. See "Connection" on page 68.
Nokia 6620 User Guide Copyright © 2004 NokiaExtrasNote: You obtain the user ID and password from your service provider when you register to the service. If you do not know your user ID or password, contact your service provider. • MEMORY CARDSelect Menu > Extras > Memory.Options in the memory card: Backup phone mem., Restore from card, Format mem. card, Memory card name, Set password / Change password / Remove password, Memory details, Help, and Exit.If you have a memory card, you can use it to backup information from phone memory and to store your multimedia files such as video clips, sound files, photos, messaging data, etc.Only use MMC cards with this device. Other memory cards, such as Secure Digital (SD) cards, do not fit in the MMC card slot and are not compatible with this device. Attempts to use a non-compatible memory card may damage the memory card as well as the phone, and data stored on the non-compatible card may be corrupted.For details on inserting a memory card into the phone, see “Insert the memory card” on page 10. Details on how you can use the memory card with other features and applications of your phone are given in the sections describing these features and applications.The memory card in the sales package may contain promotional material of third parties, which you can delete.Important: Keep all memory cards out of the reach of small children. Format memory cardImportant: When a memory card is formatted, all data on the card is permanently lost.Some memory cards are supplied pre-formatted and others require formatting. Consult your retailer to find out if you must format the memory card before you can use it.Select Options > Format mem. card., and select Yes to confirm.When formatting is complete, key in a name for the memory card (max. 11 letters or numbers).
98 Copyright © 2004 NokiaBack up and restoring informationTo back up information from phone memory to the memory card, select Options > Backup phone mem..To restore information from the memory card to phone memory, select Options > Restore from card.Note: You can only backup the phone memory and restore it to the same model of phone.Lock the memory cardYou can set a password to lock your memory card against unauthorized use. Select Options > Set password.You will be asked to enter and confirm your password. The password can be up to eight characters long.Note: The password is stored in your phone and you don’t have to enter it again while you are using the memory card on the same phone. If you want to use the memory card on another phone, you will be asked for the password.Unlock a memory cardIf you insert another password protected memory card in your phone, you will be prompted to enter the password of the card. To unlock the card, select Options > Unlock memory card.Note: Once the password is removed, the memory card is unlocked and can be used on another phone without a password.Check memory consumptionYou can check the memory consumption of different data groups and the available memory for installing new applications or software on your memory card. Select Options > Memory details.
Nokia 6620 User Guide Copyright © 2004 NokiaWeb Browser and Applications11 Web Browser and Applications • WEB (MOBILE BROWSER)Select Menu > Web or press and hold the 0 key in the standby mode.Various service providers maintain pages specifically designed for mobile phones, offering services that can be, for example, news, weather reports, banking, travel information, entertainment, and games. With the mobile browser you can view these services as WAP pages written in WML, XHTML pages written in XHTML, or a mixture of both.Note: Check the availability of services, pricing, and tariffs with your network operator and/or service provider. Service providers will also give you instructions on how to use their services.Basic steps for accessing•Save the settings that are needed to access the browser service that you want to use. See "Set up the phone for the browser service" on page 99. •Make a connection to the service. See "Make a connection" on page 100. •Start browsing the web pages. See "Browse" on page 101. •End the connection to the service. See "End a connection" on page 104. Set up the phone for the browser serviceRECEIVE SETTINGS IN A SMART MESSAGEYou may receive service settings in a special text message, a so-called smart message, from the network operator or service provider that offers the service. See "Smart messages" on page 56. For more information, contact your network operator or service provider.KEY IN THE SETTINGS MANUALLYFollow the instructions given to you by your service provider.1Select Settings > Connection settings > Access points and define the settings for an access point. See "Connection" on page 68.
100 Copyright © 2004 Nokia2Select Web > Options > Add bookmark. Write a name for the bookmark and the address of the browser page defined for the current access point.Make a connectionOnce you have stored all the required connection settings, you can access browser pages.There are three different ways to access browser pages:•Select the homepage ( ) of your service provider.•Select a bookmark from the Bookmarks view.•Press the keys 2–9 to start to write the address of a browser service. The ’Go to’ field at the bottom of the display is immediately activated and you can continue writing the address there.After you have selected a page or written the address, press the joystick to start downloading the page.View bookmarksNote: Your phone may have some pre-installed bookmarks for sites not affiliated with Nokia. Nokia does not warrant or endorse these sites. If you choose to access them, you should take the same precautions for security or content, as you would with any site.In the Bookmarks view, you can see bookmarks pointing to different kinds of browser pages. Bookmarks are indicated by the following icons:The starting page defined for the browser access point. If you use another browser access point for browsing, the starting page is changed accordingly.The last visited page. When the phone is disconnected from the service, the address of the last visited page is kept in memory until a new page is visited during the next connection.When you scroll through bookmarks, you can see the address of the highlighted bookmark in the ’Go to’ field at the bottom of the display.A bookmark showing the title.An adaptive bookmark. See "Bookmarks added automatically" on page 101.
Nokia 6620 User Guide Copyright © 2004 NokiaWeb Browser and ApplicationsOptions in the Bookmarks view (when a bookmark or folder is selected): Open, Download, Back to page, Send, Go to web address / Find bookmark, Add bookmark, Edit, Delete, Read service msgs., Disconnect, Move to folder, New folder, Mark/Unmark, Rename, Clear cache, Details, Add to ’Go to’, Settings, Help, and Exit.ADD BOOKMARKS MANUALLY1In the Bookmarks view, select Options > Add bookmark.2Start to fill in the fields. Only the address must be defined. The default access point is assigned to the bookmark if no other one is selected. Press the * key to enter special characters such as /, ., :, and @. Press the Clear key to clear characters.3Select Options > Save to save the bookmark.BOOKMARKS ADDED AUTOMATICALLYWhen you visit a web page, your browser automatically saves a bookmark in the Adaptive Bookmarks folder ( ), which is located in the list of bookmarks when you open the Web application. Adaptive bookmarks can be renamed and deleted, but they cannot be moved. To modify adaptive bookmarks settings, select Options > Preferences > Adaptive Bookmarks, and select On, Hide Folder, or Off.BrowseOn a browser page, new links appear underlined in blue and previously visited links in purple. Images that act as links have a blue border around them.Options when browsing: Open, Service options, Bookmarks, History, Go to web address, View image, Read service msgs., Save as bookmark, Send bookmark, Reload, Disconnect, Normal display/Vertical display, Show images, Clear cache, Save page, Find, Details, Settings, Help, and Exit.KEYS AND COMMANDS USED IN BROWSING•To open a link, press the joystick.•To scroll the view, use the joystick.•To enter letters and numbers in a field, press the 0–9 keys. Press the * key to enter special characters such as /, ., :, and @. Press the Clear key to clear characters.•To go to the previous page while browsing, press Back. If Back is not available, select Options > History to view a chronological list of the pages you have visited during a browsing session. The history list is cleared each time a session is closed.
102 Copyright © 2004 Nokia•To check boxes and make selections, press the joystick.•To retrieve the latest content from the server, select Options > Reload.•To open a sublist of commands or actions for the currently open browser page, select Options > Service options.•Press and hold the End key to disconnect from a browser service and to quit browsing.SAVE BOOKMARKS•To save a bookmark while browsing, select Options > Save as bookmark.•To save a bookmark received in a smart message, open the message in the Inbox in Messaging and select Options > Save to bookmarks. See "Smart messages" on page 56. VIEW SAVED PAGESOptions in the Saved pages view: Open, Back to page, Reload, Delete, Read service msgs., Disconnect, Move to folder, New folder, Mark/Unmark, Rename, Clear cache, Details, Add to ’Go to’, Settings, Help, and Exit.If you regularly browse pages containing information which doesn’t change very often, you can save and then browse them when offline.To save a page, while browsing select Options > Save page. Saved pages are indicated by the   icon. In the saved pages view you can also create folders to store your saved browser pages.Folders containing saved browser pages are indicated by the   icon. To open the Saved pages view, scroll right in the Bookmarks view. In the Saved pages view, press the joystick to open a saved page. To start a connection to the browser service and to retrieve the page again, select Options > Reload.Note: The phone stays online after you reload the page.DownloadYou can download items such as ringing tones, images, operator logos, software, and video clips through the mobile browser. These items can be provided free or you can purchase them.
Nokia 6620 User Guide Copyright © 2004 NokiaWeb Browser and ApplicationsOnce downloaded, items are handled by the respective applications on your phone (for example, a downloaded photo will be saved in the Gallery).Note: Only install software from sources that offer adequate protection against harmful software.CLEAR THE CACHEThe information or services you have accessed are stored in the cache memory of the phone. A cache is a buffer memory that is used to store data temporarily. If you have tried to access or have accessed confidential information requiring passwords (for example, your bank account), empty the cache after each use. The information or services you have accessed are stored in the cache. To empty the cache, select Options > Clear cache.PURCHASE AN ITEMTo download the item:1Scroll to the link and select Options > Open.2Choose the appropriate option to purchase the item, for example, Buy.Carefully read all the information provided.If the online content is compatible, you can use your wallet information to make the purchase:1Select Open wallet. You will be prompted for your wallet code. See "Enter the wallet code" on page 83. 2Select the appropriate card category from your wallet.3Select Fill in. This will upload the selected wallet information.If the wallet does not contain all information necessary for the purchase, you will be requested to enter the remaining details manually.Note: Copyright protections may prevent some images, ringing tones, and other content from being copied, modified, transferred, or forwarded.
104 Copyright © 2004 NokiaCHECK AN ITEM BEFORE DOWNLOADINGYou can see details about an item before you download it. Details about an item may include the price, a brief description, and size. 1Scroll to the link and select Options > Open. Details about the item are displayed on your phone.2If you want to continue with the downloading, press Accept, or if you want to cancel the download, press Cancel.End a connectionSelect Options > Disconnect, or press and hold the End key to quit browsing and to return to the standby mode.Note: If you have accessed confidential information during browsing, you should clear the cache. See "Clear the cache" on page 103. Browser settingsSelect Options > Settings, and then select one of the following options:•Default access point—If you want to change the default access point, press the joystick to open a list of available access points. The current default access point is highlighted. See "Connection" on page 68. •Show images—Choose if you want to view pictures when you are browsing. If you choose No, you can later load images during browsing by selecting Options > Show images.•Text wrapping—Choose Off if you don’t want the text in a paragraph to automatically wrap, or On if you do. If text is not wrapped, the ends of lines may be truncated.•Font size—You can choose five text sizes in the browser: Smallest, Small, Normal, Large, and Largest.•Default encoding—To make sure your browser pages display text characters correctly, select one of the following: ISO8859-1 for Western European languages, ISO8859-2 for Central European languages, ISO8859-4 for Baltic languages, ISO8859-5 for Cyrillic-based languages, ISO8859-7 for Greek language, ISO8859-9 for Turkish language.•Adaptive bookmarks–You can select On, Hide Folder, or Off. When you select Hide Folder, bookmarks are still added automatically to the Adaptive Bookmarks folder. See "Bookmarks added automatically" on page 101.
Nokia 6620 User Guide Copyright © 2004 NokiaWeb Browser and Applications•Full screen–Select Normal, Softkeys only, or Full screen.•Cookies—Allow /Reject. You can enable or disable the receiving and sending of cookies (a means of content providers to identify users and their preferences for frequently used content).•Security notifications—Choose to Hide or Show security notifications.•Sent DTMF—Always / First sending only. Choose whether you want to confirm before the phone sends DTMF tones during a voice call. For example, you can make a voice call while you are viewing a browser page, send DTMF tones while a voice call is in progress, and save in Contacts a name and phone number from a browser page. See "Options during a call" on page 23. •Wallet—Choose On if you want the wallet to open automatically when a compatible browser page is opened. •CONFIGURATION MANAGERThe configuration manager service helps you easily configure your phone connection settings. Configuration manager directs you to a WAP site where you select the type of connection settings you want to request (WAP, MMS, E-mail, or Internet). You enter information that the site needs to process your request, for example, your country, network (i.e., service provider), phone model (Nokia 6620), etc. Your request is then processed, and the settings are sent to you in a smart message. When you open the message, your settings are automatically configured in your phone. You must then select Options > Save settings.For more information on configuring settings in your phone, see “Connection” on page 68 and “Set up the phone for the browser service” on page 99.Note: There is no charge for using the configuration manager service, but the normal WAP connection and SMS charges do apply. Contact your service provider for details.To use the configuration manager service:1Select Menu > Configs.The Configurations window is displayed.2Read through the Configuration info message, and select OK to continue.The Help screen is displayed.
106 Copyright © 2004 NokiaNote: Selecting OK in the Configuration info message means that you acknowledge that you will not be charged for using the configuration manager service itself but that you will be charged for the WAP connection and also the incoming smart message in some cases. If you are unsure about how you are charged for these services, select Cancel on the Configuration info screen, and contact your service provider for details before proceeding any further.3Read through the Help screen, and select OK. If your phone requests permission to make a connection to the server, select Yes.Your phone establishes a WAP connection to the Nokia OTA tool site.4Scroll down and highlight the configuration settings you want to request (WAP, MMS, E-mail, or Internet), and press the joystick.5Follow the screen prompts to enter all information that is necessary for the configuration manager service to identify the settings you need. Scroll to the different fields and buttons, and press the joystick to select screen items. The items you are prompted to define depend on whether you are requesting settings for WAP, MMS, E-mail, or Internet. The last screen prompts you to enter your mobile phone number so that the service knows where to send your settings message.6When you receive the settings message, simply open the message, and the settings will be automatically configured in your phone. • APPLICATION MANAGERSelect Menu > Tools > App. MngrIn Application manager you can install new Symbian operating system applications (SIS files) and Java™ applications (Java MIDlets and MIDlet suites). You can also update and uninstall applications from the phone and monitor the installation history.Applications in Application manager use shared memory. See "Shared memory" on page 3. Options in the Application manager main view: Install, View details, View certificate, Update, Go to web address, Remove, View log, Send log, Settings, App. downloads, Help, and Exit.
Nokia 6620 User Guide Copyright © 2004 NokiaWeb Browser and ApplicationsWhen you open Application manager, you can see a list of:•Applications saved in Application manager.•Partially installed applications (indicated by ).•Fully installed applications that you can remove (indicated by  ).Note: Your phone supports J2ME™Java applications. Do not download PersonalJava™ applications to your phone; they cannot be installed.Install applications—general informationYou can install applications that are specifically intended for this phone and suitable for the Symbian operating system.Note: If you install an application that is not intended specifically for this phone, it may function and look different from what was originally intended.Applications may be downloaded to your phone during browsing, received as attachments in multimedia messages or e-mails, or received by Bluetooth connection or by infrared from another device, for example a phone or a compatible PC. If you are using PC Suite to transfer the application, place it in the Installs folder in the File manager.Important: Only install applications from sources that offer adequate protection against viruses and other harmful software.To increase protection, the application installation system uses digital signatures and certificates for applications. Do not install the application if Application manager gives a security warning during installation.Important: If you install an application that contains an update or repair to an existing application, you can only restore the original application if you have the original application or a full backup copy of the removed application. To restore the original application, first remove the updated or repaired application and then install again from the original application or the backup copy.Note: You can only use Symbian operating system applications with a .SIS extension.
108 Copyright © 2004 NokiaDuring installation, the phone checks the integrity of the application to be installed. The phone shows information about the checks being carried out, and you are given options on whether to continue or cancel the installation. Once the phone has checked the integrity of the application, it is installed on your phone.INSTALL APPLICATIONSOpen Application manager, scroll to the application, and select Options > Install to start the installation. You can also search the phone memory or the memory card, select the application, and press the joystick to start the installation.Some applications may give the option of partial installation, allowing you to select the particular components of an application that you want to install.If you are installing an application without a digital signature or a certificate, the phone warns you of the risks. Continue installation only if you are absolutely sure of the origin and contents of the application.INSTALL JAVA™ APPLICATIONSThe .JAR file is required for installation. If it is missing, the phone may ask you to download it. If there is no access point defined for Application manager, you will be asked to select one. When you are downloading the .JAR file, you may need to enter a user name and password to access the server. You obtain these from the supplier or manufacturer of the application.•To start a data connection and to view extra information about the application, scroll to it and select Options > Go to web address.•To start a data connection and check if there is an update available for the application, scroll to it and select Options > Update.JAVA SETTINGSTo change the default access point that a Java application uses for downloading extra data, select Options > Settings > Access point. See "Access points" on page 68. To change the security settings that determine the actions that a Java application is permitted to do, select Options > Settings.Note: Not all Java applications permit you to change the security settings.Remove an application1Scroll to the application and select Options > Remove.2Press Yes to confirm the removal.
Nokia 6620 User Guide Copyright © 2004 NokiaWeb Browser and ApplicationsImportant: If you remove an application, you can only re-install it if you have the original application or a full backup of the removed application. If you remove an application, you may no longer be able to open documents created with that application. If another application depends on the application that you removed, the other application may stop working. Refer to the documentation of the installed application for details.
110 Copyright © 2004 Nokia12 Connectivity • BLUETOOTH CONNECTIONSelect Menu > Connect. > BluetoothNote: There may be restrictions on using Bluetooth devices in some locations. Check with your local authorities or service provider.Note: This phone is designed to be compliant with and to adopt Bluetooth Specification 1.1. However, interoperability between the phone and other products with Bluetooth wireless technology depends also on the profiles and protocols used. For more information on the compatibility between Bluetooth devices, please consult your dealer.Bluetooth technology enables cost-free wireless connections between electronic devices within a maximum range of 10 metres. A Bluetooth connection can be used to send images, videos, texts, business cards, calendar notes, or to connect wirelessly to devices using Bluetooth technology, such as computers.Since devices using Bluetooth technology communicate using radio waves, your phone and the other devices do not need to be in direct line-of-sight. The two devices only need to be within a maximum of 10 metres of each other, although the connection can be subject to interference from obstructions such as walls or from other electronic devices. Using Bluetooth technology consumes the battery and the phone’s operating time will be reduced. Take this into account when performing other operations with your phone. There may be restrictions on using devices using Bluetooth technology. Check with your local authorities.When you activate a Bluetooth connection for the first time, you are asked to give a name to your phone.
Nokia 6620 User Guide Copyright © 2004 NokiaConnectivityBluetooth connection settings•Bluetooth—Select On if you want to use a Bluetooth connection. If you select Off, all active Bluetooth connections are ended, and Bluetooth connection cannot be used for sending or receiving data.•My phone’s visibility—If you select Shown to all, your phone can be found by other devices during device search. If you select Hidden, your phone cannot be found by other devices. •My phone’s name—Define a name for your phone. Note: After you have set your Bluetooth connection to be active and changed My phone's visibility to All, your phone and this name can be seen by other devices.Send data by Bluetooth connectionNote: Your phone can only have one active Bluetooth connection at a time.1Open an application where the item you wish to send is stored. For example, to send a photo to another device, open the Gallery application. 2Scroll to the item you want to send, and select Options > Send > Via Bluetooth.The phone starts to search for devices within range. Devices using Bluetooth technology that are within range start to appear on the display one by one. You can see a device icon, the device name, the device type, or a short name. Paired devices are shown with  . A paired device is one where a Bluetooth connection already exists between your phone and the other device.To interrupt the search, press Stop. The device list freezes and you can start to form a connection to one of the devices already found.Note: When searching for devices, some devices may show only the unique device addresses. To find out the unique address of your phone, enter the code *#2820# in the standby mode.
112 Copyright © 2004 NokiaNote: If you have searched for devices earlier, a list of the devices that were found previously is shown first. To start a new search, select More devices. If you switch off the phone, the list of devices is cleared and the device search needs to be started again before sending data.3Scroll to the device with which you want to connect and press Select. The item you are sending is copied to Outbox and the note Connecting is shown.4Pairing (if not required by the other device, go to step 5.)•If the other device requires pairing before data can be transmitted, a tone sounds and you are asked to enter a passcode.•Create your own passcode (1-16 characters long, numeric) and agree with the owner of the other device to use the same code. This passcode is used only once and you do not have to memorize it.•After pairing, the device is saved to the Paired devices view.Note: Pairing means authentication. The users of the devices using Bluetooth technology should agree together what the passcode is, and use the same passcode for both devices in order to pair them. Devices that do not have a user interface have a preset passcode. See "Paired devices view" on page 113. 5When the connection has been successfully established, the note Sending data is shown.Data received by Bluetooth connection can be found in the Inbox folder in Messaging. See "Inbox—receiving messages" on page 55. Icons for different devices: —Computer—Phone—Audio/video—Bluetooth deviceNote: If sending fails, the message or data will be deleted. The Drafts folder in Messaging does not store messages sent by Bluetooth connection.Check the status of the Bluetooth connectionWhen   is shown in the standby mode, Bluetooth connection is active.When   is blinking, your phone is trying to connect to the other device.When   is shown continuously, the Bluetooth connection is active.
Nokia 6620 User Guide Copyright © 2004 NokiaConnectivityPaired devices viewPairing with a device makes device searches easier and quicker. Paired devices are easier to recognize; they are indicated by   in the search result list. In the Bluetooth connection main view, scroll right to open a list of paired devices ( ).•To pair with a device: Select Options > New paired device. The phone starts a device search. Scroll to the device with which you want to pair and press Select. After you exchange passcodes, the device is added to the Paired devices list.•To cancel pairing: Scroll to the device whose pairing you want to cancel and press the Clear key or select Options > Delete. If you want to cancel all pairings, select Options > Delete all.Note: If you are currently connected to a device and you delete the pairing with that device, the pairing is removed and the device connection is terminated, but the Bluetooth connection remains active.•To set a device to be authorized or unauthorized: Scroll to the device, select Options, and then select one of the following:•Set as authorized—Connections between your phone and this device can be made without your knowledge. No separate acceptance or authorization is needed. Use this status for your own devices, for example, your PC, or devices that belong to someone you trust. The icon   is added next to authorized devices in the Paired devices view.•Set as unauthorized—Connection requests from this device need to be accepted separately every time.Receive data by Bluetooth connectionWhen you receive data by Bluetooth connection, a tone is played, and you are asked if you want to accept the message. If you accept, the item is placed in the Inbox folder in Messaging. Messages received by Bluetooth connection are indicated by  . See "Inbox—receiving messages" on page 55. Close the Bluetooth connectionA Bluetooth connection is disconnected automatically after sending or receiving data. • INFRARED CONNECTIONSelect Menu > Connect. > Infrared
114 Copyright © 2004 NokiaBy infrared, you can send or receive data such as business cards and calendar notes to and from a compatible phone or data device.Do not point the IR (infrared) beam at anyone’s eye or allow it to interfere with other IR devices. This device is a Class 1 laser product.Note: Making or answering phone calls during a computer connection is not recommended because it might disrupt the operation.Send and receive data by infraredAll items that are received by infrared are placed in the Inbox folder in Messaging. New infrared messages are indicated by  . See "Inbox—receiving messages" on page 55. 1Make sure that the infrared ports of the sending and receiving devices are pointing at each other and that there are no obstructions between the devices. The preferable distance between the two devices is one meter at most. To find the infrared port, see “Nokia 6620 phone at a glance” on page v.2The user of the receiving device activates the infrared port. To activate your phone infrared port to receive data, select Menu > Connect. > Infrared and press the joystick.3The user of the sending device selects the desired infrared function to start data transfer.To send data by infrared, select Options > Send > Infrared in an application.If data transfer is not started within one minute after the activation of the infrared port, the connection is cancelled and must be started again.Note: When using Windows 2000 and you want to use infrared to transfer files between your phone and a compatible computer, select Control Panel and select Wireless Link. In the Wireless Link File Transfer tab, check the box for “Allow others to send files to your computer using infrared.”Check the status of the infrared connectionWhen   blinks, your phone is trying to connect to the other device or a connection has been lost.When   is shown continuously, the infrared connection is active and your phone is ready to send and receive data by its infrared port.
Nokia 6620 User Guide Copyright © 2004 NokiaConnectivity • USB CONNECTIONIf you use the DKU-2 data cable, connect the cable to the USB port on your computer and to the connector on your phone. Start using the data communications application on the computer.Note: Making or answering phone calls during a computer connection is not recommended because it might disrupt the operation. • CONNECTION MANAGERSelect Menu > Connect. > Connection managerIn Connection manager you can identify the status of multiple data connections, view details on the amount of data sent and received, for example, and end unused connections. When you open Connection manager, you can see a list of:•Open data connections:• Data call• GPRS•The status of each connection.•Amount of data uploaded and downloaded for each connection (GPRS connections only).•The duration of each connection (GSM and high-speed data connections only).Note: The actual time invoiced for calls by your service provider may vary, depending upon network features, rounding-off for billing, and so forth.Options in the Connection manager main view when there are one or more connections: Details, Disconnect, Disconnect all, Help, and Exit.View connection detailsTo view the details of a connection, scroll to a connection and select Options > Details. The following information is displayed:•Name—The name of the Internet access point (IAP) in use, or ’Modem connection’ if the connection is a dial-up connection.Note: You can view details of data connections only. Voice calls are not listed.
116 Copyright © 2004 Nokia•Bearer—The type of data connection: Data call, High sp. GSM, or GPRS.•Status—The current status of the connection.•Received—The amount of data, in bytes, received to the phone.•Sent—The amount of data, in bytes, sent from the phone.•Duration—The length of time that the connection has been open.•Speed—The current speed of both sending and receiving data in kB/s (kilobytes per second).•Dial-up (GSM)—The dial-up number used, or Name (GPRS)—access point name used.•Shared (not displayed if the connection is not shared)—The number of applications using the same connection. End connectionsScroll to a connection and select Options > Disconnect to end that connection only, or select Options > Disconnect all to close all currently open connections. • CONNECT YOUR PHONE TO A COMPATIBLE COMPUTERFor further information on how to make a connection to a compatible computer by infrared, USB, or Bluetooth connection, and how to install PC Suite, see the Installation Guide for PC Suite on the CD-ROM in the ‘Install’ section. For further information on how to use PC Suite, see the help function on PC suite.Use the CD-ROMThe CD-ROM should launch itself after you have inserted it into the CD-ROM drive of your compatible PC. If not, proceed as follows:1Click the Window Start button and select Programs > Windows Explorer.2On the CD-ROM drive, locate a file called setup.exe and double-click it. The CD-ROM interface opens.3You can find PC Suite in the ‘Install’ section. Double-click ‘PC Suite for Nokia 6620’. The installation wizard will guide you through the installation process.Use your phone as a modemUse your phone as a modem to connect to the Internet with a compatible PC, or to send and receive faxes. Select Menu > Connect. > Modem.
Nokia 6620 User Guide Copyright © 2004 NokiaConnectivityDetailed instructions can be found in Quick Guide for Modem Options for Nokia 6620 on the CD-ROM supplied with the phone. • SYNC—REMOTE SYNCHRONIZATIONSelect Menu > Sync.The Sync application enables you to synchronize your calendar or contacts with various calendar and address book applications on a compatible computer or on the Internet. Synchronization takes place over a GSM data call or packet data connection.The synchronization application uses SyncML technology for synchronization. For information on SyncML compatibility, please contact the supplier of the calendar or address book application with which you want to synchronize your phone data.Create a new synchronization profileOptions in the Sync main view: Synchronize, New sync profile, Edit sync profile, Delete, View log, Help, and Exit.1If no profiles have been defined, the phone asks you if you want to create a new profile. Select Yes. To create a new profile in addition to existing ones, select Options > New sync profile. Choose whether you want to use the default setting values or copy the values from an existing profile to be used as the basis for the new profile.2Define the following:Sync profile name—Write a descriptive name for the profile.Access point—Select the access point you want to use for the data connection.Host address—Contact your service provider or system administrator for the correct values.Port—Contact your service provider or system administrator for the correct values.User name—Your user ID for the synchronization server. Contact your service provider or system administrator for your correct ID.Password—Write your password. Contact your service provider or system
118 Copyright © 2004 Nokiaadministrator for the correct value.3Scroll right to select:Calendar—Select Yes if you want to synchronize your calendar.Remote calendar—Enter a correct path to the remote calendar on the server. Must be defined if the previous setting Calendar has been set to Yes.Contacts—Select Yes if you want to synchronize your contacts.Remote contacts—Enter a correct path to the remote address book on the server. It must be defined if the previous setting Contacts has been set to Yes.4Press Done to save the settings. Synchronize dataIn the Sync main view, you can see the different profiles, and what kind of data will be synchronized: Calendar, Contacts, or both.1In the main view, scroll to a profile and select Options > Synchronize. The status of the synchronization is shown at the bottom of the screen.To cancel synchronization before it is finished, press Cancel.You are notified when the synchronization has been completed.2After synchronization is complete, press View log, or select Options > View log to open a log file showing the synchronization status (Complete or Incomplete) and how many calendar or contact entries have been added, updated, deleted, or discarded (not synchronized) in the phone or on the server.
Nokia 6620 User Guide Copyright © 2004 NokiaTroubleshooting13 Troubleshooting • SIM CARDA SIM (Subscriber Identity Module) card is required for your Nokia GSM phone to operate. The SIM card is supplied by your service provider and has your mobile phone number and all subscriber account information programmed on it. You can save contact information from your Contacts list on the SIM card so that when you use the SIM card in another GSM phone or terminal, your phone number and contacts will be available to you on the SIM card rather than stored in phone memory.The SIM card in the Nokia 6620 phone is located under the battery in the top left corner. The SIM card must be inserted under the hood and the gold contacts on the card must make direct contact with the gold contacts in the card slot. See “Insert the SIM card” on page 9. •MEMORY LOWWhen one of the following notes is shown, the phone memory is low and you must delete some data: Not enough memory to perform operation. Delete some data first. or Memory low. Delete some data. To view what kind of data you have and how much memory the different data groups consume, select Tools > File Mngr > Options > Memory details.You may want to delete the following items regularly to avoid memory getting low:•Messages from the Inbox, Drafts, and Sent folders in Messaging.•Retrieved e-mail messages from the phone memory.•Saved browser pages.•Images, video clips, and sound clips in the Gallery.If you want to delete contact information, calendar notes, call timers, call cost timers, game scores, or any other data, go to the respective application to remove the data.If you are deleting multiple items and one of the following notes is shown again: Not enough memory to perform operation. Delete some data first. or Memory low. Delete some data., try deleting items one by one (starting from the smallest item).
120 Copyright © 2004 NokiaClear calendar memoryTo remove more than one event at a time, go to the Month view and select Options > Delete entry and one of the following:•Before date—To delete all calendar notes which take place before a certain date. Enter the date before which all calendar notes will be deleted.•All entries—To delete all calendar notes.Erase log informationTo erase all the log contents, Recent calls register, and Messaging delivery reports permanently, go to Logs, scroll right, and select Options > Clear log or select Settings > Log duration > No log. • DIFFERENT WAYS TO STORE DATA•Use PC Suite to make a backup copy of all data to your computer. See "Connect your phone to a compatible computer" on page 116. •Send images to your e-mail address and then save the images to your computer.•Send data by infrared or Bluetooth connection to another compatible device.•Store data on a compatible memory card. •Q&APhone displayQ. Why do missing, discolored or bright dots appear on the screen every time I turn on my phone?A. This is a characteristic of this type of display. Some displays may contain pixels or dots that remain on or off. This is normal, not a fault. Camera Q. Why do images look smudgy?A. Check that the camera lens protection window is clean. See "Care and maintenance" on page 128.
Nokia 6620 User Guide Copyright © 2004 NokiaTroubleshootingBluetooth connection Q. Why can’t I end a Bluetooth connection?A. If another device is pairing with your phone but not sending data, and leaves the device connection open, then the only way to disconnect it is to deactivate the Bluetooth link altogether. Select Menu > Connect. > Bluetooth and select the setting Bluetooth > Off.Q. Why can’t I find a device using Bluetooth technology.A. Check that both have activated their Bluetooth connections.Check that the distance between the two devices is not over 10 meters or that there are no walls or other obstructions between the devices.Check that the other device is not in ‘Hidden’ mode.Check that both devices are compatible.Multimedia messaging Q. What should I do when the phone tells me that it cannot receive a multimedia message because memory is full?A. The amount of memory needed is indicated in the error message: Not enough memory to retrieve message. Delete some data first. To view what kind of data you have and how much memory the different data groups consume, select Tools > File Mngr > Options > Memory details. Q. How can I end the data connection when the phone starts a data connection again and again? The notes: Retrieving message or Trying to retrieve message again are shown briefly. What is happening? A. The phone is trying to retrieve a multimedia message from the multimedia messaging center. Check that the settings for multimedia messaging have been defined correctly and that there are no mistakes in phone numbers or addresses. Select Messaging > Options > Settings > Multimedia message.To stop the phone from making a data connection, you have the following options. Select Messaging and select Options > Settings > Multimedia message, and then:Select On receiving msg. > Defer retrieval if you want the multimedia messaging center to save the message to be retrieved later, for example, after you have checked the settings. After this change, the phone still needs to send information notes to the network. When you want to retrieve the message, select Retr. immediately.Select On receiving msg.  > Reject message if you want to reject all incoming
122 Copyright © 2004 Nokiamultimedia messages. After this change, the phone needs to send information notes to the network and the multimedia messaging center will delete all multimedia messages that are waiting to be sent to you.Select Multimedia reception > Off if you want to ignore all incoming multimedia messages. After this change the phone will not make any network connections related to multimedia messaging. MessagingQ. Why can’t I select a contact?A. If you cannot select a contact in the Contacts directory, the contact card does not have a phone number or an e-mail address. Add the missing information to the contact card in the Contacts application.Calendar Q. Why are the week numbers missing?A. If you have changed the Calendar settings so that the week starts on a day other than Monday, then the week numbers will not be shown.Browser services Q. No valid access point defined. Define one in Web settings. A. Insert the proper browser settings. Contact your service provider for instructions.Log Q. Why does the log appear empty?A. You may have activated a filter, and no communication events fitting that filter have been logged. To see all events in Logs, select Options > Filter > All communication.PC connectivityQ. Why do I have problems in connecting the phone to my PC?A. Make sure that PC Suite is installed and running on your PC. See the Installation guide for PC Suite on the CD-ROM in the ’Install’ section. For further information on how to use PC Suite, see the help function of PC suite.Security codesQ. What is my password for the lock code, PIN code, or PUK code?A. The default lock code is 12345. If you forget or lose the lock code, contact your phone dealer.
Nokia 6620 User Guide Copyright © 2004 NokiaTroubleshootingIf you forget or lose a PIN or PUK code or if you have not received such a code, contact your service provider.For information about passwords, contact your access point provider, for example, a commercial Internet service provider (ISP), service provider, or network operator.Application not respondingQ. How do I close an application that is not responding?A. Open the application switching window by pressing and holding the Menu key. Then scroll to the application, and press the Clear key to close the application.
124 Copyright © 2004 Nokia14 Reference information • BATTERY INFORMATIONYour device is powered by a rechargeable battery. The full performance of a new battery is achieved only after two or three complete charge and discharge cycles. The battery can be charged and discharged hundreds of times but it will eventually wear out. When the talk and standby times are noticeably shorter than normal, buy a new battery. Use only Nokia approved batteries, and recharge your battery only with Nokia approved chargers designated for this device.Unplug the charger from the electrical plug and the device when not in use. Do not leave the battery connected to a charger. Overcharging may shorten its lifetime. If left unused, a fully charged battery will lose its charge over time. Temperature extremes can affect the ability of your battery to charge.Use the battery only for its intended purpose. Never use any charger or battery that is damaged.Do not short-circuit the battery. Accidental short-circuiting can occur when a metallic object such as a coin, clip, or pen causes direct connection of the positive (+) and negative (-) terminals of the battery. (These look like metal strips on the battery.) This might happen, for example, when you carry a spare battery in your pocket or purse. Short-circuiting the terminals may damage the battery or the connecting object.Leaving the battery in hot or cold places, such as in a closed car in summer or winter conditions, will reduce the capacity and lifetime of the battery. Always try to keep the battery between 59°F and 77°F (15°C and 25°C). A device with a hot or cold battery may not work temporarily, even when the battery is fully charged. Battery performance is particularly limited in temperatures well below freezing.Do not dispose of batteries in a fire! Dispose of batteries according to local regulations. Please recycle when possible. Do not dispose as household waste. • ENHANCEMENTSA few practical rules about accessories and enhancements:•Keep all accessories and enhancements out of the reach of small children.•When you disconnect the power cord of any accessory or enhancement, grasp and pull the plug, not the cord.•Check regularly that enhancements installed in a vehicle are mounted and are operating properly.
Nokia 6620 User Guide Copyright © 2004 NokiaReference information•Installation of any complex car enhancements must be made by qualified personnel only. • ENHANCEMENTS, BATTERIES, AND CHARGERSCheck the model number of any charger before use with this device. This device is intended for use when supplied with power from ACP-12U or LCH-12.Warning: Use only batteries, chargers, and enhancements approved by Nokia for use with this particular model. The use of any other types may invalidate any approval or warranty, and may be dangerous.For availability of approved enhancements, please check with your dealer. When you disconnect the power cord of any enhancement, grasp and pull the plug, not the cord.Your device and its enhancements may contain small parts. Keep them out of reach of small children.BatteryThe 850 mAh, Li-Ion based BL-5C battery provides power in a thin and light package. It provides a talk time of up to 2–4 hours and up to 150–200 hours standby time. Charging time is 1 hour and 35 minutes.Variation in operation times will occur depending on SIM card, network and usage settings, usage style and environments. Talk time is reduced by 5 percent if Enhanced Full Rate is active, and increased by up to 30 percent if Half Rate is active.
126 Copyright © 2004 NokiaChargersThe Nokia 6620 uses the ACP-12U standard charger and mobile chargers LCH-9 and LCH-12. The LCH-12 mobile charger can be used with 12 Vdc or 24 Vdc. The Nokia 3620 and Nokia 3660 phones are also compatible with the ACP-12U and ACP-8U travel chargers.Other compatible enhancementsHeadset audio•Standard headset (HS-5)•Stereo headset (HDS-3)•Retractable headset (HS-10)•Boom headset (HDB-4)•FM radio headset (HS-2R)•Wireless Headsets (HDW-2 and HS-3W)•Inductive loopset (LPS-4) (See “Inductive Loopset LPA-4” on page 127.)•Phone adapter (HDA-10) (See “Phone Adapter HDA-10” on page 127.)Car•Mobile charger (LCH-12)•Mobile holder (MBC-19)•Wireless Car Kit (CK-1W)•Headrest Handsfree (BHF-3)Data•Connectivity cable (DKU-2)•Memory card 128 MB (DTS-128)Imaging•Nokia Image Viewer (SU-2)•Picture Frame (SU-4)•Nokia Digital Pen (SU-1B)ACP-12U
Nokia 6620 User Guide Copyright © 2004 NokiaReference informationINDUCTIVE LOOPSET LPA-4The LPA-4 Loopset gives people with T-coil equipped hearing aids the ability to make and receive calls without noise interference. The Loopset is easy to use and gives hearing-impaired users clear access to digital telephony. You wear the Loopset around your neck, connect it to your phone, and speak directly toward the microphone. If you are using a Loopset, you must activate it on your mobile phone by selecting Menu > Tools > Settings > Enhancement > Enhancement in use > Loopset. For more information, see “Accessibility solutions” on page 6.PHONE ADAPTER HDA-10The HDA-9 Phone Adapter is a Nokia enhancement that allows you to connect your mobile phone to a Telecommunications Device for the Deaf (TTY/TDD) to make a call in digital mode. If you are using a Phone Adapter, you must activate it on your mobile phone by selecting Menu > Tools > Settings > Enhancement > Enhancement in use > TTY. In addition to the Nokia 6620 phone, you’ll need the following for TTY/TDD communication:•A TTY/TDD device that is “cellular ready” or “cellular compatible”•A cable for connecting the TTY/TDD to your phone, usually supplied by the manufacturer of the TTY/TDD device•The Phone Adapter (HDA-10), which can be purchased separately as an accessory at www.nokia.comFor more information, see “Accessibility solutions” on page 6.Note: The Loopset can be purchased separately as an enhancement. For operating instructions, refer to the booklet that comes with the LPA-4.18 in.
128 Copyright © 2004 Nokia • CARE AND MAINTENANCEYour device is a product of superior design and craftsmanship and should be treated with care. The suggestions below will help you protect your warranty coverage and enjoy your device for many years.•Keep the device dry. Precipitation, humidity, and all types of liquids or moisture can contain minerals that will corrode electronic circuits. If your device does get wet, remove the battery and allow the device to dry completely before replacing it.•Do not use or store the device in dusty, dirty areas. Its moving parts and electronic components can be damaged.•Do not store the device in hot areas. High temperatures can shorten the life of electronic devices, damage batteries, and warp or melt certain plastics.•Do not store the device in cold areas. When the device returns to its normal temperature, moisture can form inside the device and damage electronic circuit boards.•Do not attempt to open the device other than as instructed in this guide.•Do not drop, knock, or shake the device. Rough handling can break internal circuit boards and fine mechanics. •Do not use harsh chemicals, cleaning solvents, or strong detergents to clean the device. •Do not paint the device. Paint can clog the moving parts and prevent proper operation.•Use a soft, clean, dry cloth to clean any lenses (such as camera, proximity sensor, and light sensor lenses).•Use only the supplied or an approved replacement antenna. Unauthorized antennas, modifications, or attachments could damage the device and may violate regulations governing radio devices.All of the above suggestions apply equally to your device, battery, charger, or any enhancement. If any device is not working properly, take it to the nearest authorized service facility for service. • ADDITIONAL SAFETY INFORMATIONOperating environmentRemember to follow any special regulations in force in any area and always switch off your device when its use is prohibited or when it may cause interference or danger. Use the device only in its normal operating positions. To maintain
Nokia 6620 User Guide Copyright © 2004 NokiaReference informationcompliance with radio frequency exposure guidelines only use accessories approved by Nokia for use with this device. When the device is on and being worn on the body, always use an approved carrying case. Parts of the device are magnetic. Metallic materials may be attracted to the device, and persons with a hearing aid should not hold the device to the ear with the hearing aid. Always secure the device in its holder, because metallic materials may be attracted by the earpiece. Do not place credit cards or other magnetic storage media near the device, because information stored on them may be erased.Medical devicesOperation of any radio transmitting equipment, including wireless phones, may interfere with the functionality of inadequately protected medical devices. Consult a physician or the manufacturer of the medical device to determine if they are adequately shielded from external RF energy or if you have any questions. Switch off your phone in health care facilities when any regulations posted in these areas instruct you to do so. Hospitals or health care facilities may be using equipment that could be sensitive to external RF energy.PACEMAKERSPacemaker manufacturers recommend that a minimum separation of 6 in (15.3 cm) be maintained between a wireless phone and a pacemaker to avoid potential interference with the pacemaker. These recommendations are consistent with the independent research by and recommendations of Wireless Technology Research. To minimize the potential for interference, persons with pacemakers should•Always keep the device more than 6 in (15.3 cm) from their pacemaker when the device is switched on•Not carry the device in a breast pocket•Hold the device to the ear opposite the pacemakerIf you have any reason to suspect that interference is taking place, switch off your device immediately.HEARING AIDSome digital wireless devices may interfere with some hearing aids. If interference occurs, consult your service provider.VehiclesRF signals may affect improperly installed or inadequately shielded electronic systems in motor vehicles such as electronic fuel injection systems, electronic antiskid (antilock) braking systems, electronic speed control systems, air bag systems. For more information, check with the manufacturer or its representative of your vehicle or any equipment that has been added.
130 Copyright © 2004 NokiaOnly qualified personnel should service the device, or install the device in a vehicle. Faulty installation or service may be dangerous and may invalidate any warranty that may apply to the device. Check regularly that all wireless device equipment in your vehicle is mounted and operating properly. Do not store or carry flammable liquids, gases, or explosive materials in the same compartment as the device, its parts, or enhancements. For vehicles equipped with an air bag, remember that an air bags inflate with great force. Do not place objects, including installed or portable wireless equipment in the area over the air bag or in the air bag deployment area. If in-vehicle wireless equipment is improperly installed and the air bag inflates, serious injury could result.Potentially explosive environmentsSwitch off your device when in any area with a potentially explosive atmosphere and obey all signs and instructions. Potentially explosive atmospheres include areas where you would normally be advised to turn off your vehicle engine. Sparks in such areas could cause an explosion or fire resulting in bodily injury or even death. Switch off the device at refuelling points such as near gas pumps at service stations. Observe restrictions on the use of radio equipment in fuel depots, storage, and distribution areas, chemical plants or where blasting operations are in progress. Areas with a potentially explosive atmosphere are often but not always clearly marked. They include below deck on boats, chemical transfer or storage facilities, vehicles using liquefied petroleum gas (such as propane or butane), and areas where the air contains chemicals or particles such as grain, dust or metal powders.FCC regulations prohibit using your wireless device while in the air. The use of wireless telephones in an aircraft may be dangerous to the operation of the aircraft, disrupt the wireless telephone network, and may be illegal.Failure to observe these instructions may lead to suspension or denial of telephone services to the offender, legal action, or both. • EMERGENCY CALLSImportant:Wireless phones, including this phone, operate using radio signals, wireless networks, landline networks, and user-programmed functions. Because of this, connections in all conditions cannot be guaranteed. You should never rely solely on any wireless phone for essential communications like medical emergencies.To make an emergency call: 1If the phone is not on, switch it on. Check for adequate signal strength. Some networks may require that a valid SIM card is properly inserted in the phone. 2Press the End key as many times as needed to clear the display and ready the
Nokia 6620 User Guide Copyright © 2004 NokiaReference informationphone for calls. 3Key in the official emergency number for your present location. Emergency numbers vary by location. 4Press the Send key.If certain features are in use, you may first need to turn those features off before you can make an emergency call. Consult this guide or your service provider. When making an emergency call, give all the necessary information as accurately as possible. Your wireless phone may be the only means of communication at the scene of an accident. Do not end the call until given permission to do so. • CERTIFICATION INFORMATION (SAR)THIS MODEL PHONE MEETS THE GOVERNMENT’S REQUIREMENTS FOR EXPOSURE TO RADIO WAVES.Your wireless phone is a radio transmitter and receiver. It is designed and manufactured not to exceed the emission limits for exposure to radio frequency (RF) energy set by the Federal Communications Commission of the U.S. Government. These limits are part of comprehensive guidelines and establish permitted levels of RF energy for the general population. The guidelines are based on standards that were developed by independent scientific organizations through periodic and thorough evaluation of scientific studies. The standards include a substantial safety margin designed to assure the safety of all persons, regardless of age and health.The exposure standard for wireless mobile phones employs a unit of measurement known as the Specific Absorption Rate, or SAR. The SAR limit set by the FCC is 1.6W/kg.* Tests for SAR are conducted using standard operating positions accepted by the FCC with the phone transmitting at its highest certified power level in all tested frequency bands. Although the SAR is determined at the highest certified power level, the actual SAR level of the phone while operating can be well below the maximum value. This is because the phone is designed to operate at multiple power levels so as to use only the power required to reach the network. In general, the closer you are to a wireless base station antenna, the lower the power output. Before a phone model is available for sale to the public, it must be tested and certified to the FCC that it does not exceed the limit established by the government-adopted requirement for safe exposure. The tests are performed in positions and locations (for example, at the ear and worn on the body) as required by the FCC for each model.
132 Copyright © 2004 NokiaThe highest SAR value for this model phone as reported to the FCC when tested for use at the ear is 1.06 W/kg, and when worn on the body, as described in this user guide, is 1.22 W/kg. (Body-worn measurements differ among phone models, depending upon available enhancements and FCC requirements). While there may be differences between the SAR levels of various phones and at various positions, they all meet the government requirement. The FCC has granted an Equipment Authorization for this model phone with all reported SAR levels evaluated as in compliance with the FCC RF exposure guidelines. SAR information on this model phone is on file with the FCC and can be found under the Display Grant section of http://www.fcc.gov/oet/fccid after searching on FCC ID QURNHL-12.For body worn operation, this phone has been tested and meets the FCC RF exposure guidelines for use with a carry case, belt clip, or holder that contains no metal and that positions the handset a minimum of 5/8 inch (1.5 cm) from the body. Use of other carry cases, belt clips, or holders may not ensure compliance with FCC RF exposure guidelines. If you do not use a body-worn accessory and are not holding the phone at the ear, position the handset a minimum of 5/8 inch (1.5 cm) from your body when the phone is switched on.*In the United States and Canada, the SAR limit for mobile phones used by the public is 1.6 watts/kilogram (W/kg) averaged over one gram of tissue. The standard incorporates a substantial margin of safety to give additional protection for the public and to account for any variations in measurements. SAR values may vary depending on national reporting requirements and the network band. For SAR information in other regions please look under product information at www.nokia.com.
Nokia 6620 User Guide Copyright © 2004 NokiaReference information • NOKIA 6620 TECHNICAL INFORMATIONFeature SpecificationWeight 4.4 oz (124 g) with 900-mAh Li-lon batterySize 117 ccFrequency Range Lowband 850824–849 MHz (TX) 869–894 MHz (RX)Highband 18001710–1785 MHz (TX) 1805–1880 MHz (RX)Highband 19001850–1910 MHz (TX) 1930–1990 MHz (RX)Transmitter Output Power Lowband up to 2 WHighband up to 1 WBattery Voltage 3.7 V nominalOperating Temperature 14°F to + 131°F(-10°C to + 55°C)Memory Locations Up to
134 Copyright © 2004 Nokia
Nokia 6620 User Guide Copyright © 2004 Nokia • Nokia ONE-YEAR LIMITED WARRANTY  Nokia Inc. (“Nokia”) warrants that this cellular phone (“Product”) is free from defects in material and workmanship that result in Product failure during normal usage, according to the following terms and conditions:1The limited warranty for the Product extends for ONE (1) year beginning on the date of the purchase of the Product. This one year period is extended by each whole day that the Product is out of your possession for repair under this warranty.2The limited warranty extends only to the original purchaser (“Consumer”) of the Product and is not assignable or transferable to any subsequent purchaser/end-user.3The limited warranty extends only to Consumers who purchase the Product in the United States of America.4During the limited warranty period, Nokia will repair, or replace, at Nokia’s sole option, any defective parts, or any parts that will not properly operate for their intended use with new or refurbished replacement items if such repair or replacement is needed because  of product malfunction or failure during normal usage. No charge  will be made to the Consumer for any such parts. Nokia will also  pay for the labor charges incurred by Nokia in repairing or replacing the defective parts. The limited warranty does not cover defects in appearance, cosmetic, decorative or structural items, including framing, and any non-operative parts. Nokia’s limit of liability under the limited warranty shall be the actual cash value of the Product at the time the Consumer returns the Product for repair, determined by the price paid by the Consumer for the Product less a reasonable amount for usage. Nokia shall not be liable for any other losses or damages. These remedies are the Consumer’s exclusive remedies for breach of warranty.5Upon request from Nokia, the Consumer must prove the date of the original purchase of the Product by a dated bill of sale or dated itemized receipt.6The Consumer shall bear the cost of shipping the Product to Nokia in Melbourne, Florida. Nokia shall bear the cost of shipping the Product back to the Consumer after the completion of service under this limited warranty.7The Consumer shall have no coverage or benefits under this limited warranty if any of the following conditions are applicable:a) The Product has been subjected to abnormal use, abnormal conditions, improper storage, exposure to moisture or dampness, unauthorized modifications, unauthorized connections, unauthorized repair, misuse, neglect, abuse, accident, alteration, improper installation, or other acts which are not the fault of Nokia, including damage caused by shipping.b) The Product has been damaged from external causes such as collision
136 Copyright © 2004 Nokiawith an object, or from fire, flooding, sand, dirt, windstorm, lightning, earthquake or damage from exposure to weather conditions, an Act of God, or battery leakage, theft, blown fuse, or improper use of any electrical source, damage caused by computer or internet viruses, bugs, worms, Trojan Horses, cancelbots or damage caused by the connection to other products not recommended for interconnection by Nokia.c) Nokia was not advised in writing by the Consumer of the alleged defect or malfunction of the Product within fourteen (14) days after the expiration of the applicable limited warranty period.d) The Product serial number plate or the enhancement data code has been removed, defaced or altered.e) The defect or damage was caused by the defective function of the cellular system or by inadequate signal reception by the external antenna, or viruses or other software problems introduced into the Product.8Nokia does not warrant uninterrupted or error-free operation of the Product. If a problem develops during the limited warranty period, the Consumer shall take the following step-by-step procedure:a) The Consumer shall return the Product to the place of purchase for repair or replacement processing.b) If “a” is not convenient because of distance (more than 50 miles) or for other good cause, the Consumer shall ship the Product prepaid and insured to: Nokia Inc., Attn: Repair Department 795 West Nasa Blvd.  Melbourne, FL 32901c) The Consumer shall include a return address, daytime phone number and/or fax number, complete description of the problem, proof of purchase and service agreement (if applicable). Expenses related to removing the Product from an installation are not covered under this limited warranty.d) The Consumer will be billed for any parts or labor charges not covered by this limited warranty. The Consumer will be responsible for any expenses related to reinstallation of the Product.e) Nokia will repair the Product under the limited warranty within 30 days after receipt of the Product. If Nokia cannot perform repairs covered under this limited warranty within 30 days, or after a reasonable number of attempts to repair the same defect, Nokia at its option, will provide a replacement Product or refund the purchase price of the Product less a reasonable amount for usage. In some states the Consumer may have the right to a loaner if the repair of the Product takes more than ten (10) days. Please contact the Customer Service Center at Nokia at the telephone
Nokia 6620 User Guide Copyright © 2004 Nokianumber listed at the end of this warranty if you need a loaner and the repair of the Product has taken or is estimated to take more than ten (10) days.f) If the Product is returned during the limited warranty period, but the problem with the Product is not covered under the terms and conditions of this limited warranty, the Consumer will be notified and given an estimate of the charges the Consumer must pay to have the Product repaired, with all shipping charges billed to the Consumer. If the estimate is refused, the Product will be returned freight collect. If the Product is returned after the expiration of the limited warranty period, Nokia’s normal service policies shall apply and the Consumer will be responsible for all shipping charges.9You (the Consumer) understand that the product may consist of refurbished equipment that contains used components, some of which have been reprocessed. The used components comply with Product performance and reliability specifications.10 ANY IMPLIED WARRANTY OF MERCHANTABILITY, OR FITNESS FOR A PARTICULAR PURPOSE OR USE, SHALL BE LIMITED TO THE DURATION OF THE FOREGOING LIMITED WRITTEN WARRANTY. OTHERWISE, THE FOREGOING LIMITED WARRANTY IS THE CONSUMER’S SOLE AND EXCLUSIVE REMEDY AND IS IN LIEU OF ALL OTHER WARRANTIES, EXPRESS OR IMPLIED. NOKIA SHALL NOT BE LIABLE FOR SPECIAL, INCIDENTAL, PUNITIVE OR CONSEQUENTIAL DAMAGES, INCLUDING BUT NOT LIMITED TO LOSS OF ANTICIPATED BENEFITS OR PROFITS, LOSS OF SAVINGS OR REVENUE, LOSS OF DATA, PUNITIVE DAMAGES, LOSS OF USE OF THE PRODUCT OR ANY ASSOCIATED EQUIPMENT, COST OF CAPITAL, COST OF ANY SUBSTITUTE EQUIPMENT OR FACILITIES, DOWNTIME, THE CLAIMS OF ANY THIRD PARTIES, INCLUDING CUSTOMERS, AND INJURY TO PROPERTY, RESULTING FROM THE PURCHASE OR USE OF THE PRODUCT OR ARISING FROM BREACH OF THE WARRANTY, BREACH OF CONTRACT, NEGLIGENCE, STRICT TORT, OR ANY OTHER LEGAL OR EQUITABLE THEORY, EVEN IF NOKIA KNEW OF THE LIKELIHOOD OF SUCH DAMAGES. NOKIA SHALL NOT BE LIABLE FOR DELAY IN RENDERING SERVICE UNDER THE LIMITED WARRANTY, OR LOSS OF USE DURING THE PERIOD THAT THE PRODUCT IS BEING REPAIRED.
138 Copyright © 2004 Nokia11 Some states do not allow limitation of how long an implied warranty lasts, so the one year warranty limitation may not apply to you (the Consumer). Some states do not allow the exclusion or limitation of incidental and consequential damages, so certain of the above limitations or exclusions may not apply to you (the Consumer). This limited warranty gives the Consumer specific legal rights and the Consumer may also have other rights which vary from state to state.12 Nokia neither assumes nor authorizes any authorized service center or any other person or entity to assume for it any other obligation or liability beyond that which is expressly provided for in this limited warranty including the provider or seller of any extended warranty or service agreement.13 This is the entire warranty between Nokia and the Consumer, and supersedes all prior and contemporaneous agreements or understandings, oral or written, relating to the Product, and no representation, promise or condition not contained herein shall modify these terms.14 This limited warranty allocates the risk of failure of the Product between the Consumer and Nokia. The allocation is recognized by  the Consumer and is reflected in the purchase price.15 Any action or lawsuit for breach of warranty must be commenced within eighteen (18) months following purchase of the Product.16 Questions concerning this limited warranty may be directed to:  Nokia Inc.  Attn: Customer Service 7725 Woodland Center Blvd., Ste. 150 Tampa, FL 33614 Telephone: 1-888-NOKIA-2U (1-888-665-4228) Facsimile: (813) 287-6612 TTY/TDD Users Only: 1-800-24-NOKIA (1-800-246-6542)17 The limited warranty period for Nokia supplied attachments and accessories is specifically defined within their own warranty cards and packaging.
[ 139 ]Appendix A Message from the CTIA(Cellular Telecommunications & Internet Association)  to all users of mobile phones.&
[ 140 ]A Guide to Safe and Responsible Wireless Phone UseWireless Phone "Safety Tips"
[ 141 ]
[ 142 ]
Nokia 6620 User Guide Copyright © 2003 NokiaAppendix BMessage from the FDA(U.S. Food and Drug Administration) to all users of mobile phones.July 18, 2001........For updates: http://www.fda.gov/cdrh/phones
144 Copyright © 2003 NokiaConsumer Update on Wireless Phones U.S. Food and Drug Administration 1. Do wireless phones pose a health hazard?2. What is FDA’s role concerning the safety of wireless phones?••••••••
Nokia 6620 User Guide Copyright © 2003 Nokia3. What kinds of phones are the subject of this update?4. What are the results of the research done already?5. What research is needed to decide whether RF exposure from wireless phones poses a health risk?
146 Copyright © 2003 Nokia6.What is FDA doing to find out more about the possible health effects of wireless phone RF?&7. How can I find out how much radiofrequency energy exposure I can get by using my wireless phone?8. What has FDA done to measure the radiofrequency energy coming from   wireless phones?
Nokia 6620 User Guide Copyright © 2003 Nokia9. What steps can I take to reduce my exposure to radiofrequency energy from my wireless phone?10. What about children using wireless phones?11. What about wireless phone interference with medical equipment?
148 Copyright © 2003 Nokia 12. Where can I find additional information?• • • • • July 18, 2001For updates: http://www.fda.gov/cdrh/phones
Nokia 6620 User Guide Copyright © 2004 NokiaIndexNumerics1-touch dialingAssigning numbers 31Making calls 22AAccess codes, See Security codeAccess points 68Accessibility solutions 6See also Accessory (LPS-3 and HDA-9)Accessories, See EnhancementsAlarm clockAlarm tone 88Setting 88Snooze 88Turning off 88Answering a call 23Antenna 12Application manager 106ApplicationsAdding voice commands 90Installing applications 108Java application settings 108Removing files 108Audio files, See Media filesAutomatic call answer 73BBackground image, See ThemesBatteries 125BatteryCharging 11Inserting 11Blocking calls 72Bluetooth connection 110Closing the connection 113Connection requests 112Connection status indicators 112Device icons 112Pairing 112Passcode 112Receiving data 113Sending data 111Settings 111Unique device address 111BrowserAccess points 68Bookmarks 100Adaptive 101Adding 101Icons 100Browsing 101Connecting 100Ending connections 104Icons 100Service message settings 64Service messages 57WAP pages 99XHTML pages 99CCache, clearing 103Calculator 86Calendar 34
150 Copyright © 2004 NokiaAlarm tone 37Deleting many entries simultaneously 120Remote synchronization 118Settings 37Views 35Call blocking 72Call lists, See LogsCall register, See LogCall timers 26Calls1-touch dialing 22Answering 23Conference calls 22Dialed 25Duration timers 26Forwarding 23International 21Making a call 21Missed 25Options during a call 23Received 25Rejecting 23Settings 67Settings for forwarding 24Transferring 23Using the Contacts directory 21Cameras 39Memory card 41Memory consumption 41Self-timer 40Settings 40Taking pictures 39Video recorder 41CD-ROM 116Cell broadcast messages (info service) 60Cell info display 73CertificatesManagement 75Trust settings 76Chargers 125Clearing memoryCalendar entries 120Log information 120Clock 88Alarm 88Settings 88CodeAccess, See Security codePIN, See PIN codeSecurity, See Security codeComputer connections 116Conference calls 22Connecting to a PC 116ConnectionBluetooth 110Indicators, See IconsInfrared 113Manager 115Settings 68USB 115Viewing details 115Contact cardsAssigning 1-touch dialing numbers 31Assigning default numbers and
Nokia 6620 User Guide Copyright © 2004 Nokiaaddresses 29Creating 28Data import 38Inserting images 28Remote synchronization 118Ringing tonesAdding 29For contact group 29For individual contact 29Removing 29Voice tags 29, 30Contact groups 31Converter 86Adding exchange rates 87Converting currencies 87Converting units 87CopyingSIM card to phone memory 29Text 53Customer care 6DData connections to networkEnding 116Data import 38Date, settings 72Delivery reports 50Dialed numbers 25Display settings 67See also ThemesDownloading files to the Gallery47EEditingContact cards 28Text 50Themes 80EGPRS, See  GPRSE-mailDeleting 59Remote mailbox 57Retrieving 58Settings 63Undeleting 59EnhancementsActivating 73Descriptions 125HDA-9 Phone Adapter 127LPS-3 Loopset 127Rules for use 124Settings 73ErasingLog 26Recent calls log 25FFile formatsRealOne Player 44SIS file 107File manager 76Files, opening 46Fixed dialing 74FoldersCreating 18Opening 46Organizing 18Forwarding calls 23
152 Copyright © 2004 NokiaGGallery 45Downloading files from the Internet 47Folders 46Picture messages 46Uploading images 47Wallpaper images 46GIF animations 43Go to (shortcuts)Adding a shortcut 81Using shortcuts 81GPRS 71GSM data connections 115HHandsfree use, See LoudspeakerHelp 17IIcons 14Activity 14Bluetooth connection 112Browser 100Data connection 15Enhancement 15GPRS connection 115In standby mode 14Infrared connection 114Messaging 55Voice volume 15Idle state, See Standby modeImage server 47Images 46Adding to a contact card 28Full screen 43Keyboard shortcuts when viewing images 43Memory consumption 41Moving the focus 43Wallpapers folder 46Zooming 43Importing data from other Nokia phones 38Indicators, See IconsInfrared connection 113InsertingBattery 11Memory card 10SIM card 9InstallingApplications 108Java files 108Instant Messaging (IM) 91Group conversations 93, 94IM contacts 95Individual conversations 94Settings 92, 96Internet access points (IAP), See Access pointsInternet service provider (ISP), See Access pointsJJavaInstalling applications 108Settings 108Joystick, using to move in menus16
Nokia 6620 User Guide Copyright © 2004 NokiaKKeyguard 20Keypad lock, See KeyguardKeys, phone key definitions vLLanguageFor writing 66Setting phone language 66Listening to messages, See Voice mailLock code 12, 74Lock keypad, See KeyguardLocking memory card (using password) 98LogData counter 25Erasing contents 26Filtering 26General (all calls and connections) 26Recent, missed, and received calls 25Settings 26Loopset, See EnhancementsLoudspeakerActivating 19Turning off 19MMailE-mail 57Voice mail 21Making calls 21Media filesFile formats 44Mute 45Playing 44Seek 45Track list 44Media gallery, See GalleryMemory card 97Backup 98Cameras 41Consumption 98Format 97Inserting 10Password (Lock/Unlock) 98Restore 98Video clips 97Memory lowCheck memory consumption 98Troubleshooting 119Memory, viewing details 77Menu 16Menu key v, 16Rearranging the main Menu 16MessagingDelivery reports 50Inbox 55Main view 49Messages on the SIM card 60My folders 57Outbox 59Sent folder settings 65Settings 61Text messages 53Writing text 50
154 Copyright © 2004 NokiaMissed calls 25Mobile browser, See BrowserModem, using your phone as116Mp3 track list, See Track listMultimedia presentation 55Music files, See Media filesMuteActive call 23Media files 45Ringing tone on incoming call 23My folders 57NNavigation bar 17Network Services 2Notes 88OOptions lists 17Organizing the main Menu 16Outbox 59PPacket data (GPRS)Connection timer 26Data counter 25, 26Settings 71Pasting text 53PC Suite 116Personal notes 84PersonalizeAlarm clock tone 88Calendar alarm tone 37Phone Adapter, See EnhancementsPhone display, See ThemesPhone illustration vPhonebook, See Contact cardsPicture messages 46Pictures, taking 39PIN codeUnblocking 73Using when powering on 12Playing media files 44Power on and off 12Predictive text inputHow to use 51Tips 52Turning off 52Presence 32Profiles 78Renaming 79Settings 79Purchasing downloads 103QQuick guide viRRealOne Player 43File formats 44Playing media files 44Settings 45Streaming live content 44Received calls 25ReceivingData by Bluetooth connection 113Data by infrared connection
Nokia 6620 User Guide Copyright © 2004 Nokia114Ringing tones, Operator logos, and settings, see Smart messagesRecent calls log, see LogRecorder 89RecordingSounds 89Videos 41Voice commands 90Register your phone 4Rejecting calls 23Remote mailbox 57Remote synchronization 117Removing an application 108Reports 50Ringing tonesAdding a personal ringing tone 29Changing 79Muting 23Receiving in a smart message 56SScreen saverDisplay 80Settings 67Scrolling, with joystick 16Search for an item 19SecurityPIN, lock, and PUK codes 73Security certificates 75Settings 73Security code 73, 122Seek for media files 45Self-timer (for camera) 40SendingData by Bluetooth connection 111Data by infrared connection 114Service command editor 61Setting the time and date 13Settings 66Applications (Java™) 108Bluetooth connection 111Calendar 37Call blocking 72Call forwarding 24Cameras 40Cell broadcast (info service) 64Certificates 75Clock 88Connection 68Data call (GPRS) 71Date and time 72Display 67E-mail 63Enhancements 73Fixed dialing 74General 66Lock code 74Log 26Messaging 61Messaging, Sent folder 65Phone settings 66PIN code 73
156 Copyright © 2004 NokiaRealOne Player 45Security 73Security codes 73Sounds (customizing Profiles) 79Text messages 61Video recorder 42Wallet 85Shared memory 3ShortcutsAdding menu shortcuts 81Using the ’Go to’ menu 81When viewing images 43SIM cardCopying names and numbers 29Definition 119Inserting 9Messages 60SIS file 107Smart messages 56Snooze 88SoftwareInstalling applications 108Removing applications 108Transferring an application to your phone 107Sound clips 46Sound files, See Media filesSpeed dialing, See 1-touch dialingStandby modeScreen description 13Settings 67Stopping alarm clock 88Storing data 120Subscribed contacts (Presence)31Switching between applications17Synchronization 117SyncML 117TTemplates folder 57TextCopying and pasting 53Input 50Messages, writing and sending 53Templates 57Themes 79Editing 80Restoring 81Wallpapers folder 46Thumbnails, in a contact card28Tickets 85Time and date settings 72To-do 37ToolsApplication manager 106File manager 76Settings 66Voice mail 21Track list 47Traditional text input 50Transferring calls 23Troubleshooting 119
Nokia 6620 User Guide Copyright © 2004 NokiaTTY/TDD communication 6, 127UUnit converter 86Uploading images 47USB 115USSD commands 61VVideo clipsOpening 46Saving 42Video player, See RealOne PlayerVideo recorder 41Memory card 42Saving video clips 42Settings 42ViewingConnection details 115GIF animations 43Voice commands 89Adding 90Changing 91Deleting 91Starting applications 91Voice dialing, See Voice tagsVoice mail 21Changing the number 22Forwarding calls to voice mail 24Listening to messages 21Voice messages, See Voice mailVoice recorder 89Voice tags 29Adding, changing, and deleting 30Making calls 30Volume control 19WWallet 83Creating a wallet profile 84Creating personal notes 84Entering the wallet code 83Reset code 86Retrieving data into browser 85Settings 85Storing personal card details 84Viewing ticket details 85Wallpaper, See Themes 80WAP pages, See BrowserWarranty 4, 135Web, See BrowserWriting 50Predictive text input 51Traditional text input 50XXHTML pages, See BrowserZZoomingOn saved images 43When recording video 41When taking a picture 39
158 Copyright © 2004 Nokia
Para obtener un manual del usuario en español favor de llamar o enviar un fax al teléfono 1-888-NOKIA-2U, fax 813-249-9619.9310640
Copyright © Nokia 2003

Navigation menu