User Manual
WEB Terminal
NEXTERM SE Overview
1Minet INC
User’s Manual
Video Cable :
Shielded Interface Cable must be used to ensure product compliance
WEB Terminal
NEXTERM SE Overview
2
Minet INC
1. NEXTERM SE Overview
1.1 Introduction
“ Easy Installation, Optimized Functions and The Lowest Price”
It is this web terminal’s strong points that you can expect when you utilize it
in your environments.
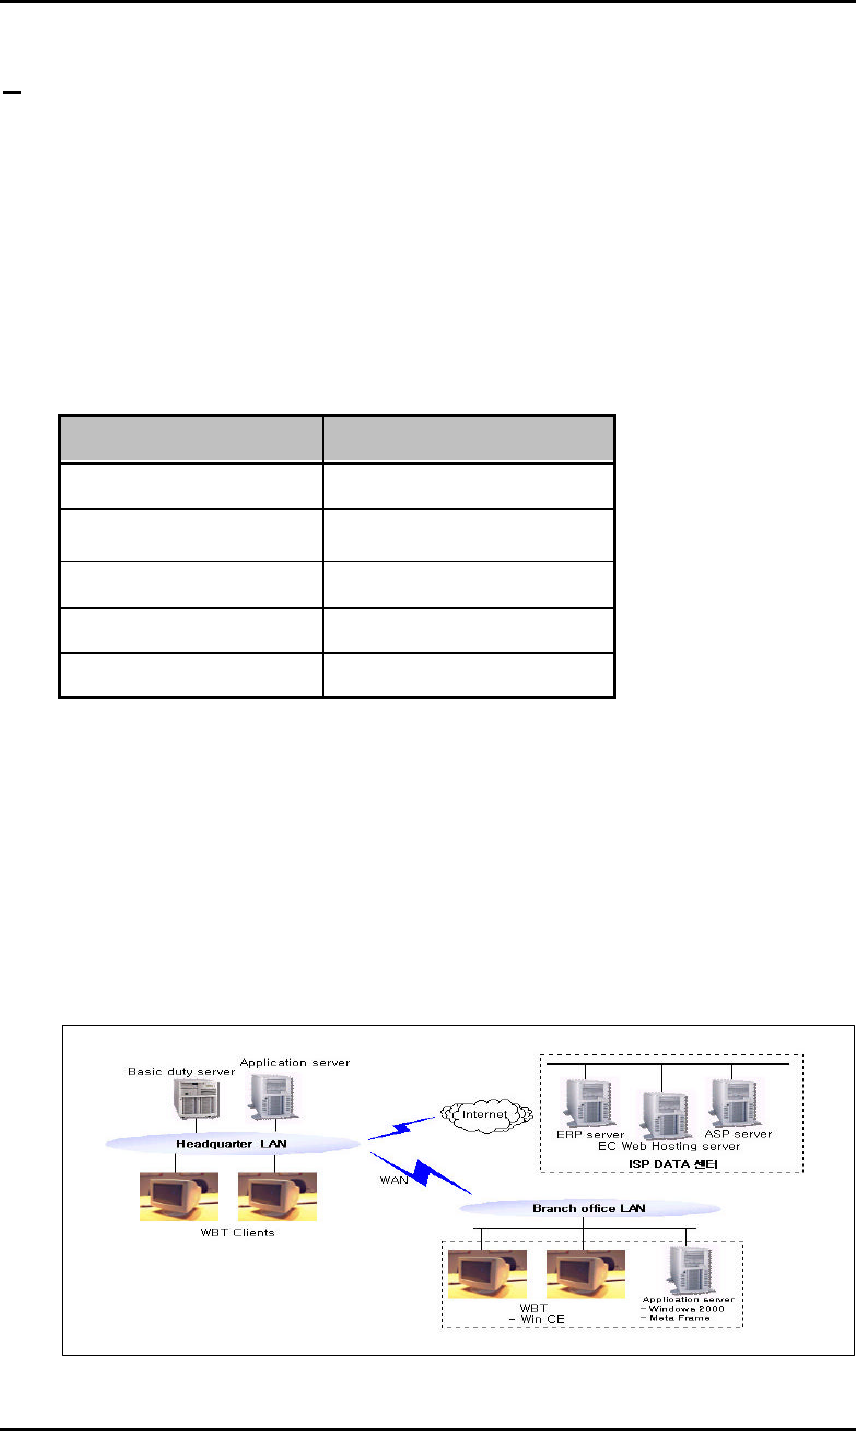
Under the basic environment of server based computing and internet connection
speed of 56Kbps, you can use various applications on the high performance
servers running Windows 2000 Server OS as well as internet connection.
Classification NEXTERM SE
Operating Mode WBT(Windows Based Terminal)
CPU Intel StrongArm
206MHZ(235MIPS)
SDRAM 16M
Flash 8M
Operating System Windows CE 3.0
1.2 Functions
All application programs are operated in servers. NEXTERM SE as a client
transfers only the inputs of mouse or keyboard to sever and the result of
application programs, which operates on the server to the client using protocol
(RDP or ICA). Therefore the traffic that causes problems in the existing
network will be reduced and the client specification does not require high
performance.

WEB Terminal
NEXTERM SE Overview
3Minet INC
1.3 Features
As Operating System, Windows CE is utilized
NEXTERM SE has an open architecture and uses 32-bit multitasking and multi-
thread operating system that support various functions:
l Utilizes a kernel based on the architecture of Windows NT
l Supports pre-occupied multitasking and multi-thread
l Provides users with friendly GUI environment
l Booting process is not necessary since the operation system is stored on
ROM
StrongARM CPU of Intel utilized
l Low power (4W) Operating available
l Size and weight reduced
l Low noise (Cooling fan unnecessary)
Quick Booting Circuit Design (Compared to personal computer)
When powering system on, system booting is performed in the last
task environment
Minimized Size
There are unnecessary elements such as HDD, FDD, CD-ROM and cooling fan.
Server Environment Available
l Programs are executed in servers and the results of the execution are
displayed on the client
l Multi-user can connect to the server simultaneously and execute each
different program independently.
WEB Terminal
NEXTERM SE use preparations
3
Minet INC
2. NEXTERM SE Use Preparations
This chapter provides the structure and setting method of NEXTERM SE .
2.1 System Structure
You must be familiar with the system structure for the proper connection of
peripheral devices.
l Basic supplied parts are: Monitor, Mount (main frame), Keyboard, Mouse and
Adapter.
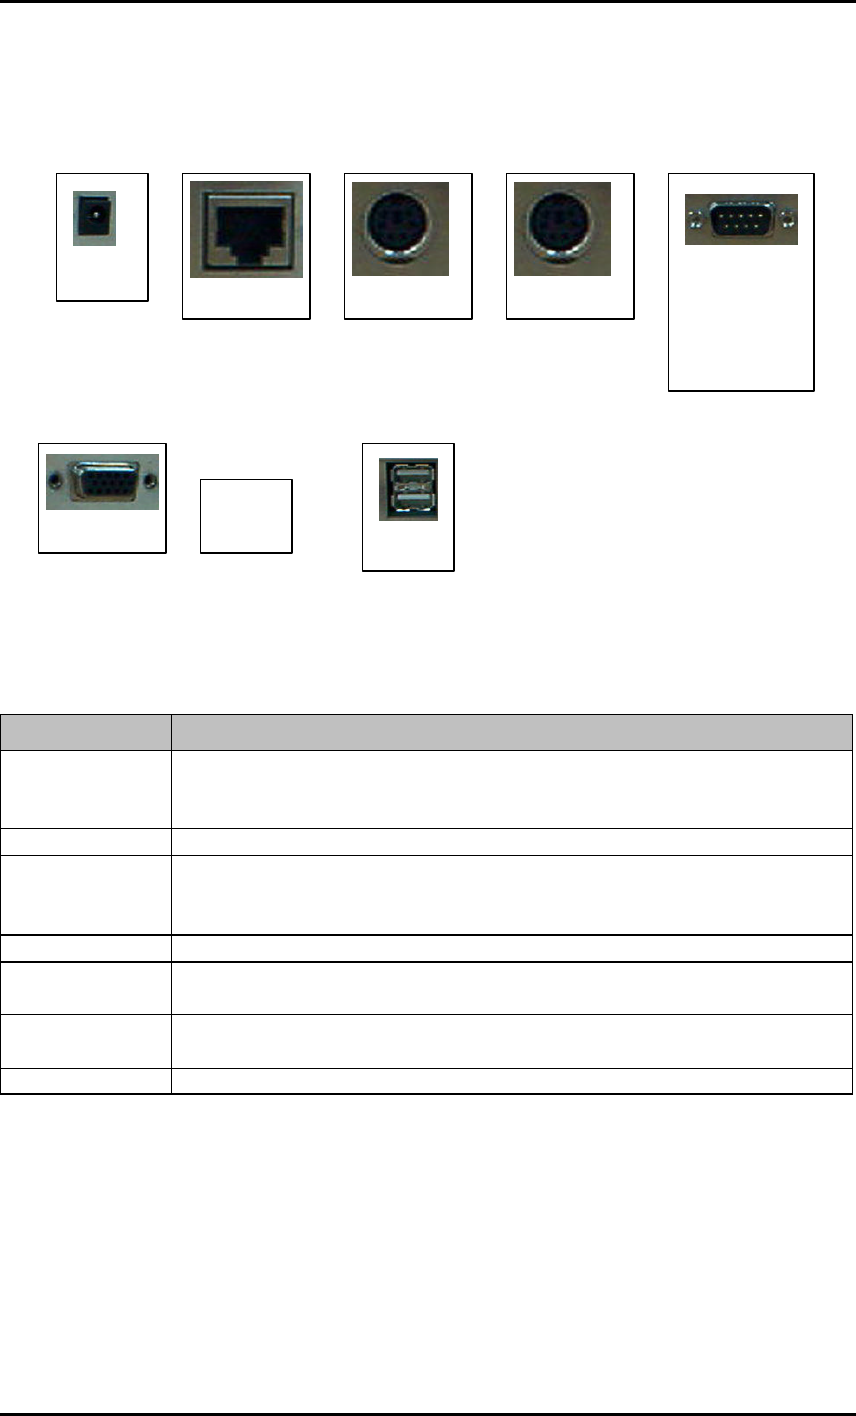
NEXTERM SE Front
Name Functions Description
Headphone Input terminal of headphone
Power Button Monitor OFF, SUSPEND MODE, RESET function
WEB Terminal
NEXTERM SE use preparations
14
Minet INC
NEXTERM SE Rear
HEADPHONE
Name Functions Description
RS-232C This is connected to D-
type connector that consists of 9 pins and
interface with other serial devices for transmitting/receiving
data
MOUSE PS/2 Port, connected to MINI-DIN connector made up of 6 pins
RS-232C This is connected to D-
type connector that consists of 9 pins and
interface with other serial devices for transmitting/receiving
data
KEY PS/2 Port, connected to MINI-DIN connector made up of 6 pins
LAN Single line for digital transmission.
This interface is connected to a RJ-45 Jack made up of 8 pins.
Microphone and
Headphone Input terminal of microphone and headphone
Power
This is connected to an adapter that supplies power to the system.
RS-232C
(Serial
devices)
MOUSE(PS/2)
KEY(PS/2) LAN
Power
VGA(monitor
USB
WEB Terminal
NEXTERM SE use preparations
5
Minet INC
2.2 Connecting the Components
This section shows how to install the components.
Note: the power should be off during the system connection.
1 Connecting Keyboard
Connect the keyboard to its
port
after checking whether the port is
PS/2.
2 Connecting Mouse
Connect the mouse to its
port after
checking whether the port is PS/2.
3 Connecting LAN
Connect the RJ-
45 jack to the LAN
port.
Connect the microphone to
the microphone port.
Connect the speaker or
headphone to the audio
port.
5 Connecting Power
Connect the adapter to the POWER port
and outlet. Be sure that you must use
a supplied adapter.
Connecting Speaker
and Microphone
Connecting other
connection devices
4 Connecting Monitor
Connect the monitor s
ignal cable,
which is attached to the monitor with
the VGA port

WEB Terminal
NEXTERM SE use preparations
6Minet INC
2.3 Connecting external devices
NEXTERM SE has RS-232C port that can connect additional external devices.
Serial Port
Serial port can be connected to an external modem or other devices that support
the serial port.
2.4 Power Button
This section explains the power button on he front panel of the mount (main
frame).
If you press this button within 0.5 with system on after adapter connected, the
screen will be ON/OFF. The mode will change into the Suspend mode (CPU is
resting) if you press it for 0.5 ∼ 3 seconds. And the system will be reset if
you press it for 3 seconds or longer. You can press it again in order to return
to the normal operation mode from the screen off or suspend mode.

WEB Terminal
Operation of NEXTERM SE
7Minet INC
3. Operation of NEXTERM SE
For more detailed information, ask the server administrator.
3.1 Setup of Operating Environment
This section describes how to setup the operating environment of WEB Terminal.
3.1.1 Preference setting
Press the mouse right button on the background screen, and then click
Preference. Terminal Preference will appear.
Terminal preference has the following 2 taps.
l Manufacture : This shows factory-default settings and operating system
version information.
l Preference : This enable to set the name and information of this terminal,
type of keyboard and screen saver function. If you select the bottom option,
the terminal environment will be reset to factory-default settings.
3.1.2 System Setup
Press the mouse right button on the background screen in order to display the
menu, and then click “System Setup -> OS & Memory”. System Properties window
will appear.
General displays the system information and Memory displays the system memory
management information.
You can divide the Storage Memory and Program Memory by moving the scroll bar
using a mouse.
You should allocate more space to Program Memory if many windows are displayed
or a large execution file is running. You should allocate more space to Storage
Memory if there are many files to be stored while using E-mail or Web surfing.
3.1.3 Display Setup
Press the mouse right button on the background screen in order to display the
menu, and then click System Setup -> Display to open MQConfig window.

WEB Terminal
NEXTERM SE use preparations
14
Minet INC
If you select Display Setting tap, you can set color, resolution and recovery
rate. You can watch a normal screen in case you adjust the desktop size and CRT
Viewport to the same size. If you have changed the settings, don’t reboot after
pressing OK button on the screen. Only reboot after press “Save”.
3.1.4 Keyboard Setup
Press the mouse right button on the background screen in order to display the
menu, and then click System Setup -> Input to open Keyboard Properties window.
You can change the speed setting of keyboard button.
3.1.5 Network Setup
For more detailed information, ask the server administrator.
Press the mouse right button on the background screen in order to display the
menu, and then click System Setup -> NETWORK to open NETWORK CONFIGURATION
window.
Select CS8900A ETHERNET DRIVER, and then click Properties.
Select one of the following options from the IP Address window.
l If the network uses Dynamic Host Configuration Protocol (DHCP), use IP
information provided by DHCP.
l If you want to use Static IP information allocated to you, click the below
IP address
Type IP Address, Subnet Mask, and Gateway.
Click Name Server tap in order to display the next screen.
Type IP of DNS Server.
Click the User information of the initial screen in order to type the ID and
PASSWORD to be used on the network, and then enter the related information.
In order to save the typed information after verifying them, click “Registry
Save” icon.

WEB Terminal
Operation of NEXTERM SE
13
Minet INC
3.1.6 Sound Setup
Press the mouse right button on the background screen in order to display the
menu, and click System Setup -> Sound in order to open Volume & Sounds
Properties window.
You can control the various sound and volume.
3.2 Network Environment View
3.2.1 PING
Press the mouse right button on the background screen in order to display the
menu, and click NETWORK TEST -> PING to open PING window.
You can check the connection condition when typing the opposite side IP or name
on the Destination Hostname or IP section and pressing the Start.
3.2.2 Ipconfig
Press the mouse right button on the background screen in order to display the
menu, and click NETWORK TEST -> Ipconfigf to open Ipconfig window.
When clicking the Ipconfig button, the information of the operating network
will appear.
3.3 Operation of Connection Manager
This is used to connect WEB Terminal to servers.
If users didn’t set the automatic start connection, Connection Manager will be
displayed automatically when starting and ending WEB Terminal.
1. Click “Add” from Configure window. New Connection window will appear.
2. Select one of the following connection protocols.
l Citrix Independent Computing Architecture Protocol (ICA)
l Microsoft Remote Desktop Client Protocol (RDP)
3. Click “OK”.
As Connection is created, registration is completed on the Connection Name list.
3.3.1 Additional Creation of ICA Connection
1. Select “Citrix ICA Client” of New Connection window in order to display Specify
Connection Type window.

WEB Terminal
NEXTERM SE use preparations
14
Minet INC
2. Specify a connection type.
l Network Connection – Direct connection line is required such as 10/100Base-
T.
l Dial-in Connection – uses a modem.
3. Click “Next”
4. All existing Citrix servers or applications on the servers will be inquired and
recognized. Select required servers or applications. If the server list doesn’t
appear, search it again using “Refresh” or type the server name or IP to
connect directly.
5. Click “Next”. If you select “FINISH”, following option will be saved without
specification.
6. You are able to change the sever name or create an icon on the background
screen.
7. Click “Next”.
8. Configuration can be made in such a way that the applications can be used from
the selected server. You can leave it blank in order to specify Command Line
and Working Directory or to use Windows NT desktop.
9. Click “Next”.
10. Specify Username, Password and Domain in order to logon the server
automatically.
11. Click “Next”.
12. Specify 16, 256 or Thousands Window Colors on the Select Window Option window.
13. Click “Next”.
14. You can configure the ICA session.
l Compress Data Stream – select it when connection is made with modem (modem
dial-up) or WAN(wide area network).
l Enable Sound – select it when LAN (Local area network) is the same as
10/100Base T. When using Sound through WAN and modem, increasing usage of
bandwidth causes some problems.
l If you use modem or WAN, set SOUND QUALITY to LOW and SPEEDSCREEN to ON.
15. Click “Next”.
16. Set the network environment connecting the server.
17. Click “Finish”.
Now the installation of ICA connection is finished and it is ready to connect
to the server.

WEB Terminal
Operation of NEXTERM SE
13
Minet INC
3.3.2 Additional Creation of RDP Connection
1. Select Microsoft Remote Desktop Client of New Connection window in order to
display WTS Connection Wizard.
2. Type a name for new connection on the Name section.
3. Type the name and IP address of the server to be connected to the server
section.
4. Check Low Speed Connection when connecting to the server through low bandwidth
lines such as a modem or WAN.
5. Click “Next”.
6. If you want to logon to server automatically, select Automatic Logon, and then
type your User name, Password and Domain.
7. Click “Next”.
8. You can configure the Application that is selected instead of the Desktop.
Select Application file name, and then specify Command Lined and Working
Directory or leave it blank to use Windows NT desktop.
9. Click “Next”.
10. Click “Finish”.
Now the installation of Connection Wizard is finished and it is ready to connect
to the server.
3.3.3 Editing and Deleting Connections
1. Select ICA connection to be edited form the Connection Name list.
2. If you click “Edit”, the following window will appear.
3. You can modify on each tap. Refer to the “Additional Creation of ICA
Connection” for the related tap information
RDP Connection Editing
1. Select RDP connection to be edited from Connection Name list.
2. Click “Edit” and the following “Edit Connection” will appear.
Edit Connection window consists of the following two tabs.
l Net Connections – enable you to edit the connection or automatically logon.
l Application – unable to move automatically to the file name or working
directory path whenever connecting to the server and starting the session.

WEB Terminal
NEXTERM SE use preparations
14
Minet INC
3. Change the sections that need to be changed in Net Corrections or
Application.
4. When it done, click “OK”.
Refer to “Additional Creation of RDP Connection” for more information of
each section.
Connection Deleting
1. Select connection to be edited from Connection Name list
2. Click “Delete”.
3. Click “Yes”.
Startup connections Setting
It provides automatic connection to the server whenever the terminal is
started up.
1. Click “Startup” and the following Connection Startup window will appear.
2. Select the following Startup Options.
l Make the selected connection your default connection
Connection selected from NEXTERM SE Connection Manager is used as default.
This default connection is highlighted when turning NEXTERM SE on and
NEXTERM LGESP Connection Manager screen appears
l Automatically start the selected connection at startup
The system will be started up automatically with the selected connection
whenever you operate NEXTERM SE .
3. Click “OK” in order to store the changed data.
Startup Connections Closing
1. Select Auto-start Connection Name, and then click “Startup”. NEXTERM SE
Connection Startup screen will appear.
2. Click “Make the selected connection your Default connection”, and then click
“OK”. Select Connection, and then click “End”.
3.3.4 Connecting Servers
NEXTERM LE Connection Manager lists all available network connection. In order
to connect the server, follow the next steps.
1. Select a Connection Name on the list.
2. Click “Connect” or double click “Connection Name”. If the connection has
been defined as automatic logon, NEXTERM SE will be connected and logon
automatically.

WEB Terminal
Operation of NEXTERM SE
13
Minet INC
3. In case the logon is not automatic, the Window Logon Information window will
appear. Typing user’s accourt will complete the logon.
3.3.5 Using of NEXTERM SE Hot Keys
Hot Keys used to simplify the switching process between active sessions.
By using Hot Keys instead of NEXTERM SE Connection Manager, you can switch
automatically each program through simple key manipulation.
Hot Key Function
CTRL+ALT+UP.Arrow Changes to Up between active sessions
CTRL+ALT+DOWN.Arrow Changes to Down between active sessions
CTRL+ALT+HOME Changes to default session automatically
CTRL+ALT+END
The screen will be changed directly to NEXTERM LE
Connection Manager.
<F2>
If Connection Manager is running, the screen will be
changed Terminal Properties Screen
Unless the Hot Keys are working, refer to the instructions of “Multi
Connections Start”.
Multi Connections Start
l NEXTERM SE is able to perform multi connections simultaneously and the
number of available connections is limited per the RAM capacity.
1. Press CTRL+ALT+END to access into NEXTERM SE Connection Manager.
2. Select Connection Name, and then click “Connect”.
l In order to change the connection under operating, you should follow the
below steps.
1. Press CTRL+ALT+END to access into NEXTERM SE Connection Manager.
2. Select Connection Name and click “Connect”, or press CTRL+ALT+UP.Arrow or
CTRL+ALT+DOWN.Arrow.
3.4 Client setting and save
3.4.1 Client Setting
Press the mouse right button on the background screen in order to display the
menu, and then press Client setting to open window.

WEB Terminal
NEXTERM SE use preparations
14
Minet INC
l ICA Setting
Press “Global Setting” button in order to change various settings on the
window.
l RDP Setting
You can select RDP Encryption Enable option.
3.4.2 SAVE
If you press the mouse right button on the background screen in order to
display the menu, and then press “SAVE”. The information that users have
changed is saved on the FLASH ROM, so it can not disappear, when the power is
gone off.
3.5 Closing connections
3.5.1 Disconnecting a connection
Click the “system exit” in its Windows Start menu. “Logoff” or “Disconnect” will
be displayed. “Logoff” closes all application programs and “Disconnect” leaves
application programs operating and just disconnects from the server. If you end
the system using “Disconnect”, the same environment as before will be
configured when connecting the same account.
3.5.2 Terminal Ends
Press the mouse right button on the background screen in order to display the
menu, and then press Shutdown to open the window.
l Check the Suspend System, and then press “OK”. The terminal will be the
“suspend mode”.
When pressing the power button again, previous task environment will be
executed. But the network session may be disconnected due to connected
environment and return time.
l System, and then press l be rebooted. Unsaved information will disappear.

WEB Terminal
Troubleshooting
15
Minet INC
4. Troubleshooting
This section provides some solutions to occurred problems during operating
NEXTERM SE .
The monitor screen is blank
l Check whether the power cord has been inserted properly into the terminal.
l Check whether the power cord has been inserted properly into an AC outlet.
l Check whether the screen is OFF.
l Check whether the system is on SUSPEND mode.
The mouse does not work
l Check whether the mouse jack has been inserted properly the mouse port.
l Check whether the mouse ball is operating freely.
The Keyboard does not respond
l Check whether the keyboard has been connected properly to the keyboard port.
l Check whether power is being supplied properly to NEXTERM SE .
The Network connection does not work
l Check whether the cables are connected properly to the LAN port.
l Verify the network settings.
l Check whether the network address is valid.
l Verify the configuration of the server terminal.
WEB Terminal
System Specifications
16
Minet INC
5. System Specifications
The specification of NEXTERM SE is listed as below.
¿
Hardware Specification
Item NEXTERM SE
CPU - Intel Strong ARM 32Bit RISC Processor
- 206 MHz (235MIPS)
Flash Memory - 8MB FLASH
- Expandable to 16MB
RAM Memory - 16MB SDRAM
- Expandable to 32MB
Audio - 16-bit stereo
Video - 1024 X 768 16 bit True colors
- Up to 1280 X 1024 256 colors
¿
Communications and Input/Output Specification
Item NEXTERM SE
Networking Protocol - Ethernet 10 Base T Ethernet
- TCP/IP with DNS, DHCP, and PPP
Communication Protocol - Microsoft RDP
- Citrix ICA
Serial Port - 1 DB-9 RS232C Serial Port
Display Port - Analog VGA Video Output
Audio Port - Earphone Jack
- Microphone in
Keyboard and Mouse Port - Keyboard and Mouse Port
(PS/2 Keyboard and Mouse included)