Mipro Electronics Co ACT8H Transmitter User Manual ACT8H ACT8T 2CE263
Mipro Electronics Co Ltd Transmitter ACT8H ACT8T 2CE263
Contents
- 1. Manual part 1
- 2. Manual part 2
- 3. Manual part 3
- 4. Manual part 4
Manual part 1
Instruction Manual
ACT-8H : DIGITAL WIRELESS HANDHELD MICROPHONE
ACT- 8T : DIGITAL WIRELESS BODY PACK TRANSMITTER
Disposal
Dispose the unusable device according to valid regulations.
Disposal of spent batteries/accumulators
You are required by law to return all spent batteries. Disposing of used
batteries with domestic waste is prohibited!
Batteries / NiCad cells containing toxins are marked by
accompanying symbols that refer to the prohibition of
disposal with domestic waste. The designations for the
decisive heavy metals are: Cd=cadmium, Hg=mercury,
Pb=lead. You may return spent batteries/accumulators free
of charge to the recycling centres, our outlets or anywhere
else where batteries/accumulators are sold.
By doing so, you fulfil the legal requirements and contribute to the
conservation of our environment!
2005-08-13
Electronics Co., Ltd.
Head office: 814, Pei-Kang Road, Chiayi, 60096, Taiwan.
Taipei office: 5, Lane 118, Sung-teh Road, 10075, Taipei, Taiwan.
Web-http: //www.mipro.com.tw
E-mail: mipro@mipro.com.tw
2 CE2 6 3
Digital Wireless Microphone Systems
Digital Wireless Microphone Systems

1. Upper Grille: Provides access & protection to capsule.
2. Capsule Module: Metal grille integrated to protect the capsule.
3. Housing: Houses various PCB and Li-Poly battery module.
4. LCD Display Panel: Displays group, frequency, gain, battery level, input SPL and
error code.
5. Lithium-Polymer Battery Back: Built-in and detachable Li-Poly battery module can
be recharged alone or together with transmitter; gives 8 hours continuous
operation time.
6. Power Switch: Switch to ''ON'' when using microphone and ''OFF'' position when
not.
7. MODE: Mode selection button.
8. SET: Parameter selection button.
9. Color Rear Cap: Designed to protect the ON/OFF switch to help prevent the user
turning off the microphone during use.
10. ACT Receptor: Signal reception via the ACT function; automatically programs the
frequency and the encryption code from the receiver.
11. Battery Charging Contact: For charging battery module.
1. The world's first 24-bit true digital handheld wireless microphone, combining
the best design and the most advanced features.
2. Magnesium alloy housing offers a comfortable feel, balanced weight
allocation and special surface finishing, giving it a truly professional
appearance and quality.
3. Available in three colors: black, rose metallic and blue diamond. Custom-
made colors are also available for special requirements.
4. Anti-roll & anti-pop microphone capsule module with extremely low touch
noise characteristics.
5. Optional interchangeable microphone capsule modules.
6. Bright LCD display shows working channel, battery status, input level and
error codes.
7. Integrated antenna provides maximum transmission efficiency and the
patented color rear caps protect the on/off as well as the audio sensitivity
switches while providing easy channel identification.
8. Built-in and detachable lithium-polymer (Li-Poly) battery pack can be
recharged alone or together with the transmitter. Eight continuous hours of
operation are possible due to its compact size and high-efficiency circuitry
design.
9. Second generation of the world's first ACT function rapidly and precisely sets
up the transmitter frequency.
1. Part Names and Functions
12
()
1234
5
7
MODE
OFF
SET
86 9
Main features:
1110
DIGITAL WIRELESS HANDHELD MICROPHONE DIGITAL WIRELESS HANDHELD MICROPHONE
ACT-8H DIGITAL WIRELESS HANDHELD MICROPHONE
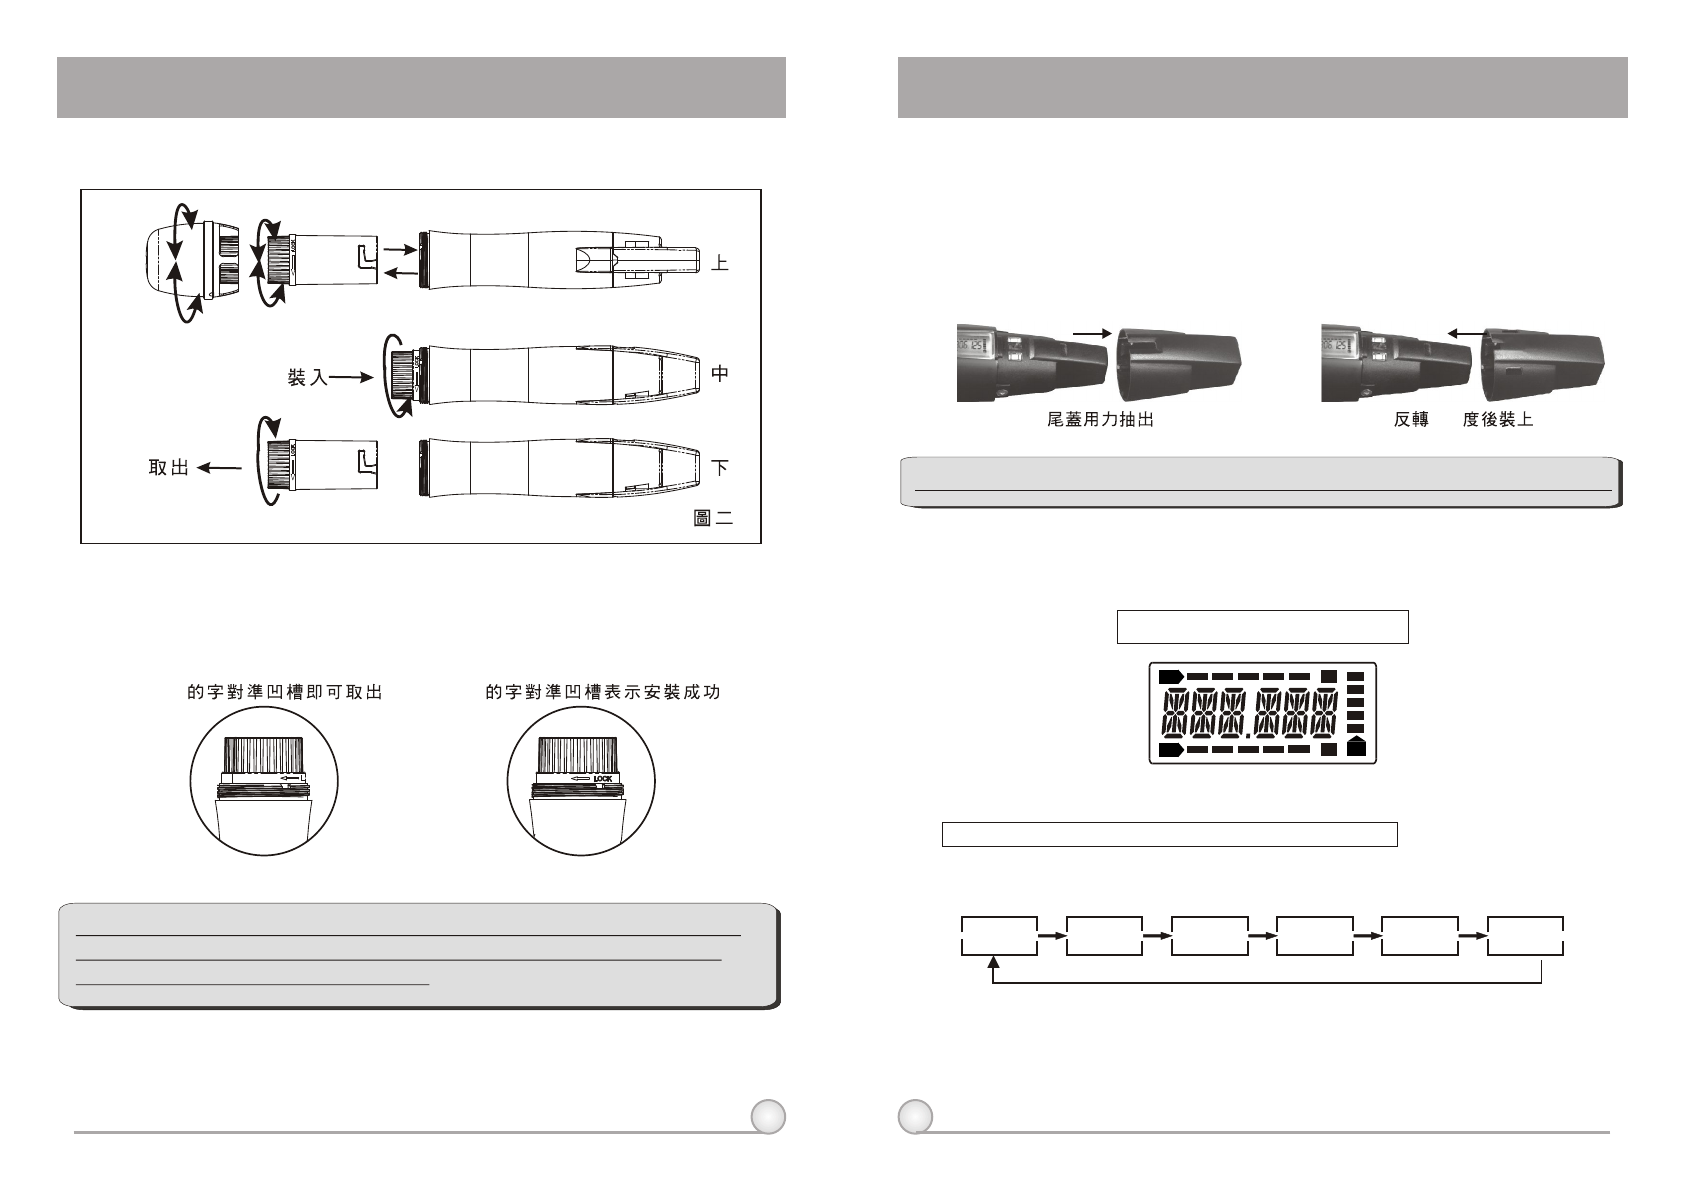
Fully Lit VFD Display
4. LCD Panel Functions
()
2. Battery Removals and Installation
Open the upper grille and capsule module, then turning the battery pack
in a counterclockwise direction in order to replace the battery (see diagram 2).
To reinstall the battery module after loading the new battery, turn it in a
clockwise direction (see diagram 2).
**NOTE: When microphone is not in use, please turn the power off.
Battery pack can be recharged while in the transmitter or remove
from transmitter and charged alone.
34
3. Rear Cap On/Off Switch Protection
The patented color rear cap serves two purposes, provides easy channel
identification and protecting the toggle on/off switch. It allows the on/off switch
to either be exposed or concealed as desired. You can avoid unintended
switching off of the microphone by rotating the color rear cap 180 degrees to
cover the on/off switch completely.
**Note: When using the microphone, the color rear cap must be in place.
A
RF
AF
B
BT
Mode Switch: To select from different menu
Function Selection:
The LCD panel has 6 functions displayed sequentially; their respective
descriptions and operations are as follows:
a. Press MODE (7) to access the 6 different functions. Once a function is selected, it
starts flashing on the screen. If parameter needs to be modified on selected
function, press SET (8) to modify the value while the display is still flashing. Once
done, leave it for 5 seconds until it stops flashing and the selection will be
programmed into the transmitter.
A. Operation Guide
FREQ LOW--CU
AF--SEN LIMIT ENCRYPGR--CH
OPEN LOCK
180
DIGITAL WIRELESS HANDHELD MICROPHONE DIGITAL WIRELESS HANDHELD MICROPHONE
**NOTE: When program a special frequency via monitoring software;
LCD screen cannot display the number. This is because this special
channel is not in the preset group and channel. Therefore, LCD panel
will look like illustration below.
**NOTE: To modify transmitter's group, channel and frequency, all
three must be set at the receiver and transmit the new setting to
transmitter via ACT.
56
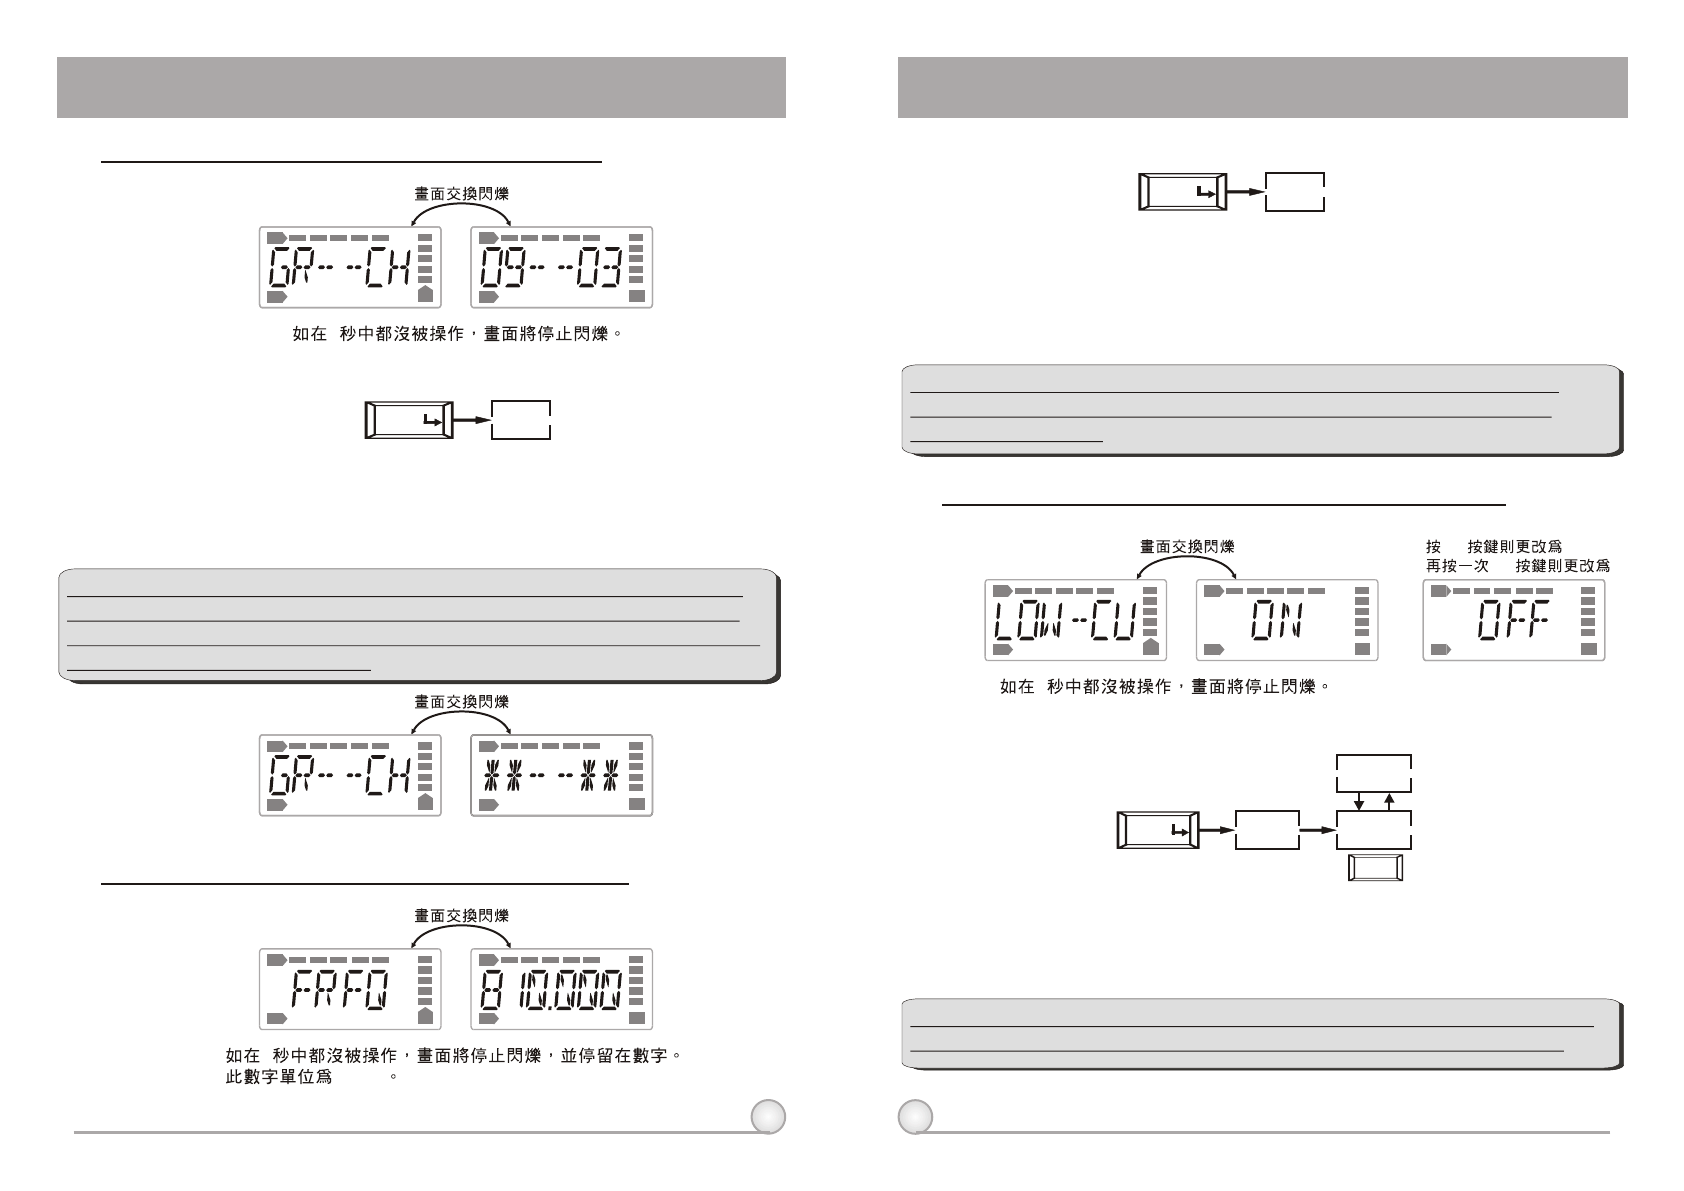
(1)GR-CH: Displays Information of Group and Channel
RF
RF
AF
AF
BT
BT
RF
RF
AF
AF
BT
BT
5
B. Operation Guide:
B. Operation Guide:
a. Press ''MODE'' and stop on "GR-CH" function, the display showing current group
and channel will be flashing. After 5 seconds, the display will stop flashing.
b. "GR-CH" function is added to display group and channel information. Changing
current group and channel must be done on the receiver.
GR--CH
MODE
5
a. Press ''MODE'' and stop on "FREQ" function, the display showing current
frequency will be flashing. After 5 seconds, the display will stop flashing.
B. "FREQ" function is added to display frequency information. Changing current
frequency must be done on the receiver.
(2) FREQ: Displays Information of Transmitter Frequency
RF
AF BT
RF
AF BT
5
FREQ
MODE
"MHz"
(3) LOW-CU: Setup and Change of Low Frequency Cut Off
a. Press ''MODE'' and stop on "LOW-CU" function, the display showing current state
will be flashing and is ready to be modified.
b. Press ''SET'' button to change to ''ON'' or ''OFF'' as desired.
SET OFF
SET ON
RF RF
AF AF
BT BT
RF
AF BT
5
LOW--CU
MODE ON
OFF
SET
A. Operate via MODE Button
A. Operate via MODE Button
B. Operation Guide:
A. Operate via MODE Button
**NOTE: When the LOW-CU function is ''ON'', the frequency response
below 100Hz will decrease about 4dB with a slope of -6dB/Octave.
DIGITAL WIRELESS HANDHELD MICROPHONE DIGITAL WIRELESS HANDHELD MICROPHONE