Mitsumi Electric Co DWLA001 Wireless LAN Desktop Unit User Manual WVUM10E
Mitsumi Electric Co Ltd Wireless LAN Desktop Unit WVUM10E
Contents
manual Part II

Mitsumi Electric Co., Ltd. Wavit11 User's Manual
33/108
CONFIDENTIAL
7. Wavit11 Set Up
“How to Start the Wavit11Configuration Utility” page34
1. Start Wavit11 Configuration Utility.
2. Set the Wavit11 in accordance with a communication mode.
“How to setup the Ad-Hoc mode” page38
“How to Setup the 802.11 Ad-Hoc mode” page41
“How to Setup the Infrastructure mode” page44
“How to Setup the AP mode” page51
“How to Setup the Wireless Bridge Mode” page57
Mitsumi Electric Co., Ltd. Wavit11 User's Manual
34/108
CONFIDENTIAL
7.1. How to Start the Wavit11Configuration Utility
[STEP1] Connect Wavit11 and personal computer using the straight cable.
[STEP2] Connect DC plug of AC adapter to Wavit11 DC IN jack.
[STEP3] Connect AC adapter to AC outlet.
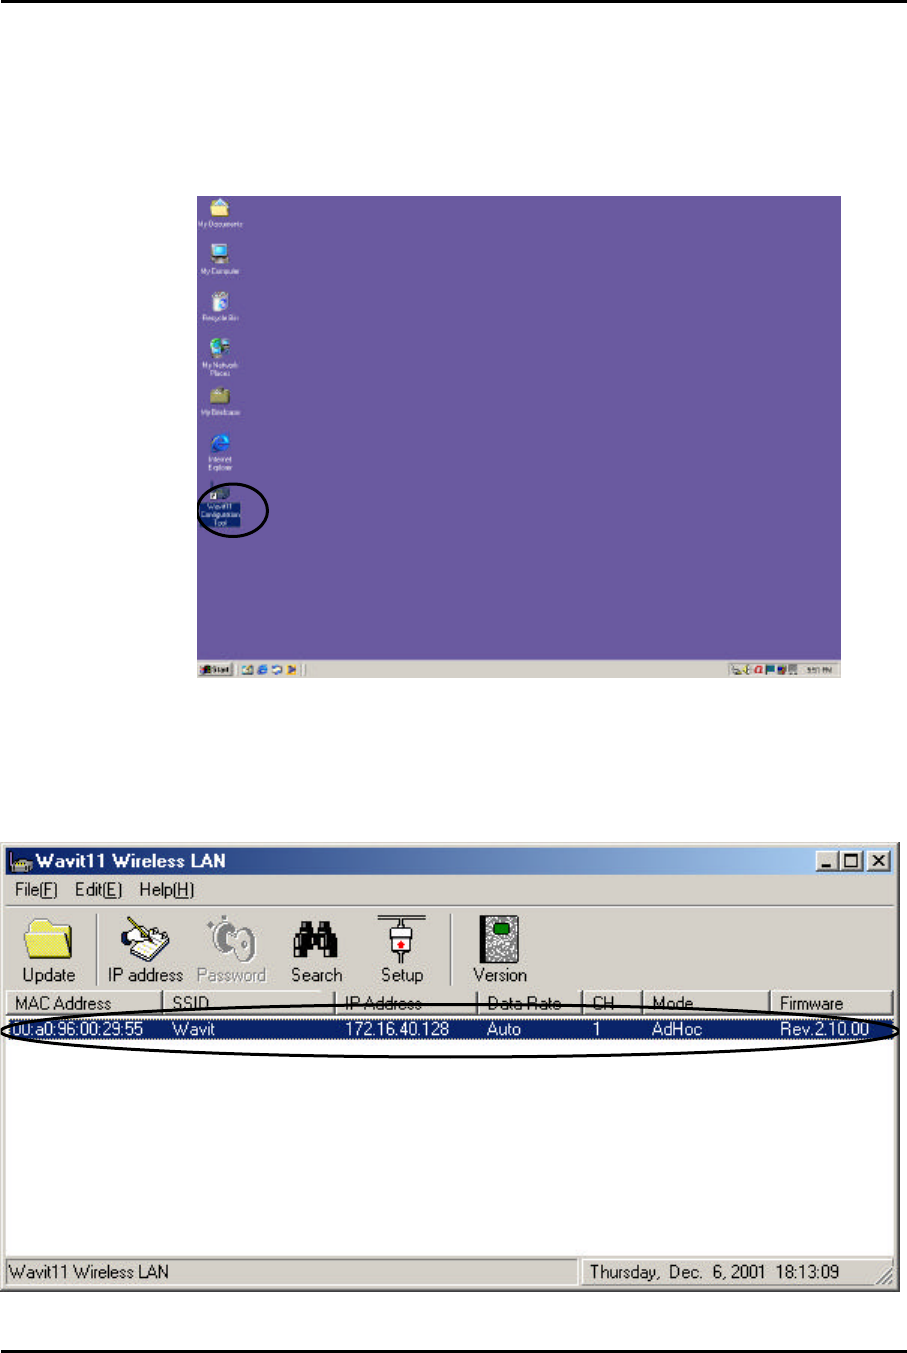
[STEP4] Click the “Wavit11 Configuration Utility” icon.
[STEP5] “Wavit11 Wireless LAN” window appears. The information of Wavit11
that is connected to this personal computer is displayed in the station list in the
“Wavit11 Wireless LAN” window.
Mitsumi Electric Co., Ltd. Wavit11 User's Manual
35/108
CONFIDENTIAL
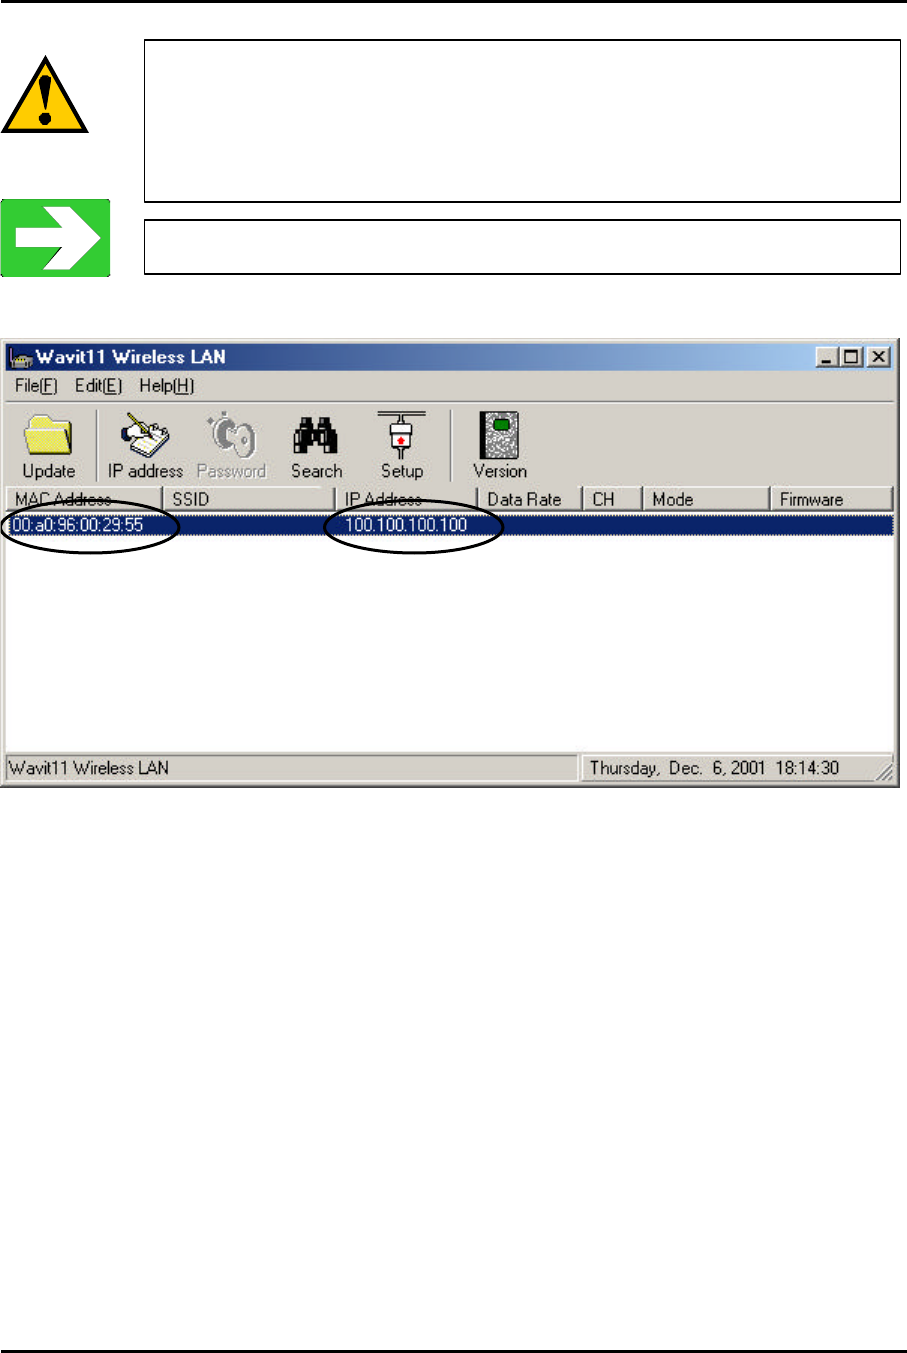
In the case that only "MAC Addre
ss" and "IP Address" are
displayed in the station list in the "Wavit11 Wireless LAN"
window, you cannot set up the Wavit11. M
odify the IP address
of Wavit11.
“How to Change the Wavit11 IP address” page59
Mitsumi Electric Co., Ltd. Wavit11 User's Manual
36/108
CONFIDENTIAL
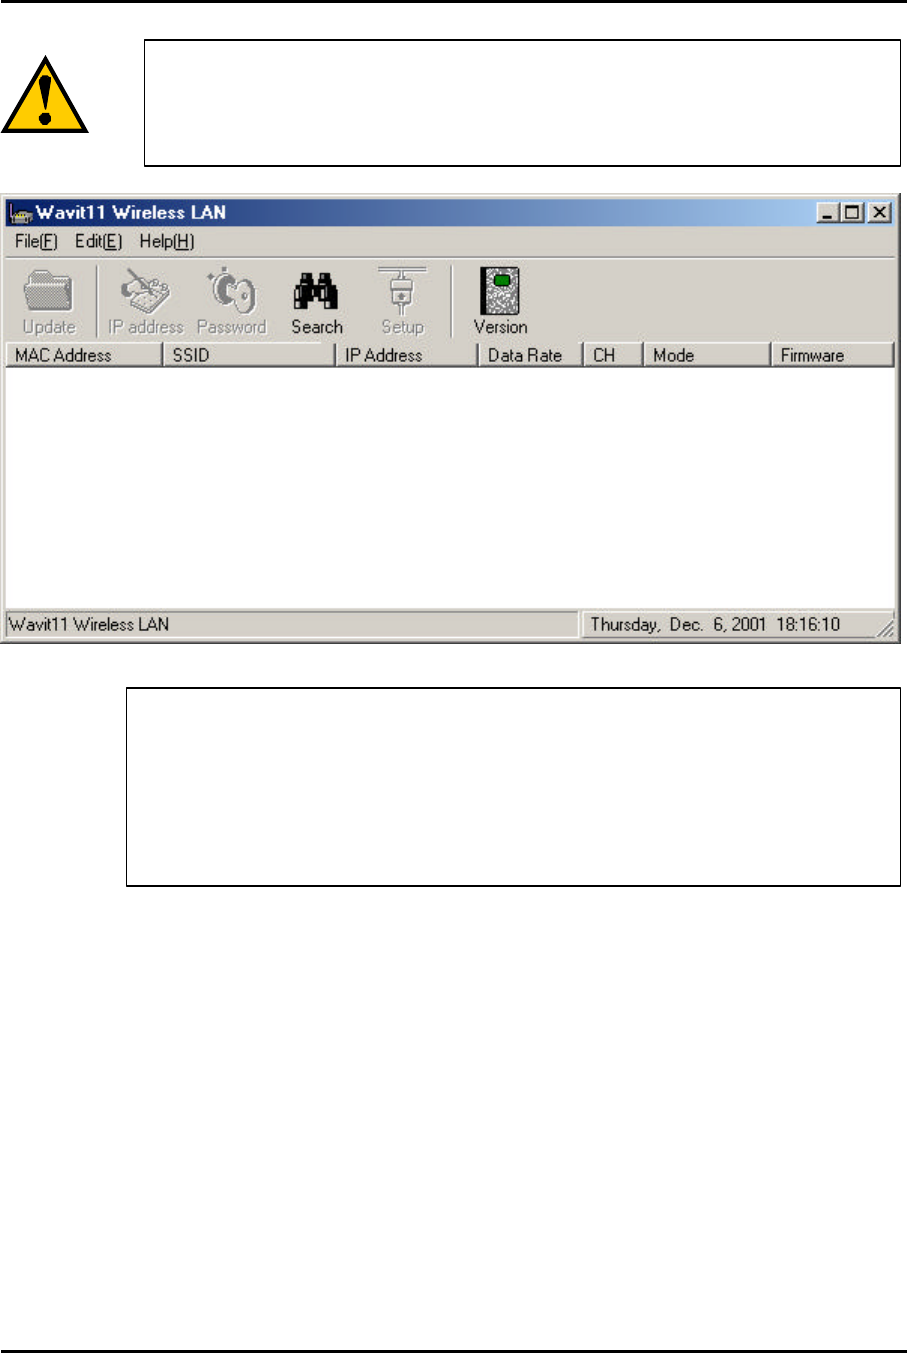
In the case that nothing is displayed to the station list of
the ”Wavit11 Wireless LAN”
window, you cannot set up the
Wavit11.
Confirm the following.
1. Connection between the Wavit11 and your personal computer
2. Connection between the Wavit11 and the AC adapter
3. Connection between the AC adapter and the AC outlet
4. TCP/IP setting of your personal computer
Mitsumi Electric Co., Ltd. Wavit11 User's Manual
37/108
CONFIDENTIAL
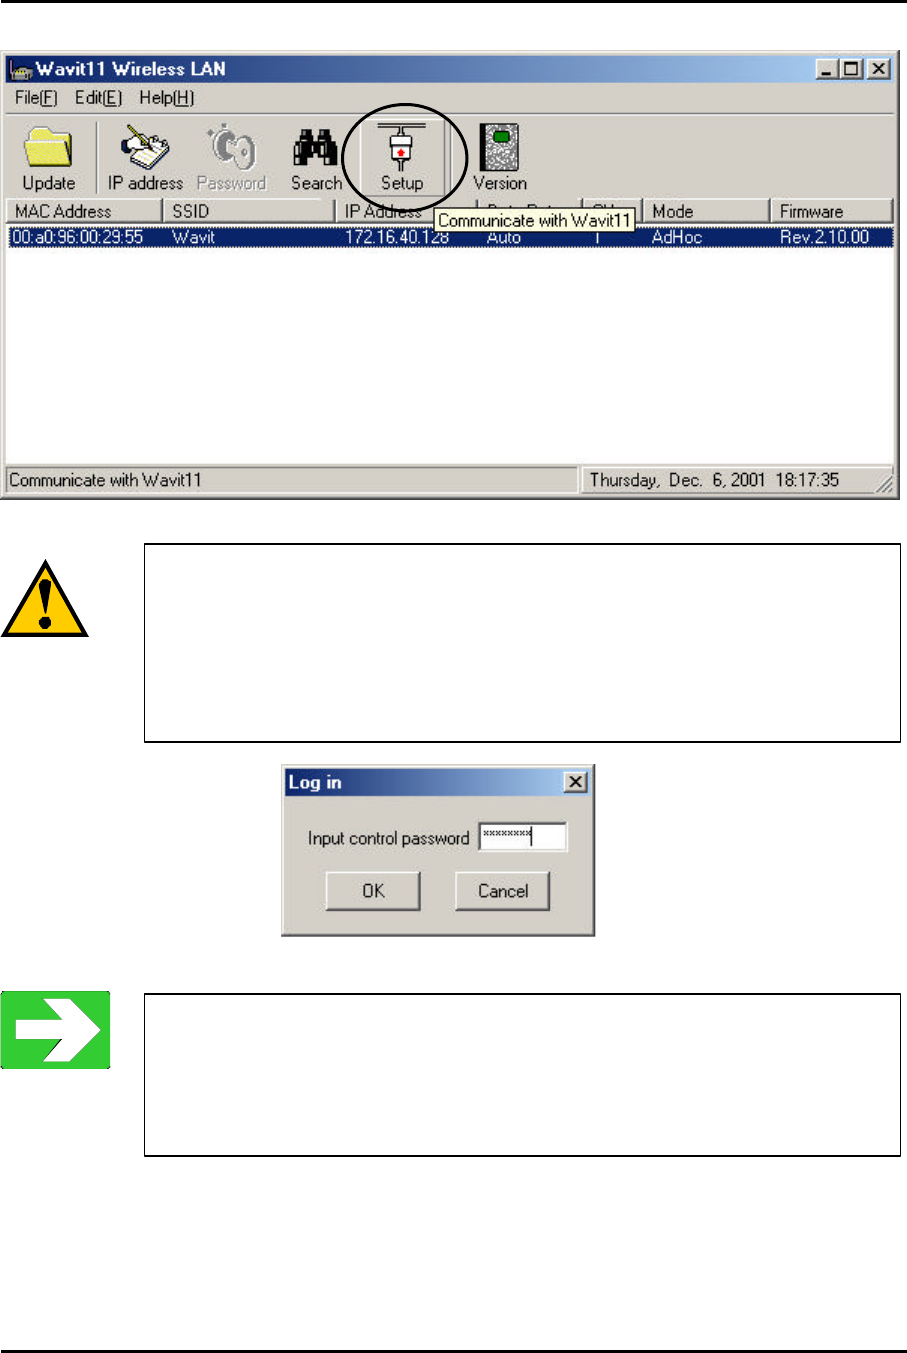
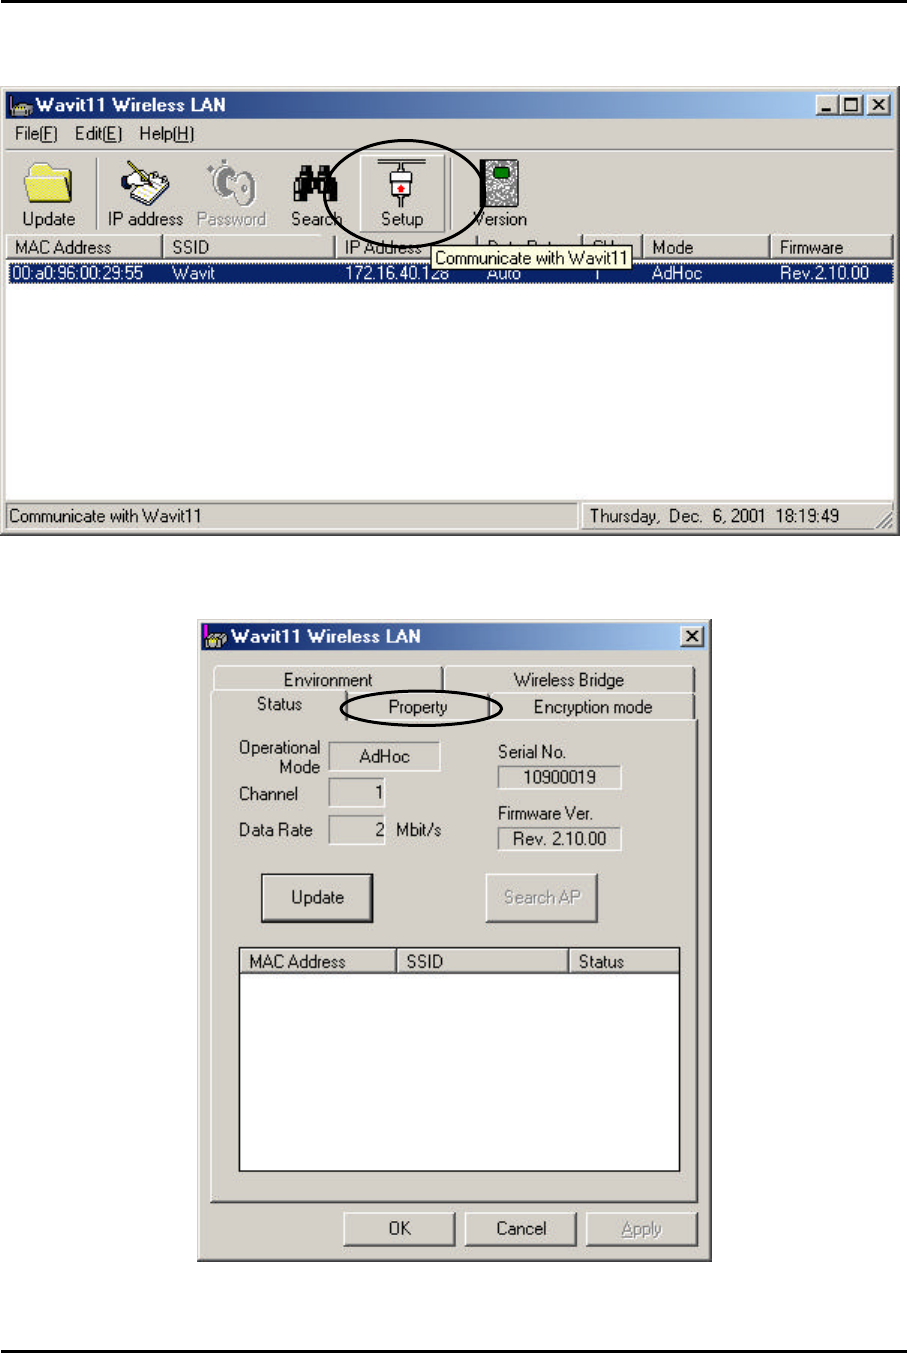
[STEP6] Click “Setup” in the “Wavit11 Wireless LAN” window.
If the operational mode is “AP” or “Wireless Bridge”:
The “Log in” window will appear after clicking the “Setup
”
button.
Input control password.
The default control password is “password”.
Initialize Wavit11 when you have forgotten the control
password.
“Wavit11 Initialization” page63
Mitsumi Electric Co., Ltd. Wavit11 User's Manual
38/108
CONFIDENTIAL
7.2. How to setup the Ad-Hoc mode
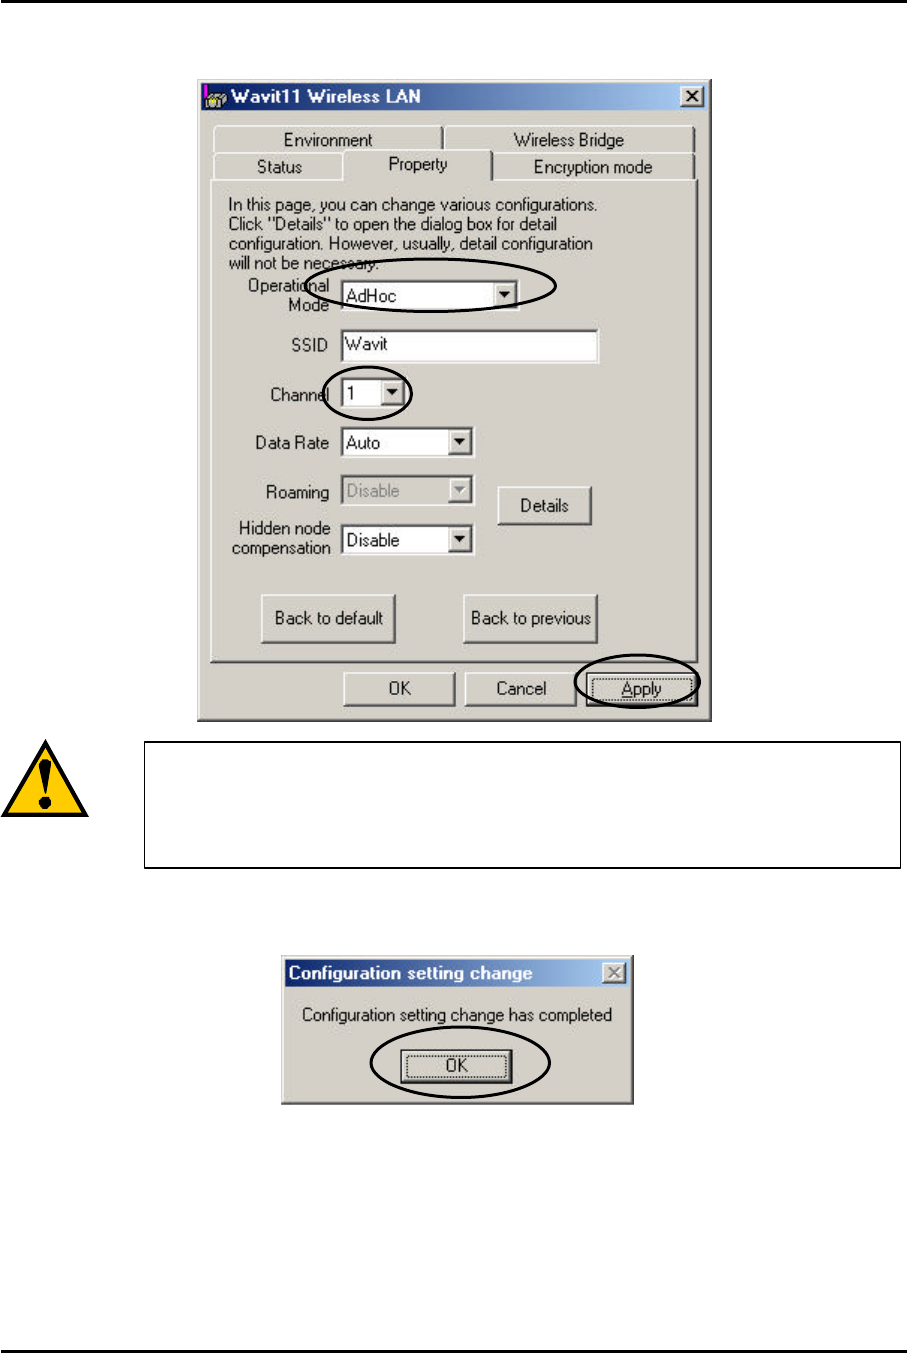
[STEP1] Click the “Setup” in the “Wavit11 Wireless LAN” window.
[STEP2] Click the “Property” page.
Mitsumi Electric Co., Ltd. Wavit11 User's Manual
39/108
CONFIDENTIAL
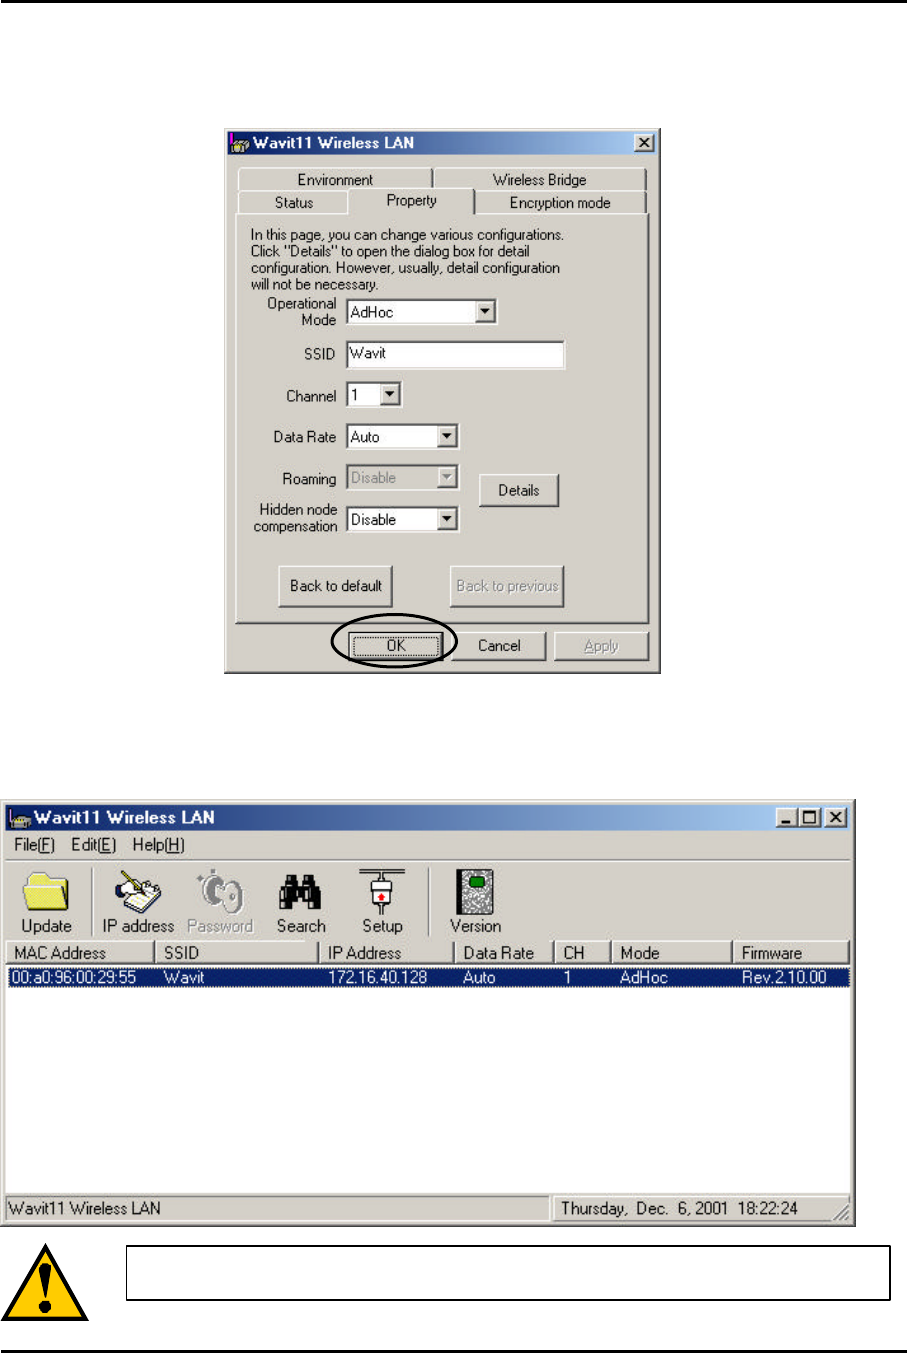
[STEP3] At the “Property” page, change the Operational Mode to “Ad-Hoc”,
select the Channel and then click the “Apply” button.
[STEP4] Click the “OK” button.
The Channel should be same on all Wavit11 in Ad-Hoc mode
.
The Wavit11 that has different Channel
cannot communicate
each other.
Mitsumi Electric Co., Ltd. Wavit11 User's Manual
40/108
CONFIDENTIAL
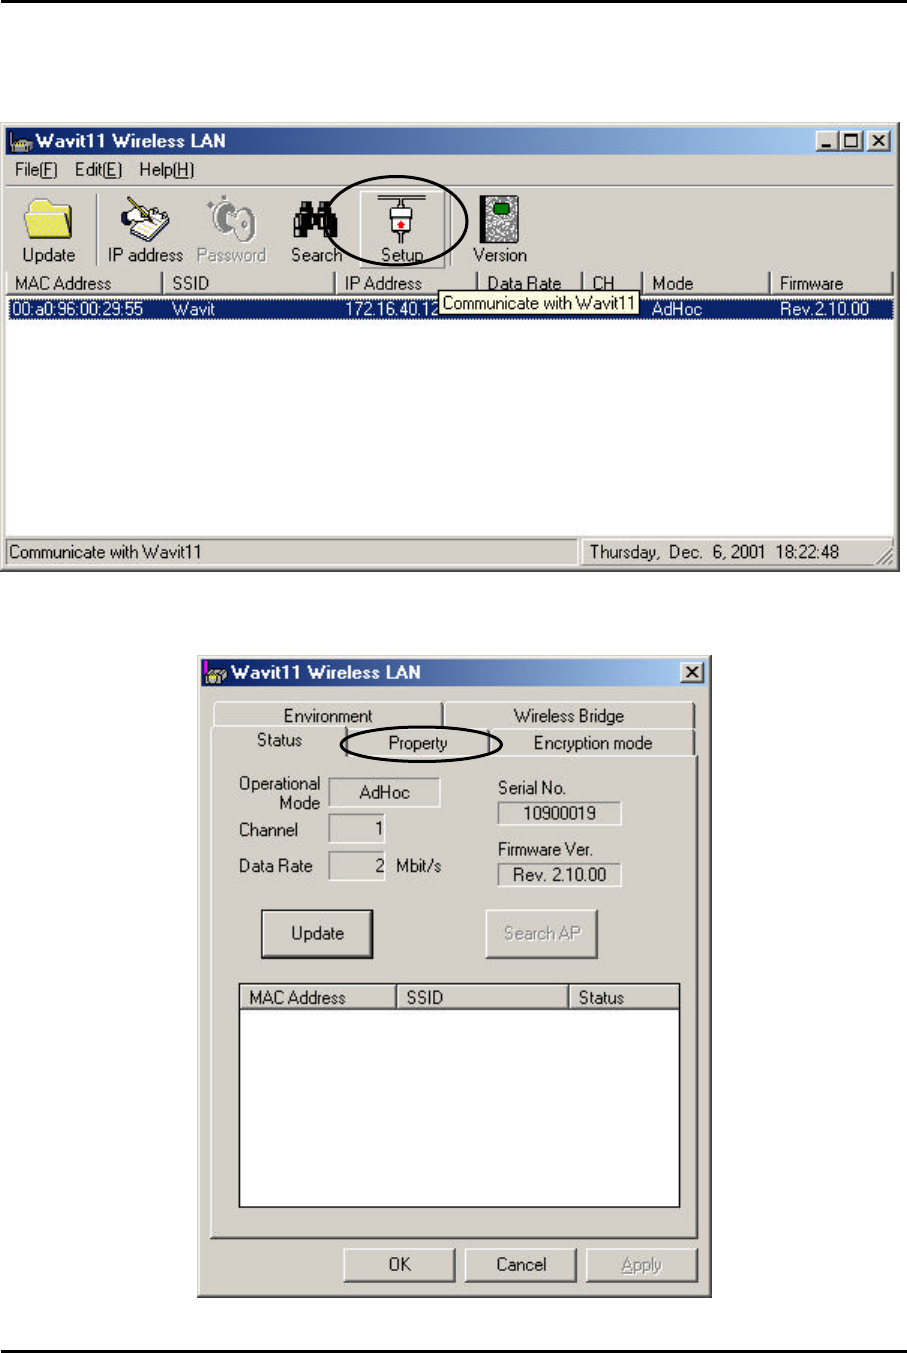
[STEP5] In the “Status” page, check that the Operational Mode is set to
“Ad-Hoc” and the Channel is set correctly as you selected, and then click the
“OK” button.
[STEP6] After returning to the “Wavit11 Wireless LAN” window, check that all
setups you selected are reflected correctly, and then end the “Wavit11
Configuration Utility”.
When your selection is not reflected, click the "Search”.
Mitsumi Electric Co., Ltd. Wavit11 User's Manual
41/108
CONFIDENTIAL
7.3. How to Setup the 802.11 Ad-Hoc mode
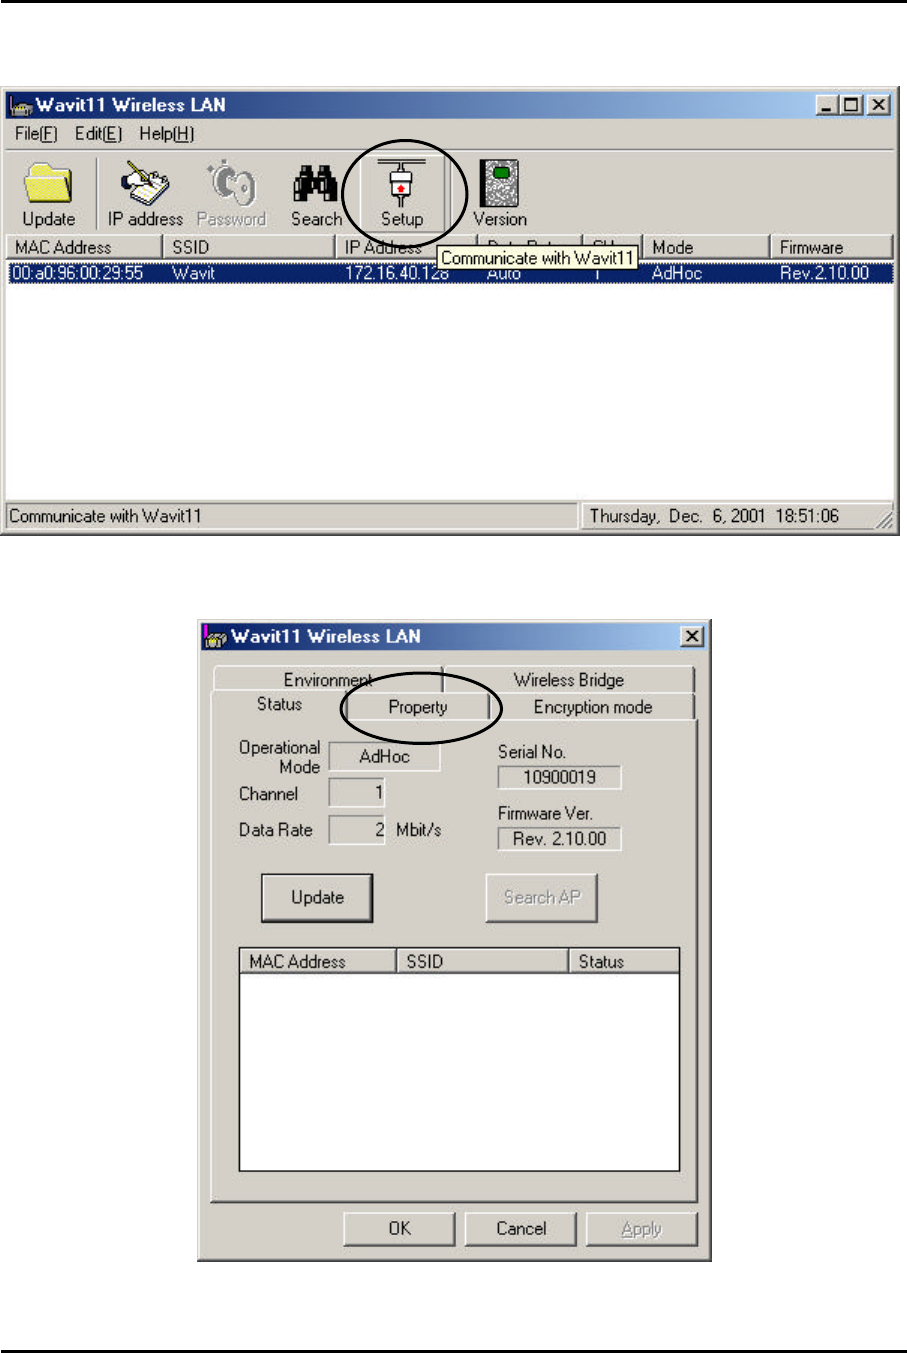
[STEP1] Click the “Setup” in the “Wavit11 Wireless LAN” window.
[STEP2] Click the “Property” page.
Mitsumi Electric Co., Ltd. Wavit11 User's Manual
42/108
CONFIDENTIAL
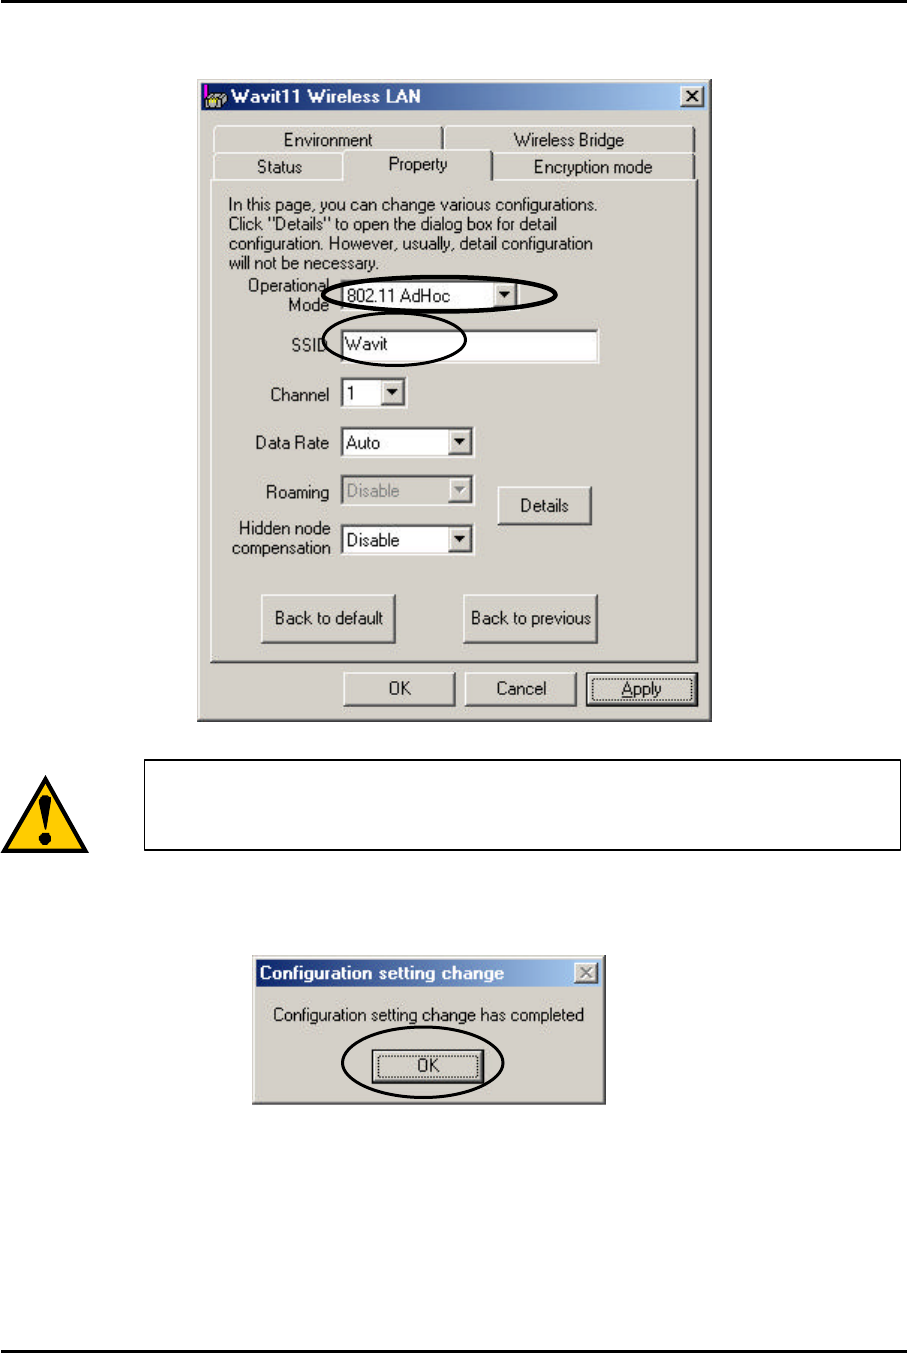
[STEP3] At the “Property” page, change the Operational Mode to “802.11
Ad-Hoc” and set the “SSID”, and then click the “Apply” button.
[STEP4] Click the “OK” button.
Set the SSID in 802.11 Ad-Hoc mode.
Wavit11 with different SSID cannot communicate each other.
Mitsumi Electric Co., Ltd. Wavit11 User's Manual
43/108
CONFIDENTIAL
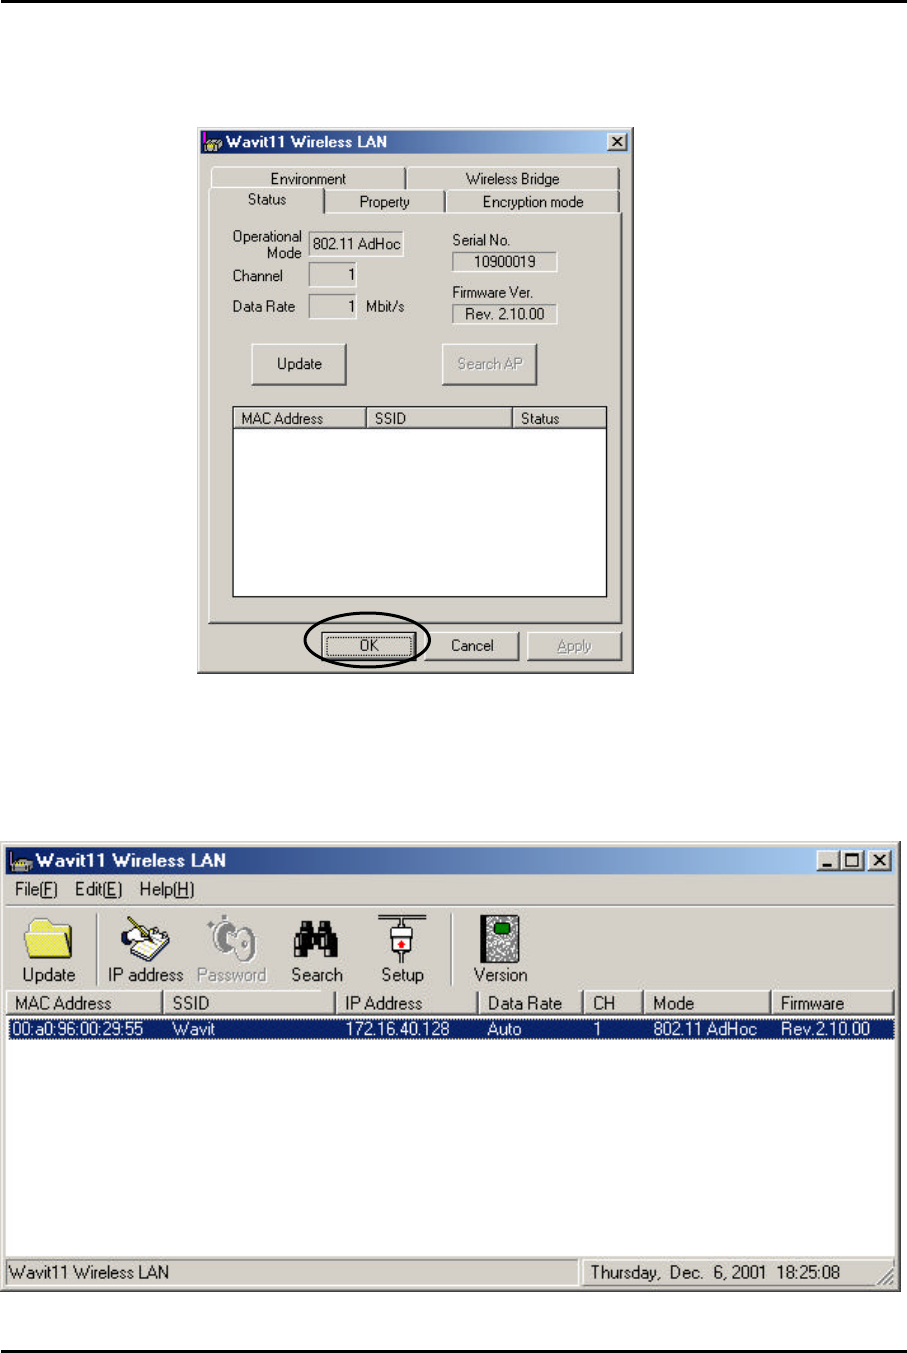
[STEP5] In the “Status” page, check that the Operational Mode is set to “802.11
Ad-Hoc” and the Channel is set correctly as you selected, and then click the
“OK” button.
[STEP6] After returning to the “Wavit11 Wireless LAN” window, check that all
setups you selected are reflected correctly and then end the “Wavit11
Configuration Utility”
Mitsumi Electric Co., Ltd. Wavit11 User's Manual
44/108
CONFIDENTIAL
7.4. How to Setup the Infrastructure mode
[STEP1] Click the “Setup” in the “Wavit11 Wireless LAN” window.
[STEP2] Click the “Property” page.
Mitsumi Electric Co., Ltd. Wavit11 User's Manual
45/108
CONFIDENTIAL
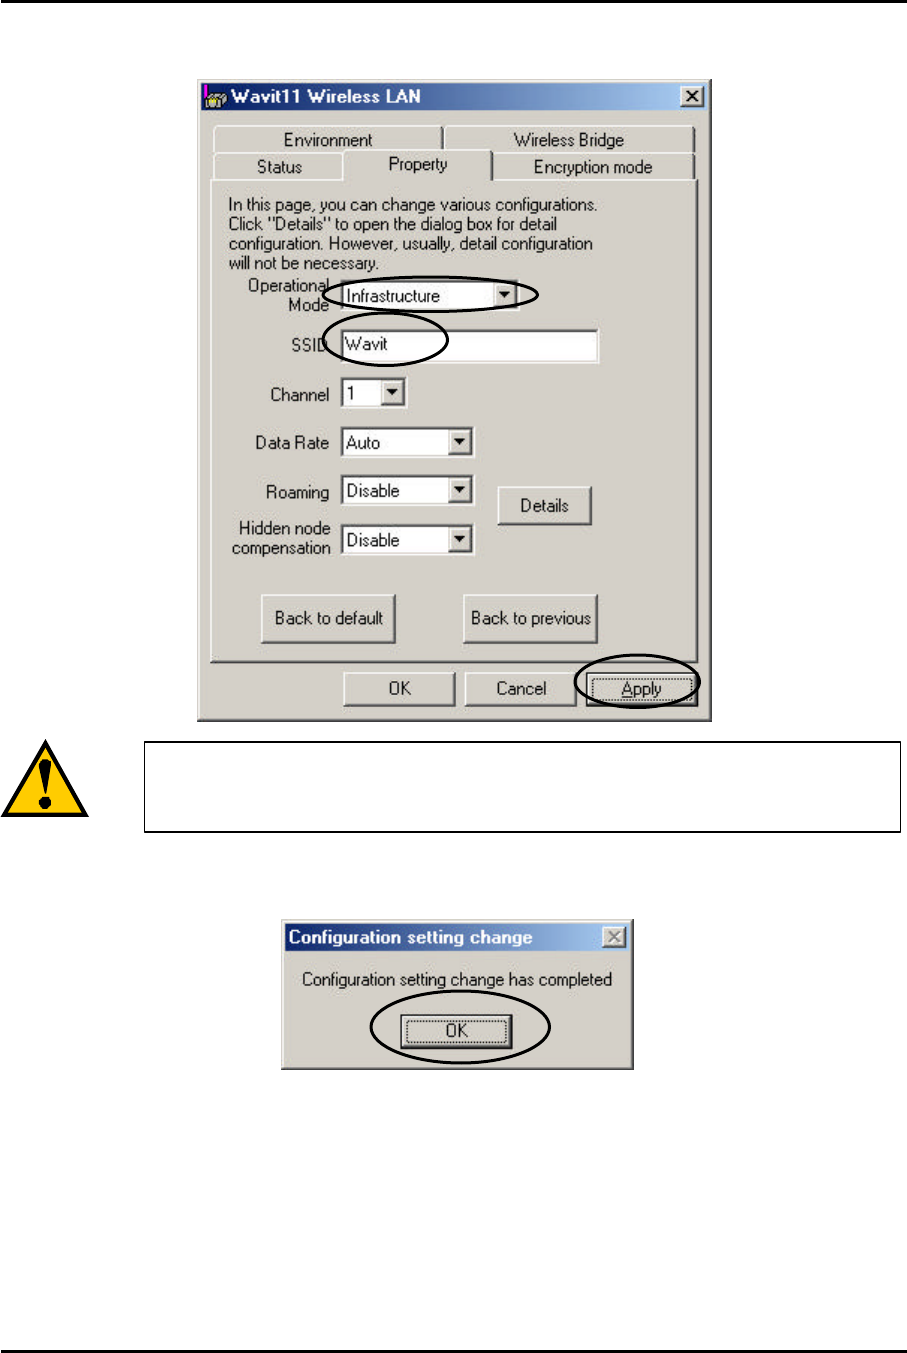
[STEP3] At the “Property” page, change the Operational Mode to
“Infrastructure” mode and set the SSID, then click the ”Apply” button.
[STEP4] Click the “OK” button.
Set the SSID in Infrastructure mode.
This SSID must be same with that of Access Point.
Mitsumi Electric Co., Ltd. Wavit11 User's Manual
46/108
CONFIDENTIAL
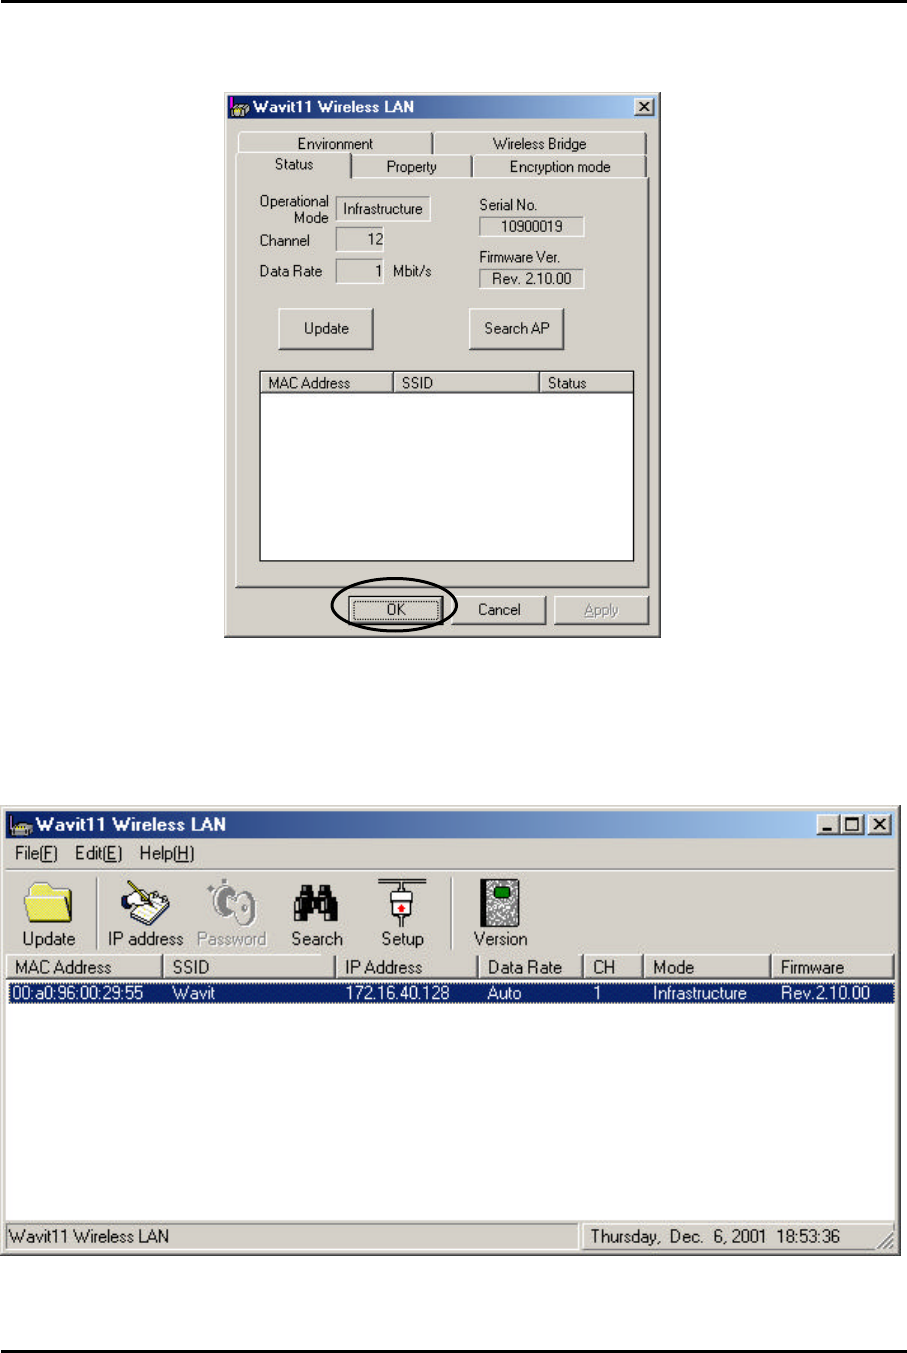
[STEP5] In the “Status” page, check that the Operational Mode is set to
“Infrastructure”, and then click the “OK” button.
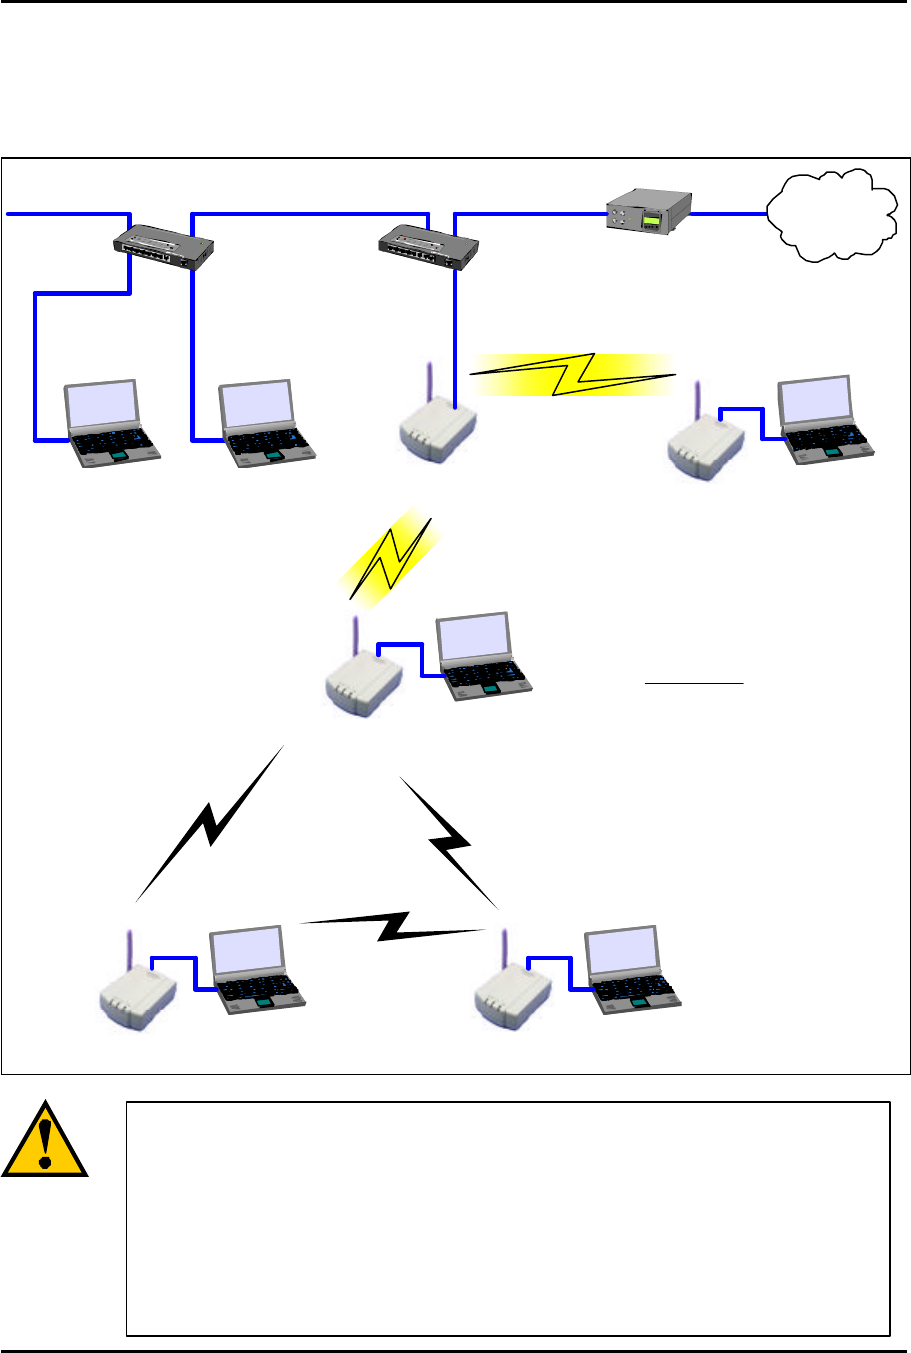
[STEP6] After returning to the “Wavit11 Wireless LAN” window, check that all
setups you selected are reflected correctly and then end the “Wavit11
Configuration Utility.
Mitsumi Electric Co., Ltd. Wavit11 User's Manual
47/108
CONFIDENTIAL
7.5. How to Setup the Both mode
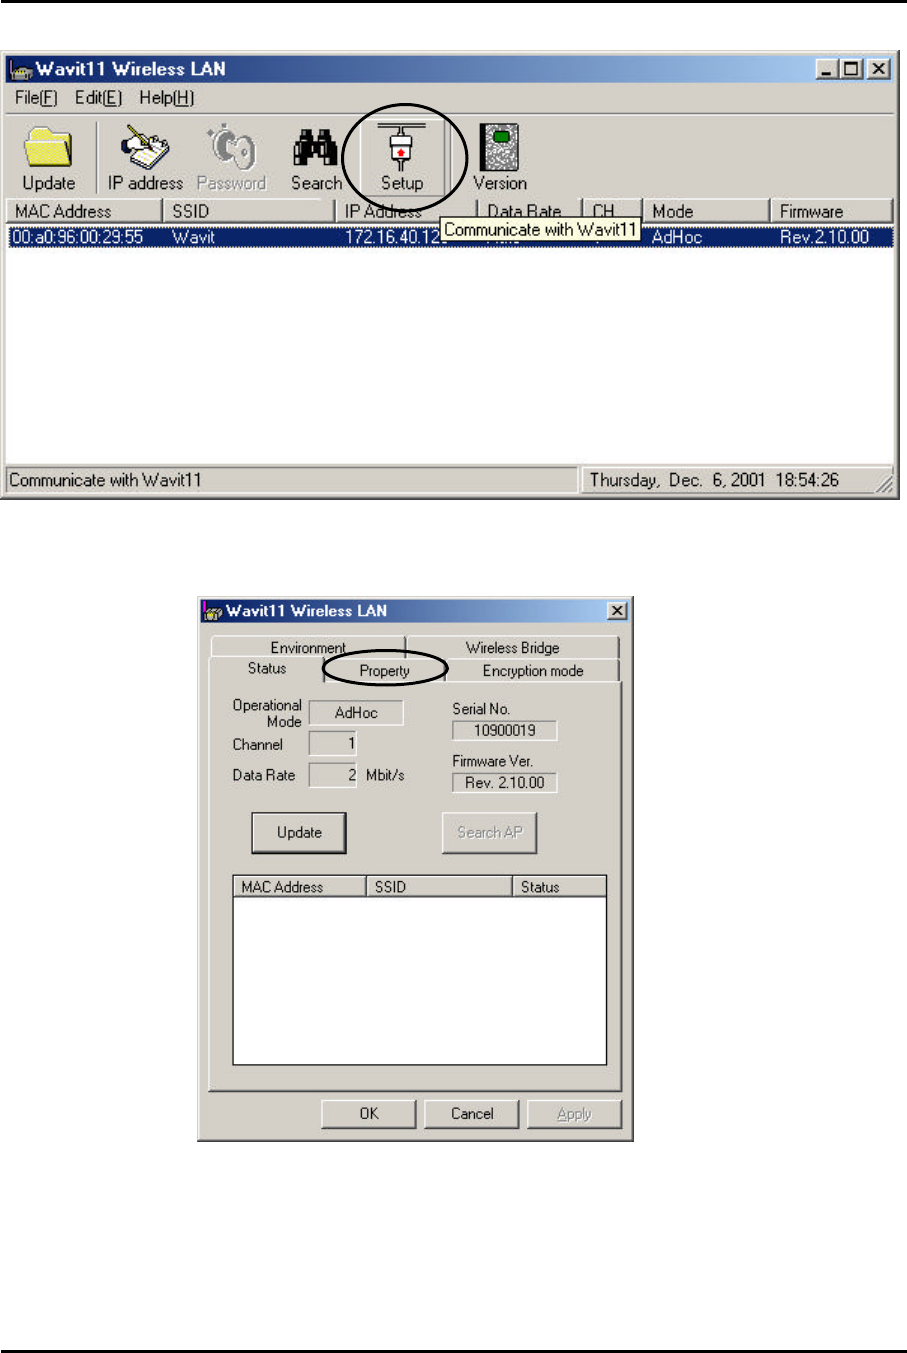
If there is an Access Point, Wavit11 in Both mode is will operate as Wavit11 in
Infrastructure mode. If there is no Access Point, Wavit11 in Both mode will
operate as Wavit11 in Ad-Hoc mode.
AP Mode Infrastructure
Mode
Both Mode
Router
Hub Internet
Hub
Ad-Hoc ModeAd-Hoc Mode
Ad-Hoc LAN
Both mode
The Wavit11 in Both mode cannot operate both Infrastructure
LAN and Ad-Hoc LAN simultaneity. The Wavit11 in
Both mode
decides whether there is an Access Point or not at the ti
me of
boot and then it decides whether it should connect to A
ccess
Point or join to Ad-Hoc LAN.
To connect to Access Point
after joining to Ad-Hoc LAN, it is necessary to reboot Wavit11.
Mitsumi Electric Co., Ltd. Wavit11 User's Manual
48/108
CONFIDENTIAL
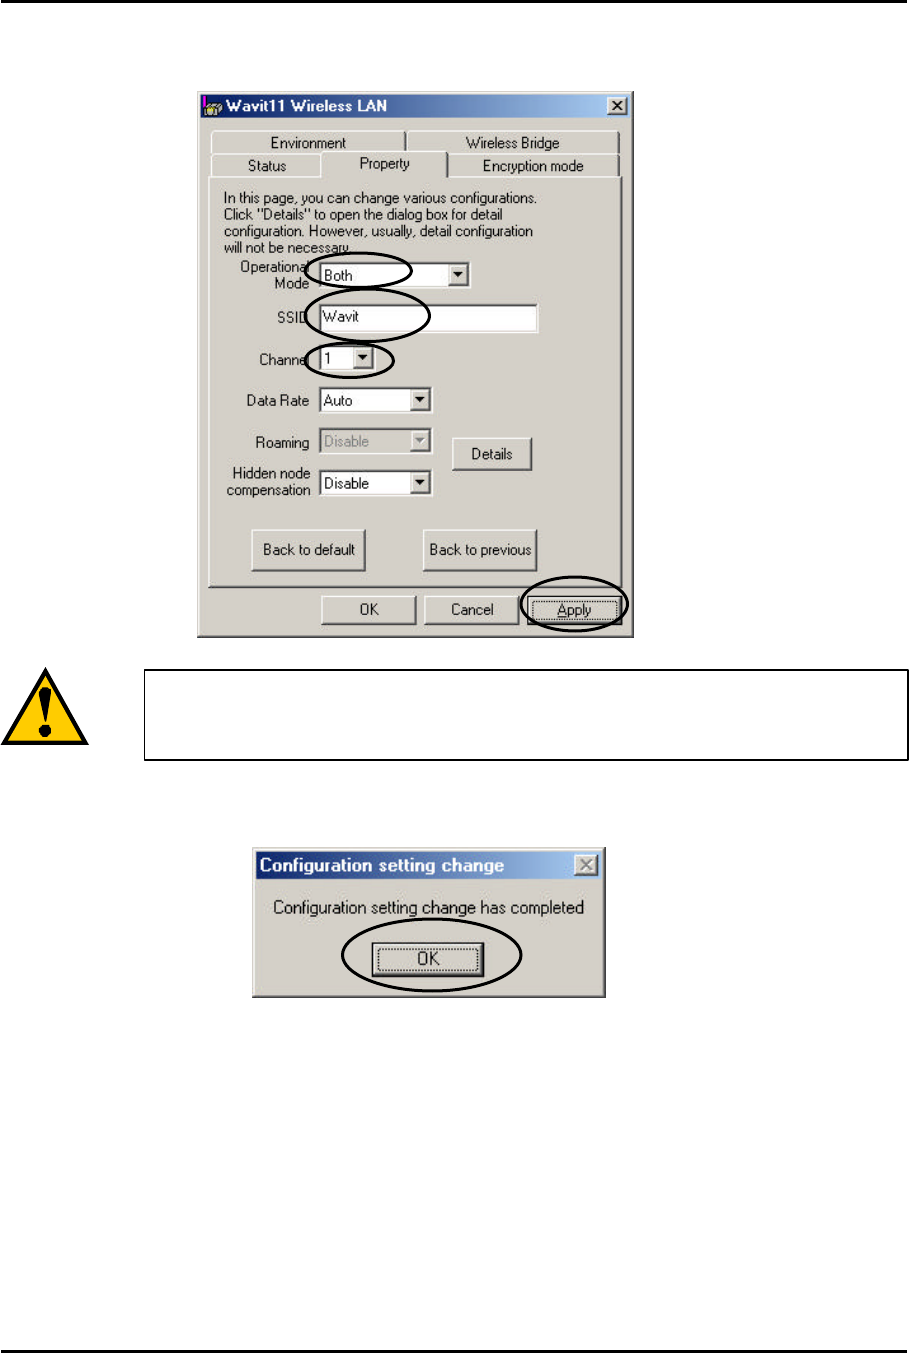
[STEP1] Click the “Setup” in the “Wavit11 Wireless LAN” window.
[STEP2] Click the “Property” page.
Mitsumi Electric Co., Ltd. Wavit11 User's Manual
49/108
CONFIDENTIAL
[STEP3] At the “Property” page, change the Operational mode to “Both”, set the
SSID and select the Channel, and then click the “Apply” button.
[STEP4] Click the “OK” button.
Set the SSID and select the Channel in Both mode.
This SSID must be the same as that of Access Point.
Mitsumi Electric Co., Ltd. Wavit11 User's Manual
50/108
CONFIDENTIAL
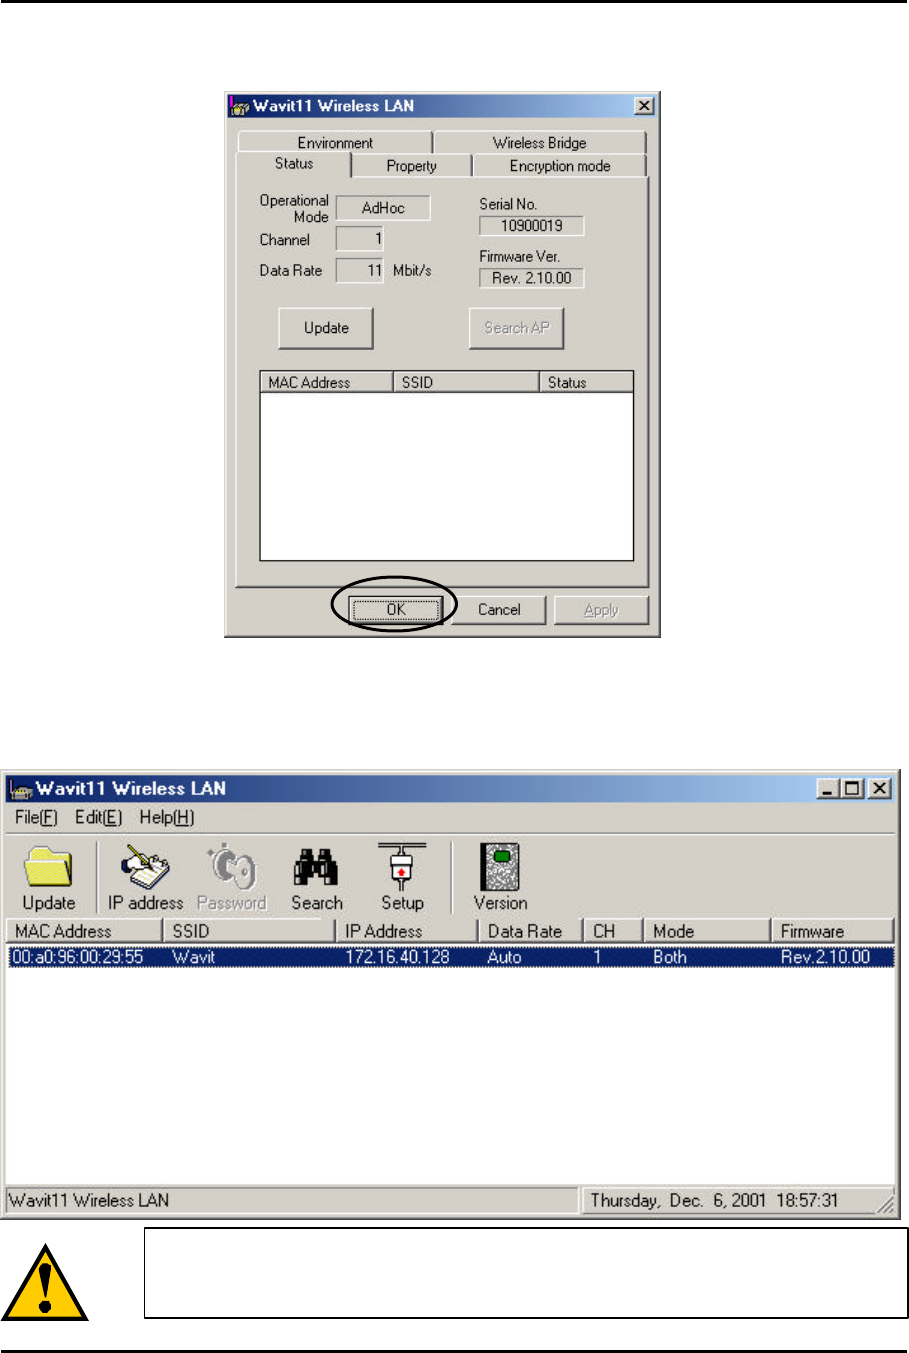
[STEP5] In the “Status” page, check that the Channel is set as you selected, and
then click the “OK” button.
[STEP6] After returning to the “Wavit11 Wireless LAN” window, check that all
setups you selected are reflected correctly, and then end the “Wavit11
Configuration Utility.
In the Both mode, there are cases where “Ad-Hoc”
or
“Infrastructure” is shown under Mode or Operational Mode.
Mitsumi Electric Co., Ltd. Wavit11 User's Manual
51/108
CONFIDENTIAL
7.6. How to Setup the AP mode
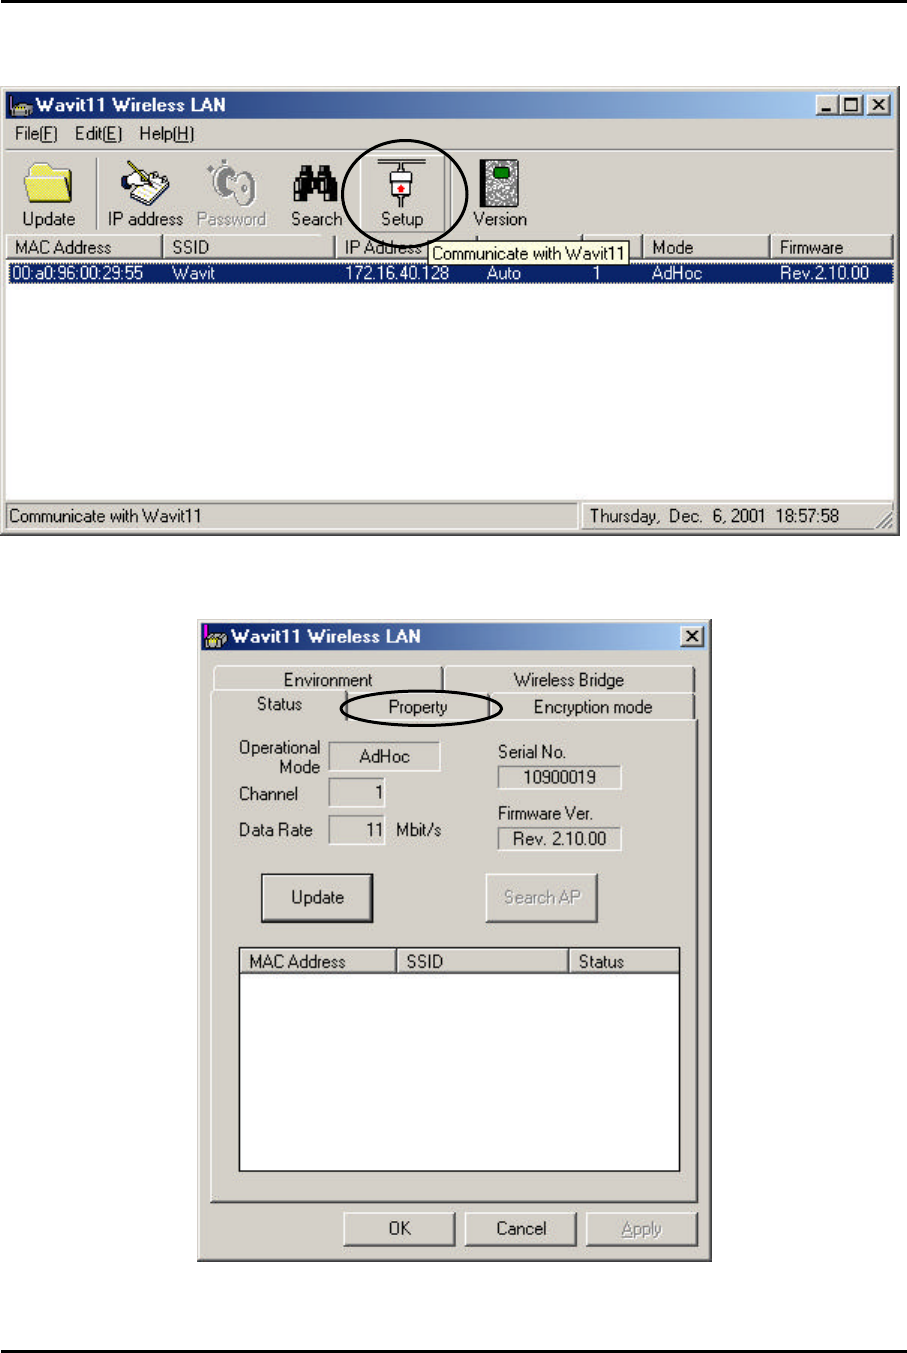
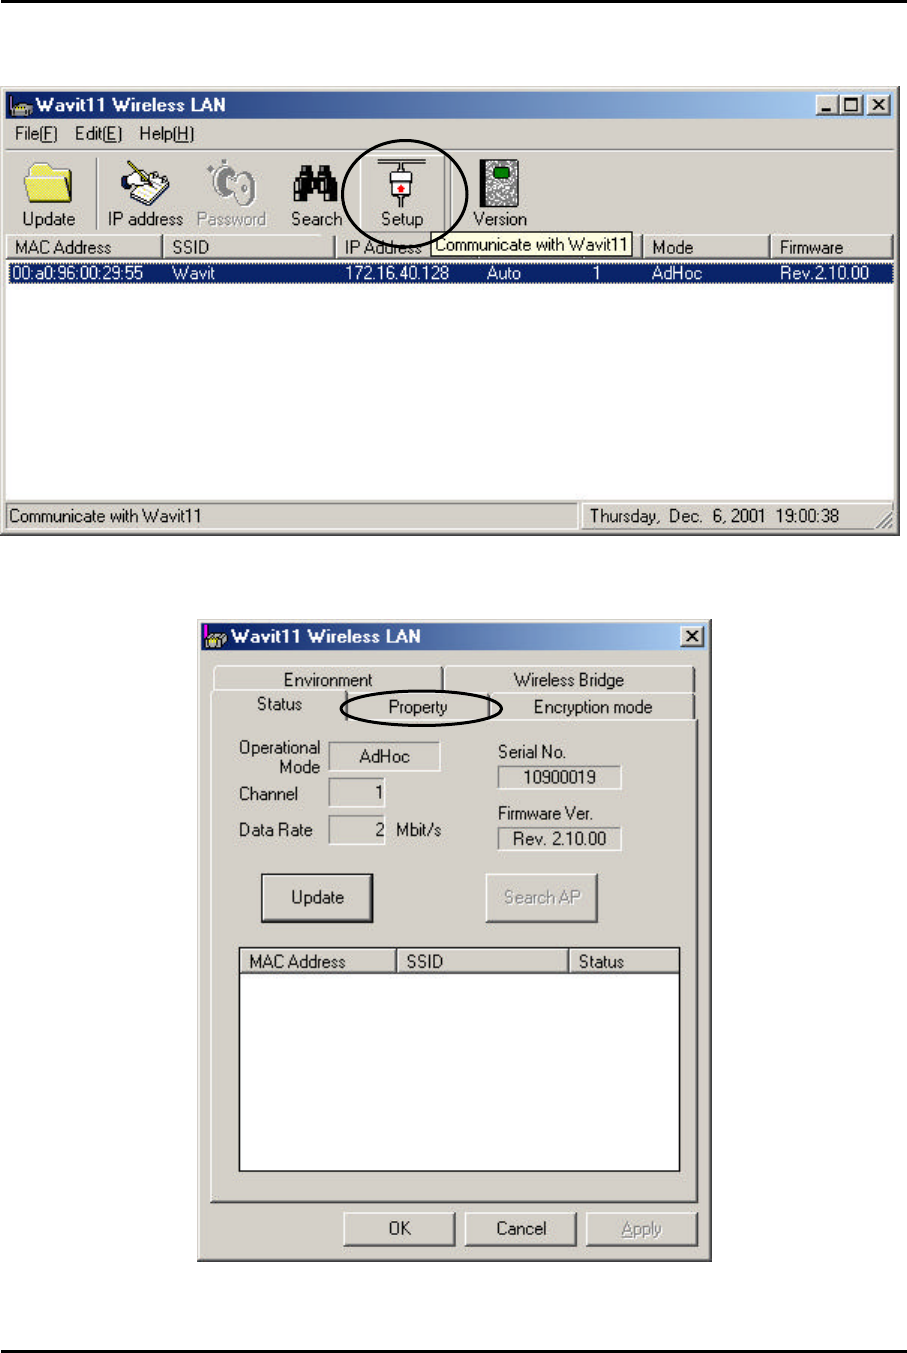
[STEP1] Click the “Setup” in the “Wavit11 Wireless LAN” window.
[STEP2] Click the “Property” page.
Mitsumi Electric Co., Ltd. Wavit11 User's Manual
52/108
CONFIDENTIAL
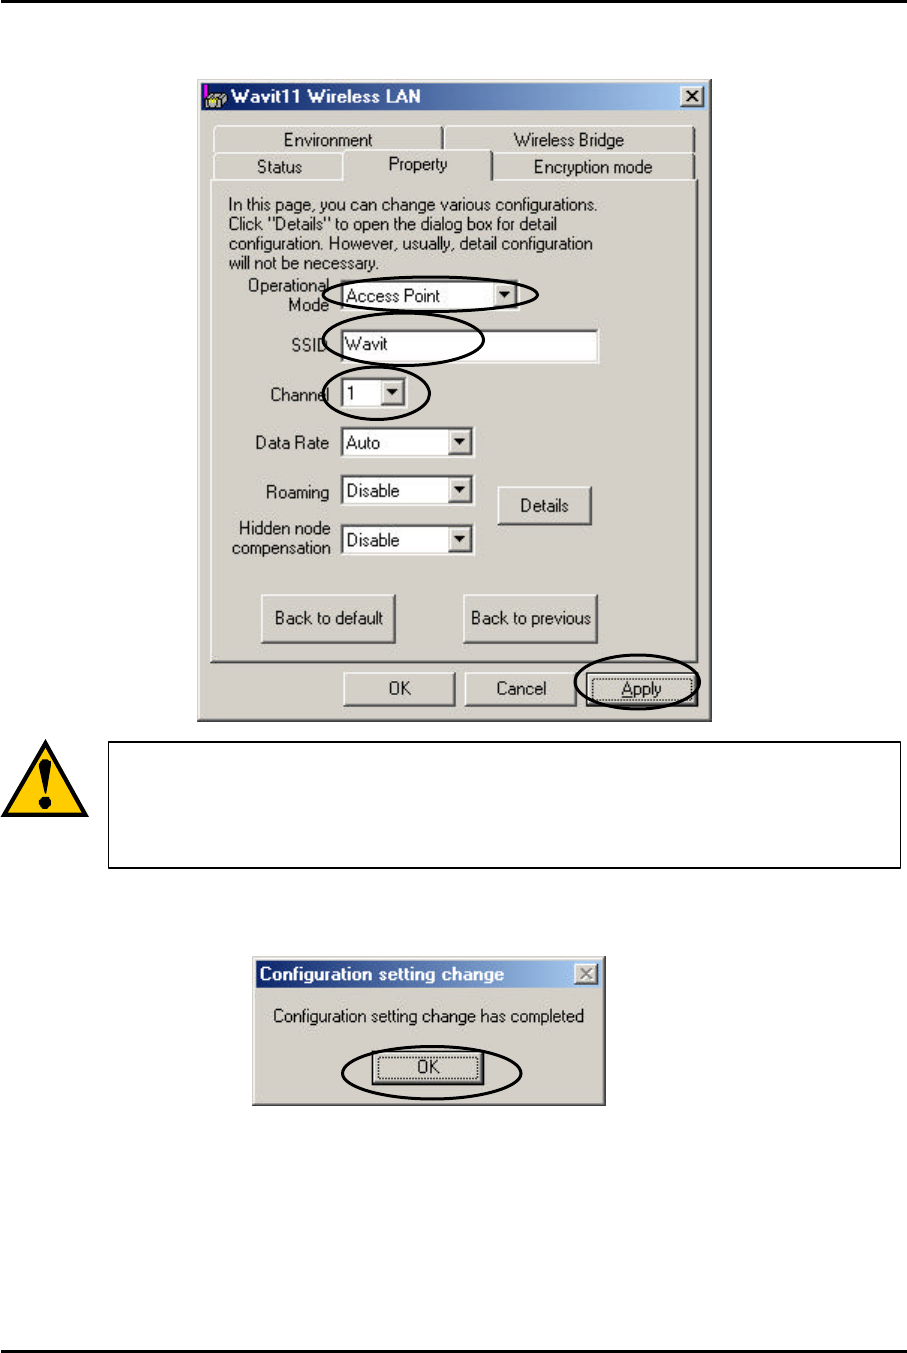
[STEP3] At the “Property” page, change the Operational Mode to “AP” mode
and set the SSID and select the Channel, and then click the “Apply” button.
[STEP4] Click the “OK” button.
Set the SSID and select the Channel in AP mode.
This SSID must be the same as that of Wavit11
in Infrastructure
mode.
Mitsumi Electric Co., Ltd. Wavit11 User's Manual
53/108
CONFIDENTIAL
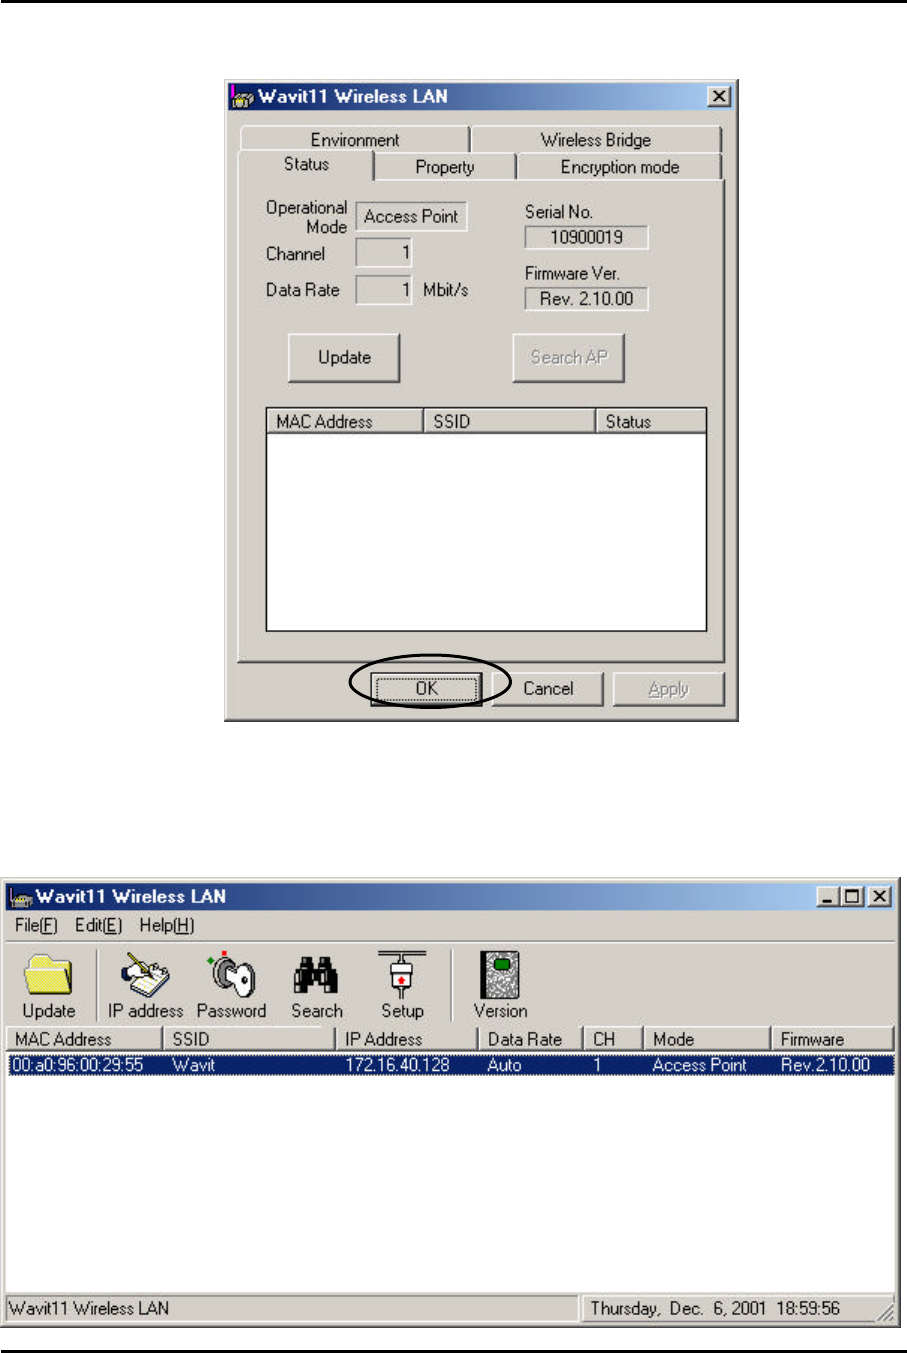
[STEP5] In the “Status” page, check that the Operational Mode is set to “AP”
and Channel is set correctly as you selected, and then click the “OK” button.
[STEP6] After returning to the “Wavit11 Wireless LAN” window, check that all
setups you selected are reflected correctly, and then end the “Wavit11
Configuration Utility.

Mitsumi Electric Co., Ltd. Wavit11 User's Manual
54/108
CONFIDENTIAL
[STEP7] Change the control password.
Many unidentified person can access the Wav
it11 in AP
mode. When the setting of Wavit11 has been modified, Access
Point cannot make the proper operation. Modify
the control
password
so as to provide protection against the settings being
changed. Take notes for the new control password after
its
modification.
“How to Change the Control Password” page61
Mitsumi Electric Co., Ltd. Wavit11 User's Manual
55/108
CONFIDENTIAL
7.7. How to Setup the Wireless Bridge Mode
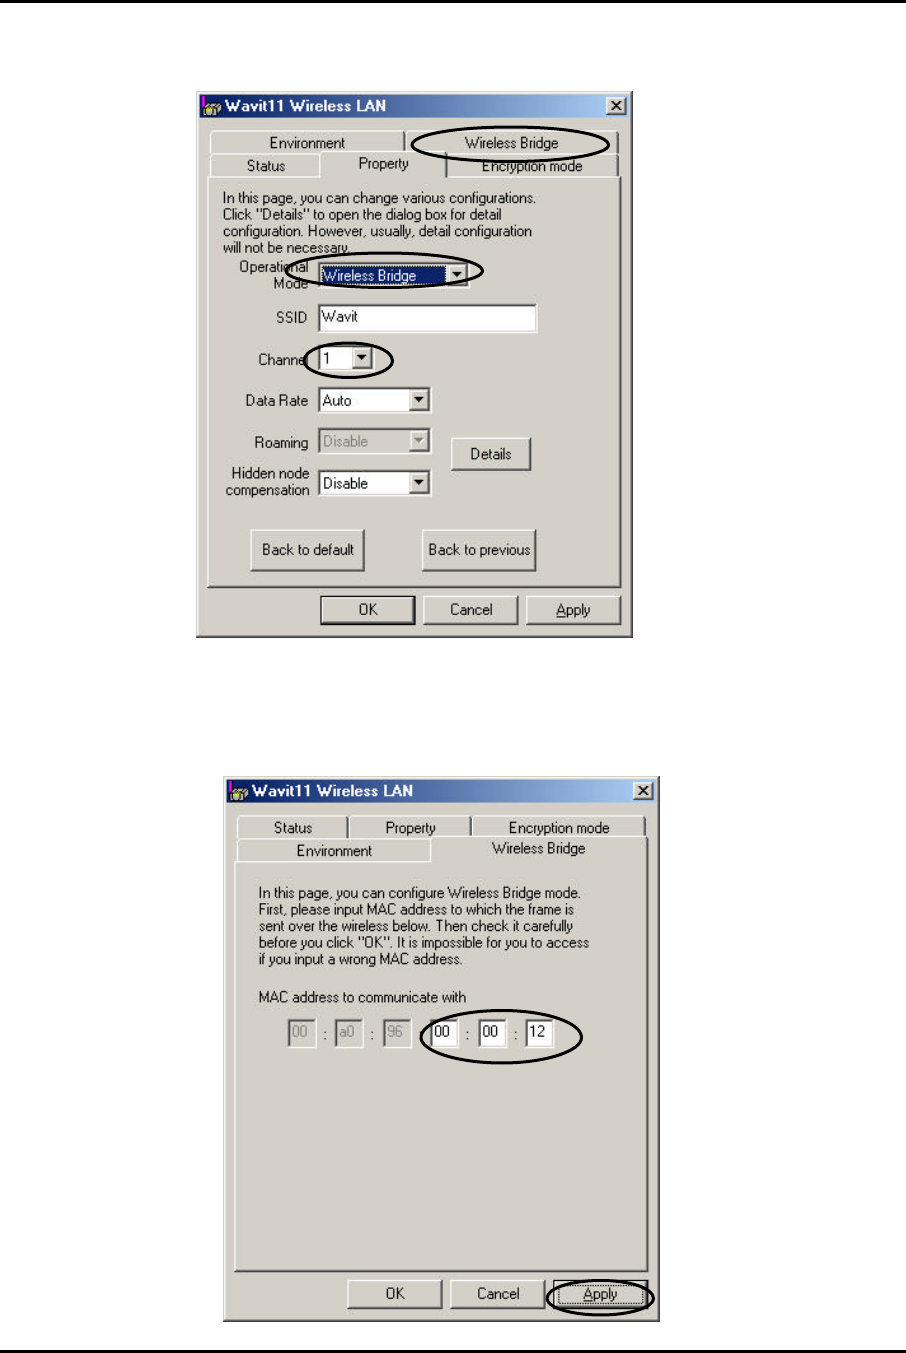
[STEP1] Click the “Setup” in the “Wavit11 Wireless LAN” window.
[STEP2] Click the “Property”.
Mitsumi Electric Co., Ltd. Wavit11 User's Manual
56/108
CONFIDENTIAL
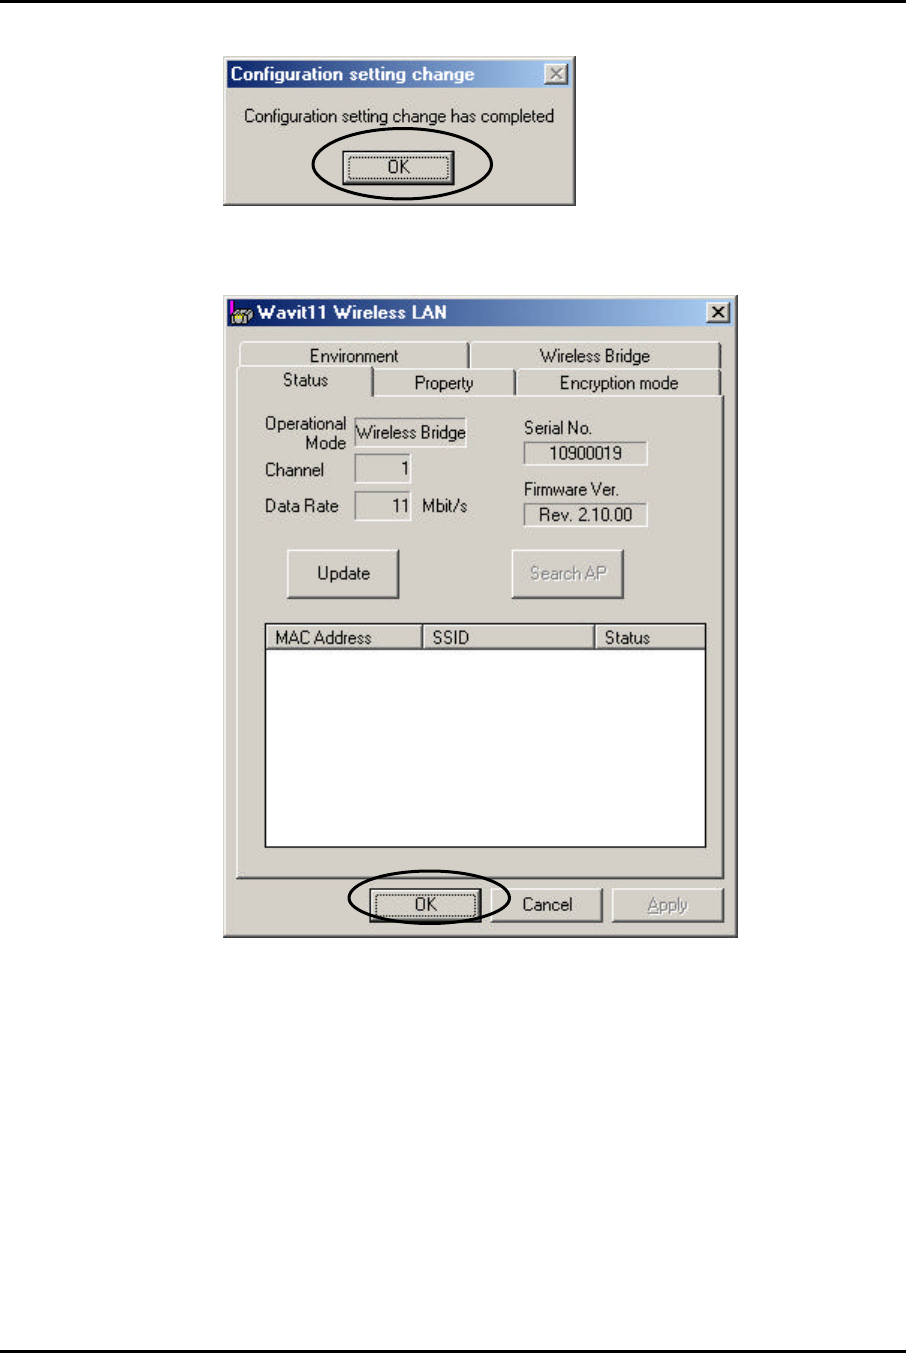
[STEP3] At the “Property” page, change the Operational Mode to “Wireless
Bridge” and select the Channel, and then open the “Wireless Bridge” page.
[STEP4] Last 6 digit of MAC address that is indicated at the label put on the
other end of Wavit11 should be inserted to “MAC address to communicate with”,
at the “Wireless Bridge” page, and then click the “Apply” button.
Mitsumi Electric Co., Ltd. Wavit11 User's Manual
57/108
CONFIDENTIAL
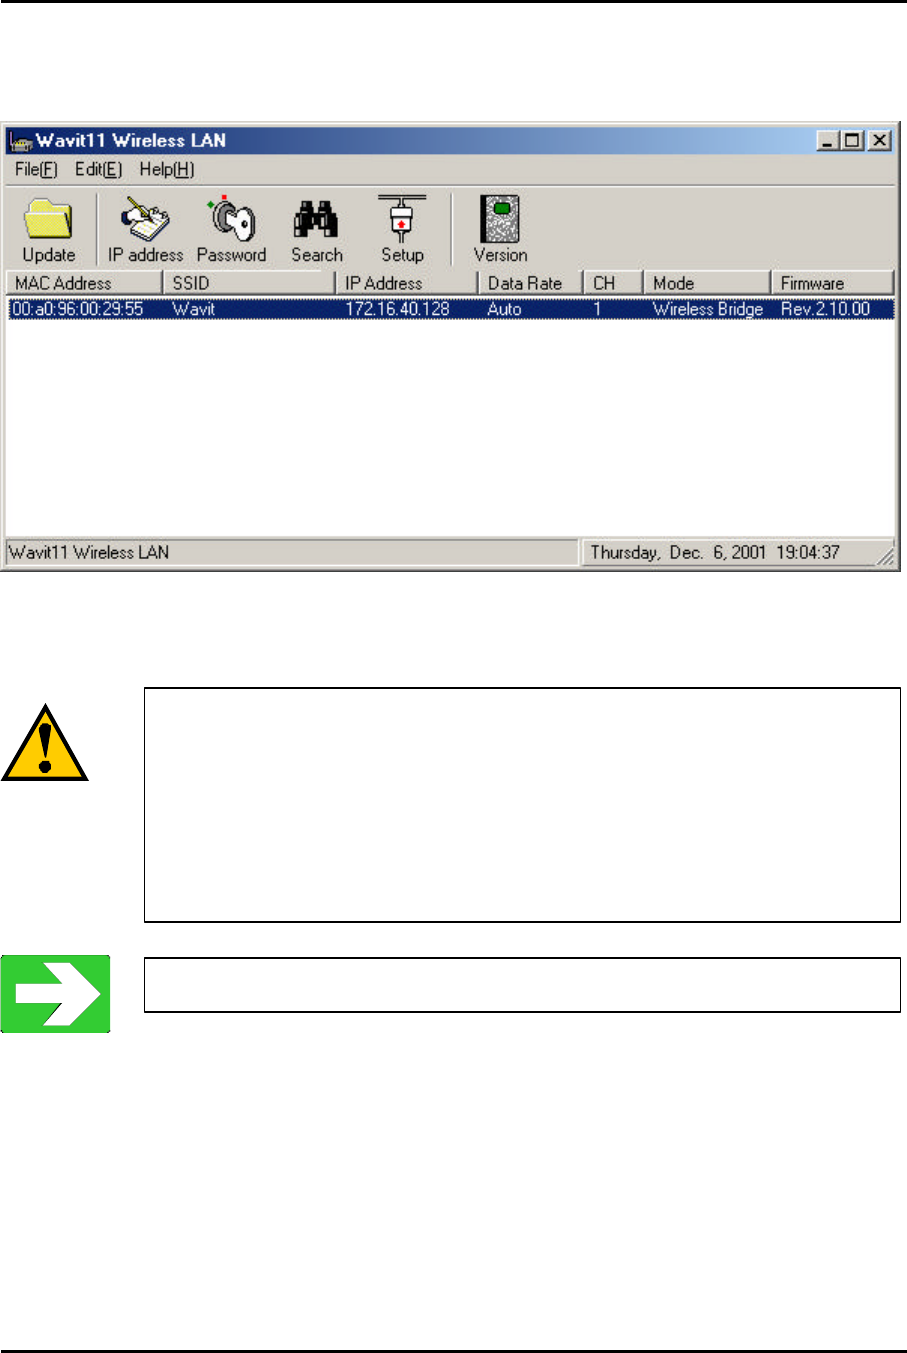
[STEP5] Click the “OK” button.
[STEP6] After checking that the Operational Mode is set to “Wireless Bridge”
and the Channel is set correctly as you selected, and then click the “OK” button.
Mitsumi Electric Co., Ltd. Wavit11 User's Manual
58/108
CONFIDENTIAL
[STEP7] After returning to the “Wavit11 Wireless LAN” window, check that all
setups you selected are reflected correctly, and then end the “Wavit11
Configuration Utility.
[STEP8] Change the “Control password”.
“How to Change the Control Password” page61
Many unidentified
person can access the Wavit11 in Wireless
Bridge mode. When the setting of Wavit11 has been modified,
the Wireless Bridge cannot make a proper operation. Modify
the
control password
so as to provide the protection against the
settings being changed. Take notes for the new
control password
after its modification.
Mitsumi Electric Co., Ltd. Wavit11 User's Manual
59/108
CONFIDENTIAL
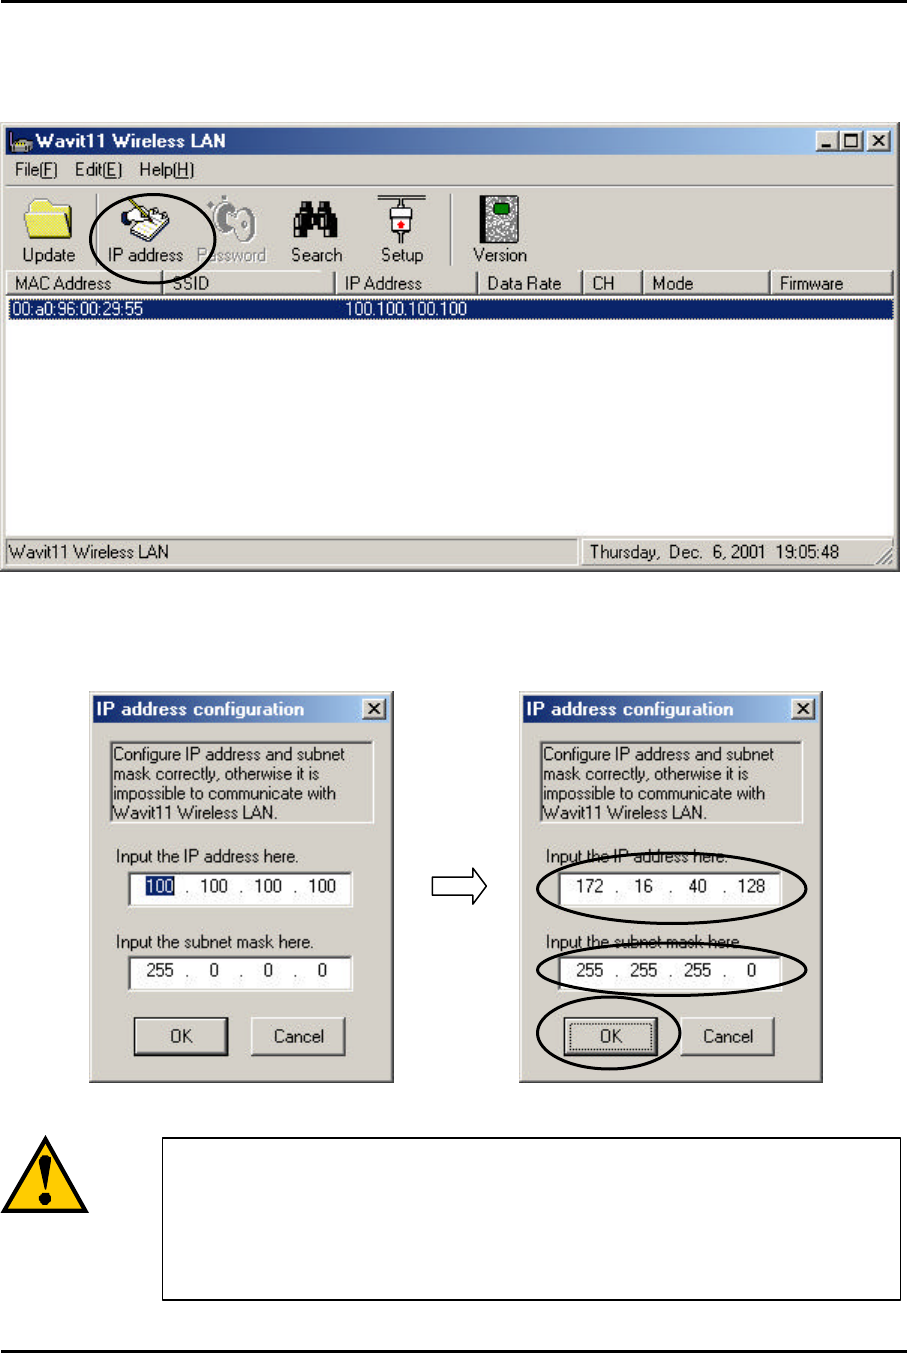
7.8. How to Change the Wavit11 IP address
[STEP1] Click the “IP address” in the “Wavit11 Wireless LAN” window.
[STEP2] At the “IP address configuration” window, set the “IP Address” and the
“Subnet Mask”, and then click the “OK” button.
A host address different from that o
f personal computer should
be set to the host address area. Setting will not be practicable if
every bit comprising the host address is 1 and host address is
0.
Mitsumi Electric Co., Ltd. Wavit11 User's Manual
60/108
CONFIDENTIAL
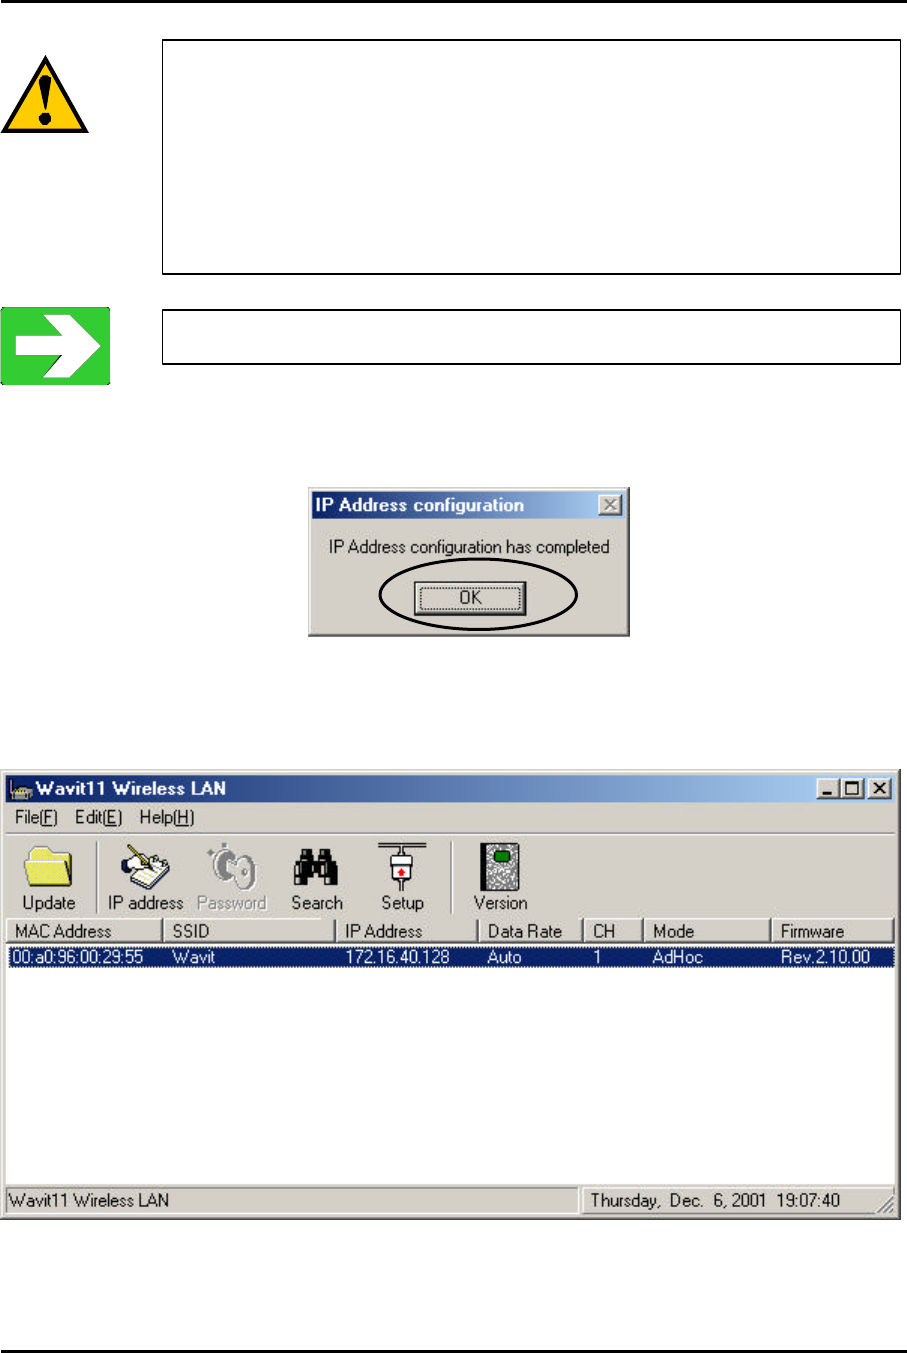
[STEP3] Click the “OK” button.
[STEP4] After the “Wavit11 Wireless LAN” window appears, Wavit11
information is shown in the station list.
When the wrong subnet mask is input by mistake
, Wavit11
cannot sometimes communicate with pers
onal computer. Thus
there are possibilities that the
setting of Wavit11 cannot be
accomplished and the mistaken setting cannot be reverted
afterwards. Initialize the Wavit11, if this kind of mistake takes
place.
“Wavit11 Initialization” page63
Mitsumi Electric Co., Ltd. Wavit11 User's Manual
61/108
CONFIDENTIAL
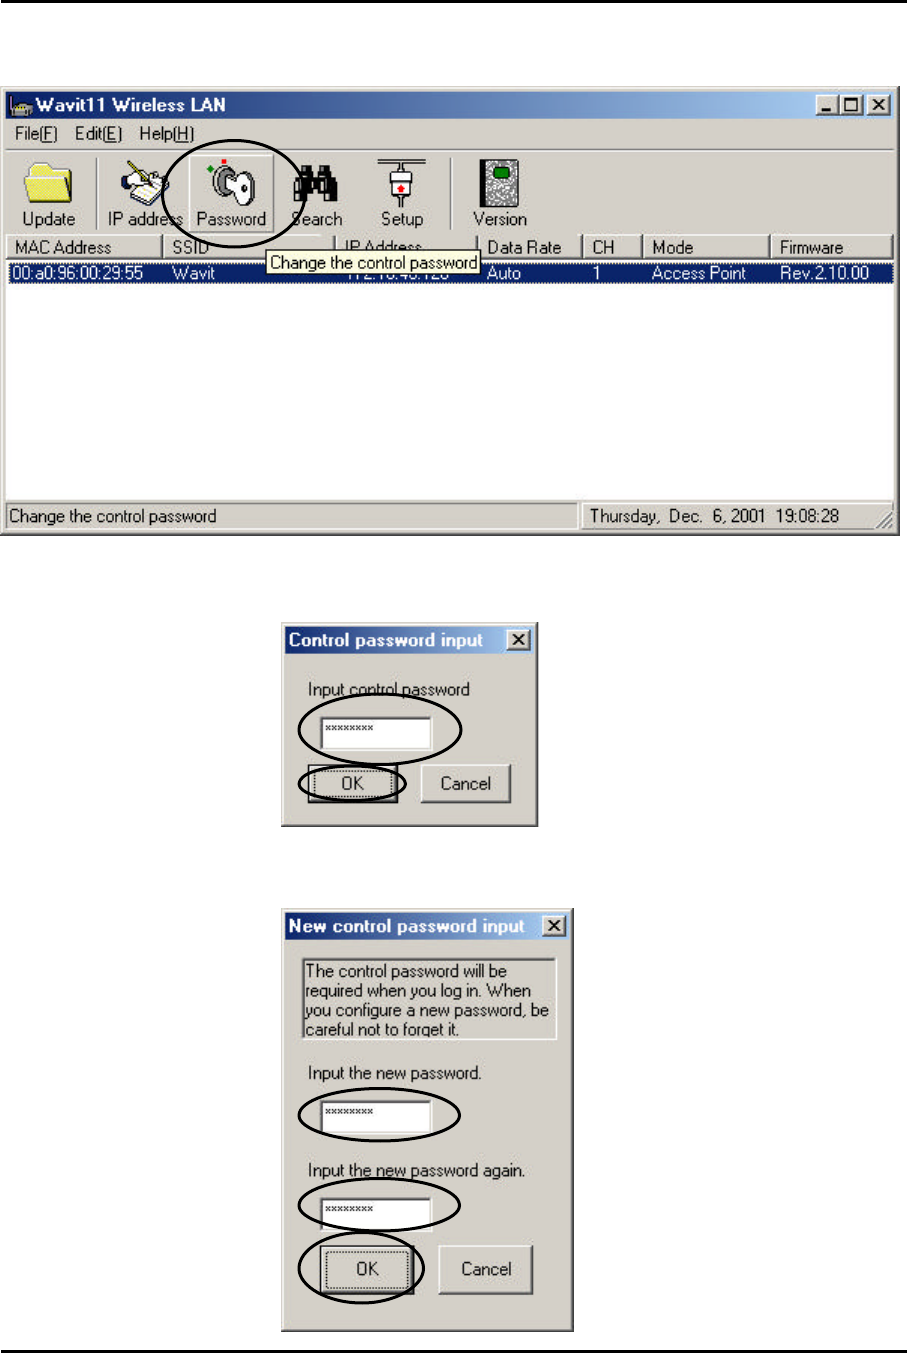
7.9. How to Change the Control Password
[STEP1] Click the “Password” in the “Wavit11 Wireless LAN” window.
[STEP2] Input current control password, and click the “OK” button.
[STEP3] Input new passwords twice, and click the “OK” button.
Mitsumi Electric Co., Ltd. Wavit11 User's Manual
62/108
CONFIDENTIAL
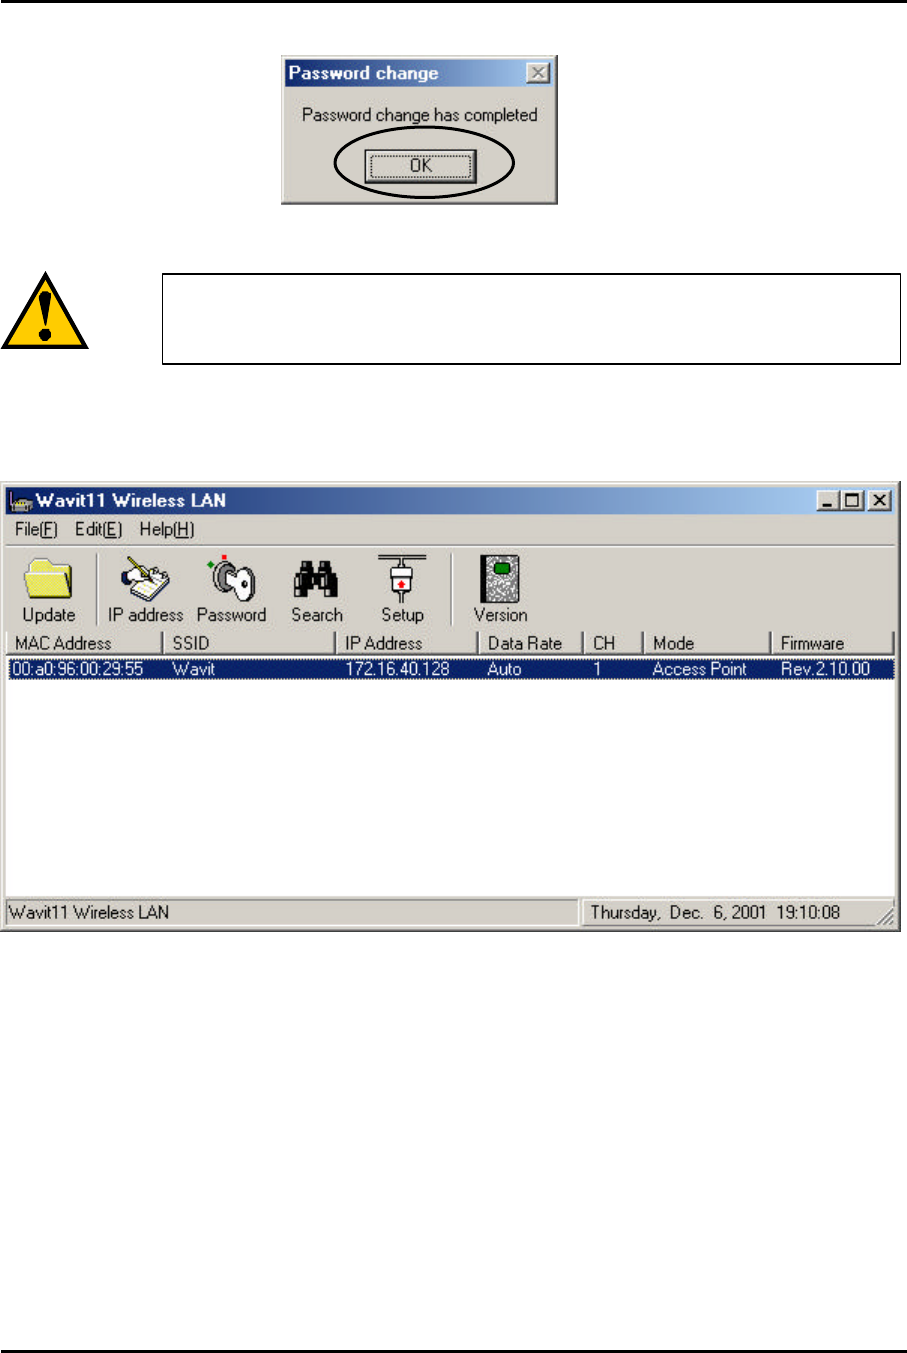
[STEP4] Click the “OK” button.
[STEP5] The “Wavit11 Wireless LAN” window appears.
The password can be modified only when
the operational
mode is “AP” or “Wireless Bridge”.
Mitsumi Electric Co., Ltd. Wavit11 User's Manual
63/108
CONFIDENTIAL
7.10. Wavit11 Initialization
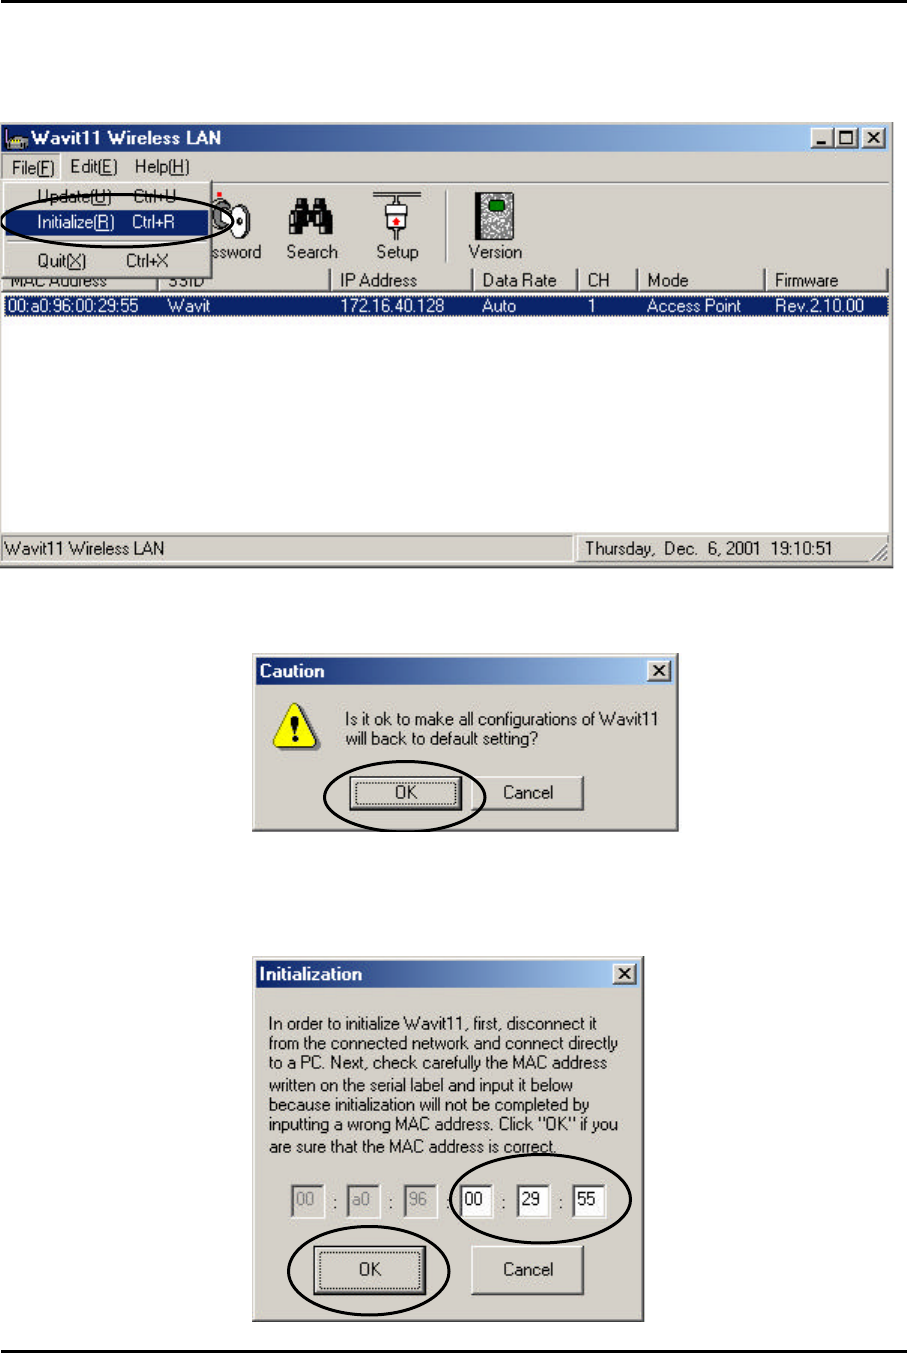
[STEP1] Click “File (F)”->”Initialize (R)” in the “Wavit11 Wireless LAN”
window.
[STEP2] The window opens to confirm your intention of carrying out
the initialization. Click the “OK” button.
[STEP3] At the Initialization window, input 6 digits of the MAC address that is
indicated at the label put on the bottom part of Wavit11 undertaking the
initialization, then click the “OK” button.
Mitsumi Electric Co., Ltd. Wavit11 User's Manual
64/108
CONFIDENTIAL
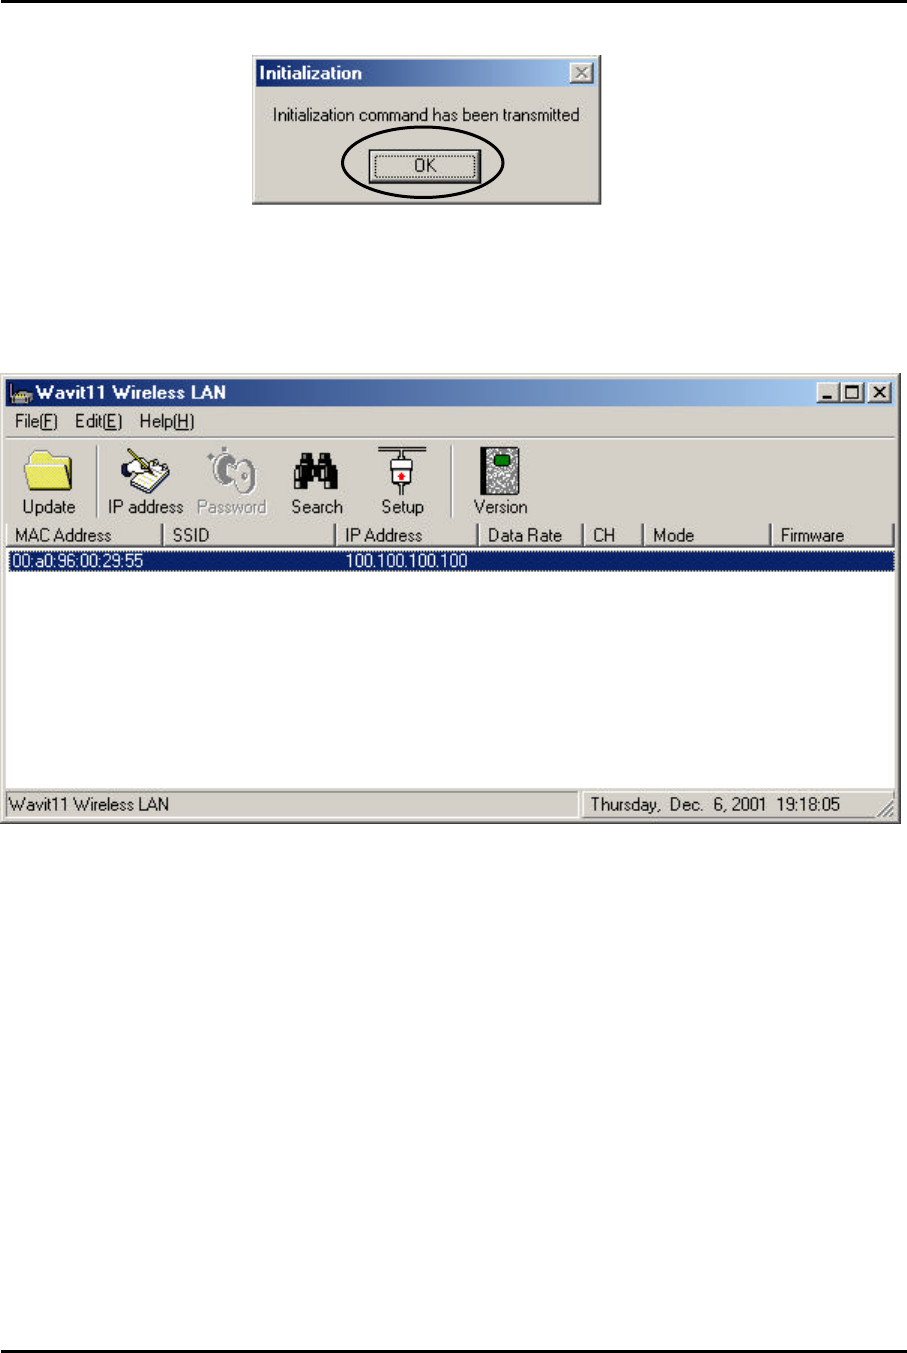
[STEP4] Click the “OK” button.
[STEP5] The “Wavit11 Wireless LAN” window is displayed. It is necessary to
make a setting again, because the setting of Wavit11 has returned to the original
setting at the time of the factory shipment.