Mobile Appliance PNX-5 Protable Navigation with Bluetooth User Manual 20080508 PND 1
Mobile Appliance, Inc. Protable Navigation with Bluetooth 20080508 PND 1
UserManual.wiki
>
Mobile Appliance
>
PNX-5 User Manual
>
User manual 1 of 2
Contents
1.
User manual 1 of 2
2.
User manual 2 of 2
User manual 1 of 2
Navigation menu
Upload a User Manual
Namespaces
Wiki Guide
HTML
PDF
Info
Views
User Manual
Discussion / Help
Navigation
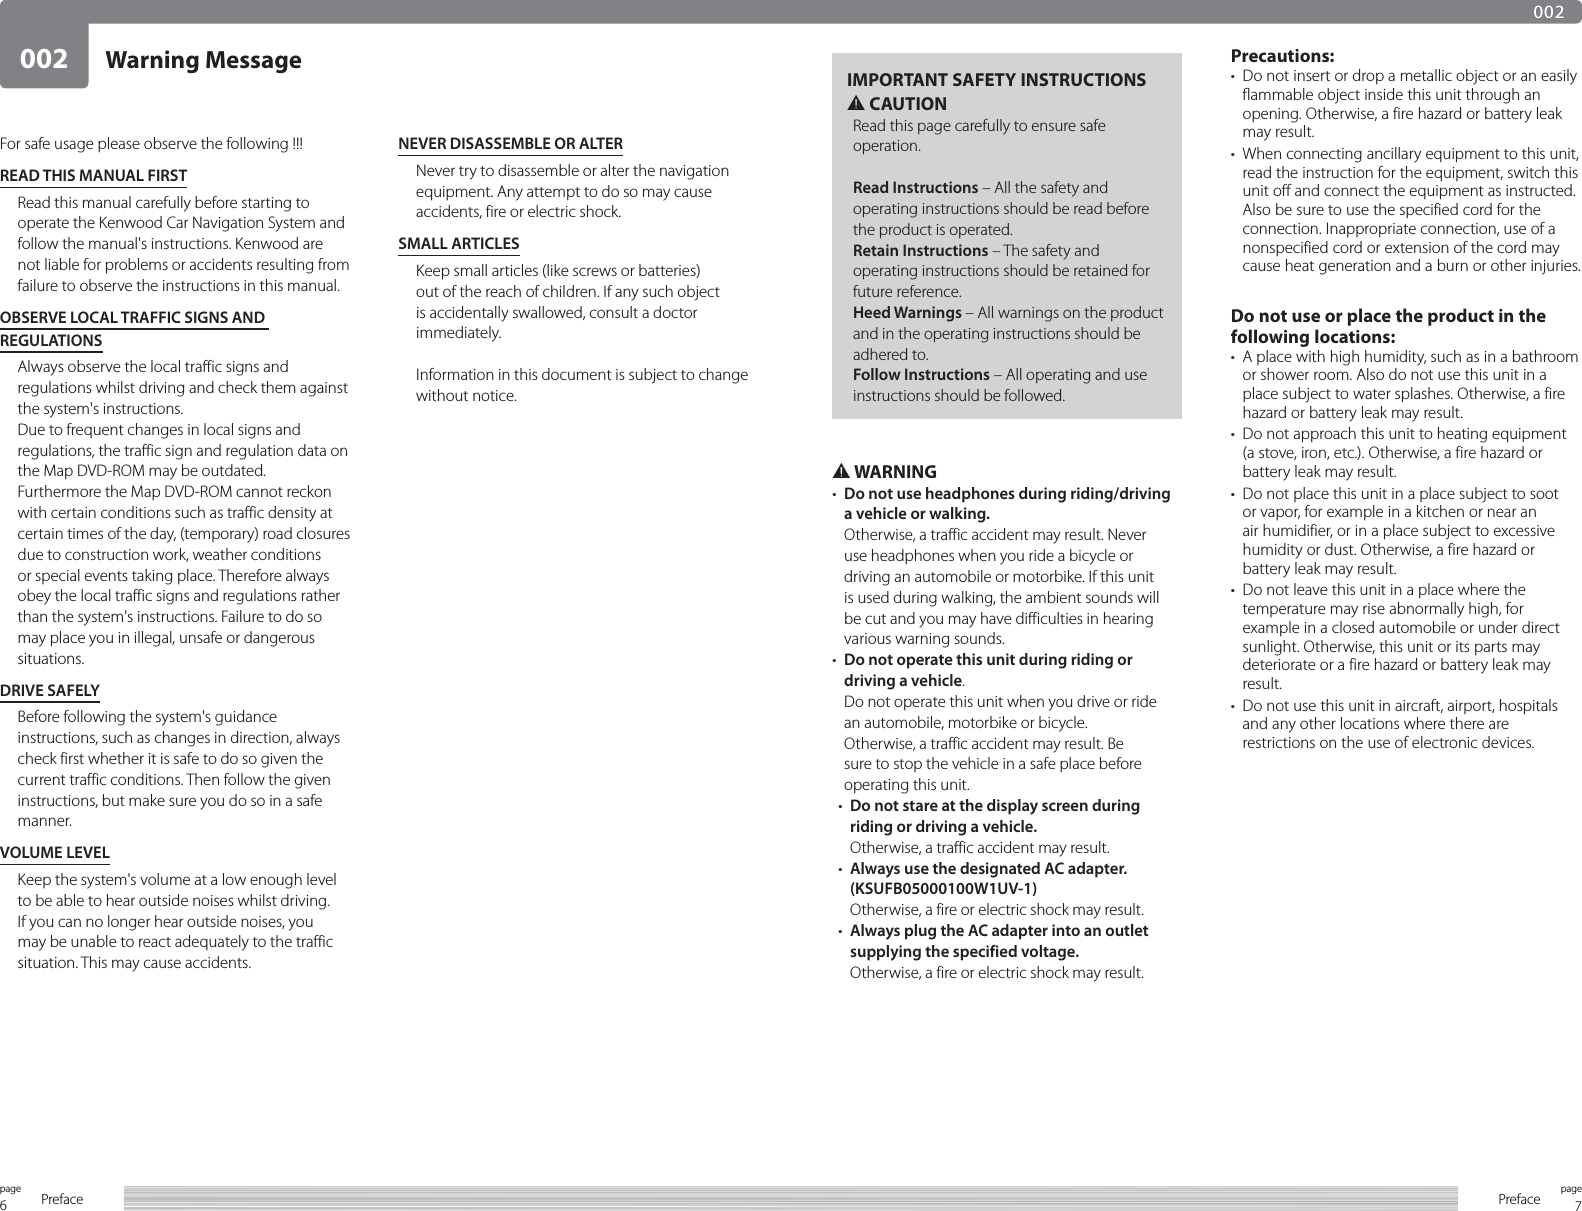
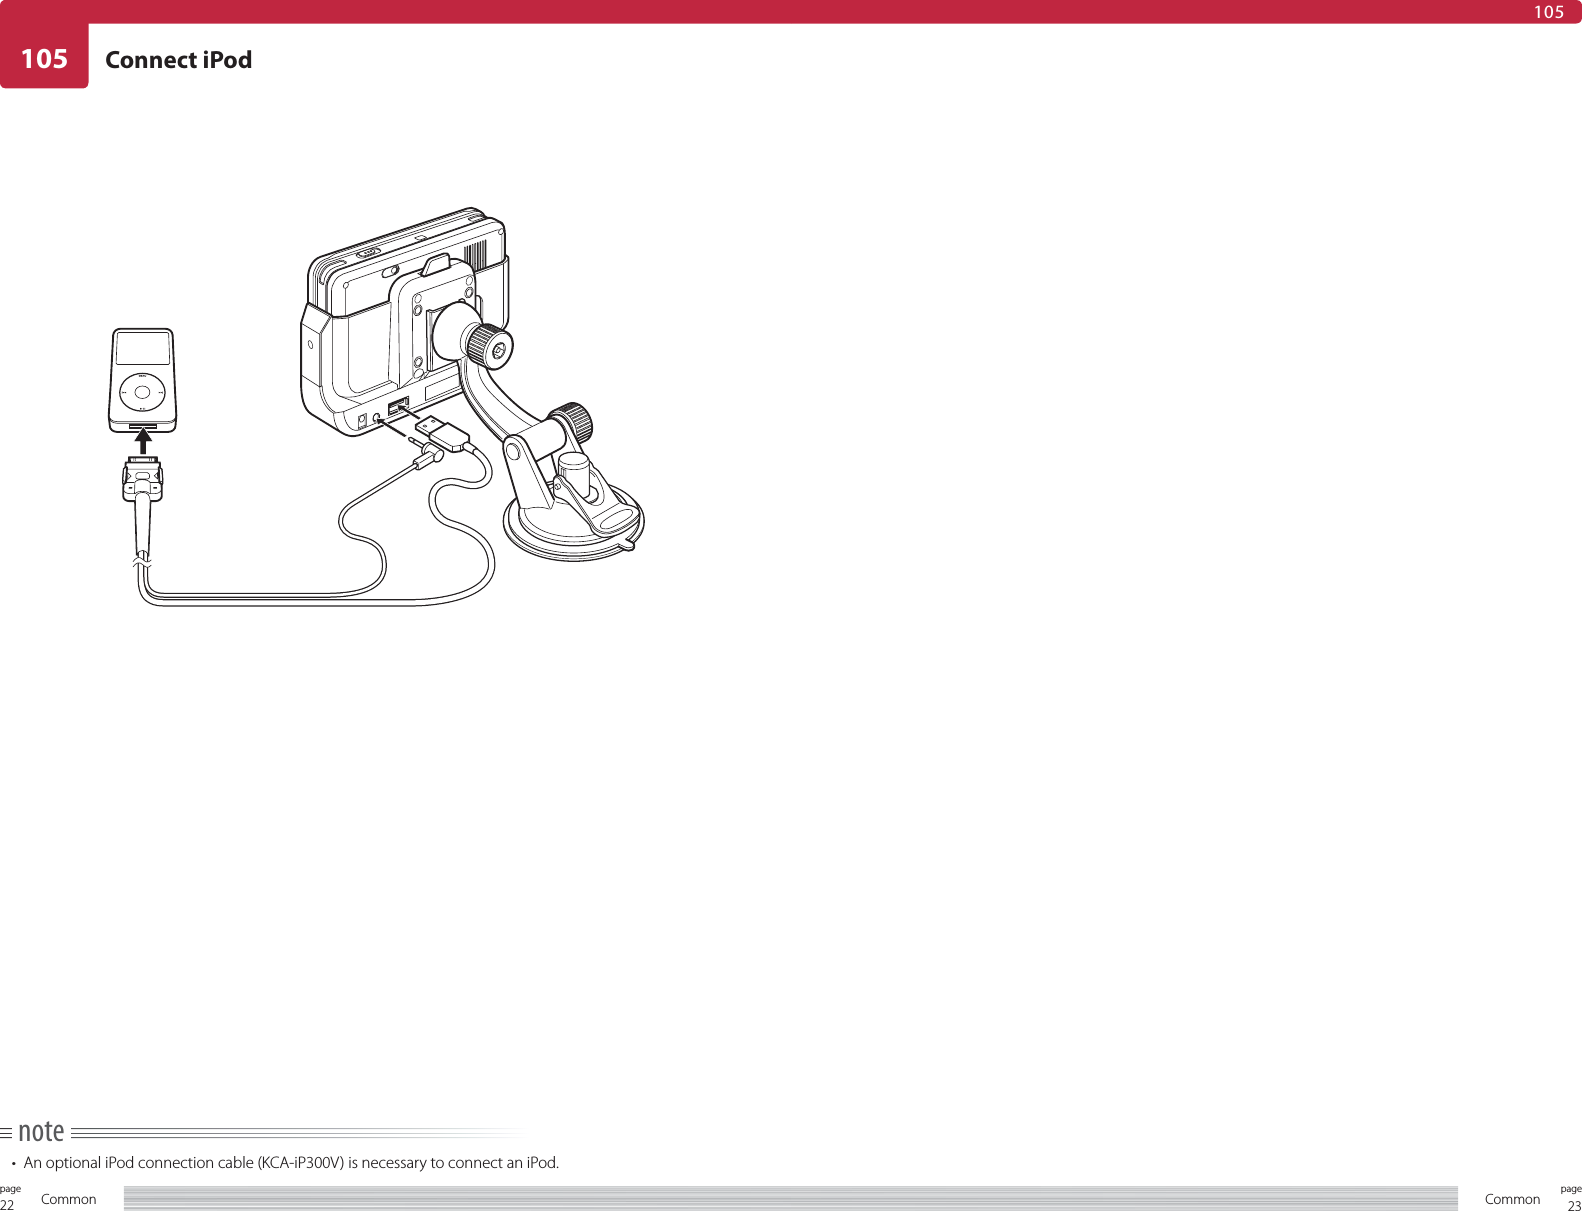
![12page Preface 13pagePreface004004How to read this manualnote• The screens and examples are created for explanatory purpose. The screen may be different from the actual screen and the examples may not be actually possible.• The "TITLE TEXT" of the screens in this manual are the name of the actual screens.The notations used in this manual are described below.84page Where219PreparationHave the Search menu displayed.115 201Operation1Select [From Map].2Scroll the map and place the cursor on the desired location.Completenote• If [From Map] does not appear in 1, select [ ].• You can also set the searched location as the destination or add it to Favorites.See 206 to set the searched location as the Final destination (Short tour) or see 207 to set as Destination (Round trip tour) or Intermediate destination (Short tour).Or, see 209 to add to Favorites.Search from mapSearching for destination from a map. Leading sentenceShort description of the function. Item No.All references in this manual are made with this item number.PreparationOperation that must be performed before starting the described operation.Complete/Next PageNext PageContinues on next page.CompleteOperation is complete.PrecautionscautionDescribes the precautions you should take when performing the operation.noteProvides supplementary description and restrictions.Organization of this manualThis is a reference manual describing all functions and operations of the PORTABLE NAVIGATION SYSTEM PNX-7/PNX-5 (hereafter referred to as this unit) and is organized according to the functions of this unit. 0×× : Describes the precautions concerning this unit.1×× : Describes the entire unit.2×× : Describes the Search menu finding out the location to set as the destination.3×× : Describes the Route menu editing the tour route.4×× : Describes the Source menu switching the source to play.5×× : Describes the Tool menu setting and operating useful functions.6×× : Describes the Setting menu setting system and AV.7×× : Describes the related reference materials. Touch Panel OperationTouch this button.Indicated as "Select [XX]" in this manual.OperationDescribes the operation.](https://usermanual.wiki/Mobile-Appliance/PNX-5.User-manual-1-of-2/User-Guide-1006886-Page-6.png)
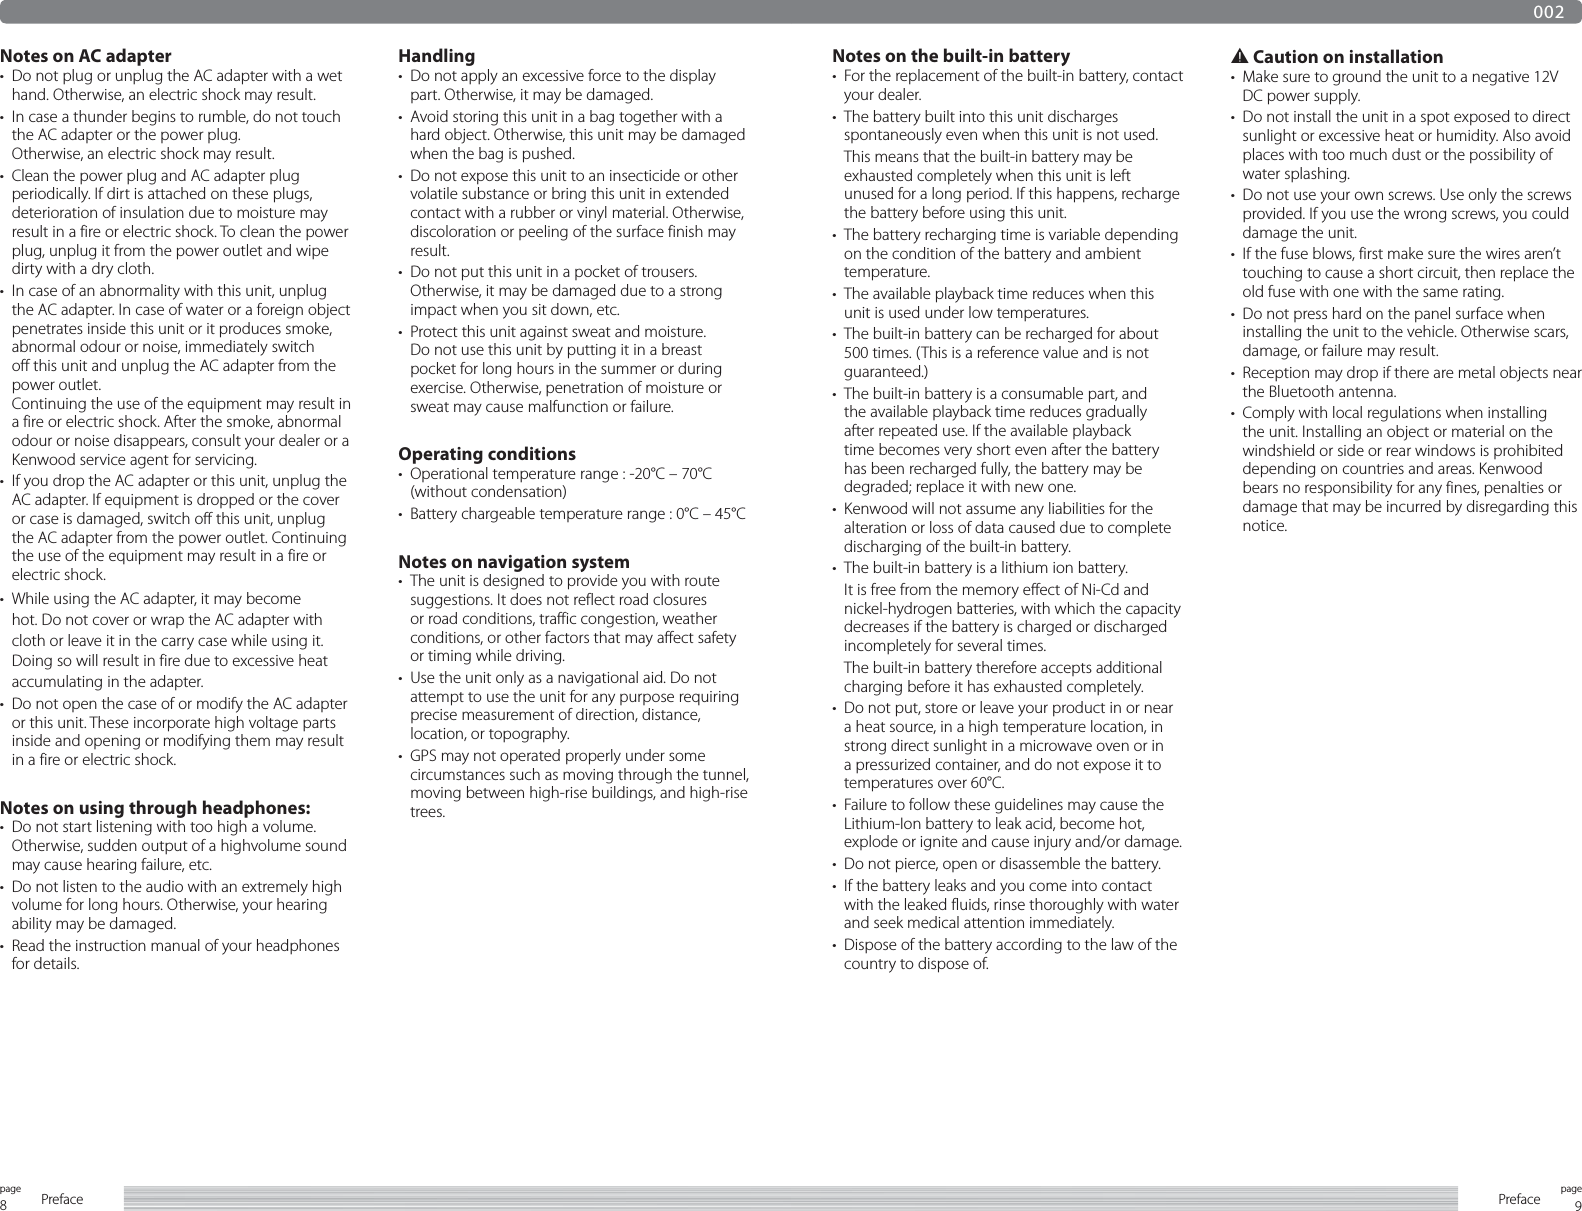
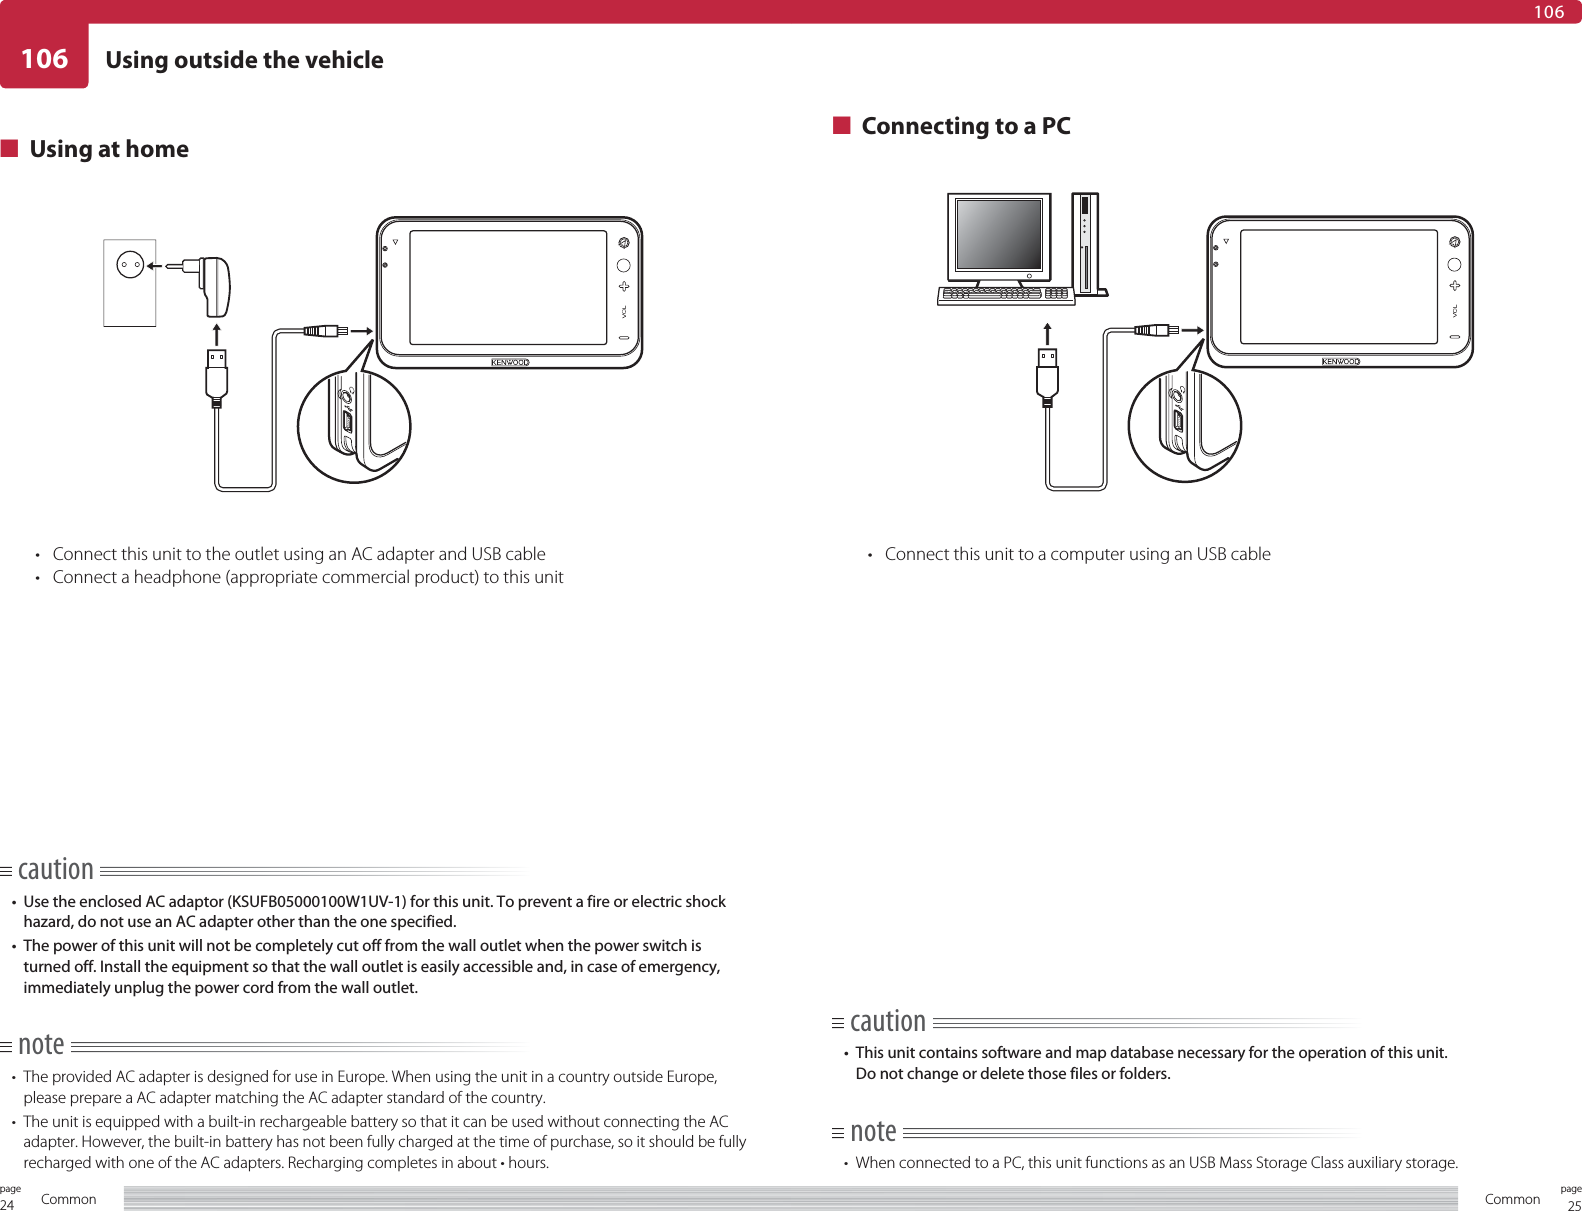
![20page Common 21pageCommon104104Inserting/removing the SD cardMatch the orientation of the SD card with the diagram and insert.Hold the end of the SD card and pull out to remove.caution• Insert firmly until it stops. However, do not exert excessive force when inserting. Otherwise, you may damage the SD card or the unit itself.note• When you insert an SD card, a message to confirm playback appears. Select [YES] to display the top category screen of the SD card. 402](https://usermanual.wiki/Mobile-Appliance/PNX-5.User-manual-1-of-2/User-Guide-1006886-Page-10.png)
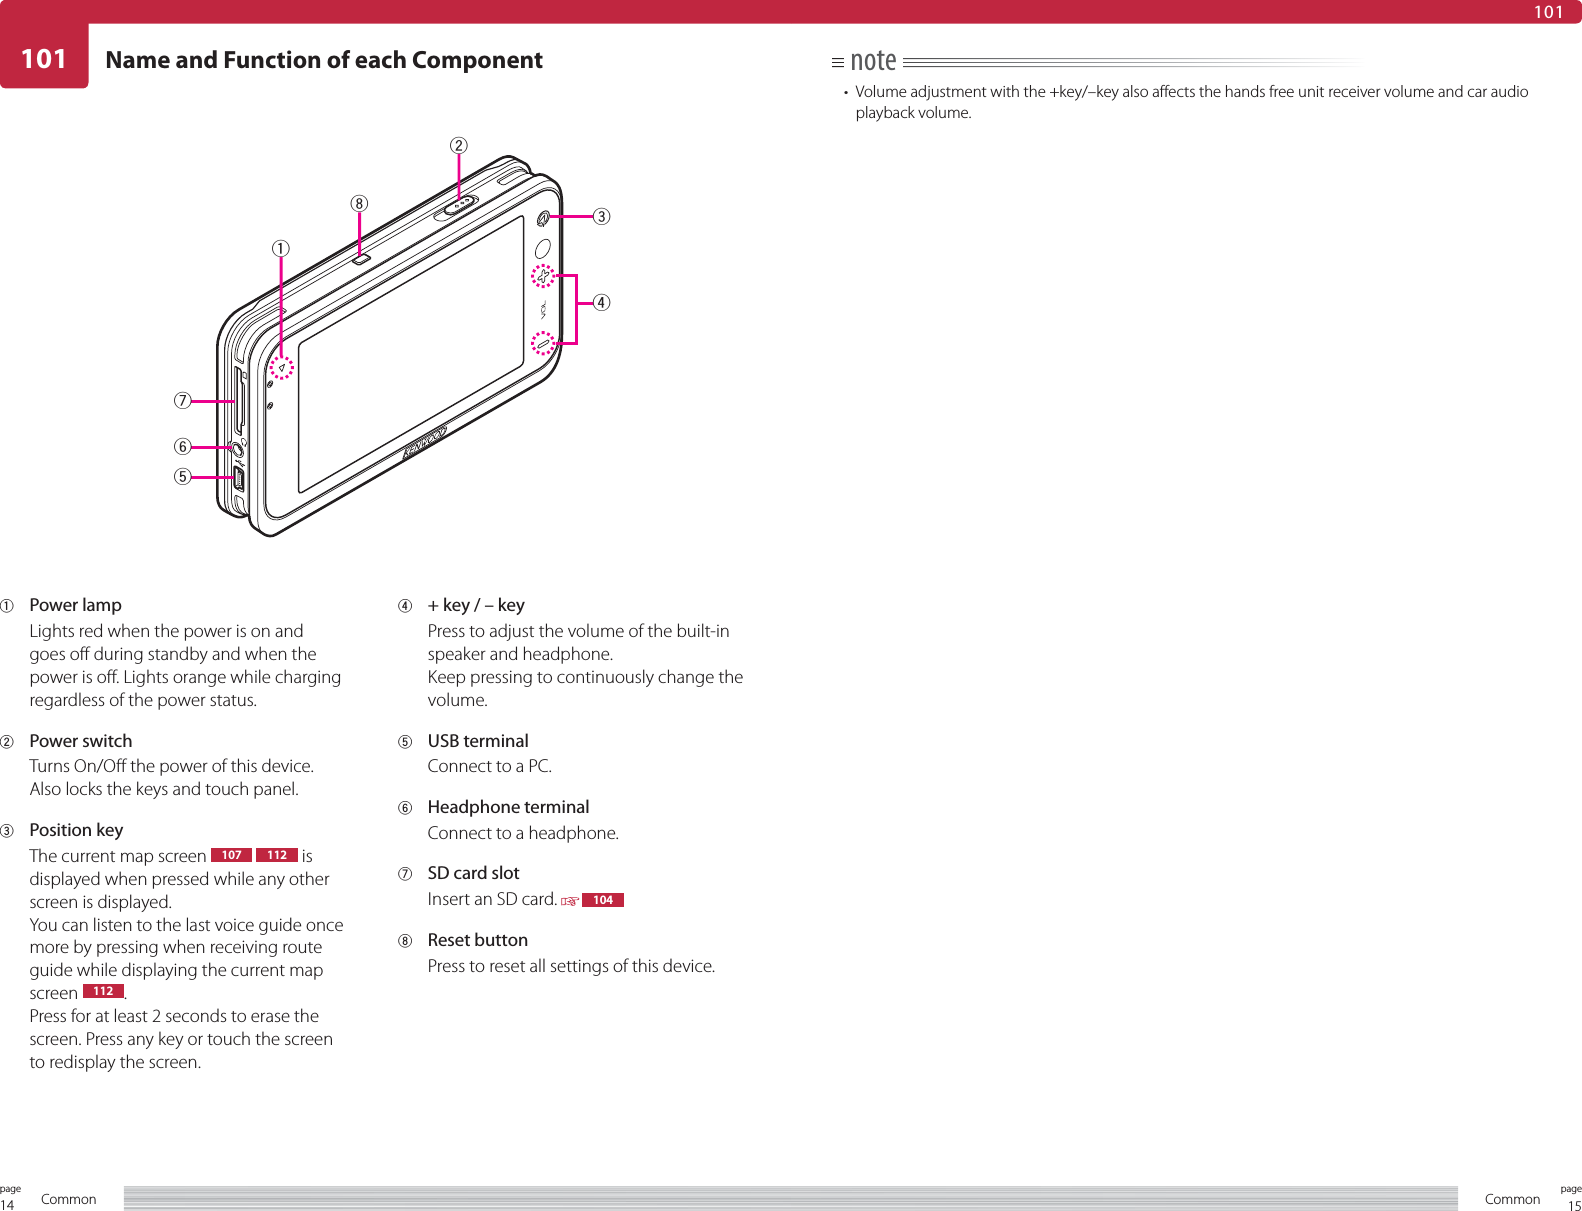
![26page Common 27pageCommon107107Map screen of current location (not during route guide)1 Remaining batteryDisplays the remaining battery.2 ClockDisplays the current time. 110Select to switch between 12 hour clock and 24 hour clock. 6043 Compass buttonSwitches the map orientation.Switches between north up and heading up each time you select.7 : 3D heading upDisplays the map (3D) so that the direction of travel is at the top of screen.7 : 2D heading upDisplays the map (2D) so that the direction of travel is at the top of screen. : 2D north upDisplays the map (2D) so that north on the map is at the top of screen.4 Bluetooth buttonDisplayed when a cell phone's hands free set is connected by Bluetooth.7 : The call screen appears when this button is selected while the phone is ready to make a call.7 : The dial palette screen appears when this button is selected while the phone is busy.5 Zoom buttonZooms in/out the map. 109[–] : Shows a wider area map.[+] : Shows a more map details.The map around the current location (current location screen) is displayed when this device is turned ON.note• When the current map screen is not displayed, press the Position key or select of each screen.• The source name is not displayed when the source is Standby. Also, the external source connected to AV-in is not displayed.• [×] is displayed when the radio signal from the GPS satellite cannot be received. The current location is not displayed correctly under this condition.• When the map direction is heading up, the vehicle symbol is displayed lower than the center of the screen. When the map direction is North up, the vehicle symbol is displayed at the center of the screen.• Orient this device vertically when the map direction is heading up to display more of the map in the traveling direction for greater convenience.• When you turn on the PNX-7/PNX-5, you must wait while the system acquires satellite signals. This process could take up to several minutes. Make sure your vehicle is outdoors in an open area away from tall buildings and trees for fastest acquisition.6 AV quick control buttonThe button display changes in the order of [OFF] = [NAV] = Current AV source name = [OFF] each time you select the button.Switch to [NAV] to display the name of the street you are traveling.Switch to the current AV source name to display the AV quick control mode button. 1117 Vehicle symbolDisplays the current position.8 MapDisplays the map around the current location.Touch the map to switch to scroll map screen. Touch once more to scroll the map so that it is centered around the touched location.Keep on touching the map to scroll the map in the touched direction. Release to stop scrolling.9 Menu buttonDisplays the Top Menu. 115Current map screen (not during route guide)<NM0000><NT1000a>12 3876459](https://usermanual.wiki/Mobile-Appliance/PNX-5.User-manual-1-of-2/User-Guide-1006886-Page-13.png)
![30page Common 31pageCommon109109Change map scaleYou can change the scale of the map displayed on the current map screen or scroll the map screen as necessary.note• Available scales are 500km (300 miles) to 50m (50 yards) for 2D display and 500m (1/4 miles) to 50m (50yards) for 3D display.See 612 for information on switching between 2D display and 3D display and switching scale.• Keep touching [+] or [-] to continuously change the scale.• The scales of the scroll map screen and current map screen are independent. For example, even if you change the scale to 50m in the scroll map screen, the map is displayed in the original scale when you return to the current map screen.](https://usermanual.wiki/Mobile-Appliance/PNX-5.User-manual-1-of-2/User-Guide-1006886-Page-15.png)
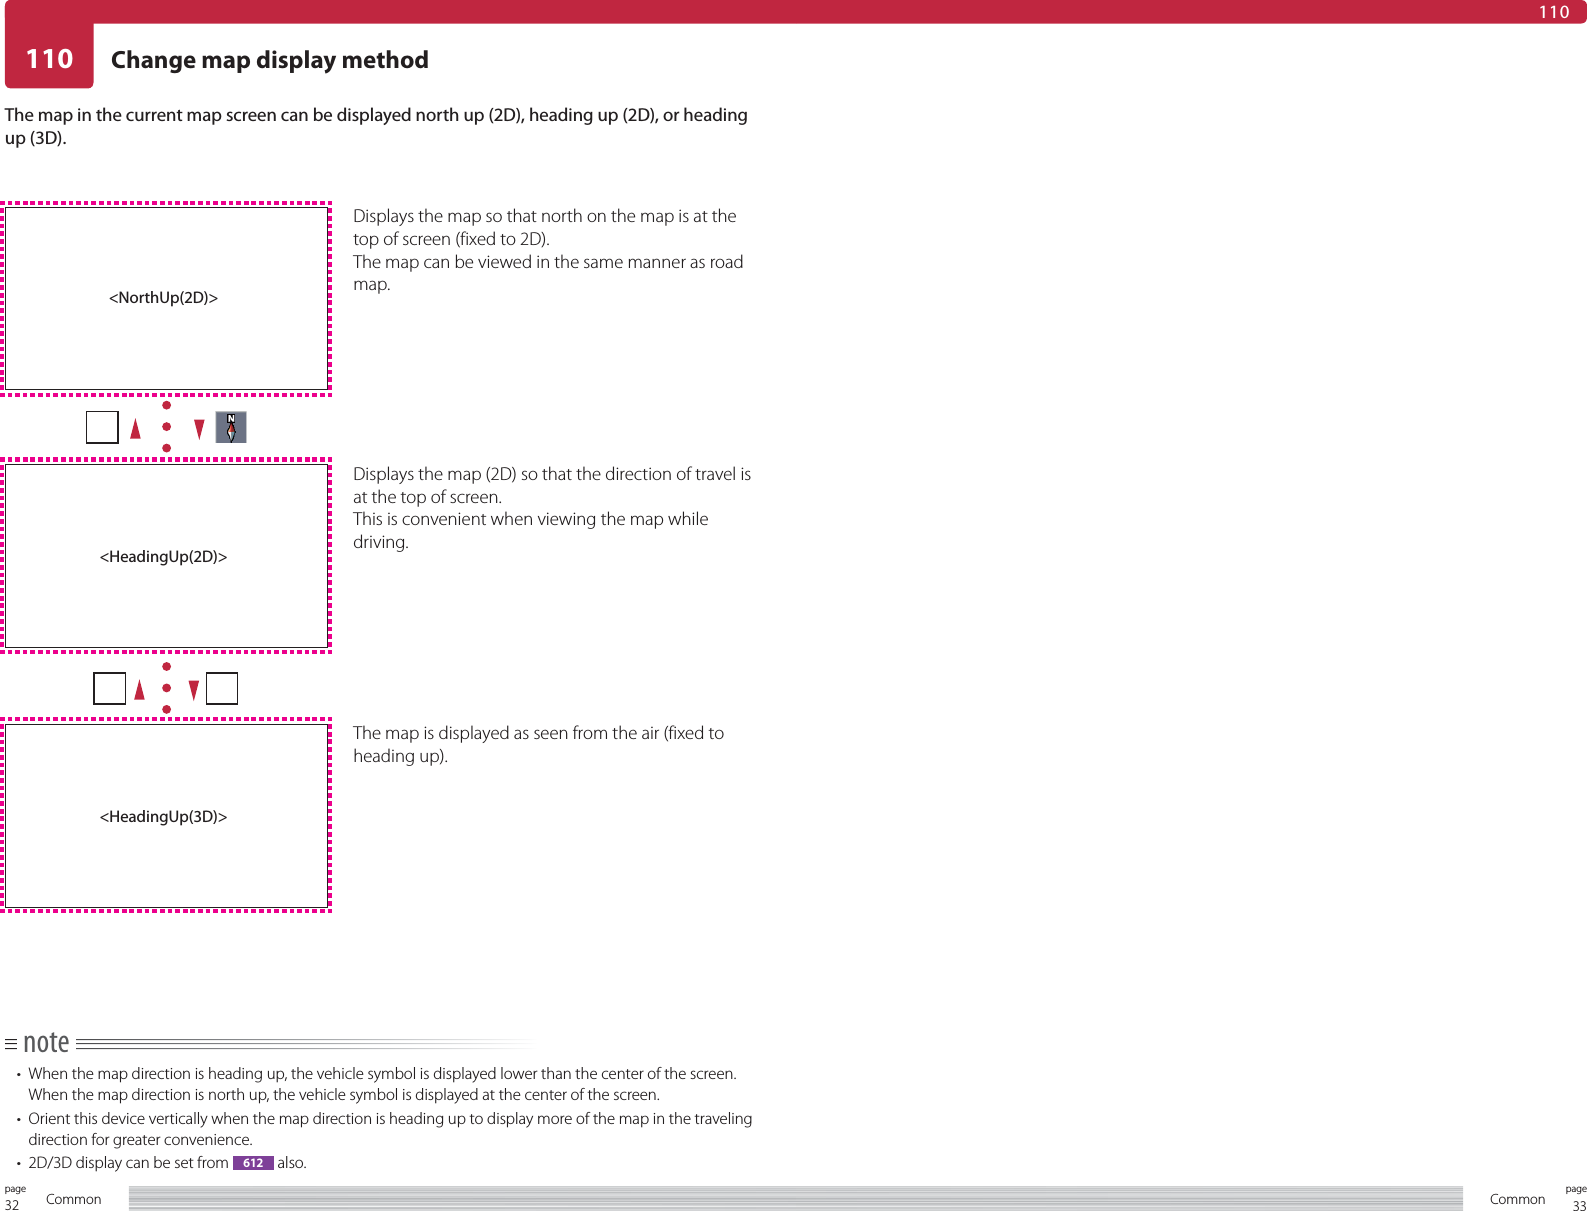
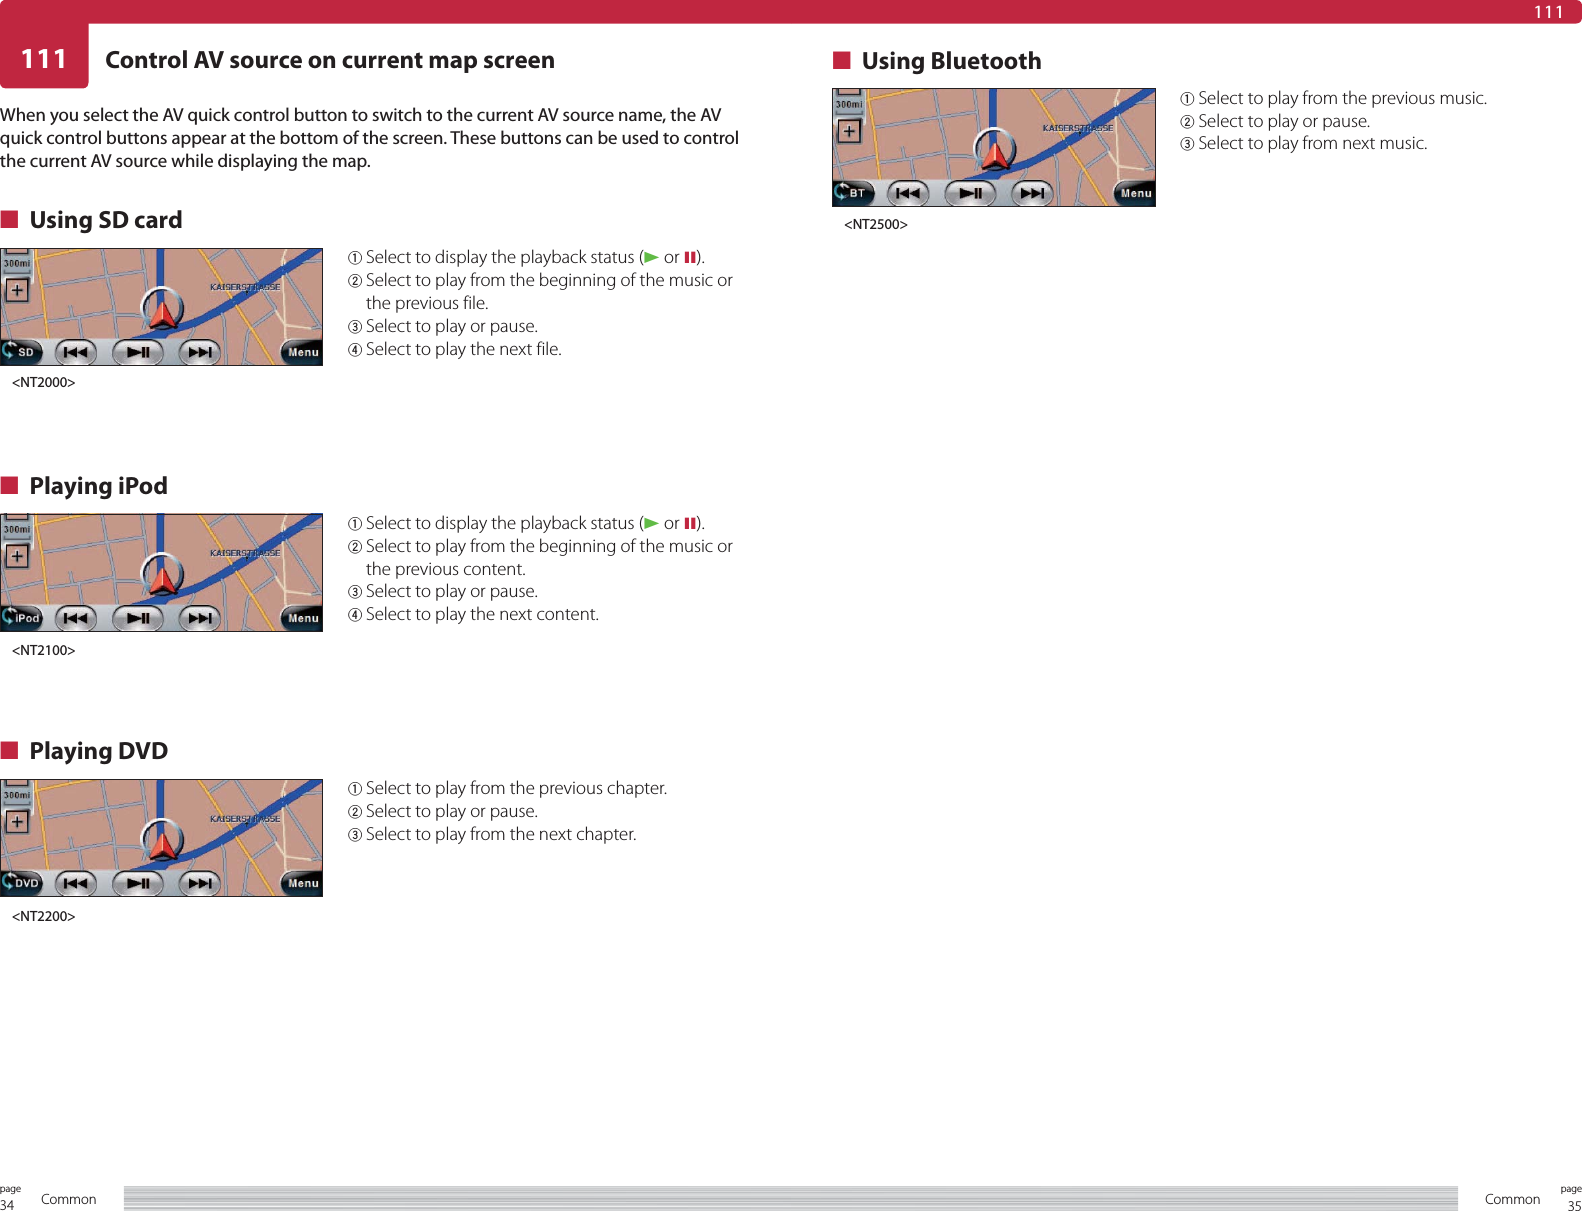
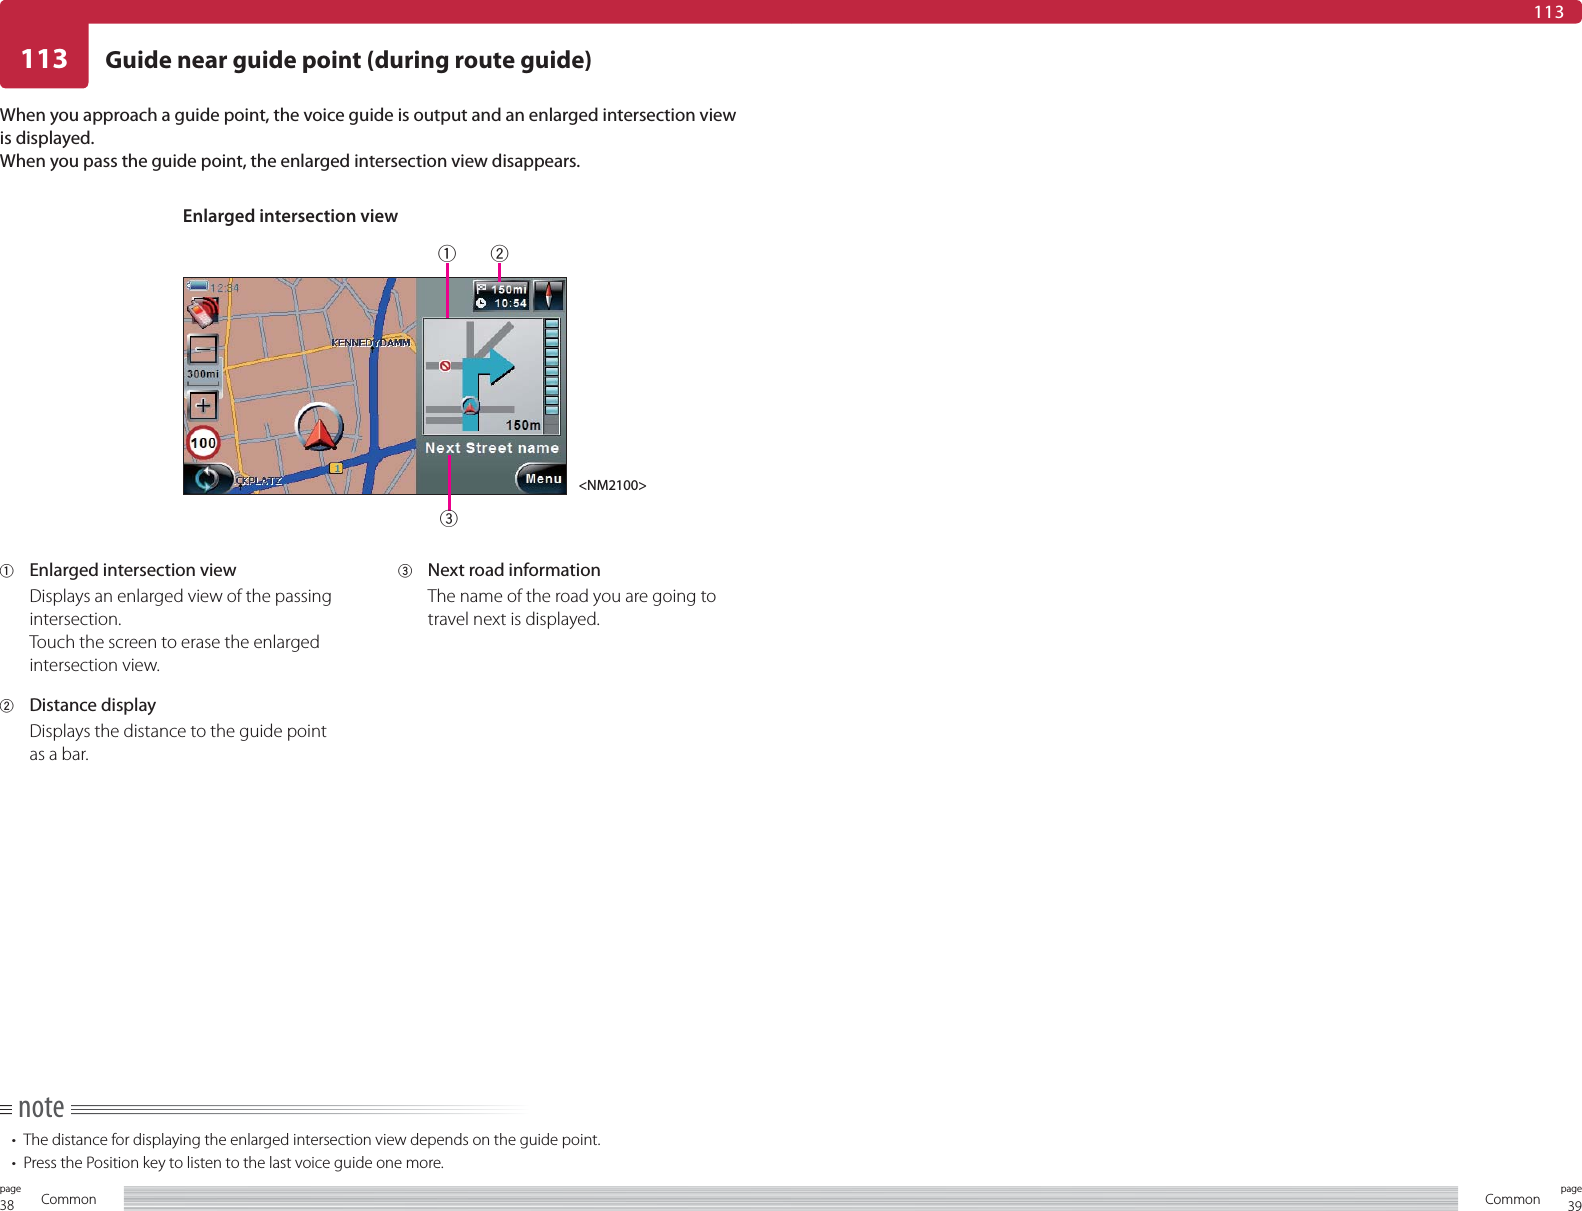
![36page Common 37pageCommon112112Map screen of current location (during route guide)1 Remaining batteryDisplays the remaining battery.2 ClockDisplays the current time.3 Destination information buttonDisplays the distance to the destination, expected arrival time, and duration.Switches between expected arrival time and duration each time you press.4 Compass buttonSwitches the map orientation.Switches between north up and heading up each time you select.7 : 3D heading upDisplays the map (3D) so that the direction of travel is at the top of screen.7 : 2D heading upDisplays the map (2D) so that the direction of travel is at the top of screen. : 2D north upDisplays the map (2D) so that north on the map is at the top of screen.5 Bluetooth buttonDisplayed when a cell phone's hands free set is connected by Bluetooth.7 : The call screen appears when this button is selected while the phone is ready to make a call.7 : The disconnect screen appears when selected while the phone is busy.6 Zoom buttonZooms in/out the map.[–] : Shows a wider area map.[+] : Shows a more map details.7 Speed limit information Displays the speed limit of the street you are traveling.You can turn off the speed limit display. 612note• See 207 , 208 or 302 for information on how to start the route guide.• Select on each screen of this device to return to the above current map screen.• The source name is not displayed when all sources are off. Also, the external source connected to AV-in is not displayed.• The speed limit information and road information are not displayed if the information cannot be obtained.• x is displayed when the radio signal from the GPS satellite cannot be received. The current location is not displayed correctly under this condition.• When the map direction is heading up, the vehicle symbol is displayed lower than the center of the screen. When the map direction is North up, the vehicle symbol is displayed at the center of the screen.• Orient this device vertically when the map direction is heading up to display more of the map in the traveling direction for greater convenience.• If the current traveling speed exceeds the speed limit, the speed limit information flashes as a warning.You can turn off this warning. 612• When you turn on the PNX-7/PNX-5, you must wait while the system acquires satellite signals. This process could take up to several minutes. Make sure your vehicle is outdoors in an open area away from tall buildings and trees for fastest acquisition.8 AV quick control buttonThe button display changes in the order of [OFF] = [NAV] = Current AV source name = [OFF] each time you select the button.Switch to [NAV] to display road information.Switch to the current AV source name to display the AV quick control mode button. 1119 Road information Displays the name of the road you are traveling.Select to display the name of the road you will travel next.0 Destination Direction FinderShows the approximate direction of the destination.- Vehicle symbolDisplays the current position.= Menu buttonDisplays the Top Menu. 115~ MapDisplays the map around the current location.Touch the map to switch to scroll map screen. Touch once more to scroll the map so that it is centered around the touched location.Keep on touching the map to switch to scroll map screen and scroll the map in the touched direction. Release to stop scrolling.The current map screen is displayed as follows during route guide (current map screen).Current map screen (during route guide)<NM2000>1234~=-098765](https://usermanual.wiki/Mobile-Appliance/PNX-5.User-manual-1-of-2/User-Guide-1006886-Page-18.png)
![40page Common 41pageCommonMap screen displaying desired location114114note• In the scroll map screen, the map is fixed to north up (2D) and cannot be changed.• The scales of the scroll map screen and current map screen are independent. For example, even if you change the scale to 50m in the scroll map screen, the map is displayed in the original scale when you return to the current map screen.• A confirmation message is displayed when you select [Add]. Select [YES] to add the position indicated by the cursor to Favorites and erase the message.• is displayed when you search for a location and display the scroll map screen with [Show in Map].Select to return to the original screen (screen where you selected [Show in Map]).Touch the map on the current map screen to switch to the scroll map screen and scroll the map to display the desired location.1 [Pos]Select to return to the current map screen.2 CompassSelect to display the north direction.3 CursorIndicates the position to be controlled.The cursor is always displayed at the center of the screen.4 Zoom buttonZooms in/out the map.[+] : Shows a more map details.[–] : Shows a wider area map.5 [Set]Sets the position indicated by the cursor as destination ( 206 ) or intermediate destination ( 207 ).6 [Add]Add the position indicated by the cursor to Favorites. 2097 MapTouch the map to switch to display the map so that the touched location is at the center.Keep on touching the map to scroll the map. Release to stop scrolling.Scroll map screen<NM4000>1276534](https://usermanual.wiki/Mobile-Appliance/PNX-5.User-manual-1-of-2/User-Guide-1006886-Page-20.png)
![42page Common 43pageCommon115115Operation1Select [MENU].The Top Menu is displayed.CompleteDisplay Top menuMany of the operation of this device can be performed from the Top menu.1 [A/V]Displays the Source menu to switch AV source and perform various operation. 4012 [Where]Displays the Search menu to search location by various method. 201You can set the searched location as the Final destination or Intermediate destination of the Short tour route.You can also add them to Favorites and save them.3 [Route]Displays the Route menu to edit the tour route. 301Destination of the Round trip tour route is also set from the route menu.4 [Tools]Displays the Tool menu to set and manipulate Bluetooth devices and display GPS satellite information. 5015 Select to return to the current map screen.6 Select to return to the current map screen.7 Displays the Setup menu to set the map display method and this device. 601note• When the top menu is displayed with the remote control, select to return to the last displayed screen.Top Menu<TOP0000><TOP0000><NM0000>1234576](https://usermanual.wiki/Mobile-Appliance/PNX-5.User-manual-1-of-2/User-Guide-1006886-Page-21.png)
![44page Common 45pageCommon116 Tour rout and drive route116■ What is a tour?A tour route starts from the current location, passes through several intermediate destinations, and arrives at the final destination.A tour route consists of 0 or more intermediate destinations and one or more final destinations.■ Setting a tour routeA relatively short distance tour such as stopping over at Heathrow Airport to pick up John, passing through Tower of London (intermediate destination) and Buckingham Palace and bringing him home is referred to as Short Tour.In the above example, London International Airport, Tower of London, and Buckingham Palace are intermediate destinations and home is the final destination.On the other hand, a relatively long distance tour starting from home in London, stopping at University of Paris to pick up Michelle, and attending a conference at the University of Naples is referred to as a Round trip tour.In the above example, University of Paris and University of Naples are destinations.On this device, the method of setting up a tour route is different between Short tour and Round trip tour.÷ Setting a Short tour routeTo set a Short tour route, search the location with the method described below 202 and set that location as the intermediate destination or final destination.÷ Round trip tourSelect [Plan Tour] from the Route Menu to start setting the Round trip tour route 302 , search location by various method 202 , and set as destination.■ Editing the tour routeYou can also edit an already created tour route by changing the order of intermediate destinations and adding or deleting intermediate destinations.■ Searching for drive routeSearching the route to drive along the tour route is referred to as route search and the searched route is referred to as the drive route.In the case of short tour, drive route search is started automatically when you set the final destination. Also, when you set intermediate destinations, select [Calc Route] on each screen to start.In this case, the drive route along the entire trip from the current location (start location) to the final destination is searched.In the case of round trip tour, select [Calc Route] on each screen to search the drive route from the current location (start location) to the destination (Destination 1). When you reach Destination 1, the drive route from Destination 1 to Destination 2 is searched.■ Setting the drive route search conditionYou can set the restrictions (left/right turns, toll roads/express ways) when searching the drive route.You can also select the drive route type (give priority to distance or travel time).](https://usermanual.wiki/Mobile-Appliance/PNX-5.User-manual-1-of-2/User-Guide-1006886-Page-22.png)
![46page Where20147pageWhere201Operation1Select [Where].The Search menu appears.CompleteDisplaying the Search menu from the Top menu to search the destination.1 [Home]Select to add home as destination. 2222 [Favorites]Select to search the destination from Favorites. 2123 [Last Dest.]Select to search the destination from a list of destinations. 2164 Select to return to the current map screen. 107 , 1135 [Coordinate Input]Select to search the destination by entering coordinates. 2186 [Address]Select to search the destination from address. 2037 Select to return to the Top menu.8 [POI]Select to search the destination from the point of interest type. 210 , 2119 [ ] [ ]Select to turn the Search menu page.<TOP0000>Search menu (1/2)<NW0000a><NW0000a>17 8 92 3 456Display Search menu](https://usermanual.wiki/Mobile-Appliance/PNX-5.User-manual-1-of-2/User-Guide-1006886-Page-23.png)
![48page Where 49pageWhere1017 [From Map]Select to search the destination from the map. 2198 [Rent-A-Car Return]Select to search for a place to return rent-a-car and a drive route passing by a gas station. 220Search menu (2/2)<NW0000b>7 8](https://usermanual.wiki/Mobile-Appliance/PNX-5.User-manual-1-of-2/User-Guide-1006886-Page-24.png)
![52page Where 53pageWhere203203PreparationHave the Search menu displayed.115 201Operation1Select [Address].2Select the button of the item to enter.3Enter the address information.Next PageSearch location by addressSearching destination from address (Address Search).4To enter another address information, select [OK] and repeat from 2.Select [LIST] when the number of hits becomes reasonable.5Select the button of the desired location.Use [ ] and [ ] to scroll the list.Completenote• Go to 206 to set the searched location as the Final destination (Short tour) or go to 207 to set as Destination (Round trip tour) or Intermediate destination (Short tour).Or, go to 209 to add to Favorites.• See 204 for the details of the address input selection screen in 2.• See 205 for the details of the address information input screen in 3.• You can narrow down the candidates by entering as much address information as possible ins 2 and 3.• A list may be displayed instead of address information input screen in 3.• The current sort order is shown on the right of the list with buttons in 5. Select these buttons to change the sort order of the list as Alphabetical = Distance = Sort off.<NW0000a><NW1000><NW1100a><NW1110><NW1000>](https://usermanual.wiki/Mobile-Appliance/PNX-5.User-manual-1-of-2/User-Guide-1006886-Page-26.png)
![54page Where 55pageWhere204204Address input selection screen detailsThe address input selection screen appears when you select [Address] from the Search menu.On this screen, select the type of address information to enter to search for location.1 [ABC]Enter the country (Example: “UK”), and prefecture.2 [ZIP-Code City Name]Enter a Zip code (Example: “CB21TN”) or a city (Example: “Cambridge”).3 Select to return to the current map screen. 4 [City Part]Enter the area name.5 [Crossing]Enter the intersecting street name.6 [Street Name]Enter the street (Example: “Trinity Lane”).7 [House-Nr.]Enter the house number (Example: 1677).8 Select to return to the Search menu.9 [Set Destination]Set as Final Destination 206 or Intermediate Destination 207 .0 [Option]Add to Favorites.You can also display the map of the searched location.Address input selection screen<NW1000>note• House number may be displayed as range (Example: 1601 to 1699).If there is no corresponding number, switch to list display and select from range. 104859672 3](https://usermanual.wiki/Mobile-Appliance/PNX-5.User-manual-1-of-2/User-Guide-1006886-Page-27.png)
![56page Where 57pageWhere205205Address information input screen detailsThe address information input selection screen appears when you select the button of the item to enter on the address input selection screen.Enter the address information with characters on this screen.note• Fuzzy search can only be turned on/off with [Guess] during City Name input.1 InputSelect to enter the item selected in the address input selection screen.2 CandidateSelect to display the candidates starting with the entered letter.3 HitsSelect to display the number of database hits.4 [BS]Select to delete the previously entered letter.5 [SP]Select to enter a space.6 [Guess]Select to turn On/Off fuzzy search for City Name input.7 [LIST]Select to display a list of locations found in the database.8 [A/a]Select to switch between uppercase and lowercase.9 KeyboardEnter characters. 0 Select to cancel entering and return to the Search menu.- [ÄÖÜ]Select to display the accented character keyboard.= [123/M]Select to switch between numeric keyboard and alphabetic keyboard.~ [OK]Select to return to the Search menu.Address information input screen<NW1100a>16~7048-5=923](https://usermanual.wiki/Mobile-Appliance/PNX-5.User-manual-1-of-2/User-Guide-1006886-Page-28.png)
![58page Where 59pageWhere206206PreparationHave the location to set as destination searched.Operation1Select [Set Destination].2Select [New Guidance].A tour route is created and set as destination.3Select [Go] to start route guide.Returns you to the current map screen and displays the drive route appears.CompleteStart route guide setting the searched location as Final DestinationSetting the searched location as the Final destination of Short tour.note• To set the short tour, first set the Final destination.• To add an intermediate destination without starting route guide, repeat selecting until the Search menu appears.• You can set the drive route search condition by selecting [Route Option] in 2. 312 , 313• Set the desired arrival time by selecting [ ] or [ ] in 3 and select [Recalculation] to recalculate and display the start time.• The screen in 1 is for address search, but you can also select [Set Destination] in the search screen for other locations to display the screen in 2 and set the searched location as the destination.<NW1300><NW1310a><NW1000>](https://usermanual.wiki/Mobile-Appliance/PNX-5.User-manual-1-of-2/User-Guide-1006886-Page-29.png)
![60page Where 61pageWhere207207PreparationHave the location to set as Intermediate Destination searched.Operation1Select [Set Destination].2Select [Intermediate Destination].3Select [Add] for the destination to add.Next PageStart route guide setting the searched location as Intermediate DestinationSetting the searched location as the Intermediate destination of Short tour.4Select [Calc.].The drive route is searched based on the cur-rent tour route.5Select [Go] to start route guide.This returns you to the current map screen and displays the drive route on the map.Completenote• The screen in 1 is for address search, but you can also select [Set Destination] in the search screen for other locations to display the screen in 2 and set the searched location as the destination.• Set the desired arrival time by selecting [ ] or [ ] in 5 and select [Recalculation] to recalculate and display the start time.<NR1000a><NW1300><NW1310a><NW1000>](https://usermanual.wiki/Mobile-Appliance/PNX-5.User-manual-1-of-2/User-Guide-1006886-Page-30.png)
![62page Where 63pageWhere208208PreparationHave the location to add to Favorites searched.Operation1Select [Option].2Select [Show in Map].The Scroll map screen appears.CompleteCheck the searched location on mapDisplaying the searched location on the scroll map screen.note• Select [Set] in 2 to set the location displayed on the map as destination. 206 , 207• Select [Add] in 2 to add the location displayed on the map to Favorites. 209<NW1200><NW1000><NM1000>](https://usermanual.wiki/Mobile-Appliance/PNX-5.User-manual-1-of-2/User-Guide-1006886-Page-31.png)
![64page Where 65pageWhere209209PreparationHave the location to add to Favorites searched.Operation1Select [Option].2Select [Save].A confirmation message is displayed.3Select [YES].Completenote• You can add up to 50 locations to Favorites.• You can also add tour route destinations to Favorites. 309• Select [Show in Map] in 2 to display the searched location on the map. 208Add searched location to FavoritesAdding the searched location to Favorites.<NW1200><NW1000>](https://usermanual.wiki/Mobile-Appliance/PNX-5.User-manual-1-of-2/User-Guide-1006886-Page-32.png)
![66page Where 67pageWhere210210PreparationHave the Search menu displayed.115 201Operation1Select [POI].2Select [Supra-regional].3Select the category button of the point of interest.Next PageSearch point of interestSearching for the location in facilities related to traffic.4Select the button of the point of interest.Use [ ] and [ ] to scroll the list.The POI information screen appears. Completenote• The current sort order is shown on the right of the list with buttons in 4. Select these buttons to change the sort order of the list as Alphabetical = Distance = Sort off.• If a cell phone is connected, you can select [Call] in 4 to call the searched location.• You can also set the searched location as the destination or add it to Favorites.See 206 to set the searched location as the Final destination (Short tour) or see 207 to set as Destination (Round trip tour) or Intermediate destination (Short tour).Or, see 209 to add to Favorites.<NW0000a><NW2000><NW2300a><NW2111><NW2112>](https://usermanual.wiki/Mobile-Appliance/PNX-5.User-manual-1-of-2/User-Guide-1006886-Page-33.png)
![68page Where 69pageWhere211211PreparationHave the Search menu displayed.115 201Operation1Select [POI].2Select the category button of the point of interest.3Select the sub-category button of the point of interest.Use [ ] and [ ] to scroll the list.Next PageSearch location by point of interest typeSearching for points of interest (POI Search).4Select the button of the point of interest.Use [ ] and [ ] to scroll the list.The POI information screen appears. Completenote• The current sort order is shown on the right of the list with buttons in 4. Select these buttons to change the sort order of the list as Alphabetical = Distance = Sort off.• If a cell phone is connected, you can select [Call] in 4 to call the searched location.• You can also set the searched location as the destination or add it to Favorites.See 206 to set the searched location as the Final destination (Short tour) or see 207 to set as Destination (Round trip tour) or Intermediate destination (Short tour).Or, see 209 to add to Favorites.<NW0000a><NW2100a><NW2110><NW2111><NW2112>](https://usermanual.wiki/Mobile-Appliance/PNX-5.User-manual-1-of-2/User-Guide-1006886-Page-34.png)
![70page Where 71pageWhere212212PreparationHave your destination added to Favorites.Have the Search menu displayed.115 201Operation1Select [Favorites].2Select the button of the desired location.Use [ ] and [ ] to scroll the list.The Favorites information screen appears. CompleteSearch from FavoritesSearching for destination from saved Favorites.note• You can set the searched location as the destination.See 206 to set the searched location as the Final destination (Short tour) or see 207 to set as Destination (Round trip tour) or Intermediate destination (Short tour).• If you selected [DEL.] in 2, all locations in Favorites are deleted.• See 209 for information on how to add to favorites.• You can edit the Favorites by selecting [Option] in the Favorites information screen in 2. 213 , 215<NW0000a><NW3000><NW3100>](https://usermanual.wiki/Mobile-Appliance/PNX-5.User-manual-1-of-2/User-Guide-1006886-Page-35.png)
![72page Where 73pageWhere213213PreparationHave your destination added to Favorites.Have the Favorites list displayed. 115 201 212Operation1Select the button of the location to check.Use [ ] and [ ] to scroll the list.2Select [Option].Next PageCheck Favorite location on mapChecking the location in Favorites on the map.3Select [Show in Map].The Scroll map screen appears.Completenote• If you selected [DEL.] in 2, all locations in Favorites are deleted.• If you select [Del. Item] in 3, you can delete the location you selected in 1 from Favorites. 215• If you select [Rename Item] in 3, you can edit the information of the location you selected in 1. 214<NW3110><NW3000><NW3100><NM1000>](https://usermanual.wiki/Mobile-Appliance/PNX-5.User-manual-1-of-2/User-Guide-1006886-Page-36.png)
![74page Where 75pageWhere214214PreparationHave the memory location added to Favorites.Have the Favorites list displayed. 115 201 212Operation1Select the button of the location to edit the information.Use [ ] and [ ] to scroll the list.2Select [Option].3Select [Rename Item].Next PageEdit Favorite location informationEditing information of location in Favorites.4Select the button of the item to edit.5Enter the information.6Select [OK].Returns you to the screen in 4.Completenote• If you selected [DEL.] in 1, you can delete all the locations in Favorites.• See 205 for information on how to use the keyboard. <NW3112a><NW3110><NW3111><NW3000><NW3100>](https://usermanual.wiki/Mobile-Appliance/PNX-5.User-manual-1-of-2/User-Guide-1006886-Page-37.png)
![76page Where 77pageWhere215215PreparationHave the memory location added to Favorites.Have the Search menu displayed.115 201 212Operation1Select the button of the location to delete.Use [ ] and [ ] to scroll the list.2Select [Option].3Select [Del. Item].A confirmation message is displayed.Next PageDelete FavoritesDeleting location in Favorites.4Select [OK].Returns you to the screen in 1.Completenote• If you selected [DEL.] in 1, you can delete all the locations in Favorites.<NW3110><NW3000><NW3100>](https://usermanual.wiki/Mobile-Appliance/PNX-5.User-manual-1-of-2/User-Guide-1006886-Page-38.png)
![78page Where 79pageWhere216216PreparationHave the Search menu displayed.115 201Operation1Select [Last Dest.].2Select the button of the desired location.Use [ ] and [ ] to scroll the list.The Previously visited destination information screen appears.CompleteSearch from previously visited destinationThe destination you searched and visited along the way as you receive route guide are stored as previously visited destination.You can search for destination from stored previously visited destinations.note• If you select [DEL.] in 2, you can delete all previous destinations.• You can also set the searched location as the destination or add it to Favorites.See 206 to set the searched location as the Final destination (Short tour) or see 207 to set as Destination (Round trip tour) or Intermediate destination (Short tour).Or, see 209 to add to Favorites.• Select [Option] on the Previously visited destination information screen in 2 to edit previous destinations. 217<NW0000a><NW4100><NW4000>](https://usermanual.wiki/Mobile-Appliance/PNX-5.User-manual-1-of-2/User-Guide-1006886-Page-39.png)
![80page Where 81pageWhere217217PreparationHave the Search menu displayed.115 201Operation1Select [Last Dest.].2Select the button of the previous destination to edit.Use [ ] and [ ] to scroll the list.3Select [Option].Next PageEdit previously visited destination Editing stored previously visited destination.4Select [Del. Item].A confirmation message is displayed.5Select [YES].The previously visited destination selected in 2 is deleted and you are returned to 2.Completenote• Select [DEL.] in 2 to delete all previous destinations.• Select [Save in Favorites] in 4 to add the previously visited destination selected in 2 to Favorites.• Select [Show in Map] in 5 to check the previously visited destination selected in 2 on the map. <NW0000a><NW4110><NW4000><NW4100>](https://usermanual.wiki/Mobile-Appliance/PNX-5.User-manual-1-of-2/User-Guide-1006886-Page-40.png)
![82page Where 83pageWhere218218PreparationHave the Search menu displayed.115 201Operation1Select [Coordinate Input].2Select [Setting] of the item to enter longitude or latitude.3Enter the longitude or latitude in the following format.Example: If East longitude 2 degrees 2 min. 38 sec.[E]2[°]20[']38["]Next PageSearch by coordinatesSearching locations by coordinates (Coordinate Search).4Select [OK].5Repeat 2 and 3 to enter longitude and latitude.6Select [OK].Completenote• You can enter longitude or latitude first.• If you select [Setting.] for Latitude in 2, [N] (North latitude) and [S] (South latitude) appear in 3. If you select [Setting.] for Longitude in 2, [E] (East longitude) and [W] (West longitude) appear in 3.• You can also set the searched location as the destination or add it to Favorites.See 206 to set the searched location as the Final destination (Short tour) or see 207 to set as Destination (Round trip tour) or Intermediate destination (Short tour).Or, see 209 to add to Favorites.<NW0000a><NW5000_1><NW5100_1><NW5100_2><NW5000_2>](https://usermanual.wiki/Mobile-Appliance/PNX-5.User-manual-1-of-2/User-Guide-1006886-Page-41.png)
![84page Where 85pageWhere219219PreparationHave the Search menu displayed.115 201Operation1Select [From Map].2Scroll the map and place the cursor on the desired location.Completenote• If [From Map] does not appear in 1, select [ ].• You can also set the searched location as the destination or add it to Favorites.See 206 to set the searched location as the Final destination (Short tour) or see 207 to set as Destination (Round trip tour) or Intermediate destination (Short tour).Or, see 209 to add to Favorites.Search from mapSearching for destination from a map.<NW0000b><NM1000>](https://usermanual.wiki/Mobile-Appliance/PNX-5.User-manual-1-of-2/User-Guide-1006886-Page-42.png)
![86page Where 87pageWhere220220PreparationHave the Search menu displayed.115 201Operation1Select [Rent-A-Car Return].2Select the button of the item to enter.3Enter the address information.Next PageSearch for rent-a-car returnSearching for drive route with rent-a-car return as the Final destination and its nearest gas sta-tion as Intermediate destination.4Select [LIST].5Select the button of the desired location.Use [ ] and [ ] to scroll the list.6Select [OK].7Select the button of the desired rent-a-car dealer.8Select [Set Destination].An inquiry message is displayed.Next Page<NW0000b><NW2200><NW1100a><NW2200><NW2111><NW1110><NW3100>](https://usermanual.wiki/Mobile-Appliance/PNX-5.User-manual-1-of-2/User-Guide-1006886-Page-43.png)
![88page Where 89pageWhere2209Select [YES] or [NO].[YES] : Set the gas station nearest the rent-a-car parking as Intermediate destination.[NO] : Set the rent-a-car parking as the nearest destination.10Select [Go] to start route guide.Returns you to the current map screen and displays the drive route appears.Completenote• If a cell phone is connected, you can select [Call] on the POI information screen in 8 to make a phone call.• Set the desired arrival time by selecting [ ] or [ ] in 10 and select [Recalculation] to recalculate and display the start time.• The current sort order is shown on the right of the list with buttons in 5 and 7. Select these buttons to change the sort order of the list as Alphabetical = Distance = Sort off.• A list screen may be displayed in 3.<NW1310a>](https://usermanual.wiki/Mobile-Appliance/PNX-5.User-manual-1-of-2/User-Guide-1006886-Page-44.png)
![90page Where 91pageWhere221221PreparationHave home set.Have the Search menu displayed.115 201Operation1Select [Home].2Select [New Guidance] or [Intermediate Destination].[New Guidance]: A tour route is created and your home is set as destination. ( 3 )[Intermediate Destination] :Home is added as Intermediate destination to the current route. 207Next PageGo homeSearching for drive route to return home or drive route with home as Intermediate destination.3Select [Go] to start route guide.Returns you to the current map screen and displays the drive route appears.Completenote• If home is not added, select [Home] to display the screen to add home. See 222 for information on adding home.• To add home as Intermediate destination, have a tour route created with the destination set.• You can set the drive route search condition by selecting [Route Option] in 2. 312 , 313• Set the desired arrival time by selecting [ ] or [ ] in 3 and select [Recalculation] to recalculate and display the start time.<NW0000a><NW1300><NW1310a>](https://usermanual.wiki/Mobile-Appliance/PNX-5.User-manual-1-of-2/User-Guide-1006886-Page-45.png)
![92page Where 93pageWhere222222Change/Add homePreparationHave the Search menu displayed.115Operation1Select .2Select [Nav Map Setting].3Select [ ] to display screen 4/4.Next PageAdding home.4Select [Edit] for Home Address.5Search home by any Search method.6Select [Set Destination].Home is added and you are returned to 3.Completenote• If home is already added, a confirmation message appears before 5. Select [YES] and go to 5.In this case, the previous home location will be overwritten.<S00000><SN1000a><SN1000d><NW0000><NW1000><TOP0000>](https://usermanual.wiki/Mobile-Appliance/PNX-5.User-manual-1-of-2/User-Guide-1006886-Page-46.png)
![94page Route30195pageRoute301Operation1Select [Route].The Route menu appears.CompleteDisplaying Route menu to handle tour route or drive route from the Top menu.1 [Plan Tour]Select to create a Round trip tour route. 302If a Round trip tour route is already set, you can edit the tour route. 2 [Route option]Select to set the drive route search condition. 3123 [Plan Navi]Select to edit the Short tour route.4 Select to return to the current map screen.5 [Cancel Guidance]Select to cancel route guide. 3206 [DEMO]Select to simulate the drive guide. The start location and destination can be set independently of the current drive route. 3217 Select to return to the Top menu.8 [Navi map Context]Select to control during route guide. 315<NR0000><NR0000><TOP0000>Route menu71526438Display Route menu](https://usermanual.wiki/Mobile-Appliance/PNX-5.User-manual-1-of-2/User-Guide-1006886-Page-47.png)
![96page Route 97pageRoute302302Setting the destination of Round trip tour.4Repeat 2 to 3 to set all Destinations.Completenote• Select [Plan tour] when a route is already set in 1 to display the destination list of the Round trip tour.• Select [Calc.] in 4 to search the drive route from the current location to the next destination. 206• Select [INFO.] in 4 to perform the following:– View destination information. 304– Check the destination on the map. 305• Select [Delete Destination] in 4 to delete destination individually. 306• Select [Option] in 4 to perform the following:– Add all destination to Favorites. 309– Delete all destinations. 308– Change the order of destinations. 307– Display the entire drive route on the map. 310– Display the drive route as list. 311PreparationHave the Route menu displayed.115 301Operation1Select [Plan Tour].Round trip tour route is displayed.2Select [Add].3Search the destination by any method and select [Set Destination].Next Page<NR0000><NR1000><NR1000a>Set round trip tour](https://usermanual.wiki/Mobile-Appliance/PNX-5.User-manual-1-of-2/User-Guide-1006886-Page-48.png)
![98page Route 99pageRoute303303PreparationHave the Route menu displayed.115 301Operation1Select [Plan Tour] or [Plan Navi].The Tour route screen appears.CompleteDisplaying destinations set in Short tour or Round trip tour route.1 [Add]Select to add destination. The Search menu appears. 2012 DestinationSelect to display the set destinations.The drive route is searched to travel the displayed destinations from the top.3 [INFO.]Select to display the selected destination's information. 3044 [Calc.]Select to search the drive route. 206 , 2075 Scroll barActivates when the destinations do not fit in one screen and allows you to scroll the list of destinations.6 [Option]Select to display tour route details and add destination to Favorites. Tour route screen<NR1000a><NR1000a><NR0000>132546View tour route](https://usermanual.wiki/Mobile-Appliance/PNX-5.User-manual-1-of-2/User-Guide-1006886-Page-49.png)
![100page Route 101pageRoute304304PreparationHave the Tour route screen displayed.or115 301 303 303Operation1Select the button of the destination to display the information.2Select [INFO.].Information of the selected destination is displayed.Completenote• Select [Show in Map] on the destination information screen in 2 to display a map around the destination ( 305 ).Displaying information of destinations set in tour route.<NR1000a><NR1200a>Display destination information](https://usermanual.wiki/Mobile-Appliance/PNX-5.User-manual-1-of-2/User-Guide-1006886-Page-50.png)
![102page Route 103pageRoute305305Checking the location of destination set in Short tour or Round trip tour on the map.3Select [Show in Map].The Scroll map screen appears.Completenote• Select [Add] on the Scroll map screen in 3 to add the location displayed on map to Favorites. • Select [Set] on Scroll map screen in 3 to set the location displayed on map as destination.PreparationHave the Search menu displayed.or115 301 303 303Operation1Select the button of the destination to display on map.2Select [INFO.].Next Page<NR1000a><NM1000><NR1200a>Check destination on the map](https://usermanual.wiki/Mobile-Appliance/PNX-5.User-manual-1-of-2/User-Guide-1006886-Page-51.png)
![104page Route 105pageRoute306306PreparationHave the Tour route screen displayed.or115 301 303 303Operation1Select the button of the destination to delete.2Select [Option].3Select [Delete Destination].A confirmation message is displayed.Next PageIndividually deleting destination set in tour route.4Select [YES].Route guide is stopped.5Select [YES].The selected destination is deleted and you are returned to the Tour route screen.Completenote• Step 4 is not necessary if route guide is not active or if the destination you are trying to delete (Round trip tour) is not a destination of the current drive route.• If you stop route guide in 4, the searched drive route is deleted.<NR1000a><NR1210a>Individually delete destination](https://usermanual.wiki/Mobile-Appliance/PNX-5.User-manual-1-of-2/User-Guide-1006886-Page-52.png)
![106page Route 107pageRoute307307PreparationHave the Tour route screen displayed.or115 301 303 303Operation1Select the button of the destination to change the order.2Select [Option].3Select [Move Destination].A confirmation message is displayed.Next PageChanging the order of destinations set in the tour route.4Select [YES].Route guide is stopped.5Select the arrow button of the destination.The order of destinations changes.Completenote• If you stop route guide in 4, the searched drive route is deleted.• A vehicle mark in 5 indicates the zone you are currently traveling.The button of the destinations you already traveled (destination on the Start side of the vehicle mark) is grayed out and you cannot move to location before that destination.• To search the drive route once again with the new order, select [Calc] following 5.To edit the tour route further, select after 5. Returns you to the Tour route screen.<NR1000a><NR1110a><NR1100a>Change the order of destinations](https://usermanual.wiki/Mobile-Appliance/PNX-5.User-manual-1-of-2/User-Guide-1006886-Page-53.png)
![108page Route 109pageRoute308308PreparationHave the Tour route screen displayed.or115 301 303 303Operation1Select [Option].2Select [Delete All Destinations].A confirmation message is displayed.3Select [YES].All destinations are deleted and you are returned to the Tour route screen.Completenote• If you delete all destinations with the above procedure, the tour route itself is deleted as well as the drive route.Deleting all destinations set in the tour route.<NR1100a><NR1000a>Delete tour route](https://usermanual.wiki/Mobile-Appliance/PNX-5.User-manual-1-of-2/User-Guide-1006886-Page-54.png)
![110page Route 111pageRoute309309PreparationHave the Tour route screen displayed.115 301 303 303Operation1Select [Option].2Select [Save Destination to Favorites].A confirmation message is displayed.3Select [YES].All destinations are added to Favorites and you are returned to the Tour route screen.CompleteAdding destinations set in tour route to Favorites.<NR1000a><NR1100a>Add all destination to Favorites](https://usermanual.wiki/Mobile-Appliance/PNX-5.User-manual-1-of-2/User-Guide-1006886-Page-55.png)
![112page Route 113pageRoute310310PreparationHave the Tour route screen displayed.115 301 303 303Operation1Select [Option].2Select [Show Route].CompleteDisplaying the drive route of a Short tour from the current location to the Final Destination or of a Round trip tour from the current location to the next destination on the map.<NR1000a><NR1100a><NM3000>Display entire drive route on map](https://usermanual.wiki/Mobile-Appliance/PNX-5.User-manual-1-of-2/User-Guide-1006886-Page-56.png)
![114page Route 115pageRoute311311PreparationHave the Tour route screen displayed.115 301 303 303Operation1Select [Option].2Select [Tour List].The Route list screen appears.CompleteDisplaying drive route details.note• On the Route list screen in 2, location with TMC information are displayed as button. Select the button of the location to display TMC information.<NR1000a><NR1100a><NR4300>Display drive route details](https://usermanual.wiki/Mobile-Appliance/PNX-5.User-manual-1-of-2/User-Guide-1006886-Page-57.png)
![116page Route 117pageRoute312312PreparationHave the Route menu displayed.115 301Operation1Select [Route option].2Select the search condition button.[Turn] : Avoid left/right turns.[Motorway] : Allow use of express ways.[Toll Road] : Allow use of toll roads.[Ferry] : Allow use of ferries.3Select .Returns you to the Route menu.CompleteSetting the drive route search condition.note• Even if you set to avoid left/right turns, they will be used if the destination cannot be reached without them.• Even if you set to avoid express ways, toll roads, and ferries, they will be used if the destination cannot be reached without them.<NR0000><NR2000>Select to set the drive route search condition](https://usermanual.wiki/Mobile-Appliance/PNX-5.User-manual-1-of-2/User-Guide-1006886-Page-58.png)
![118page Route 119pageRoute313313PreparationHave the Route menu displayed.115 301Operation1Select [Route option].2Select [Kind of Route].Next PageSetting the drive route type.3Select the route type button.[Economical] : Search the most economical route. Go to 5.[Ecological] : Search the route with least effect on environment. Go to 5.[Short] : Search the route with shortest dis-tance. Go to 5.[Fast] : Search the route with shortest travel time. Go to 5.[Optimal] : Allows you to set the balance be-tween travel time and distance.4If you select [Optional] in 3, select [+] or [–] to set the balance between emphasizing travel time and distance.5Select [OK].Returns you to the Route menu.Completenote• Even if you select [Fast] in 3, the searched route may not always be the fastest. Also, even if select [Short], the searched route may not always be the shortest.<NR0000><NR2100><NR2000><NR2100>Set drive route type](https://usermanual.wiki/Mobile-Appliance/PNX-5.User-manual-1-of-2/User-Guide-1006886-Page-59.png)
![120page Route 121pageRoute314314PreparationHave the Route menu displayed.115 301Operation1Select [Route option].2Select [Speed Profile].Next PageSetting the average speed used to calculate the travel time or expected arrival time.3Select the button of the desired speed.[Slow] : Assume driving at relatively slow speed.[Normal] : Assume driving at normal speed.[Fast] : Assume driving at relatively fast speed.[Adaptive] : Set according to road condition.4Select .Complete■ When [Adaptive] is selected4If you select [Adaptive] in 3, select [+] or [–] to set the assumed speed according to street condition.5Select [OK].6Select .Complete<NR0000><NR2000><NR2200><NR2210>Set average speed](https://usermanual.wiki/Mobile-Appliance/PNX-5.User-manual-1-of-2/User-Guide-1006886-Page-60.png)
![122page Route 123pageRoute315315PreparationHave the Route menu displayed.115 301Operation1Select [Navi map Context].The Route guide menu appears.CompleteDisplaying route guide menu.1 [Jam Ahead Cancel Jam]Select to repeat drive route search to avoid traffic jam ahead. 3162 [Dest Info.]Select to display next intermediate destination information. 3183 [Route List]Select to display drive route details. 3114 Select to return to the current map screen.5 [Alternative Route]Select to repeat route search with different search condition. 3196 [Skip Next Dest.]Select to cancel next intermediate destination and search drive route once more. 3177 Select to return to the top menu.8 [Show Route]Select to display drive route on map. 310Route guide menu<NR4000><NR0000><NR4000>1 26573 48Display route guide menu](https://usermanual.wiki/Mobile-Appliance/PNX-5.User-manual-1-of-2/User-Guide-1006886-Page-61.png)
![124page Route 125pageRoute316316PreparationHave the Route guide menu displayed.115 301 315Operation1Select [Jam Ahead Cancel Jam].2Select the distance to start avoiding traffic jam.3Select [Go].Returns you to the current map screen and displays the new drive route.CompleteSearching for route avoiding traffic jam.note• The traffic jam avoiding distance is different between normal street and express way.• Set the desired arrival time in 3 and select [Recalculation] to recalculate and display the start time.<NR4000><NR4100b><NW1310a>Avoid traffic jam](https://usermanual.wiki/Mobile-Appliance/PNX-5.User-manual-1-of-2/User-Guide-1006886-Page-62.png)
![126page Route 127pageRoute317317PreparationHave the Route guide menu displayed.115 301 315Operation1Select [Skip Next Dest.].A confirmation message is displayed.2Select [OK].3Select [Go].Returns you to the current map screen and displays the new drive route.CompleteSearching drive route skipping the next destination.note• If there is no destination remaining in the tour route when the next destination is skipped, the current map screen appears when you select [OK] in 2.• Set the desired arrival time in 2 and select [Recalculation] to recalculate and display the start time.<NR4000><NW1310a>Skip next destination](https://usermanual.wiki/Mobile-Appliance/PNX-5.User-manual-1-of-2/User-Guide-1006886-Page-63.png)
![128page Route 129pageRoute318318PreparationHave the Route guide menu displayed.115 301 315Operation1Select [Dest Info.].CompleteDisplaying the next destination's information.<NR4000><NR1200a>Display next destination information](https://usermanual.wiki/Mobile-Appliance/PNX-5.User-manual-1-of-2/User-Guide-1006886-Page-64.png)
![130page Route 131pageRoute319319PreparationHave the Route guide menu screen displayed.115 301 315Operation1Select [Alternative Route].A confirmation message is displayed.2Select [YES].3Set the search condition.See 312 and 313 .Next PageRepeating route search with different condition.4Select [Calc].5Select [Go].Returns you to the current map screen and displays the new drive route.Completenote• Set the desired arrival time in 5 and select [Recalculation] to recalculate and display the start time.<NR4000><NW1310a><NR4200>Search alternate route](https://usermanual.wiki/Mobile-Appliance/PNX-5.User-manual-1-of-2/User-Guide-1006886-Page-65.png)
![132page Route 133pageRoute320320PreparationHave the Route menu displayed.115 301Operation1Select [Cancel Guidance].2Select [OK].Route guide is canceled and you are returned to the current map screen.No drive route is displayed on the current map screen.Completenote• You should cancel route guide if you want to travel off the drive route.• The drive route is not deleted even if you cancel it.To resume route guide, display the tour route ( 303 ) and select [Calc].Canceling current route guide.<NR0000>Cancel route guide](https://usermanual.wiki/Mobile-Appliance/PNX-5.User-manual-1-of-2/User-Guide-1006886-Page-66.png)
![134page Route 135pageRoute321321PreparationHave the Route menu displayed.115 301Operation1Select [DEMO].2Select [Set] for the Start Location Description or Destination Location Description.3Set the start location or destination.Next PageSimulating the route guide specifying the start and destination locations.4Select [Set Destination].Returns you to the screen in 2.5Repeat 2 to 4 to set both the start and destination locations.6Select [Start Demo].Starts route search and demo mode drive.Completenote• See 202 for information on how to set the start or destination location in 3.• You are returned to 2 when you arrive at the destination in demo mode.Select [Auto Rep.] in 6 to repeat demo mode from the start location.• When you select in demo mode, a confirmation message appears and you are returned to 2 after you select [YES].• The searched drive route is canceled if you select [Set Demo] in 6 when a drive route is already searched. However, the destination is saved as previous destination. <NM5000><NR0000><NR3000b><NR3000a><NW0000a>Drive in demo mode](https://usermanual.wiki/Mobile-Appliance/PNX-5.User-manual-1-of-2/User-Guide-1006886-Page-67.png)
![136page A/V401137pageA/V401Operation1Select [A/V].The Source menu appears.CompleteDisplaying the Source menu to switch the AV source from the Top menu.1 [iPod]Select to play music and video in the connected iPod. 4132 [DVB-T]Select to switch to terrestrial digital television broadcasts (digital TV). 4233 [SD]Select to play files inside the inserted SD card. 4024 [Bluetooth]Select to play music in the connected Bluetooth device. 4195 Select to return to the current map screen. 107 , 1126 Select to return to the Top menu. 1157 [Standby]Select to turn off the AV source.note• Unplayable AV source cannot be selected.• Only PNX-7 can be viewed for digital TV. • If the previously played AV source is available, select [A/V] to switch to the playback screen of that source and start playback.<A00000-1><TOP0000>Source menu (When connecting iPod)<A00000-1>Display Source menu1234567](https://usermanual.wiki/Mobile-Appliance/PNX-5.User-manual-1-of-2/User-Guide-1006886-Page-68.png)
![138page A?V 139pageA/V4018 [DVD]Select to play music and video in the connected DVD player. 420note• [DVD] can be selected when a DVD player is connected and the Input Select is set to “DVD” ( 616 ).• When Input Select is set to “AV in”, [AV IN] is displayed instead of [DVD].• When iPod is connected, neither [DVD] nor [AV IN] is displayed.Source menu (When connecting DVD)<A00000-2>8](https://usermanual.wiki/Mobile-Appliance/PNX-5.User-manual-1-of-2/User-Guide-1006886-Page-69.png)
![140page A/V 141pageA/V402402PreparationHave the Source menu displayed.115 401Operation1Select [SD].The top category of the SD card appears.CompleteDisplay SD card's top categoryDisplaying the top category for music selection from the Source menu.1 [PlayList]Select to play from playlist. 4072 [Album]Select to play music by album. 4053 Select to return to the current map screen. 107 , 1124 [Compose]Select to play music by composer. 4085 [Genre]Select to play music by genre. 4096 [Video]Select to play video. 4117 [Title]Select to play music by title. 4048 [Artist]Select to play music by artist. 4069 [Photo Gallery]Select to view still images. 4100 [Player]Select to display the Player screen. 403- [SRC]Select to return to the Source menu. 401SD card Top category screen<AC2000><AC2000><A00000-1>40-1652 3789](https://usermanual.wiki/Mobile-Appliance/PNX-5.User-manual-1-of-2/User-Guide-1006886-Page-70.png)
![142page A/V 143pageA/V4034031 Album artSelect to display album art.2 Music informationSelect to display the artist name, music title, and album title.Select the name to horizontally scroll the selected information.3 Select to return to the current map screen. 107 , 1124 Select to display the music in the list (Playlist, Album. etc.) containing the current music. 5 [TOP]Select to display the top category. 4026 Playback status7 Play time barSelect to display the playback progress.Touch the bar to play from the touched location.8 [MORE]Select to display the More screen. 9 [4]Select to play from the beginning of the music or the previous music.0 [38]Select to toggle between play and halt.- [¢]Select to play the next music.= [SRC]Select to return to the Source menu. 401PreparationHave the music in the SD card playing.Operation1Select [Player].The Music playback control screen (Main screen) appears. Completenote• If you select [Player] in 1, all songs are played.SD card music playback control screen(Main screen)<MC0000a><MC0000a><AC2200>49=21 3580 -67Control while playing music in SD card](https://usermanual.wiki/Mobile-Appliance/PNX-5.User-manual-1-of-2/User-Guide-1006886-Page-71.png)
![144page A?V 145pageA/V4031 [BACK]Select to return to the Music playback control screen (Main screen). 2 Select to randomly play music in the current list (Playlist, Album, etc.). 3 Select to repeat the current music. 4 [1][¡]Select to play at x2 speed in the forward or backward direction. SD card music playback control screen213<MC0000b>4](https://usermanual.wiki/Mobile-Appliance/PNX-5.User-manual-1-of-2/User-Guide-1006886-Page-72.png)
![146page A/V 147pageA/V404404PreparationHave the SD card Top category screen displayed.115 401 402Operation1Select [Title].2Select the button of the title to play.The music starts playing.Use [ ] and [ ] to scroll the list.CompleteSelecting and playing music file or video file in the SD card by title.note• If you select [ALL PLAY] or [Player] in 2, all songs are played.• Select [A-Z] or [A-Z] in 2 to sort the list in ascending or descending order.• Select [SRC] in 2 to return to the Source menu or [TOP] to return to the Top category screen. Or select [HOME] to display a list of songs being played.• If you displayed the screen in 2 from the Playlist selection screen ( 407 ), the screen changes in the order of [All] = [Audio] = [Movie] = [All] each time you select [All]. Select [All] to list all files, [Audio] to list only audio files, and [Movie] to list only video files.• See 403 for the screen displayed while playing a music file. See 412 for the screen displayed while playing a video file. <AC2200><AC2200>Select by title and play](https://usermanual.wiki/Mobile-Appliance/PNX-5.User-manual-1-of-2/User-Guide-1006886-Page-73.png)
![148page A/V 149pageA/V405405PreparationHave the SD card Top category screen displayed.115 401 402Operation1Select [Album].2Select the button of the album to play.Use [ ] and [ ] to scroll the list.3Select the button of the music to play. 404The music is played. CompleteSelecting and playing music in SD card by album title.note• Select [ALL PLAY] in 2 to select songs in all albums. • Select [Player] in 2 to play songs from the first song in the top album. • Select [A-Z] or [A-Z] in 2 to sort the list in ascending or descending order.• Select [VIEW] in 2 to change the album display method from list display = album art thumbnail display = rotation display. Select an album art during album art thumbnail display or rotation display to play the album. • Select [SRC] in 2 to return to the Source menu or [TOP] to return to the Top category screen. Or select [HOME] to display a list of songs being played.• Select [ALL PLAY] in 3 to play all songs in the album. • See 403 for the screen while playing.<AC2400><AC2000>Select by album title and play](https://usermanual.wiki/Mobile-Appliance/PNX-5.User-manual-1-of-2/User-Guide-1006886-Page-74.png)
![150page A/V 151pageA/V406406PreparationHave the SD card Top category screen displayed.115 401 402Operation1Select [Artist].2Select the button of the artist to play.Use [ ] and [ ] to scroll the list.3Select an album. 405NextSelecting and playing music in SD card by artist name.4Select the button of the music to play. 404The music is played. Completenote• Select [ALL PLAY] in 2 to select songs of all artists. • Select [Player] in 2 to play songs from the first song of the top artist. • Select [A-Z] or [A-Z] in 2 to sort the list in ascending or descending order.• Select [ALL PLAY] in 3 to play all songs of artist selected in 2.• Select [SRC] to return to the Source menu or [TOP] to return to the Top category screen. Or select [HOME] to display a list of songs being played.• See 403 for the screen while playing.<AC2000><AC2300>Select by artist name and play](https://usermanual.wiki/Mobile-Appliance/PNX-5.User-manual-1-of-2/User-Guide-1006886-Page-75.png)
![152page A/V 153pageA/V407407PreparationHave the SD card Top category screen displayed.115 401 402Operation1Select [PlayList].2Select the button of the playlist to play.Use [ ] and [ ] to scroll the list.3Select the button of the music to play. 404The music is played. CompletePlaying from playlist in the SD card.note• You cannot create or edit Playlist from the PND. You must use a PC. • Select [ALL PLAY] in 2 to select files in all playlists. • Select [Player] in 2 to play songs from the first song in the top playlist. • Select [A-Z] or [A-Z] in 2 to sort the list in ascending or descending order.• Select [ALL PLAY] in 3 to play all songs in playlist selected in 2.• Select [SRC] to return to the Source menu or [TOP] to return to the Top category screen. Or select [HOME] to display a list of songs being played.• See 403 for the screen while playing.<AC2100><AC2000>Play from Playlist](https://usermanual.wiki/Mobile-Appliance/PNX-5.User-manual-1-of-2/User-Guide-1006886-Page-76.png)
![154page A/V 155pageA/V408408PreparationHave the SD card Top category screen displayed.115 401 402Operation1Select [Composer].2Select the button of the composer to play.Use [ ] and [ ] to scroll the list.3Select an album. 405NextSelecting and playing music in SD card by composer.4Select the button of the music to play. 404The music is played. Completenote• Select [ALL PLAY] in 2 to select songs of all composers. • Select [Player] in 2 to play songs from the first song in the top composer. • Select [A-Z] or [A-Z] in 2 to sort the list in ascending or descending order.• Select [SRC] in 2 to return to the Source menu or [TOP] to return to the Top category screen. Or select [HOME] to display a list of songs being played.• Select [ALL PLAY] in 3 to play all songs of composer selected in 2.• See 403 for the screen while playing.<AC2500><AC2000>Select by composer and play](https://usermanual.wiki/Mobile-Appliance/PNX-5.User-manual-1-of-2/User-Guide-1006886-Page-77.png)
![156page A/V 157pageA/V409409PreparationHave the SD card Top category screen displayed.115 401 402Operation1Select [Genre].2Select the button of the genre to play.Use [ ] and [ ] to scroll the list.3Select an album. 405NextSelecting and playing music in SD card by genre.4Select the button of the music to play. 404The music is played. Completenote• Select [ALL PLAY] in 2 to select songs in all genre. • Select [Player] in 2 to play songs from the first song in the top genre. • Select [A-Z] or [A-Z] in 2 to sort the list in ascending or descending order.• Select [SRC] in 2 to return to the Source menu or [TOP] to return to the Top category screen. Or select to display a list of songs being played.• Select [ALL PLAY] in 3 to play all songs of genre selected in 2.• See 403 for the screen while playing.<AC2600><AC2000>Select by genre and play](https://usermanual.wiki/Mobile-Appliance/PNX-5.User-manual-1-of-2/User-Guide-1006886-Page-78.png)
![158page A/V 159pageA/V410410PreparationHave the SD card Top category screen displayed.115 401 402Operation1Select [Photo Gallery].2Select the images to display. The selected images are checked. Use [ ] and [ ] to scroll the thumbnail display.Next Pagenote• Select [ALL] in 2 to select all images. Or, select [Release] to cancel all selections. • When selecting [FOL.UP] in 2, content of folder of one upper hierarch is displayed. Or, when selecting [TOP], content of the top hierarchy is displayed.Displaying the still images in the SD card.■ Viewing each image in full screen3Select [Stand].The selected image is displayed full screen. If you select more than one image in 2, you can scroll the images with [ ] and [ ]. Completenote• Touch the screen when an image is displayed full screen to return to thumbnail display.<AC2700_2><AC2710><AC2700_1><AC2000>View still images](https://usermanual.wiki/Mobile-Appliance/PNX-5.User-manual-1-of-2/User-Guide-1006886-Page-79.png)
![160page A?V 161pageA/V■ Viewing a slideshow3Select [Slide Show].The selected images are displayed as slide show. Completenote• Touch the screen during slide show to return to thumbnail display.410<AC2700_2><AC2720>](https://usermanual.wiki/Mobile-Appliance/PNX-5.User-manual-1-of-2/User-Guide-1006886-Page-80.png)