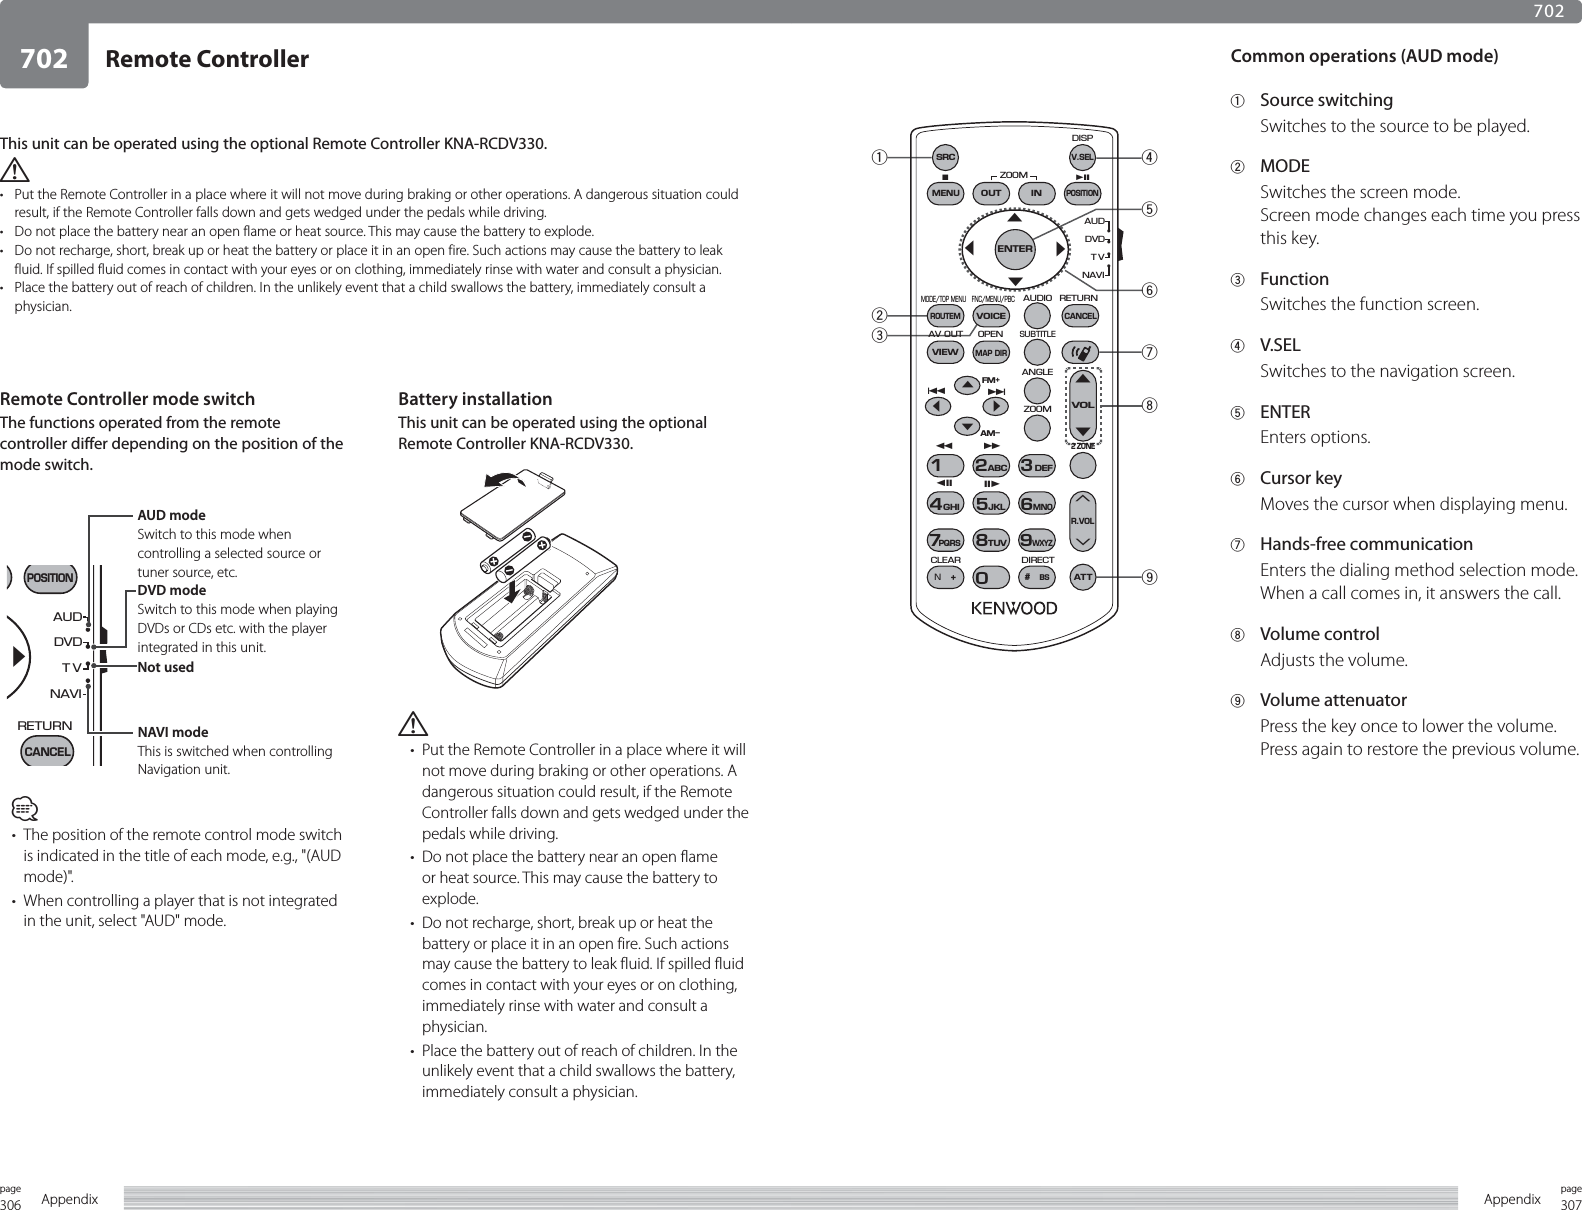
Mobile Appliance PNX-5 Protable Navigation with Bluetooth User Manual unprotected 20080508 PND User M
Mobile Appliance, Inc. Protable Navigation with Bluetooth unprotected 20080508 PND User M
Contents
- 1. User manual 1 of 2
- 2. User manual 2 of 2
User manual 2 of 2
![162page A/V 163pageA/V411411PreparationHave the SD card Top category screen displayed.115 401 402Operation1Select [Video].2Select the button of the video to play.Select [ ] and [ ] to scroll.CompletePlaying video in the SD card.note• Select [SRC] in 2 to return to the Source menu or [TOP] to return to the Top category screen. Or select to display a list of videos being played.• Select [VIEW] in 2 to change the list to thumbnail display. Select [VIEW] in thumbnail display to return to list display.• Select [Player] in 2 to play sequentially from the first video file. <AC2800><VC0000><AC2000>View video](https://usermanual.wiki/Mobile-Appliance/PNX-5.User-manual-2-of-2/User-Guide-1006887-Page-1.png)
![164page A/V 165pageA/V412412Touch the center of the screen while playing video in an SD card to display the control buttons.1 Select to display a list.2 [TOP]Select to display the top category. 4023 [SET]Select to adjust the image quality. 6154 Play time barSelect to display the play time bar.Touch the bar to play from the touched location.5 Playback information Select to display the playback status, current chapter, and playback duration.6 [1] [¡]Select to play at x2 speed in the forward or backward direction. 7 [4] [¢]Select a chapter.8 [38]Select to pause/resume playback.9 [SRC]Select to return to the Source menu. 401PreparationHave video playing.411Operation1Touch the screen.Complete<VC0000><VC1000>note• Touch the screen to erase the player control buttons.SD card video play control screen (player con-trol button)<VC1000>123467 8 76 95Control while playing video](https://usermanual.wiki/Mobile-Appliance/PNX-5.User-manual-2-of-2/User-Guide-1006887-Page-2.png)
![166page A/V 167pageA/V413413PreparationHave the Source menu displayed.115 401Operation1Select [iPod].2Select [Music].Select to display the iPod top category.CompleteDisplaying the iPod top category to select music.1 [PlayList]Select to play by playlist.See 407 .2 [Album]Select to play music by album.See 405 .3 Select to return to the current map screen. 107 , 1124 [Compose]Select to play music by composer. See 408 .5 [Genre]Select to play music by genre.See 409 .6 [Podcast]Select to play podcast. 4157 [Title]Select to play music by title. See 404 .8 [Artist]Select to play music by artist. See 406 .9 [Audiobook]Select and play audiobook. 4140 [Player]Select to return to the Player screen.See 403 .- [AV Sel.]Select to return to the Music/Video selection screen in 2.= [SRC]Select to return to the Source menu. 401note• On iPod without Video, the Music/Movie selection screen is not displayed in 2 and the Top category screen is displayed.• See 403 for the screen displayed while playing.<AI1000><AI1100>iPod Top category screen<AI1100><A00000-1>40-=1652893Display iPod's top category7](https://usermanual.wiki/Mobile-Appliance/PNX-5.User-manual-2-of-2/User-Guide-1006887-Page-3.png)
![168page A/V 169pageA/V414414PreparationHave the iPod top category screen displayed.115 401 413Operation1Select [Audiobook].2Select the button of the audiobook to play.Audiobook starts playing.Use [ ] and [ ] to scroll the list.Completenote• Select [ALL PLAY] or [Player] in 2 to play all audiobooks sequentially.• Select [SRC] in 2 to return to the Source menu or [TOP] to return to the Top category screen. Or select to display a list of audiobooks being played.• See 403 for the screen displayed while playing.• You can change the audiobook playback speed. 618Playing audiobook in iPod.<AI1150><AI1120>Play audiobook](https://usermanual.wiki/Mobile-Appliance/PNX-5.User-manual-2-of-2/User-Guide-1006887-Page-4.png)
![170page A/V 171pageA/V415415PreparationHave the iPod top category screen displayed.115 401 413Operation1Select [Podcast].2Select the button of the podcast to play.Podcast starts playing.Use [ ] and [ ] to scroll the list.Completenote• Select [ALL PLAY] or [Player] in 2 to play all podcasts sequentially.• Select [SRC] in 2 to return to the Source menu or [TOP] to return to the Top category screen. Or select to display a list of podcasts being played.Playing podcast in iPod.<AI1160><AI1120>Play podcast](https://usermanual.wiki/Mobile-Appliance/PNX-5.User-manual-2-of-2/User-Guide-1006887-Page-5.png)
![172page A/V 173pageA/V416416Displaying the iPod video library from the Source menu.1 Select to return to the current map screen. 107 , 1122 [Muisc Videos]Select to play a music video. 4173 [Video Podcast]Select to play a video podcast. 4174 [Movies]Select to play a movie. 4175 [TV Shows]Select to play a TV show. 4176 [Player]Select to display the Player screen. 4187 [AV Sel.]Select to return to the Music/Video selection screen in 1.8 [SRC]Select to return to the Source menu. 401note• On iPod without Video, the Music/Movie selection screen is not displayed in 1 and you are returned to the Top category screen. 413PreparationHave the Source menu displayed.115 401 413Operation1Select [Movie].The iPod video library screen appears.Complete<AI1000>iPod Video Library screen<AI1200><AI1200>81376524Display iPod video library](https://usermanual.wiki/Mobile-Appliance/PNX-5.User-manual-2-of-2/User-Guide-1006887-Page-6.png)
![174page A/V 175pageA/V417417PreparationHave the iPod video library screen displayed.416Operation1Select the button of the type of video file to play.2Select the button of the file to play.A video file starts playing.Use [ ] and [ ] to scroll the list.CompletePlaying video files in iPod. note• Select [ALL PLAY] or [Player] in 2 to play all video files continuously.• Select [SRC] in 2 to return to the Source menu or [TOP] to return to the video library. Or select to display a list of video files being played.• See 418 for the screen displayed while playing a video file. <AI1210><AI1200><VI0000>Play video on iPod](https://usermanual.wiki/Mobile-Appliance/PNX-5.User-manual-2-of-2/User-Guide-1006887-Page-7.png)
![176page A/V 177pageA/V418418PreparationHave an iPod video file playing.417Operation1Touch the center of the screen.Control buttons are displayed.CompleteTouch the center of the screen while playing iPod video file to display the control buttons.1 Select to return to the current map screen. 107 , 1122 Select to display a list of category containing the content being played.3 [TOP]Select to return to the iPod top category. 4134 [SET]Select to display the iPod setup screen. 6185 Play time barSelect to display the play positions. Touch the bar to play from the touched location. 6 Playback information Select to display the playback status, current chapter, and playback duration.7 [1] [¡]Select to play at x2 speed in the forward or backward direction. 8 [4] [¢]Select a chapter.9 [38]Select to start or pause play.0 [SRC]Select to return to the Source menu. 401note• Touch the screen to erase the player control button.• You can set whether to display in wide mode and the type of video signal. 618<VI1000><VI0000>iPod video play control screen (player control buttons)<VI1000>234578 9 87 061Control while playing video with iPod](https://usermanual.wiki/Mobile-Appliance/PNX-5.User-manual-2-of-2/User-Guide-1006887-Page-8.png)
![178page A/V 179pageA/V419419PreparationHave the Source menu displayed.115 401Operation1Select [Bluetooth].Control buttons are displayed.CompletePlaying music in Bluetooth device.1 Select to return to the current map screen. 107 , 1122 [MORE]Select to display the More screen. 3 [4] [¢]Select a song.4 [38]Select to start or pause playing music.5 [SRC]Select to return to the Source menu. 401note• When a Bluetooth device supporting profile A2DP is connected, you can play music in that device. • When a Bluetooth device supporting profile AVRCP is connected, you can perform the above controls.7 [BACK]Select to return to Main screen.8 [1] [¡]Select to play at x2 speed in the forward or backward direction. <MA1000a><A00000-1>Bluetooth music play control screen (Main screen)<MA1000a>Bluetooth music play control screen (More screen)<MA1000b>745183 3Play music in Bluetooth device2](https://usermanual.wiki/Mobile-Appliance/PNX-5.User-manual-2-of-2/User-Guide-1006887-Page-9.png)
![180page A/V 181pageA/V420420PreparationHave the Source menu displayed.115 401Operation1Select [DVD].DVD starts playing.Completenote• [DVD] is not shown on the Source menu when iPod is connected.• An optional B cradle is necessary in order to connect a DVD player.• Set the video source to “DVD” when a DVD player is connected. 616Playing DVD.<VD0000><A00000-2>Play DVD](https://usermanual.wiki/Mobile-Appliance/PNX-5.User-manual-2-of-2/User-Guide-1006887-Page-10.png)
![182page A/V 183pageA/V421421PreparationHave a DVD playing.420Operation1Touch the screen.The player control buttons appear.CompleteTouch the center of the screen while playing DVD to display the control buttons.1 Select to return to the current map screen. 107 , 1122 [CONT.]Select to display the disc control buttons.3 [SET]Select to adjust the image quality. 6154 [1] [¡]Select to play forward or backward at x2 speed.5 [4] [¢]Select a chapter.6 [38]Select to start or pause play.7 [SRC]Select to return to the Source menu. 401note• Touch the screen to erase the player control buttons.<VD1000><VD0000>DVD video play control screen (player control buttons)<VD1000>2345 6 54 71Control while playing DVD](https://usermanual.wiki/Mobile-Appliance/PNX-5.User-manual-2-of-2/User-Guide-1006887-Page-11.png)
![184page A/V 185pageA/V422422PreparationHave the player control buttons displayed.421Operation1Select [CONT.].Disc control buttons appear.CompleteSelecting the player control button [CONT.] to display disc control buttons.1 Select to return to the current map screen. 107 , 1122 [TOP MENU]Select to return to the top of the disc menu.3 [MENU]Select to display the disc menu.4 [RETURN]Select to move up a level in the disc menu.5 Select to move the display position of the disc control buttons.6 Select to return to the previous screen.7 [] [ ] [ ] [ ]Select a disc menu item.8 [Enter]Select to confirm item selection.note• The disc menu is specific to the DVD being played and the available controls depend on the DVD.• When the disc control buttons are displayed, touching the disc menu has no effect.• If the disc control buttons are overlapped with the background and difficult to see, select to change the display position.• Touch the screen to erase the disc control buttons.• The zoom function and angle function are not supported.DVD MediaPlayer screen (Disc control buttons)<AD1000a><AD1000a><VD1000>23681457Disc control buttons](https://usermanual.wiki/Mobile-Appliance/PNX-5.User-manual-2-of-2/User-Guide-1006887-Page-12.png)
![186page A/V 187pageA/V423423PreparationHave the Source menu displayed.115 401Operation1Select [DVB-T].The digital TV screen appears.Completenote• Only PNX-7 can be viewed for digital TV. • If the previously viewed channel cannot be received, the digital TV control screen appears. 424• Channel scan starts the first time you view digital TV after purchase. 425Digital TV cannot be received without performing a channel scan.• You must perform channel scan in order to receive digital TV broadcasts.Viewing digital TV.<VT1000><A00000-1>View digital TV](https://usermanual.wiki/Mobile-Appliance/PNX-5.User-manual-2-of-2/User-Guide-1006887-Page-13.png)
![188page A/V 189pageA/V424424PreparationHave the digital TV screen displayed (no need to tune to a channel).423Operation1Touch the screen.The TV control buttons appear.CompleteTouch the center of the digital TV screen to display the control buttons.1 Select to return to the current map screen. 107 , 1122 [PRESET CH]Select to display the preset channel list. 4273 [P-LIST]Select to display a program list screen. 4264 [EPG]Select to display the program guide. 4295 Select to switch voice stream.6 [Seek]Select to switch to the next channel. 4287 [TeleText]Select to display text information. 4318 [Scan]Select to scan and preset channels. 4259 [SRC]Select to return to the Source menu. 401note• This function is available only for PNX-7. • Touch the screen to erase the TV control buttons.<VT1000><AT1100>Digital TV control screen (TV control buttons)<AT1100>2361457 8 9Control digital TV](https://usermanual.wiki/Mobile-Appliance/PNX-5.User-manual-2-of-2/User-Guide-1006887-Page-14.png)
![190page A/V 191pageA/V425425PreparationHave the digital TV control screen displayed (no need to tune to a channel).423Operation1Select [Scan].A confirmation message is displayed.2Select [YES].Channel scan starts.When channel scan completes, the scan result is displayed.3Select .Select to return to the digital TV control screen. CompleteScanning and presetting channels available at your area.note• This function is available only for PNX-7.• Select the button of the channel displayed in 3 to start playing that channel.• The digital TV control screen is displayed after scan completes the first time you change the source to digital TV.<AT1120><AT1152>Scan and preset digital TV channels](https://usermanual.wiki/Mobile-Appliance/PNX-5.User-manual-2-of-2/User-Guide-1006887-Page-15.png)
![192page A/V 193pageA/V426426PreparationHave the digital TV control screen displayed.423Operation1Select [P-LIST].2Select the button of the program to view.The selected program is received.3Select [Player].The button disappears.Completenote• This function is available only for PNX-7. • The program list does not appear until channel scan is complete.Tuning from the program list of current channels.<AT1112><AT1120>Tune digital TV from program list](https://usermanual.wiki/Mobile-Appliance/PNX-5.User-manual-2-of-2/User-Guide-1006887-Page-16.png)
![194page A/V 195pageA/V427427PreparationHave the digital TV control screen displayed.423Operation1Select [PRESET CH].2Select the button of the channel to view.Tunes to the selected channel.3Select [Player].The button disappears.Completenote• This function is available only for PNX-7. • The program list does not appear until channel scan is complete.• If you selected [Release] in 3, the selected channel is deleted from the preset list.Tuning from preset list of channels.<AT1120><AT1120>Tune digital TV from preset list](https://usermanual.wiki/Mobile-Appliance/PNX-5.User-manual-2-of-2/User-Guide-1006887-Page-17.png)
![196page A/V 197pageA/V428428PreparationHave the digital TV control screen displayed.423Operation1Select [SEEK].2Select the seek direction button.The next channel is received.3Touch the screen.The button disappears.Completenote• This function is available only for PNX-7. Tuning to the next channel.<AT1140><AT1120>Tune digital TV by channel seek](https://usermanual.wiki/Mobile-Appliance/PNX-5.User-manual-2-of-2/User-Guide-1006887-Page-18.png)
![198page A/V 199pageA/V429429PreparationHave the digital TV control screen displayed.423Operation1Select [EPG].2Select the button of the program.Use [ ] and [ ] to scroll the list.The program detail screen appears.Next PageTuning from the EPG (Electronic Program Guide).3Select .Completenote• This function is available only for PNX-7. • Select [Player] in 2 to return to the original program.<AT1160><AT1120><AT1115>View digital TV program guide](https://usermanual.wiki/Mobile-Appliance/PNX-5.User-manual-2-of-2/User-Guide-1006887-Page-19.png)
![200page A/V 201pageA/V430430PreparationHave the program list screen or preset channel screen displayed.426 427Operation1Select [DIRECT CH].2Select a channel with the ten keys.3Select [Enter].The specified channel is received and the but-ton disappear.Completenote• This function is available only for PNX-7. Tuning by specifying a channel no.<AT1112><AT1112>Tune digital TV by channel number](https://usermanual.wiki/Mobile-Appliance/PNX-5.User-manual-2-of-2/User-Guide-1006887-Page-20.png)
![202page A/V 203pageA/V431413PreparationHave the digital TV control screen, program list screen, or preset channel screen displayed.423 426 427Operation1Select [TeleText].Text information is displayed.Completenote• This function is available only for PNX-7. • Touch the screen while text information is displayed to make it half transparent. Touch the screen once more to return to the TV screen.Displaying text information.<AT1150><AT1120>Display digital TV text information](https://usermanual.wiki/Mobile-Appliance/PNX-5.User-manual-2-of-2/User-Guide-1006887-Page-21.png)
![204page Tools501205pageToolsDisplay Tools menu501Operation1Select [Tools].The Tools menu appears.CompleteDisplaying the Tools menu from the Top menu to set such an option as Bluetooth.1 [GPS]Select to display the current position of the GPS satellites and reception information. 5032 [Position]Select to display/reset drive information. 5053 Select to return to the current map screen.4 [TMC]elect to display the TMC information. 5065 [Bluetooth]Select to set Bluetooth related settings. 5096 Select to return to the Top menu.<T00000><TOP0000><T00000>Tools menu1 2 3465](https://usermanual.wiki/Mobile-Appliance/PNX-5.User-manual-2-of-2/User-Guide-1006887-Page-22.png)
![206page Tools 207pageTools502 Set GPS502PreparationHave the Tools menu displayed.115 501Operation1Select [GPS].2Select [ON] or [OFF] for “GPS Activate” and “WASS/EGNOS”. Completenote• When you turn GPS Activation OFF, you will not receive signals from GPS satellites and positioning will be stopped. This will reduce consumption of built-in battery. • WASS (North America) and EGNOS (Europe) are systems to increase positioning precision using stationary satellites. If turn this option OFF, this system is not used. • Select [Information] in 2 to display GPS satellite information. 503• Select [Cold Start] in 2 to reset GPS satellite reception information. 504Displaying information such as current position of GPS satellites.<TG1000><T00000>](https://usermanual.wiki/Mobile-Appliance/PNX-5.User-manual-2-of-2/User-Guide-1006887-Page-23.png)
![208page Tools 209pageTools503 View GPS satellite information503PreparationHave the Tools menu displayed.115 501Operation1Select [GPS].2Select [Information] of “GPS”.A GPS satellite layout diagram and strength of signal from each satellite are displayed.CompleteDisplaying information such as current position of GPS satellites.note• Three-dimensional positioning is performed if radio signals are received from four or more GPS satellites. Two-dimensional positioning is performed and positioning precision is slightly reduced if radio signals are received from three GPS satellites. Positioning cannot be performed if radio signals are received from only two or less GPS satellites.<TG1000><TG1120><T00000>](https://usermanual.wiki/Mobile-Appliance/PNX-5.User-manual-2-of-2/User-Guide-1006887-Page-24.png)
![210page Tools 211pageTools504 Reset reception504PreparationHave the Tools menu displayed.115 501Operation1Select [GPS].2Select [Cold Start] of “GPS”.A confirmation message is displayed.3Select [YES].The GPS satellite information is reset and you are returned to the screen in 2.CompleteResetting GPS satellite information.note• If you drive for a long distance with the power of PND turned off, it may take a while to locate the current position when you turn the power back on.In such case, it may be faster to reset the GPS information as described above. There is no need to reset the GPS information in any other case.<TG1000><T00000>](https://usermanual.wiki/Mobile-Appliance/PNX-5.User-manual-2-of-2/User-Guide-1006887-Page-25.png)
![212page Tools 213pageTools505 Display travel information505PreparationHave the Tools menu displayed.115 501Operation1Select [Position].Travel information is displayed.Completenote• If you select [Reset Max. Values], the Max. Speed and Max. Altitude are reset.If you select [Reset Max. Distance], Total Distance Traveled and Total Time are reset.Displaying travel information.<TP1000><T00000>](https://usermanual.wiki/Mobile-Appliance/PNX-5.User-manual-2-of-2/User-Guide-1006887-Page-26.png)
![214page Tools 215pageTools506 Display TMC information506PreparationHave the Tools menu displayed.115 501Operation1Select [TMC].2Select [TMC List].Next PageDisplaying TMC information.3Select the button of the information to display.Use [ ] and [ ] to scroll the list.The selected TMC information is displayed.Completenote• No TMC information can be displayed if none is recevied.<TT0000><TT1000><TT1120>](https://usermanual.wiki/Mobile-Appliance/PNX-5.User-manual-2-of-2/User-Guide-1006887-Page-27.png)
![216page Tools 217pageTools507 Select TMC Station to receive507PreparationHave the Tools menu displayed.115 501Operation1Select [TMC].2Select [Select TMC Station].3Select [ ] until the TMC Station to receive is displayed. CompleteSelecting the TMC Station to receive.note• No TMC information can be displayed if none is recevied.<TT0000><T00000><TT2000>](https://usermanual.wiki/Mobile-Appliance/PNX-5.User-manual-2-of-2/User-Guide-1006887-Page-28.png)
![218page Tools 219pageTools508 Display Bluetooth menu508PreparationHave the Tools menu displayed.115 501Operation1Select [Bluetooth].The Bluetooth menu appears.CompleteDisplaying the Bluetooth menu from the Tools menu to set Bluetooth options and operation.1 [Hands Free]Select to make a phone call. 518 5212 [SMS]Select to send and receive short message (SMS). 522 5263 Select to return to the current map screen.4 [Set up]Select to display Bluetooth Setup Menu to set Bluetooth settings. 509 5 [Buddy]Select to send and receive position information. 527 5296 Returns you to the Tools menu.Bluetooth menu<TB1000><T00000><TB1000>123465](https://usermanual.wiki/Mobile-Appliance/PNX-5.User-manual-2-of-2/User-Guide-1006887-Page-29.png)
![220page Tools 221pageTools509 Display Bluetooth setup menu509PreparationHave the Bluetooth menu displayed.115 501 508Operation1Select [Set up].The Bluetooth setup menu appears.CompleteDisplaying the Bluetooth setup menu to set Bluetooth options from the Bluetooth menu.1 [Paired list]Select to display the Bluetooth device connection history. 517 2 [Inquiry]Select to connect with nearby Bluetooth device. 516 3 [General Settings]Select to set general Bluetooth settings. 510 4 Select to return to the current map screen.5 [SMS Settings]Select to set SMS (Short Message Service). 513 6 [Hands free Settings]Select to set the hands free unit options. 514 7 Returns you to the Tools menu.<TB1000>Bluetooth setup menu<TB1400><TB1400>1234576](https://usermanual.wiki/Mobile-Appliance/PNX-5.User-manual-2-of-2/User-Guide-1006887-Page-30.png)
![222page Tools 223pageTools510 Set general Bluetooth settings510PreparationHave the Tools menu displayed.115 501 508 509Operation1Select [General Settings].2Select [ON] or [OFF] for “Bluetooth activation” and “Auto reconnection”.3Select .Returns you to the Bluetooth setup menu.CompleteActivating Bluetooth and other Bluetooth setup.note• Set Bluetooth activation ON when using a Bluetooth device. Bluetooth function is disabled when it is OFF.• When Bluetooth reconnection is turned on, Bluetooth devices are automatically reconnected when the this unit is turned on. Bluetooth devices are not reconnected automatically when it is OFF.• Bluetooth devices are not automatically reconnected in the following cases even when Bluetooth reconnection is on. – Connection with Bluetooth device is intentionally disconnected – Power of Bluetooth device is off – Information of Bluetooth device is not in the pair list – Bluetooth Activation is off – No external power is supplied to the this unitIn addition, some Bluetooth devices must be in standby mode to reconnect. • Select [Devica Name] in 2 to assign a name to Bluetooth device. 511 • Select [Passkey] in 2 to set pass key. 512 <TB1430><TB1400>](https://usermanual.wiki/Mobile-Appliance/PNX-5.User-manual-2-of-2/User-Guide-1006887-Page-31.png)
![224page Tools 225pageTools511 Naming Bluetooth device511PreparationHave the Tools menu displayed.115 501 508 509Operation1Select [General Settings].2Select [Device Name] of “Bluetooth”.3Enter the name.Next PageNaming Bluetooth device. 4Select [OK].Returns you to the Bluetooth setup menu.Completenote• Select [ÄÖÜ] in 3 to enter characters with umlaut, [123/M] to enter alphanumeric characters, and [A/a] to switch case. • Select [BS] in 3 to delete the last entered character. Select [SP] to enter a space.<TB1430><TB1432a><TB1400>](https://usermanual.wiki/Mobile-Appliance/PNX-5.User-manual-2-of-2/User-Guide-1006887-Page-32.png)
![226page Tools 227pageTools512 Set passkey to Bluetooth device512PreparationHave the Tools menu displayed.115 501 508 509Operation1Select [General Settings].2Select [Passkey] of “Bluetooth”.3Enter the passkey.Next PageSetting passkey to Bluetooth device. Bluetooth device cannot be connected without passkey if passkey is set.4Select [OK].Completenote• Passkey can contain up to 16 characters. • Select [Clear] in 3 to clear all entered characters. <TB1430><TB1433><TB1400>](https://usermanual.wiki/Mobile-Appliance/PNX-5.User-manual-2-of-2/User-Guide-1006887-Page-33.png)
![228page Tools 229pageTools513 Set SMS513Setting the SMS incoming mode and incoming call tone volume.PreparationHave the Tools menu displayed.115 501 508 509Operation1Select [SMS Settings].2Select [+] or [–].The incoming tone is sounded at the set volume each time you select. 3Select [Auto] or [Manual].Completenote• If you select [Auto] in 3, all messages are downloaded the first time you connect and new messages are downloaded thereafter as they are received.If you select [Manual], no automatic download is performed.<TB1400><TB1450_1><TB1450_2>](https://usermanual.wiki/Mobile-Appliance/PNX-5.User-manual-2-of-2/User-Guide-1006887-Page-34.png)
![230page Tools 231pageTools514 Set hands free514Setting the hands free unit options.PreparationHave the Tools menu displayed.115 501 508 509Operation1Select [Hands free Settings].2Set each item.CompleteThe following items can be set:Item DescriptionAuto Answer See 515 .Incoming call tone volume Adjusts the incoming call tone volume. [+] Increases the volume.[–] Decreases the volume.Phonebook down load mode Sets the cell phone phonebook download mode. [Auto] Downloads the phonebook the first time you connect and downloads the difference thereafter. [Manual] Does not download automatically.Noise reduction Sets the noise reduction function.[ON] Enables the function.[OFF] Disables the function.Echo cancellaion Sets the echo cancellation function.[ON] Enables the function.[OFF] Disables the function.note• On some cell phones, you cannot download the phonebook automatically even when you turn on the Phonebook download mode. • “Noise reduction” and “Echo canncellation” are on screen 2/2. Select [ ] to display.<TB1400><TB1440a>](https://usermanual.wiki/Mobile-Appliance/PNX-5.User-manual-2-of-2/User-Guide-1006887-Page-35.png)
![232page Tools 233pageTools515 Set auto answer515Setting the duration before sending auto answer message for an incoming callPreparationHave the Tools menu displayed.115 501 508 509Operation1Select [Hands free Settings].2Select [Auto answer].3Select the button of the action to perform.Completenote• Select [Never] in 3 to disable auto answer. • Select [Immediately] in 3 to send the auto answer message as soon as there is an incoming call. <TB1440a><TB1445><TB1400>](https://usermanual.wiki/Mobile-Appliance/PNX-5.User-manual-2-of-2/User-Guide-1006887-Page-36.png)
![234page Tools 235pageTools516 Set inquiry mode516PreparationHave the Tools menu displayed.115 501 508 509Operation1Select [Inquiry].2Select [Inquiry].Available Bluetooth devices are searched and a list of found devices is displayed. 3Select the button of the Bluetooth device to connect.Use [ ] and [ ] to scroll the list.If there are multiple pages, select [DISP] to change the page. CompleteSearch nearby Bluetooth device and connect.note• In 3, [HF] is displayed for Bluetooth devices that support profile HFS, HSP, or PBAP and [Audio] is displayed for devices that support profile A2DP or AVRCP.• If the connected Bluetooth device is a cell phone, the phonebook and messages are downloaded. 513 , 514<TB1420><TB1400><TB1420_0>](https://usermanual.wiki/Mobile-Appliance/PNX-5.User-manual-2-of-2/User-Guide-1006887-Page-37.png)
![236page Tools 237pageTools517 Display connection history517PreparationHave the Tools menu displayed.115 501 508 509Operation1Select [Paired lsist].Display a list of Bluetooth devices starting from the one with latest connection history.2Select the button of the Bluetooth device to display the information. Use [ ] and [ ] to scroll the list.The device information screen appears and detailed device information is displayed. CompleteDisplay the Bluetooth device connection history. Also display Bluetooth device information.note• In 2, [HF] is displayed for Bluetooth devices that support profile HFS, HSP, or PBAP and [Audio] is displayed for devices that support profile A2DP or AVRCP.• On the Device information screen in 2, you can select [Hands free] or [Audio] to connect.However, if a passkey is set for the selected Bluetooth device, the passkey input screen appears. Enter the correct passkey and select [OK] to connect.<TB1411><TB1410><TB1400>](https://usermanual.wiki/Mobile-Appliance/PNX-5.User-manual-2-of-2/User-Guide-1006887-Page-38.png)
![238page Tools 239pageTools518 Make call from phonebook518note• Phonebook is dowloaded automatically if have Phonebook down load mode turned on ( 514 ). If Phonebook download mode is turned off or if the cell phoen does not support automatic phonebook download, select [DL P-BOOK] to download the cell phone's phonebook. • If there are more than one phone number listed for the party selected in 2, a screen to select a phone number appears. Select the button of the phone number to dial.• Select the on the Dial pad screen to hang up.• You can adjust the volume during conversation. 521Making a phone call from a cell phone using the downloaded phonebook.PreparationHave the Bluetooth menu displayed.115 501 508Operation1Select [Hands Free].2Select the button of the party to call.Use [ ] and [ ] to scroll the list.The current map screen is displayed once you are connected.Complete<TB1110><TB1100><TB1000>](https://usermanual.wiki/Mobile-Appliance/PNX-5.User-manual-2-of-2/User-Guide-1006887-Page-39.png)
![240page Tools 241pageTools519 Make a call from call history519PreparationHave the Bluetooth menu displayed.115 501 508Operation1Select [Hands Free].2Select [LOG.].3Select the button of the party to call.Use [ ] and [ ] to scroll the list.The current map screen is displayed once you are connected.CompleteMaking a call from incoming or outgoing call history.note• The following symbols are displayed on the history list. : Outgoing call : Incoming call (answered) : Incoming call (not answered)• Select the on the Dial pad screen to hang up.• You can adjust the volume during conversation. 521<TB1100><TB1120><TB1000>](https://usermanual.wiki/Mobile-Appliance/PNX-5.User-manual-2-of-2/User-Guide-1006887-Page-40.png)
![242page Tools 243pageTools520 Make a call by dialing520PreparationHave the Bluetooth menu displayed.115 501 508Operation1Select [Hands Free].2Select [DIAL PAD].3Select the button of the phone number to call.Next PageMaking a call by dialing. 4Select .The current map screen appears once you are connected.Completenote• If you select [BS] in the Dial Pad screen in 3, the last entered number is deleted. • Select the on the Dial pad screen in 3 to hang up.• You can adjust the volume during conversation by selecting [5] or [∞] on the Dial pad screen in 3. See 521 to adjust the volume while actually listening.<TB1120><TB1130><TB1000>](https://usermanual.wiki/Mobile-Appliance/PNX-5.User-manual-2-of-2/User-Guide-1006887-Page-41.png)
![244page Tools 245pageTools521 Adjust receiver volume during conversation521PreparationPerform during conversation.Operation1Select .2Select [5] or [∞].The receiver volume changes according to the selected button.Completenote• You can also set the receiver volume before starting conversation (while dialing for example). 520Make a call from incoming or outgoing call history.<NM0000><TB1150>](https://usermanual.wiki/Mobile-Appliance/PNX-5.User-manual-2-of-2/User-Guide-1006887-Page-42.png)
![246page Tools 247pageTools522 Display SMS menu522PreparationHave the Bluetooth menu displayed.115 501 508Operation1Select [SMS].The SMS menu appears.CompleteDisplaying the SMS menu to handle SMS messages1 [Create SMS]Select to create a new message. 5232 [Download unread SMS]Select to download unread messages. 5243 Select to return to the current map screen.4 [Outbox]Select to display a list of messages in the out box. 5265 [Inbox]Select to display a list of messages in the in box. 5256 Select to return to the Bluetooth menu.<TB1200>SMS menu<TB1200><TB1000>123465](https://usermanual.wiki/Mobile-Appliance/PNX-5.User-manual-2-of-2/User-Guide-1006887-Page-43.png)
![248page Tools 249pageTools523 Send short message 523PreparationHave the SMS menu displayed.115 501 508 522Operation1Select [Create SMS].The Create SMS screen appears.2Select [To:].3Select [From PhoneBook].Next PageCreating and sending SMS message. 4Select the button of the receiver.Use [ ] and [ ] to scroll the list.Returns you to the Create SMS screen.5Select [Message].6Enter the message.7Select [OK].Returns you to the Create SMS screen.8Select [SEND].The message is sent and a confirmation mes-sage is displayed.Next Page<TB1212a><TB1120><TB1200><TB1210_1><TB1211><TB1210_2><TB1210_3>](https://usermanual.wiki/Mobile-Appliance/PNX-5.User-manual-2-of-2/User-Guide-1006887-Page-44.png)
![250page Tools 251pageTools9Select [OK].Returns you to the SMS menu.Completenote• You can also directly enter the receiver.• Select [SAVE] in 8 to save the created message without sending.• If there is a saved message, a confirmation message appears before the Create SMS screen in 2.Select [YES] to edit the saved message and then continue from 2.Select [NO] to delete the saved message and then continue from 2 to create a new message.■ Directly specifying the receiver2Select [To:].3Select [Direct Input].4Enter the phone number with the ten keys and select [OK].Returns you to the Create SMS screen.Complete523<TB1210_1><TB1211><TB1213>](https://usermanual.wiki/Mobile-Appliance/PNX-5.User-manual-2-of-2/User-Guide-1006887-Page-45.png)
![252page Tools 253pageTools524 Manually download unread short messages524PreparationHave the SMS menu displayed.115 501 508 522Operation1Select [Download Unread SMS].2Select [Start].Starts downloading of unread messages.Automatically returns you to the SMS menu when download completes.Completenote• If automatic message download is set in 513 , the above receive operation is unnecessary.• The downloaded messages are stored in Inbox. 525Manually downloading unread messages.<TB1200><TB1240>](https://usermanual.wiki/Mobile-Appliance/PNX-5.User-manual-2-of-2/User-Guide-1006887-Page-46.png)
![254page Tools 255pageTools525 Read received message 525PreparationHave the SMS menu displayed.115 501 508 522Operation1Select [Inbox].A list of received messages appear. 2Select the message to display. Use [ ] and [ ] to scroll the list.A selected message is displayed. CompleteReading the received SMS message.note• Select [REPLY] in 2 to reply to the received message. Or select [FORWARD] to forward the received message. See 523 for the remaining operation.<TB1200><TB1220><TB1221>](https://usermanual.wiki/Mobile-Appliance/PNX-5.User-manual-2-of-2/User-Guide-1006887-Page-47.png)
![256page Tools 257pageTools526 Read sent message 526PreparationHave the SMS menu displayed.115 501 508 522Operation1Select [Outbox].A list of sent messages is displayed. 2Select the message to display. Use [ ] and [ ] to scroll the list.A selected message is displayed. CompleteReading the sent SMS message.note• Select [FORWARD] in 2 to forward the sent message. See 523 for the remaining operation.<TB1200><TB1230><TB1231>](https://usermanual.wiki/Mobile-Appliance/PNX-5.User-manual-2-of-2/User-Guide-1006887-Page-48.png)
![258page Tools 259pageTools527 Receive buddy message 527Operation1Select [Accept].2Check the location and then select .Returns you to the original screen.Completenote• Select [Accept] in 1 to send your location information with an Acceptance buddy message.Or select [Refuse] to delete the received buddy message and return to the original screen.When you receive a buddy message, the message is displayed on the screen.<NM6000>](https://usermanual.wiki/Mobile-Appliance/PNX-5.User-manual-2-of-2/User-Guide-1006887-Page-49.png)
![260page Tools 261pageTools528 Send buddy message 528PreparationHave the Bluetooth menu displayed.115 501 508Operation1Select [Buddy].Displays the Buddy List screen.2Select the button of the receiver.3Select [Send Invite]. Transmission starts.When transmission completes, a confirmation message is displayed.Next PageSending your location information with Buddy message.4Select [OK].Returns you to the Buddy List screen.Completenote• Last five Buddy messages received are displayed on the Buddy list screen in 2.• When there is no telephone number information for the receiver selected in 2, the screen specifying the receiver appears. Specify the receiver in same method in 523 .• See 529 for deleting Buddy message listed on Buddy list screen in 2.• The position information received by Buddy message can be displayed on the map (Scrollable map screen) when [Show Map] is selected in 3.The position on the map can be set as a destination or registered in Favorites.• When the Buddy messega you sent is accepted by receiver, the confirming message is displayed. Slect [OK] to display receiver's position information on the Buddy map. Or select [Cancel] not to display.<TB1310><TB1000><TB1300>](https://usermanual.wiki/Mobile-Appliance/PNX-5.User-manual-2-of-2/User-Guide-1006887-Page-50.png)
![262page Tools 263pageTools529 Delete buddy message 529PreparationHave the Bluetooth menu displayed.115 501 508Operation1Select [Buddy].Displays the Buddy List screen.2Select the button of the message to delete.3Select [Delete Registry].A confirmation message is displayed.Next PageDeleting unnecessary Buddy messages.4Select [OK].Returns you to the Buddy List screen.Complete<TB1000><TB1300><TB1310>](https://usermanual.wiki/Mobile-Appliance/PNX-5.User-manual-2-of-2/User-Guide-1006887-Page-51.png)
![264page Setup601265pageSetupDisplay Setup menu601Operation1Select .The Setup menu appears.CompleteDisplaying the Setup menu from the top menu to set various options.1 [AV Setting]Select to set various AV function related settings. 6132 [Nav Map Setting]Select to set various map display related settings. 6123 [System Setting]Select to set various system related settings. 6024 Select to return to the top menu. 1155 Select to return to the current map screen. 107 , 112Setup menu<TOP0000><S00000><S00000>12345](https://usermanual.wiki/Mobile-Appliance/PNX-5.User-manual-2-of-2/User-Guide-1006887-Page-52.png)
![266page Setup 267pageSetup602 Display System setup menu602PreparationHave the Setup menu displayed.115 601Operation1Select [System Setting].The System setup menu appears.CompleteDisplaying the System setup menu from the Setup menu to set system related options.1 [Volume Setting]Select to set the route guide and beep volume. 6032 [Initial Settings]Select to set various functions of this unit. 604 , 6053 [Rear View Camera Settings]Select to set the rear view camera operation and video. 6064 Select to return to the current map screen. 107 , 1125 [Display Mode (Portrait/Landscape)]Select to set the display mode when the device is rotated. 6096 [Language]Select to set the voice guidance options and the menu language. 6077 Select to return to the Setup menu. 6018 [Audio Output Setting]Select to set the voice output device. 6089 [][ ]Select to turn the System setup menu page.System setup menu (1/2)<S00000><SS1000a><SS1000a>123459876](https://usermanual.wiki/Mobile-Appliance/PNX-5.User-manual-2-of-2/User-Guide-1006887-Page-53.png)
![268page Setup 269pageSetup602System setup menu (2/2)<SS1000b>0 [PND DEMO MODE]Select to turn on/off demo mode.- [Version Information]Select to display the software and map version. 6110 -](https://usermanual.wiki/Mobile-Appliance/PNX-5.User-manual-2-of-2/User-Guide-1006887-Page-54.png)
![270page Setup 271pageSetup603 Set volume603PreparationHave the Setup menu displayed.115 601 602Operation1Select [Volume Setting].2Select the button of the Auto Volume pattern.Select [OFF] to cancel Auto Volume. 3Select [+] or [–] of the “Navigation Guidance” to adjust the voice guidance volume.Next PageSetting the volume.4Select [+] or [–] to adjust the beep volume.5Select .Select to return to the System setup menu.Completenote• If Auto Volume is not set to [OFF], the volume increases automatically when you exceed the predefined speed for each pattern. Automatic volume adjustment is canceled when your speed drops below the predefined speed.• Auto Volume applies to all sounds output from the built-in speaker.• 2 to 4 may be set in any order.<SS1000a><SS1120_1><SS1120_2><SS1120_3>](https://usermanual.wiki/Mobile-Appliance/PNX-5.User-manual-2-of-2/User-Guide-1006887-Page-55.png)
![272page Setup 273pageSetup604 Set various functions604PreparationHave the Setup menu displayed.115 601 602Operation1Select [Initial Setting].The Initial setting screen appears.CompleteSetting various options of the this unit. 1 Select to return to the current map screen. 107 , 1122 Touch Panel AdjustmentSelect to adjust the touch position. 6053 Dimmer settingSelect to set the built-in brightness sensor. [OFF] : Turns the sensor off.[ON] : Turns the sensor on.4 12H/24H settingSelect to toggle between 12 hour clock and 24 hour clock.5 Select to return to the Top menu. 1156 [] [ ]Select to turn the Initial Setting screen page.Initial Setting screen (1/3)note• If you turn off the dimmer, you cannot switch automatically between daytime screen and nighttime screen( 612 ).• Even when the this unit enters Standby mode, you can continue using from the previous state when you turn the power back on. <SS1000a><SS1200a><SS1200a>123465](https://usermanual.wiki/Mobile-Appliance/PNX-5.User-manual-2-of-2/User-Guide-1006887-Page-56.png)
![274page Setup 275pageSetup6049 Standby after settingSelect to select the time to enter Standby mode.[OFF] : Standby mode is not entered.[30 minutes] [2 hours] : Standby mode is entered when the selected time has elapsed.0 Battery Save Mode settingSelect to enable/disable Battery save mode.- Battery Save after settingSelect to set the time to enter Battery Save mode when it is enabled in 0. Initial Setting screen (3/3)<SS1200c>6 FM Transmitter settingSelect to set the frequency of the FM transmitter. 7 Navigation Guidance settingSelect to set the navigation guidance interrupt output.8 Remote Control settingSelect to enable/disable remote control.Initial Setting screen (2/3)<SS1200b>note• The screen goes dark in Battery save mode.• Even if the Battery save mode is on, Battery save mode is not entered when you are watching digital TV or using Bluetooth. 9780-](https://usermanual.wiki/Mobile-Appliance/PNX-5.User-manual-2-of-2/User-Guide-1006887-Page-57.png)
![276page Setup 277pageSetup605 Adjust touch position605PreparationHave the Setup menu displayed.115 601 602Operation1Select [Initial Setting].2Select [SET] of “Touch Panel”.3Follow the displayed instruction and touch at top right.Next PageMatching the touch position with recognition position.4Follow the displayed instruction and touch at bottom right.Touch position and recognition position are adjusted and you are returned to the System setup menu.Completenote• You can retry from 2 if you select [Reset] in 3, or from 3 if you select [Reset] in 4.<SS1000a><SS1200a><SS1210>](https://usermanual.wiki/Mobile-Appliance/PNX-5.User-manual-2-of-2/User-Guide-1006887-Page-58.png)
![278page Setup 279pageSetup606 Set rear view camera606PreparationHave the Setup menu displayed.115 601 602Operation1Select [Rear View Camera Settings].2Set each item.3Select .Returns you to the System setup menu.CompleteSetting the rear view camera video display method. The following items can be set:Item DescriptionRearview Image Interrupt [ON] Automatically switches to rear view camera video when you change gear to reverse. [OFF] Does not switch automatically.Mirror Setting [ON] Flips the video horizontally. [OFF] Does not flip horizontally.note• Select [ON] of “Manual” in 2 to switch to rear view camera video. You can see the rear view video by this method even if “Rearview Image Interrupt” is set to [OFF].• When the rear view camera video is displayed, touch the screen to return to the original screen even when the gear is in reverse.<SS1000a><SS1300>](https://usermanual.wiki/Mobile-Appliance/PNX-5.User-manual-2-of-2/User-Guide-1006887-Page-59.png)
![280page Setup 281pageSetup4Select the button of the language to use for menu display. If the desired language is not displayed, scroll with [fi] or [%].5Select .Returns you to the System setup menu.Complete607 Set language607PreparationHave the Setup menu displayed.115 601 602Operation1Select [Language].2Select the button of the language to use for voice guidance. If the desired language is not displayed, scroll with [fi] or [%].3Select [ ].Next PageSetting the voice guidance and menu language.<SS1000a><SS1400a><SS1400b>](https://usermanual.wiki/Mobile-Appliance/PNX-5.User-manual-2-of-2/User-Guide-1006887-Page-60.png)
![282page Setup 283pageSetup608 Set voice volume608PreparationHave the Setup menu displayed.115 601 602Operation1Select [Audio Output Setting].2Select the button of the output device.3Select .Returns you to the System setup menu.CompleteSetting the voice output device.The following items can be set:Item Description[FMT] Outputs to FM transmitter.[BT] Outputs to Bluetooth device.[Internal] Outputs to built-in speaker.<SS1000a><SS1500>](https://usermanual.wiki/Mobile-Appliance/PNX-5.User-manual-2-of-2/User-Guide-1006887-Page-61.png)
![284page Setup 285pageSetup609 Set landscape/portrait mode609PreparationHave the Setup menu displayed.115 601 602Operation1Select [Display Mode].2Select the button of the display mode to set.3Select .Returns you to the System setup menu.CompleteSetting the display mode when the this unit is rotated.The following items can be set:Item Description[Portrait] Fixes the screen to landscape or portrait mode and does not change when the this unit is rotated. [Landscape][AUTO] Automatically rotates the screen according to the orientation of the this unit.<SS1000a><SS1600>](https://usermanual.wiki/Mobile-Appliance/PNX-5.User-manual-2-of-2/User-Guide-1006887-Page-62.png)
![286page Setup 287pageSetup610 Set demo mode610PreparationHave the Setup menu displayed.115 601 602Operation1Select [PND DEMO MODE].2Select [ON].A confirmation message is displayed.3Select [YES].The screen changes to demo screen.CompleteSetting the demo mode introducing the functions of the this unit.note• The demo mode screen appears as soon as you turn on the demo mode.• When you touch the screen in demo mode, demo mode is canceled and you are returned to the screen in 2.• When demo mode is ON, the screen automatically switches to demo mode when no operation is performed for five minutes in normal mode.• Even when demo mode is ON, demo mode is not entered when you are watching digital TV or using Bluetooth. • To end demo mode, select [OFF] in 2.<SS1000b><SS1800>](https://usermanual.wiki/Mobile-Appliance/PNX-5.User-manual-2-of-2/User-Guide-1006887-Page-63.png)
![288page Setup 289pageSetup611 Display version information611PreparationHave the Setup menu displayed.115 601 602Operation1Select [Version Information].The this unit software and map version infor-mation is displayed.2Select when finished viewing.Returns you to the System setup menu.CompleteDisplaying the this unit software and map version information.<SS1000><SS1700>](https://usermanual.wiki/Mobile-Appliance/PNX-5.User-manual-2-of-2/User-Guide-1006887-Page-64.png)
![290page Setup 291pageSetup612 Set the map display method612PreparationHave the Top menu displayed.115Operation1Select .2Select [Nav Map Setting].The Map Setting screen appears.3Set each item.CompleteSetting the map display method.The following items can be set:Item DescriptionMap Color Sets the map display color.[AUTO] Automatically switches according to Dimmer or Illumination setting.[Day] Fixes to daytime screen.[Night] Fixes to night time screen.[Dimmer] Automatically switches between daytime screen and night time screen according to brightness.[Illumination] Switches between daytime screen and night time screen according to the illumination of the small light.Map View Switches between 2D display and 3D display.[2D] Switches to 2D display.[3D] Switches to 3D display.Map Orientation Switches the map orientation.[N-Up] Displays as North up.[H-Up] Displays as heading up.POI Icon Sets the icon display of the location in Favorites.[ON] Displays as icon.[OFF] Turns display off.Display speed limits Displays the speed limit of the street you are traveling.[ON] Displays the speed limit during route guide.[OFF] Turns display off.Speed Limit warnings (Beep) Sets the alert display/sound when you exceed the speed limit.[ON] Turns alert on.[OFF] Turns alert off.Units Switches the unit (km/mile) of distance.[meter] Displays in km and m.[Mile] Displays in mile and yard.Home Address Adds home. 222Map DB Selects the map database to be used.note• There are four Map Setting screens in 3. Select the desired screen with [ ] and [ ].• Have the Dimmer ON when selecting [Dimmer] of “Map Color”. 604• You can select [Illumination] of “Map Color” when using the optional B cradle.• Select [Select] of “Map DB” to display the database selection screen. Select a database and select [YES] on the confirmation message to switch the database.• When the map is displayed in 3D display, the map orientation is fixed to heading up.• These settings are enabled when you select the button.<S00000><SN1000a><TOP0000>](https://usermanual.wiki/Mobile-Appliance/PNX-5.User-manual-2-of-2/User-Guide-1006887-Page-65.png)
![292page Setup 293pageSetup613 Display AV setup menu613PreparationHave the Setup menu displayed.115 601Operation1Select [AV Setting].The AV setup menu appears.CompleteDisplaying the AV setup menu to set AV options from the setup menu.1 [Sound]Select to set the equalizer. 6142 [Image]Select to set the image quality. 6153 [Input Select]Select to set the AV input. 6164 Select to return to the current map screen. 107 , 1125 [iPod]Select to set iPod. 6186 [Info.]Select to display the registered device information. 6177 Select to return to the AV setup menu.note• You cannot select the button for unconnected source device. AV setup menu<S00000><SA1000b><SA1000b>1234576](https://usermanual.wiki/Mobile-Appliance/PNX-5.User-manual-2-of-2/User-Guide-1006887-Page-66.png)
![294page Setup 295pageSetup614 Set equalizer614PreparationHave the Setup menu displayed.115 601 613Operation1Select [Sound].2Select the button of the desired sound quality.3Select .Returns you to the AV setup menu.CompleteSetting the equalizer.The following items can be set:Item Description[Natural] Produces natural flat sound.[Rock] Produces speedy sound with strong attacks.[Pops] Produces rhythmic sound focused on mid range.[Jazz] Produces sound with clear wood base tone scale and vocal sound quality.[Easy] Produces deep pleasant sound focused on the bass range.<SA1000b><SA1120>](https://usermanual.wiki/Mobile-Appliance/PNX-5.User-manual-2-of-2/User-Guide-1006887-Page-67.png)
![296page Setup 297pageSetup615 Set image quality615Setting the image quality of video source.PreparationHave the Setup menu displayed.115 601 613Operation1Select [Image].2Select [%] or [fi] for each item.3Select .Returns you to the AV setup menu. CompleteThe following items can be set:Item DescriptionBrightness Adjusts the brightness.<SA1000b><SA1200>](https://usermanual.wiki/Mobile-Appliance/PNX-5.User-manual-2-of-2/User-Guide-1006887-Page-68.png)
![298page Setup 299pageSetup616 Select video source device616Selecting the connected video source device.PreparationHave the Setup menu displayed.115 601 613Operation1Select [Input Select].2Select the button of the connected video source device.3Select .Returns you to the AV setup menu.CompleteThe following items can be set:Item Description[AV in] Select when a video device other than a DVD player is connected.[DVD Player] Select when a DVD player is connected.<SA1000b><SA1300>](https://usermanual.wiki/Mobile-Appliance/PNX-5.User-manual-2-of-2/User-Guide-1006887-Page-69.png)
![300page Setup 301pageSetup617 Display device information617Displaying device information such as DivX registration code.PreparationHave the Setup menu displayed.115 601 613Operation1Select [Info.].Divx registration code is displayed.2Select .Returns you to the AV setup menu.Complete<SA1000b><SA1400>note• When buying DRM enabled contents, check the Registration Code. Registration Code changes each time a file with the displayed Registration Code is played to protect against copying.• When downloading a DivX VOD file controlled by DRM, register the code appeared on the screen such as the one above. Otherwise the file may not be able to play with this unit. Remaining number of viewing is displayed when playing a DivX VOD file with the viewing restriction. When the remaining number of viewing reached 0, a warning message appears and the file cannot be played.](https://usermanual.wiki/Mobile-Appliance/PNX-5.User-manual-2-of-2/User-Guide-1006887-Page-70.png)
![302page Setup 303pageSetup618 Set iPod618Select to set iPod.PreparationHave the Setup menu displayed.115 601 613Operation1Select [iPod].2Select the button of each item.3Select .Returns you to the AV setup menu.CompleteThe following items can be set:Item Description[Wide Screen] Set whether to display in wide mode.[Video] Set the video signal type.[Audio] Set the playback speed of audiobook.<SA1000b><SA1500>](https://usermanual.wiki/Mobile-Appliance/PNX-5.User-manual-2-of-2/User-Guide-1006887-Page-71.png)
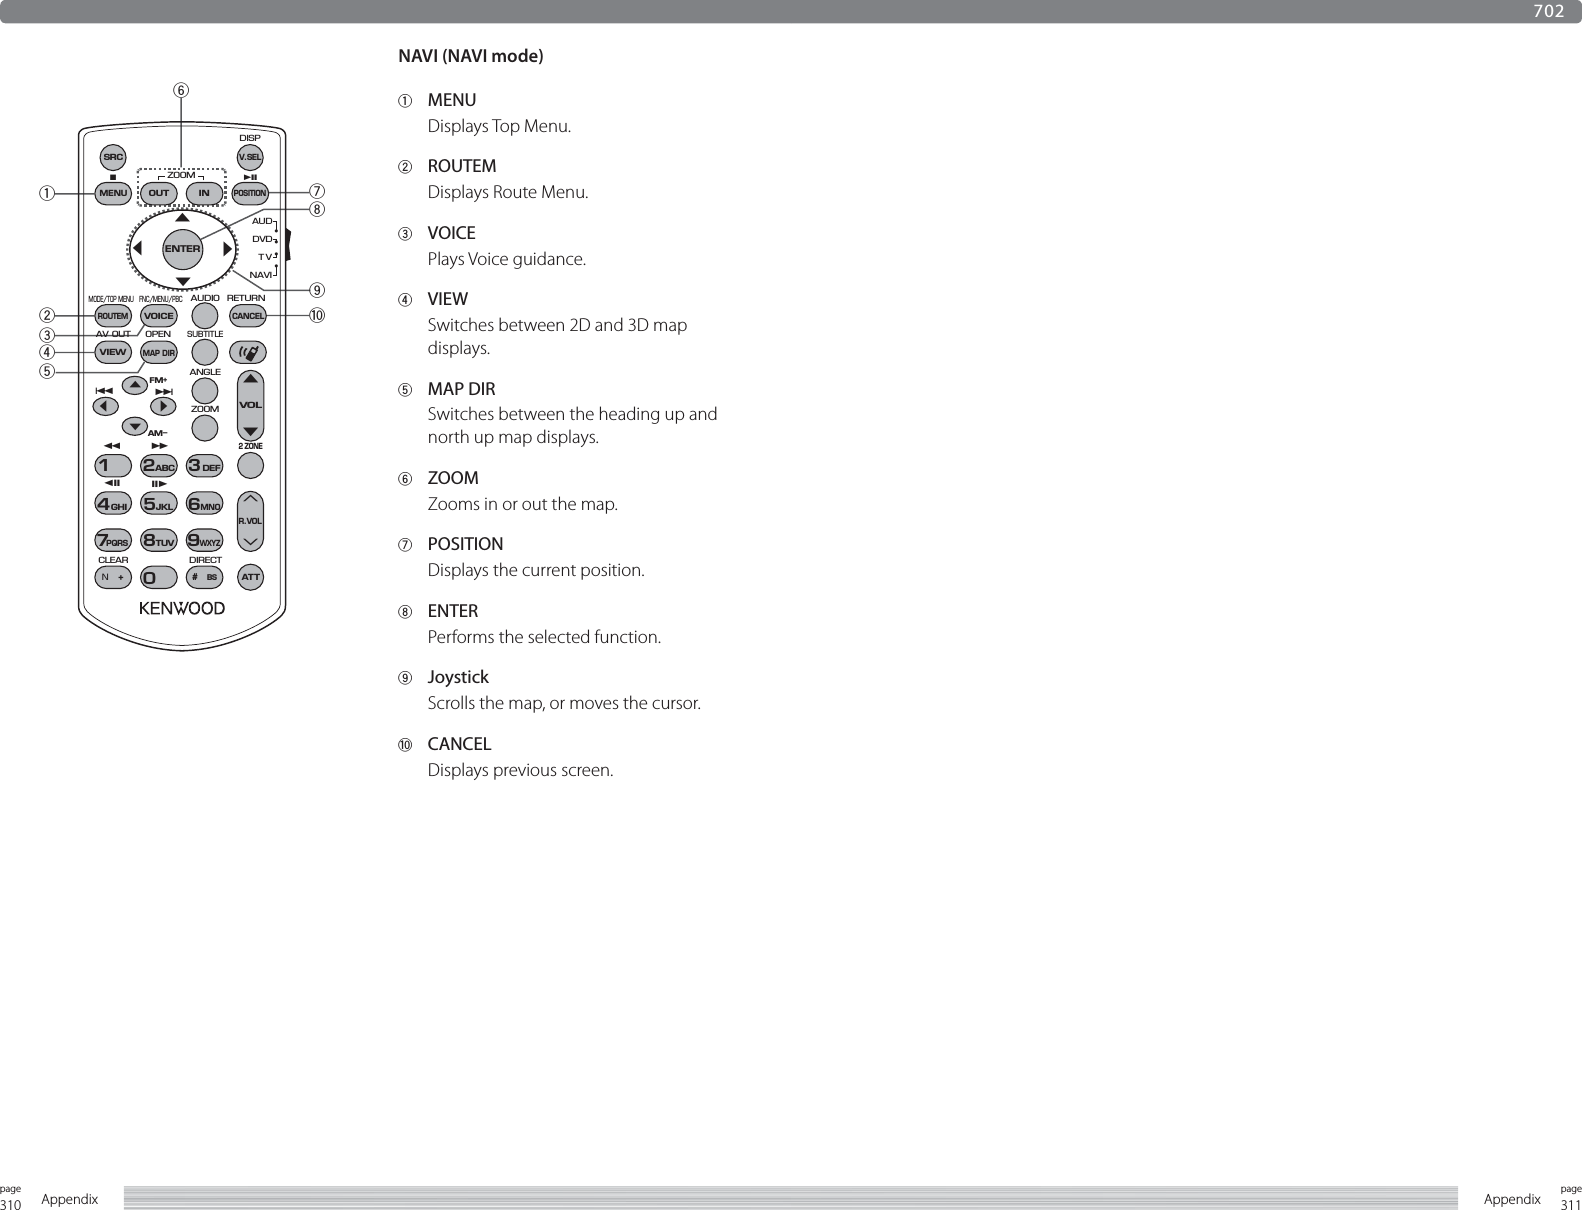
![308page Appendix 309pageAppendix1234756=-089702DVD/VCD/CD/Audio files (DVD mode)1 StopMemorizes the last point where the disc stopped. When pressed again, the last point is deleted.2 DVD Top MenuReturns to the DVD top menu.3 DVD MenuDisplays the DVD menu.Turns the playback control on or off while playing VCD.4 Folder search Selects the folder to be played.5 Track search and file searchSelects the track or file to be played.6 Numeric keypad• Specify the number to search in direct search.• Press 1 2ABC to fast forward/backward. Switches the fast forward/backward speed each time you press this key.• Press 4GHI 5JKL to slow forward/backward. Switches the slow playback speed each time you press this key.7 Play/PausePauses the track.Press again to resume playing.8 AUDIOSwitch Voice LanguageSwitches the voice language each time you press this key.9 SUBTITLESwitches the subtitle language.0 Picture AngleSwitches the picture angle each time you press this key.V.SELR.VOLOUTMENUINENTERZOOMFNC/MENU/PBCMODE/TOP MENUAUDIOANGLEZOOMRETURNDVDTVNAVIAUDDISP12ABC3DEF4GHI7PQRS#+ BS5JKL8TUV09WXYZ6MNO1AT T2 ZONEVOLFM+AM−POSITIONSRCDY1OOOOOOVOICECANCELROUTEMSUBTITLEAV OUTCLEAR DIRECTOPENMAP DIRVIEW••••OOOO- ZOOMSwitches the zoom ratio each time you press this key.= Direct searchPressing this button switches the features that can be searched directly. DVDTitle numberChapter numberPlay timeItem number*Cancel* You may not be able to use this function with some discs or scenes. CDTrack numberPlay timeCancel Audio filesFolder numberFile numberCancel VCD 1.X, VCD 2.X (PBC OFF)Track numberCancel VCD 2.X (PBC ON)Scene numberNumberCancelOnce you have switched to the direct search feature, specify the search number from the numeric keypad, and then press [ENTER] key.](https://usermanual.wiki/Mobile-Appliance/PNX-5.User-manual-2-of-2/User-Guide-1006887-Page-74.png)