Mobile Appliance PNX-5 Protable Navigation with Bluetooth User Manual unprotected 20080508 PND User M
Mobile Appliance, Inc. Protable Navigation with Bluetooth unprotected 20080508 PND User M
Contents
- 1. User manual 1 of 2
- 2. User manual 2 of 2
User manual 2 of 2
162
page A/V 163
page
A/V
411
411
Preparation
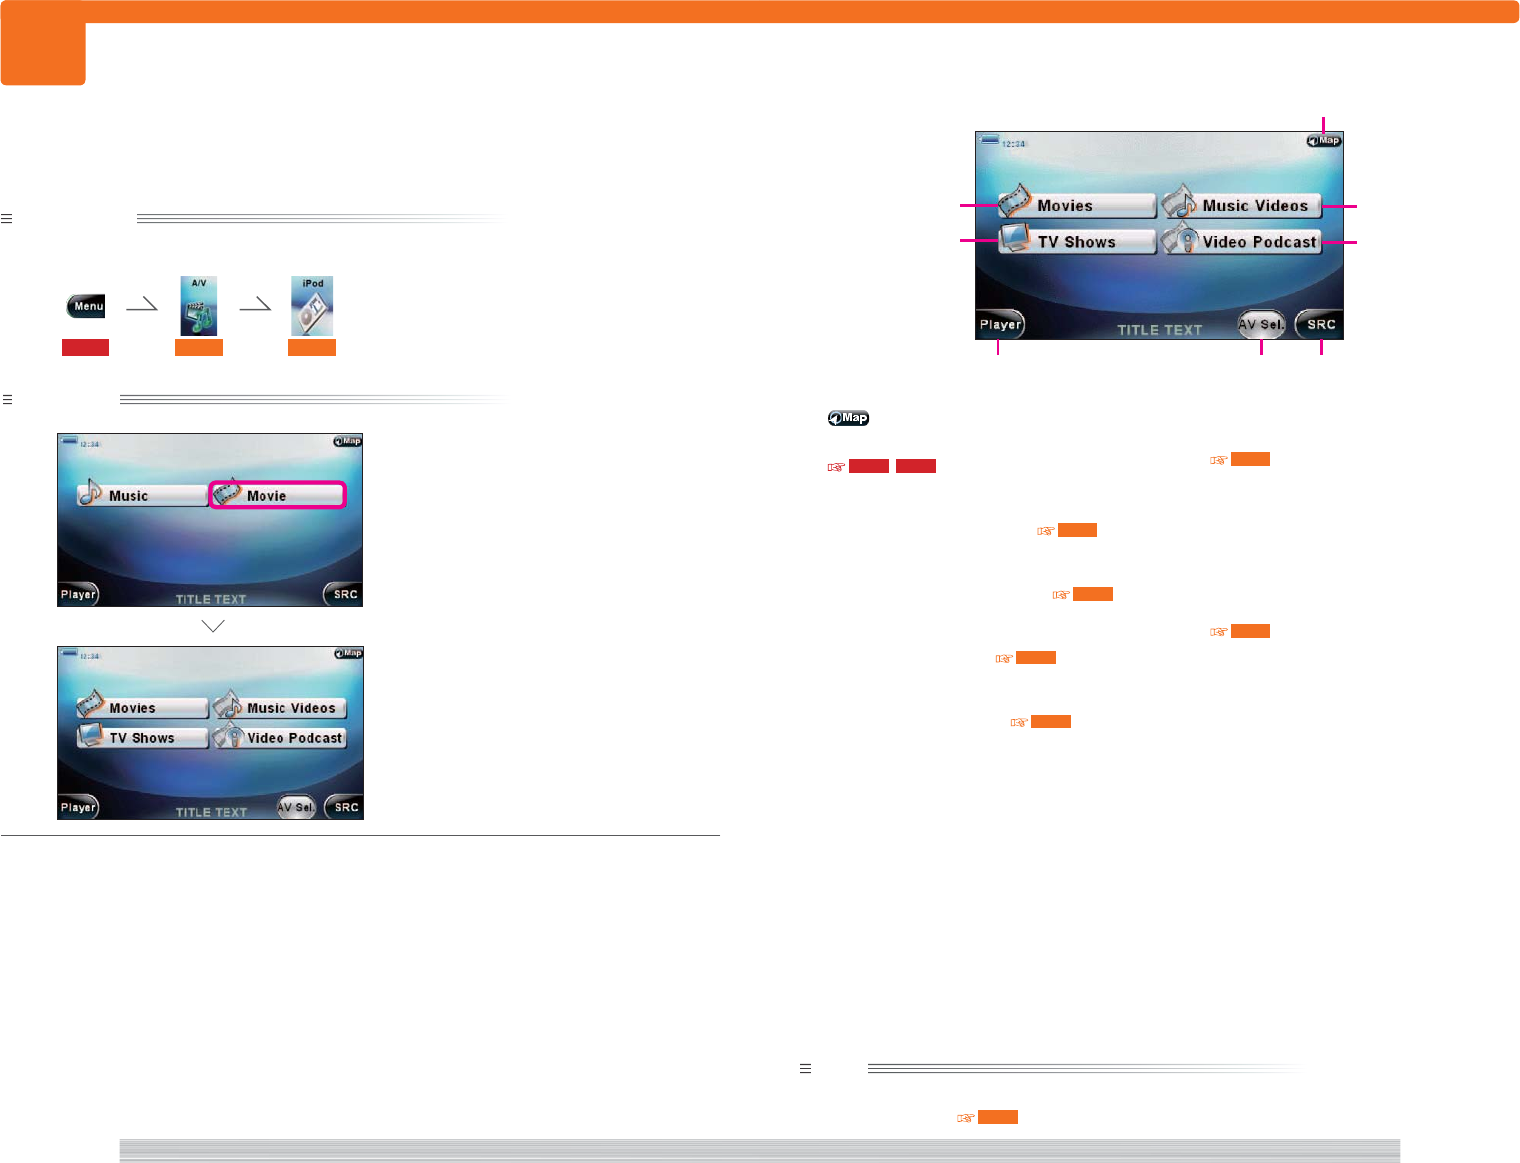
Have the SD card Top category screen displayed.
115 401 402
Operation
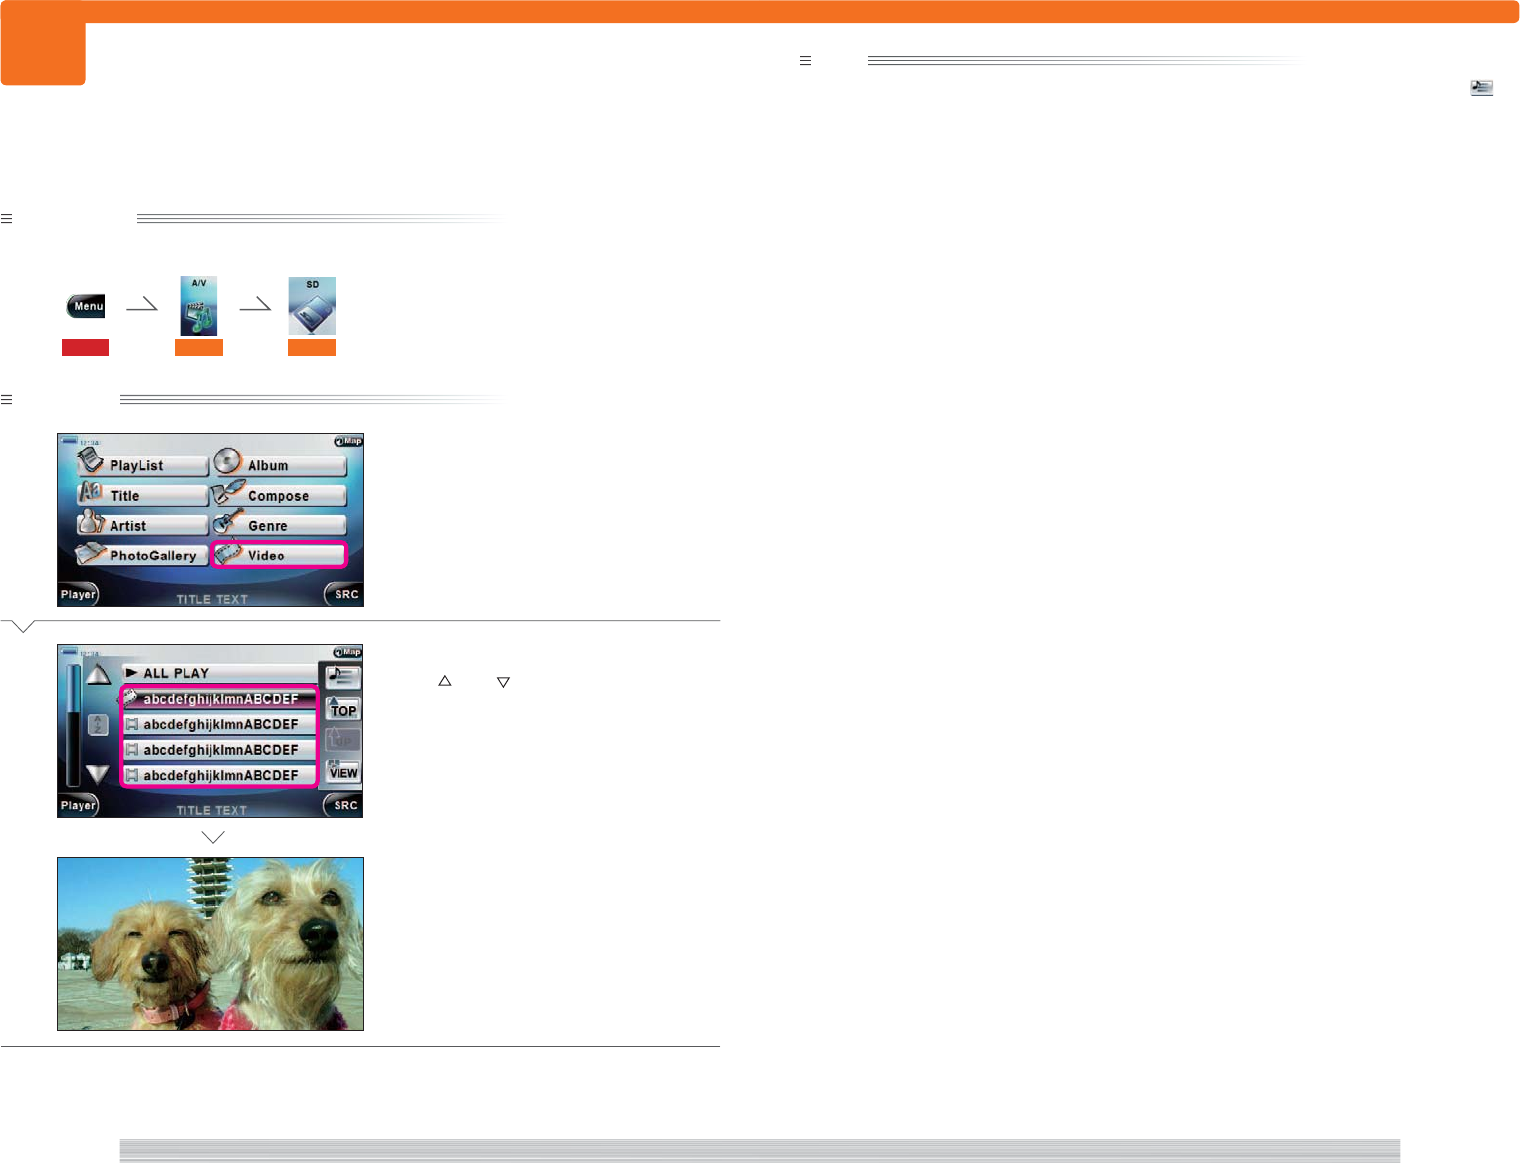
1
Select [Video].
2
Select the button of the video to play.
Select [ ] and [ ] to scroll.
Complete
Playing video in the SD card.
note
• Select [SRC] in
2
to return to the Source menu or [TOP] to return to the Top category screen. Or select to
display a list of videos being played.
• Select [VIEW] in
2
to change the list to thumbnail display.
Select [VIEW] in thumbnail display to return to list display.
• Select [Player] in
2
to play sequentially from the first video file.
<AC2800>
<VC0000>
<AC2000>
View video
164
page A/V 165
page
A/V
412
412
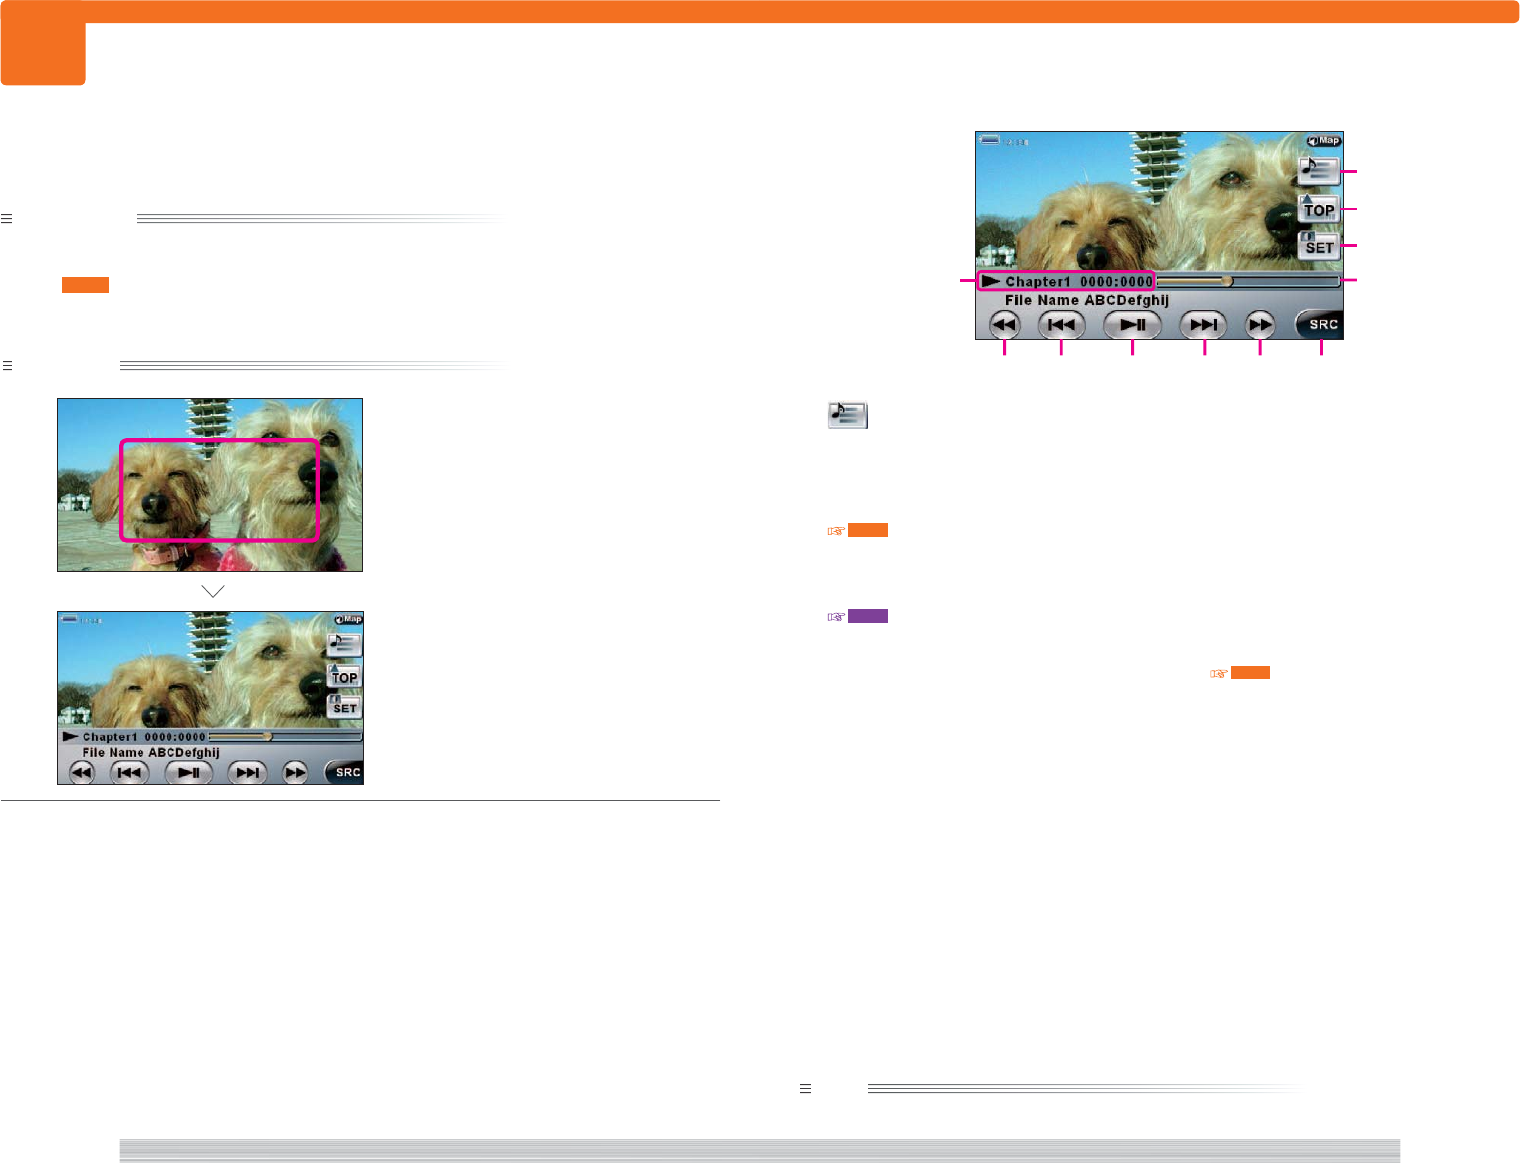
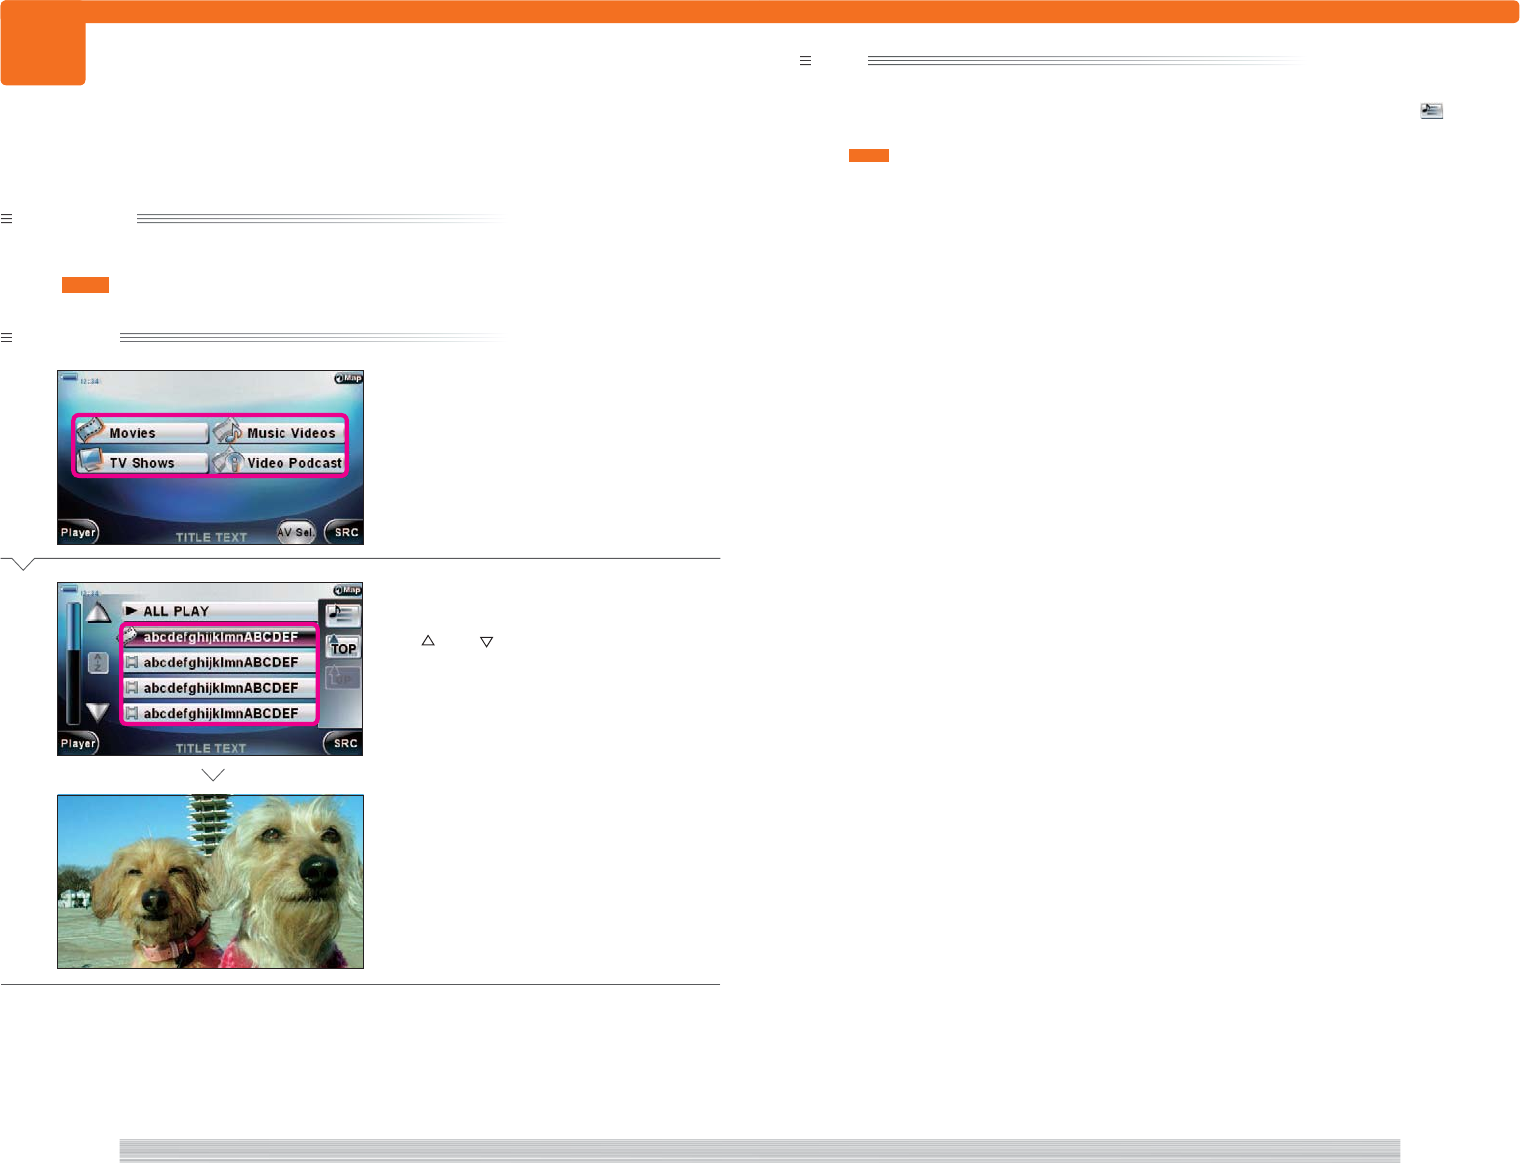
Touch the center of the screen while playing video in an SD card to display the control buttons.
1
Select to display a list.
2 [TOP]
Select to display the top category.
402
3 [SET]
Select to adjust the image quality.
615
4 Play time bar
Select to display the play time bar.
Touch the bar to play from the touched
location.
5 Playback information
Select to display the playback status,
current chapter, and playback duration.
6 [1] [¡]
Select to play at x2 speed in the forward or
backward direction.
7 [4] [¢]
Select a chapter.
8 [38]
Select to pause/resume playback.
9 [SRC]
Select to return to the Source menu.
401
Preparation
Have video playing.
411
Operation
1
Touch the screen.
Complete
<VC0000>
<VC1000>
note
• Touch the screen to erase the player control buttons.
SD card video play control screen (player con-
trol button)
<VC1000>
1
2
3
4
67 8 76 9
5
Control while playing video
166
page A/V 167
page
A/V
413
413
Preparation
Have the Source menu displayed.
115 401
Operation
1
Select [iPod].
2
Select [Music].
Select to display the iPod top category.
Complete
Displaying the iPod top category to select music.
1 [PlayList]
Select to play by playlist.
See 407 .
2 [Album]
Select to play music by album.
See 405 .
3
Select to return to the current map screen.
107 , 112
4 [Compose]
Select to play music by composer.
See 408 .
5 [Genre]
Select to play music by genre.
See 409 .
6 [Podcast]
Select to play podcast. 415
7 [Title]
Select to play music by title.
See 404 .
8 [Artist]
Select to play music by artist.
See 406 .
9 [Audiobook]
Select and play audiobook. 414
0 [Player]
Select to return to the Player screen.
See 403 .
- [AV Sel.]
Select to return to the Music/Video
selection screen in
2
.
= [SRC]
Select to return to the Source menu.
401
note
• On iPod without Video, the Music/Movie selection screen is not displayed in
2
and the Top category screen is
displayed.
• See 403 for the screen displayed while playing.
<AI1000>
<AI1100>
iPod Top category screen
<AI1100>
<A00000-1>
4
0-=
1
6
5
2
8
9
3
Display iPod's top category
7

168
page A/V 169
page
A/V
414
414
Preparation
Have the iPod top category screen displayed.
115 401 413
Operation
1
Select [Audiobook].
2
Select the button of the audiobook
to play.
Audiobook starts playing.
Use [ ] and [ ] to scroll the list.
Complete
note
• Select [ALL PLAY] or [Player] in
2
to play all audiobooks sequentially.
• Select [SRC] in
2
to return to the Source menu or [TOP] to return to the Top category screen. Or select to
display a list of audiobooks being played.
• See 403 for the screen displayed while playing.
• You can change the audiobook playback speed. 618
Playing audiobook in iPod.
<AI1150>
<AI1120>
Play audiobook
170
page A/V 171
page
A/V
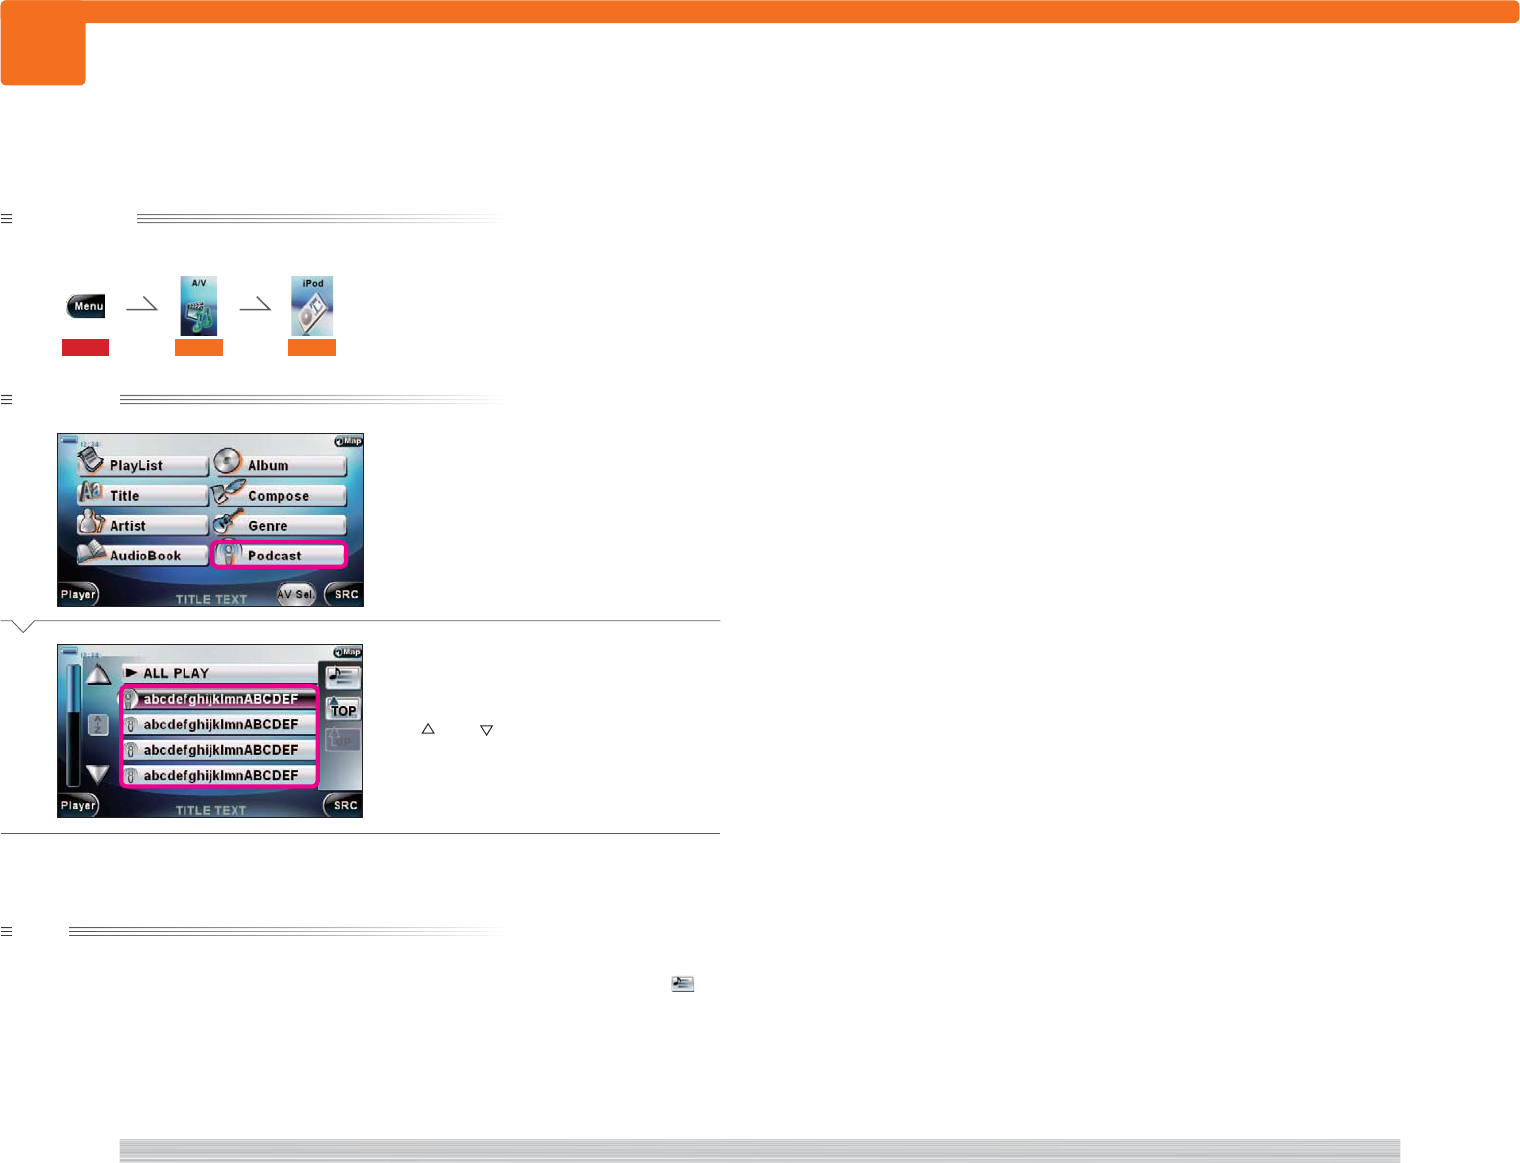
415
415
Preparation
Have the iPod top category screen displayed.
115 401 413
Operation
1
Select [Podcast].
2
Select the button of the podcast to
play.
Podcast starts playing.
Use [ ] and [ ] to scroll the list.
Complete
note
• Select [ALL PLAY] or [Player] in
2
to play all podcasts sequentially.
• Select [SRC] in
2
to return to the Source menu or [TOP] to return to the Top category screen. Or select to
display a list of podcasts being played.
Playing podcast in iPod.
<AI1160>
<AI1120>
Play podcast
172
page A/V 173
page
A/V
416
416
Displaying the iPod video library from the Source menu.
1
Select to return to the current map screen.
107 , 112
2 [Muisc Videos]
Select to play a music video. 417
3 [Video Podcast]
Select to play a video podcast. 417
4 [Movies]
Select to play a movie. 417
5 [TV Shows]
Select to play a TV show. 417
6 [Player]
Select to display the Player screen.
418
7 [AV Sel.]
Select to return to the Music/Video
selection screen in
1
.
8 [SRC]
Select to return to the Source menu.
401
note
• On iPod without Video, the Music/Movie selection screen is not displayed in
1
and you are returned to the
Top category screen. 413
Preparation
Have the Source menu displayed.
115 401 413
Operation
1
Select [Movie].
The iPod video library screen appears.
Complete
<AI1000>
iPod Video Library screen
<AI1200>
<AI1200>
8
1
3
76
5
2
4
Display iPod video library
174
page A/V 175
page
A/V
417
417
Preparation
Have the iPod video library screen displayed.
416
Operation
1
Select the button of the type of video
file to play.
2
Select the button of the file to play.
A video file starts playing.
Use [ ] and [ ] to scroll the list.
Complete
Playing video files in iPod.
note
• Select [ALL PLAY] or [Player] in
2
to play all video files continuously.
• Select [SRC] in
2
to return to the Source menu or [TOP] to return to the video library. Or select to display a
list of video files being played.
• See 418 for the screen displayed while playing a video file.
<AI1210>
<AI1200>
<VI0000>
Play video on iPod
176
page A/V 177
page
A/V
418
418
Preparation
Have an iPod video file playing.
417
Operation
1
Touch the center of the screen.
Control buttons are displayed.
Complete
Touch the center of the screen while playing iPod video file to display the control buttons.
1
Select to return to the current map screen.
107 , 112
2
Select to display a list of category
containing the content being played.
3 [TOP]
Select to return to the iPod top category.
413
4 [SET]
Select to display the iPod setup screen.
618
5 Play time bar
Select to display the play positions.
Touch the bar to play from the touched
location.
6 Playback information
Select to display the playback status,
current chapter, and playback duration.
7 [1] [¡]
Select to play at x2 speed in the forward or
backward direction.
8 [4] [¢]
Select a chapter.
9 [38]
Select to start or pause play.
0 [SRC]
Select to return to the Source menu.
401
note
• Touch the screen to erase the player control button.
• You can set whether to display in wide mode and the type of video signal. 618
<VI1000>
<VI0000>
iPod video play control screen (player control
buttons)
<VI1000>
2
3
4
5
78 9 87 0
6
1
Control while playing video with iPod
178
page A/V 179
page
A/V
419
419
Preparation
Have the Source menu displayed.
115 401
Operation
1
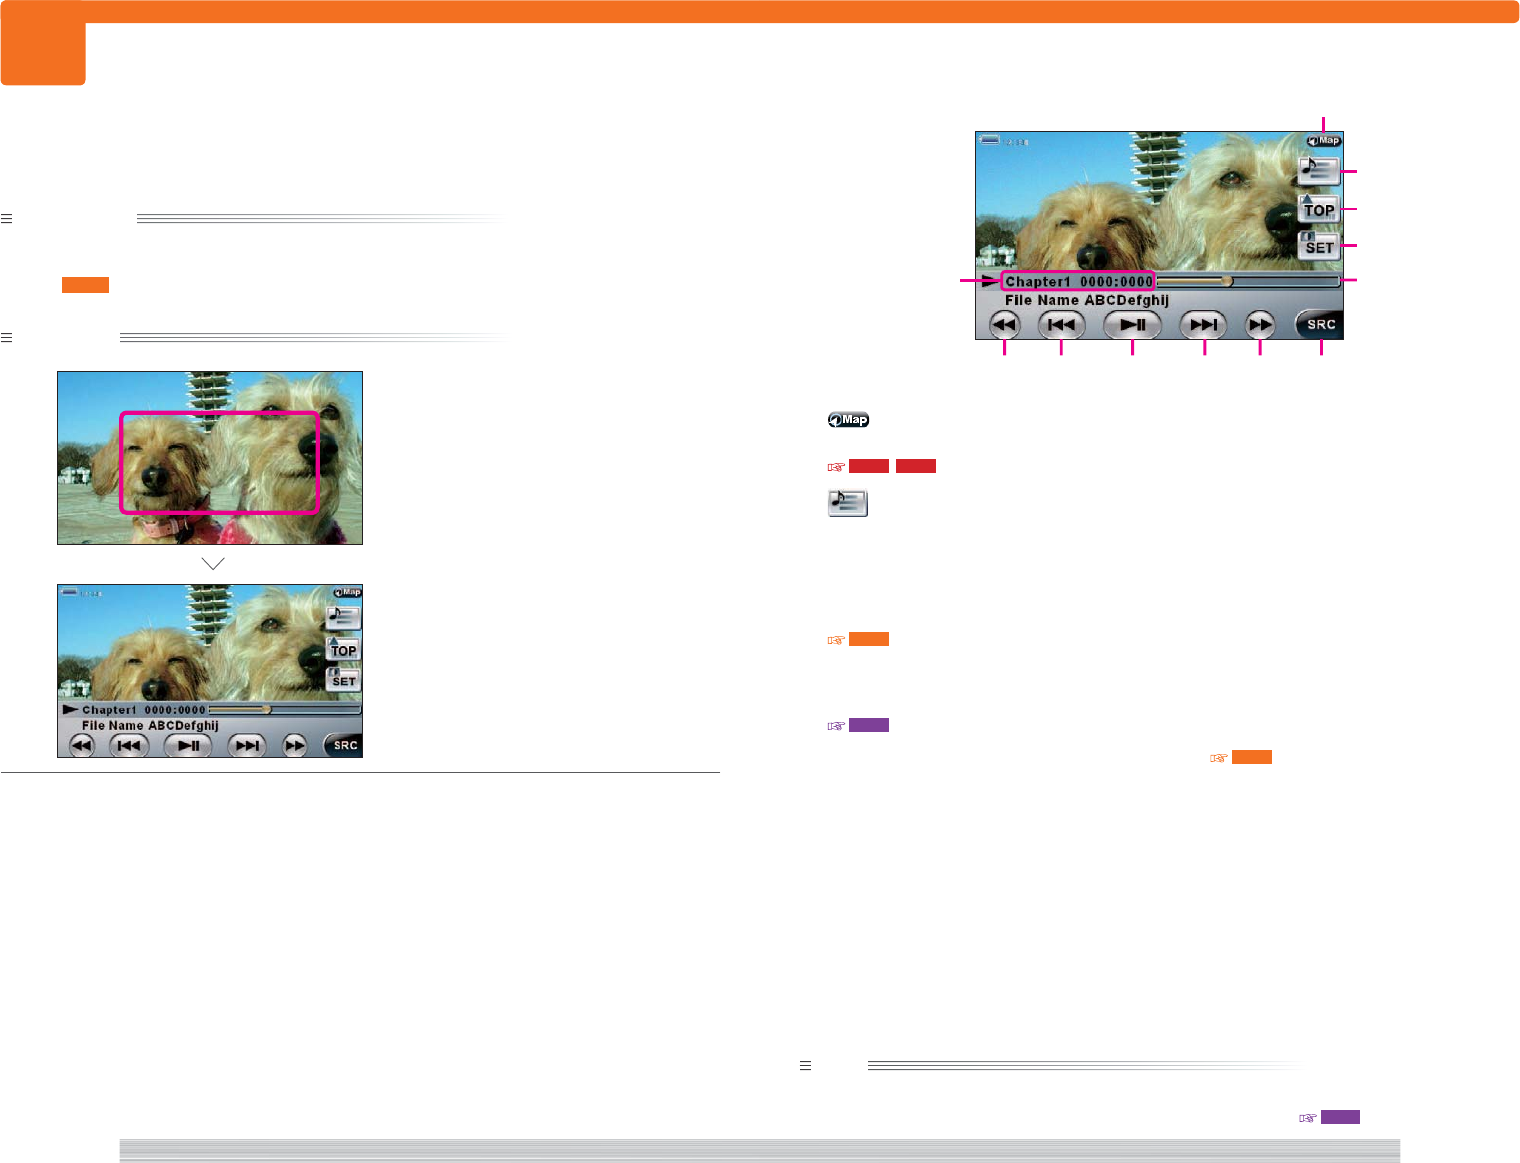
Select [Bluetooth].
Control buttons are displayed.
Complete
Playing music in Bluetooth device.
1
Select to return to the current map screen.
107 , 112
2 [MORE]
Select to display the More screen.
3 [4] [¢]
Select a song.
4 [38]
Select to start or pause playing music.
5 [SRC]
Select to return to the Source menu.
401
note
• When a Bluetooth device supporting profile A2DP is connected, you can play music in that device.
• When a Bluetooth device supporting profile AVRCP is connected, you can perform the above controls.
7 [BACK]
Select to return to Main screen.
8 [1] [¡]
Select to play at x2 speed in the forward or
backward direction.
<MA1000a>
<A00000-1>
Bluetooth music play control screen (Main
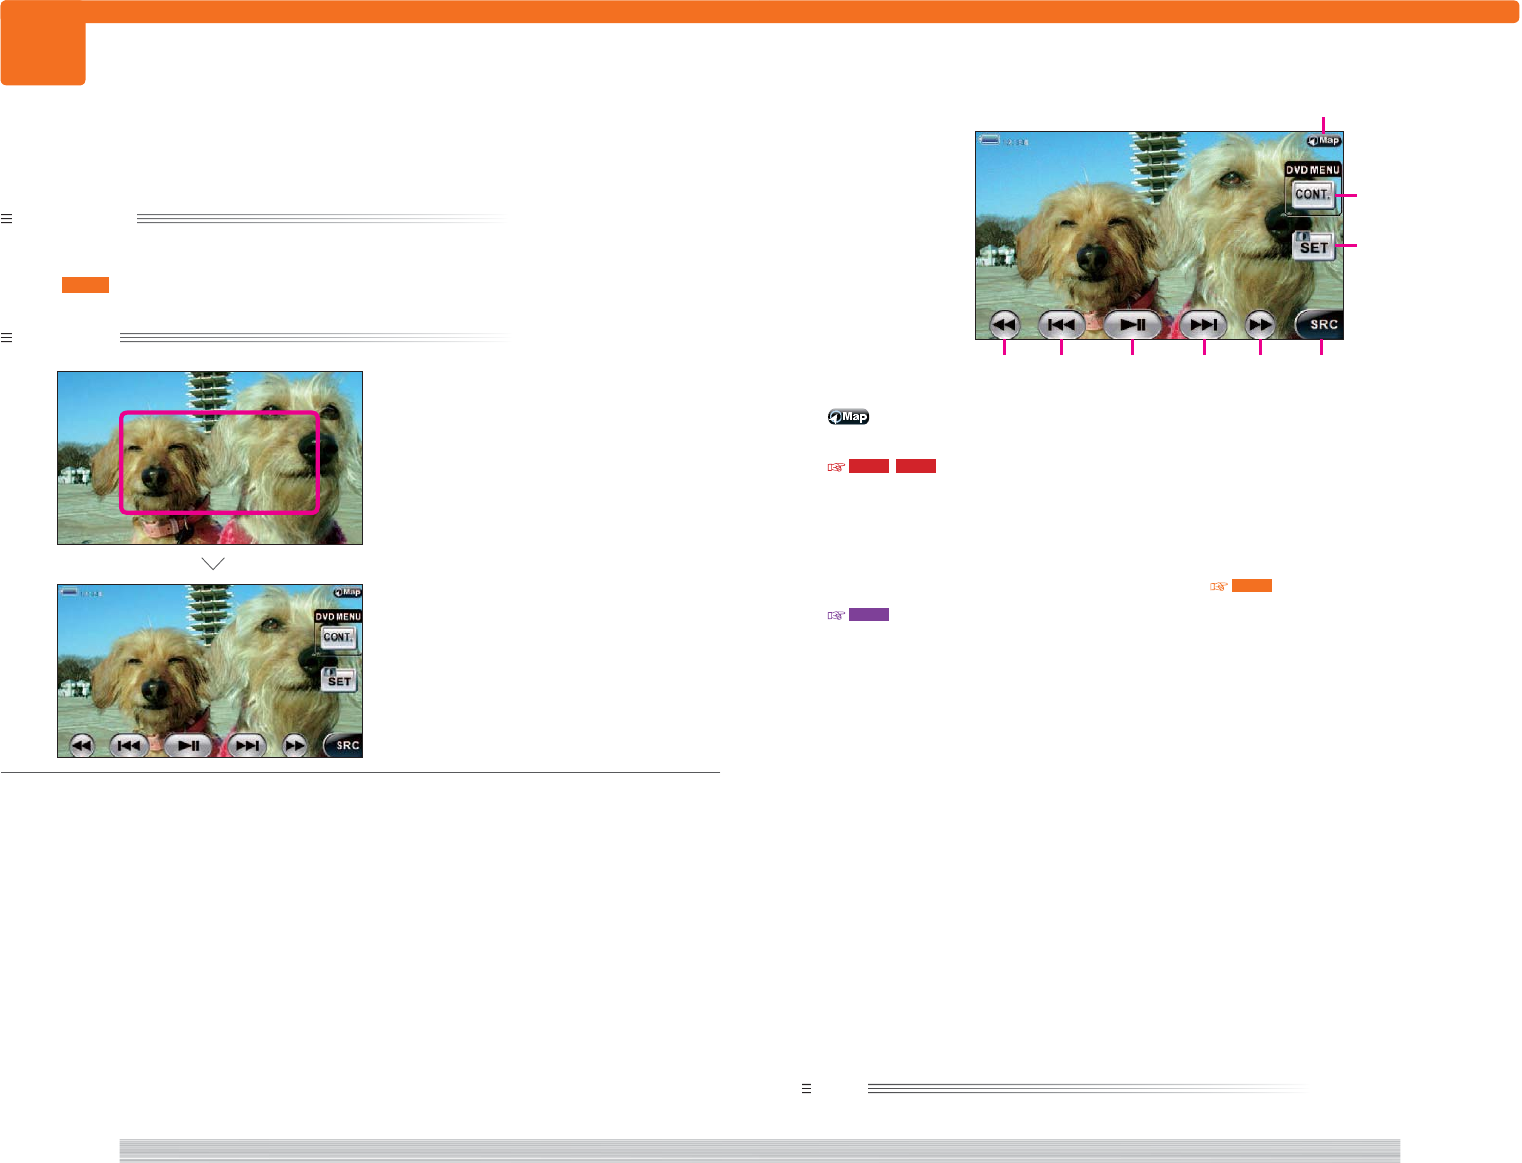
screen)
<MA1000a>
Bluetooth music play control screen (More
screen)
<MA1000b>
7
45
1
8
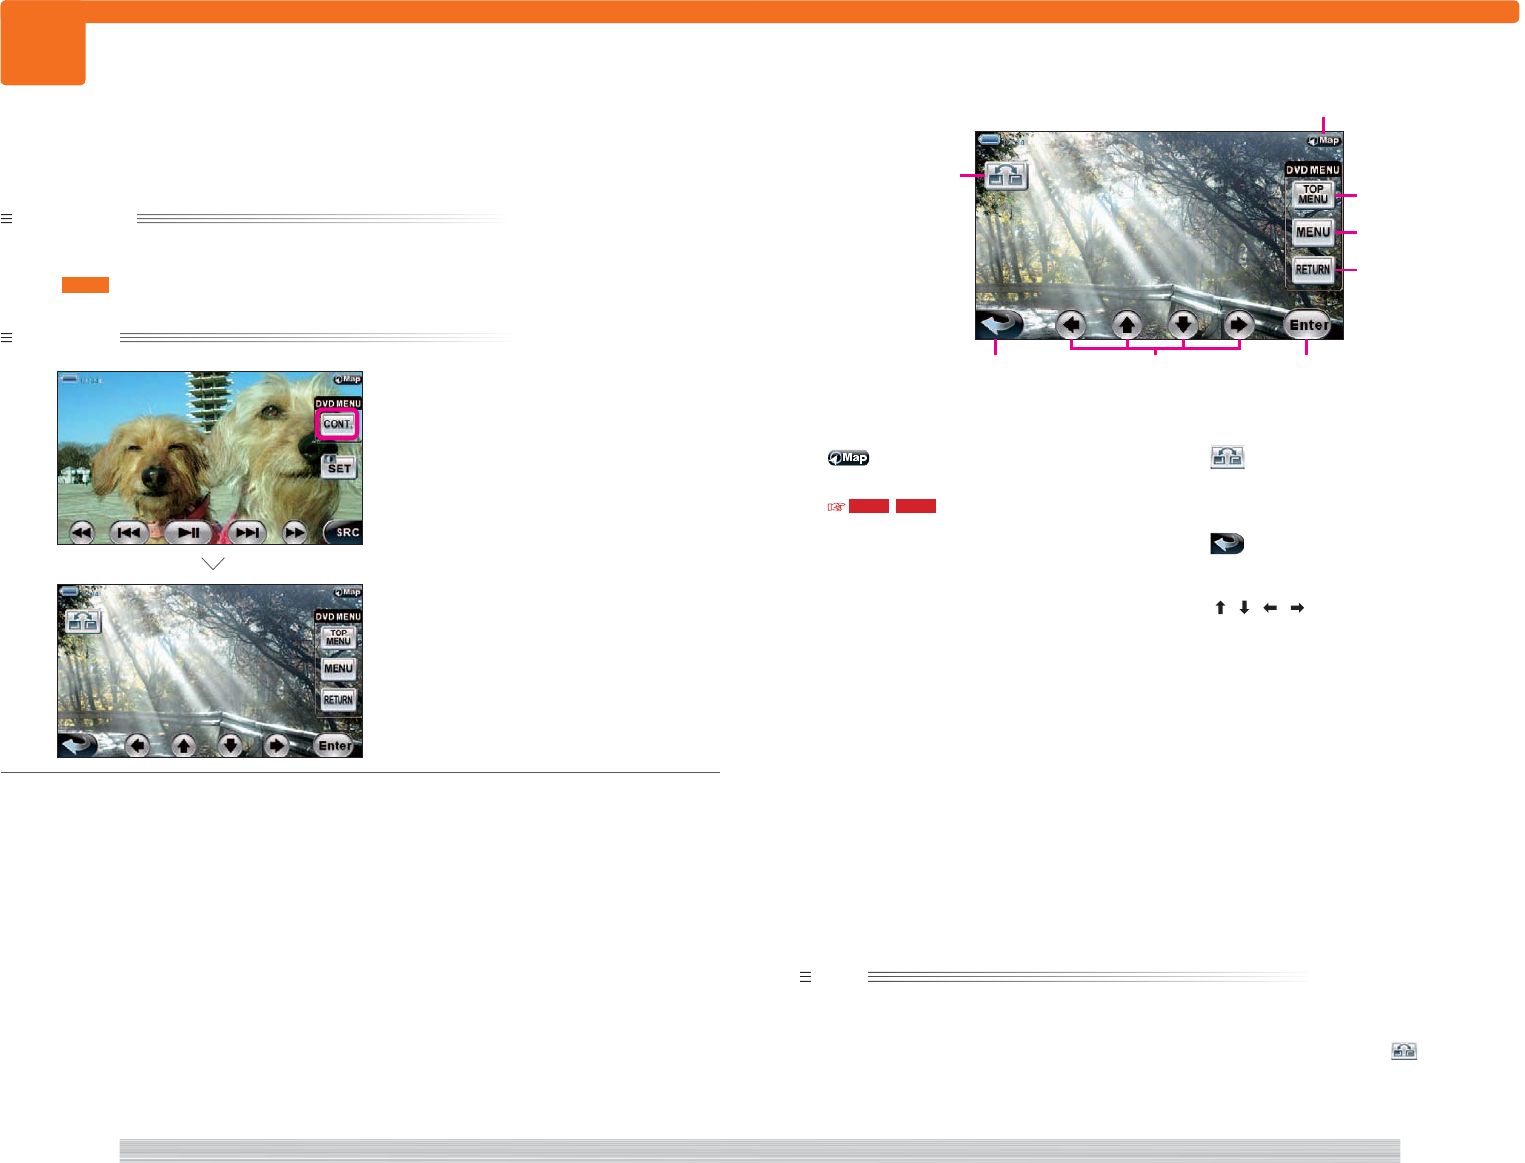
3 3
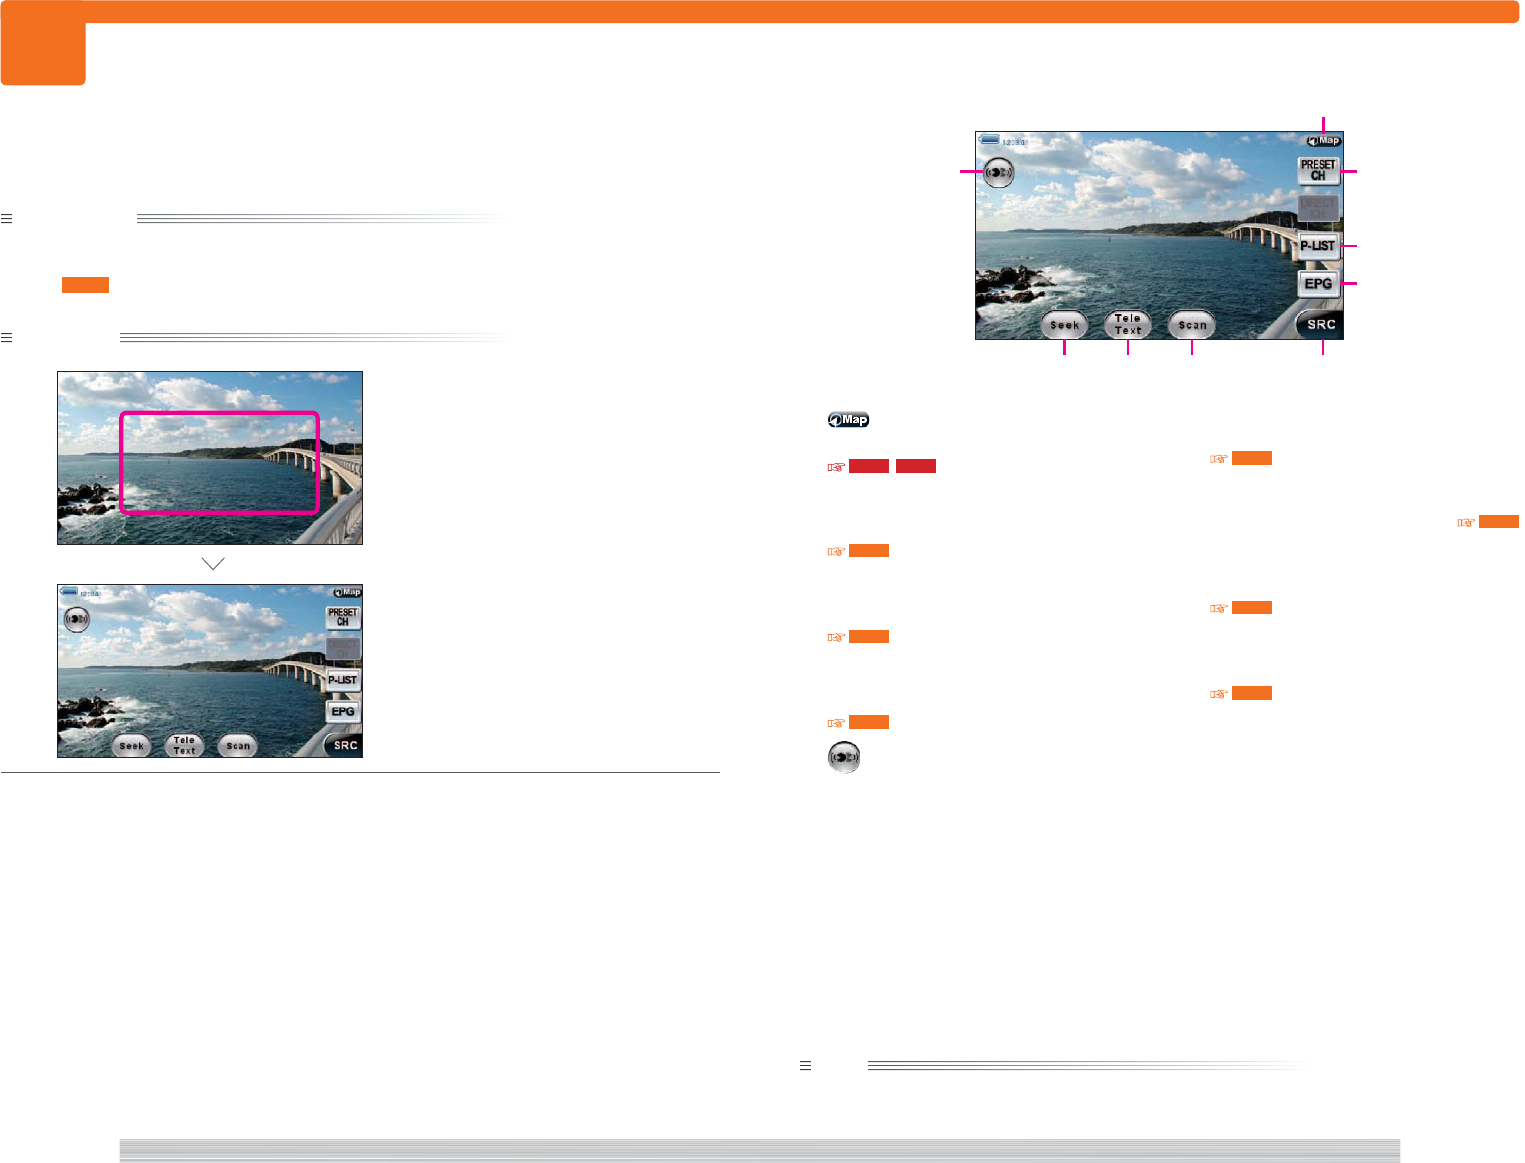
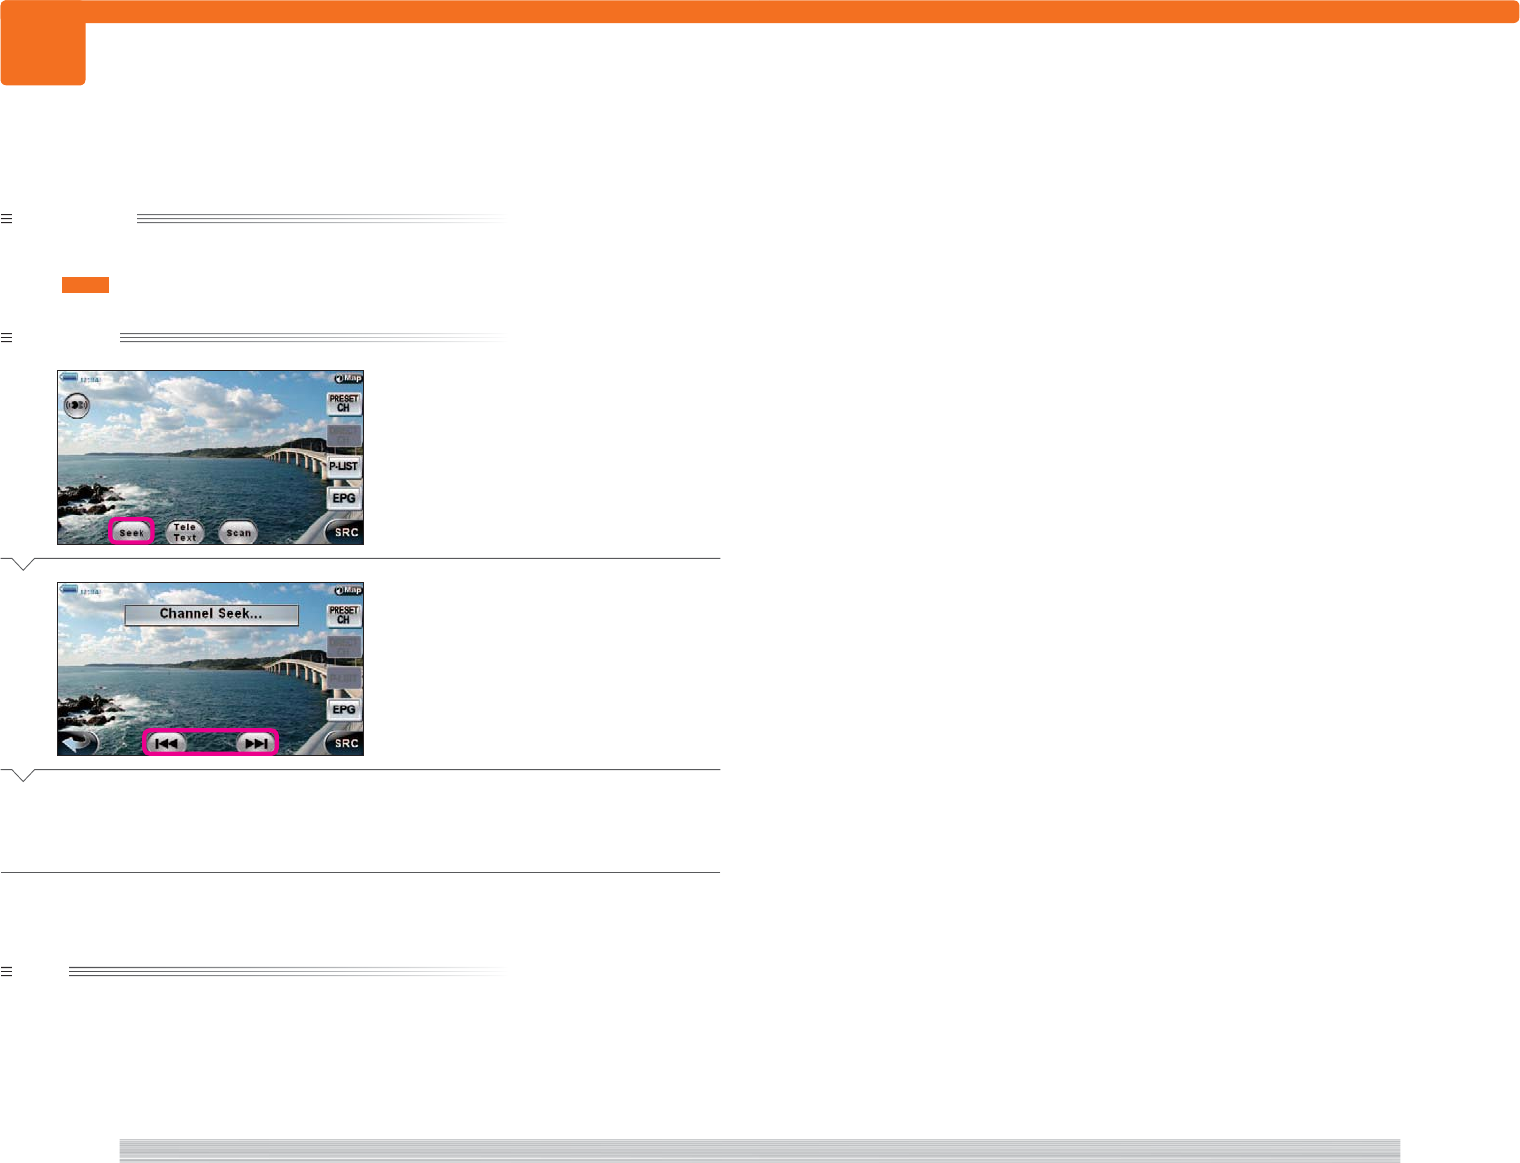
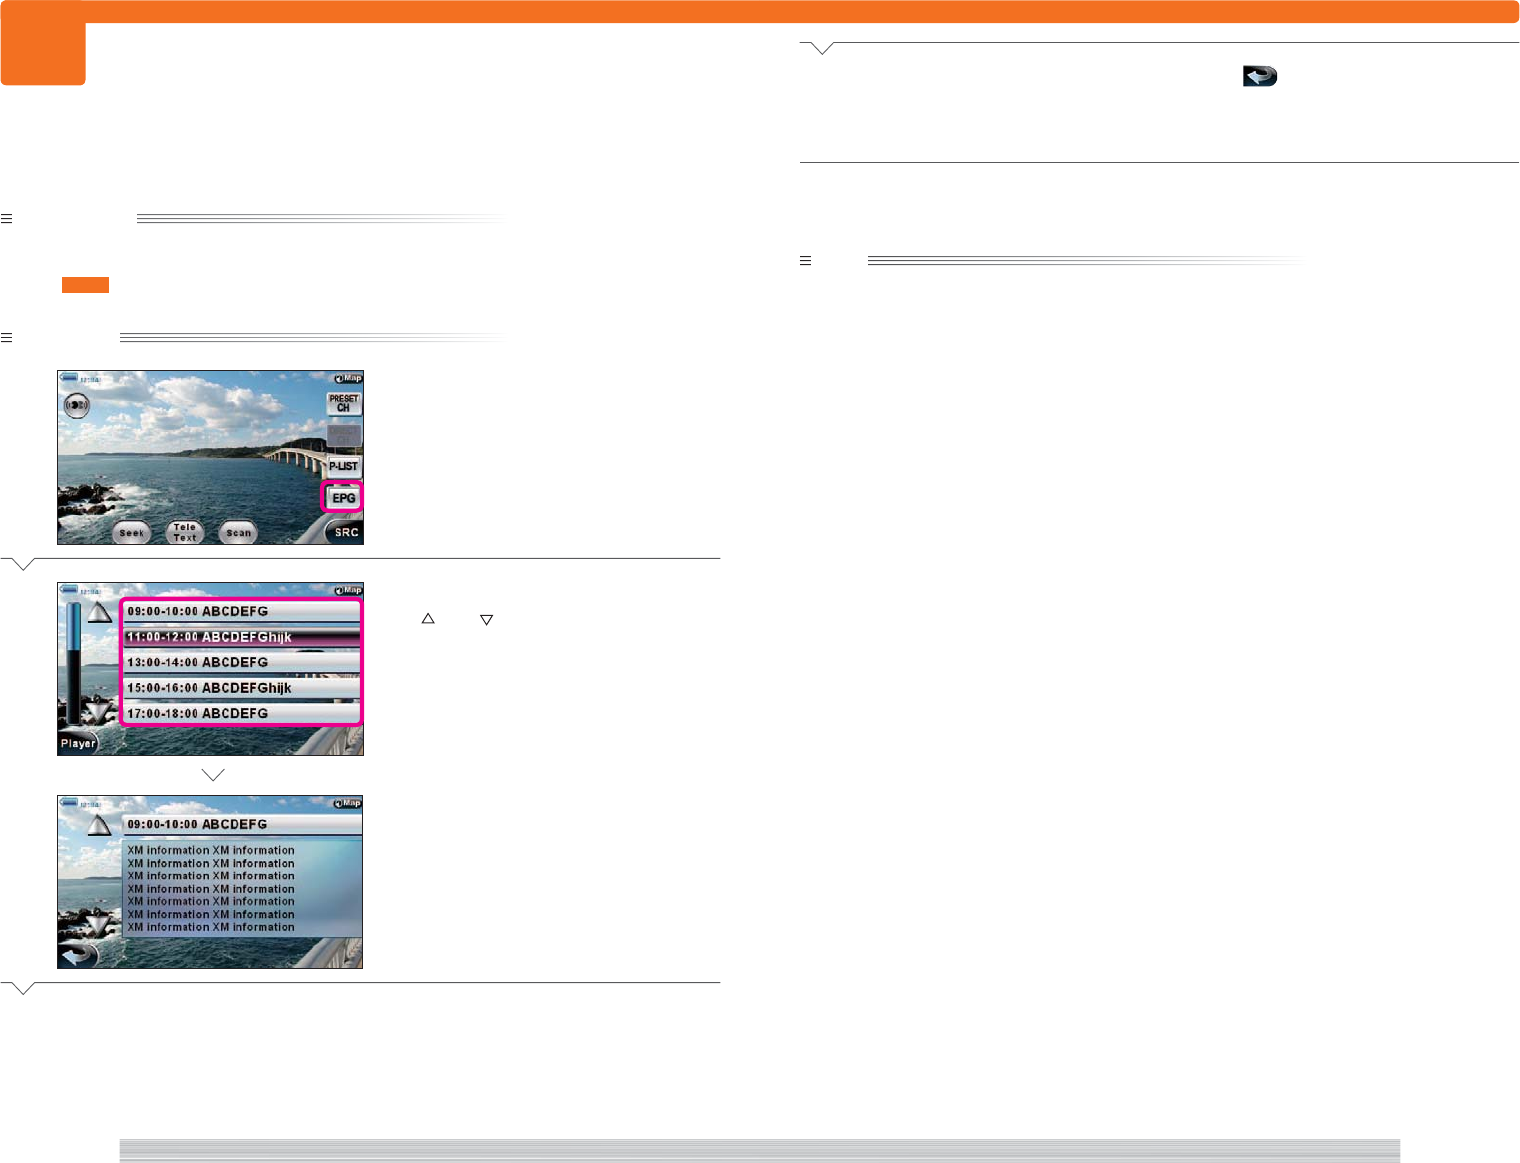
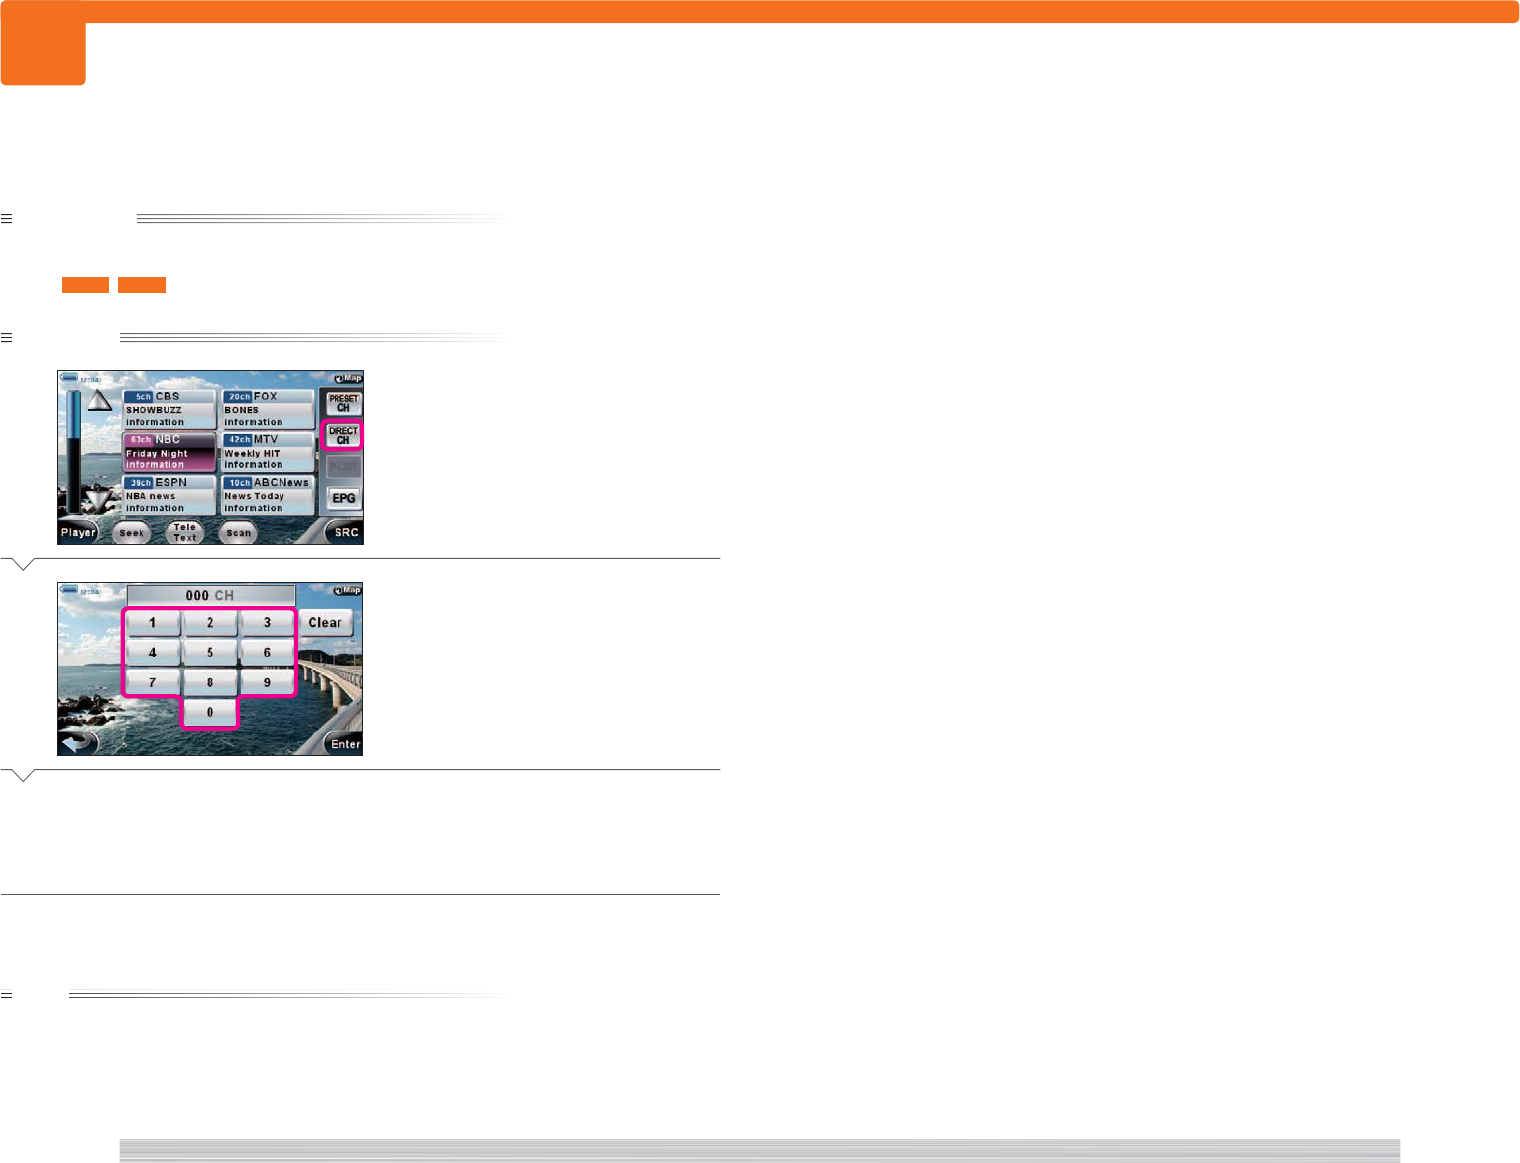
Play music in Bluetooth device
2

180
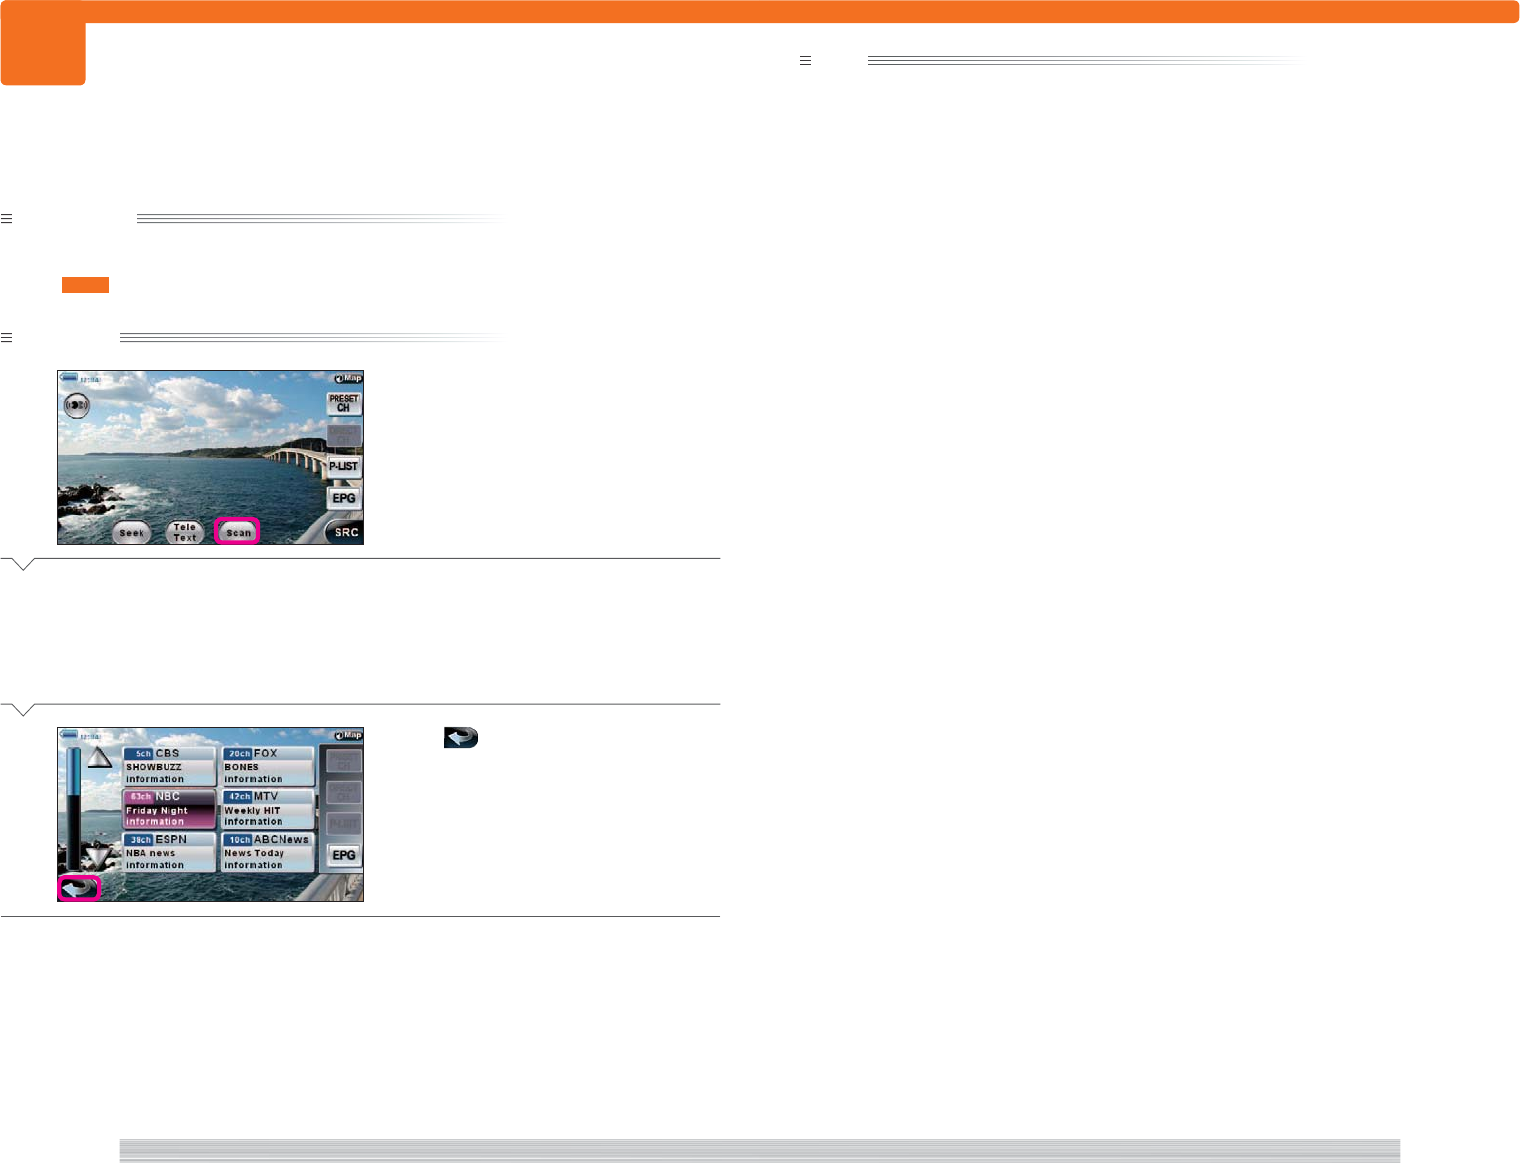
page A/V 181
page
A/V
420
420
Preparation
Have the Source menu displayed.
115 401
Operation
1
Select [DVD].
DVD starts playing.
Complete
note
• [DVD] is not shown on the Source menu when iPod is connected.
• An optional B cradle is necessary in order to connect a DVD player.
• Set the video source to “DVD” when a DVD player is connected. 616
Playing DVD.
<VD0000>
<A00000-2>
Play DVD
182
page A/V 183
page
A/V
421
421
Preparation
Have a DVD playing.
420
Operation
1
Touch the screen.
The player control buttons appear.
Complete
Touch the center of the screen while playing DVD to display the control buttons.
1
Select to return to the current map screen.
107 , 112
2 [CONT.]
Select to display the disc control buttons.
3 [SET]
Select to adjust the image quality.
615
4 [1] [¡]
Select to play forward or backward at x2
speed.
5 [4] [¢]
Select a chapter.
6 [38]
Select to start or pause play.
7 [SRC]
Select to return to the Source menu.
401
note
• Touch the screen to erase the player control buttons.
<VD1000>
<VD0000>
DVD video play control screen (player control
buttons)
<VD1000>
2
3
45 6 54 7
1
Control while playing DVD
184
page A/V 185
page
A/V
422
422
Preparation
Have the player control buttons displayed.
421
Operation
1
Select [CONT.].
Disc control buttons appear.
Complete
Selecting the player control button [CONT.] to display disc control buttons.
1
Select to return to the current map screen.
107 , 112
2 [TOP MENU]
Select to return to the top of the disc
menu.
3 [MENU]
Select to display the disc menu.
4 [RETURN]
Select to move up a level in the disc menu.
5
Select to move the display position of the
disc control buttons.
6
Select to return to the previous screen.
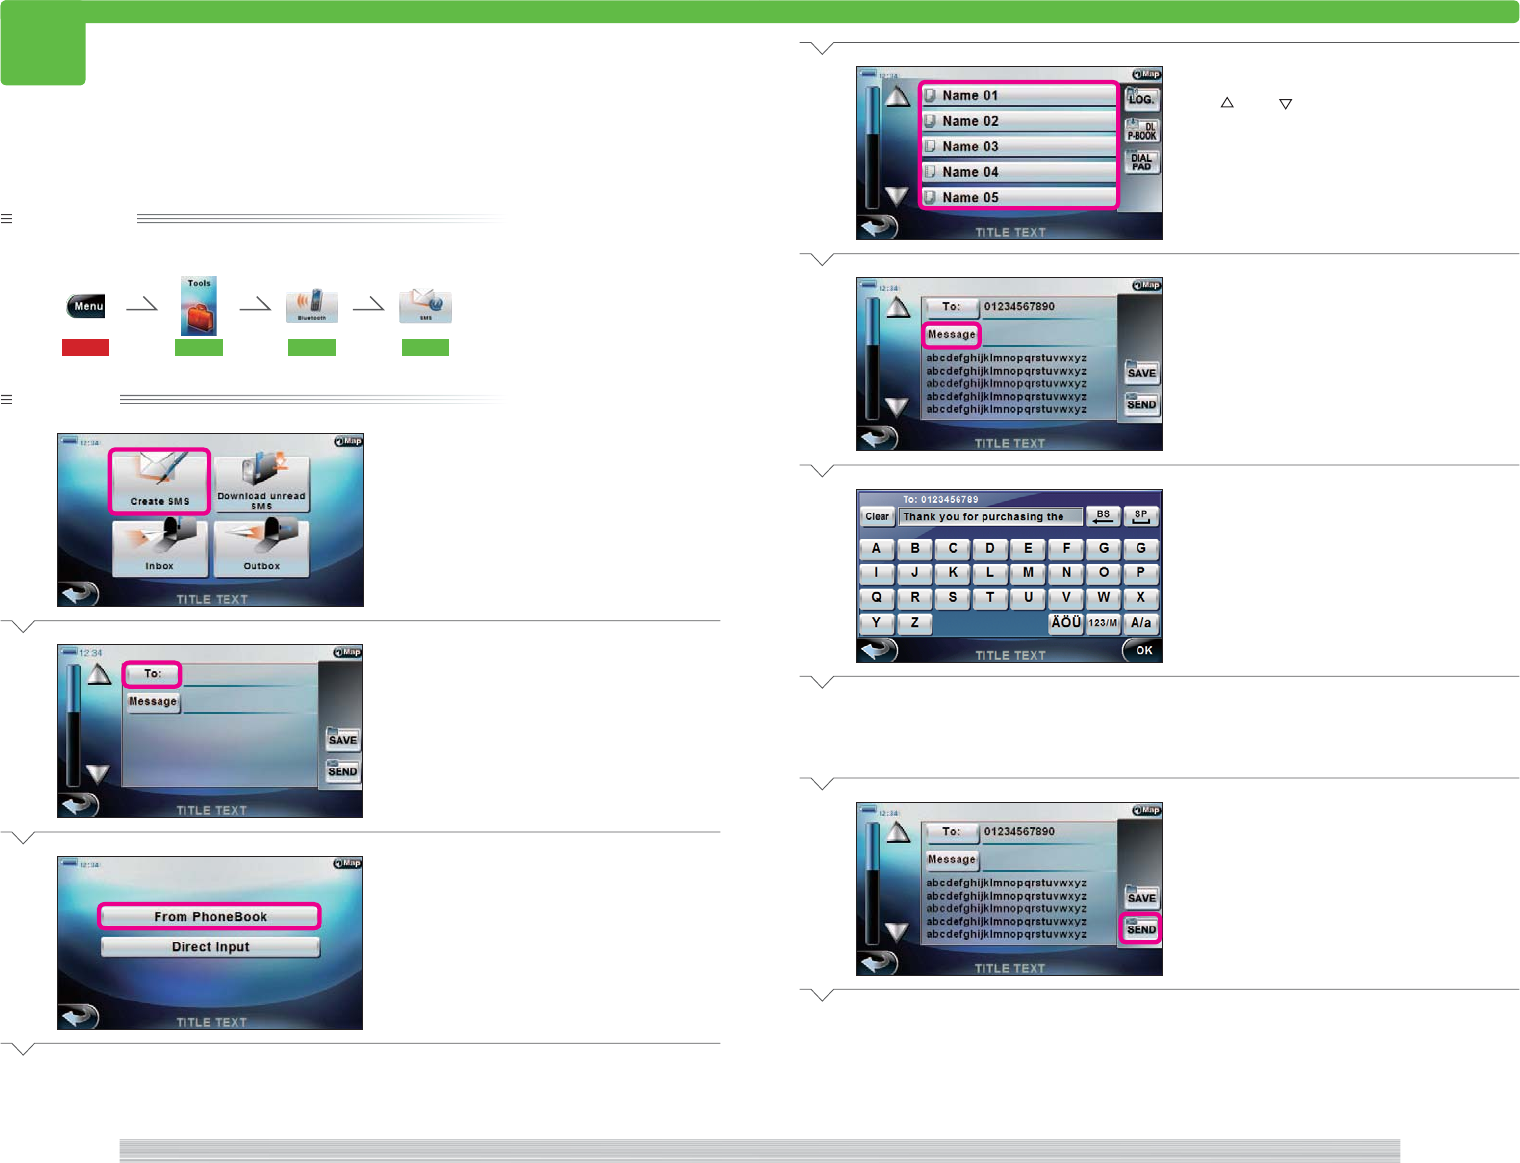
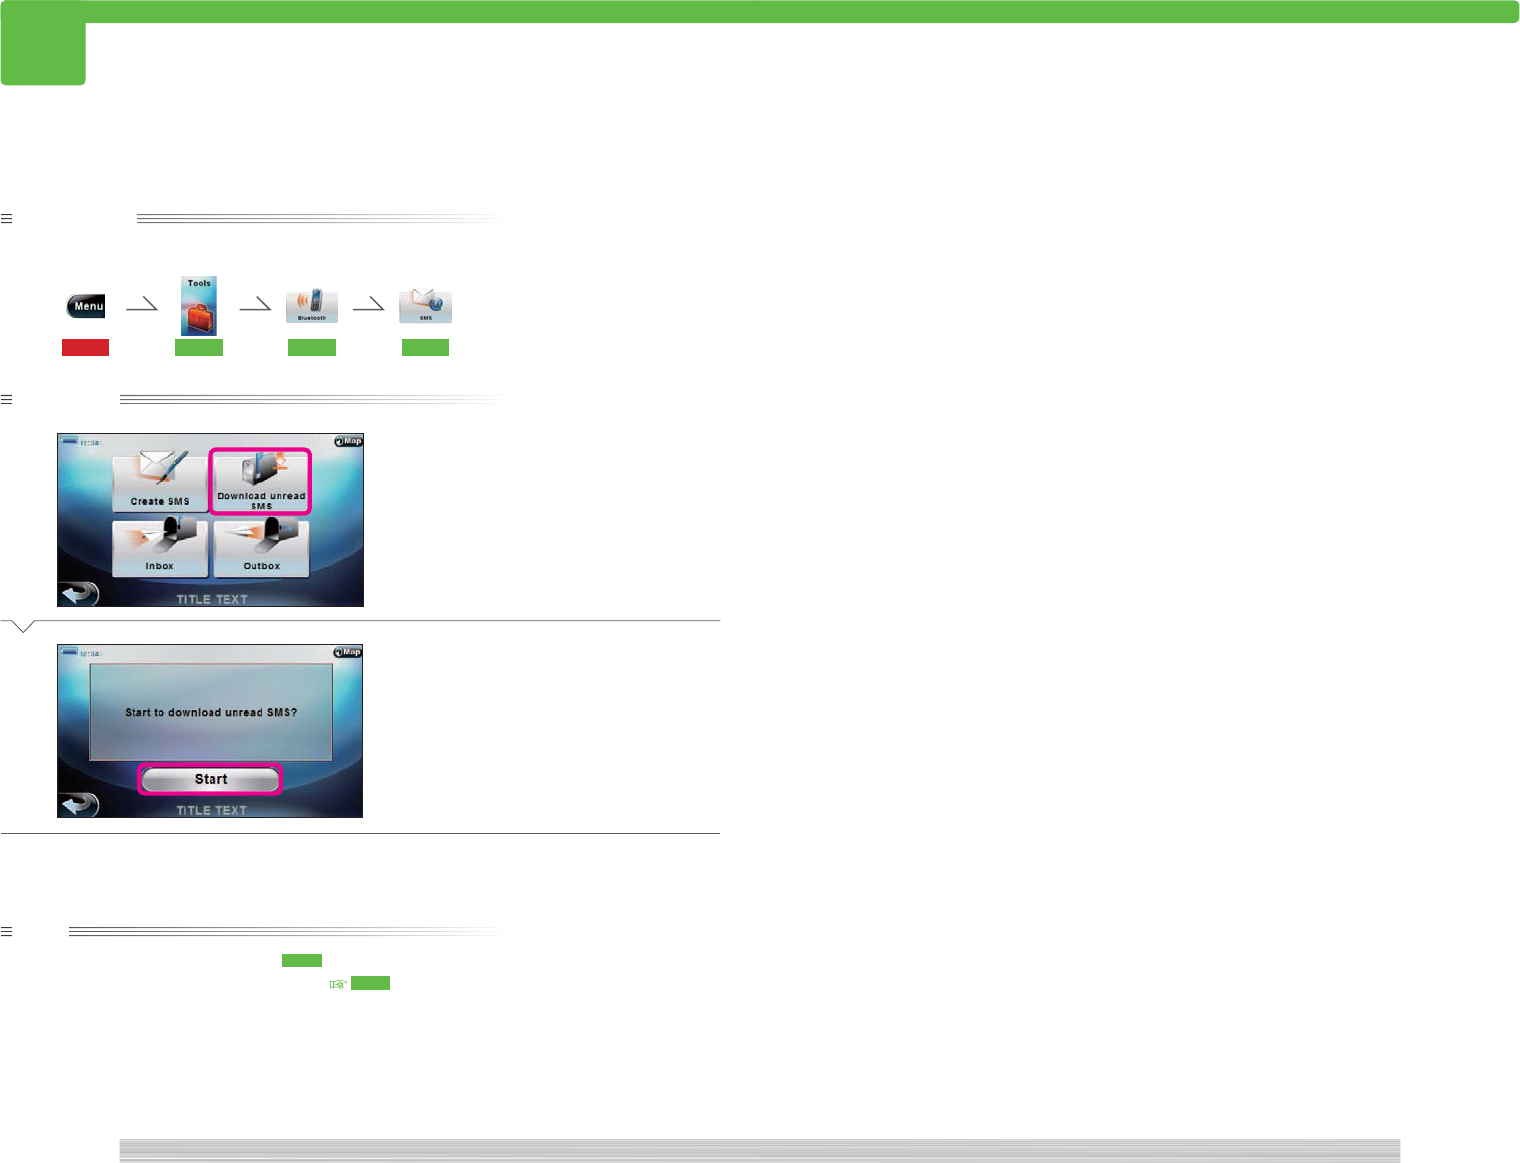
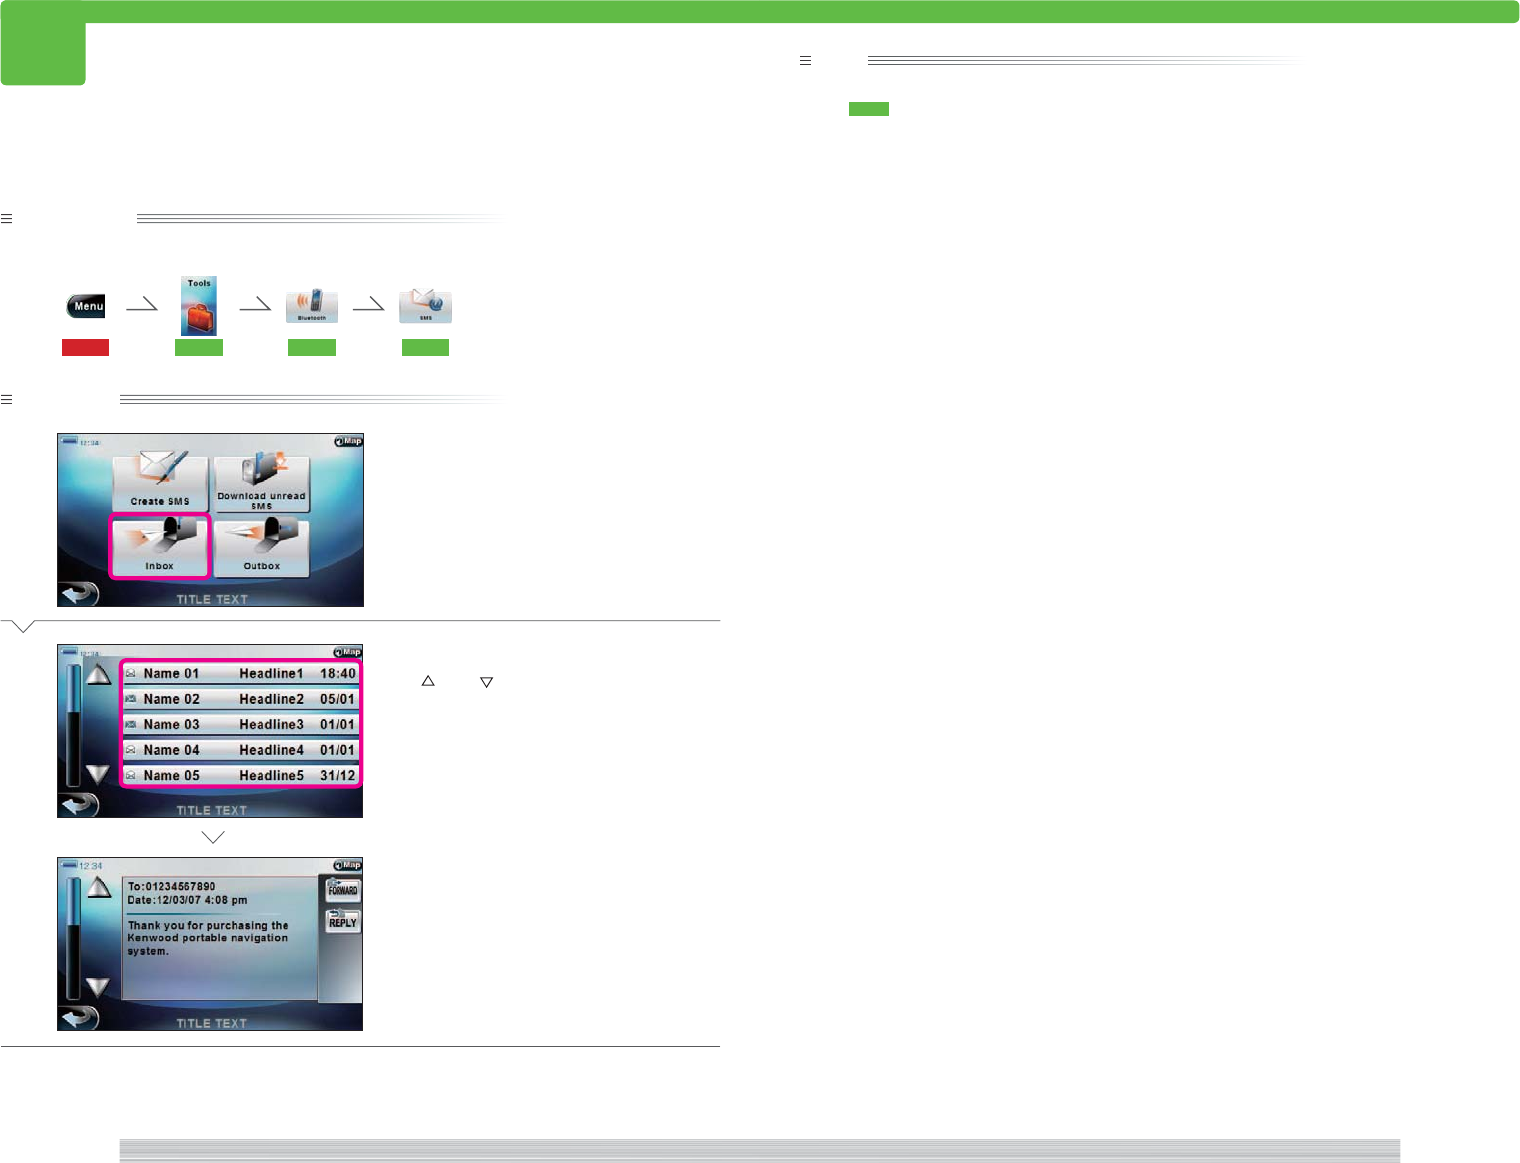
7 [] [ ] [ ] [ ]
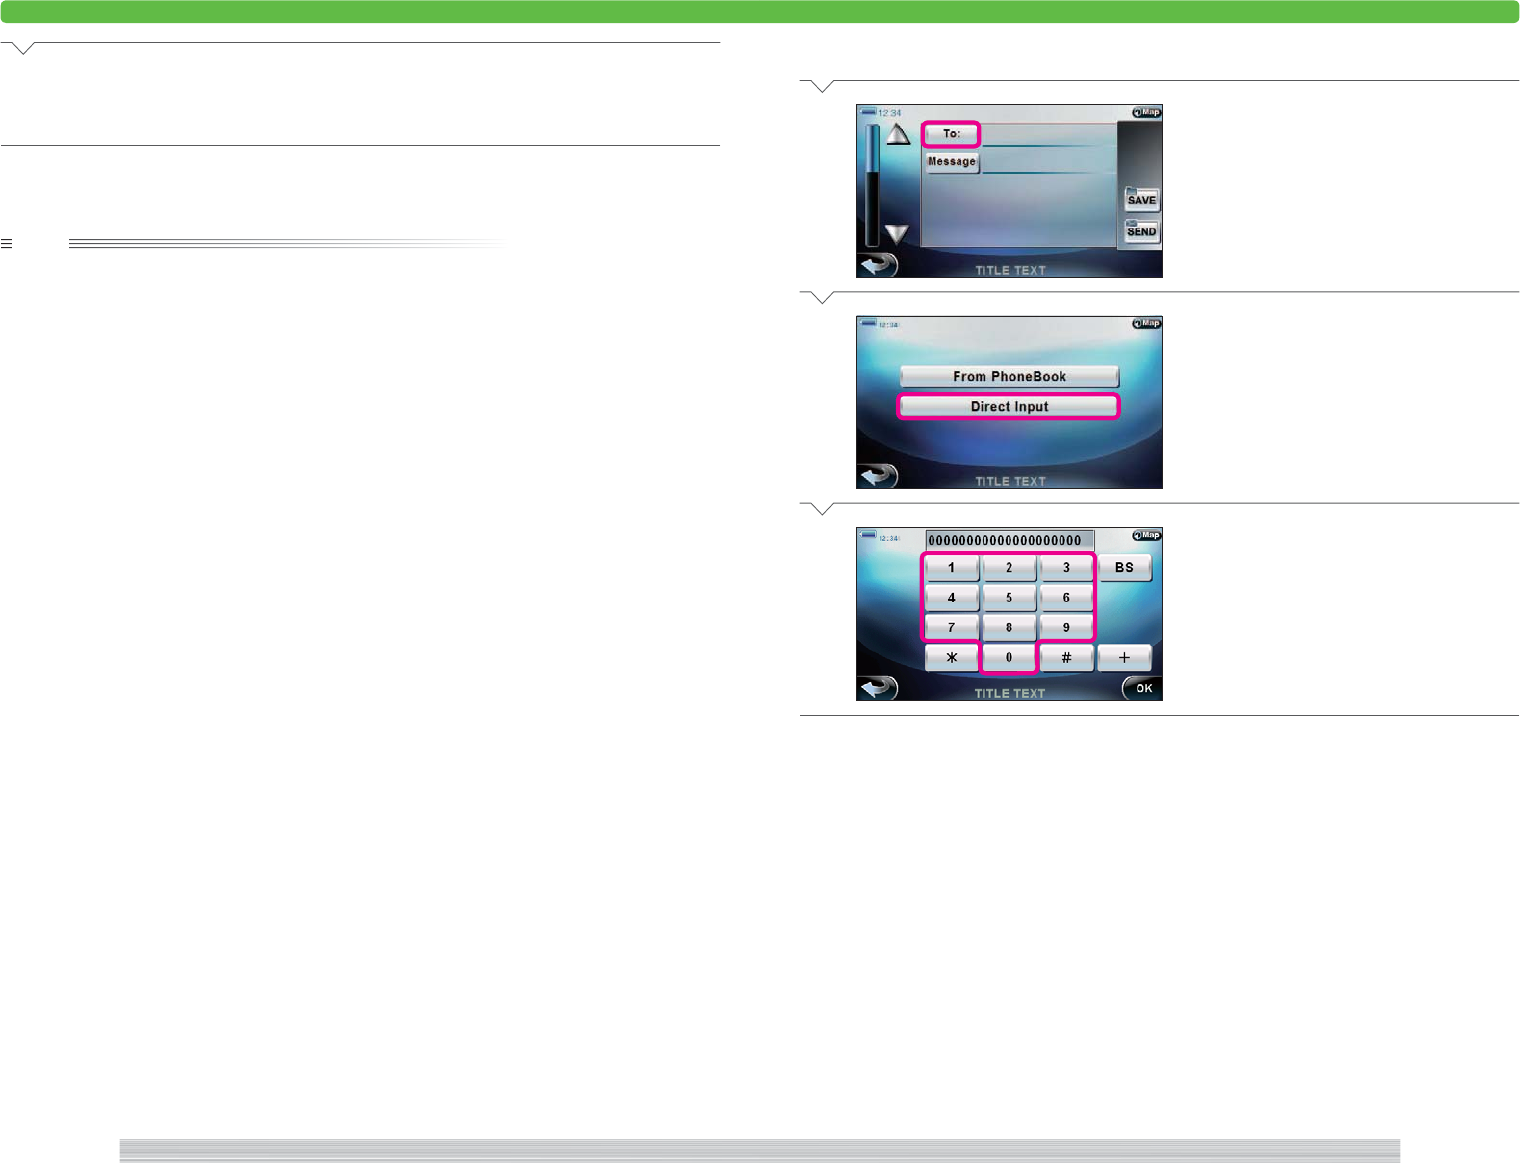
Select a disc menu item.
8 [Enter]
Select to confirm item selection.
note
• The disc menu is specific to the DVD being played and the available controls depend on the DVD.
• When the disc control buttons are displayed, touching the disc menu has no effect.
• If the disc control buttons are overlapped with the background and difficult to see, select to change the
display position.
• Touch the screen to erase the disc control buttons.
• The zoom function and angle function are not supported.
DVD MediaPlayer screen (Disc control buttons)
<AD1000a>
<AD1000a>
<VD1000>
2
3
68
1
4
5
7
Disc control buttons

186
page A/V 187
page
A/V
423
423
Preparation
Have the Source menu displayed.
115 401
Operation
1
Select [DVB-T].
The digital TV screen appears.
Complete
note
• Only PNX-7 can be viewed for digital TV.
• If the previously viewed channel cannot be received, the digital TV control screen appears. 424
• Channel scan starts the first time you view digital TV after purchase. 425
Digital TV cannot be received without performing a channel scan.
• You must perform channel scan in order to receive digital TV broadcasts.
Viewing digital TV.
<VT1000>
<A00000-1>
View digital TV
188
page A/V 189
page
A/V
424
424
Preparation
Have the digital TV screen displayed (no need to tune to a channel).
423
Operation
1
Touch the screen.
The TV control buttons appear.
Complete
Touch the center of the digital TV screen to display the control buttons.
1
Select to return to the current map screen.
107 , 112
2 [PRESET CH]
Select to display the preset channel list.
427
3 [P-LIST]
Select to display a program list screen.
426
4 [EPG]
Select to display the program guide.
429
5
Select to switch voice stream.
6 [Seek]
Select to switch to the next channel.
428
7 [TeleText]
Select to display text information. 431
8 [Scan]
Select to scan and preset channels.
425
9 [SRC]
Select to return to the Source menu.
401
note
• This function is available only for PNX-7.
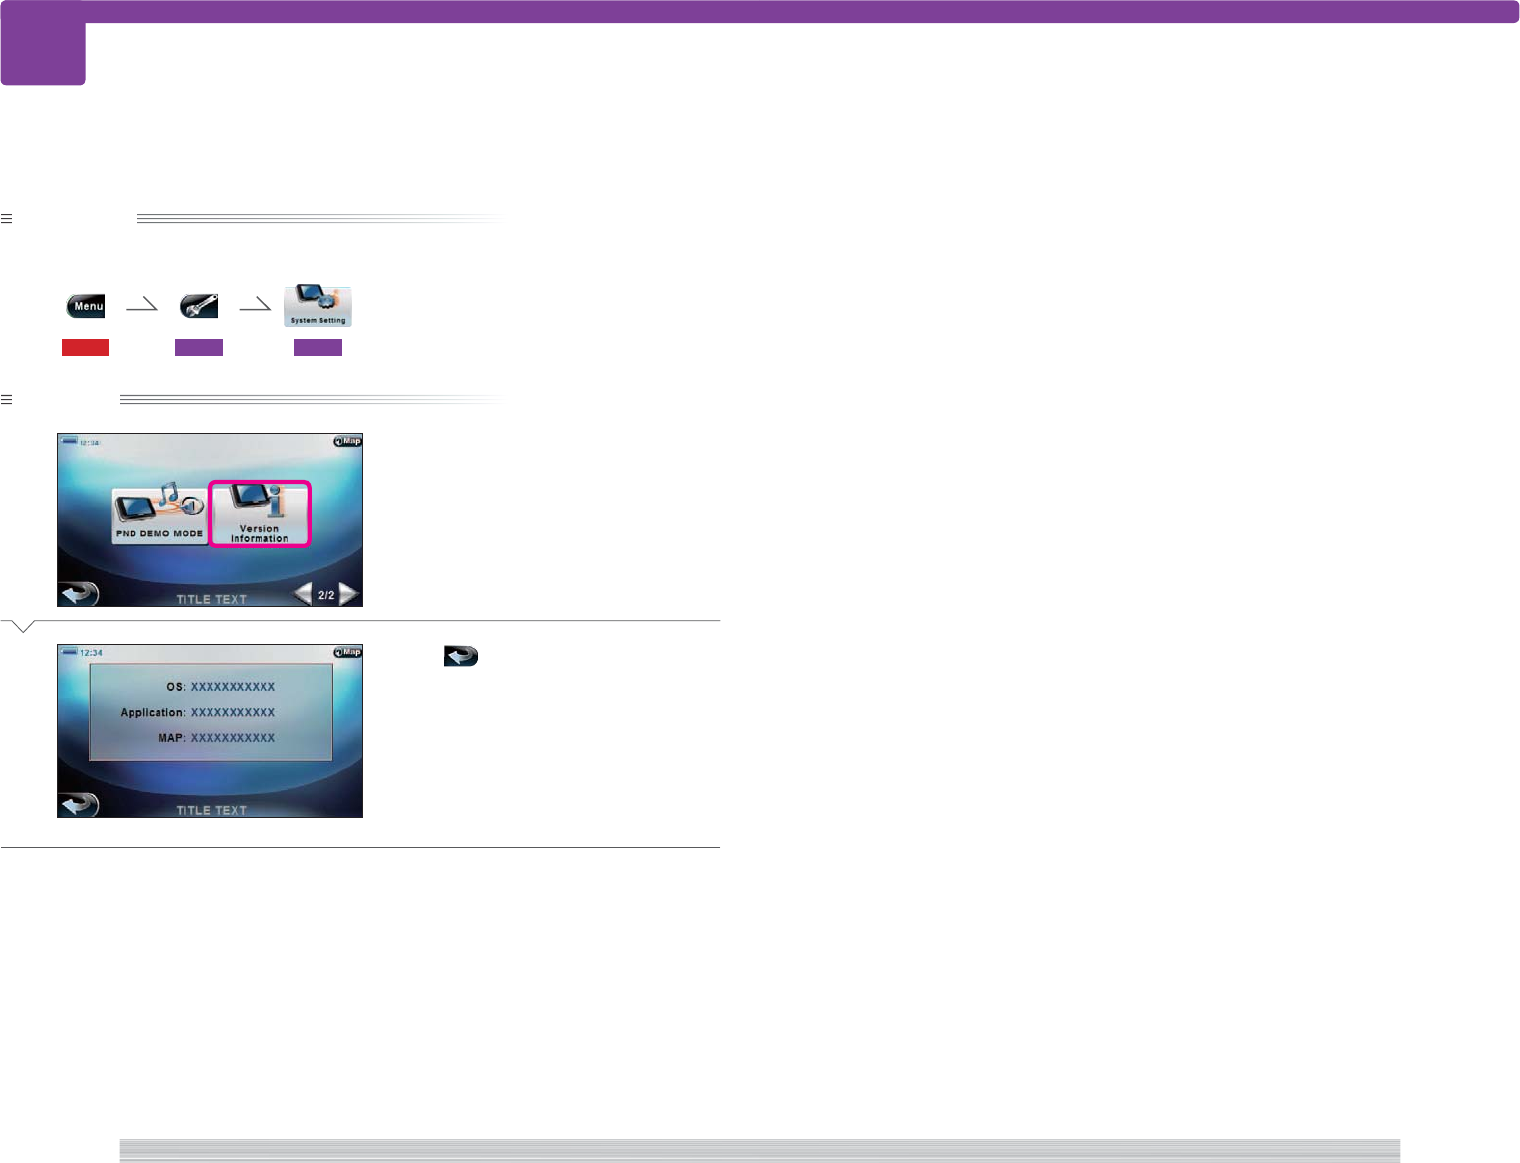
• Touch the screen to erase the TV control buttons.
<VT1000>
<AT1100>
Digital TV control screen (TV control buttons)
<AT1100>
2
3
6
1
4
5
7 8 9
Control digital TV
190
page A/V 191
page
A/V
425
425
Preparation
Have the digital TV control screen displayed (no need to tune to a channel).
423
Operation
1
Select [Scan].
A confirmation message is displayed.
2
Select [YES].
Channel scan starts.
When channel scan completes, the scan result
is displayed.
3
Select .
Select to return to the digital TV control
screen.
Complete
Scanning and presetting channels available at your area.
note
• This function is available only for PNX-7.
• Select the button of the channel displayed in
3
to start playing that channel.
• The digital TV control screen is displayed after scan completes the first time you change the source to digital
TV.
<AT1120>
<AT1152>
Scan and preset digital TV channels

192
page A/V 193
page
A/V
426
426
Preparation
Have the digital TV control screen displayed.
423
Operation
1
Select [P-LIST].
2
Select the button of the program to
view.
The selected program is received.
3
Select [Player].
The button disappears.
Complete
note
• This function is available only for PNX-7.
• The program list does not appear until channel scan is complete.
Tuning from the program list of current channels.
<AT1112>
<AT1120>
Tune digital TV from program list

194
page A/V 195
page
A/V
427
427
Preparation
Have the digital TV control screen displayed.
423
Operation
1
Select [PRESET CH].
2
Select the button of the channel to
view.
Tunes to the selected channel.
3
Select [Player].
The button disappears.
Complete
note
• This function is available only for PNX-7.
• The program list does not appear until channel scan is complete.
• If you selected [Release] in
3
, the selected channel is deleted from the preset list.
Tuning from preset list of channels.
<AT1120>
<AT1120>
Tune digital TV from preset list
196
page A/V 197
page
A/V
428
428
Preparation
Have the digital TV control screen displayed.
423
Operation
1
Select [SEEK].
2
Select the seek direction button.
The next channel is received.
3
Touch the screen.
The button disappears.
Complete
note
• This function is available only for PNX-7.
Tuning to the next channel.
<AT1140>
<AT1120>
Tune digital TV by channel seek
198
page A/V 199
page
A/V
429
429
Preparation
Have the digital TV control screen displayed.
423
Operation
1
Select [EPG].
2
Select the button of the program.
Use [ ] and [ ] to scroll the list.
The program detail screen appears.
Next Page
Tuning from the EPG (Electronic Program Guide).
3
Select .
Complete
note
• This function is available only for PNX-7.
• Select [Player] in
2
to return to the original program.
<AT1160>
<AT1120>
<AT1115>
View digital TV program guide
200
page A/V 201
page
A/V
430
430
Preparation
Have the program list screen or preset channel screen displayed.
426 427
Operation
1
Select [DIRECT CH].
2
Select a channel with the ten keys.
3
Select [Enter].
The specified channel is received and the but-
ton disappear.
Complete
note
• This function is available only for PNX-7.
Tuning by specifying a channel no.
<AT1112>
<AT1112>
Tune digital TV by channel number

202
page A/V 203
page
A/V
431
413
Preparation
Have the digital TV control screen, program list screen, or preset channel screen displayed.
423 426 427
Operation
1
Select [TeleText].
Text information is displayed.
Complete
note
• This function is available only for PNX-7.
• Touch the screen while text information is displayed to make it half transparent. Touch the screen once more
to return to the TV screen.
Displaying text information.
<AT1150>
<AT1120>
Display digital TV text information
204
page Tools
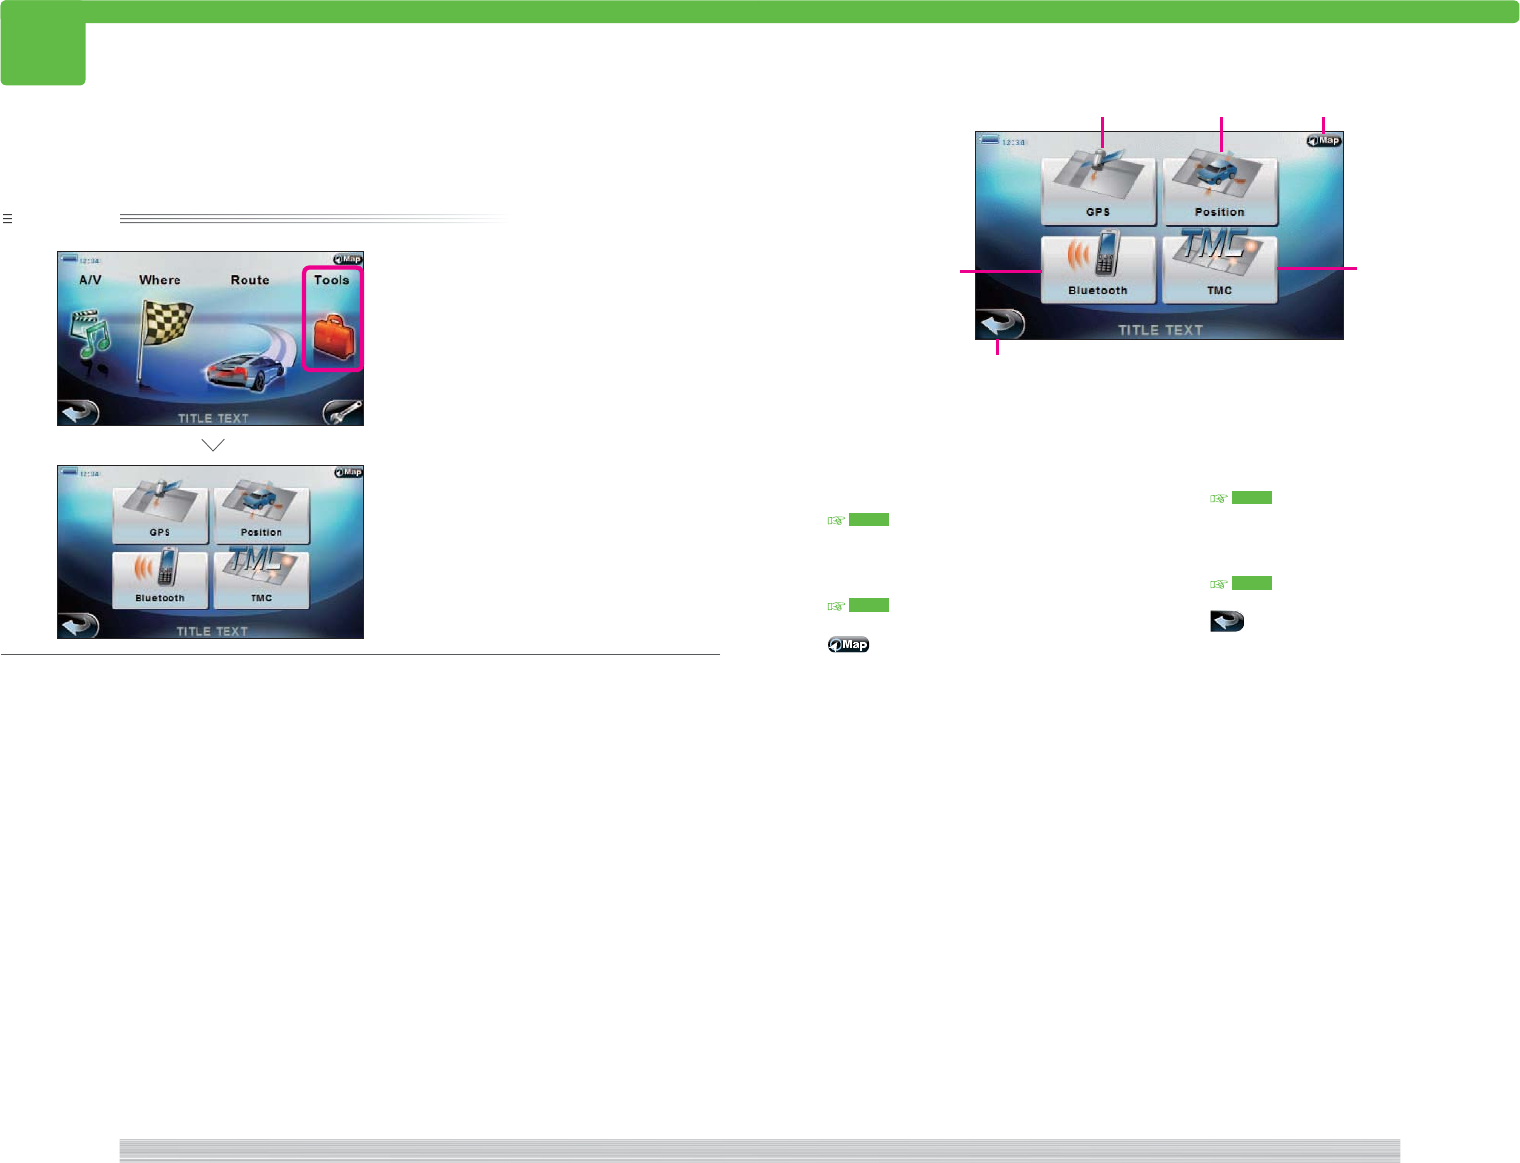
501
205
page
Tools
Display Tools menu
501
Operation
1
Select [Tools].
The Tools menu appears.
Complete
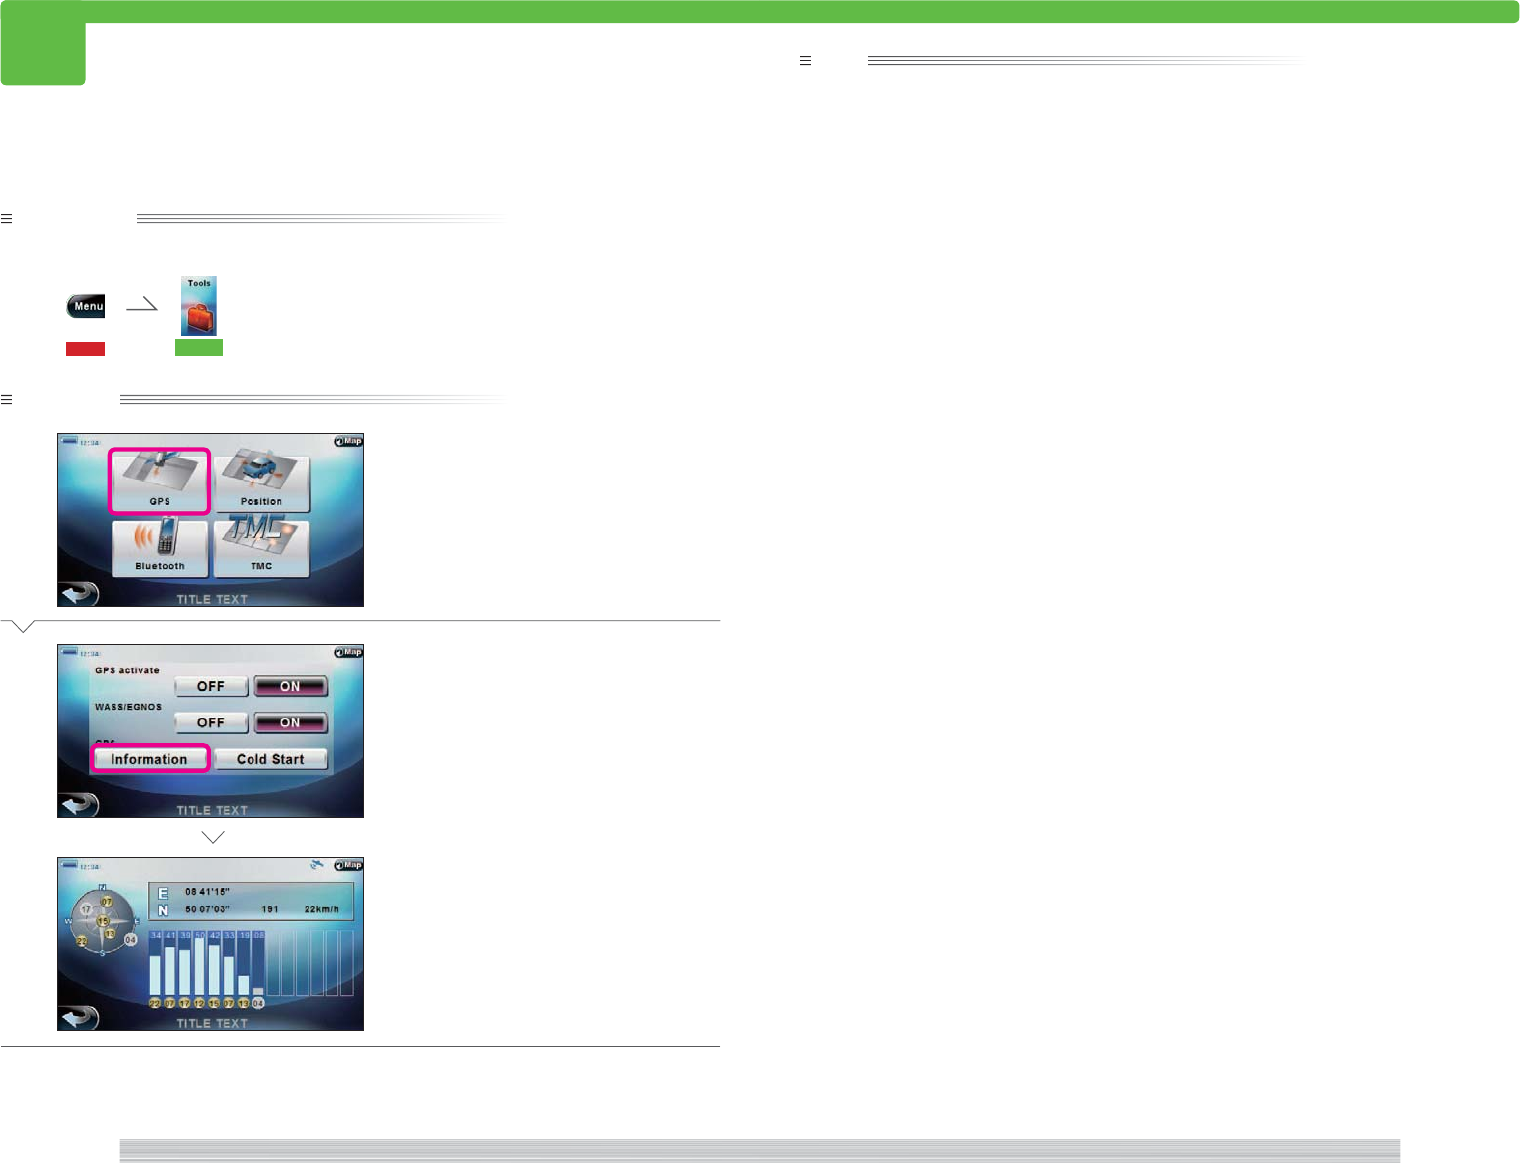
Displaying the Tools menu from the Top menu to set such an option as Bluetooth.
1 [GPS]
Select to display the current position of the
GPS satellites and reception information.
503
2 [Position]
Select to display/reset drive information.
505
3
Select to return to the current map screen.
4 [TMC]
elect to display the TMC information.
506
5 [Bluetooth]
Select to set Bluetooth related settings.
509
6
Select to return to the Top menu.
<T00000>
<TOP0000>
<T00000>
Tools menu
1 2 3
4
6
5

206
page Tools 207
page
Tools
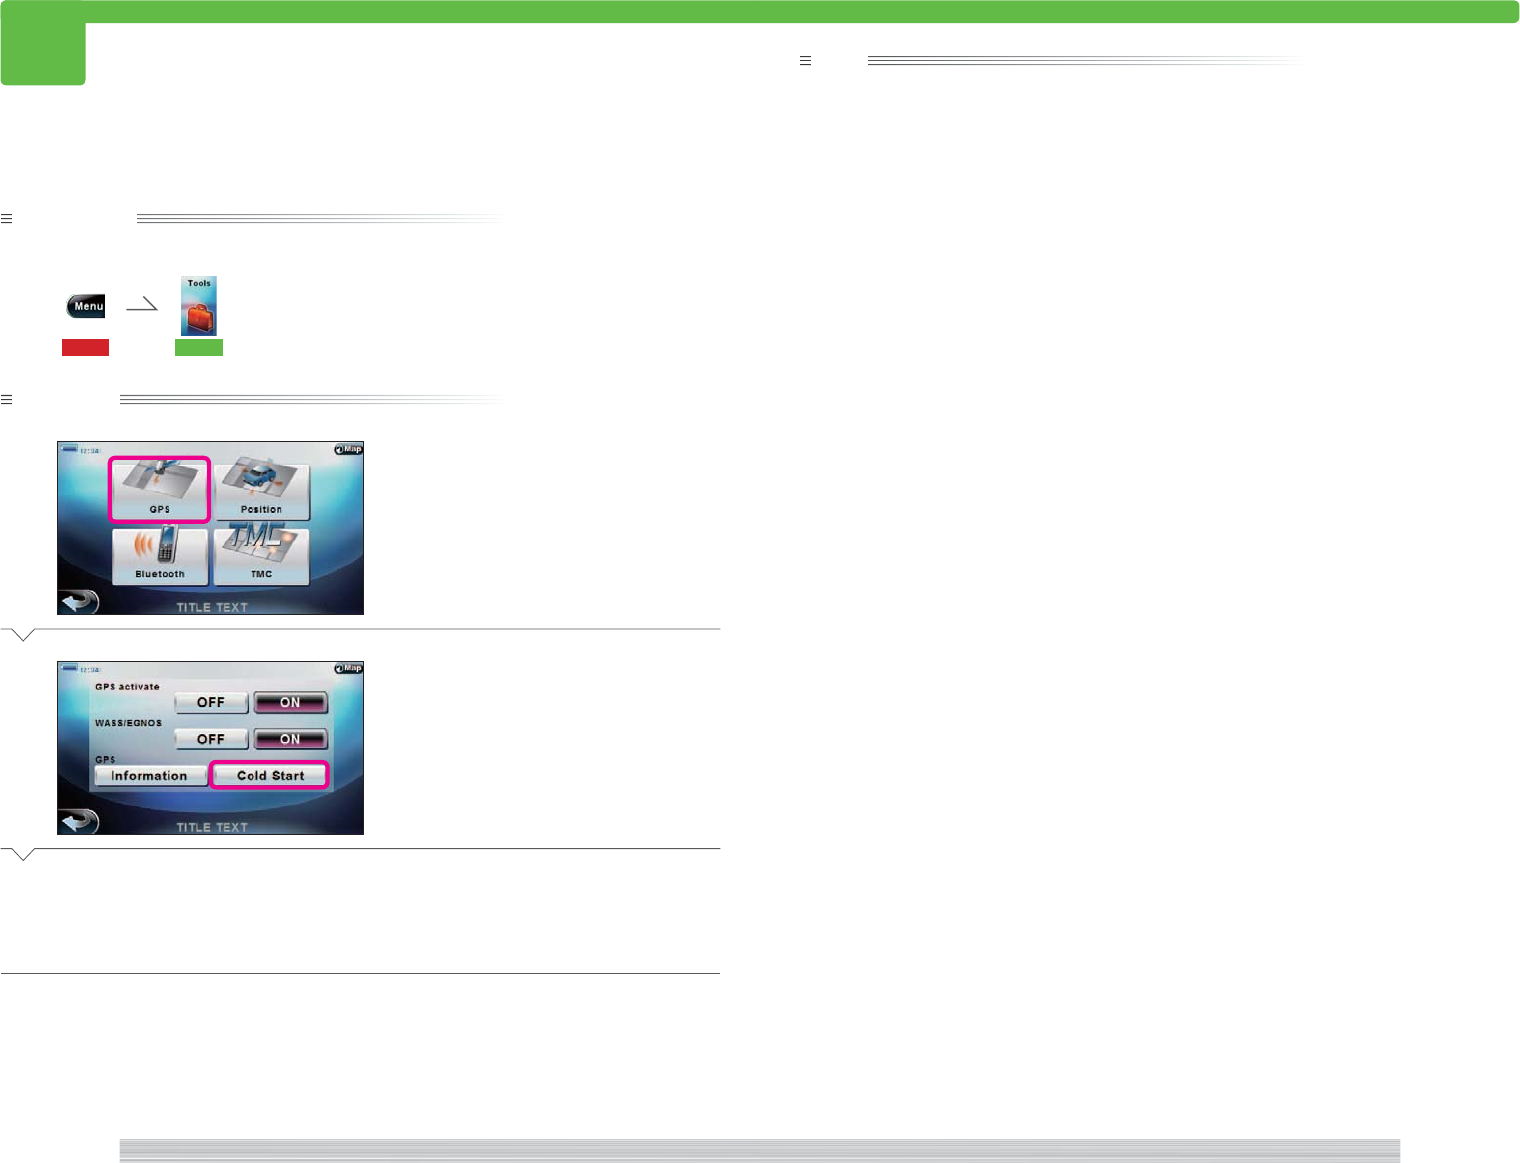
502 Set GPS
502
Preparation
Have the Tools menu displayed.
115 501
Operation
1
Select [GPS].
2
Select [ON] or [OFF] for “GPS Activate”
and “WASS/EGNOS”.
Complete
note
• When you turn GPS Activation OFF, you will not receive signals from GPS satellites and positioning will be
stopped. This will reduce consumption of built-in battery.
• WASS (North America) and EGNOS (Europe) are systems to increase positioning precision using stationary
satellites. If turn this option OFF, this system is not used.
• Select [Information] in
2
to display GPS satellite information. 503
• Select [Cold Start] in
2
to reset GPS satellite reception information. 504
Displaying information such as current position of GPS satellites.
<TG1000>
<T00000>
208
page Tools 209
page
Tools
503 View GPS satellite information
503
Preparation
Have the Tools menu displayed.
115 501
Operation
1
Select [GPS].
2
Select [Information] of “GPS”.
A GPS satellite layout diagram and strength of
signal from each satellite are displayed.
Complete
Displaying information such as current position of GPS satellites.
note
• Three-dimensional positioning is performed if radio signals are received from four or more GPS satellites.
Two-dimensional positioning is performed and positioning precision is slightly reduced if radio signals are
received from three GPS satellites. Positioning cannot be performed if radio signals are received from only
two or less GPS satellites.
<TG1000>
<TG1120>
<T00000>
210
page Tools 211
page
Tools
504 Reset reception
504
Preparation
Have the Tools menu displayed.
115 501
Operation
1
Select [GPS].
2
Select [Cold Start] of “GPS”.
A confirmation message is displayed.
3
Select [YES].
The GPS satellite information is reset and you
are returned to the screen in
2
.
Complete
Resetting GPS satellite information.
note
• If you drive for a long distance with the power of PND turned off, it may take a while to locate the current
position when you turn the power back on.
In such case, it may be faster to reset the GPS information as described above. There is no need to reset the
GPS information in any other case.
<TG1000>
<T00000>

212
page Tools 213
page
Tools
505 Display travel information
505
Preparation
Have the Tools menu displayed.
115 501
Operation
1
Select [Position].
Travel information is displayed.
Complete
note
• If you select [Reset Max. Values], the Max. Speed and Max. Altitude are reset.
If you select [Reset Max. Distance], Total Distance Traveled and Total Time are reset.
Displaying travel information.
<TP1000>
<T00000>
214
page Tools 215
page
Tools
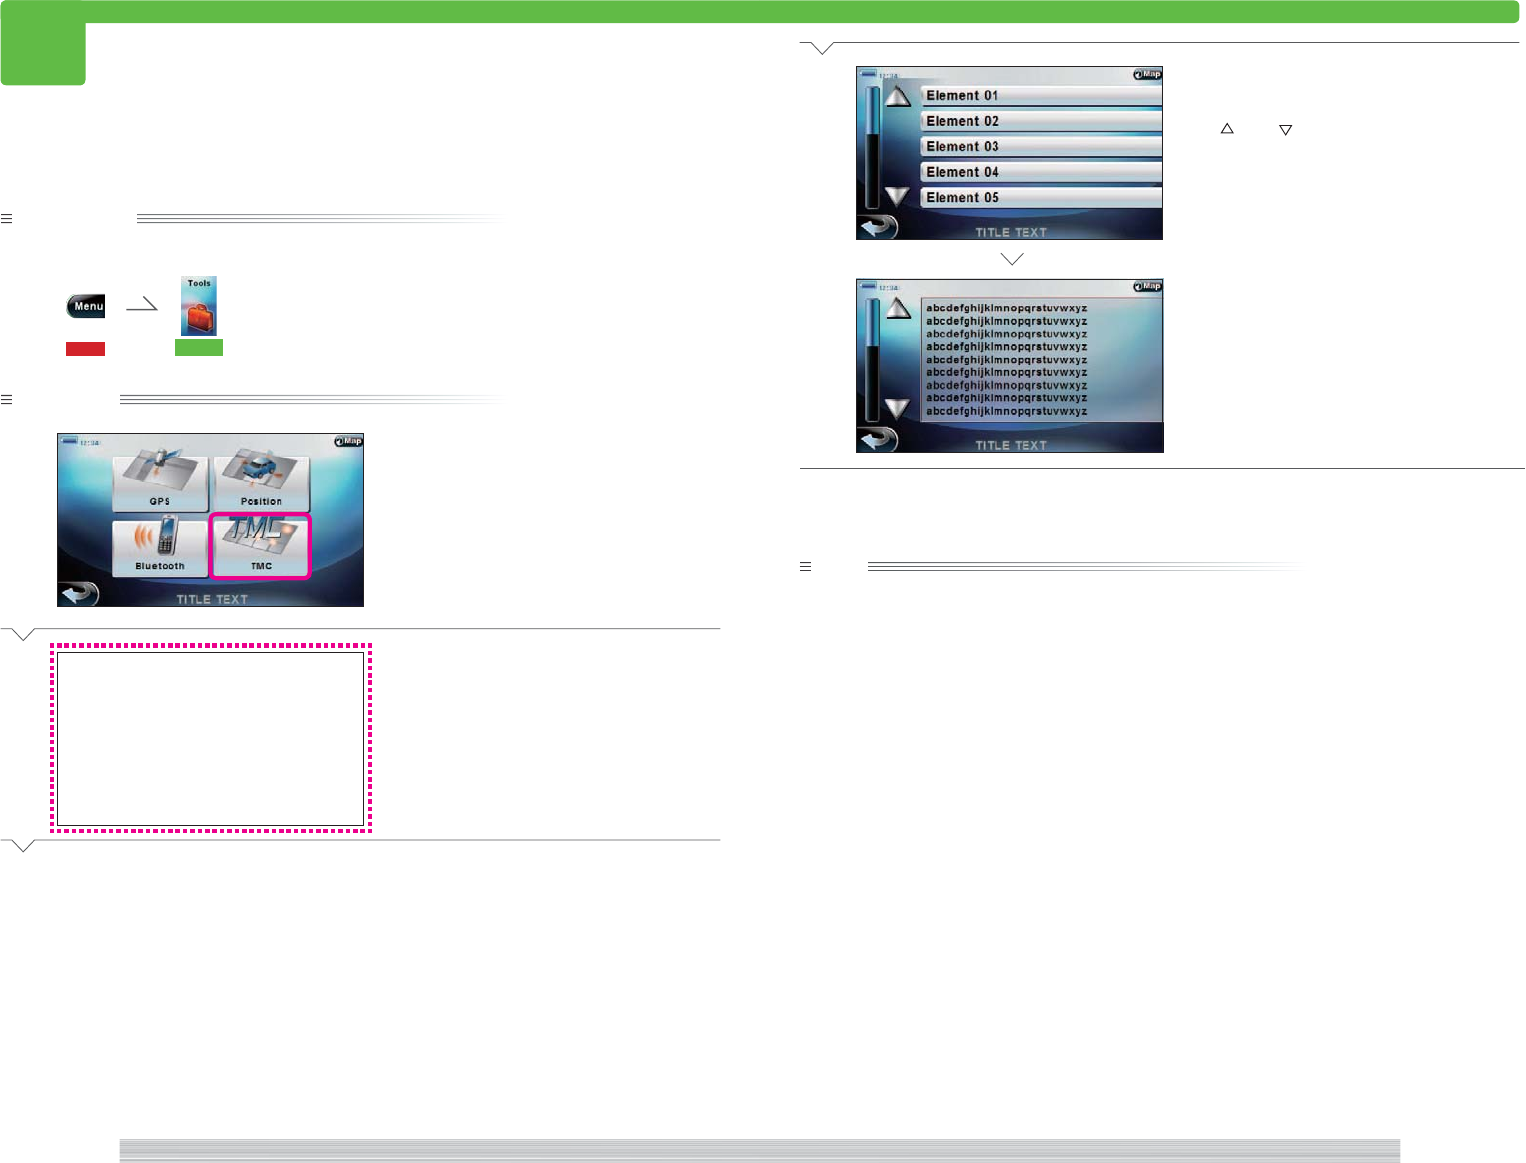
506 Display TMC information
506
Preparation
Have the Tools menu displayed.
115 501
Operation
1
Select [TMC].
2
Select [TMC List].
Next Page
Displaying TMC information.
3
Select the button of the information
to display.
Use [ ] and [ ] to scroll the list.
The selected TMC information is displayed.
Complete
note
• No TMC information can be displayed if none is recevied.
<TT0000>
<TT1000>
<TT1120>
216
page Tools 217
page
Tools
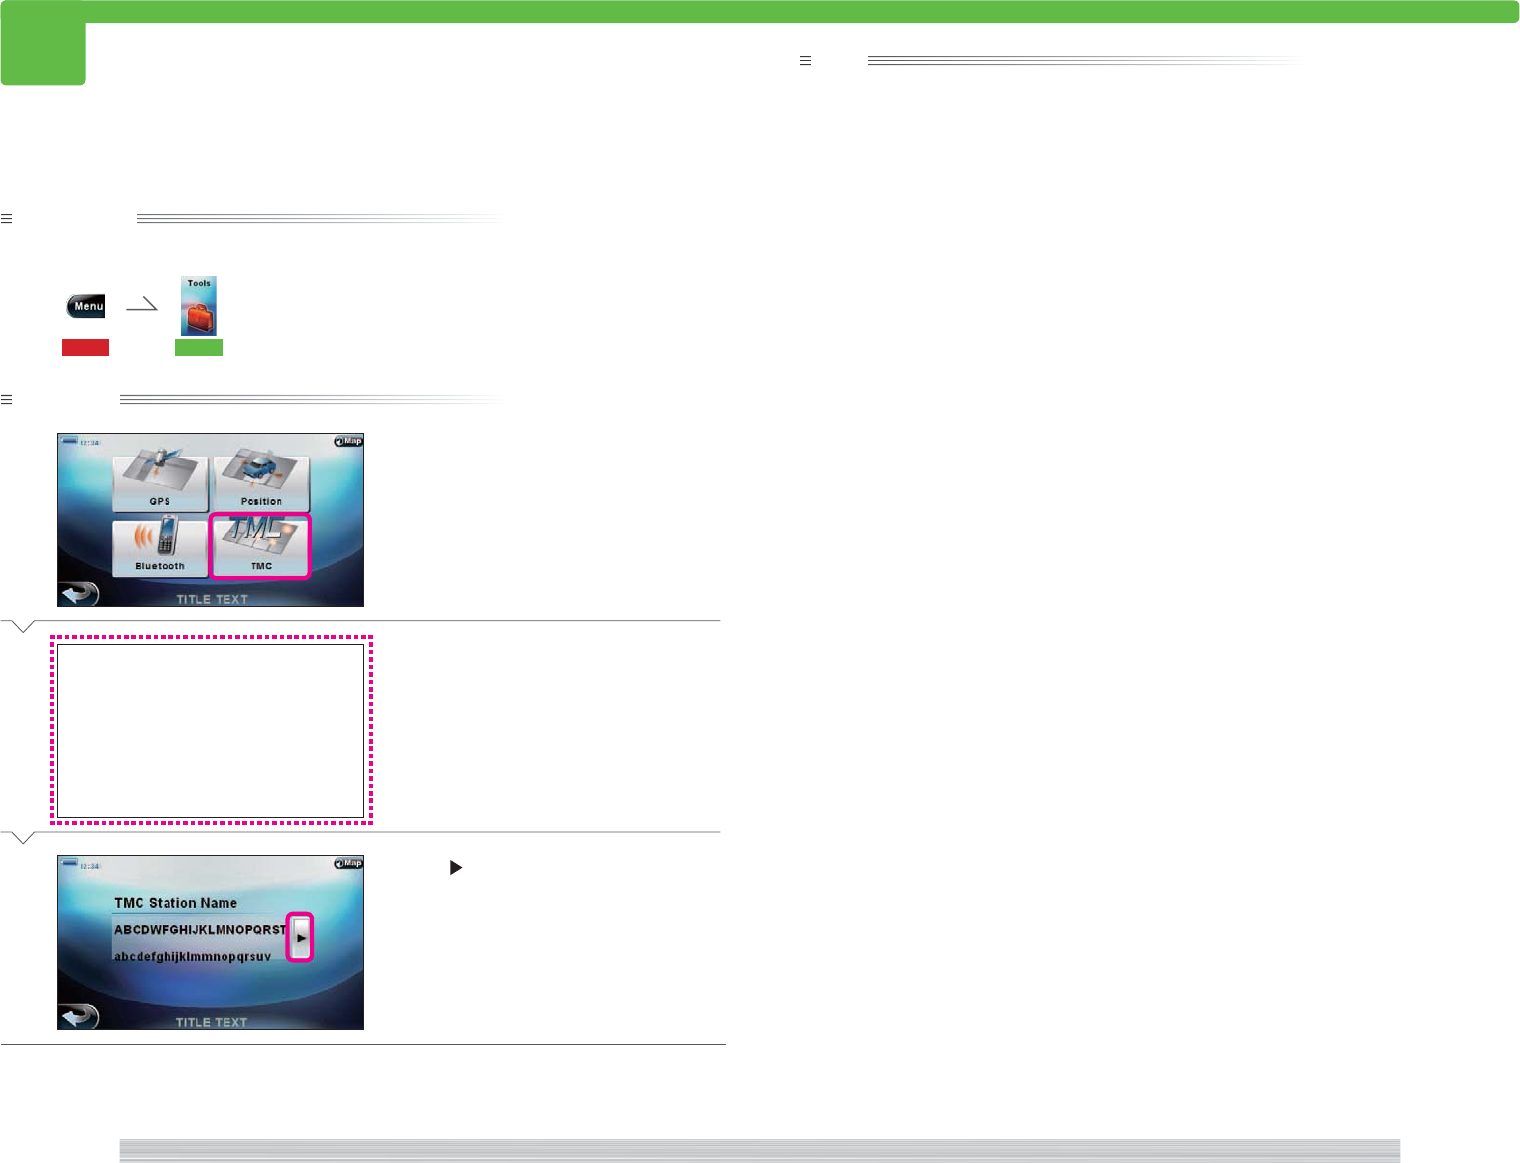
507 Select TMC Station to receive
507
Preparation
Have the Tools menu displayed.
115 501
Operation
1
Select [TMC].
2
Select [Select TMC Station].
3
Select [ ] until the TMC Station to
receive is displayed.
Complete
Selecting the TMC Station to receive.
note
• No TMC information can be displayed if none is recevied.
<TT0000>
<T00000>
<TT2000>

218
page Tools 219
page
Tools
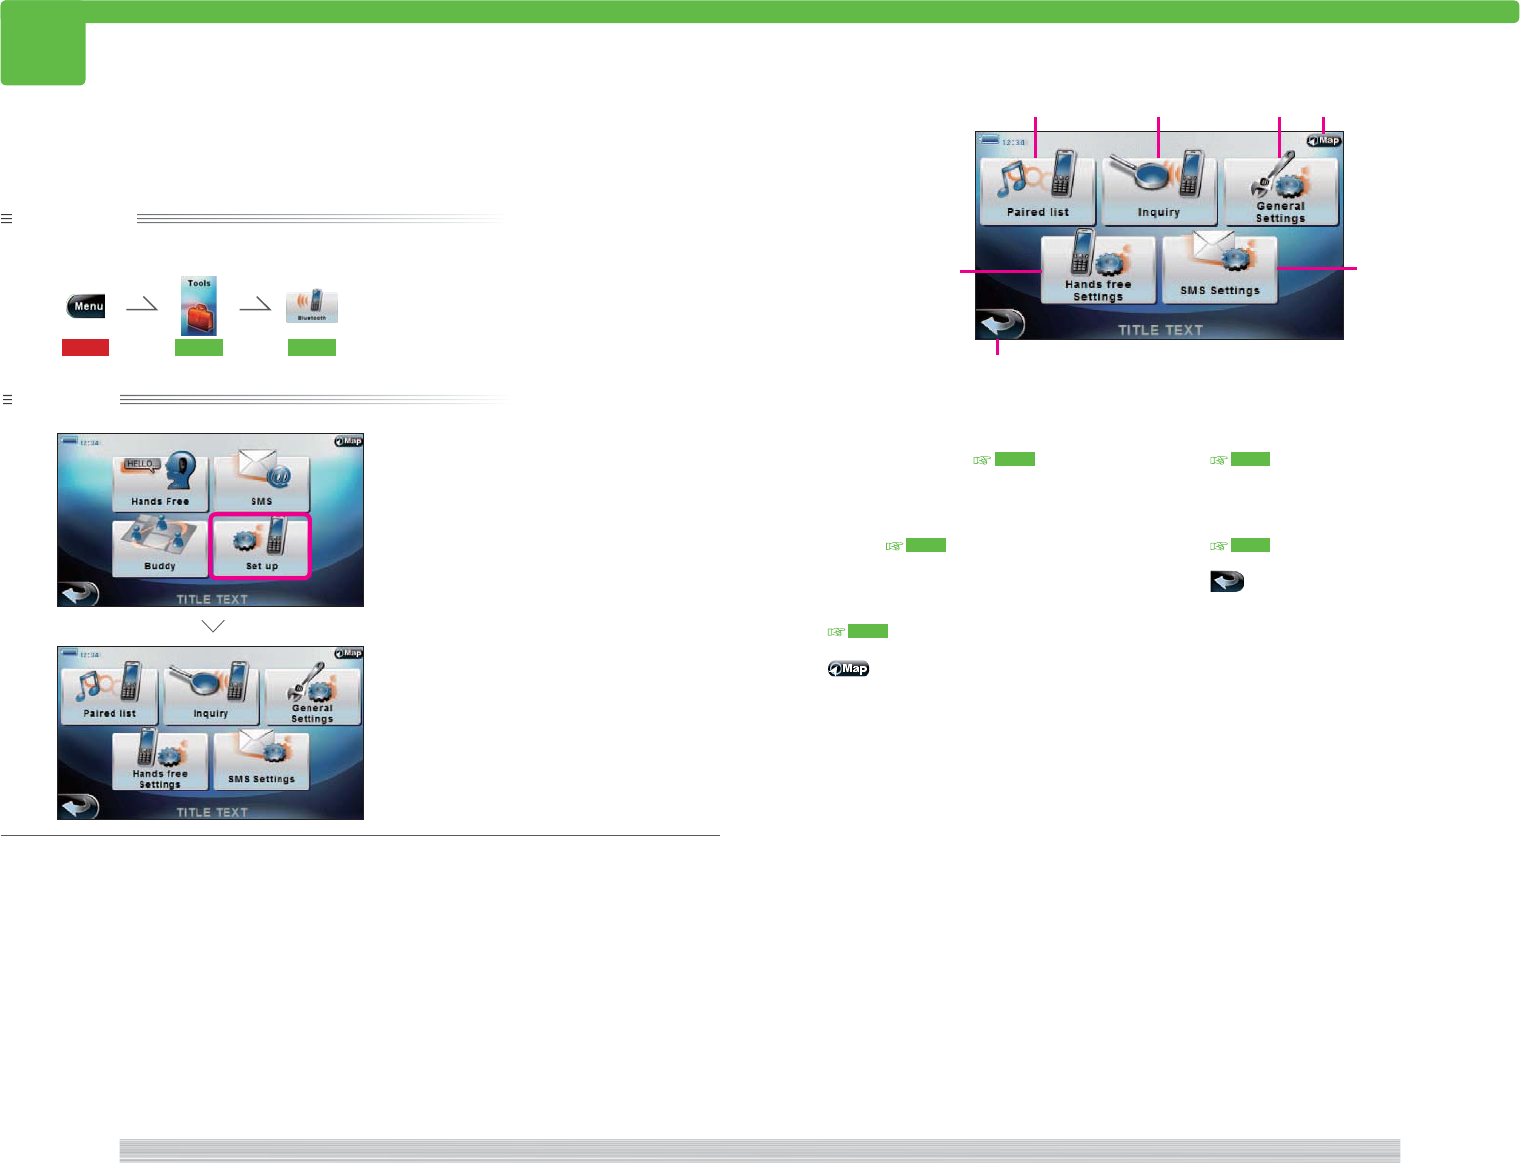
508 Display Bluetooth menu
508
Preparation
Have the Tools menu displayed.
115 501
Operation
1
Select [Bluetooth].
The Bluetooth menu appears.
Complete
Displaying the Bluetooth menu from the Tools menu to set Bluetooth options and operation.
1 [Hands Free]
Select to make a phone call.
518 521
2 [SMS]
Select to send and receive short message
(SMS). 522 526
3
Select to return to the current map screen.
4 [Set up]
Select to display Bluetooth Setup Menu to
set Bluetooth settings. 509
5 [Buddy]
Select to send and receive position
information. 527 529
6
Returns you to the Tools menu.
Bluetooth menu
<TB1000>
<T00000>
<TB1000>
123
4
6
5
220
page Tools 221
page
Tools
509 Display Bluetooth setup menu
509
Preparation
Have the Bluetooth menu displayed.
115 501 508
Operation
1
Select [Set up].
The Bluetooth setup menu appears.
Complete
Displaying the Bluetooth setup menu to set Bluetooth options from the Bluetooth menu.
1 [Paired list]
Select to display the Bluetooth device
connection history. 517
2 [Inquiry]
Select to connect with nearby Bluetooth
device. 516
3 [General Settings]
Select to set general Bluetooth settings.
510
4
Select to return to the current map screen.
5 [SMS Settings]
Select to set SMS (Short Message Service).
513
6 [Hands free Settings]
Select to set the hands free unit options.
514
7
Returns you to the Tools menu.
<TB1000>
Bluetooth setup menu
<TB1400>
<TB1400>
1234
5
7
6
222
page Tools 223
page
Tools
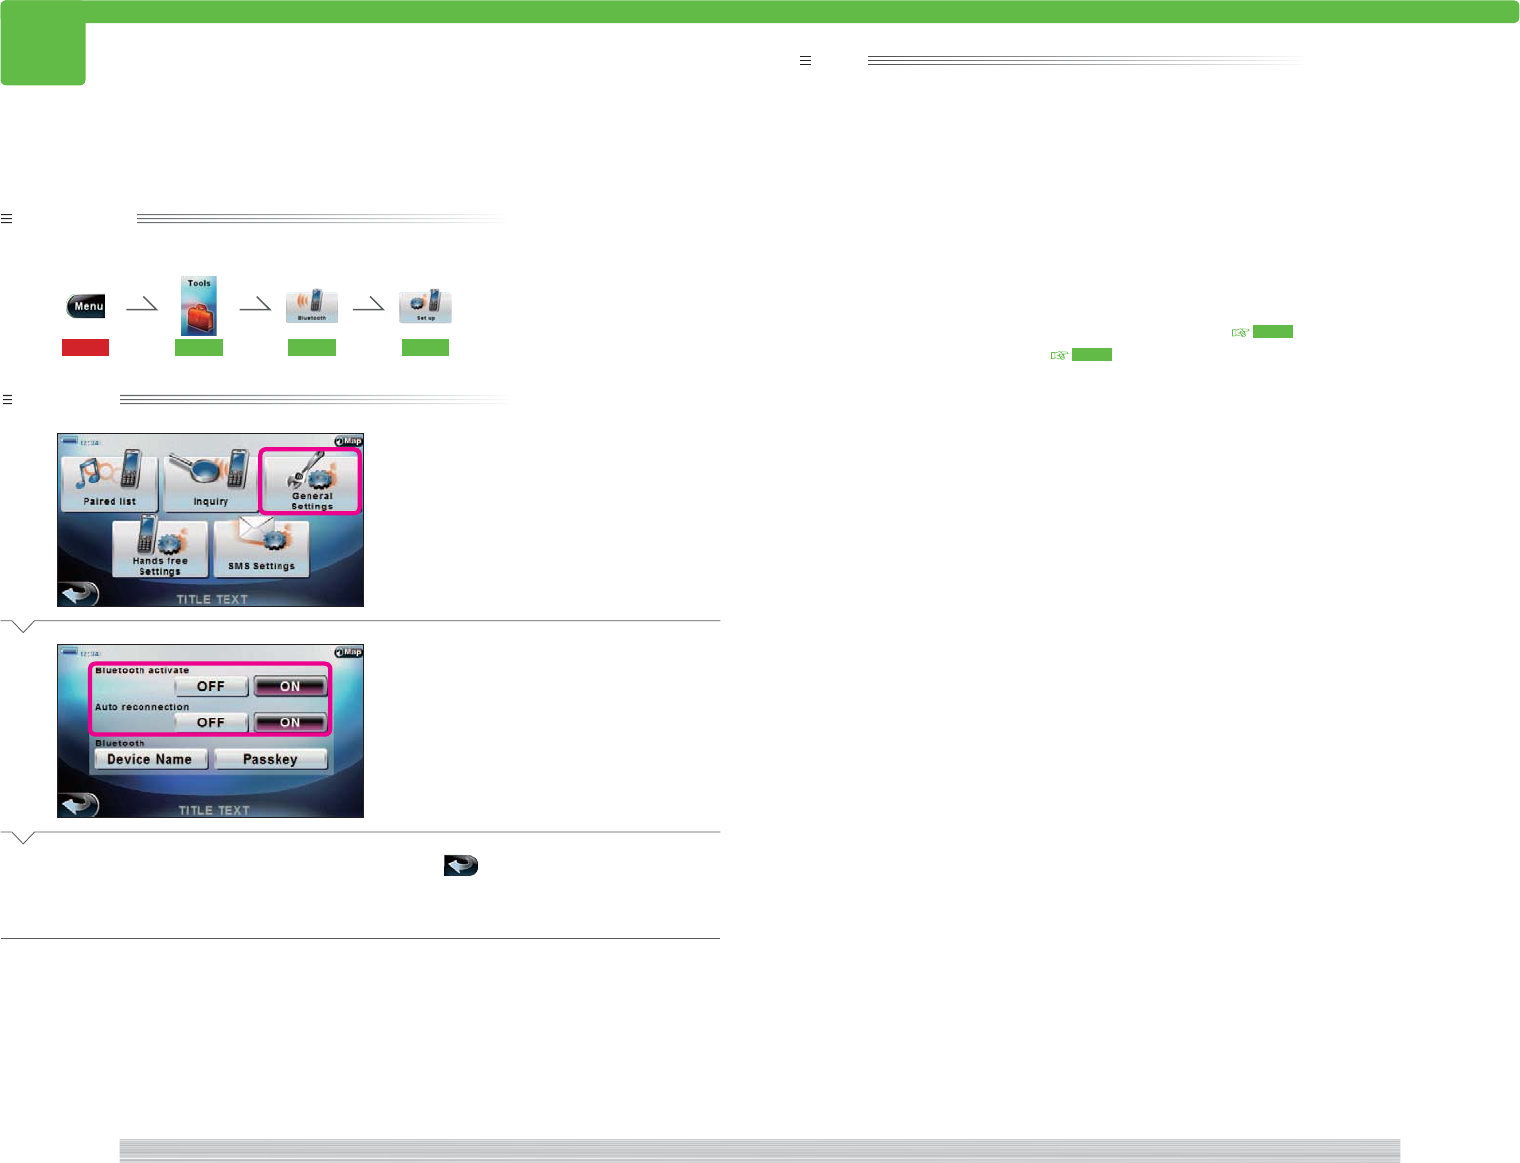
510 Set general Bluetooth settings
510
Preparation
Have the Tools menu displayed.
115 501 508 509
Operation
1
Select [General Settings].
2
Select [ON] or [OFF] for “Bluetooth
activation” and “Auto reconnection”.
3
Select .
Returns you to the Bluetooth setup menu.
Complete
Activating Bluetooth and other Bluetooth setup.
note
• Set Bluetooth activation ON when using a Bluetooth device. Bluetooth function is disabled when it is OFF.
• When Bluetooth reconnection is turned on, Bluetooth devices are automatically reconnected when the this
unit is turned on. Bluetooth devices are not reconnected automatically when it is OFF.
• Bluetooth devices are not automatically reconnected in the following cases even when Bluetooth
reconnection is on.
– Connection with Bluetooth device is intentionally disconnected
– Power of Bluetooth device is off
– Information of Bluetooth device is not in the pair list
– Bluetooth Activation is off
– No external power is supplied to the this unit
In addition, some Bluetooth devices must be in standby mode to reconnect.
• Select [Devica Name] in
2
to assign a name to Bluetooth device. 511
• Select [Passkey] in
2
to set pass key. 512
<TB1430>
<TB1400>
224
page Tools 225
page
Tools
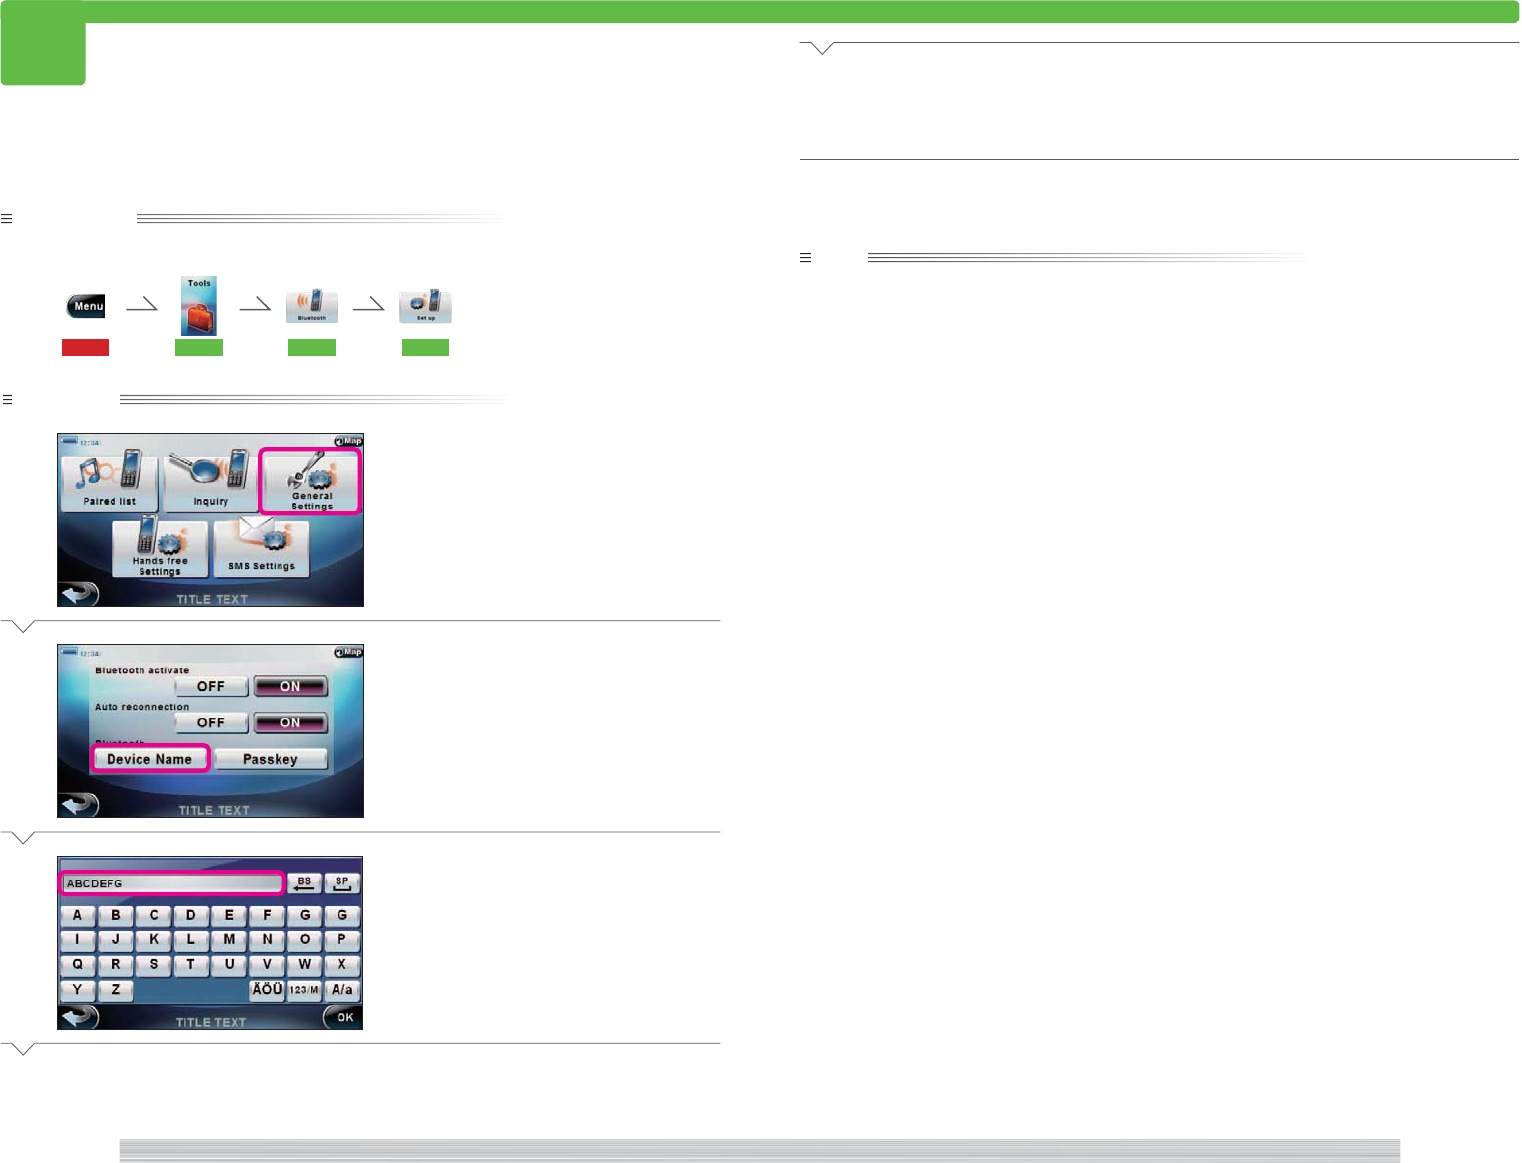
511 Naming Bluetooth device
511
Preparation
Have the Tools menu displayed.
115 501 508 509
Operation
1
Select [General Settings].
2
Select [Device Name] of “Bluetooth”.
3
Enter the name.
Next Page
Naming Bluetooth device.
4
Select [OK].
Returns you to the Bluetooth setup menu.
Complete
note
• Select [ÄÖÜ] in
3
to enter characters with umlaut, [123/M] to enter alphanumeric characters, and [A/a] to
switch case.
• Select [BS] in
3
to delete the last entered character. Select [SP] to enter a space.
<TB1430>
<TB1432a>
<TB1400>
226
page Tools 227
page
Tools
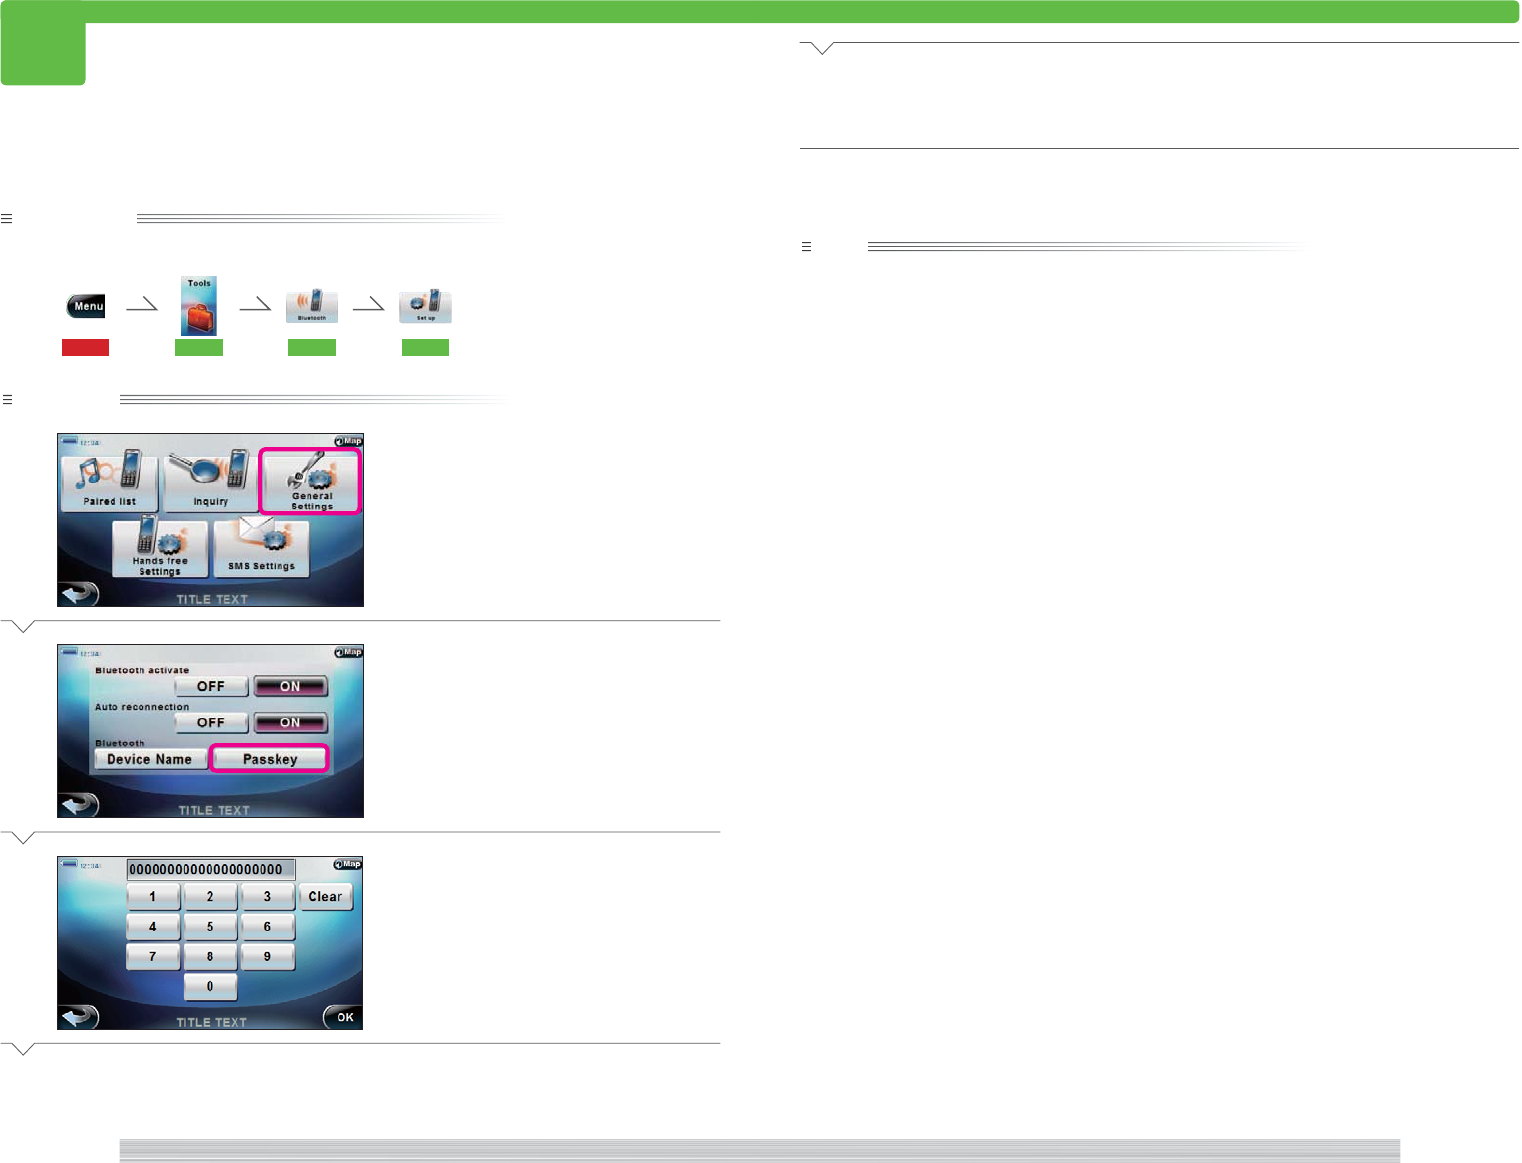
512 Set passkey to Bluetooth device
512
Preparation
Have the Tools menu displayed.
115 501 508 509
Operation
1
Select [General Settings].
2
Select [Passkey] of “Bluetooth”.
3
Enter the passkey.
Next Page
Setting passkey to Bluetooth device.
Bluetooth device cannot be connected without passkey if passkey is set.
4
Select [OK].
Complete
note
• Passkey can contain up to 16 characters.
• Select [Clear] in
3
to clear all entered characters.
<TB1430>
<TB1433>
<TB1400>

228
page Tools 229
page
Tools
513 Set SMS
513
Setting the SMS incoming mode and incoming call tone volume.
Preparation
Have the Tools menu displayed.
115 501 508 509
Operation
1
Select [SMS Settings].
2
Select [+] or [–].
The incoming tone is sounded at the set
volume each time you select.
3
Select [Auto] or [Manual].
Complete
note
• If you select [Auto] in
3
, all messages are downloaded the first time you connect and new messages are
downloaded thereafter as they are received.
If you select [Manual], no automatic download is performed.
<TB1400>
<TB1450_1>
<TB1450_2>
230
page Tools 231
page
Tools
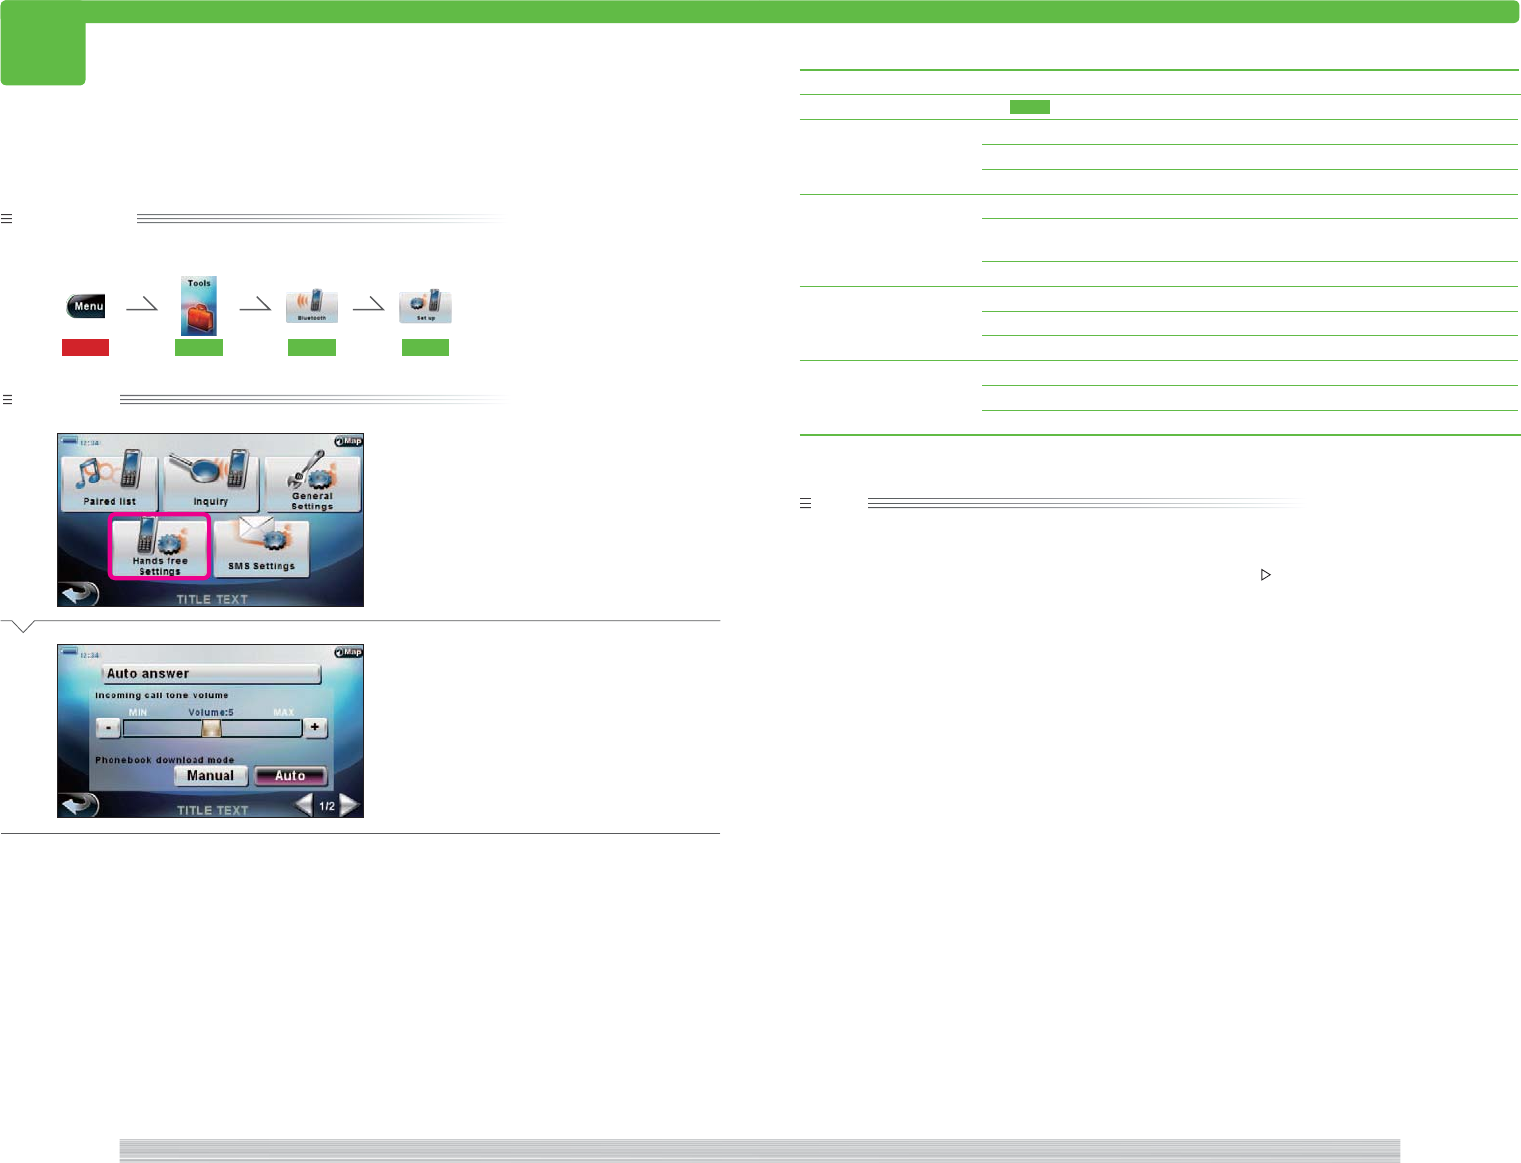
514 Set hands free
514
Setting the hands free unit options.
Preparation
Have the Tools menu displayed.
115 501 508 509
Operation
1
Select [Hands free Settings].
2
Set each item.
Complete
The following items can be set:
Item Description
Auto Answer See 515 .
Incoming call tone volume Adjusts the incoming call tone volume.
[+] Increases the volume.
[–] Decreases the volume.
Phonebook down load mode Sets the cell phone phonebook download mode.
[Auto] Downloads the phonebook the first time you connect and downloads the
difference thereafter.
[Manual] Does not download automatically.
Noise reduction Sets the noise reduction function.
[ON] Enables the function.
[OFF] Disables the function.
Echo cancellaion Sets the echo cancellation function.
[ON] Enables the function.
[OFF] Disables the function.
note
• On some cell phones, you cannot download the phonebook automatically even when you turn on the
Phonebook download mode.
• “Noise reduction” and “Echo canncellation” are on screen 2/2. Select [ ] to display.
<TB1400>
<TB1440a>
232
page Tools 233
page
Tools
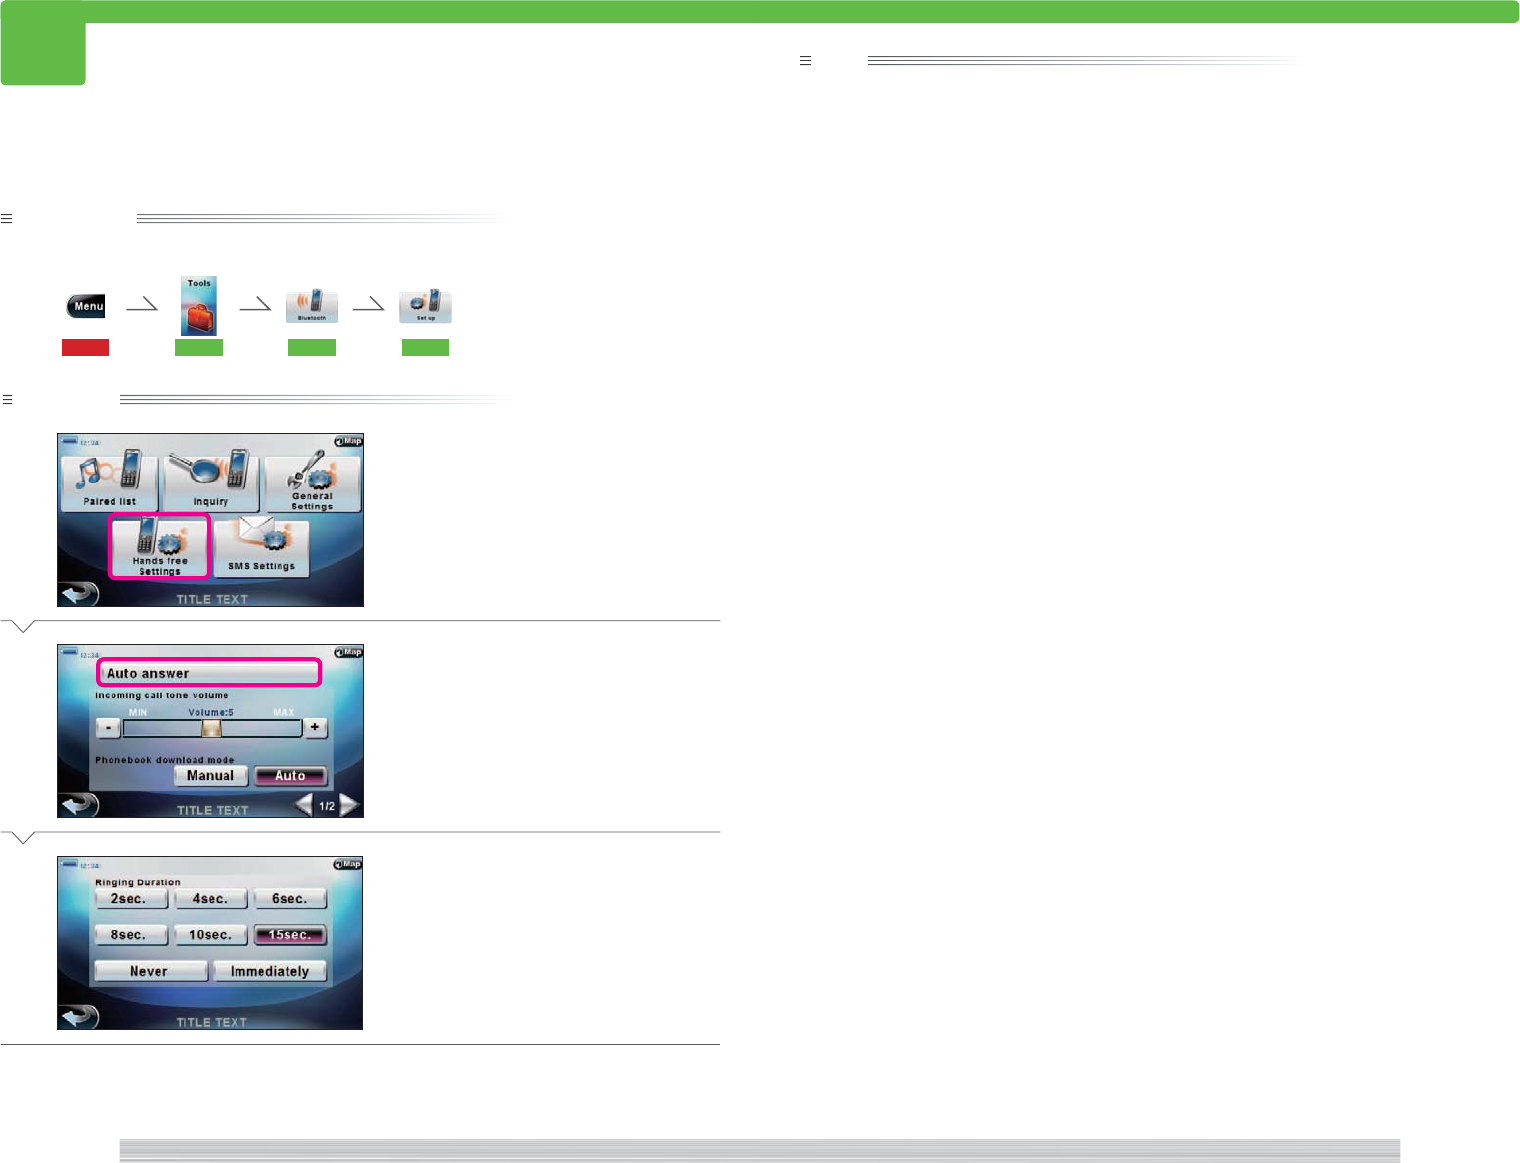
515 Set auto answer
515
Setting the duration before sending auto answer message for an incoming call
Preparation
Have the Tools menu displayed.
115 501 508 509
Operation
1
Select [Hands free Settings].
2
Select [Auto answer].
3
Select the button of the action to
perform.
Complete
note
• Select [Never] in
3
to disable auto answer.
• Select [Immediately] in
3
to send the auto answer message as soon as there is an incoming call.
<TB1440a>
<TB1445>
<TB1400>
234
page Tools 235
page
Tools
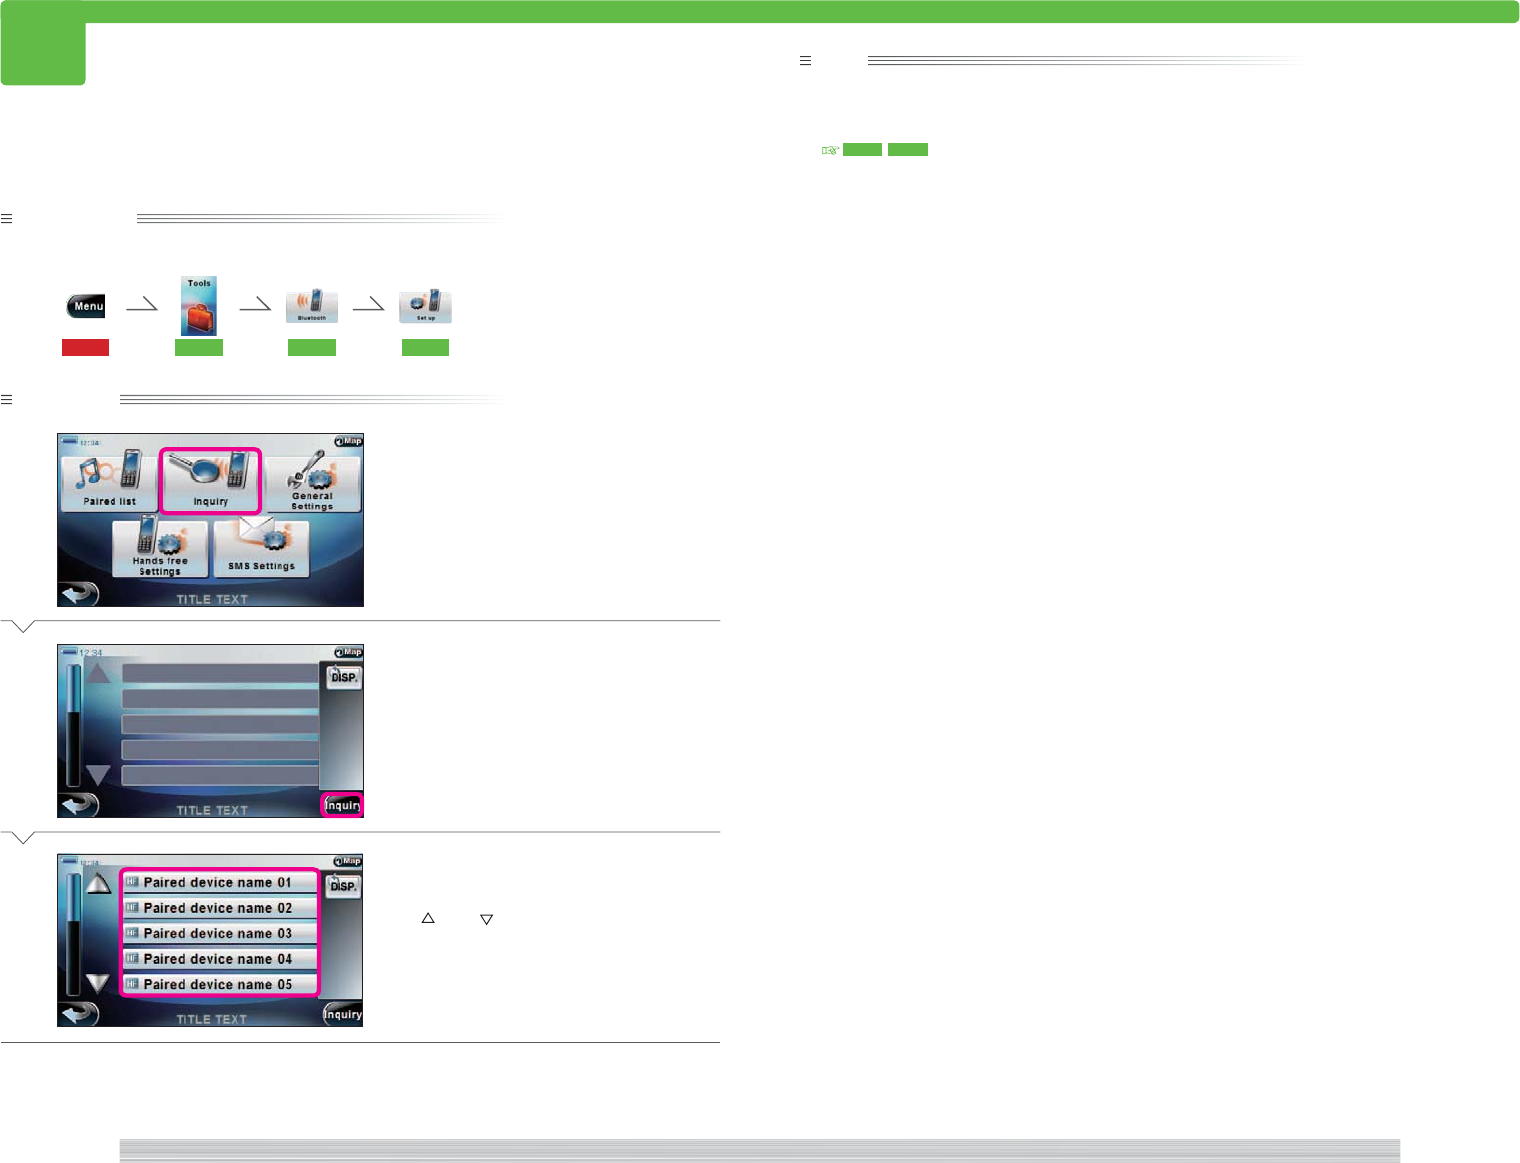
516 Set inquiry mode
516
Preparation
Have the Tools menu displayed.
115 501 508 509
Operation
1
Select [Inquiry].
2
Select [Inquiry].
Available Bluetooth devices are searched and
a list of found devices is displayed.
3
Select the button of the Bluetooth
device to connect.
Use [ ] and [ ] to scroll the list.
If there are multiple pages, select [DISP] to
change the page.
Complete
Search nearby Bluetooth device and connect.
note
• In
3
, [HF] is displayed for Bluetooth devices that support profile HFS, HSP, or PBAP and [Audio] is displayed for
devices that support profile A2DP or AVRCP.
• If the connected Bluetooth device is a cell phone, the phonebook and messages are downloaded.
513 , 514
<TB1420>
<TB1400>
<TB1420_0>
236
page Tools 237
page
Tools
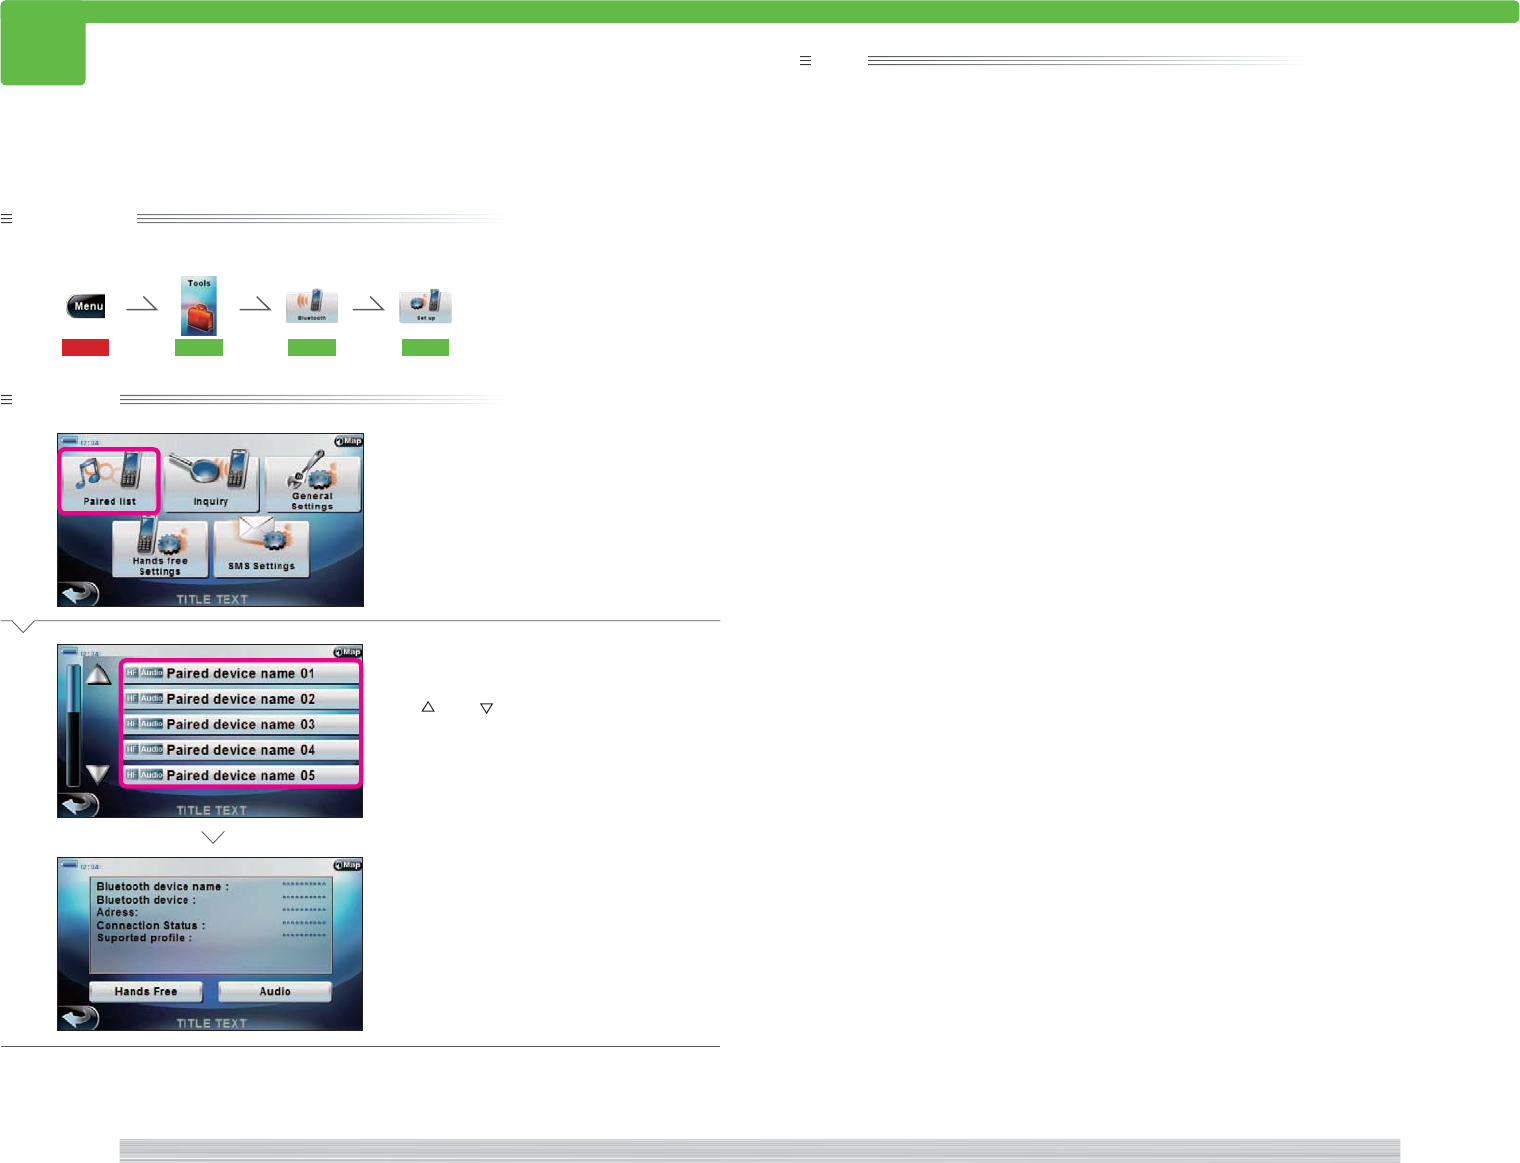
517 Display connection history
517
Preparation
Have the Tools menu displayed.
115 501 508 509
Operation
1
Select [Paired lsist].
Display a list of Bluetooth devices starting
from the one with latest connection history.
2
Select the button of the Bluetooth
device to display the information.
Use [ ] and [ ] to scroll the list.
The device information screen appears and
detailed device information is displayed.
Complete
Display the Bluetooth device connection history. Also display Bluetooth device information.
note
• In
2
, [HF] is displayed for Bluetooth devices that support profile HFS, HSP, or PBAP and [Audio] is displayed for
devices that support profile A2DP or AVRCP.
• On the Device information screen in
2
, you can select [Hands free] or [Audio] to connect.
However, if a passkey is set for the selected Bluetooth device, the passkey input screen appears. Enter the
correct passkey and select [OK] to connect.
<TB1411>
<TB1410>
<TB1400>
238
page Tools 239
page
Tools
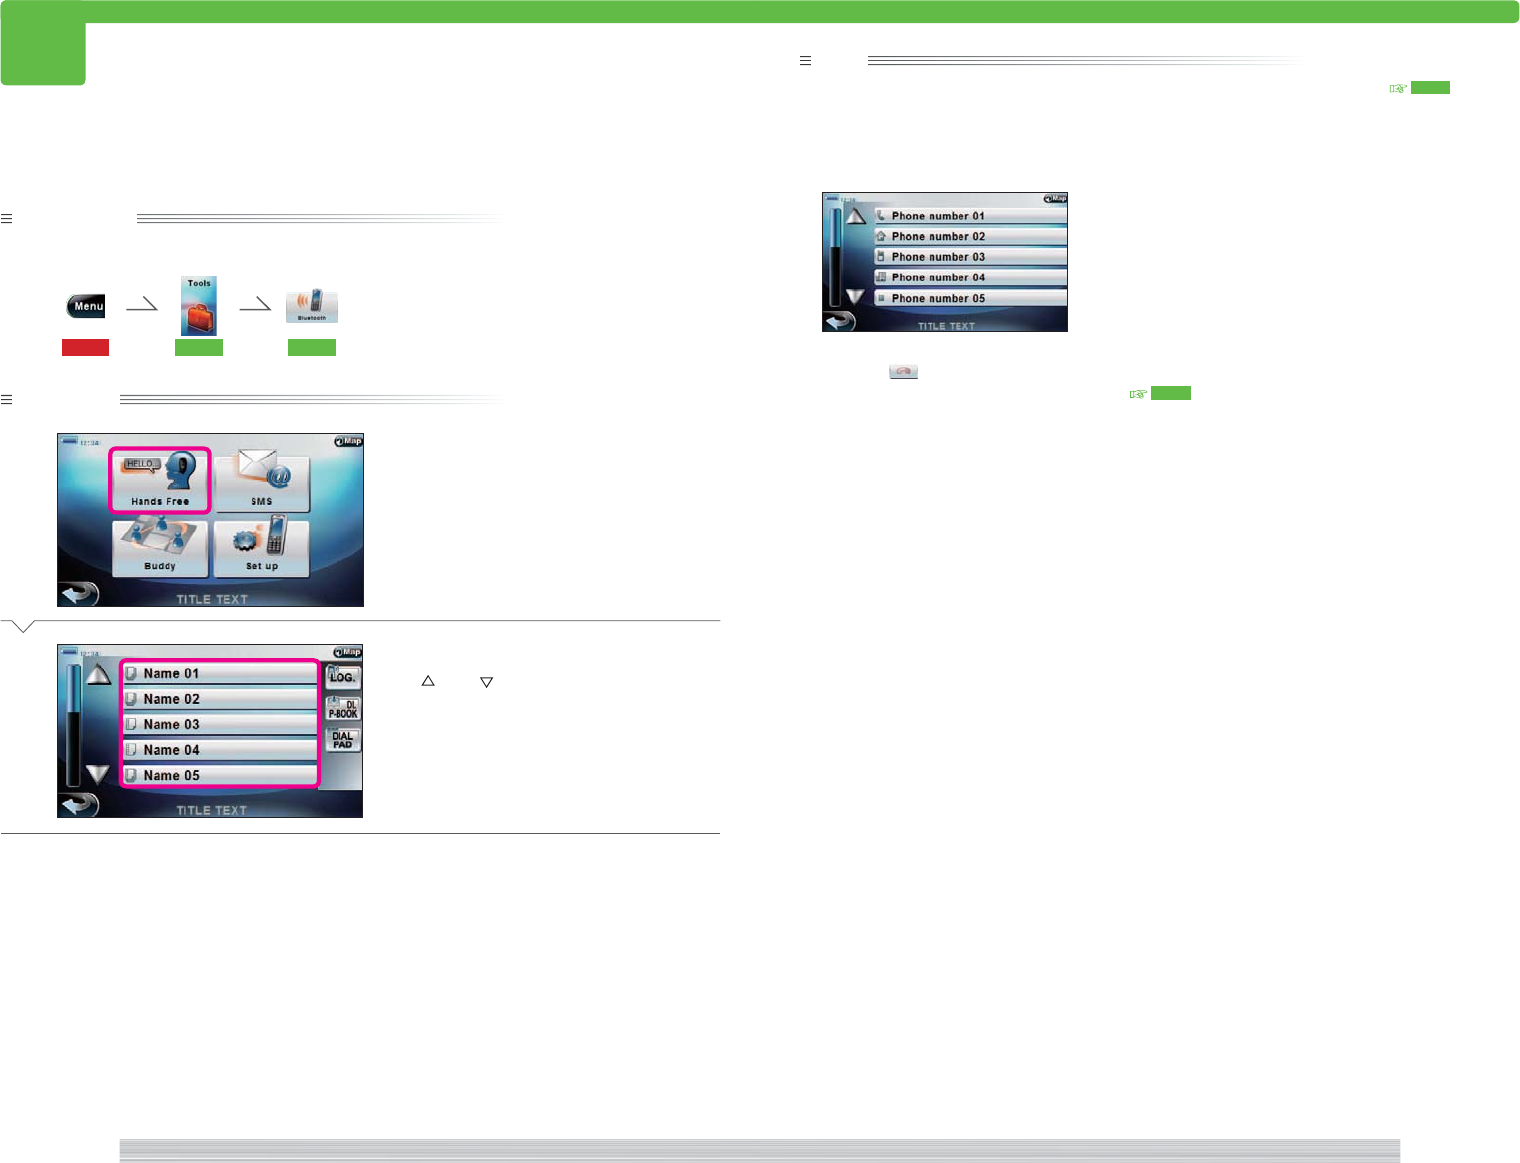
518 Make call from phonebook
518
note
• Phonebook is dowloaded automatically if have Phonebook down load mode turned on ( 514 ).
If Phonebook download mode is turned off or if the cell phoen does not support automatic phonebook
download, select [DL P-BOOK] to download the cell phone's phonebook.
• If there are more than one phone number listed for the party selected in
2
, a screen to select a phone
number appears.
Select the button of the phone number to dial.
• Select the on the Dial pad screen to hang up.
• You can adjust the volume during conversation. 521
Making a phone call from a cell phone using the downloaded phonebook.
Preparation
Have the Bluetooth menu displayed.
115 501 508
Operation
1
Select [Hands Free].
2
Select the button of the party to call.
Use [ ] and [ ] to scroll the list.
The current map screen is displayed once you
are connected.
Complete
<TB1110>
<TB1100>
<TB1000>

240
page Tools 241
page
Tools
519 Make a call from call history
519
Preparation
Have the Bluetooth menu displayed.
115 501 508
Operation
1
Select [Hands Free].
2
Select [LOG.].
3
Select the button of the party to call.
Use [ ] and [ ] to scroll the list.
The current map screen is displayed once you
are connected.
Complete
Making a call from incoming or outgoing call history.
note
• The following symbols are displayed on the history list.
: Outgoing call
: Incoming call (answered)
: Incoming call (not answered)
• Select the on the Dial pad screen to hang up.
• You can adjust the volume during conversation. 521
<TB1100>
<TB1120>
<TB1000>
242
page Tools 243
page
Tools
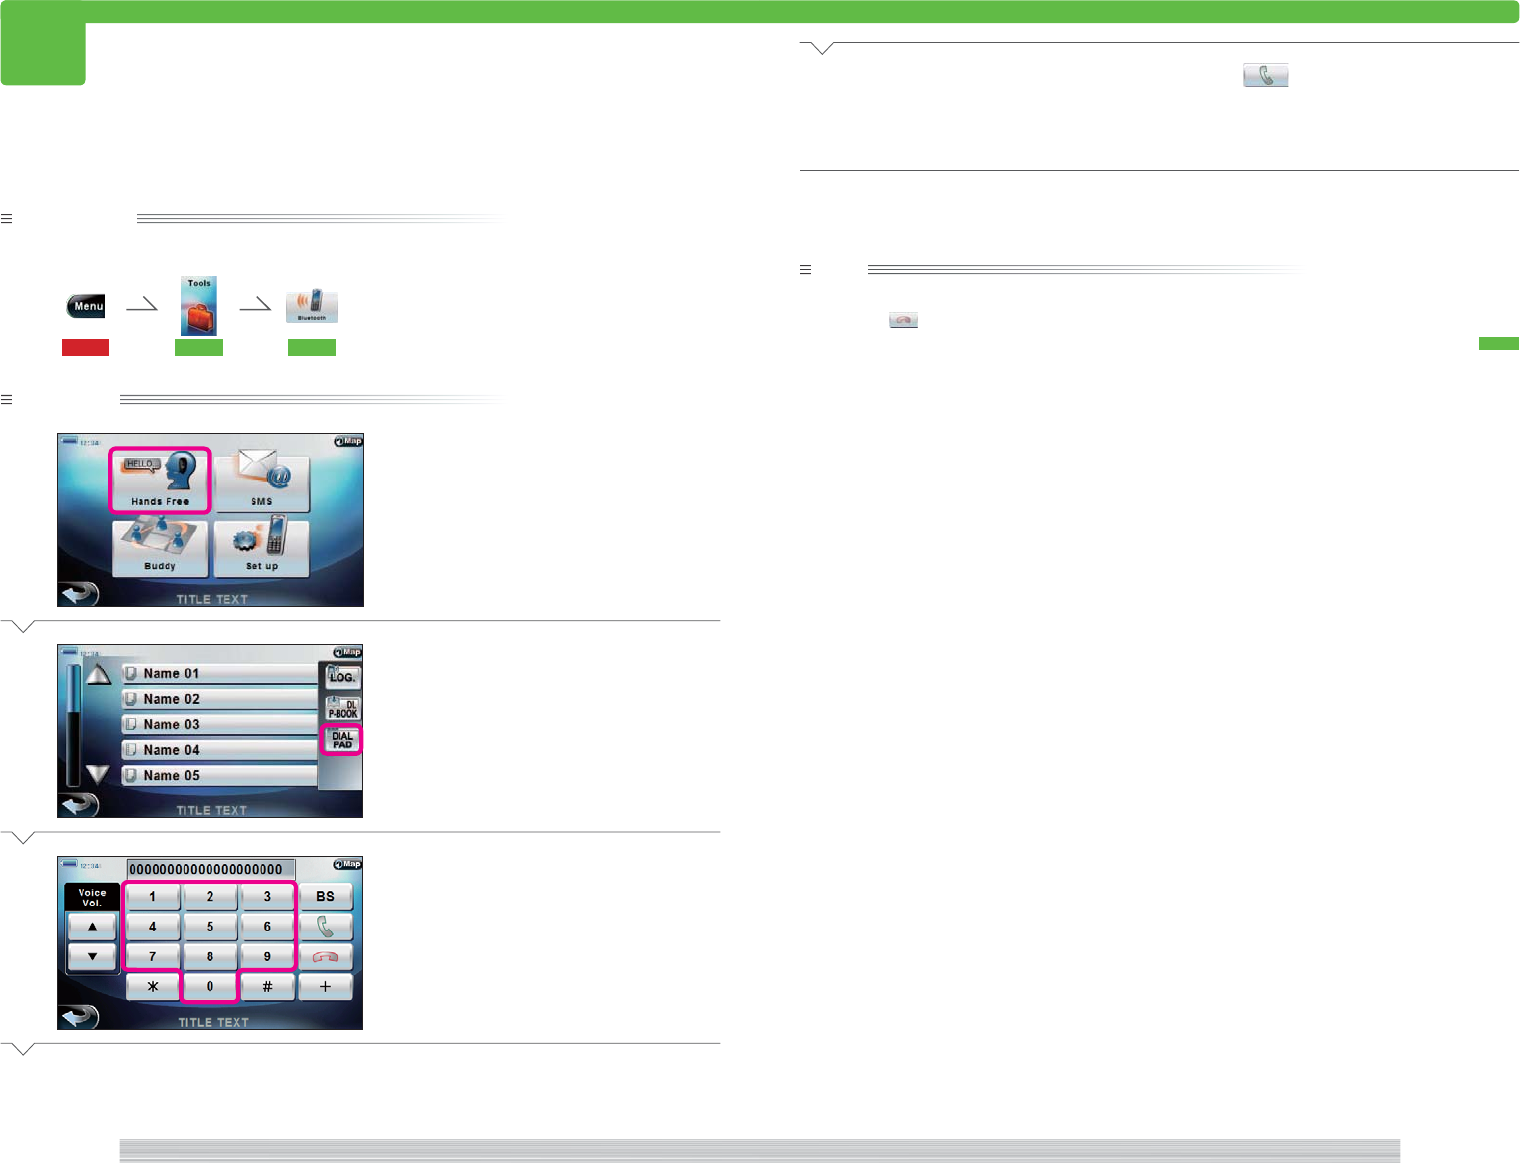
520 Make a call by dialing
520
Preparation
Have the Bluetooth menu displayed.
115 501 508
Operation
1
Select [Hands Free].
2
Select [DIAL PAD].
3
Select the button of the phone
number to call.
Next Page
Making a call by dialing.
4
Select .
The current map screen appears once you are
connected.
Complete
note
• If you select [BS] in the Dial Pad screen in
3
, the last entered number is deleted.
• Select the on the Dial pad screen in
3
to hang up.
• You can adjust the volume during conversation by selecting [5] or [∞] on the Dial pad screen in
3
. See 521
to adjust the volume while actually listening.
<TB1120>
<TB1130>
<TB1000>
244
page Tools 245
page
Tools
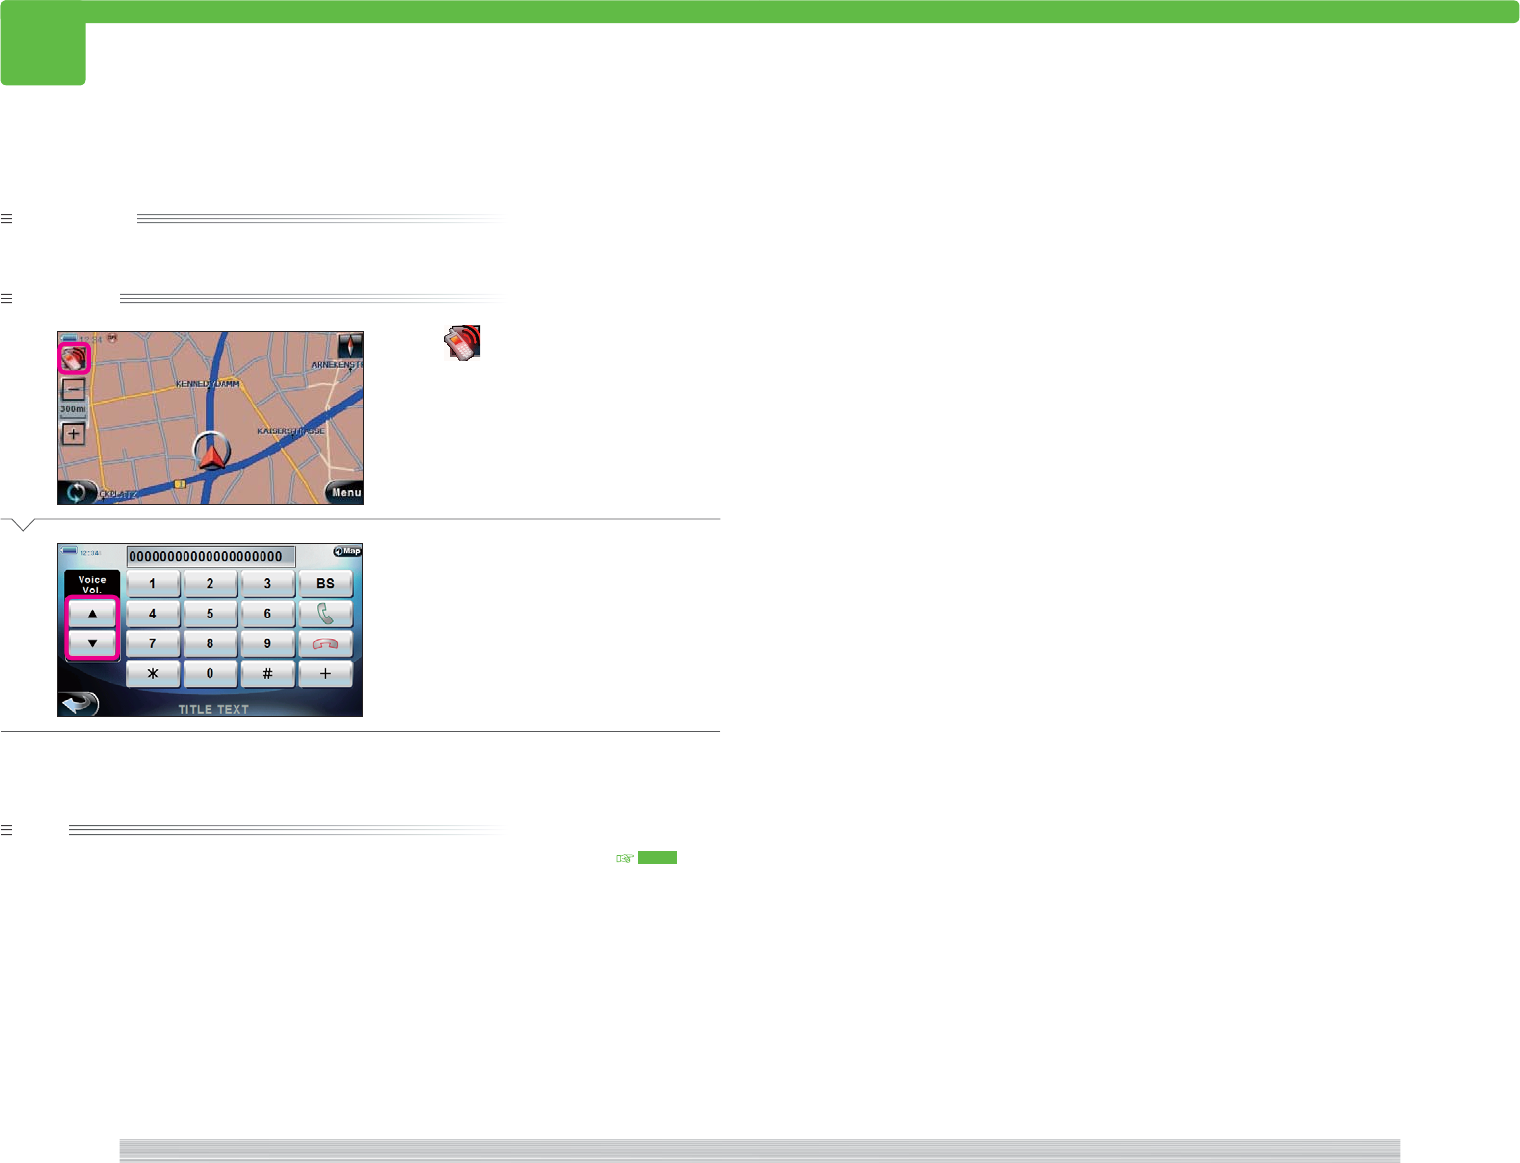
521 Adjust receiver volume during conversation
521
Preparation
Perform during conversation.
Operation
1
Select .
2
Select [5] or [∞].
The receiver volume changes according to the
selected button.
Complete
note
• You can also set the receiver volume before starting conversation (while dialing for example). 520
Make a call from incoming or outgoing call history.
<NM0000>
<TB1150>
246
page Tools 247
page
Tools
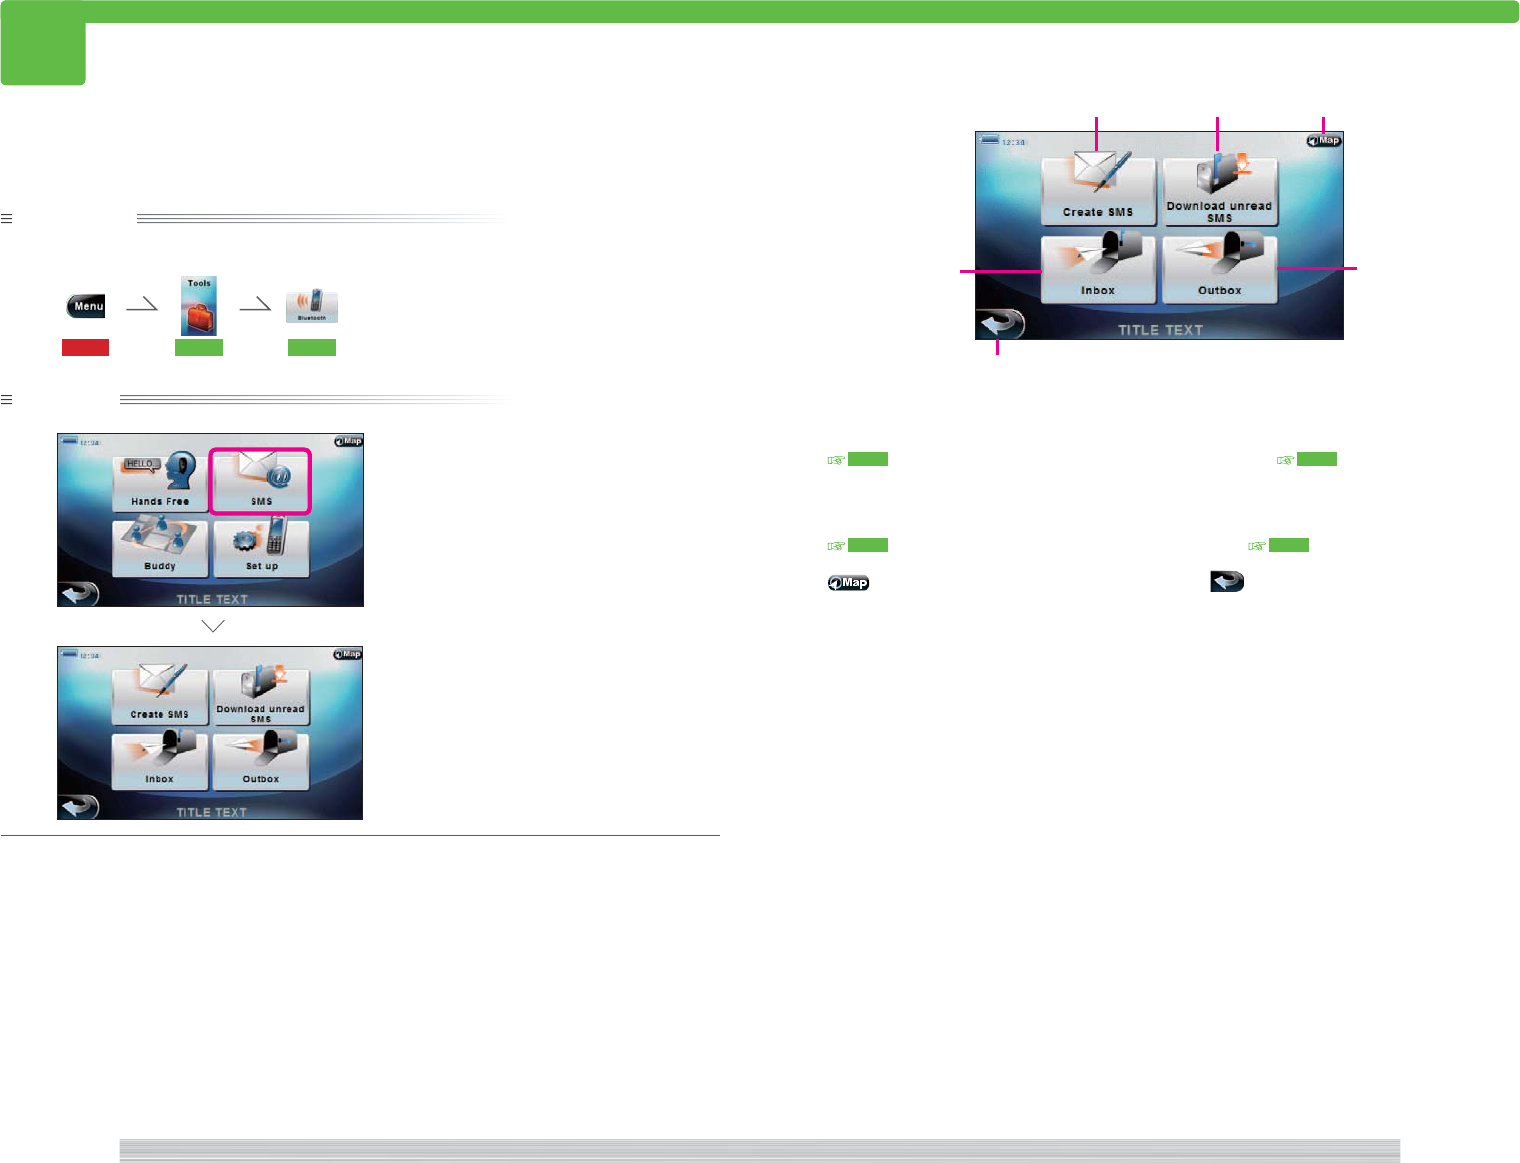
522 Display SMS menu
522
Preparation
Have the Bluetooth menu displayed.
115 501 508
Operation
1
Select [SMS].
The SMS menu appears.
Complete
Displaying the SMS menu to handle SMS messages
1 [Create SMS]
Select to create a new message.
523
2 [Download unread SMS]
Select to download unread messages.
524
3
Select to return to the current map screen.
4 [Outbox]
Select to display a list of messages in the
out box. 526
5 [Inbox]
Select to display a list of messages in the in
box. 525
6
Select to return to the Bluetooth menu.
<TB1200>
SMS menu
<TB1200>
<TB1000>
123
4
6
5
248
page Tools 249
page
Tools
523 Send short message
523
Preparation
Have the SMS menu displayed.
115 501 508 522
Operation
1
Select [Create SMS].
The Create SMS screen appears.
2
Select [To:].
3
Select [From PhoneBook].
Next Page
Creating and sending SMS message.
4
Select the button of the receiver.
Use [ ] and [ ] to scroll the list.
Returns you to the Create SMS screen.
5
Select [Message].
6
Enter the message.
7
Select [OK].
Returns you to the Create SMS screen.
8
Select [SEND].
The message is sent and a confirmation mes-
sage is displayed.
Next Page
<TB1212a>
<TB1120>
<TB1200>
<TB1210_1>
<TB1211>
<TB1210_2>
<TB1210_3>
250
page Tools 251
page
Tools
9
Select [OK].
Returns you to the SMS menu.
Complete
note
• You can also directly enter the receiver.
• Select [SAVE] in
8
to save the created message without sending.
• If there is a saved message, a confirmation message appears before the Create SMS screen in
2
.
Select [YES] to edit the saved message and then continue from
2
.
Select [NO] to delete the saved message and then continue from
2
to create a new message.
■ Directly specifying the receiver
2
Select [To:].
3
Select [Direct Input].
4
Enter the phone number with the ten
keys and select [OK].
Returns you to the Create SMS screen.
Complete
523
<TB1210_1>
<TB1211>
<TB1213>
252
page Tools 253
page
Tools
524 Manually download unread short messages
524
Preparation
Have the SMS menu displayed.
115 501 508 522
Operation
1
Select [Download Unread SMS].
2
Select [Start].
Starts downloading of unread messages.
Automatically returns you to the SMS menu
when download completes.
Complete
note
• If automatic message download is set in 513 , the above receive operation is unnecessary.
• The downloaded messages are stored in Inbox. 525
Manually downloading unread messages.
<TB1200>
<TB1240>
254
page Tools 255
page
Tools
525 Read received message
525
Preparation
Have the SMS menu displayed.
115 501 508 522
Operation
1
Select [Inbox].
A list of received messages appear.
2
Select the message to display.
Use [ ] and [ ] to scroll the list.
A selected message is displayed.
Complete
Reading the received SMS message.
note
• Select [REPLY] in
2
to reply to the received message. Or select [FORWARD] to forward the received message.
See 523 for the remaining operation.
<TB1200>
<TB1220>
<TB1221>

256
page Tools 257
page
Tools
526 Read sent message
526
Preparation
Have the SMS menu displayed.
115 501 508 522
Operation
1
Select [Outbox].
A list of sent messages is displayed.
2
Select the message to display.
Use [ ] and [ ] to scroll the list.
A selected message is displayed.
Complete
Reading the sent SMS message.
note
• Select [FORWARD] in
2
to forward the sent message. See 523 for the remaining operation.
<TB1200>
<TB1230>
<TB1231>
258
page Tools 259
page
Tools
527 Receive buddy message
527
Operation
1
Select [Accept].
2
Check the location and then select
.
Returns you to the original screen.
Complete
note
• Select [Accept] in
1
to send your location information with an Acceptance buddy message.
Or select [Refuse] to delete the received buddy message and return to the original screen.
When you receive a buddy message, the message is displayed on the screen.
<NM6000>

260
page Tools 261
page
Tools
528 Send buddy message
528
Preparation
Have the Bluetooth menu displayed.
115 501 508
Operation
1
Select [Buddy].
Displays the Buddy List screen.
2
Select the button of the receiver.
3
Select [Send Invite].
Transmission starts.
When transmission completes, a confirmation
message is displayed.
Next Page
Sending your location information with Buddy message.
4
Select [OK].
Returns you to the Buddy List screen.
Complete
note
• Last five Buddy messages received are displayed on the Buddy list screen in
2
.
• When there is no telephone number information for the receiver selected in
2
, the screen specifying the
receiver appears. Specify the receiver in same method in 523 .
• See 529 for deleting Buddy message listed on Buddy list screen in
2
.
• The position information received by Buddy message can be displayed on the map (Scrollable map screen)
when [Show Map] is selected in
3
.
The position on the map can be set as a destination or registered in Favorites.
• When the Buddy messega you sent is accepted by receiver, the confirming message is displayed. Slect [OK] to
display receiver's position information on the Buddy map. Or select [Cancel] not to display.
<TB1310>
<TB1000>
<TB1300>
262
page Tools 263
page
Tools
529 Delete buddy message
529
Preparation
Have the Bluetooth menu displayed.
115 501 508
Operation
1
Select [Buddy].
Displays the Buddy List screen.
2
Select the button of the message to
delete.
3
Select [Delete Registry].
A confirmation message is displayed.
Next Page
Deleting unnecessary Buddy messages.
4
Select [OK].
Returns you to the Buddy List screen.
Complete
<TB1000>
<TB1300>
<TB1310>
264
page Setup
601
265
page
Setup
Display Setup menu
601
Operation
1
Select .
The Setup menu appears.
Complete
Displaying the Setup menu from the top menu to set various options.
1 [AV Setting]
Select to set various AV function related
settings. 613
2 [Nav Map Setting]
Select to set various map display related
settings. 612
3 [System Setting]
Select to set various system related
settings. 602
4
Select to return to the top menu. 115
5
Select to return to the current map screen.
107 , 112
Setup menu
<TOP0000>
<S00000>
<S00000>
1234
5
266
page Setup 267
page
Setup
602 Display System setup menu
602
Preparation
Have the Setup menu displayed.
115 601
Operation
1
Select [System Setting].
The System setup menu appears.
Complete
Displaying the System setup menu from the Setup menu to set system related options.
1 [Volume Setting]
Select to set the route guide and beep
volume. 603
2 [Initial Settings]
Select to set various functions of this unit.
604 , 605
3 [Rear View Camera Settings]
Select to set the rear view camera
operation and video. 606
4
Select to return to the current map screen.
107 , 112
5 [Display Mode (Portrait/Landscape)]
Select to set the display mode when the
device is rotated. 609
6 [Language]
Select to set the voice guidance options
and the menu language. 607
7
Select to return to the Setup menu.
601
8 [Audio Output Setting]
Select to set the voice output device.
608
9 [][ ]
Select to turn the System setup menu
page.
System setup menu (1/2)
<S00000>
<SS1000a>
<SS1000a>
1234
5
98
7
6
268
page Setup 269
page
Setup
602
System setup menu (2/2)
<SS1000b>
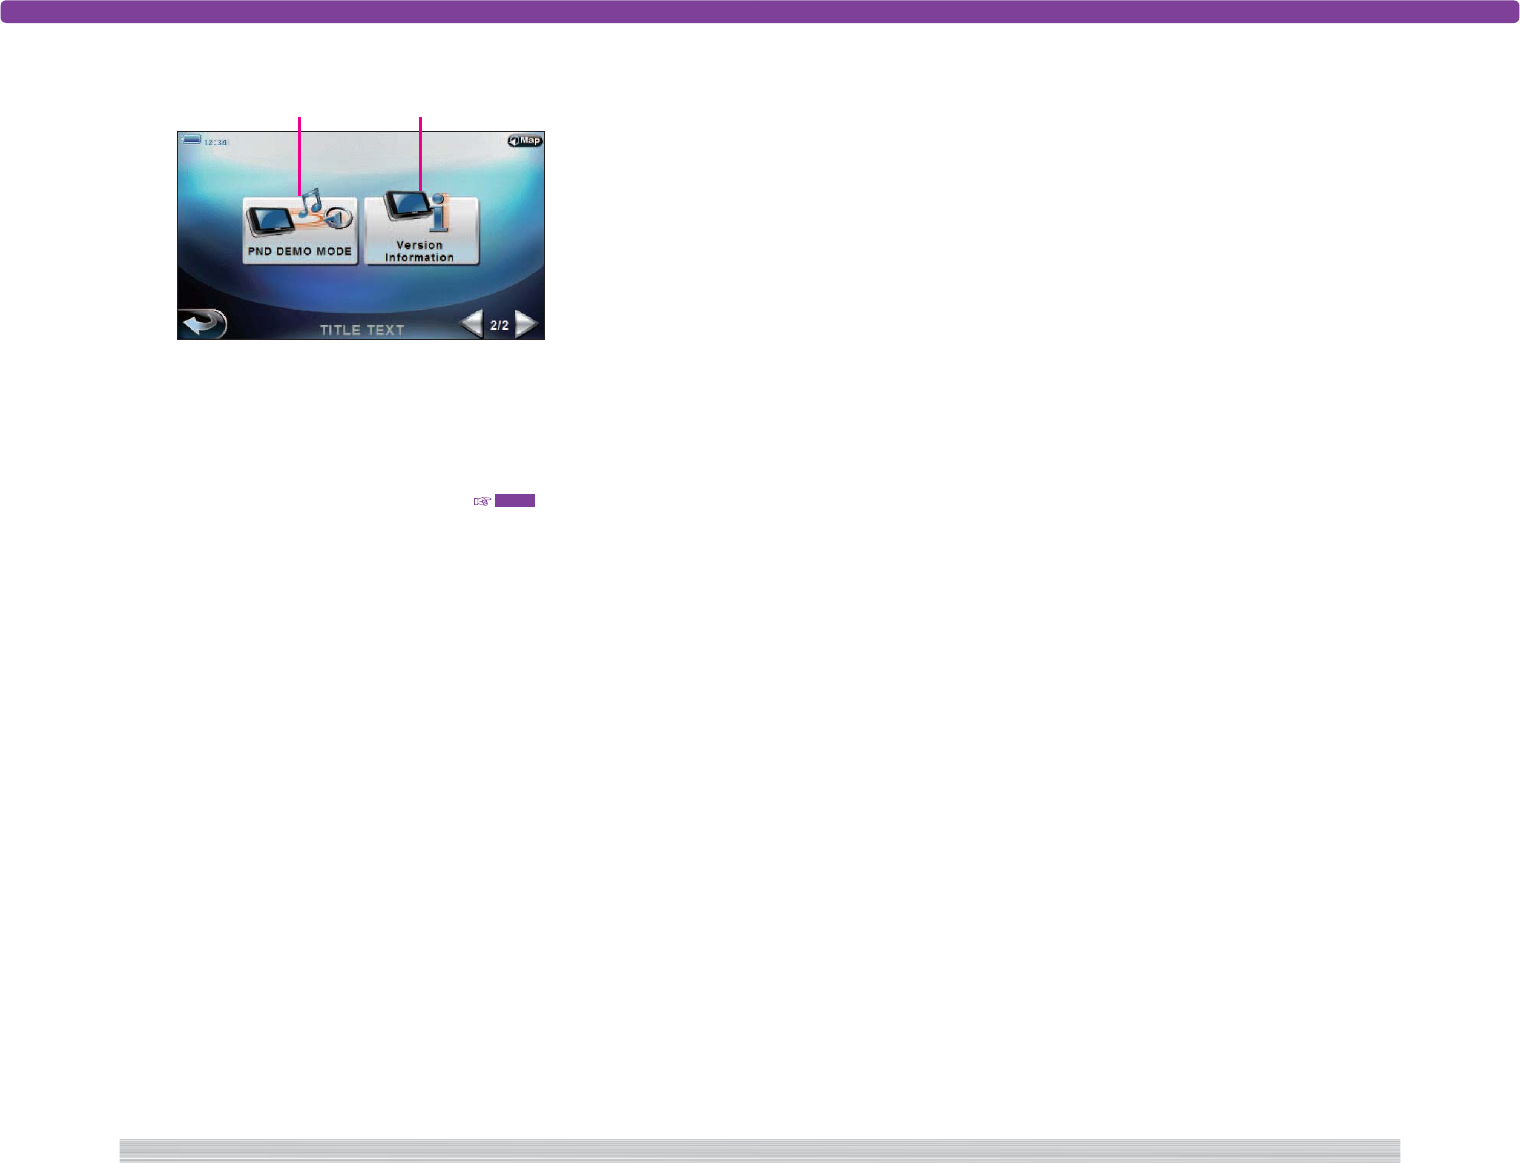
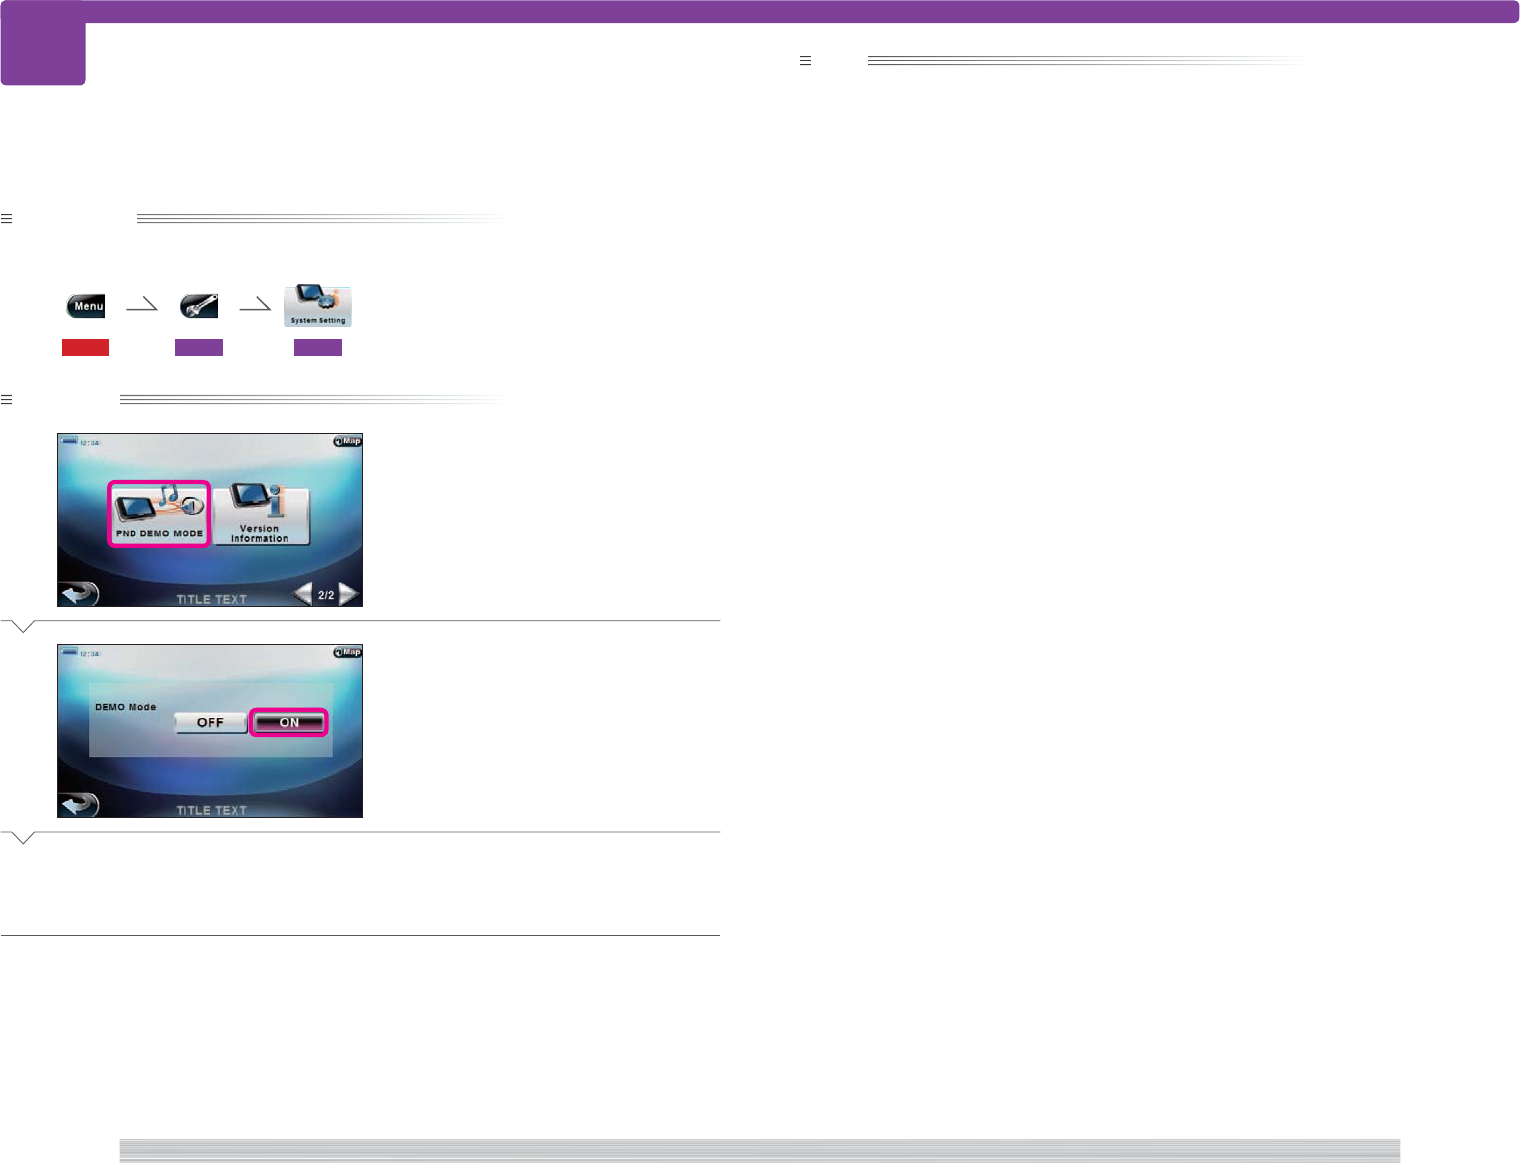
0 [PND DEMO MODE]
Select to turn on/off demo mode.
- [Version Information]
Select to display the software and map
version. 611
0 -
270
page Setup 271
page
Setup
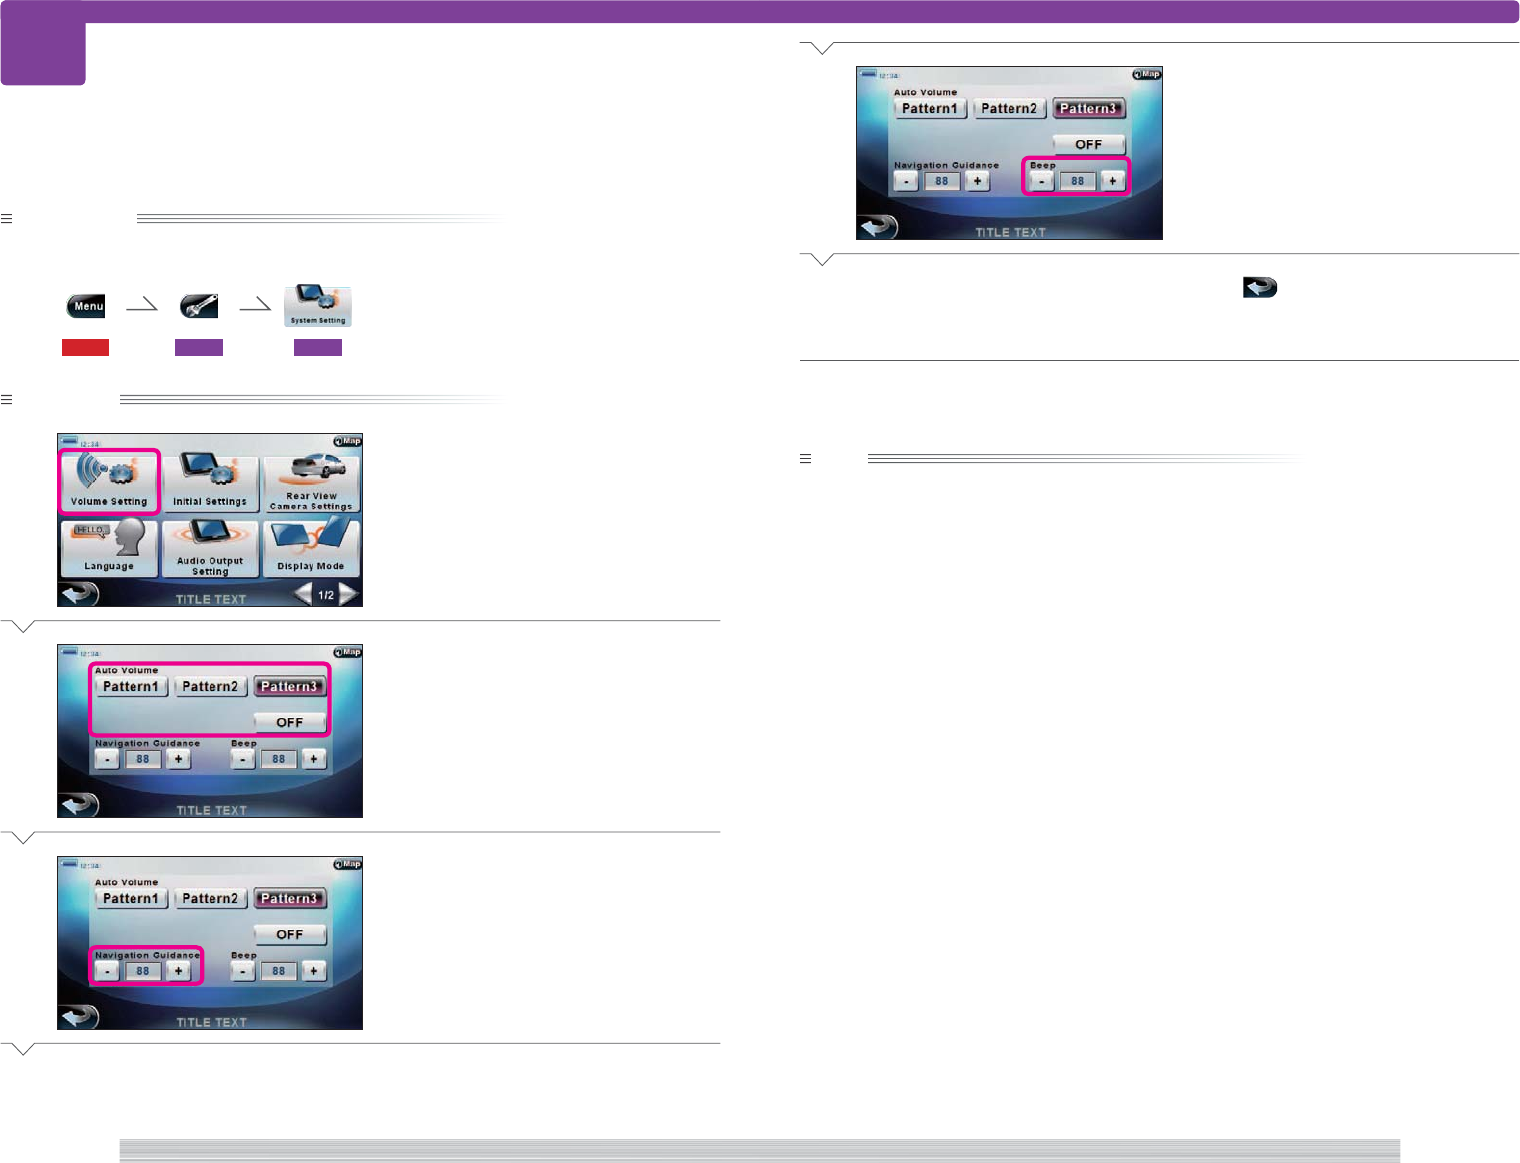
603 Set volume
603
Preparation
Have the Setup menu displayed.
115 601 602
Operation
1
Select [Volume Setting].
2
Select the button of the Auto Volume
pattern.
Select [OFF] to cancel Auto Volume.
3
Select [+] or [–] of the “Navigation
Guidance” to adjust the voice
guidance volume.
Next Page
Setting the volume.
4
Select [+] or [–] to adjust the beep
volume.
5
Select .
Select to return to the System setup menu.
Complete
note
• If Auto Volume is not set to [OFF], the volume increases automatically when you exceed the predefined
speed for each pattern. Automatic volume adjustment is canceled when your speed drops below the
predefined speed.
• Auto Volume applies to all sounds output from the built-in speaker.
•
2
to
4
may be set in any order.
<SS1000a>
<SS1120_1>
<SS1120_2>
<SS1120_3>
272
page Setup 273
page
Setup
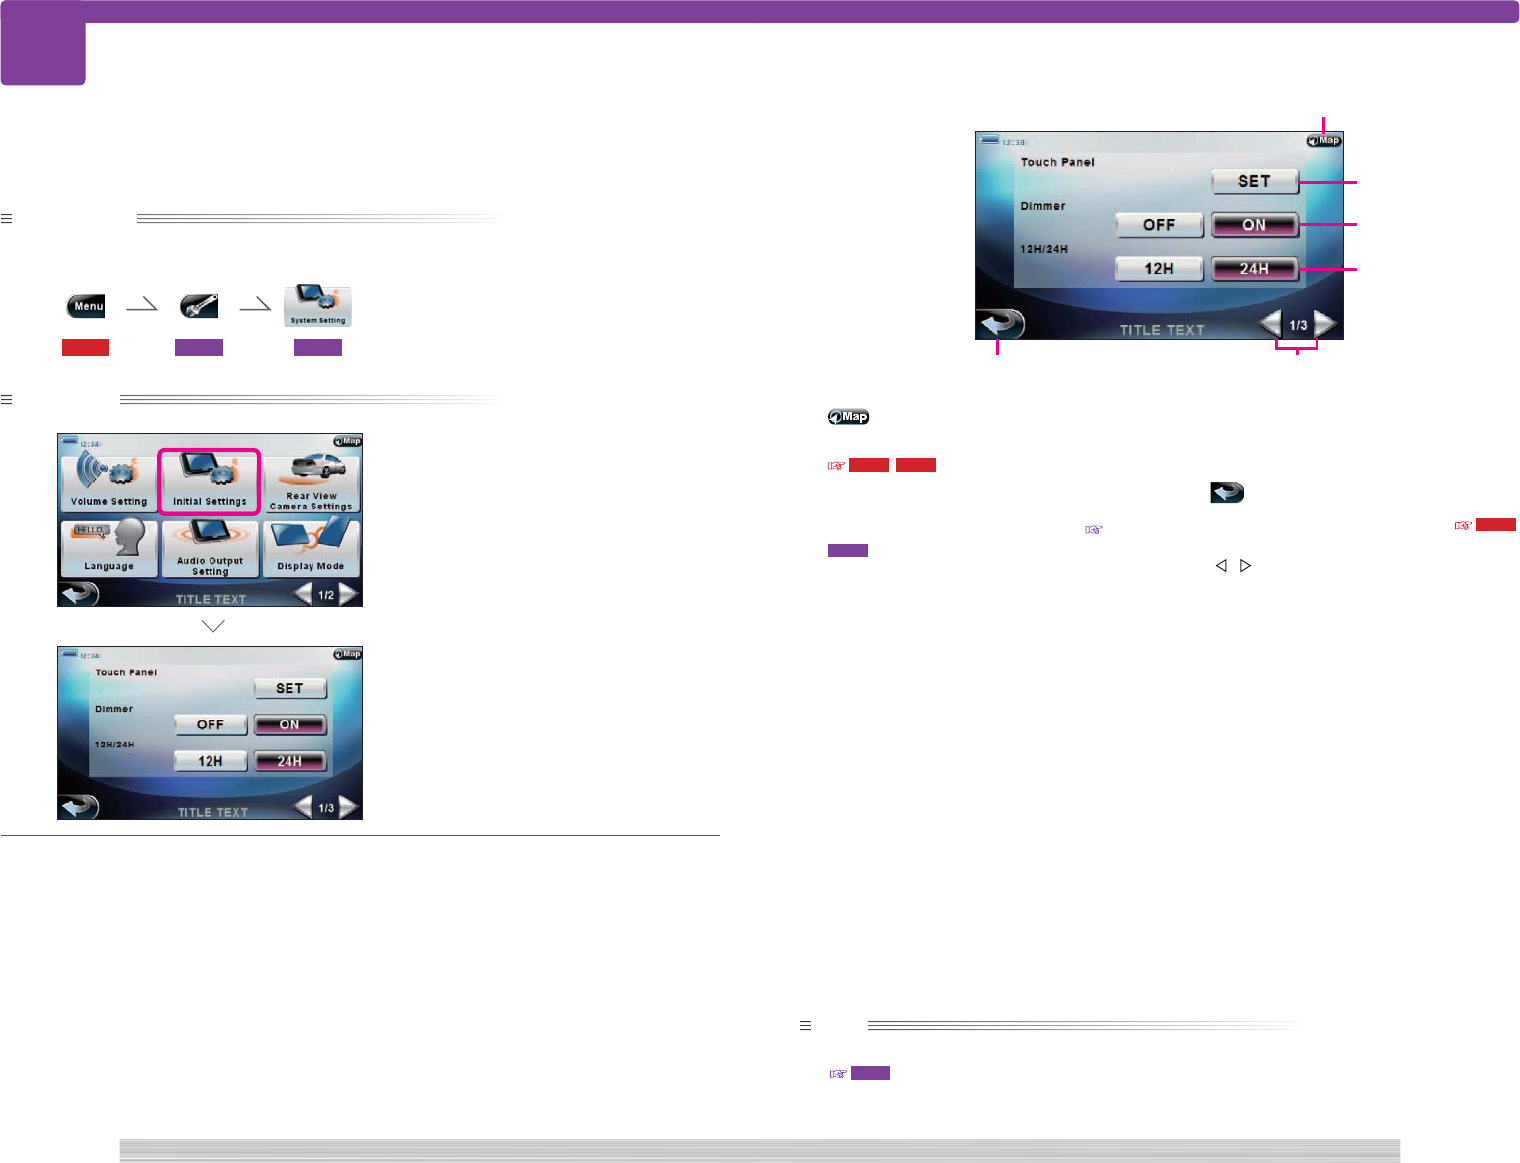
604 Set various functions
604
Preparation
Have the Setup menu displayed.
115 601 602
Operation
1
Select [Initial Setting].
The Initial setting screen appears.
Complete
Setting various options of the this unit.
1
Select to return to the current map screen.
107 , 112
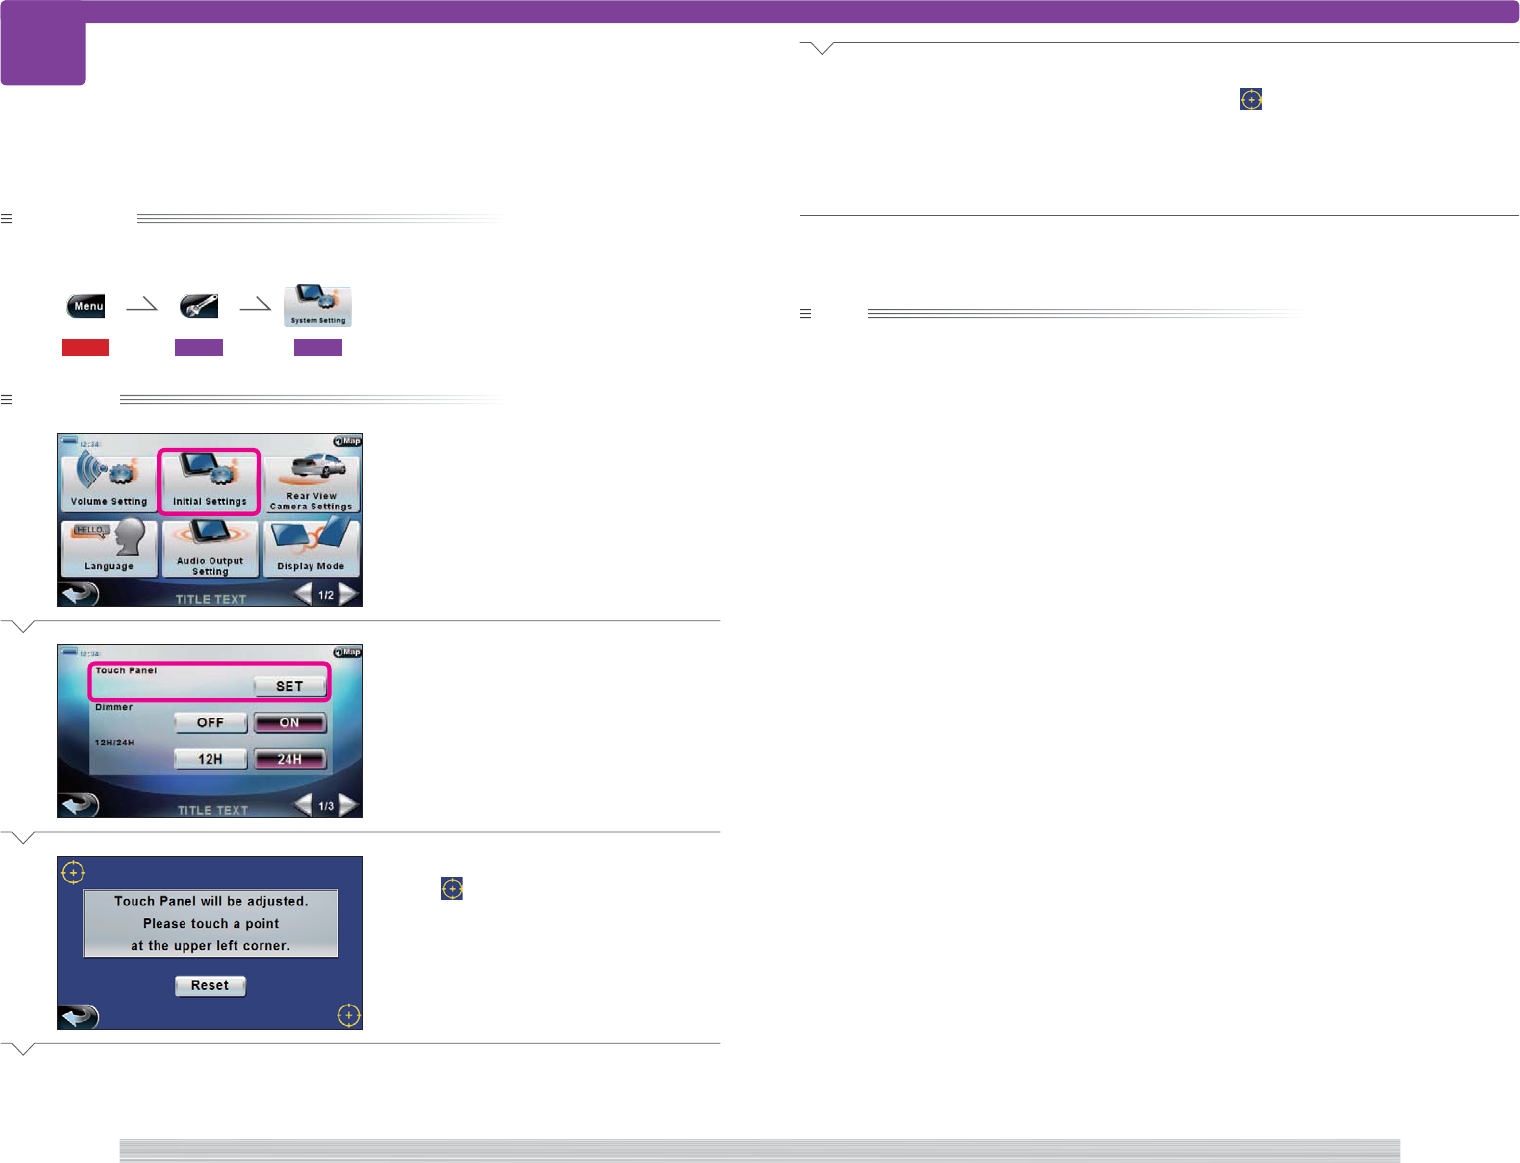
2 Touch Panel Adjustment
Select to adjust the touch position.
605
3 Dimmer setting
Select to set the built-in brightness sensor.
[OFF] : Turns the sensor off.
[ON] : Turns the sensor on.
4 12H/24H setting
Select to toggle between 12 hour clock
and 24 hour clock.
5
Select to return to the Top menu. 115
6 [] [ ]
Select to turn the Initial Setting screen
page.
Initial Setting screen (1/3)
note
• If you turn off the dimmer, you cannot switch automatically between daytime screen and nighttime screen
( 612 ).
• Even when the this unit enters Standby mode, you can continue using from the previous state when you
turn the power back on.
<SS1000a>
<SS1200a>
<SS1200a>
1
2
3
4
6
5
274
page Setup 275
page
Setup
604
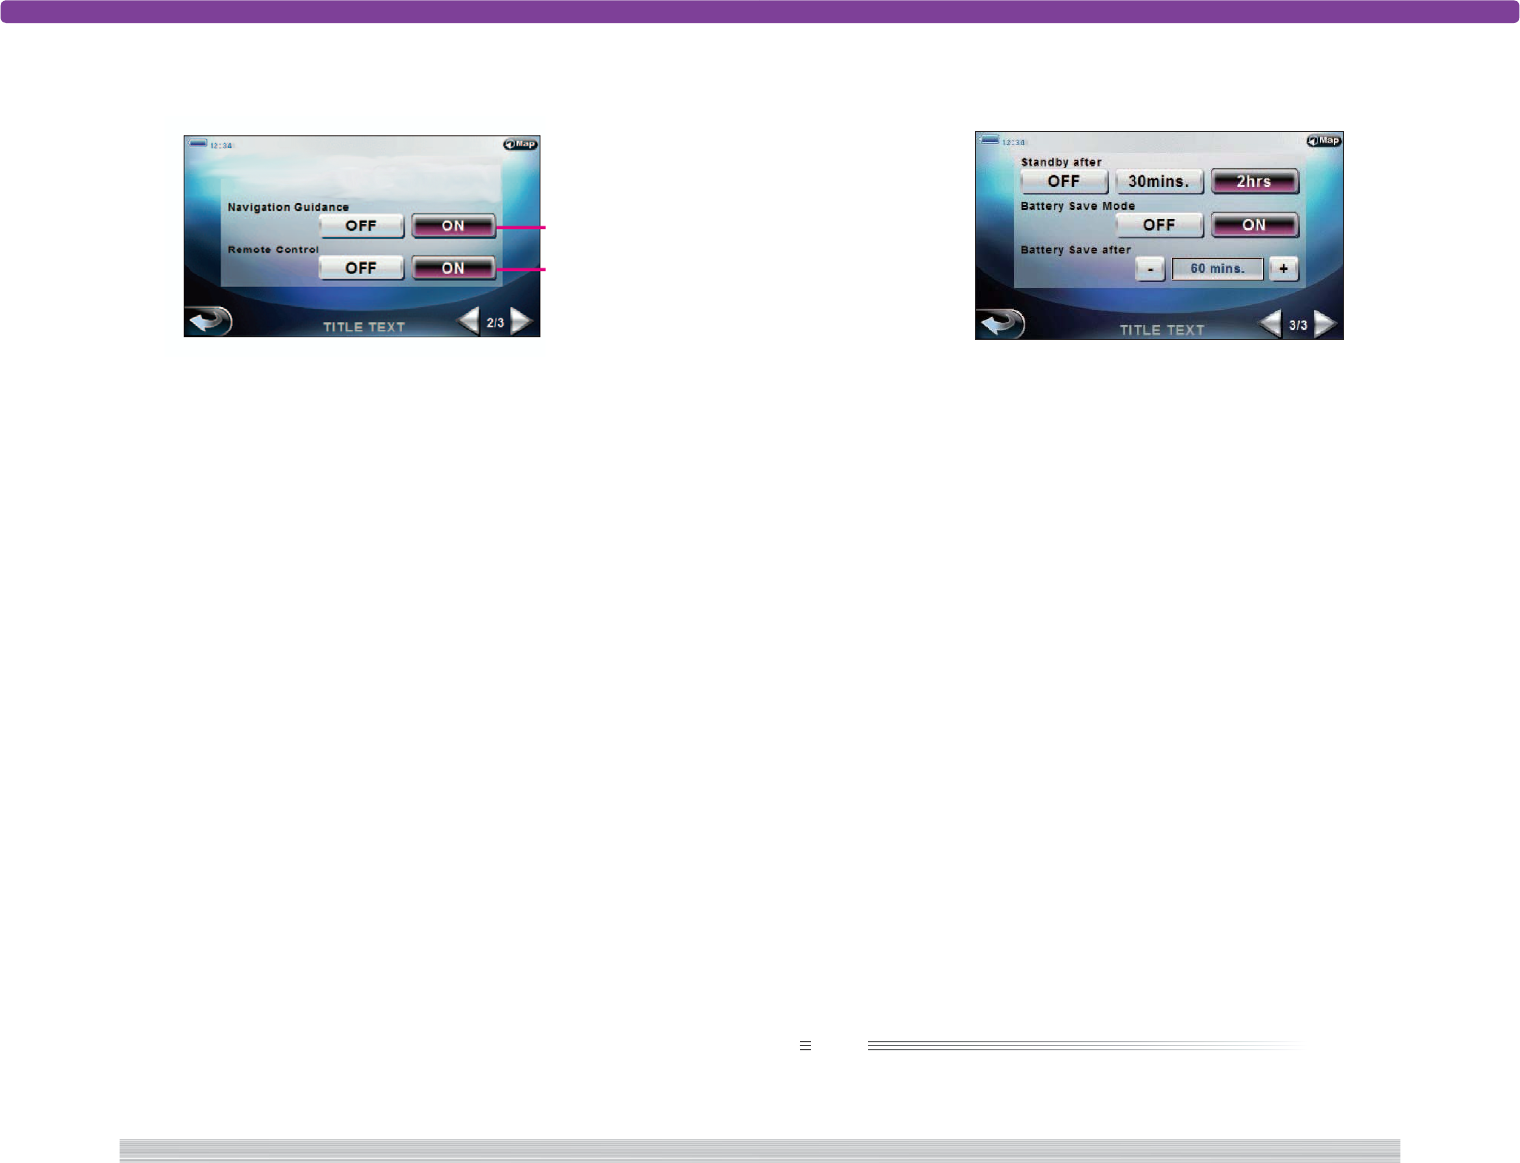
9 Standby after setting
Select to select the time to enter Standby
mode.
[OFF] : Standby mode is not entered.
[30 minutes] [2 hours] : Standby mode
is entered when the selected time has
elapsed.
0 Battery Save Mode setting
Select to enable/disable Battery save
mode.
- Battery Save after setting
Select to set the time to enter Battery Save
mode when it is enabled in 0.
Initial Setting screen (3/3)
<SS1200c>
6 FM Transmitter setting
Select to set the frequency of the FM
transmitter.
7 Navigation Guidance setting
Select to set the navigation guidance
interrupt output.
8 Remote Control setting
Select to enable/disable remote control.
Initial Setting screen (2/3)
<SS1200b>
note
• The screen goes dark in Battery save mode.
• Even if the Battery save mode is on, Battery save mode is not entered when you are watching digital TV or
using Bluetooth.
9
7
8
0
-
276
page Setup 277
page
Setup
605 Adjust touch position
605
Preparation
Have the Setup menu displayed.
115 601 602
Operation
1
Select [Initial Setting].
2
Select [SET] of “Touch Panel”.
3
Follow the displayed instruction and
touch at top right.
Next Page
Matching the touch position with recognition position.
4
Follow the displayed instruction and
touch at bottom right.
Touch position and recognition position are
adjusted and you are returned to the System
setup menu.
Complete
note
• You can retry from
2
if you select [Reset] in
3
, or from
3
if you select [Reset] in
4
.
<SS1000a>
<SS1200a>
<SS1210>

278
page Setup 279
page
Setup
606 Set rear view camera
606
Preparation
Have the Setup menu displayed.
115 601 602
Operation
1
Select [Rear View Camera Settings].
2
Set each item.
3
Select .
Returns you to the System setup menu.
Complete
Setting the rear view camera video display method.
The following items can be set:
Item Description
Rearview Image Interrupt [ON] Automatically switches to rear view camera video when you change gear to
reverse.
[OFF] Does not switch automatically.
Mirror Setting [ON] Flips the video horizontally.
[OFF] Does not flip horizontally.
note
• Select [ON] of “Manual” in 2 to switch to rear view camera video. You can see the rear view video by this
method even if “Rearview Image Interrupt” is set to [OFF].
• When the rear view camera video is displayed, touch the screen to return to the original screen even when
the gear is in reverse.
<SS1000a>
<SS1300>
280
page Setup 281
page
Setup
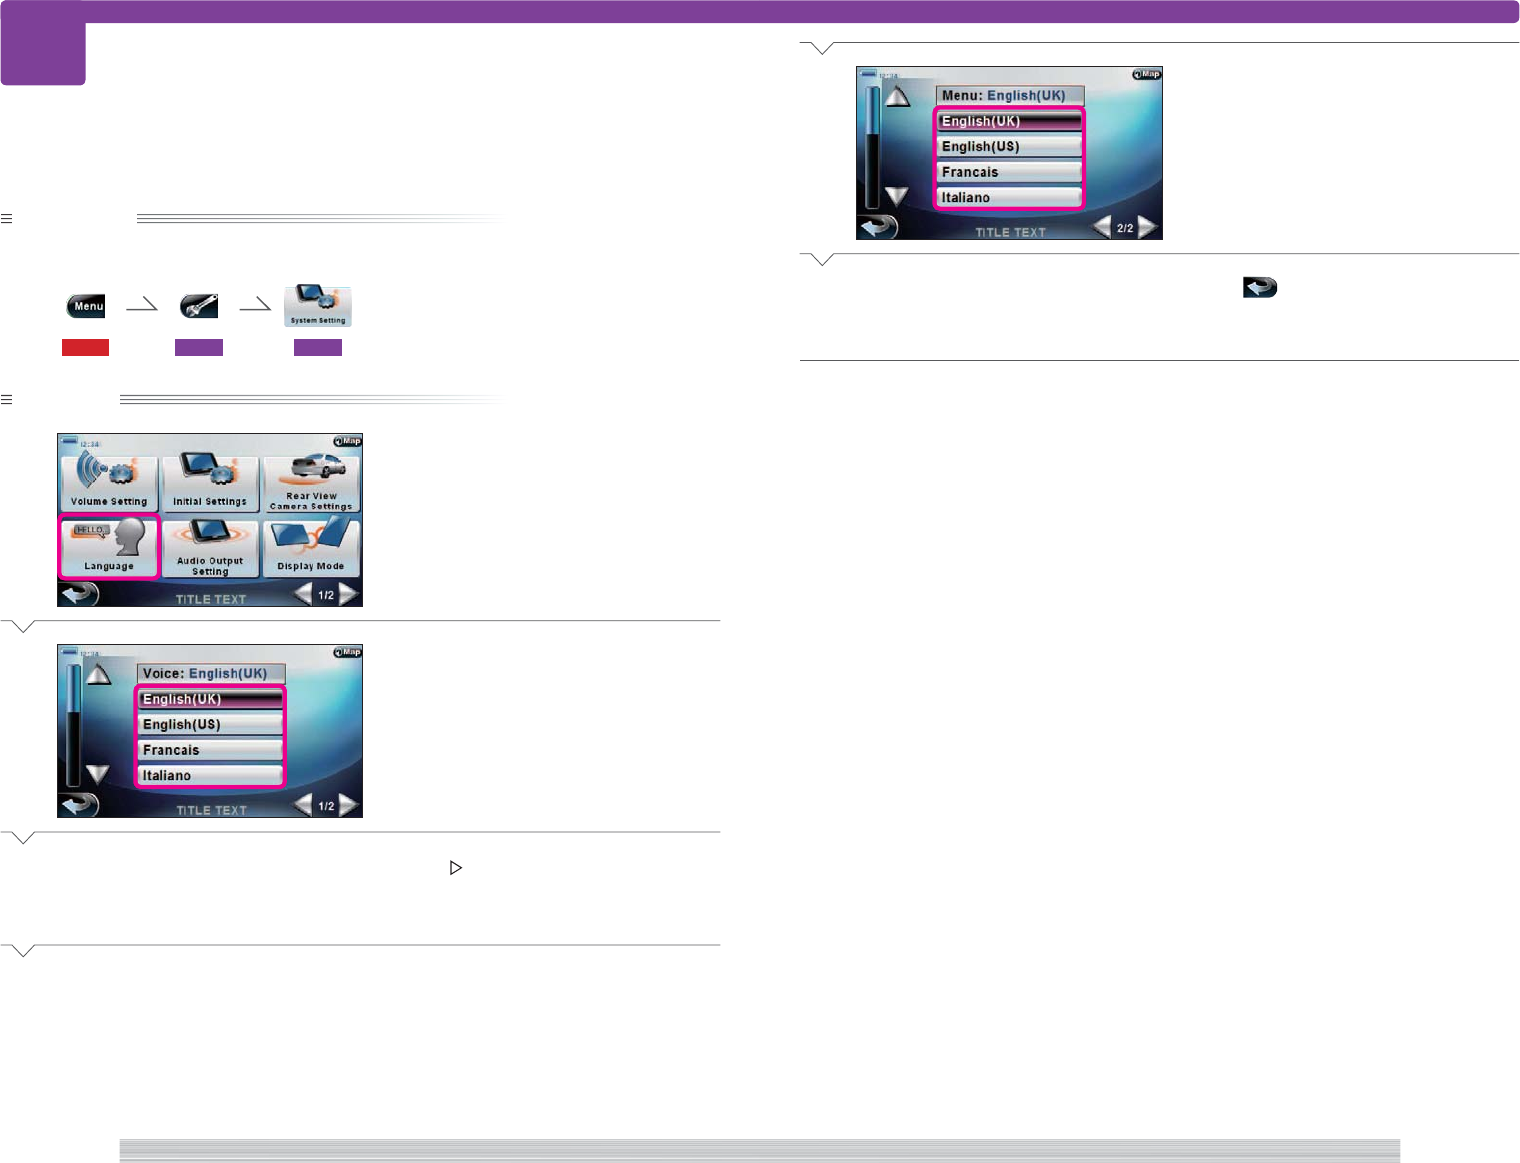
4
Select the button of the language to
use for menu display.
If the desired language is not displayed, scroll
with [fi] or [%].
5
Select .
Returns you to the System setup menu.
Complete
607 Set language
607
Preparation
Have the Setup menu displayed.
115 601 602
Operation
1
Select [Language].
2
Select the button of the language to
use for voice guidance.
If the desired language is not displayed, scroll
with [fi] or [%].
3
Select [ ].
Next Page
Setting the voice guidance and menu language.
<SS1000a>
<SS1400a>
<SS1400b>

282
page Setup 283
page
Setup
608 Set voice volume
608
Preparation
Have the Setup menu displayed.
115 601 602
Operation
1
Select [Audio Output Setting].
2
Select the button of the output
device.
3
Select .
Returns you to the System setup menu.
Complete
Setting the voice output device.
The following items can be set:
Item Description
[FMT] Outputs to FM transmitter.
[BT] Outputs to Bluetooth device.
[Internal] Outputs to built-in speaker.
<SS1000a>
<SS1500>
284
page Setup 285
page
Setup
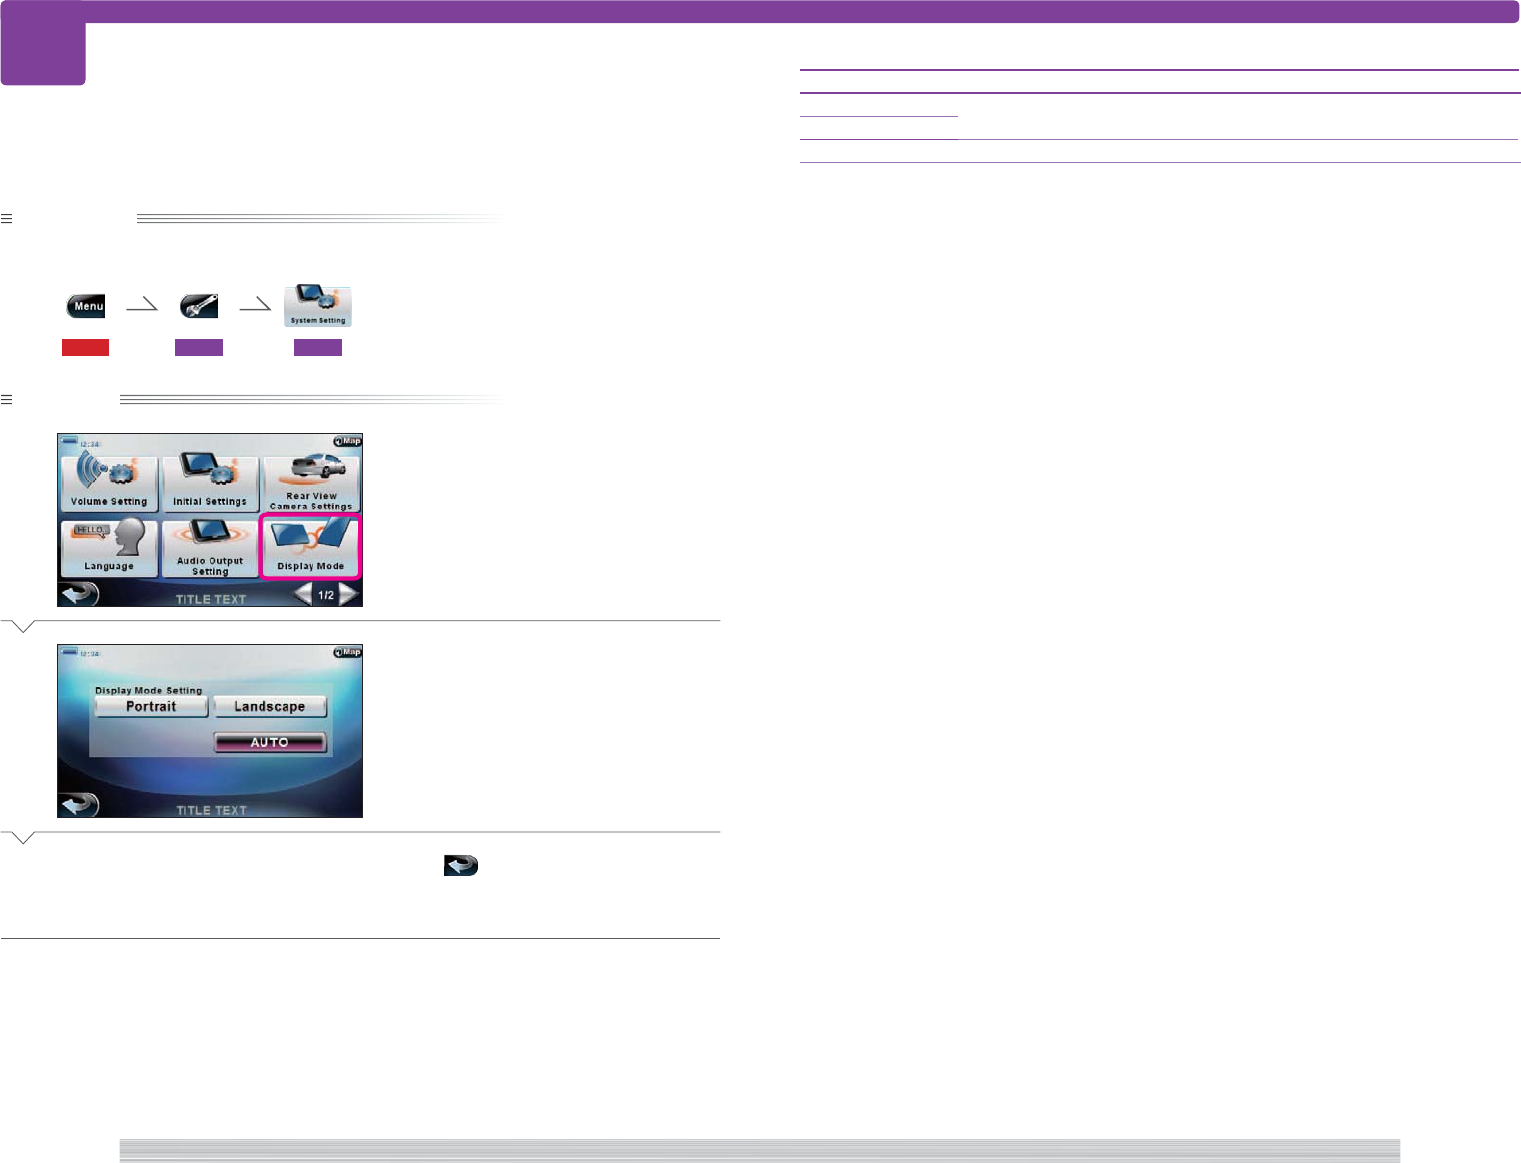
609 Set landscape/portrait mode
609
Preparation
Have the Setup menu displayed.
115 601 602
Operation
1
Select [Display Mode].
2
Select the button of the display mode
to set.
3
Select .
Returns you to the System setup menu.
Complete
Setting the display mode when the this unit is rotated.
The following items can be set:
Item Description
[Portrait] Fixes the screen to landscape or portrait mode and does not change when the this unit is rotated.
[Landscape]
[AUTO] Automatically rotates the screen according to the orientation of the this unit.
<SS1000a>
<SS1600>
286
page Setup 287
page
Setup
610 Set demo mode
610
Preparation
Have the Setup menu displayed.
115 601 602
Operation
1
Select [PND DEMO MODE].
2
Select [ON].
A confirmation message is displayed.
3
Select [YES].
The screen changes to demo screen.
Complete
Setting the demo mode introducing the functions of the this unit.
note
• The demo mode screen appears as soon as you turn on the demo mode.
• When you touch the screen in demo mode, demo mode is canceled and you are returned to the screen in
2
.
• When demo mode is ON, the screen automatically switches to demo mode when no operation is performed
for five minutes in normal mode.
• Even when demo mode is ON, demo mode is not entered when you are watching digital TV or using
Bluetooth.
• To end demo mode, select [OFF] in
2
.
<SS1000b>
<SS1800>
288
page Setup 289
page
Setup
611 Display version information
611
Preparation
Have the Setup menu displayed.
115 601 602
Operation
1
Select [Version Information].
The this unit software and map version infor-
mation is displayed.
2
Select when finished viewing.
Returns you to the System setup menu.
Complete
Displaying the this unit software and map version information.
<SS1000>
<SS1700>
290
page Setup 291
page
Setup
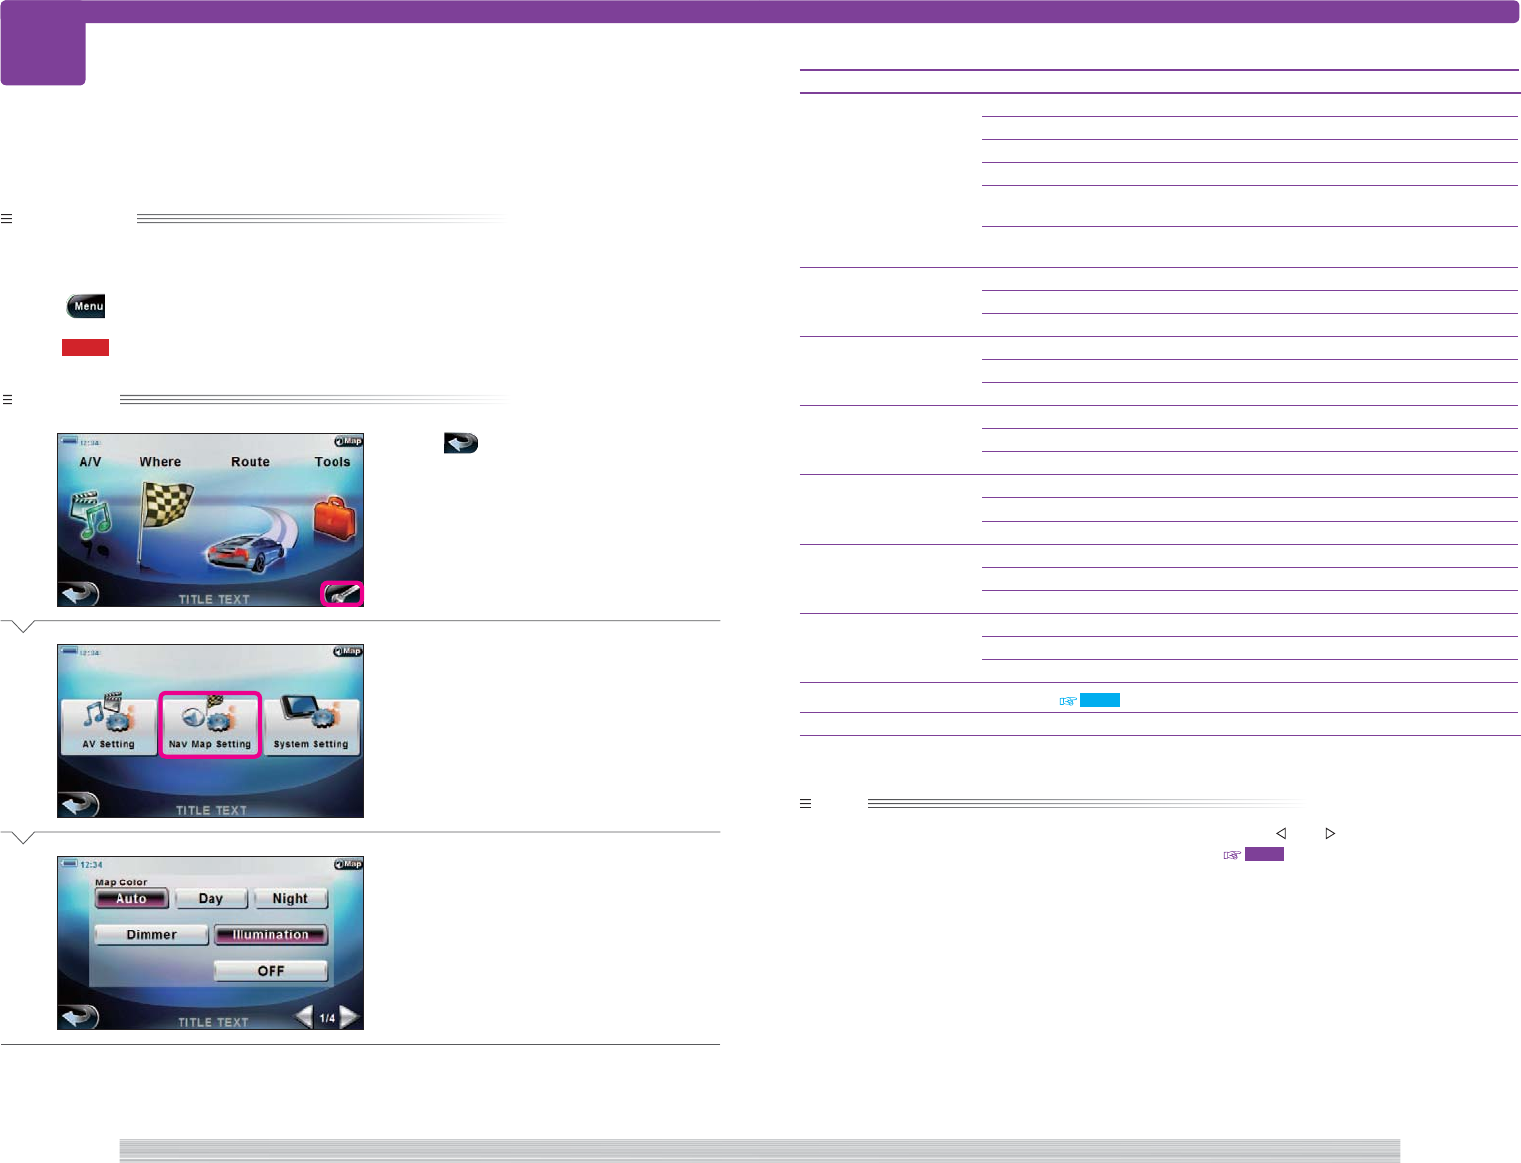
612 Set the map display method
612
Preparation
Have the Top menu displayed.
115
Operation
1
Select .
2
Select [Nav Map Setting].
The Map Setting screen appears.
3
Set each item.
Complete
Setting the map display method.
The following items can be set:
Item Description
Map Color Sets the map display color.
[AUTO] Automatically switches according to Dimmer or Illumination setting.
[Day] Fixes to daytime screen.
[Night] Fixes to night time screen.
[Dimmer] Automatically switches between daytime screen and night time screen
according to brightness.
[Illumination] Switches between daytime screen and night time screen according to the
illumination of the small light.
Map View Switches between 2D display and 3D display.
[2D] Switches to 2D display.
[3D] Switches to 3D display.
Map Orientation Switches the map orientation.
[N-Up] Displays as North up.
[H-Up] Displays as heading up.
POI Icon Sets the icon display of the location in Favorites.
[ON] Displays as icon.
[OFF] Turns display off.
Display speed limits Displays the speed limit of the street you are traveling.
[ON] Displays the speed limit during route guide.
[OFF] Turns display off.
Speed Limit warnings (Beep) Sets the alert display/sound when you exceed the speed limit.
[ON] Turns alert on.
[OFF] Turns alert off.
Units Switches the unit (km/mile) of distance.
[meter] Displays in km and m.
[Mile] Displays in mile and yard.
Home Address Adds home. 222
Map DB Selects the map database to be used.
note
• There are four Map Setting screens in
3
. Select the desired screen with [ ] and [ ].
• Have the Dimmer ON when selecting [Dimmer] of “Map Color”. 604
• You can select [Illumination] of “Map Color” when using the optional B cradle.
• Select [Select] of “Map DB” to display the database selection screen. Select a database and select [YES] on the
confirmation message to switch the database.
• When the map is displayed in 3D display, the map orientation is fixed to heading up.
• These settings are enabled when you select the button.
<S00000>
<SN1000a>
<TOP0000>
292
page Setup 293
page
Setup
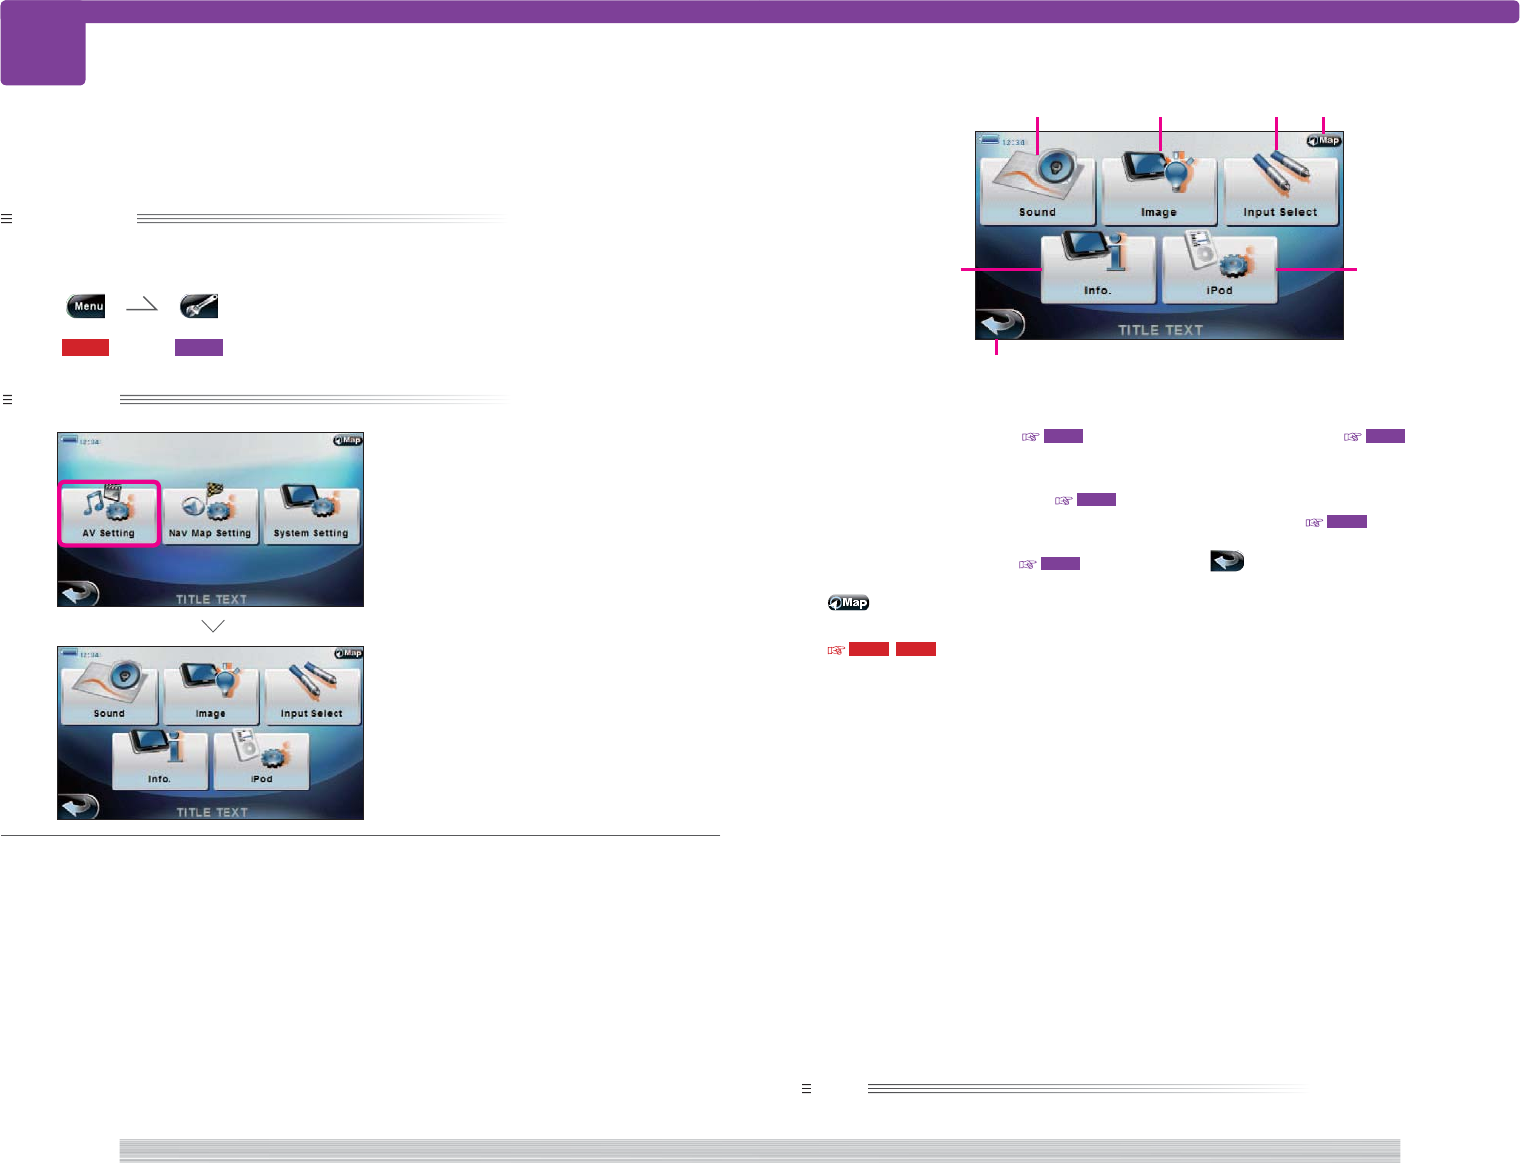
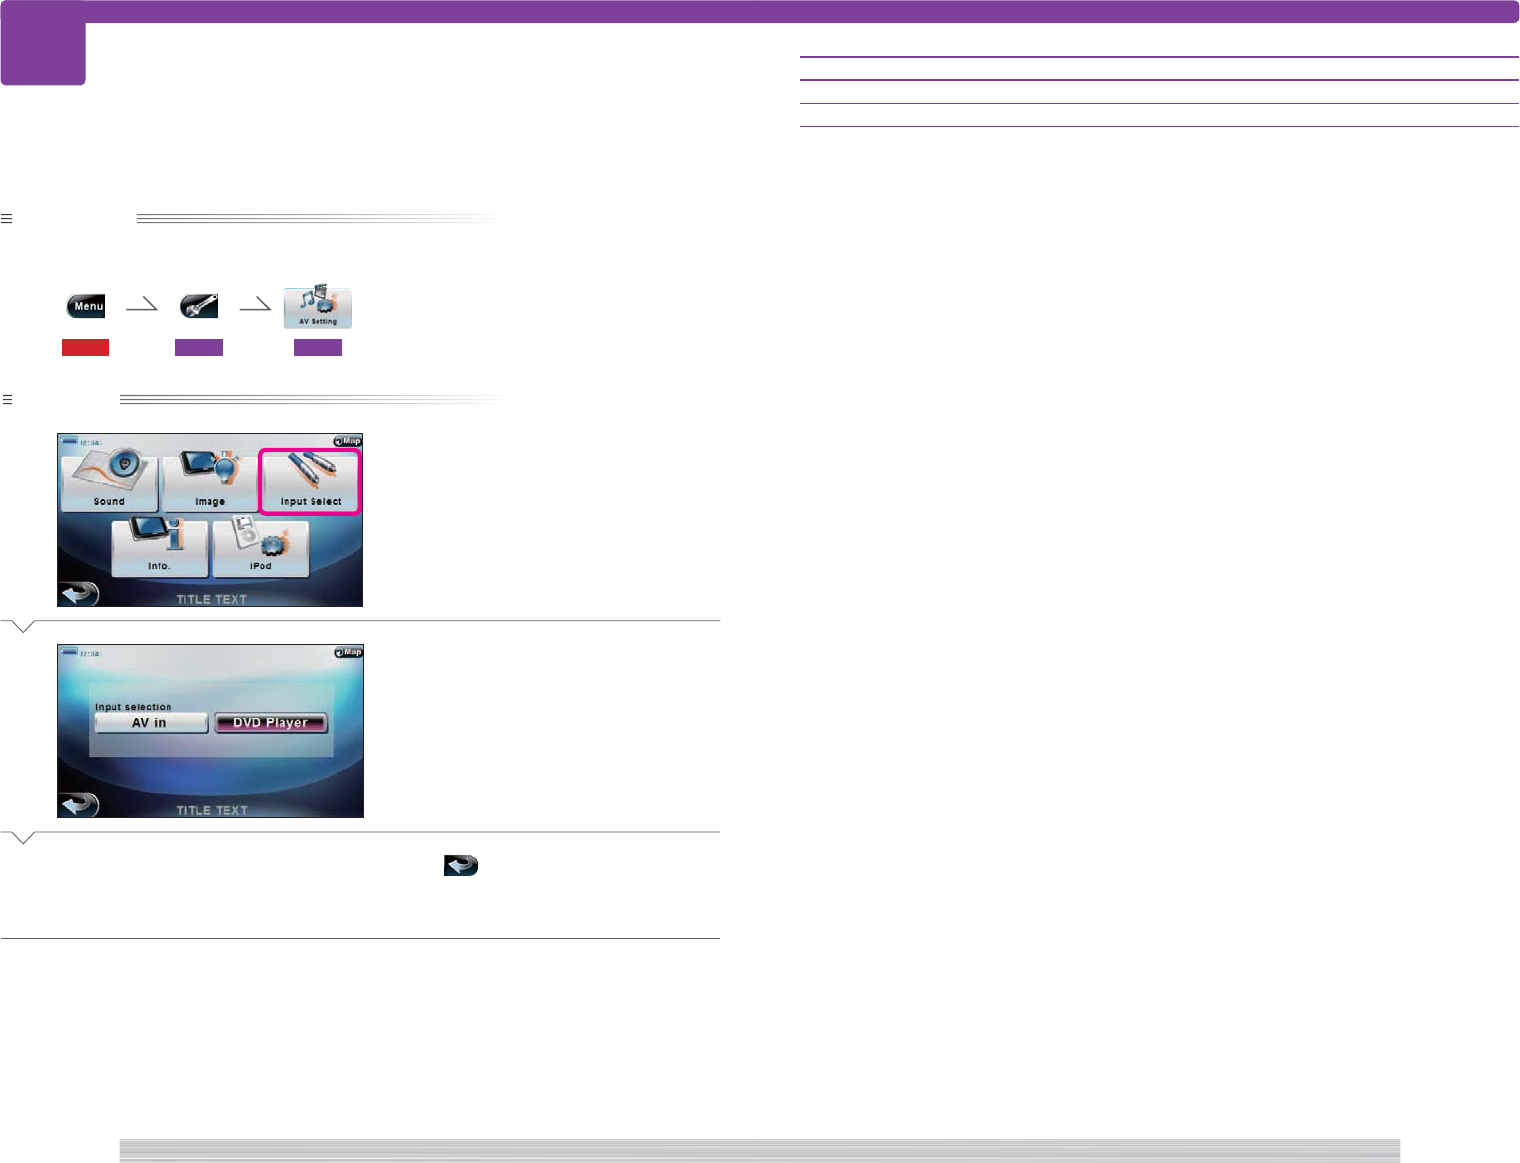
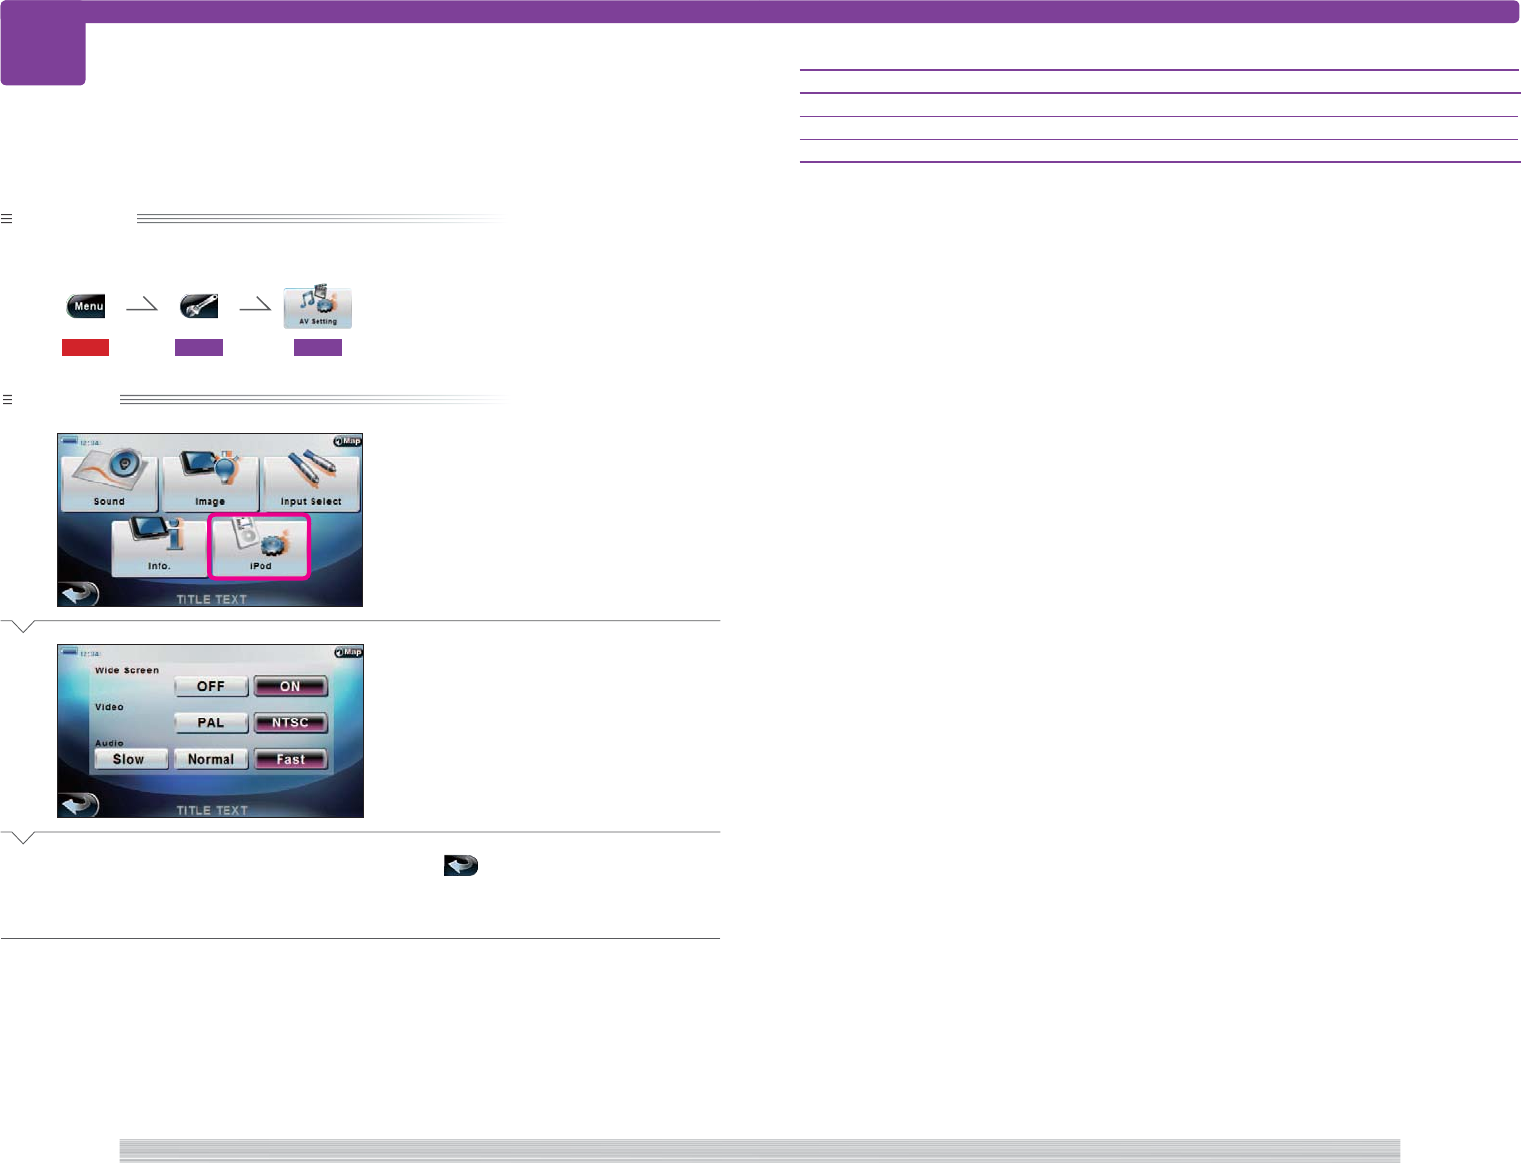
613 Display AV setup menu
613
Preparation
Have the Setup menu displayed.
115 601
Operation
1
Select [AV Setting].
The AV setup menu appears.
Complete
Displaying the AV setup menu to set AV options from the setup menu.
1 [Sound]
Select to set the equalizer. 614
2 [Image]
Select to set the image quality. 615
3 [Input Select]
Select to set the AV input. 616
4
Select to return to the current map screen.
107 , 112
5 [iPod]
Select to set iPod. 618
6 [Info.]
Select to display the registered device
information. 617
7
Select to return to the AV setup menu.
note
• You cannot select the button for unconnected source device.
AV setup menu
<S00000>
<SA1000b>
<SA1000b>
1234
5
7
6
294
page Setup 295
page
Setup
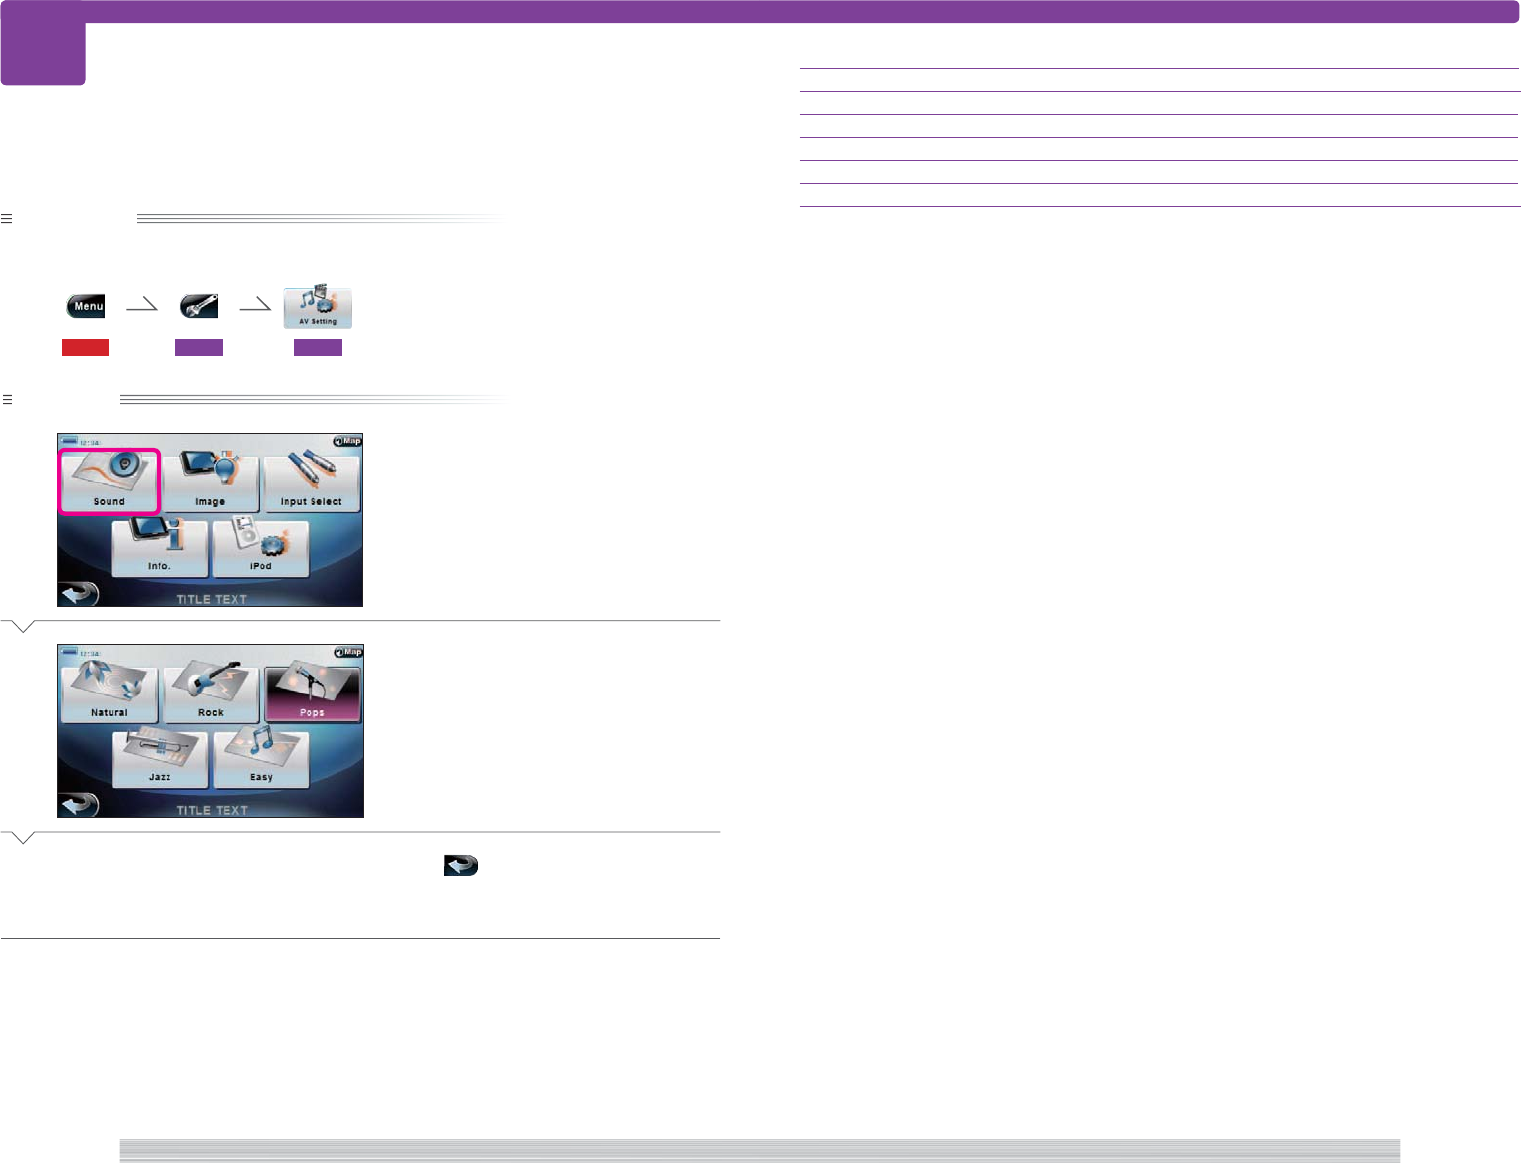
614 Set equalizer
614
Preparation
Have the Setup menu displayed.
115 601 613
Operation
1
Select [Sound].
2
Select the button of the desired
sound quality.
3
Select .
Returns you to the AV setup menu.
Complete
Setting the equalizer.
The following items can be set:
Item Description
[Natural] Produces natural flat sound.
[Rock] Produces speedy sound with strong attacks.
[Pops] Produces rhythmic sound focused on mid range.
[Jazz] Produces sound with clear wood base tone scale and vocal sound quality.
[Easy] Produces deep pleasant sound focused on the bass range.
<SA1000b>
<SA1120>

296
page Setup 297
page
Setup
615 Set image quality
615
Setting the image quality of video source.
Preparation
Have the Setup menu displayed.
115 601 613
Operation
1
Select [Image].
2
Select [%] or [fi] for each item.
3
Select .
Returns you to the AV setup menu.
Complete
The following items can be set:
Item Description
Brightness Adjusts the brightness.
<SA1000b>
<SA1200>
298
page Setup 299
page
Setup
616 Select video source device
616
Selecting the connected video source device.
Preparation
Have the Setup menu displayed.
115 601 613
Operation
1
Select [Input Select].
2
Select the button of the connected
video source device.
3
Select .
Returns you to the AV setup menu.
Complete
The following items can be set:
Item Description
[AV in] Select when a video device other than a DVD player is connected.
[DVD Player] Select when a DVD player is connected.
<SA1000b>
<SA1300>

300
page Setup 301
page
Setup
617 Display device information
617
Displaying device information such as DivX registration code.
Preparation
Have the Setup menu displayed.
115 601 613
Operation
1
Select [Info.].
Divx registration code is displayed.
2
Select .
Returns you to the AV setup menu.
Complete
<SA1000b>
<SA1400>
note
• When buying DRM enabled contents, check the Registration Code. Registration Code changes each time a file with the
displayed Registration Code is played to protect against copying.
• When downloading a DivX VOD file controlled by DRM, register the code appeared on the screen such as
the one above. Otherwise the file may not be able to play with this unit. Remaining number of viewing is
displayed when playing a DivX VOD file with the viewing restriction. When the remaining number of viewing
reached 0, a warning message appears and the file cannot be played.
302
page Setup 303
page
Setup
618 Set iPod
618
Select to set iPod.
Preparation
Have the Setup menu displayed.
115 601 613
Operation
1
Select [iPod].
2
Select the button of each item.
3
Select .
Returns you to the AV setup menu.
Complete
The following items can be set:
Item Description
[Wide Screen] Set whether to display in wide mode.
[Video] Set the video signal type.
[Audio] Set the playback speed of audiobook.
<SA1000b>
<SA1500>

304
page Appendix
701
305
page
Appendix
General Information
701
■ Accuracy of the Vehicle’s Position
Area in which GPS signals cannot be received
Because the radiowave signals from the GPS
satellites travel primarily by line of sight, the
navigation system might not be able to receive
the signals in the areas described below.
(If the GPS mark does not appear on the map
screen, it means that the GPS radiowave signals
are not being properly received.)
(1) Inside a tunnel
(2) Inside a building
(3) Under a three-dimensional road such as a
high-speed road
(4) On boulevards lined with trees
(5) Between buildings
(6) Under a cliff or in a cave
• If the GPS antenna or its surroundings are
blocked by an obstacle (including cargo), it
might not be possible for the system to receive
the GPS radiowave signals.
• If multiple paths are created due to the
reflection from the buildings, a large
measurement error could occur, causing the
vehicle’s mark to deviate from its actual position.
Deviation of the vehicle’s position mark
The vehicle’s position mark could deviate from its
actual position when the vehicle is being driven
under the conditions listed below or due to
conditions of the GPS satellites.
If the vehicle travels on a road whose actual shape
differs from that in the map data, the vehicle’s
mark could deviate from the actual position. The
correct position will eventually appear on the
screen through the correction function. If the
screen does not show the correct position for a
long time, correct the current position or make an
automatic correction.
(1) The vehicle’s mark could appear on a parallel
road.
(2) When the road splits into a narrow Y, the
vehicle’s mark could appear on the other fork
of the Y.
(3) When the vehicle makes a right or left turn,
the vehicle’s mark could appear on one street
ahead or behind.
(4) If the vehicle is transported by a means other
than the vehicle’s own power, such as on a
ferry boat, the vehicle’s mark will remain in
the position it was before the transport until
the system can calculate the position through
the GPS.
(5) When the vehicle is driven on a steep incline,
the vehicle’s mark could deviate from its
actual position.
(6) If there are continuous gradual curves in
the same direction, the vehicle’s mark could
deviate from its actual position.
(7) If the vehicle is driven in a zigzag pattern,
such as through frequent lane changes, the
vehicle’s mark could deviate from its actual
position.
(8) If the vehicle is placed on a turntable , such as
in a parking area, and turned with the ignition
OFF, the orientation of the vehicle’s mark
could deviate from its actual orientation. The
vehicle’s mark could also deviate even after
the vehicle has exited the parking area.
■ How the Vehicle’s Position is detected
Detecting the vehicle’s position through the GPS
GPS stands for the "Global Positioning System";
it is a system for detecting an object’s position
through the use of the satellites of the Defense
Department of the United States.
Radiowave signals from three or more satellites
are received by the navigation system, which
utilizes the principle of triangulation to detect
the position in which the radiowave signals are
received.
When the navigation unit is receiving the GPS
radiowave signals, a "GPS" mark will appear on the
map screen.
Making corrections to the detection of the
vehicle’s position through map matching
• In map matching, the position information
resulting from the detection of the vehicle’s
position and the locus of the travel of the vehicle
up to the present are constantly compared to
the shapes of the roads on the map in order to
correct the vehicle’s position mark to the most
appropriate road.
• If the vehicle is driven on a road whose actual
shape differs from its map data, the vehicle’s
position mark on the map could deviate from its
actual position.
Occasionally, the correction of the vehicle’s
position mark to the actual road on the map can
be observed particularly after the vehicle has
turned at an intersection or has come out of a
parking area.
■ Accuracy of the Route Guidance
The conditions listed below do not indicate a
malfunction.
(1) The guidance might prompt the driver to
drive straight even though the vehicle is
being driven on a straight road.
(2) The directional guidance could display
multiple place names.
(3) If the vehicle makes a turn at an intersection
before the guided route, the wrong type of
voice guidance could be output.
(4) The guidance might not be output while the
vehicle is making a turn at an intersection.
(5) The system might not be able to search for
the proper route.
(6) If there is no road to the destination or if
there is only a narrow road, the route might
only indicate up to an area that is short of the
destination.
(7) The repeat search time could be long while
the vehicle is being driven at high speeds.
(8) While the system is searching again for the
route, the route indication might not appear
in time for the next right or left turn.
(9) The route might not change even if a search
is made again.
(10) The system might guide the driver to make
a U-turn.
(11) The system might guide the driver on a road
that cannot actually be travelled (such as on a
road in which entry is prohibited).
(12) The system might not output guidance
even if the vehicle is driven in reverse on the
guided route.
(13) The system might not use a local ferry boat
even if it the ferry priority is selected.
(14) If the intersection you’re being guided to is
near the end of the route search, the system
might not be able to provide guidance.
(15) The route might not go on a toll road even
the toll-road priority is selected.
Similarly, a route that uses a toll road could
appear on the screen even if the toll-road
priority is not selected.
(The driver may or may not be able to select
the "toll-road priority" if both toll and free
roads are available.)
■ Caution on condensation
Condensation (of dew) may occur inside the unit
when there is a great diff erence in temperature
between this unit and the outside. This unit may
not function properly if condensation occurs. In
this case, leave the unit for a few hours and restart
the operation after the condensation has dried
up.
Be specially cautious against condensation in the
following circumstances:
When this unit is carried from one place to
another across a large difference in temperature,
when the humidity in the room where this unit is
installed increases, etc.
Maintenance of the unit When the front panel or
case becomes dirty, wipe with a soft, dry cloth.
Do not use thinner, benzine, alcohol, etc. for these
agents may cause discoloration.
In regard to contact cleaner Do not use contact
cleaners because it could cause a malfunction.
Be specially careful not to use contact cleaners
containing oil, for they may deform the plastic
component.
306
page Appendix 307
page
Appendix
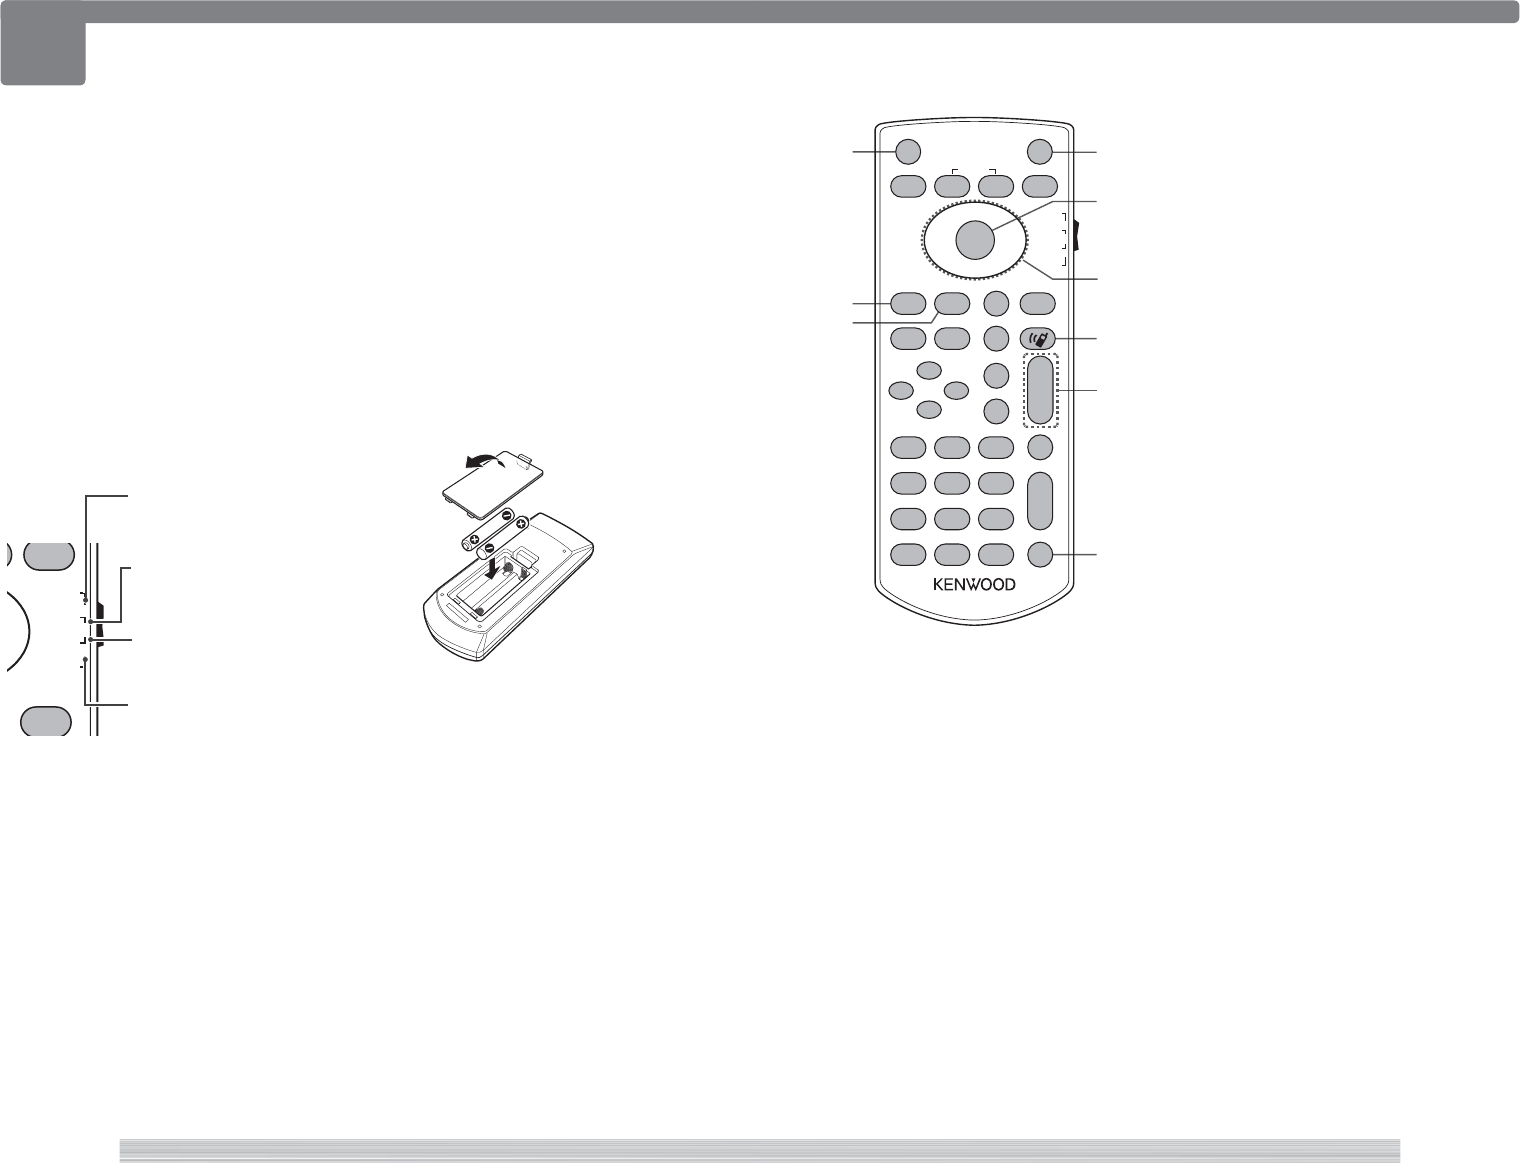
Remote Controller
702
1
2
3
4
6
5
8
9
7
702
This unit can be operated using the optional Remote Controller KNA-RCDV330.
¤
• Put the Remote Controller in a place where it will not move during braking or other operations. A dangerous situation could
result, if the Remote Controller falls down and gets wedged under the pedals while driving.
• Do not place the battery near an open flame or heat source. This may cause the battery to explode.
• Do not recharge, short, break up or heat the battery or place it in an open fire. Such actions may cause the battery to leak
fluid. If spilled fluid comes in contact with your eyes or on clothing, immediately rinse with water and consult a physician.
• Place the battery out of reach of children. In the unlikely event that a child swallows the battery, immediately consult a
physician.
Remote Controller mode switch
The functions operated from the remote
controller differ depending on the position of the
mode switch.
RETURN
DVD
TV
NAVI
AUD
POSITION
O
CANCEL
•
•
•
•
DVD mode
Switch to this mode when playing
DVDs or CDs etc. with the player
integrated in this unit.
AUD mode
Switch to this mode when
controlling a selected source or
tuner source, etc.
NAVI mode
This is switched when controlling
Navigation unit.
Not used
⁄
• The position of the remote control mode switch
is indicated in the title of each mode, e.g., "(AUD
mode)".
• When controlling a player that is not integrated
in the unit, select "AUD" mode.
Battery installation
This unit can be operated using the optional
Remote Controller KNA-RCDV330.
¤
• Put the Remote Controller in a place where it will
not move during braking or other operations. A
dangerous situation could result, if the Remote
Controller falls down and gets wedged under the
pedals while driving.
• Do not place the battery near an open flame
or heat source. This may cause the battery to
explode.
• Do not recharge, short, break up or heat the
battery or place it in an open fire. Such actions
may cause the battery to leak fluid. If spilled fluid
comes in contact with your eyes or on clothing,
immediately rinse with water and consult a
physician.
• Place the battery out of reach of children. In the
unlikely event that a child swallows the battery,
immediately consult a physician.
Common operations (AUD mode)
1 Source switching
Switches to the source to be played.
2 MODE
Switches the screen mode.
Screen mode changes each time you press
this key.
3 Function
Switches the function screen.
4 V.SEL
Switches to the navigation screen.
5 ENTER
Enters options.
6 Cursor key
Moves the cursor when displaying menu.
7 Hands-free communication
Enters the dialing method selection mode.
When a call comes in, it answers the call.
8 Volume control
Adjusts the volume.
9 Volume attenuator
Press the key once to lower the volume.
Press again to restore the previous volume.
V.SEL
R.VOL
OUT
MENU
IN
ENTER
ZOOM
FNC/MENU/PBCMODE/TOP MENU
AUDIO
ANGLE
ZOOM
RETURN
DVD
TV
NAVI
AUD
DISP
12
ABC
3
DEF
4
GHI
7
PQRS
#+ BS
5
JKL
8
TUV
0
9
WXYZ
6
MNO
1
AT T
2 ZONE
VOL
FM
+
AM−
POSITION
SRC
D
Y
1
O
O
O
O
O
O
VOICE
CANCEL
ROUTEM
SUBTITLE
AV OUT
CLEAR DIRECT
OPEN
MAP DIR
VIEW
•
•
•
•
O
O
O
O
308
page Appendix 309
page
Appendix
1
2
3
4
7
5
6
=
-
0
8
9
702
DVD/VCD/CD/Audio files (DVD mode)
1 Stop
Memorizes the last point where the disc
stopped. When pressed again, the last
point is deleted.
2 DVD Top Menu
Returns to the DVD top menu.
3 DVD Menu
Displays the DVD menu.
Turns the playback control on or off while
playing VCD.
4 Folder search
Selects the folder to be played.
5 Track search and file search
Selects the track or file to be played.
6 Numeric keypad
• Specify the number to search in direct
search.
• Press
1
2ABC
to fast forward/backward.
Switches the fast forward/backward
speed each time you press this key.
• Press
4GHI
5JKL
to slow forward/
backward. Switches the slow playback
speed each time you press this key.
7 Play/Pause
Pauses the track.
Press again to resume playing.
8 AUDIO
Switch Voice Language
Switches the voice language each time
you press this key.
9 SUBTITLE
Switches the subtitle language.
0 Picture Angle
Switches the picture angle each time you
press this key.
V.SEL
R.VOL
OUT
MENU
IN
ENTER
ZOOM
FNC/MENU/PBCMODE/TOP MENU
AUDIO
ANGLE
ZOOM
RETURN
DVD
TV
NAVI
AUD
DISP
12
ABC
3
DEF
4
GHI
7
PQRS
#+ BS
5
JKL
8
TUV
0
9
WXYZ
6
MNO
1
AT T
2 ZONE
VOL
FM
+
AM−
POSITION
SRC
D
Y
1
O
O
O
O
O
O
VOICE
CANCEL
ROUTEM
SUBTITLE
AV OUT
CLEAR DIRECT
OPEN
MAP DIR
VIEW
•
•
•
•
O
O
O
O
- ZOOM
Switches the zoom ratio each time you
press this key.
= Direct search
Pressing this button switches the features
that can be searched directly.
DVD
Title number
Chapter number
Play time
Item number*
Cancel
* You may not be able to use this function
with some discs or scenes.
CD
Track number
Play time
Cancel
Audio files
Folder number
File number
Cancel
VCD 1.X, VCD 2.X (PBC OFF)
Track number
Cancel
VCD 2.X (PBC ON)
Scene number
Number
Cancel
Once you have switched to the direct
search feature, specify the search number
from the numeric keypad, and then press
[ENTER] key.

310
page Appendix 311
page
Appendix
1
2
3
4
5
0
9
8
7
6
702
NAVI (NAVI mode)
1 MENU
Displays Top Menu.
2 ROUTEM
Displays Route Menu.
3 VOICE
Plays Voice guidance.
4 VIEW
Switches between 2D and 3D map
displays.
5 MAP DIR
Switches between the heading up and
north up map displays.
6 ZOOM
Zooms in or out the map.
7 POSITION
Displays the current position.
8 ENTER
Performs the selected function.
9 Joystick
Scrolls the map, or moves the cursor.
0 CANCEL
Displays previous screen.
V.SEL
R.VOL
OUT
MENU
IN
ENTER
ZOOM
FNC/MENU/PBCMODE/TOP MENU
AUDIO
ANGLE
ZOOM
RETURN
DVD
TV
NAVI
AUD
DISP
12
ABC
3
DEF
4
GHI
7
PQRS
#+ BS
5
JKL
8
TUV
0
9
WXYZ
6
MNO
1
AT T
2 ZONE
VOL
FM
+
AM−
POSITION
SRC
D
Y
1
O
O
O
O
O
O
VOICE
CANCEL
ROUTEM
SUBTITLE
AV OUT
CLEAR DIRECT
OPEN
MAP DIR
VIEW
•
•
•
•
O
O
O
O
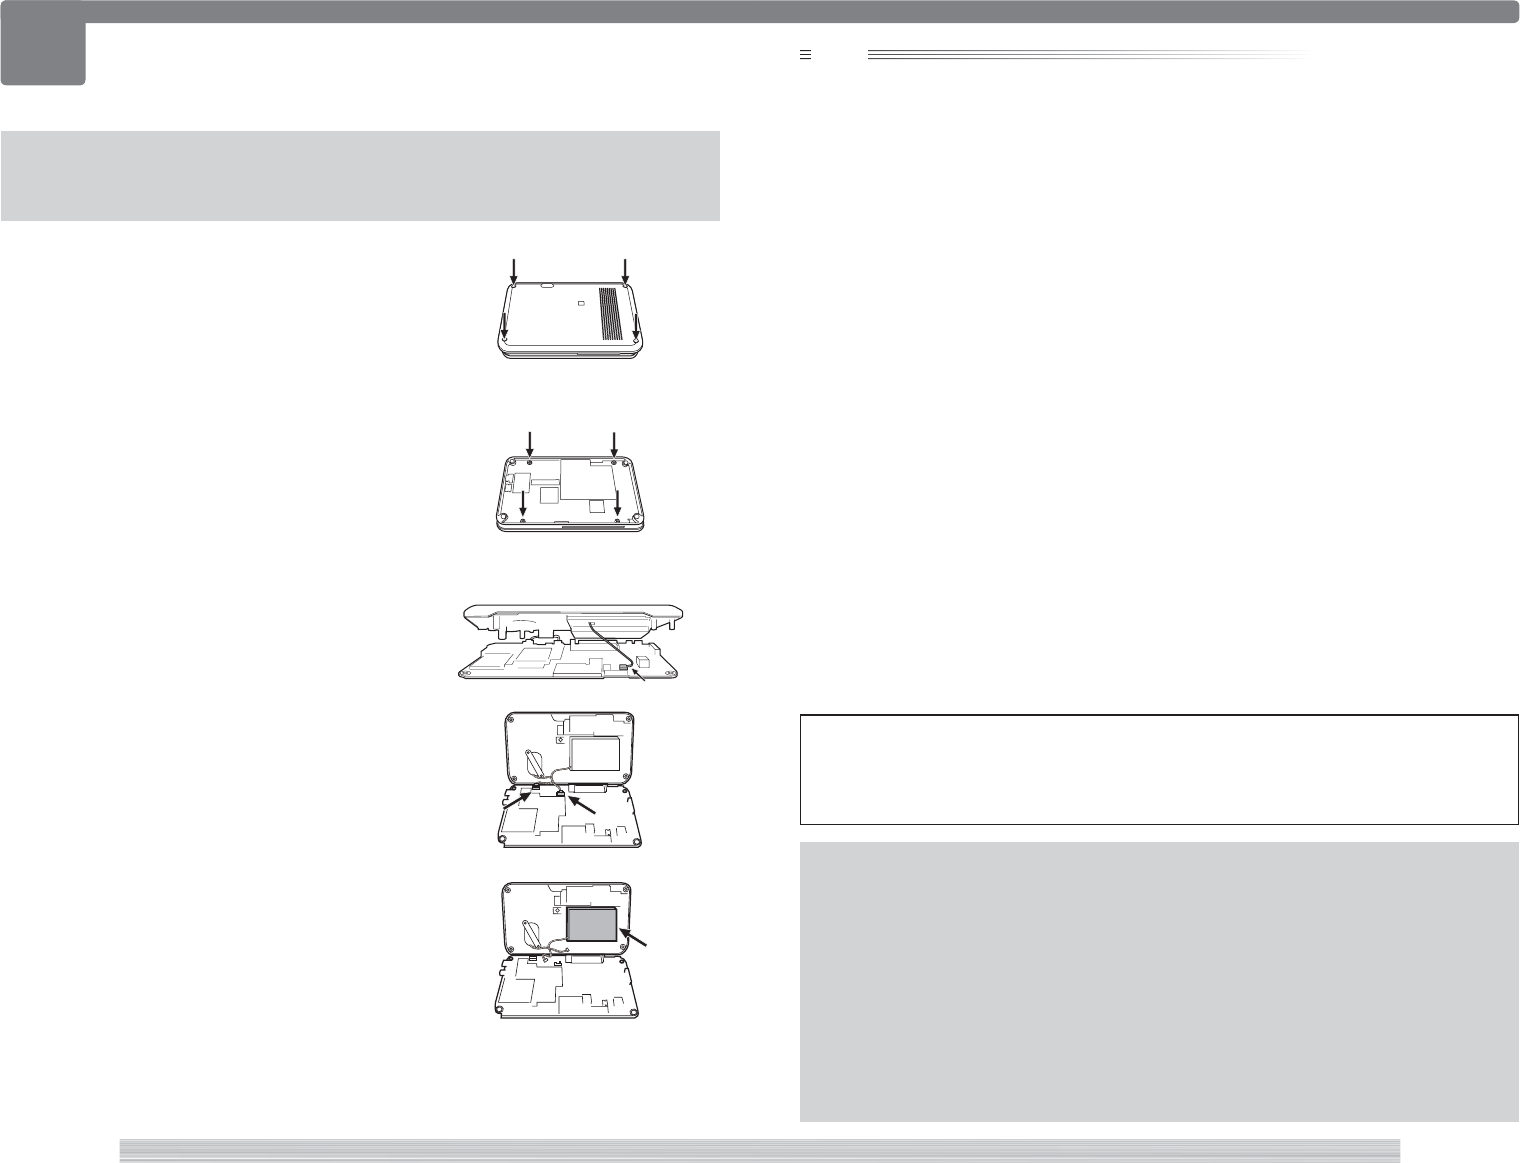
312
page Appendix 313
page
Appendix
IMPORTANT
Never attempt to open the unit besides when disposing of it.
For replacement of the built-in battery, contact your nearest Kenwood service agent.
note
• Remove the built-in battery after having confirmed that it is completely discharged.
• Once the built-in battery is disconnected, do not attempt to reconnect it to the connector on the circuit
board.
• Bring the removed built-in battery to a rechargeable battery recycling business as early as possible.
WARNING
• Do not heat excessively the built-in battery, open it, modify it or throw it in fire or water.
Excessive heat generation, explosion or fire ignition may cause a fire.
• Do not leave the built-in battery near fire or under direct sunlight.
A fire, explosion or excessive heat generation may result.
• Attach insulating tape on the connectors of the built-in battery.
A fire or explosion may result if the battery electrodes are short-circuited.
• Do not leave the built-in battery within the reach of children.
Injury or other accidents may result.
• If the built-in battery fluid leaks and enters your eyes, immediately rinse your eyes with fresh water and
call a doctor.
If the fluid is left in your eyes, an eye injury may result.
Recycling the Built-in Battery
The unit uses a lithium ion rechargeable battery cell as the built-in battery. The lithium ion rechargeable
battery is a recyclable resource. When disposing of the unit, take out the built-in battery and bring it to your
local recycling business.
Removing the Built-in Battery to Dispose
703
703
1Remove four screws.
At this time, insert the fingernail etc. in the space between
the frame and the front panel to release fixed hooks that
exist in all surroundings.
2Open half the front panel and remove the flexible cable from
the connector on the PCB.
3Remove four screws.
At this time, insert the fingernail etc. in the space between
the frame and the rear panel to release fixed hooks that exist
in all surroundings.
4Open the rear panel and remove two connectors on the
PCB.
5Open half the PCB and remove the flexible cable from the
connector the PCB.
6Open half the PCB and remove two connectors on the PCB.
7Remove the built-in battery from the rear panel.

314
page Appendix 315
page
Appendix
Limited warranty and after service
704
704

316
page Appendix 317
page
Appendix
Troubleshooting
705
705
What might seem to be a malfunction in your unit
may just be the result of slight misoperation or
miswiring. Before calling service, first check the
following table for possible problems.
Navigation
? The map does not scroll even when the
vehicle is moving.
✔ The screen shown might not be the
Current Position screen.
☞ Display the Current Position screen.
107 , 112
? The vehicle marker does not appear.
✔ The screen shown might not be the
Current Position screen.
☞ Display the Current Position screen.
107 , 112
? The GPS disable marker is not displayed.
✔ Your vehicle might be in a position where
GPS signals cannot be received.
☞ Try moving your vehicle to a position
where there are no obstacles around.
? There is no voice guidance.
✔ The guidance volume might be turned
down low.
☞ Adjust the volume. 603
? Small spots or bright flashes appear in the
screen displayed.
✔ This is probably due to the nature of the
LCD display.
☞ There is nothing wrong with the display
and no need for concern.
318
page Appendix 319
page
Appendix
Specifications
706
706
Navigation section
Receiver
: High-sensitivity GPS receiver
Reception Frequency
: 1575.42 MHz (C/A code)
Acquisition Times
Cold : < 38 seconds
Factory Reset : < 45 seconds
(On average for a stationary receiver with a clear
view of the sky)
Accuracy
Position : < 10 meters typical
Velocity : 0.05 m/sec. RMS
Position Method
: GPS
Antenna
: External GPS antenna
Monitor section
Picture Size
: 6.95 inches (diagonal) wide
: 156.2 mm (W) x 82.4 mm (H)
Display Sytem
: Transparent TN LCD panel
Drive System
: TFT active matrix system
Number of Pixels
: 336,960 (480H x 234V x RGB)
Effective Pixels
: 99.99 %
Pixel Arrangement
: RGB striped arrangement
Back Lighting
: Cold Cathode Fluorescent Tube
USB interface section
USB Standard
: USB 1.1/ 2.0
File Sytem
: FAT 16/ 32
Maximum Power Supply Current
: 500 mA
D/A Converter
: 24 Bit
Audio Decoder
: MP3/ WMA/ AAC
Bluetooth section
Technology
: Bluetooth Ver.1.2 Certified
Frequency
: 2.402 – 2.480 GHz
Output Power
: +4 dBm (MAX), 0 dBm (AVE), Power Class 2
Profile
HFP (Hands Free Profile), SPP (Serial Port Profile),
HSP (Headset Profile), A2DP (Advanced Audio
Distribution Profile), AVRCP (Audio/Video
Remote Control Profile), OPP (Object Push
Profile), PBAP (Phonebook Access Profile), SYNC
(Synchronization Profile)
General
Operating voltage
: 14.4 V (11 – 16 V allowable)
Current Consumption
: 15 A
DImensions (W × H × D)
: 182 × 112 × 163 mm
Operational Temperature Range
: -10 °C – +60 °C
Storage Temperature Range
: -20 °C – +85 °C
Weight
: 2.5 kg
Although the effective pixels for the liquid crystal panel is given as 99.99% or more, 0.01% of pixels may not light or may light
incorrectly.
Specifications subject to change without notice.

Declaration of Conformity with regard to the R&TTE Directive 1999/5/EC
Manufacturer:
Kenwood Corporation
2967-3 Ishikawa-machi, Hachioji-shi, Tokyo, 192-8525 Japan
EU Representative's:
Kenwood Electronics Europe BV
Amsterdamseweg 37, 1422 AC UITHOORN, The Netherlands
English
Hereby, Kenwood declares that this unit DNX5220BT is in compliance with the
essential requirements and other relevant provisions of Directive 1999/5/EC.
Français
Par la présente Kenwood déclare que l’appareil DNX5220BT est conforme aux
exigences essentielles et aux autres dispositions pertinentes de la directive
1999/5/CE.
Par la présente, Kenwood déclare que ce DNX5220BT est conforme aux
exigences essentielles et aux autres dispositions de la directive 1999/5/CE qui
lui sont applicables.
Deutsch
Hiermit erklärt Kenwood, dass sich dieser DNX5220BT in Übereinstimmung mit
den grundlegenden Anforderungen und den anderen relevanten Vorschriften
der Richtlinie 1999/5/EG befindet. (BMWi)
Hiermit erklärt Kenwood die Übereinstimmung des Gerätes DNX5220BT mit
den grundlegenden Anforderungen und den anderen relevanten Festlegungen
der Richitlinie 1999/5/EG. (Wien)
Nederlands
Hierbij verklaart Kenwood dat het toestel DNX5220BT in overeenstemming
is met de essentiële eisen en de andere relevante bepalingen van richtlijn
1999/5/EG.
Bij deze verklaat Kenwood dat deze DNX5220BT voldoet aan de essentiële
eisen en aan de overige relevante bepalingen van Richtlijn 1999/5/EC.
Italiano
Con la presente Kenwood dichiara che questo DNX5220BT è conforme ai
requisiti essenziali ed alle altre disposizioni pertinenti stabilite dalla direttiva
1999/5/CE.
Español
Por medio de la presente Kenwood declara que el DNX5220BT cumple con los
requisitos esenciales y cualesquiera otras disposiciones aplicables o exigibles de
la Directiva 1999/5/CE.
Português
Kenwood declara que este DNX5220BT está conforme com os requisitos
essenciais e outras disposições da Directiva 1999/5/CE.
Polska
Kenwood niniejszym oświadcza, że DNX5220BT spełnia zasadnicze wymogi
oraz inne istotne postanowienia dyrektywy 1999/5/EC.
Český
Kenwood timto prohlasuje, ze DNX5220BT je ve shode se zakladnimi
pozadavky a s dalsimi prislusnymi ustanoveni Narizeni vlady c. 426/2000 Sb.
Magyar
Alulírott, Kenwood, kijelenti, hogy a jelen DNX5220BT megfelel az 1999/5/EC
irányelvben meghatározott alapvető követelményeknek és egyéb vonatkozó
előírásoknak.
Svenska
Härmed intygar Kenwood att denna DNX5220BT stär l överensstämelse med de
väsentliga egenskapskrav och övriga relevanta bestämmelser som framgår av
direktiv 1999/5/EG.
Suomi
Kenwood vakuuttaa täten että DNX5220BT tyyppinen laite on direktiivin
1999/5/EY oleellisten vaatimusten ja sitä koskevien direktiivin muiden ehtojen
mukainen.
Slovensko
S tem Kenwood izjavlja, da je ta DNX5220BT v skladu z osnovnimi zahtevami
in ostalimi ustreznimi predpisi Direktive 1999/5/EC.
Slovensky
Spoločnosť Kenwood týmto vyhlasuje, že DNX5220BT spĺňa zákldné
požiadavky a ďalšie prislušné ustanovenia Direktĺvy 1999/5/EC.
Dansk
Undertegnede Kenwood erklærer harved, at følgende udstyr DNX5220BT
overholder de væsentlige krav og øvrige relevante krav i direktiv 1999/5/EF.
Ελληνικά
ΜΕ ΤΗΝ ΠΑΡΟΥΣΑ Kenwood ΔΗΛΩΝΕΙ ΟΤΙ DNX5220BT ΣΥΜΜΟΡΦΩΝΕΤΑΙ
ΠΡΟΣ ΤΙΣ ΟΥΣΙΩΔΕΙΣ ΑΠΑΙΤΗΣΕΙΣ ΚΑΙ ΤΙΣ ΛΟΙΠΕΣ ΣΧΕΤΙΚΕΣ ΔΙΑΤΑΞΕΙΣ ΤΗΣ
ΟΔΗΓΙΑΣ 1999/5/EK.
Eesti
Sellega kinnitab Kenwood, et see DNX5220BT vastab direktiivi 1999/5/EC
põhilistele nõudmistele ja muudele asjakohastele määrustele.
Latviešu
Ar šo, Kenwood, apstiprina, ka DNX5220BT atbilst Direktīvas 1999/5/EK
galvenajām prasībām un citiem tās nosacījumiem.
Lietuviškai
Šiuo, Kenwood, pareiškia, kad šis DNX5220BT atitinka pagrindinius Direktyvos
1999/5/EB reikalavimus ir kitas svarbias nuostatas.
Malti
Hawnhekk, Kenwood, jiddikjara li dan DNX5220BT jikkonforma mal-ħtiġijiet
essenzjali u ma provvedimenti oħrajn relevanti li hemm fid-Dirrettiva 1999/5/
EC.
Українська
Компанія Kenwood заявляє, що цей виріб DNX5220BT відповідає
ключовим вимогам та іншим пов’язаним положенням Директиви
1999/5/EC.
DivX, DivX Certified, and associated logos are trademarks of DivX, Inc. and are used under license.
About DivX
DivX is a popular media technology created by DivX, Inc. DivX media Files contain highly compressed video
with high visual quality that maintains a relatively small file size. DivX files can also include advanced media
features like menus, subtitles, and alternate audio tracks. Many DivX media files are available for download
online, and you can create your own using your personal content and easy-to-use tools from DivX.com.
About DivX Certified
DivX Certified products are officially tested by the creators of DivX and guaranteed to play all versions of DivX
video, including DivX 6. Certified products qualify for one of several DivX Profiles that designate the type of
video the product supports, from compact portable video to high-definition video.
The Bluetooth word mark and logos are owned by the Bluetooth SIG, Inc. and any use of such marks by Kenwood Corporation is
under license. Other trademarks and trade names are those of their respective owners.
This equipment has been tested and found to comply with the limits for a Class B digital device ,
p
ursuant to part 15 of the FCC rules. These limits are designed to provide reasonable protection
a
gainst harmful interference in a residential installation. This equipment generates, uses and
c
an radiate radio frequency energy and, if not installed and used in accordance with the instructions,
m
ay cause harmful interference to radio communications. However, there is no guarantee
t
hat interference will not occur in a particular installation. If this equipment does cause
h
armful interference to radio or television reception, which can
b
e determined by turning the equipment off and on, the user is encouraged to try to correct
t
he interference by one or more of the
f
ollowing measures:
-
Reorient or relocate the receiving antenna.
-
Increase the separation between the equipment and receiver.
-
Connect the equipment into an outlet on a circuit different from that to which the receiver is connecte
d.
-
Consult the dealer or an experienced radio/TV technician for help.
Y
ou are cautioned that changes or modifications not expressly approved by the party responsible
f
or compliance could void your authority to operate the equipment.
F
CC RF Radiation Exposure Statement:
1
.This Transmitter must not be co-located or operating in conjunction with any other antenna
o
r transmitter.
2
.This equipment complies with FCC RF radiation exposure limits set forth for an uncontrolled
e
nvironment. This equipment should be installed and operated with a minimum distance of 20
c
entimeters between the radiator and your body